Set up Flowable with OAuth 2.0 and Keycloak
Target audience: System administrators
 info
infoThere is a video version of this how-to which is limited to setting up Flowable Work without Design and Control.
Setting up SSO (single sign-on) for the Flowable applications (Work/Engage, Design and Control) is often a requirement in enterprise environments. In this guide we'll demonstrate how to implement SSO using OAuth 2.0 and Keycloak. This is a beginner's guide that gathers and centralizes information which is described in more detail in the advanced guides, for example (you can read these links later after grasping the basics here):
- An overview of OAuth 2.0 configuration options
- Setting up SSO with OAuth 2.0 on Azure
- Adding OAuth 2.0 to a custom Flowable application
Even though aimed at beginners, setting up SSO with OAuth 2.0 with Keycloak (or other solutions) is a complex task. It's worthwhile understanding the basics of OAuth 2.0 and the different flows before proceeding.
 tip
tipSince Flowable uses Spring Security OAuth under the hood, many other resources around this topic can be found online through searching for OAuth and Spring Security. As the Flowable applications are Spring Boot applications, these resources are typically applicable with no or few changes.
Setup the Flowable Applications
While it is technically possible to run Flowable Work, Design and Control on the same host/port with OAuth 2.0 / Keycloak, it complicates the configuration quite a bit. As such, we'll be running each application on a separate Tomcat server (or alternative) as a war file. Running as a jar (java -jar <application>) also works, if using different ports.
 note
noteFlowable Engage? Replace Work with Engage in the subsequent sections if running Engage instead of Work.
We'll be using the following ports:
- Flowable Work on a Tomcat server configured for port 8080.
- Flowable Design on a Tomcat server configured for port 7080.
- Flowable Control on a Tomcat server configured for port 9080.
The choice of these ports is arbitrary. However, if you want to copy-paste settings you'll need to use these ports and be running everything on localhost. If using a different port or host, change the configuration settings accordingly.
To change the port of Tomcat, edit the conf/server.xml file and change the port number in the following line:
<Connector port="7080" protocol="HTTP/1.1"
           connectionTimeout="20000"
           redirectPort="7145" />
Note that you need to change both the port and the redirectPort to an unused port.
Also in the same file, the shutdown port needs to be changed to a free port or else the Tomcat servers will fail to boot up.
<Server port="8012" shutdown="SHUTDOWN">
Setup Keycloak
First of all, you'll need a Keycloak instance. Follow the instructions on the Keycloak website to get started.
For example, when using Docker, booting up a Keycloak instance can be done easily as follows from the terminal:
docker run -p 8081:8080 -e KEYCLOAK_ADMIN=admin -e KEYCLOAK_ADMIN_PASSWORD=admin quay.io/keycloak/keycloak:latest start-dev
This will boot up Keycloak on port 8081 on the local machine (passing network traffic to port 8080 of the Docker container).
Log in with admin/admin after going to http://localhost:8081/admin in a browser.
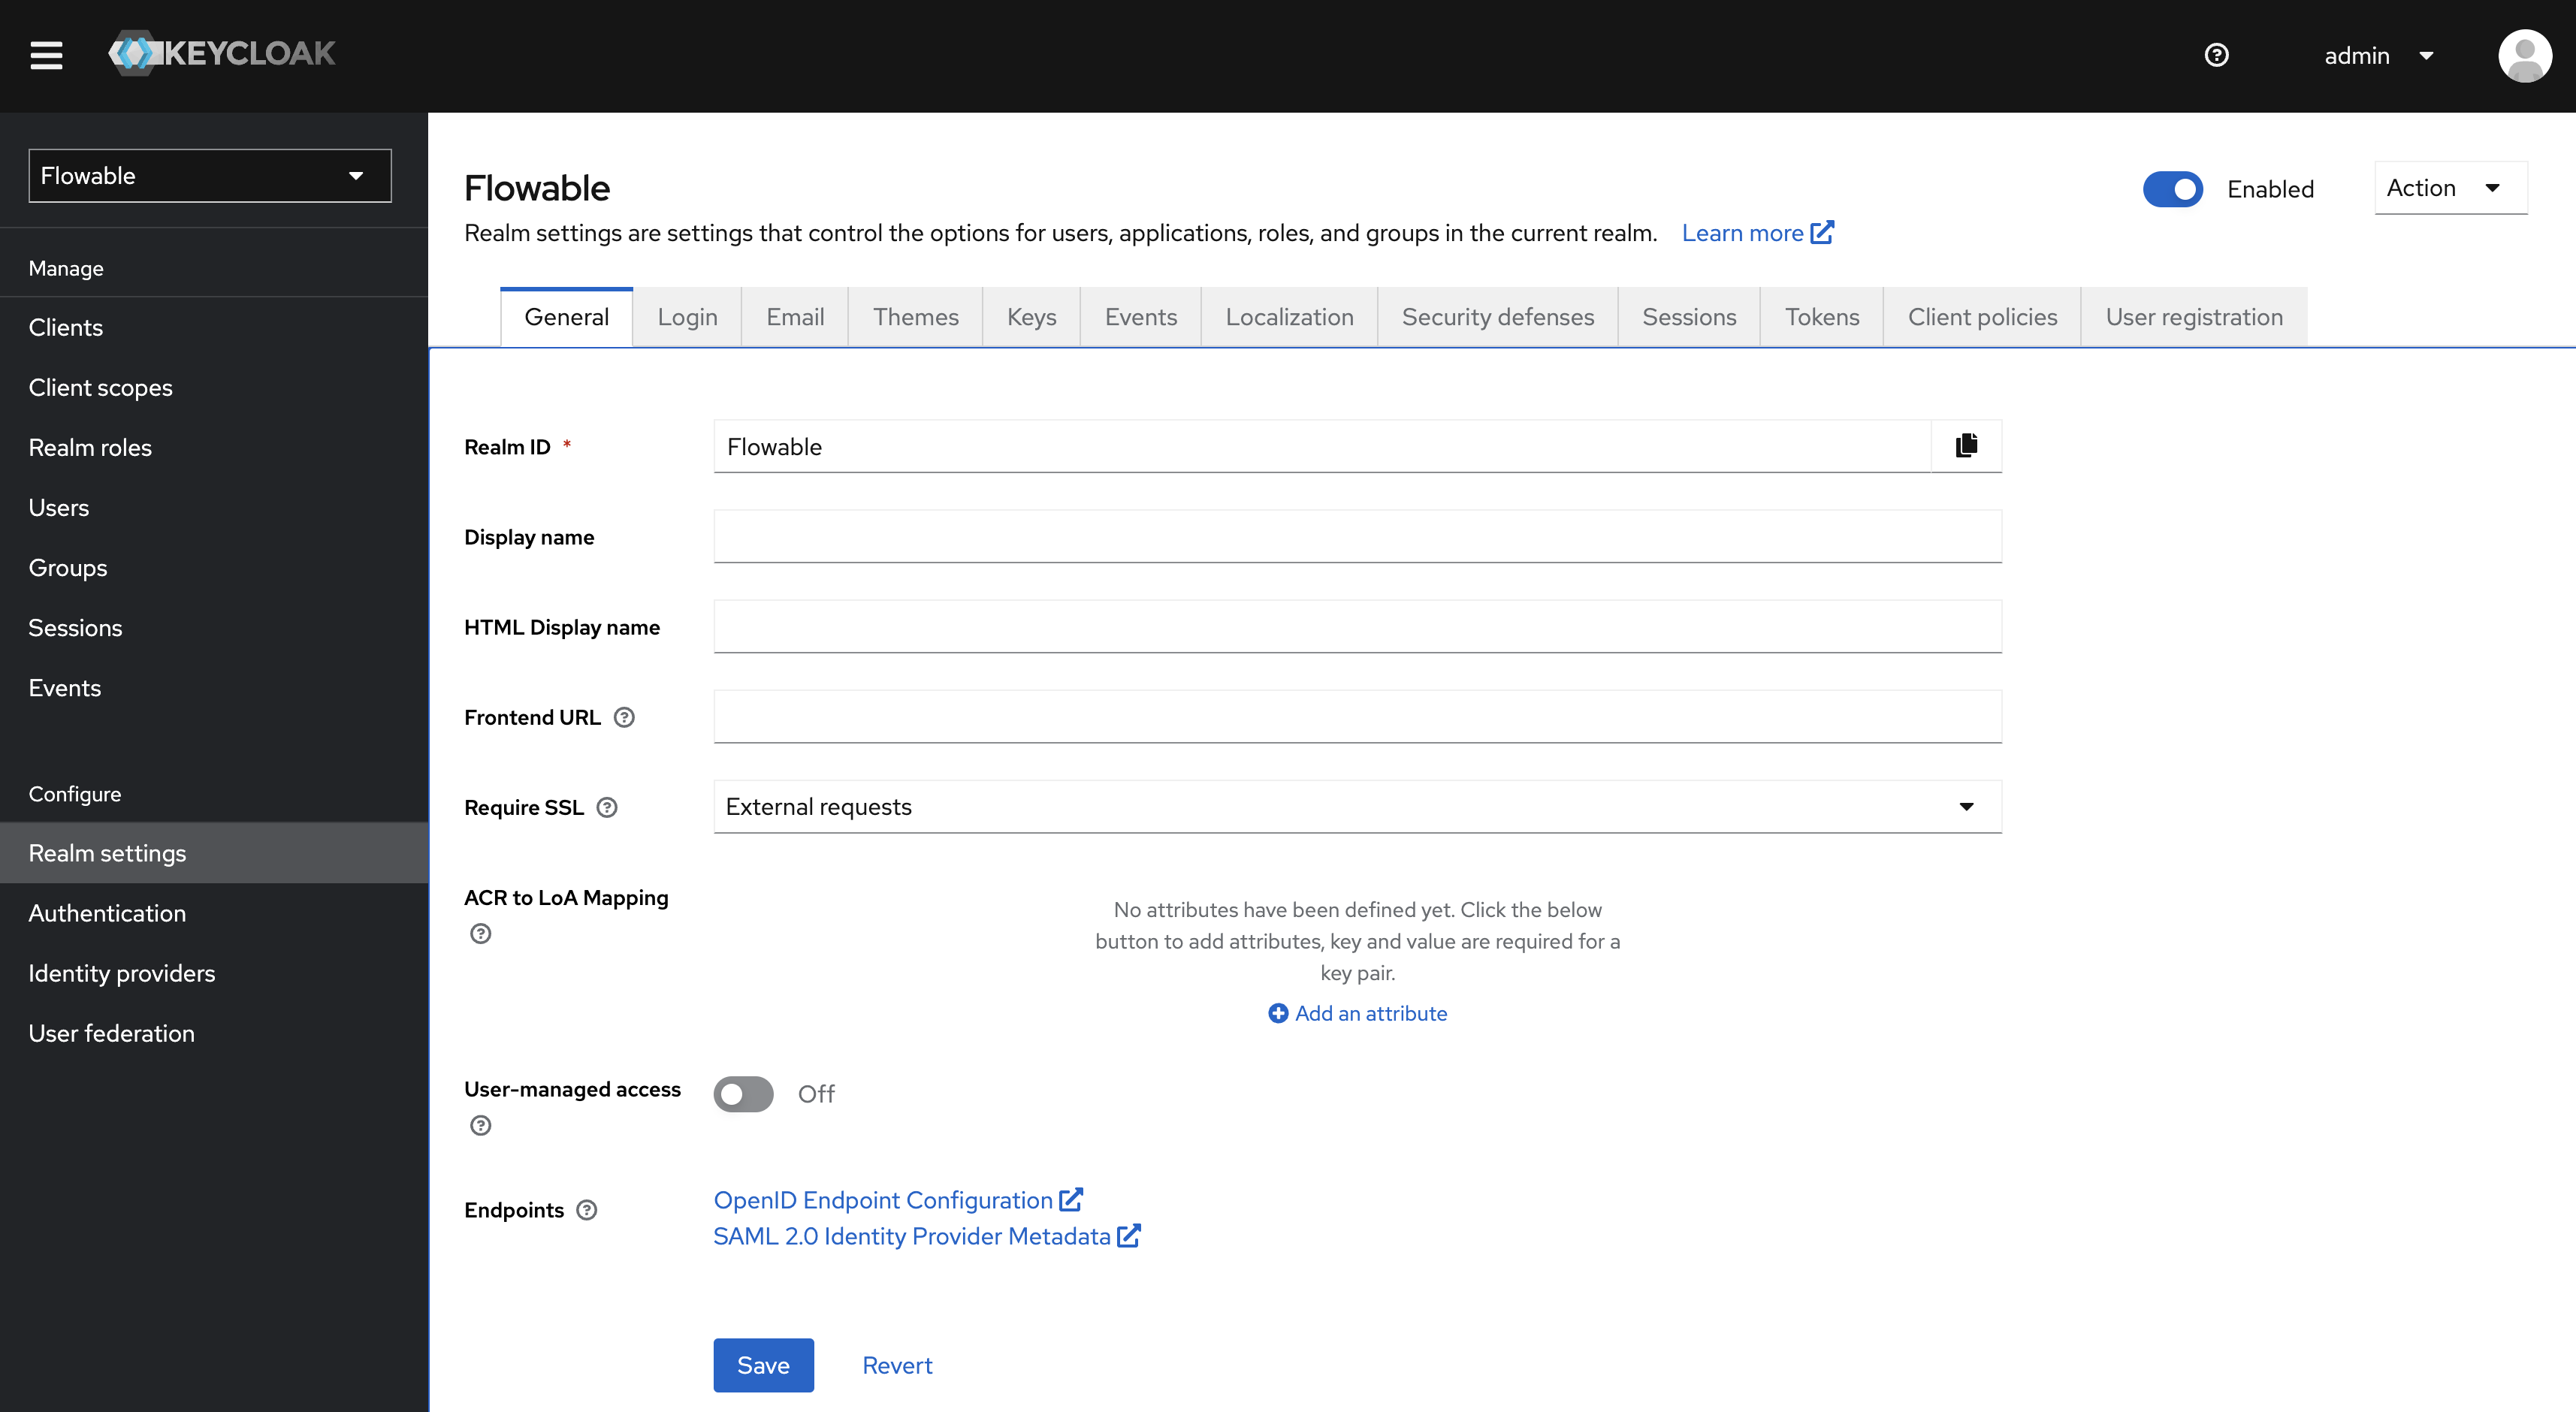
In the Keycloak UI, find the Add realm button and add a Flowable realm.
Now, go the Clients section and click the Create Client button. Create three clients (one for work, design and control), by filling in the name and the client id:
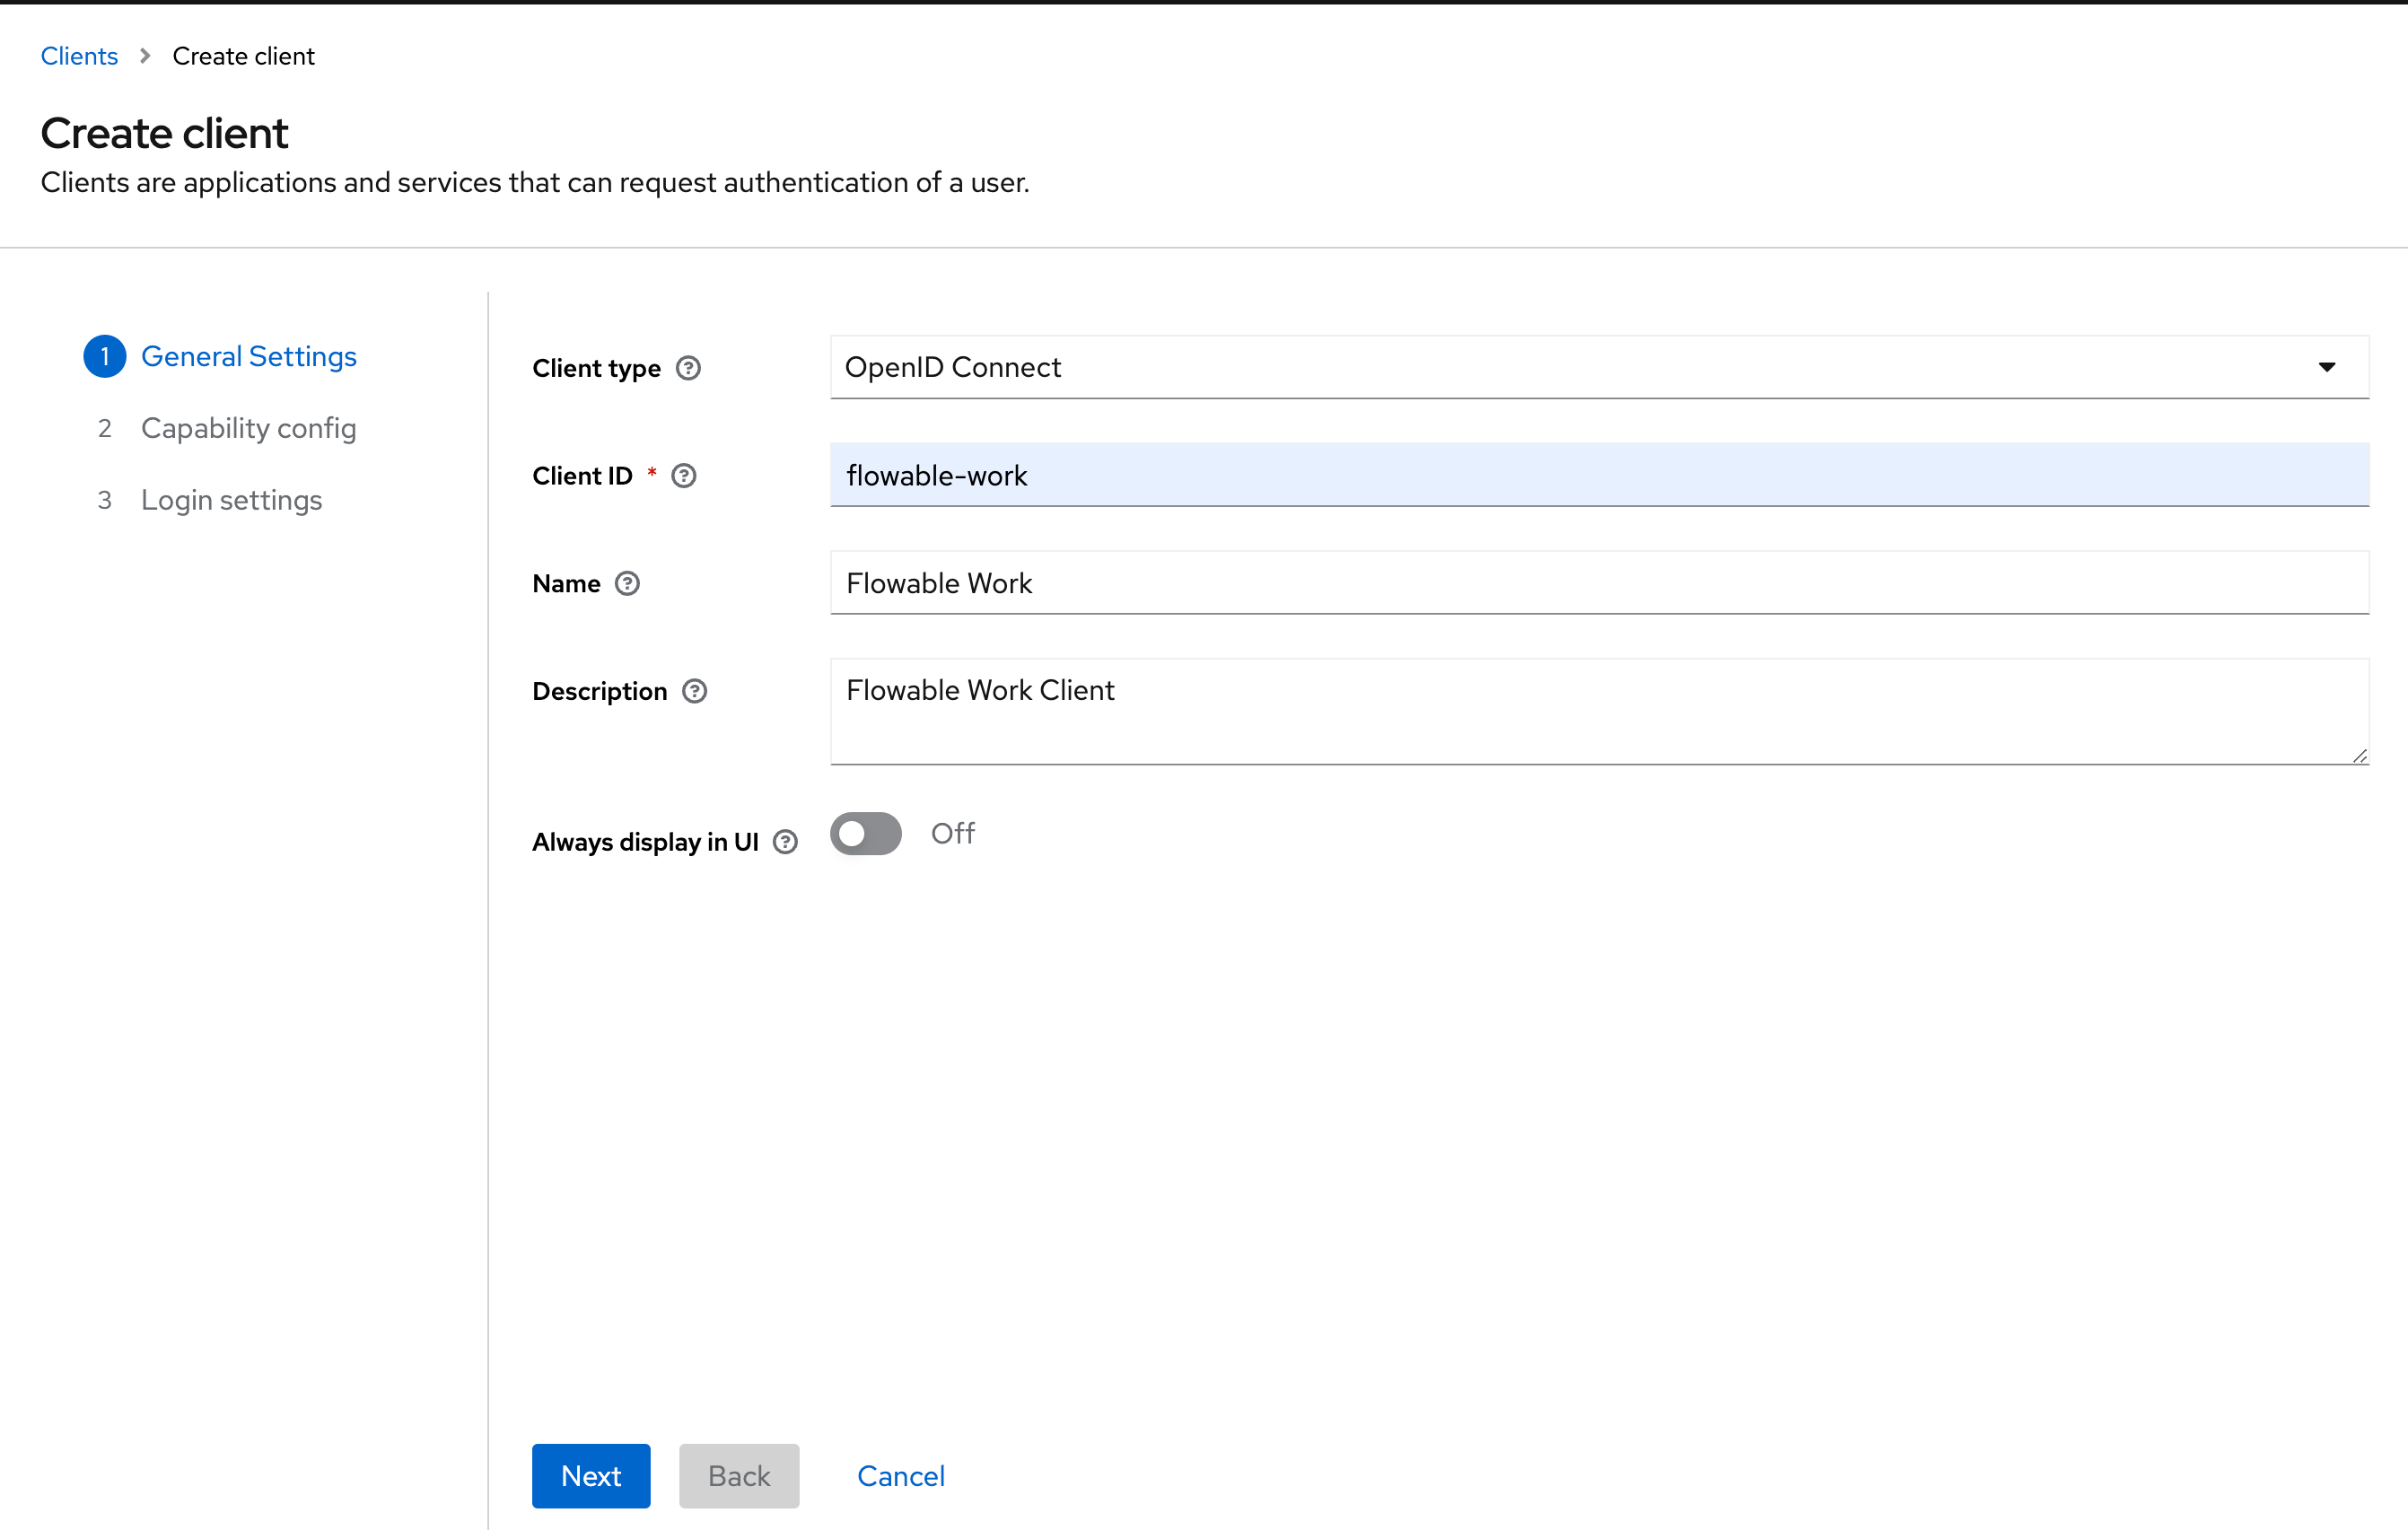
Work:
- Name: Flowable-Work
- Client ID: flowable-work
Design:
- Name: Flowable Design
- Client ID: flowable-design
Control:
- Name: Flowable Control
- Client ID: flowable-control
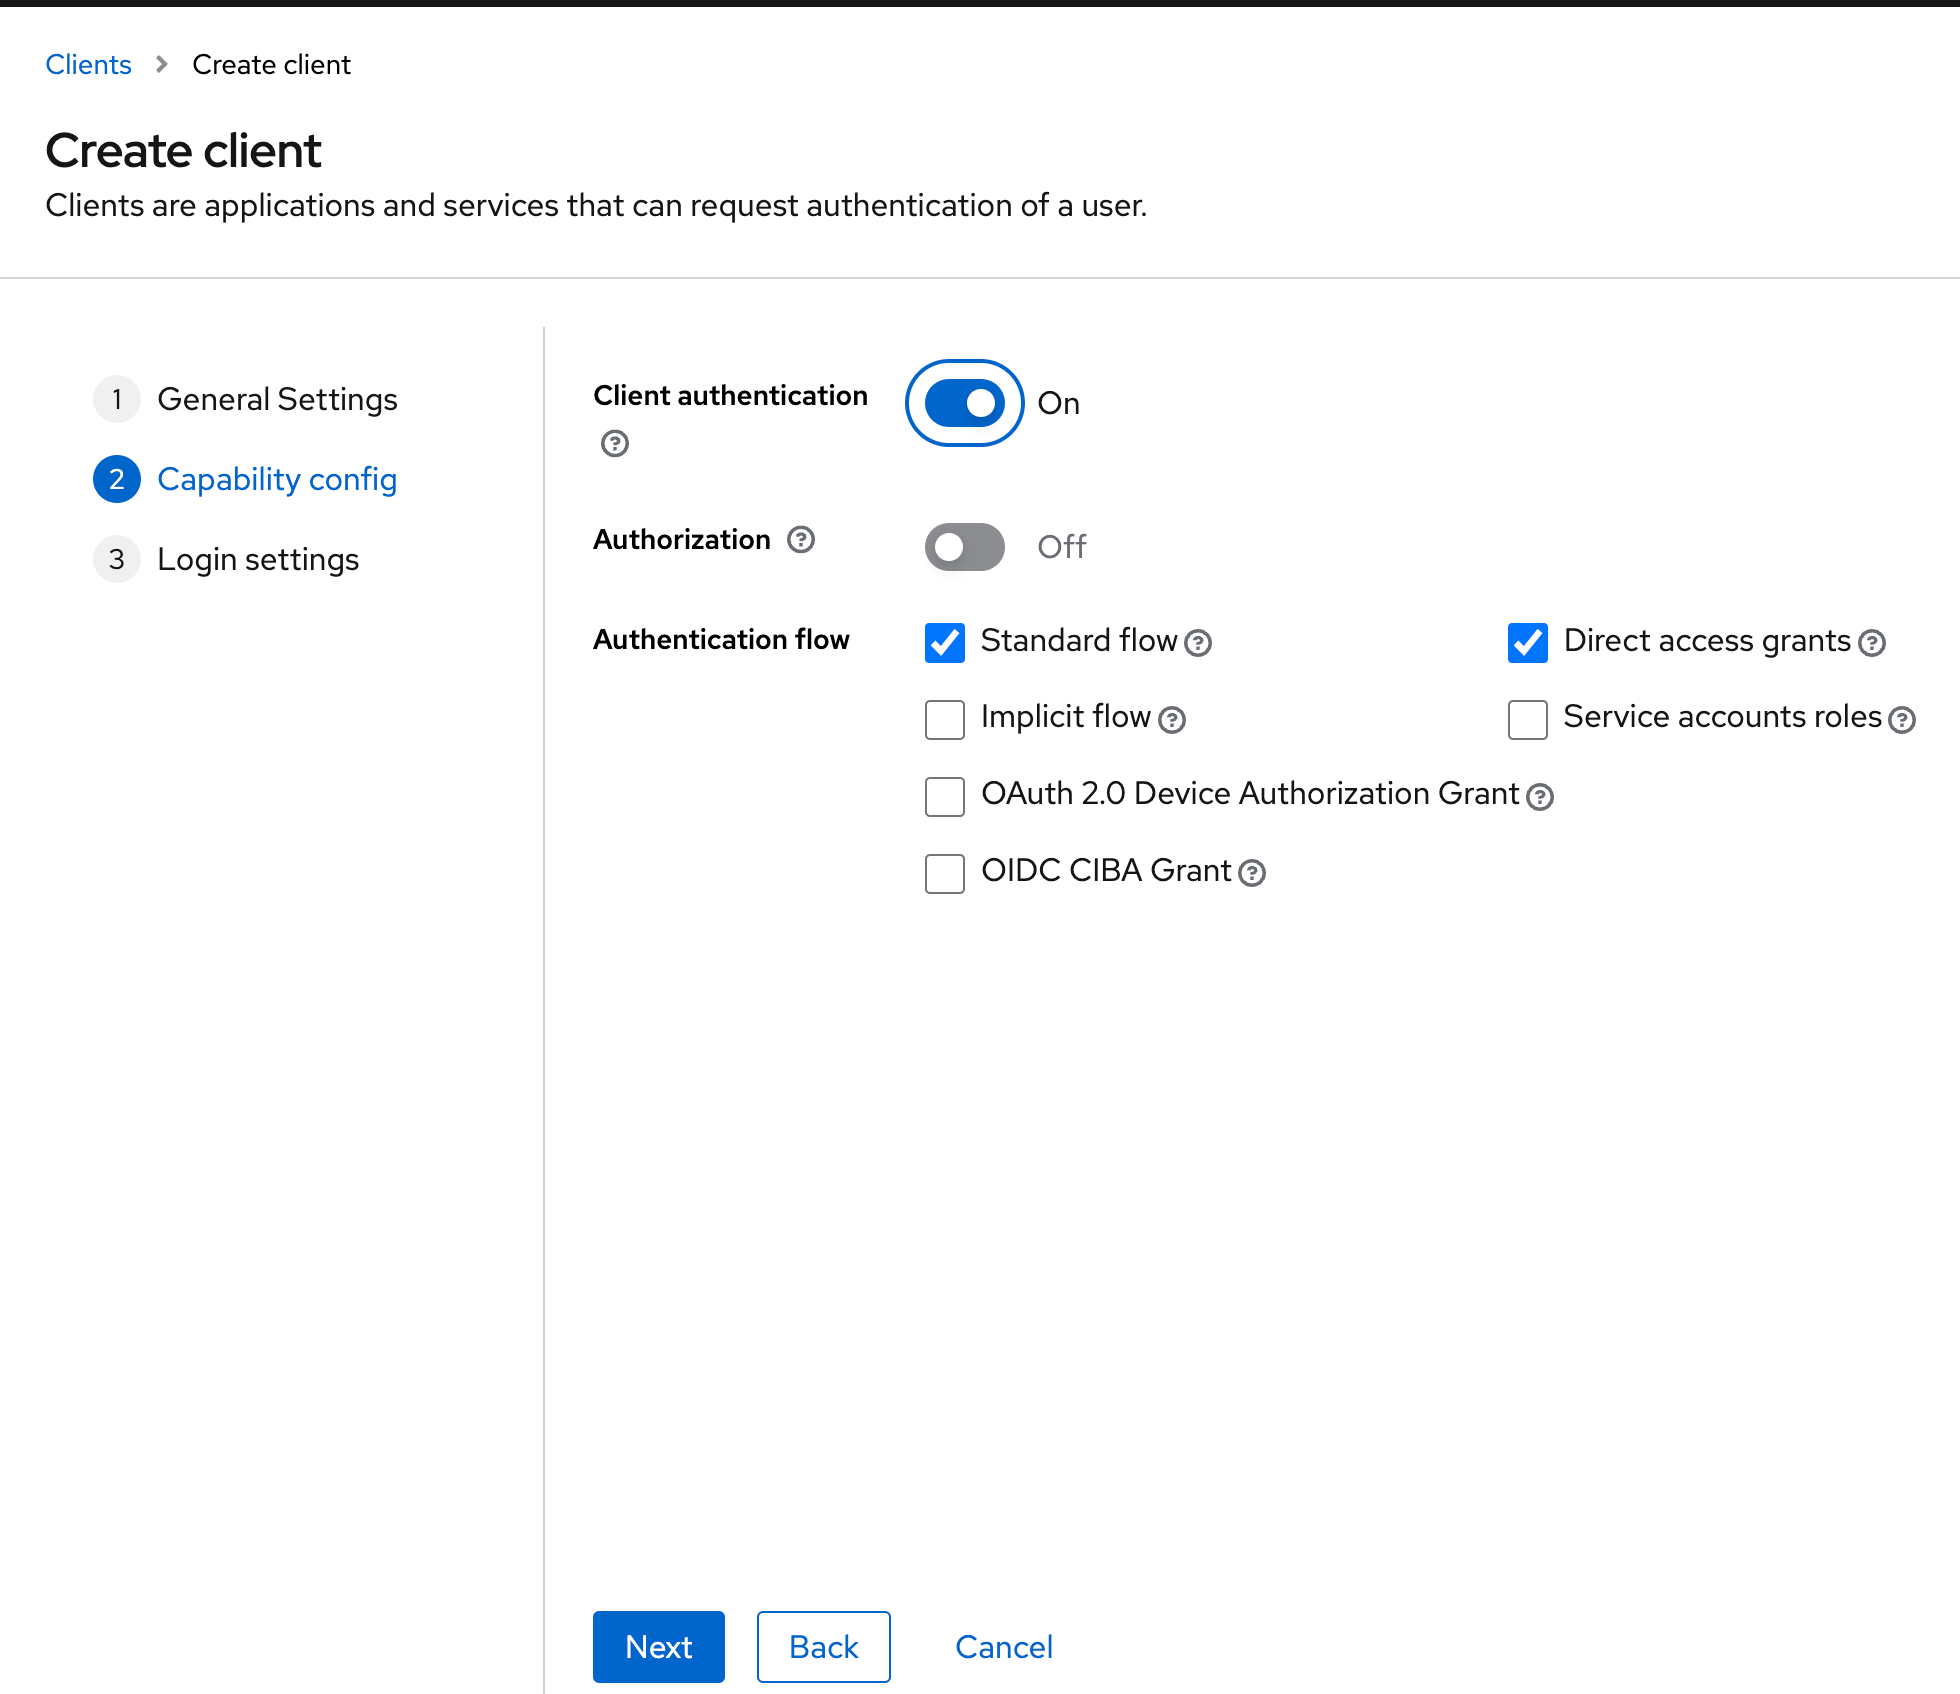
The next step is the Capability Config. Please activate the Client Authentication here:
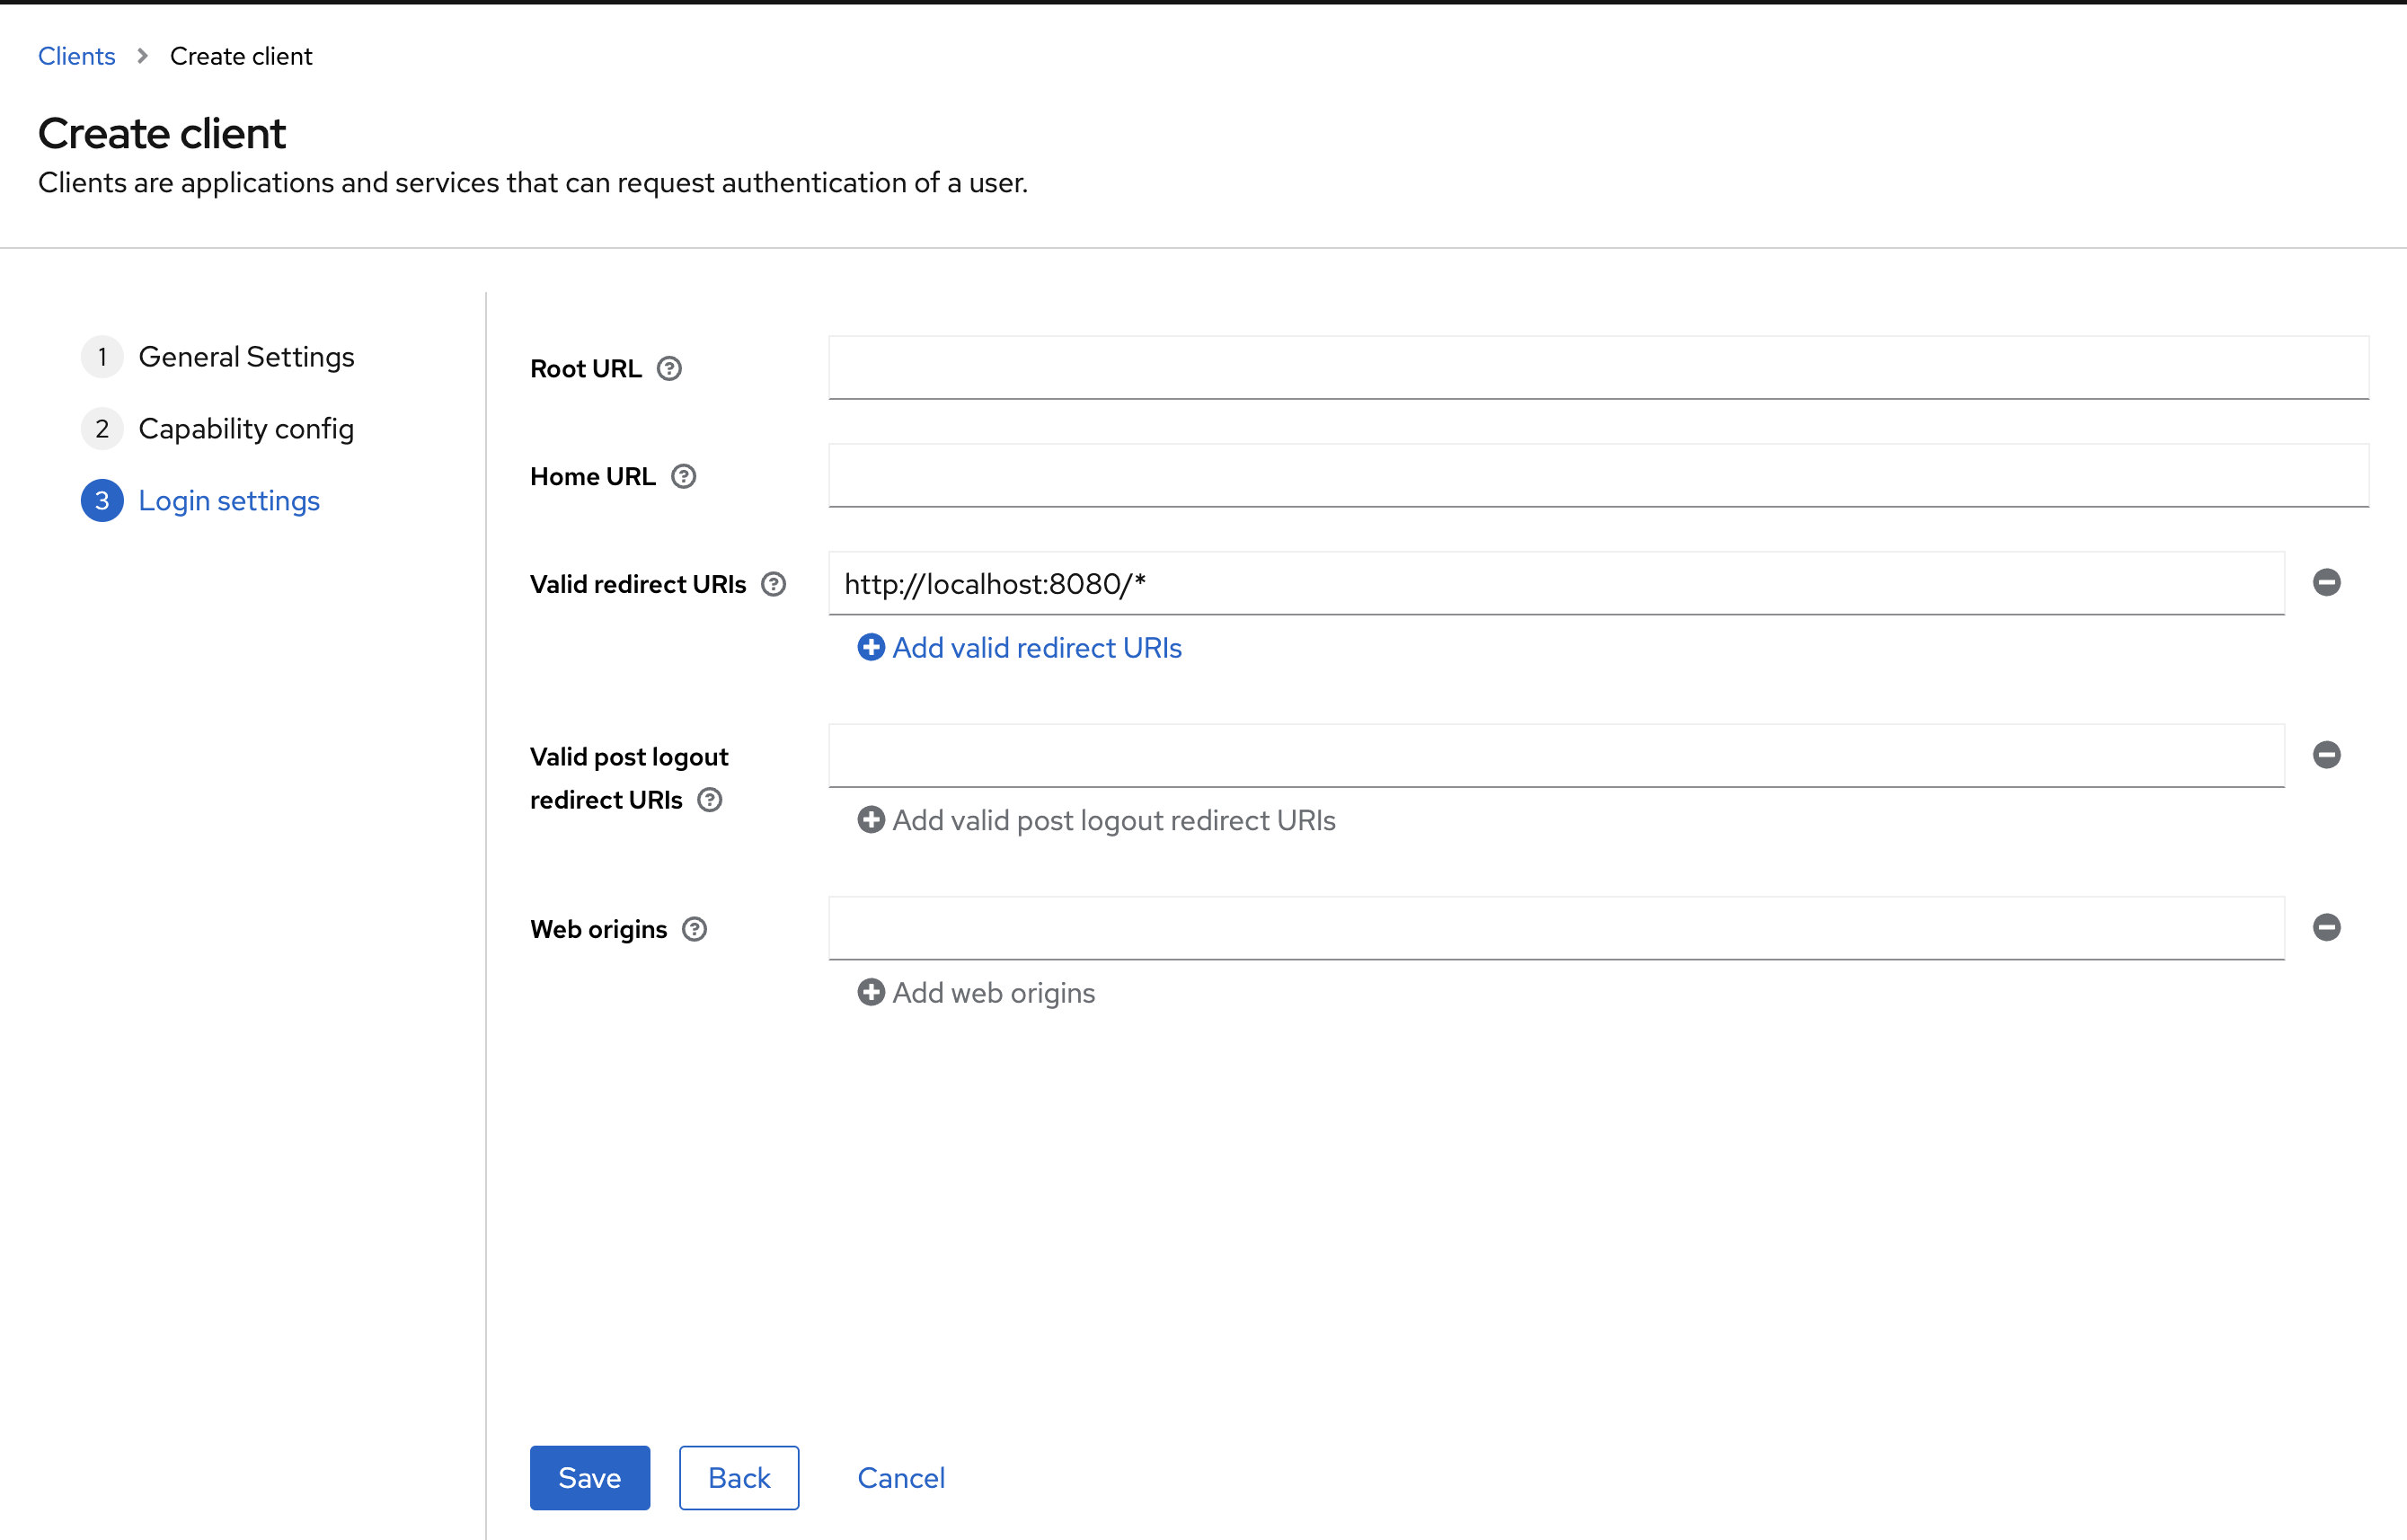
And the last step are the Login Settings. Please fill out the Valid redirect URIs as following:
- flowable-work: http://localhost:8080/*
- flowable-design: http://localhost:7080/*
- flowable-control: http://localhost:9080/*
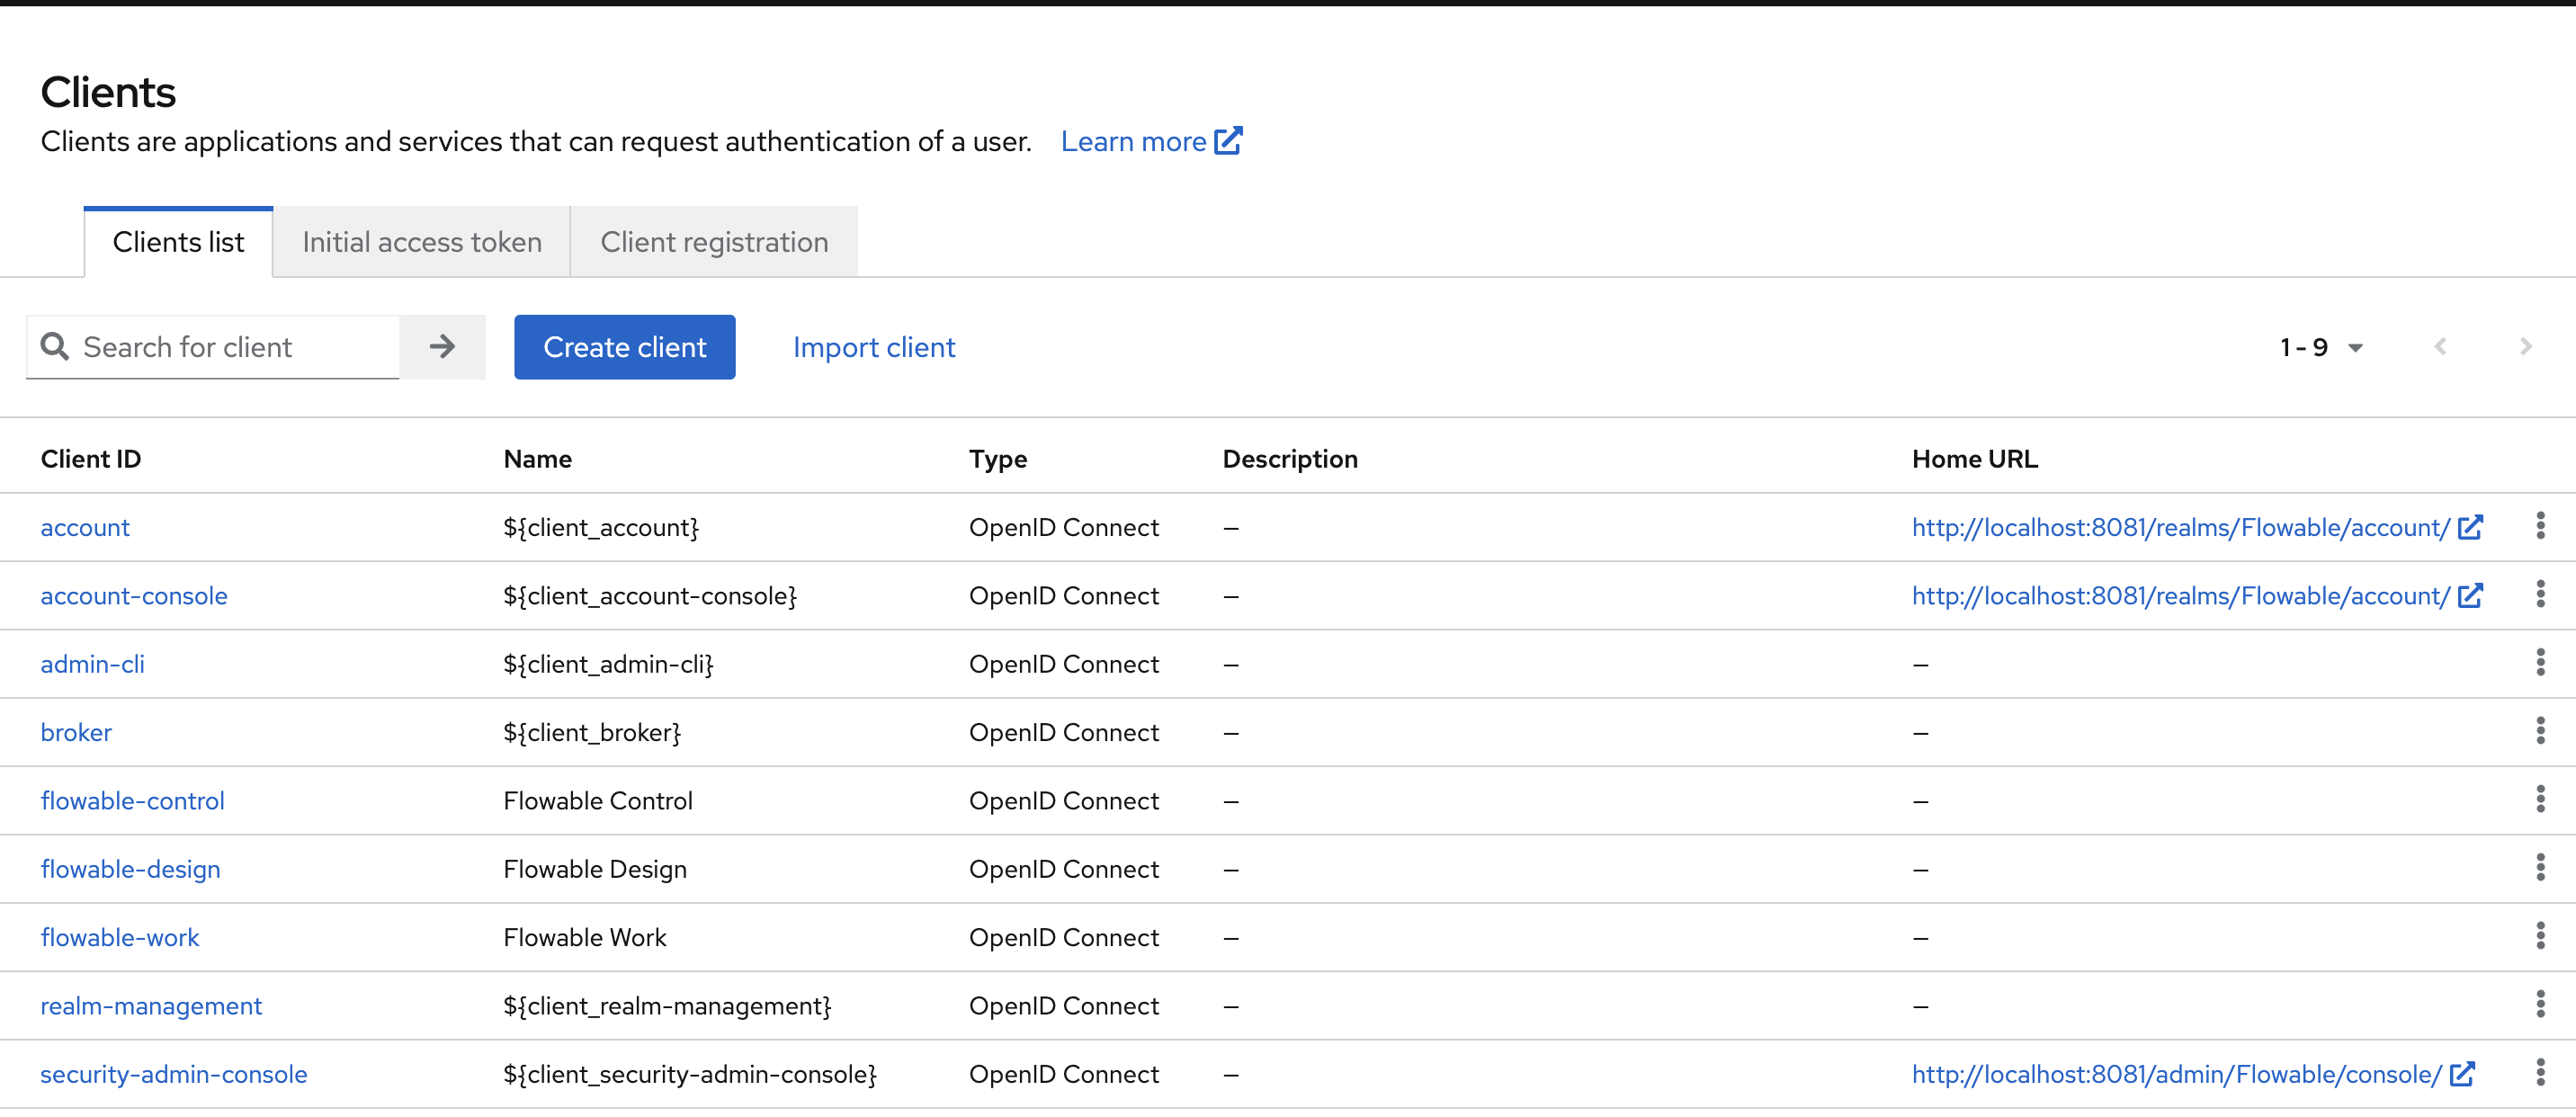
After creating the three clients, the Clients UI should look as follows:
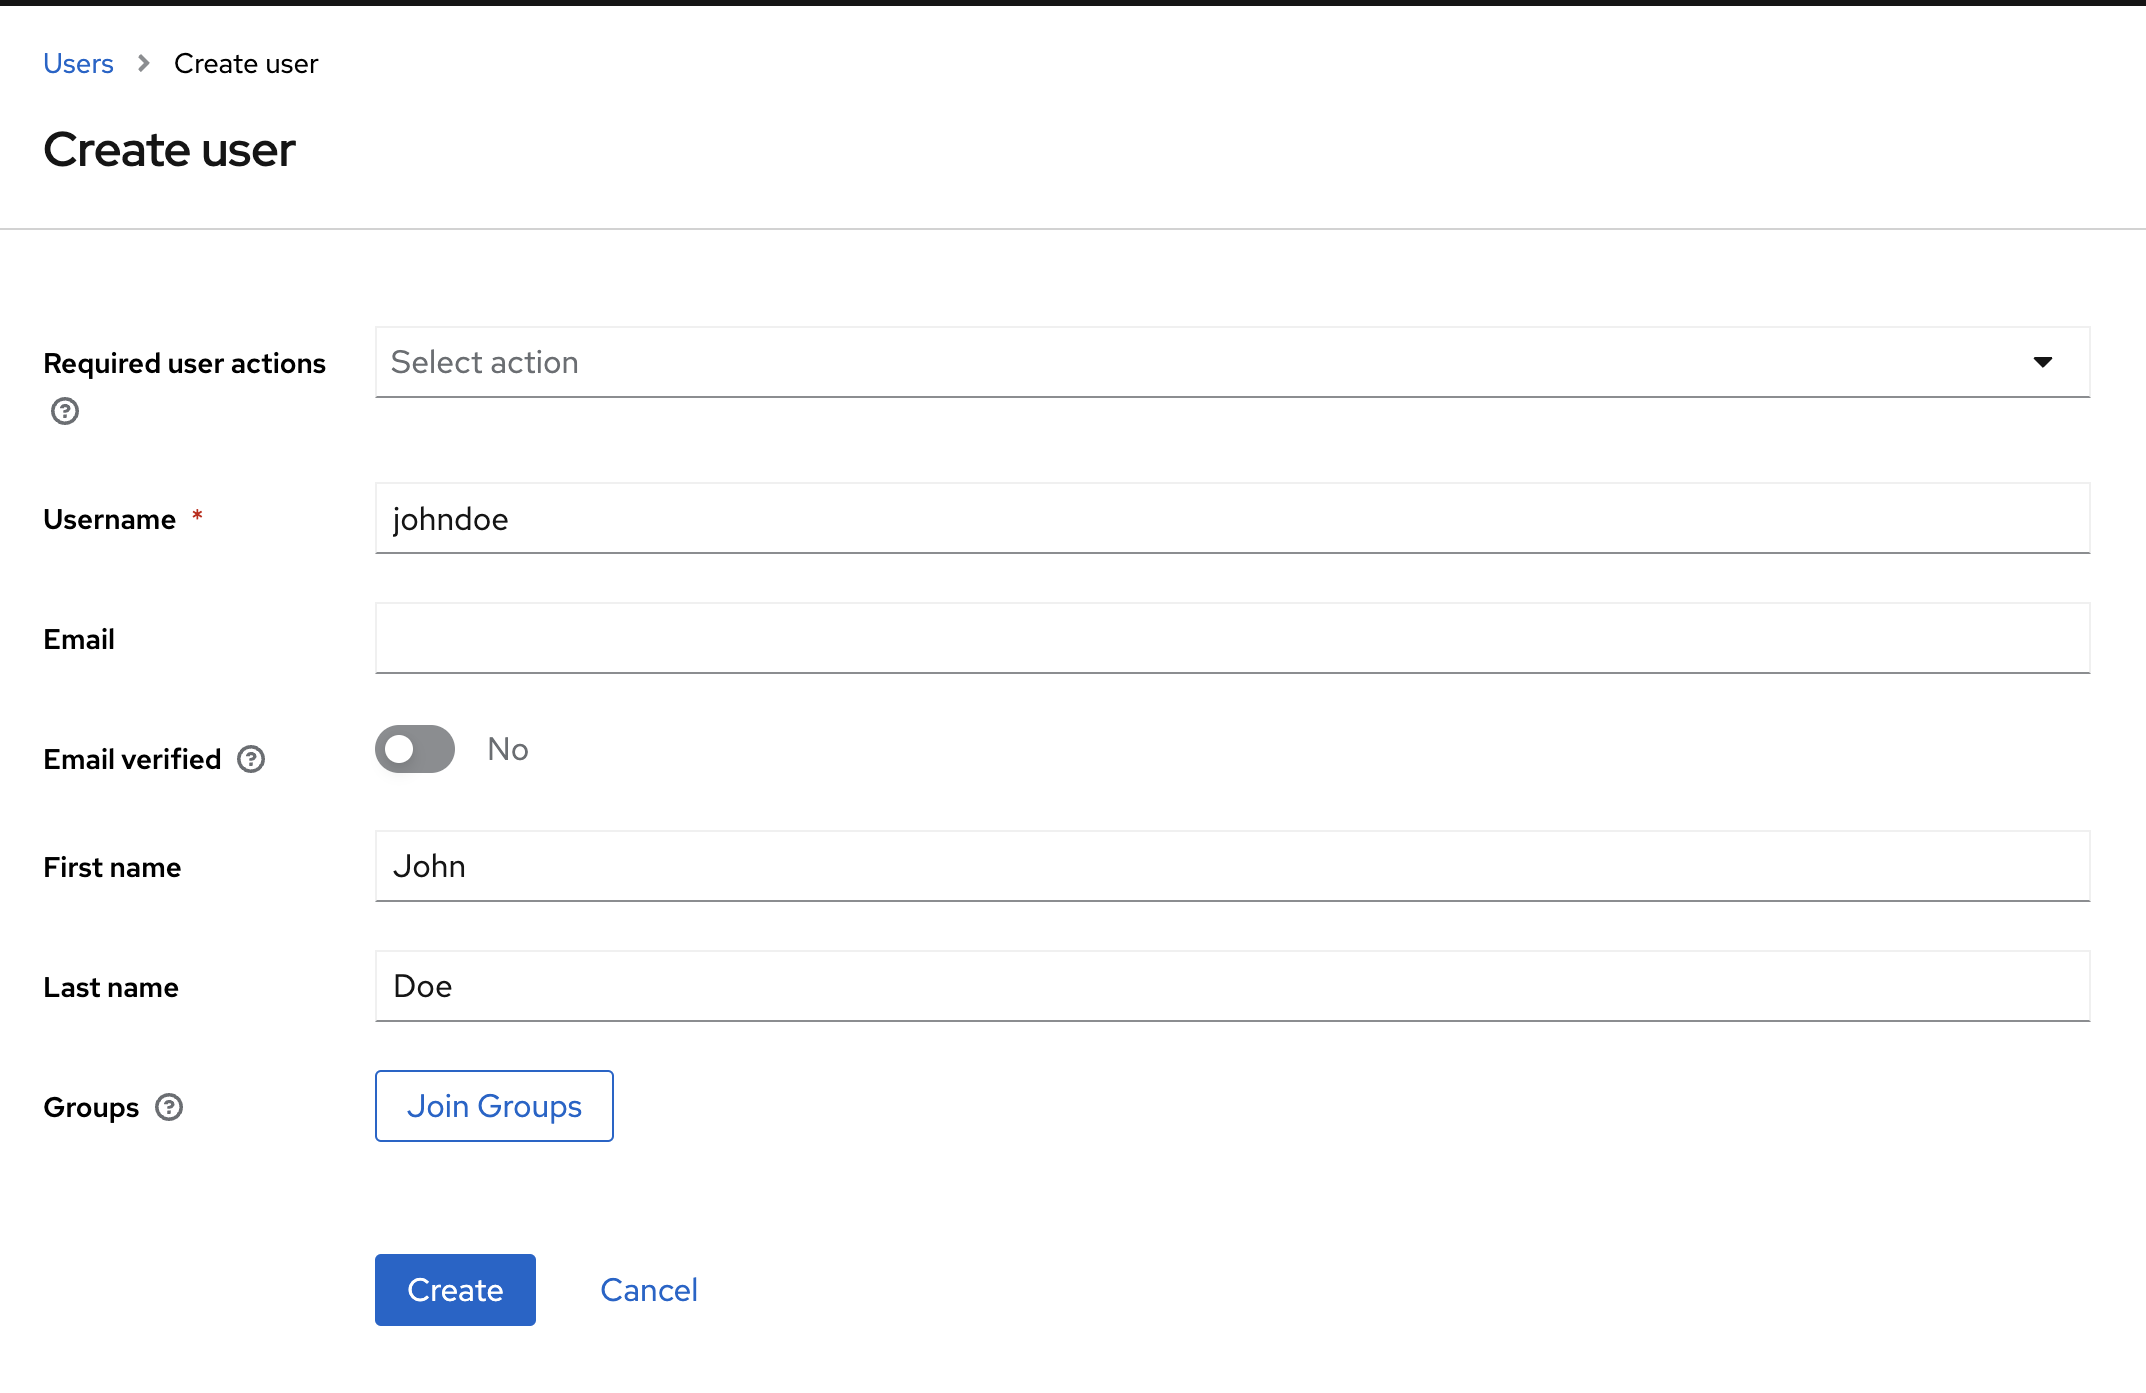
Finally, let's create a user. Go to Users and Add user. Fill in a user name, a first and last name. Here we are using the johndoe login name:
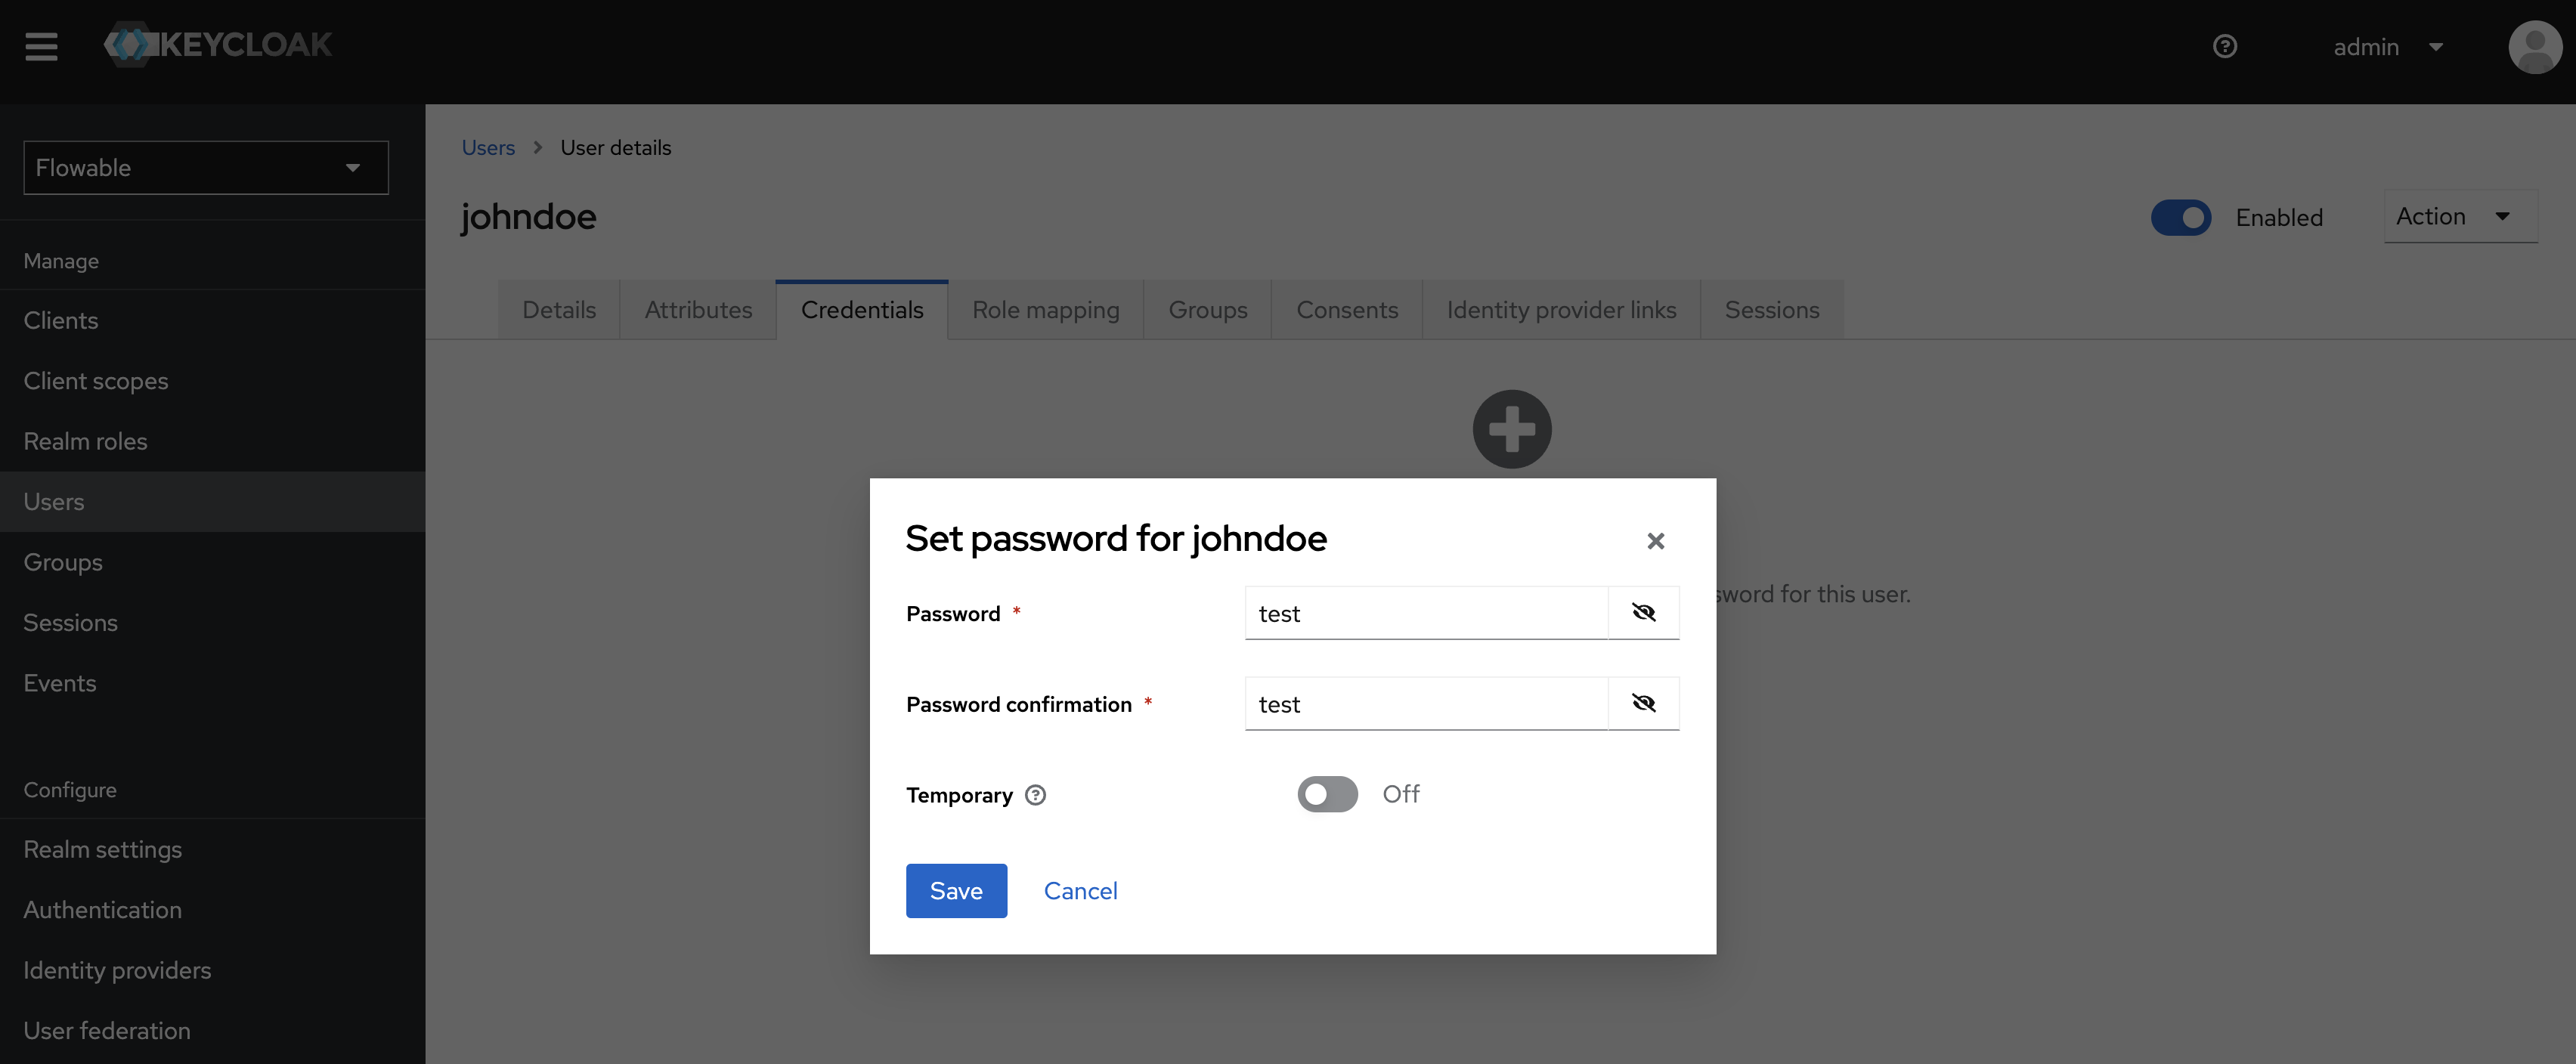
After you created the User, please set a password for the User. You can do this over the Credentials Tab on the User Page:
For now, that's all we need: we've set up one 'realm' that contains three clients (our three Flowable applications). We've created a user in this realm which we'll use now to log in.
noteIn a more realistic setup, you'll integrate Keycloak with an existing user store, like e.g. LDAP. This is outside of the scope of this guide, as it has no impact on configuring the SSO.
Login for Flowable Work
There are various ways of giving access to Flowable Work through OAuth 2.0 / Keycloak. What matters in the end, is that the OAuth 2.0 token that Flowable Work will receive as part of the request indicates which authorities that user has.
Authorities?The concept of an authority is often used in identity management. Also Spring Security uses this concept to indicate that a user (or group) has a certain capability to do something.
In Keycloak, there are no authorities, but there are roles. What we'll want to do is map these roles - which we'll configure in Keycloak- to an authority in Flowable Work.
It's possible to map each authority to a separate role. However, there's also a more convenient way by using something called a 'user definition' in Flowable Work.
User definitions?A user definition is a flexible way to bundle together various configurations for users. A user can be given such a definition, at which point it inherits everything related to the user definition. Two often used user definitions (but any number are possible) are the user-admin and user-default user definitions. Such a user definition defines for example which features are enabled in the Work UI, group memberships, certain permissions, etc.
Basically, a user can be given a user definition, which then transitively gives all configured options of that definition to that user.
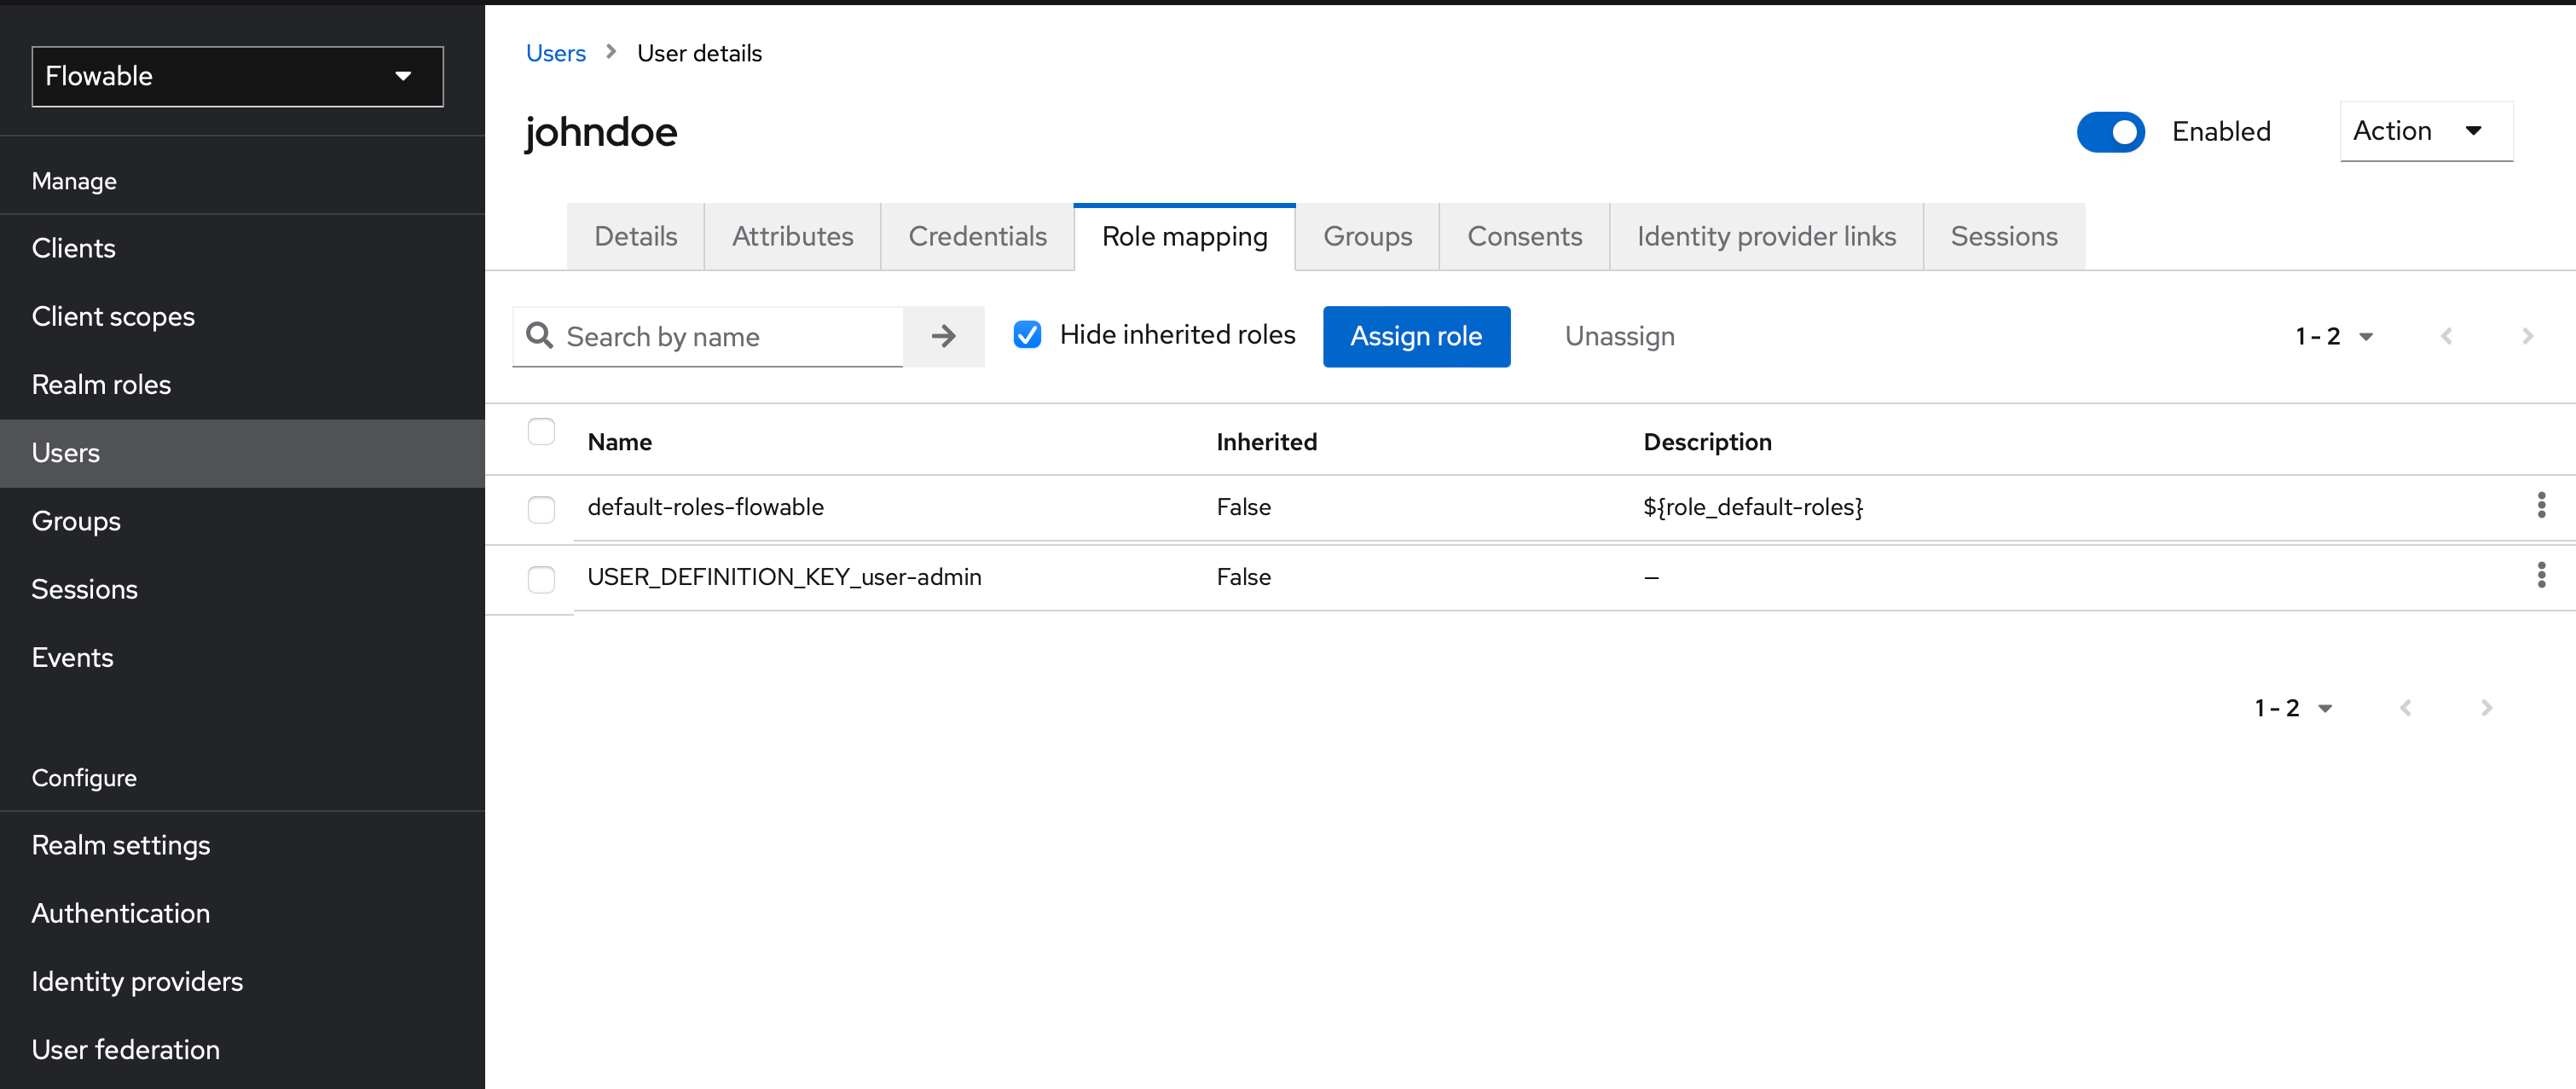
When logging in with johndoe, we'll want him to become an administrator. Go to Keycloak and find the Realm Roles section. Create a new role and give it the Role Name USER_DEFINITION_KEY_user-admin.
When such a special name is detected in Flowable Work, it will automatically apply the user-admin user definition to our user.
Alternatively, use the
USER_DEFINITION_KEY_user-defaultvalue for regular users.
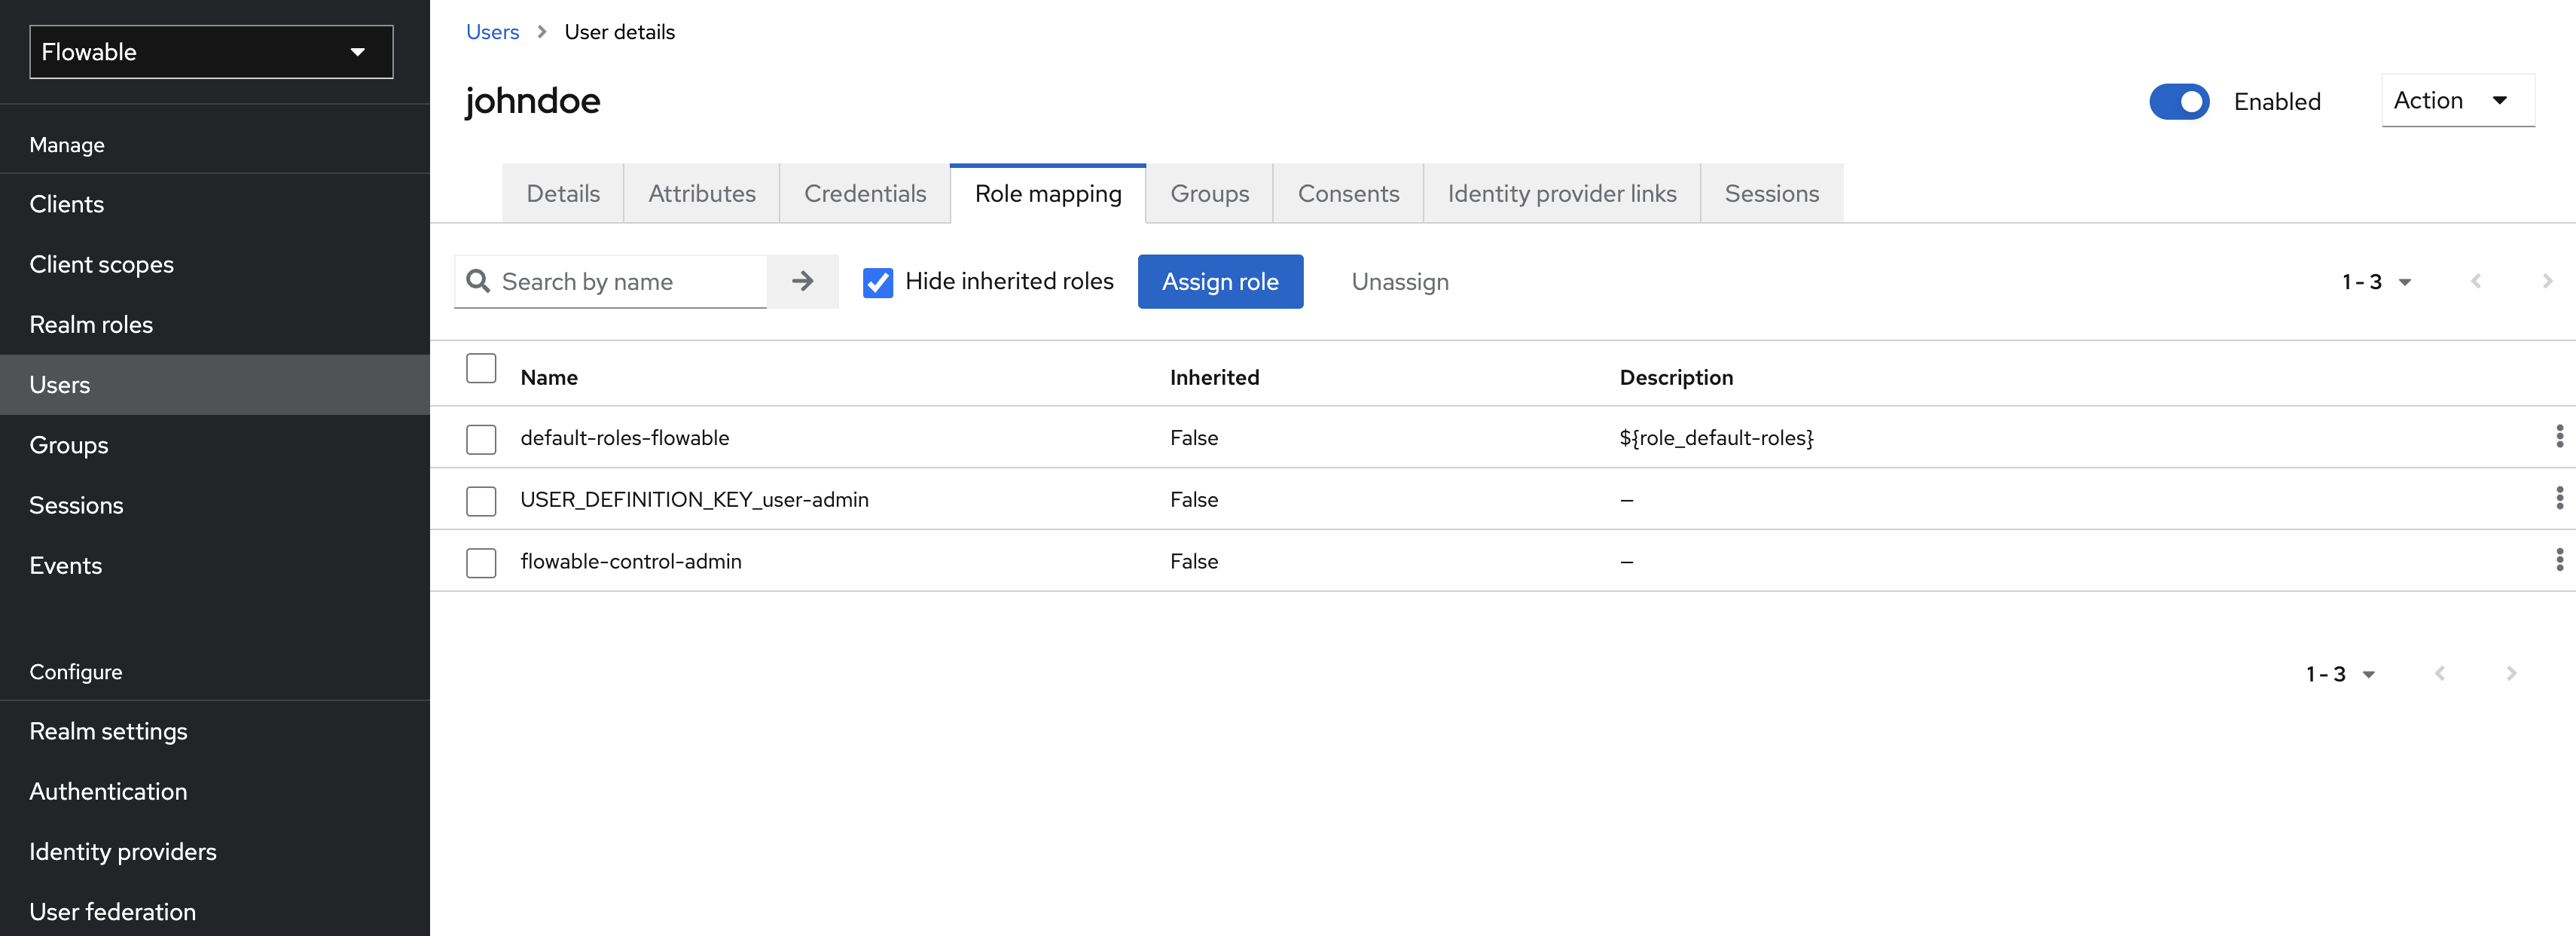
You can now assign the newly created Role to the User:
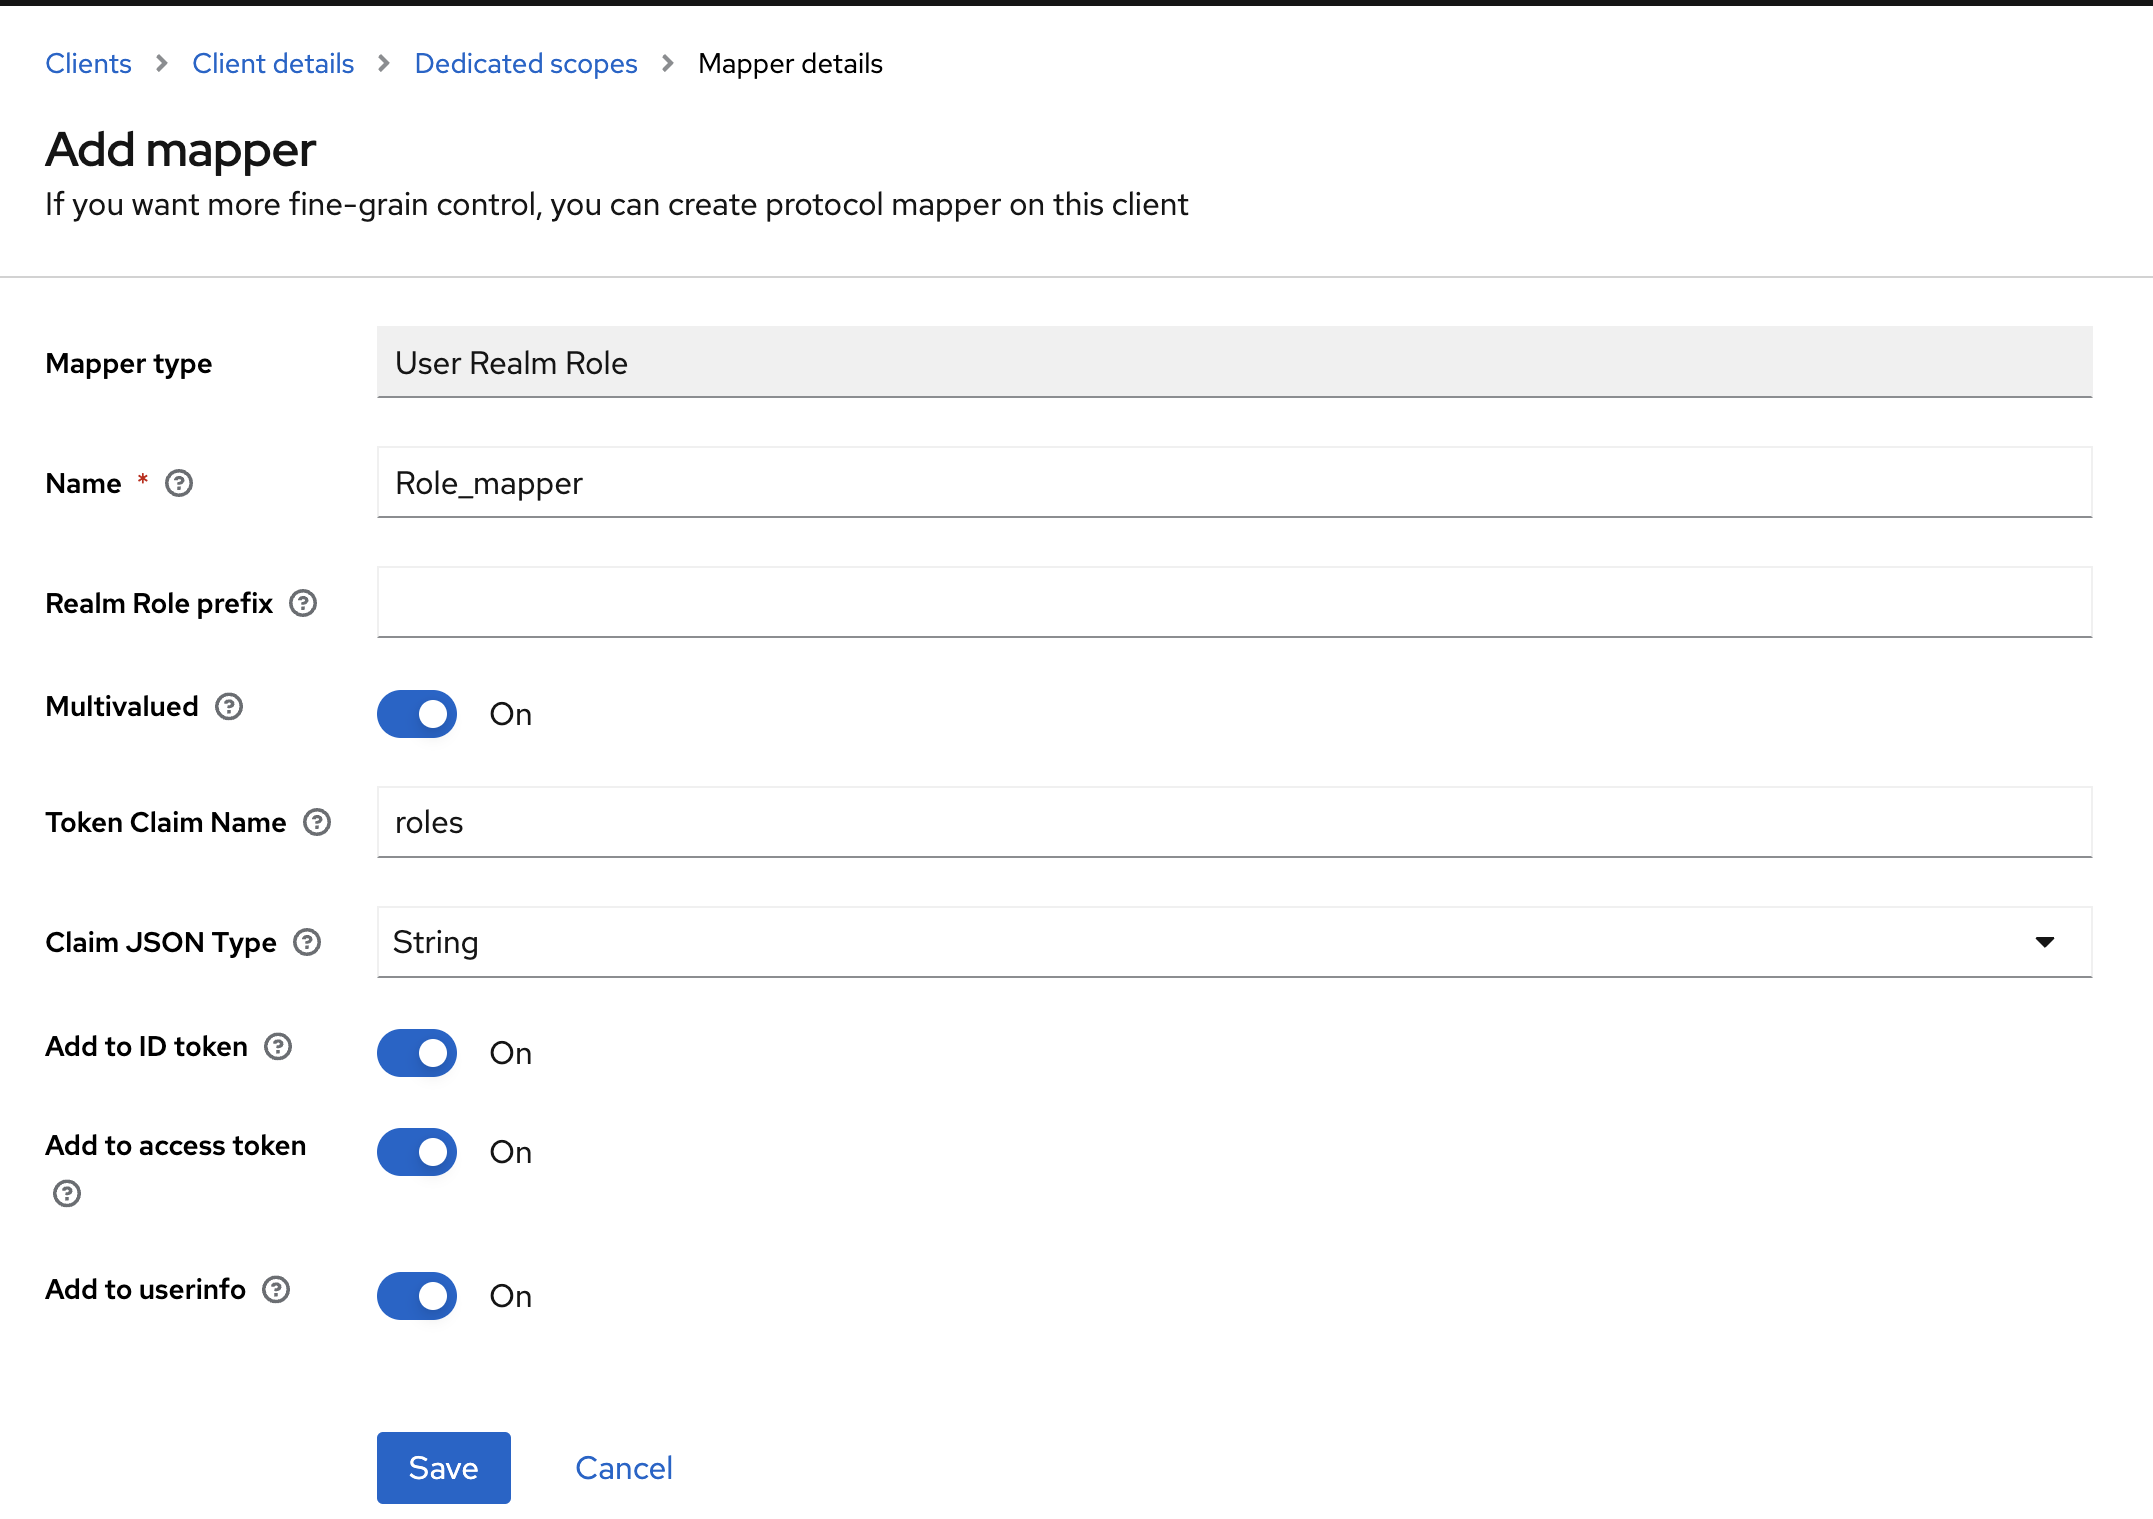
Lastly, Keycloak doesn't send roles automatically in the OAuth 2.0 token. To do this, you can go to the
flowable-work client configuration (Clients -> select flowable-work), find the Client scopes tab, select the flowable-work-dedicated Scope and Configure a new Mapper of type User Realm Role with following parameters:
- Name: Role_mapper (can be chosen freely)
- Mapper Type: User Realm Role
- Token Claim Name: roles (this will store the roles in the
rolesproperty of the token as an array)
All is now set up. Let's open up the application.properties configuration file for Flowable Work (for example in the lib folder of the Tomcat of Flowable Work) and add the following lines. Explanations are given as comments inline. This way the whole section can be copied in one go.
# This wil configure Spring Security to use OAuth 2.0
application.security.type=oauth2

# A name for this client registration id. Can be freely chosen.
# All configuration with the same registration id (here: flowable-work) belong to the same configuration.
spring.security.oauth2.client.registration.flowable-work.client-name=Flowable Work

# Client id (must match the one we created in Keycloak)
spring.security.oauth2.client.registration.flowable-work.client-id=flowable-work

# Client secret (can be found in the Credentials tab of the Client in Keycloak)
spring.security.oauth2.client.registration.flowable-work.client-secret=<Your Flowable Work Client Secret>

# This indicates we want to use the OAuth 2.0 authorization_code flow (i.e. with a login form)
spring.security.oauth2.client.registration.flowable-work.authorization-grant-type=authorization_code

# This will retrieve the openid and profile information from the token (contains name and other pieces of data)
spring.security.oauth2.client.registration.flowable-work.scope=openid,profile

# This configures which URL must be used as OAuth Authentication server
spring.security.oauth2.client.provider.flowable-work.issuer-uri=http://localhost:8081/realms/Flowable

# This is needed when using Keycloak: the user name is stored in the preferred_username property
spring.security.oauth2.client.provider.flowable-work.user-name-attribute=preferred_username
Each of your new added client does have a Client Secret which you can find in Keycloak on the Credential tab:
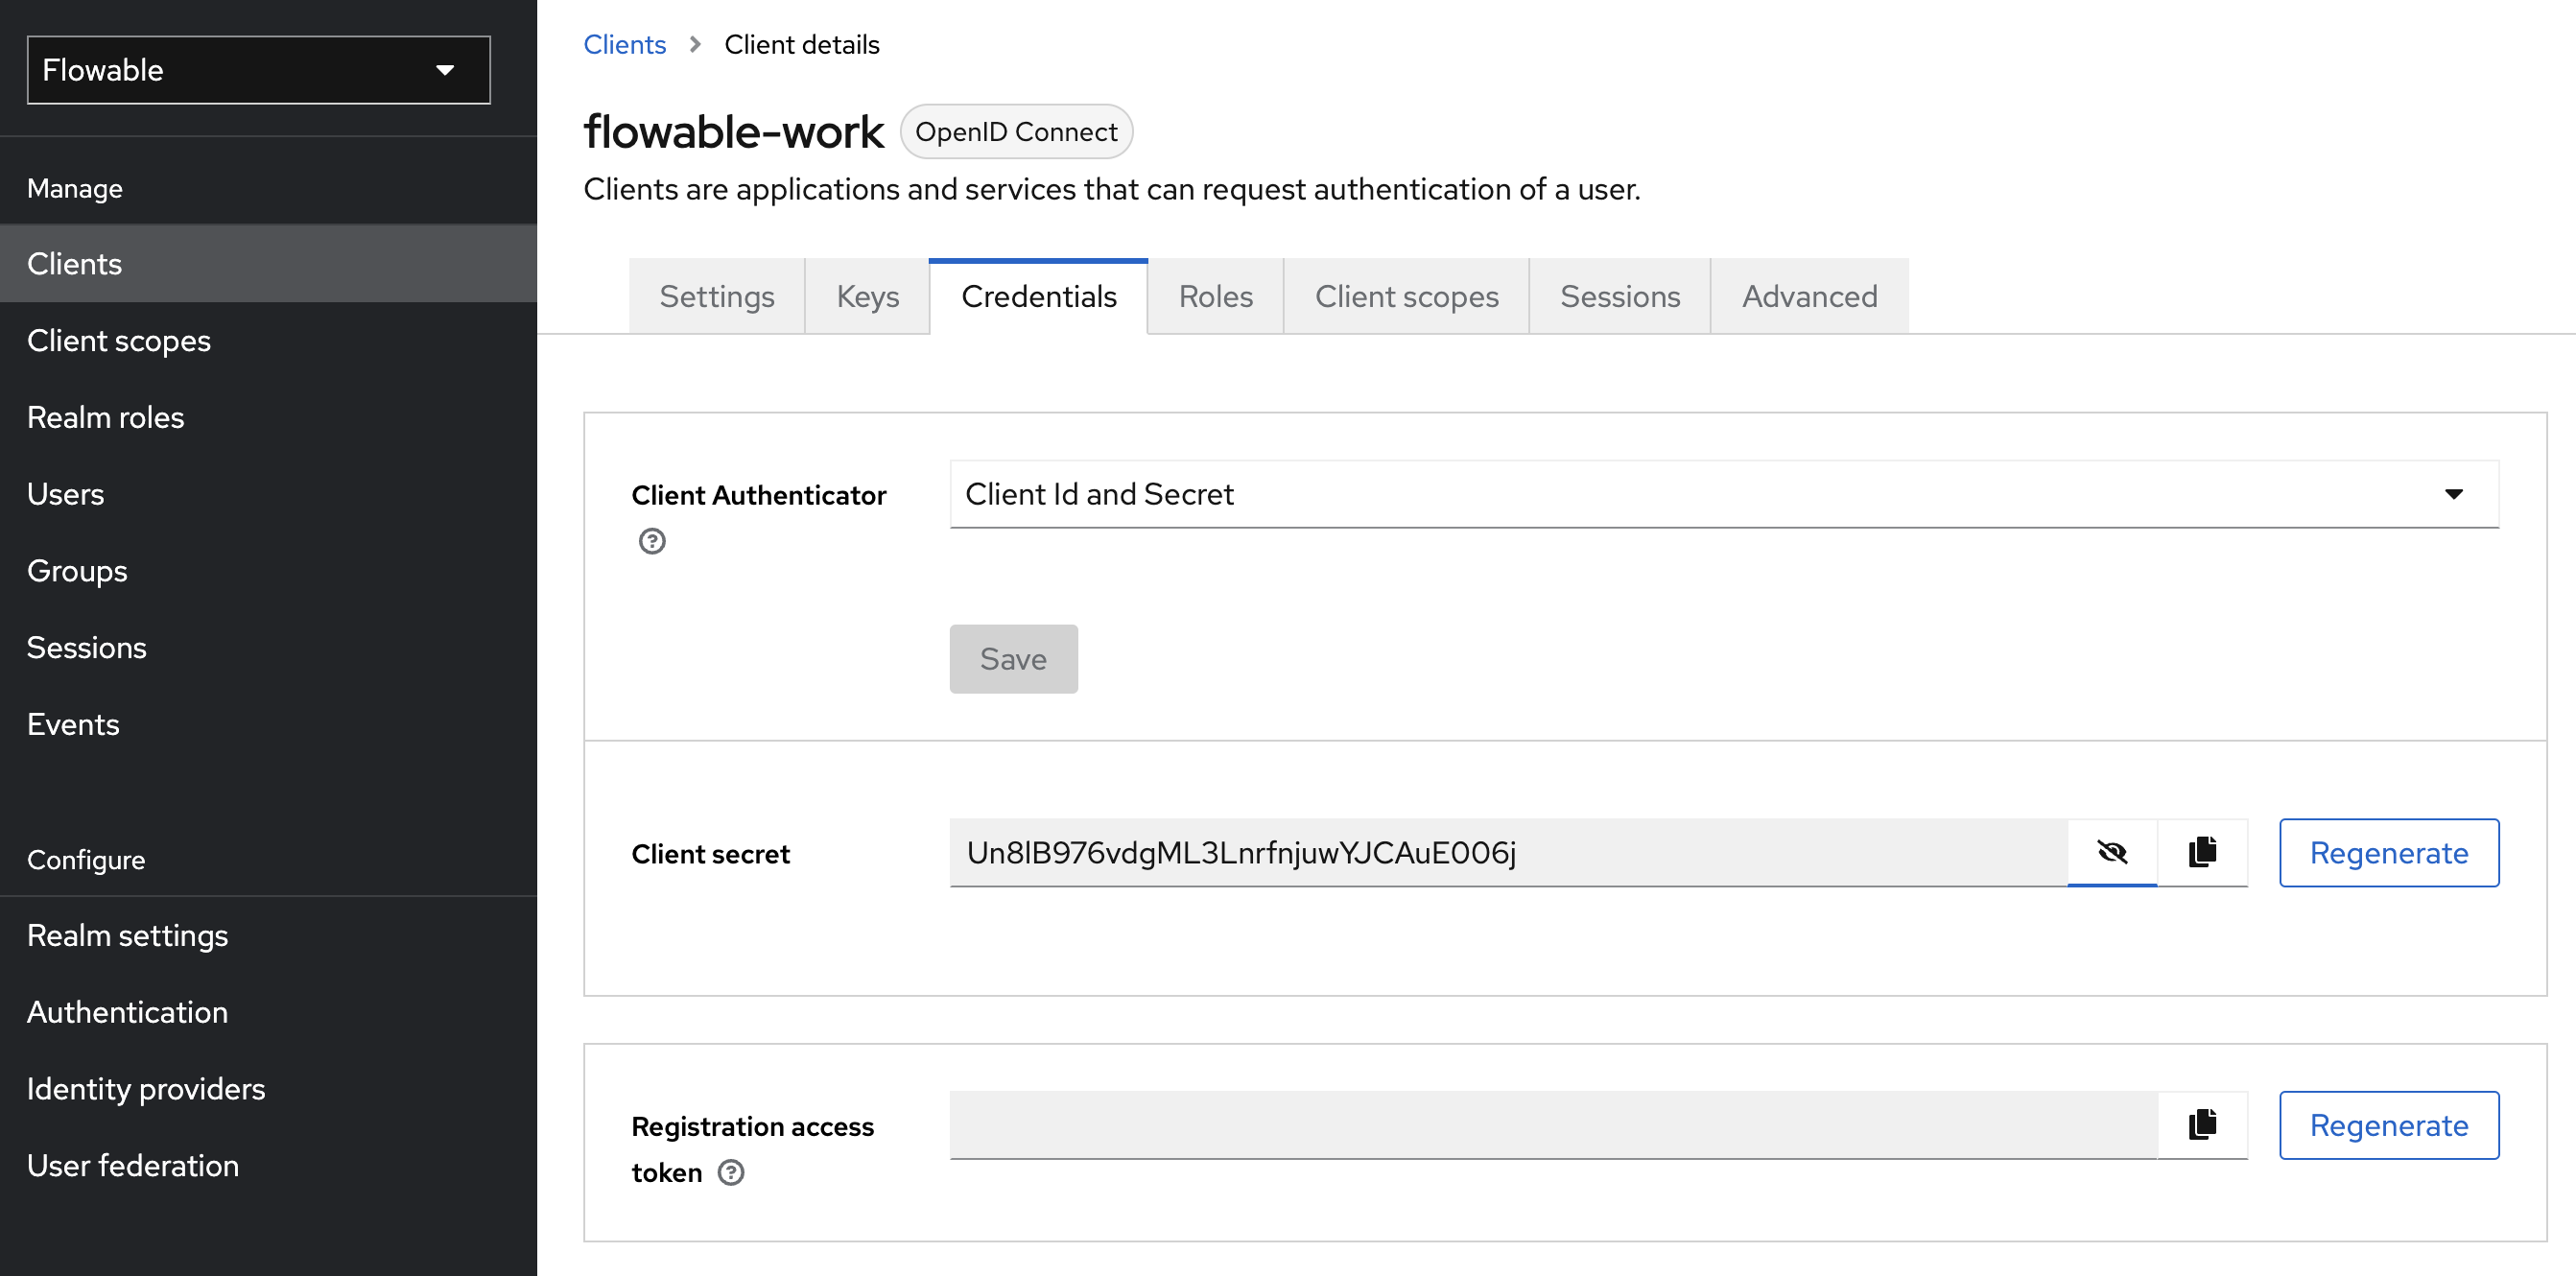
Please copy the Client Secret of the Flowable Work Client and paste it as value for
spring.security.oauth2.client.registration.flowable-work.client-secret.
Note how Spring Security uses the spring.security.oauth2.client.registration.<registration-id> pattern to group configuration for the same 'client' together. The client here is the Flowable Work application.
Where do these URLs come from?You might be wondering where these and URLs in subsequent sections come from. To find these for your realm, go to the Realm settings and click on the OpenID Endpoint Configuration link.
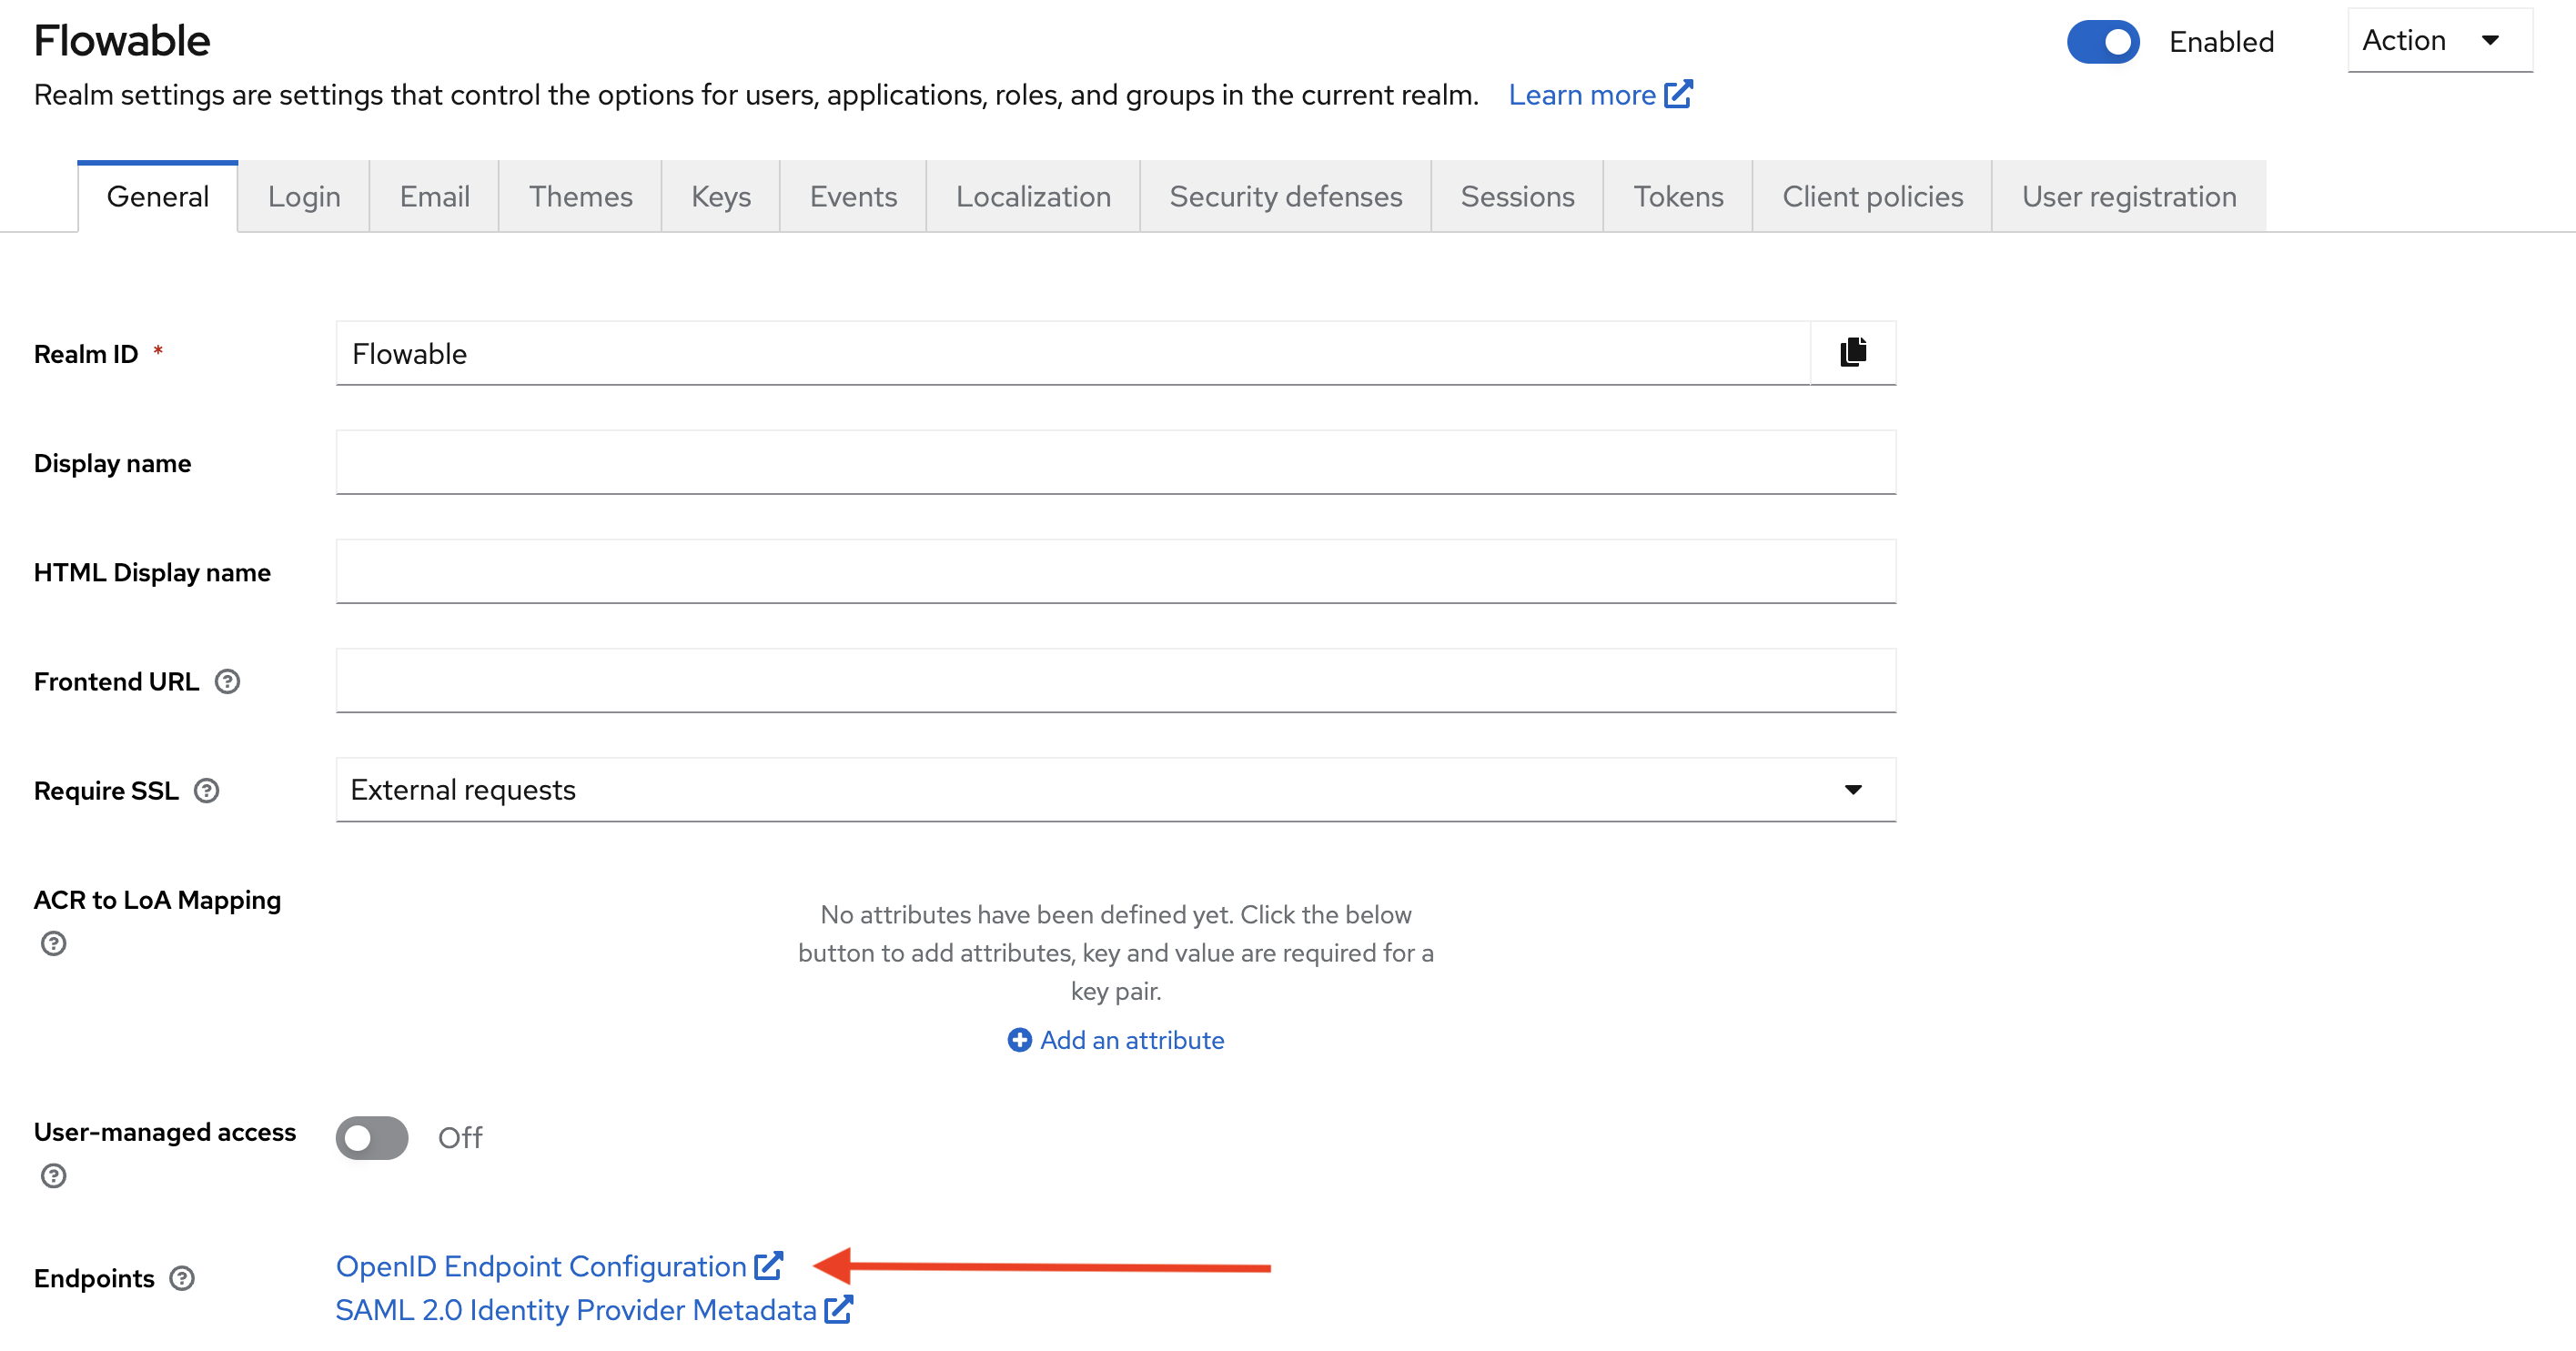
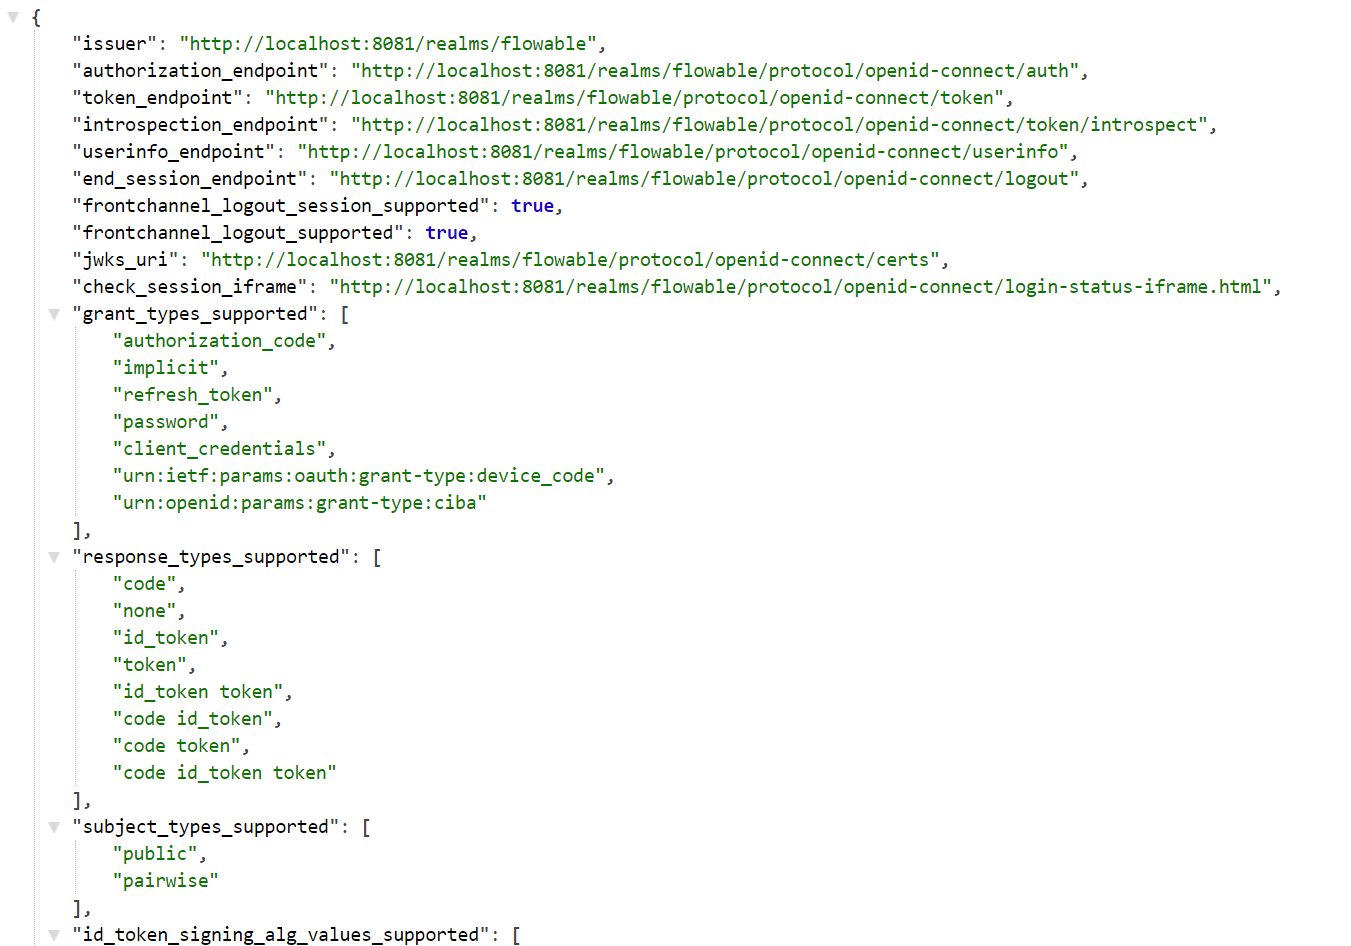
This will show a page with various URLs that can be used when configuring the client:
:::
With these properties, we've configured our application to retrieve tokens from the issuer-uri, using the authorization_code flow. We're passing the client id and secret when doing so.
When this is successful, we'll get back a token. The last thing we need to configure now is how to read the information in this token. As we gave our user the user-admin user definition key through the role, we need to configure that the roles, which we stored in the roles property above map to the authorities in Flowable.
flowable.security.oauth2.client.mapper.authorities-attributes=roles
This means that in Spring Security, we'll have the USER_DEFINITION_KEY_user-admin authority (as we're mapping values in the roles array to authorities). Flowable will see this special prefix and give the user the user-admin user definition and all that relates to it to the current user.
The roles can also be used to assign users to a group or a tenant.
When a role is prefixed with GROUP_ then the user will be member of the group that comes after the prefix, e.g. when the role is GROUP_myCustomGroup the user will be member of the group with a key myCustomGroup.
When a role is prefixed with TENANT_ then the user will be member of the tenant that comes after the prefix, e.g. when the role is TENANT_acme the user will be member of the acme tenant.
Additionally, you can map the groups, the tenant identifier (in case of multi-tenant) or a property containing the user definition key value. We're not using these, so no need to add them. Using groups will make things like role management easier (all roles associated with a group are given to the users belonging to this group). Furthermore, groups can be then used to determine the user definition in case it is not provided within the other authorities.
# These are not needed, just to show what is possible.
flowable.security.oauth2.client.mapper.groups-attributes=groups
flowable.security.oauth2.client.mapper.tenant-attribute=
flowable.security.oauth2.client.mapper.user-definition-key-attribute=
flowable.security.oauth2.client.mapper.load-authorities-from-identity-service=false
flowable.security.oauth2.client.mapper.idm-user-id-attributes=sub
flowable.security.oauth2.client.mapper.user-definition-group-mappings[0].group-key=
flowable.security.oauth2.client.mapper.user-definition-group-mappings[0].user-definition-key=
flowable.security.oauth2.client.mapper.user-definition-group-mappings[1].group-key=
flowable.security.oauth2.client.mapper.user-definition-group-mappings[1].user-definition-key=
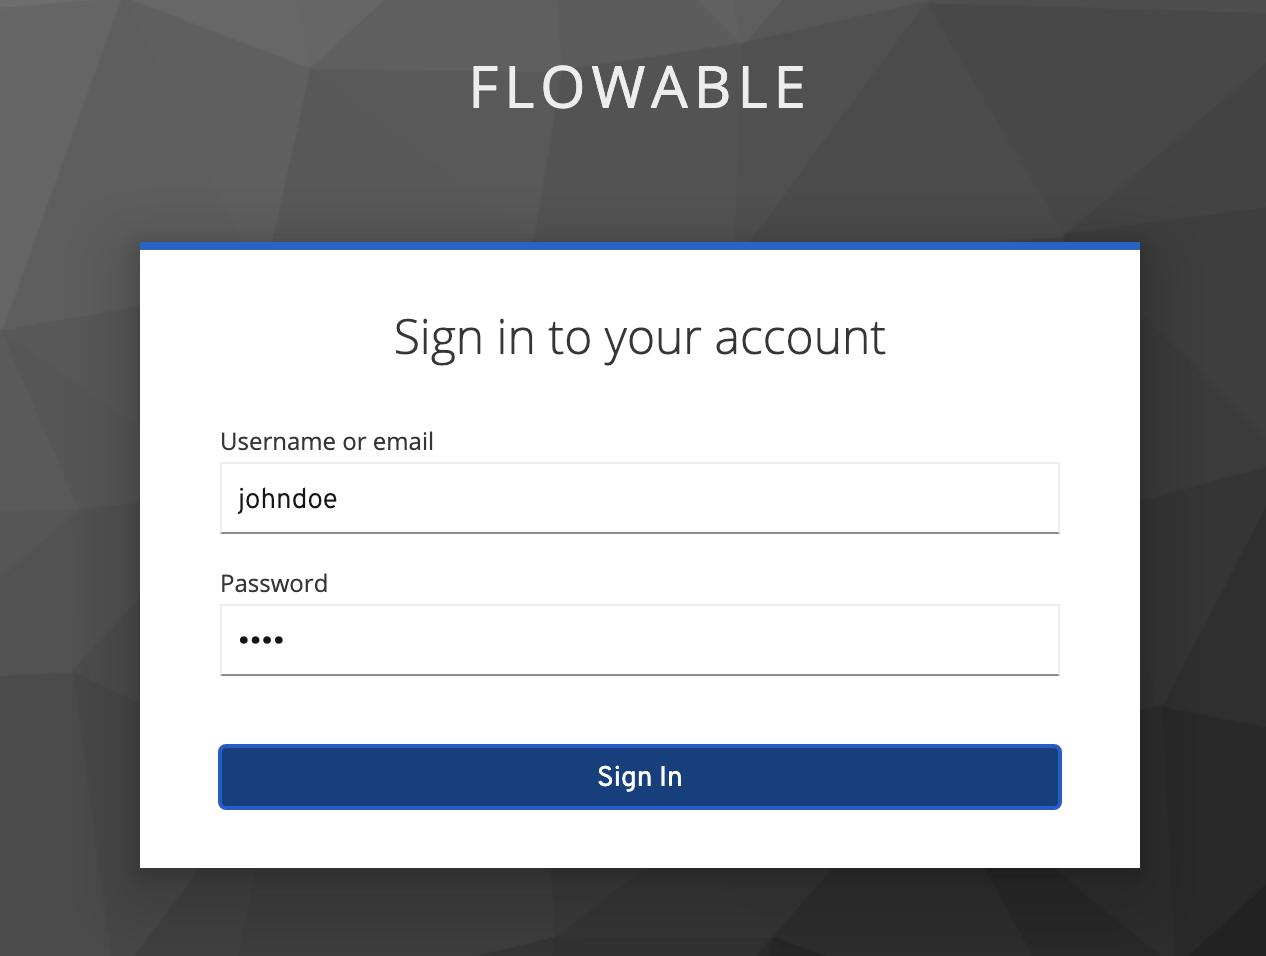
Boot up Flowable Work and go to http://localhost:8080/flowable-work. You'll notice that we're taken to a Keycloak login page:
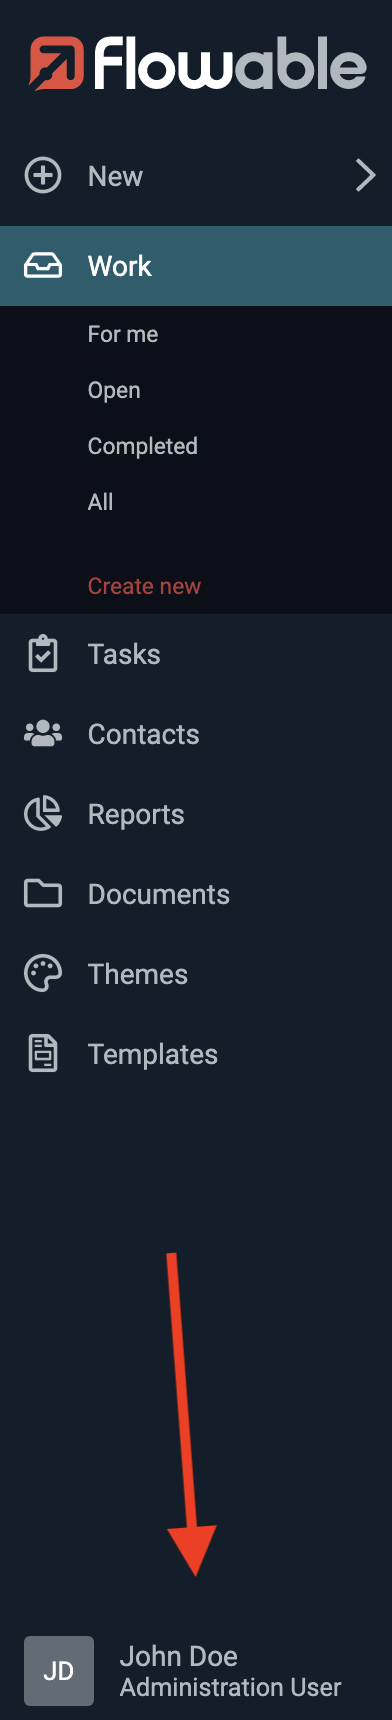
After logging in, we can now see that we can access Flowable Work and our user has been given the administrator rights through the role-to-authority mapping:
Login for Flowable Control
The setup for Flowable Control is quite similar as for Flowable Work. Make sure to create the same Mapper for roles in the flowable-control client in Keycloak as we've done above.
The only difference now is the different client-id and client-secret (which can be found in the Credentials tab of the flowable-control client in Keycloak)
Also note that Control has a specific flowable.control.app.security.type property to enable OAuth 2.0.
flowable.control.app.security.type=oauth2

spring.security.oauth2.client.registration.flowable-control.client-name=Flowable Control
spring.security.oauth2.client.registration.flowable-control.client-id=flowable-control
spring.security.oauth2.client.registration.flowable-control.client-secret=<Your Flowable Control Client Secret>

spring.security.oauth2.client.registration.flowable-control.authorization-grant-type=authorization_code
spring.security.oauth2.client.registration.flowable-control.scope=openid,profile

spring.security.oauth2.client.provider.flowable-control.issuer-uri=http://localhost:8081/realms/Flowable
spring.security.oauth2.client.provider.flowable-control.user-name-attribute=preferred_username
Flowable Control does not have user definitions like Flowable Work has. Instead, you need to indicate which authorities grant admin user rights.
Let's create a new realm role flowable-control-admin in Keycloak and assign it to our user:
Now we have to configure Control to look at the roles property in the token for authorities. If it finds a role with the name flowable-control-admin, we indicate it's an admin user for Control:
# Defines where to look for authorities
flowable.control.app.security.oauth2.authorities-attributes=roles

# Defines that the 'flowable-control-admin' authority indicates an admin user.
flowable.control.app.security.oauth2.admin-authorities=flowable-control-admin

#flowable.control.app.security.oauth2.tenant-attribute=
Boot up Flowable Control and go to http://localhost:9080/flowable-control. If you were logged in into Flowable Work in the same browser, you won't need to log in (that's the point of SSO). If not, you'll get redirected to the Keycloak login page and will be logged in into all apps of our realm.
However, you'll notice that nothing is working in Control right now. That's because we haven't configured our OAuth 2.0 setup yet in such a way that we'll allow server-to-server communication over REST. More specifically, Flowable Control will use the REST API of Flowable Work to retrieve information about the system. Let's fix that.
Flowable Work as a Resource Server
In OAuth 2.0 concepts, we need to make Flowable Work a Resource Server. When Flowable Control will want to do a REST request, it first needs to get a token (another one than the regular user access token) from the Authorization service. That token can then be used (using Bearer authentication in the HTTP headers) to do the requests.
Add the following properties to the application.properties file of Flowable Work:
spring.security.oauth2.resourceserver.jwt.issuer-uri=http://localhost:8081/realms/Flowable

# Keycloak puts the user id in the preferred_username
flowable.security.oauth2.resourceserver.jwt.principal-claim-name=preferred_username

# Similar to the client mapping from before
flowable.security.oauth2.resourceserver.mapper.authorities-attributes=roles
flowable.security.oauth2.resourceserver.mapper.groups-attributes=groups
flowable.security.oauth2.resourceserver.mapper.tenant-attribute=
flowable.security.oauth2.resourceserver.mapper.user-definition-key-attribute=
Note that we're not configuring a client registration here as before, but we're configuring the current application as a resource server.
The second part of the properties is similar to before: when the resource server is accessed with a token, the authorities will be in the roles property.
We can't reuse the client properties that look very similar (the application for example might not allow for user login), so they need to be somewhat repeated.
Note the resource server has a specific URL it uses to exchange token (JWT) information, which is the same here as the client URL (but that's not always the case, this depends on the identity management system)
Finally, reboot Flowable Work with this new set of properties.
Configure Flowable Control to Connect to Flowable Work
With Flowable Work configured as a 'resource server', we can now add a second client registration to the configuration of Flowable Control specifically for the communication with the REST API of Flowable Work.
The biggest difference here is that instead of the authorization_code, the client_credentials OAuth 2.0 flow is used. This means that no login is required and the information will all be passed through HTTP headers.
See the inline comments for more information. Here we've named the client registration admin-access, but this can be chosen freely (as long as it's consistently used for related properties).
# Note how the 'token-uri' is now used. This URL can be found in the client endpoints in Keycloak
spring.security.oauth2.client.provider.admin-access.token-uri=http://localhost:8081/realms/Flowable/protocol/openid-connect/token

# The client id and secret are the same as for the regular user login
spring.security.oauth2.client.registration.admin-access.client-name=Work Admin Access
spring.security.oauth2.client.registration.admin-access.client-id=flowable-control
spring.security.oauth2.client.registration.admin-access.client-secret=<Your Flowable Control Client Secret>

# The grant-type is now different!
spring.security.oauth2.client.registration.admin-access.authorization-grant-type=client_credentials

spring.security.oauth2.client.provider.admin-access.user-name-attribute=preferred_username
spring.security.oauth2.client.registration.admin-access.scope=openid
If you are using the oauth2CurrentUser authentication type between Control and Work and you want to refresh the access token once it expires, you need to also add offline_access as one of the scopes.
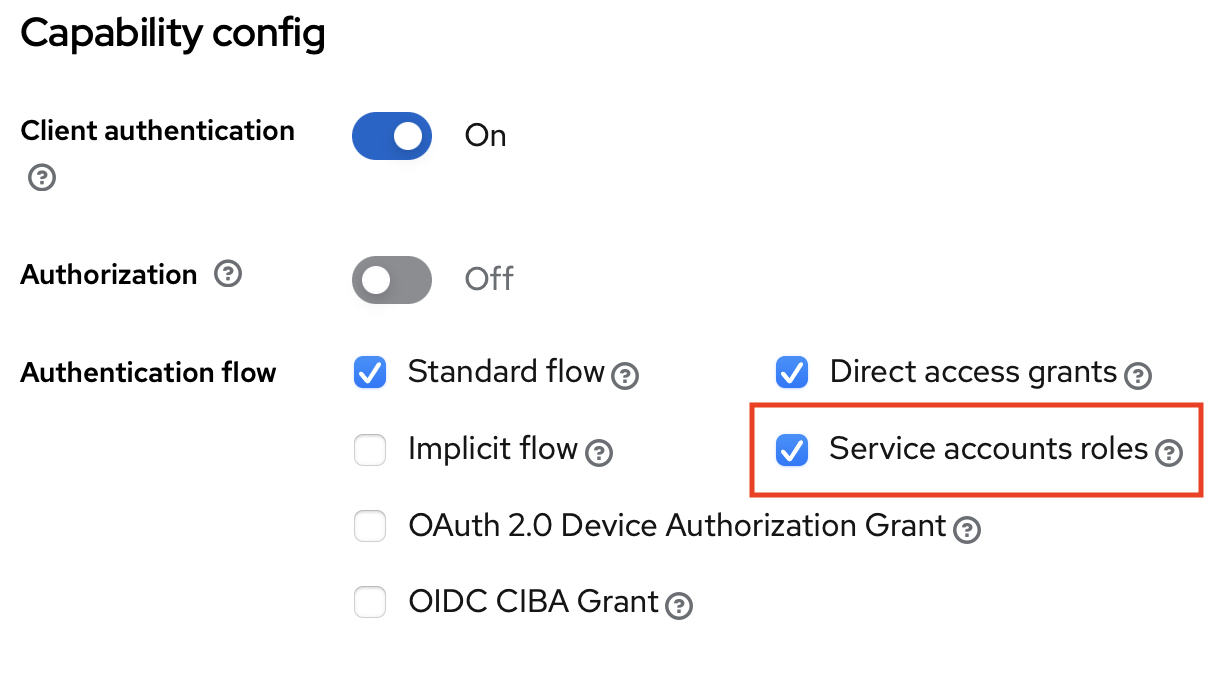
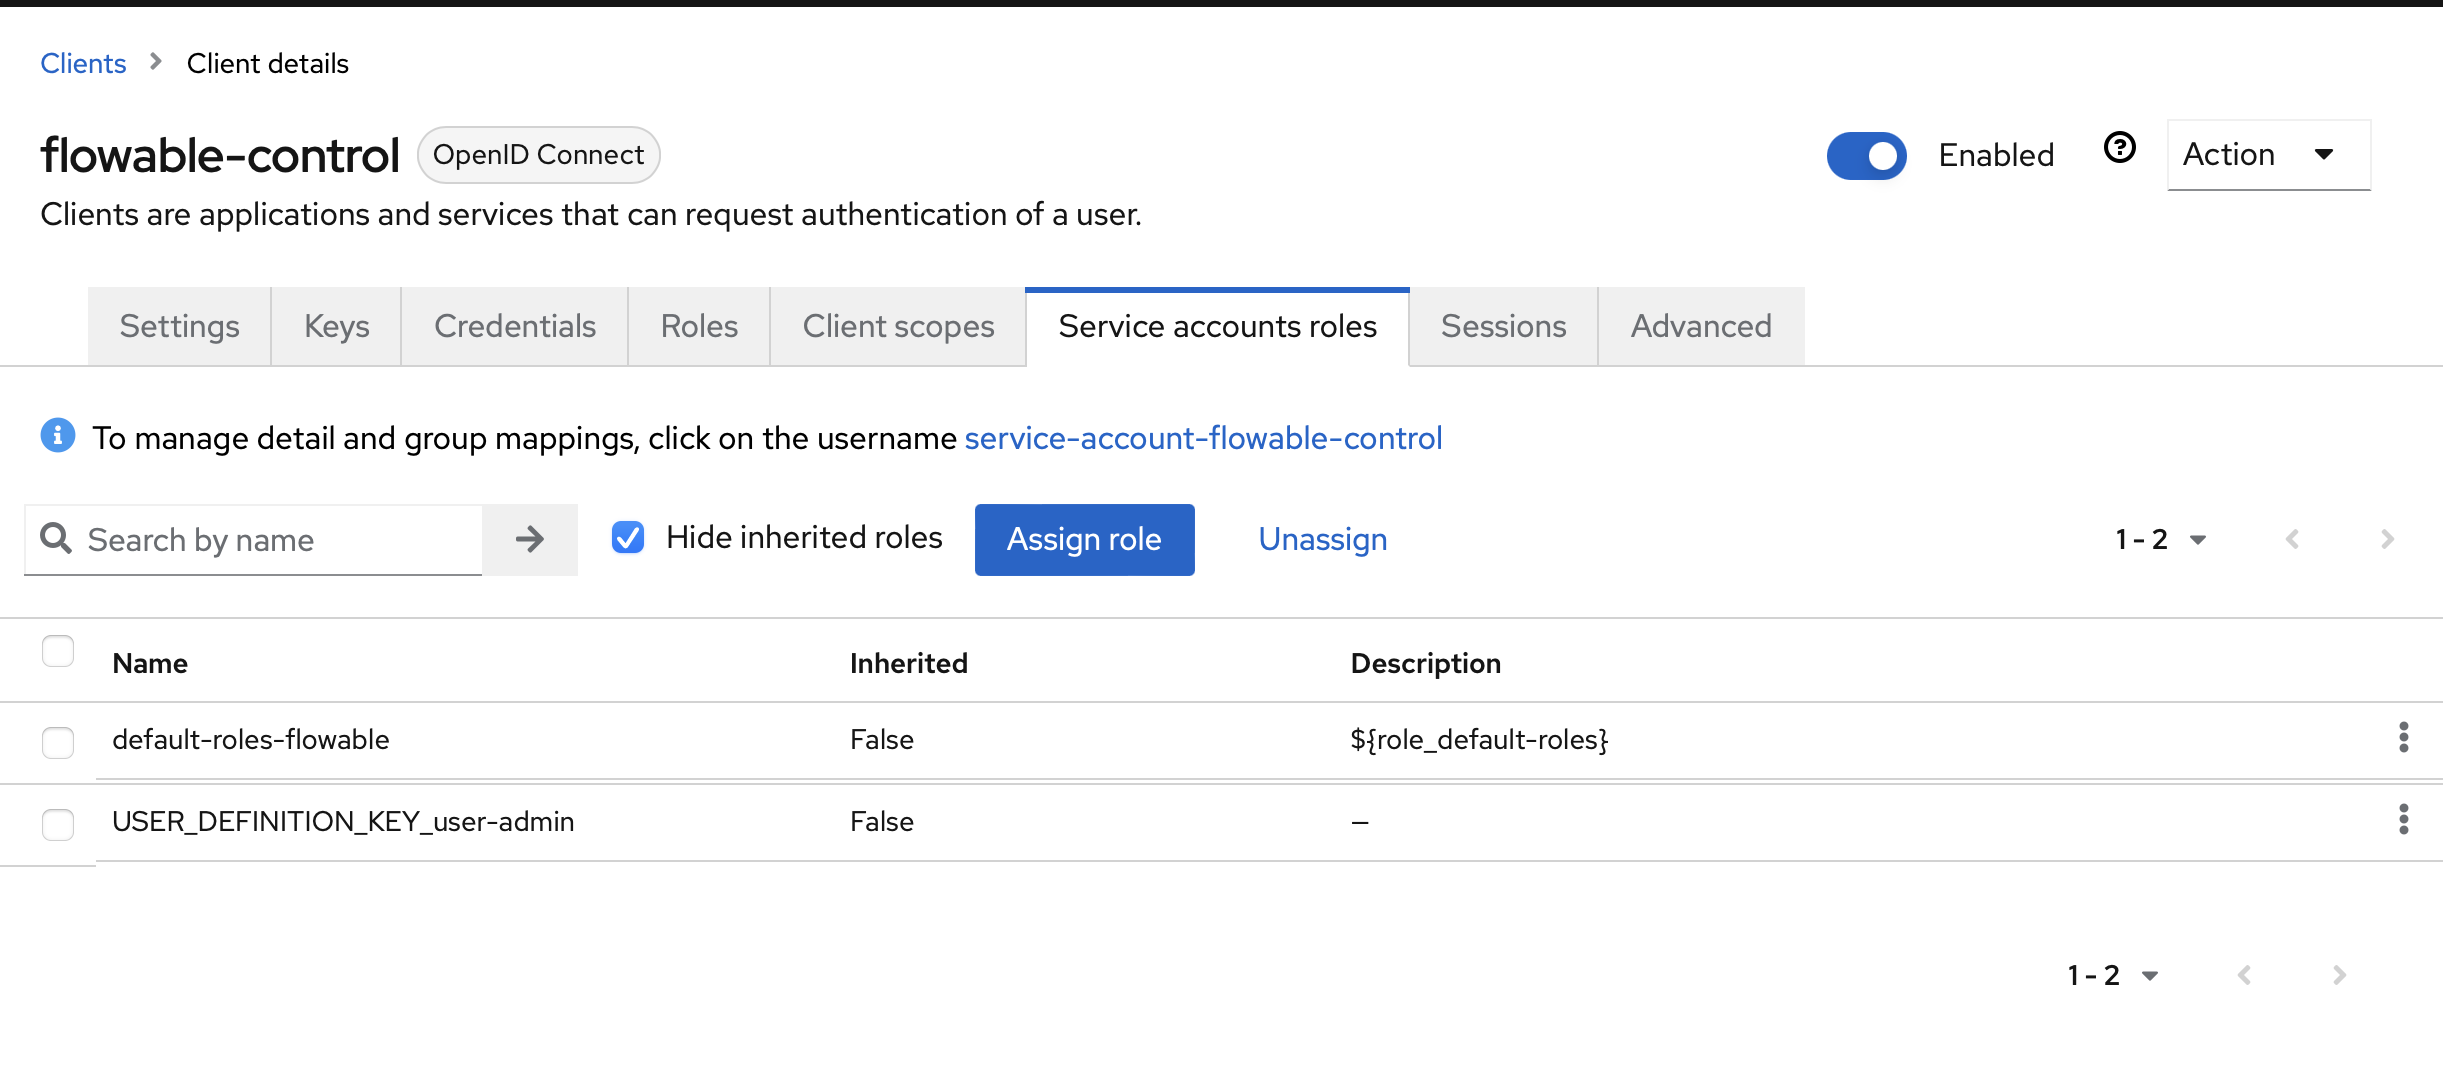
In Keycloak, we must now additionally enable the flowable-control client to allow the client_credentials flow. This is done by enabling the Service Accounts:
Keycloak doesn't give these service accounts the roles by default (which is logical, they are no real users), and we need them for the authorities. To enable this, go to the Service Account Roles tab and select the USER_DEFINITION_KEY_user-admin. Make sure the currently logged in user also has this role, as Flowable Work will validate authorities on its side again.
After rebooting Flowable Control, one last thing needs to be done: we need to configure the cluster connection in such a way that we link it to the admin-access OAuth 2.0 client registration from above.
In Flowable-Control go to Configuration, Clusters and then click on Edit cluster configuration. Pick Oauth2 as authentication type and fill in admin-access for the registration ID:
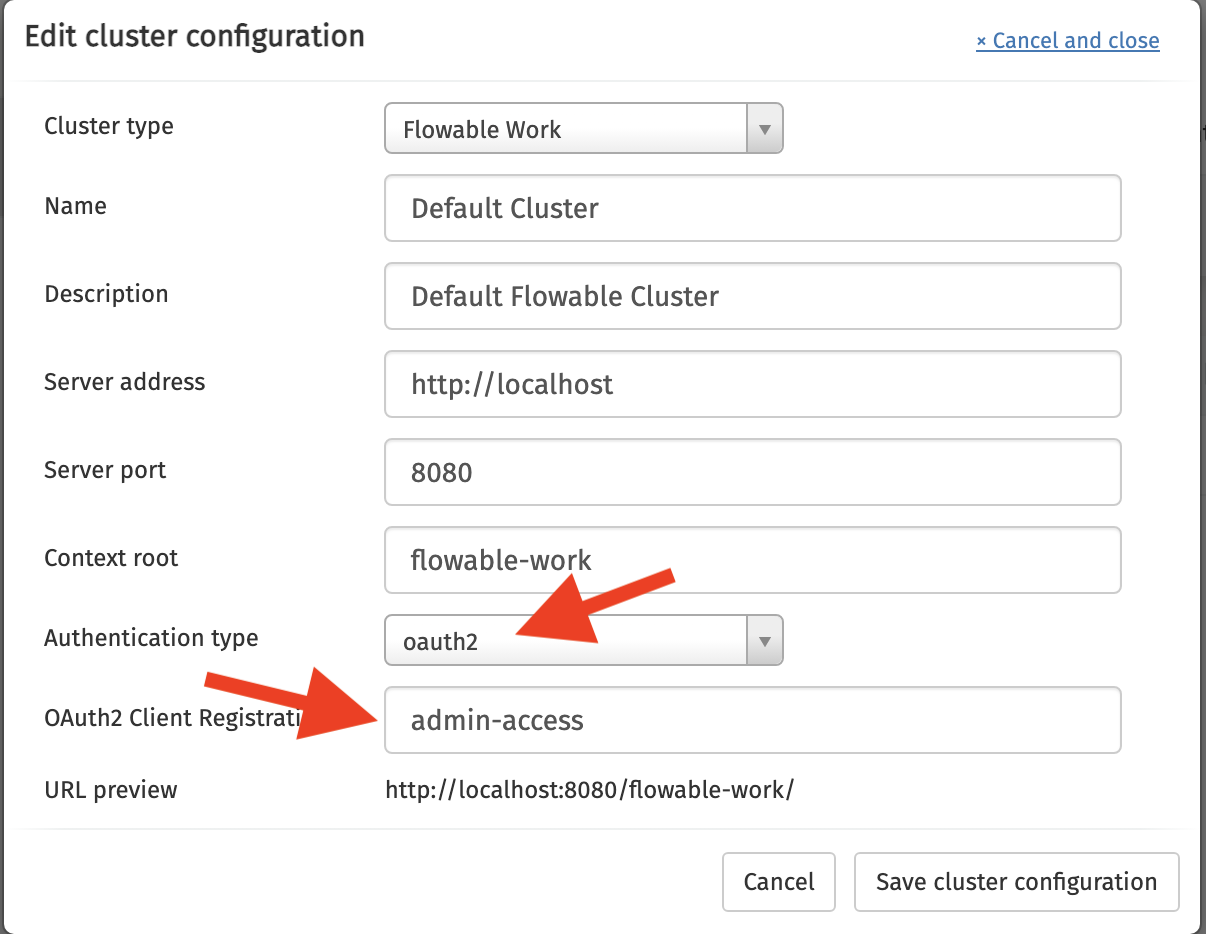
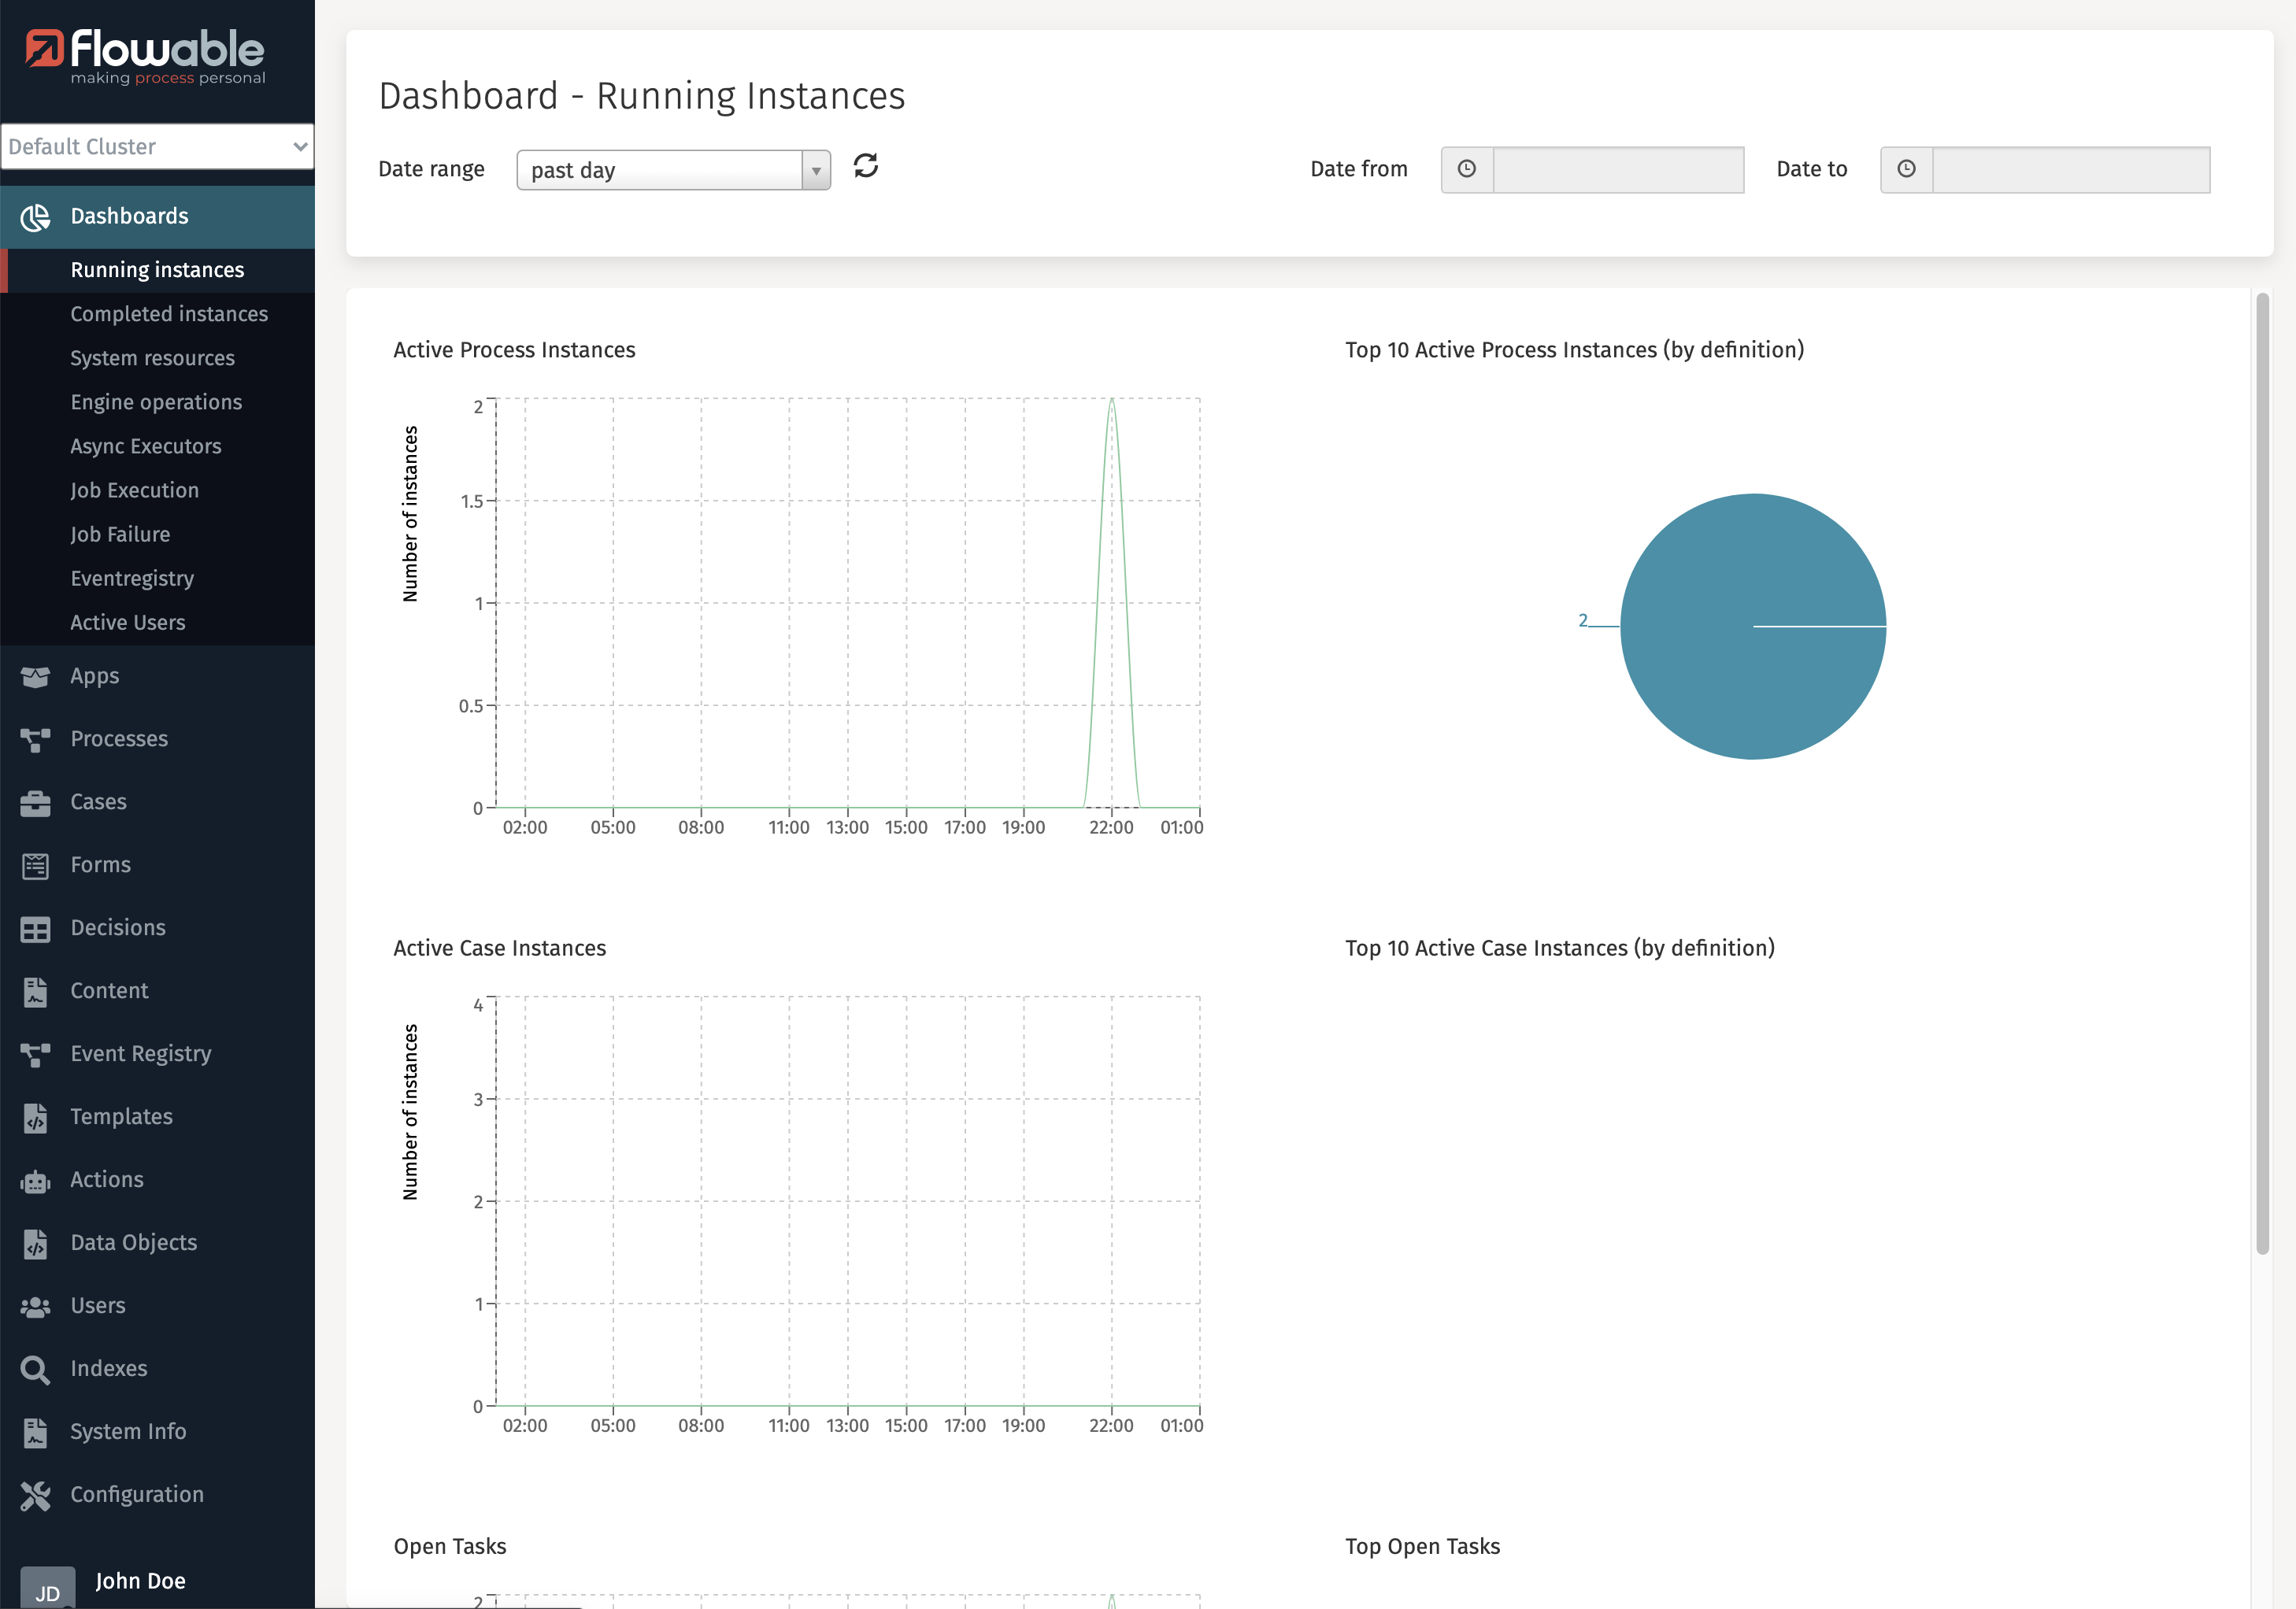
Now everything works correctly in Flowable Control:
Login for Flowable Design
noteThis guide is using the configuration for Flowable Design 3.14 and above. In case you are using Flowable Design 3.13 or the Angular-based Flowable Design 3.14 please check the appropriate property mapping.
Similar as to Flowable Control, we'll need to create a new realm role flowable-design-admin (can be freely chosen) in Keycloak and give it to our user. In the configuration, it's mapped to authorities from the roles property again.
application.design.security.type=oauth2

spring.security.oauth2.client.registration.flowable-design.client-name=Flowable Design
spring.security.oauth2.client.registration.flowable-design.client-id=flowable-design
spring.security.oauth2.client.registration.flowable-design.client-secret=<Your Flowable Design Client Secret>

spring.security.oauth2.client.registration.flowable-design.authorization-grant-type=authorization_code
spring.security.oauth2.client.registration.flowable-design.scope=openid,profile

spring.security.oauth2.client.provider.flowable-design.issuer-uri=http://localhost:8081/realms/Flowable
spring.security.oauth2.client.provider.flowable-design.user-name-attribute=preferred_username

flowable.design.security.oauth2.authorities-attributes=roles
flowable.design.security.oauth2.admin-authorities=flowable-design-admin
flowable.design.security.oauth2.tenant-attribute=
Flowable Design can also be configured to use a Bearer Token for authentication. e.g. if you have a custom WAF (Web Application Firewall) which performs the authentication and then passes the token to Flowable Design. To enable this, you need to set the following properties:
spring.security.oauth2.resourceserver.jwt.issuer-uri=<token issuer URI>
This will enable the JWT resource server, and Flowable Design will use the token to authenticate the user. The same principles from the previous sections also apply for the Resource Server configuration. The only difference is that you need to use different properties to configure how the token is mapped to the user in Flowable Design.
The properties for configuring are:
flowable.design.security.oauth2.resourceserver.mapper.authorities-attributes=roles
flowable.design.security.oauth2.resourceserver.mapper.admin-authorities=flowable-design-admin
flowable.design.security.oauth2.resourceserver.mapper.tenant-attribute=
Configure Flowable Design to Connect to Flowable Work
Similar to Flowable Control, you'll need to be able to access the resource server (Flowable Work) if you want to publish apps.
Like for Control, make sure to enable the service accounts and enabled the role mapping for those accounts (see above).
The configuration is done the same way as Flowable Control. The only difference is the use of the flowable.design.remote.authentication properties, which are done via the cluster configuration UI in Flowable Control but doesn't exist for Flowable Design:
spring.security.oauth2.client.registration.work-access.client-name=Work Access
spring.security.oauth2.client.registration.work-access.client-id=flowable-design
spring.security.oauth2.client.registration.work-access.client-secret=<Your Flowable Design Client Secret>

spring.security.oauth2.client.registration.work-access.authorization-grant-type=client_credentials
spring.security.oauth2.client.registration.work-access.scope=openid

spring.security.oauth2.client.provider.work-access.token-uri=http://localhost:8081/realms/Flowable/protocol/openid-connect/token
spring.security.oauth2.client.provider.work-access.user-name-attribute=preferred_username

# Specific to Flowable Design:
flowable.design.remote.authentication.type=oauth2
flowable.design.remote.authentication.user=work-access
flowable.design.remote.authentication.password=
If you are using the oauth2CurrentUser authentication type between Design and Work and you want to refresh the access token once it expires, you need to also add offline_access as one of the scopes.
After rebooting Flowable Design, it's now possible to publish apps to Flowable Work.
Configure Logout URLs
The Flowable applications can also be configured to process logout when using OpenID connect by configuring the following properties.
For Flowable Work
flowable.security.oauth2.post-logout-redirect-url=http://localhost:8080/flowable-work
For Flowable Design
flowable.design.security.oauth2.post-logout-redirect-url=http://localhost:7080/flowable-work
For Flowable Control
flowable.control.app.security.oauth2.post-logout-redirect-url=http://localhost:9080/flowable-work
The post logout redirect URL configured above needs to be configured also in Keycloak as Valid post logout redirect URIs for each Keycloak Client configuration.
Conclusion
After applying the steps in the previous sections, you'll have implemented SSO for Flowable Work, Design and Control. Design and Control are furthermore configured to use OAuth 2.0 tokens to call the Work REST API.
There are plenty of different ways of configuring Keycloak and Spring Security for Flowable. However, with this guide, the basics should be clear: each application needs to map to a Client in Keycloak and roles can be used to map into authorities of Flowable in a flexible way.
Note that integrating with different OAuth 2.0 providers most likely will mean using (slightly) different configuration options. Always make sure to check the relevant documentation of the identity management provider, as one wrongly configured property might lead to not being able to log in (as it should be, when it comes to security).