Security
Security and Identity Management
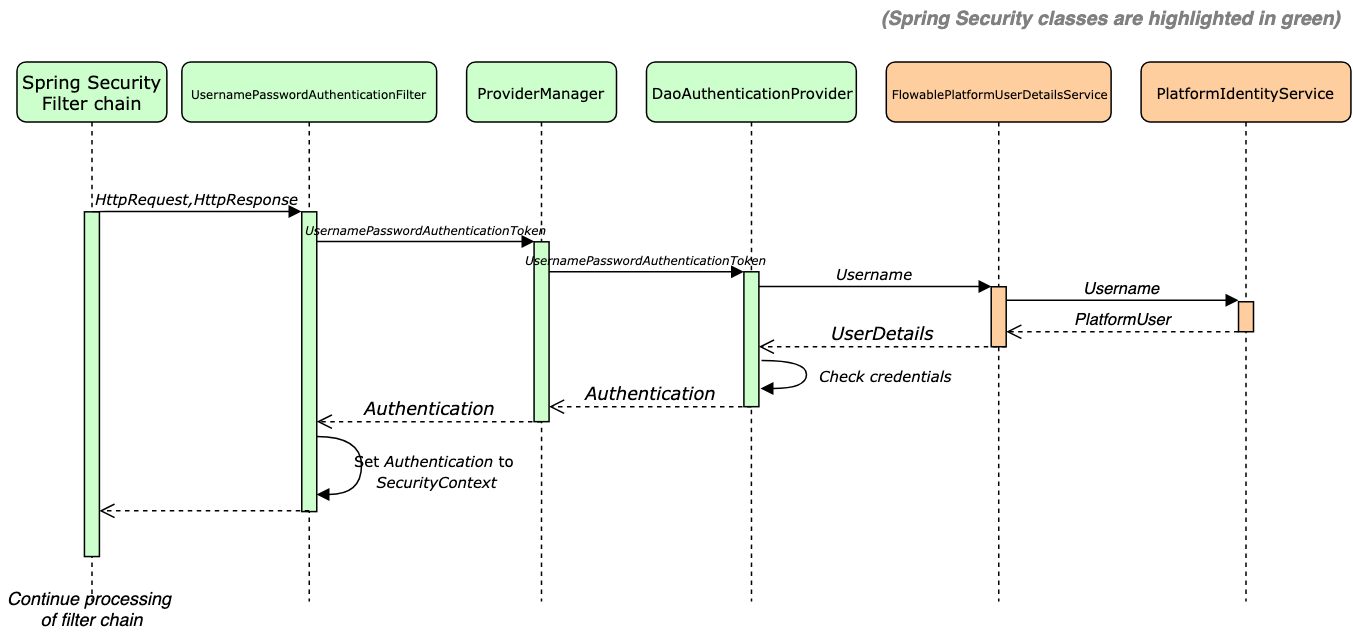
Flowable relies on the Spring Security framework to provide authentication and access control capabilities. Spring Security is an open source library that provides connectors and adapters to many security standards such as OAuth, SAML, basic authentication, etc. As with all Spring frameworks, it is designed to be highly customizable and adaptable to many security requirements.
Authentication and Authorization
The out of the box security configuration for Flowable provides a simple configuration that can be extended and adapted according to your needs.
Upon an authentication attempt, the user is loaded through the
FlowablePlatformUserDetailsService (which is called from DaoAuthenticationProvider
as this class delegates to an instance of the UserDetailsService) and given that
the user exists, an instance of org.springframework.security.core.userdetails.UserDetails
is created. The UserDetails object contains the following information:
-
The username and password of the user
-
Granted authorities for the user:
-
Group keys prefixed with
GROUP_ -
Tenant id prefixed with
TENANT_(only needed for multi-tenant applications) -
User definition key prefixed with
USER_DEFINITION_KEY_ -
Authorities retrieved via the
com.flowable.core.spring.security.UserDefinitionAuthoritiesProvider
-
After the Spring Security filter chain is executed, the Spring Security Context contains the authenticated user information, which is used for access control or other purposes.
Flowable uses the com.flowable.core.spring.security.SecurityUtils to retrieve
all the needed information for the Flowable Authorization.
SecurityScope
Every action uses com.flowable.core.common.api.security.SecurityScope to get the
required information.
-
SecurityScope#getUserId()provides the id of the current user. -
SecurityScope#getTenantId()provides the tenant id of the current user. -
SecurityScope#getGroupKeys()provides the group keys of the current user. -
SecurityScope#getUserDefinitionKey()provides the user definition key of the current user. -
SecurityScope#hasAuthority(String)provides a way to check if the current user has the given authority.
The SecurityScope is provided via a bean com.flowable.core.common.api.security.SecurityScopeProvider.
The default implementation uses the org.springframework.security.core.Authentication to get access to the relevant information.
-
SecurityScope#getUserId()retrieved viaAuthentication#getName(). -
SecurityScope#getTenantId()the firstGrantedAuthoritythat is prefixed withTENANT_. -
SecurityScope#getGroupKeys()all grantedGrantedAuthority(ies) that have theGROUP_prefix -
SecurityScope#getUserDefinitionKey()the firstGrantedAuthoritythat is prefixed withUSER_DEFINITION_KEY_ -
SecurityScope#hasAuthority(String)provides a way to check if the current user has the given authority.
For example, if the user has the following GrantedAuthority(ies)
-
GROUP_user -
GROUP_admin -
TENANT_acme -
access-reports
The current user group keys are user and admin,
and the current user tenant id is acme.
Administrators
When doing calls over REST Flowable needs to know whether the user doing the request is an admin user or not.
The reason for this is that admin users are allowed to access all data (within their tenant).
For these users it is not checked if they have access to the data via the IdentityLink(s).
Such users are the technical users used by Flowable Control to get data for a particular Flowable instance.
By default, a user is an admin user if they are a member of the flowableAdministrator group.
However, it is possible to provide a custom logic for determining whether a user is an admin or not.
This can be done by implementing the com.flowable.core.spring.security.interceptor.PlatformSecurityInterceptor.
If such bean exists, then PlatformSecurityInterceptor#hasAdminRights(Authentication) would be called to determine whether the current user Authentication has admin rights or not.
Furthermore, you can also set a comma-separated list of users by setting the userId of the users which should be admin also through the property flowable.platform.idm.additional-admin-users.
This means that you are in full control to decide how you want to determine what an admin user is.
Super Administrators
Super administrators are admin users which are in the empty or default tenant.
These users have access to the data across all tenants in the system.
Such users are the technical users used by Flowable Control to get data for a particular Flowable instance.
Customizing the Default Configuration
As other Flowable engines, the Identity Management (IDM) engine provides extension
points to override default beans by custom ones. For instance, if in your project,
you provide a custom UserDetailsService, the security auto-configuration
(com.flowable.autoconfigure.security.FlowablePlatformSecurityAutoConfiguration)
finds the bean and does not use the default bean.
See the following classes for more configuration options:
-
com.flowable.spring.boot.FlowableSecurityAutoConfiguration
-
com.flowable.autoconfigure.security.FlowablePlatformSecurityAutoConfiguration
-
com.flowable.core.spring.security.FlowablePlatformUserDetailsService
-
com.flowable.autoconfigure.security.FlowablePlatformSecurityProperties
In order for Flowable to be able to use the correct userId, group keys, tenant id and user definition key
then a custom bean implementation of com.flowable.core.common.api.security.SecurityScopeProvider should be provided.
Have a look at Custom Security Authentication for more details about how to customize the authentication
and Custom Identity Service for more details how to write a custom PlatformIdentityService.
Identity Management Introduction
Most of the BPMN and CMMN models in Flowable involve interactions with users,
for instance, creating tasks, assigning cases, etc. In the case of Flowable with chat capabilities,
the users can also be part of conversations (chats) with other users.
The Flowable IDM engine encapsulates and provides all user and group-related
features and services. Queries for users and groups can be defined in
PlatformIdentityService, which delegates the
execution to the corresponding Entity Managers, which finally query the
database for the information.
Besides the normal querying functions (methods createPlatformUserQuery and
createPlatformGroupQuery), this service provides other user management capabilities:
-
User: create, update, deactivate, change password, set presence information etc.
-
Group: create, update, manage memberships, etc.
-
Privileges: create, delete, assign to users and groups, etc.
Overriding the Default Identity Service
The default PlatformIdentityService is sufficient if the users are synced in the Flowable Database.
However, in most cases you have your own identity store (LDAP, Azure AD, or something else).
In this case you would need to provide your own implementation of the PlatformIdentityService.
The API has certain methods that do not necessarily need a custom implementation and can use the default implementation.
Ideally would be to subclass ReadOnlyIdmIdentityService and implement the following methods:
-
Retrieve methods - These are the most important methods and are used by Flowable to query users for assigning tasks
-
createPlatformUserQuery()- Make sure you implement your ownPlatformUserQuerythat would be able to query the users -
createPlatformGroupQuery()- Make sure you implement your ownPlatformGroupQuerythat would be able to query the groups -
findUniqueTenantIds()
-
-
Create, Update and Delete methods - In case you want to support user / group creation you can implement the following methods:
-
Group newGroup(String) -
void saveGroup(Group) -
void deleteGroup(String) -
PlatformGroupBuilder createNewGroupBuilder(String) -
PlatformGroupBuilder createUpdateGroupBuilder(String) -
User newUser(String) -
void saveUser(User) -
void deleteUser(String) -
PlatformUserBuilder createNewUserBuilder(String) -
PlatformUserBuilder createUpdateUserBuilder(String) -
void createMembership(String, String) -
void deleteMembership(String, String)
-
-
Password related methods
-
void checkPassword(String, String) -
void updateUserPassword(User)
-
-
Native query methods - These are not used by the Platform, you can throw an exception if you don’t need to support it
-
NativeUserQuery createNativeUserQuery() -
NativeGroupQuery createNativeGroupQuery()
-
-
Privilege methods - These are used by the IDM REST API to retrieve the users and groups for a certain privilege. See Privileges for more info.
-
List<Group> getGroupsWithPrivilege(String) -
List<User> getUsersWithPrivilege(String)
-
-
Deprecated methods scheduled for removal
-
PlatformUser findPlatformUserById(String)- You can redirect it tocreatePlatformUserQuery().userId(String) -
PlatformGroup findPlatformGroupById(String)- You can redirect it tocreatePlatformGroupQuery().groupId(String) -
List<PlatformGroup> findPlatformGroupsForUser(String)- You can redirect it tocreatePlatformGroupQuery().groupMember(String)
-
In order for your custom PlatformIdentityService to be configured with the CoreIdmEngineConfiguration,
you need to use an EngineConfigurationConfigurer as follows:
@Bean
public EngineConfigurationConfigurer<CoreIdmEngineConfiguration> customCoreIdmEngineConfigurer() {
    return idmEngineConfiguration -> {
        idmEngineConfiguration.setIdmIdentityService(new YourCustomIdentityService());
    };
}
 important
Do not define your custom identity service as a bean.
The PlatformIdentityService is exposed as a bean once the Core IDM engine is created.
For more details about writing your own PlatformIdentityService have a look at Custom Identity Service.
Multi-tenancy
In the Flowable default implementation of the PlatformIdentityService a single user can only be a member of a single tenant.
However, we are not forcing this requirement on the PlatformIdentityService.
Therefore, in all the relevant places where the PlatformUserQuery and PlatformGroupQuery are used in the Platform
we are passing the tenant id of the current user or current process / case.
The findUser(userId) function, that can be used in processes or cases,
has been adapted to pass the process / case in which it is invoked.
This means that when querying for that user we are going to pass the tenant id of the process / case to the PlatformUserQuery.
When querying for users or groups over the REST API we are always going to pass the current user tenant id in the requests. The only exception to this rule is when a super admin does the querying.
See Multi-tenancy for more information on multi-tenancy.
Privileges
If you have browsed through some of the classes mentioned above,
you might have noticed the Privilege
entities. These entities provide a custom extension point to add special
permissions to users and groups. Technically, they are mapped to
org.springframework.security.core.GrantedAuthority, which means they can be used
to restrict access to specific endpoints; for example:
.authorizeHttpRequests(
    configurer -> configurer
            .requestMatchers(PathPatternRequestMatcher.withDefaults().matcher("/service/reports/*")).hasAuthority("reports")
)
Remember Me Services
Flowable provides stateless applications: no information is stored in any of the servers running them. However, sometimes, it is important to store some data to increase the end-user happiness. A good example is user tokens, which are stored by the RememberMe Services in the database so that users do not have to log in again in the case a server is down. The default RememberMe Services of Flowable enrich the tokens with useful information, such as User-Agent and IP addresses, enabling further possibilities for special auditing use cases.
Limit access based on groups or authorities
2025.2.01+Sometimes you do not want all users to access Flowable. Out of the box, you can configure that with 2 properties.
application.security.access-groups and application.security.access-authorities
Both properties act as an allow list to only grant access to users with a specific group or authority.
noteIn order to allow easy usage of those properties, it is not required to add the GROUP_ prefix for groups.
application.security.access-groups=flowableUserGroup is enough.
LDAP
This section will explain how to configure your custom Flowable application to work with LDAP. For all the configuration properties have a look at the LDAP Installation Guide.
In order to work with LDAP in your application you need to add the following dependencies (on top of the default flowable ones):
<dependency>
    <groupId>com.flowable.core</groupId>
    <artifactId>flowable-spring-boot-starter-ldap</artifactId>
</dependency>

<!-- LDAP Security needed only if projects need to use the LDAP Security -->
<dependency>
    <groupId>org.springframework.security</groupId>
    <artifactId>spring-security-ldap</artifactId>
</dependency>
Then in your SecurityConfiguration you'll need to do the following:
@Configuration(proxyBeanMethods = false)
@EnableWebSecurity
public class SecurityConfiguration {

    @Bean
    public FlowableLdapAuthenticationProviderFactory ldapAuthenticationProvider() {
        return new FlowableLdapAuthenticationProviderFactory();
    }

    @Bean
    @Order(10)
    public SecurityFilterChain ldapDefaultSecurity(HttpSecurity http, ObjectProvider<FlowableHttpSecurityCustomizer> httpSecurityCustomizers) throws Exception {
        for (FlowableHttpSecurityCustomizer customizer : httpSecurityCustomizers.orderedStream()
                .collect(Collectors.toList())) {
            customizer.customize(http);
        }
        // ...

        return http.build();
    }
}
Using the FlowableLdapAuthenticationProviderFactory will make sure that the configuration properties are properly applied for authentication security.
If you need to customize something, you use the FlowableLdapAuthenticationProviderFactory and customize it.
OAuth2
This section will explain how to configure your custom Flowable application to work with OAuth2. For all the configuration properties have a look at the OAuth2 Installation Guide.
Depending on how you want to use OAuth2 for your application you will need to add some or all of the following dependencies (on top of the default flowable ones):
- spring-boot-starter-oauth2-client - When the users will log in to the application by being redirected to the SSO.
- spring-boot-starter-oauth2-resource-server - When the application is accessed using already authenticated users / machines. i.e. machine to machine communication, Flowable Control to Work, Flowable Design to Work, etc.
 <!-- OAuth2 Client needed only if projects needs to use OAuth2 Security -->
<dependency>
    <groupId>org.springframework.boot</groupId>
    <artifactId>spring-boot-starter-oauth2-client</artifactId>
</dependency>
<!--
    OAuth2 Resource Server needed only if projects need to use OAuth2 Security to communicate with the Flowable REST API.
    e.g. machine to machine, Flowable Control to Work, Flowable Design to Work
-->
<dependency>
<groupId>org.springframework.boot</groupId>
<artifactId>spring-boot-starter-oauth2-resource-server</artifactId>
</dependency>
Then in your SecurityConfiguration you'll need to do the following:
import jakarta.servlet.DispatcherType;

import org.springframework.beans.factory.ObjectProvider;
import org.springframework.context.ApplicationContext;
import org.springframework.context.annotation.Bean;
import org.springframework.context.annotation.Configuration;
import org.springframework.core.annotation.Order;
import org.springframework.http.HttpStatus;
import org.springframework.security.config.Customizer;
import org.springframework.security.config.annotation.web.builders.HttpSecurity;
import org.springframework.security.config.annotation.web.configuration.EnableWebSecurity;
import org.springframework.security.oauth2.jwt.JwtDecoder;
import org.springframework.security.web.SecurityFilterChain;
import org.springframework.security.web.authentication.HttpStatusEntryPoint;
import org.springframework.security.web.context.HttpSessionSecurityContextRepository;
import org.springframework.security.web.savedrequest.RequestCacheAwareFilter;
import org.springframework.security.web.util.matcher.AnyRequestMatcher;
import org.springframework.security.web.util.matcher.DispatcherTypeRequestMatcher;
import org.springframework.security.web.util.matcher.RequestHeaderRequestMatcher;
import org.springframework.security.web.util.matcher.RequestMatchers;

import com.flowable.autoconfigure.security.FlowableHttpSecurityCustomizer;
import com.flowable.autoconfigure.security.PlatformStaticResourceLocation;
import com.flowable.autoconfigure.security.servlet.PlatformPathRequest;
import com.flowable.core.spring.security.token.FlowableJwtResourceServerConfigurer;
import com.flowable.core.spring.security.web.savedrequest.MatchingRequestParameterNameRemovalRedirectFilter;

@Configuration(proxyBeanMethods = false)
@EnableWebSecurity
public class SecurityConfiguration {

    @Autowired
    protected ObjectProvider<OidcClientInitiatedLogoutSuccessHandler> oidcClientInitiatedLogoutSuccessHandlerProvider;

    @Bean
    @Order(10)
    public SecurityFilterChain oauthDefaultSecurity(HttpSecurity http, ObjectProvider<FlowableHttpSecurityCustomizer> httpSecurityCustomizers) throws Exception {
        for (FlowableHttpSecurityCustomizer customizer : httpSecurityCustomizers.orderedStream().toList()) {
            customizer.customize(http);
        }

        http.exceptionHandling(exceptionHandling -> exceptionHandling
                // Using this entry point as a default entry point if none of the others match (the first default entry point is the default entry point).
                // This one will not match any request, so it won't override other defaults from Spring Security
                .defaultAuthenticationEntryPointFor(new HttpStatusEntryPoint(HttpStatus.UNAUTHORIZED), RequestMatchers.not(AnyRequestMatcher.INSTANCE))
                // using this no op authentication entry point, due to Spring Boot (3.x) no longer using a default error handling
                .defaultAuthenticationEntryPointFor((request, response, authException) -> {}, new DispatcherTypeRequestMatcher(DispatcherType.ERROR))
                .defaultAuthenticationEntryPointFor(new HttpStatusEntryPoint(HttpStatus.UNAUTHORIZED),
                        new RequestHeaderRequestMatcher("X-Requested-With", "XMLHttpRequest"))
        );

        // We mark all requests as authenticated in order for the redirect to happen when the application is accessed
        // We allow the favicon to always be available, since it is invoked by the browser itself
        http.authorizeHttpRequests(configurer -> configurer
                .requestMatchers(PlatformPathRequest.toStaticResources().at(PlatformStaticResourceLocation.FAVICON)).permitAll()
                .anyRequest().authenticated()
        );
        // Currently an HttpSessionSecurityContextRepository is needed for the oauth2 to work
        HttpSessionSecurityContextRepository securityContextRepository = new HttpSessionSecurityContextRepository();
        securityContextRepository.setDisableUrlRewriting(true);
        http.securityContext(securityContext -> securityContext.securityContextRepository(securityContextRepository));

        http.addFilterAfter(new MatchingRequestParameterNameRemovalRedirectFilter(), RequestCacheAwareFilter.class);

        http.oauth2Login(Customizer.withDefaults());
        http.oauth2Client(Customizer.withDefaults());
        http.logout(logout -> {
            logout
                    .logoutUrl("/auth/logout")
                    .logoutSuccessUrl("/");
            oidcClientInitiatedLogoutSuccessHandlerProvider.ifAvailable(logout::logoutSuccessHandler);
        });

        ApplicationContext applicationContext = http.getSharedObject(ApplicationContext.class);
        JwtDecoder jwtDecoder = applicationContext
                .getBeanProvider(JwtDecoder.class)
                .getIfAvailable();
        if (jwtDecoder != null) {
          // Doing this since Flowable Access token authentication could be enabled through properties.
          // if you need to use Bearer authentication, and Flowable Access token then you should register the jwt configurer only if the flowable one isn't already configured
          if (http.getConfigurer(FlowableJwtResourceServerConfigurer.class) == null) {
            http.oauth2ResourceServer(configurer -> configurer.jwt(Customizer.withDefaults()));
          }
        }

        return http.build();
    }
}
Using the FlowableHttpSecurityCustomizer will make sure that the configuration properties are applied for authentication security.
The Flowable Security auto configurations will make sure that the required mapping properties are applied.
Refresh Token
v3.16.6+When using OAuth2 the offline_access scope can be used for the client registration.
This will enable the Flowable Platform Application to refresh the access token when it expires.
e.g. when using SharePoint with delegated authentication.
When using the out-of-the-box application the property application.security.oauth2.authorized-client-repository-type with a default value of session can be used.
With this the refresh token is stored in the HTTP session and can be used to refresh the access token when it expires.
When creating a custom application then the OAuth2AuthorizedClientRepository should be exposed.
This repository should be able to store the refresh token and be able to retrieve it when needed.
By default Spring Security is using an in memory implementation.
This can be changed to use an HTTP Session implementation by using the following configuration:
@Bean
public OAuth2AuthorizedClientRepository customOauth2AuthorizedClientRepository() {
    return new HttpSessionOAuth2AuthorizedClientRepository();
}
Flowable Access Tokens
v3.15.0+Since 3.15 Flowable Work has an option to create access tokens for users.
This access tokens can be used with any other custom authentication mechanism.
In order to enable them you'll need to set the flowable.platform.idm.token-signing-secret with a value with at least 32 characters.
noteIf you change the property then the tokens that were created prior to the change will no longer be valid.
Once the property is set all user that have a user definition that has the personalAccessTokens allowed feature are going to be able to create their own access tokens.
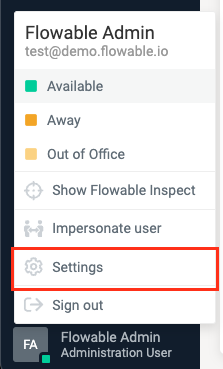
Creating a token can be done by going to settings by clicking on the user in the bottom left of the screen and clicking on settings
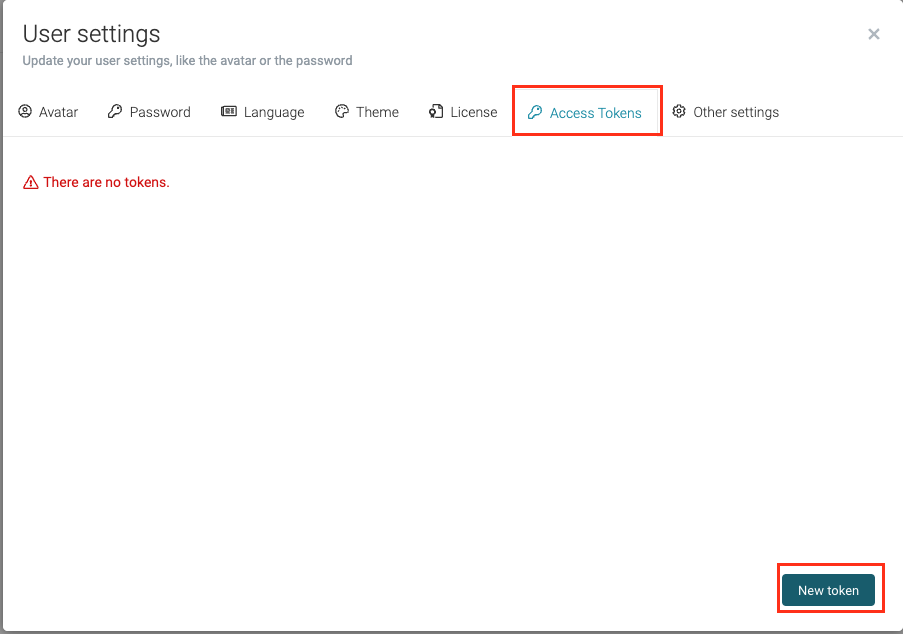
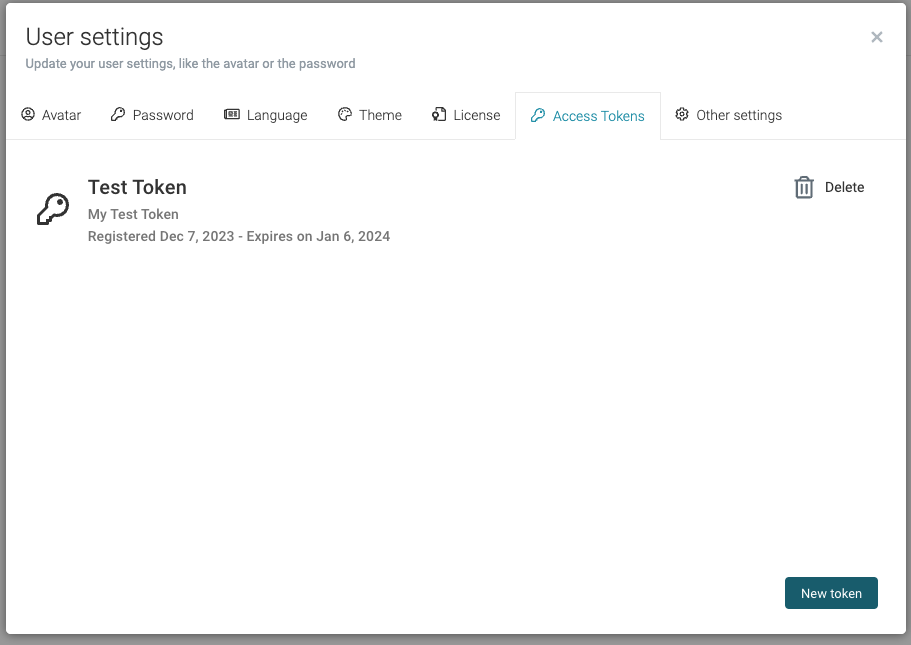
The Access tokens are available in the Access Tokens tab. The "New token" button can be used to start creating a new token
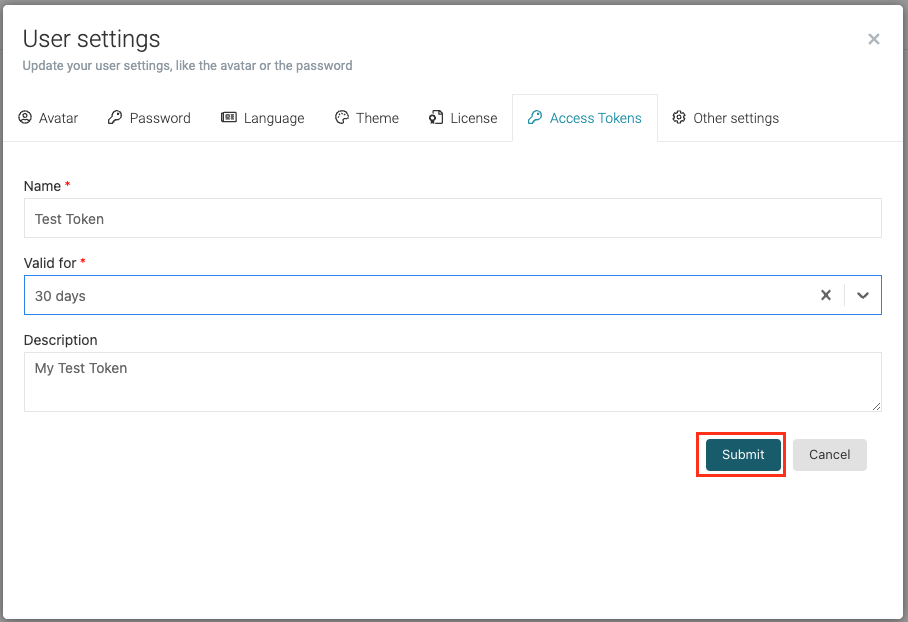
When creating a token you need to give it a name and choose for how long you want it to be valid.
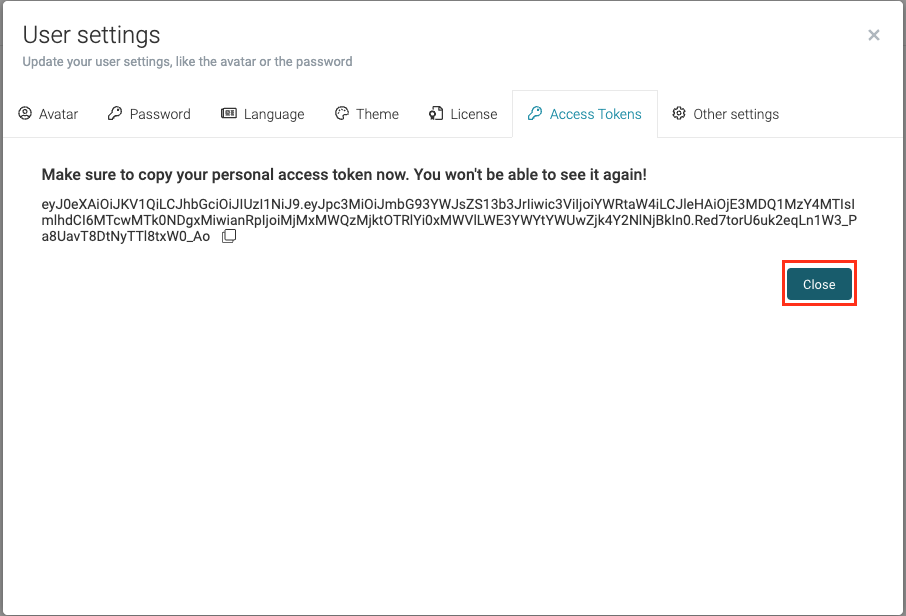
Once you create the token you will see its value. This is the only time when you can see the value, you can copy it and use it.
Once you create the token you will be able to see it in the Access Tokens tab. Here you can also manage your tokens, i.e. revoke them if they need to be revoked.
Technical User
A technical user can be set up to authenticate with Flowable. Once this user is configured, it allows authentication with the REST API via HTTP Basic Authentication, irrespective of the Flowable Platform Application's authentication settings. For instance, it remains usable even when OAuth2 is enabled. This functionality is beneficial for communication between Flowable Design/Control and Flowable Work, among other applications.
The properties to configure this are:
flowable.security.basic-auth.enabled=true
flowable.security.basic-auth.username=technical-user
flowable.security.basic-auth.password=test
flowable.security.basic-auth.granted-authorities=USER_DEFINITION_KEY_user-default,GROUP_flowableUser,TENANT_flowable
The configuration above will allow accessing the REST API using the username technical-user and the password test.
The user will have the user definition key user-default, be part of the flowableUser group, and belong to the flowable tenant.
Custom Security Authentication
Flowable relies on the Spring Security framework to provide authentication and access control capabilities. Spring Security is an open source library that provides connectors and adapters to many security standards such as OAuth, SAML, basic authentication, etc. As with all Spring frameworks, it is designed to be highly customizable and adaptable to many security requirements.
This document describes how you can create your own Custom Authentication From Scratch and Custom Authentication With Existing Integration. If you need to create a custom identity service then have a look at Custom Identity Service. We assume that you are already familiar with the basics defined in Security and Identity Management.
Custom Authentication From Scratch
For this example, we assume that you have some kind of Single Sign-On (SSO) system which performs the authorization for the users and attaches the userId, tenantId and groups as HTTP Headers on the incoming requests. Additionally, you don’t have some common libraries in your organization that integrate with Spring Security so you would need to do everything on your own.
These are the headers which are added by your SSO:
Incoming Headers.
X-USER-ID: kermit
X-TENANT-ID: muppets
X-GROUP: Accounting
X-GROUP: IT
X-GROUP: HR
We now need to intercept the request and extract this information into a so-called Authentication.
Spring Security already has us covered we need to extend the AbstractPreAuthenticatedProcessingFilter
and add our extraction logic.
We will create our own implementation of the principal that would store the information.
CustomPrincipal.
public class CustomPrincipal implements Principal {

    protected String userId;
    protected String tenantId;
    protected Collection<String> groups;

    public CustomPrincipal(String userId, String tenantId, Collection<String> groups) {
        this.userId = userId;
        this.tenantId = tenantId;
        this.groups = groups;
    }

    @Override
    public String getName() {
        return userId;
    }

    // getters omitted
}
We are now going to write the authentication filter, which uses the HttpServletRequest to extract the information from the headers.
Extending from AbstractPreAuthenticatedProcessingFilter allows us to easily hook in with the Spring Security authentication.
It is going to intercept all requests and perform the authentication via the AuthenticationManager.
CustomHeaderAuthenticationFilter.
public class CustomHeaderAuthenticationFilter
    extends AbstractPreAuthenticatedProcessingFilter {

    protected Object getPreAuthenticatedPrincipal(HttpServletRequest request) {
        String userId = request.getHeader("X-USER-ID");
        String tenantId = request.getHeader("X-TENANT-ID");
        Enumeration<String> headersEnumeration = request.getHeaders("X-GROUP-ID");
        Set<String> groups = new HashSet<>();
        while (headersEnumeration.hasMoreElements()) {
            groups.add(headersEnumeration.nextElement());
        }
        return new CustomPrincipal(userId, tenantId, groups);
    }
    protected Object getPreAuthenticatedCredentials(HttpServletRequest request) {
        // The request is already authenticated there is nothing we need to do
        return "N/A";
    }
}
The next step is to write a custom AuthenticationUserDetailsService that loads the Spring Security UserDetails
from the PreAuthenticationToken created by our CustomHeaderAuthenticationFilter.
CustomAuthenticationUserDetailsService.
public class CustomAuthenticationUserDetailsService
    implements AuthenticationUserDetailsService<PreAuthenticatedAuthenticationToken> {

    @Override
    public UserDetails loadUserDetails(PreAuthenticatedAuthenticationToken token) {
        CustomPrincipal customPrincipal = (CustomPrincipal) token.getPrincipal();
        Collection<? extends GrantedAuthority> authorities = new ArrayList<>();
        // have some custom logic to get more authorities
        return User.withUsername(customPrincipal.getUserId())
            .password("n/A")
            .authorities(authorities)
            .build();
    }

}
We now have all the needed pieces to make Spring Security work with our authentication.
We are now going to add a custom SecurityScopeProvider and SecurityScope so that we can link our custom security with Flowable.
CustomSecurityScope.
public class CustomSecurityScope implements SecurityScope {

    protected Authentication authentication;

    public CustomSecurityScope(Authentication authentication) {
        this.authentication = authentication;
    }

    @Override
    public String getUserId() {
        return authentication.getName();
    }

    @Override
    public Set<String> getGroupKeys() {
        return new HashSet<>(getCustomPrincipal().getGroups());
    }

    @Override
    public String getTenantId() {
        return getCustomPrincipal().getTenantId();
    }

    @Override
    public String getUserDefinitionKey() {
        return null;
    }

    @Override
    public boolean hasAuthority(String authority) {
        for (GrantedAuthority grantedAuthority : authentication.getAuthorities()) {
            if (Objects.equals(authority, grantedAuthority.getAuthority())) {
                return true;
            }
        }

        return false;
    }

    protected CustomPrincipal getCustomPrincipal() {
        return (CustomPrincipal) authentication.getPrincipal();
    }
}
CustomSecurityScopeProvider.
public class CustomSecurityProvider implements SecurityScopeProvider {

    @Override
    public SecurityScope getSecurityScope(Principal principal) {
        if (principal instanceof Authentication) {
            return new CustomSecurityScope((Authentication) principal);
        }
        return new FlowablePrincipalSecurityScope(principal);
    }
}
We now also have all the pieces to make the Security work with Flowable.
The final step is to actually link all of this together.
To make the linking a bit easier we are going to add a CustomHttpConfigurer.
public class CustomHttpConfigurer<H extends HttpSecurityBuilder<H>>
    extends AbstractHttpConfigurer<CustomHttpConfigurer<H>, H> {

    @Override
    public void init(H http) {
        PreAuthenticatedAuthenticationProvider authenticationProvider
            = new PreAuthenticatedAuthenticationProvider();
        authenticationProvider.setPreAuthenticatedUserDetailsService(
                    new CustomAuthenticationUserDetailsService()
                );
        authenticationProvider = postProcess(authenticationProvider);

        http
            .authenticationProvider(authenticationProvider)
            .setSharedObject(
                    AuthenticationEntryPoint.class,
                    new Http403ForbiddenEntryPoint()
            );
    }

    @Override
    public void configure(H http) {
        AuthenticationManager authenticationManager
            = http.getSharedObject(AuthenticationManager.class);

        CustomHeaderAuthenticationFilter authenticationFilter
            = new CustomHeaderAuthenticationFilter();
        authenticationFilter.setAuthenticationManager(authenticationManager);
        authenticationFilter = postProcess(authenticationFilter);

        http.addFilter(authenticationFilter);
    }
}
-
Register our
CustomAuthenticationUserDetailsServicewith the out of the boxPreAuthenticatedAuthenticationProvider -
Register the authentication provider with Spring Security
-
Since all our requests are authenticated via our SSO we send back HTTP 403 if there was no authentication
-
Create and add our CustomHeaderAuthenticationFilter
Finally, we need to register this as a Spring Configuration. For this we are going to adapt the out of the box security configuration for Flowable so our custom configuration works.
@Configuration
@EnableWebSecurity
public class SecurityConfiguration {

    @Bean
    @Order(10)
    public SecurityFilterChain customDefaultSecurity(HttpSecurity http, ObjectProvider<FlowableHttpSecurityCustomizer> httpSecurityCustomizers) throws Exception {
        for (FlowableHttpSecurityCustomizer customizer : httpSecurityCustomizers.orderedStream()
                .collect(Collectors.toList())) {
            customizer.customize(http);
        }

        http
            .apply(new CustomHttpConfigurer<>())
            .and()
            .authorizeHttpRequests(configurer -> configurer
                  .requestMatchers(PlatformPathRequest.toStaticResources().atCommonLocations()).permitAll()
                  .anyRequest().authenticated()
            );

            return http.build();
    }

    @Bean
    public CustomSecurityProvider() {
        return new CustomSecurityProvider();
    }
}
-
Apply our CustomConfigurer to the Spring Security configuration
-
Register our
CustomSecurityProvideras a Spring Bean
Custom Authentication With Existing Integration
In the previous section we assumed that your organization does not have any Spring Security Integration.
However, in case that your organization already has some kind of integration then the only thing you need to do is do provide a custom SecurityScopeProvider and SecurityScope that would perform the mapping from your Organization Spring Security integration to Flowable.
For the purposes of this example lets imagine that the following stands:
-
You have a custom implementation of the Spring Security
UserDetailsnamedAcmeUserDetails. It contains thetenantIdfor your user. -
Your groups are mapped as a custom
GroupGrantedAuthorityand that you have otherGrantedAuthority(ies) which represent something else for your organization.
For this we will have the following implementations
AcmeSecurityScope.
public class AcmeSecurityScope implements SecurityScope {

    protected Authentication authentication;

    public AcmeSecurityScope(Authentication authentication) {
        this.authentication = authentication;
    }

    @Override
    public String getUserId() {
        return authentication.getName();
    }

    @Override
    public Set<String> getGroupKeys() {
        Set<String> groupKeys = new HashSet<>();
        for (GrantedAuthority authority: authentication.getGrantedAuthorities()) {
            if (authority instanceof GroupGrantedAuthority) {
                groupKeys.add(((GroupGrantedAuthority) authority).getGroupId());
            }
        }
        return groupKeys;
    }

    @Override
    public String getTenantId() {
        return getAcmeUserDetails().getTenantId();
    }

    @Override
    public String getUserDefinitionKey() {
        // If you need you can do a mapping between certain attributes from your
        // user details to a Flowable User Definition
        return null;
    }

    @Override
    public boolean hasAuthority(String authority) {
        for (GrantedAuthority grantedAuthority : authentication.getAuthorities()) {
            if (Objects.equals(authority, grantedAuthority.getAuthority())) {
                return true;
            }
        }

        return false;
    }

    protected AcmeUserDetails getAcmeUserDetails() {
        return (AcmeUserDetails) authentication.getDetails();
    }
}
AcmeSecurityScopeProvider.
public class AcmeSecurityProvider implements SecurityScopeProvider {

    @Override
    public SecurityScope getSecurityScope(Principal principal) {
        if (principal instanceof Authentication) {
            return new AcmeSecurityScope((Authentication) principal);
        }
        return new FlowablePrincipalSecurityScope(principal);
    }
}
Finally, we need to register this as a Spring Configuration.
You would need to consult with your organization documentation for how to configure your security configuration.
The only thing needed for the integration with Flowable to work is to have the AcmeSecurityScopeProvider registered as a Spring Bean
@Configuration
public class AcmeFlowableConfiguration {

    @Bean
    public AcmeSecurityProvider() {
        return new AcmeSecurityProvider();
    }
}
Custom Identity Service
This document describes how you can create your own Custom
PlatformIdentityService
and thus avoid syncing your users into the Flowable database.
We assume that you are already familiar with the basics defined in Security and Identity Management
and Overriding the Default Identity Service.
If you need to create a custom authentication then have a look at Custom Security Authentication.
We are only going to implement the retrieve methods, nothing else. For this example, we are going to assume that your users are going to be retrieved from LDAP and we are going to use Spring LDAP to do the querying.
AcmeFlowablePlatformIdentityService.
public class AcmeFlowablePlatformIdentityService extends ReadOnlyIdmIdentityService {

    protected LdapTemplate ldapTemplate;

    public AcmeFlowablePlatformIdentityService(
            CoreIdmEngineConfiguration idmEngineConfiguration,
            LdapTemplate ldapTemplate
    ) {
        super(idmEngineConfiguration);
        this.ldapTemplate = ldapTemplate;
    }

    // Retrieve methods

    @Override
    public PlatformUserQuery createPlatformUserQuery() {
        return new AcmePlatformUserQuery(commandExecutor, ldapTemplate);
    }

    @Override
    public PlatformGroupQuery createPlatformGroupQuery() {
        return new AcmePlatformGroupQuery(commandExecutor, ldapTemplate);
    }

    @Override
    public List<String> findUniqueTenantIds() {
        return Collections.emptyList();
    }

}
For the purposes of this example we are going to show the implementation of only of
subsets of methods of the AcmePlatformUserQuery and AcmePlatformGroupQuery.
AcmePlatformUserQuery.
public class AcmePlatformUserQuery
    extends AbstractQuery<PlatformUserQuery, PlatformUser>
    implements PlatformUserQuery {

    protected LdapTemplate ldapTemplate;

    protected String userId;
    protected String displayName;
    protected String displayNameLike;
    protected boolean includeIdentityInfo;

    public AcmePlatformUserQuery(CommandExecutor commandExecutor, LdapTemplate ldapTemplate) {
        super(commandExecutor);
        this.ldapTemplate = ldapTemplate;
    }

    @Override
    public PlatformUserQuery includeIdentityInfo() {
        this.includeIdentityInfo = true;
        return this;
    }

    @Override
    public PlatformUserQuery userId(String id) {
        userId = id;
        return this;
    }

    @Override
    public PlatformUserQuery userDisplayName(String displayName) {
        this.displayName = displayName;
        return this;
    }

    @Override
    public PlatformUserQuery userDisplayNameLike(String displayNameLike) {
        this.displayNameLike = displayNameLike;
        return this;
    }

    @Override
    public PlatformUserQuery userDisplayNameLikeIgnoreCase(String displayNameLikeIgnoreCase) {
        this.displayNameLike = displayNameLikeIgnoreCase;
        return this;
    }

    // ...

    @Override
    public long executeCount(CommandContext commandContext) {
        return executeList(commandContext).size();
    }

    @Override
    public List<PlatformUser> executeList(CommandContext commandContext) {
        LdapQueryBuilder queryBuilder = LdapQueryBuilder.query();

        ContainerCriteria criteria = queryBuilder.where("objectClass").is("user");
        if (userId != null) {
            criteria = criteria.and("sAMAccountName").is(userId);
        }

        if (displayName != null) {
            criteria = criteria.and("displayName").is(displayName);
        }

        if (displayNameLike != null) {
            criteria = criteria.and("displayName").like(displayNameLike.replace('%', '*'));
        }

        return ldapTemplate.search(criteria, new AttributesMapper<PlatformUser>() {

            @Override
            public PlatformUser mapFromAttributes(Attributes attributes) throws NamingException {
                BasicPlatformUser user = new BasicPlatformUser();
                user.setIdentityInfo(new ArrayList<>());

                user.setId(getAttribute("sAMAccountName", attributes));
                user.setFirstName(getAttribute("givenName", attributes));
                user.setLastName(getAttribute("sn", attributes));
                user.setDisplayName(getAttribute("displayName", attributes));
                user.setEmail(getAttribute("mail", attributes));
                String dn = getAttribute("distinguishedName", attributes);
                BasicPlatformIdentityInfo<String> dnInfo = BasicPlatformIdentityInfo.userInfo("dn", user.getId());

                dnInfo.setTenantId(user.getTenantId());
                dnInfo.setValue(value);
                dnInfo.setTypeName(StringType.TYPE_NAME);

                userEntity.getIdentityInfo().add(dnInfo));
                if (includeIdentityInfo) {
                    CoreIdmEngineConfiguration idmEngineConfiguration = CommandContextUtil.getIdmEngineConfiguration(commandContext);
                    List<PlatformIdentityInfo> userDbInfos = idmEngineConfiguration.getIdmIdentityService().createPlatformIdentityInfoQuery()
                        .userId(user.getId())
                        .tenantId(user.getTenantId())
                        .list();
                    user.getIdentityInfo().addAll(userDbInfos);
                }
                return user;
            }
        });
    }

    protected static String getAttribute(String attributeName, Attributes attributes) {
        Attribute attribute = attributes.get(attributeName);
        if (attribute != null && attribute.size() > 0) {
            try {
                return (String) attribute.get();
            } catch (NamingException e) {
                throw new FlowableException("Exception getting attribute " + attributeName);
            }
        } else {
            return null;
        }
    }
}
AcmePlatformGroupQuery.
public class AcmePlatformGroupQuery
    extends AbstractQuery<PlatformGroupQuery, PlatformGroup>
    implements PlatformGroupQuery {

    protected LdapTemplate ldapTemplate;

    protected String groupId;
    protected Collection<String> groupIds;
    protected String userId;

    public AcmePlatformGroupQuery(CommandExecutor commandExecutor, LdapTemplate ldapTemplate) {
        super(commandExecutor);
        this.ldapTemplate = ldapTemplate;
    }

    @Override
    public PlatformGroupQuery groupId(String groupId) {
        this.groupId = groupId;
        return this;
    }

    @Override
    public PlatformGroupQuery groupIds(List<String> groupIds) {
        this.groupIds = groupIds;
        return this;
    }

    @Override
    public PlatformGroupQuery groupKey(String groupKey) {
        this.groupId = groupKey;
        return this;
    }

    @Override
    public PlatformGroupQuery groupMember(String groupMemberUserId) {
        this.userId = groupMemberUserId;
        return this;
    }

    // ...

    @Override
    public long executeCount(CommandContext commandContext) {
        return executeList(commandContext).size();
    }

    @Override
    public List<PlatformGroup> executeList(CommandContext commandContext) {
        LdapQueryBuilder queryBuilder = LdapQueryBuilder.query();

        ContainerCriteria criteria = queryBuilder.where("objectClass").is("group");
        if (groupId != null) {
            criteria = criteria.and("sAMAccountName").is(groupId);
        }

        if (userId != null) {
            // LDAP requires the User Distinquished name, so we look it up
            PlatformUser user = new AcmePlatformUserQuery(commandExecutor, ldapTemplate).userId(userId).singleResult();
            String userDn = user.findString("distinguishedName");

            // 1.2.840.113556.1.4.1941 is the OID for the LDAP_MATCHING_RULE_IN_CHAIN
            // See more at https://ldapwiki.com/wiki/1.2.840.113556.1.4.1941
            criteria = criteria.and("member:1.2.840.113556.1.4.1941:").is(userDn);
        }

        return ldapTemplate.search(criteria, new AttributesMapper<PlatformGroup>() {

            @Override
            public PlatformGroup mapFromAttributes(Attributes attributes) throws NamingException {
                BasicPlatformGroup group = new BasicPlatformGroup();

                group.setId(getAttribute("distinguishedName", attributes));
                group.setKey(getAttribute("sAMAccountName", attributes));
                group.setName(getAttribute("name", attributes));
                return groupEntity;
            }
        });
    }

    protected static String getAttribute(String attributeName, Attributes attributes) {
        Attribute attribute = attributes.get(attributeName);
        if (attribute != null && attribute.size() > 0) {
            try {
                return (String) attribute.get();
            } catch (NamingException e) {
                throw new FlowableException("Exception getting attribute " + attributeName);
            }
        } else {
            return null;
        }
    }
}
We now need to register our AcmePlatformIdentityService with the Core IDM Engine.
This is done by using the EngineConfigurationConfigurer as follows:
Register AcmePlatformIdentityService with the Core IDM Engine.
@Configuration
public class AcmeFlowableConfiguration {

    @Bean
    public EngineConfigurationConfigurer<CoreIdmEngineConfiguration> acmeCoreIdmEngineConfigurer(LdapTemplate ldapTemplate) {
        return idmEngineConfiguration -> {
            idmEngineConfiguration.setIdmIdentityService(
                new AcmePlatformIdentityService(idmEngineConfiguration, ldapTemplate)
            );
        };
    }
}