Interactive messages with WhatsApp
Target audience: Modelers
Overview
In this how-to guide we want to make use of the WhatsApp interactive messages all controlled by a process tapping into a conversation.
As an example we are going to create a feedback process where we ask the client over WhatsApp to leave a qualification of the service we provided. This could be started automatically after a service being provided over WhatsApp or in our case, we start it manually through an action exposed to such a conversation.
Create App and initialize feedback process
First we create a new App, named WhatsApp Feedback Action (or whatever you fancy) and add a new process model named WhatsApp Interactive Feedback Process to it.
We want to first create the different models before going into details, so just simply add a start and end event for the time being, we will add the conversation interactions later on step by step.
Create action to kick off the feedback process
In this next step we want to create the action with which we will trigger the feedback process out of a WhatsApp conversation.
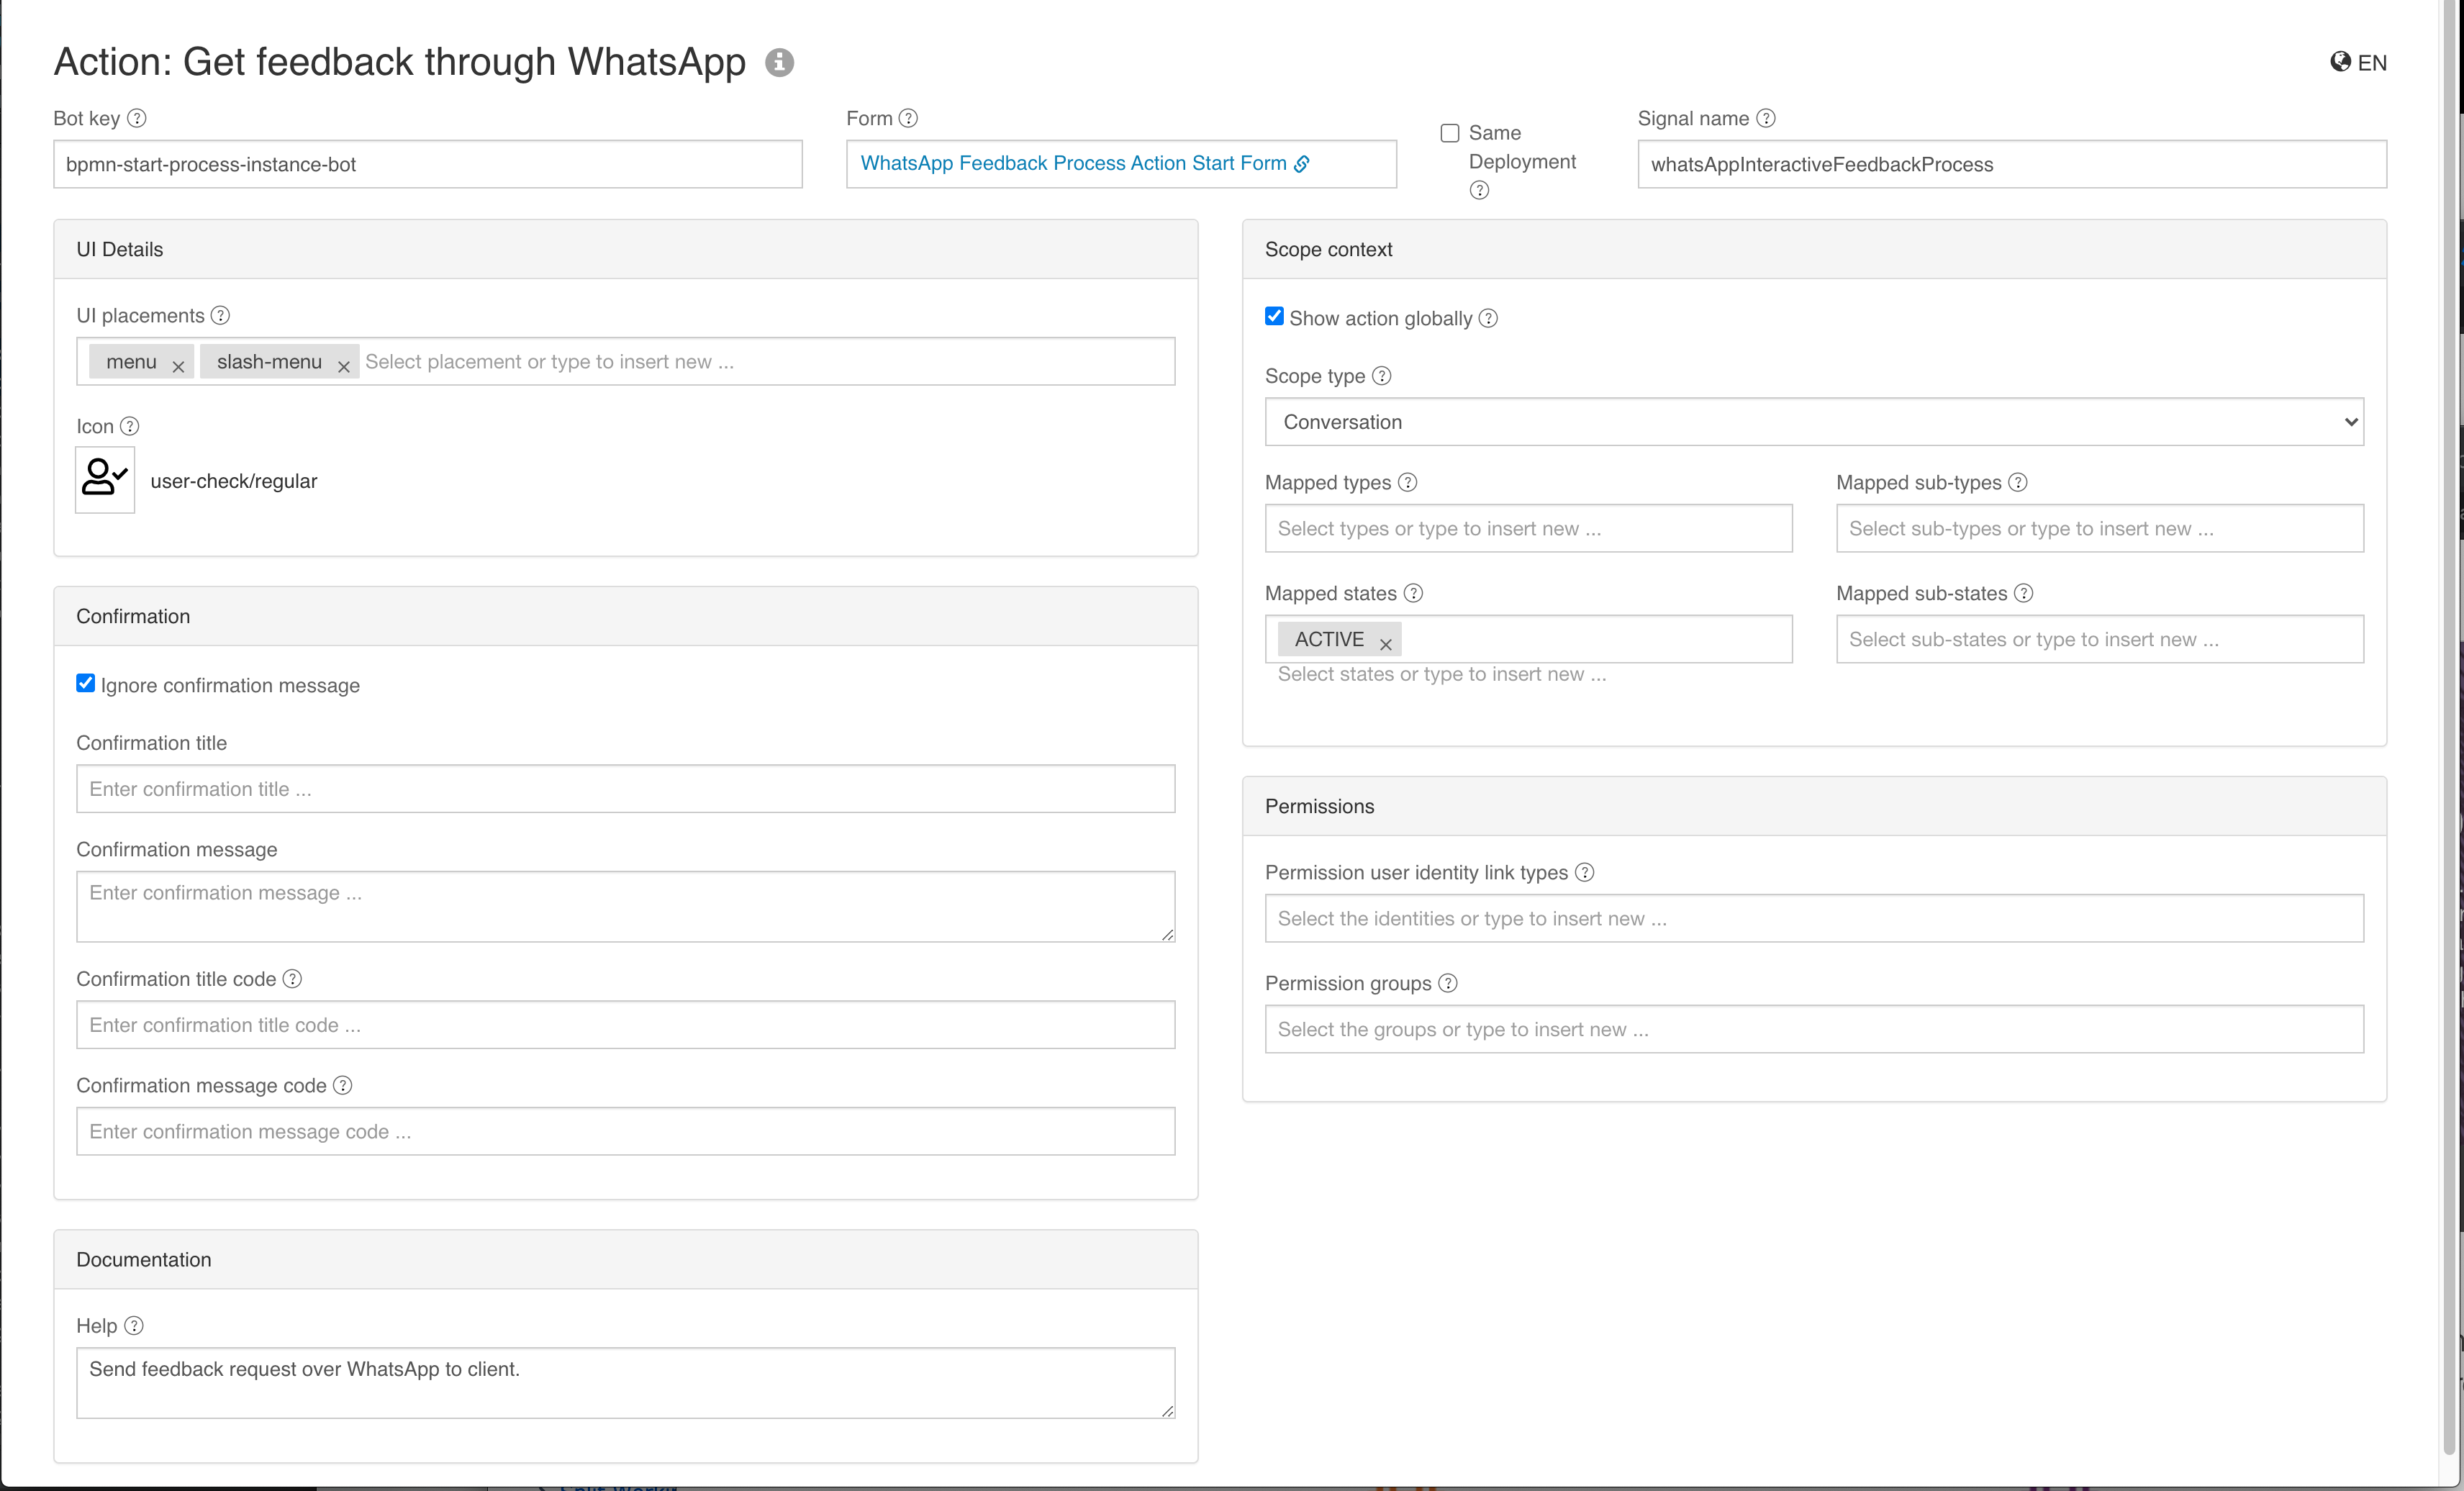
Add a new action named Get feedback through WhatsApp to our App. There is a bot already existing we can use to start a new process instance whenever this action
is triggered, named BpmnStartProcessInstanceBot with a key of bpmn-start-process-instance-bot. So
In the form property, add a new form and name it WhatsApp Feedback Process Action Start Form (or something like that), which will open the form editor after
creating a new form and setting it as the action start form for us.
We want to let the agent make a personal invitation message to increase the possibility we actually get a feedback from the client, so let's create a form similar to this one:
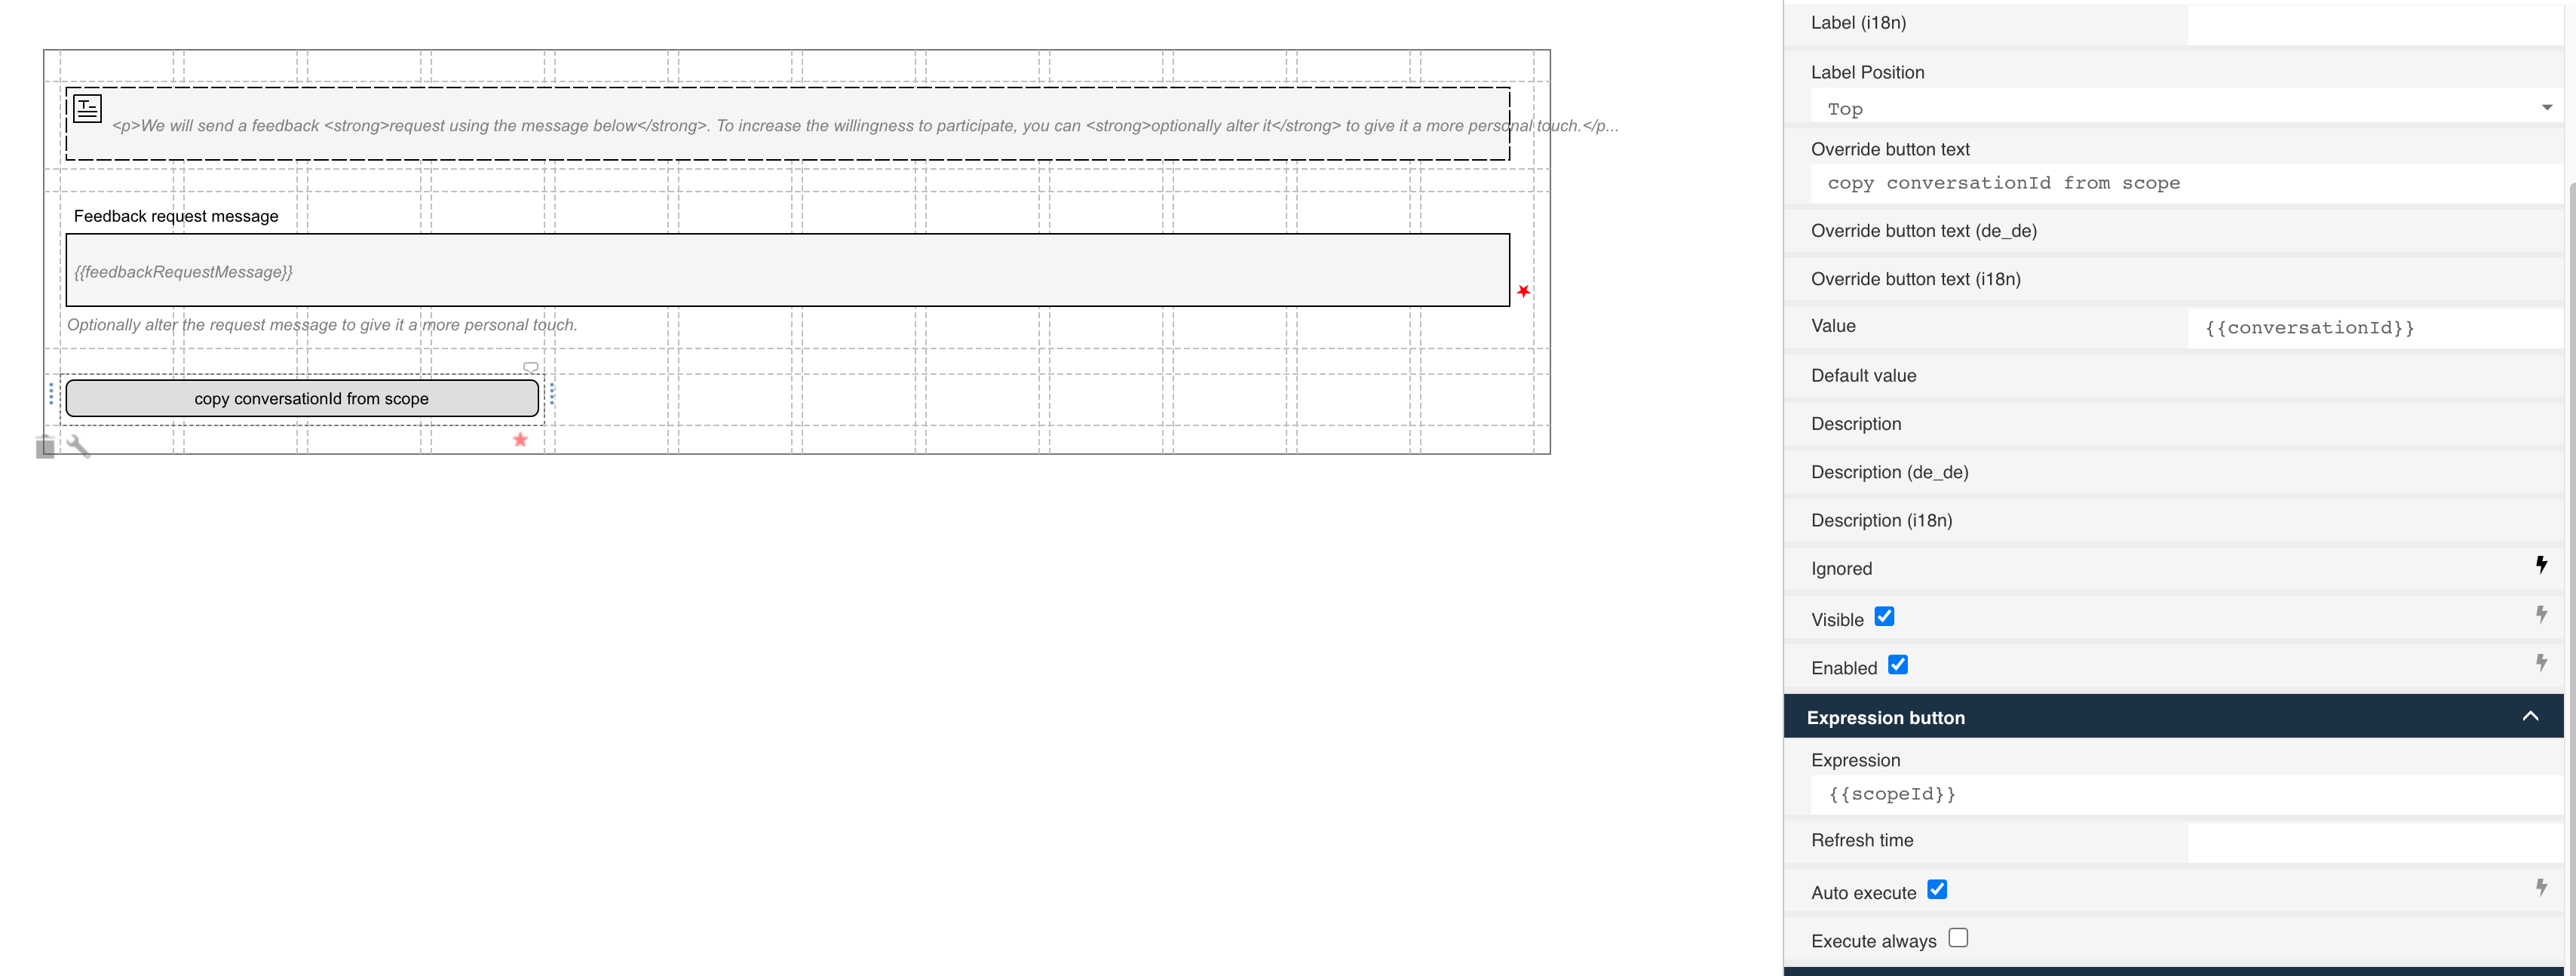
The interesting part is the Expression button we added at the bottom of the form, it uses auto execution and will add a new variable to the payload of the action
by executing the expression {{scopeId}} and store it as a variable named conversationId. The scope id in our case where we use the action within a conversation
will result in the conversation id being sent as part of the payload.
As we don't need to see the button, because it will be executed automatically, you can set the Style class property to hidden. This way, the button is still there
and will be executed, but invisible to the user.
You can also add an outcome like Send feedback request to have another button at runtime than Execute.
The next property in the action is the signal name we can use to tell the bot later on which process we want to start, so put whatsAppInteractiveFeedbackProcess
or whatever process model key you used in the previous step into the signal name property.
Next, we need to decide where to place the action within the conversation UI. We can choose between menu, quick-menu and / or slash-menu. Let's use
all of them first, so we can see how they show up in the various menus at runtime to finally decide where to put them.
Optionally, you can choose an icon for the action, if you want. We will ignore the confirmation message as we have a start form where the agent can still cancel, if the process should not be started, so there is no additional need for a confirmation.
If you want you can add a help text too for the action which will show up in the slash-action menu for instance.
Last thing is the scoping we need to take care when finalizing the action model. There are two ways we can activate an action; globally or individually using
an action instance created through the API (com.flowable.action.api.runtime.ActionInstanceBuilder). In our case, creating it only for WhatsApp enabled client
conversations would actually make more sense or in other words, using the builder API to create action instances for exactly the conversations we want that
action to show up. But it's a bit more complex and we will look into it a bit later. Let's start with just setting it to global and conversation scope.
The full action model comes down to something like this:
Intro to WhatsApp interactive messages
Before we get to learn how to send interactive messages to WhatsApp, we need to look into some basics.
First, you can find all the low-level details in Facebooks documentation about the WhatsApp business API in relation to interactive messages
here.
Flowable Engage supports them using a predefined service task in Flowable Design so you can simply fill in the necessary properties and send interactive messages.
When sending an interactive message using the predefined service tasks, the message will ONLY be sent to the external WhatsApp recipients through the adapter, but you won't see it as an internal message in the Flowable Engage UI as it is very specific to WhatsApp. That's why we are going to make use of an internal message we send to the internal conversation only for clarification, and we link them both together so whenever a reply comes in from the user on WhatsApp, we actually see it as a true reply in our internal conversation UI.
Given the note before, a best practice is to first send an internal message describing what you're about to send as an interactive message and then use that message id as a reference in the interactive template message. If we want to wait for the reply of the client, which most likely will be the case, we can use an event receive task to wait for that reply. Flowable then links them together automatically, so it looks like a reply in the UI like it does in WhatsApp, which is pretty neat.
Send request for feedback message
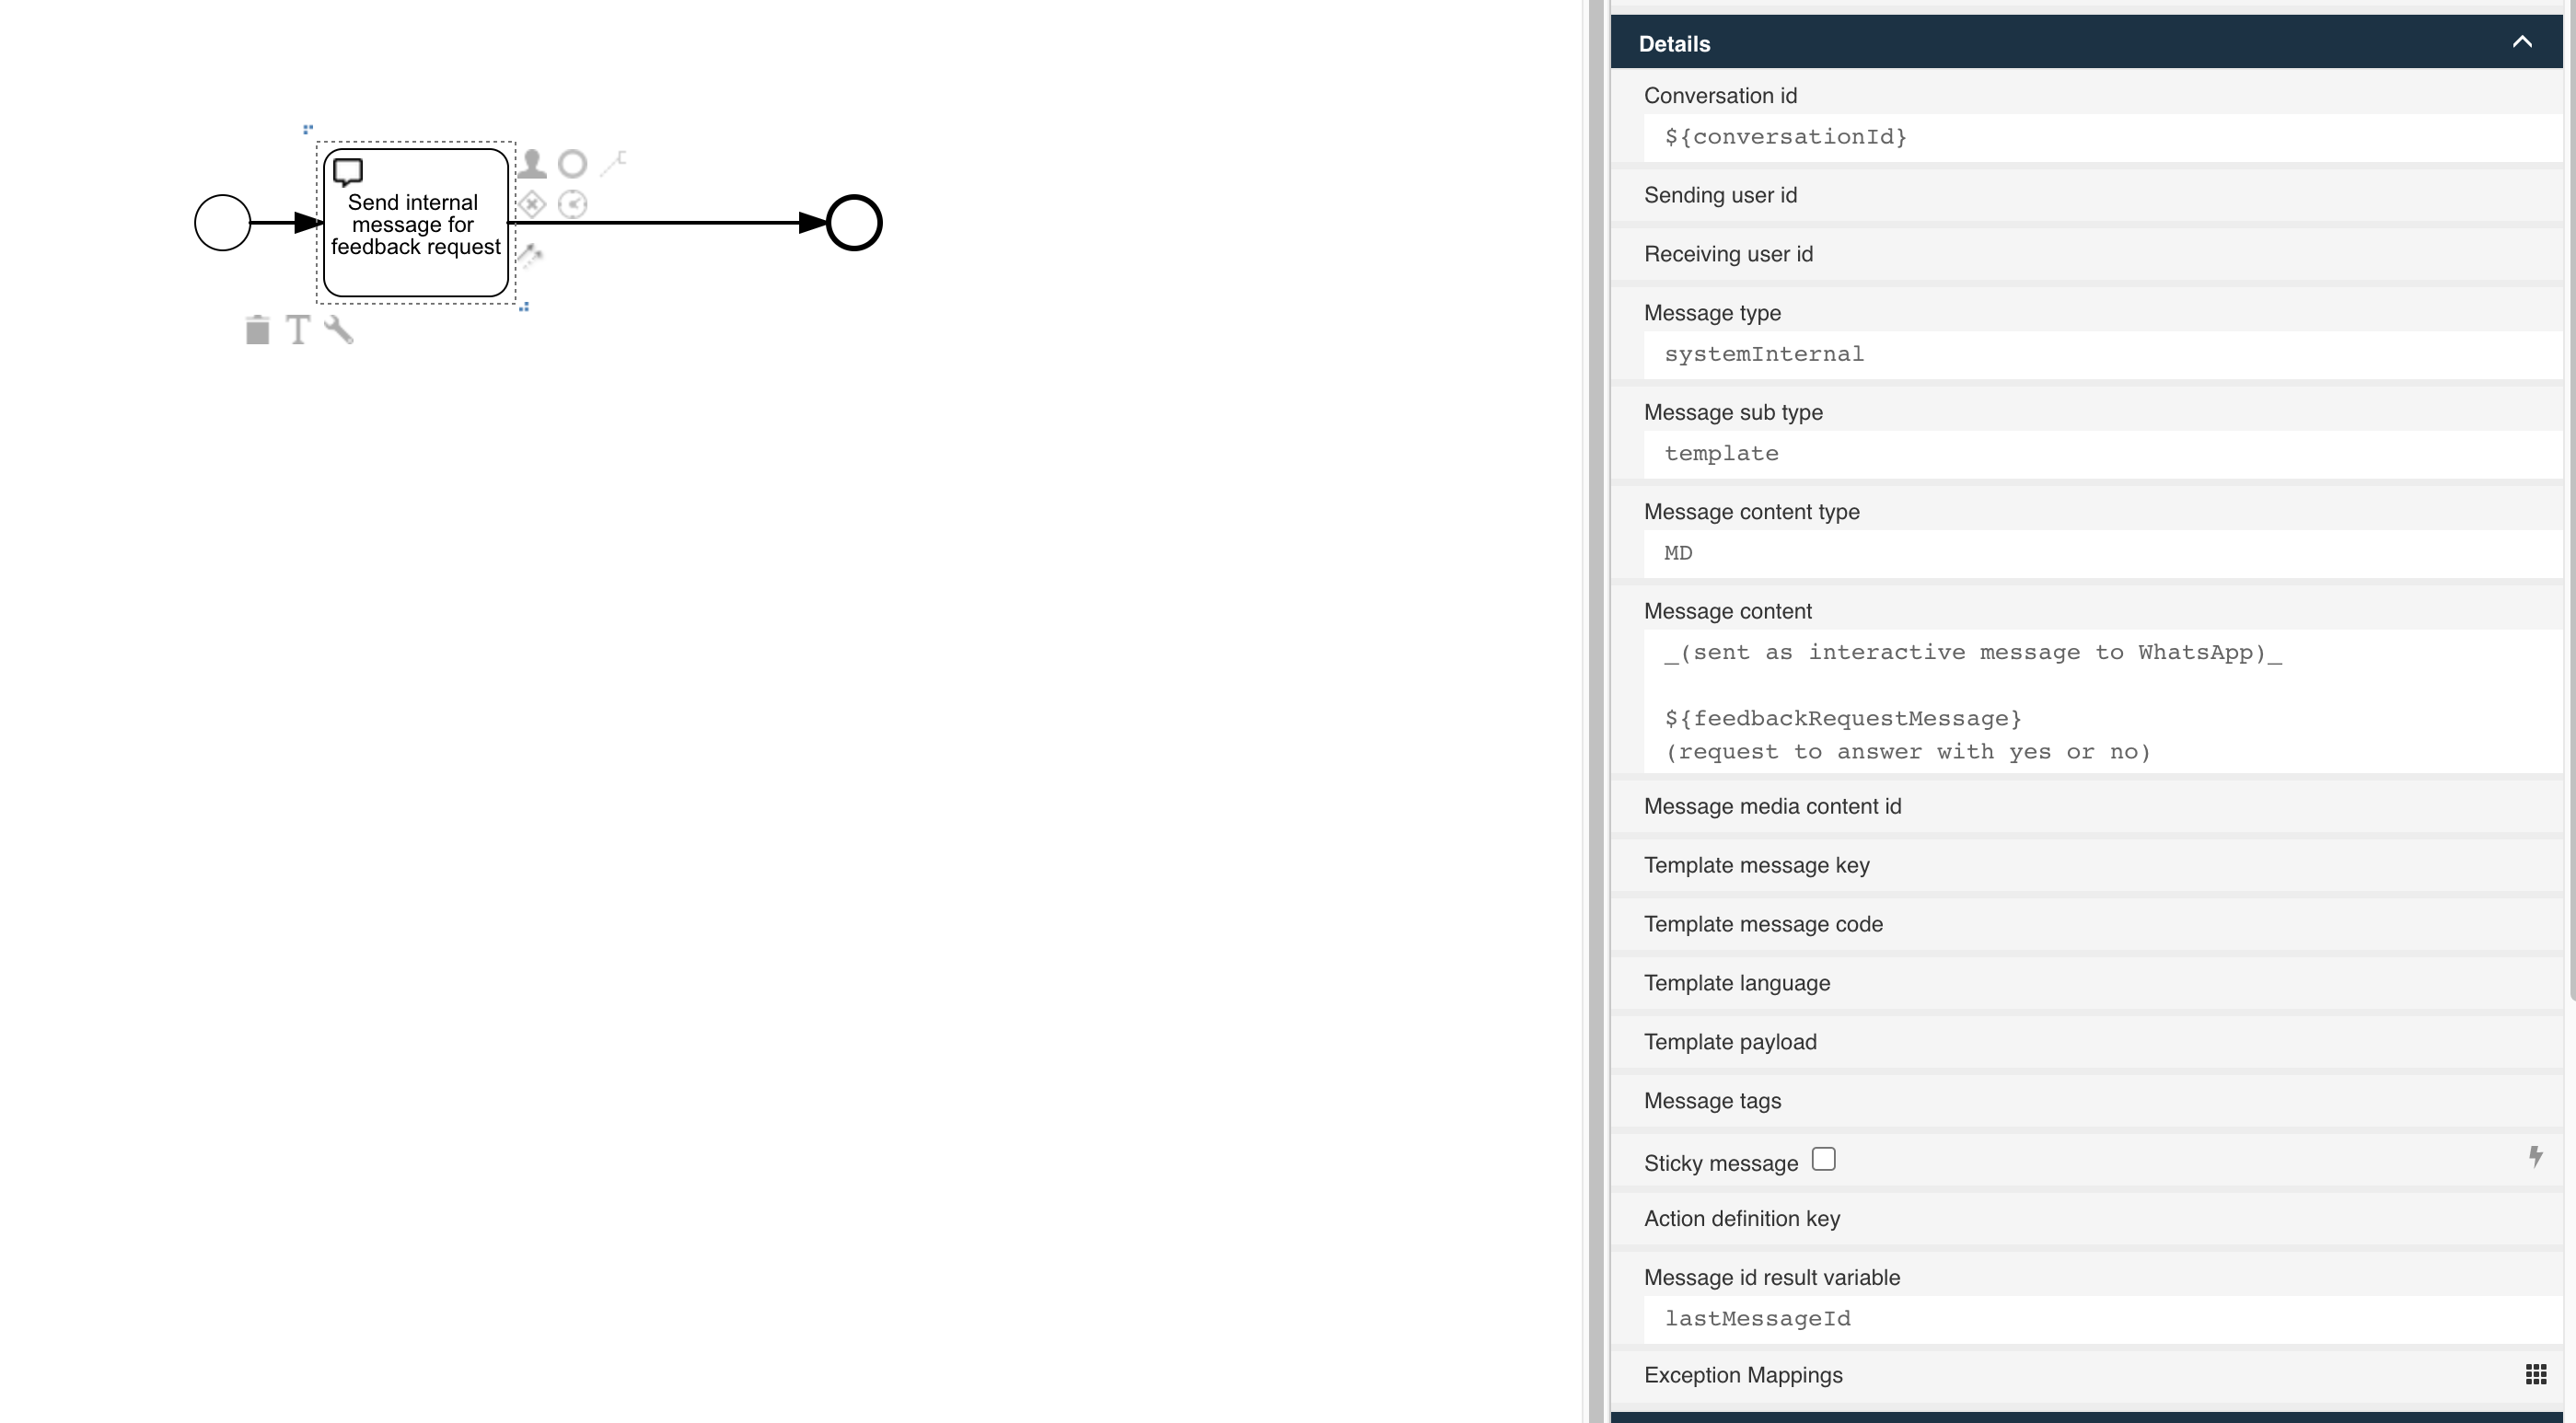
As we learned in the interactive message intro, we should first send an internal message before sending the interactive message template, so we can link both together to have a nice visual feedback whenever the user on WhatsApp replies.
In the process model, we can use a Send message service task to create and send that internal message. We can use ${conversationId} as the id of the conversation
as we added it to the process as a variable when starting it through the action bot.
Using systemTemplate as the type of the message marks it to only be sent internally, so it will not be sent to WhatsApp. This way we can exactly define how we want
the internal message to be like. As a good practice, be as close to the one being sent as an interactive message to WhatsApp, but it might have a bit more
information which is fine. In our case, we make use of the maybe altered message being defined in the action start form we named feedbackRequestMessage. As
you can see, there is support for using expressions for the message content.
The important part is to save the message id so we can later use it to link the response to the interactive message with this one internally. Use something like
lastMessageId as the Message id result variable property.
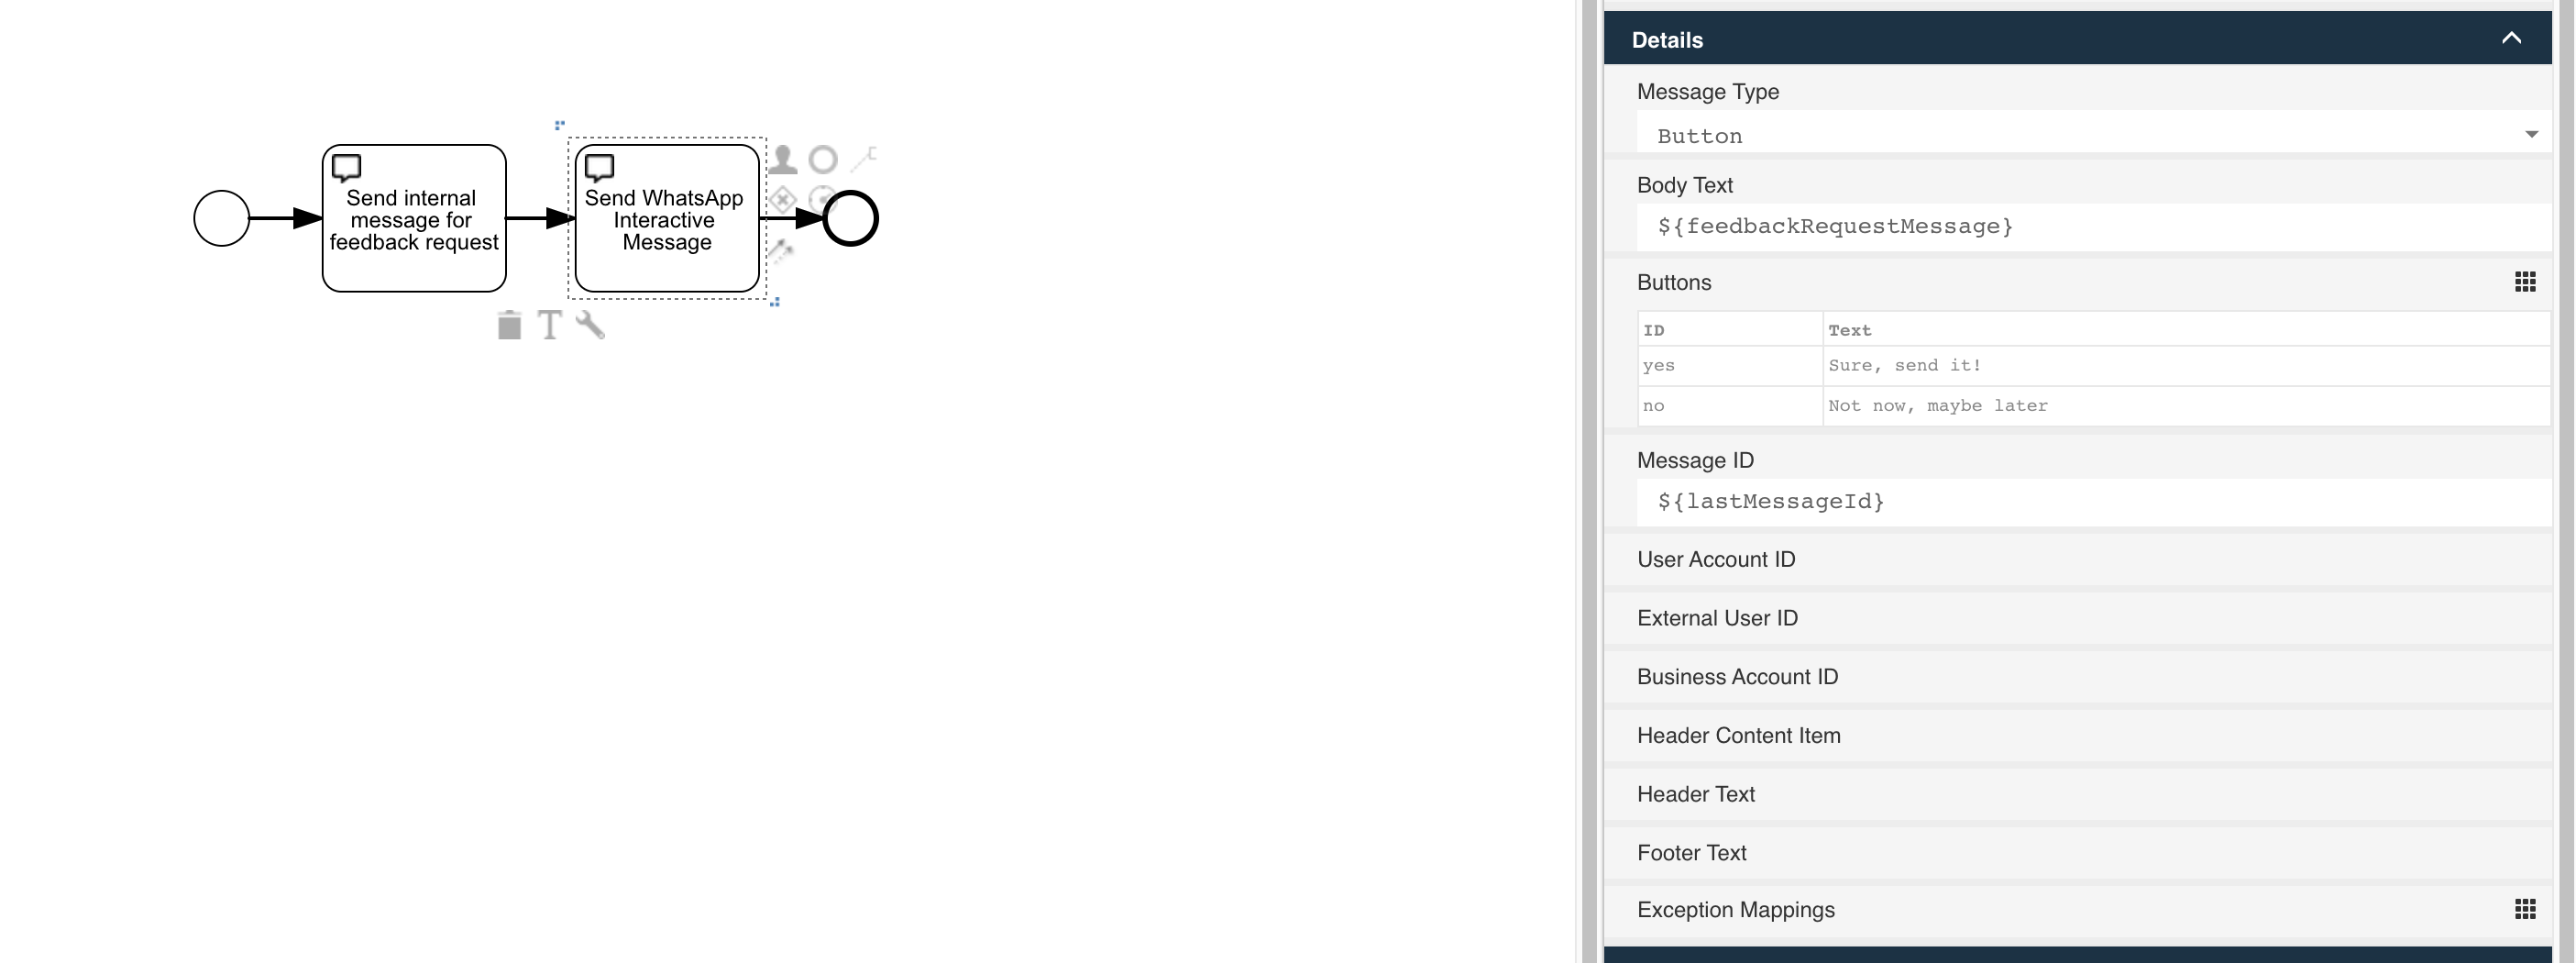
As we created the internal representation of the interactive message now, we create the WhatsApp interactive message by using the Send WhatsApp interactive message
service task. Choose Button as the message type as in our first one, we only offer to answer with yes or no. In the Body text we simply use the expression
with the feedbackRequestMessage variable as it was defined in the action start form.
Add two buttons with id yes and no and whatever text you want, something like Sure, send it and Not now, maybe later. Keep in mind that you can only
use 20 characters for a button text (as of now, might change anytime as Facebook changes its APIs, that's why we don't limit it in Design).
As the message id, use ${lastMessageId} to link the answer of the reply to the previously sent internal message. A nice sideeffect for using that message id
is that everything is taken from it concerning external user id, account id and whatever is necessary to send the interactive message to the correct WhatsApp
account. As an alternative you could also set all this information individually using those properties like User account id, etc.
As we are using the built-in process start bot which will get the process model and search for the start form of it to map the payload of the variable against,
we need to reference the same form we used for the action in the start event. Select the start event of the process and chose the existing action start form in the
Start form reference property of the start event.
I think now is a good time to give it a first try. Deploy (publish) the App and go into your WhatsApp conversation you want to send the feedback request. Bear in mind that the 24h limit also applies for interactive messages, so make sure to first send a message from WhatsApp before starting the feedback request.
In the action menu of the conversation, you should now see the Get feedback through WhatsApp action.
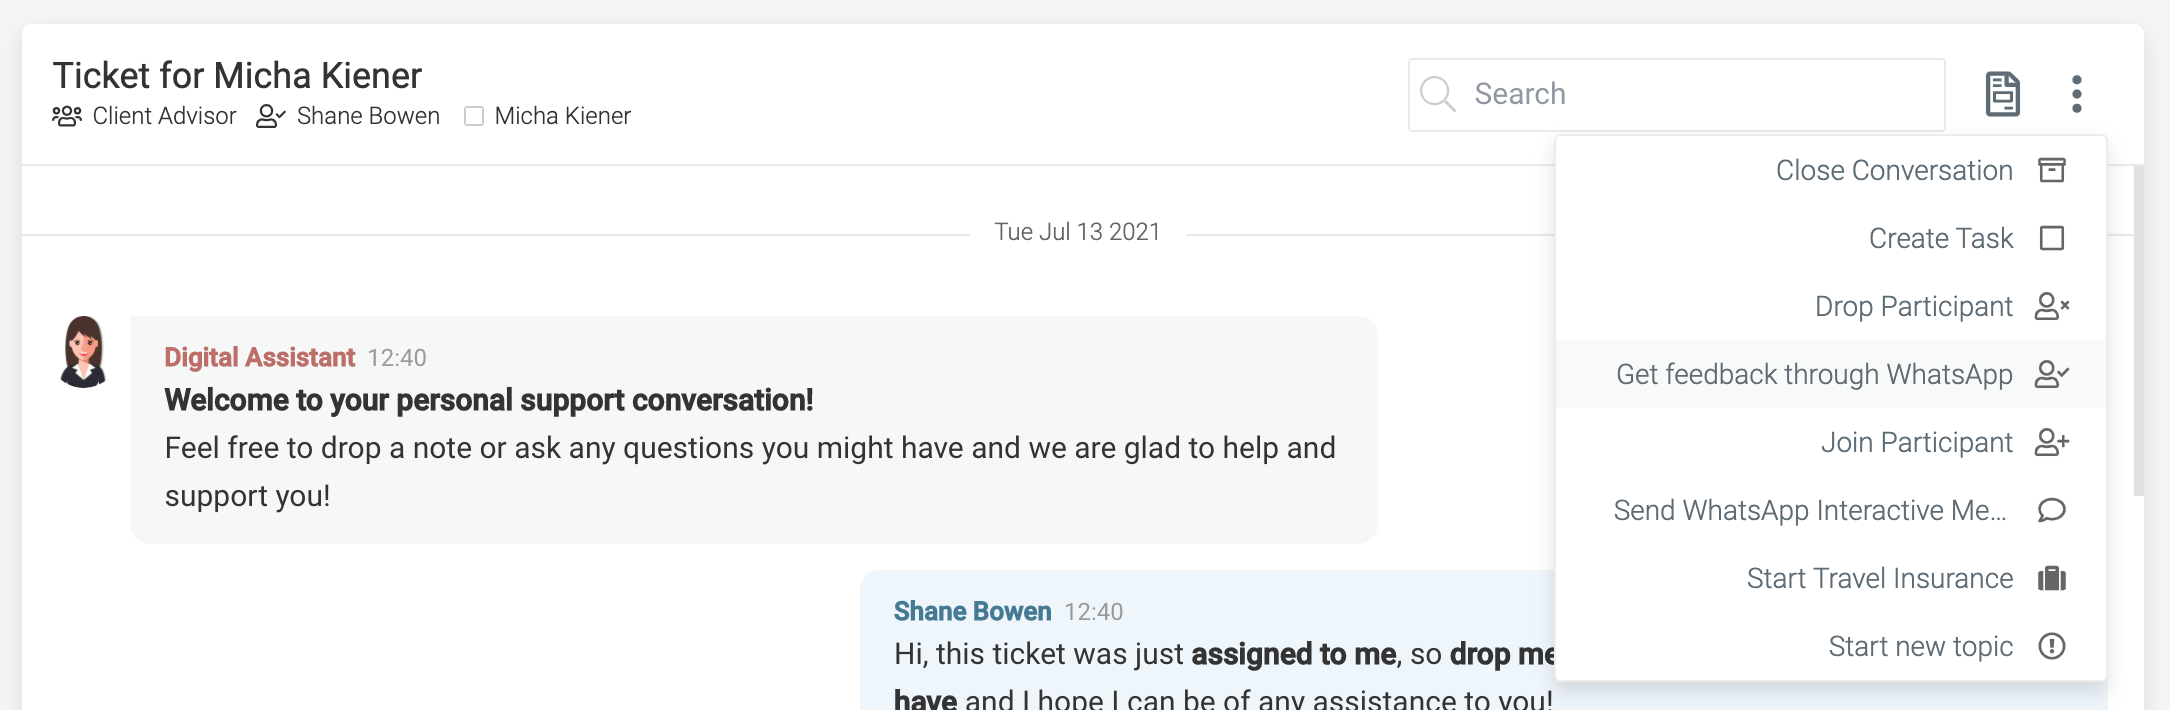
When started, you should now see the action start form where you can alter the initial message to request a feedback:

Internally, the conversation should look something like this now:
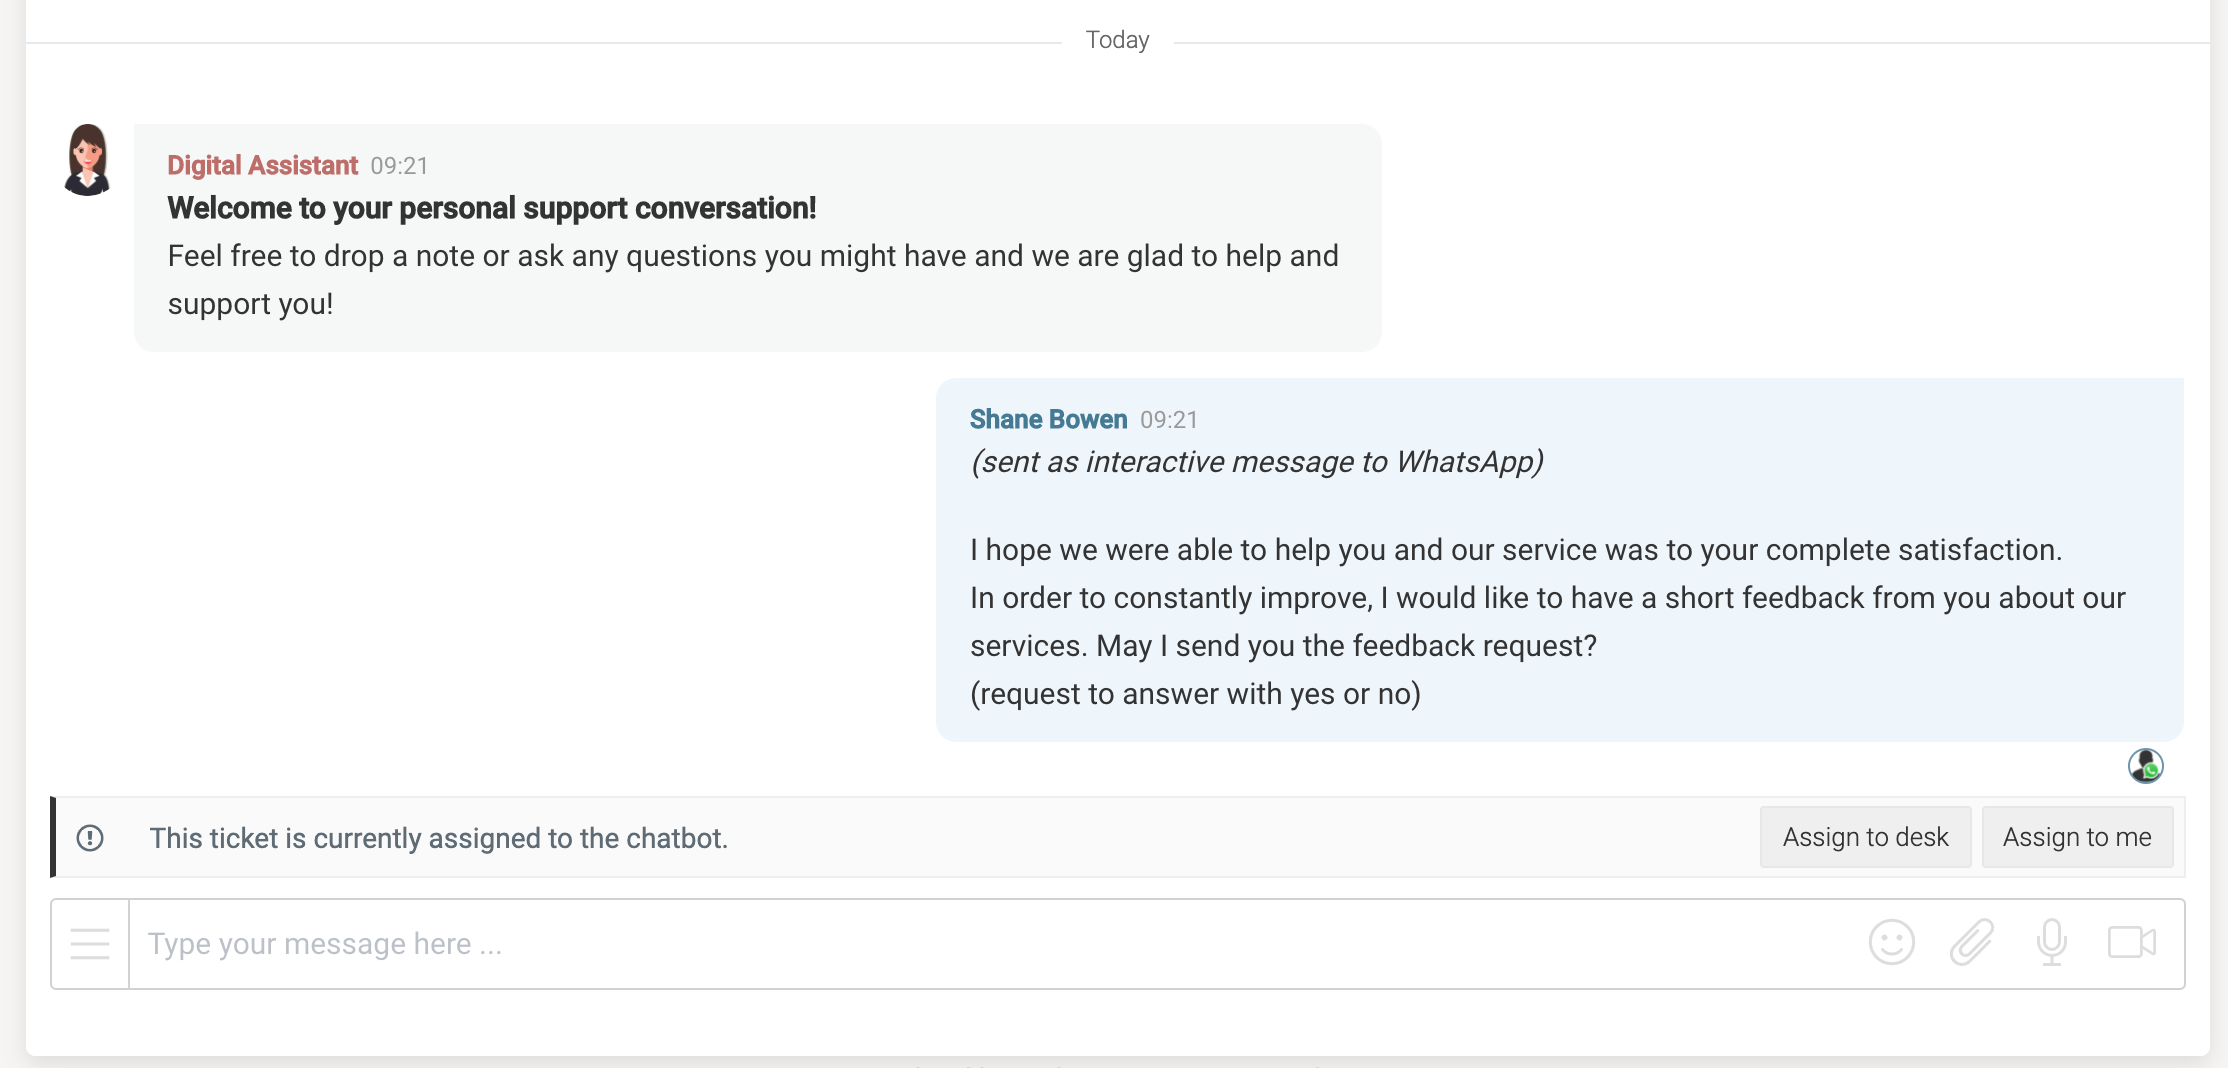
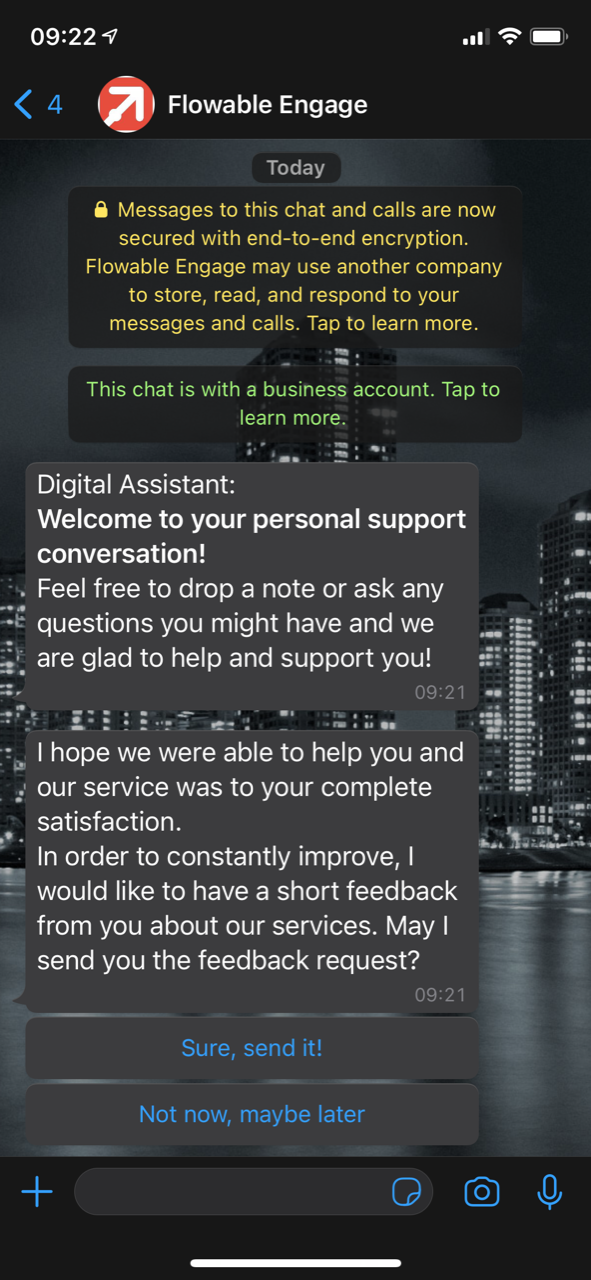
In WhatsApp we should have received something like this:
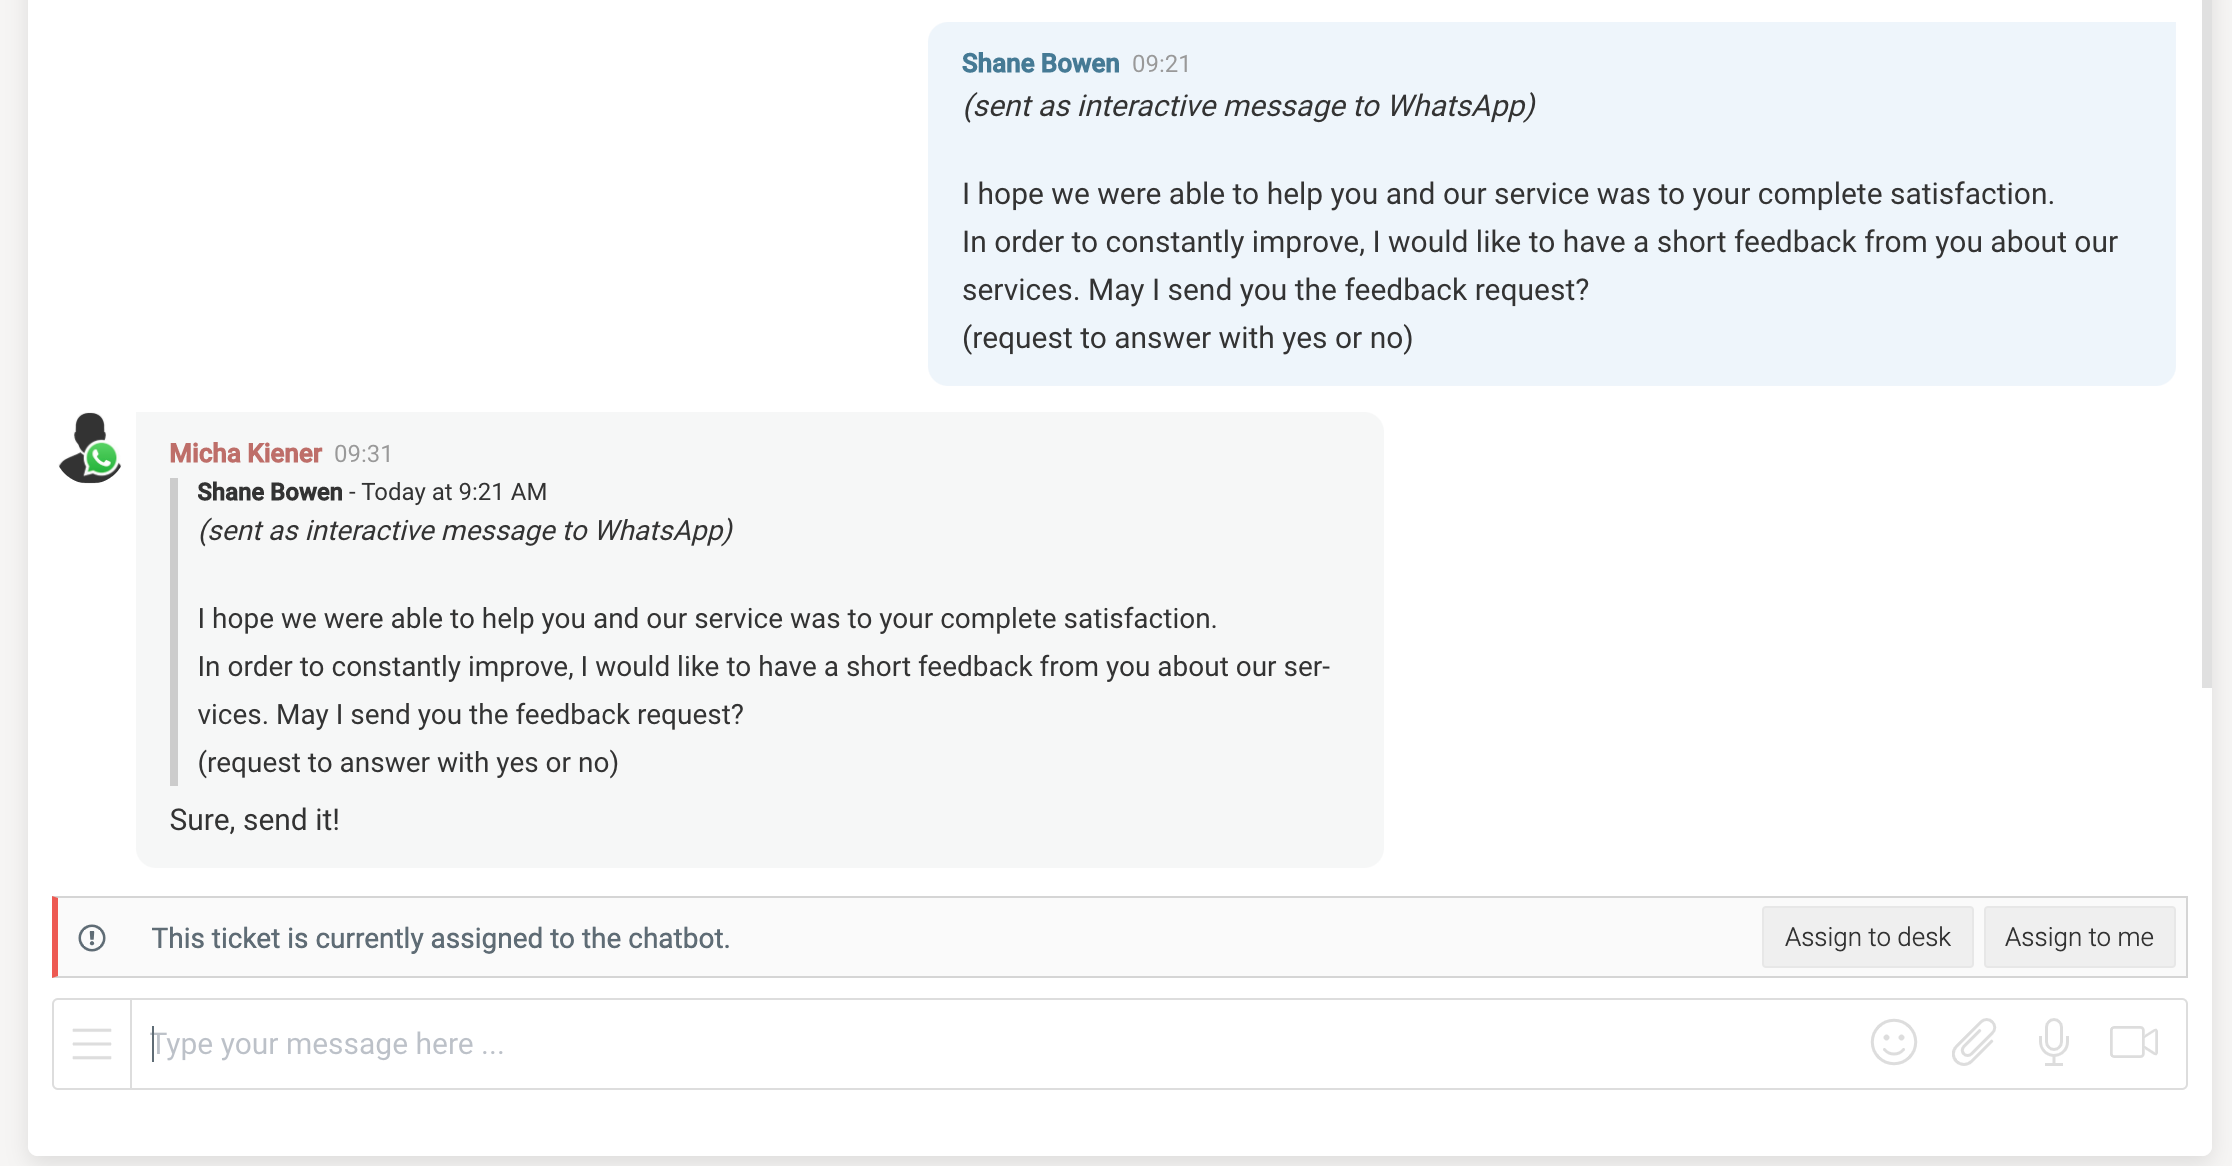
Now let's see what happens, if we answer the interactive template by choosing one of the two options. Internally, we see it like this:
And in WhatsApp, this is how it is shown:
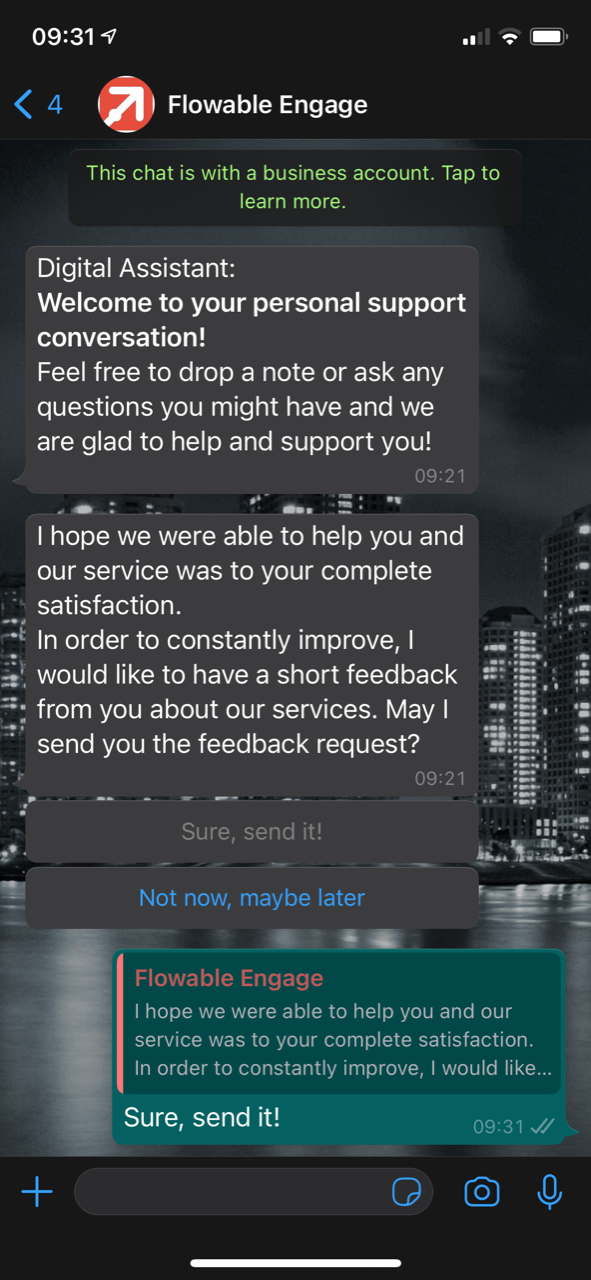
As you can see, we try to use a very similar approach of showing it as a reply-to message internally as well as it is shown and sent in WhatsApp. That's why it is important to use the internal message and its id to link the two messages to make this possible.
Wait for interactive message reply
As a next step, we want to wait within the process until an option was chosen and sent back as a reply message and of course we want to know the option the user has chosen in WhatsApp.
There is a simple out-of-the-box way to do exactly this, we can use the internal event bus and event listening mechanism using correlation to let the process stop and wait for exactly the answer to our request on WhatsApp.
You can make use of the event registry, internal event bus and predefined event definitions when waiting and listening to interactive message replies.
To do so, simply add a Receive event task after the WhatsApp interactive message task, so we stop process execution until we received the reply.
In the Inbound event property, go to Reference, uncheck the App only models and choose External message received event. It is a built-in event definition
we don't explicitly need to define ourselves, we can simply use the existing one which already contains all the information we can get out of it as we will see.
With the External message received event being selected, click on the next one, currently showing No inbound event configuration. It will let us configure
how we want to process the event in our receive event task.
It has a lot of possible information we can use, but let's start with the correlation parameters first.
The event correlation section is used to tell the event engine on how to find a target where the event will be sent to (can also result in more than one target). It takes one or more parameters and searches for them in the event subscription list, and the event is sent to all matching event subscriptions.
In our case, we make use of the conversation id and the message id we used for the WhatsApp interactive message as correlation parameters:
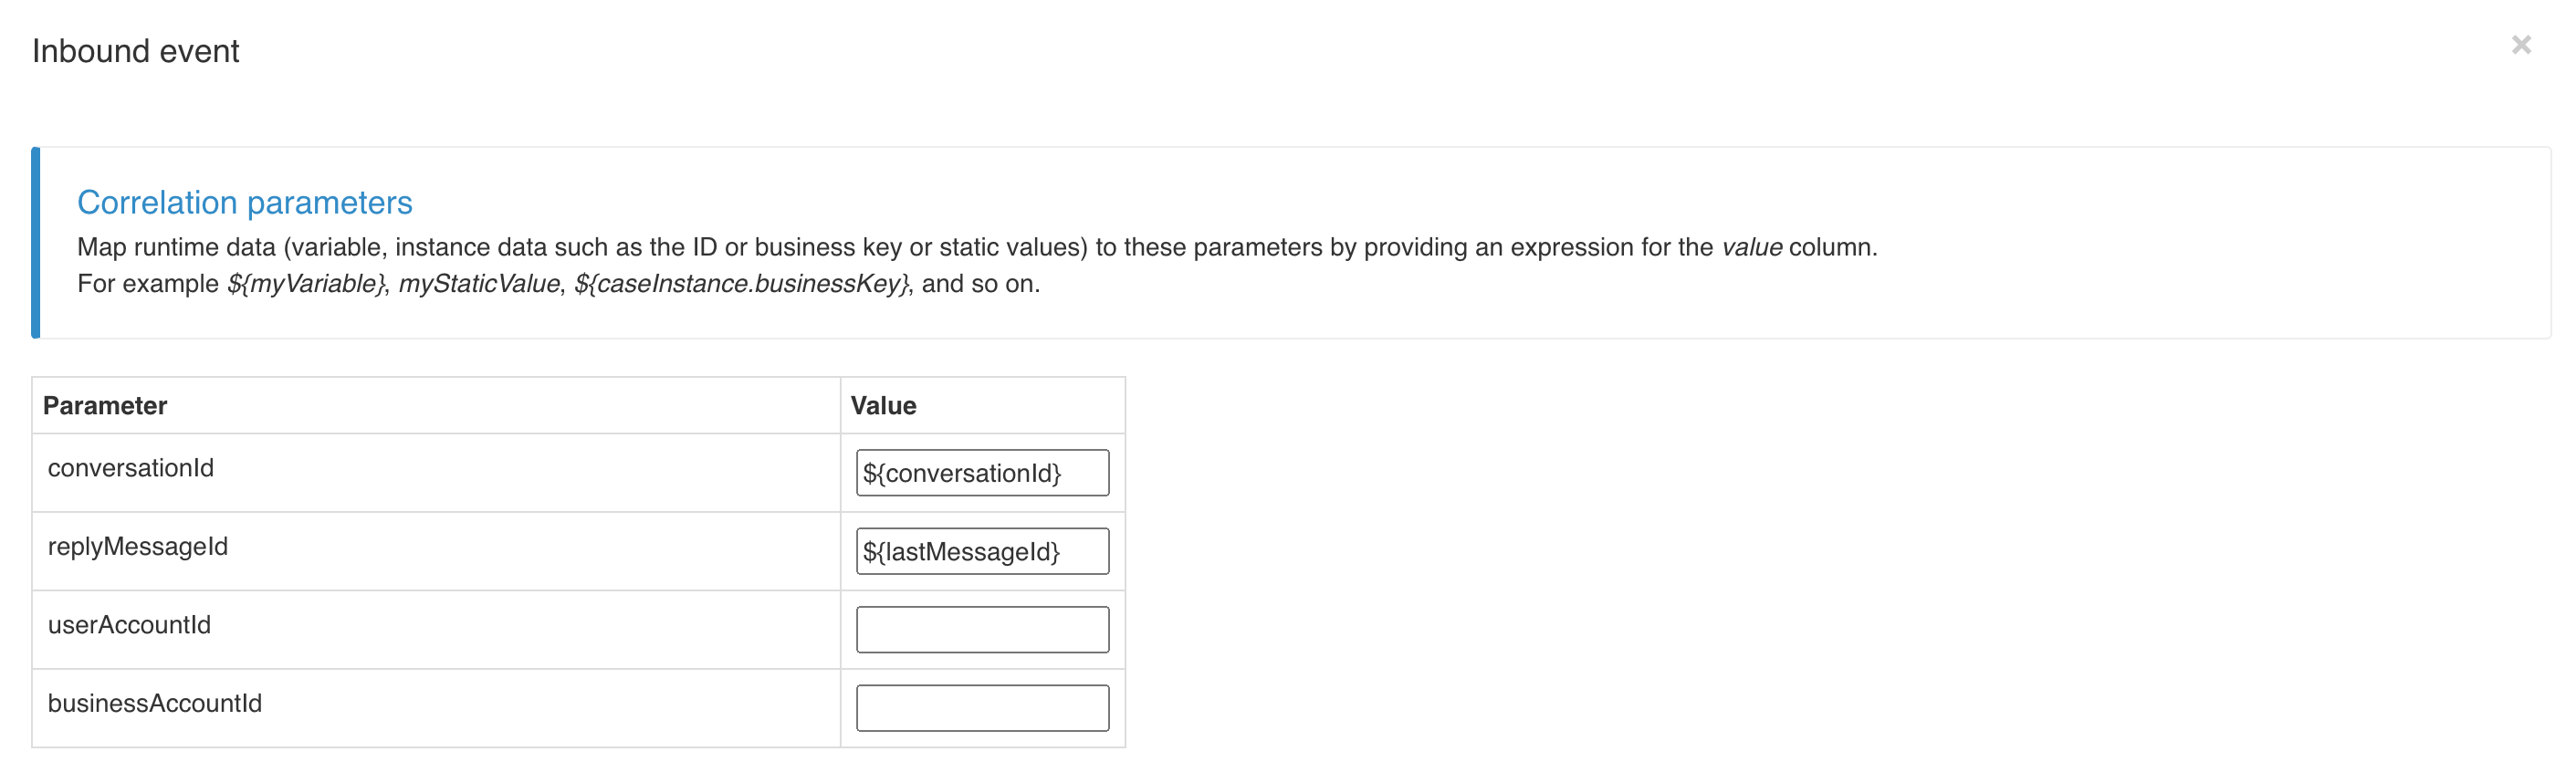
What happens behind the scenes? When the engine hits the event receive task, it will use the conversation id and our last message id and use them to register itself as an event subscription and then enter a wait state. Once that message is received, it will match with our correlation parameters and will be sent to our event receive task and then continuing the process.
In the data mapping section, we can choose what data of the message event we want to store / use as we continue with the process. We are only interested in the
chosen reply button and hence we only need to map the interactiveOutcome parameter of the event payload. We can map it to something lik feedbackRequestOutcome
in order to store the outcome in that variable and use it later for a gateway.
We don't need to choose a specific inbound channel which defaults to the Flowable internal channel where this kind of events are published.
As the next step, we add an exclusive gateway as we only want to continue, if the client has chosen yes to participate in the feedback. We can make use of the
condition builder to create the condition expression we need to form the condition to continue whenever the client has chosen the first option:
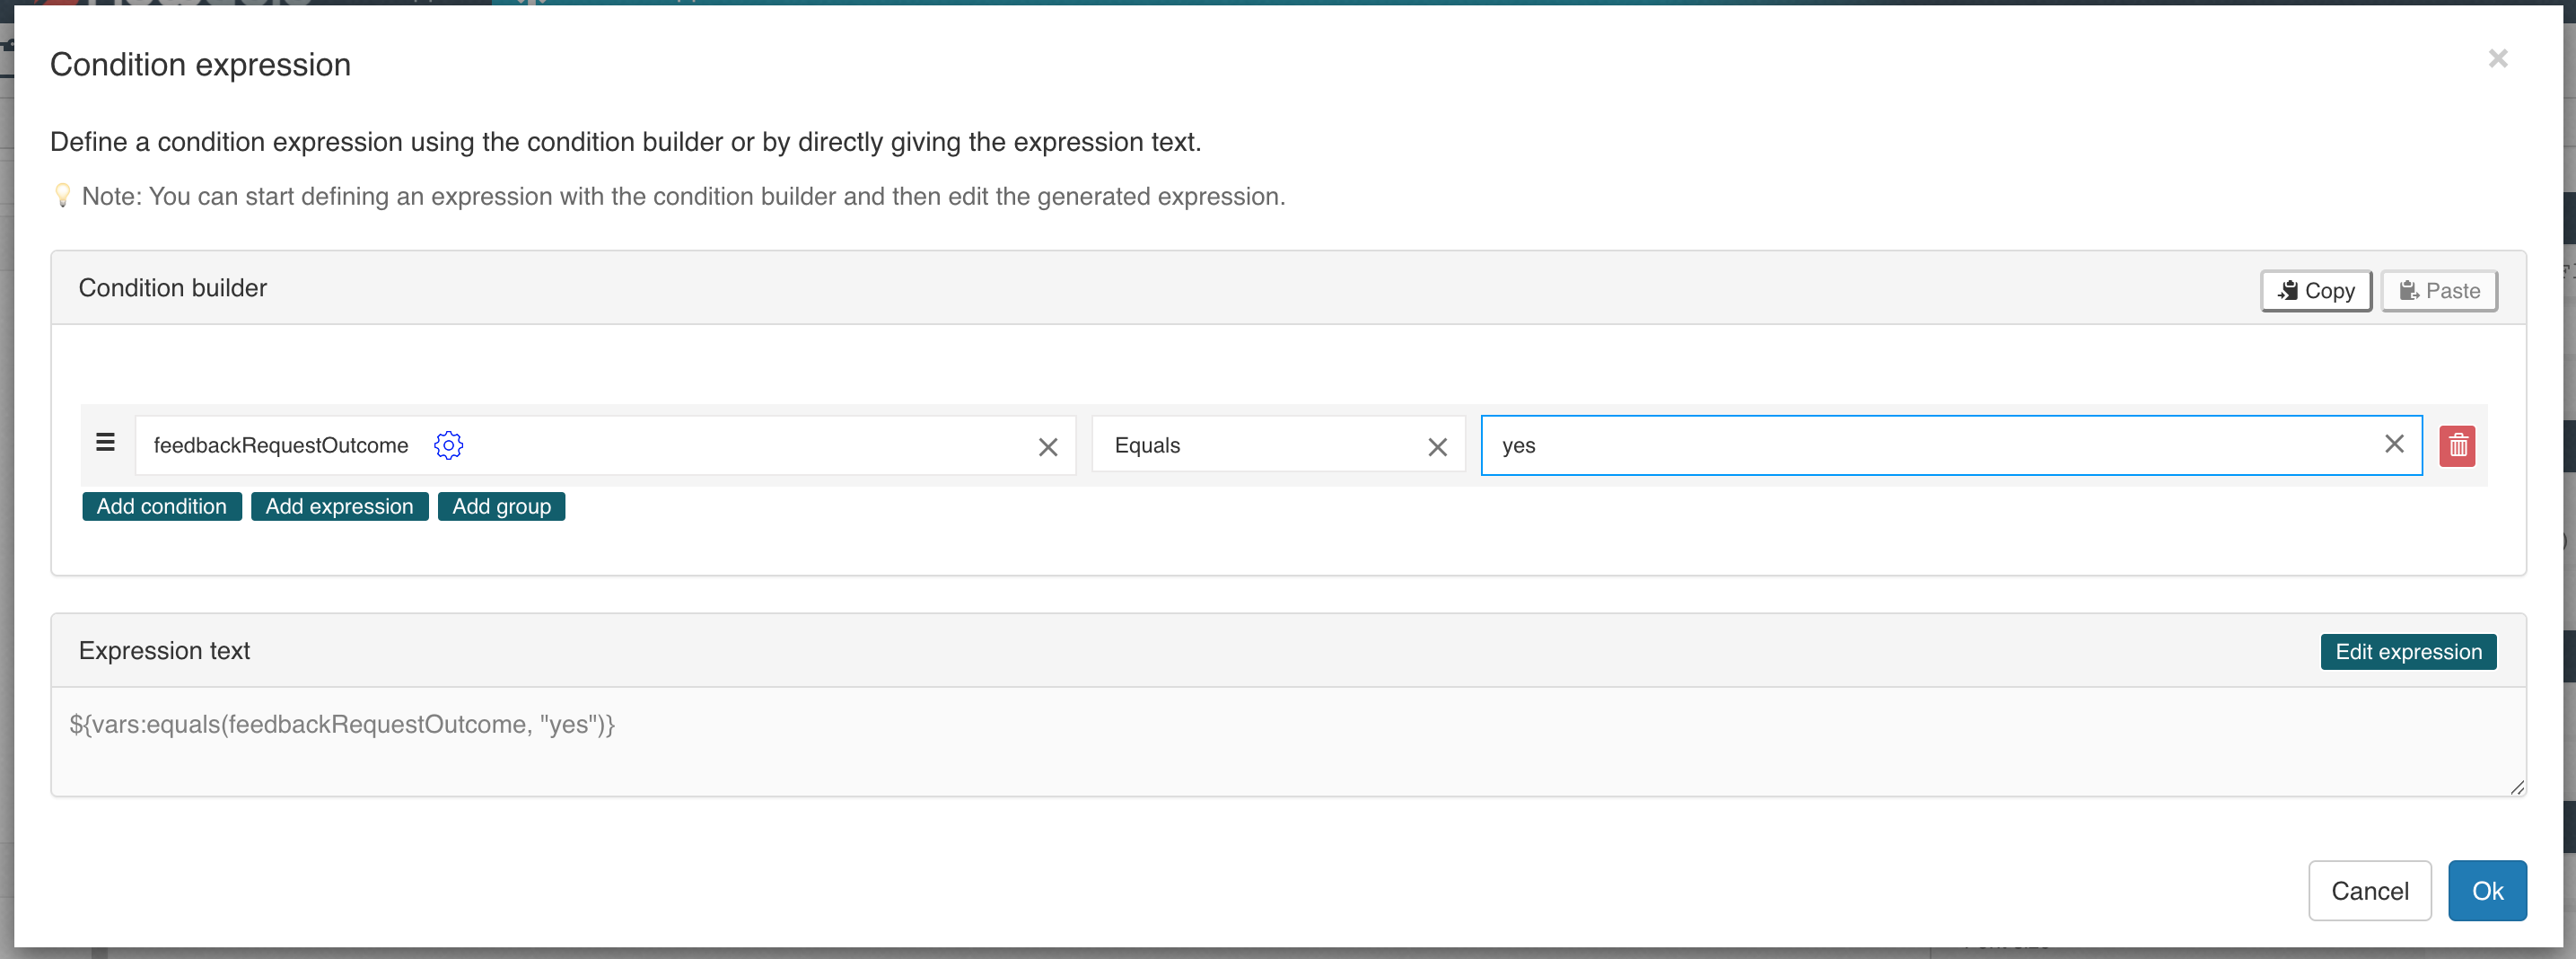
As you can see, we can make use of the interactive outcome variable we set on the data mapping of the event receive task and match it with the id of the
button we set on the WhatsApp interactive message task (in our case either yes or no).
We add a joining exclusive gateway and drag another sequence flow to it, naming it no and marking it as the default to make sure every other result ends up
in not taking part in the feedback request.
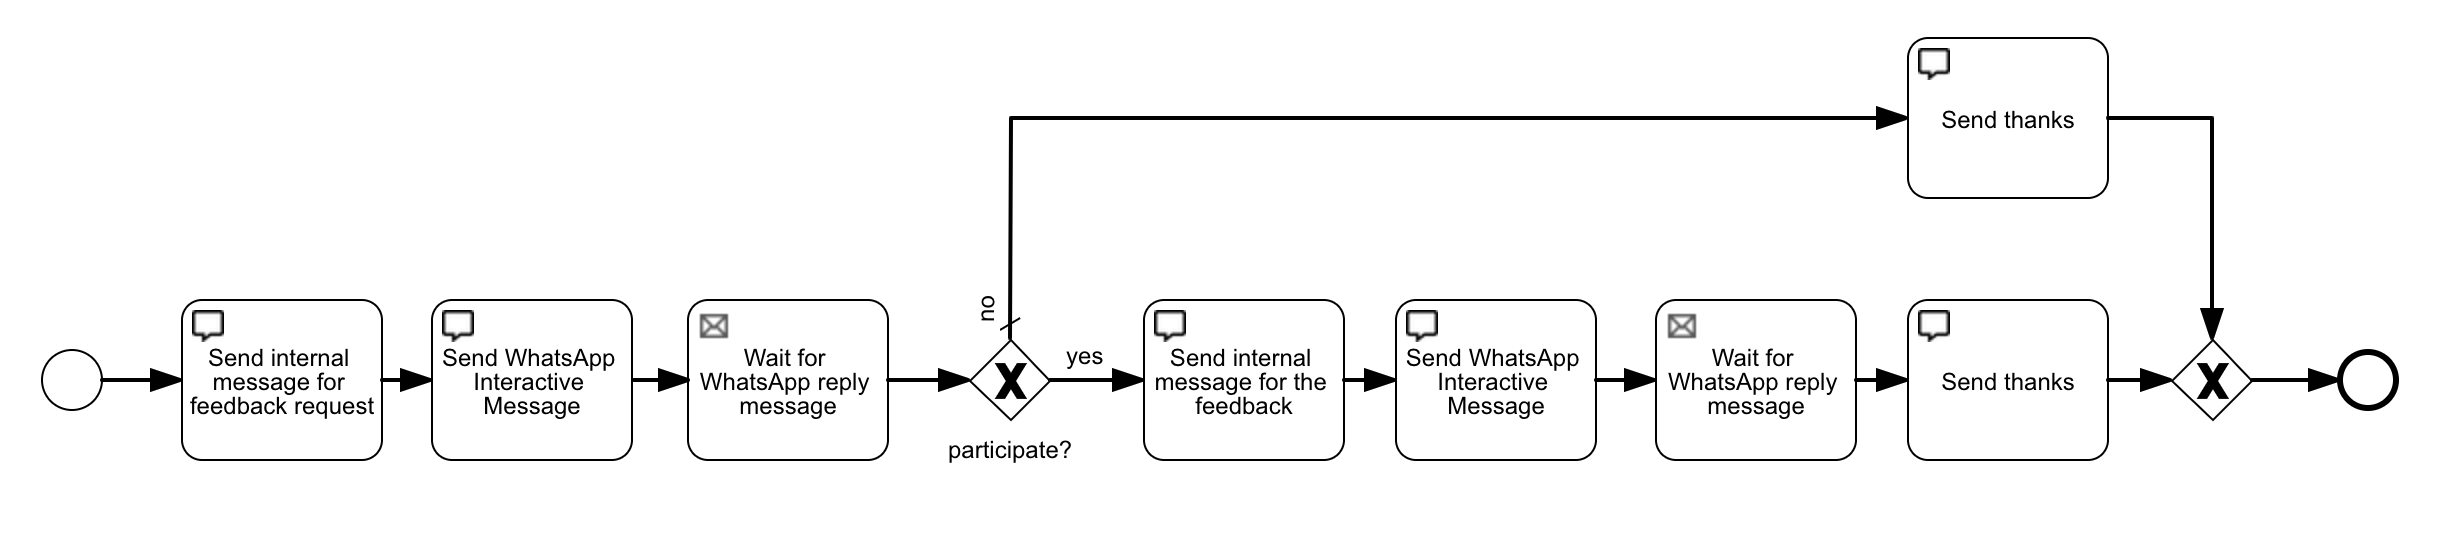
Add feedback request path in the process
As a next step, we use the very same pattern for the actual feedback by first creating an internal message, representing the interactive template message to be sent to WhatsApp, then the interactive message itself and finally the event receive task to wait for the answer.
As the internal message, we could use something like this as the content:
_(sent as interactive message to WhatsApp)_

Please choose the level of service you experienced with us.
(levels from 0 to 5, 5 being best)
Everything else can be the same as in our first one, which is ${conversationId} as the conversation id property, systemInternal as the type, MD as the
content type and lastMessageId again as the message id result variable property.
The next task is again our WhatsApp interactive message service task, but this time we are going to make use of the list type, so choose List as the message type.
As the body text we use the same as in the internal message: Please choose the level of service you experienced with us.. As you will see later in WhatsApp, in
a list type interactive message, there is a link button rendered below the message you have to select in order to choose from one of the options. We can also
name this button, let's use Choose level as our button content.
The tricky part are the sections, WhatsApp offers sections and rows to present the options to select from. Of course, you can also just use one section and in
this case, create one section and leave its label empty, then WhatsApp will render all the options (rows) in one list.
Bear in mind that no matter the number of sections, currently, WhatsApp limits the number of options (rows) to 10 max, regardless how many you have per section.
In our sample, let's use two sections, named Insuficient quality and Sufficient quality, to divide the total amount of 6 options into two
categories. The first three rows go into the first section and might be labeled terrible, bad and mediocre and for the second section good, super and fantastic.
Optionally, you can even give the options a short description if the label is not good enough.
Like with the buttons, the id is the important part if we want to use the selected outcome later on in the process. We can use values from 0 to 5 for our
sample.
Optionally, you can make use of a header and / or footer additionally to the main content of that interactive message. Let's use something like Provide feedback
as the header text and Let us know how you rate us. as the footer text. We will see in WhatsApp how they get rendered as part of the interactive message.
The last part is the Receive event task again we can configure the same way as the first one with the External message received inbound event and the same
correlation parameters. To not overwrite the existing previous outcome, we choose serviceQualityLevel as the mapping to the interactiveOutcome event field.
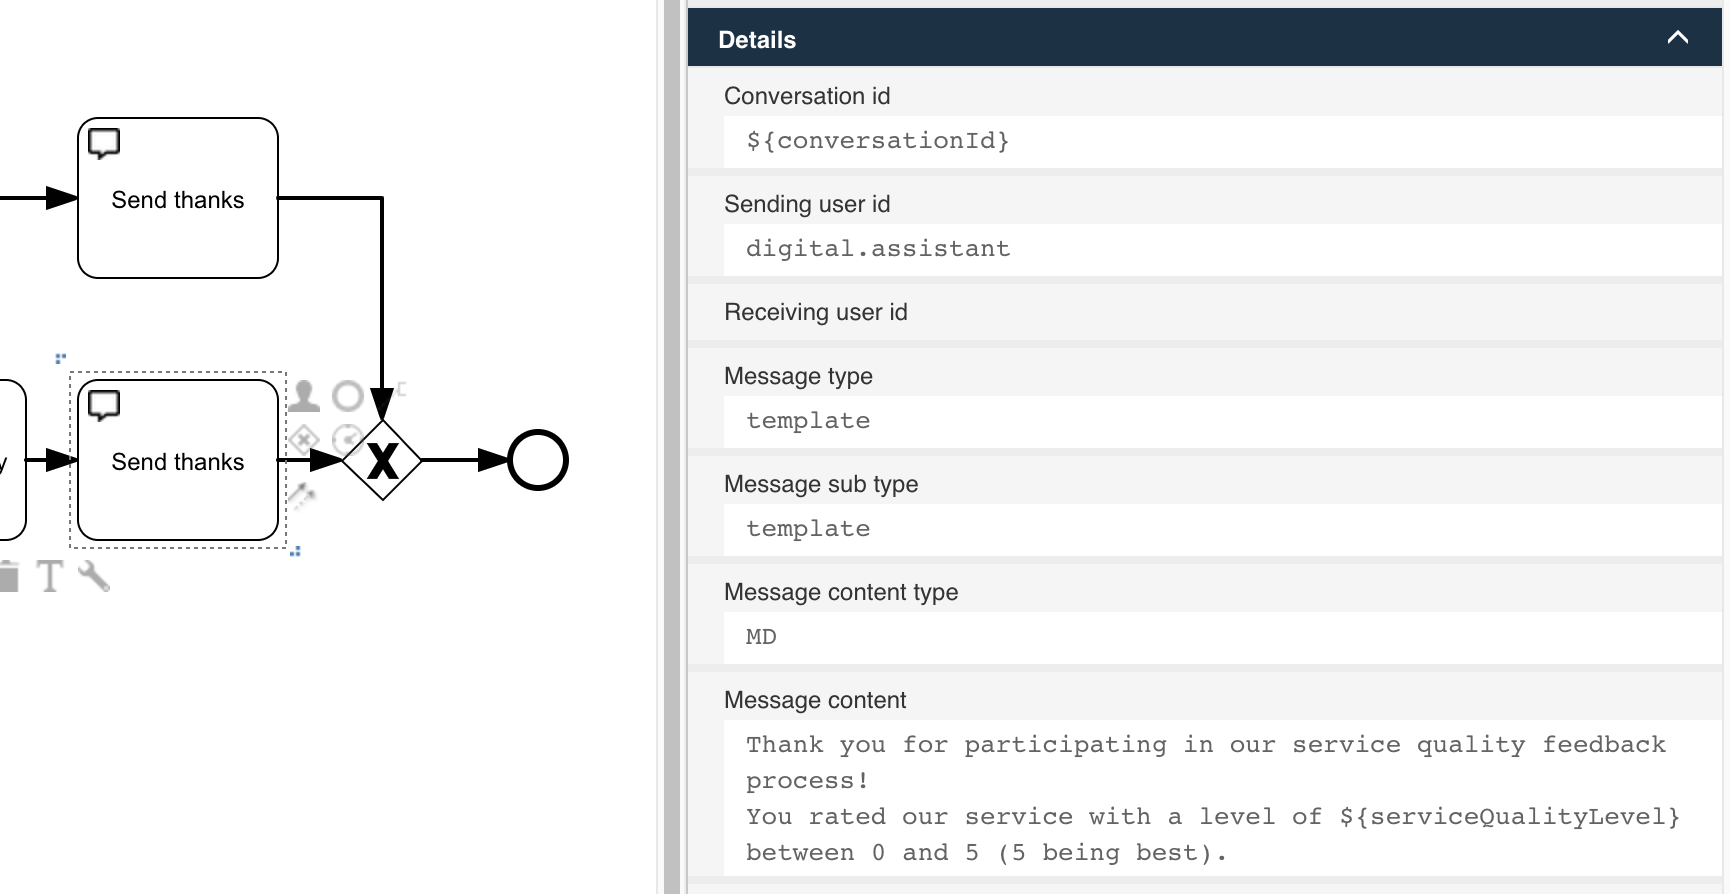
Maybe we want to send a thank you message at the end and we can use the Send message task again for this, but now just using template as the message type
which will send it to WhatsApp as well, not just internal as we did before.
As the message, we might use something like:
Thank you for participating in our service quality feedback process!
You rated our service with a level of ${serviceQualityLevel} between 0 and 5 (5 being best).
You can also add a Send message task in the other path where the client does not want to participate in the feedback request just as a feedback that we got
their decision.
Final sample process
The final process for our feedback might now look like this:
Let's publish it and give it another try.
Running it will produce the following conversation on WhatsApp:
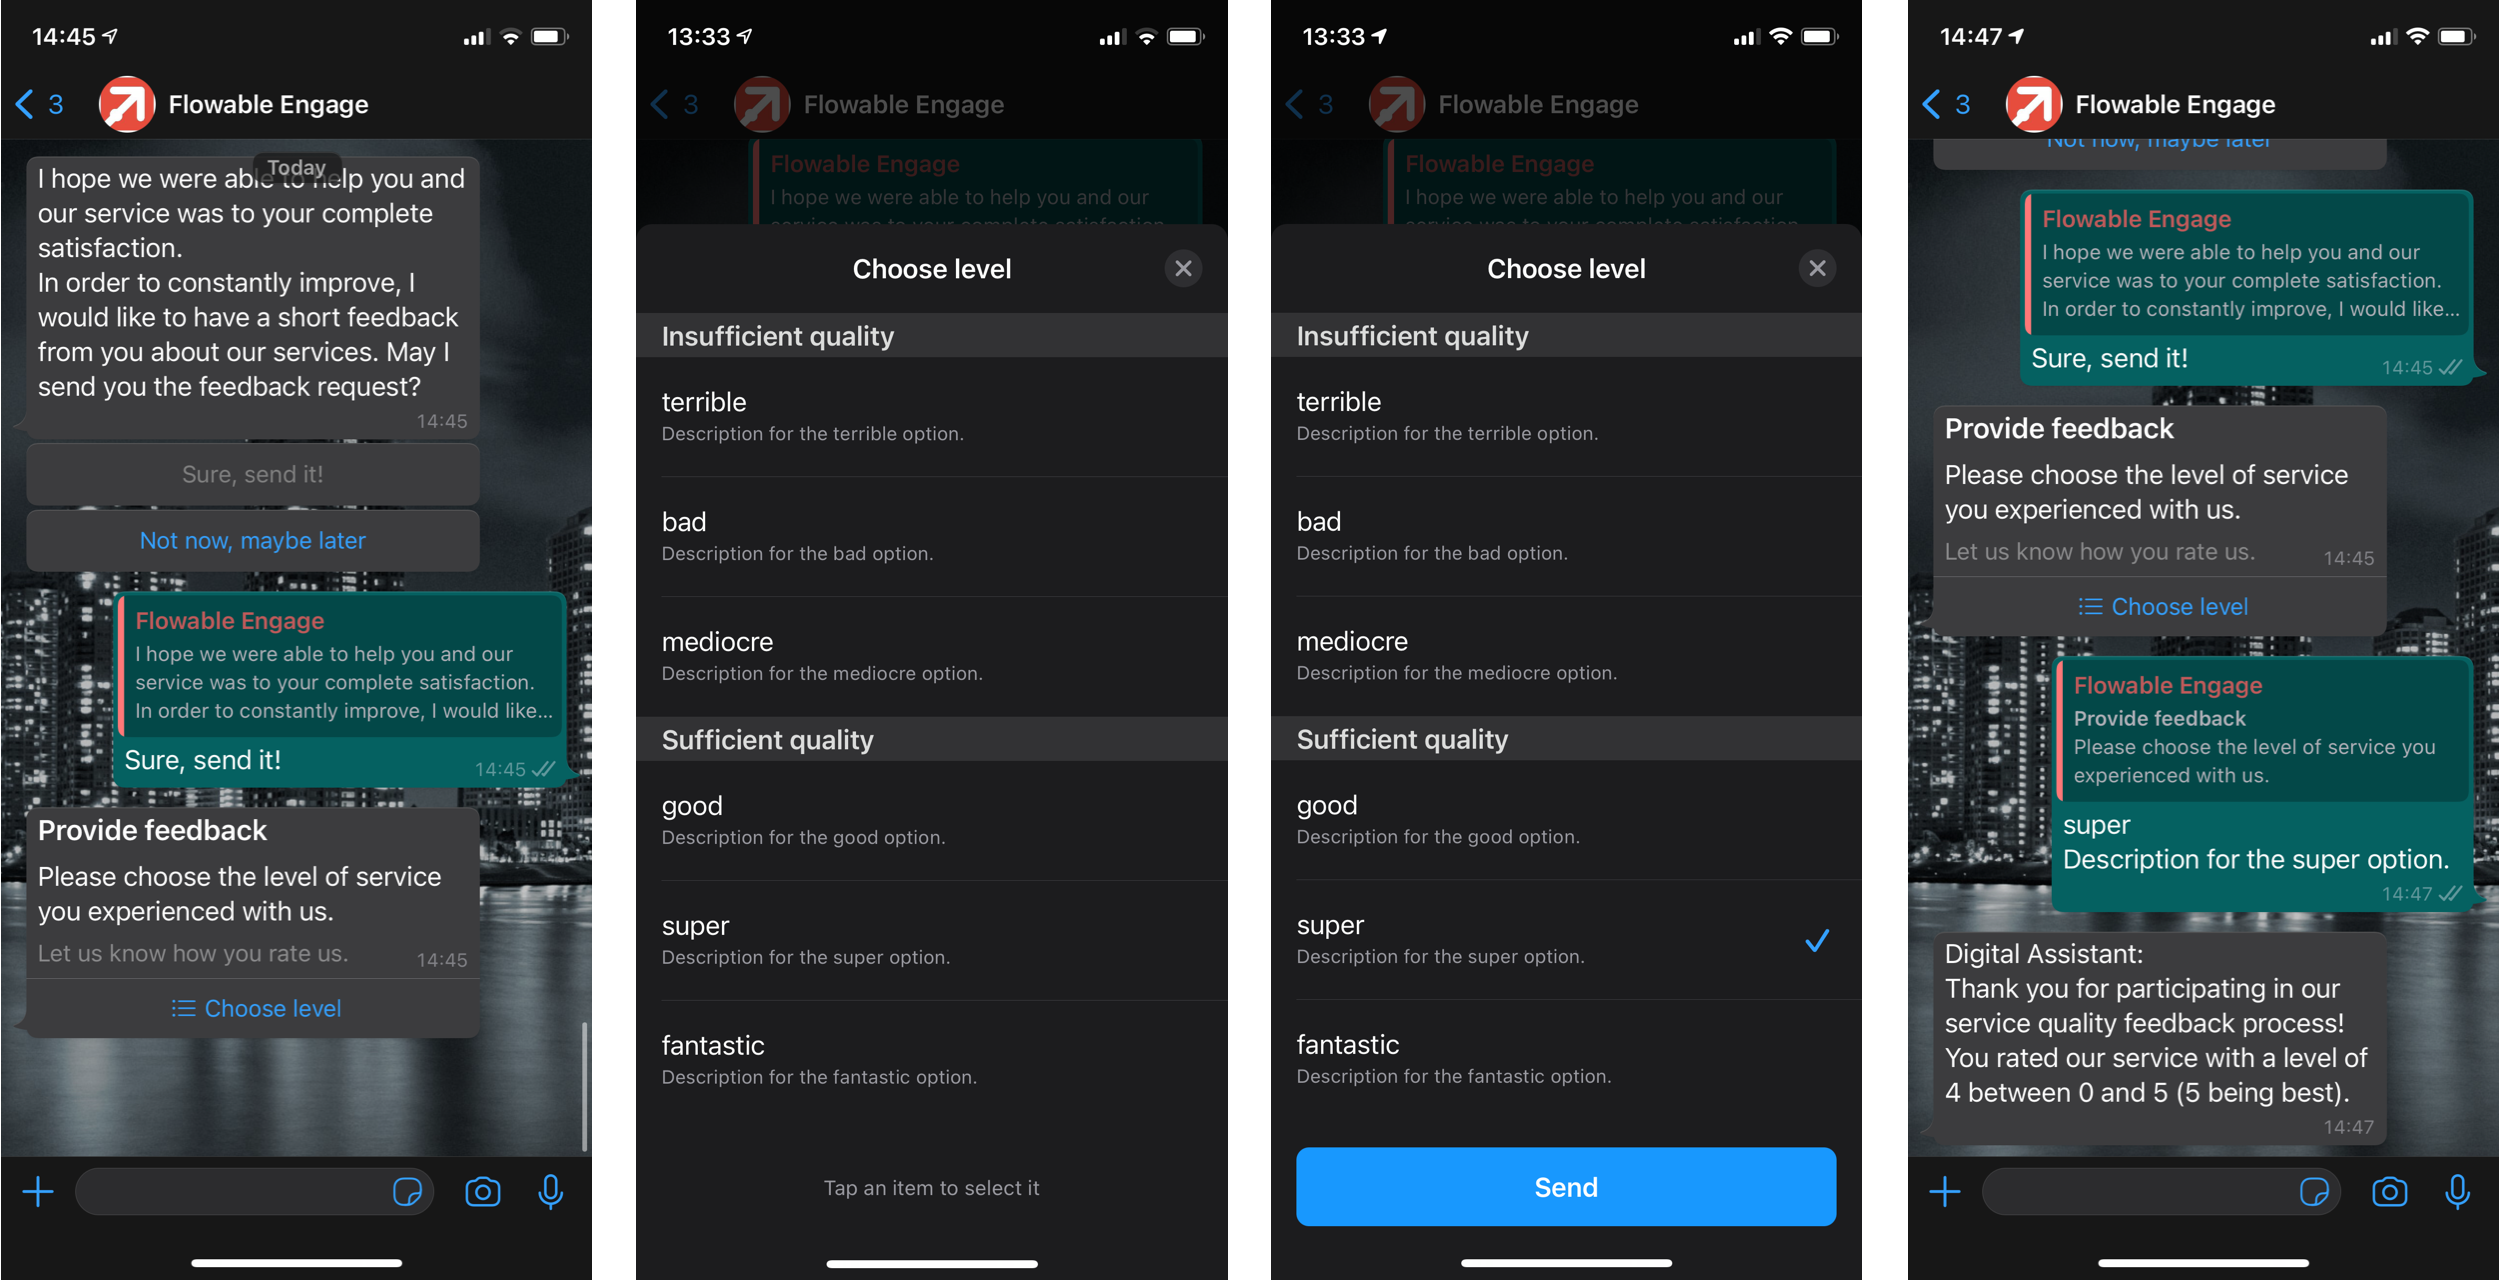
Internally, it looks something like this:

Making the process more robust
What happens, if the client does not answer the interactive message as we can't force that to happen, obviously.
As one option, we can add a timeout to the waiting receive event task to abort the feedback process completely, if the client does not respond within a defined
amount of time. We can use a Timer boundary event on both the Receive event task activities to cancel the process if they run into the timeout:
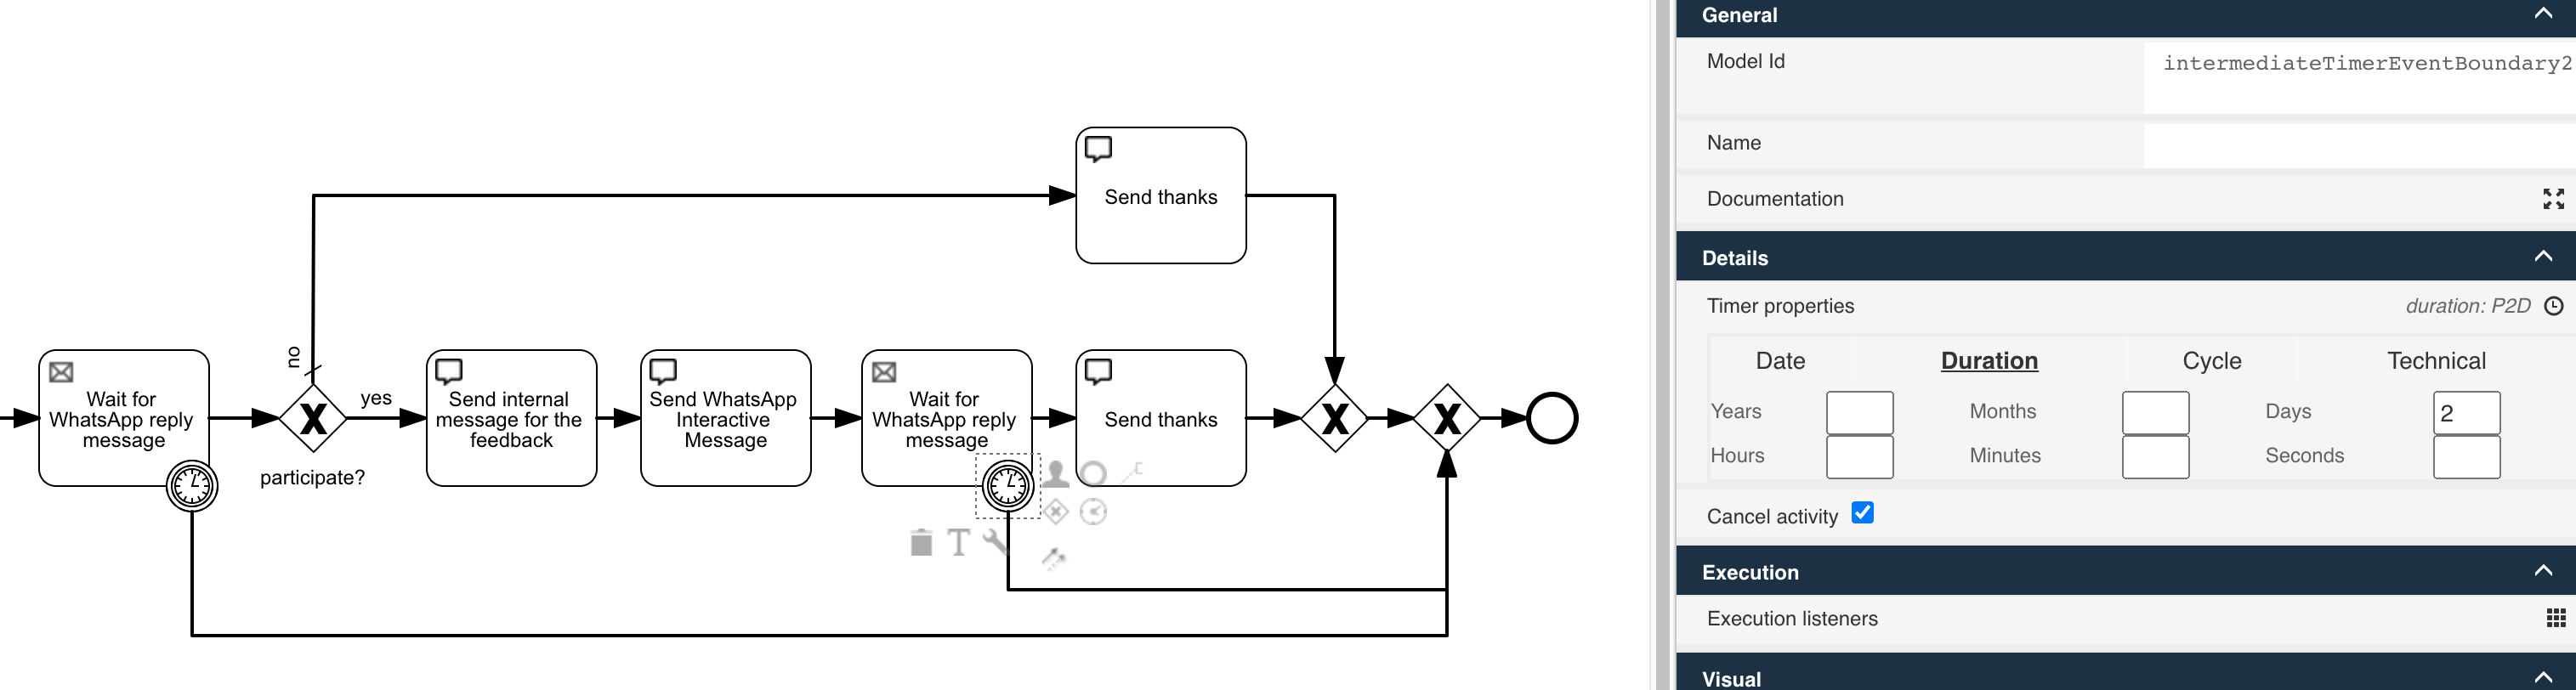
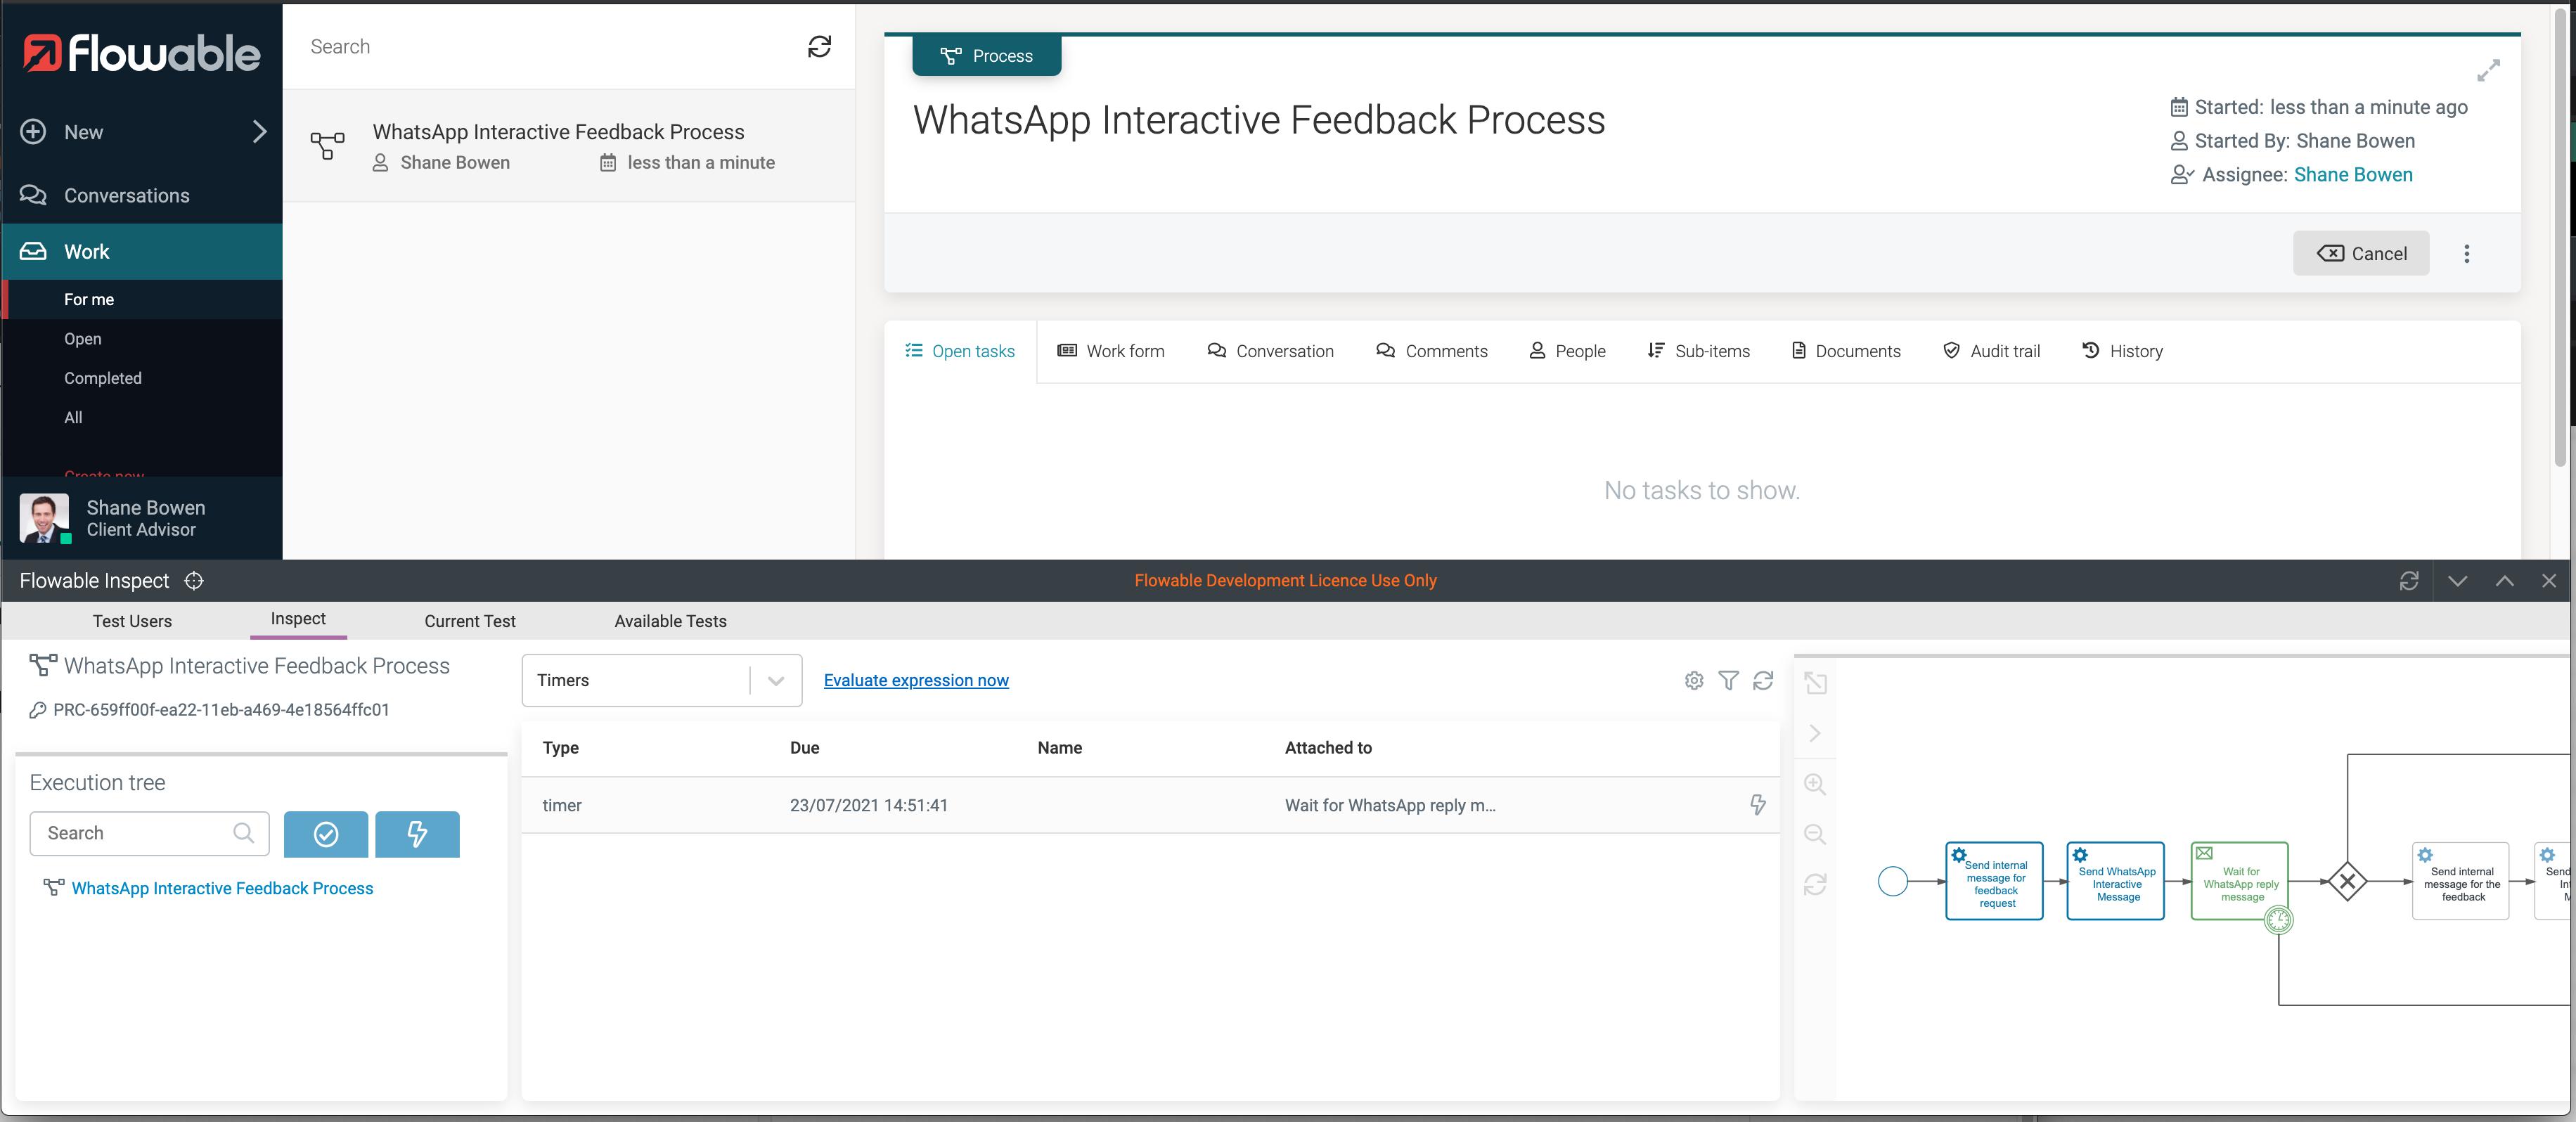
By the way, if you want to test the timer boundary event and its path, but don't want to wait for two days for it to trigger, here is an easy way to test it using Flowable Inspect.
Go to the Work inbox in your Flowable Engage runtime, select Open to see all currently open processes, and you should see your running WhatsApp interactive feedback process.
Select it and then in the bottom left user menu, choose Show Flowable Inspect to see behind that process instance.
From the Inspect UI choose Timers instead of the default Variables view, and you should see your timer instance there. If you want to test what happens if that
timer triggers without actually waiting for it, simply use the lightning icon on the right and trigger the timer. The process will then be completed immediately
as if that timer triggered on its configured time, and you can test that path.
Creating a scoped action
As mentioned in the action creation chapter at the beginning of this how-to, we also want to take a look on how we can make use of a scoped action instance instead of a global one. This gives us the possibility to exactly choose where our feedback process action should show up and not globally on all conversations with a specific type and state, maybe that would be too much.
If we only want the action to show up on a conversation with a client over WhatsApp, we can make use of the action instance builder API in Java:
actionRuntimeService.createActionInstanceBuilder()
    .actionDefinitionKey("getFeedbackThroughWhatsApp")
    .scopeId(whatsAppConversation.getId())
    .scopeType("conversation")
    .scopeDefinitionId(whatsAppConversation.getConversationDefinitionId())
    .name("Get feedback through WhatsApp")
    .start();
Of course, we need the conversation where we want to scope the action too, in fact, the id of that conversation would be already enough although we are using
a full fledged conversation object in our sample code as we only need the id of the conversation we want the action to be scoped to.
The scopeDefinitionId is optional and is a good practice to set, if available, but might also be null.
The name is optional too and if not explicitly provided, the name of the action model will be used instead.
As soon as the action instance is created, it has the exact same effect as if we defined it on a global level, but we have the ability to only scope it to the conversations we want it to appear and not globally on all of them.
You need to slightly adapt the action model by unchecking the Show action globally checkbox to make sure it only shows up where an instance has been
created and scoped to a conversation.
Conclusion
As we could see, the WhatsApp interactive messages are a great way to dynamically interact with your clients over WhatsApp and process the chosen options in
a process or case model with the existing service tasks provided by Flowable Engage and Work. Specially the Receive event task in combination with the
External message received event definition makes it very easy to wait for a reply from the client and then continue with the process and react on the option
chosen.