Restyle the frontend
Target audience: Developers
Introduction
In this how-to, we will modify the appearance of the Flowable UI to make it match the styleguide of the example GearCaseFlow company:
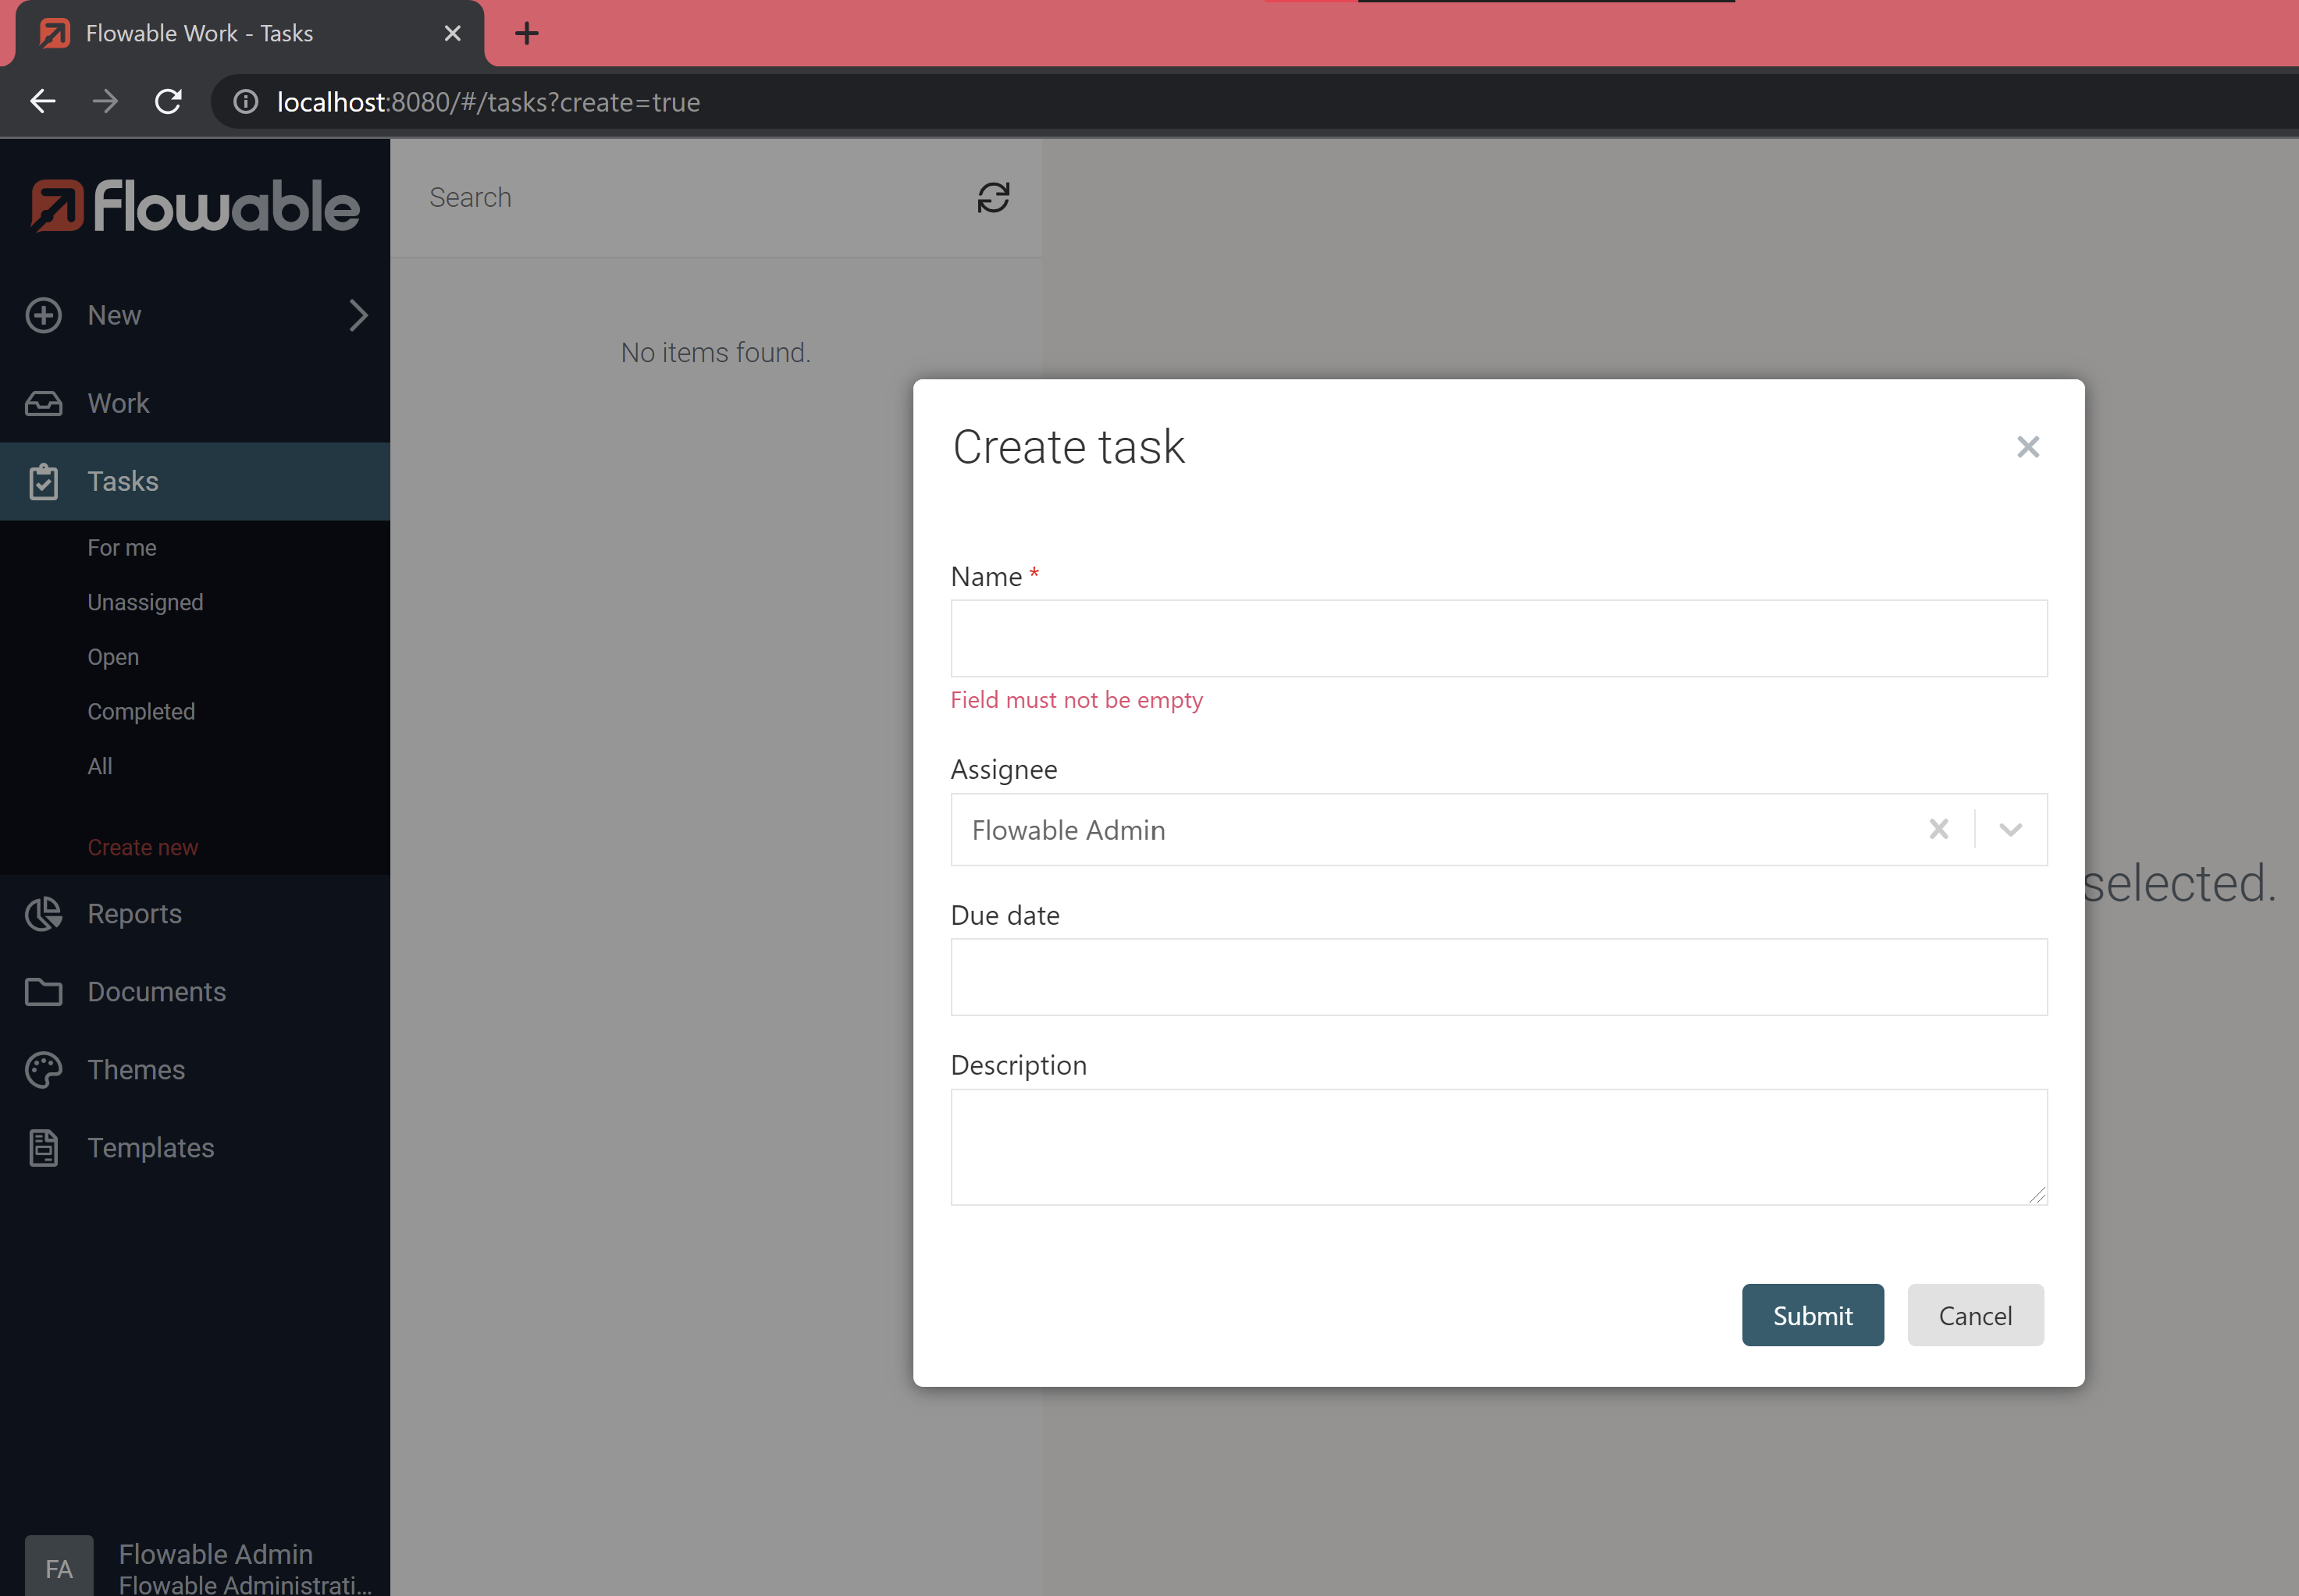
Before any restyling:
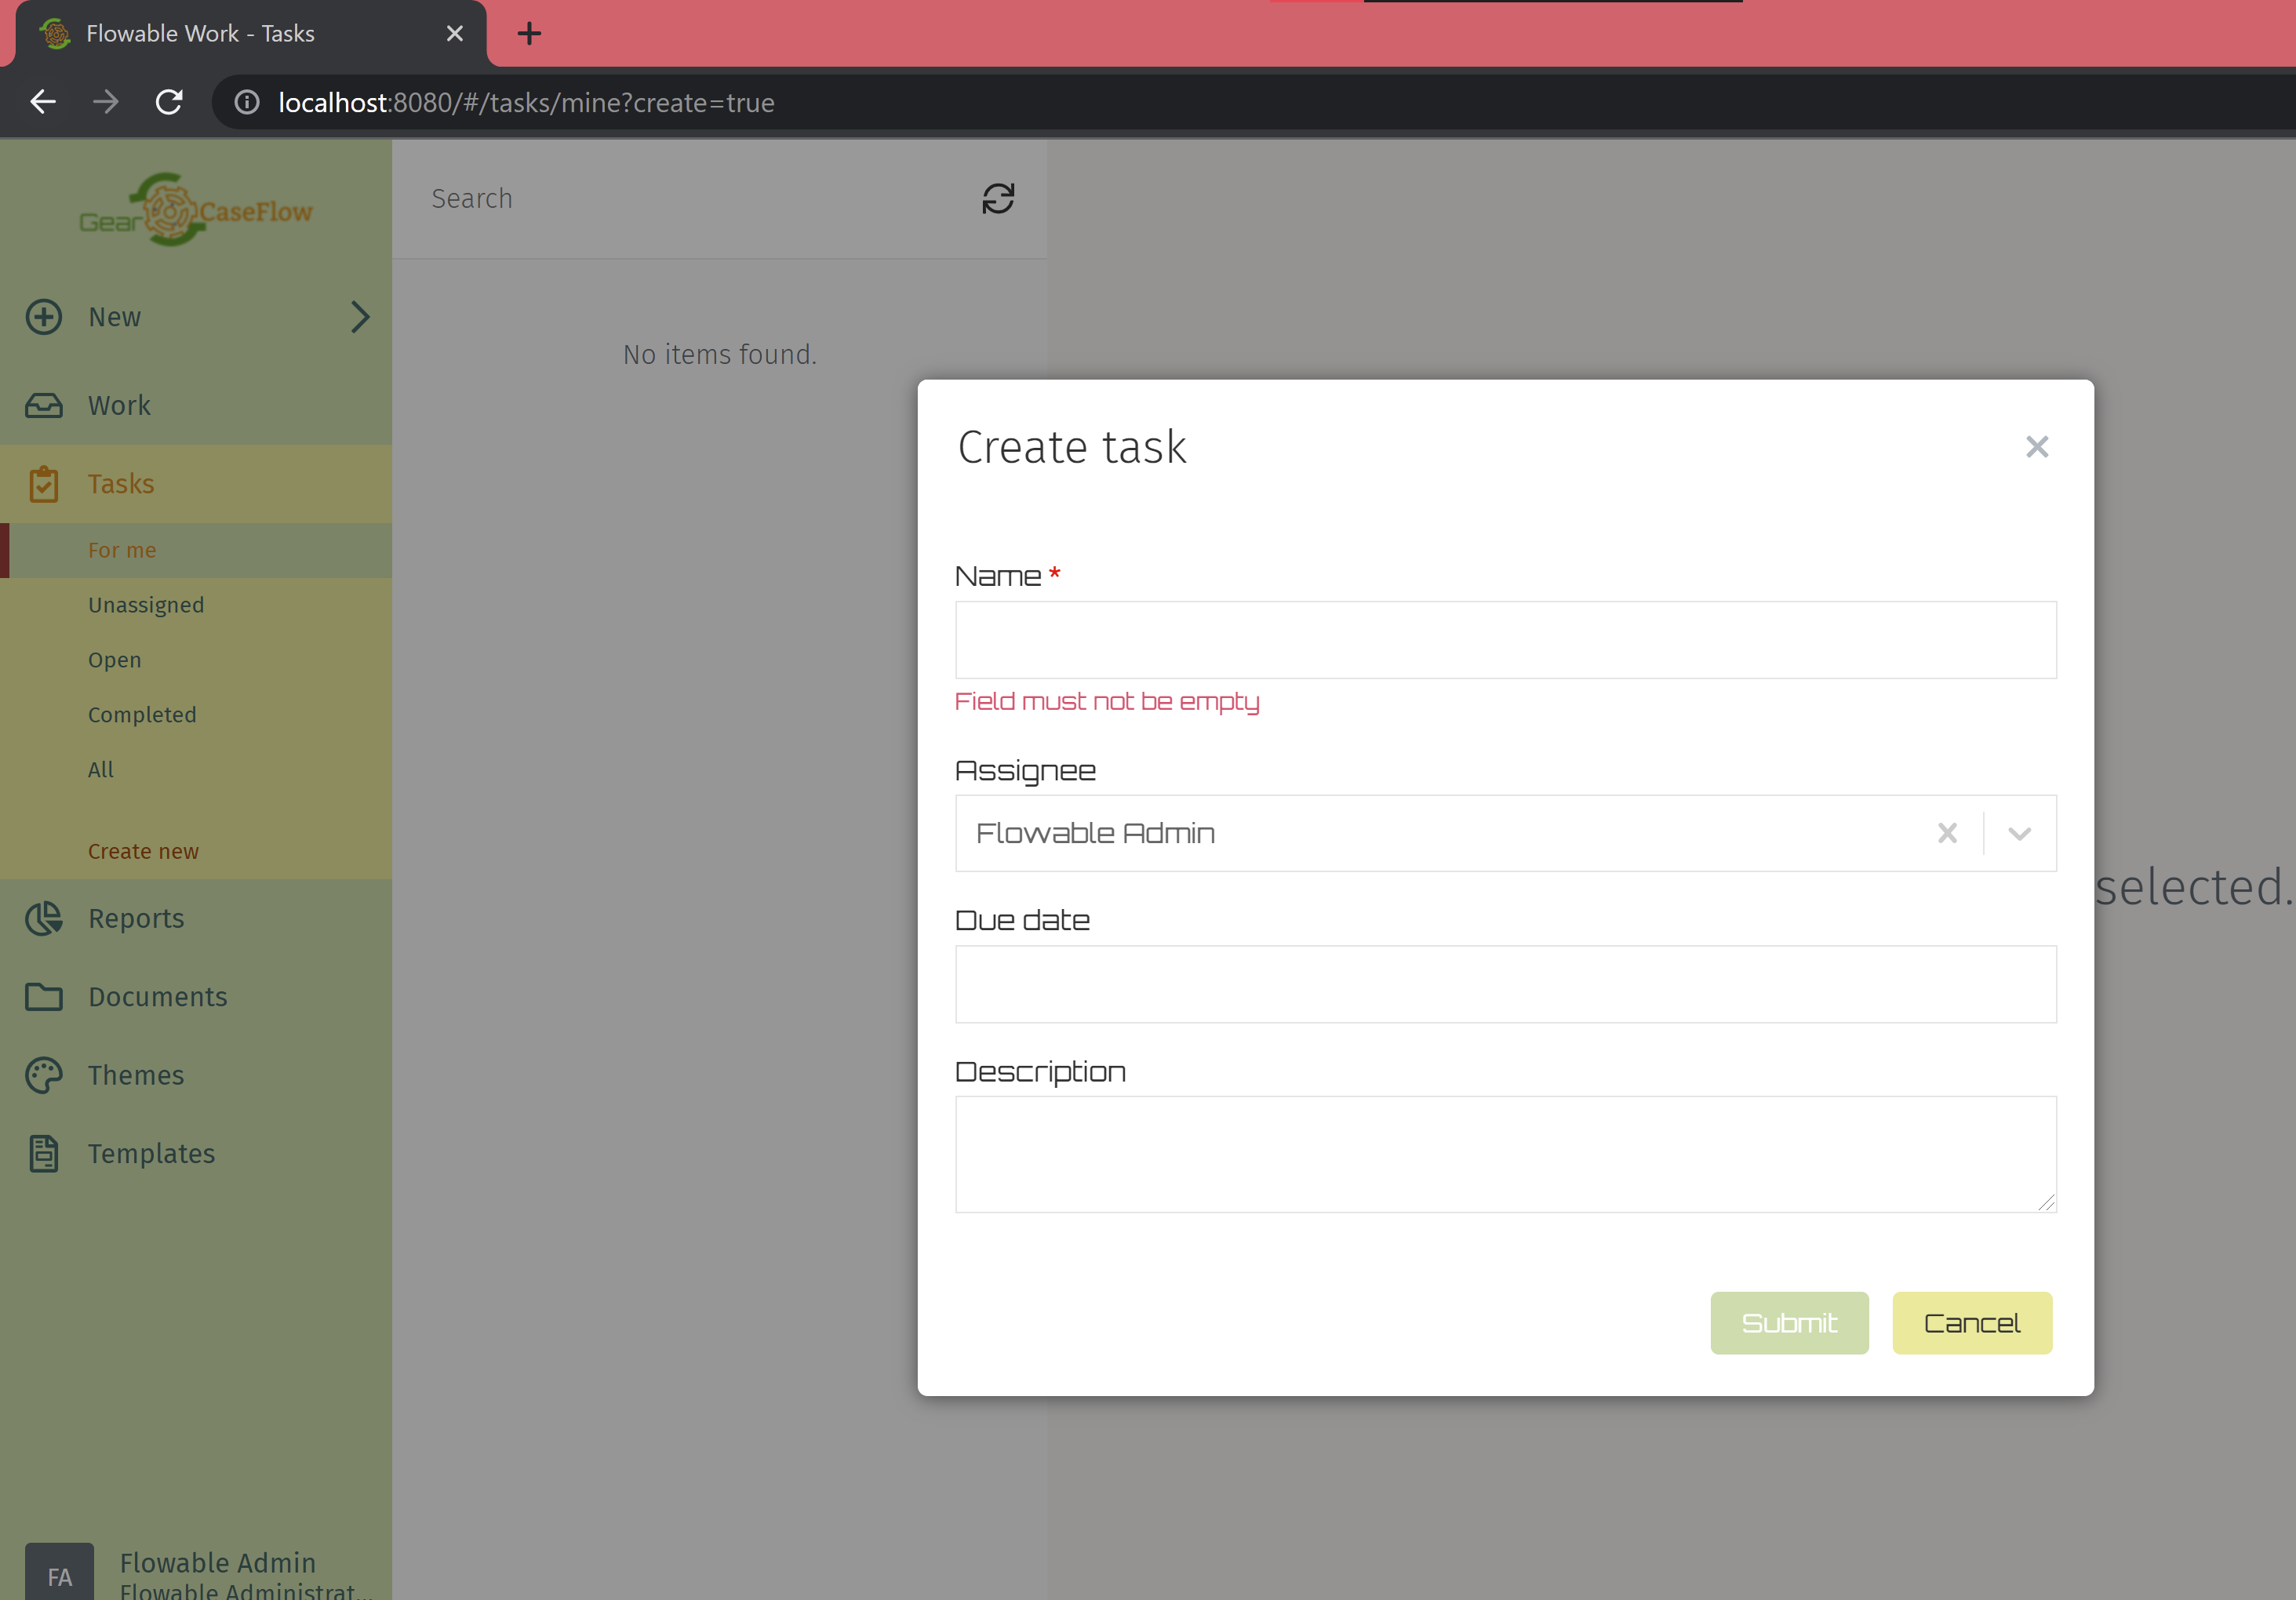
With style "Breeze":
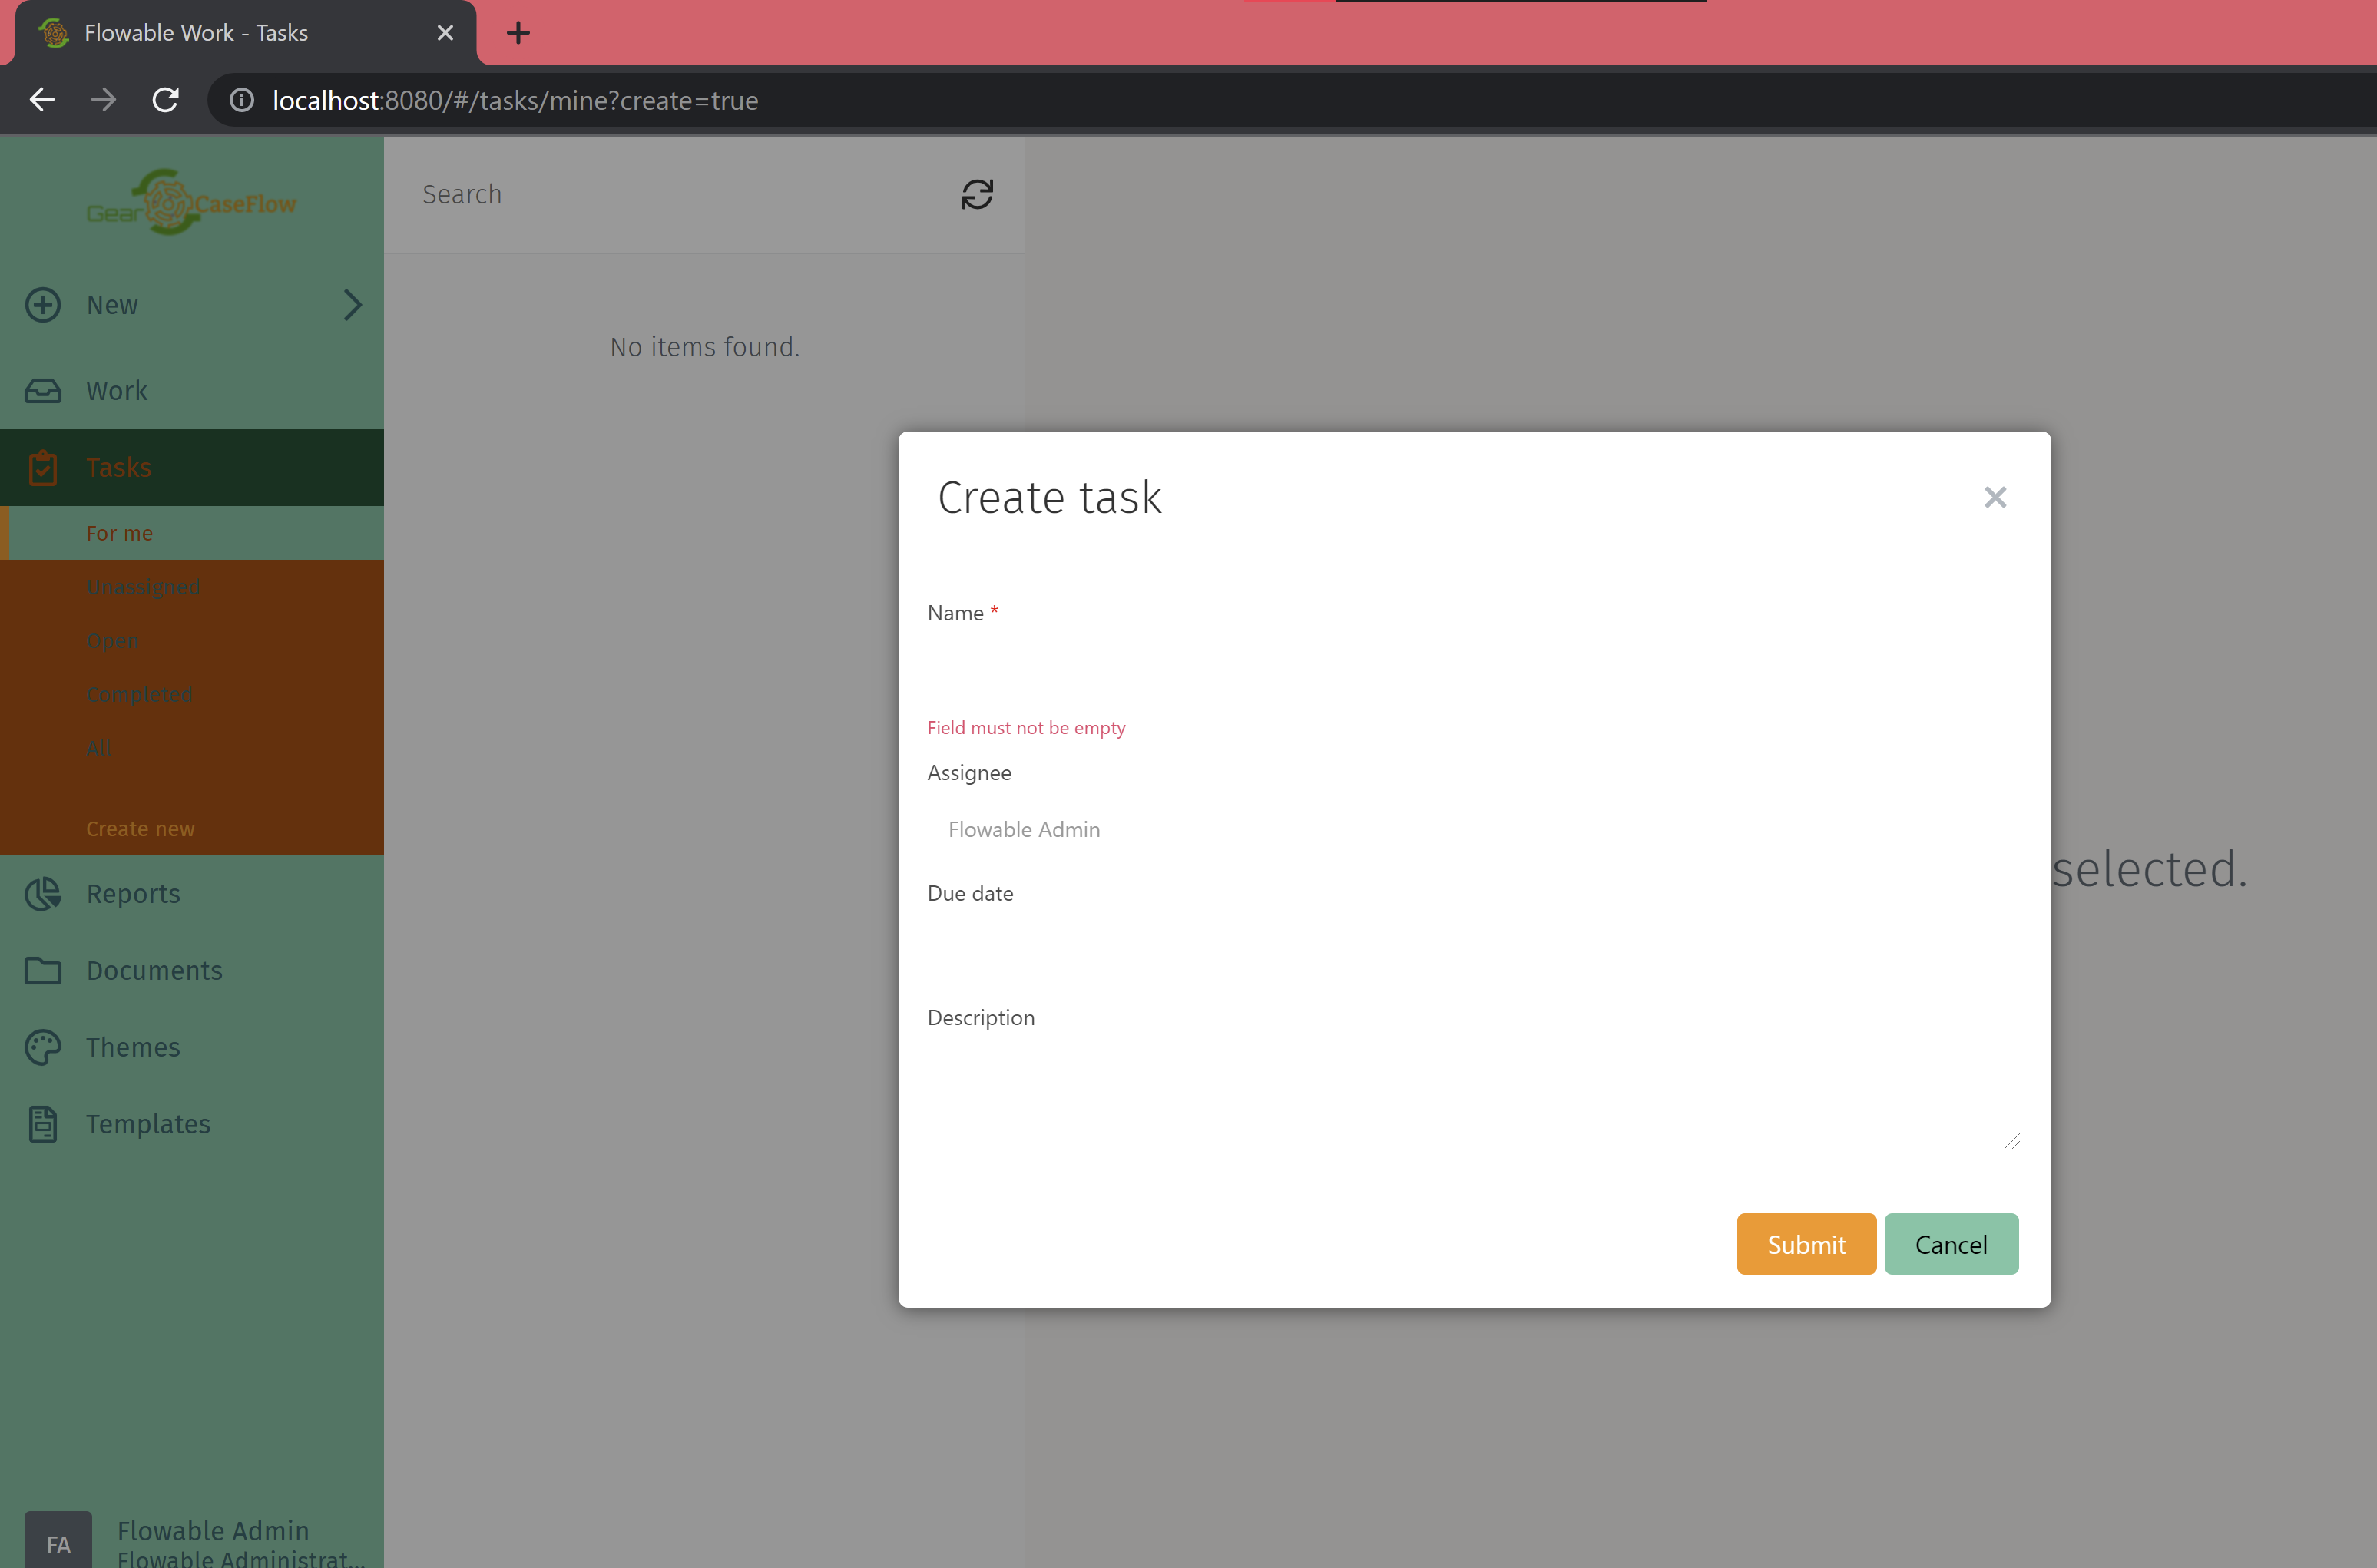
With style "Fresh":
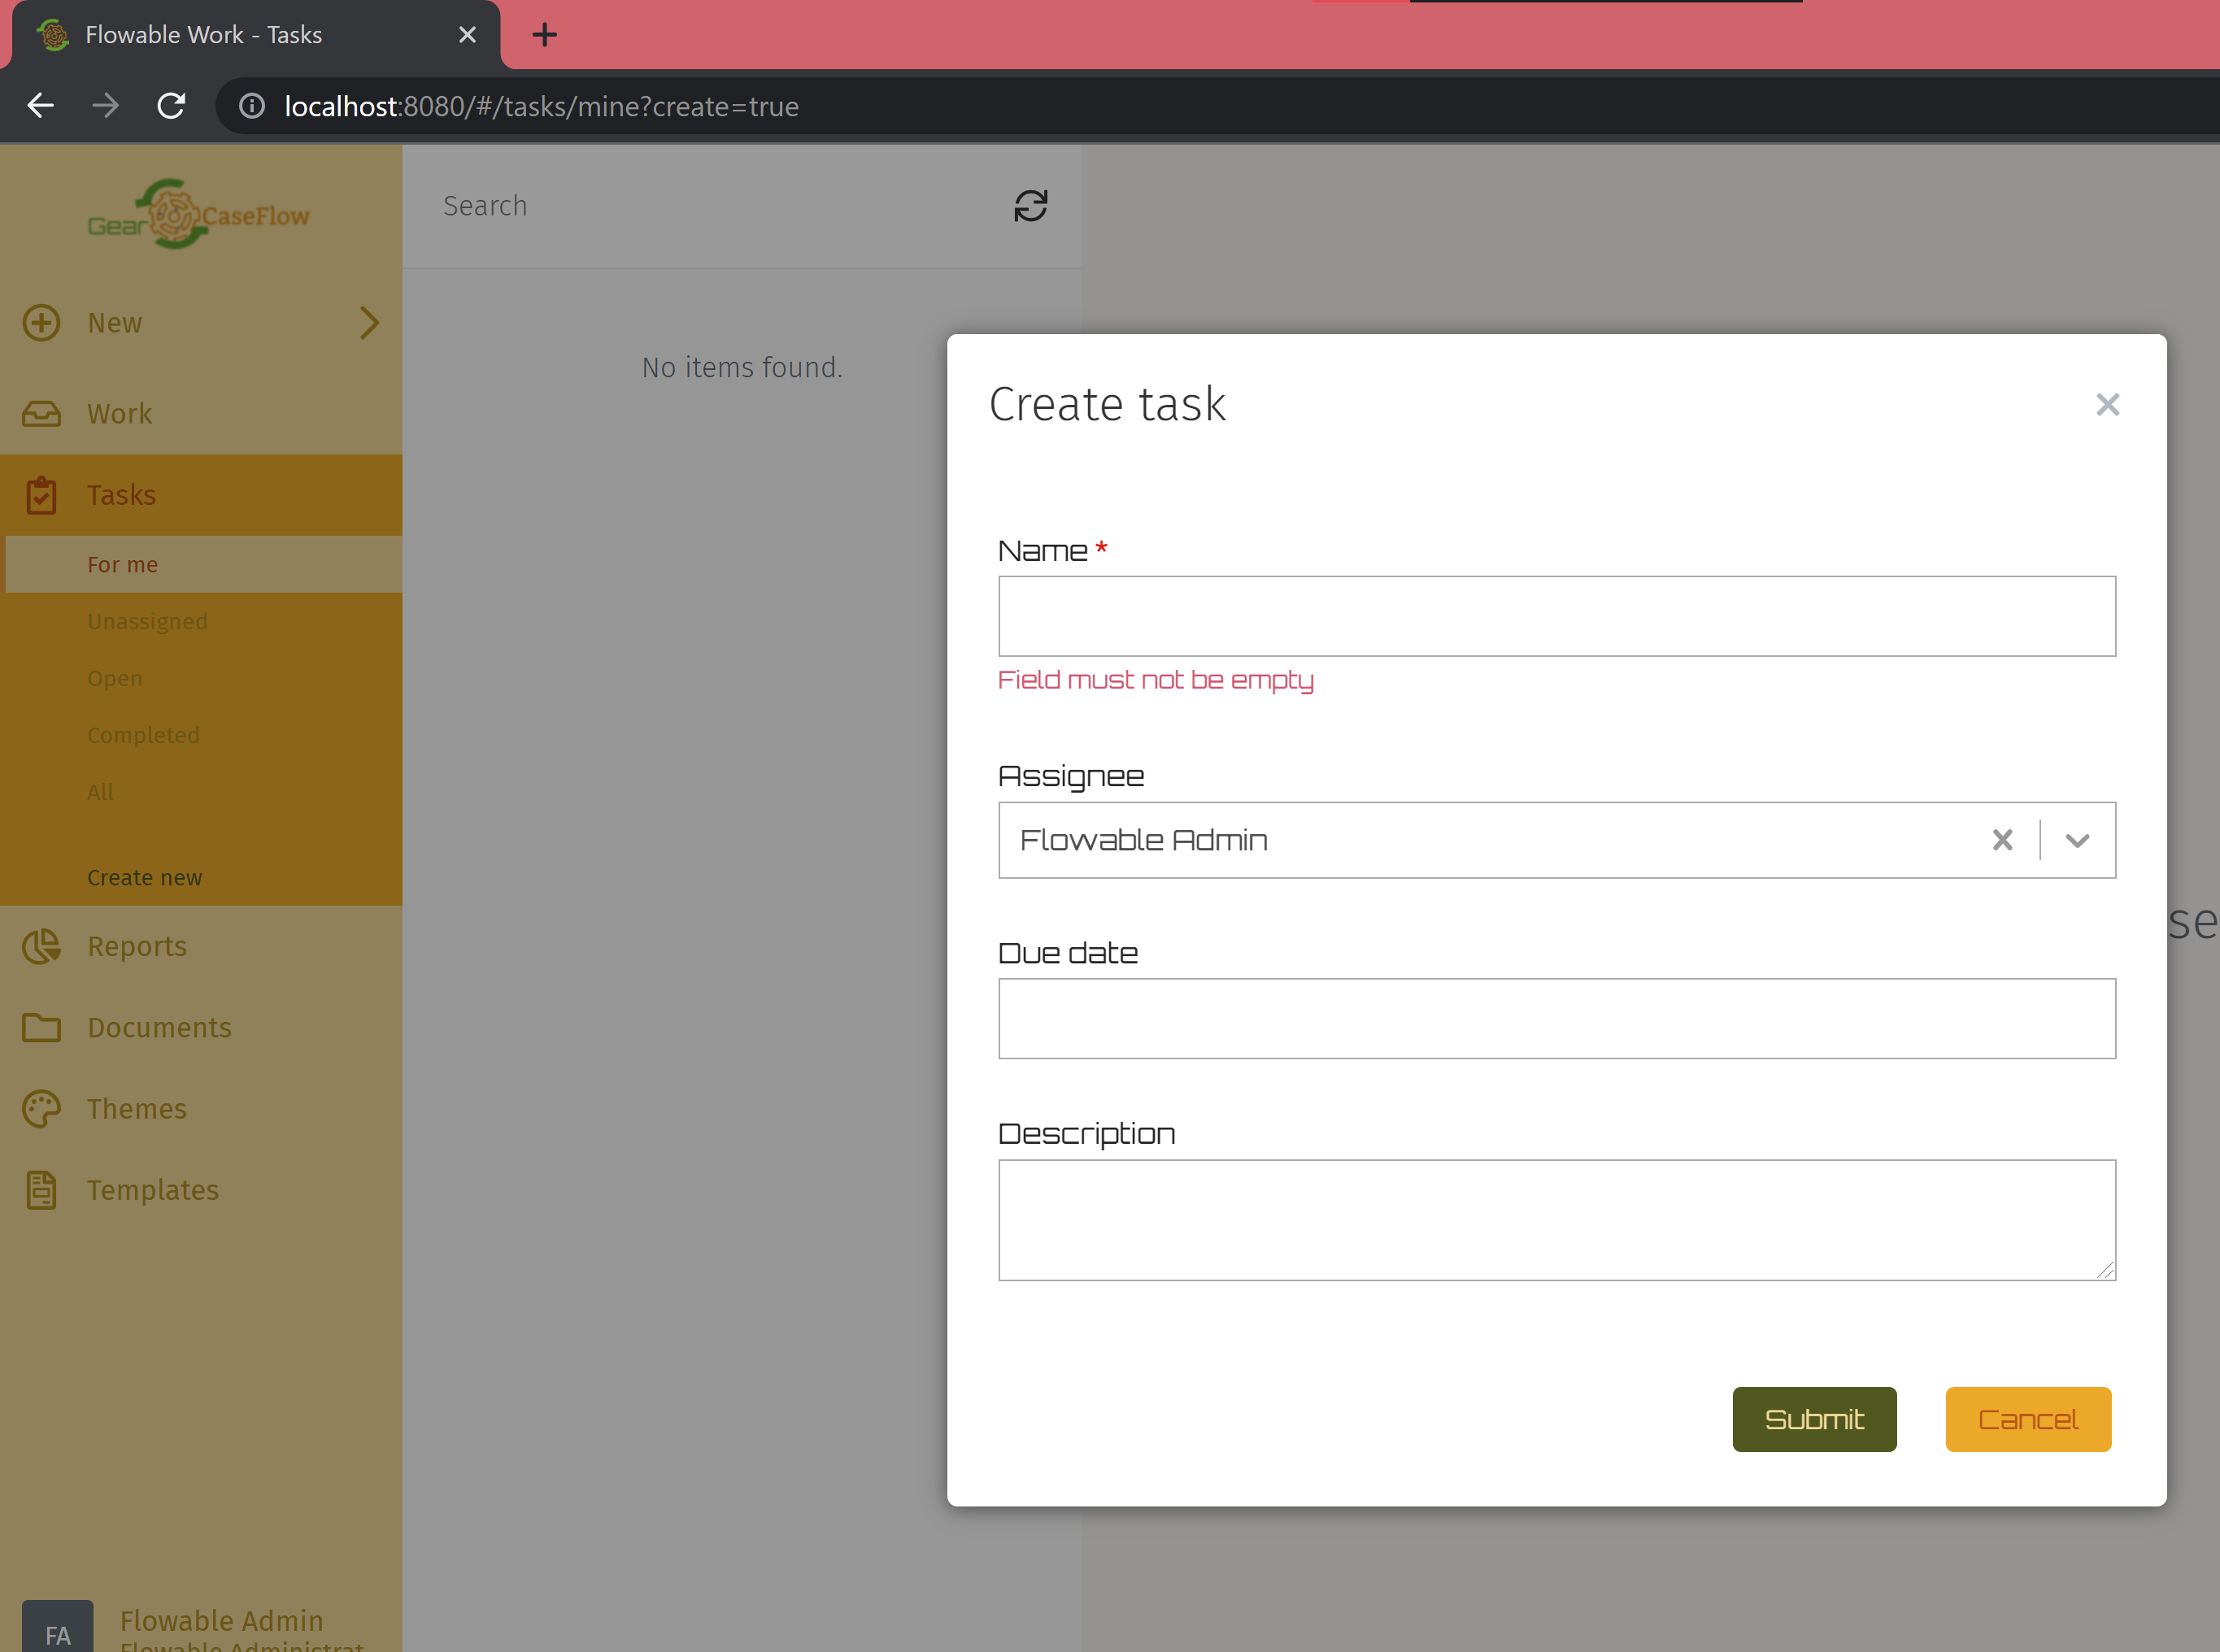
With style "Cozy":
If you want to dive in details into all your customization options, refer to the frontend theme customization documentation.
Load custom fonts, logo and favicon
Flowable comes with embedded fonts, logo and icons, but you can easily replace the ones used in the default theme with your own.
Let's tweak slightly the initial appearance of the Flowable UI with the following resources:
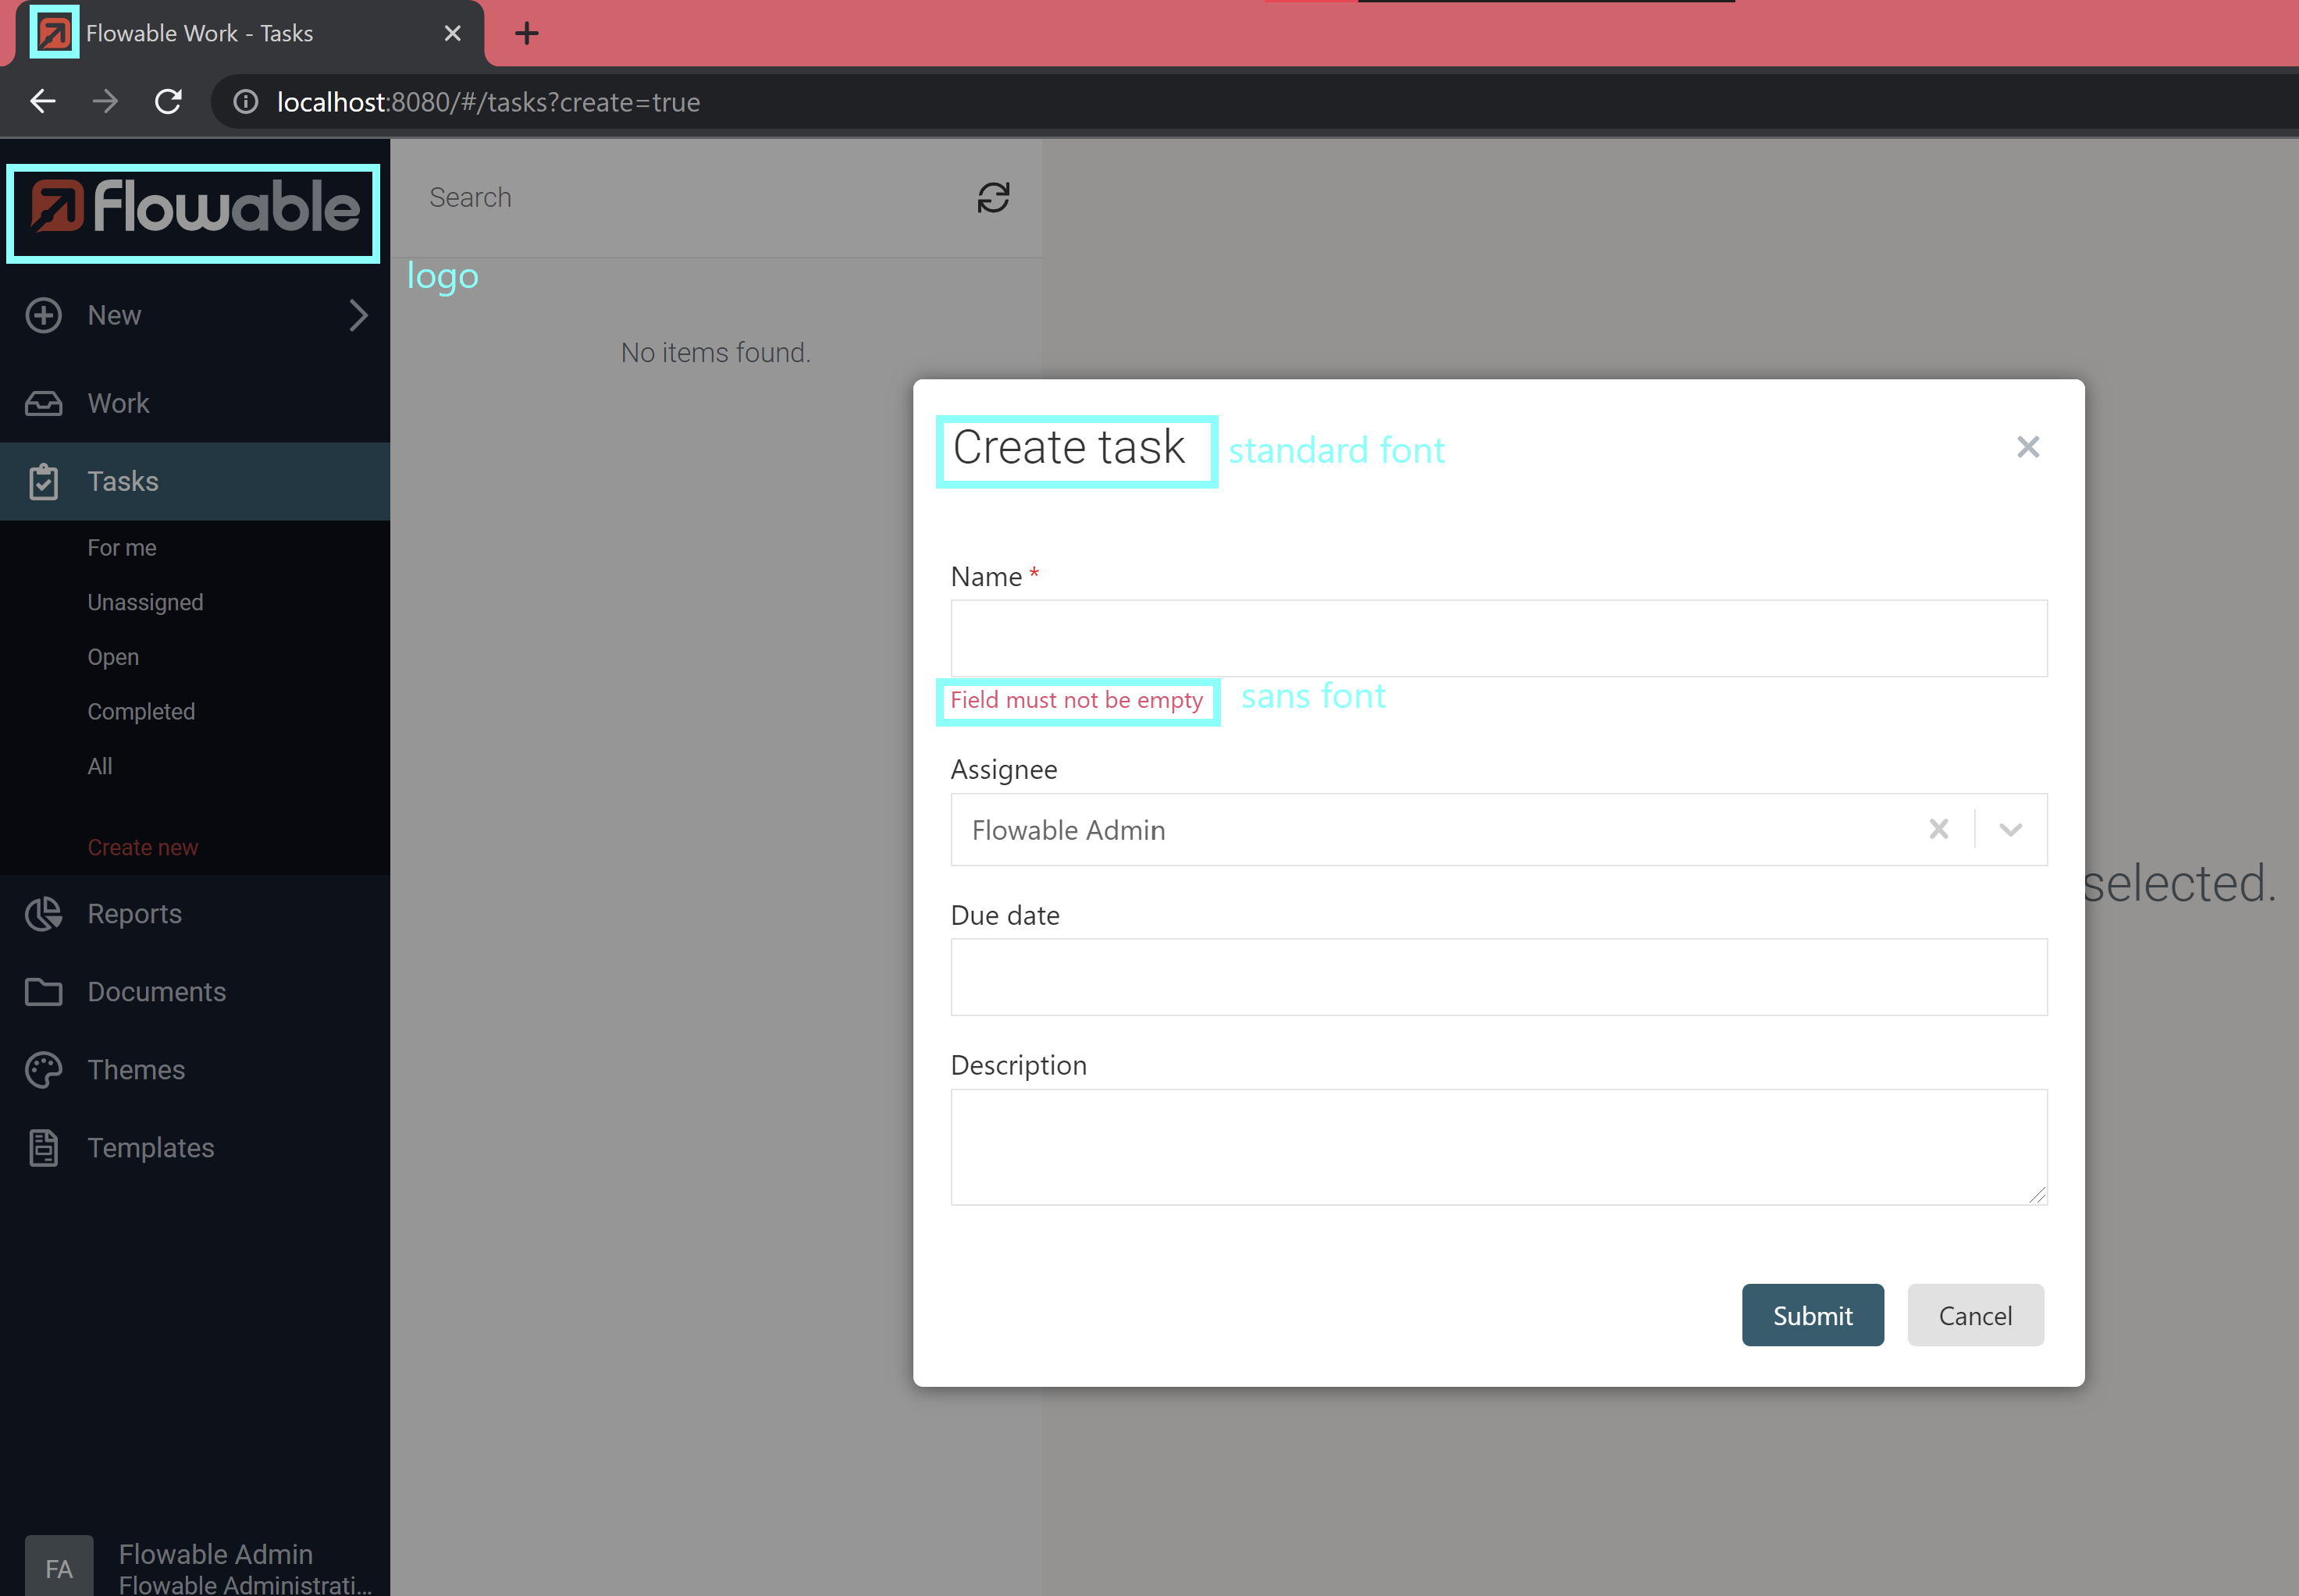
- Standard Font: Fira Sans (already available in the Flowable libraries)
- Sans Font: Orbitron (available on the Google Fonts page)
- Logo: GearCaseFlow full logo

- Favicon: GearCaseFlow favicon
- Notification icon (e.g. for chat and other desktop features): GearCaseFlow logo icon


The first step to include any of these changes, is to add the resources to your project.
So let's copy the logo, favicon and notification icon resources and to place them under /src/main/resources/public in your project.
Only the favicon and notification icon are picked up automatically (provided they are named favicon.icon and notification.png). For the other resources to come into use, user themes need to be created. We will work on it in a moment.
You can then create a file called custom.css with following content under /src/main/resources/static/ext:
@import url('https://fonts.googleapis.com/css2?family=Orbitron&display=swap');
Note: of course, you can also download the Orbitron font files from the Google fonts website and declare the font here using the @font-face API.
The Fira Sans font is already available in the Flowable libraries, so there is no need to add it to your project.
Create user themes
For this how-to, we will create 3 different themes, as there are 3 different ways to define the styles available in your project.
Customize the theme CSS variables in your stylesheet
To start with, if only one theme is relevant for your application, you can extend your custom.css file with corresponding CSS theme variables.
For example, extend your custom.css file with the following content:
:root {
  --flw-font-family: Fira Sans;
  --flw-font-sans: Orbitron;
  --flw-logo-url: url('../logo.png');
  --flw-logo-url-full: url('../logo.png');
  --flw-navigationBar-bgcolor: #ebe996;
  --flw-switcher-base: #c8dcab;
  --flw-switcher-item-color: #2e6965;
  --flw-switcher-selected-bgcolor: #ebe996;
  --flw-switcher-selected-color: #e78c0a;
  --flw-subMenu-action-color: #bf4b02;
  --flw-subMenu-bgcolor: #ebe996;
  --flw-subMenu-item-color: #2e6965;
  --flw-subMenu-selected-bgcolor: #c8dcab;
  --flw-subMenu-selected-color: #e78c0a;
  --flw-forms-color: #c8dcab;
  --flw-button-bg: #ebe996;
  --flw-button-primary-bg: #c8dcab;
}
Now start up your Flowable server and log in as an admin user.
How do you like the changed theme? Doesn't it feel like a futuristic spring breeze?
Use the Theme Management application graphical interface
To define the next user theme, we will use the embedded theme management app. This is the easiest way to manage your themes, as it does not require any technical skill.
Comment out the styling changes done in the previous example in order to start anew. Then rebuild you project and restart your Flowable server.
Log in as admin and open the "Themes" app from the left navigation menu.
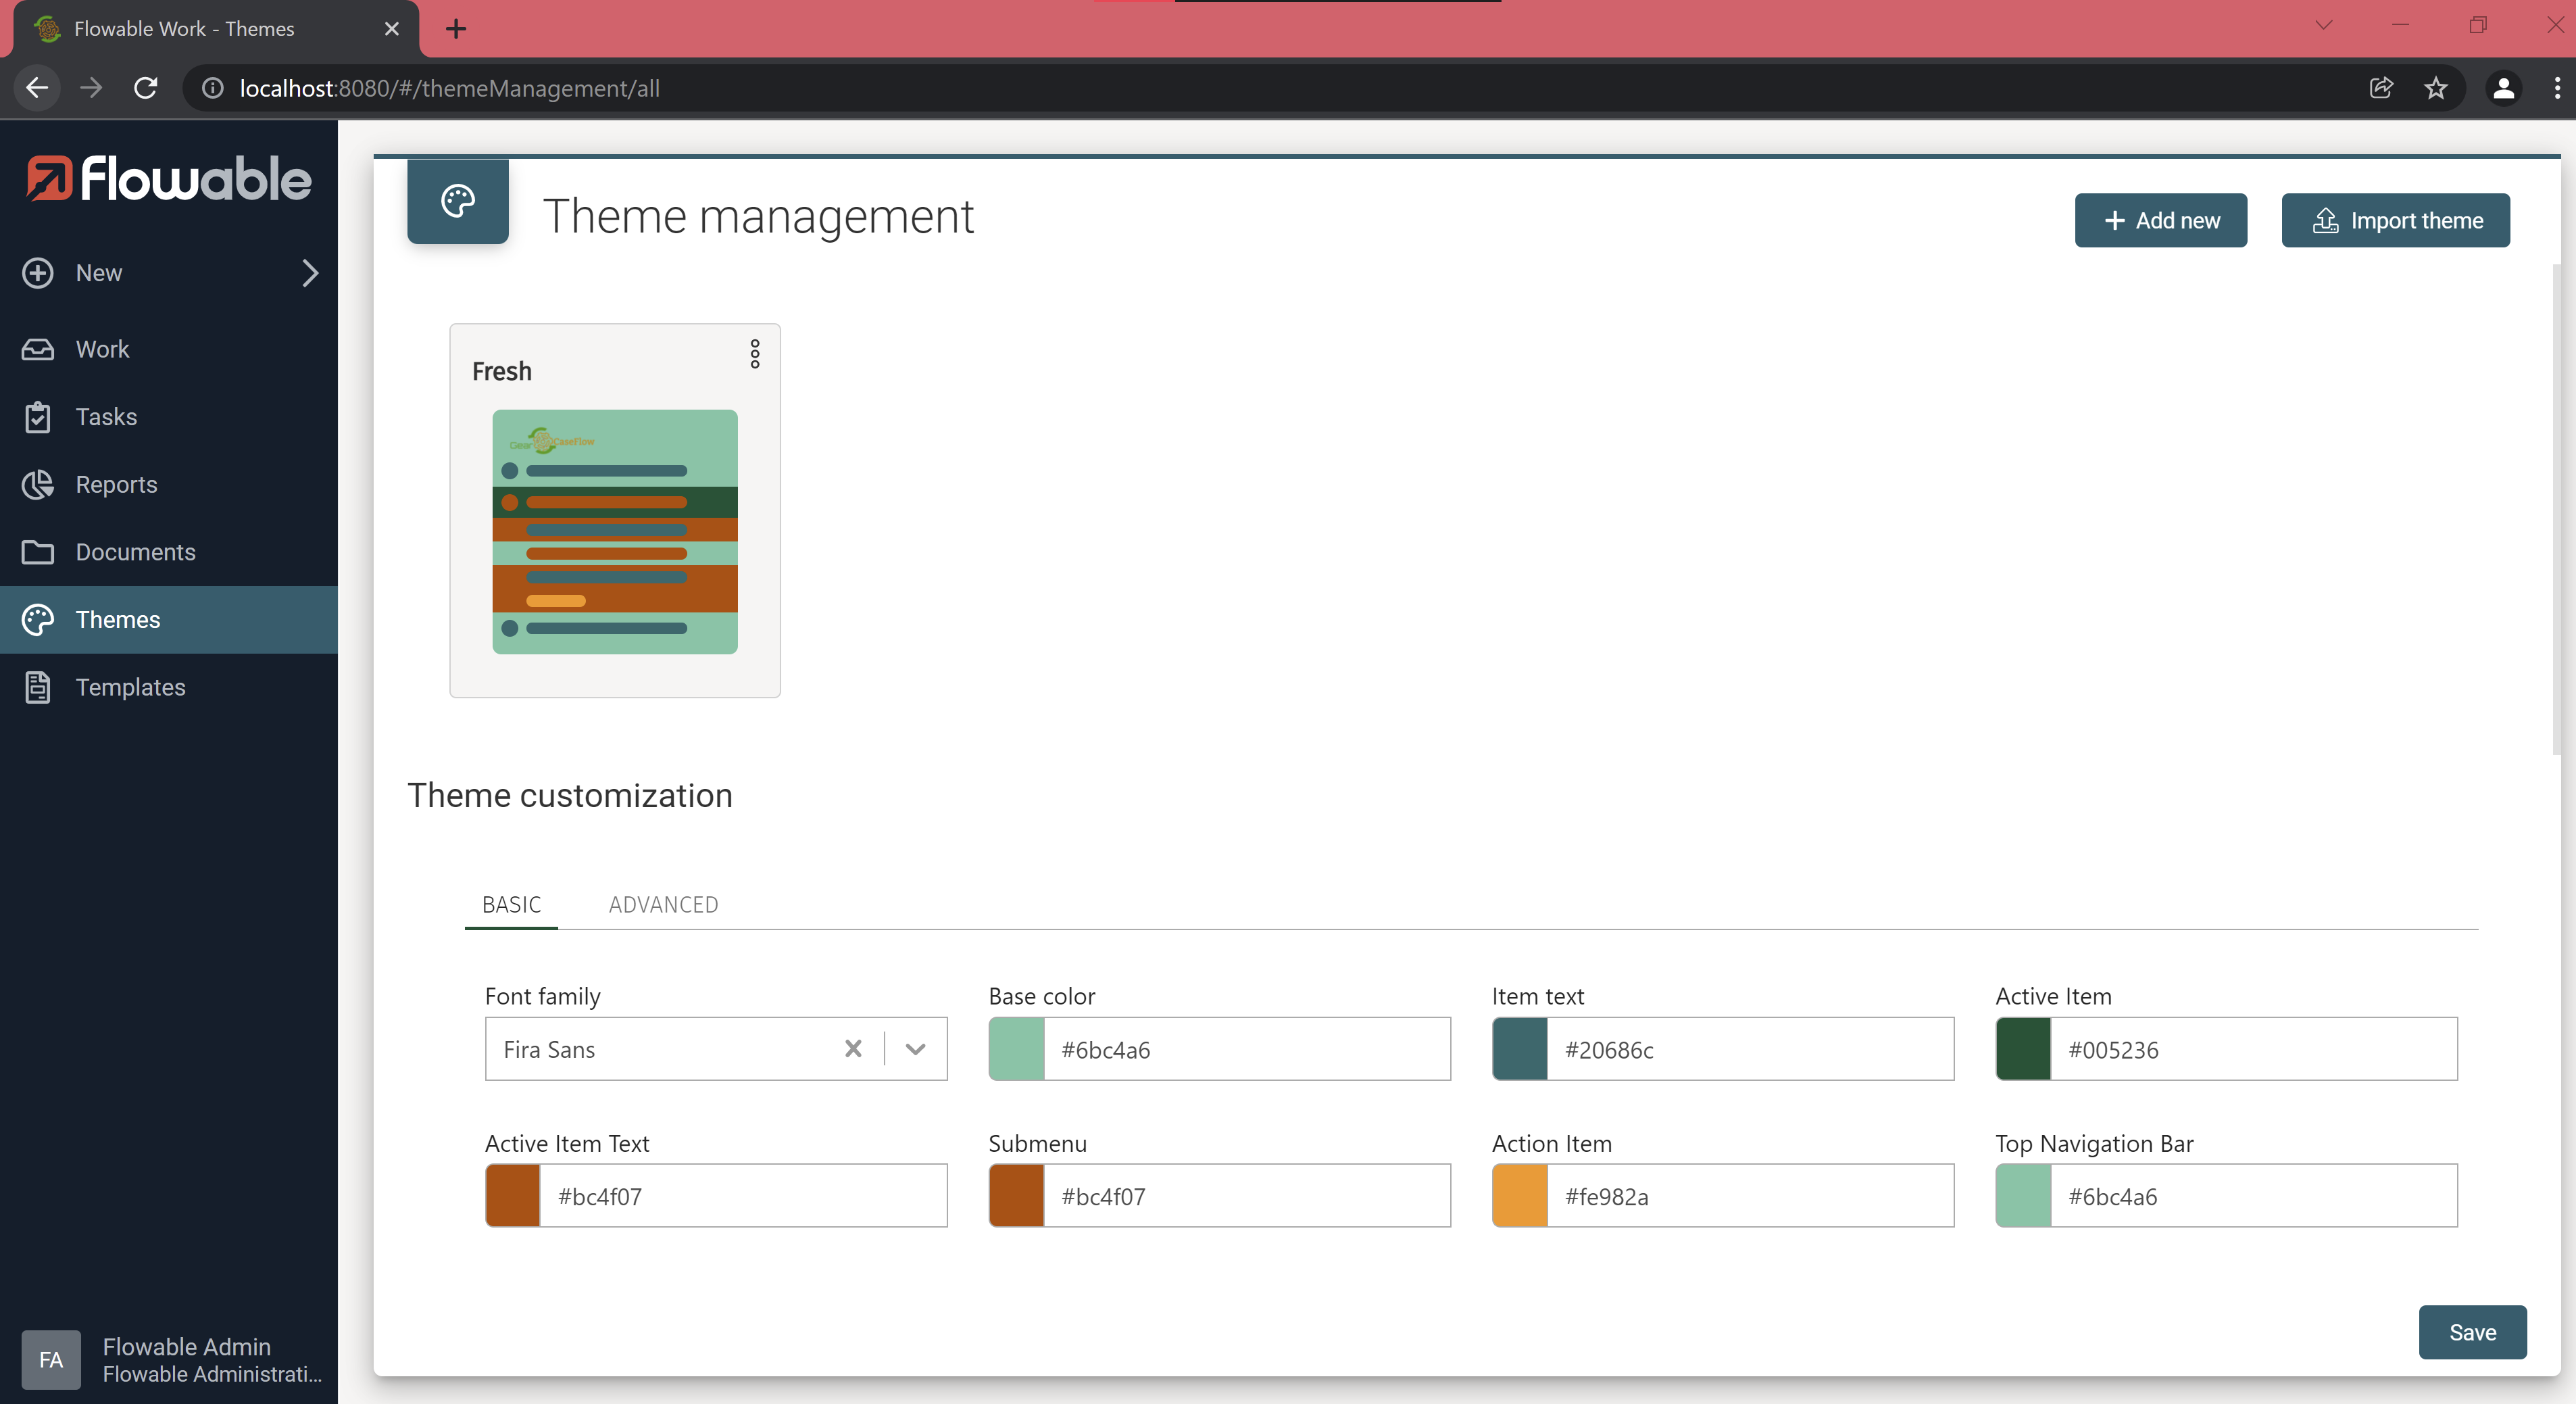
Click on the big "+" button (if this is your first theme), or on "Add new" on the top right otherwise. Let's call this first how-to theme "Fresh".
2 edit modes are offered to you: "Basic" and "Advanced". We will start with the "Basic" mode, which shows the most important theme fields and calculates additional values on-the-fly.
Let's define our style in the following way:
- Font family: "Fira Sans"
- Base color:
#6bc4a6 - Item text:
#20686c - Active item:
#005236 - Active item text:
#bc4f07 - Submenu:
#bc4f07 - Action item:
#fe982a - Top navigation bar:
#6bc4a6 - Button background:
#6bc4a6 - Primary button background:
#fe982a - Main color:
#005236 - Contrast: high
- Theme: light
- Font family: System fonts
- Font size: normal
- Grid separation: large
- Logo URL and Full logo URL: if file "logo.png" was not added to your resources folder, upload it now, otherwise hover over the file names and click on the "edit" icon and provide the path to your logo file relative to the
publicresource folder (which should simply belogo.pngin your case)
As you can see while defining all these values, the preview card for your theme is also updated on-the-fly.
And once all of this is entered, click "Save".
You can then click on the 3 vertical dots on the right of the theme preview card, and click on "Set as default".
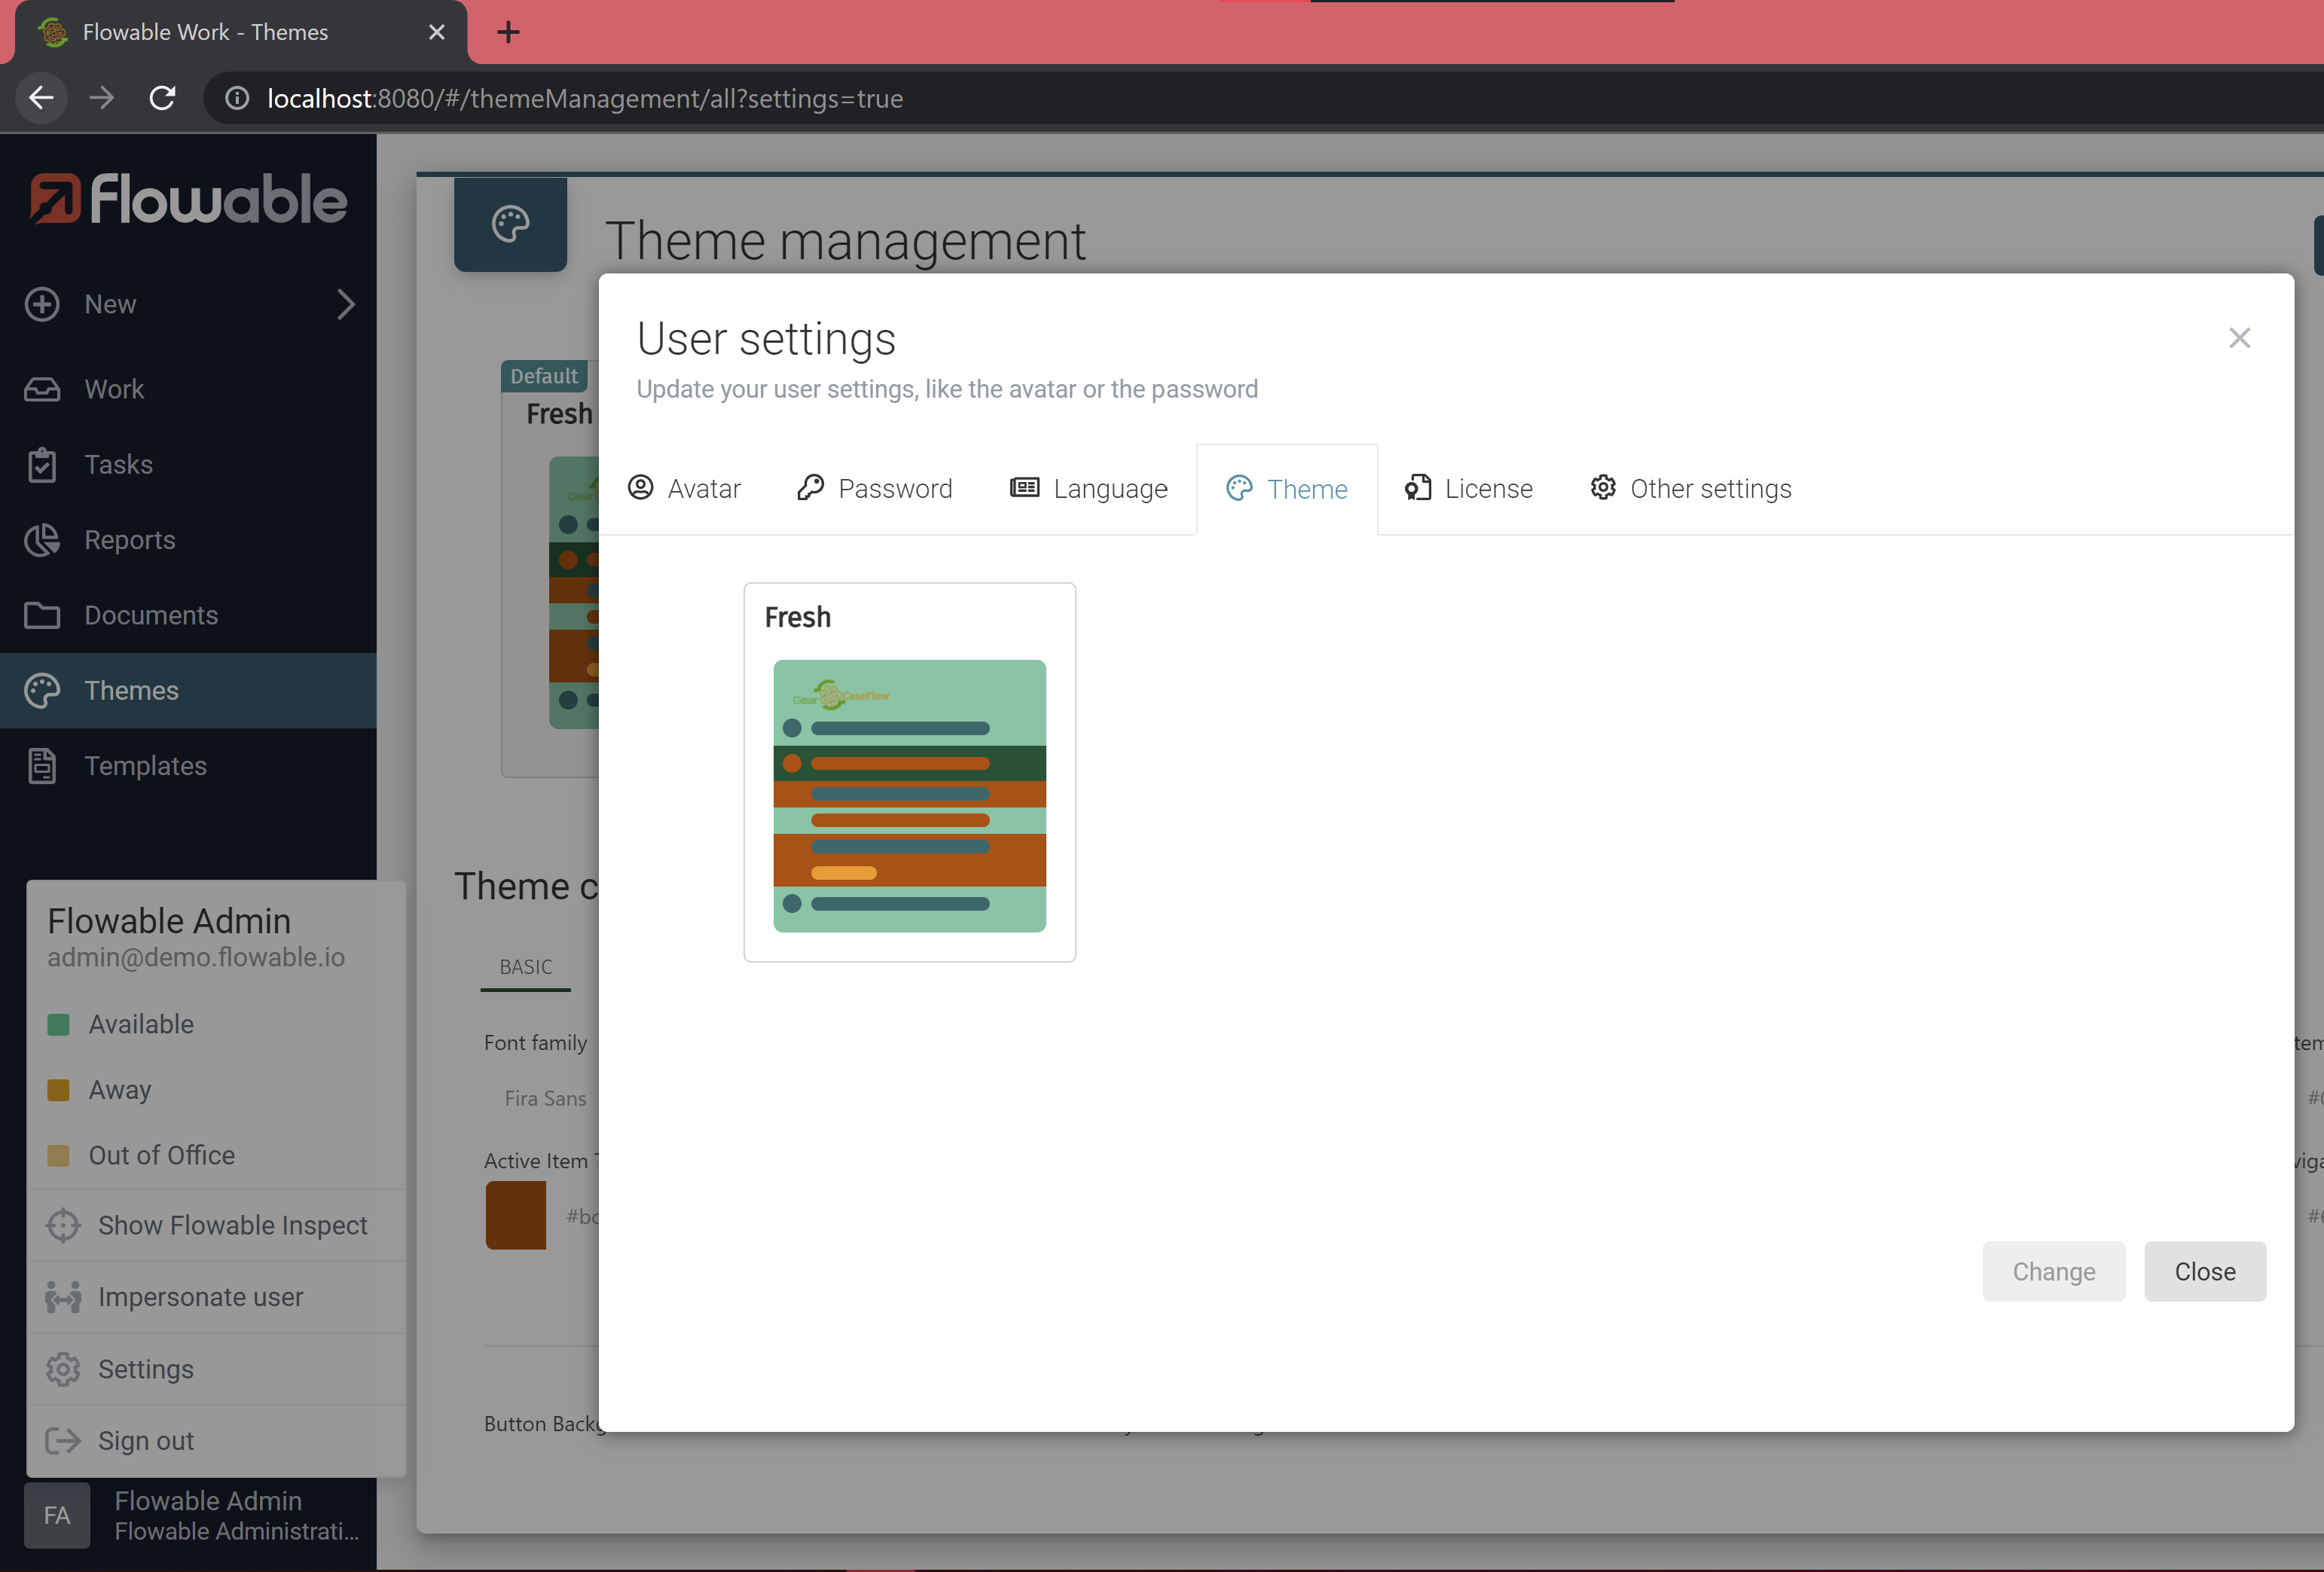
Changing which theme is the default one will however not change the theme of users who already have a specific theme pre-configured, such as the admin user. To change the theme of the current user, click on the user profile (bottom left), then on "Settings", open tab "Themes" and select the theme you just created.
How do you like the result? Isn't it a refreshing color scheme?
In the theme app, you can now switch to the "Advanced" tab and have a look at the generated additional theme settings. Do not hesitate to play around with the different values to see how it impacts the user interface.
If you want to keep this first "Fresh" theme as a reference, you can create a new theme with the "Add new button", then click on the 3 vertical dots on the right of the preview card of the new theme, click on "Copy from existing", select the "Fresh" theme and finally click on "Apply". If you are satisfied, do not forget to click on "Save".
Configure available themes as a JSON file
Themes defined in JSON files can either be imported at runtime into the Theme Management application, or loaded from the classpath during the server startup with slightly different syntax.
If you want to export our "Fresh" theme to manage it later from the classpath, go back to the Theme app, click on the 3 vertical dots on the right of the preview card of your theme, and then click on "Export". As you can see, the generated file contains much more than just the variables we defined explicitly, but also a few calculated ones.
Now let's create a theme management JSON file. Copy the following code to a file named gearcaseflow-themes.json and place it in resource folder com/flowable/themes/custom:
{
  "overwrite": true,
  "defaultTheme": "Cozy",
  "themes": [
    {
      "name": "Cozy",
      "options": {
        "fontFamily": "Fira Sans",
        "flwFontSans": "Orbitron",
        "subMenuSelectedItemFg": "#d35002",
        "subMenuSelectedItemBg": "#f9d692",
        "subMenuItemFg": "#c18e01",
        "subMenu": "#ffa602",
        "topNavBar": "#c18e01",
        "buttonBg": "#ffa602",
        "buttonFg": "#d35002",
        "buttonPrimaryBg": "#4f5819",
        "buttonPrimaryFg": "#f9d692",
        "switcherBase": "#f9d692",
        "switcherSelectedBg": "#ffa602",
        "switcherSelectedFg": "#d35002",
        "switcherItemFg": "#c18e01",
        "switcherAction": "#4f5819",
        "flwFormsColor": "#f9d692",
        "logoUrl": "url('logo.png')",
        "logoUrlFull": "url('logo.png')"
      }
    }
  ]
}
After rebuilding the project and restarting the server, log into the application to define the theme of the admin user through their user settings.
Doesn't your project now feel like a galactic pumpkin afternoon?
Finally, you can now merge the exported "Fresh" theme into the themes array of gearcaseflow-themes.json as follows in order to manage it all in one place only:
{
  "overwrite": true,
  "defaultTheme": "Cozy",
  "themes": [
    {
      "name": "Cozy",
      "options": {
        "fontFamily": "Fira Sans",
        "flwFontSans": "Orbitron",
        "subMenuSelectedItemFg": "#d35002",
        "subMenuSelectedItemBg": "#f9d692",
        "subMenuItemFg": "#c18e01",
        "subMenu": "#ffa602",
        "topNavBar": "#c18e01",
        "buttonBg": "#ffa602",
        "buttonFg": "#d35002",
        "buttonPrimaryBg": "#4f5819",
        "buttonPrimaryFg": "#f9d692",
        "switcherBase": "#f9d692",
        "switcherSelectedBg": "#ffa602",
        "switcherSelectedFg": "#d35002",
        "switcherItemFg": "#c18e01",
        "switcherAction": "#4f5819",
        "flwFormsColor": "#f9d692",
        "logoUrl": "url('logo.png')",
        "logoUrlFull": "url('logo.png')"
      }
    },
    {
      "name": "Fresh",
      "options": {
        "subMenuSelectedItemBg":"#6bc4a6",
        "buttonHoverBg":"#58bd9b",
        "flwText3Xl":"30.6px",
        "buttonHoverFg":"#000000",
        "flwFormsOrangeBackgroundColor":"#fef5ee",
        "fontFamily":"Fira Sans",
        "flwFormsColorHover":"#002015",
        "subMenuSelectedItemFg":"#bc4f07",
        "subMenuItemFgHover":"#ccd1d6",
        "flwColorLightgray":"#999999",
        "flwFontSans":"-apple-system, BlinkMacSystemFont, \"Segoe UI\", Roboto, \"Helvetica Neue\", Arial, \"Noto Sans\", sans-serif",
        "subMenuItemFg":"#20686c",
        "subMenu":"#bc4f07",
        "topNavBar":"#6bc4a6",
        "switcherSelectedBgHover":"#006643",
        "subMenuSelectedItemBorder":"#fe982a",
        "flwFormsMutedTextColor":"#737373",
        "flwFormsTextColor":"#4d4d4d",
        "switcherSelectedFg":"#bc4f07",
        "flwFormsOrangeColor":"#faa05a",
        "flwTextTiny":"10px",
        "flwTextMed":"13px",
        "logoUrl":"logo.png",
        "flwFormsRedBackgroundColor":"#fef4f6",
        "flwFormsBackgroundColor":"#FFFFFF",
        "flwTextXl":"22.95px",
        "flwFormsSelectedRowBackgroundColor":"#FFFFDD",
        "flwFormsColorSecondary":"#0a1411",
        "flwFormsBorderColor":"#acacac",
        "flwTextLg":"21px",
        "flwTextXs":"11px",
        "buttonPrimaryBg":"#fe982a",
        "flwFormsSuccessColor":"#32d296",
        "buttonPrimaryFg":"#ffffff",
        "flwTextBase":"14px",
        "switcherItemFg":"#20686c",
        "switcherBase":"#6bc4a6",
        "flwText2Xl":"27px",
        "flwFormsBlueBackgroundColor":"#d8eafc",
        "switcherSelectedBg":"#005236",
        "flwFormsMutedBackgroundColor":"#f8f8f8",
        "switcherAction":"#fe982a",
        "flwFormsErrorColor":"#f0506e",
        "flwFormsGreenBackgroundColor":"#edfbf6",
        "flwTextSm":"12px",
        "flwFormsColor":"#005236",
        "buttonBg":"#6bc4a6",
        "buttonFg":"#000000",
        "switcherItemFgHover":"#2b8e94",
        "flwFormsShadowColor":"#000000",
        "buttonPrimaryHoverFg":"#ffffff",
        "switcherActionHover":"#ffb667",
        "flwFormsDebugBorder":"#ff0097",
        "flwGutter":"12px",
        "flwFormsLabelTextColor":"#262626",
        "buttonPrimaryHoverBg":"#fea443",
        "logoUrlFull":"logo.png"
      }
    }
  ]
}
Apply different themes to different user types
The styling changes defined in your custom.css file will always be applied as root theme, and you can then override parts of it with custom user themes.
The root theme is perfect for defining your corporate identity, while user themes will tailor your application to the use cases of your various user types. For example,
if you have users with multiple accounts (such as a regular and an administrative account), creating a strong contrast between the themes of both account types
could be useful.
Note: In multi-tenancy setups, you can also have different set of user themes per tenant when defining them as JSON files loaded from the classpath.
If you want to apply a distinct theme between your admin and non admin users, you can simply define the "theme" property of each user (for example in your tenant setup file), or set an initial variable called "theme" in your user definitions.
Conclusion
Congratulations on customizing the look and feel of your Flowable application! Your users will certainly now feel more at home.
Finally, do not hesitate to explore further and be creative. In case of doubts or questions regarding other customization options, such as the implementation of a fully custom frontend build, you can always refer to the frontend documentation.