Integrate OAuth 2.0 / OpenID Connect with Flowable Control
Target audience: Developer
Introduction
For all Flowable products (Work, Design, Control, etc.) Spring Boot Starter dependencies exist to customize them. One typical customization that is often required is to integrate Single-Sign On (SSO).
This How-To describes how you can use the Flowable Control Application with OAuth 2.0 / OpenID Connect. The principles shown here can be also used to do other security configurations.
 note
noteThis integration is also available out-of-the-box for the Flowable Control application provided by Flowable. The same properties explained here are also valid for the out-of-the-box application.
Additionally, this How-To is an example meant as an inspiration when met with similar requirements. Custom code isn't covered by standard Flowable Support.
Project Setup
To customize the Flowable Control application, we first need to set up a project. This can be based on a start.spring.io project which can then be enhanced with the Flowable dependencies. Your project should include in addition to that a driver of a supported database.
Once you created the project you can add the Flowable Control dependency:
<dependency>
    <groupId>com.flowable.control</groupId>
    <artifactId>flowable-spring-boot-starter-control</artifactId>
    <version>${com.flowable.control.version}</version>
</dependency>
You also need to add your database configuration to the application.properties as well as some required default properties:
flowable.control.app.security.encryption.credentials-i-v-spec=j8kd02hejA9lKmm6
flowable.control.app.security.encryption.credentials-secret-spec=9FGl73ngxcOoJvmL
flowable.control.app.cluster-config.name=Default Cluster
flowable.control.app.cluster-config.user-name=admin
flowable.control.app.cluster-config.password=test
flowable.control.app.cluster-config.server-address=http://localhost
flowable.control.app.cluster-config.port=8080
flowable.control.app.cluster-config.context-root=/
Once this is done, you can start the Spring Boot app, and you will have Flowable Control running with the context root /flowable-control on your defined port.
In the example above you can open localhost:8080/flowable-control/, and sign-in with the username admin and the password test.
It expects a running Flowable Work on port 8080 (as shown in the configuration properties).
Authenticating with OAuth 2.0 / OpenID Connect
Our Flowable Control application can now be enhanced with the security configuration of our choice.
In this tutorial we are integrating with an OAuth 2.0 server, which can be for example Keycloak, Okta, Azure AD etc.
Alternatively, but not covered in this tutorial, you can do a SAML integration similarly.
Azure SSO Setup
For this example integration we are going to use Azure SSO.
The first thing we need to do before starting with the Flowable Project setup is to make sure that we have an Azure Active Directory instance. If you don't have one then we suggest following the Create Azure Active Directory instance guide from Azure.
However, most likely you have one Azure Active Directory for your company. We will head to https://portal.azure.com/ and navigate to it. Next step is going to be to create our Application Registrations. The steps for that are explained here in the Azure documentation. Make sure that you store the generated key somewhere, we will need it for configuring our application.
noteGranting admin consent for your example might not be possible if you are using your main directory. However, this is not a problem for our configuration.
You can skip the last step (selecting implicit grant and hybrid flows), because we are not going to use the Azure AD Spring Boot Starters.
In addition to the steps explained above we need to add some more configurations in order to simplify our integration with Flowable:
- Go back to the "Authentication" section and change the "Redirect URIs" to "http://localhost:8080/login/oauth2/code/azure"
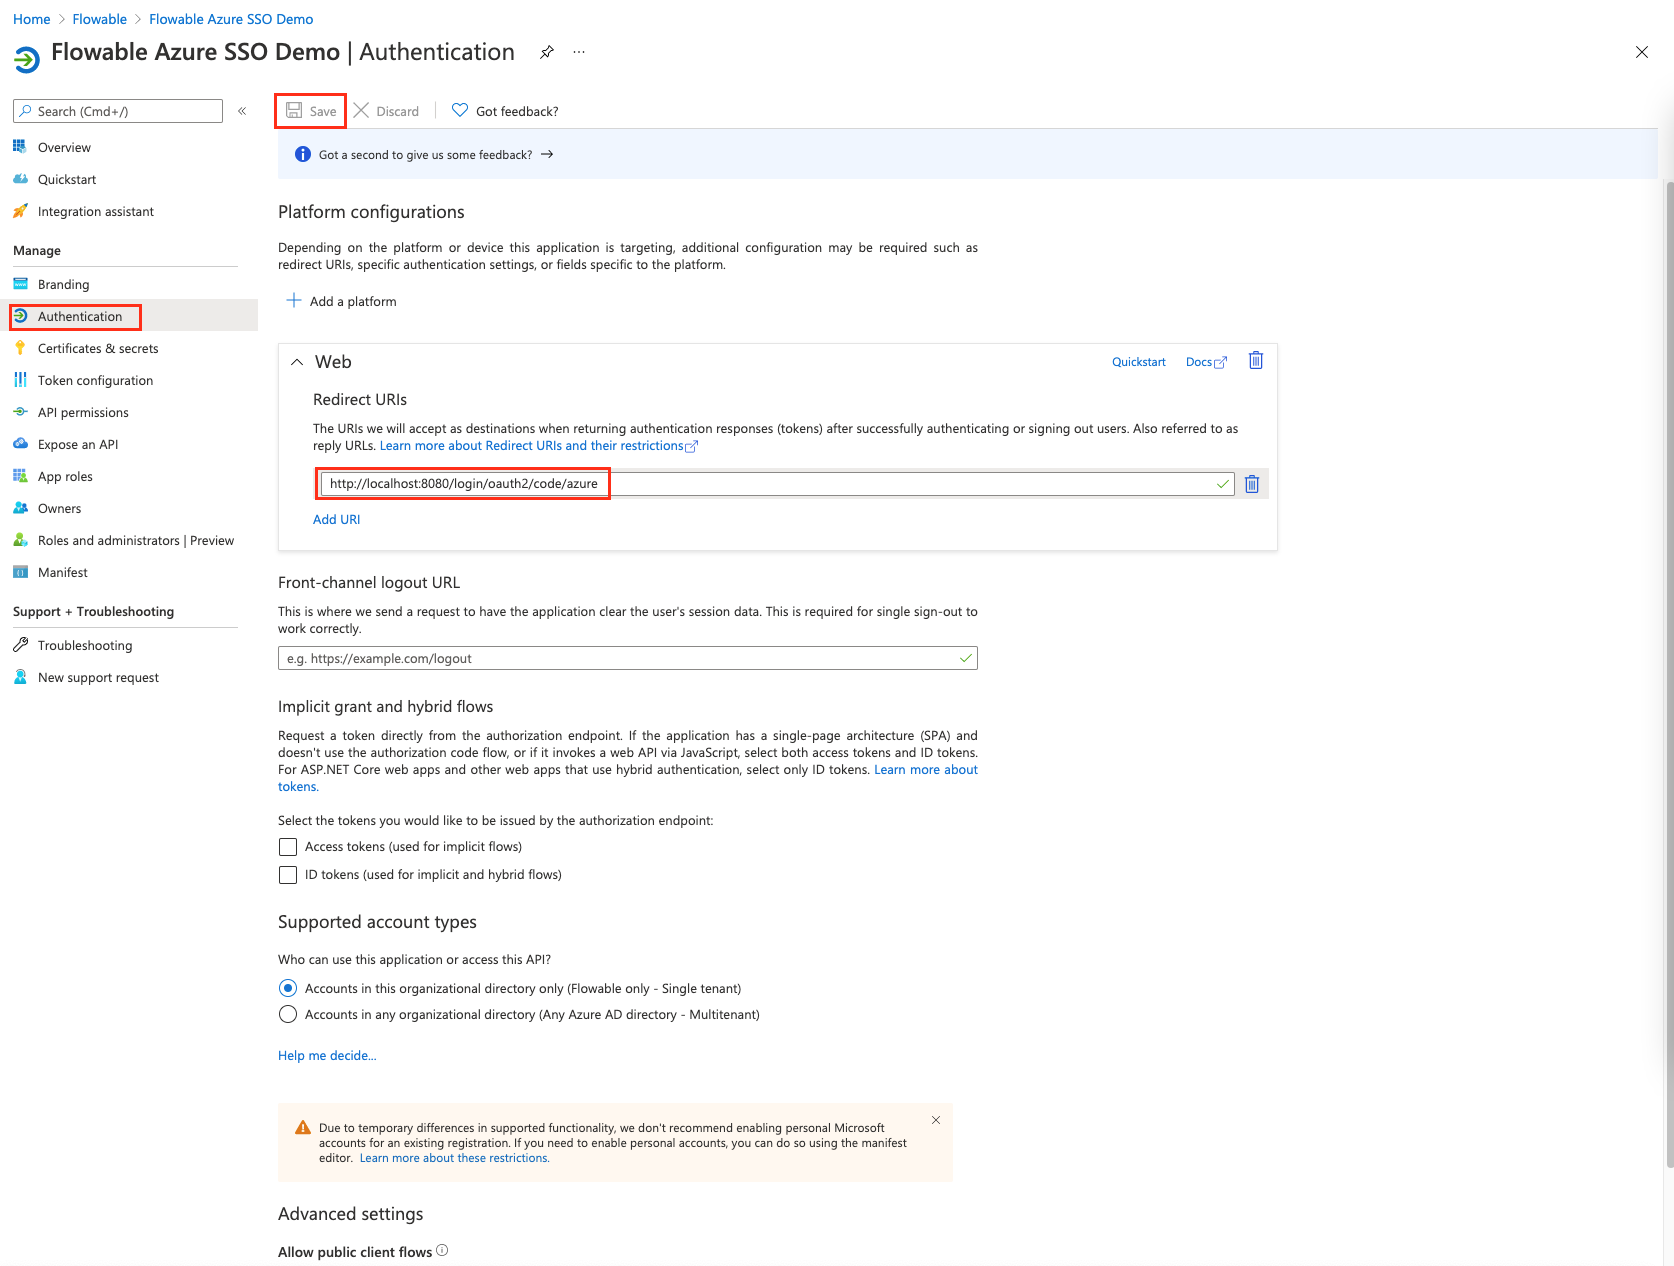
noteYou need to use the URI where Flowable Control is running. Make sure that this does not clash with Flowable Work
Required Dependencies
The first step of the configuration is to add the needed dependencies to our project to have OAuth 2.0 Spring modules:
<dependency>
    <groupId>org.springframework.security</groupId>
    <artifactId>spring-security-oauth2-client</artifactId>
</dependency>
<dependency>
    <groupId>org.springframework.security</groupId>
    <artifactId>spring-security-oauth2-jose</artifactId>
</dependency>
The first dependency is the Spring OAuth 2.0 client itself, while the second one is for Javascript Object Signing and Encryption (jose), which allows parsing of a JWT token.
Configuration Properties
As a next step we need to integrate with our OAuth 2.0 provider.
The configuration here is specific to the Azure SSO. However, the general structure is normally the same for all providers.
In the example below the following replacements are needed:
<name>- This can be any string you want. e.g.azure<client-id>- The id of the client which we created at the beginning. This can be seen in the overview of the application.<client-secret>- The secret of the client which we created at the beginning<tenant-id>- The tenant id of the Azure AD. This can be seen in the overview of the application.
spring.security.oauth2.client.registration.<name>.client-id=<client-id>
spring.security.oauth2.client.registration.<name>.client-secret=<client-secret>
spring.security.oauth2.client.registration.<name>.scope=openid,profile,email
spring.security.oauth2.client.registration.<name>.authorization-grant-type=authorization_code
spring.security.oauth2.client.provider.<name>.issuer-uri=https://login.microsoftonline.com/<tenant-id>/v2.0
spring.security.oauth2.client.provider.<name>.user-name-attribute=email
This will hook up Spring with our OAuth 2.0 provider, in a next step we need to configure that our OAuth 2.0 token is required. Therefore, we still require some Java code to customize our security configuration.
Security Configuration
Flowable offers an out of the box SecurityConfiguration which is used by default and can configure HTTP Basic or OAuth2 login for Flowable.
To enable OAuth2, we need to set the following properties:
# Setting this will tell Flowable Control to use oauth2 for logging into it
flowable.control.app.security.type=oauth2

# The authorities from the OAuth2 token that should mark the user logging in as an admin user
flowable.control.app.security.oauth2.admin-authorities=
flowable.control.app.security.oauth2.authorities-attributes=roles
flowable.control.app.security.oauth2.tenant-attribute=
flowable.control.app.security.oauth2.privilege-role-authority-prefix=
flowable.control.app.security.oauth2.username-attribute=
flowable.control.app.roles.default-user-role=
flowable.control.app.roles.default-admin-role=
2025.1.01+ a JWT bearer token can be used to authenticate with Flowable Control.
To configure the JWT bearer token mapping the prefix flowable.control.app.security.oauth2.resourceserver.mapper should be used for the applicable properties.
The available properties are in defined here.
The flowable.control.app.security.oauth2.admin-authorities can be used to mark user logging in as an Admin user in Flowable Control.
A user will also be marked as an Admin user in Flowable Control if it has the access-admin role given by the SSO Provider.
Azure SSO can be configured in such a way that different users can get specific roles for a particular application.
noteflowable.control.app.security.oauth2.privilege-role-authority-prefix, flowable.control.app.security.oauth2.username-attribute, flowable.control.app.roles.default-user-role and flowable.control.app.roles.default-user-role
will be further looked at later in this how-to.
In case you are not using an OpenID Connect OAuth2 SSO you can configure the attributes that contain the current user information.
flowable.control.app.security.oauth2.current-user.first-name-attribute=given_name
flowable.control.app.security.oauth2.current-user.last-name-attribute=family_name
flowable.control.app.security.oauth2.current-user.display-name-attribute=name
flowable.control.app.security.oauth2.current-user.email-attribute=email
We can now start the application and head to the Control endpoint. We will be greeted by the Azure SSO login. Once you sign in you will be redirected to the Flowable Control UI.
In the next section we are going to explain how you can grant the user admin permissions.
Configuring Flowable Permissions
Currently, Flowable distinguishes two types of users:
- Admin
- Non-Admin
Configure Admin Users
Control Admin users are allowed to add new Cluster Configurations, change Cluster Configurations, perform destructive operations (e.g. terminate a Process instance).
To make a user an admin, first we are going to add the access-admin role in our Azure application.
The value of the role needs to be access-admin.
Once we have this role created, we need to assign it to our user or even groups.
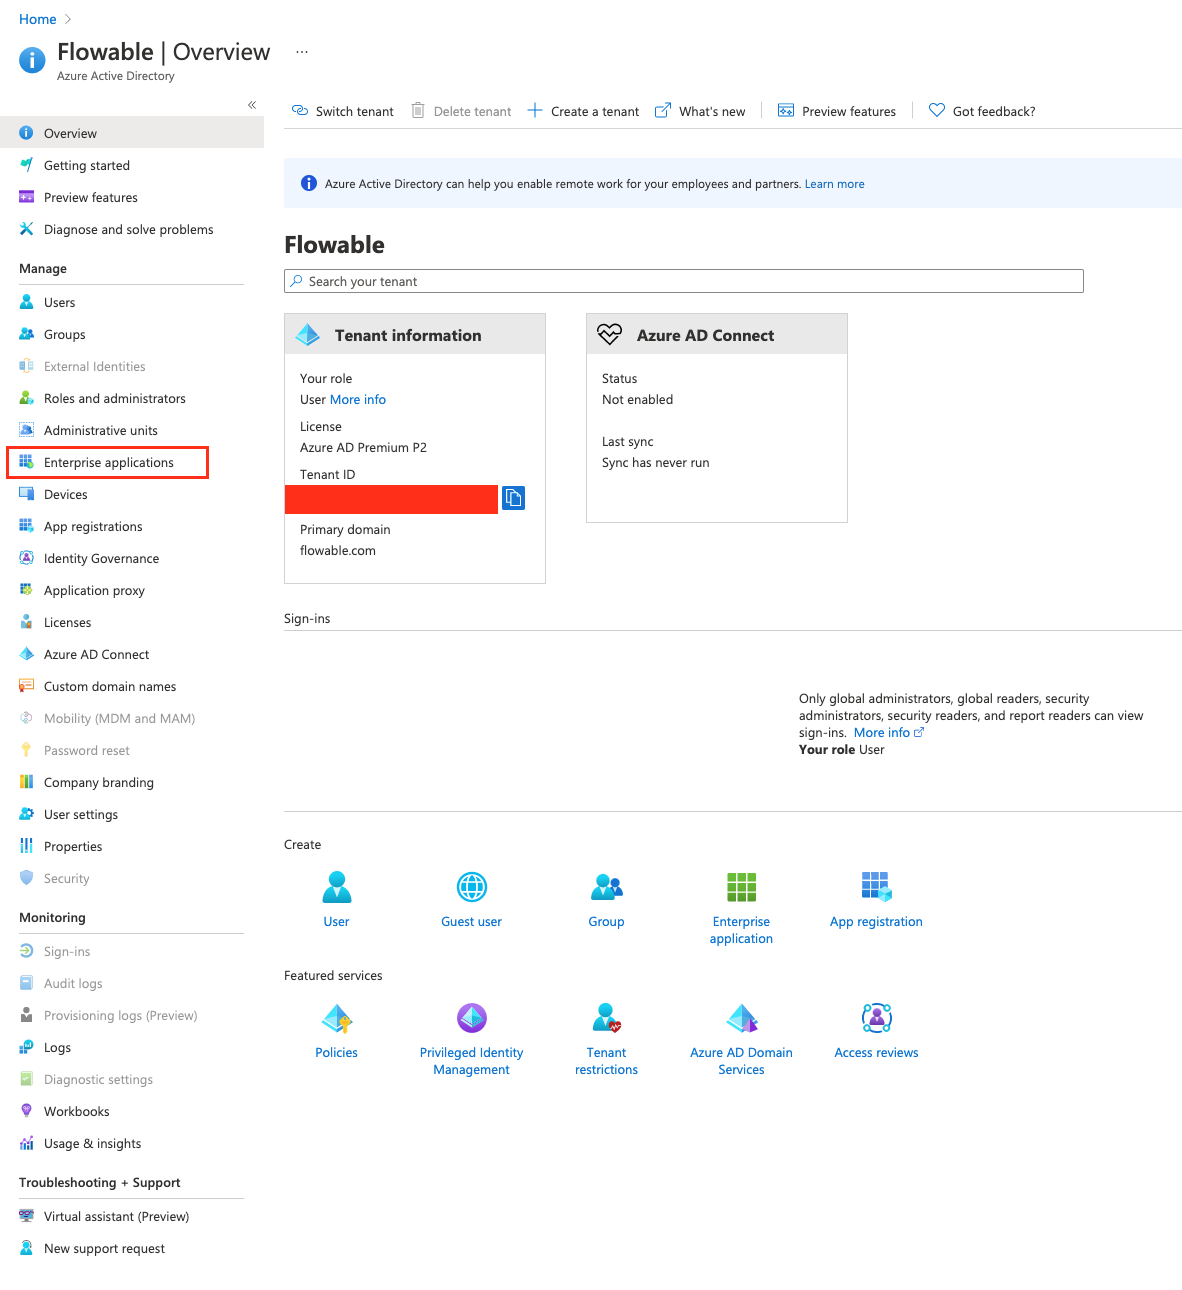
To do this, we need to go to the "Enterprise Applications" section of our Active Directory.
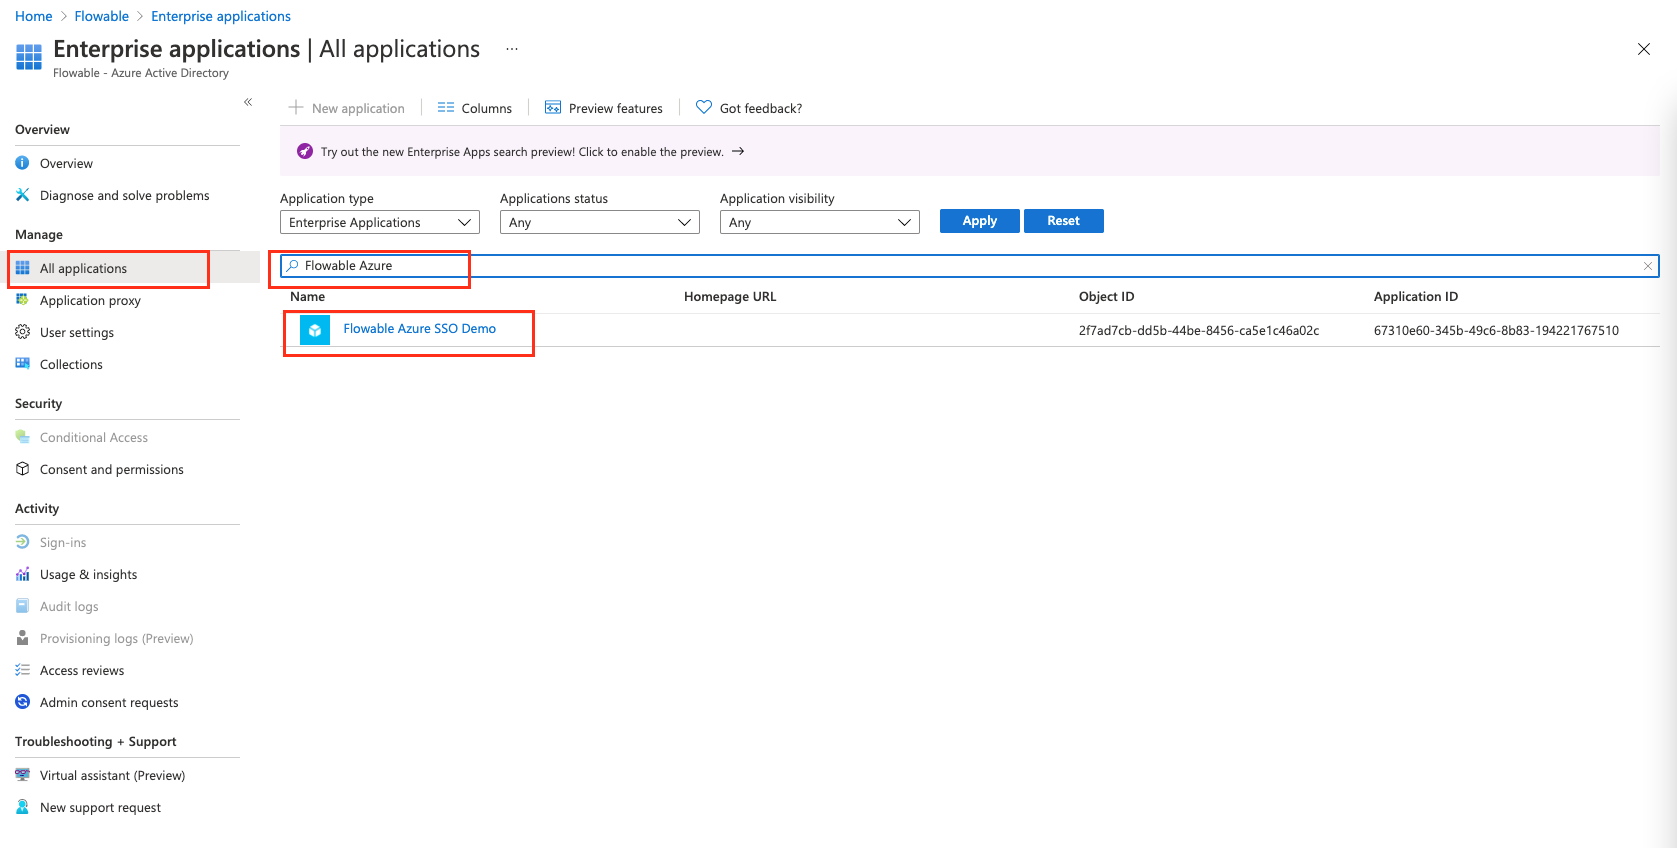
Once we are there, we will head to "All Applications" and search for the application we created at the beginning. We've named it "Flowable Azure SSO Demo".
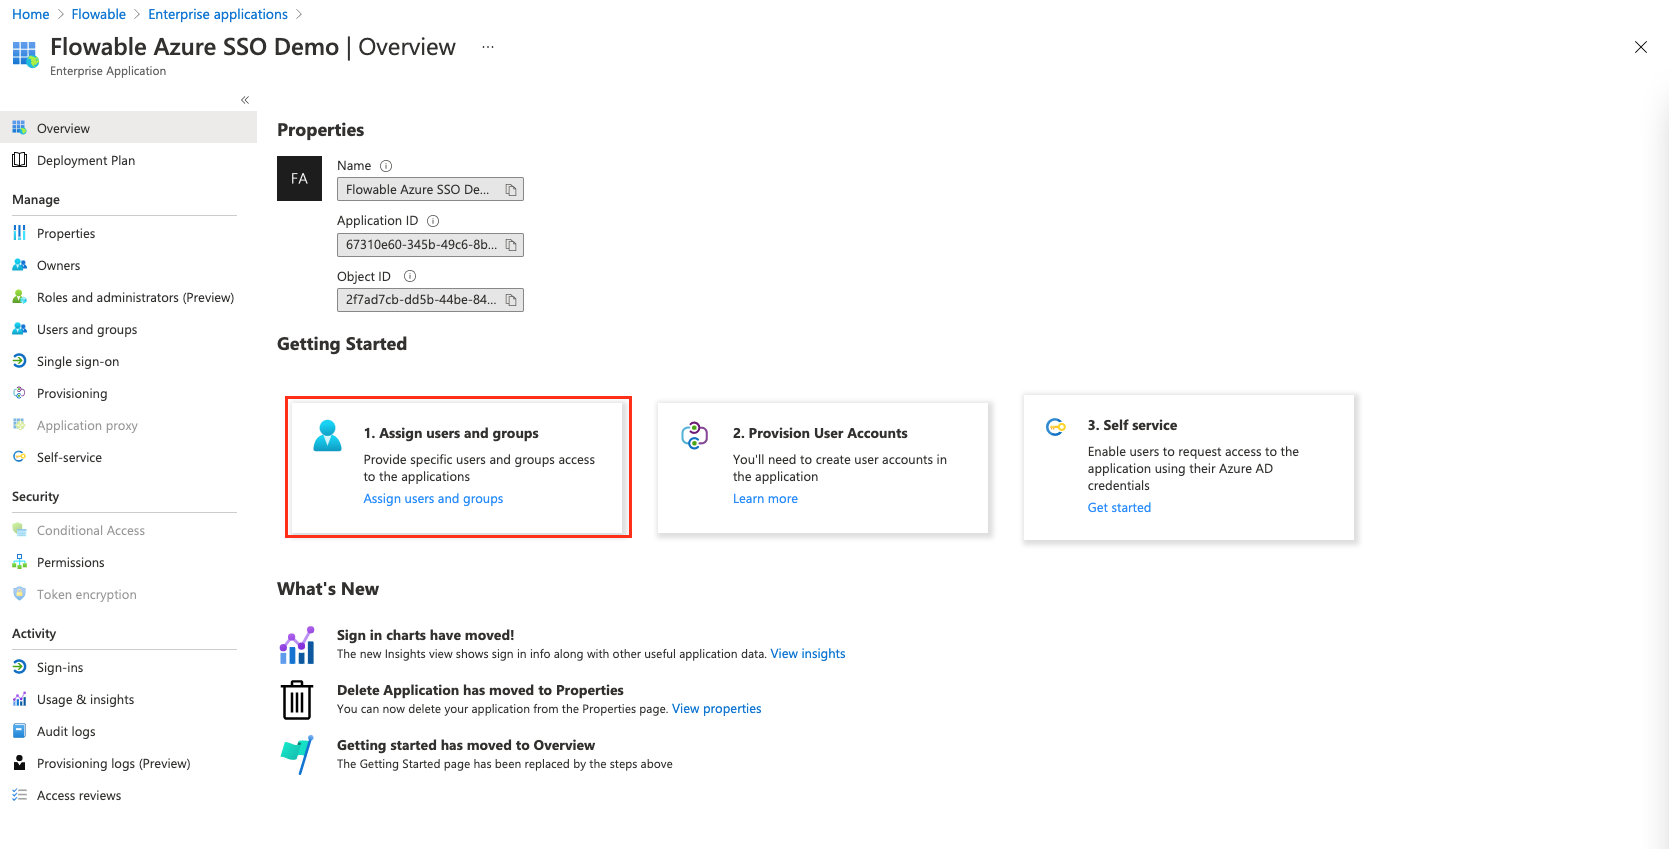
We now select the application and head to "Assign Users and Groups"
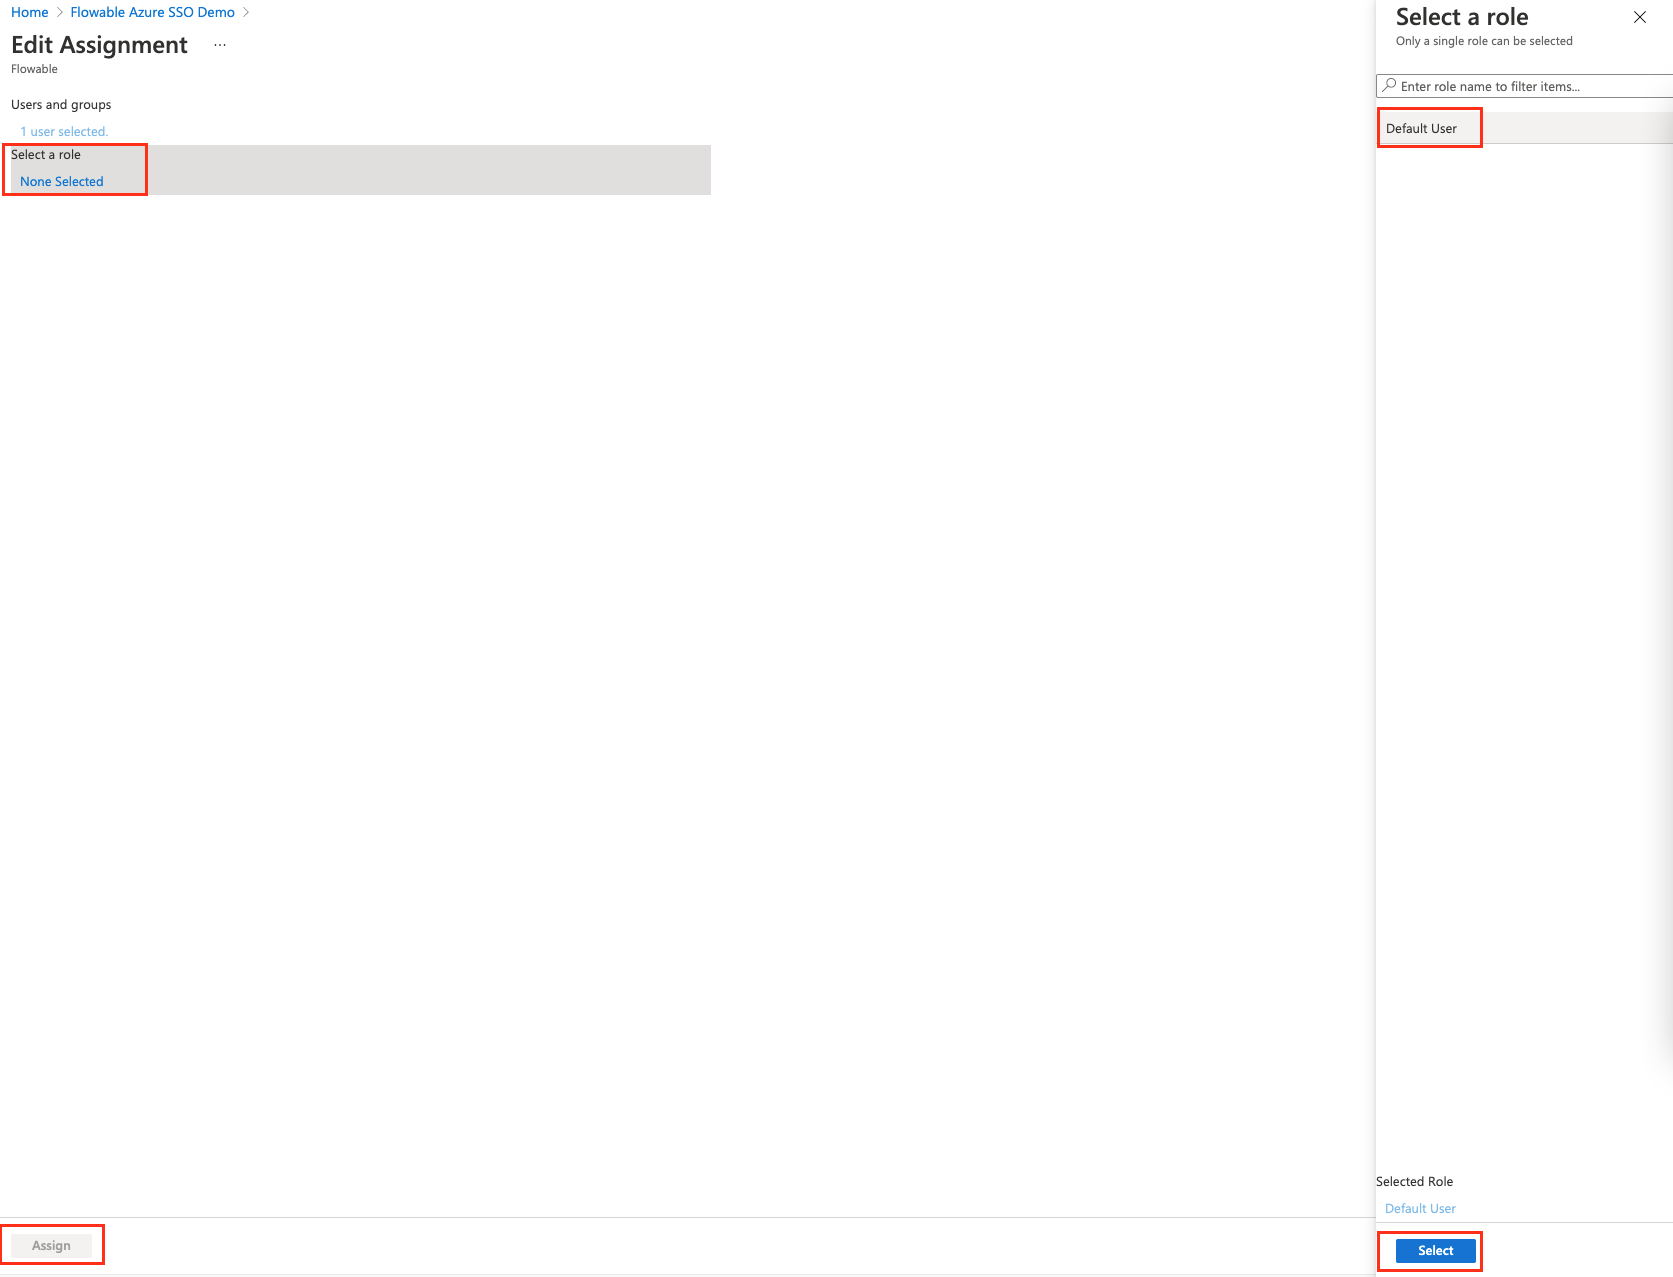
There we select and edit our user
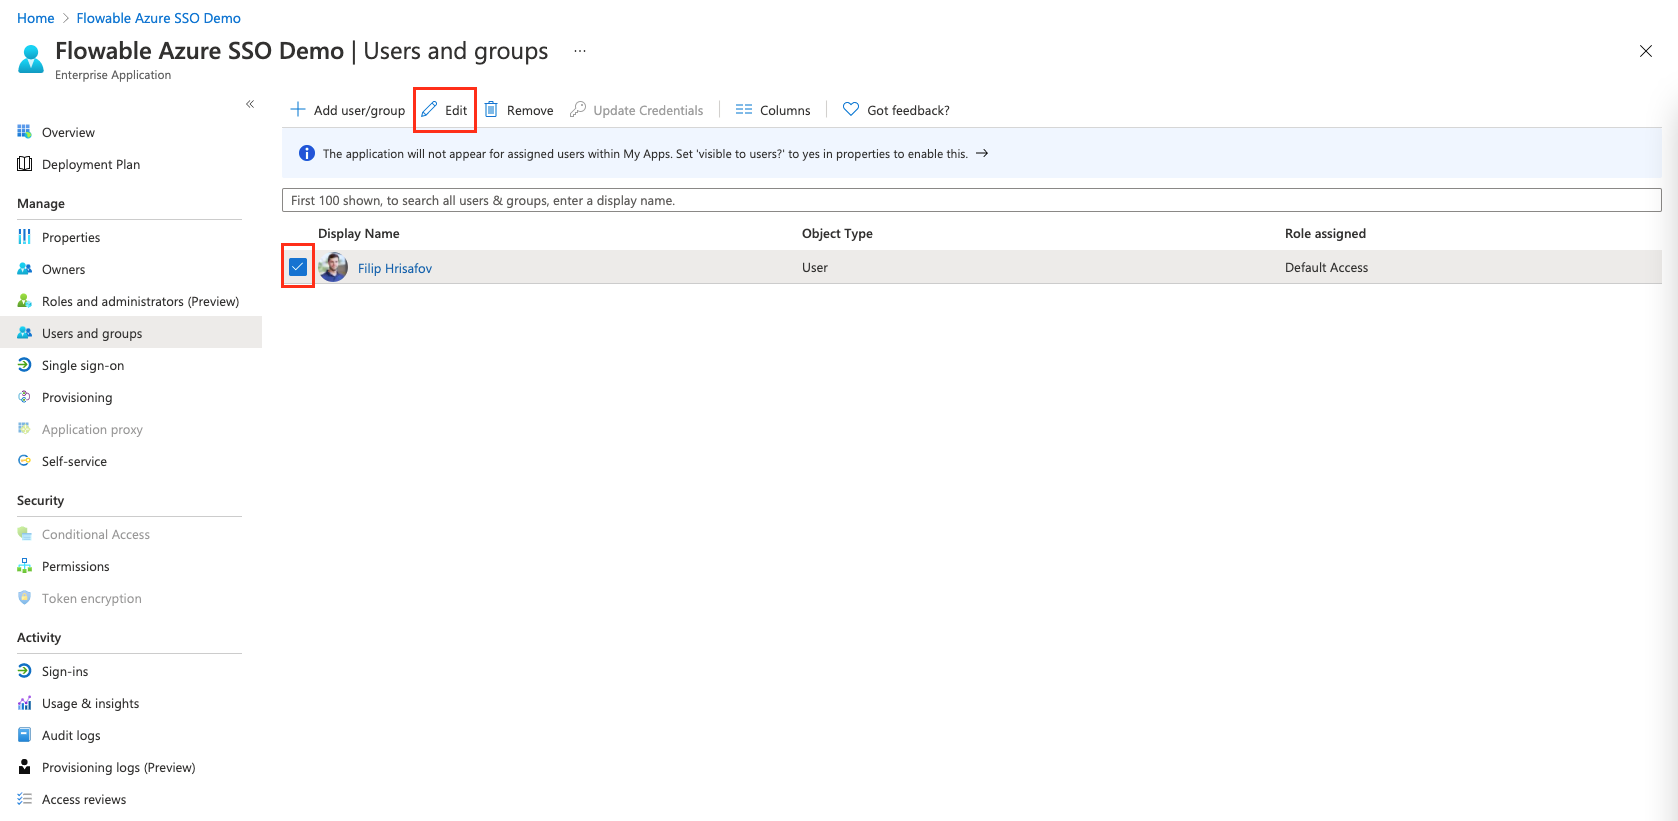
And assign the default user role to the user
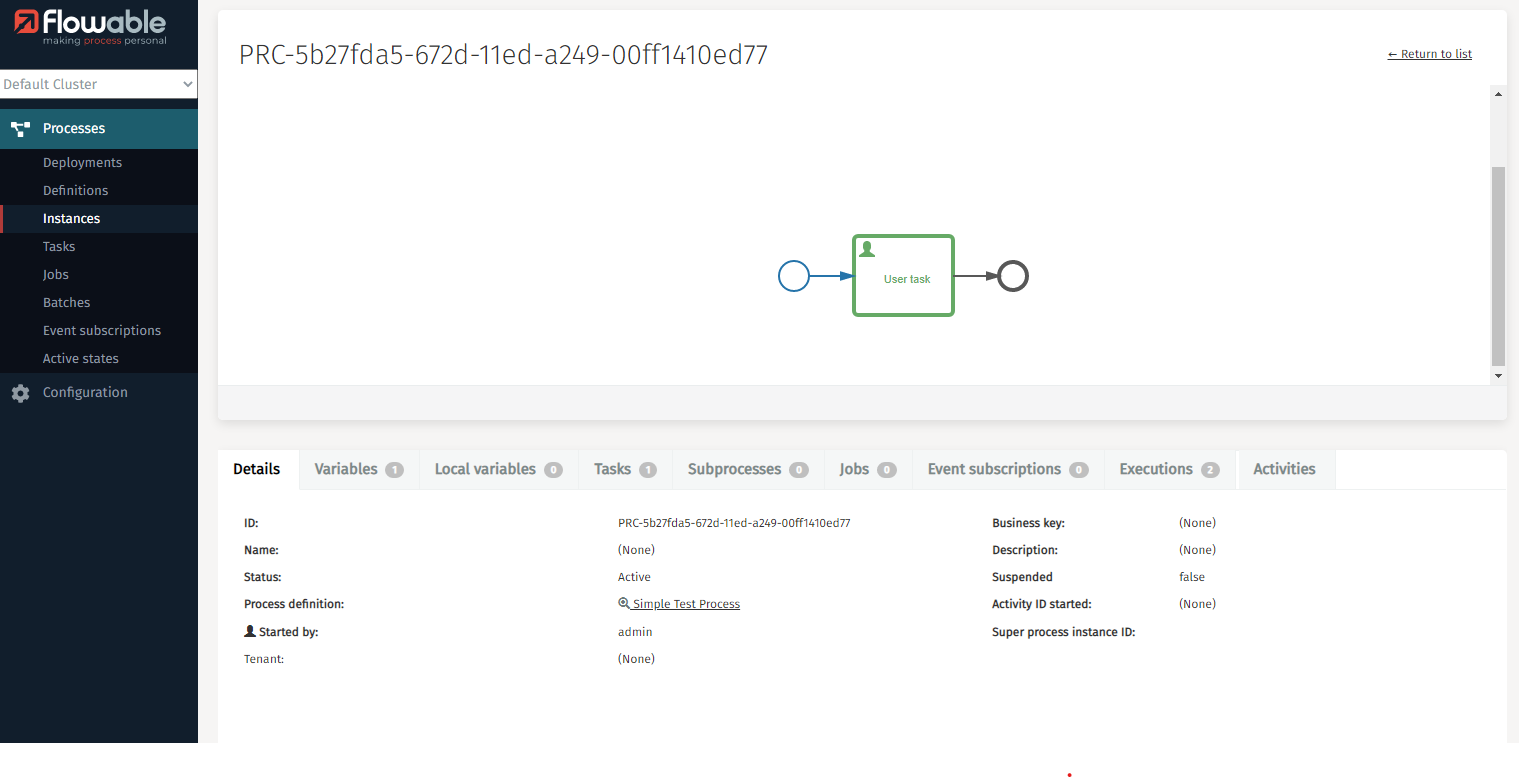
Finally, after these steps we can head to our application, and we will see that the user now has Admin privileges, i.e. the user can edit the cluster configuration.
Configure User permissions
With the introduction of roles and privileges in Flowable Control the possibilities to grant access to users increased drastically.
To grant privileges to users, the built-in SecurityConfiguration provides different solutions.
Granting Flowable Control roles
The flowable.control.app.security.privilege-role-authority-prefix can be used to map authorities to Flowable Control roles.
To activate that mapping, we need to provide the prefix for role authorities.
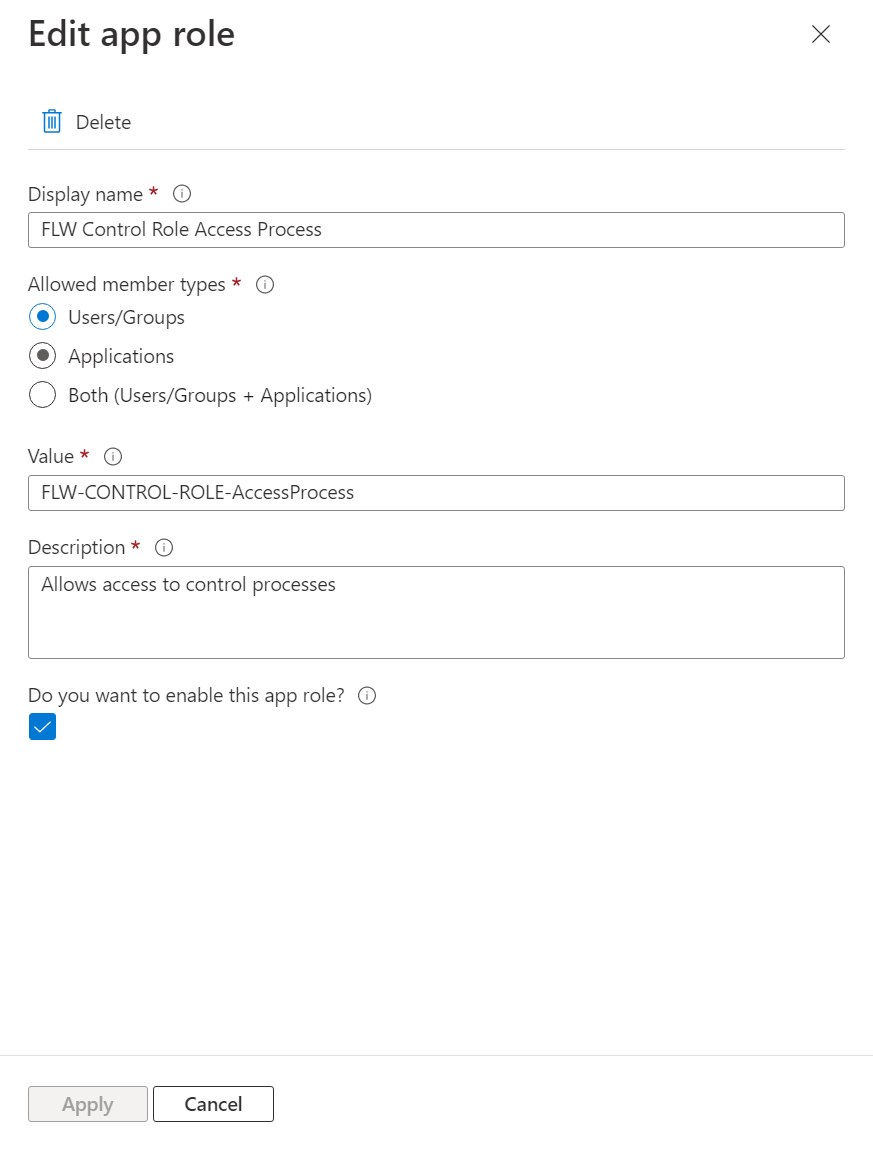
flowable.control.app.security.oauth2.privilege-role-authority-prefix=FLW-CONTROL-ROLE-
Create a role in Azure. Use the prefix FLW-CONTROL-ROLE- followed by the actual role name AccessProcess. Assign the Azure user to the Role FLW-CONTROL-ROLE-AccessProcess
Create the Flowable Control role AccessProcess.
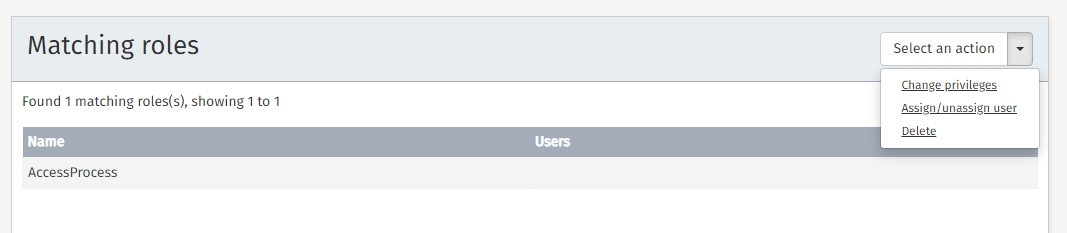
noteCheck out the Control user guide for role management for a detailed guide.
Add the Access Process privilege to the role and close the dialog with a click on save
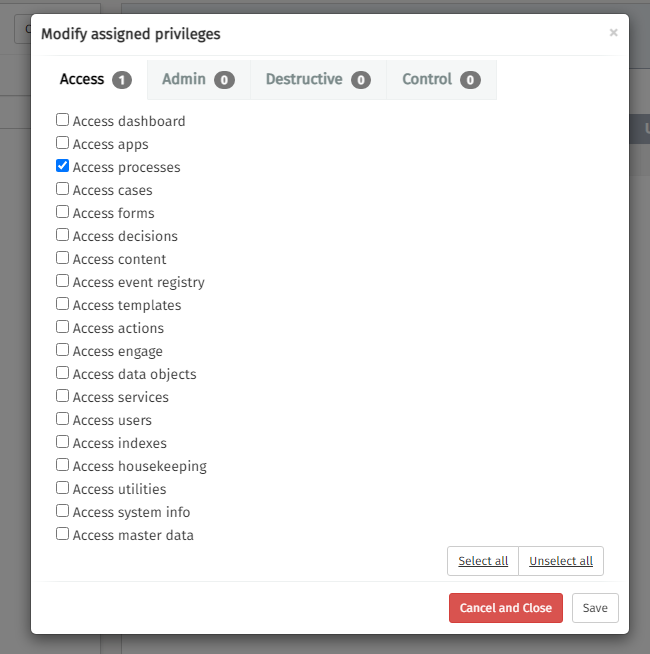
noteSee the control privileges list for more details
Finally, you can log in with your Azure account and the user
Assigning user to Flowable Control roles
You can assign the Azure user directly to roles in Flowable Control.
Set the flowable.control.app.security.oauth2.username-attribute property and Flowable Control checks the assigned users for all existing roles. The defined privileges are applied accordingly.
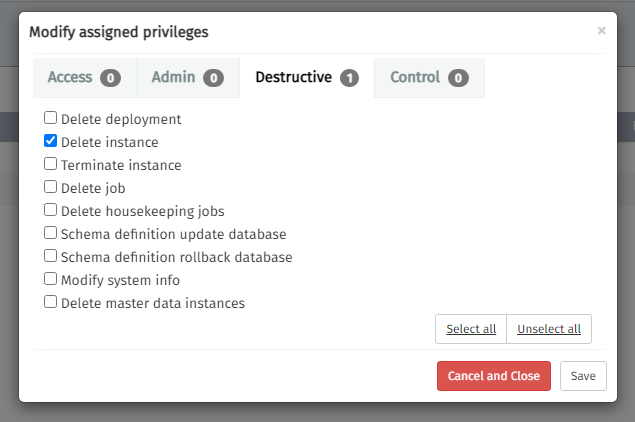
Create a role in Flowable Control. In this example, we add the Delete Instance privilege.
Assign the Azure user to the Control role
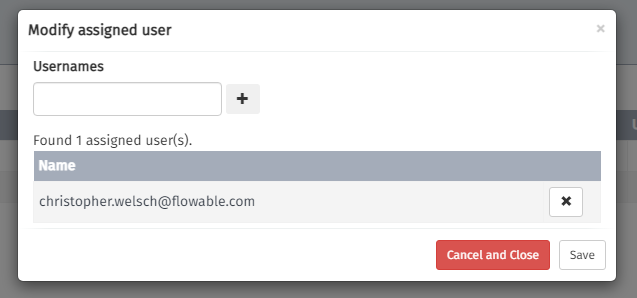
noteCheck out the Control user guide for role management for detailed information.
At last, one additional property is required.
flowable.control.app.security.oauth2.username-attribute=email
The email attribute is provided by Azure. We add the property flowable.control.app.security.username-attribute=email to tell Flowable Control the attribute, where to find the username, and match it with assigned Flowable Control roles.
noteThe permissions are accumulated over all roles. Either provided by the username to role mapping or direct role assignment.
Default admin and default non-admin roles
If no roles are granted, Flowable Control built-in SecurityConfiguration provides a fallback mechanism.
- For admin users, the default Admin role grants access to all Flowable Control features
- For non-admin users the default role grants all available access permissions
You can use flowable.control.app.roles.default-admin-role and flowable.control.app.roles.default-user-role to set the default roles that apply to users when no role is assigned.
flowable.control.app.roles.default-user-role=CustomDefaultUserRole
These default fallback roles are virtual and cannot be changed. You must create your own roles and set the properties to modify the fallback mechanism.
Create a new default role for the non-admin user. The default non-admin user role does not match our requirements. So we add a new role and grant more privileges, but also remove some Access Privileges

In addition, we want the non-admin user to be able to modify instances and instance-related data
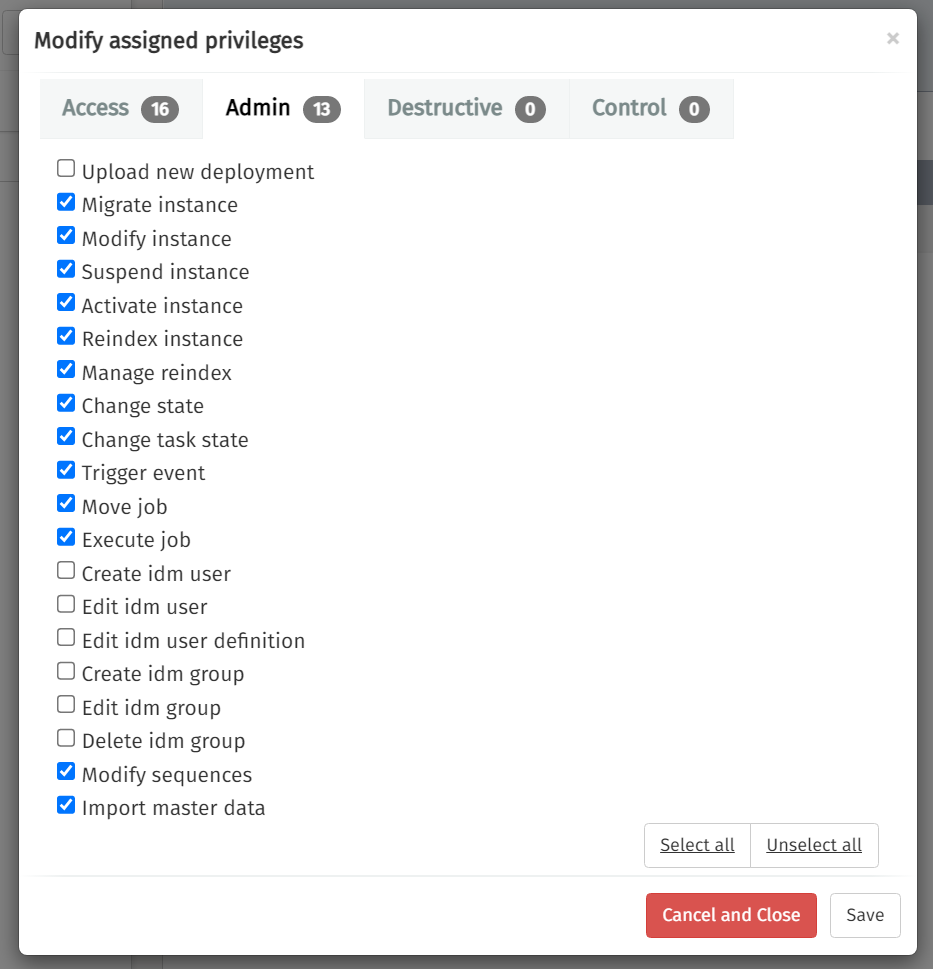
The user has access to several admin features and limited Access Privileges

noteCommunicating between Flowable Work and Flowable Control is still with basic auth. Flowable Control is able to communicate with Flowable Work using OAuth2 as well. More about that in the next section.
Authenticating using Bearer Tokens
Flowable Control can also be configured to use a Bearer Token for authentication. e.g. if you have a custom WAF (Web Application Firewall) which performs the authentication and then passes the token to Flowable Control. To enable this, you need to set the following properties:
spring.security.oauth2.resourceserver.jwt.issuer-uri=<token issuer URI>
This will enable the JWT resource server, and Flowable Control will use the token to authenticate the user. The same principles from the previous sections also apply for the Resource Server configuration. The only difference is that you need to use different properties to configure how the token is mapped to the user in Flowable Control.
The properties for configuring are:
flowable.control.app.security.oauth2.resourceserver.mapper.admin-authorities=
flowable.control.app.security.oauth2.resourceserver.mapper.authorities-attributes=roles
flowable.control.app.security.oauth2.resourceserver.mapper.tenant-attribute=
flowable.control.app.security.oauth2.resourceserver.mapper.privilege-role-authority-prefix=
flowable.control.app.security.oauth2.resourceserver.mapper.username-attribute=
OAuth2 Authentication between Flowable Control and Flowable Work/Engage
Flowable Control supports three types of authentication with Flowable Work / Engage out of the box:
- Basic Auth
- OAuth2 (client credentials)
- OAuth2 (current user token)
Based on how your application is configured you will have the available authentication options in the Cluster / Endpoint configuration.
OAuth2 client credentials
Using OAuth2 client credentials is similar to using Basic Auth, it is similar in such a way that a service account is used to communicate with Flowable Work / Engage.
For the next section to work we assume that you have read the Integrate Azure SSO with Flowable Work How-To.
While working through the How-To please ensure that the property flowable.security.oauth2.resourceserver.jwt.principal-claim-name is not set.
Otherwise, the application token coming from Flowable Control won't be accepted by Flowable Work / Engage since it does not contain a preferred_username.
Before we continue configuring Flowable Control, we need to do some configurations in our Azure portal.
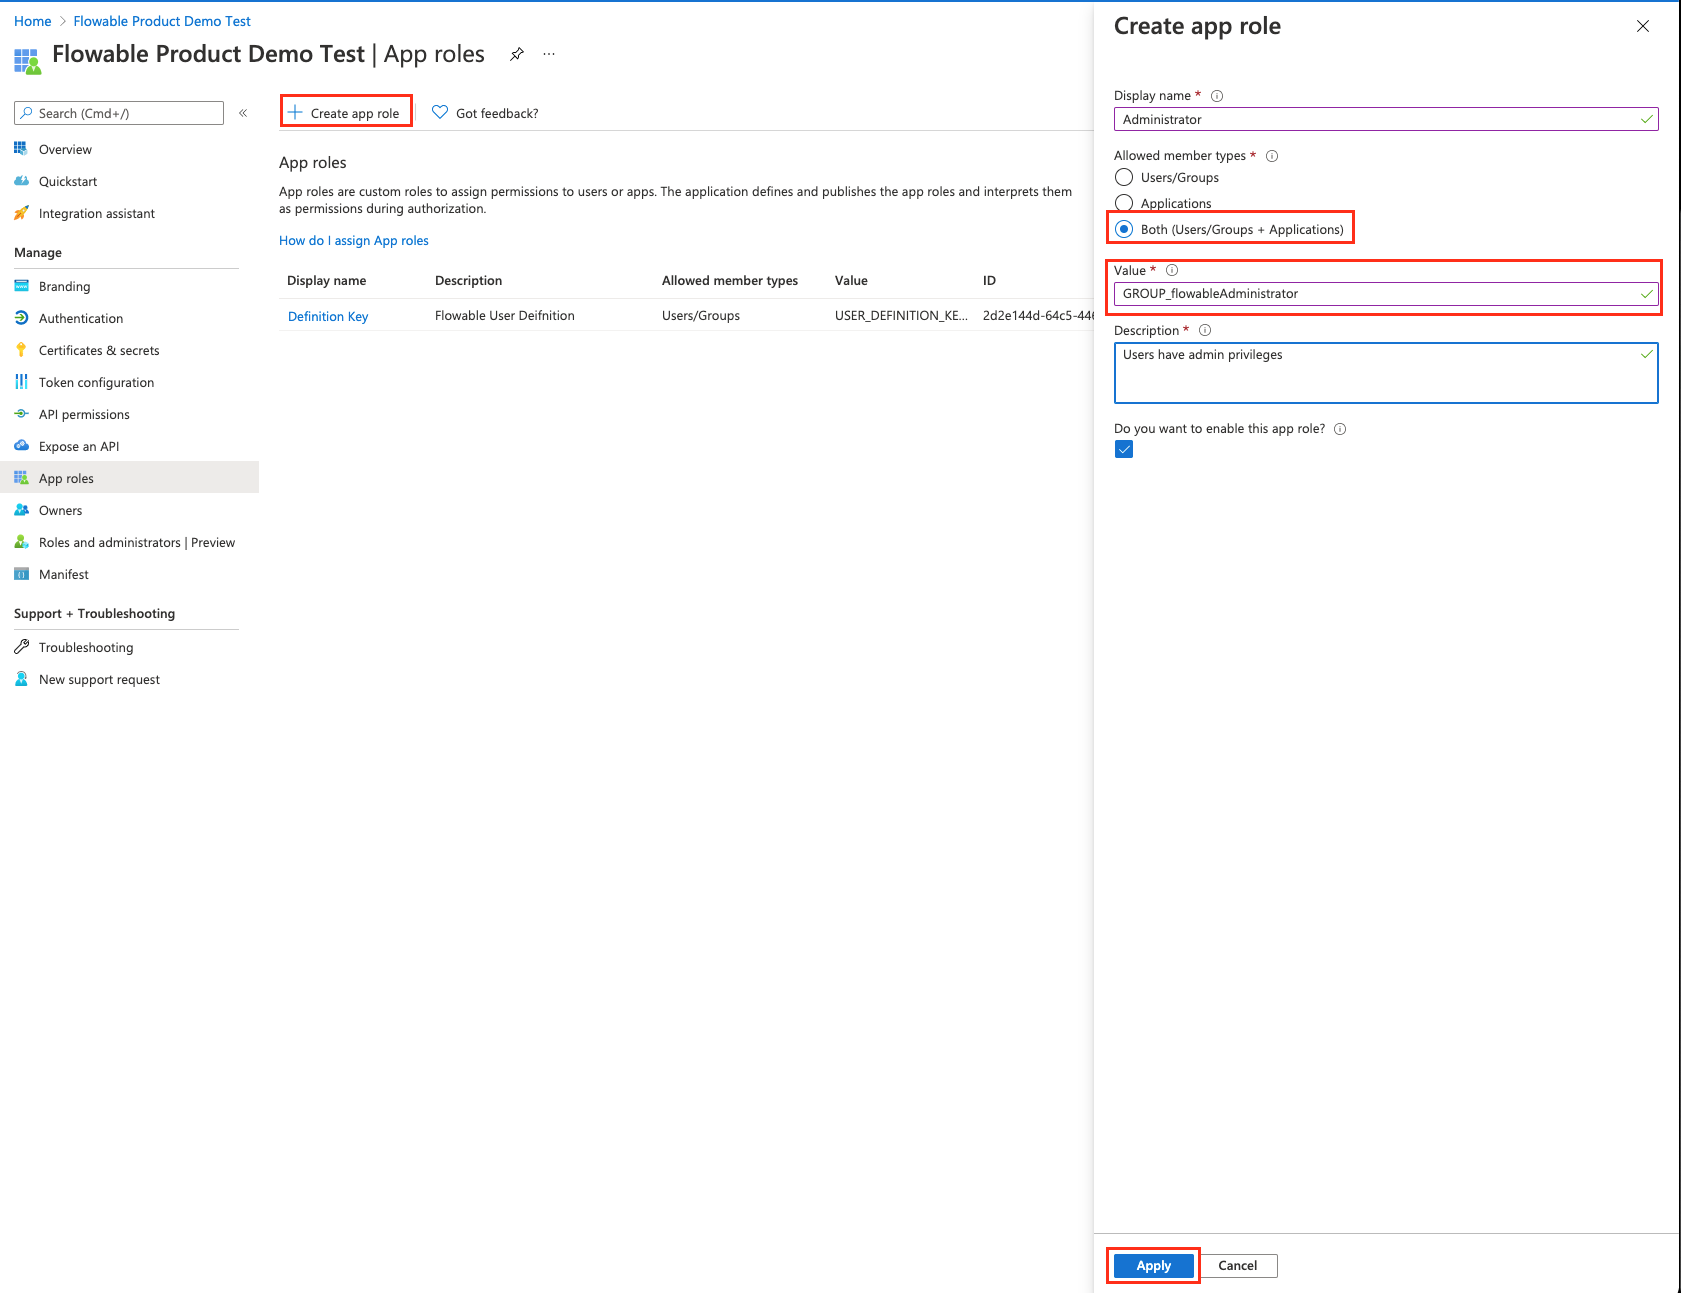
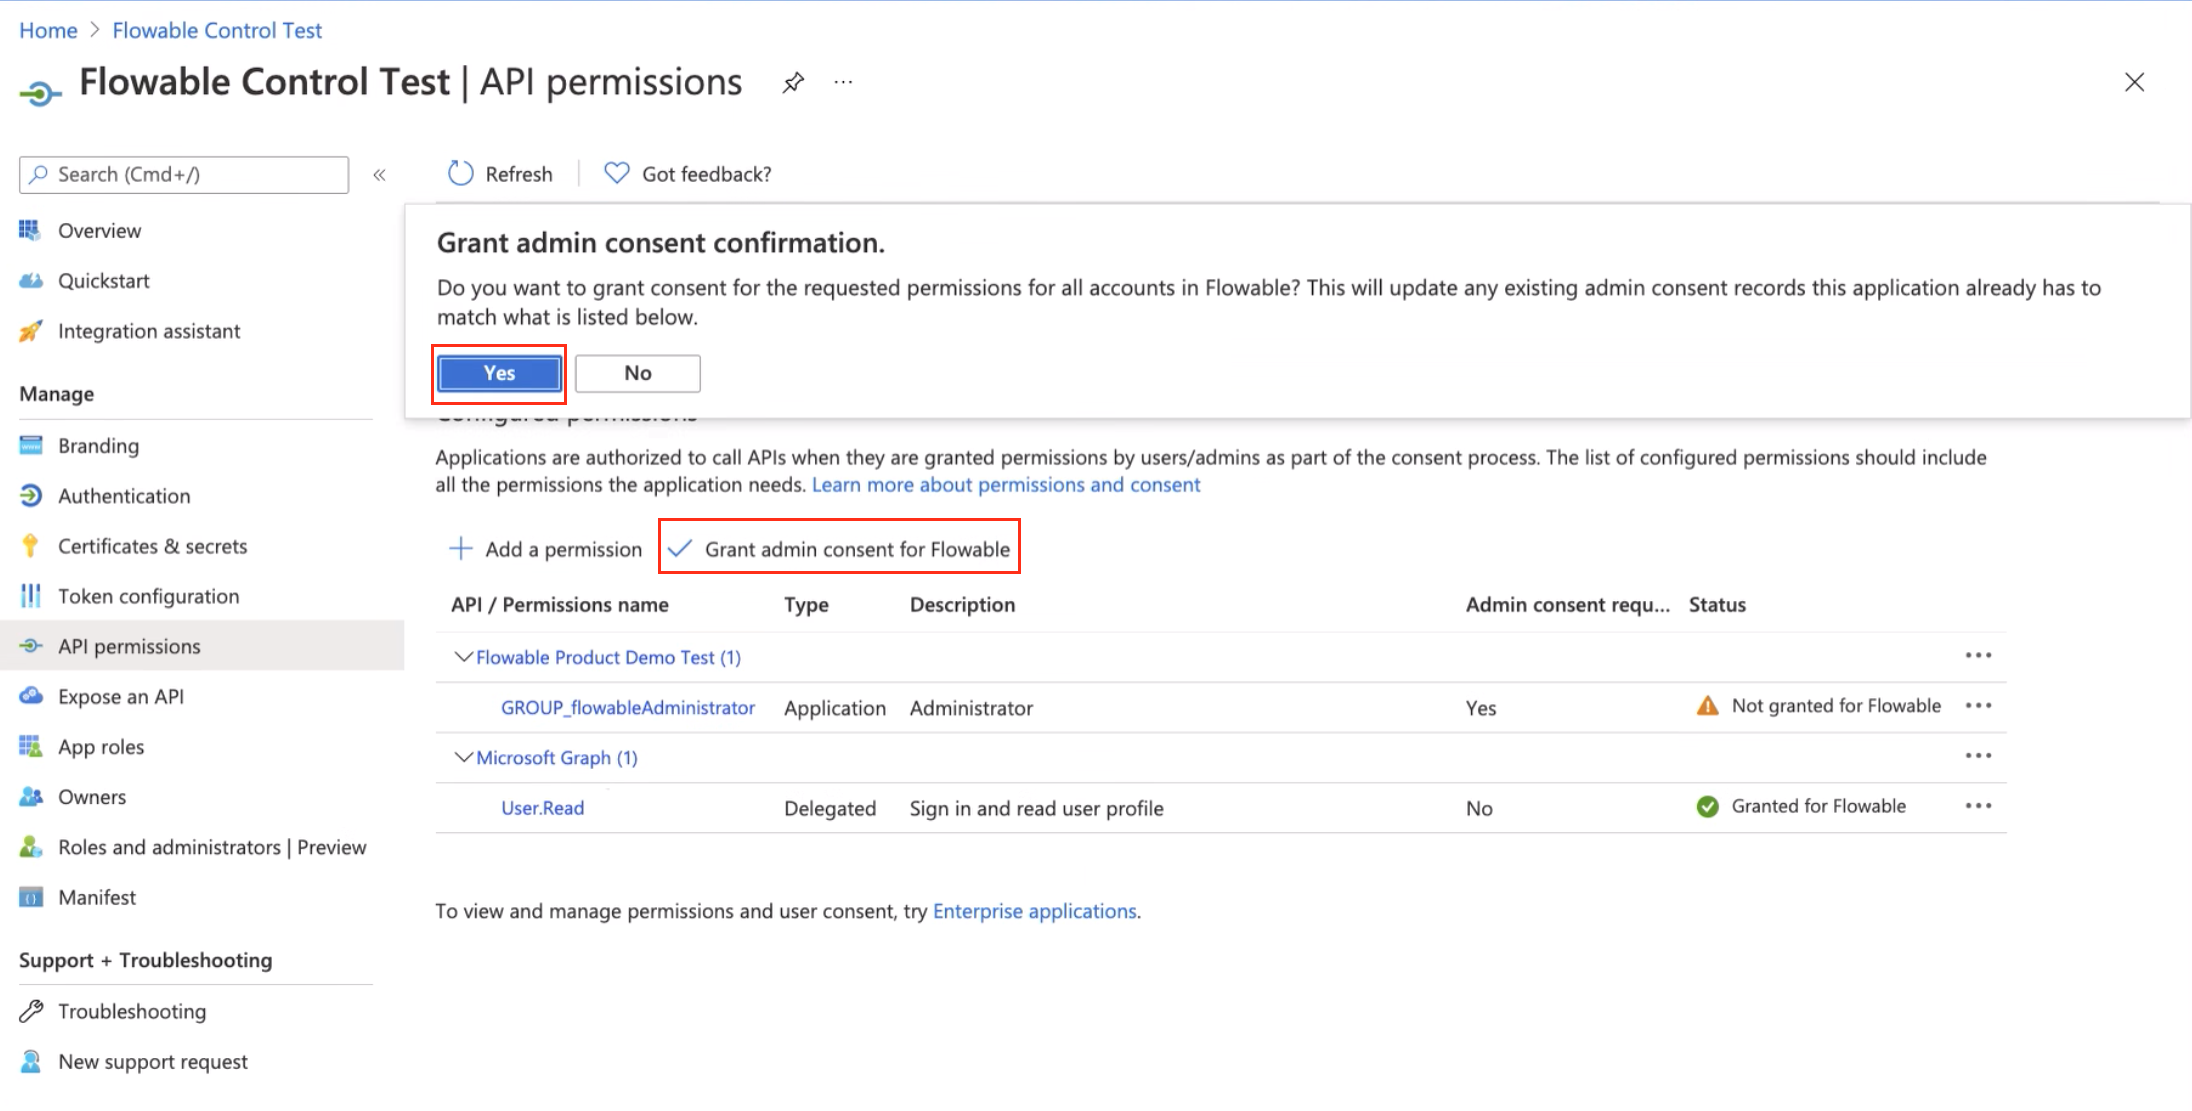
First, we need to make sure that we have a role in making a user / application an Admin. We will head to the Application App Roles and add a role with value GROUP_flowableAdministrator
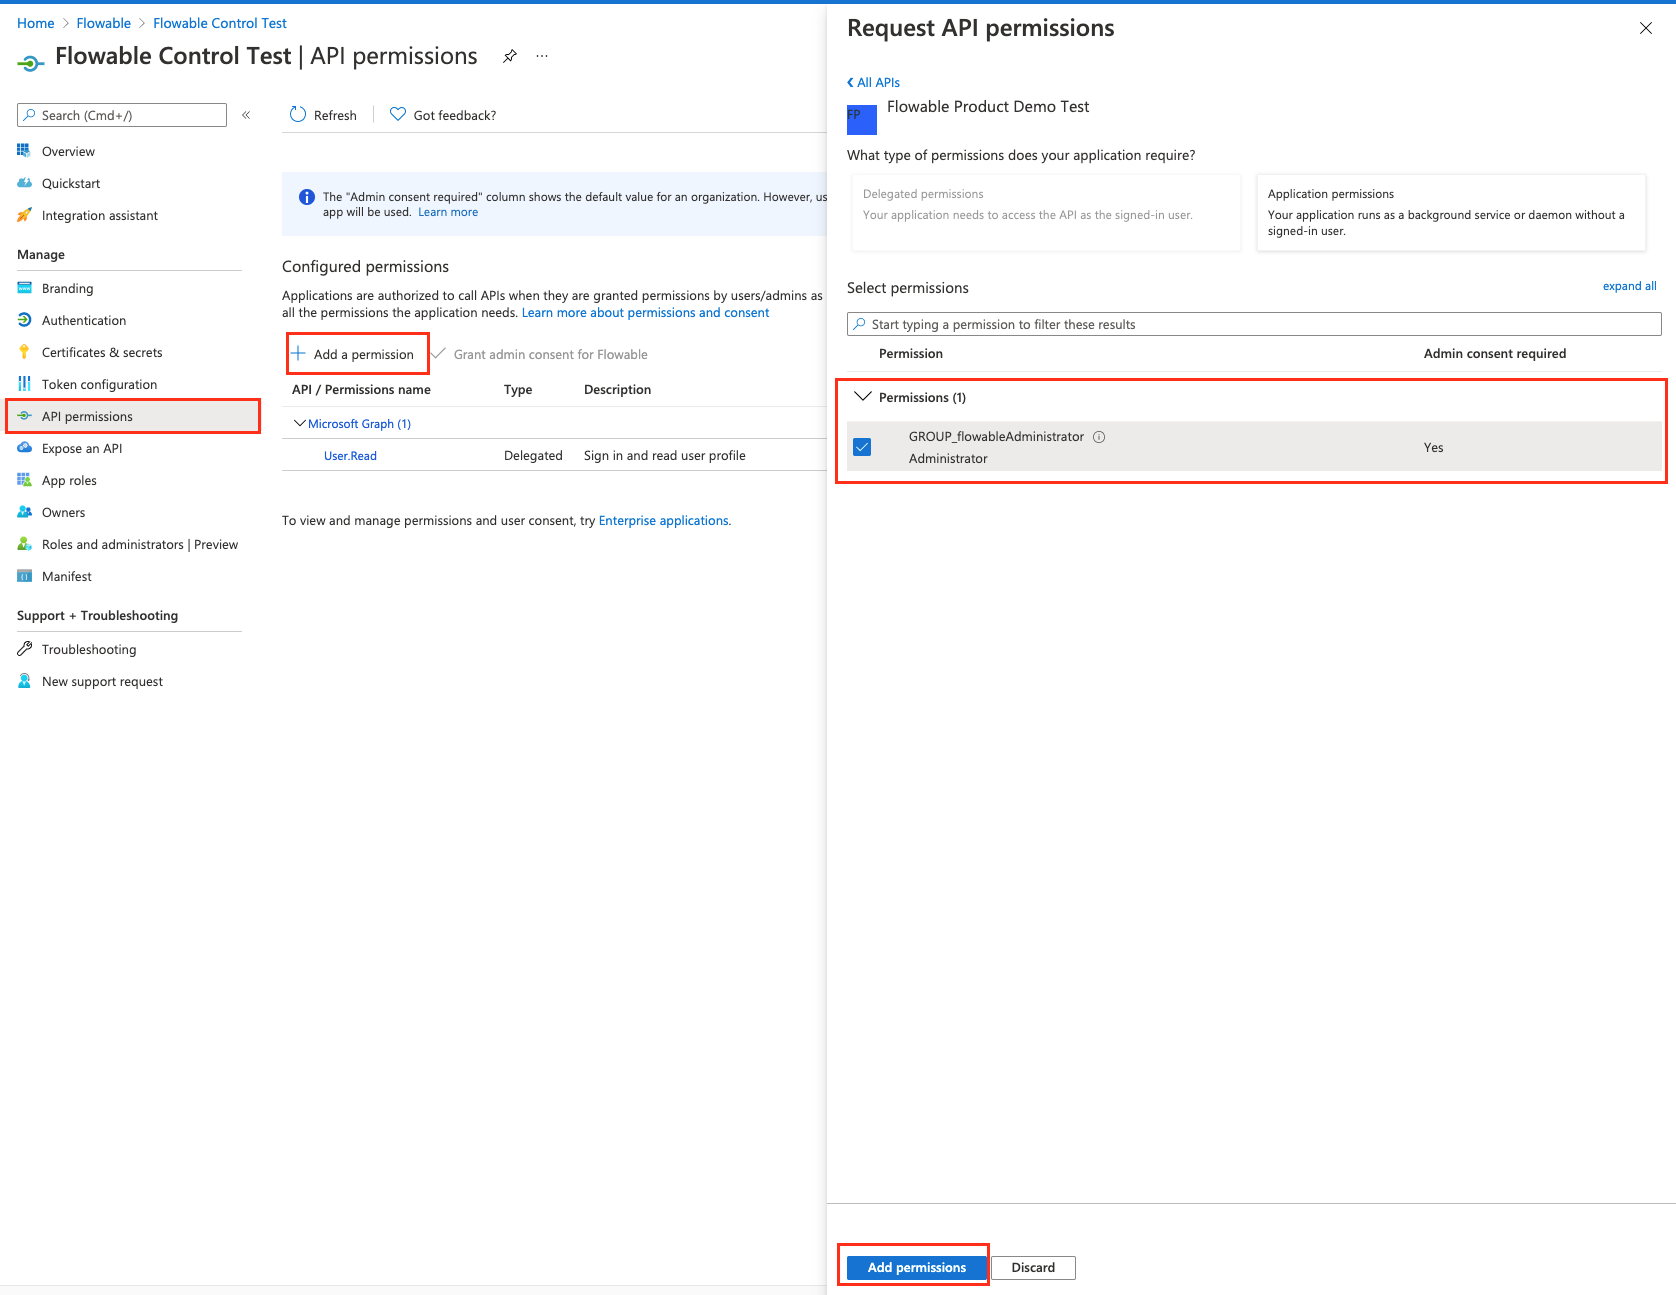
Once we have this role, we now need to assign it to our registered application.
To do that, we need to head to our application in the "Enterprise Applications".
There we need to go to permissions and click on the "Grand admin consent for <Organization>".
Note that you need to have the right permissions to be able to do this consent.
Once we have this setup we need to configure Flowable Control. The configuration here is specific to the Azure SSO. However, the general structure is normally the same for all providers.
In the example below, the following replacements are needed:
<name>- This can be any string you want. e.g.admin<provider-id>- This is optional to link it to an already existing OAuth2 Client provider<client-id>- The id of the client which we created at the beginning. This can be seen in the overview of the application.<client-secret>- The secret of the client which we created at the beginning<work-client-id>- The id of the client which was created for the Flowable Work Integration. This can be seen in the overview of the application.
spring.security.oauth2.client.registration.<name>.provider=<provider-id>
spring.security.oauth2.client.registration.<name>.client-id=<client-id>
spring.security.oauth2.client.registration.<name>.client-secret=<client-secret>
spring.security.oauth2.client.registration.<name>.scope=<work-client-id>/.default
spring.security.oauth2.client.registration.<name>.authorization-grant-type=client_credentials

# This part is optional. The provider-id above can be the same as the one set for login.
#spring.security.oauth2.client.provider.<provider-id>.issuer-uri=https://login.microsoftonline.com/<tenant-id>/v2.0
#spring.security.oauth2.client.provider.<provider-id>.user-name-attribute=email
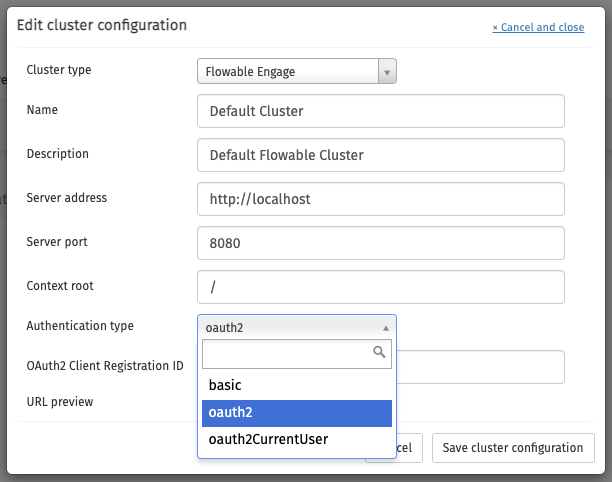
To finalize the configuration, we need to head to our cluster configuration and configure the authentication type.
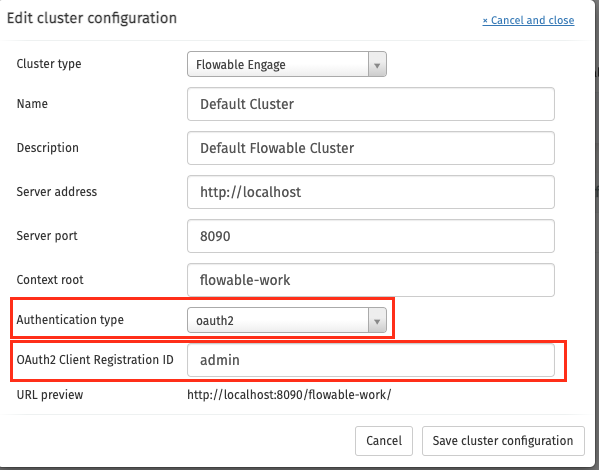
Note, that the "OAuth2 Client Registration ID" should match the client registration name configured in the properties
Once this is setup you should be able to communicate between Flowable Control and Flowable Work.
noteIn case the communication is not working you might be affected by your Access Token is being rejected due to invalid issuer. To fix that, follow the answer on this question
OAuth2 Current User ID Token
In case you want to use the same ID Token between Flowable Control and Flowable work you will have to adapt the "Redirect URIs" of your Flowable Work configuration to also include the Flowable Control URI. This integration will only work if you are also using OAuth2 to login to Flowable Control.
importantFor Flowable Control to work correctly, the user logging in to Control should also have admin rights in Flowable Work. Otherwise, Flowable Control might not work as expected.
Conclusion
The Flowable products are extendable through the default Spring Boot (starter) approach. You can customize the security of your application specific to the need of your environment in a really powerful way.
Integrations to standard identity providers are working easily as everything is based on the Spring Security framework.
Additionally, the security between different Flowable applications can be configured easily.