Custom Search Query
Target audience: Developers & Modelers
Available from: 3.10
Introduction
Sometimes, users will want to see slightly different data or data visualised in a different way than the default views. These default views, when you authenticate, show the instances (e.g. cases, processes and tasks) that you have permission on.
There is also an API with some default filters available to search work items (i.e. root case or process instances) or tasks with the filterId open, all, completed, and mine. However, sometimes there is no filter available which is giving you exactly what you would like to have.
In this case, Flowable offers you to create your own Elasticsearch query. In this howto, we'll show a basic example how such a custom query can be built.
There is also an advanced howto on indexing and search that covers advanced topics.
Creating an Own Query
Flowable has the capability to create your own queries, which is a powerful feature, and you should definitely check out the documentation on indexing to get a full overview of all additional possibilities with Flowable.
A simple example
This part is not in the above video
As an example, let's assume that we would like to search for all cases having a given case definition key which were started by a given user.
Looking at our index (it's always a good idea to do this, this can be done through Flowable Control by clicking on Indexes > Cases), we see for example the following structure:
{
  "__flowableVersion": 8,
  "caseDefinitionKey": "testCaseModel",
  "caseDefinitionName": "Test Case Model",
  "startUserId": "admin",
  "startTime": "2021-02-21T14:46:53.322Z",
  "id": "CAS-a3260edf-7453-11eb-9d47-1281fbfbc379",
  "state": "active",
  "involvedUsers": [
    "admin"
  ],
  "variables": [
    {
      "id": "VAR-a326d231-7453-11eb-9d47-1281fbfbc379",
      "name": "initiator",
      "type": "string",
      "scopeId": "CAS-a3260edf-7453-11eb-9d47-1281fbfbc379",
      "scopeType": "cmmn",
      "scopeDefinitionId": "CAS-95dd54ea-7453-11eb-9d47-1281fbfbc379",
      "scopeDefinitionKey": "testCaseModel",
      "rawValue": "admin",
      "textValue": "admin",
      "textValueKeyword": "admin"
    }
  ],
  "caseDefinitionId": "CAS-95dd54ea-7453-11eb-9d47-1281fbfbc379",
  "caseDefinitionCategory": "http://flowable.org/cmmn",
  "identityLinks": [
    {
      "id": "IDL-a3276e72-7453-11eb-9d47-1281fbfbc379",
      "type": "assignee",
      "userId": "admin"
    },
    {
      "id": "IDL-a3359f47-7453-11eb-9d47-1281fbfbc379",
      "type": "participant",
      "userId": "admin"
    },
    {
      "id": "IDL-a3276e73-7453-11eb-9d47-1281fbfbc379",
      "type": "owner",
      "userId": "admin"
    },
    {
      "id": "IDL-a32635f0-7453-11eb-9d47-1281fbfbc379",
      "type": "starter",
      "userId": "admin"
    }
  ],
  "tenantId": "default"
}
We can see that our indexed document will have a startUserId property and a caseDefinitionKey property.
We can use these parts of the document to search for our cases.
This can be easily achieved with the following Elasticsearch query:
{
  "query": {
    "bool": {
      "must": [
        {
          "term": {
            "startUserId": "admin"
          }
        },
        {
          "term": {
            "caseDefinitionKey": "testCaseModel"
          }
        }
      ]
    }
  }
}
Of course, this query would only find the cases instances with definition testCaseModel which were started by admin.
We can replace admin and testCaseModel with whatever we want to search for.
An example with nested queries
Let's assume now that we would also like to search for all case instances with a given assignee.
Looking once more at our index, we can see that our indexed document will not have a simple assignee property but that it will have a nested identityLinks array, and that one such identity link will correspond to the case assignee.
We can use this part of the document to search for our cases.
In this nested array, there must be an entry with the userId equal to our assignee we are searching for, and the type of the field to assignee.
This can be easily achieved with the following Elasticsearch query:
{
  "query": {
    "bool": {
      "must": [
        {
          "nested": {
            "path": "identityLinks",
            "query": {
              "bool": {
                "must": [
                  {
                    "term": {
                      "identityLinks.type": "assignee"
                    }
                  },
                  {
                    "term": {
                      "identityLinks.userId": "admin"
                    }
                  }
                ]
              }
            }
          }
        }
      ]
    }
  }
}
Of course, this query would only find the cases with the assignee admin.
We can replace admin with whatever we want to search for.
Using the Query in Flowable
Going against Elasticsearch gives you now a different document structure than what you might be used to from Flowable.
When you go to Elasticsearch without going to Flowable you are losing the out-of-the-box access control which is built into Flowable. To avoid that, Flowable provides the possibility to query with your custom queries.
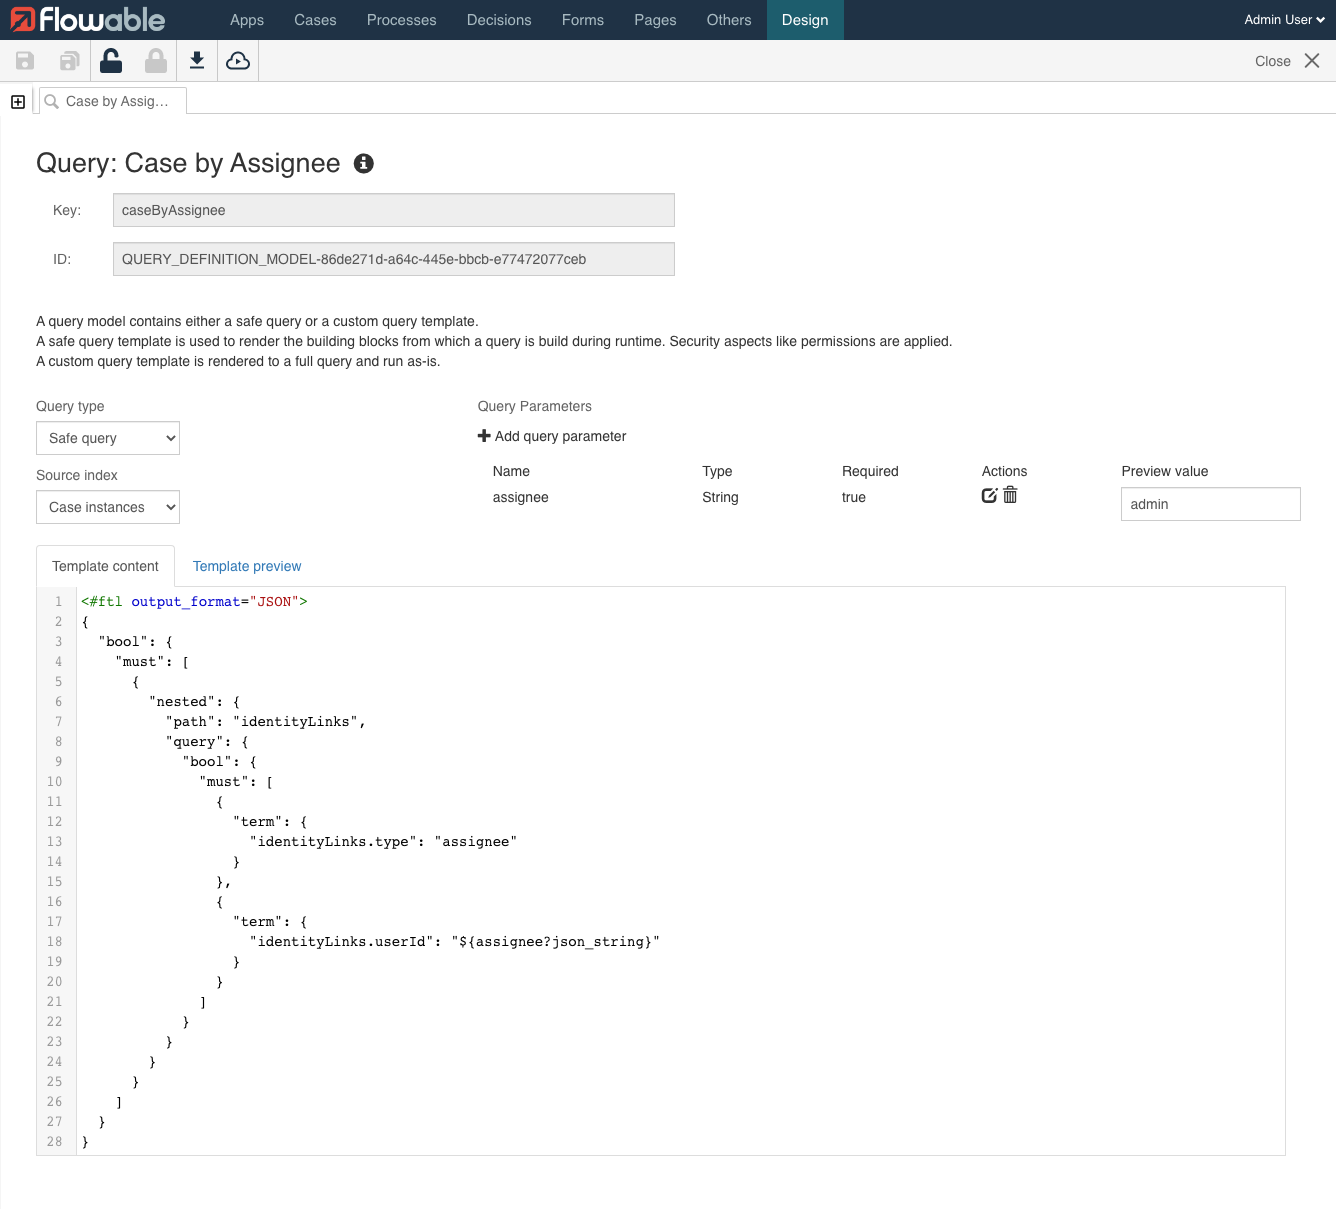
To create your own query you need to create a Query model in Flowable Design.
We can call the model Case by Assignee and give it the key caseByAssignee.
There are two query types, the first is Safe query handling security and permissions for you, while the Custom query allows you to use the full features from Elasticsearch.
This query will use the case-instances index, since we need to specify this as the Source index.
The field Query Parameters allows us to specify custom parameters a user can pass in.
There we can add the parameter assignee as mandatory.
As Template content we can specify our query as a FreeMarker template with the attributes we have set:
<#ftl output_format="JSON">
{
  "bool": {
    "must": [
      {
        "nested": {
          "path": "identityLinks",
          "query": {
            "bool": {
              "must": [
                {
                  "term": {
                    "identityLinks.type": "assignee"
                  }
                },
                {
                  "term": {
                    "identityLinks.userId": "${assignee?json_string}"
                  }
                }
              ]
            }
          }
        }
      }
    ]
  }
}
The userId is now ${assignee?json_string}, which is exactly the same name as we have specified as a parameter.
We use ?json_string to ensure that it is not possible to escape the double quotes of the JSON string (e.g. by providing a double quote as search query).
The Template preview allows us to look at the query with the filled in value, as well as validate the Freemarker template and the JSON syntax.
You won't see a preview until you fill out assignee, since this field is mandatory.
Once done, the query model looks like this:
To make it available you need to publish an app which includes the query model.
Once this is done, we can execute a REST request to use our query:
/platform-api/search/query-case-instances/query/caseByAssignee?assignee=admin.
As a result, we should see all case instances with the assignee admin.
Further reading
This article has only shown a small part of the Elasticsearch integration. In addition to executing queries, it's also possible to extract variables, write your own content into the index, and enhance the output result. As a further resource, it's recommended to look into the Work Indexing documentation and the Advanced search How-To.