Advanced search
Target audience: Developers
Overview
In this how to guide we are going to build a custom dashboard with some advanced search capabilities to build a nice user experience around how to search your cases, preview them and how to create and navigate around them.
You will learn how to extend the built-in Elasticsearch support by adding extra fields to case, enhancing the data being indexed and how to create custom and dynamic queries to enable powerful searches for dashboards, selections and even inside cases.
Did you ever wonder on how you can extend the way data gets indexed? Or how you can search within a specific variable in that data table? How you can heavily customize the data behind a selection and improve its type-ahead capabilities? If yes, then this how to guide is made for you.
This guide does not focus on how to create a case model, forms and processes, although we highlight some design details of course, so it is expected for you to be familiar with Flowable Design and how you can set up an app, case models and forms.
More details can be found in the the documentation on indexing.
Requirements
We want to build a dashboard with advanced search capabilities to lookup cases we want to work on or see its overview. There should be a structured search where we can explicitly search within designated fields, but also kind of global search allowing us to search within a lot of content of those cases, no matter where we might find a hit. The search and result list should be immediate with type-ahead support and without a search button. In the data table showing the found cases, we need sorting support, even with more than one column and infinite scrolling would be really nice.
The dashboard needs to allow us to quickly look into a case preview before navigating to the case for editing or just for an extended overview. And of course we want to create new cases directly from the dashboard with a start form and navigation to the freshly created case once it is available.
If we want to be really bold, we even add some nice charts for our managers to love.
Sample case model
We will create and use a very simple case model as this guide is around how to extend the built-in Elasticsearch capabilities and not how to model nice cases and forms.
The case model is built around a client lifecycle where we can set up some very basic client data including the name, birthday a main phone number and a list of addresses.
Building the sample app
Before we can dig into how to extend the indexing capabilities, we need a sample app to generate some case data we can use as an example to explain the extended indexing features we support.
As we are not focussing on how to design forms and create a case model, here are just some details around how we expect the variable structure within the case, so the explained details about the extended indexing and search capabilities will match.
| Variable name | Type | Description |
|---|---|---|
| firstName | String | The firstname of the client |
| lastName | String | The lastname of the client |
| mainPhoneNumber | String | The main phone number (we might add a list of additional phone number at a later stage) |
| birthday | Date | The birthday of the client |
| comments | String | The optional comments we want to also be able to search within later |
| addresses | Array | The list of addresses of the client (see next fields for the variables within that array) |
| addresses.street | String | The street of the address |
| addresses.zip | Number | The ZIP code of the address |
| addresses.city | String | The city of the address |
| addresses.countryKey | Master data select | The country which is stored using the key of the master data source |
Extending the case index mapping
Each case is automatically indexed with all available metadata and its variables. As we want to explore some advanced search capabilities, we are going to write an index extension with new indexed fields, analyzers and filters.
The following file case-mapping-extension.json can be put into a resource within the classpath com/flowable/indexing/mapping-extension/custom
in order to be picked up automatically and being installed on bootup.
{
  "key": "client-case-mapping-extension",
  "extends": "case-instances",
  "version": 1,

  "settings": {
    "analysis": {
      "analyzer": {
        "phonetic_analyzer": {
          "type": "custom",
          "tokenizer": "standard",
          "filter": [
            "lowercase",
            "phonetic_filter"
          ]
        }
      },
      "filter": {
        "phonetic_filter": {
          "type": "phonetic",
          "encoder": "metaphone",
          "replace": false
        }
      }
    }
  },

  "properties": {
    "clientName_typeAhead": {
      "type": "text",
      "analyzer": "ngrams",
      "search_analyzer": "standard",
      "copy_to": [ "clientName_phonetic", "clientName_edge" ]
    },
    "clientName_phonetic": {
      "type": "text",
      "analyzer": "phonetic_analyzer"
    },
    "clientName_edge": {
      "type": "text",
      "search_analyzer": "standard",
      "analyzer": "edge_ngrams"
    },
    "address_typeAhead": {
      "type": "text",
      "analyzer": "ngrams",
      "search_analyzer": "standard",
      "copy_to": "fullTextVariables"
    }
  },

  "fullTextVariables": [
    {
      "name": "firstName",
      "scopeDefinitionKey": "searchSampleClientCase"
    },
    {
      "name": "lastName",
      "scopeDefinitionKey": "searchSampleClientCase"
    },
    {
      "name": "comments",
      "scopeDefinitionKey": "searchSampleClientCase"
    }
  ]
}
Let's analyze it step by step and add some details what exactly we are doing there.
{
  "key": "client-case-mapping-extension",
  "extends": "case-instances",
  "version": 1
}
The key needs to be unique in the system, but will not be used elsewhere, it is an internal identifier on how we manage indexing extensions.
The important part is the extends value and with case-instances we tell the indexing engine which index we want to extend and
in this example we are going to extend the existing default mapping for indexing cases. More than one such extension mappings can be
present and will all be merged before creating the real indexing structure. In fact, this is very important to notice: we merge the
default mapping with all the extensions before we send it to Elasticsearch and hence making it really flexible also for future
extensions in the product itself.
Whenever you change something make sure you increase the version as we use it to detect whether we need to apply any changes to the
existing Elasticsearch schema on bootstrap.
{
  "settings": {
    "analysis": {
      "analyzer": {
        "phonetic_analyzer": {
          "type": "custom",
          "tokenizer": "standard",
          "filter": [
            "lowercase",
            "phonetic_filter"
          ]
        }
      },
      "filter": {
        "phonetic_filter": {
          "type": "phonetic",
          "encoder": "metaphone",
          "replace": false
        }
      }
    }
  }
}
In the settings section we are going to add a new analyzer and filter for the phonetic search (this kind of search will take into account how words sound) we want to experiment with later.
We are not going into details around how that all works, basically, you can directly use whatever Elasticsearch supports in here as
after merging we are directly using that as a schema for Elasticsearch (Ok, there are a couple of exceptions we will discover a bit
later). For the settings section, we use it one to one for the schema directly.
For the phonetic filter to work, you probably have to install the phonetic analysis plugin. You can find additional information here and around the phonetic filter here.
{
    "properties": {
    "clientName_typeAhead": {
      "type": "text",
      "analyzer": "ngrams",
      "search_analyzer": "standard",
      "copy_to": [ "clientName_phonetic", "clientName_edge" ]
    },
    "clientName_phonetic": {
      "type": "text",
      "analyzer": "phonetic_analyzer"
    },
    "clientName_edge": {
      "type": "text",
      "search_analyzer": "standard",
      "analyzer": "edge_ngrams"
    },
    "address_typeAhead": {
      "type": "text",
      "analyzer": "ngrams",
      "search_analyzer": "standard",
      "copy_to": "fullTextVariables"
    }
  }
}
In the properties section we add a couple of new fields for the case index. Be careful when adding new fields as they might increase the size of the case index. Only add new fields when you feel like the ones provided out of the box with the variables are not meeting your
search requirements. In our example here we explore new fields with specific analyzers, more for the sake of how to do such things than
the necessity itself.
We have two variables for the first and last name of the client, but want to be able to search within the name regardless of
first or last name, thus we create a new field with a type ahead semantic using the built-in ngrams analyzer. By the way, if you want
to see what the default index mapping looks like for cases, you can do so within the case-instance-mapping.json file of the
product. There you can see that we already have a default ngrams analyzer we can make use of.
The copy-to value is interesting as it simply copies the value provided to this field to clientName_phonetic as well as to
clientName_edge automatically, which prevents us to provide the same value for those three fields and we only have to provide
it for clientName_typeAhead instead.
In the clientName_phonetic we are going to use our previously defined new analyzer phonetic_analyzer.
{
    "fullTextVariables": [
    {
      "name": "firstName",
      "scopeDefinitionKey": "searchSampleClientCase"
    },
    {
      "name": "lastName",
      "scopeDefinitionKey": "searchSampleClientCase"
    },
    {
      "name": "comments",
      "scopeDefinitionKey": "searchSampleClientCase"
    }
  ]
}
This one is pretty useful as we simply define some variable names to be copied into the full text search field which is available
in the default case index (i.e. when doing a full text search for case instances). Whenever the indexer finds such a variable, and it matches the provided case model key, it copies its
content into the existing field named fullTextVariables where you can then search.
Indexed Data Enhancer
In the previous chapter, we wrote a case index mapping extension by adding new fields, analyzers, filters and some more tweaks. Now we need learn how we can feed those new fields with data.
There is an indexing hook point we can make use of, an interface named PlatformIndexedDataEnhancer. For simplicity, there is an adapter
available: IndexedDataEnhancerAdapter which implements all those (many) hook points for you so you only have to overwrite an implement
the ones you need.
For our use case, as we only need to hook into the case indexing part, we just need one to be implemented, the
enhanceHistoricCaseInstanceReindexData method.
This only applies if you use the synchronous history manager, not the asynchronous one (the synchronous one is default since version 3.8.0). For asynchronous history, there are more fine-grained methods to be implemented as the way the history gets handled is different. Keep in mind that the asynchronous history manager has been removed since version 3.15.0.
Let's look at our example for such a data enhancer where we extract some of our case data and put it back into those specific fields we added in the mapping extension:
package com.flowable.howto;

import static com.flowable.indexing.api.IndexingJsonConstants.FIELD_VARIABLE_JSON;
import static com.flowable.indexing.api.IndexingJsonConstants.FIELD_VARIABLE_NAME;
import static com.flowable.indexing.api.IndexingJsonConstants.FIELD_VARIABLE_TEXT_VALUE;

import org.flowable.cmmn.api.history.HistoricCaseInstance;
import org.flowable.engine.impl.event.logger.handler.Fields;
import org.springframework.beans.factory.annotation.Autowired;
import org.springframework.context.annotation.Lazy;

import com.fasterxml.jackson.databind.JsonNode;
import com.fasterxml.jackson.databind.node.ArrayNode;
import com.fasterxml.jackson.databind.node.ObjectNode;
import com.flowable.dataobject.api.runtime.DataObjectRuntimeService;
import com.flowable.dataobject.api.runtime.MasterDataInstance;
import com.flowable.indexing.api.IndexingManagerHelper;
import com.flowable.indexing.impl.IndexedDataEnhancerAdapter;

/**
 * A registered indexed data enhancer is invoked during the indexing of any work object data and can be used to hook into the indexing data and enhance it
 * with additional data to be indexed alongside the default one.
 */
public class IndexedDataEnhancer extends IndexedDataEnhancerAdapter {

    /**
     * We need this runtime service to lookup master data where we only have its id, but want to index the value for searching, not only the id.
     */
    @Autowired @Lazy
    protected DataObjectRuntimeService dataObjectRuntimeService;

    /**
     * As long as we only use the synchronous history manager, we only need to override this method for indexing, for asynchronous indexing, also consider
     * the other methods as the indexing is slightly different due to its asynchronous semantics.
     *
     * @param historicCaseInstance the case instance being indexed right now which can be enhanced
     * @param data the data node (JSON) holding the data being sent to the index
     * @param indexingManagerHelper the indexing helper which can be used with some supporting methods around indexing
     */
    @Override
    public void enhanceHistoricCaseInstanceReindexData(HistoricCaseInstance historicCaseInstance, ObjectNode data, IndexingManagerHelper indexingManagerHelper) {

        // we only want to enhance our special case model used in this how-to guide (use your case model key here if different than this one)
        if ("searchSampleClientCase".equals(historicCaseInstance.getCaseDefinitionKey())) {

            // data extraction at this point of execution only works by getting it out of the variable JSON structure, not the case variable map
            // as it might not be loaded in all cases (e.g. if the case variables have never been used and hence through lazy loading the map is not
            // initialized), that's why in here we recommend to only use the JSON data structure, even if it a bit more boilerplate code needed, but it works
            // in all cases.
            if (data.has(Fields.VARIABLES)) {
                JsonNode variablesNode = data.get(Fields.VARIABLES);
                if (!variablesNode.isNull() && variablesNode.size() > 0 && variablesNode instanceof ArrayNode) {
                    ArrayNode variables = (ArrayNode) variablesNode;
                    StringBuilder clientNameBuilder = new StringBuilder();
                    StringBuilder countryKeysBuilder = new StringBuilder();

                    // we extract specific values from the variable data node and save them in temporary vars to put into specific places for indexing after
                    for (JsonNode variableNode : variables) {
                        if ("lastName".equals(variableNode.get(FIELD_VARIABLE_NAME).asText())) {
                            clientNameBuilder.append(variableNode.get(FIELD_VARIABLE_TEXT_VALUE).asText());
                            clientNameBuilder.append(" ");
                        } else if ("firstName".equals(variableNode.get(FIELD_VARIABLE_NAME).asText())) {
                            clientNameBuilder.append(variableNode.get(FIELD_VARIABLE_TEXT_VALUE).asText());
                            clientNameBuilder.append(" ");
                        } else if ("addresses".equals(variableNode.get(FIELD_VARIABLE_NAME).asText())) {
                            // the addresses variable is in fact an array as you might have more than one address
                            JsonNode addresses = variableNode.get(FIELD_VARIABLE_JSON);
                            if (addresses.size() > 0) {
                                // we just extract the street, city and build the country name and add them all into a single full-text indexed field for the
                                // addresses, so you can search for any of those values
                                StringBuilder addressValueBuilder = new StringBuilder();
                                for (JsonNode address : addresses) {
                                    addressValueBuilder.append(getStringValueOrDefault(address.get("street"), "")).append(" ");
                                    addressValueBuilder.append(getStringValueOrDefault(address.get("city"), "")).append(" ");
                                    addressValueBuilder.append(getStringValueOrDefault(address.get("zip"), "")).append(" ");

                                    // the country is saved with its master data key, but we want to index its value (the name and even ISO code)
                                    String countryKey = getStringValueOrDefault(address.get("countryKey"), null);
                                    if (countryKey != null) {
                                        countryKeysBuilder.append(countryKey).append(" ");
                                        addressValueBuilder.append(countryKey).append(" ");

                                        // let's resolve that master data value, so we can additionally index its name, not just the key
                                        MasterDataInstance countryData = dataObjectRuntimeService.createMasterDataInstanceQuery()
                                            .definitionKey("md-country")
                                            .key(countryKey)
                                            .singleResult();

                                        if (countryData != null) {
                                            addressValueBuilder.append(countryData.getName()).append(" ");
                                        }
                                    }
                                }

                                // add the extracted addresses (street and city only) as a new top-level data field
                                data.put("address_typeAhead", addressValueBuilder.toString().trim());
                            }
                        }
                    }

                    // if we could extract data for the client name, we add it to an additional field with type-ahead support as being added within the
                    // mapping extension
                    if (clientNameBuilder.length() > 0) {
                        // add the extracted first and last name as a new top-level data field
                        data.put("clientName_typeAhead", clientNameBuilder.toString().trim());
                    }

                    // add the extracted country keys (ISO 3 codes) as a new variable value as we don't need any specific analyzer settings
                    // we can only add it here as within the address variable, we might run into a concurrent modification exception when still
                    // looping over the variables and the same time adding a new one
                    String countryKeys = countryKeysBuilder.toString().trim();
                    if (countryKeys.length() > 0) {
                        // we just add the country keys as a new variable named 'countryKeys' into the existing variable data node so it gets
                        // indexed as a regular variable
                        ObjectNode countryKeysNode = variables.addObject();
                        countryKeysNode.put("name", "countryKeys");
                        countryKeysNode.put("type", "text");
                        countryKeysNode.put("scopeId", historicCaseInstance.getId());
                        countryKeysNode.put("scopeType", "cmmn");
                        countryKeysNode.put("scopeDefinitionId", historicCaseInstance.getCaseDefinitionId());
                        countryKeysNode.put("scopeDefinitionKey", historicCaseInstance.getCaseDefinitionKey());
                        countryKeysNode.put("textValue", countryKeys);
                        countryKeysNode.put("rawValue", countryKeys);
                    }
                }
            }
        }
    }

    /**
     * Extracting a single variable value out of the variable data node with the option of a default value, if the requested one is not found.
     *
     * @param variableData the data node containing the variable values
     * @param defaultValue the optional default value to be returned, if none is found, might of course also be null
     * @return the variable value requested, if found, the given default one, if not found within the variable data node
     */
    protected String getStringValueOrDefault(JsonNode variableData, String defaultValue) {
        if (variableData == null) {
            return defaultValue;
        }
        return variableData.asText(defaultValue);
    }
}
Look at the comments made inline in the Java code for more clarification. You need this bean to be included in your Spring configuration as it will be picked up automatically.
Due to how beans are wired during bootstrap, we need the DataObjectRuntimeService to be injected lazily,
otherwise we run into a circular dependency problem.
As you can see in the example, we are able to enrich a case being indexed with whatever we want, we even look up the value for the referenced country master data in order to become searchable. This way you can also enhance it with 3rd party external data you need to find cases with.
Search Result Data Enhancing
We learned how to enhance the case data being indexed and in this chapter we will see a small example on how we can also enrich search hit data being returned from an Elasticsearch query.
package com.flowable.howto;

import com.fasterxml.jackson.databind.JsonNode;
import com.flowable.platform.service.caze.CaseInstanceResultMapper;
import com.flowable.platform.service.caze.CaseInstanceSearchRepresentation;

/**
 * This data enhancer is triggered on every search hit node with the ability to enhance what is sent back as the search result.
 * We enhance the hit node by adding the _score field as well, helpful for queries with a scored sort order rather than any other sorting.
 */
public class CaseSearchDataEnhancer implements CaseInstanceResultMapper.Enhancer {

    /**
     * We add the _score filed to the search response, whenever available in the hit node (it will NOT be available, if the query contains a search clause,
     * as scoring in a sorted result does not make any sense and hence is not calculated by Elasticsearch).
     *
     * @param response the response object already containing the basic case data extracted from the source with can be enriched additionally
     * @param hitNode the full hit document node as being returned by the Elasticsearch query
     */
    @Override
    public void enhanceHitNode(CaseInstanceSearchRepresentation response, JsonNode hitNode) {
        JsonNode score = hitNode.get("_score");
        if (score != null && !score.isNull()) {
            response.getVariables().put("_score", score.asDouble());
        }
    }

    @Override
    public void enhance(CaseInstanceSearchRepresentation response, JsonNode sourceNode) {
        enhanceHitNode(response, sourceNode);
    }
}
In this example we want to additionally pass along the _score field we get from a scored query from Elasticsearch into the result as it might
be interesting to see how the score is calculated on different hits. As we will play with different ways of how to tune an Elasticsearch query,
the score comes in handy to see in the frontend when executing and playing with queries.
The score is only calculated for queries without any sort order as it would not make sense to calculate the score, if it is not used for
sorting, obviously. For queries having a specific sort order applied, the _score field will always be null.
Build a Dashboard Page
Before we will deep dive into the dynamic query templates, we want to build a simple dashboard page where we can play with the queries and see the hit results.
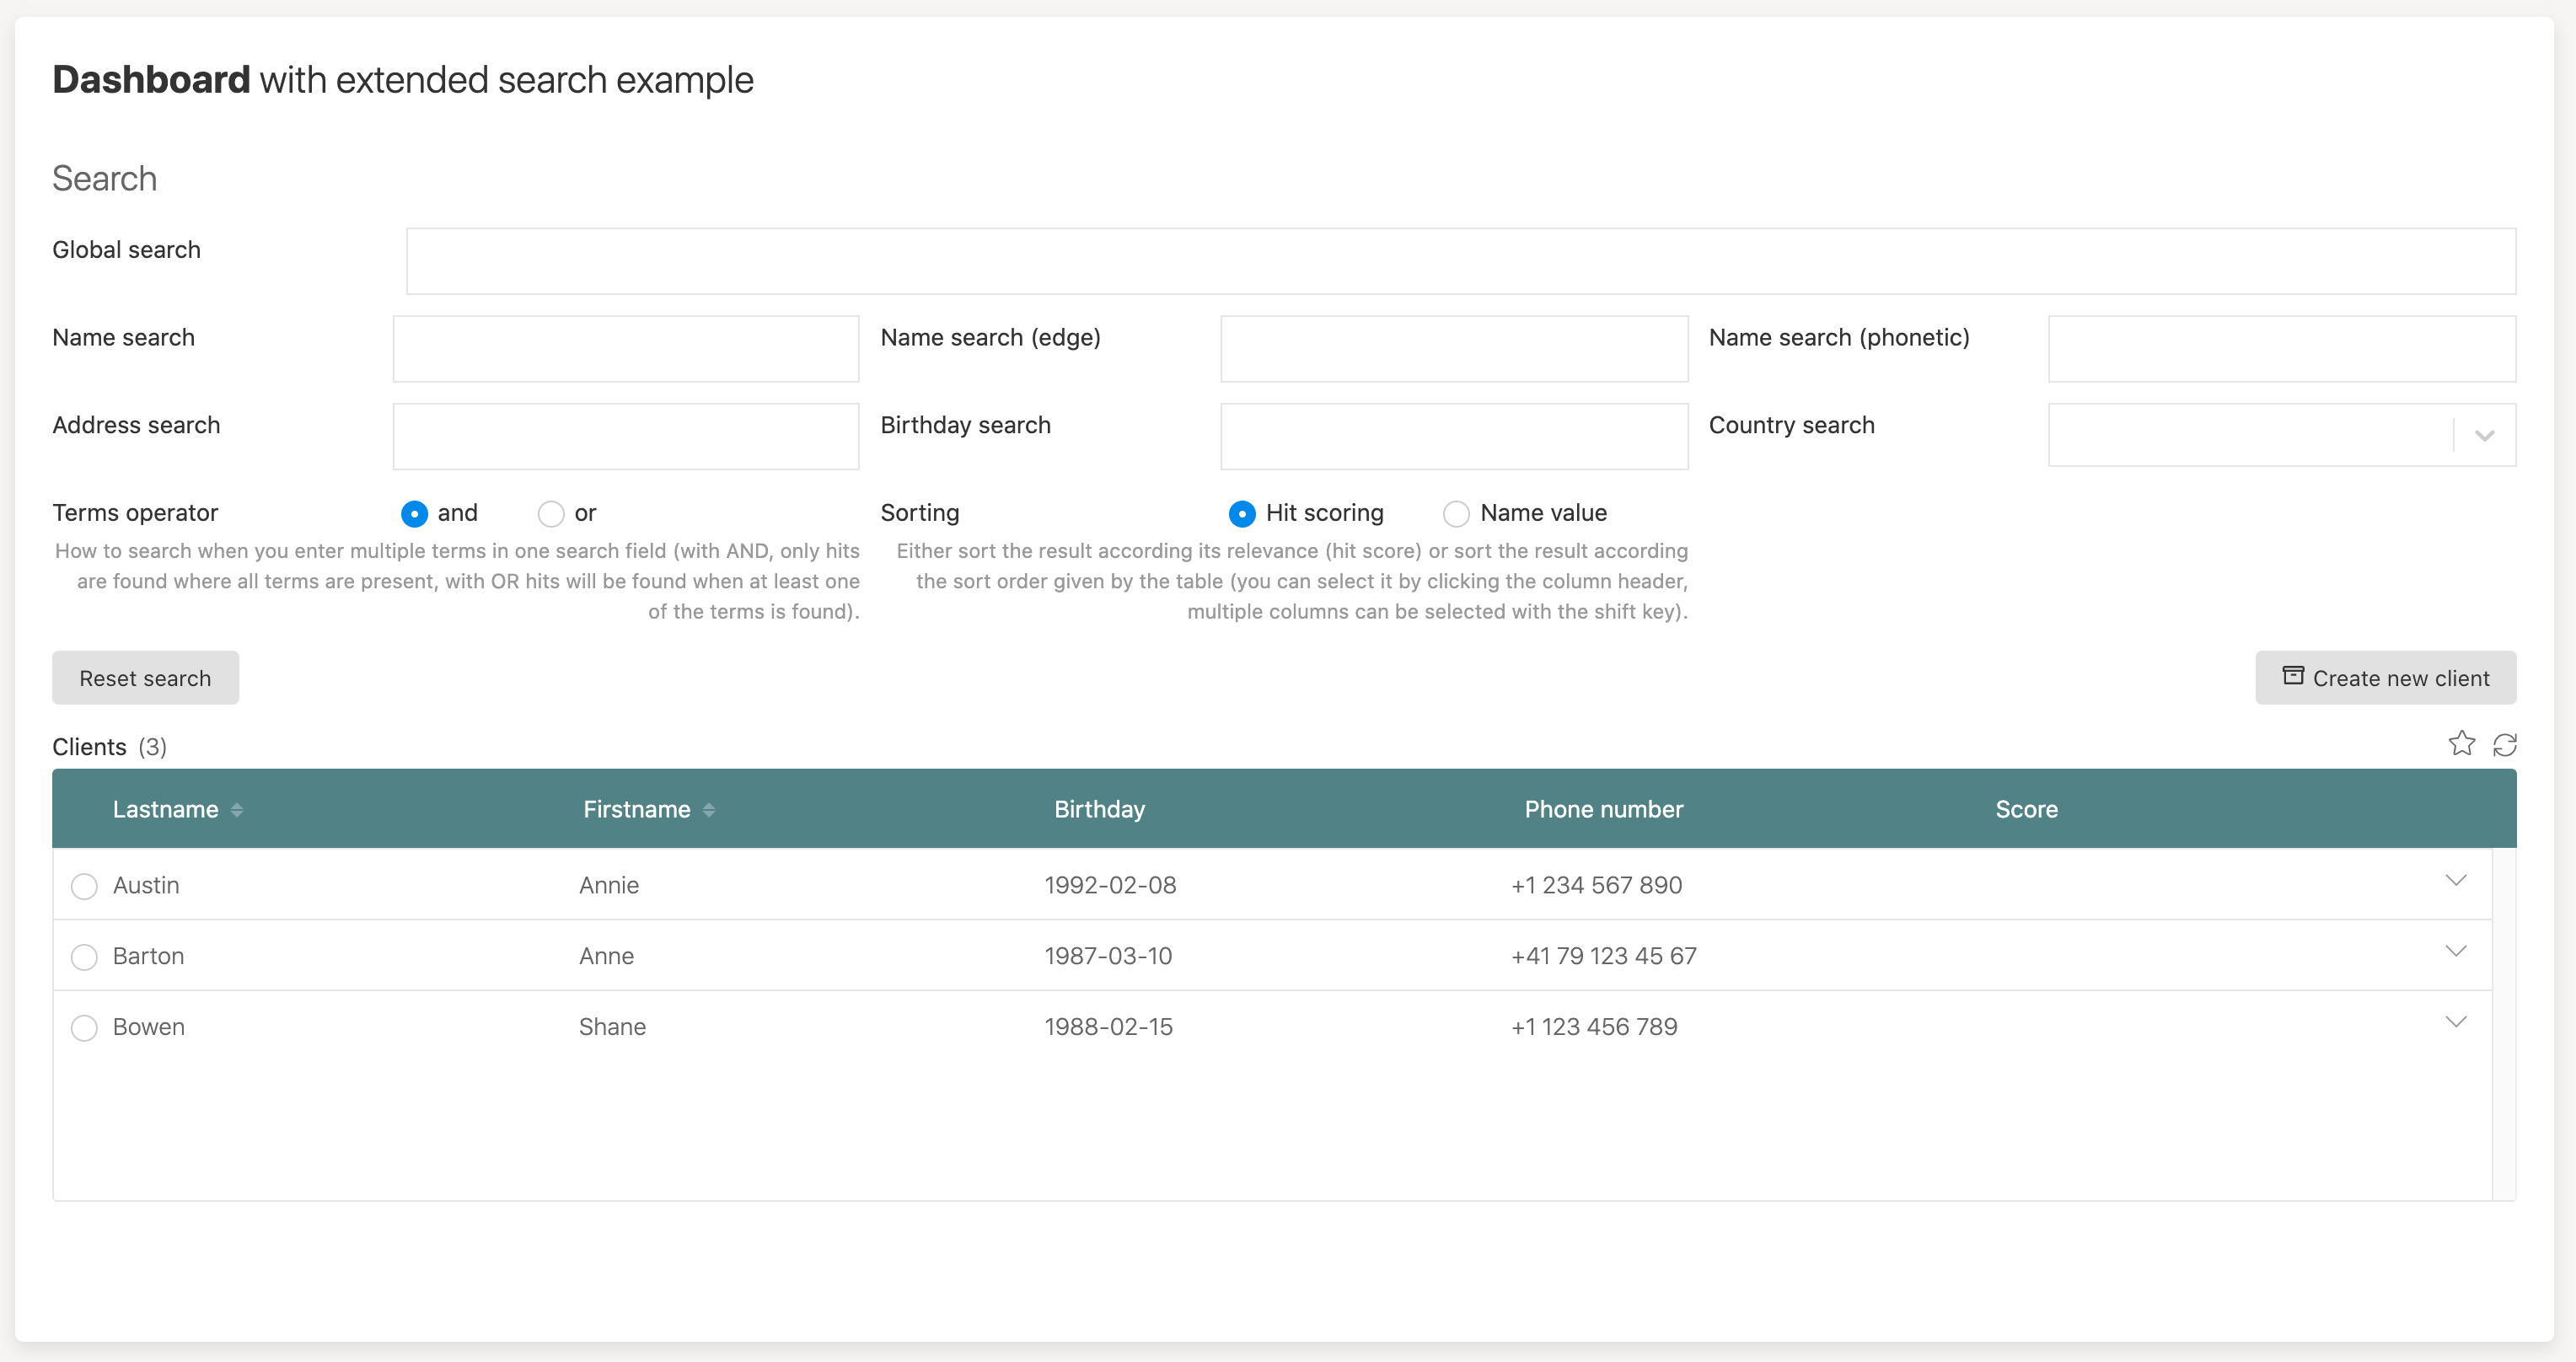
First part of the dashboard page; the search fields:
 As we want to play with different options when execution a search query template, we need some search fields like a global search field but also
some dedicated fields for a more structured search.
As we want to play with different options when execution a search query template, we need some search fields like a global search field but also
some dedicated fields for a more structured search.
We also want to test specific sorting and hit scoring, so we add a radio button to toggle the two versions, make sure the values for this static
data source are client-search-scored and client-search respectively. We will need those exact values later as you will see.
For the term operator selection, use AND and OR as the values as we will use those directly within the query template.
The next part is a data table to be added to the dashboard page where we can render the returned query hits:

The data table needs quite a bit of tuning, so we go into all the property details step by step.
First we define the columns we want in our data table:

Normally you can use the same value for both the model id and the accessor, the only exception is when you want the same value in more than one column, maybe with different formatting. In that case, the model id needs to be different as it has to be unique within the table. We select the first and last name column to be sortable and we will see later how we can make use of that.
We are not going into all the details the data table has to offer, that might in fact be yet another how-to as there are tons of options available. We only cover the ones that are relevant for the search results.
Here are the settings for the pagination, filtering and sorting:
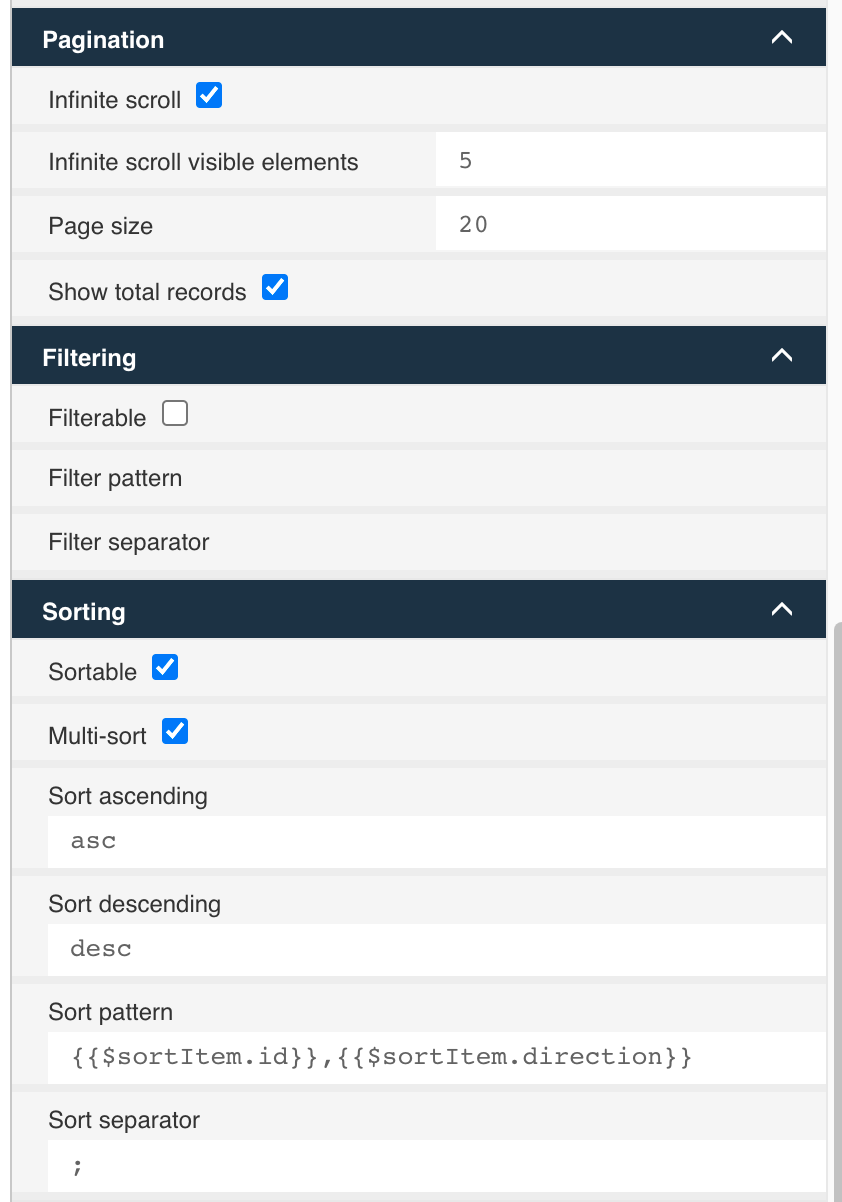
Of course, we want our search to support infinite scrolling, so we choose that option with 5 visible elements, and a page size of 20. Of course, you can play with different parameters there. We don't use the table filtering options as we have dedicated fields for the structured search. But it would be possible too for the dynamic query template we are going to setup in the next chapter.
Sorting is a bit more tricky, and here are the details for the different sorting properties. Eventually, the current sorting is sent to the REST
based data source with one parameter like {{$sort}} but we can configure how the value is built according our needs in the backend. If you want
to see more options, go into the data table documentation which can be found here.
As soon as we want to be able to sort for more than one column, we need to define how that sort parameter is built by defining the sort pattern.
We define asc and desc for the sort direction, which becomes available using {{$sortItem.direction}}. We could use whatever helps us best
in the dynamic query template. Same for the sort separator used to separate the sort items, if there are more than one. Eventually, we come up
with a sort pattern of {{$sortItem.id}},{{$sortItem.direction}} which results in the following examples:
firstName,asclastName,desclastName,asc;firstName,desc
In the query template we can then split that sort parameter with the ; and each item with , to get all the necessary information, but we will
look into it when discussing the query template.
The final important piece is the data source configuration:
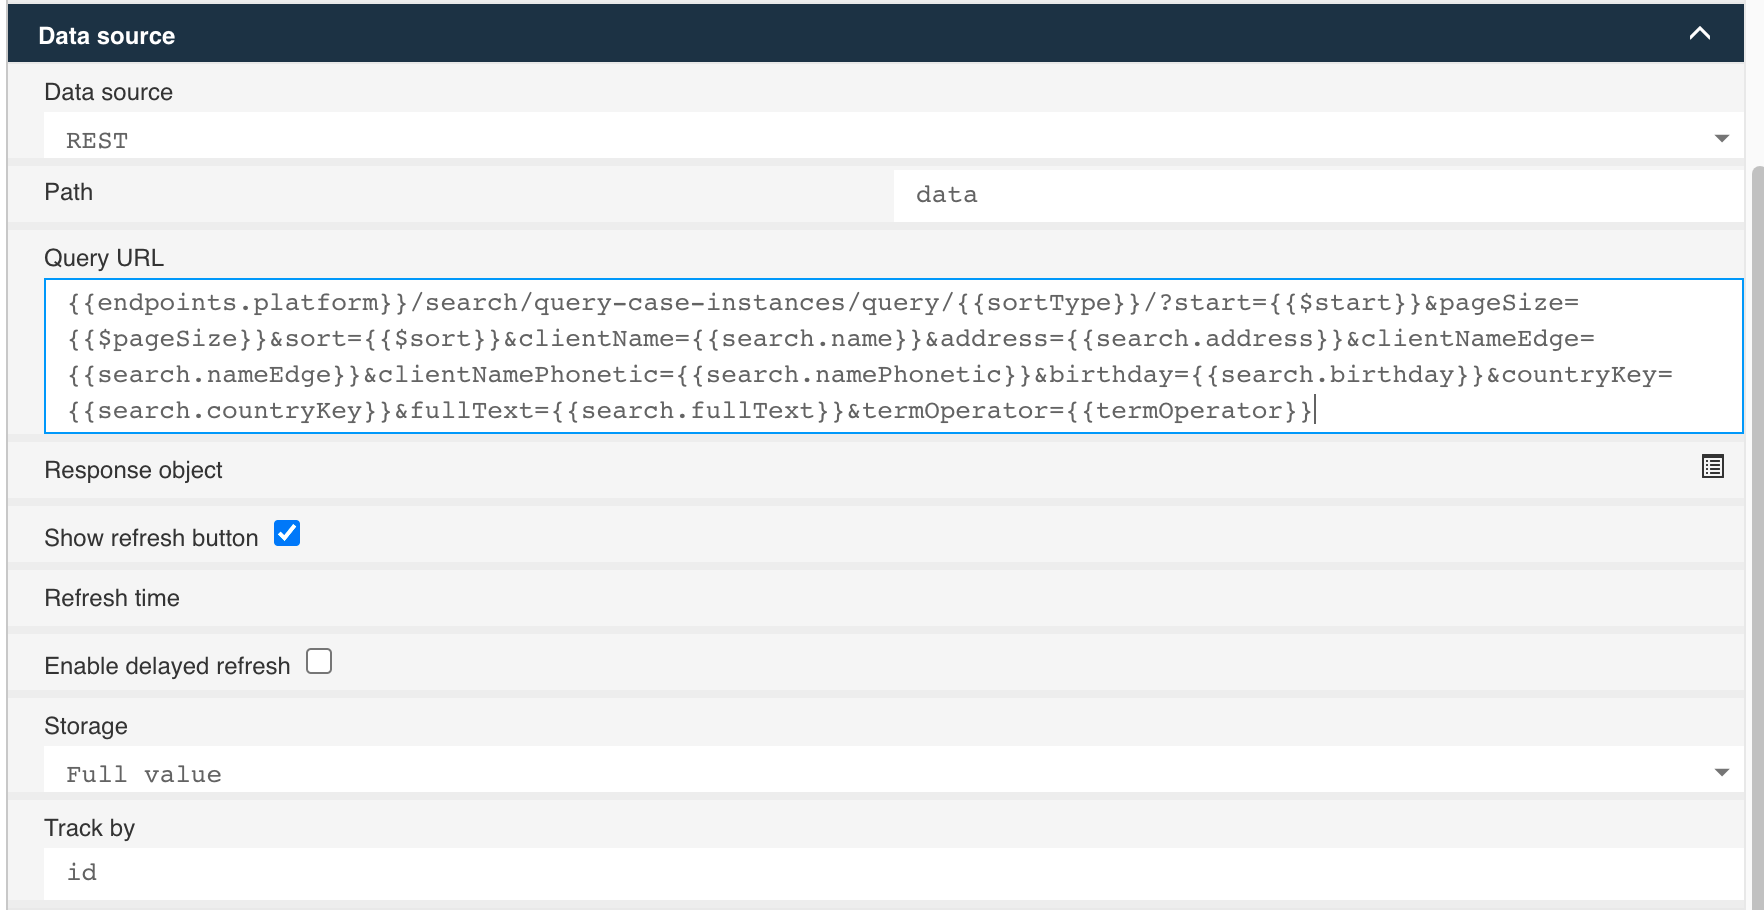
We will use a built-in REST endpoint as the data source, so choosing REST as the type. And here is the full query URL:
{{endpoints.platform}}/search/query-case-instances/query/{{sortType}}/?start={{$start}}&pageSize={{$pageSize}}&sort={{$sort}}&clientName={{search.name}}&address={{search.address}}&clientNameEdge={{search.nameEdge}}&clientNamePhonetic={{search.namePhonetic}}&birthday={{search.birthday}}&countryKey={{search.countryKey}}&fullText={{search.fullText}}&termOperator={{termOperator}}
The first part {{endpoints.platform}}/search/query-case-instances/query defines our REST endpoint we want to use, a built-in one where we can access dynamic query templates.
The next part, /{{sortType}} is a bit more special as we are using the value of the sorting radio button, that's why we mentioned earlier that those
values need to match the query template key we are going to use later on. So basically, we map the value of those radio button options directly to
the key of the query template to be used and therefore us it as an expression in our query URL.
It will result to either {{endpoints.platform}}/search/query-case-instances/query/client-search or
{{endpoints.platform}}/search/query-case-instances/query/client-search-scored depending on the sorting type we have chosen.
The start, pageSize and sort parameters are built-ins of the data table and if we use infinite scrolling will provide the current value using
the {{$start}}, {{$pageSize}} and {{$sort}} expressions. The name of the URL parameters are of course totally custom, we can choose whatever
we want, but of course it needs to match what we are looking for in the query template later.
The next part of the query URL is built using our dedicated search fields, and the final part is a bit special as well as we just submit the chosen
term operator according the value of that radio button group.
For the storage we chose the full value as we later want to include a detail view to show the selected case data and hence need the full case data for that. To track the selected row, we make use of the id field in the case data.
From a dashboard perspective, we should be good to go, and the next part is building the dynamic query templates.
Create a dynamic query template
There is a built-in support for dynamic Elasticsearch query templates, based on the Freemarker template engine. To get started with Freemarker or to find any useful information when building query templates, you can find a lot here.
We are going to explain the details in our examples of course, but not into all the details about Freemarker of course.
Query template and meta data
Creating a dynamic query template comes with two steps: the meta data around the query and the query template itself.
The query metadata can go into com/flowable/indexing/mapping-extension/custom and is a JSON file, typically you would use the key of the template
as the name with a .json ending. In our case, we create the first one and name it client-search-query.json in the aforementioned resource location.
The content for the meta data is quite simple:
{
  "key": "client-search",
  "sourceIndex": "case-instances",
  "type": "query",
  "version": 1,
  "templateResource": "classpath:/com/flowable/indexing/mapping-extension/custom/client-search-dynamic-query.ftl"
}
The key property is essential and is the same as we already used in our dashboard configuration, it's basically how you access the query later.
The sourceIndex tells the engine where to execute the query against and the templateResource points to our Freemarker template resource which can
be anywhere, it is internally resolved to a Spring Resource, so there is a lot of flexibility around it.
So let's add the Freemarker template itself as the resource we pointed to in our query meta data:
<#ftl output_format="JSON">
{
    "from": "${start!0}",
    "size": "${pageSize!20}",

<#if !(termOperator?has_content)>
    <#assign termOperator = 'AND'>
</#if>

    "query": {
        "bool": {
            "must": [
                {
                    "term": {
                        "caseDefinitionKey": "searchSampleClientCase"
                    }
                },
                {
                    "term": {
                        "state": "active"
                    }
                }
<#if caseId?has_content>
                ,{
                    "term": {
                        "_id": "${caseId}"
                    }
                }
<#else>
    <#if clientName?has_content>
                ,{
                    "match": {
                        "clientName_typeAhead": {
                            "query": "${clientName}",
                            "operator": "${termOperator}"
                        }
                    }
                }
    </#if>
    <#if clientNameEdge?has_content>
                ,{
                    "match": {
                        "clientName_edge": {
                            "query": "${clientNameEdge}",
                            "operator": "${termOperator}"
                        }
                    }
                }
    </#if>
    <#if clientNamePhonetic?has_content>
                ,{
                    "match": {
                        "clientName_phonetic": {
                            "query": "${clientNamePhonetic}",
                            "operator": "${termOperator}"
                        }
                    }
                }
    </#if>
    <#if address?has_content>
                ,{
                    "match": {
                        "address_typeAhead": {
                            "query": "${address}",
                            "operator": "${termOperator}"
                        }
                    }
                }
    </#if>
    <#if fullText?has_content>
                ,{
                    "match": {
                        "fullTextVariables": {
                            "query": "${fullText}",
                            "operator": "${termOperator}"
                        }
                    }
                }
    </#if>
    <#if birthday?has_content>
                ,{
                    "nested": {
                        "path": "variables",
                        "query": {
                            "bool": {
                                "must": [
                                    {
                                        "term": {
                                            "variables.name": "birthday"
                                        }
                                    },
                                    {
                                        "term": {
                                            "variables.dateValue": "${birthday}"
                                        }
                                    }
                                ]
                            }
                        }
                    }
                }
    </#if>
    <#if countryKey?has_content>
                ,{
                    "nested": {
                        "path": "variables",
                        "query": {
                            "bool": {
                                "must": [
                                    {
                                        "term": {
                                            "variables.name": "countryKeys"
                                        }
                                    },
                                    {
                                        "match": {
                                            "variables.textValue": "${countryKey}"
                                        }
                                    }
                                ]
                            }
                        }
                    }
                }
    </#if>
</#if>
            ]
        }
    },

    <#if !(sort?has_content)>
        <#assign sort = 'lastName,asc'>
    </#if>
    <#list sort?split(';')>
        "sort": [
        <#items as sortColumn>
            <#assign sorting = sortColumn?split(',')>
            {
                "variables.textValueKeyword" : {
                    "order" : "${sorting[1]}",
                    "nested": {
                        "path": "variables",
                        "filter": {
                            "term" : { "variables.name" : "${sorting[0]}" }
                        }
                    }
                }
            }
            <#sep>,</#sep>
        </#items>
        ]
    </#list>

}
Now this is a bit more complex, but we are going to look into all the interesting pieces, one by one.
{
  "from": "${start!0}",
  "size": "${pageSize!20}"
}
We map the query URL parameters start and pageSize to the Elasticsearch query from and size. The ! is used to define default values for the
from and size parameter should the URL parameters not be provided.
We can add as many custom URL parameters to a dynamic query as we want, and we can make use of them in the template. If you want your query to be very robust, make sure to properly initialize them with meaningful default values, if they are not provided by the REST call.
<#if !(termOperator?has_content)>
    <#assign termOperator = 'AND'>
</#if>
This block makes sure we define a default term operator, if it is not provided as a query URL parameter. Remember how we used the values of the
radio buttons to define the term operator to be used? Yes, they feed into here as AND or OR and we define it as AND, if not provided.
{
      "query": {
        "bool": {
            "must": [
                {
                    "term": {
                        "caseDefinitionKey": "searchSampleClientCase"
                    }
                },
                {
                    "term": {
                        "state": "active"
                    }
                }
              ...
}
Then we start with the query itself, using a bool query with a must clause where we initially add the case definition key with a static, fixed
value to only get cases of a certain model. Of course, you could even make that one dynamic by using a parameter instead of the fixed value.
We only want open, active cases, hence the second term within the list of must terms.
<#if caseId?has_content>
                ,{
                    "term": {
                        "_id": "${caseId}"
                    }
                }
<#else>
Now we are entering the dynamic part. This first step (if / else) is adding the case id as a term, if provided through a URL parameter and then leaves out all other terms as if there is the case id provided, we don't need anything else.
It is a good idea to always provide the functionality for a lookup using an id within a query template. This way, you can make use of the very
same template for both, a search / query and a lookup. That comes in handy when you want to use such a query in a selection for instance, so you
can use the very same REST URL / query for both, the query URL and the lookup URL.
<#if clientName?has_content>
            ,{
                "match": {
                    "clientName_typeAhead": {
                        "query": "${clientName}",
                        "operator": "${termOperator}"
                    }
                }
            }
</#if>
This part adds the client name as a paramter, if there is a value provided using the clientName URL parameter. Remember the field we are using for
this term, named clientName_typeAhead, which we added using a mapping extension. Now we can make use of this specific field in our query by adding
it as a term.
Something more to note here is the operator we add in there. If provided through a URL parameter value, we use it, otherwise it will contain the default
value as we initialized it at the beginning of our template.
With the operator, we can change the search behavior to only return hits when all the terms provided by the client name are found (AND) or if at least
one is found (OR). Searching for John Doe with operator AND only returns cases where the name contains John AND Doe. Using operator OR, cases
with John Foo would be returned as well as Bar Doe as an example.
Using AND as the operator usually only makes sense if you are not making use of the scoring where hits containing all terms will have a higher
score than the ones with only one term and hence showing up first in the returned, scored-sorted hit list. But we will dive into the scoring stuff
a bit later.
So far, we added terms for special fields in the index, so we don't go into details for all of them as they are built in the same way as the previous one.
The birthday one is just a regular indexed variable and therefore needs a bit of a special treatment when we want to add it as a term:
<#if birthday?has_content>
            ,{
                "nested": {
                    "path": "variables",
                    "query": {
                        "bool": {
                            "must": [
                                {
                                    "term": {
                                        "variables.name": "birthday"
                                    }
                                },
                                {
                                    "term": {
                                        "variables.dateValue": "${birthday}"
                                    }
                                }
                            ]
                        }
                    }
                }
            }
</#if>
We build a nested term by using the variables path, where we need the variable name to be birthday (same as used in the form where we provided that
data). The second part is making use of the date value where we want to match it with the value provided in the URL parameter.
Remeber how we added the collected country keys as a new indexed variable value using the indexed data enhancer we looked at earlier?
Now we make use of it as we can add a term the very same way as with a regular variable:
<#if countryKey?has_content>
            ,{
                "nested": {
                    "path": "variables",
                    "query": {
                        "bool": {
                            "must": [
                                {
                                    "term": {
                                        "variables.name": "countryKeys"
                                    }
                                },
                                {
                                    "match": {
                                        "variables.textValue": "${countryKey}"
                                    }
                                }
                            ]
                        }
                    }
                }
            }
</#if>
The term is built the very same way as for any other variable we want to match for. The difference between the birthday and this one, however, is the
variables.textValue here, as we want the term to match the text value for the country keys and not the date value as we used before.
After closing the first if / else (if you remember, to turn the query into a search or lookup, depending on the case id parameter provided) and
some closing brackets, we now deal with the sort order for the query:
<#if !(sort?has_content)>
    <#assign sort = 'lastName,asc'>
</#if>
<#list sort?split(';')>
    "sort": [
    <#items as sortColumn>
        <#assign sorting = sortColumn?split(',')>
        {
            "variables.textValueKeyword" : {
                "order" : "${sorting[1]}",
                "nested": {
                    "path": "variables",
                    "filter": {
                        "term" : { "variables.name" : "${sorting[0]}" }
                    }
                }
            }
        }
        <#sep>,</#sep>
    </#items>
    ]
</#list>
The first <#if block defines a default sort order (by last name ascending), if the sort URL parameter is not provided. This way, we always make
sure the hits are sorted, even if no particular sort order defined. This makes a lot of sense if that query is used in a selection for instance.
As we will look into scored queries later as well, the current one uses a sort order, not the scoring.
Do you remember how we setup the data table to create the sort parameter with combining the sort columns selected? It uses the ; as the delimiter
between different sorting columns (if more than one used) and , as a delimiter between the sorting field and the sort order.
So we actually need to split it up again in the template so we can iterate over the sorting columns and add them as sorting terms in a list.
Once we restart the server and with a deployed dashboard app, we can now search and play with all the search fields, combine them if needed, play with the operator and find out, how that dynamic query stuff actually works.
Scored query template
In this chapter we want to explore an alternative for a query and not use the sorting options we used in the previous ones, but use the scoring mechanism of Elasticsearch and return hits sorted according their score.
The basic idea around scoring is the following: the more matches you produce on a hit, the higher score it gets or let's say the more the document matches your query criteria, the higher the score.
A scored query vs a structured search we did previously is a completely different mindset. In a structured query you search for particular documents according a very structured way, even if you use full text search, look at it more like filtering and sorting. A scored query, however, is more like a Google search where you type in search criteria and want to see search results, hits, the higher they match the criteria, the better, and those you want to see first.
Of course there is a lot to tune when using scoring, like boosting a field or a term or even turn of the score for a field completely if it is irrelevant for the hit. As an example, if you add a term to filter for a active instances only, that must not have an impact on the score, but the more terms are matching in a multi-term global search, the higher the score and so on.
The same way we created the first query, we also add the meta data for it in a resource file named client-search-scored-query.json:
{
  "key": "client-search-scored",
  "sourceIndex": "case-instances",
  "type": "query",
  "version": 1,
  "templateResource": "classpath:/com/flowable/indexing/mapping-extension/custom/client-search-scored-dynamic-query.ftl"
}
Here is the query template in full and we are going to look closer into it step by step afterwards:
<#ftl output_format="JSON">
{
    "from": "${start!0}",
    "size": "${pageSize!20}",

<#if !(termOperator?has_content)>
    <#assign termOperator = 'AND'>
</#if>
<#assign hasShouldClause = false>

    "query": {
        "bool": {
            "must": [
                {
                    "term": {
                        "caseDefinitionKey": {
                            "value": "searchSampleClientCase",
                            "boost": 0
                        }
                    }
                },
                {
                    "term": {
                        "state": {
                            "value": "active",
                            "boost": 0
                        }
                    }
                }
<#if caseId?has_content>
                ,{
                    "term": {
                        "_id": "${caseId}"
                    }
                }
<#else>
    <#if clientName?has_content>
        <#assign hasShouldClause = true>
            ],
            "should": [
                {
                    "match": {
                        "clientName_typeAhead": {
                            "query": "${clientName}",
                            "operator": "${termOperator}",
                            "boost": 4
                        }
                    }
                }
    </#if>
    <#if clientNameEdge?has_content>
        <#if hasShouldClause>
            ,
        <#else>
            <#assign hasShouldClause = true>
            ],
            "should": [
        </#if>
                {
                    "match": {
                        "clientName_edge": {
                            "query": "${clientNameEdge}",
                            "operator": "${termOperator}",
                            "boost": 5
                        }
                    }
                }
    </#if>
    <#if clientNamePhonetic?has_content>
        <#if hasShouldClause>
            ,
        <#else>
            <#assign hasShouldClause = true>
            ],
            "should": [
        </#if>
                {
                    "match": {
                        "clientName_phonetic": {
                            "query": "${clientNamePhonetic}",
                            "operator": "${termOperator}",
                            "boost": 3
                        }
                    }
                }
    </#if>
    <#if address?has_content>
        <#if hasShouldClause>
            ,
        <#else>
            <#assign hasShouldClause = true>
            ],
            "should": [
        </#if>
                {
                    "match": {
                        "address_typeAhead": {
                            "query": "${address}",
                            "operator": "${termOperator}",
                            "boost": 2
                        }
                    }
                }
    </#if>
    <#if fullText?has_content>
        <#if hasShouldClause>
            ,
        <#else>
            <#assign hasShouldClause = true>
            ],
            "should": [
        </#if>
                {
                    "match": {
                        "fullTextVariables": {
                            "query": "${fullText}",
                            "operator": "${termOperator}",
                            "boost": 1
                        }
                    }
                }
    </#if>
    <#if birthday?has_content>
        <#if hasShouldClause>
            ,
        <#else>
            <#assign hasShouldClause = true>
            ],
            "should": [
        </#if>
                {
                    "nested": {
                        "path": "variables",
                        "query": {
                            "bool": {
                                "must": [
                                    {
                                        "term": {
                                            "variables.name": {
                                                "value": "birthday",
                                                "boost": 0
                                            }
                                        }
                                    },
                                    {
                                        "term": {
                                            "variables.dateValue": {
                                                "value": "${birthday}",
                                                "boost": 6
                                            }
                                        }
                                    }
                                ]
                            }
                        }
                    }
                }
    </#if>
    <#if countryKey?has_content>
        <#if hasShouldClause>
            ,
        <#else>
            <#assign hasShouldClause = true>
            ],
            "should": [
        </#if>
                {
                    "nested": {
                        "path": "variables",
                        "query": {
                            "bool": {
                                "must": [
                                    {
                                        "term": {
                                            "variables.name": {
                                                "value": "countryKeys",
                                                "boost": 0
                                            }
                                        }
                                    },
                                    {
                                        "match": {
                                            "variables.textValue": {
                                                "query": "${countryKey}",
                                                "boost": 1
                                            }
                                        }
                                    }
                                ]
                            }
                        }
                    }
                }
    </#if>
</#if>
            ]
        }
    }

<#if hasShouldClause>
    ,
    "min_score": 0.1
<#else>
    ,
    "sort": [
        {
            "variables.textValueKeyword" : {
                "order" : "asc",
                "nested": {
                    "path": "variables",
                    "filter": {
                        "term" : { "variables.name" : "lastName" }
                    }
                }
            }
        },
        {
            "variables.textValueKeyword" : {
                "order" : "asc",
                "nested": {
                    "path": "variables",
                    "filter": {
                        "term" : { "variables.name" : "firstName" }
                    }
                }
            }
        }
    ]
</#if>
}
The first part for the from and size parameters as well as the termOperator is the very same, so we don't go into details again here, look
it up for the previous query, if there are questions about it.
<#assign hasShouldClause = false>
We initialize a variable to keep track, if we actually added any terms. Unlike the previous query, in a scored one you typically use should for
your terms, not must. The must part is only used for terms that you need to include or exclude documents explicitly (like we will see and do
with the state or the case definition).
If we want the query to return data even if we didn't enter any search terms yet (like a show me all documents), we then want to include a sort
order other than the scoring as scoring only makes sense, if we have at least one term to base the score on.
{
    "query": {
        "bool": {
            "must": [
                {
                    "term": {
                        "caseDefinitionKey": {
                            "value": "searchSampleClientCase",
                            "boost": 0
                        }
                    }
                },
                {
                    "term": {
                        "state": {
                            "value": "active",
                            "boost": 0
                        }
                    }
                }
    ...
}
The first part is the very same as we already had in our previous query. We include some must terms here to make sure we don't get closed cases
for instance and also only instances of a particular case model. As we will see later, all the other terms are added using a should clause as
we want to make use of the scoring and hence not all the terms must match to produce a hit, but the more matches we get, the higher the score.
The only thing we added here is the boost parameter which is 1 by default if not specified, and we set it to 0 as those matching terms don't
have any impact on the score, as we only will have active cases of a particular case model and hence adding a score here would not make any sense.
<#if caseId?has_content>
                ,{
                    "term": {
                        "_id": "${caseId}"
                    }
                }
<#else>
We treat the case id the same way as we did before, it also goes into the must list of terms. This way, we can make use of the same query for
both a lookup and search in a selection for instance.
As this term is never combined with a scored query using the should terms, we don't need the boost parameter in here as we did with the other
must terms, but it would not be wrong either, if specified.
<#if clientName?has_content>
    <#assign hasShouldClause = true>
        ],
        "should": [
            {
                "match": {
                    "clientName_typeAhead": {
                        "query": "${clientName}",
                        "operator": "${termOperator}",
                        "boost": 4
                    }
                }
            }
</#if>
As this is the first term to go into the should list, we initialize the hasShouldClause to be true (we need it at the end of the query) and we close the must term list and open the should term list in here before adding the match term for the client name.
If we get a hit in the client name, we want to boost it more like if we get a hit within the full text search or the comments, so we boost this
field with a factor of 4 using "boost": 4.
We still add the dynamics with the term operator like we did before, so you can play with it, but typically, it will be OR as the more hits we
get, the better the score, so we don't need to match all the terms, unless, you want it that way, of course.
<#if clientNameEdge?has_content>
    <#if hasShouldClause>
        ,
    <#else>
        <#assign hasShouldClause = true>
        ],
        "should": [
    </#if>
            {
                "match": {
                    "clientName_edge": {
                        "query": "${clientNameEdge}",
                        "operator": "${termOperator}",
                        "boost": 5
                    }
                }
            }
</#if>
We don't know if we included the clientName term in the previous section or in other words, we don't know if the must list is closed already and the should list was started. To be able to overcome this problem, we make use of the hasShouldClause flag and if set, we know there is already at least one should term included and hence we simply need a , to separate the terms, if not, we initialize that flag to true as we are just going to add the first should term then and in that case, we close the list of the must terms and start the should ones.
This pattern is now going to be repeated for each dynamic should term which is a bit of boilerplate stuff, but if you want to be totally
dynamic, that is the price to pay.
As the edge filter is more precise as the typeAhead one and only matches terms at the beginning of the name and not everywhere, we boost this
one slightly more than the previous one and use "boost": 5 here.
Please play with those boosting parameters, the operators, etc as this is exactly meant to provide you with the tooling to figure out your exact
needs for searching. You might even want to make the boosting factors dynamic too and use expressions here instead of the fixed values, so you don't
have to change the template and restart the server for every experiment.
The next terms are all built the same way, so we don't go into details here. Just pay attention to the boost factor as it is different for all those terms. Usually you ask yourself, how relevant is a match in this field? Is it more precise as others or in other words, does it deliver more accurate hits than if we get a match in another field? If so, we might want to boost it more than others.
<#if birthday?has_content>
    <#if hasShouldClause>
        ,
    <#else>
        <#assign hasShouldClause = true>
        ],
        "should": [
    </#if>
            {
                "nested": {
                    "path": "variables",
                    "query": {
                        "bool": {
                            "must": [
                                {
                                    "term": {
                                        "variables.name": {
                                            "value": "birthday",
                                            "boost": 0
                                        }
                                    }
                                },
                                {
                                    "term": {
                                        "variables.dateValue": {
                                            "value": "${birthday}",
                                            "boost": 6
                                        }
                                    }
                                }
                            ]
                        }
                    }
                }
            }
</#if>
The birthday term is a bit special too, so let's have a closer look at it. Like before we are using a nested query part as we are directly
searching within the variables. The variables.name term is boosted with 0 as it is a must and does not provide any additional value to the
scoring if matched. For the date value, however, we use a very high boost (6 in this example) as if we get a hit there, it is very precise.
A hit in the birthday field is very specific and that's why we boost this one pretty high.
<#if hasShouldClause>
    ,
    "min_score": 0.1
<#else>
    ,
    "sort": [
        {
            "variables.textValueKeyword" : {
                "order" : "asc",
                "nested": {
                    "path": "variables",
                    "filter": {
                        "term" : { "variables.name" : "lastName" }
                    }
                }
            }
        },
        {
            "variables.textValueKeyword" : {
                "order" : "asc",
                "nested": {
                    "path": "variables",
                    "filter": {
                        "term" : { "variables.name" : "firstName" }
                    }
                }
            }
        }
    ]
</#if>
The last part of the query is very interesting now as we have two possible endings of the query. If we didn't have any terms at all, and we want to return a complete list the same way a filtering would do as well, we want to add sorting as we will not have any score at all to sort for.
We can make use of the hasShouldClause flag again to distinguish and if it is false we simply add a default sorting order. Of course, we could as well make it dynamic and specified according query parameters like we did in the first query, but a default order is enough for the example here.
The "min_score": 0.1 needs some explanation as well. If we added at least one search term which goes into the should term list, we don't want to return any documents where we don't have at least one match. And this can be done using the min_score parameter telling Elasticsearch to only
return hits having at least 0.1 score.
Play time: use the different search options
In this chapter we are going to play with the different search options a bit but we encourage you to go way further and figure out all the options you have when tuning an Elasticsearch query.
Using the filtering search type
If we use this type of the query, we only get results matching the terms as we used must terms instead of should, so we give it a try here.
Without typing in any term, we get the list of all cases back. In our example, we only have three to play with, you want to add way more testing data to have a nice experience with all the options of course. For a first small glimpse it is sufficient though for the moment.
You can play with terms, the operator, the global search versus structure search in the fields and even with phonetic search terms.
As an example: if you type in "ann austin", you only get one hit (Annie Austin), if using the AND operator, as all terms need to match. With the OR operator, however, you will get two hits, Annie Austin and Ann Barton. And with this example, the difference between the two query types
becomes obvious, in a scored query, Annie Austin would produce a way higher score as it has two matching terms, whereas with Anne Barton, we only get one. But in a structured, filtering type of query, both produce a hit and then it's just a matter of what sort order we use to define which one is shown first.
If you type in Annie in the name search field, you get a hit, obviously, but if you would type in Anny, there is not hit produced as there is no match. Using the phonetic search, however, finds Annie Austin with the search term Anny as well as it sounds the same. This makes searching more powerful, but also not as precise as with exact matches. This will even be more useful with the scored query as we can take that into account with the boosting.
Using the scored query type
If we switch to the scored query type, it really gets interesting, and we can directly see how the score is affected with all the options we have. We use the OR operator as it gives us more flexibility in a scored query. The more terms we find in the same field, the higher the score which is normally more useful than preventing a hit from being returned if not all terms are matched. Unless it is essential but then we can still use the AND operator.

If we only use ann as the term, we get two hits like before, but now we can see the scoring and see a slightly higher score for Anne Barton, as the real name is shorter and matches the search term a bit better.
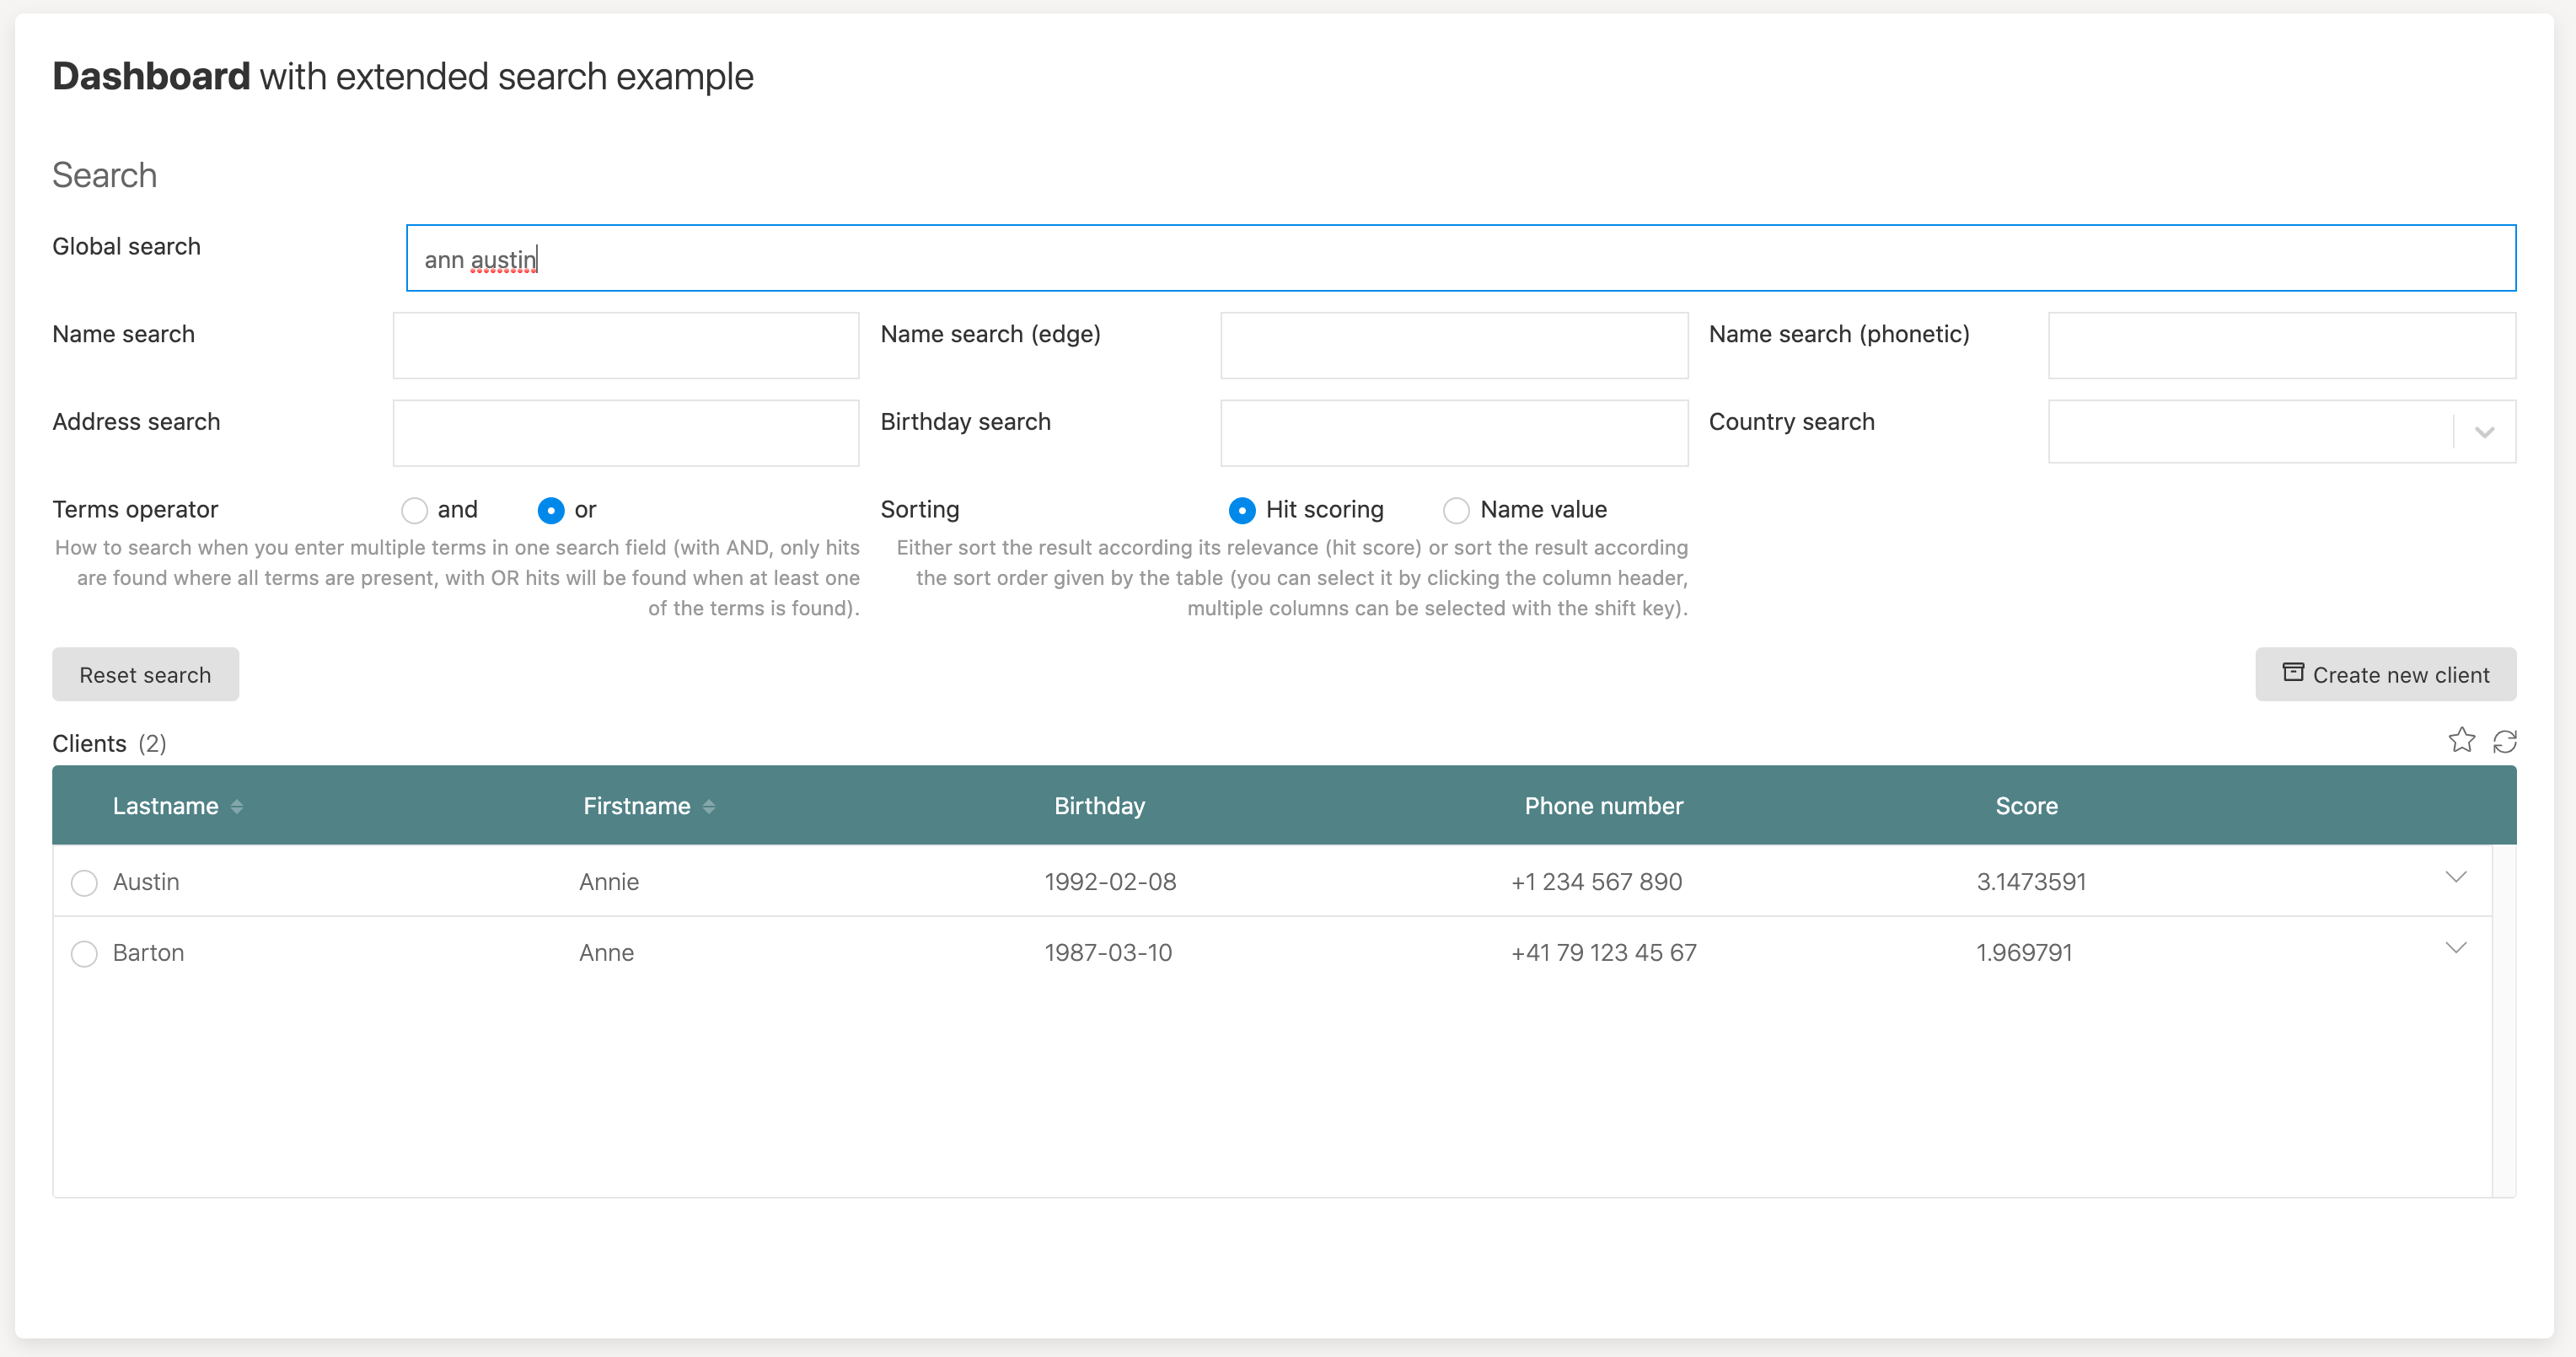
If we add another term in the same field, austin in this example and we are using the OR operator, we still get both hits, but now, Annie Austin is higher ranked as it matches to two terms, not just one. If you play with it in other fields like the name or the name edge, you will see the impact on the score immediately as we use different boosting factors when we get a hit in those fields.
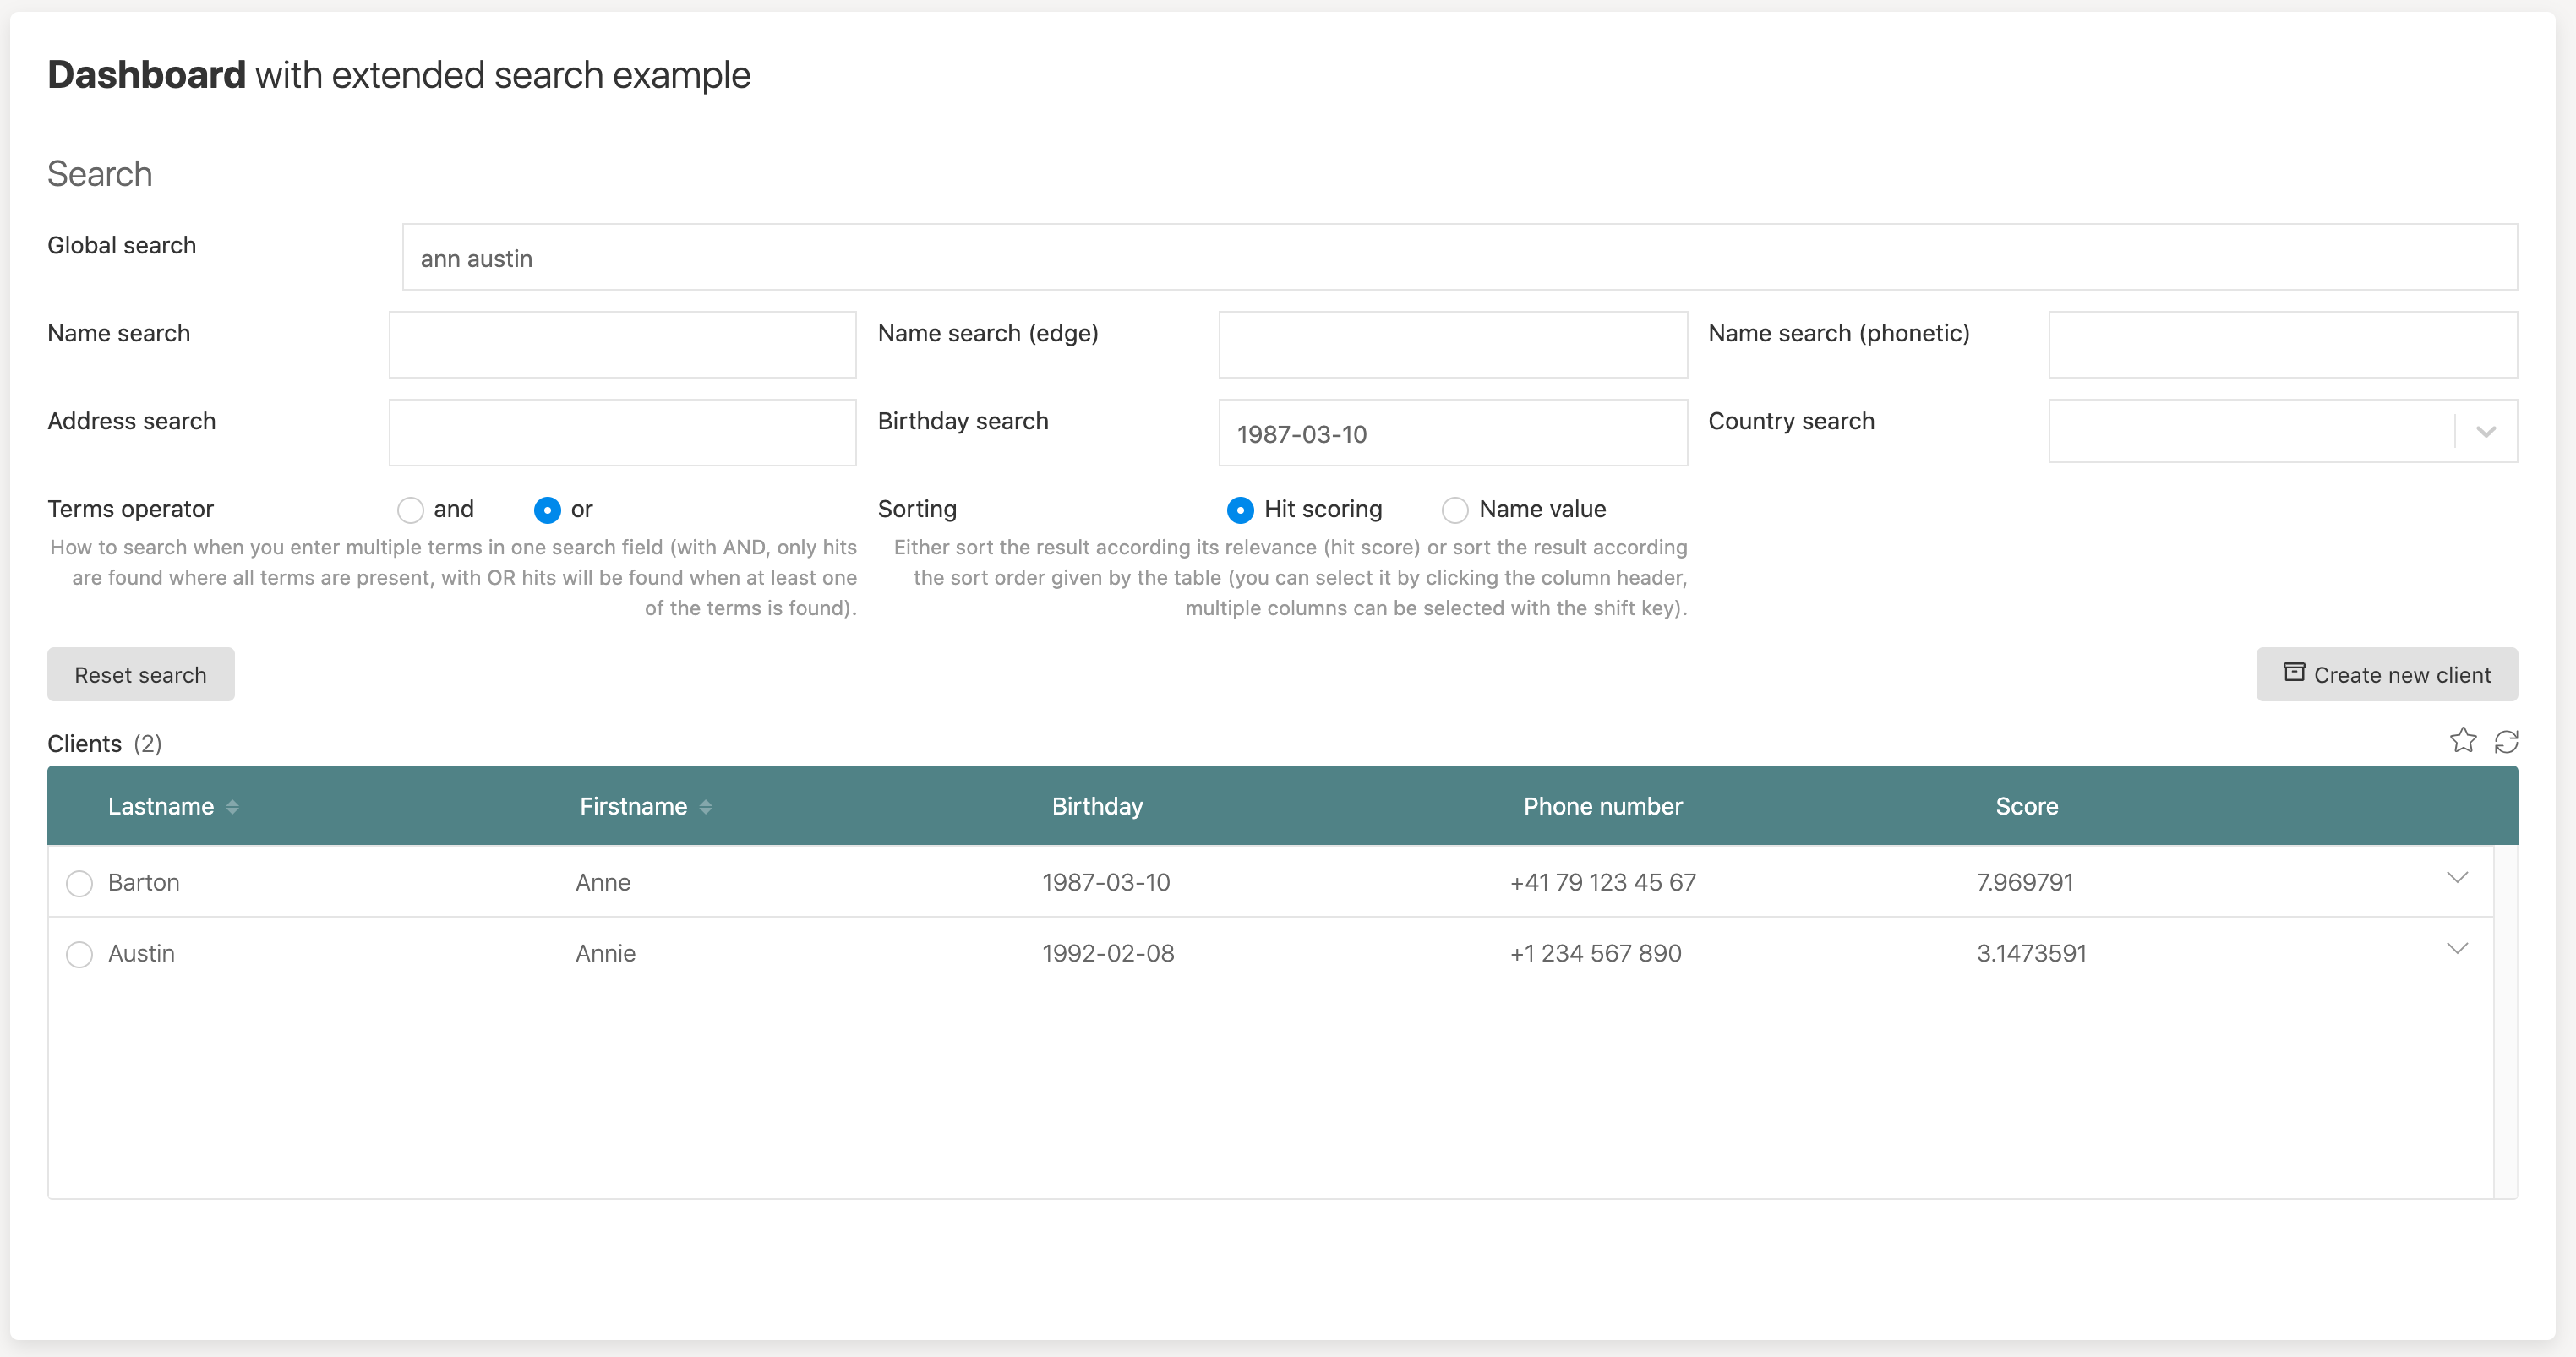
If we even combine it with a birthday search, you see that now Anne Barton is our first hit as the birthday match is counted way more than a single missing term in the other field.
Wrapping up
You have hopefully gained some valueable information around extending the built in Elasticsearch indexing and how to build powerful and dynamic query templates. Please also consult the documentation for the Elasticsearch product directly, as everything provided by that product can also be used in Flowable.