Target audience: Modelers
This how-to describes a use-case for data objects. The idea is to use data objects to manage static data, also called master data. However, this how-to is unrelated to the Flowable Master Data functionality.
Part One
Overview
In this how-to guide you learn to use the data object engine for managing and using master data.
We will create a data object definition holding our master data and some small processes and actions to actually create and manage that data.
A page will round up the whole guide with functions for the management of master data, as well as a few examples of how this data can then be used in forms.
Example Master Data
Instead of using some hello world or test data, we will manage a list of locations as master data. Assume we run a global business and want to manage our
locations to be used (referenced) in forms, cases and processes.
The locations change over time, we open up new ones and close down non-profitable ones, and we want to keep track of those changes and make our master data
time-sensitive (bitemporal). We will add the time sensitivity later on and first start with just a state field to mark an entry as active or inactive.
Our master data should also be aware of permissions. Who will be able to manage our locations and who is able to view and select it for reference.
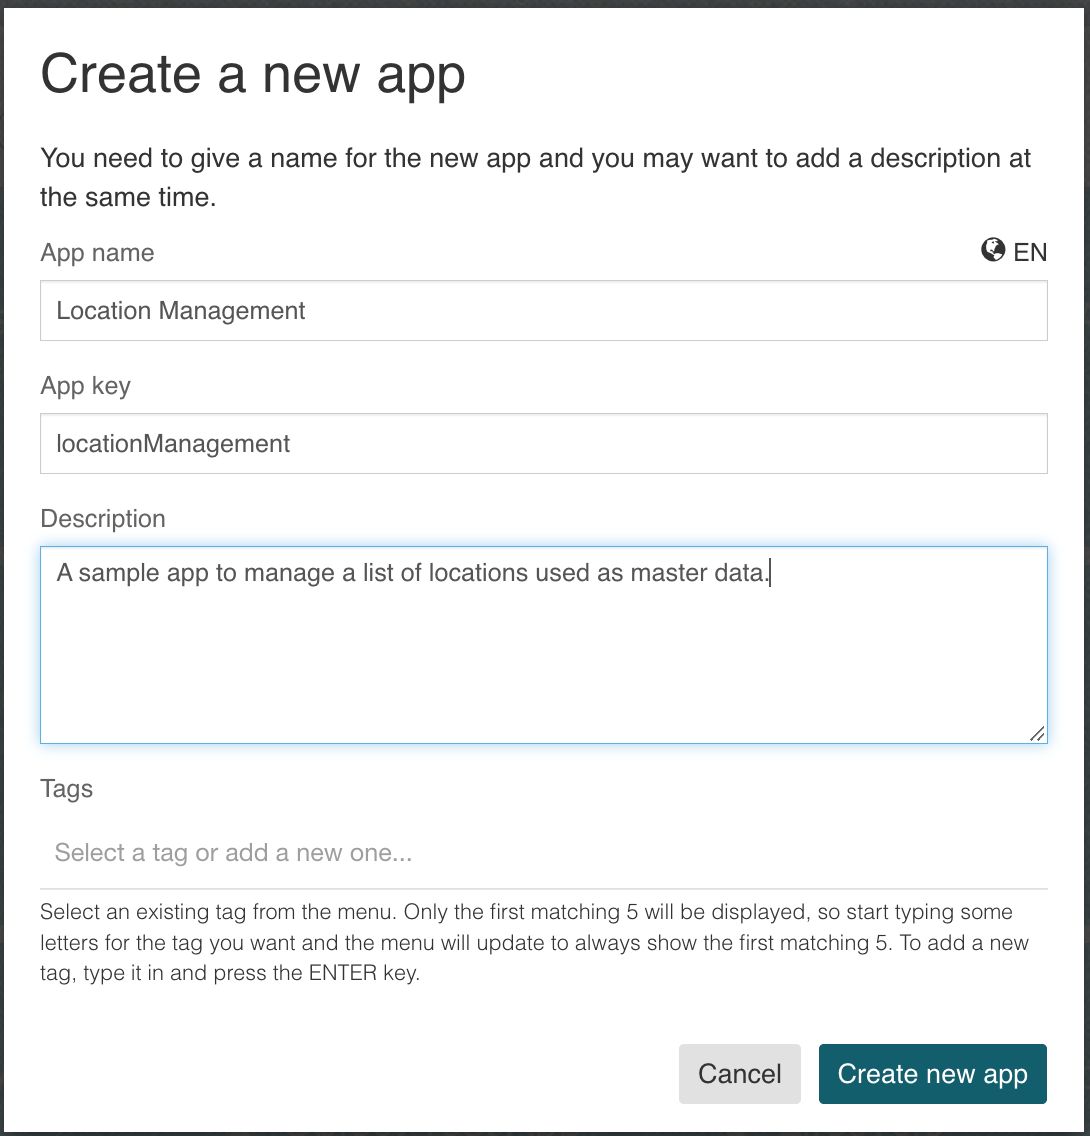
Create App
We simply start with creating a new App which we might want to name something like Location Management. Whatever we create down the line will end up in this app.
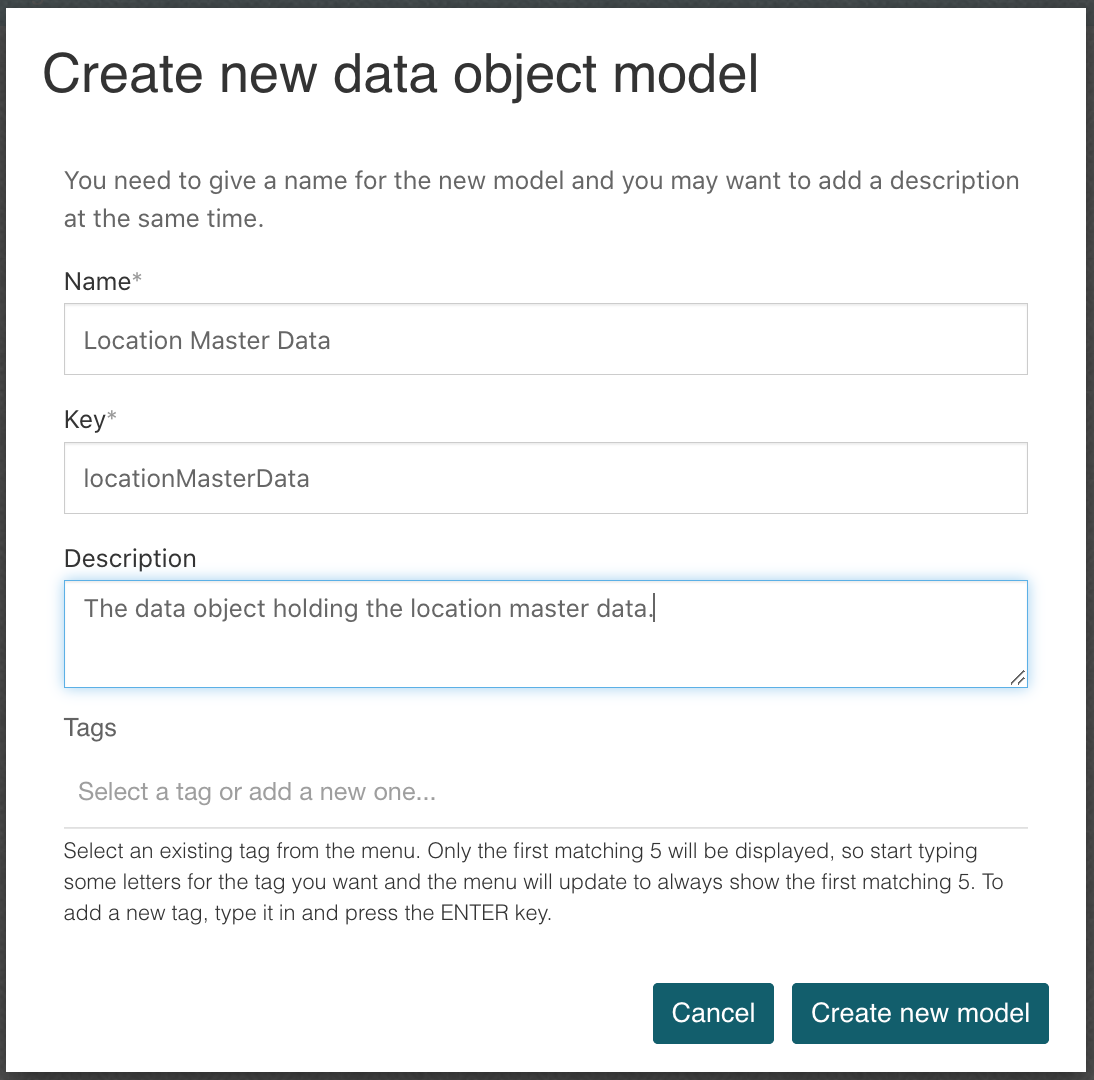
Create data object model, data source and schema
Inside our newly created app, create a new data object model for our master data and name it Location Master Data.
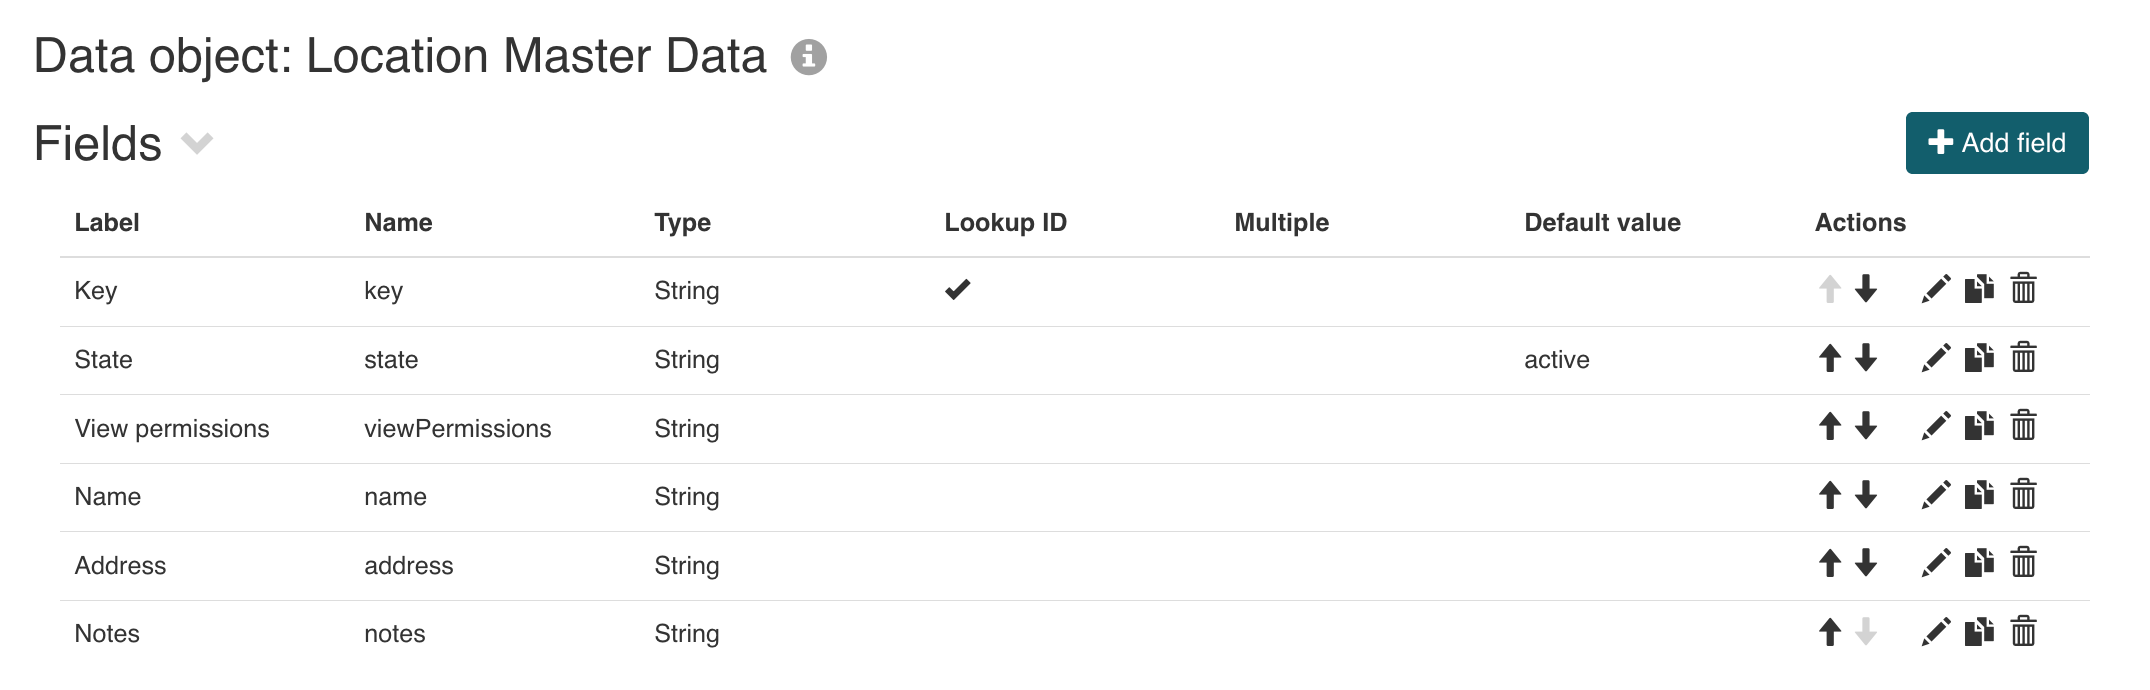
Create data object fields
Next we will add all the necessary fields to our data object model, and we start with the lookup id.
Here is a table on all the fields we add and what we will use them for:
| Label | Type | Notes |
|---|---|---|
| Key | String | This will be our lookup id for the data object and the same time acting as the key for our location so it becomes easily referencable. |
| State | String | The state field will be used to mark an entry either as active or inactive to be able to only show active locations when selecting. |
| View permissions | String | We will store the id of the selected group having view permnissions to this master data entry. |
| Name | String | This is the name of the location used as the label for selections, referencing, etc. |
| Address | String | The address acts as an example on how you can add any arbitrary data coming in handy when using and managing master data. |
| Notes | String | Just any information we might want to store for our locations. |
Your data object model should now look like this:
Create data source
Once the fields are defined, we can choose the source for our data. In our example we create a new data source backed by the database.
Choose Create new data source of type Database, give it a meaningful name and key and a database table name:
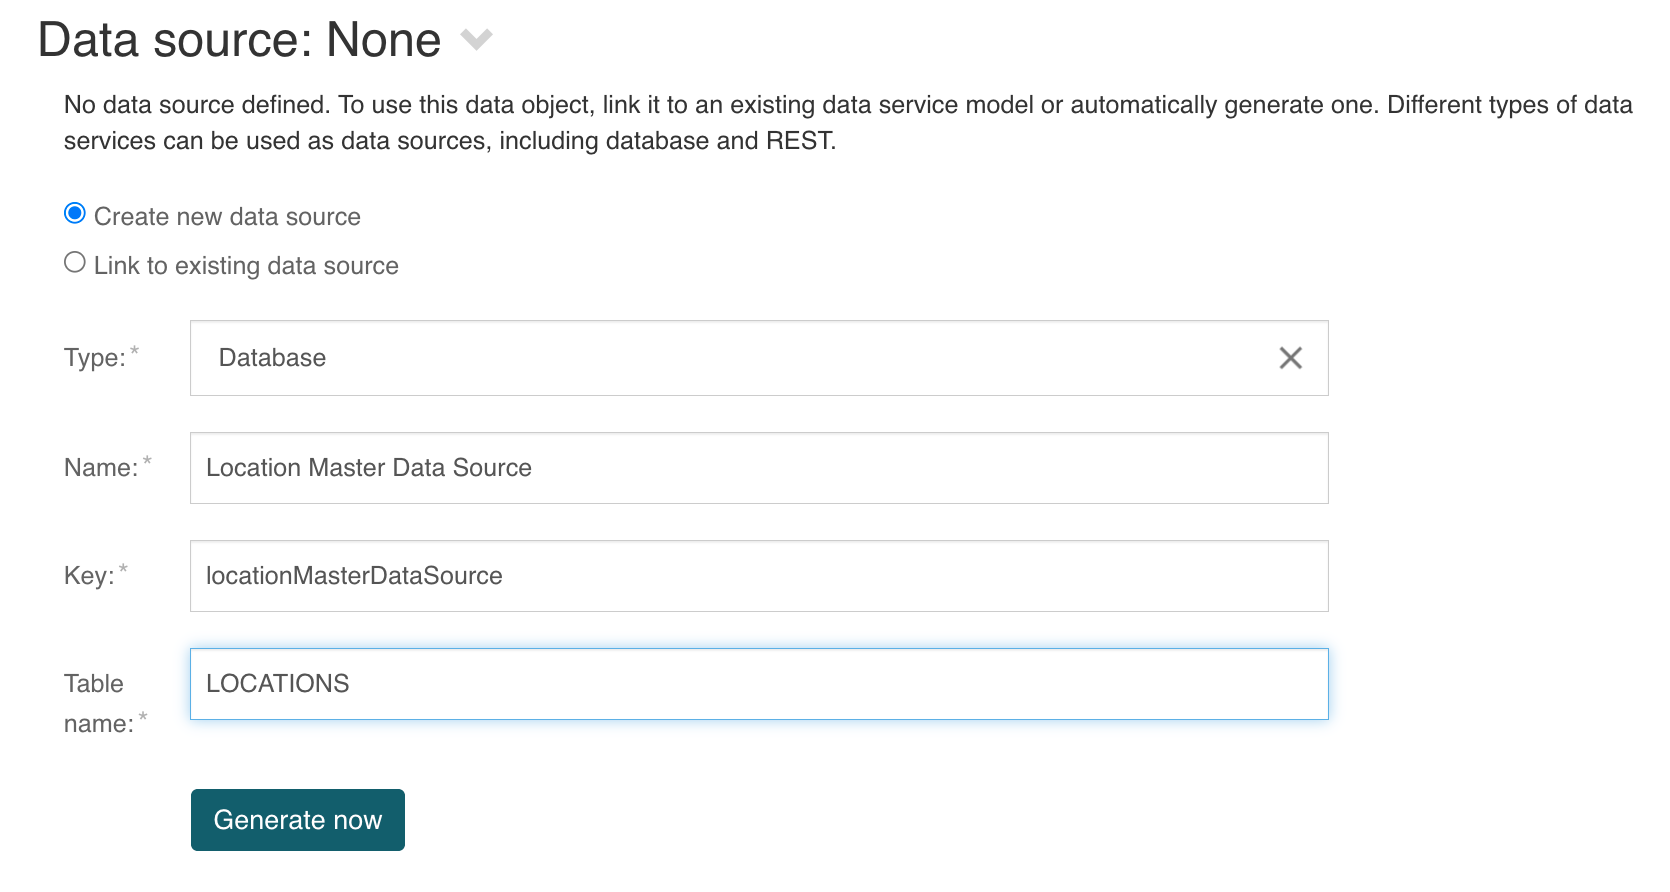
Once the data source is defined, click the Generate now button to actually create and prefill a new data source based on our entered data.
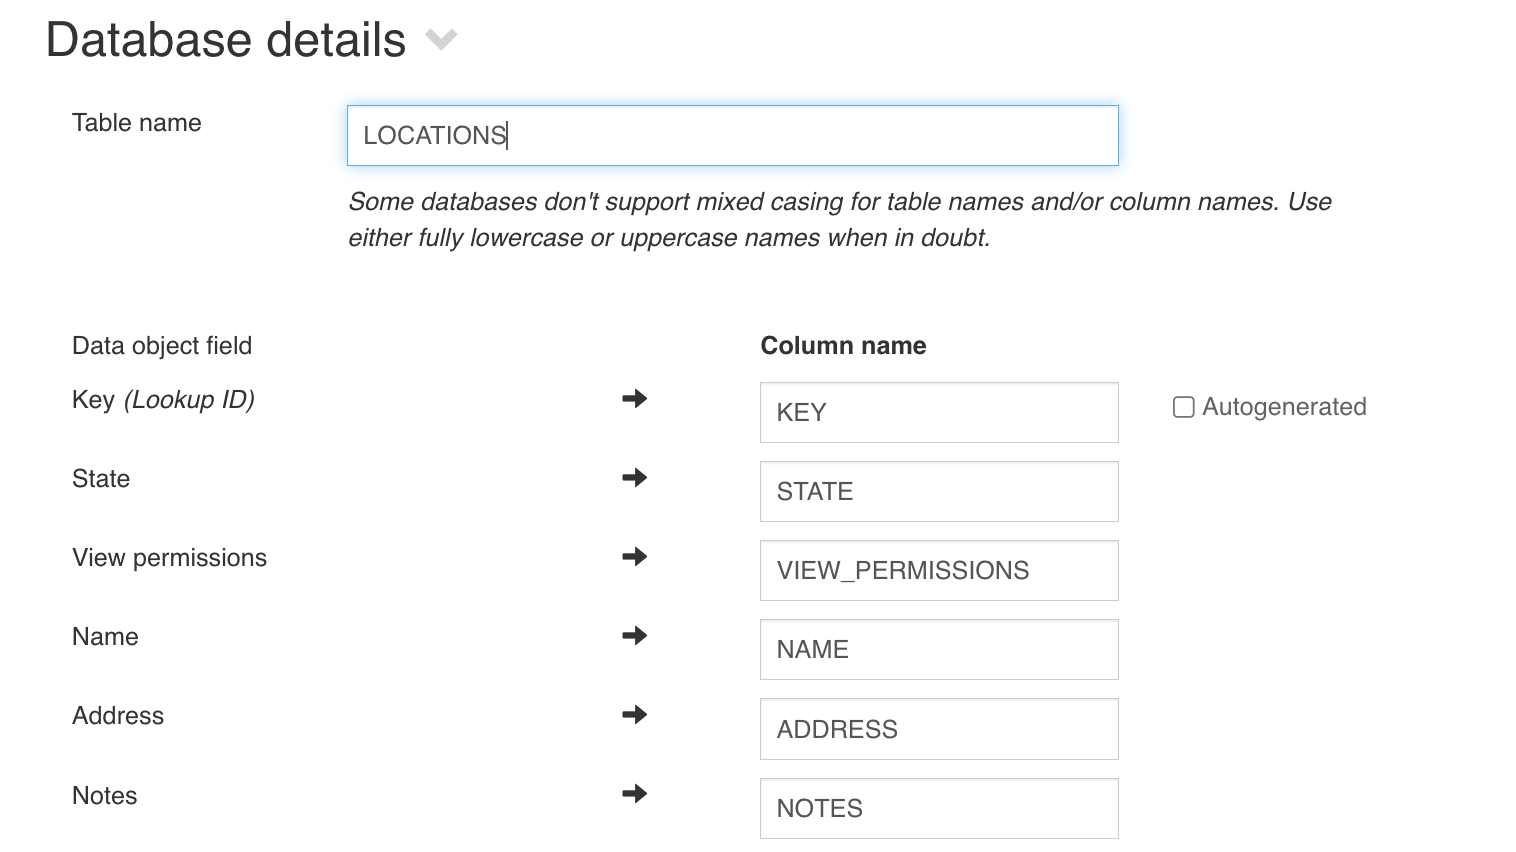
Define database details
Open the Database details section and add names for all columns for the database table holding our data object. Disable the autogenerated checkbox for the
lookup id (our key field) as we want the key to be defined manually as a human readable value and not a UUID which would be the case if it gets autogenerated.
Your database definition should now look like this:
Define database schema
We can automatically generate a Liquibase script (table schema) to be deployed to our database over Flowable Control.
Only generate the script once all the fields are properly defined as it cannot be re-generated again as of now! You can only delete and re-create it if you add or change fields. Once deployed and already in use, you can only add new changesets manually to update the table accordingly.
Click the Generate schema button to create the Liquibase schema script for our database backed data object.
Data source operations
The last section of the data source already contains some minimal operations, generated automatically like lookup, create, update and delete which are used
as a minimal set of operations to manage our data object based location master data.
We will add more operations as we move along with this guide like searches and lookups for example.
Permissions
One last part we need to define for our master data objects: the permissions. For this go back to our first data object model (we named it Location Master Data).
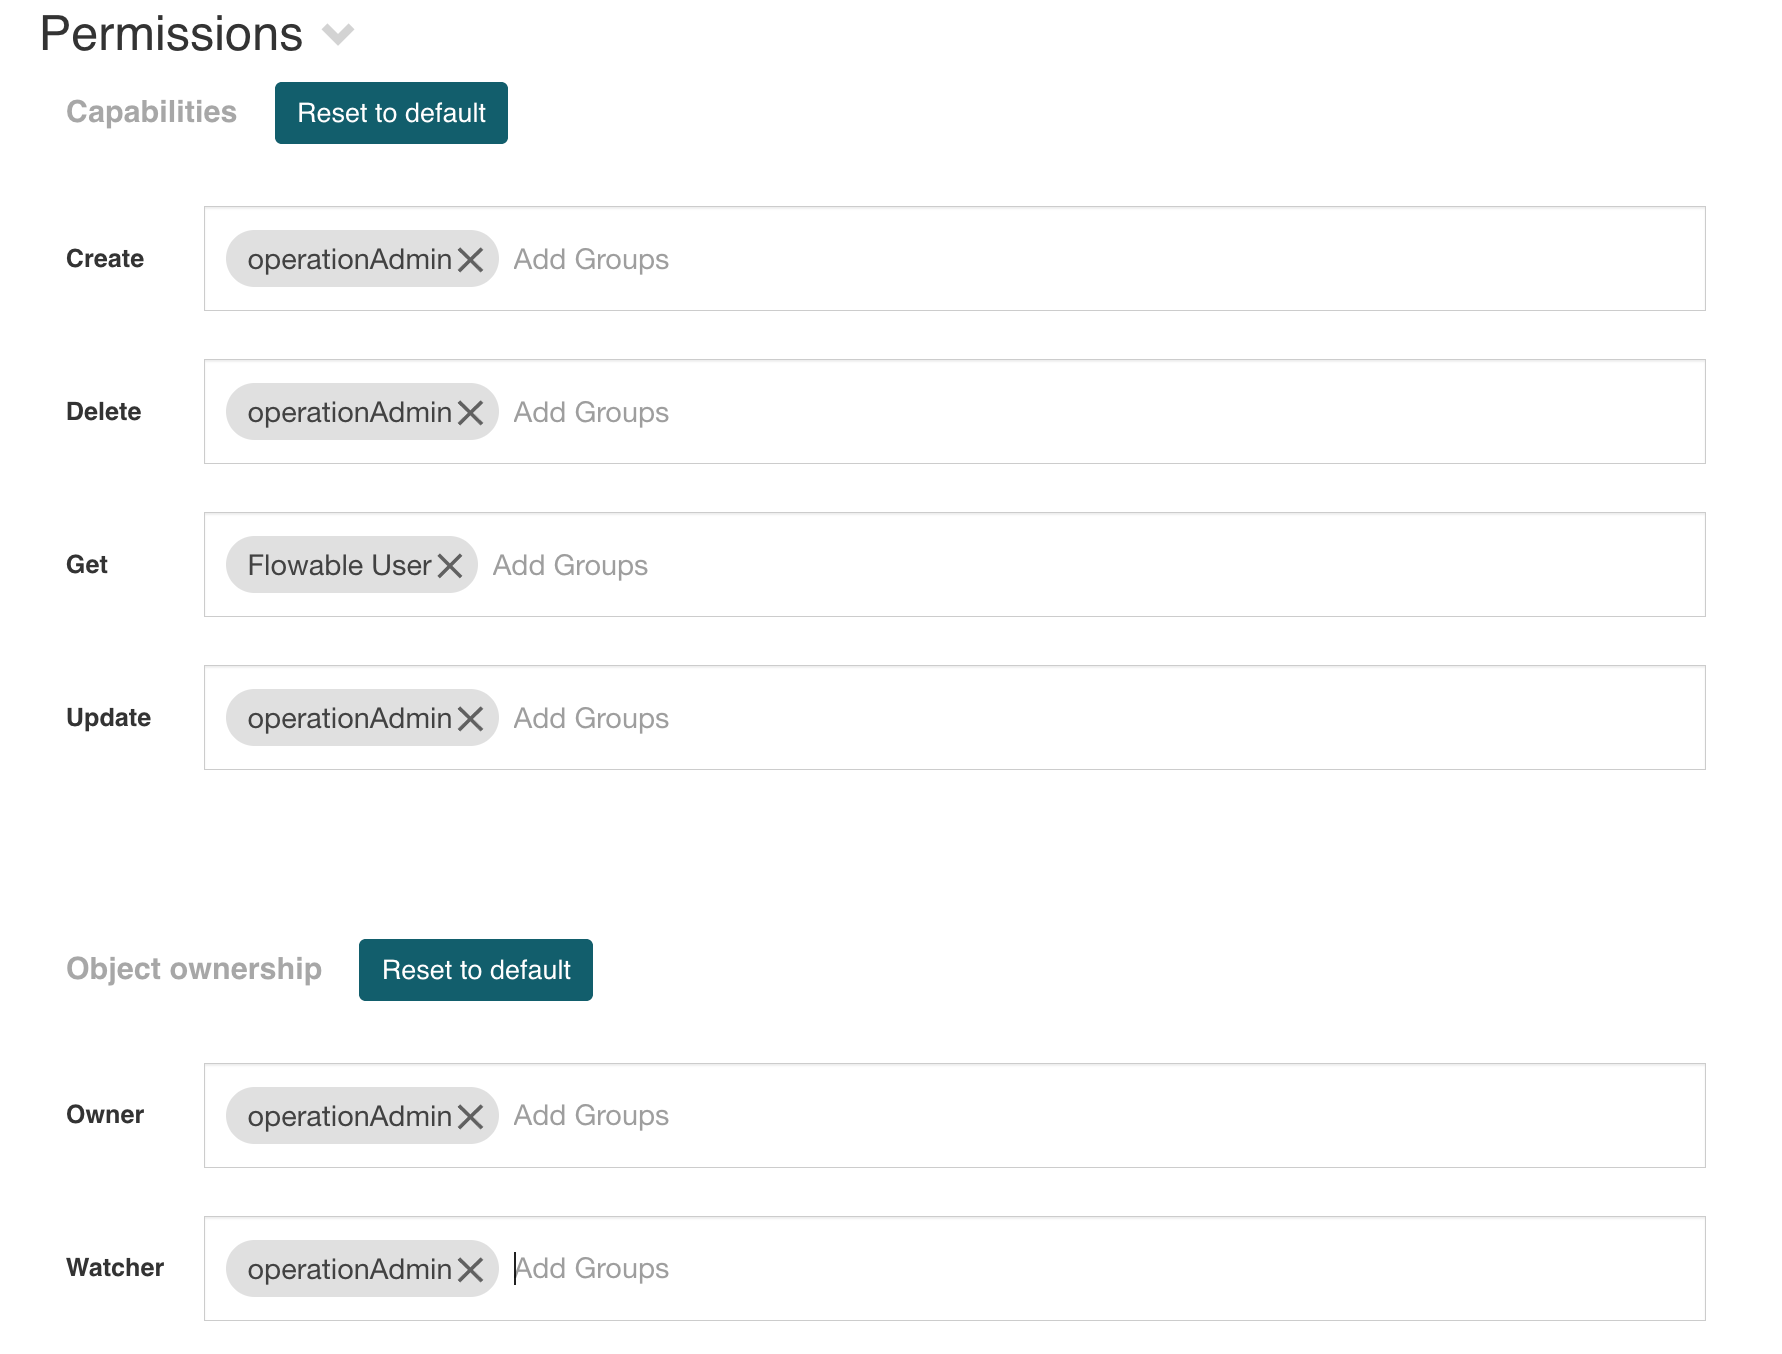
Open the section Permissions and you see the capabilities and object ownership parts having default settings to allow all users to manage and see the data objects.
But we need a more fine-grained approach as we don't want to allow everyone to manage and even see our master data.
The first part, the capabilities acts like a permission check for the general CRUD operations on our data objects. For Create, Delete and Update we need
different permissions than the default ones, so remove the Flowable User permission and add operationAdmin instead. You can use any group id you like of
course as I'm using the operation admin as it exists in our default user and group setup.
We keep the Flowable User in the Get operation as this will allow everyone to actually see and read the data object. Further down the line, we additionally
limit the reading capabilities further more by managing the watcher permissions.
Set the default Owner permission to operationAdmin as well as the Watcher permission so your permission section should look like this:
Deploy app and install the schema
We should now be able to deploy our app containing the data object, the database backed data source and service definition for it as well as the Liquibase schema to install the table into our database using Flowable Control.
Save all models and hit the app publishing button and fingers crossed, we should now have all the necessary definitions in our Flowable Work runtime to work with our newly created location master data objects.
If you go to Flowable Control and open the Data Objects / Schema definitions menu, you should see our locationMasterDataSchema in there.
Select it and you should see something like this:
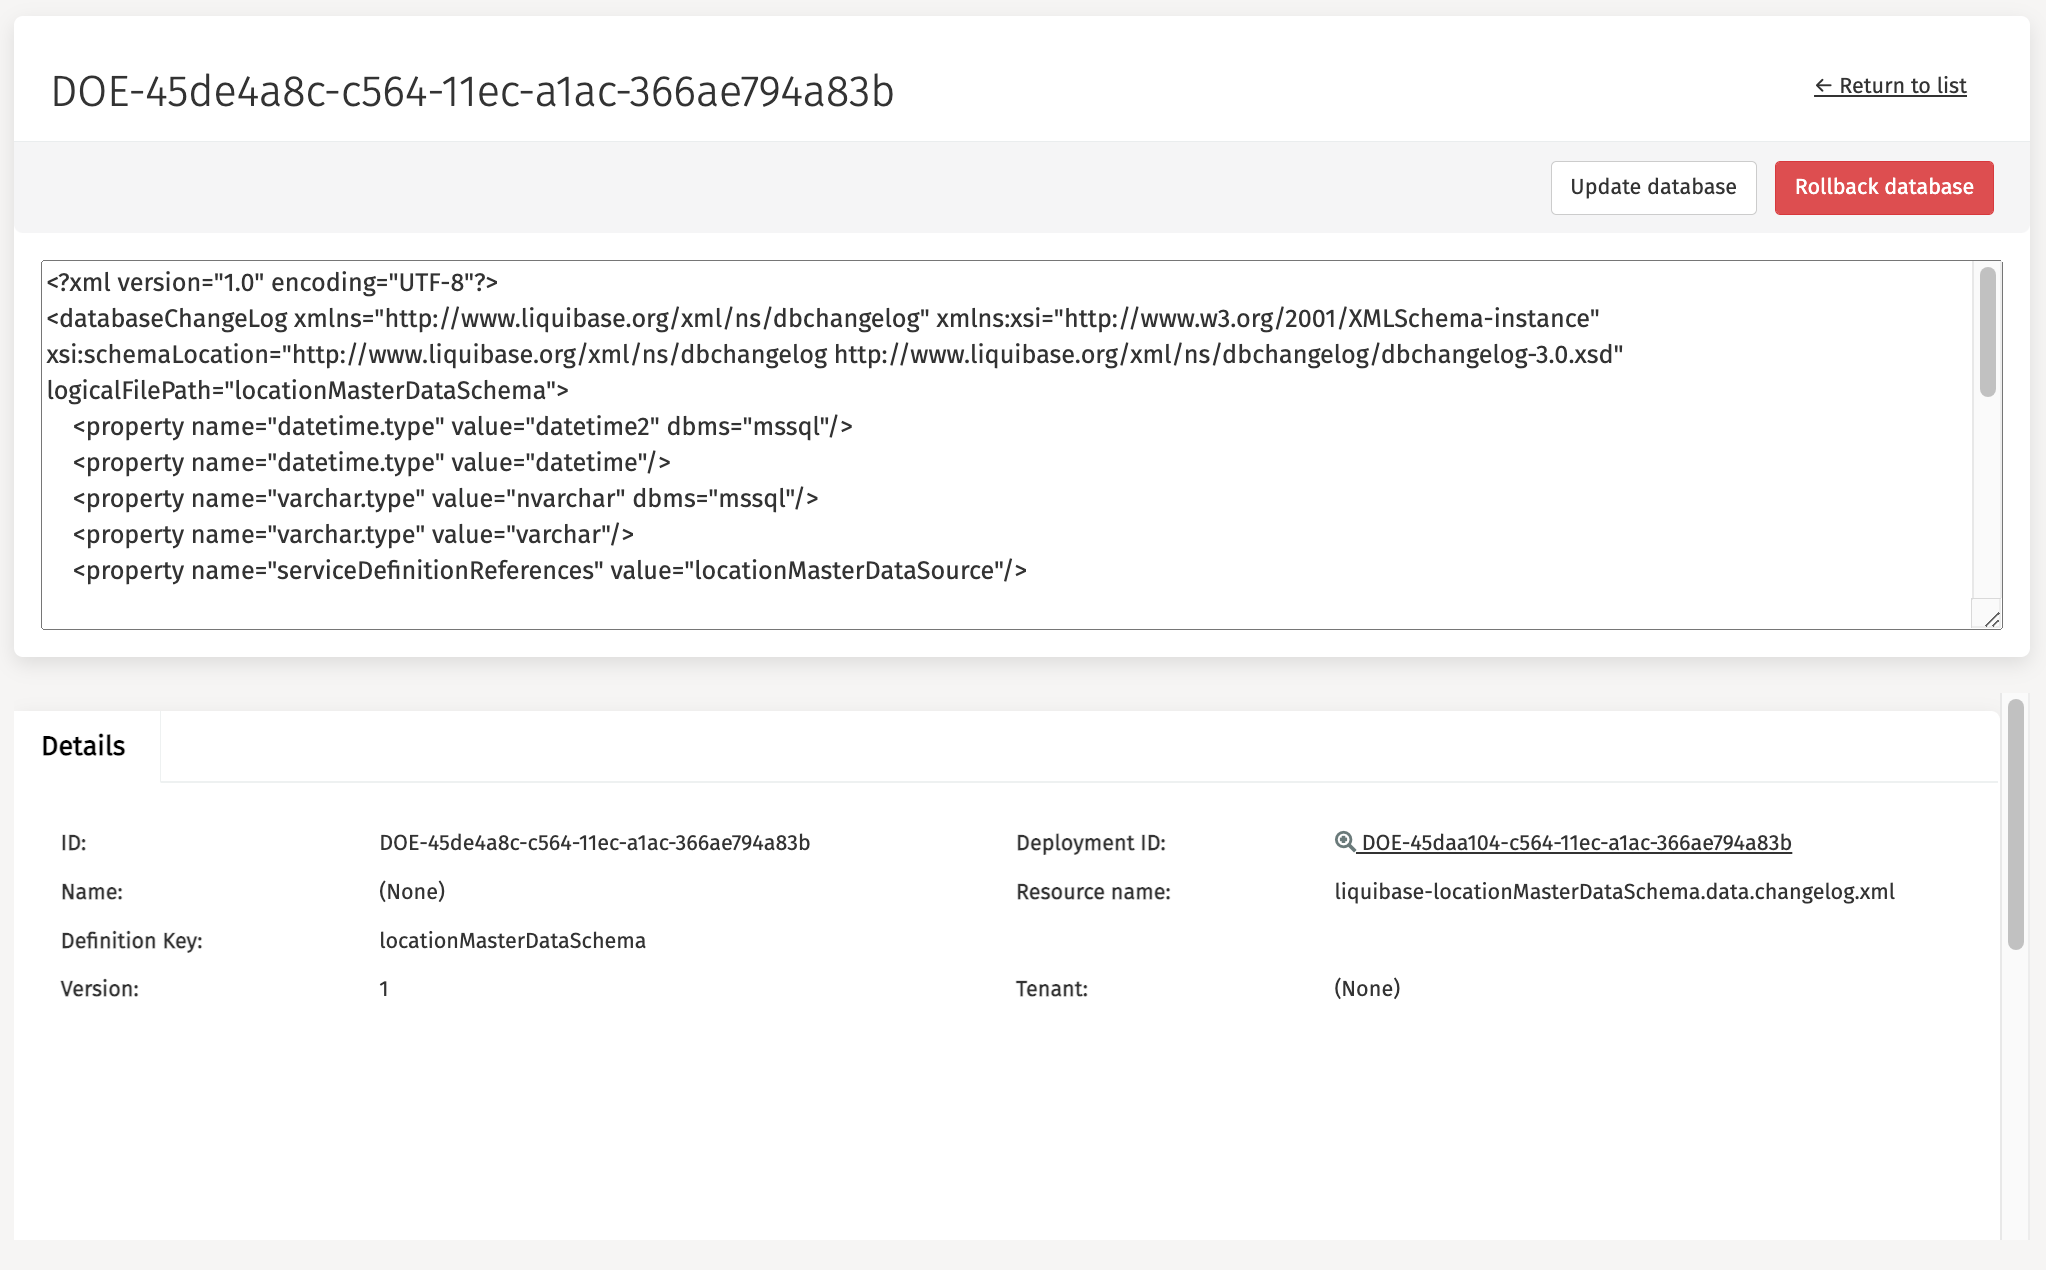
You can click the Update database button on top to actually deploy the schema and make the table available in our database.
If you connect to your database, you will see a new table being created in your schema named locations (or whatever you named it) along with two meta data
tables created by Liquibase to keep records on the version of that table and to automatically update should we change it in the future (and we will).
Create form and process to insert new master data
We now have all the infrastructure setup defining our master data object for locations, deployed it to the runtime and checked the database table to actually be
there. But of course we also want to insert new locations now.
There are several ways you can do this:
- using the Java data object runtime service API
- using a data object table with create / update / delete support
- using a process to create a new data object
- using the REST API to create a new data object
We will use a process to create a new location master data object as we also want to dynamically set the view permissions for it which is not supported by the default create and update function exposed to a data object data table where it only uses the default permission from the data object permission definition.
Create start form for the create process
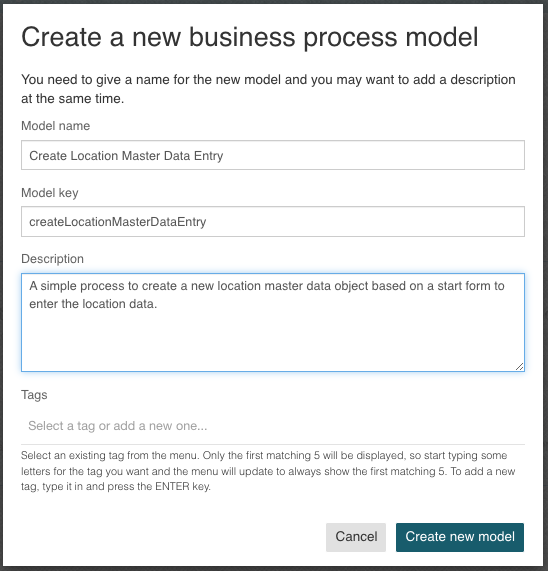
Go back to our location management app and create a new process model named Create Location Master Data Entry:
Select the start event in the newly created process model, select the Start form reference property, select new and enter the name for the start form as
Create Location Master Data Object Start Form which will then open up the form editor where we will create the start form for the process.
You can add a text display component at the top of the form with some information about creating a new location (optional).
As we will make use of the main location properties in different places, lets add it as a subform to be able to re-use it elsewhere later.
Add a new subform component to the form, name it New location and disable the Store subform data in a single variable property.
Select the Form reference property and set the name for the subform to Location Master Data Object Subform, create it and we will add some components to
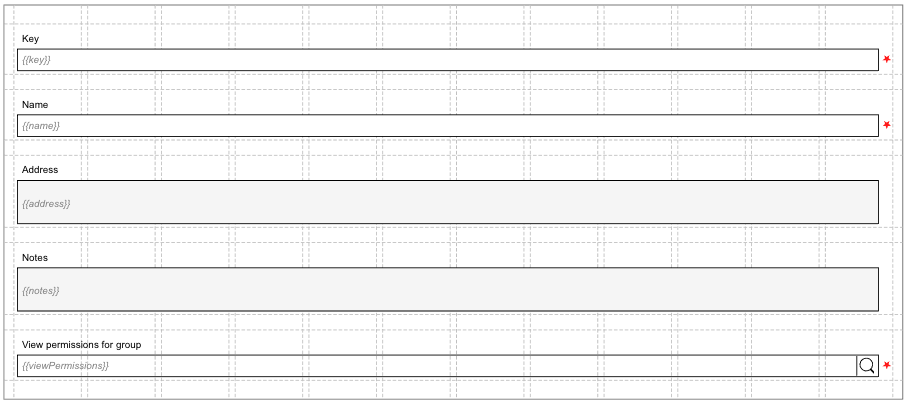
enter the data for a new location:
- Text component named
Key(and value{{key}}), make it mandatory (required) - Text component named
Name(and value{{name}}), make it mandatory (required) - Multiline text component named
Address(and value{{address}}), leave it as optional - Multiline text component named
Notes(and value{{notes}}), leave it as optional - Group of people component named
View permissions for group(and value need to be changed to{{viewPermissions}}), make it required as well, change theInput min lengthto 0
Your subform should now look something like this:
Add create data object service task to process
Now we should have our start form defined for the process creating the location master data object. Switch back to the process model and add a new
Data object create service task after the start event and name it Create location (you should find it in the Flowable Work section in the palette).
Select the Data object configuration property, select Reference and choose the existing Location Master Data entry which will let the service task know
that we want to create a new location object with it.
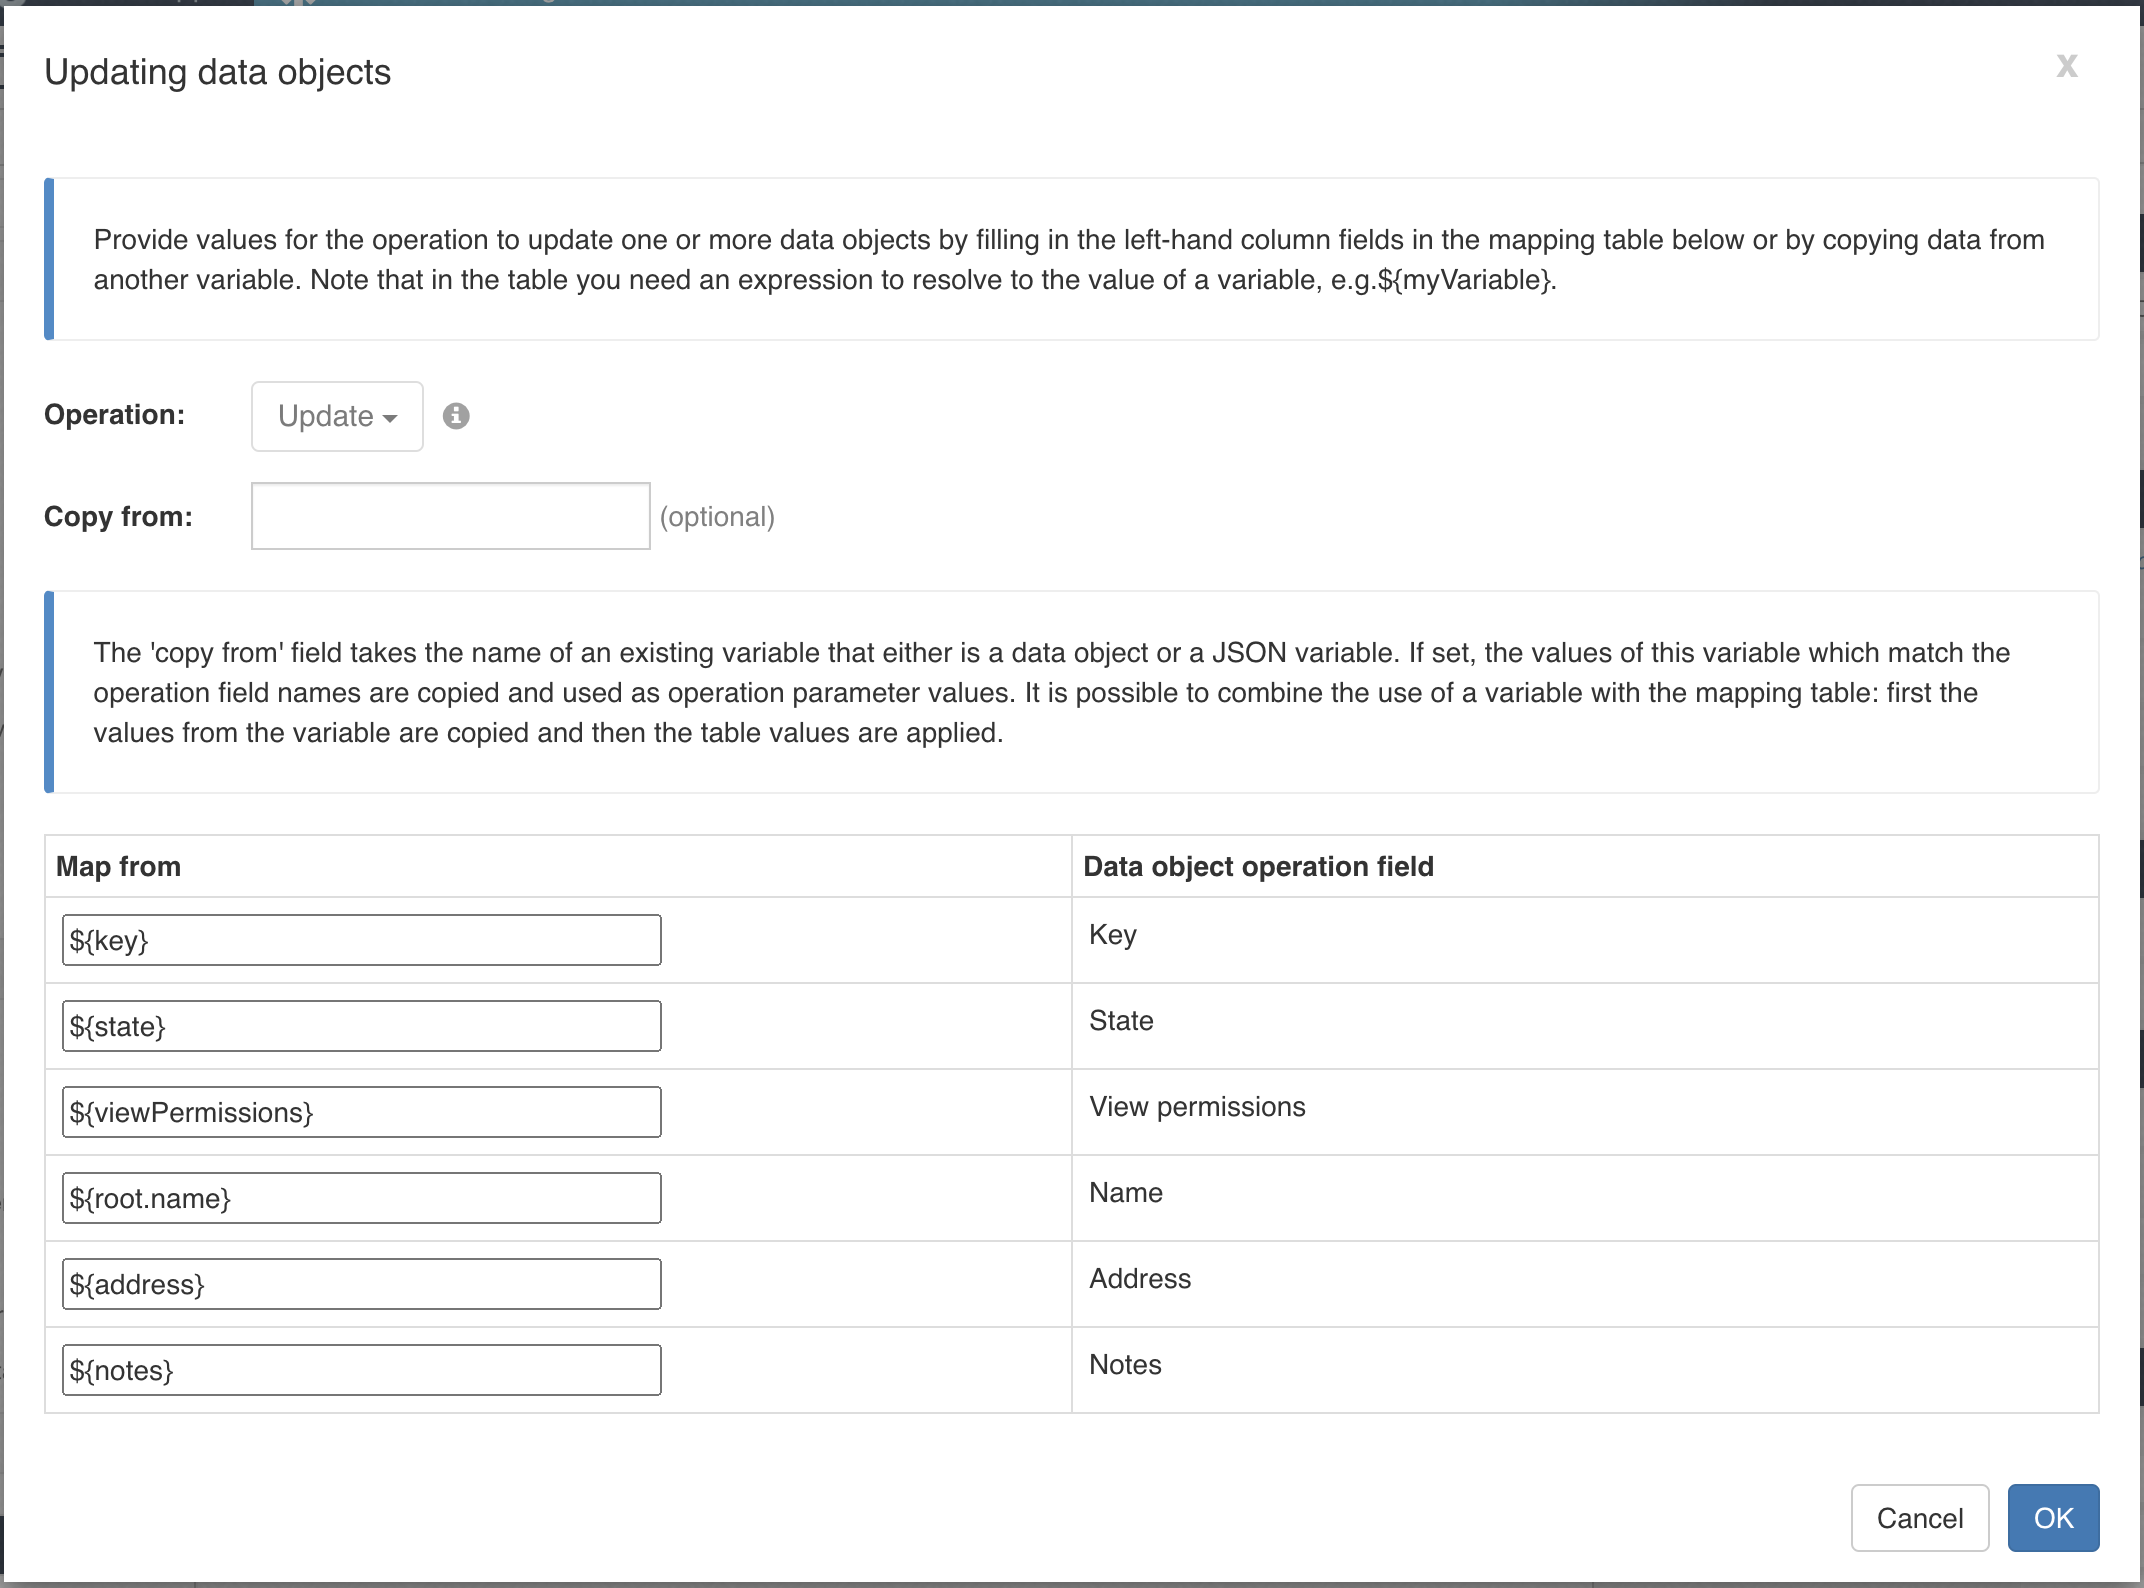
Click the Operation not configured property, and you should be taken to the mapping dialog where we map the fields for the location master data object:
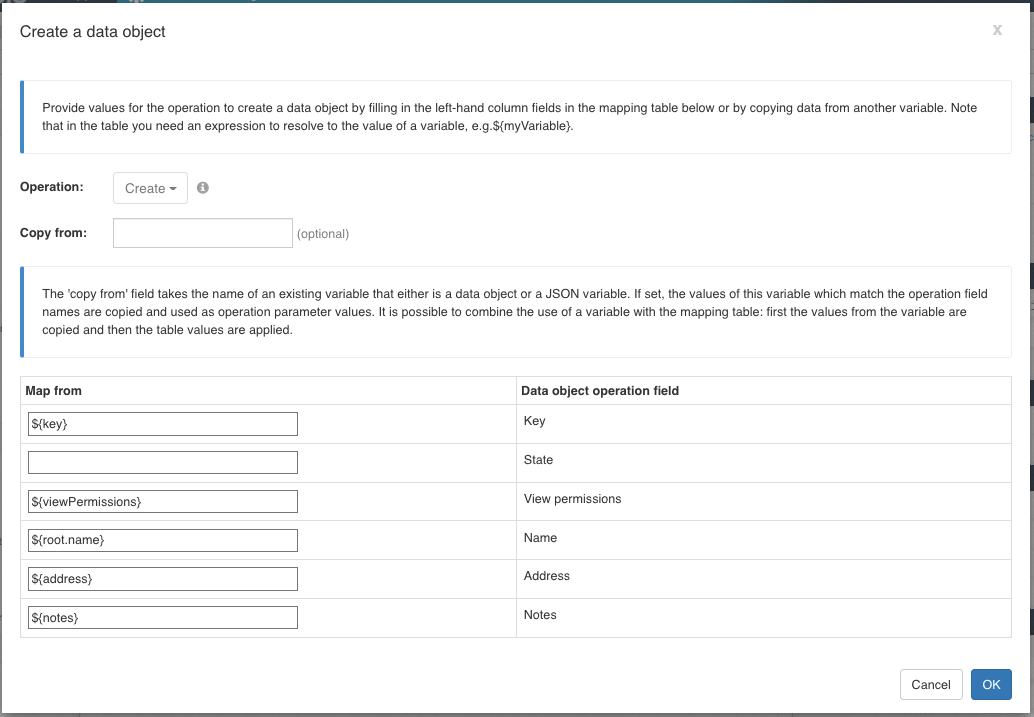
We can leave the state field mapping empty as we set a default value in that field to be active by default. But of course we could also set a static value
of active there as well.
Pay attention to the name field, we need to use ${root.name} there for the expression to get the name for the location. Name is a reserved property name
referring to the name of a process or case instance and therefore is not a variable we can simply access using an expression, so we first need to point to our
process instance which is root to then get its name, hence root.name as the expression.
This will create a new location data object with the default watcher permissions set to the group operationAdmin as we defined it in the permission section
of the data object model.
Before we will add a new step to dynamically set the view permissions according the data entered in the start form, lets give it a try by ending the process
with an end event, save everything and deploy it again to the runtime.
Test the creation process
Once successfully deployed to the runtime, we can now start that process to create a new location master data entry.
Click the New button, select Work and choose the Create Location Master Data Entry process which should bring you to the start form we created.
Add some values for our first location to be created:
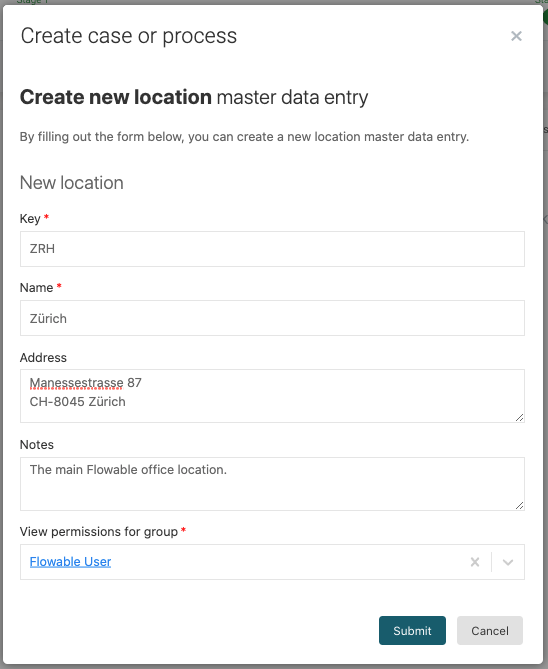
Once you submit the values entered, the process will be executed, creating our first location data object and finish right afterwards.
To check, if that really happened, go back to your database browser, open up the locations table again and you should now see one entry containing our entered
values in there:

Add watcher permissions dynamically using a service definition
If we checked the act_ru_identitylink table and select rows where scope_type_ = 'data-object-locationMasterData' then we will see two rows with the
default values for owner and watcher being set to operationAdmin as we did not yet add our dynamically selected view permission group yet.
This is what we will do next within the process. So go back to our process model where we added the creation data object service task as of now.
We could do it in several ways, one by adding a generic Service task and use an expression to add an identity link with the exposed
dataObjectRuntimeService bean. But that would leave this technical expression right within the process model which is possible of course, but not good design.
So we will actually create a service definition model to define our services needed to add and later remove identity links, so it can be referenced and used
easily in our processes with a nice mapping for the necessary input parameters.
Make same space in the existing process between the create data object service task and the end event and add a new Service registry task in between.
Select the Service model property and set the new name to Data Object Identity Link Service which will then create a new service definition model and open it up.
Select Expression as the service type, so we can make use of the exposed Spring bean named dataObjectRuntimeService to add the watcher permissions.
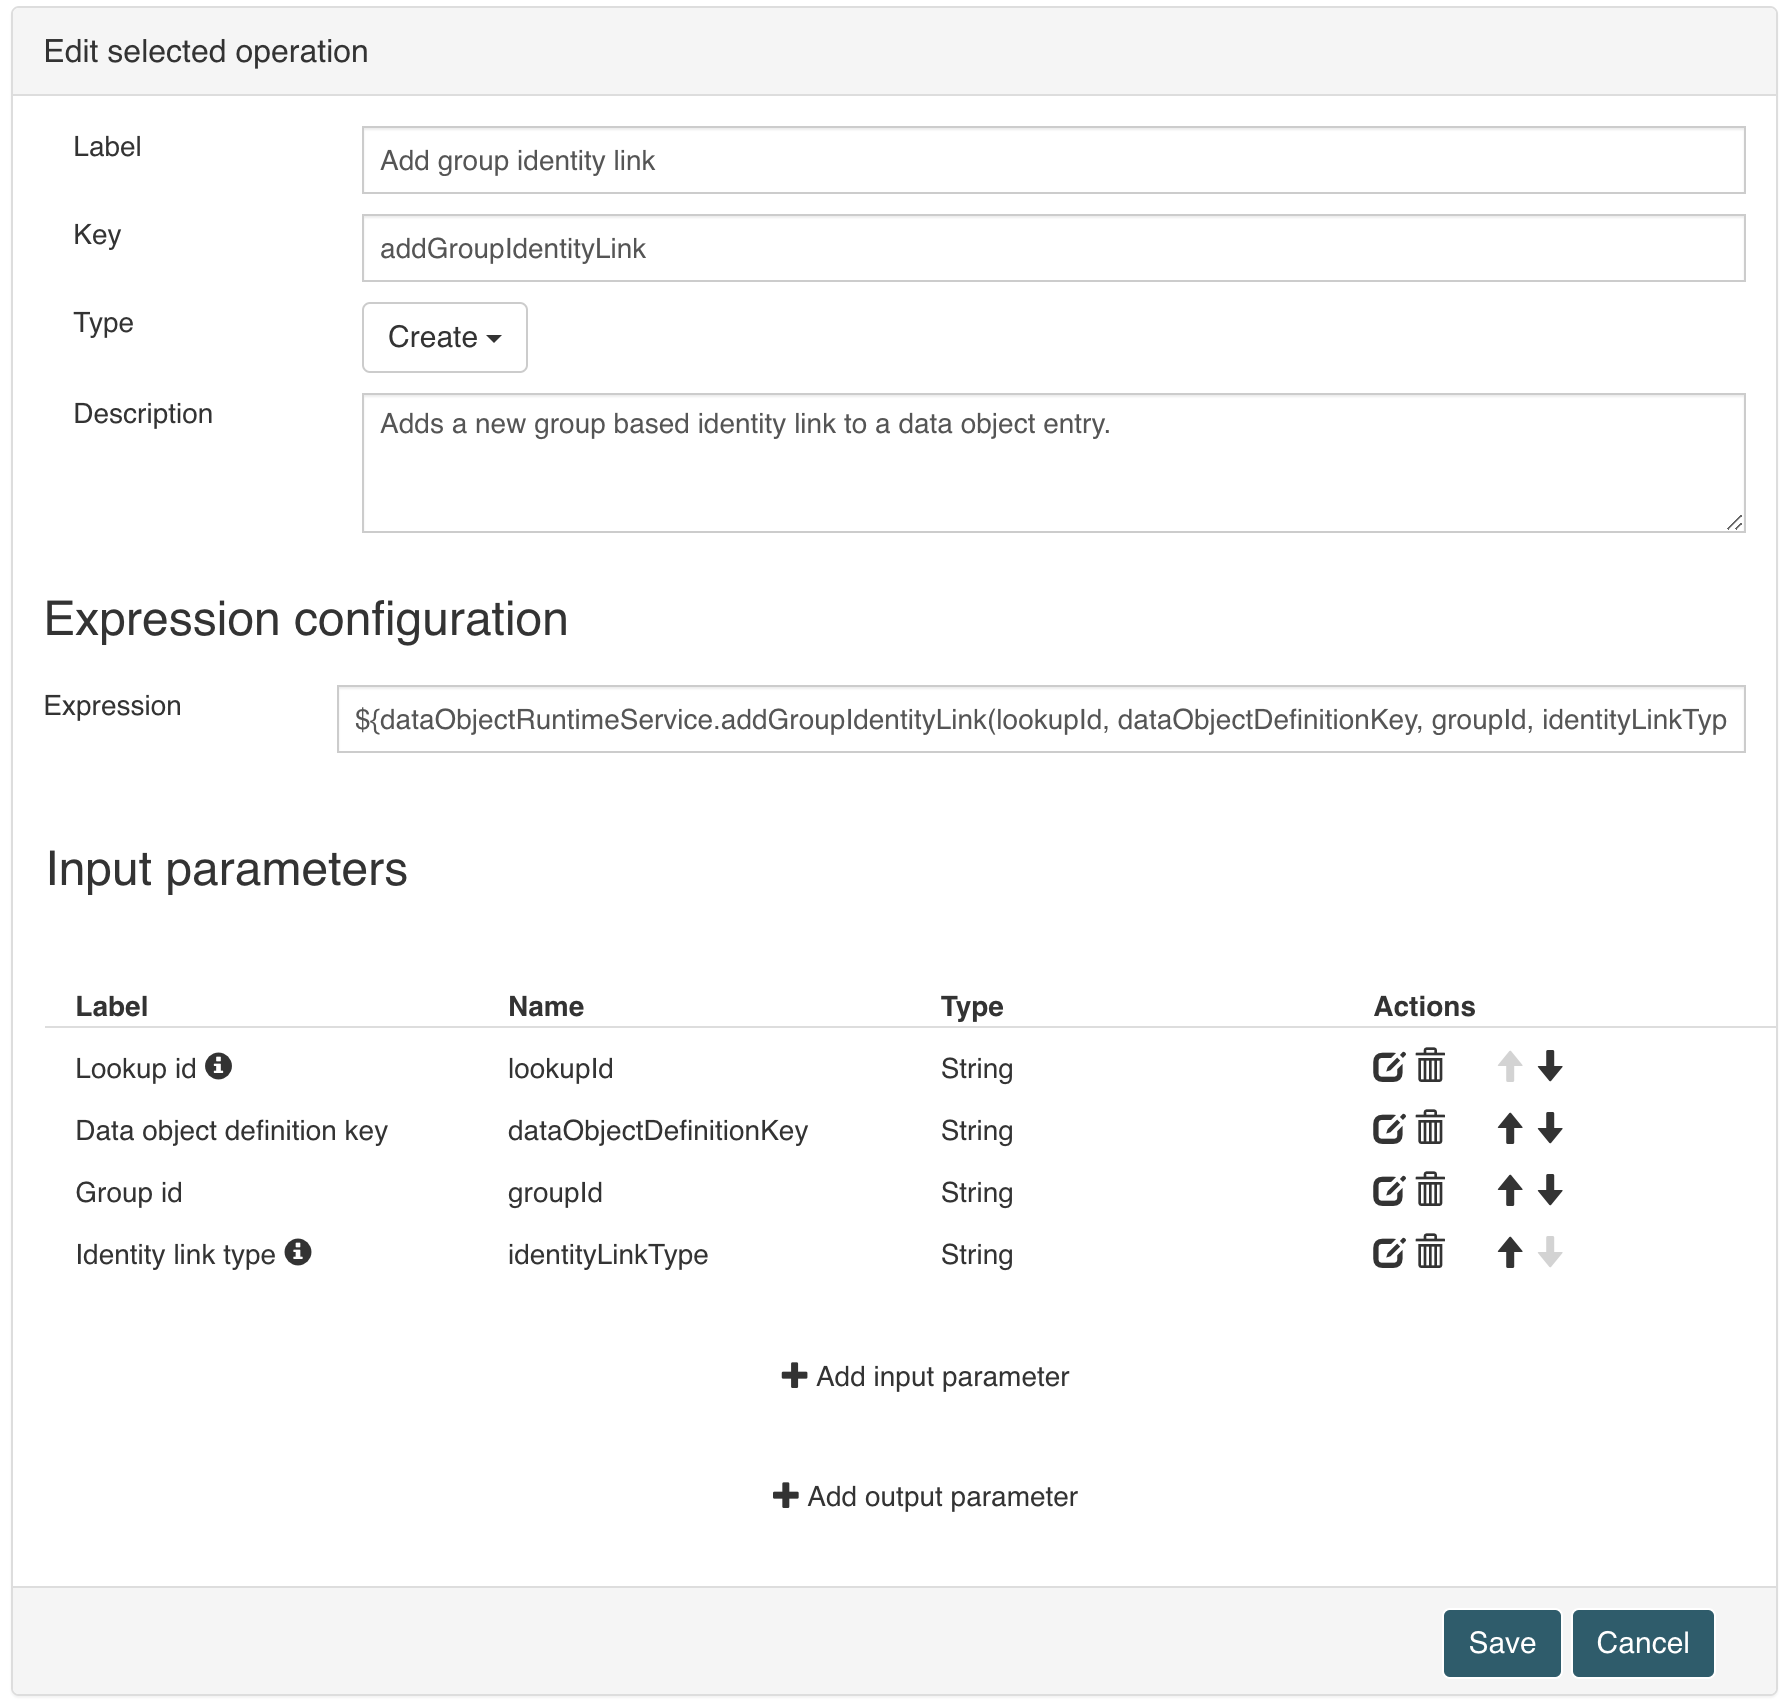
Click Add operation to create a new operation within the service definition and name it Add group identity link with key addGroupIdentityLink and type
Create.
Set the expression to ${dataObjectRuntimeService.addGroupIdentityLink(lookupId, dataObjectDefinitionKey, groupId, identityLinkType)} which is using the
data object runtime service to create a group based identity link between our data object and the selected group from the start form.
We need to define all the parameters that we used in this expression now, so add the following input parameters:
| Label | Name | Type | Required | Default value |
|---|---|---|---|---|
| Lookup id | lookupId | String | yes | - |
| Data object definition key | dataObjectDefinitionKey | String | yes | - |
| Group id | groupId | String | yes | - |
| Identity link type | identityLinkType | String | no | watcher |
The name needs to match the parameter name used in the expression to tell the service engine which value to put where, the order, however, is not relevant.
We don't need any output parameters as the service does not provide any return value.
Save the changes made to the service definition and go back to the process.
Your operation should now look like this:
Having created and selected the service model now, next step is to select the operation we want to execute in that service registry task within the process.
Select Add group identity link as the service operation, and you should see all our four input parameters in the service input parameter list property.
Click into the Service input parameters list, and it will open a dialog to map the required input parameters to process variables.
Map the input parameters like this:
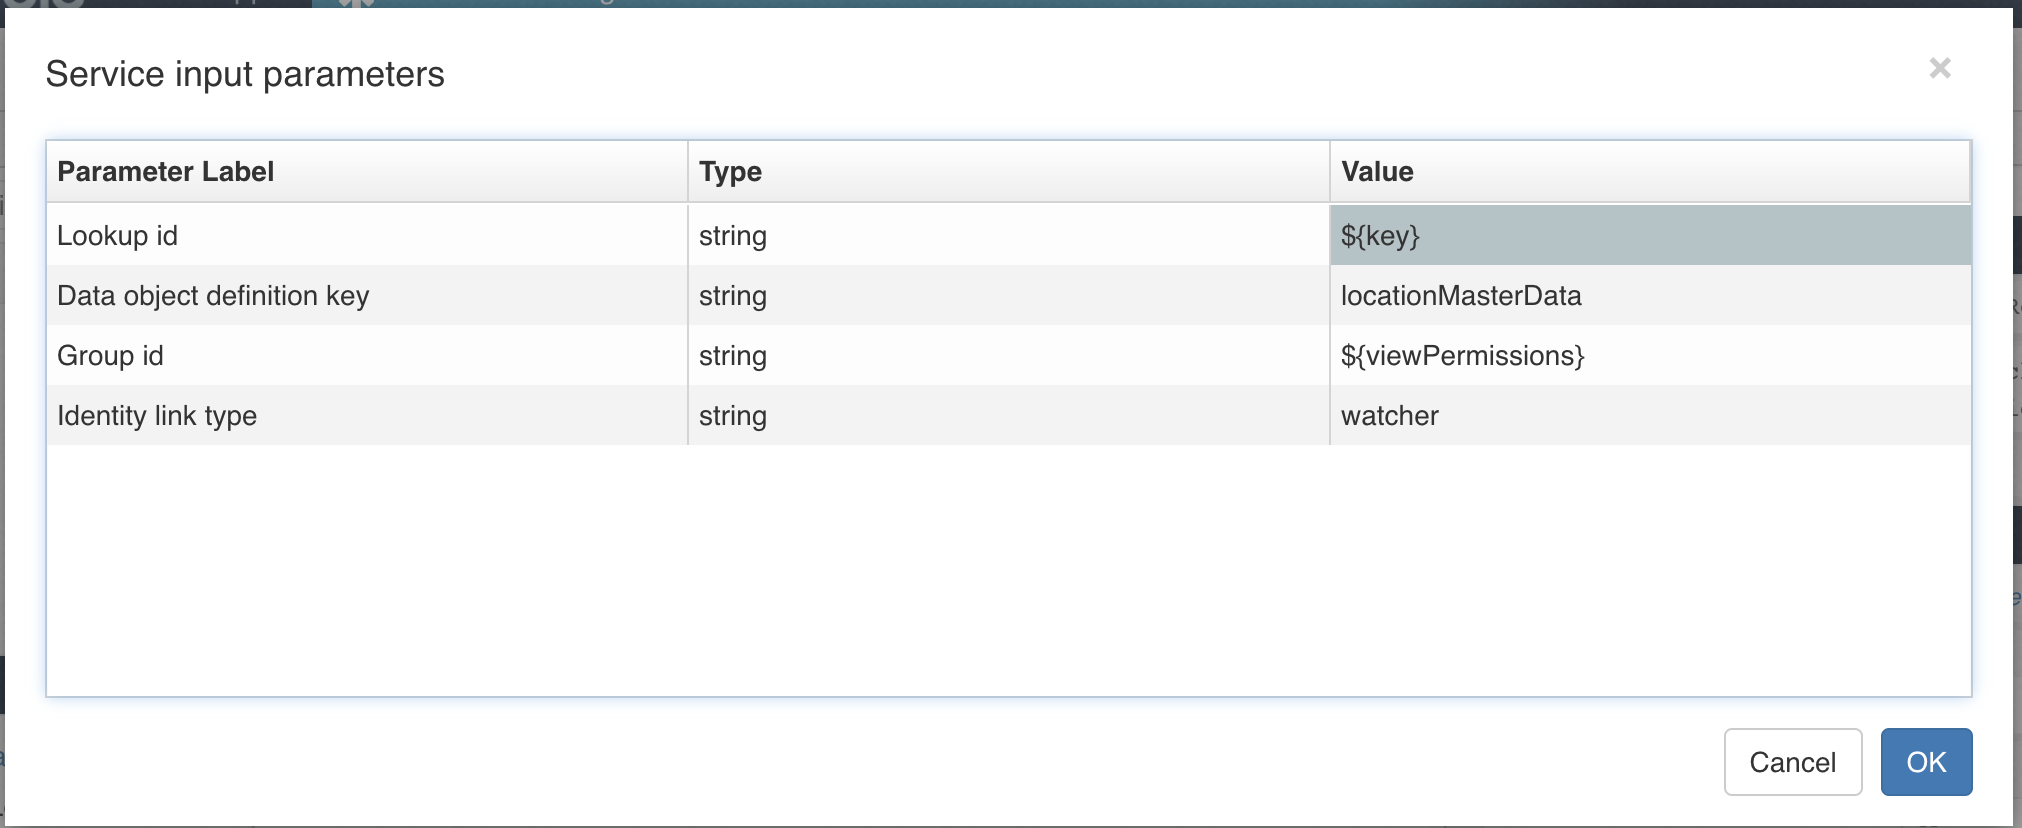
The data object definition key is static in our case, as we already know the key of our data object definition as well as the identity link type. We could also have made this static in the service definition itself, but the way we did it serves a more generic purpose so the service definition can be used even outside our current use case, which is a good design principle.
If we save everything and deploy it again to the runtime, we should now be able to create a new location entry and see an additional row in the identity link table, having three entry for each location now, the default owner and watcher being mapped to operationAdmin and the third one being mapped between watcher and our selected group in the start form.
Create location management dashboard
Having to look directly into the database for our newly generated location master data is of course not very convenient. That's why we want to create a new
dashboard to create, see and manage our location data.
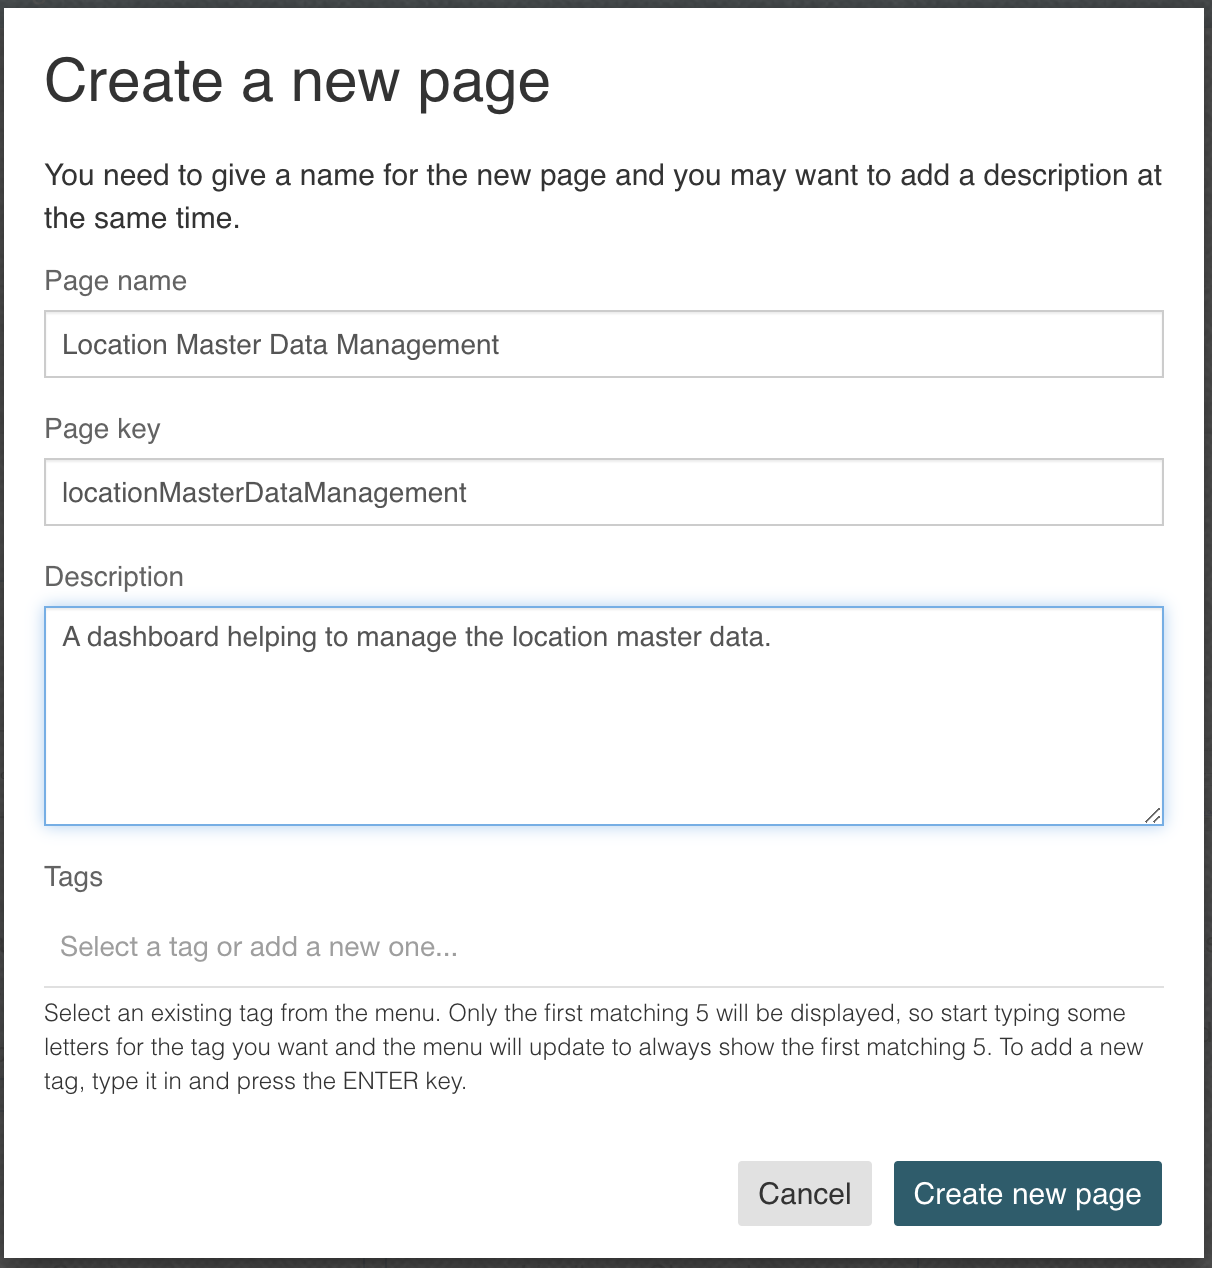
Go back to our location master data app and add a new Page model named Location Master Data Management.
With the page model open in the form editor, we can now add a Text display component to give the dashboard a nice title like Location Master Data Management.
But the important part to be added is a Data object data table where we want to list all of our locations.
Add such a data object data table and choose our Location Master Data in the Operation configuration property. When clicking on the Operation not configured
property, we need to select a Data retrieval operation on our data source behind the data object. But wait, we don't have one yet! We only have the default
CRUD operations as being created for us automatically.
Create new search operation
In order to fill the data object table with our location data, we need to add a new search / list operation in our data service behind the data object model.
Open up the Location Master Data Source and click the Add operation button to create a new operation.
We could name it List locations with key listLocations and type Search and add a filter parameter:
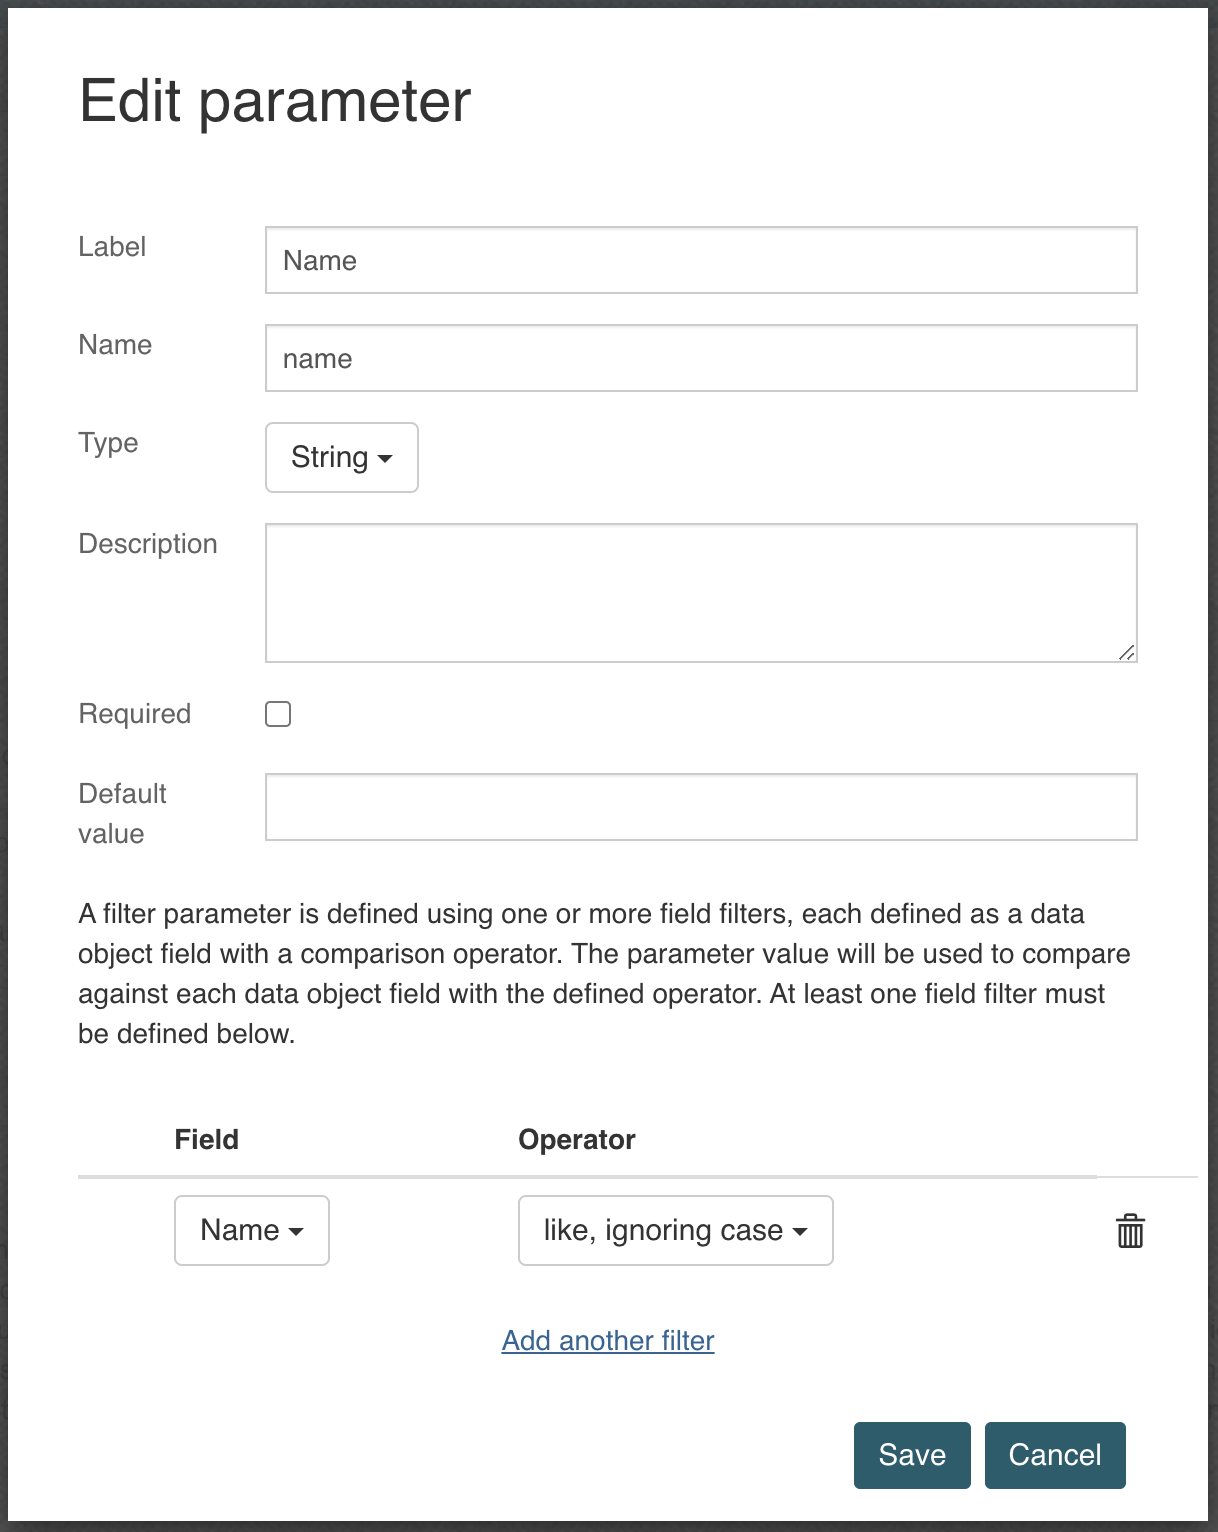
We can also define a sort order for our search operation by clicking on the Configure sort fields and as an example selecting the name property to sort for.
Finally, add the operation and save the data source model and go back to our dashboard page.
Use search operation in the data object table with search parameter
We should now be able to select the Location Master Data data object and our newly added List locations operation in the data object data table.
But when we choose that search operation, the Name search parameter shows up and needs to be mapped. We can map such search parameters to fixed values, but
we can also make this dynamic as we want to be able to search for the name of a location.
Put {{$temp.locationSearch}} into the Map from field for the name search parameter and close the dialog.
Now we need a Text data entry component, you might want to drag it on top of the data object table, name it Location search and set its value to
{{$temp.locationSearch}} as we used in the mapping for the search parameter.
What does the prefix $temp actually mean? The form engine support a temporary namespace for variables named $temp and if used as the prefix for a variable,
those never get saved. In theory, you don't even want to save the content of a dashboard, but it's a good practice anyway to use the temporary namespace when
using variables only for the UI like filtering, etc.
Configure data object columns
The next thing we need to do is configuring the columns we want to show on that location data table.
Click the Columns property and select Key, State, View permissions, Name and maybe even Address as the columns we want to show.
Maybe you want to move the view permissions to the end of the table, you can do this with the move up / down buttons at the end of the column table.
We can also choose which columns we want to sort on, by default they are all on.
We might also want to enable the refresh button, so click the Show refresh button checkbox to allow reloading.
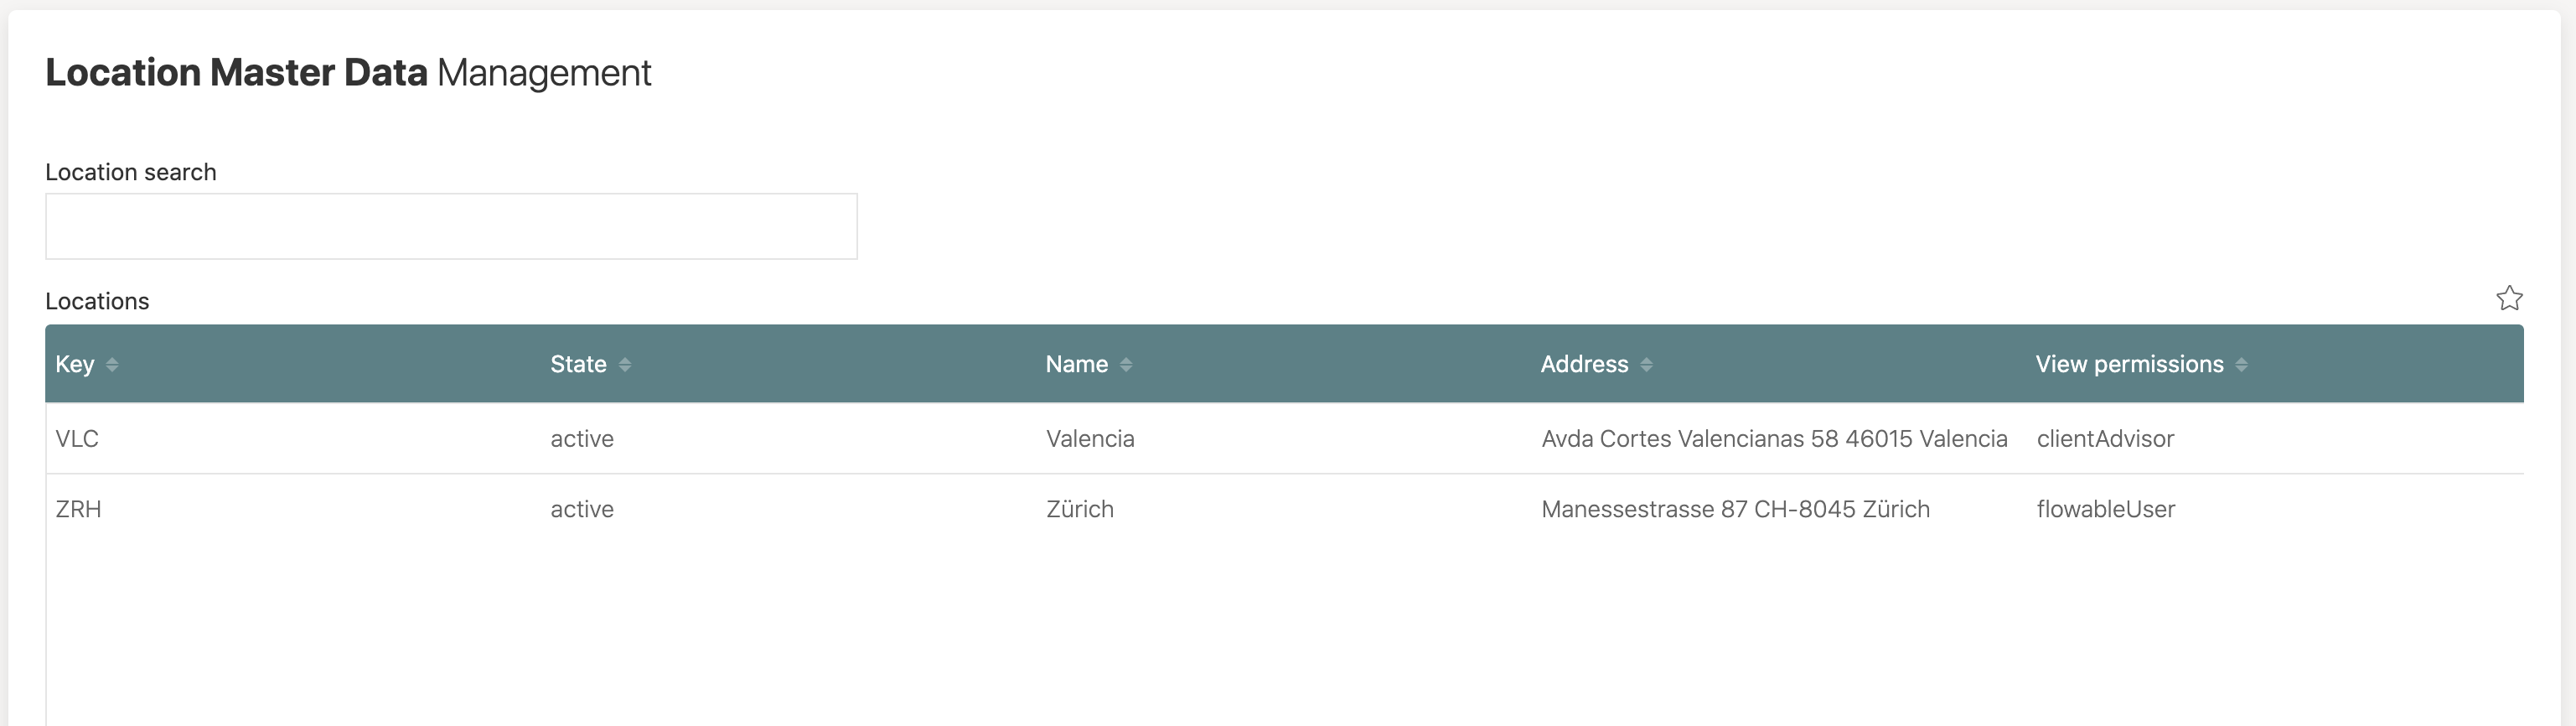
Save all the changes, re-deploy the app and go to Flowable Work to see the changes. You might need to do a refresh as we just deployed a new dashboard / page.
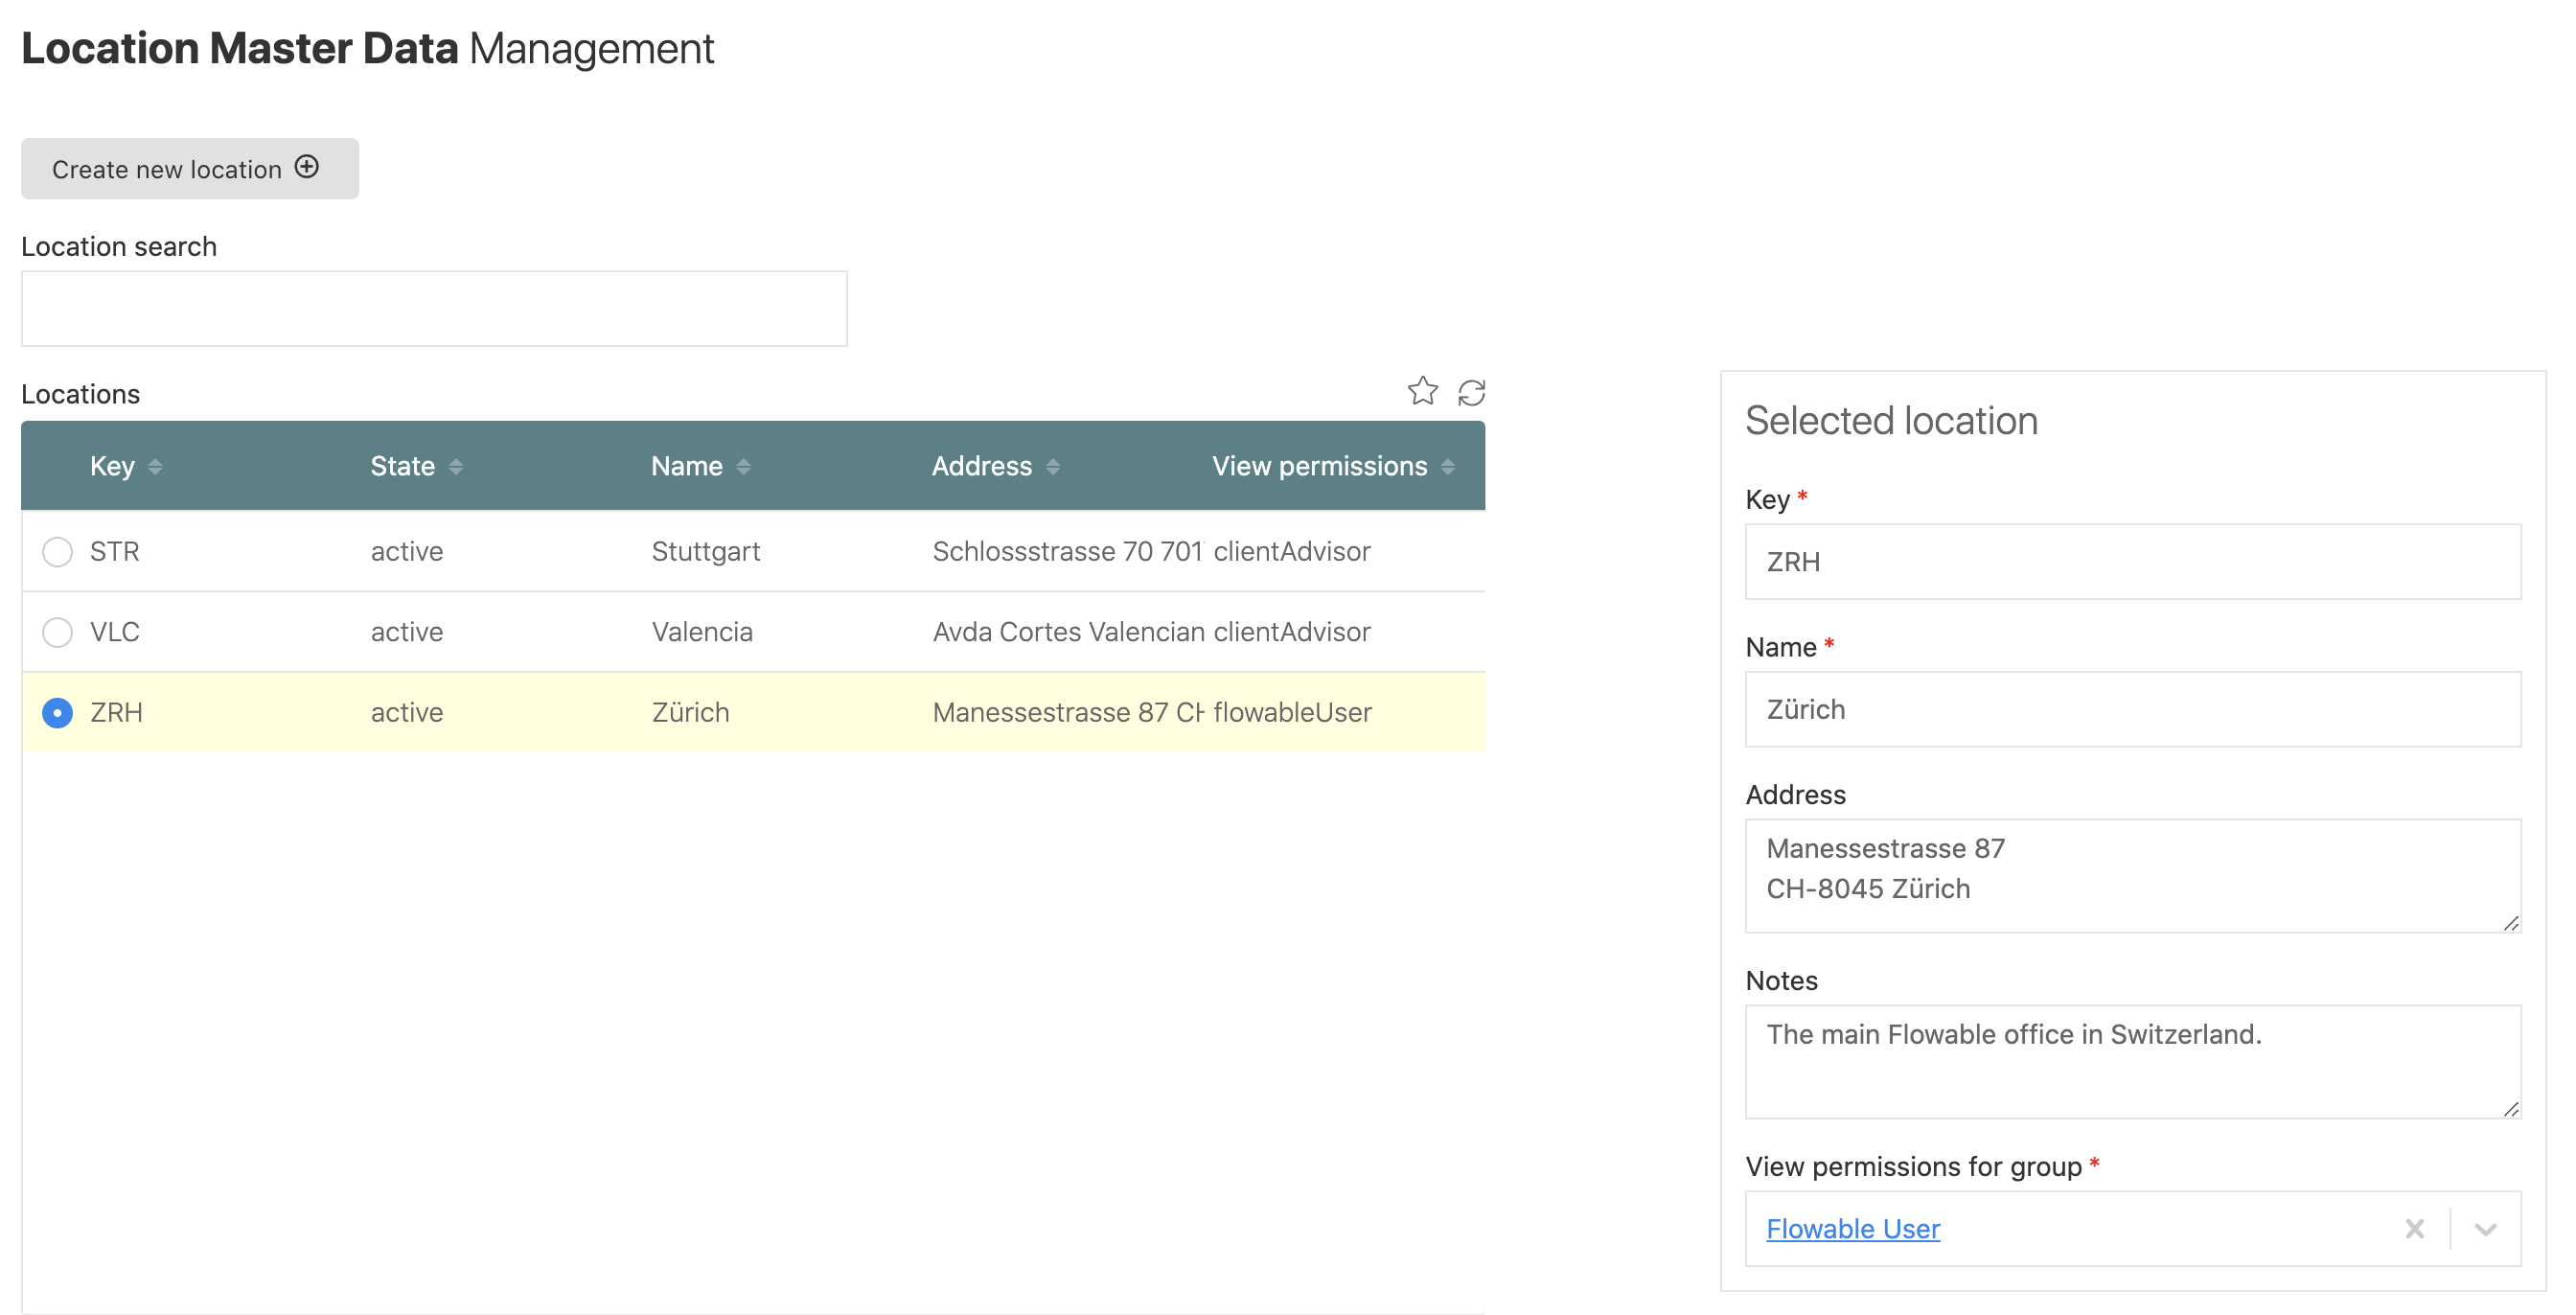
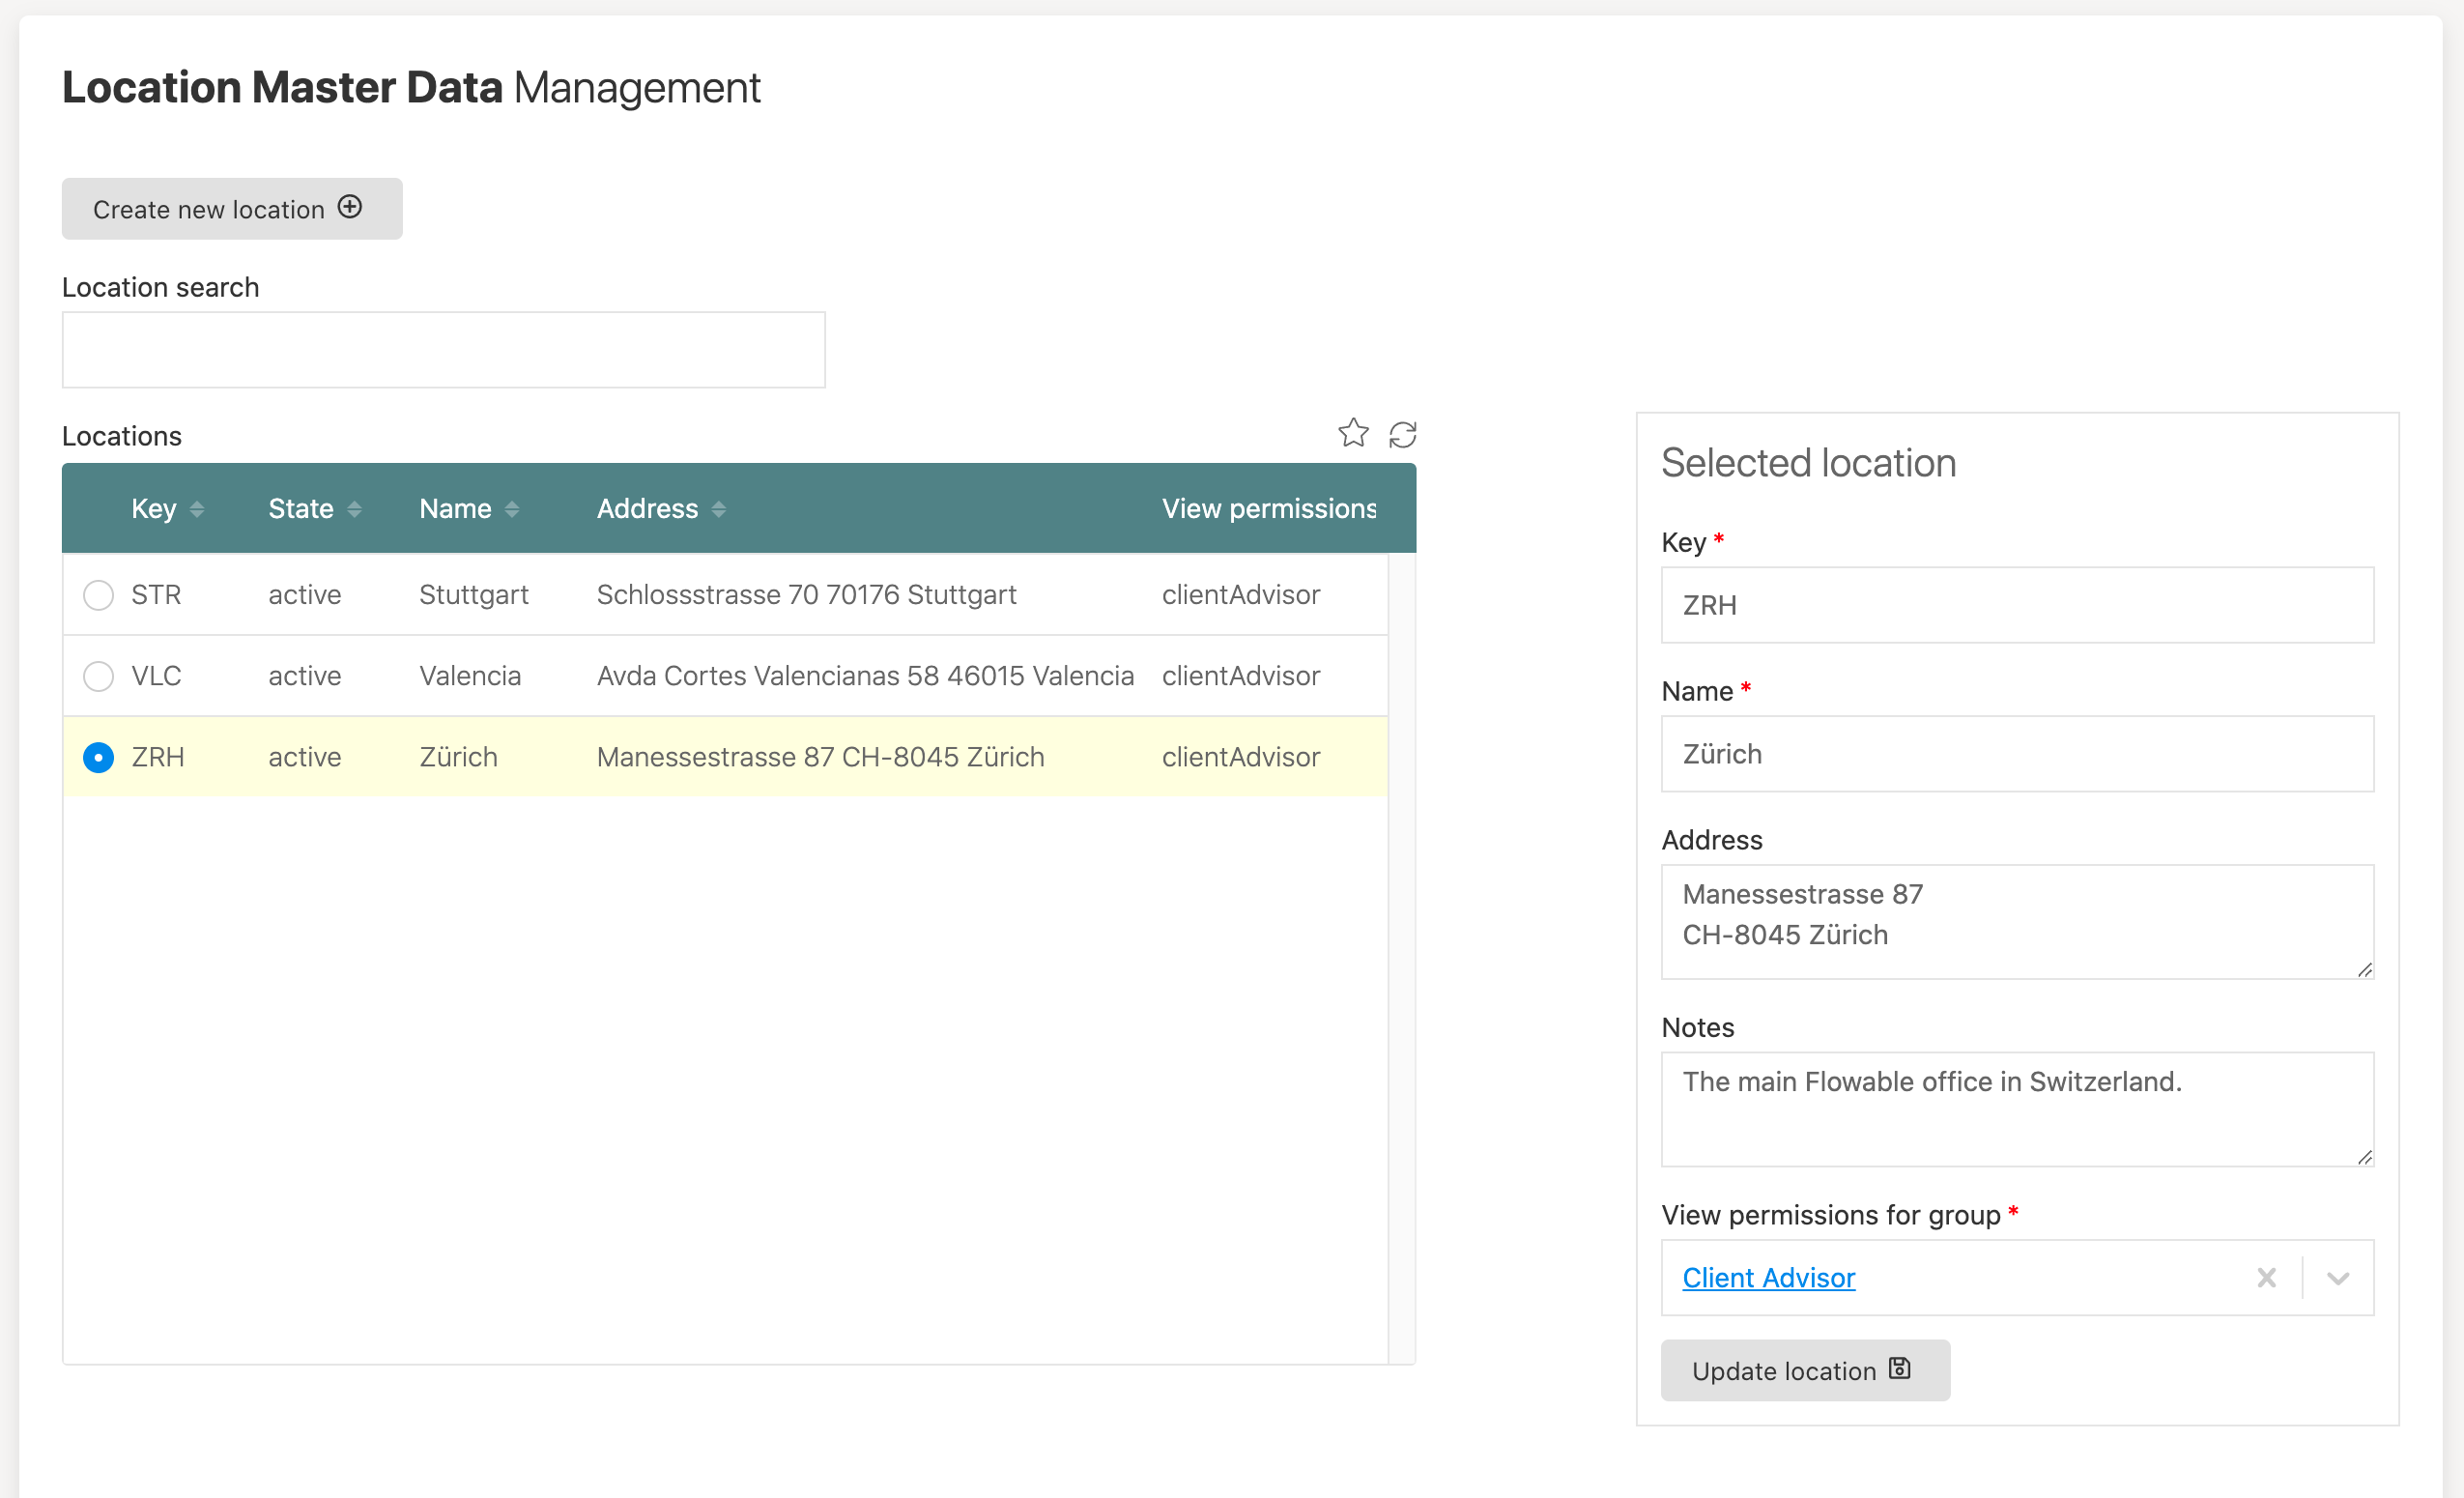
Your dashboard is reachable though the menu on the left named Location Master Data Management and might look something like this:
If you can't see any data yet, maybe you need to switch to another user you are currently using which has the operationAdmin group assigned or just the
regular administration user, that might work as well.
Also test out the search functionality, once you start typing something into our search field, you should see the table refreshing its locations and only show
the ones where your search term is actually found in the name of the location.
Create action to add a new location
So far we manually started our location creation process in order to create a new location data object. We want to make this directly available from our dashboard, and we want to make use of an action and action button for this, but still using our process behind the scenes.
Create action model
Go back to our app and create a new action model and name it Create Location Master Data:
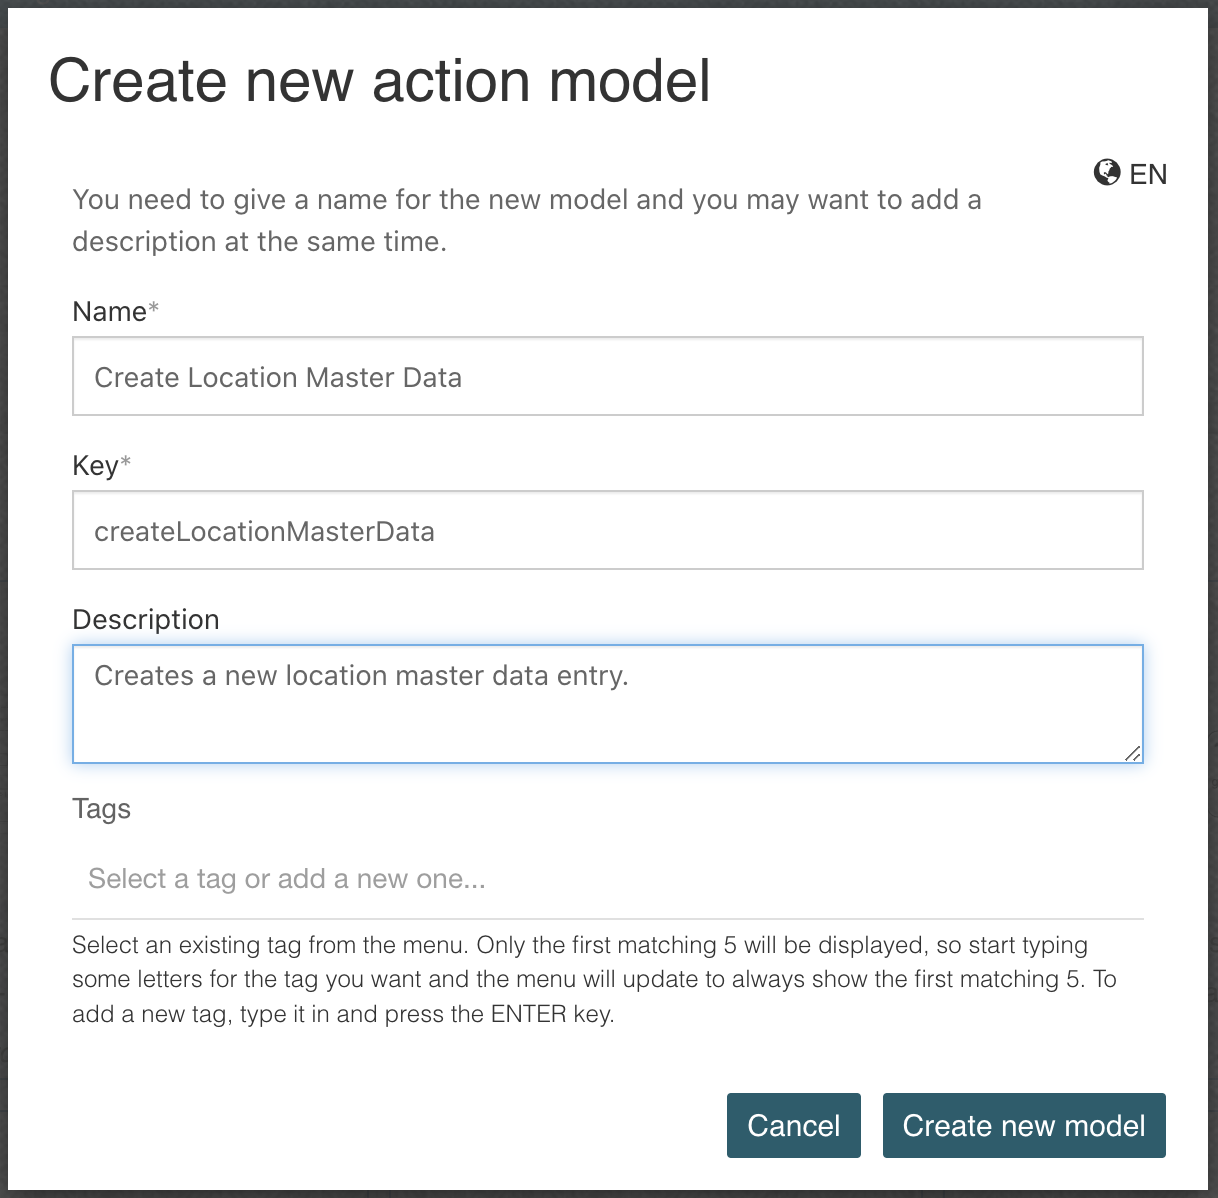
Actions can be used in various places like in our case a dashboard through an action button to execute some logic on the backend, triggered by the frontend.
But actions can also be exposed to other objects like cases, tasks or even users to extend their functionality.
An action needs a 'bot' being able to execute it. You can either write your own bot service or make use of predefined ones.
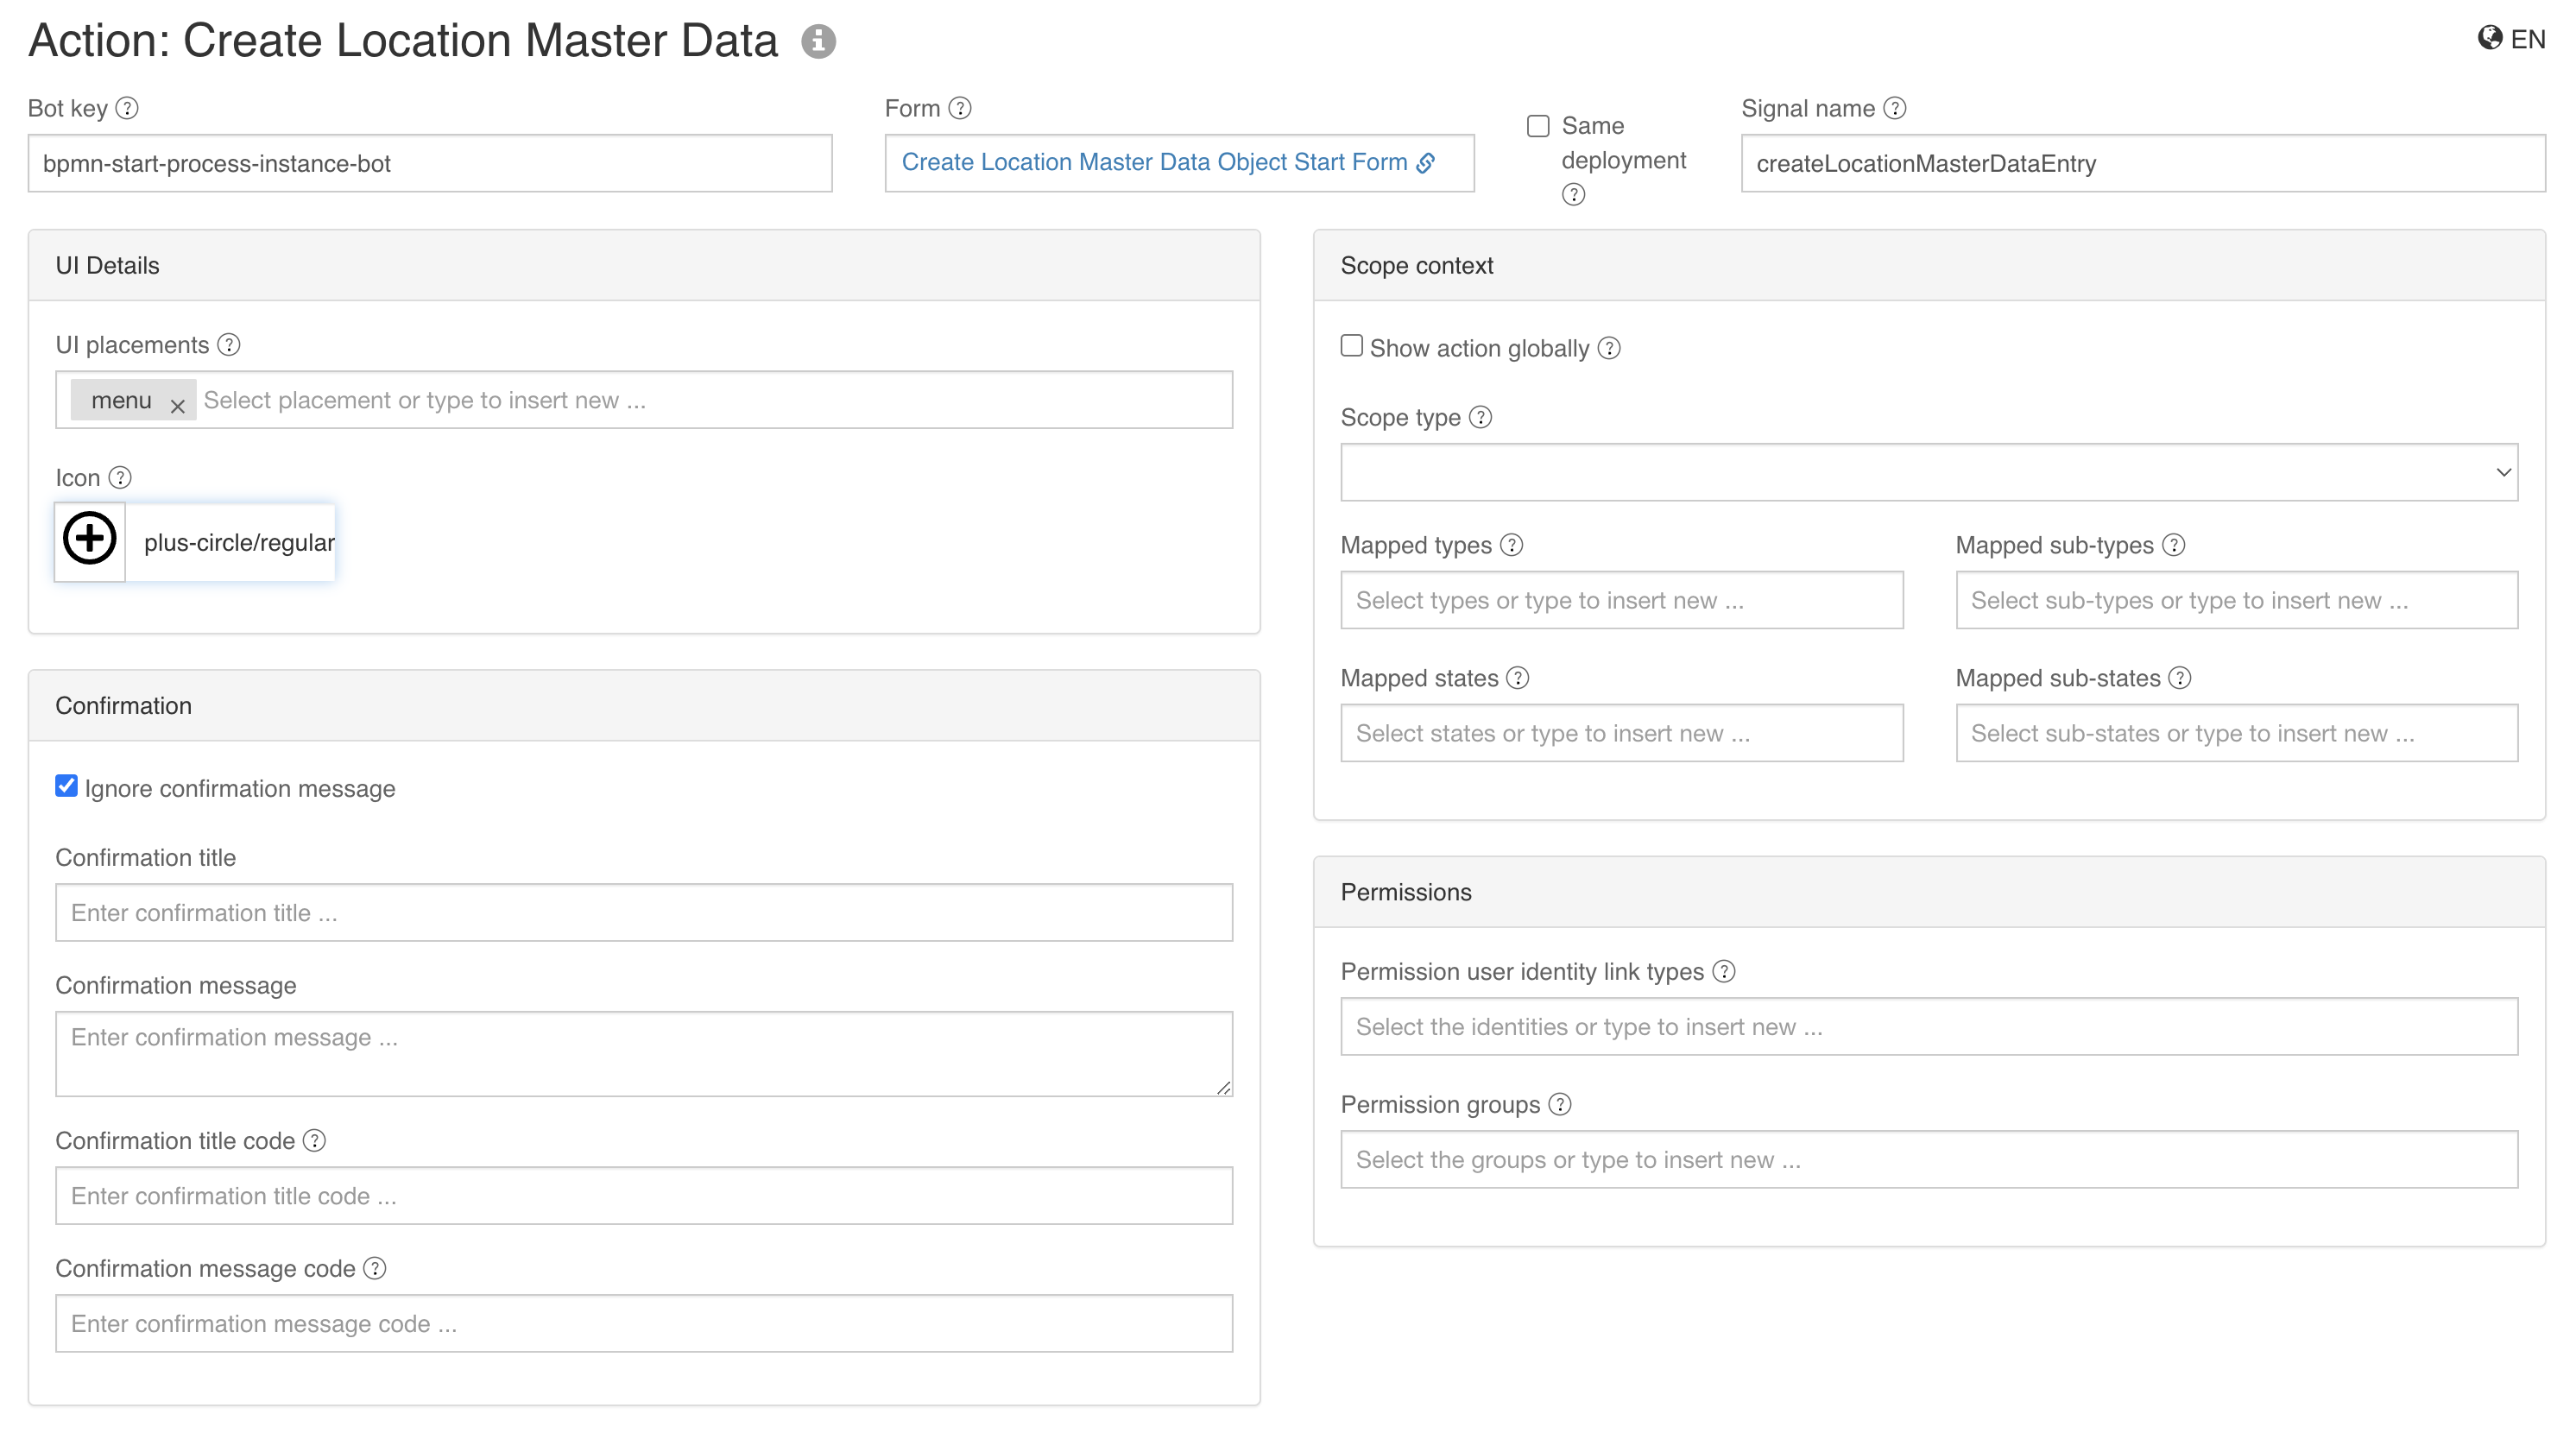
We will make use of an existing, predefined bot with key bpmn-start-process-instance-bot. This bot is able to kick off a new process and takes in the payload
from the action to use that data when starting the process.
Enter bpmn-start-process-instance-bot into the bot key field of our action model and set the signal name to createLocationMasterDataEntry, which represents
the key of our process to be started by the bot.
Select our location create start form we already created and used with the process, it fits perfectly for the action, so we can actually use the same form
when executing the action, passing all the same values entered to the process which is pretty much the same as we would have started the process manually like
we did before.
You can optionally choose any icon you like and leave everything else pretty much unchanged with the provided default values, if any:
Now save the action model and go back to our dashboard page model.
Add action button to the dashboard
As we defined our action model now, we want to use it on our dashboard.
On top of the location search text box, add and place a new Button group container and then drag and drop a new Action button into it and name it
Create new location.
Choose our Create Location Master Data action model in the Action definition key property of the action button to let the button execute that action, when
clicked.
Save all models and re-deploy the app, go to Flowable Work and refresh our dashboard, and you should see that new action button.
Try it out, when clicked you should be taken to the same start form we had with our process and if executed, there is a new location data object. But wait,
it does not automatically show up in our data table, right? The table refresh button now comes in handy, so we can at least manually reload the table and should
see our newest location afterwards.
Make location data editable
Until now, we managed to easily create and see our location master data on the location management dashboard.
But we don't want to stop there, we also want to be able to update it after it was created.
Show selected location in a subform
First we need to allow the data table to select an entry. For this select Single in the Selectable property of the data object data table. This will allow
us to select one entry at a time and then access that selection through a variable.
For this, set the Value of the data table to {{$temp.selectedLocation}}. Again, we are using our temporary namespace to store the selected data object.
Whenever we select an entry now, it will become available in the variable selectedLocation within the temp namespace.
As a next step, we want to show that selected data of course. For this we can use a Subform component we drag to the right of the data table for instance.
You can give it 4 columns and let the table span the first 7 columns, so there is a bit of space in between.
Name it Selected location and set its value to {{$temp.selectedLocation}} and make sure the Store subform data in a single variable is actually checked.
We only want to show it when we selected a location, so set the Ignored expression to {{!$temp.selectedLocation}}, which means that the subform is going
to be ignored, if there is no selected location data available in our temporary namespace.
Additionally, check the Show border property which will give our subform a nice boarder to set it apart from the rest of our dashboard.
Select the Form reference property and create a new form named Location Master Data Object Update Form where we will put our selected location data in.
Remember that we actually created a subform holding all the properties of a location already? This comes in handy now as we can use it within our update form to
show our location data. Drag and drop a new Subform component to our form and select our existing form named Location Master Data Object Subform as the
Form reference.
Your dashboard page form might now look something like this:

When re-deploying the app and refreshing our dashboard in the runtime, you should now be able to select any entry in your table and it will show up in our subform with the appropriate data:
Add update action to the subform
We can already select an existing location and see its data in our subform on the dashboard. We can even change it there, but obviously, it does not yet get saved, and we want to support it of course.
The easiest way would be using the existing functionality backed into the data object data table like creating, updating and even deleting data object directly
through the functionality of the data table. Of course that would also have been the easiest way for creating new locations.
However, we did not choose this way as we additionally had to create a group based identity link when creating the location data object representing the watcher
view permissions we wanted to dynamically give to the new location.
The same will be with updating an existing location data object, we could use the default functionality, but then the view permissions would not be applied.
We will create a new update location process, a new update action and add it as an action button to our update form. With all the information and experience
until now, you might even be able to pull that off completely yourself by now.
But no worries, we are going to create it step by step like we did it before in this how-to guide.
First we create the 'hard' part; the update process, but we might want to make our lives just a little easier by selecting our existing creation process model in our app and duplicate it (use the dotted menu for the duplication action):
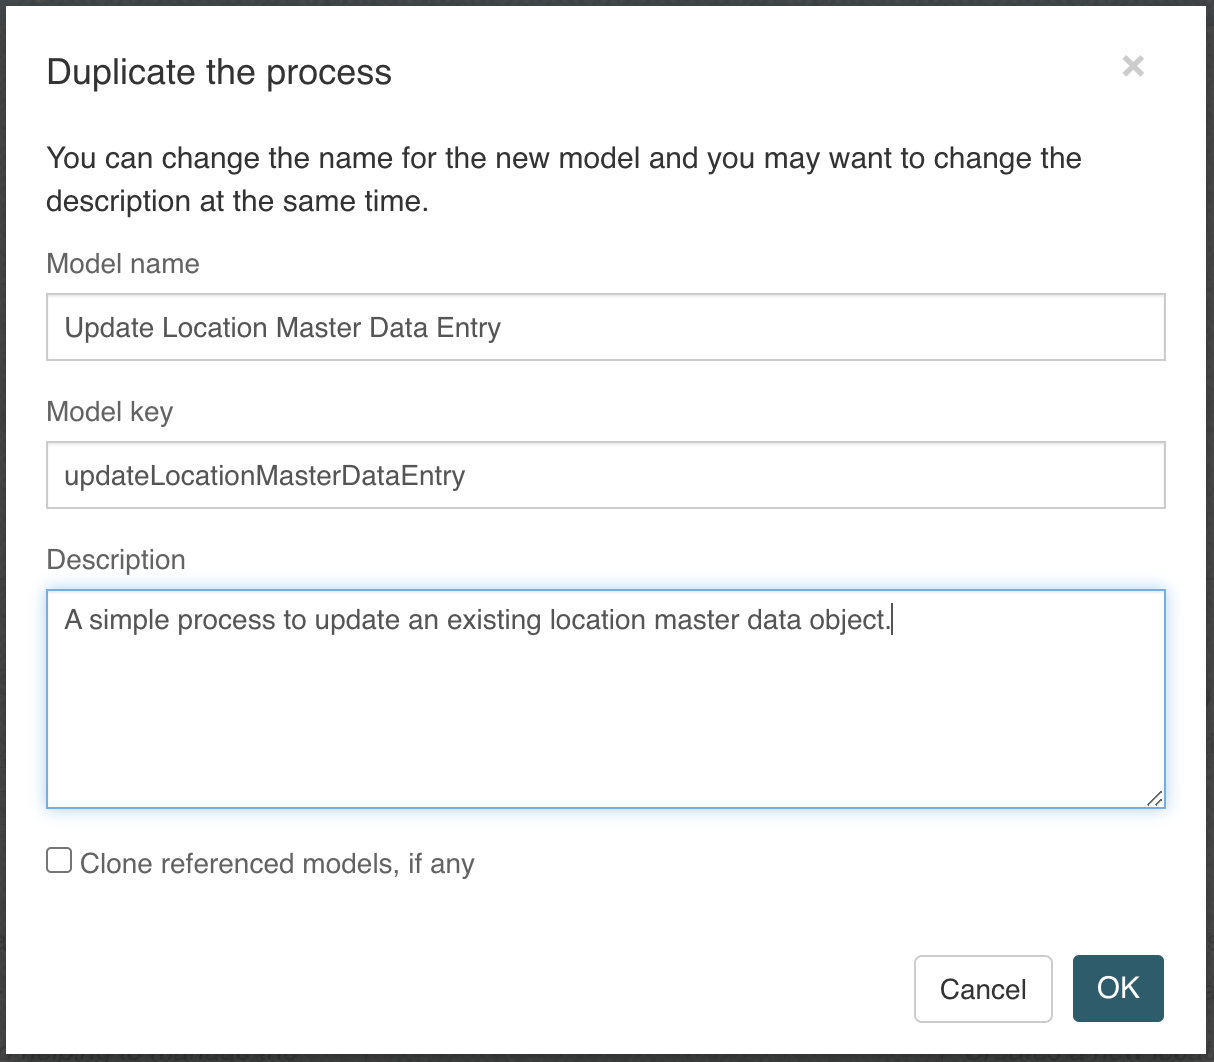
If you don't see the duplicated process right away in our app, you might need to manually add it with the plus-button and then choosing
Include an existing model into the app, selecting the duplicated update process, and then we should be fine.
Now open up that newly, duplicated update process model as we need to obviously modify it.
First, we change the type of the Create location service task to Data object update, you can do this with the Transform shape action and choose the
Data object update service task in the Flowable Work section.
Change the name of the service task to Update location and choose the Location Master Data in the Data object configuration property.
To make our lives a bit easier when configuring the update operation, we can set the start form of the process to our subform, containing all fields, so we can
use autocompletion when doing the mapping. Select the start event, go to the Start form property and select the Location Master Data Object Subform form.
Now select the Update location service task again and click the Operation not configured property and do the mapping to reflect something like this:
The Add watcher group permission is just fine, we can leave it as-is. But wait, what if we update an existing location over and over again? Will it not just
keep adding new group identity links to our data object? This is correct, so we need to delete the old one before we are going to add the new one, which might
be the same or a changed one of course.
How can we delete the old, existing link first? We only have the new, update data. But we can make use of a lookup data object service task to load our
currently saved version of the data object to be updated.
Make some space between the start event and the Update location service task as we first need to delete the existing link before adding the new one.
Add a Data object lookup service task right after the start event and choose our Location Master Data as the data object configuration.
Click the Operation not configured property and set the mapping for the lookup id (key) to ${key}, this is the only thing we need to look up our existing
location data object. Set the Output variable to oldLocation and check the Save output variable as transient variable as we don't need to actually store
it, we only need access to the old viewPermission property in order to delete the old link entry.
Add a Service registry task right after the lookup task to delete the old view permission link entry. As the Service model, select our existing
Data Object Identity Link Service. But we first need to add a new operation to delete an existing identity link, so go to our service definition model
and click the Add operation button.
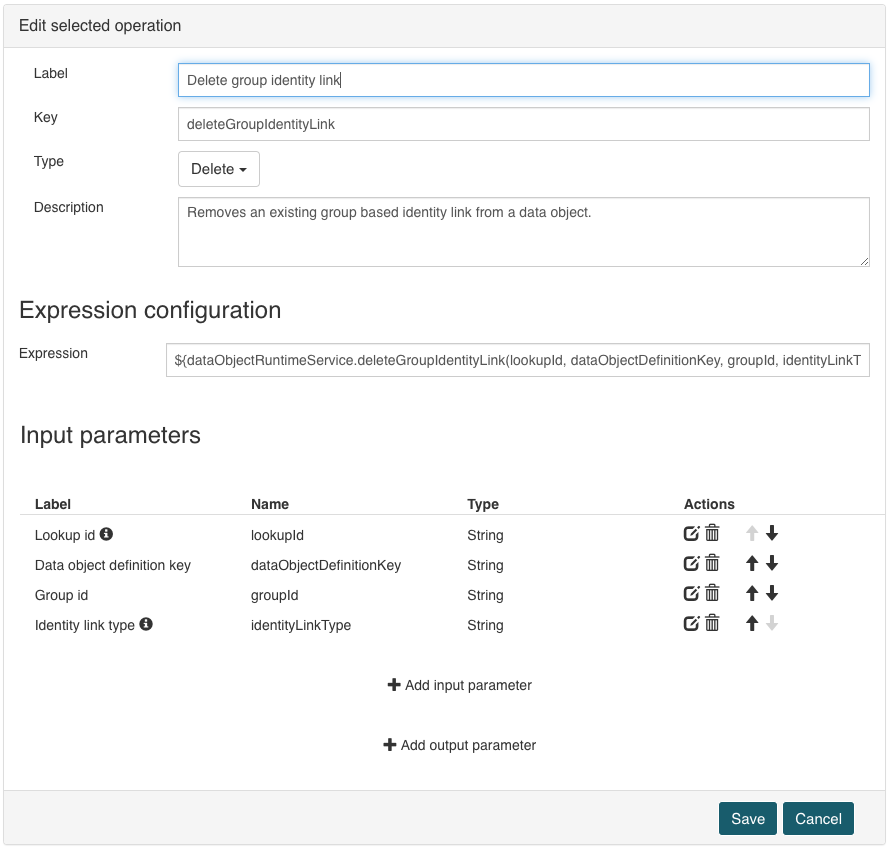
Name the new operation Delete group identity link with key deleteGroupIdentityLink and type Delete.
Set the expression to ${dataObjectRuntimeService.deleteGroupIdentityLink(lookupId, dataObjectDefinitionKey, groupId, identityLinkType)} which is using the
data object runtime service to delete a group based identity link between our data object and the selected group from the start form.
We need to define all the parameters that we used in this expression now, so add the following input parameters:
| Label | Name | Type | Required | Default value |
|---|---|---|---|---|
| Lookup id | lookupId | String | yes | - |
| Data object definition key | dataObjectDefinitionKey | String | yes | - |
| Group id | groupId | String | yes | - |
| Identity link type | identityLinkType | String | no | watcher |
We don't need any output parameters, so you can add the operation and save the service definition model and go back to our update process model.
Map the input parameters of the service task like this:
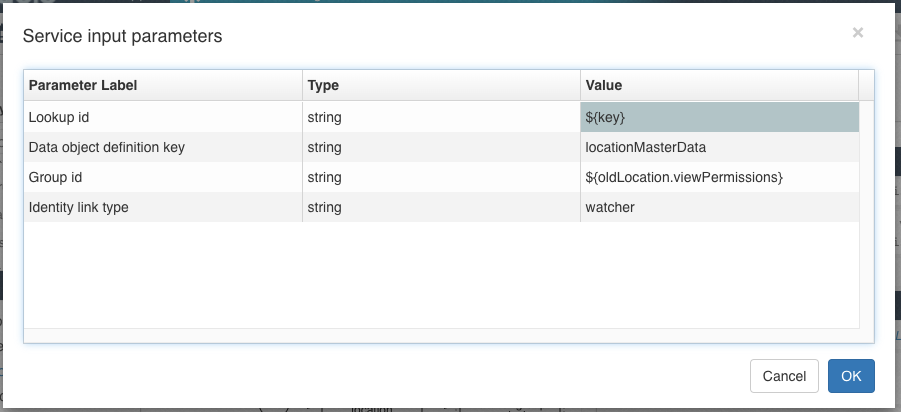
The update process should be fine now, we delete the old view permissions, update our existing location data object and then add the new view permissions.
Now we still need to add a new action button to our update form, but of course we first need an update action invoking our newly created update process.
We can go back to our app and duplicate the existing Create Location Master Data action and name it Update Location Master Data / key updateLocationMasterData.
Like before, you might need to manually add the duplicated update action to the app by using the Include an exsting model into the app action.
The bot key is the same as we want to start our update process, but we don't need a start form as we are going to send the data form our update subform along with
the action. Set the signal name to updateLocationMasterDataEntry to start the update process instead of the creation one. You can use the save icon instead
of the plus one for instance, and then we should be good to go, so save the updated action and open / go to the dashboard page form model.
Select our update subform and click the referenced form to open the Location Master Data Object Update Form. Below the subform there we add a button group
container and drop a new Action button in there, we name Update location.
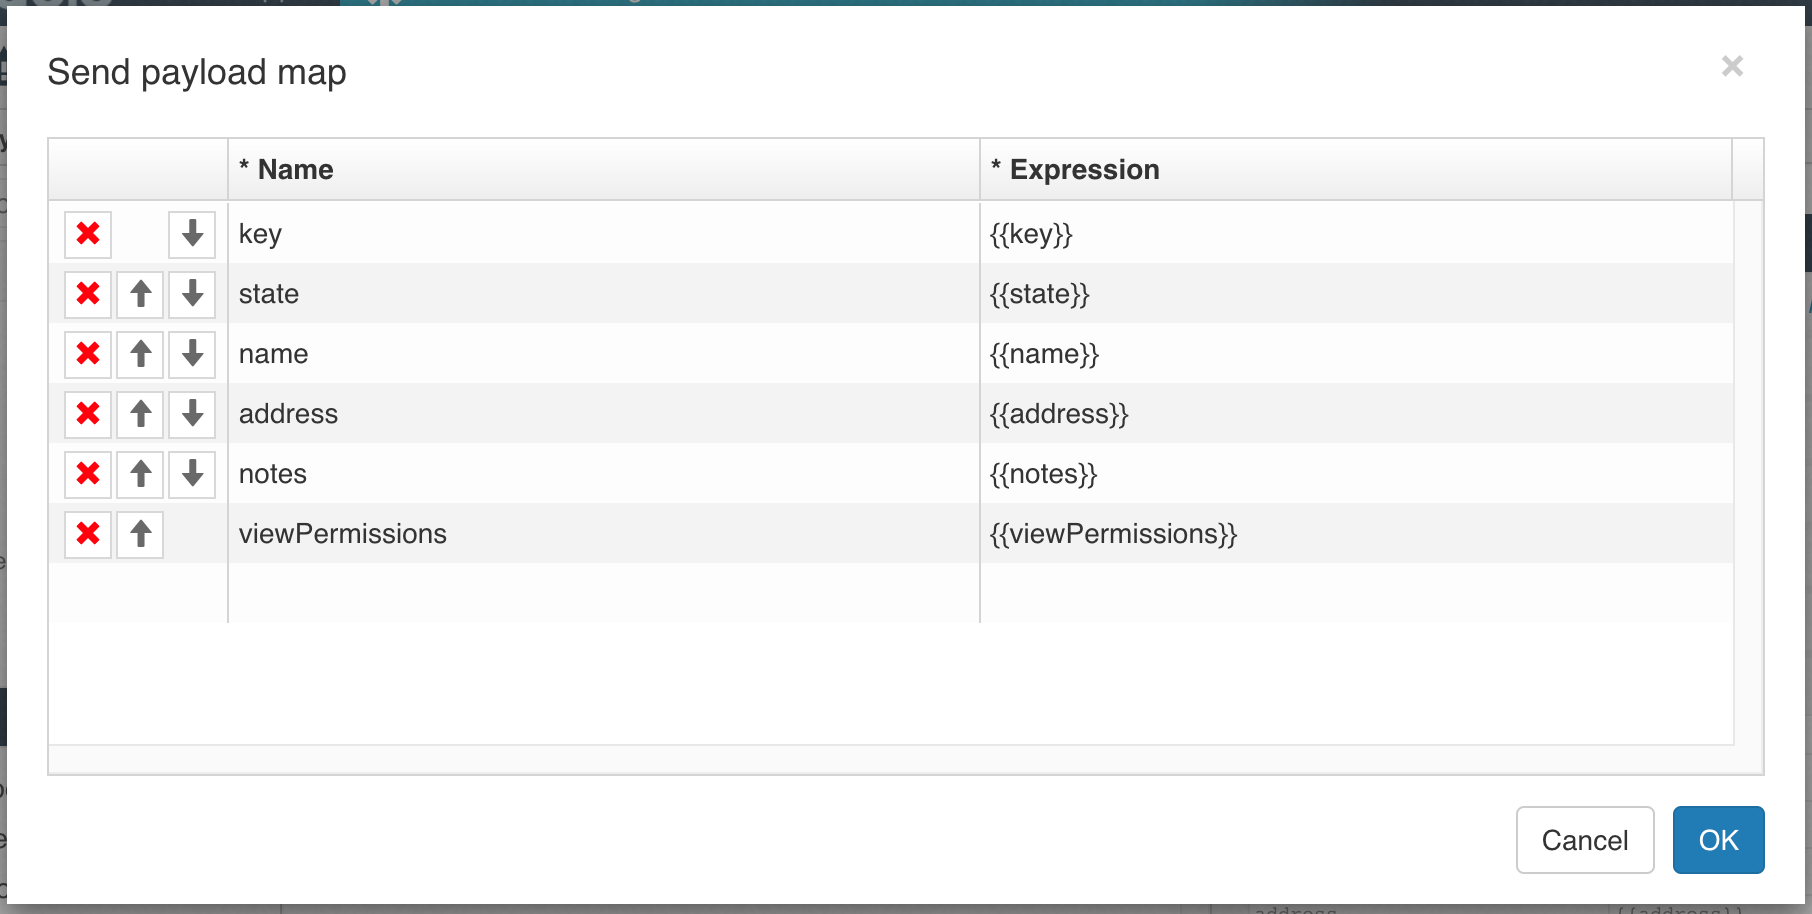
Select our Update Location Master Data action definition, uncheck the Send scope id to get definition checkbox, as we didn't scope the action and then
click the Send payload map property and add the following values in there:
We now have an action button on our main page form and one in our subform and unfortunately, both are having the same initial id given by Design because those
forms don't know each other when adding new components. We need to change the id of the one in the subform, you can give it any other id than the one we have
on our main form, so we can rename the id property from work-action1 to work-action2 as an example, otherwise we will have a clash at runtime when we
have two action buttons with the same id.
We can now redeploy, select a location from the table, change some values, even including the view permissions and then click the Update location button.
This will start our update process changing the values and view permissions of our location data object.
Our dashboard should now look something like this:
Use data object select component
As we now have created all the foundation to create and maintain master data like our locations, we also want to use and reference them in forms.
There are several ways we can use this, one is the data object select component where we can directly use our data object for a selection.
To test it out, we add a new Data Object Select component to our location management dashboard page, we might want to add a horizontal line in between to
separate it from the location table, but that is of course optional.
Name it like Select a location and set the value to {{$temp.location}} then select our data object model Location Master Data, click the Operation not configured
property and our List locations should already be preselected and the name parameter mapped to {{$searchText}}, so we can use autocompletion through the
name parameter.
Next is the format of how a location data object is rendered in the selection component. Click the Format property and click the Add button in the Name
row to add the name to the output format. Maybe we also want to include the key in brackets, click into the custom separator text input field and add ( (space
and open bracket) and click the Add button next to it to add it to the output format. Now click the Add button in the Key row to add the key into the
brackets, then change the custom separator input field to ) (closing bracket) and click Add.
The Format property should now have <Name> (<Key>) as its value. At any time you can also manually configure the format by using the Manual configuration
where you can directly edit the expression for the output format.
Once the format is set, check the Enable autocomplete property and set the Input min. length to 0, so we don't need to type in at least one character but
can simply click the select component, and we will already see a list of our locations.
When saved and redeployed, you should now see a selection below our location table and be able to select a location.
The variable $temp.location will contain the selected data object, the same way we have been using it with the selection in our location table. If we change
the value of the selection component to {{$temp.selectedLocation}}, the same value as we used in our data object table, we can now either use the table or
the selection component to select a location for editing. You can see wherever we select, the other component gets updated with the same selected location
automatically.
Part Two
Overview
In part two of this how-to we are going to make use of the state field we already have in our location data object.
We want to make sure only active locations can be used for new selections, but of course we cannot delete any existing location data object as it might be
still referenced in old data. This is where the state property comes in and instead of deleting a existing location data object, we set it to inactive in order
to not show up again for new selections but still be available for data referencing it already.
Only show active locations for selection
In our test selection on the location management dashboard, we have the opportunity to select a location. Currently, we use the listLocations operation for
the select component, the same operation we also use for the location data table where we want to be able to see and manage our master data.
But in the selection, we only want to show active locations for a new selection.
Create new search operation for active locations
First we need a new search operation we can let our select component be based on where only active locations will be returned.
Go back to our Location Master Data Source and click the Add operation button to create a new operation. Choose List active locations as the name and
listActiveLocations as the key and set the type to Search.
Add a new filter parameter and name it Name / name and filter the Name field with like, ignoring case, the same way we also filtered in the listLocations
operation.
For the state filtering, we add another filter parameter, name it State / state and filter the field State with equals. The important part here is that
we set a default value active, so when only passing in the name filter, we only return active locations. Of course, we could use the same operation to only
return active or even inactive locations, but we will just use it to return active locations for our selection.
Add a new sort field and select the Name field with ascending order for our default sort order.
Now add / save the operation and save our Location Master Data Source service.
Use new active search operation in select
Go back to our location master data management dashboard page and select our location selection component as we want to make use of our new search (list) operation.
Click the Operation configured property, and you should now be able to select the List active locations operation instead of the previous one.
You should see the same Name field still be mapped to {{$searchText}} which is used for our autocomplete functionality.
There is a new field State now available to map, you can leave it empty as we already defined our default value for it in the operation, but we could also
set it to active of course, would be the same result.
Save and deploy the app again, and we still see the same location list in our selection as of course we did not yet update a location to be inactive.
Add state property to update panel
We now want to be able to inactivate a existing location master data object.
We have a subform named Location Master Data Object Subform where we have all the location data fields available for editing. That subform is used in both,
the creation action start form and in the update subform. We only want to let the user set the state property when updating as it does not make sense to create
a new location in inactive state directly.
That's why we will add the state field to the Location Master Data Object Update Form subform, where we already have the update action button.
This way, the state can only be changed while updating the location data, not when creating it.
Add a new Select (single) component between the subform and the button group and name it State which should automatically set its value to {{state}}.
Set the selection to Required and the Data source to Static. Then click the Items property and add two entries; active and inactive. You can use
the same value for both, the Value and Text.
Save everything, redeploy and refresh our dashboard and when selecting an entry, you should now see the newly added state property, and you will be able to
change it from active to inactive and vice-versa.
Testing the active / inactive state
If you select one of your locations and change the state to inactive, update it and then reload the dashboard (as existing values are actually cached), you
will still see that inactive location in our master data list, but if you try to select it in our selection field, it will no longer show up for selection.
But how can we test, if an existing old value is still rendered in the selection? Well, if you set the value of both the table and the selection to the same value (as previously mentioned), you will be able to select the inactive one in the location data table, and it will also be selected in our selection field. And as you can see, it is working fine, an existing, selected value is still showing up, even if inactive, but you will no longer be able to select / change an inactive location.
Part Three
Overview
In this third part, we will add time-sensitivity or bi-temporality to our location master data. So far we have used the state field to mark a location as
active or inactive. This means, at that very moment when we update a location to become inactive, it will no longer be available for selection.
However, maybe this is not good enough, what if we want to be able to create a new location now, but it should become available beginning of next month? What
if we want to inactivate a location, but it is still valid until the end of the month?
That's where a valid from / to set of timestamps comes into play. If we add a valid-from and a valid-to timestamp to our master data, we can use this information when looking up values, if they are currently (now) available. We can go back in time or look into the future to see what was active a month ago or what will become active tomorrow. But in most cases, we just use now to make that selection.
Add valid from / to fields to the data object
The first thing to do is extending the existing location data object by adding our two new fields, Valid from and Valid to properties.
Open the Location Master Data data object model in Flowable Design and add two new fields to it:
Valid from/validFromas typeDate with timeValid to/validToas typeDate with time
You can move those new fields up just below our state field as they represent some metadata for our location.
We now have two more fields defined in our data object, but of course we already have created and used it before, so we need to be a bit more cautious as we are
dealing with an update to an existing data object.
Let's look at it step by step on how to make this work.
Add new fields to the database mapping and schema
Save the data object definition and navigate to the data source named Location Master Data Source and open the Database details section.
You will see our two new fields with empty column name mappings, so we add VALID_FROM and VALID_TO to those column names.
Now save it and navigate to the Location Master Data Schema which was generated for us the first time we created our location data object. As the note is
saying, we cannot re-generate it, if it was already deployed and is in use, unless you want to manually drop those tables and re-create them from scratch.
But in this tutorial, we will learn on how to create / add a new change-set to add our two new columns to it.
We have to manually add a new changeSet to the Liquibase changelog where we add the two new columns with default values:
<?xml version="1.0" encoding="UTF-8"?>
<databaseChangeLog xmlns="http://www.liquibase.org/xml/ns/dbchangelog"
                   xmlns:xsi="http://www.w3.org/2001/XMLSchema-instance"
                   xsi:schemaLocation="http://www.liquibase.org/xml/ns/dbchangelog http://www.liquibase.org/xml/ns/dbchangelog/dbchangelog-4.5.xsd"
                   logicalFilePath="locationMasterDataSchema">
    <property name="datetime.type" value="datetime2" dbms="mssql"/>
    <property name="datetime.type" value="datetime"/>
    <property name="varchar.type" value="nvarchar" dbms="mssql"/>
    <property name="varchar.type" value="varchar"/>
    <property name="serviceDefinitionReferences" value="locationMasterDataSource"/>

    <changeSet id="1" author="flowable">
        <createTable tableName="LOCATIONS">
            <column name="KEY" type="${varchar.type}(255)">
                <constraints nullable="false" primaryKey="true"/>
            </column>
            <column name="STATE" type="${varchar.type}(255)"/>
            <column name="VIEW_PERMISSIONS" type="${varchar.type}(255)"/>
            <column name="NAME" type="${varchar.type}(255)"/>
            <column name="ADDRESS" type="${varchar.type}(255)"/>
            <column name="NOTES" type="${varchar.type}(255)"/>
        </createTable>
    </changeSet>

    <changeSet id="2" author="flowable">
        <addColumn tableName="LOCATIONS">
            <column name="VALID_FROM" afterColumn="KEY" type="${datetime.type}(6)" defaultValueDate="1970-01-01T00:00:00">
	        	<constraints nullable="false"/>
	        </column>
            <column name="VALID_TO" afterColumn="VALID_FROM" type="${datetime.type}(6)" defaultValueDate="2999-12-31T23:59:59">
	            <constraints nullable="false"/>
            </column>
        </addColumn>
        <createIndex indexName="INDEX_VALID_FROM" tableName="LOCATIONS">
          	<column name="VALID_FROM"/>
      </createIndex>
      <createIndex indexName="INDEX_VALID_TO" tableName="LOCATIONS">
          	<column name="VALID_TO"/>
      </createIndex>
    </changeSet>
</databaseChangeLog>
We added the new change set with id 2 where we add the two column of type date / time. To both we add the nullable="false" constraint as we want to make sure
the valid-from / -to is always set and never null, which will help us when defining the operations to search for valid entries.
We also add a default value as we want to deploy this script to our existing table which already contains entries, so we need to define what values they will have
when we add the columns. To make sure all the existing locations will be valid, we add a very old validFrom date and a very futuristic validTo date as well.
If we expect a lot of location master data, it is a good plan to add an index to those new fields as we will use them in all queries. We can do so with the
createIndex command of Liquibase.
Please pay attention to the version of the Liquibase db changelog XML schema and use something like 4.5 or whatever Liquibase version you are currently using.
As we added the fields to our data object definition, updated the database column mapping and extended our schema script, we can now save everything and redeploy our app to make all those changes available in the runtime.
Once deployed, go to Flowable Control, open the Data Objects / Schema definitions section and select our locationMasterDataSchema script.
You can deploy it to our database with the Update database button.
If you open up our location table again, we should now see the two new column VALID_FROM and VALID_TO with the default values we set in the script:

Going back to our runtime and open / refresh the location master data management dashboard again, everything should work as before as we just added new columns with default values, but so far did not yet make use of them.
Add valid from / to fields to the list active location operation
In the existing listActiveLocations operation, we already filtered for the state property, which we can keep, but now we additionally want to filter for
the valid timestamp as well to only return active and valid entries.
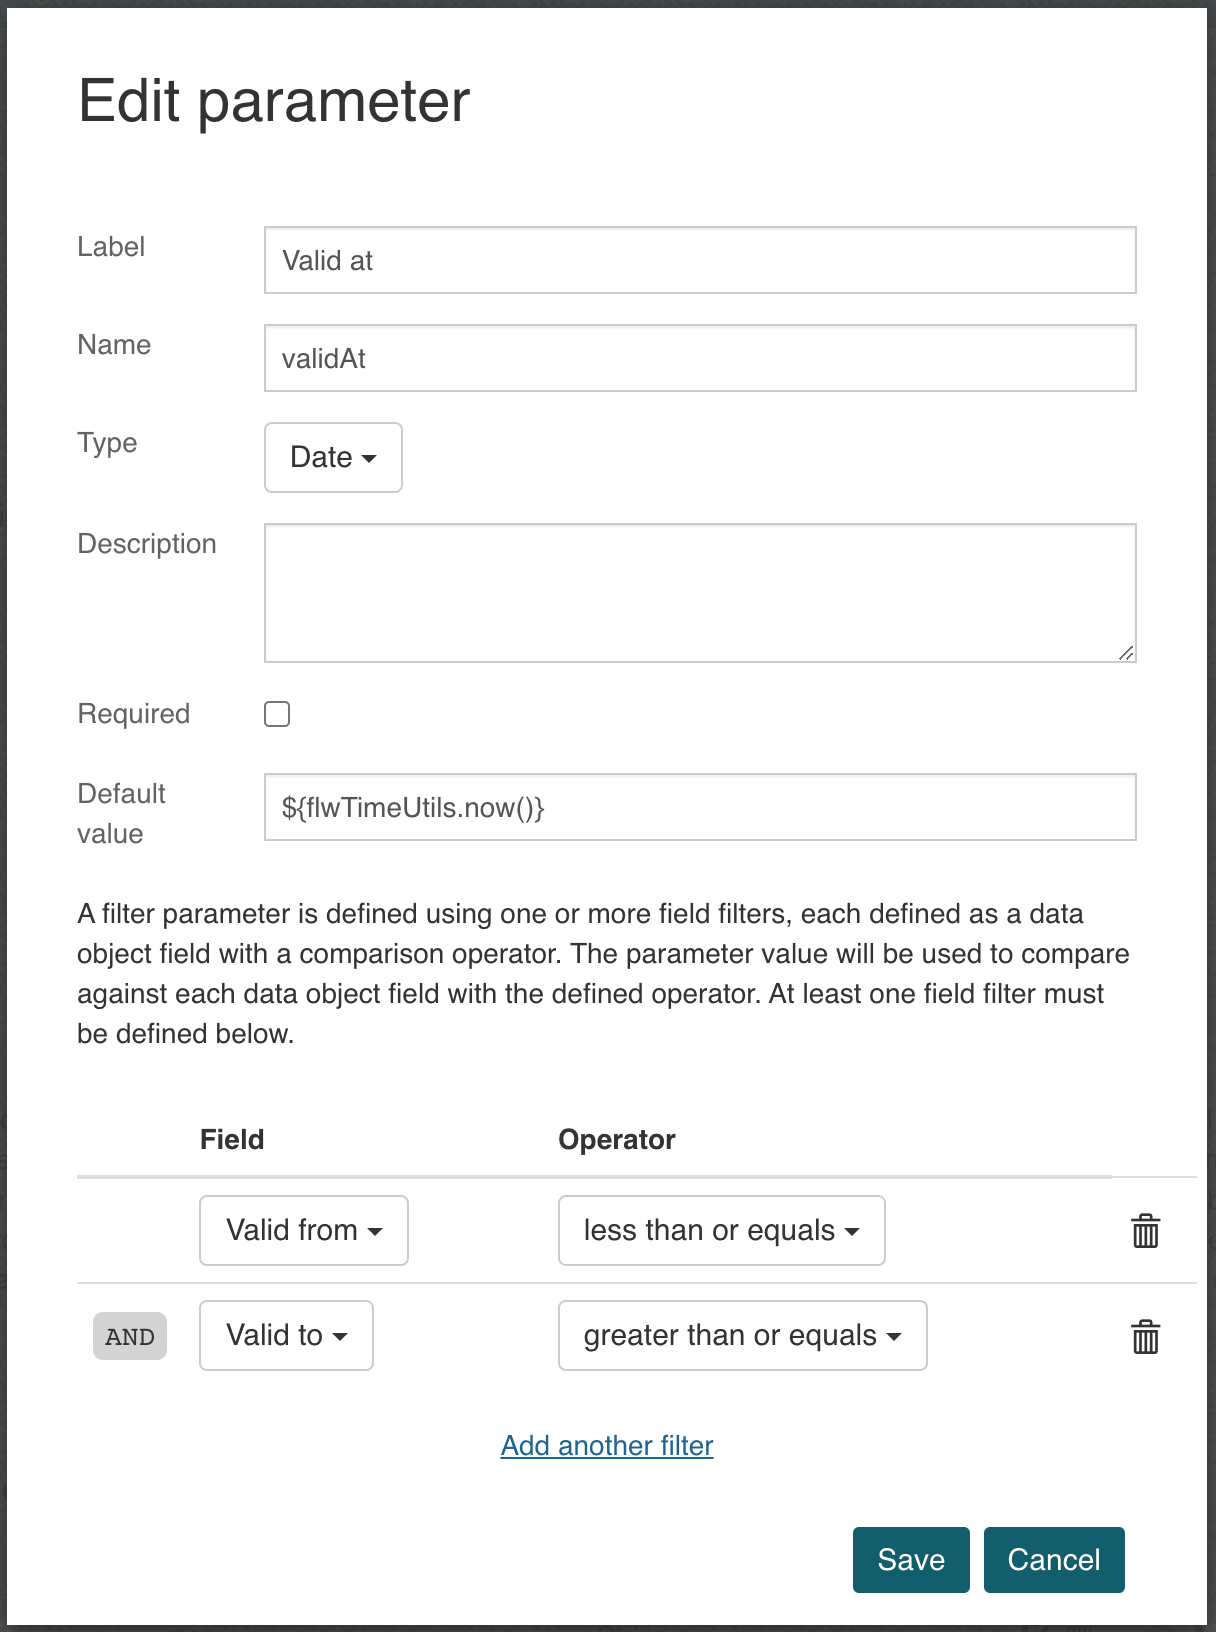
Open the operation listActiveLocations again for editing and add a new filter parameter:
- Label
Valid at - Name
validAt - Type
date - Set the default value to
${flwTimeUtils.now()}(this will use the current date and time to return valid entries for) - Add filter
Valid fromand use operatorless than or equalswhich means thevalidFromtimestamp in the location needs to be older or equal to the valid at timestamp - Add filter
Valid toand use operatorgreater than or equalswhich means thevalidTotimestamp in the location needs to be newer or equal to the valid at timestamp
We now added another filter parameter to our list operation which is using now as the default validAt parameter, but of course we could provide any date time
value to the parameter if we want to list locations at a very specific point in time.
Saving and deploying the app again and refreshing / testing the dashboard will not yet show any difference, which is exactly what we wanted for now. We introduced a new valid-from / -to mechanism but did it in a way to not break backwards compatibility.
Make valid from / to editable for locations
As a next step, we want to make use of our valid-from / -to system. First thing we need to do is making those date time fields editable.
Open the Location Master Data Object Subform subform as we want to be able to specify the those timestamps either at creation time and also when updating
a location data object.
Add a new Date component at the bottom of the form and name it Valid from which should set the value to {{validFrom}} our field name from the data object
definition. Make it required as we also set the column in the database to be required. Make sure to check the Enable time property to also allow the time
to be set, not just the date. You can choose the time interval you want, like 30 minutes.
We want to make the creation of a new location as easy as possible, so we set a default value of Relative 0 days, or you can also set it into the past, if
you want.
Add another Date component, name if Valid to / value {{validTo}} and use the same settings as above, but set the default value to Realtive + 1000 years
or something like that, just making sure our entry is valid "forever".
Add {{!key}} to the Ignored property of both date picker components as we only want to show / enable them when at least we have the key specified of our
location data object.
Wire valid from / to values from the form to the operation
So far we added our two new properties to our subform to become available in both creation and updating functionalities, which is great, but those values
also need to find their way into the create or update operation of the data object.
If you remember, we used a create and update data object service task in both our processes to create or update a data object entry. And of course in the
configuration of the service task we mapped our form-based values into the fields for the data object operation.
Those two services need to be updated of course, so let's open both the Create Location Master Data Entry and Update Location Master Data Entry process
models.
On the creation process, select the Create location service task and click the Operation configured property and you should see two more fields to be mapped.
Use ${validFrom} and ${validTo} respectively for the mappings of the new fields.
Do exactly the same for the Update location service task in the update process and save both process models.
Remember the Update location action button within the update location subform? We used an explicit payload mapping there to make sure we only send the values
with the action which are needed.
We need to add the new fields there as well, so open the Location Master Data Object Update Form form, select the Update location action button and click
the Send payload map property and add validFrom with a mapping of {{validFrom}} and validTo / {{validTo}} accordingly.
When saved and deployed again, we should now be able to update an existing location and change the valid from / to timestamps accordingly.
Add valid from / to fields to the location data table
We might also want to add our new fields to the location data table. Open the Location Master Data Management page form, select the Locations data table
and click the Columns property.
Click both the Valid from and Valid to fields and they will be added as new columns. You can arrange them how you like and also change the date / time
format if you want.
Saving, redeploying and refreshing the location master data management dashboard should now look something like this:
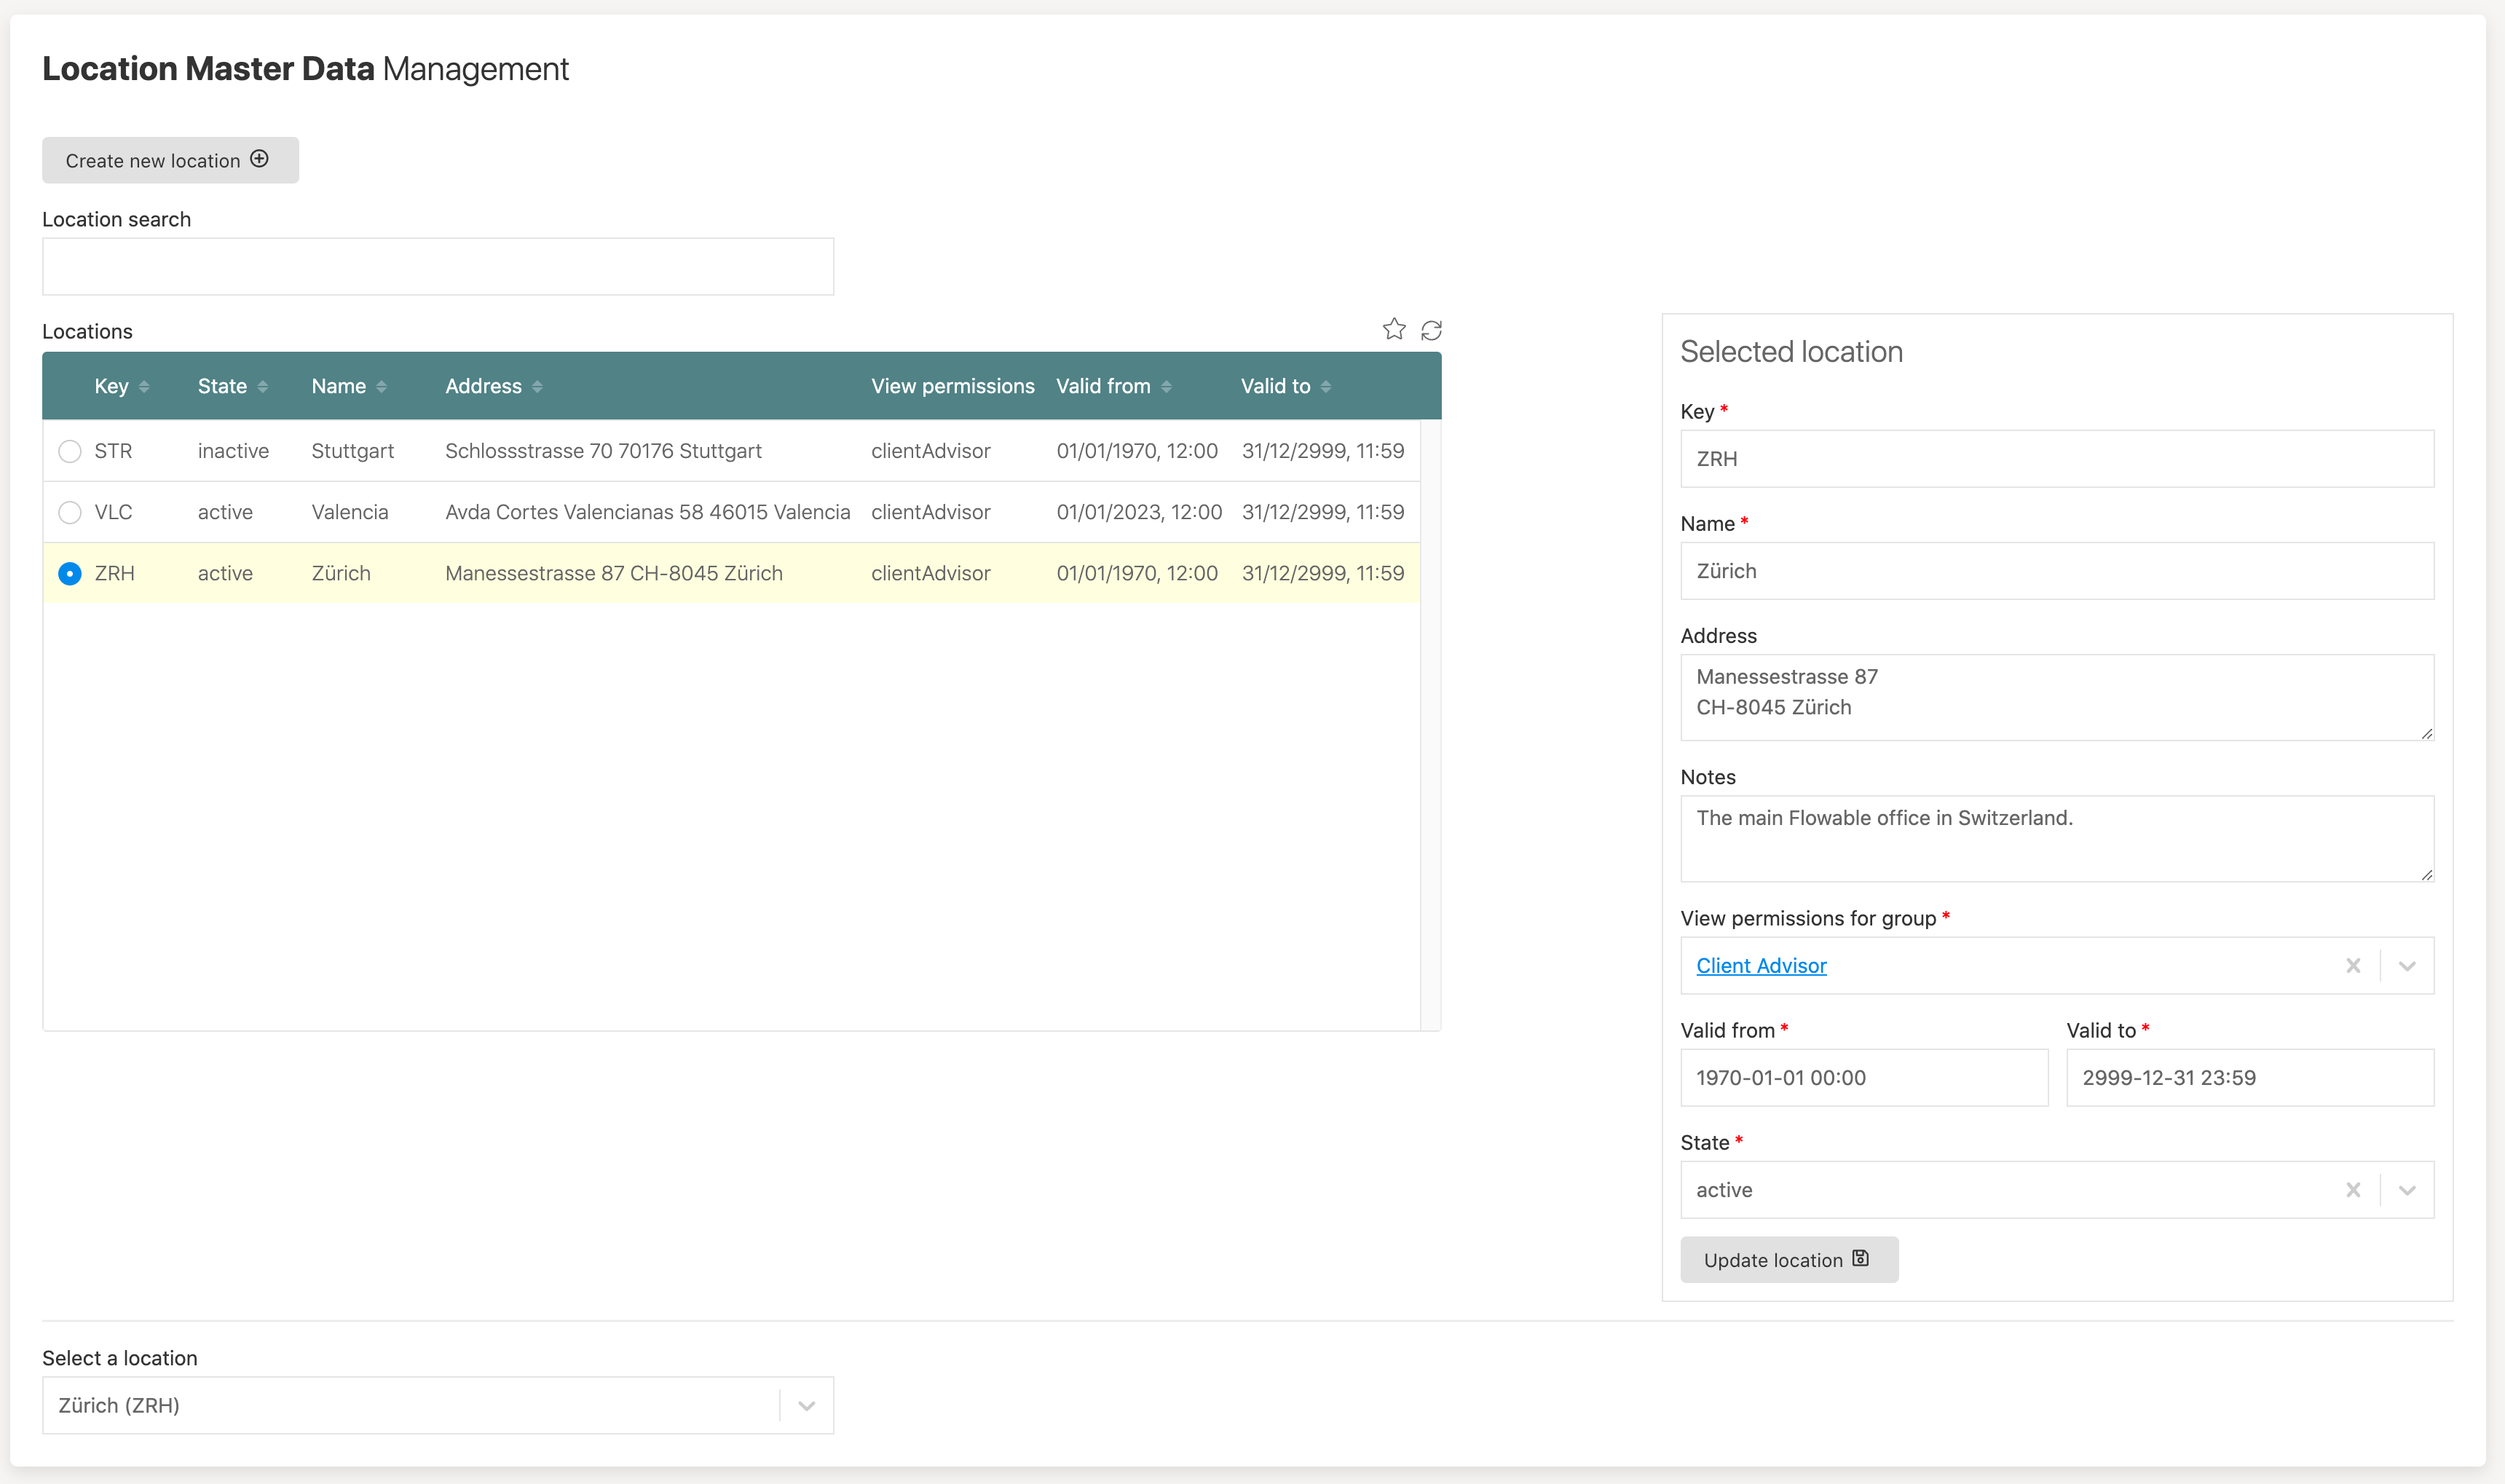
If you play with the valid from / to dates of the locations and refreshing the dashboard so the selection data gets reloaded, you should now see that we only get valid and active locations to select from.
Conclusion
The data object engine is a very powerful tool to create and manage master data even for complex scenarios with a lot of functionalities we can leverage.
You could also design a generic master data management system with data objects by creating a data object Generic Master Data and using a generic id for
referencing and lookup and type, key for a more user-friendly lookup, selections could be prefiltered by type to only return entries for a certain
master data type and of course you would most likely have a name field to be used when rendering such a master data entry.
Adding more generic fields might even give you the opportunity to add more information to master data than just key and name.
There is a decision to be made whether you want all master data specific and having the ability to add specific information like in our case the address or notes or having a very generic way of managing master data. Of course, you can also combine it and use the generic way for simple "code-value" master data and the specific way for more complex master data where you have some additional information you want to add beside just the name of a master data entry.