How it was all put together
Extending the models in the app
Up until now, you’ve been experiencing Flowable very much from the perspective of someone working on cases and processes. In this section we’ll start to expose how it was all put together. There is a lot that could be potentially covered, so again we’ll keep it reasonably straightforward to follow. There is other detailed documentation on modeling.
Importing the loan app models
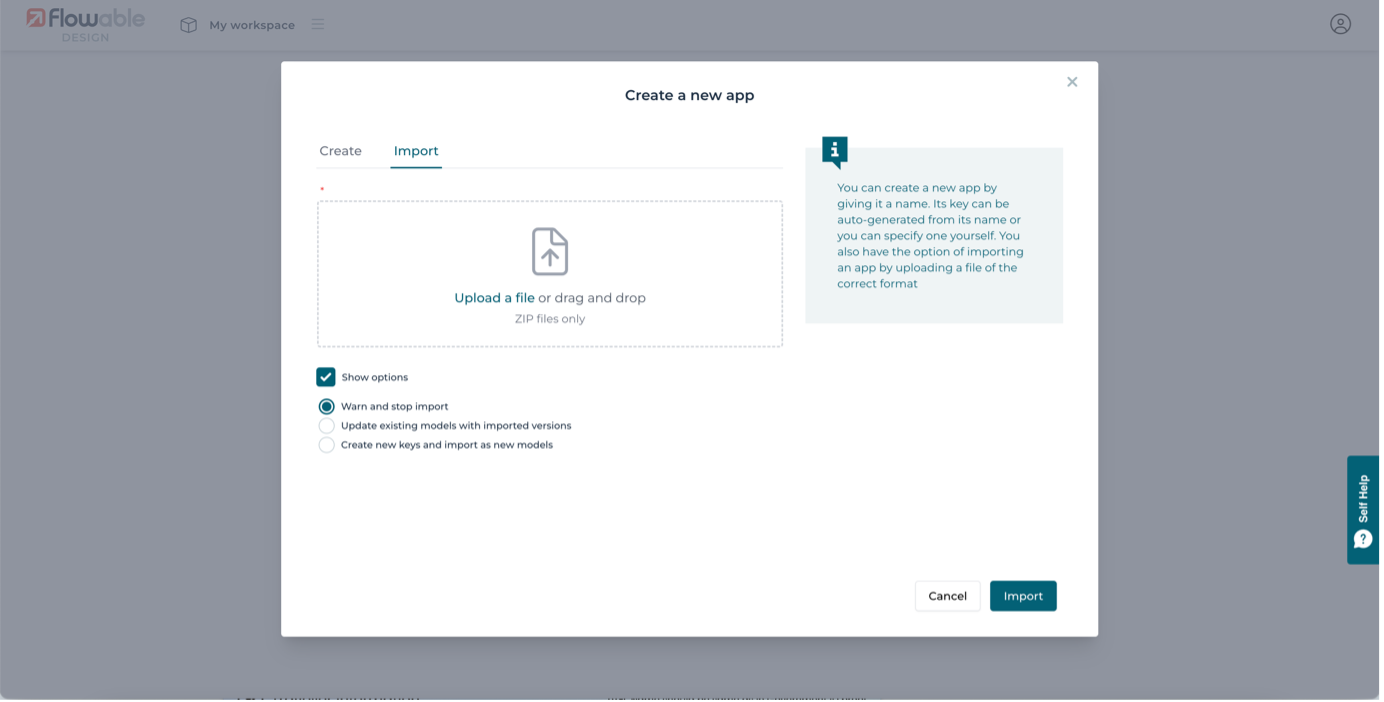
Flowable Design (Cloud Edition) is the application where all the app models are created and managed. Sign in to Flowable Cloud Account with your credentials and access Flowable Design from there. Once you land on the My workspace page of Flowable Design, you will have an option to either create a new app or import an existing one. In the Import section, you can Upload LoanApp.zip that you downloaded earlier.
If you haven't already downloaded the loan demo app, get it from here.
Adding a new process to the case
There’s a lot of information and options here, and you can adjust views as per your requirement.
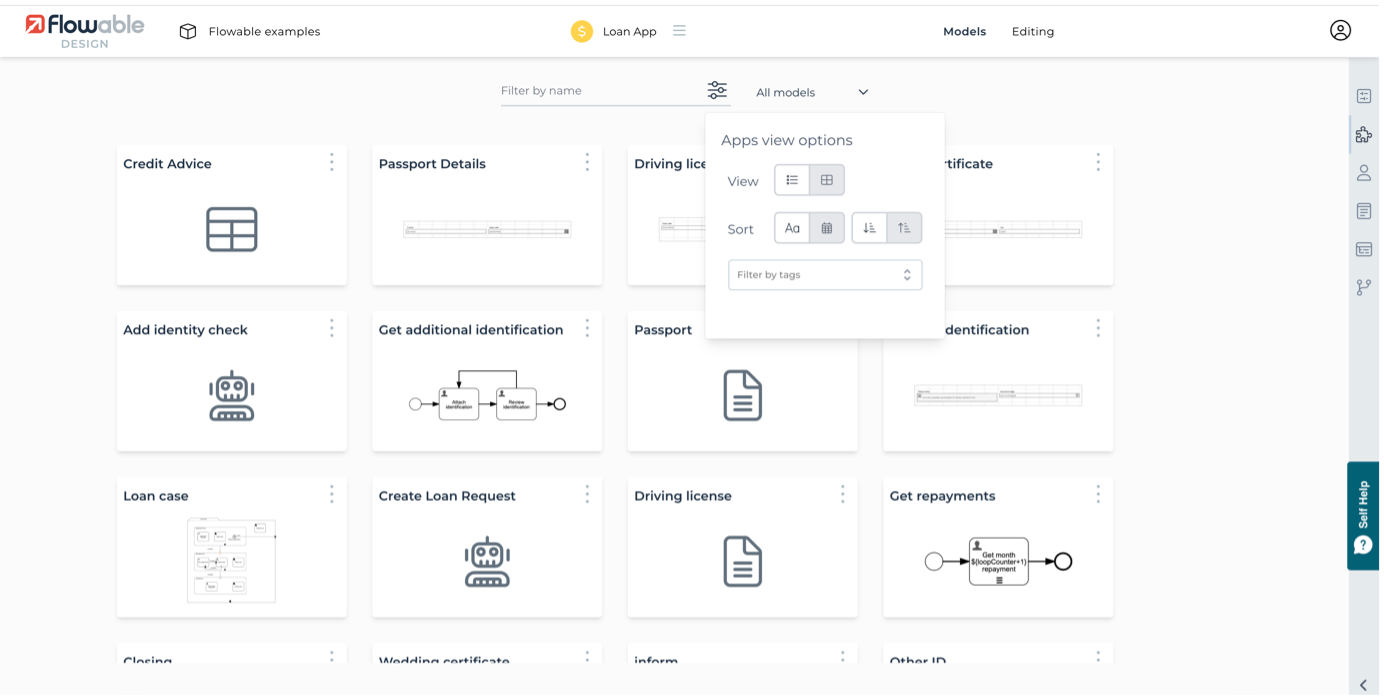
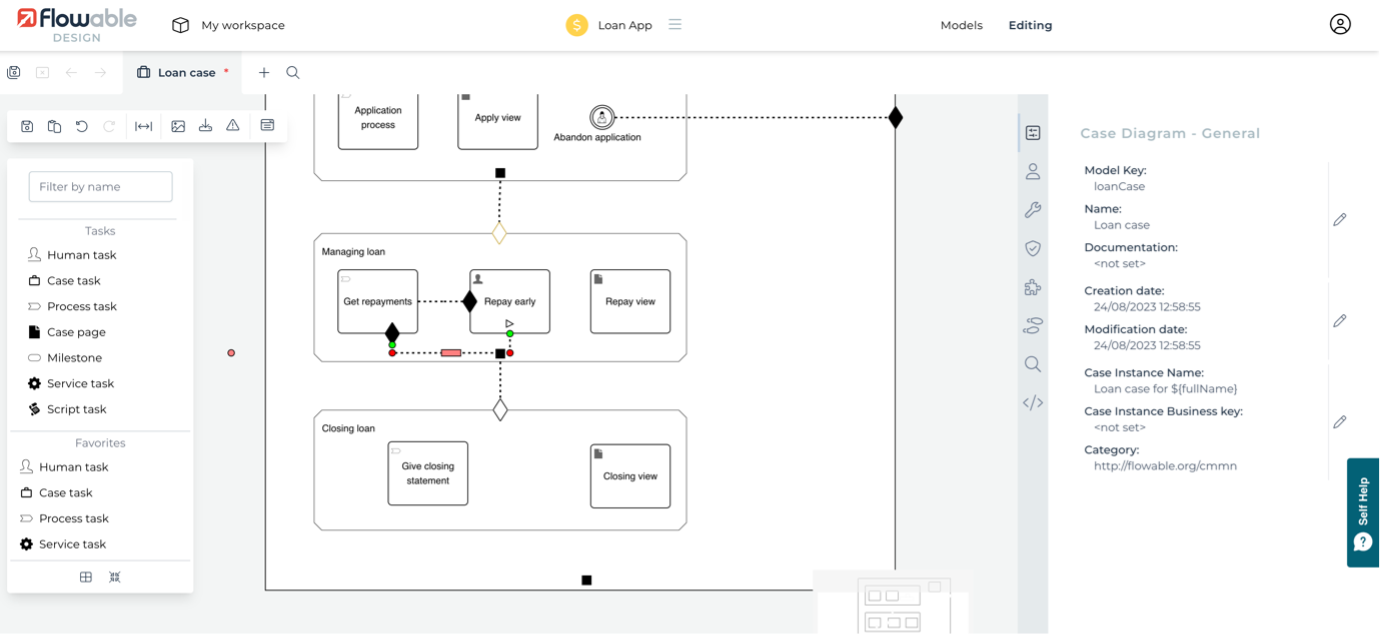
What we’re going to do is change part of the case (CMMN) model and substitute the task in the final stage with a simple process (BPMN) that you’ll create yourself. Once in edit, the main central area is the model canvas where you can select and add new elements to a model. This is the visual representation of the CMMN model for the Loan case, with a case plan containing three stages, linked by entry criteria. You’ll also see the shape palette on the left-hand side, which shows the case elements that can be dragged onto the canvas. The right-hand side shows all the attributes for the currently selected element. Initially, that’s the attributes for the overall case plan.

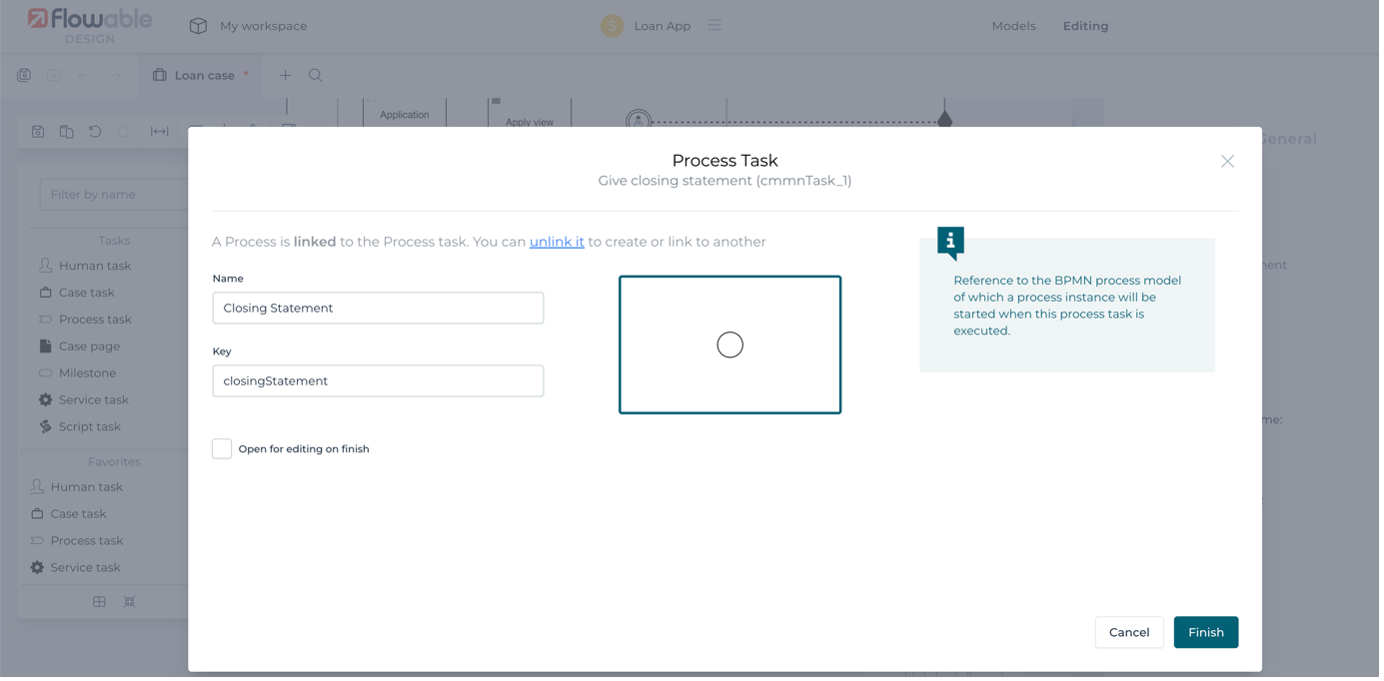
To modify the Give closing statement human task and make it a process task, you could delete it and then drag and drop a process task from the palette.
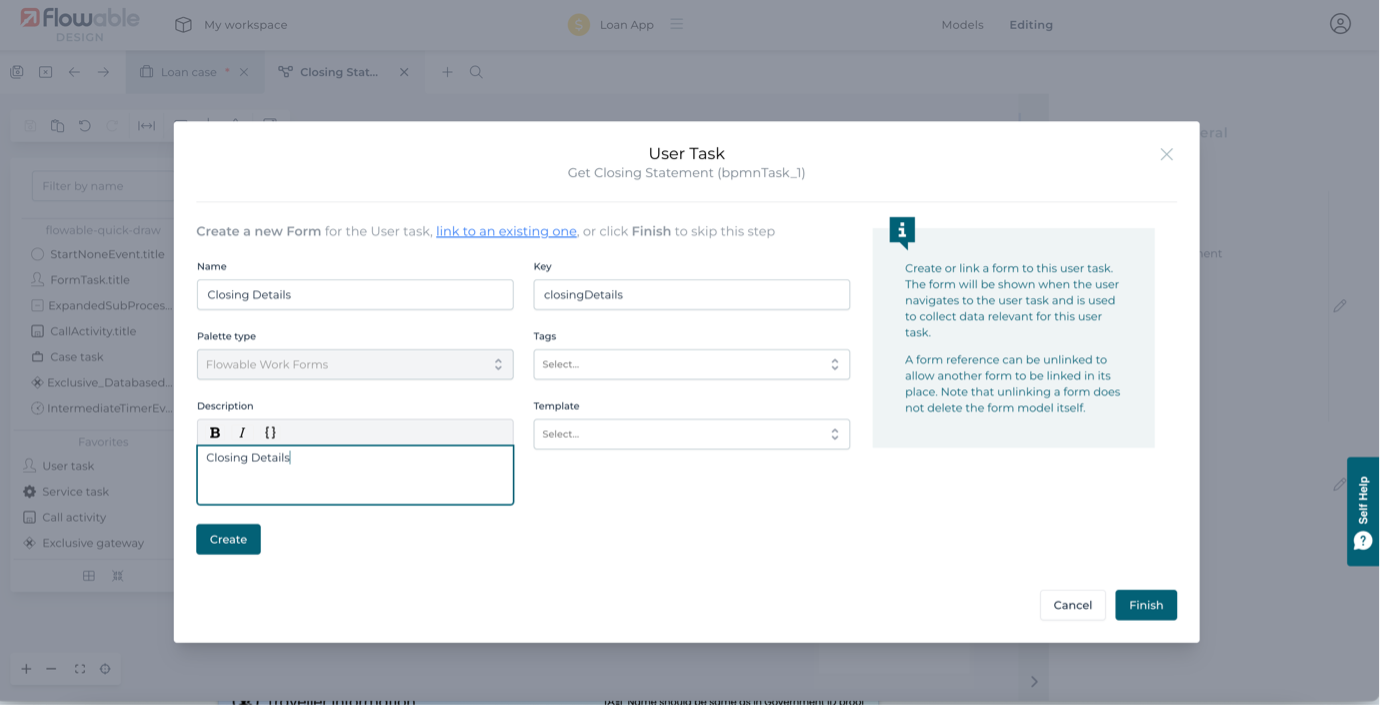
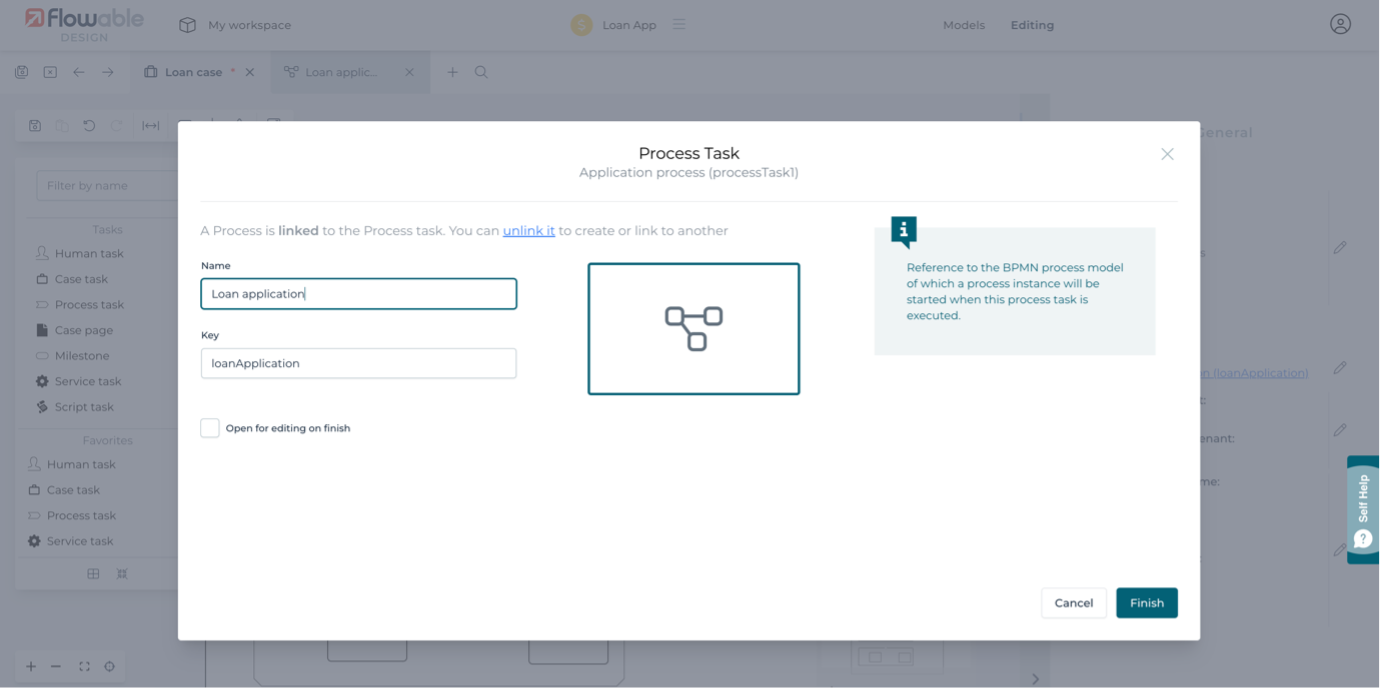
You will now have a process task named Give closing statement but it will be needing a process to reference. We’re going to create a new process (we could have picked an existing process if already modeled). Select the Subprocess ref. attribute of the process task in the right-hand panel. Click on the edit button under the Process header.

You should be able to see the pop-up window to enter the Process Task. On this page, you should enter the name of the process task and the key is generated automatically. Then click the Create button and only then continue with the Finish button.

Once entered, you should be able to enter the canvas of Flowable Design to model the process.
To build a model, you can always drag elements from the palette. It can be quicker to build from the existing elements on the canvas. Click on the start event and from the context menu that appears you can select the person icon.

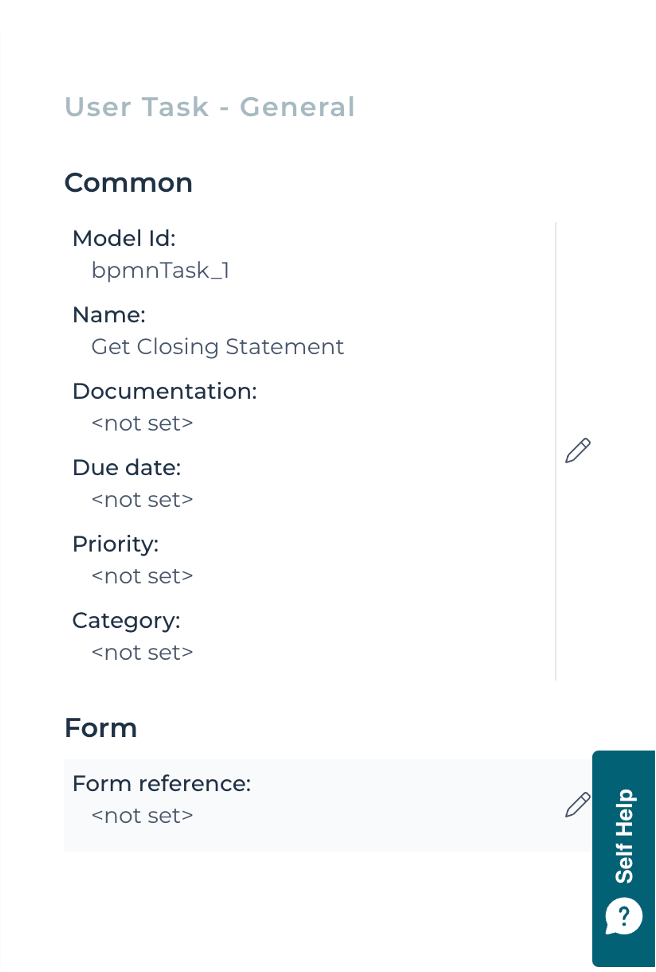
Select the User Task from the drop down. Just type a new name Get closing information and press enter.
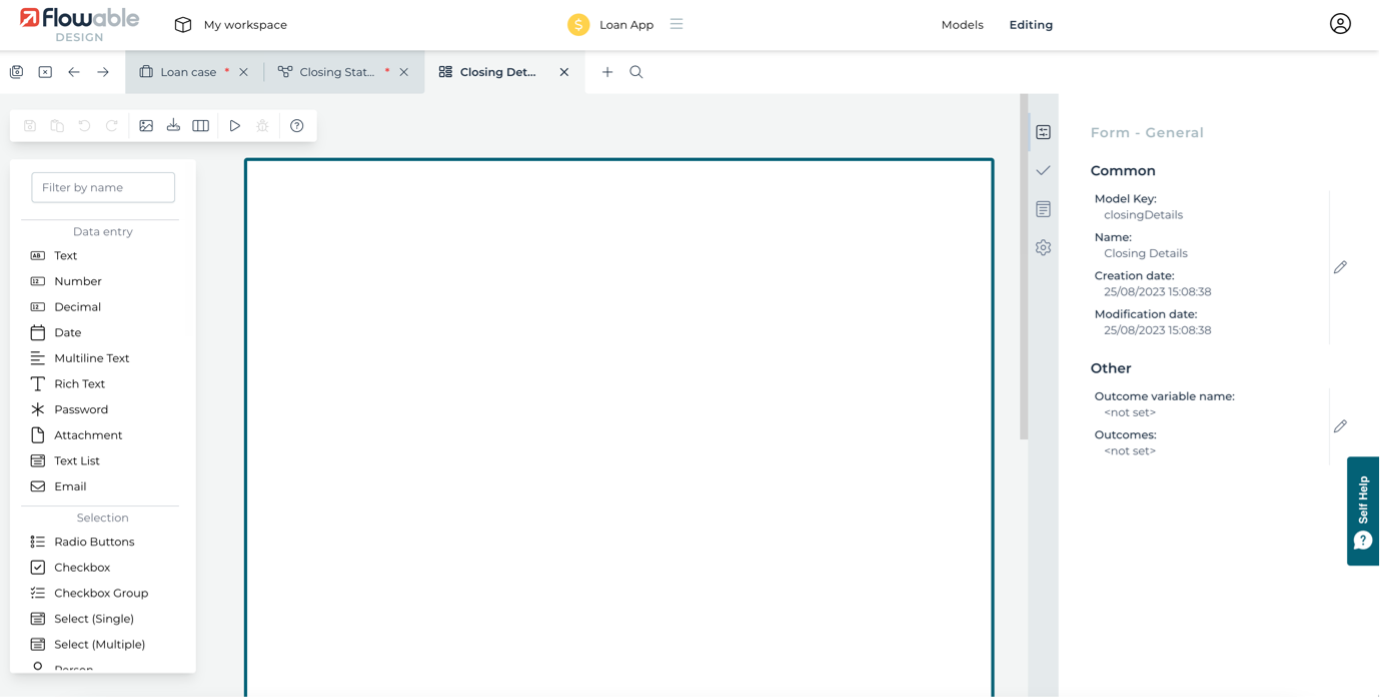
Its context menu will still be visible, so now select the circle icon to add a closing event. You’ll now have a single step process with start and end events. It might be a good idea to save the edits made so far. In the toolbar at the top, click the Save all button (double disk icon) to save all the opened models. It’s worth doing that every now and then. We want to collect some information in this task, so we need to add a form to the task. On the right-hand side, you should be able to see the header Form Reference. Click on the edit icon and name the new form Closing details.
Click on the Create button before clicking on the Finish button.
You’ll now see the form palette with all the different controls that you can add to a form, from simple data collection to rich tab, accordion and wizard components.
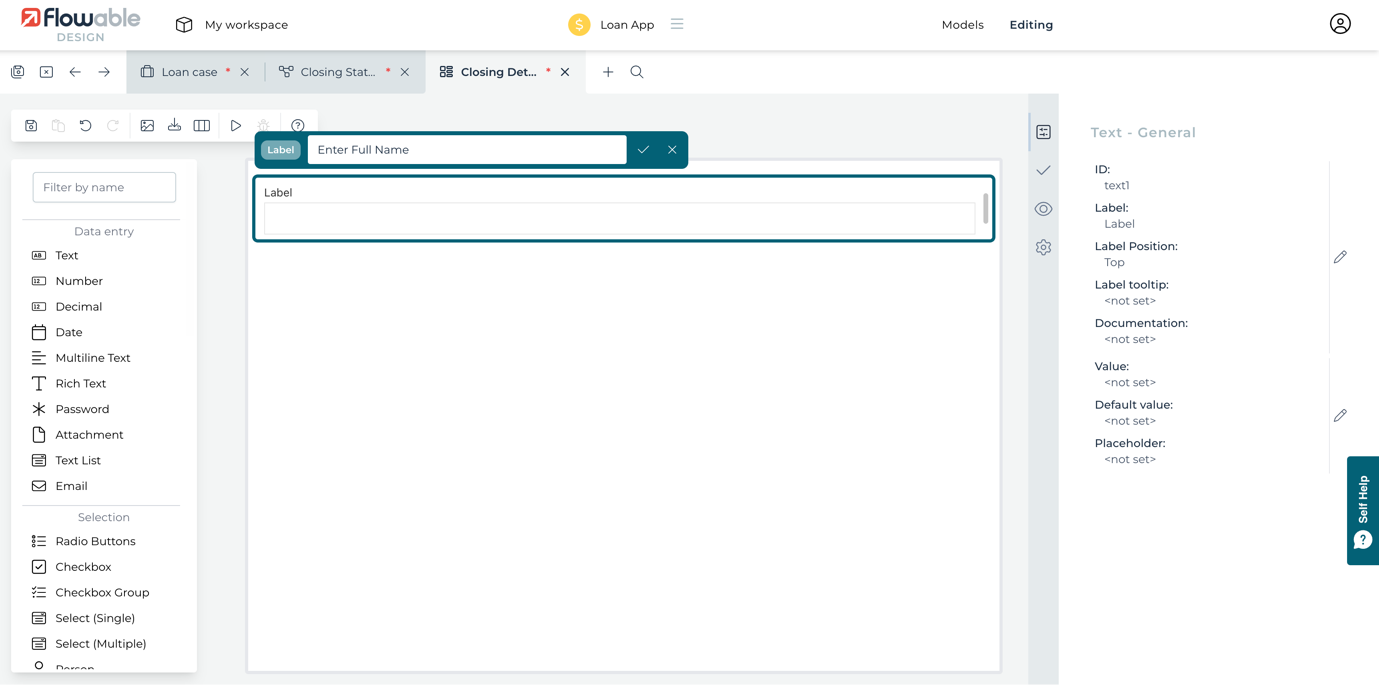
Drag a Text control from the palette and drop it onto the form. Its label will be highlighted for editing.

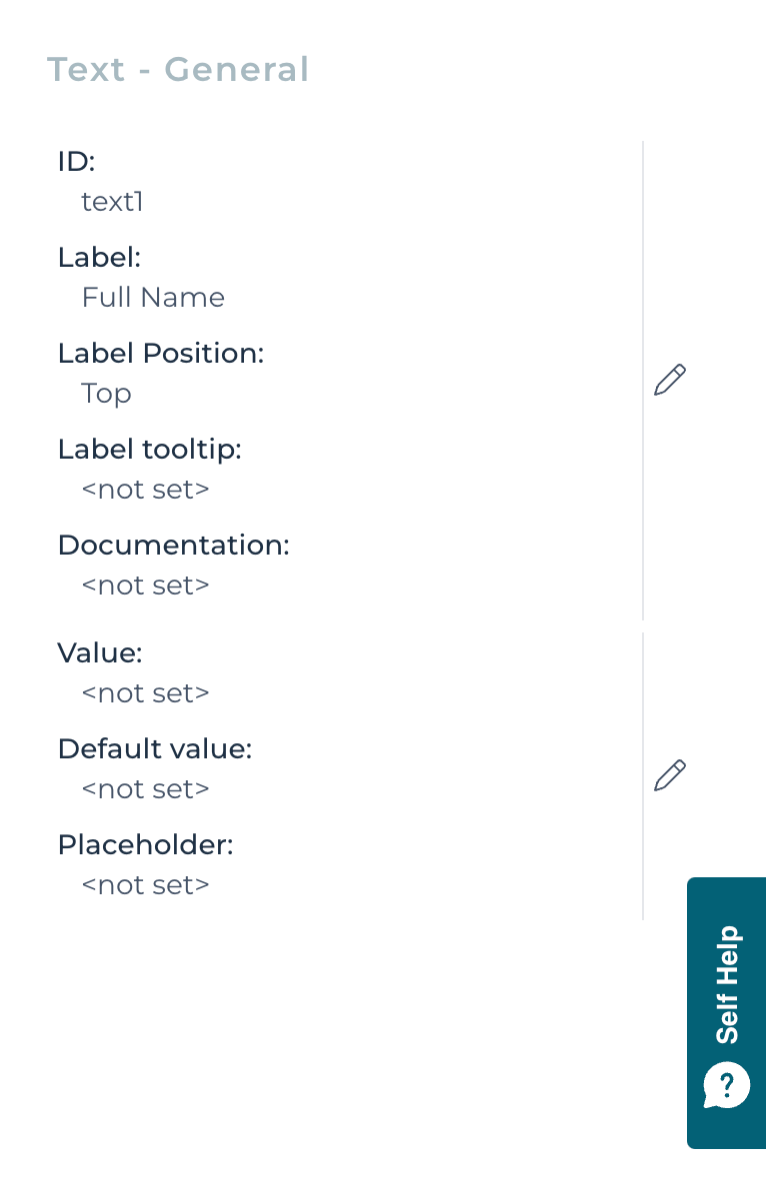
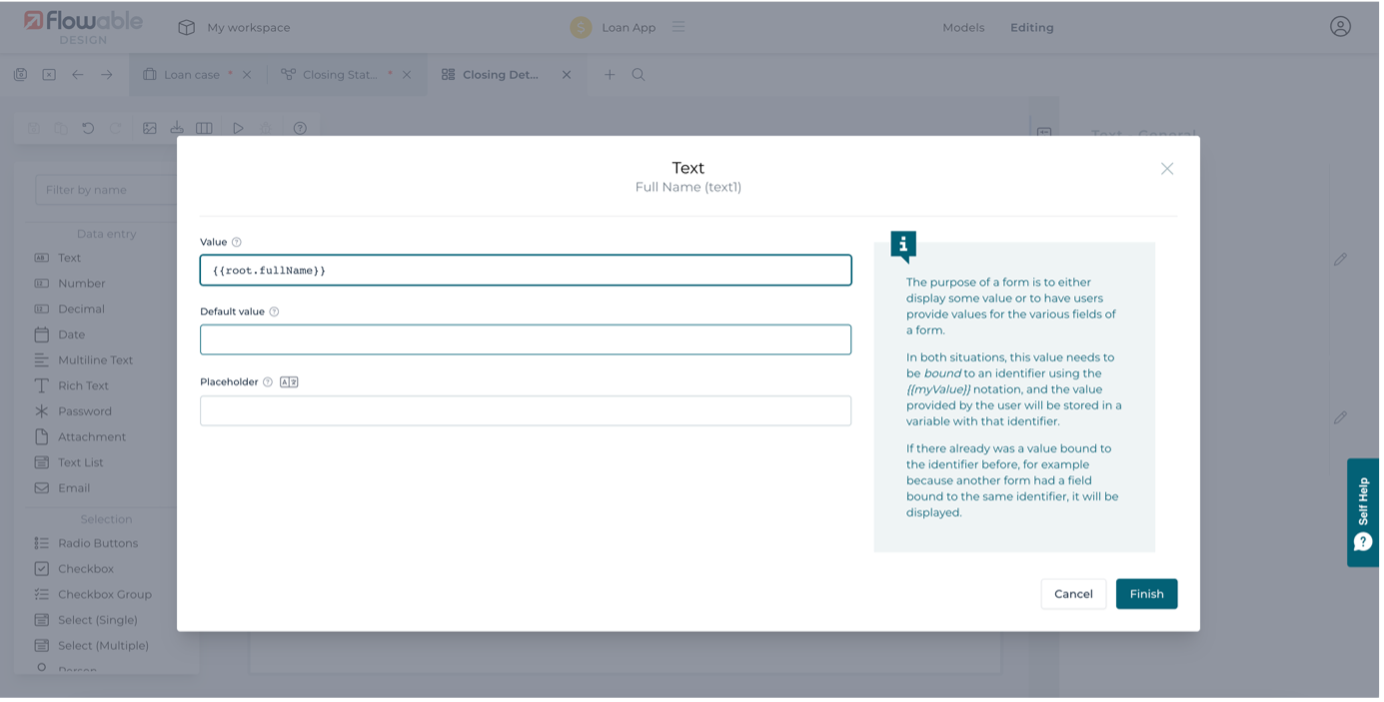
Type Full name and press enter to set the label. A default variable name for holding its value is generated based on the label.
In this case, we want to use the name that was given when a case is created (there’s a Start form on the case plan with a field for the name). You can change the value in its attribute in the right-hand panel by inserting {{root.fullName}}by clicking on edit button on value. This means the form will use a variable that’s defined in its root, the top-most case or process of which the form is part.
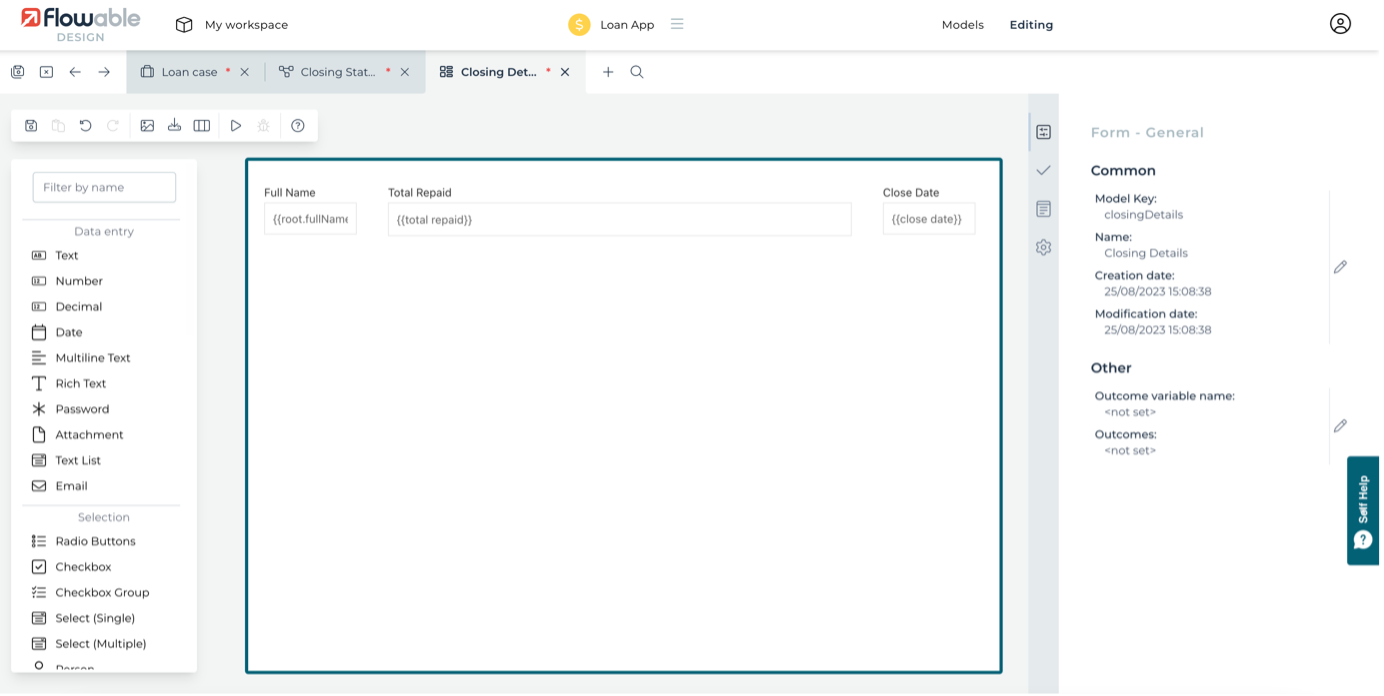
Next add a Date field to the right of the Full name field. You’ll see the text field shrinks to make room for the new field. Name this Close date and leave the default variable name.
Then add a Number field between the two current fields and name it Total repaid. Again, you’ll see the existing fields adjust their size to make room for the new field.

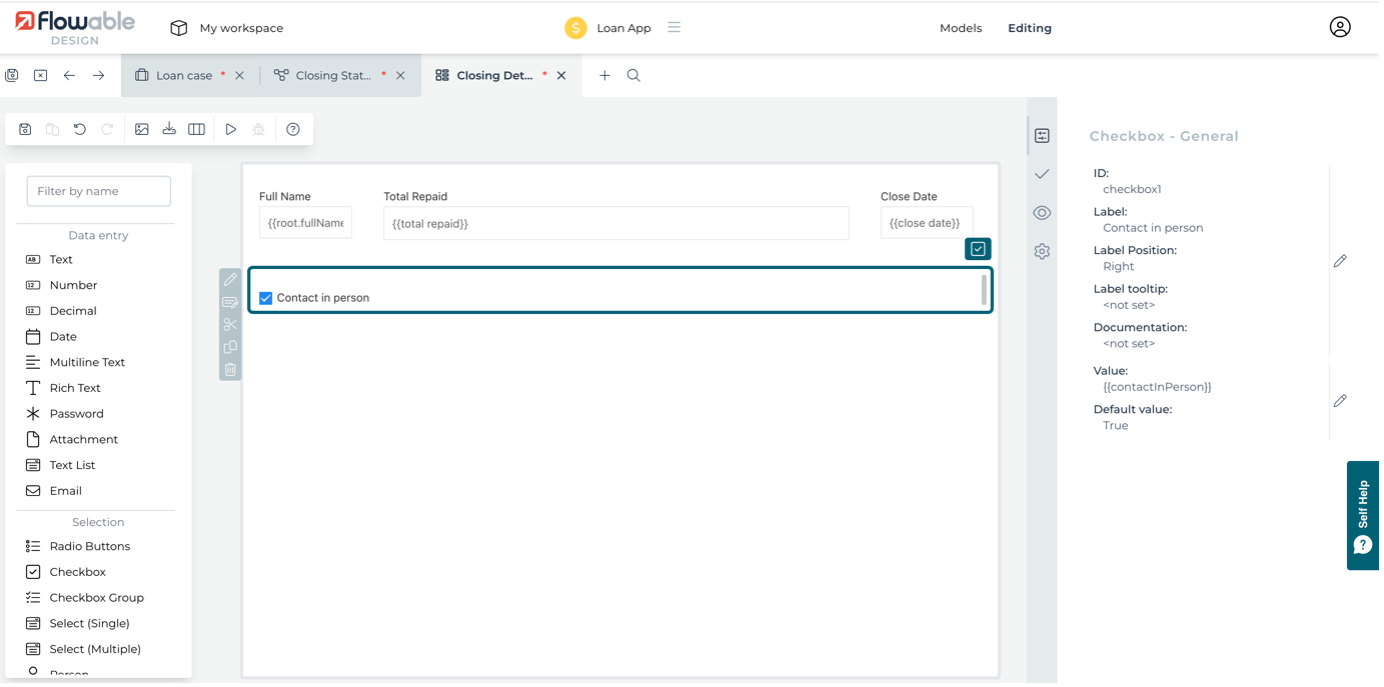
Now drag a Checkbox field below the Full name one. Name it Contact in person and leave the default generated variable name.
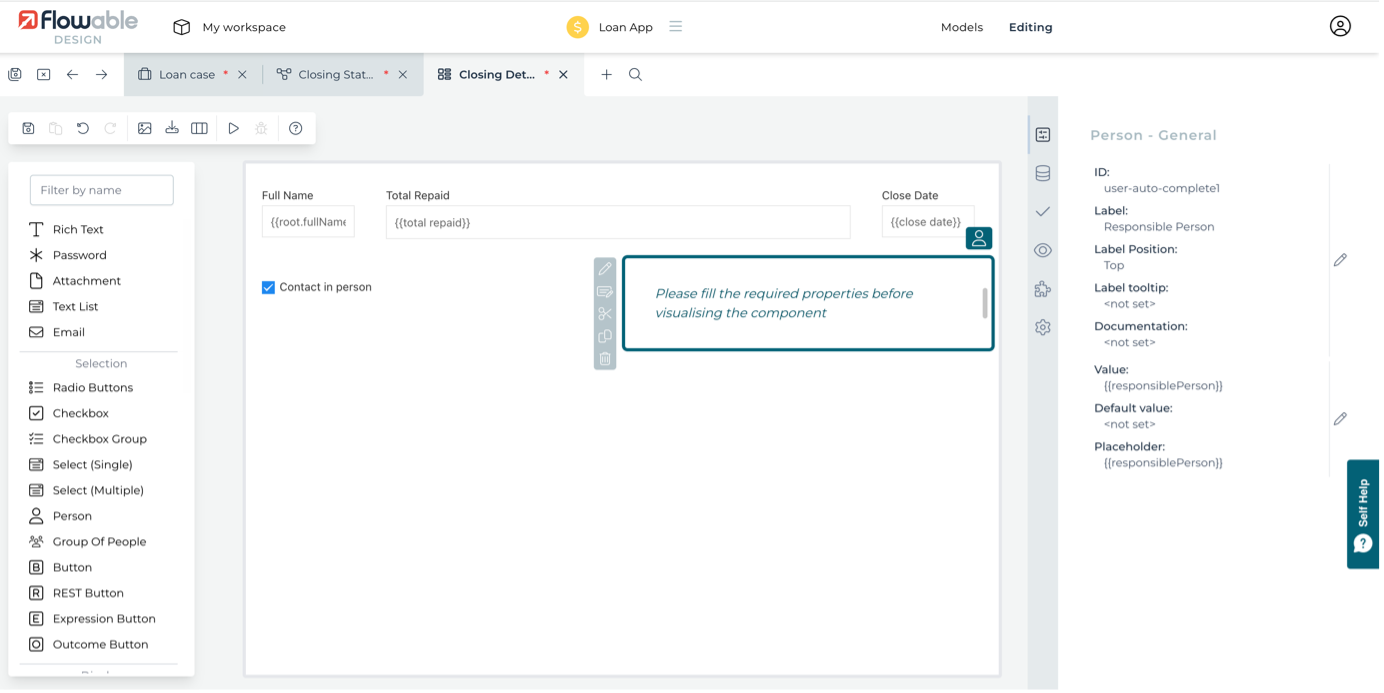
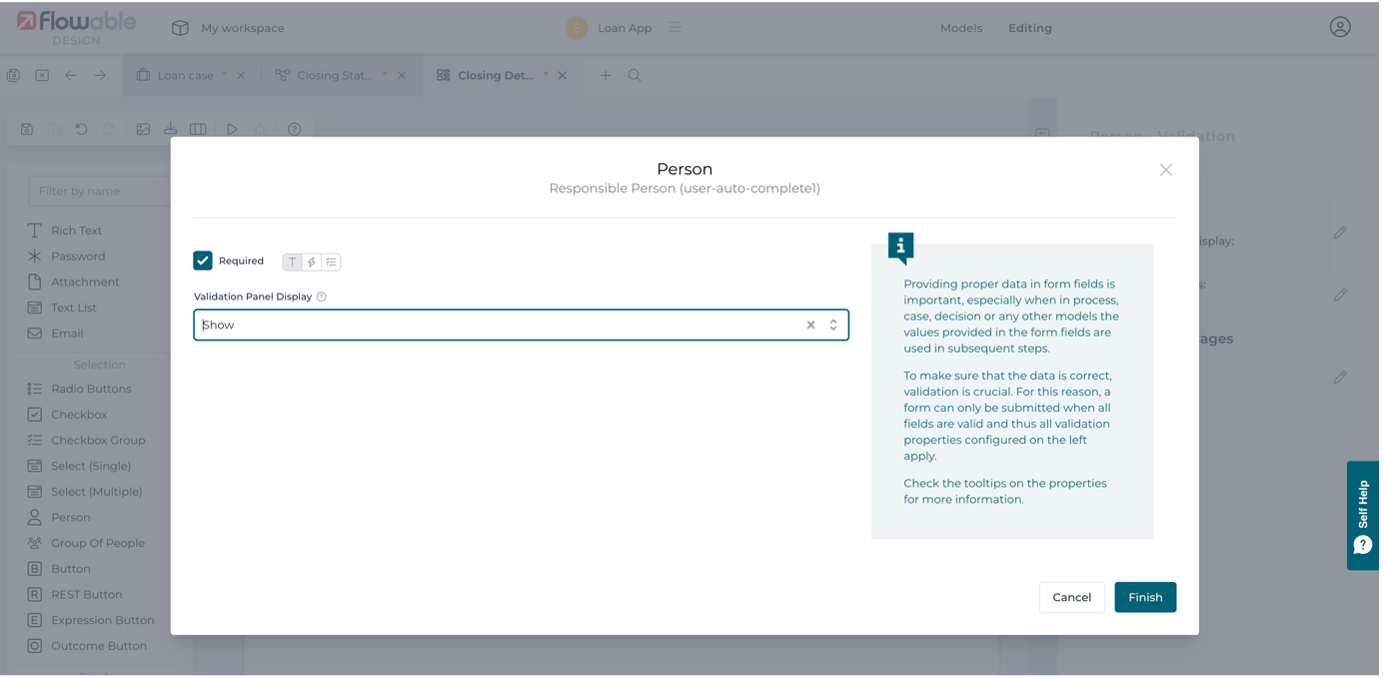
The final field we’re going to add is one for selecting users. Drag a Person field to the right of the Contact in person field, naming it Responsible person, also leaving the default variable name.
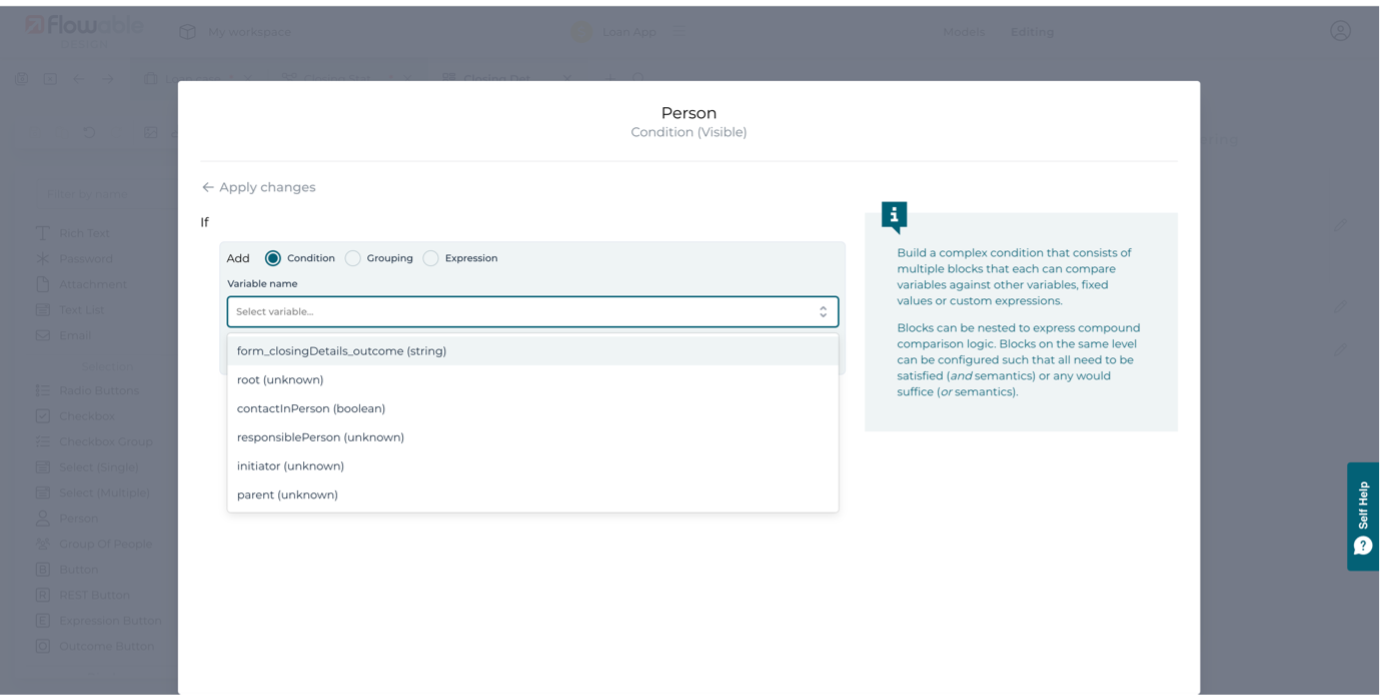
We only want to show the person field when the checkbox has been selected, so we need to define some dynamic behavior for it. Click on the Responsible person field and then on its Eye icon on the right hand side panel. Then click on the edit icon located on the right hand top.
 Once inside, click on the lightning symbol under Visible.
Once you are on the above screen, click on the condition builder icon, which is the third option in the list.

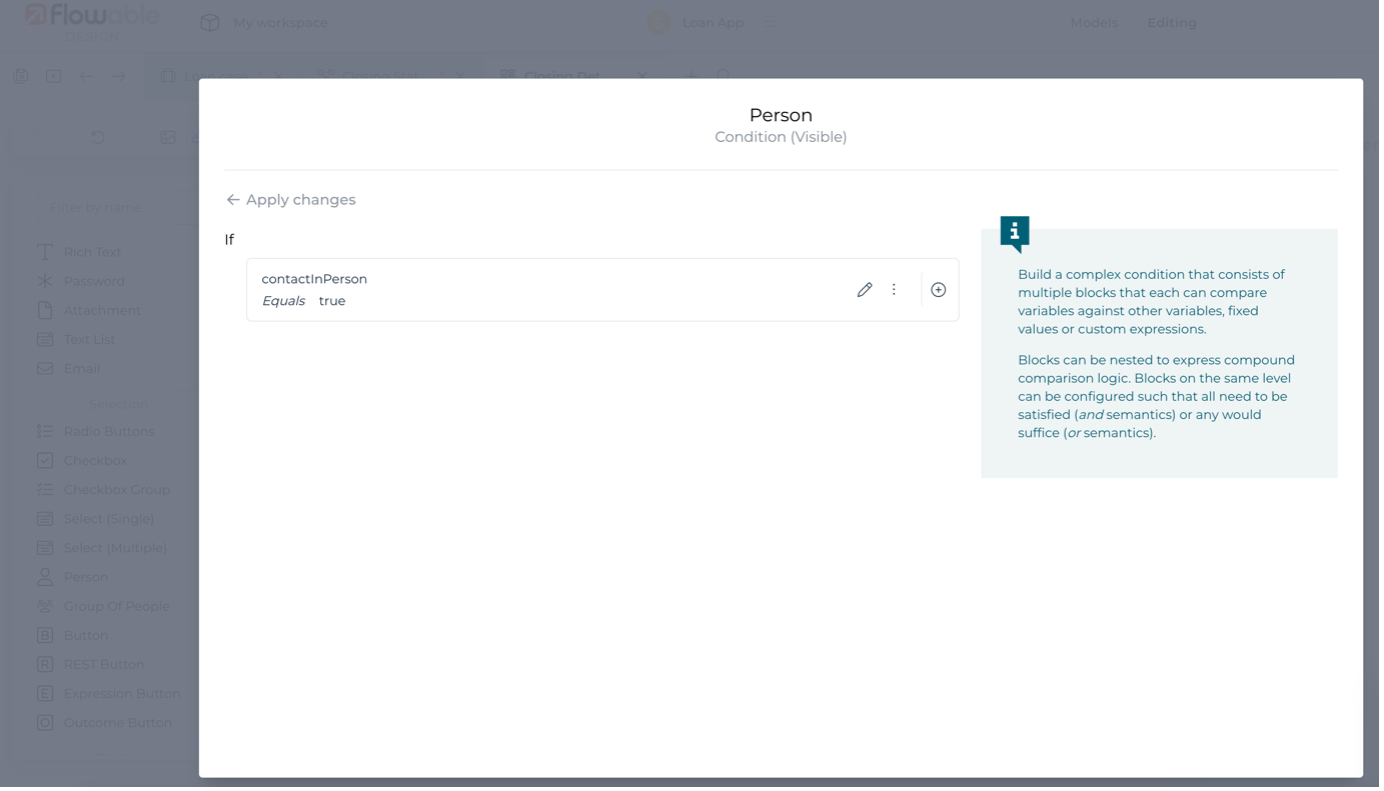
We want to test if the checkbox has been selected, that is, when its variable is set to true. Leave the test operator part of the condition as equals and click on the value to set it to true.
If the person field is displayed, we also need it to be a mandatory field, so the user is forced to fill it. Select the Responsible person field and follow the same steps to add the same condition on the Required attribute.
We’ve finished with the form, so make sure it’s saved and switch editor tab back to the Closing statement process model.
Next, we need to add another task to inform the customer. Simply drag the end event item and add another user task in between the first task and the end event.
We only want to run the Inform customer task if we need to contact the customer in person. We need to add an extra path to the exit event that bypasses the task if necessary. To do this we’ll need an exclusive gateway added. Expand the connectors either side of the Inform customer task if needed and drag and drop two gateways on the expanded connectors.
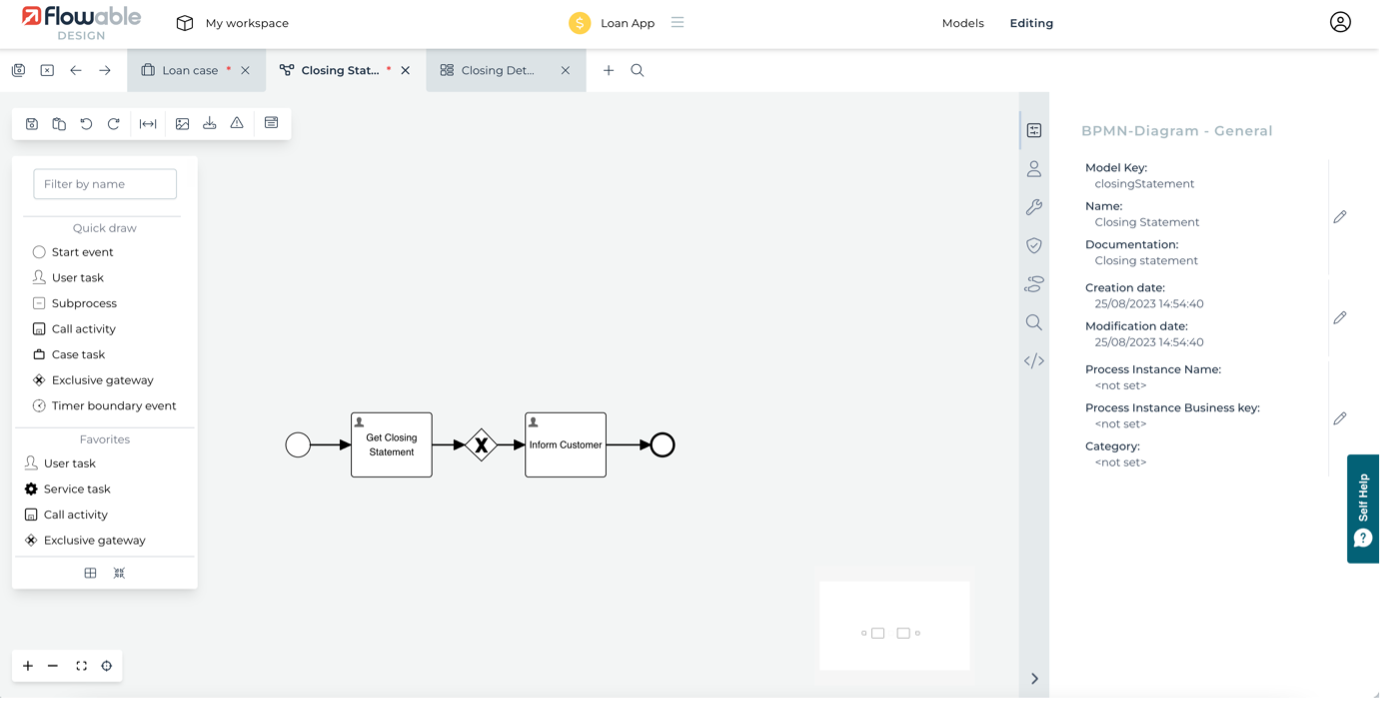
Now drag the Inform customer task downwards and the connectors will bend to keep the connectors clear. This doesn’t always give the best layout, so you can hover over a connector and any elbows will be highlighted with a red dot.
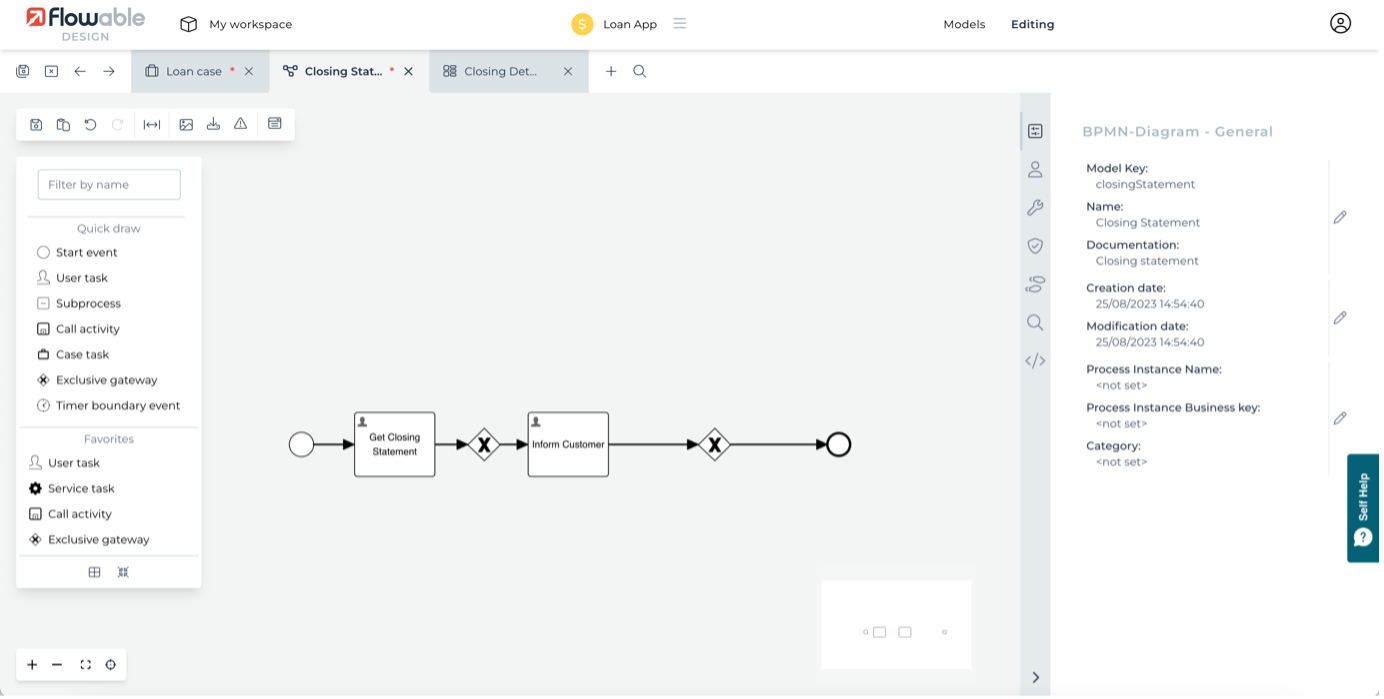
We need to add a new connection that bypasses the Inform customer task, so select the gateway on the left to show its context menu. Click and drag the connector edge icon (double arrows) to connect the first gateway directly to the second gateway. This now gives a path that allows a flow to go directly from the first task to the exit event.
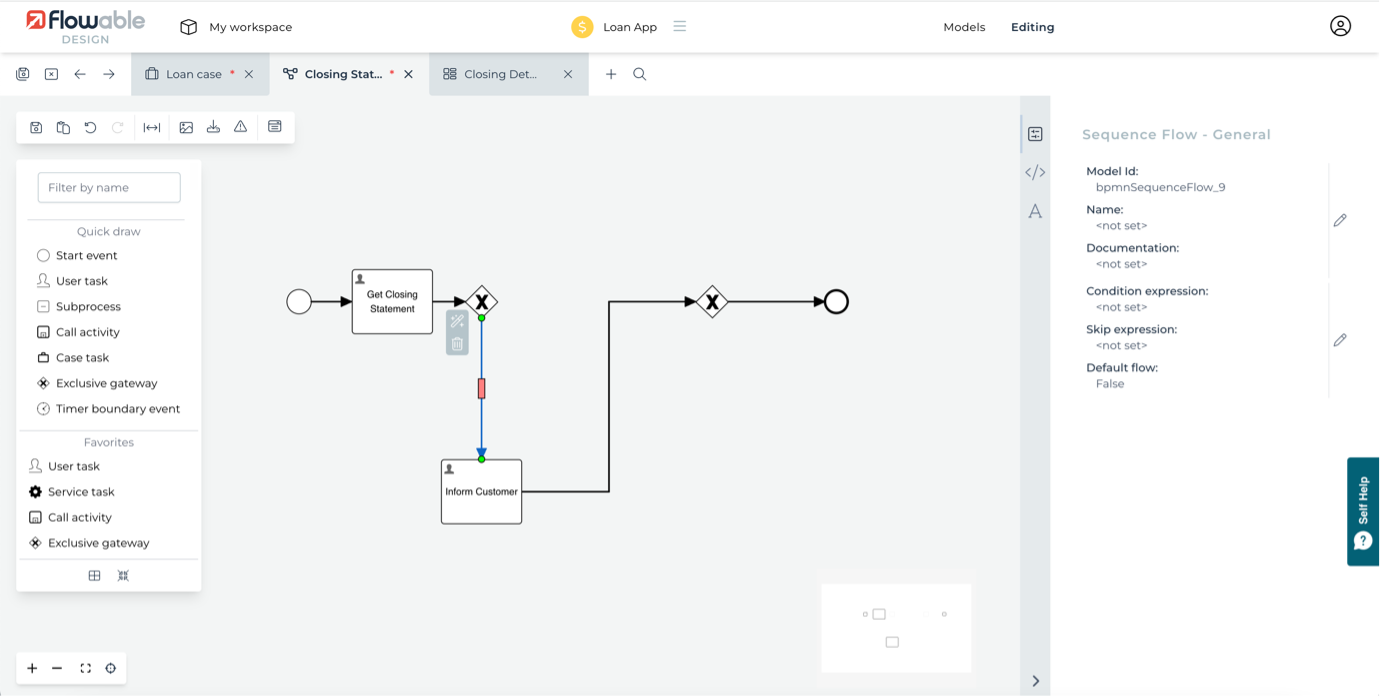
At the moment, the process flow doesn’t have any detail about how to control which path should be taken. Click on the connector going to the Inform customer task, then using the condition builder on its Condition expression attribute, add the same condition testing the contactInPerson variable is true.
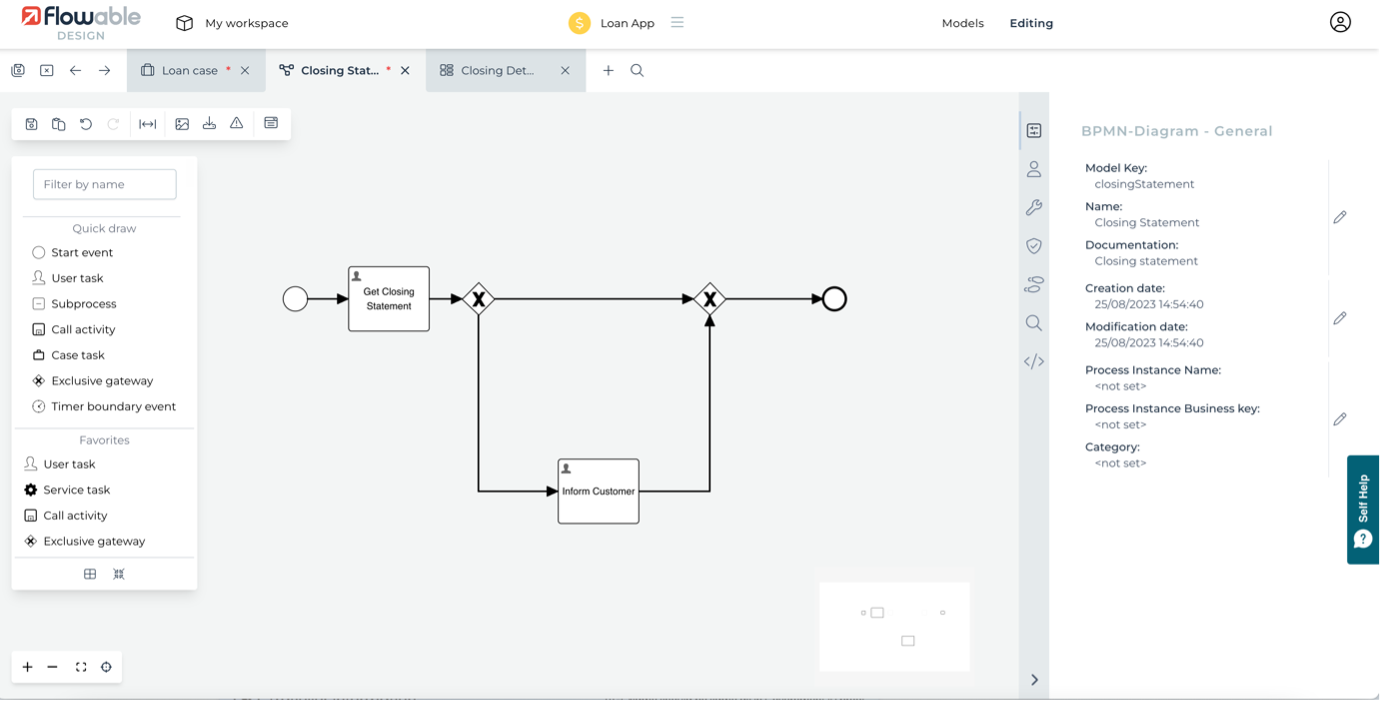
It can also be good to mark one of the flows from a gateway as the default if none of the other flow conditions from it are met. Select the top connector and click its Default flow attribute to set this. The connector will now have a \ at one end to indicate it’s the default.

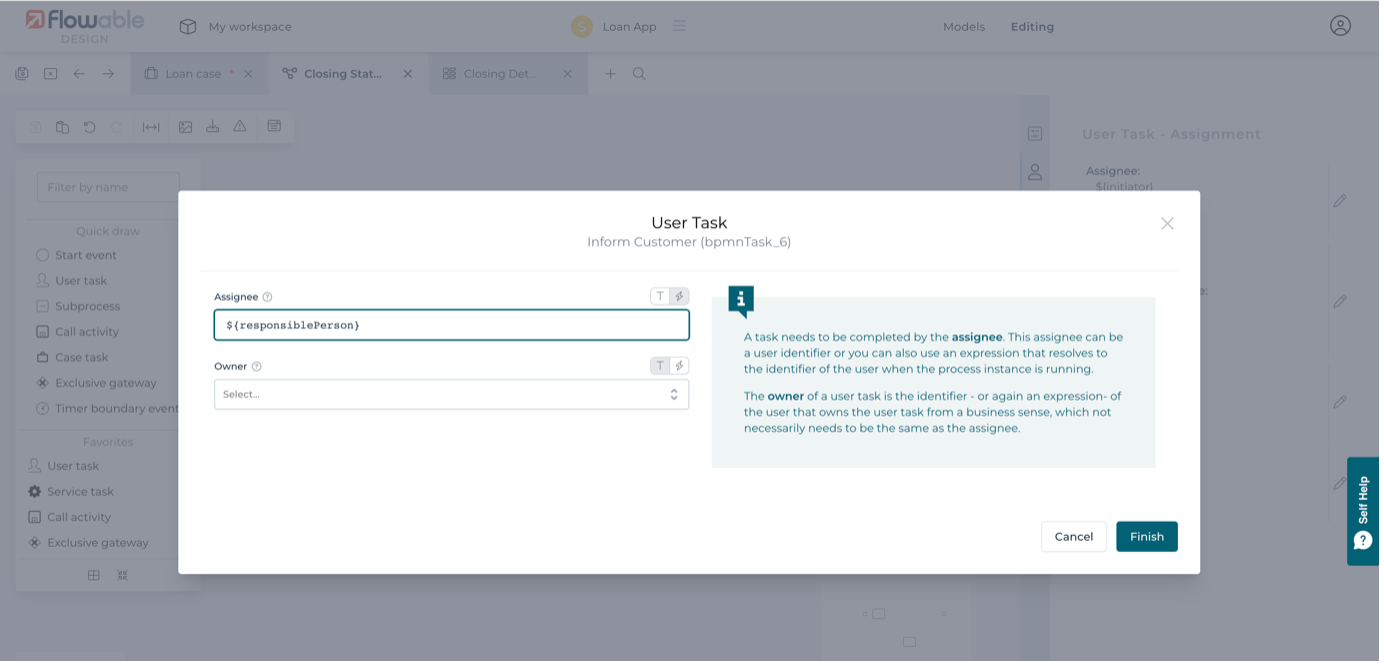
We also want the Inform customer task to be assigned to the person selected in the first task. We can use an expression to set the assignee of the task at runtime instead of fixing it to a specific person in the process model. Select the Inform customer task and edit the Assignee to set it to ${responsiblePerson}. You need to use the ${} notation as the assignee will be set by the Flowable engine, not in a task form where the {{}} notation is used.
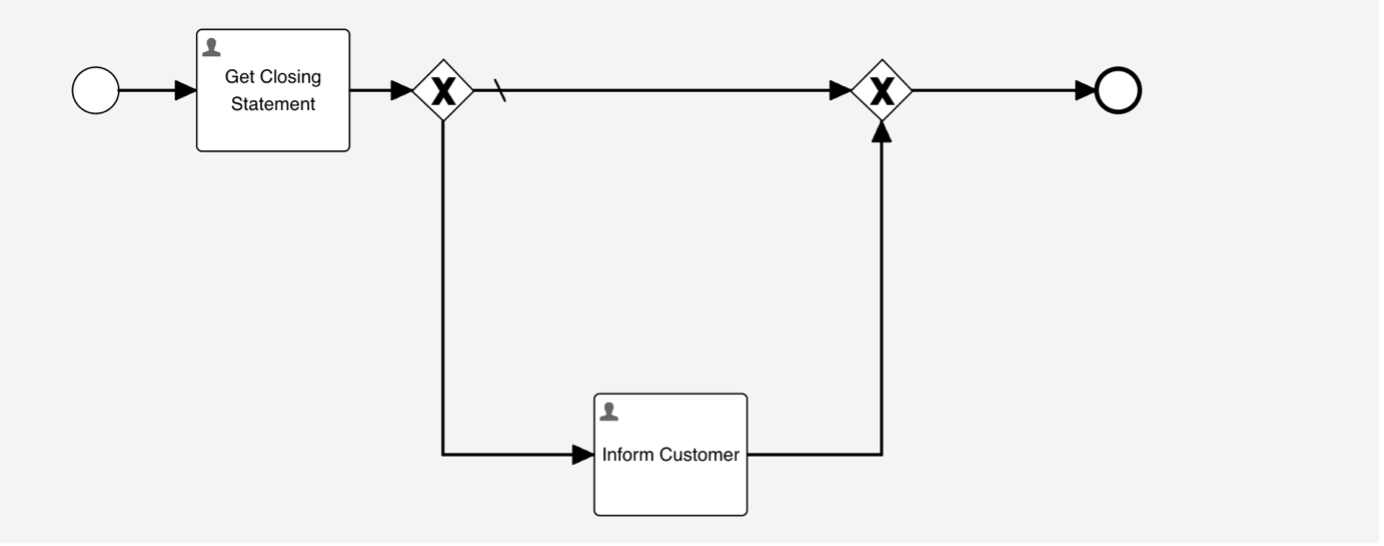
Finally, for this task we’re going to just re-use the form we created before. To do this, select the Inform customer task and select the link icon from its context menu. In the Form reference attribute, click the Reference tab and select the Closing details form you created earlier.
Save the models and we’re ready to test the new process on Flowable Work.
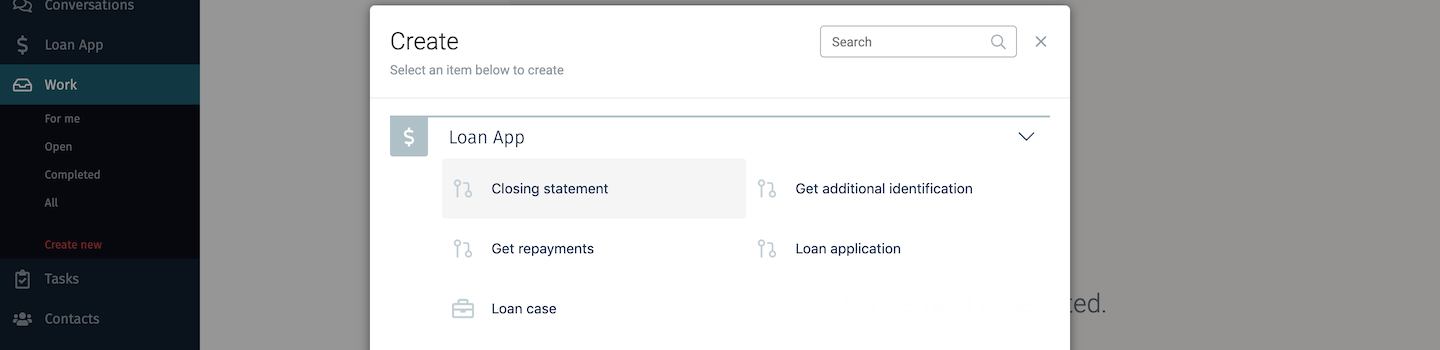
Time to switch back to Flowable Work to run the newly updated Loan App. Sign in as Kenny (kenny.cole) and click the New FlowApp and select Work. You will see the new process, Closing statement, listed. Select it and it will start outside of the case. You can test it in the full case later.
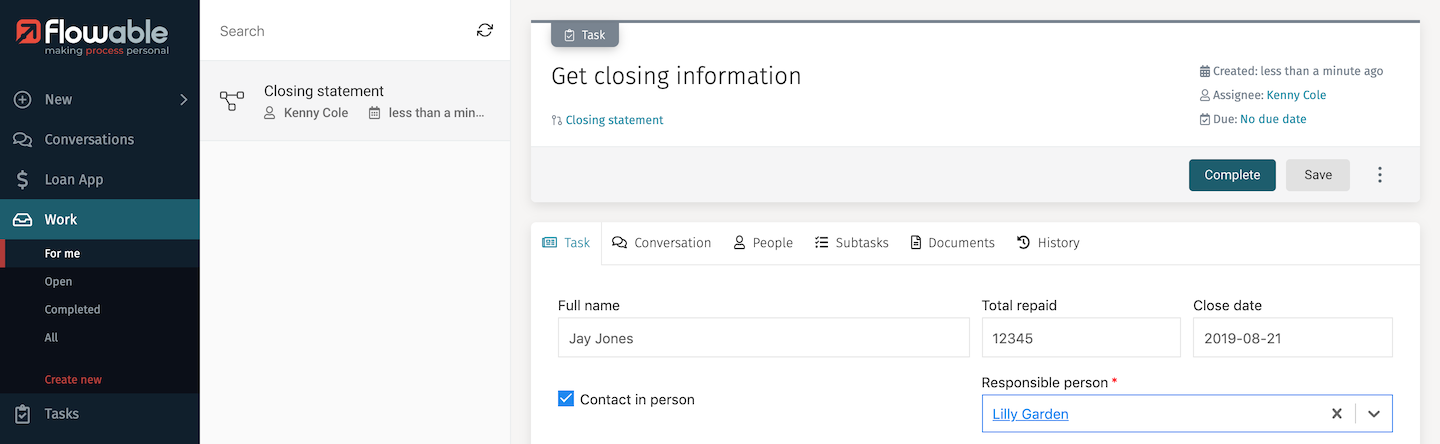
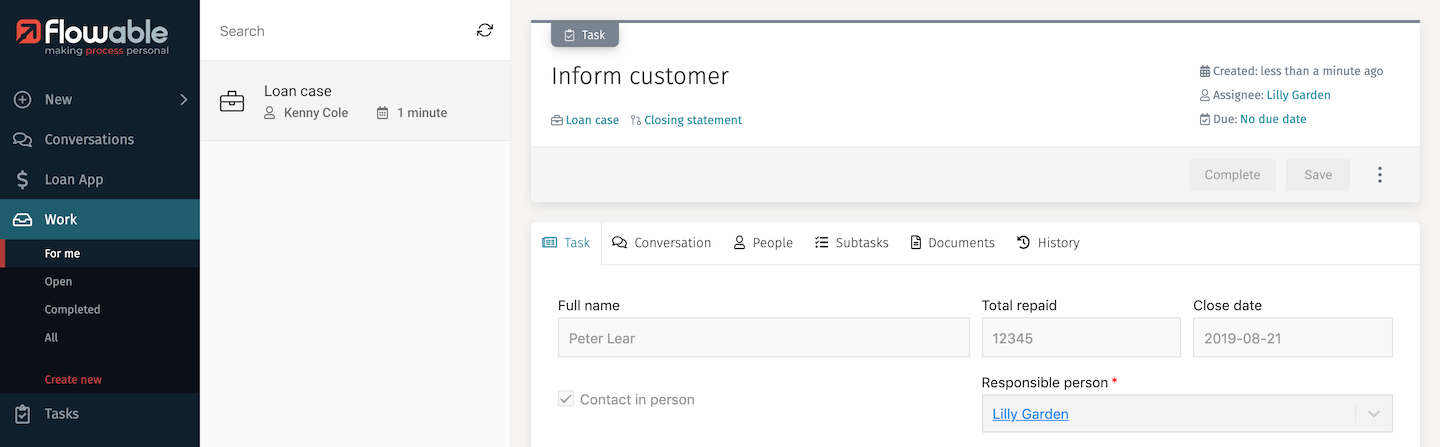
As it doesn’t have a start form (one linked to its start event), you will be prompted to confirm starting the process. Click OK and the first task should show as an Open task. Select it and you’ll see the form you defined. The Full name will be empty because in this use the root is the process itself, and no value has been set yet. Fill in some values and enable the Contact in person checkbox. The person picker should appear. In it, start typing li and you should be able to select Lilly Garden.
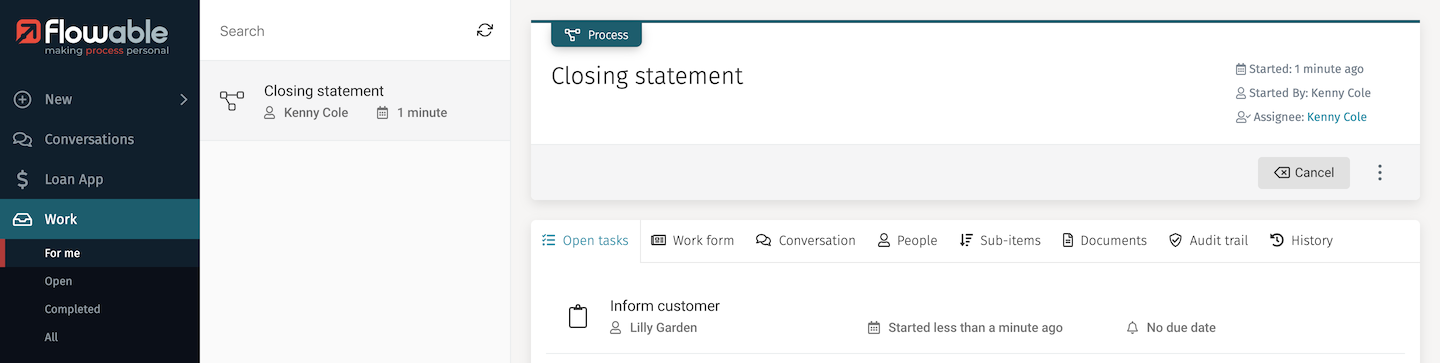
Complete the task and you will see the Inform customer in Open tasks, assigned to Lilly Garden.
Select the task to see its details. Notice that you can’t complete this task, but you could change the assignee to someone else or edit the due date. You can do this because you started the process and are its overall owner.
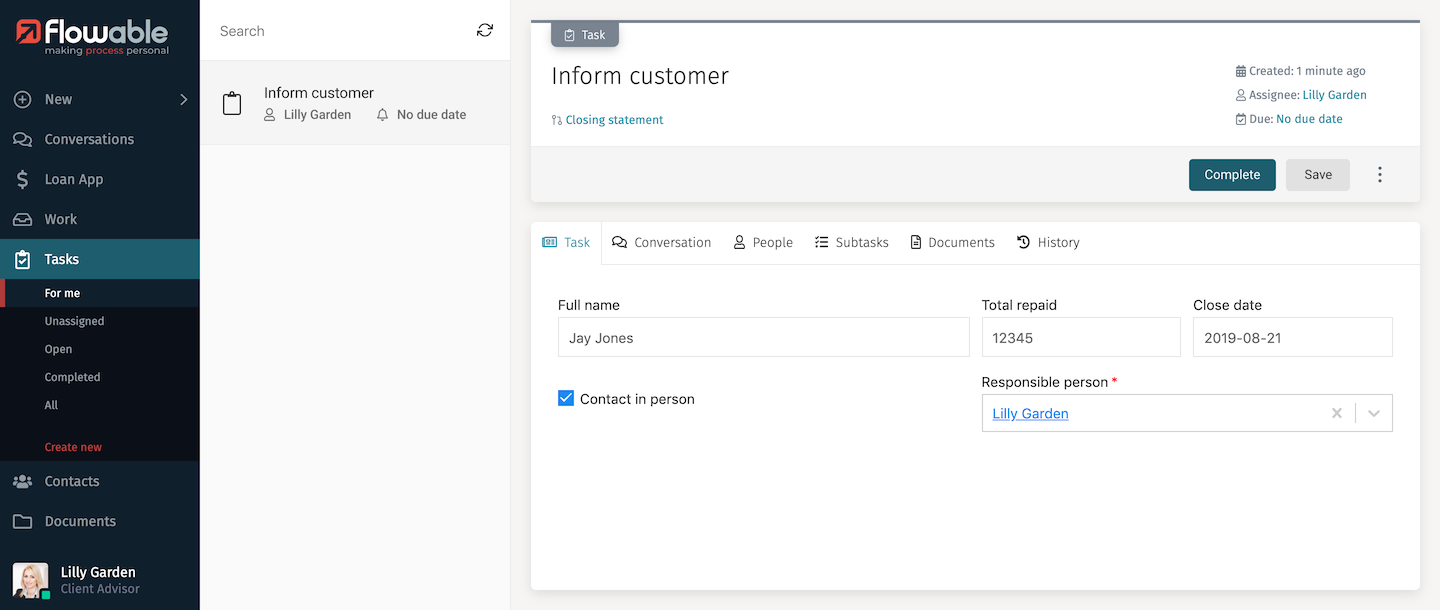
To complete the task as it is, you’ll need to switch user to Lilly. Sign out of Flowable Work and sign in using lilly.garden with password test. Go to the Tasks FlowApp and you will see the task. You can now complete it.
Now we know the process works, sign in as Kenny and run the whole Loan case through. This time, your new process should be started at the closing stage, but the Full name will be already filled in because it has picked it up from the value in the root case.
That should have given you an idea about creating process and form models using Flowable Design. There’s lots of additional capabilities and aids to make creating complex real-world solutions more easily.
Exploring the case model in more detail
The example app has a number of details in it that are worth pointing out, to give you ideas about how you might model things, or to highlight the benefits of different approaches. This isn’t meant to be a deep guide on CMMN, BPMN or DMN.
Looking at the example case model
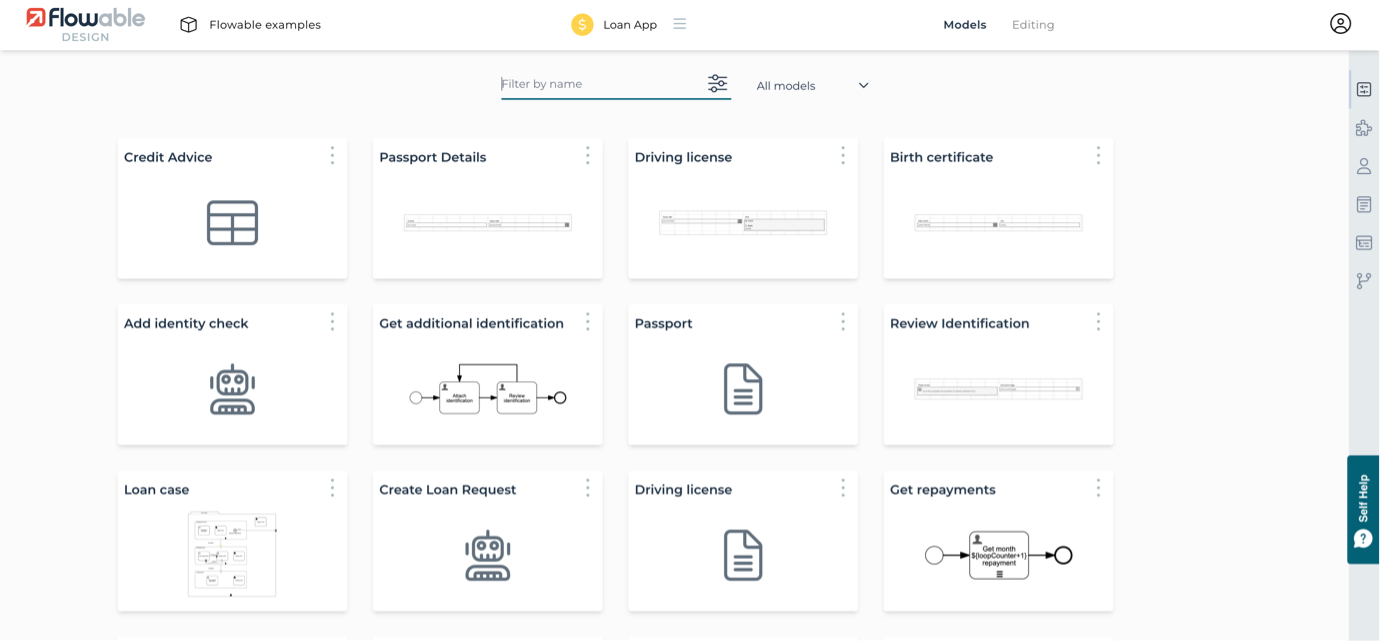
Sign in to Flowable Design and navigate to the Loan case CMMN model, opening it in the editor so we can dig into its details. Using CMMN is a way to look at describing a problem in a different way from BPMN. With CMMN you’re describing how the overall case and its components are related: you can think of it declaring what the problem looks like rather than the sequence of steps needed to complete it. BPMN is more about getting from one point to another: the procedure to follow. You can express that something follows another in both CMMN and BPMN but they are different and using the right one for the job is a skill to learn. With CMMN, you need to think about it more as expressing what might be available for execution at any point in time, rather than being given the next step to execute explicitly.
Stages
If you remember, the loan case had a case plan with three stages. Click on the Applying for loan stage and click on the spanner icon on the right hand side and you can see that Show state is enabled(True).This is by default for a stage and says that it should be shown in the case header for the end user. You might have some stages in your case that are useful for defining the behavior but aren’t useful for the end user to know about.

Looking at the stage’s attributes, you can also see that Auto complete is enabled. This means that the case or stage will complete automatically if there’s nothing active (no open tasks, running processes or the like). It is possible for some actions to be active for manually starting something and these will stop a case or stage completing if not auto complete.
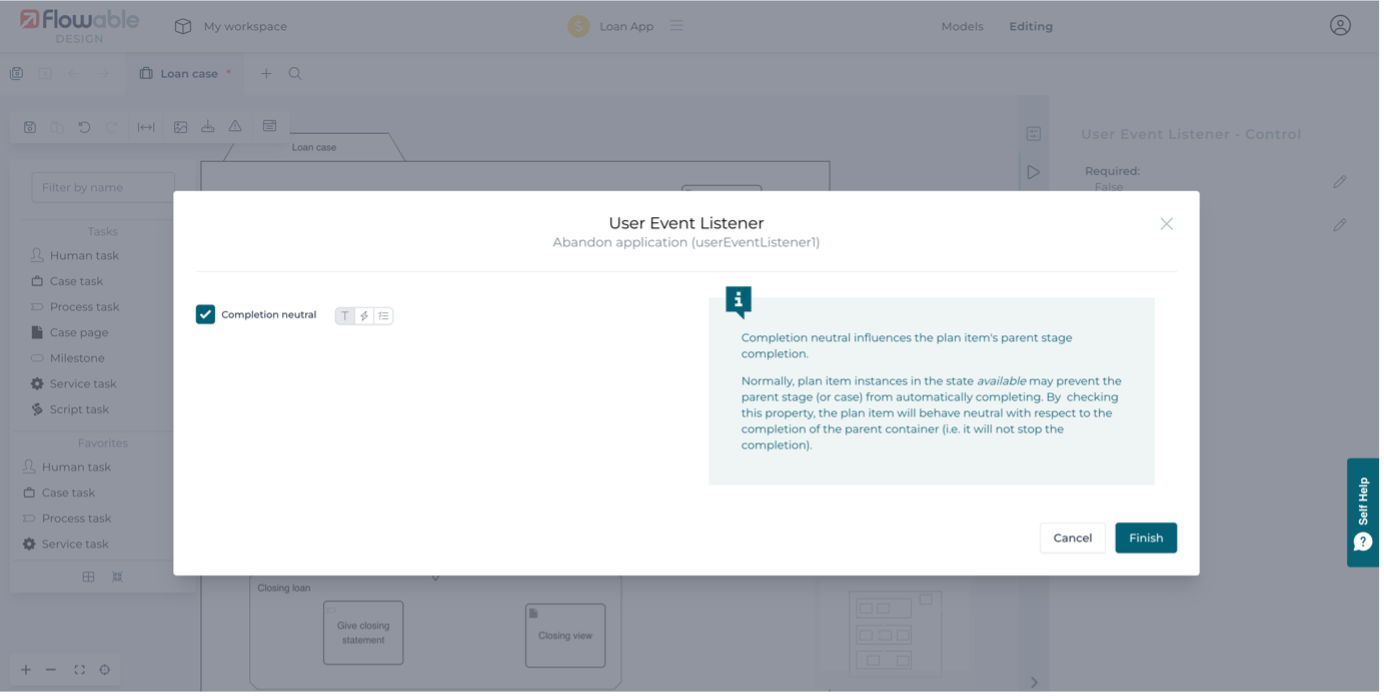
Setting a complete stage or case as auto-completing may be too wide an impact for some models. As an alternative, you can select individual elements an mark them as completion neutral. Select the Applying for a loan stage and set auto-completing off. Then select the Abandon application user event and set it to be completion neutral.
You can do the same to the Repay early task in the Managing loan stage, removing the auto-completion from the stage and adding completion neutral to the manual task.
Let’s go back to the Applying for a loan stage and take a deeper look there. You can see two elements: a process task and a user event listener. To look deeper into the user event Abandon application, select it. If you can remember running the case, you’ll recall there was an action in the UI named Abandon application, and it was there because of this element in the model. Any user event that is available for execution will show in the UI as an action available for the user to select. In this model, the user event is available if the Applying for a loan stage is active (which it is at the start of the case as it has no entry criteria, more of which later).

In a user event’s attributes you can see an option to reference a Start form. In our model, this references a form named Reason. Click on the form link if you’d like to open the form to view or change it. It has a text field to record the reason for taking the action, which will be kept as part of the history of the case. The form fields could have been passed on to subsequent processing if the user event hadn’t been linked to exiting the whole case.
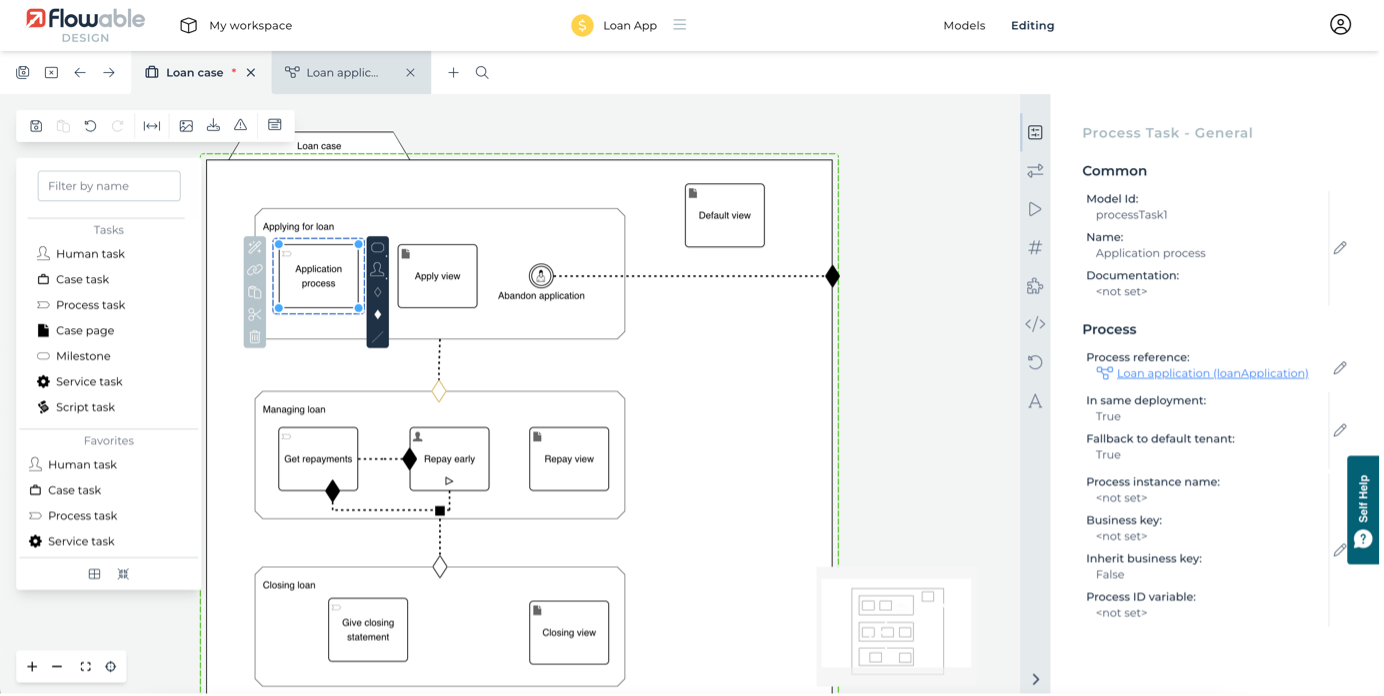
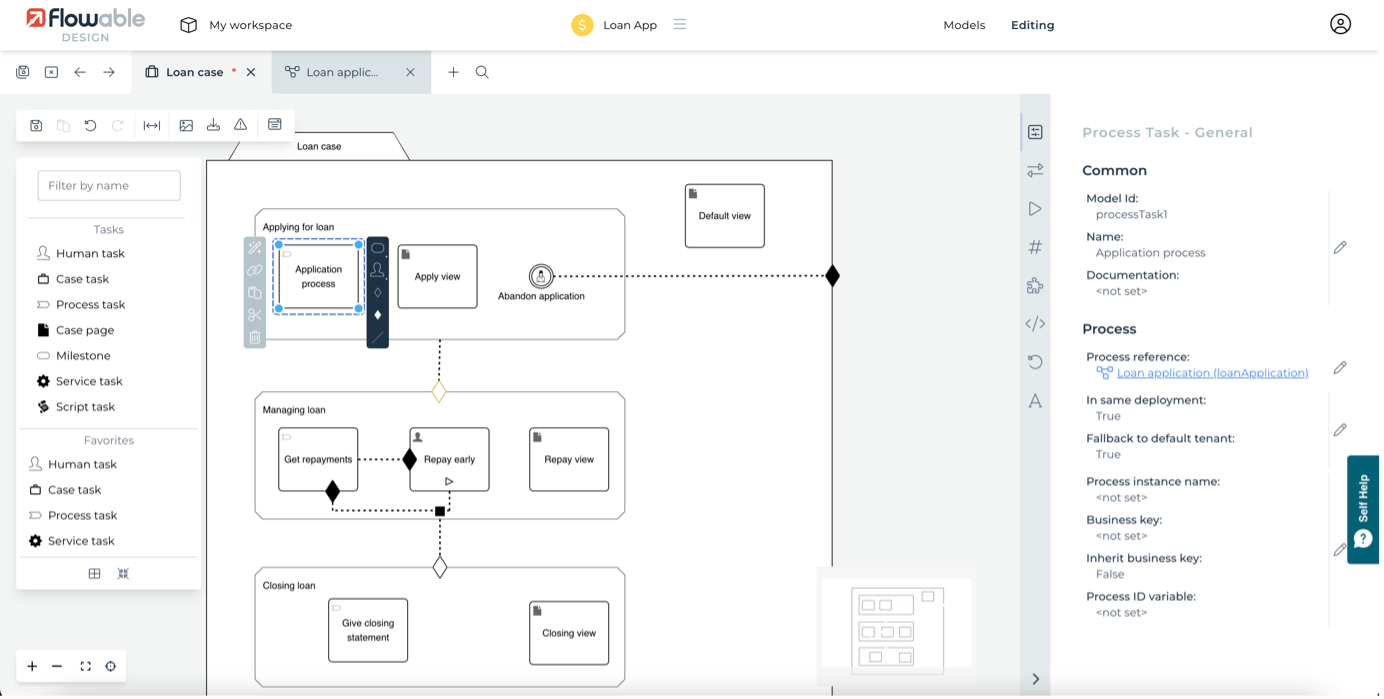
Moving to the proces task, select it and look at its attributes. As this task is not manually activated, it will automatically become active when the stage becomes active. That means as soon as the stage starts, the process will be started too. Naturally, a process task needs to specify the BPMN model it will use. If you click on the Loan application process that’s referenced there, a new tab will open to allow you to edit or inspect that process model.
 If you needed to change the model referenced, click on the edit icon on the right-hand side of Process reference and unlink it and create another.
Looking at other attributes on the Application process task on right hand side in the Process Task- Variable Mapping, there are two that are key to our overall case model. They are the In and Out attributes that allow you to map some variables from the case into variables used in the process that’s called.
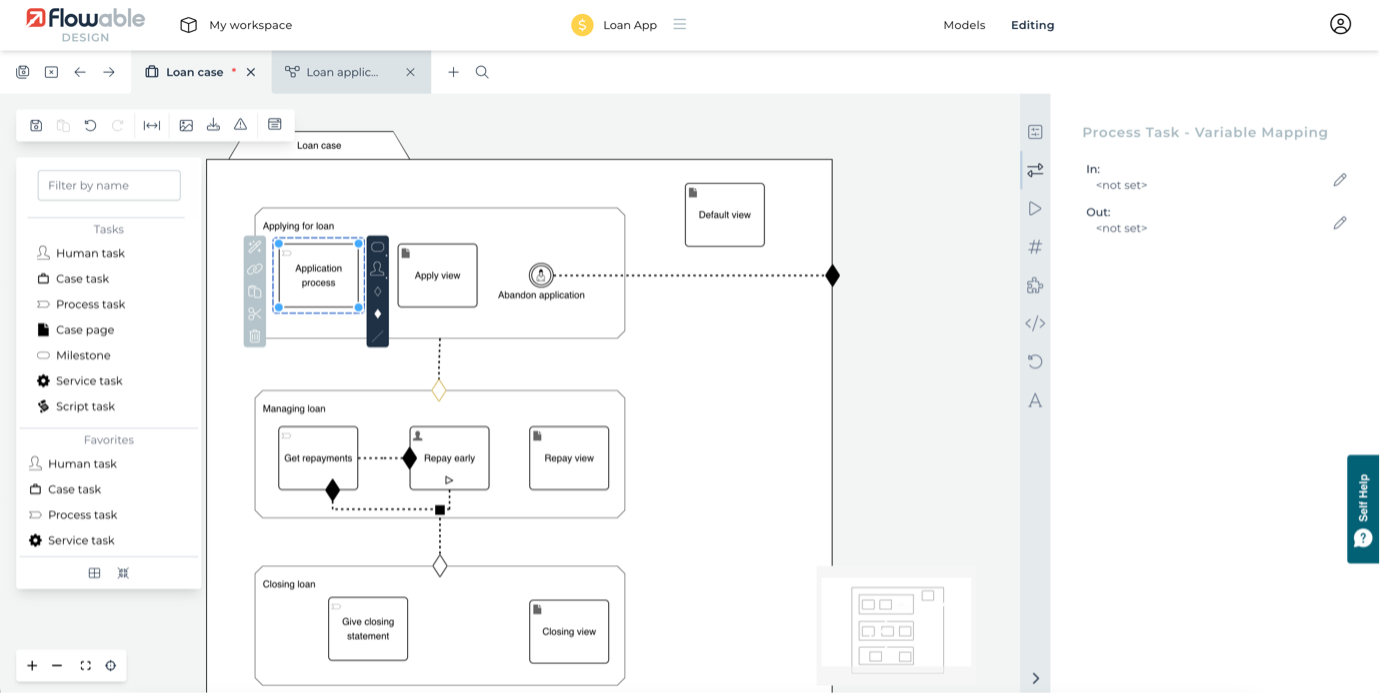
In this example, we wanted to pass in the fullName variable from the case’s start form into the process, where it uses a variable fullName as well by coincidence. There’s a variable set in the process that is needed in the case logic, so you can see it maps the process loan_outcome to the case loanDecision variable. This allows you to use meaningful variable names in your cases and processes and be able to re-use them in different contexts or apps. You can add or edit the In and Out values by clicking on the attribute to pop up a dialog for the changes.
Variable scopes
If you know a process is always going to be called from another case or process, and that a variable is set in them that you would like to access, then there is another approach than having to map variables in and out. In the loan example, within the Loan application process anytime you needed the fullName you could use the path notation of variables to access it. The common uses would be root.fullName or parent.fullName depending on how you plan to use the process. Using root means it will look to the highest level item in any nested calls of processes and cases. Using parent just looks one level up for the variable. In the loan example, the case is both the root item and the parent item for the loan application process.
Criteria
One of the expressive features of CMMN is criteria, entry ones that determine if an item is available or active, exit ones that say when an item should become unavailable or complete. Criteria can be standalone or linked to other case items. In the model here, we have an entry criterion on the Managing loan stage that is triggered when the first stage completes. It has an additional condition that has to be met for it to become active. If the Applying for loan stage completes but the condition isn’t met, then there’s no active or available items, so the case itself completes. The condition in this example is basically testing if the decision made in the first stage was an acceptance of the loan application.
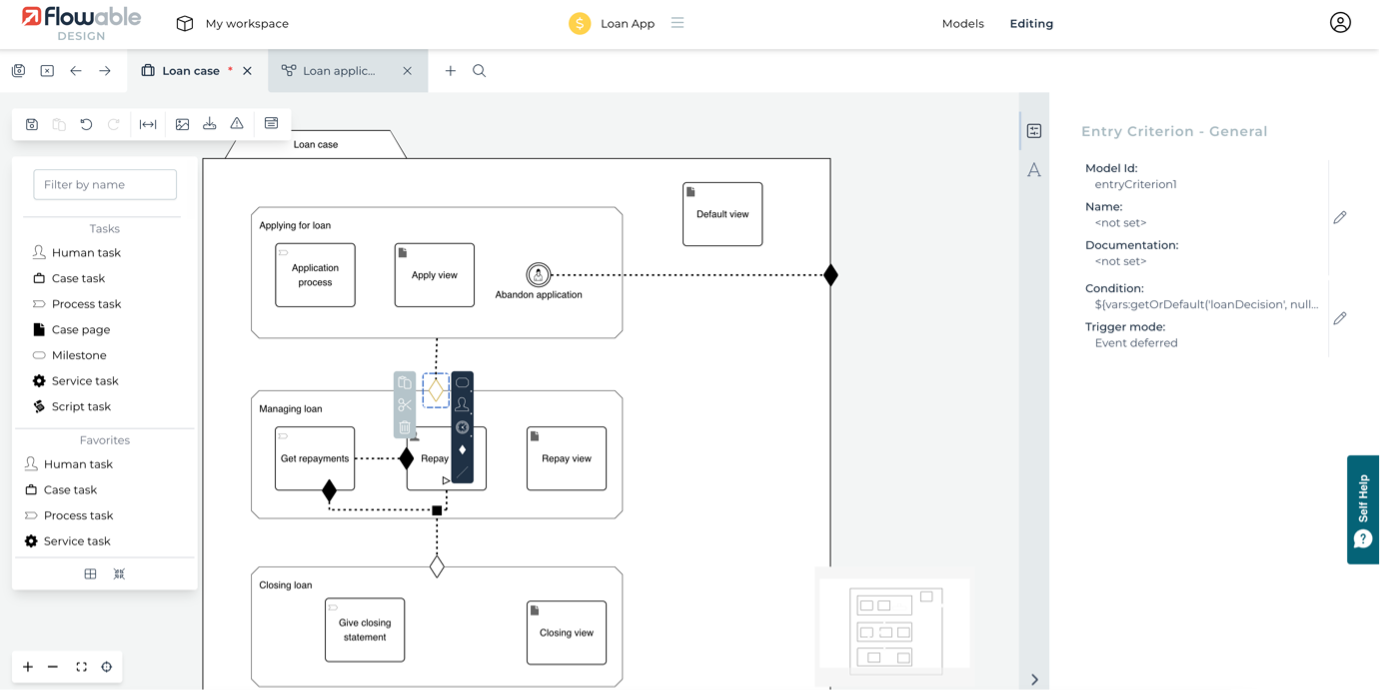
This condition expression is a bit more complex than just testing the variable value. The simple expression would be:
${loanDecision == 'accept'}
However, with CMMN, the entry criterion is tested when the case starts - before the first stage has run and before the loanDecision variable has been created. To account for this, you can use one of the built-in functions to get a variable’s value, and if that variable is undefined to create it with some default value. In this example, the variable will be set to null if it doesn’t already exist, meaning the test for it being equal to accept will fail.
Try doing this with BPMN
Moving on to the rest of the Managing loan stage, you can see there are two tasks: one that will automatically start a process when the stage becomes active and one that’s a human task that can be manually activated (shown by the triangle/play icon). Select the Repay early task and you’ll see the Manual activation attribute is enabled. You could also make the process task manually activated if you wanted, meaning a user would have to choose to start the process instead of it starting automatically. If any item is marked as manually activated, then in the Flowable UI there will be a user action available to start it.

You can also see there are exit criteria for completion from each item to the other in this stage. This is a very powerful example of something that is complex to do as clearly in BPMN. What it means is that if one of the items completes first then it then exits the other item. Both items are available or active, but only one of them is needed for the stage to complete.
The effect of this is that the Get repayments process gets started automatically, which in turn creates tasks to get each repayment. If this process completes and all repayment tasks complete, then the process task will complete and the exit criterion on Repay early in turn will make it complete. This will leave all items in the stage as complete meaning the stage itself will complete.
However, if the user triggers the Repay early manually activated task, then this task will become active, alongside any repayment task. If the user completes the Repay early task, then the total loan needs to be considered repaid, so the repayment process and any of its tasks will be completed.
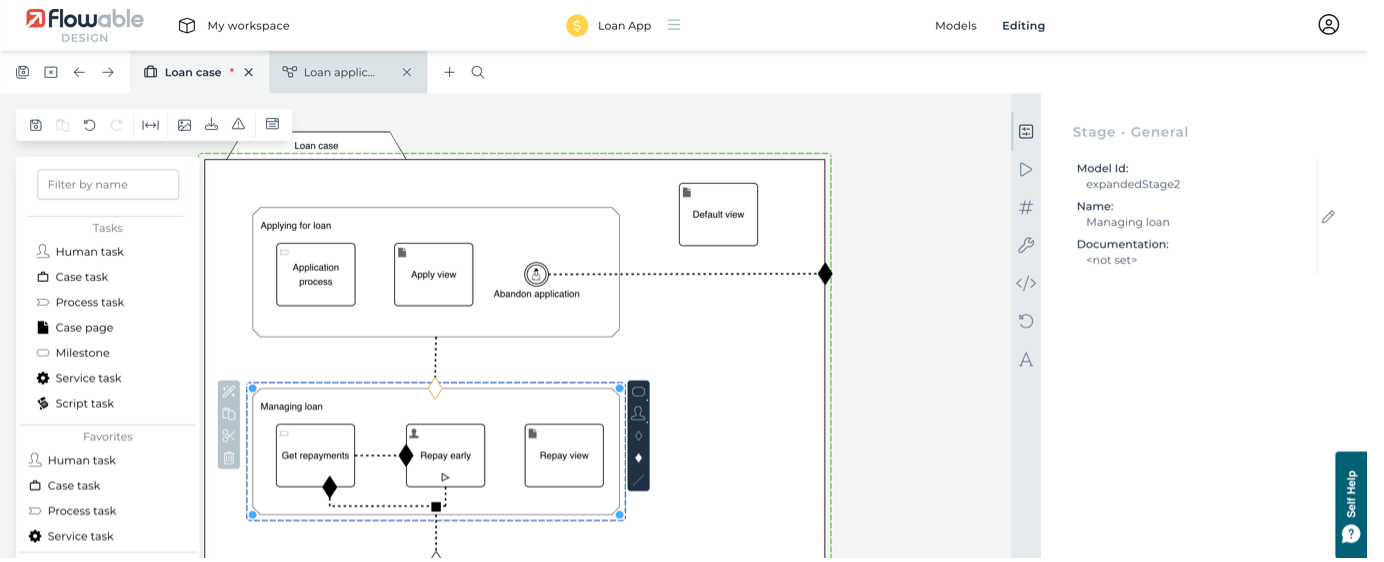
When the Managing loan stage completes, it triggers the Closing loan stage, which has no additional condition on its entry criterion. As you may have noticed, a criterion with a condition expression is shown visually by it being displayed yellow. The final stage in the case simply creates a user task automatically. When that task completes, all elements of the case are completed, so the case itself will complete.
Exploring the process model in more detail
There’s also quite a bit of detail to dig into the BPMN process model in the example, as well as some additional tweaks that can be made. Still signed in to Flowable Design, from editing the case model, you can open the loan application process in the editor by clicking on the diagram’s link icon or the Process reference attribute link.
Control the start of a process
You will have seen this process diagram when you ran the application. As it is, this process can be run standalone from the case model. If you remember from the New dialog in Flowable Work this process was listed as available as well as the case itself. Also, remember that to start the process, the process task in the case had a start form to prompt for the applicant name. To start the process standalone, it is also necessary to have the start form.
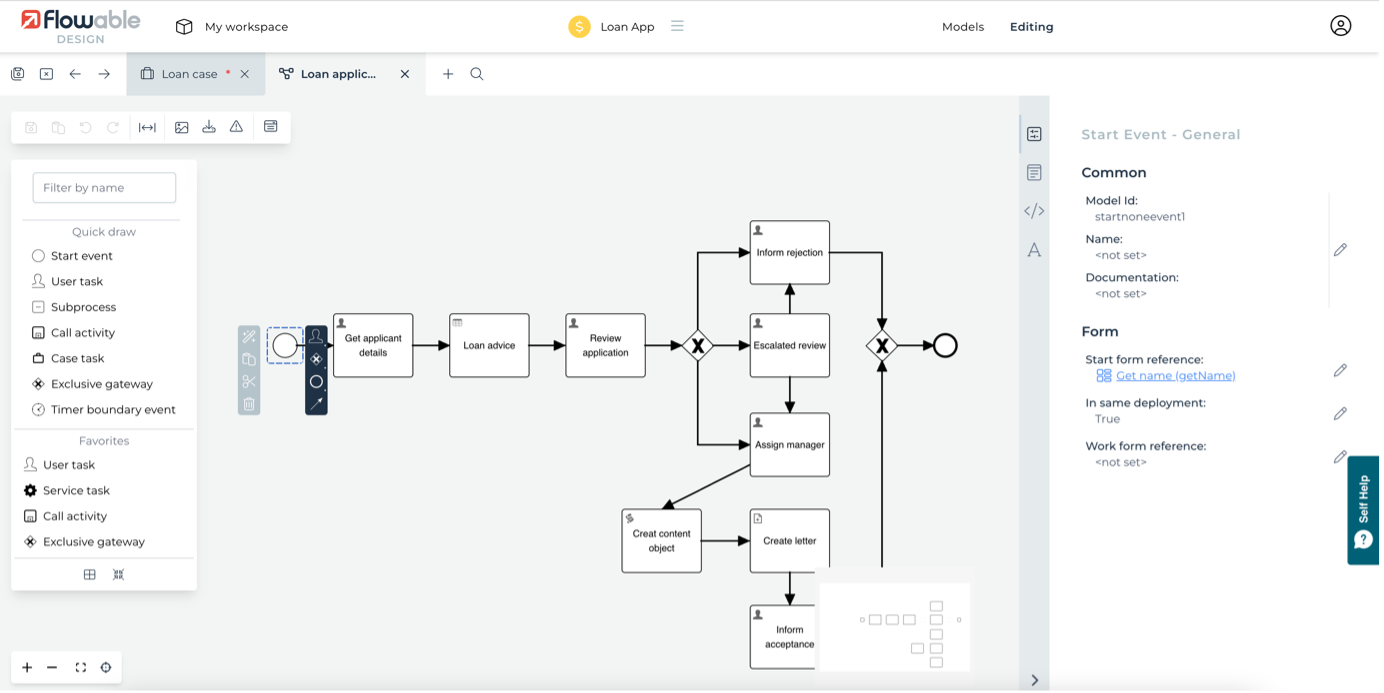
The same start form has been used for starting the process from the case or from the user starting the process directly. This process could also be started by another system, for example, by a REST call to Flowable (including passing the name). The form on a start event is only displayed if starting the process directly from the Flowable user interface. It is certainly useful to use when debugging complex cases and processes.
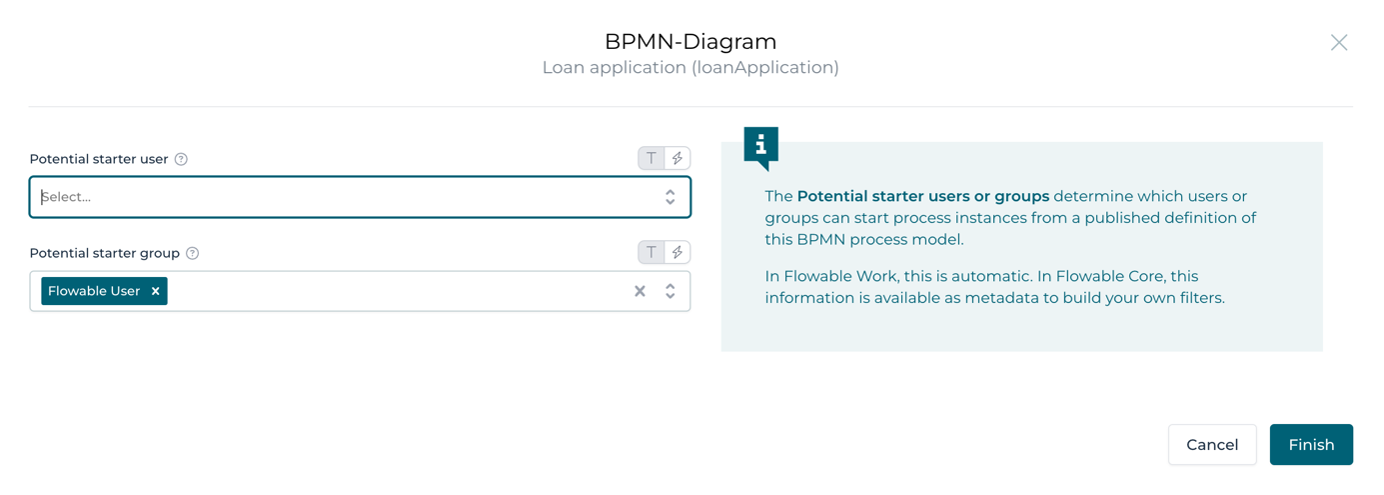
As mentioned above, the process is also shown in the New dialog along with the case and other processes that are part of the overall Loan App. You can control what is available for a user to start using the Potential starter group or Potential starter user attributes. By default, the group is set to flowableUser, which means any user in Flowable can start the process. If no value is set, then only admin users can start it.
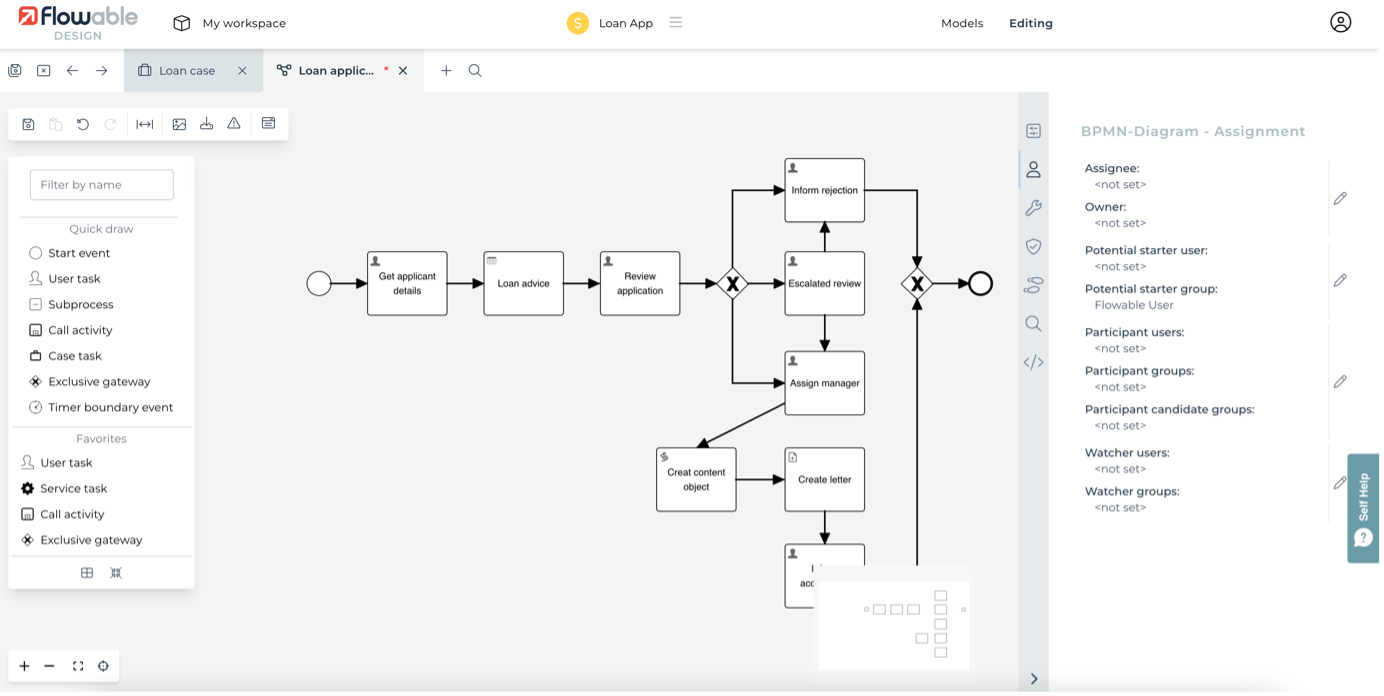
Remove the value of Potential starter group from the Loan application process by clicking on BPMN-diagram-assignment and then clicking on the edit icon.Also, edit the Get additional information and Get repayments processes and remove flowableUser from these.
Save the models and switch to Flowable Work and click New to start a new piece of work. If you only have one app published then the case will be the only thing that can be started, so Flowable will initiate it and you will see the start form without selecting the case.
Decisions and flows
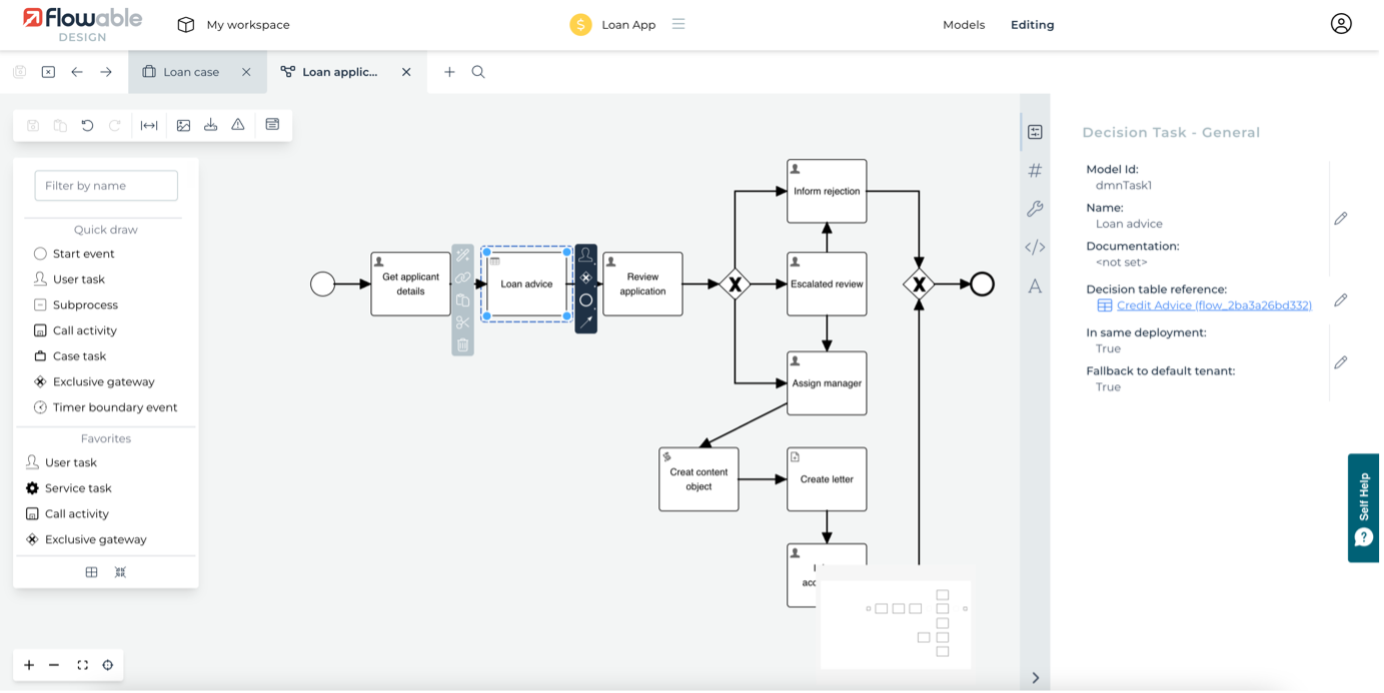
Often, when defining a process, there is the need to consider a number of business rules that then affect how the process flows or additional data that can be inferred. Flowable supports Decision Tables defined using the DMN open specification. In the Loan application process a simple decision table is used to guide the process flow and give information to the user.You can see this by clicking on Loan Advice task. On the right-hand side, the Decision table reference will show up.
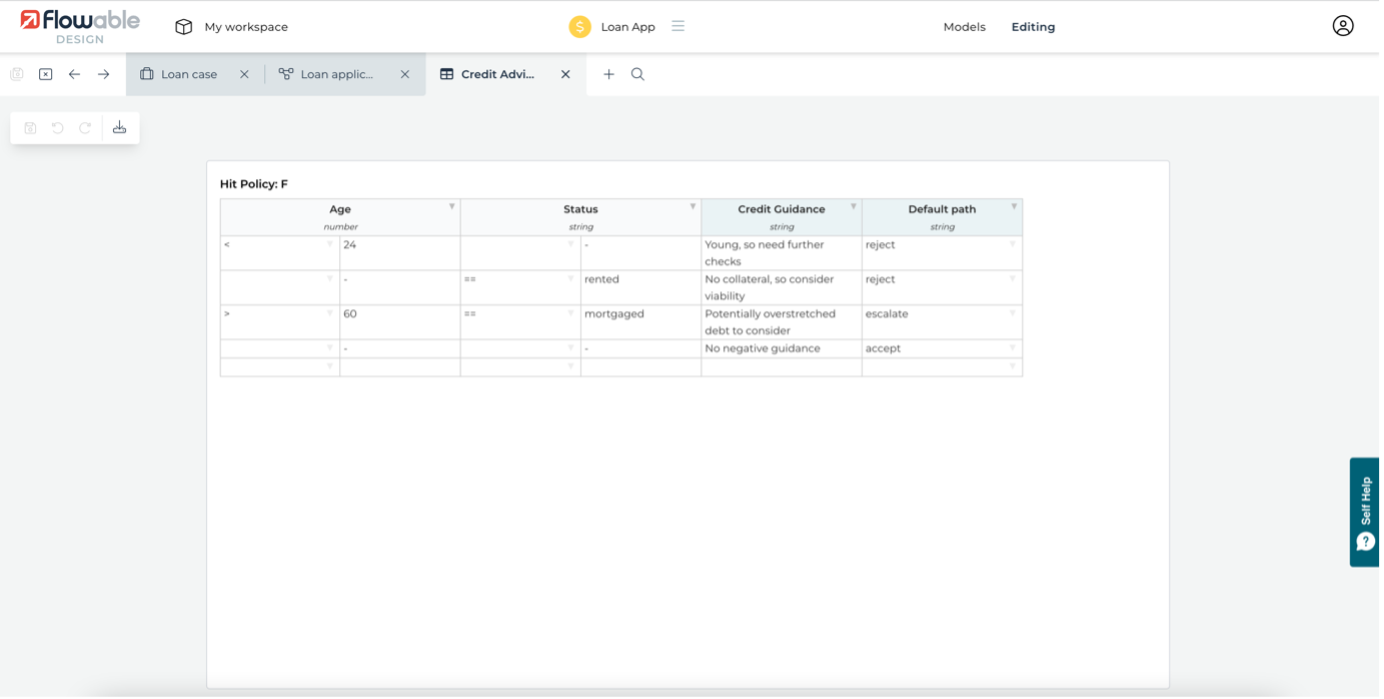
Click on the decision task’s link icon or Decision table reference attribute to open it. You will see something that looks very much like a spreadsheet. Each row in the table can be thought of as a separate business rule, with the columns defining what process variables should be tested or set. The columns on the left-hand side define the conditions of the rule: the variables that will be tested. The columns on the right-hand side define the actions of the rules: what variables will be set to if the rule’s conditions are met.
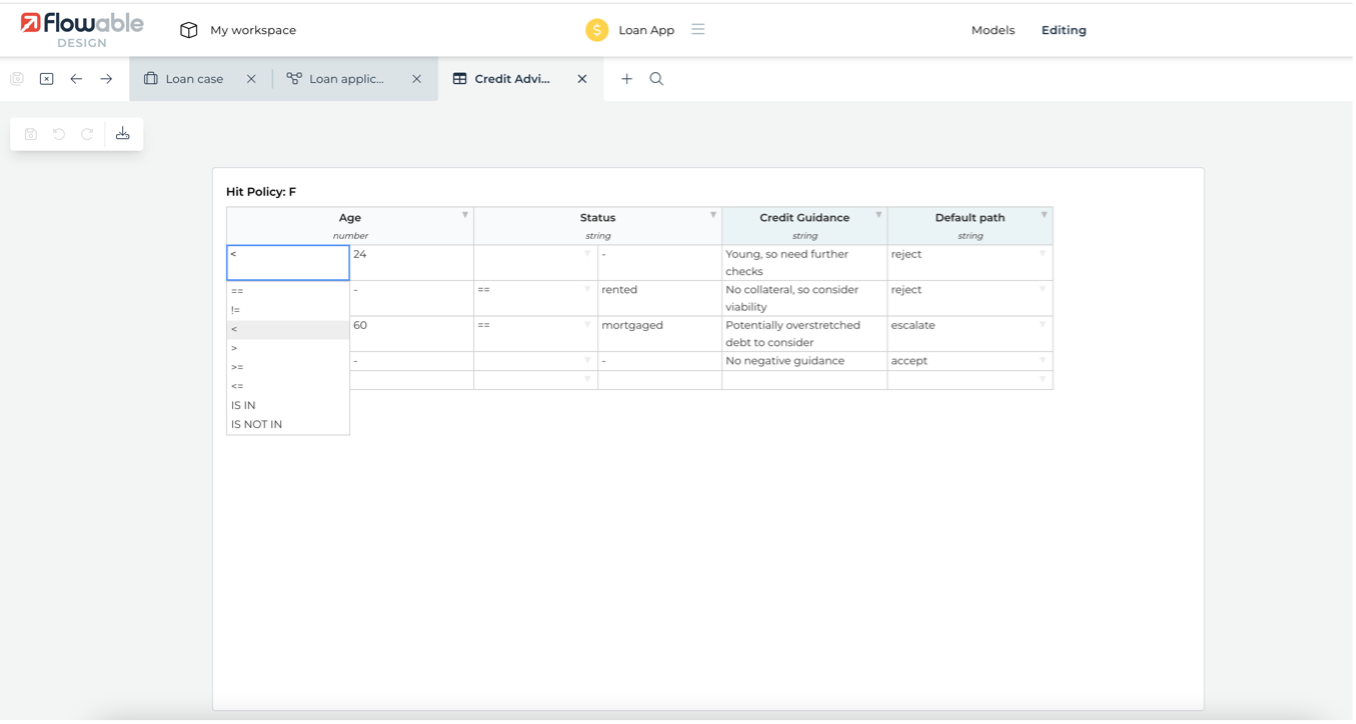
In this decision table there are 4 rules, each with 2 conditions and 2 actions. Looking at the first rule (row), it states that if the age variable is less than 24 and ignoring the home variable (a dash means no condition) then set the guidance value to some text and the defaultPath value to reject. Depending on the type of variable, a range of operators is provided alongside the value to test.
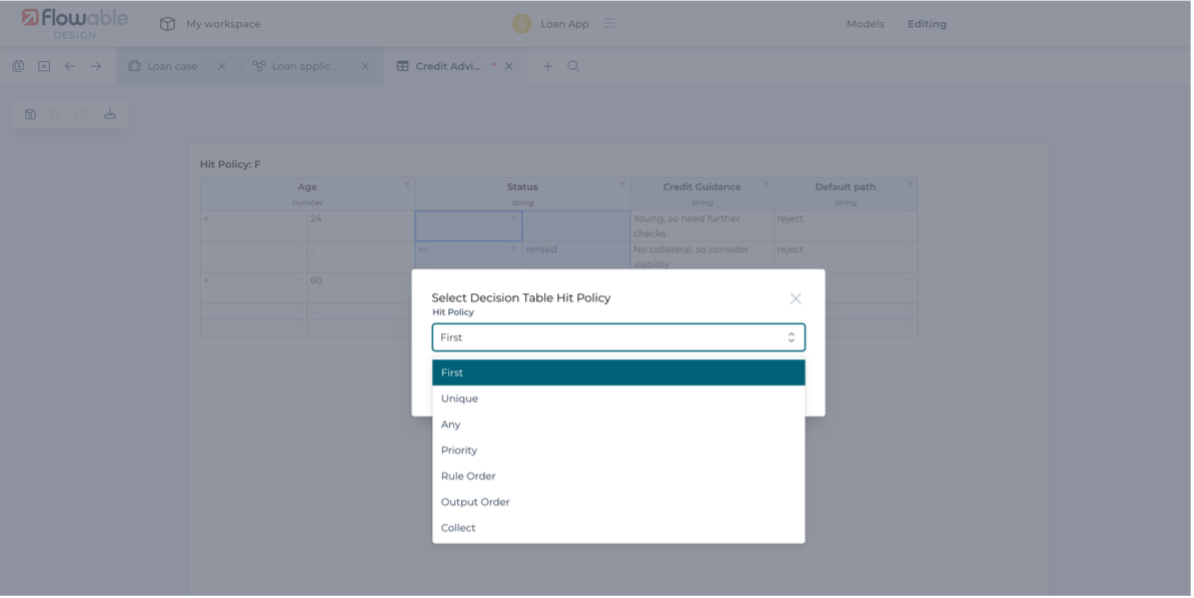
The rules will be tested from the top and depending on the hit policy stop at the first rule that succeeds. The hit policy is set by clicking on the initial letter of the hit policy shown in the top left corner of the table. There are a number of hit policies available that can be selected from the dialog that pops up.

New rules can be added using the last row of the table, or by inserting a rule at a particular point using the context menu, available with a right-click.
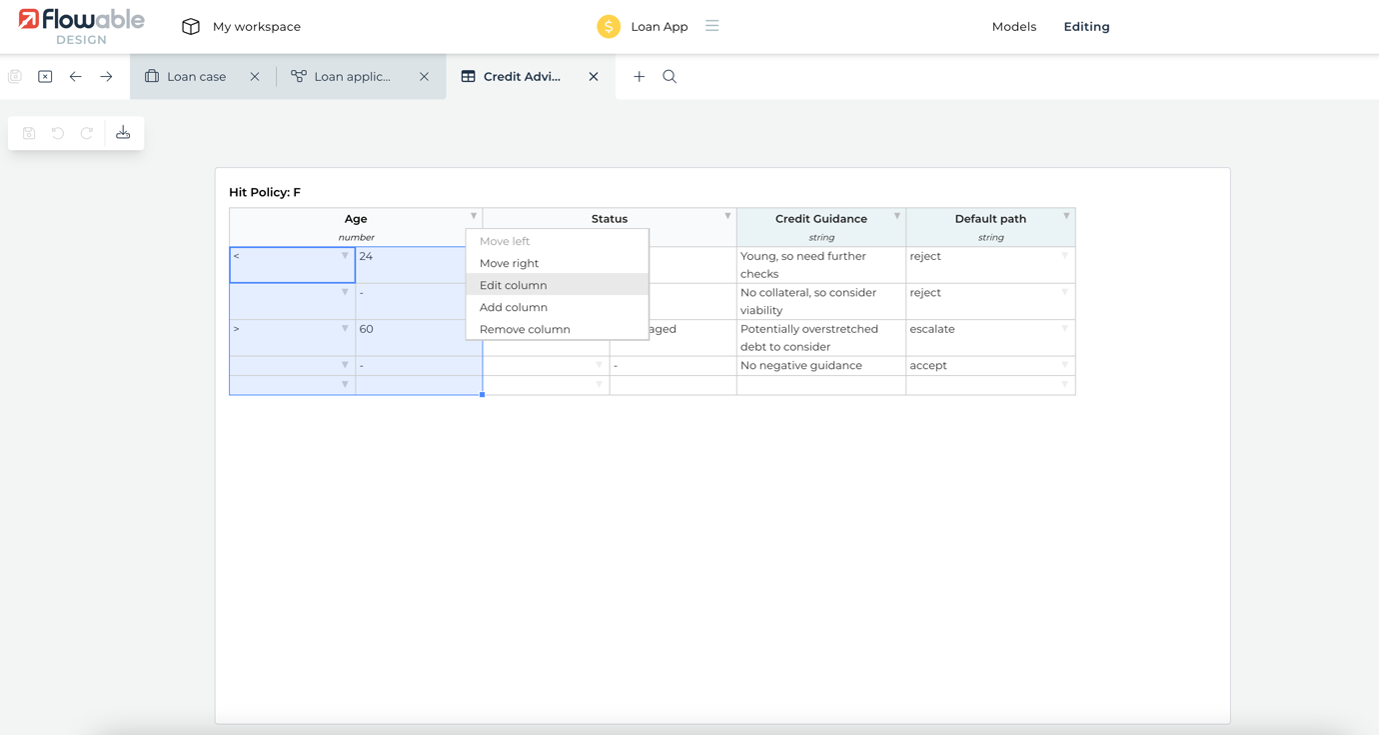
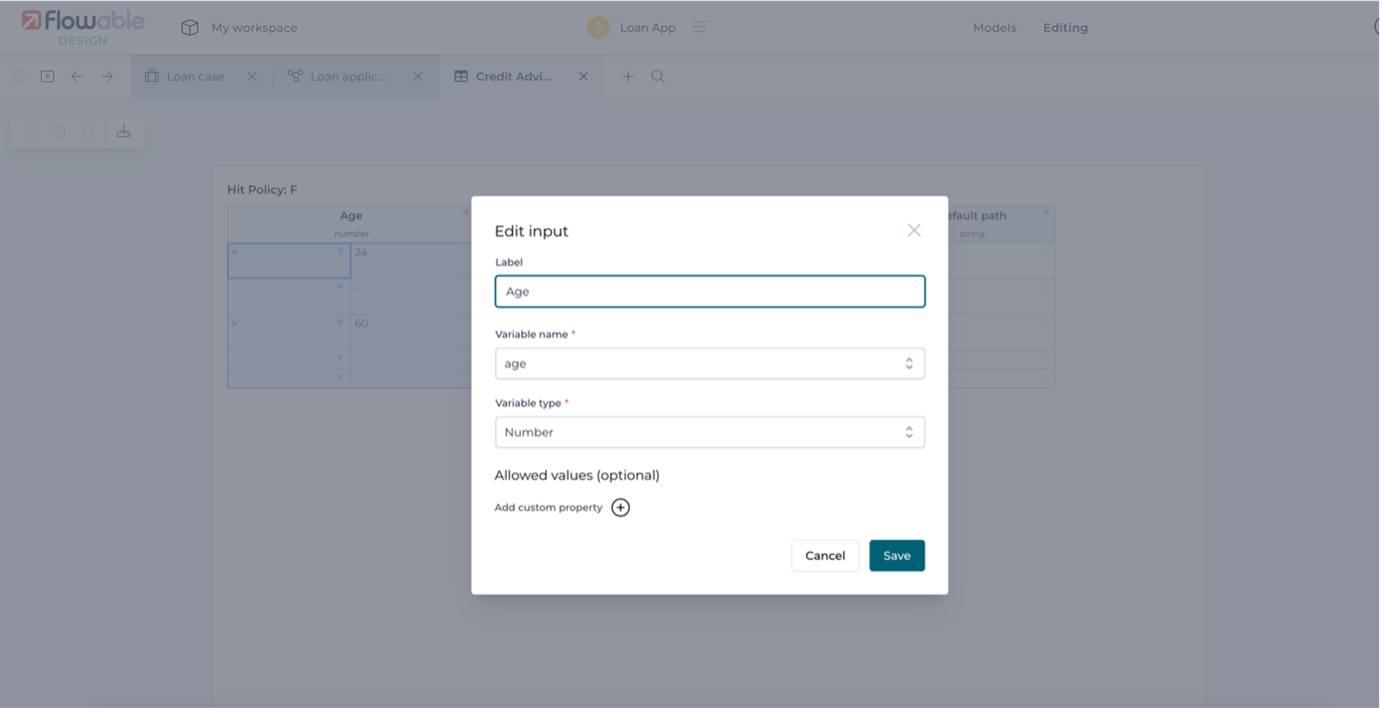
Additional columns of conditions or actions can be created using the drop down icon in the column headers. Details for a column can be viewed and modified in a dialog opened by clicking on the column title. An input column can have a title label to help the user if the variable name isn’t clear. It’s necessary to specify the type of the variable. It’s also possible to add a list of allowed values, which will then show up as a dropdown menu when editing the rules.
An output column can also have a label and possible output values. For both input and output columns it’s possible to use an expression as the value, allowing for rich conditions and actions to be defined. An expression needs to start with ={ and closed with } and follow the JUEL expression syntax used throughout Flowable.
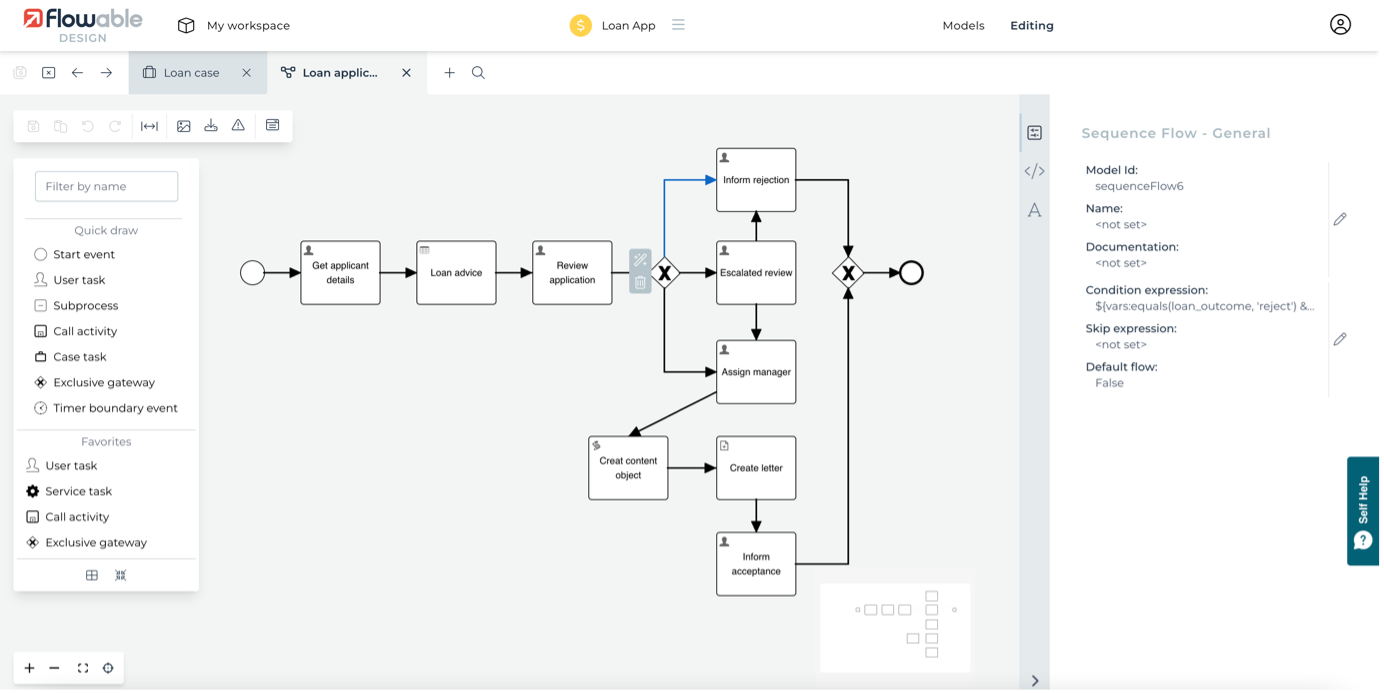
Notice in the Decision Table that there’s a column that sets the defaultPath variable. This is used later in the exclusive gateway in addition to the outcome chosen by the loan reviewer. The logic for which flow to take is defined in the condition on the sequence flow. Click on the flow going to the Inform rejection task to see its attributes, including the Condition expression.
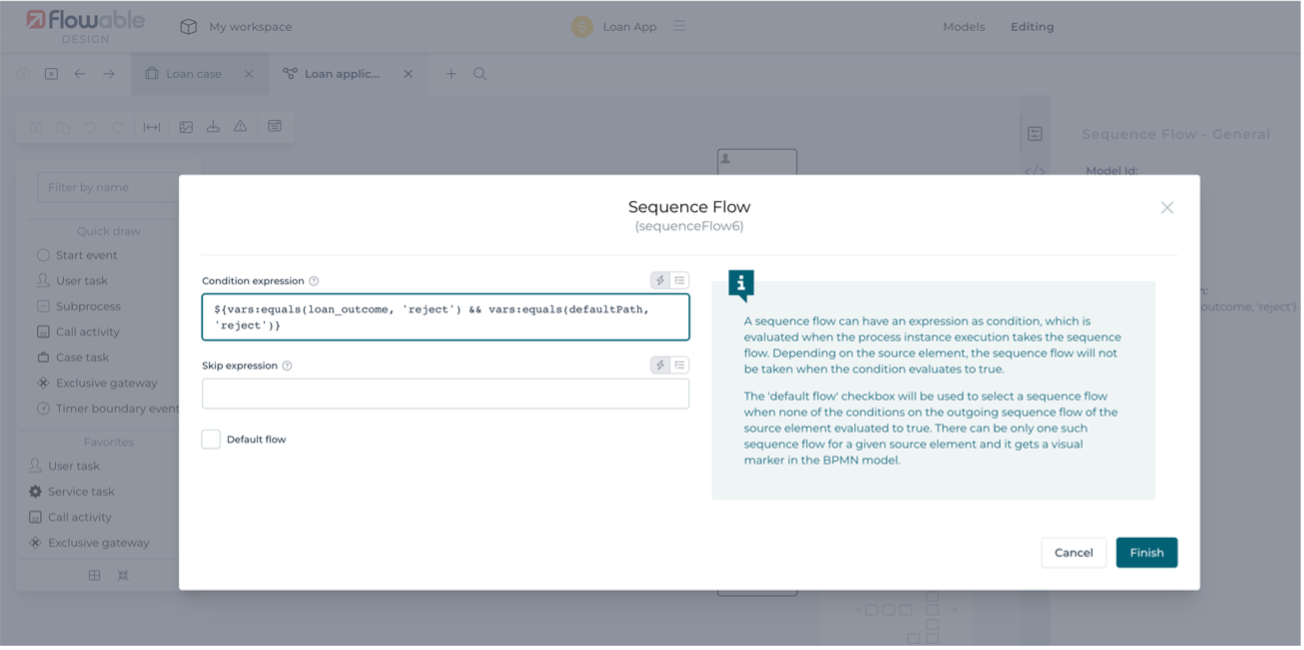
To edit the condition expression, click on the edit icon on the right hand side panel under the Condition expression editor.You will see a popup to edit the sequence flow. Here, click on the second option (right most) to edit the conditions.
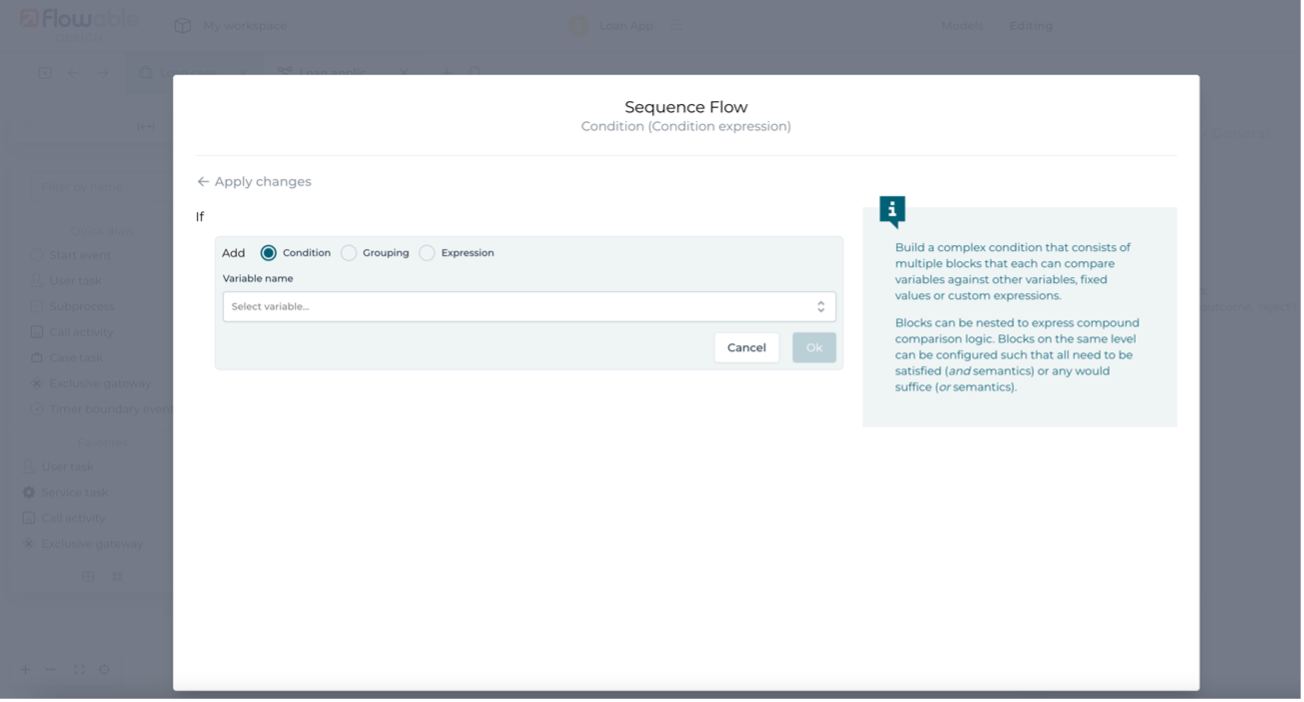
The logic here says the condition succeeds when the outcome selected by the reviewer is reject and the Decision Table default path was also (AND) reject. If you wanted to test if either was true (OR), you can set the condition match for the group of conditions to Any. You can also set the match to None (NOT) so that if any conditions succeed the overall expression fails. You can group conditions and have any number of subgroups in an expression.
The condition expression for the acceptance flow is essentially the same as for rejection. The condition for escalation includes the logic that if the loan reviewer chose a different outcome than the Decision Table suggested was the default path, then the flow should go to escalation.
This all means the flow will go in the direction of the reviewer’s outcome if it’s what was expected from the credit advice rules, otherwise it will be escalated (or if the reviewer decided escalation was needed).
Generating documents
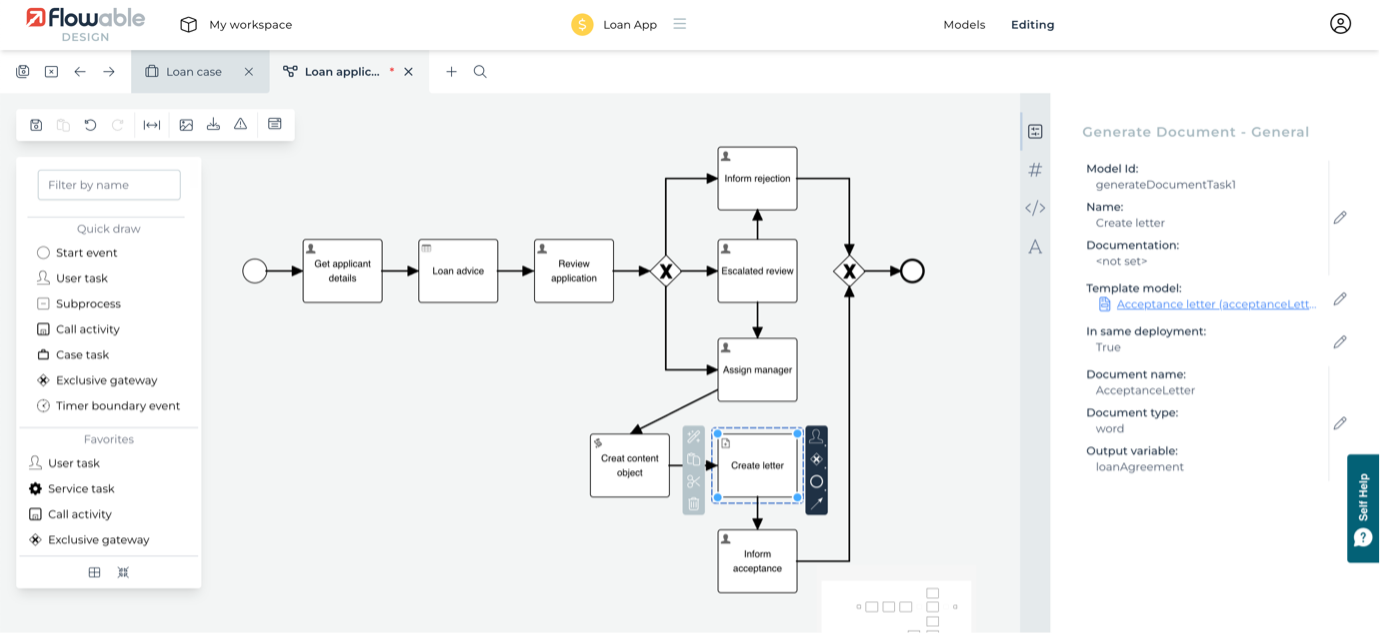
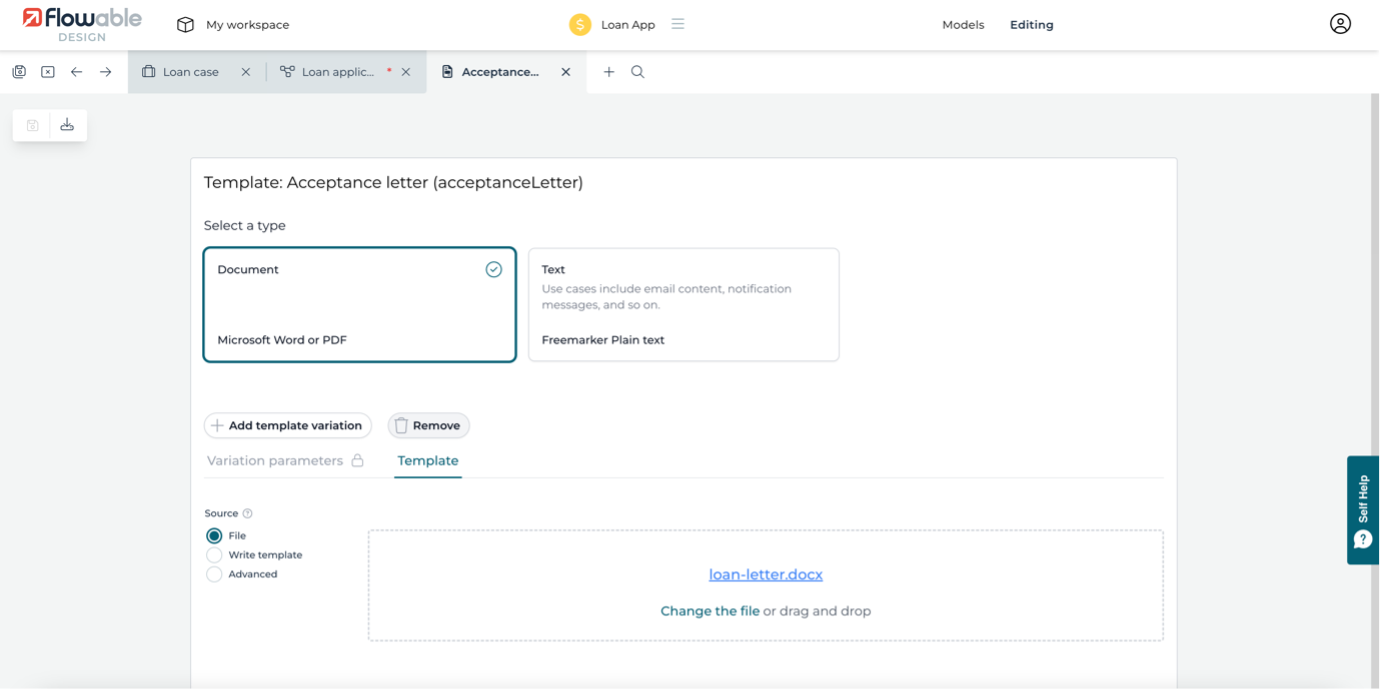
Part of the acceptance flow is to generate a letter with details of the loan. This is done using the Generate document activity. If you click on the Create letter step, you’ll see the attributes available. The main attribute identifies the document template to use. You will need to have defined the template already and then select it in this attribute.
You can also set if the generated document should be PDF or Microsoft Word format, as well a name for the document (which can be a dynamic expression). Importantly, to use the generated document later in the process, you need to specify the process variable to use to reference it.
To add or modify a template, you need to click on the Template Model and click on the edit icon.
Subforms and nesting forms
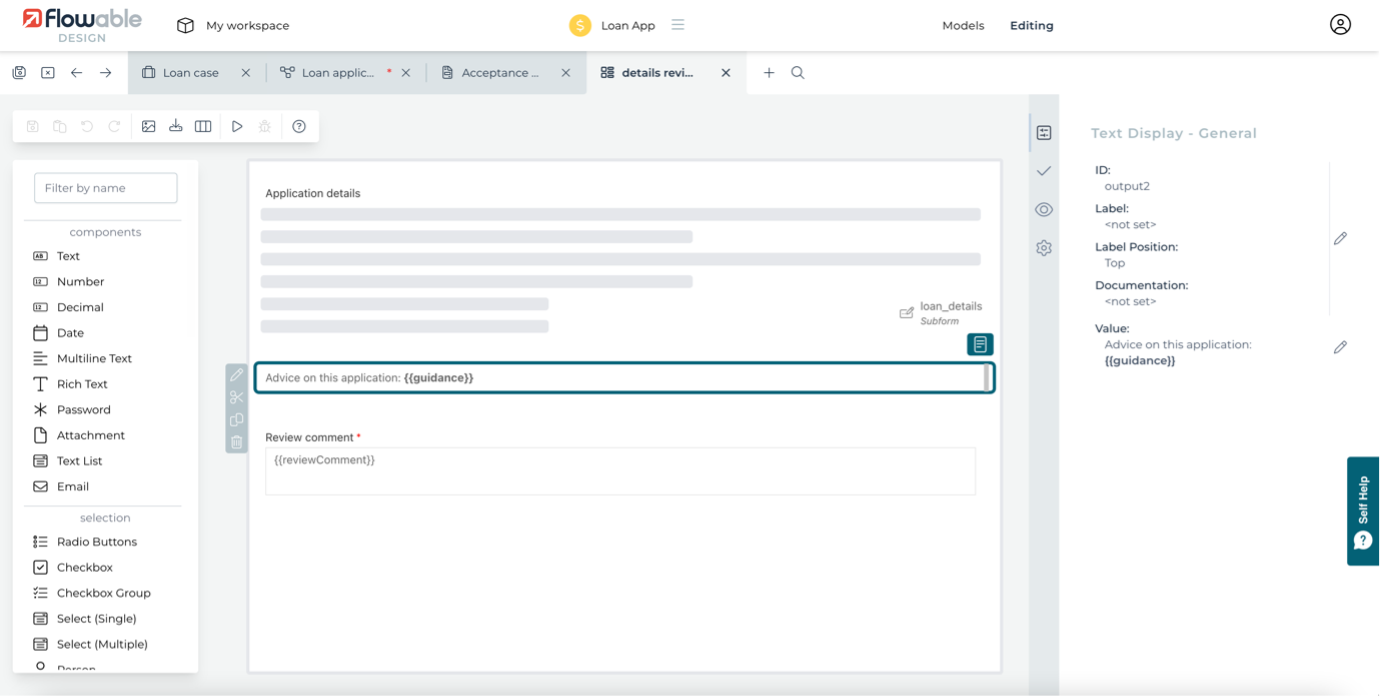
One of the powerful features of Flowable Forms is subforms, which allows you to include an existing form inside another. This means you can create form fragments that can be brought together to create more complex forms, or re-use a complex form with some additions. Go back to editing the Loan application process model and select the Review application step, then open its referenced form, details review.
Here you can see the original loan details form is included at the top of the form with an additional text output field. The subform has been set with Enabled off, so the details part will be shown read-only. As the subform has the same variables as when it was used in the first user task, the values will also be displayed when the form is shown again, even as a subform.
If you look at the form linked to the Escalated review task, you’ll see that it then includes the details review subform as well as another text output field. This shows how forms can be nested to any level to provide flexibility and maximum re-use of forms. Subforms can also be made repeating, so you can create a list of elements that are added or edited using the same form definition.
Content models
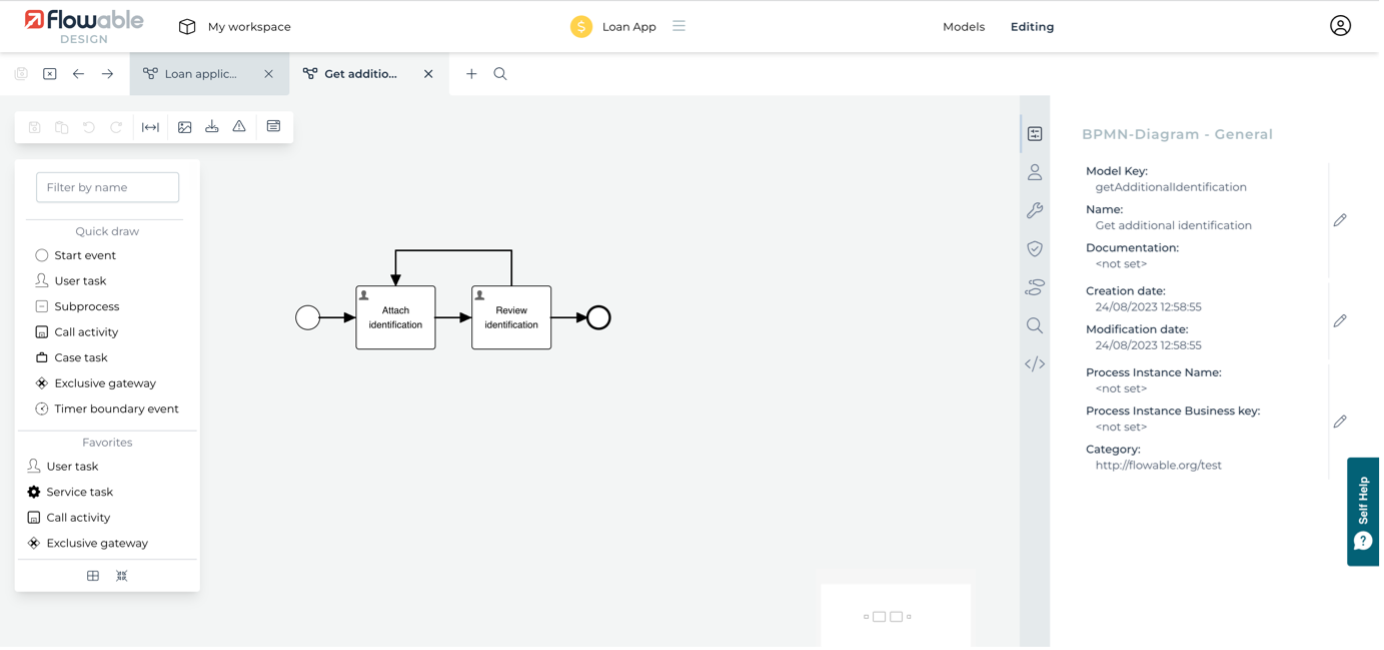
Do you remember the little process that was injected into the running process to get additional ID? It has an example of adding a content model to a file that’s being uploaded (you can attach a content model to a file at any time). From the Loan app, edit the Get additional identification process.

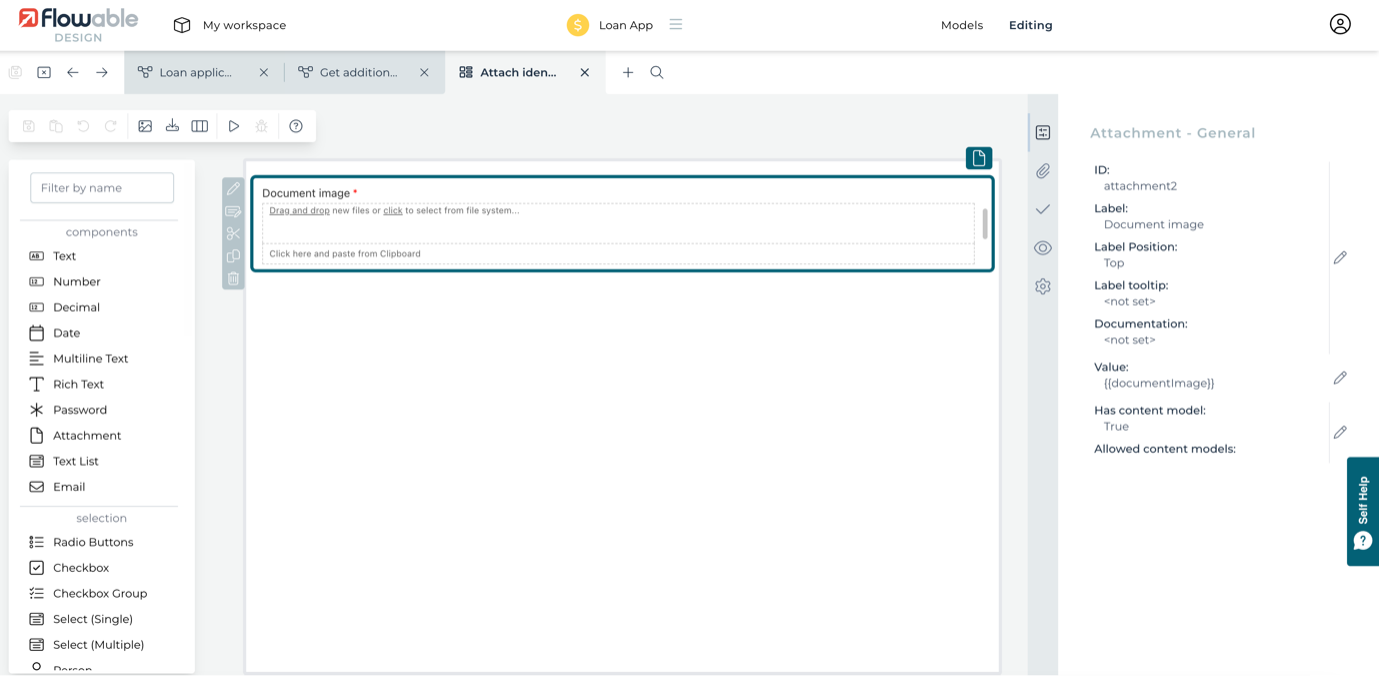
Select the Attach identification task and open the linked form. You’ll see an attach field with the Has content model attribute enabled. The Require content model attribute is also enabled, meaning the user has to select a content type for the field to be correctly filled. It is also possible to list a set of content models that can be used. If none are defined, as in this example, then all content models in the app will be allowed.
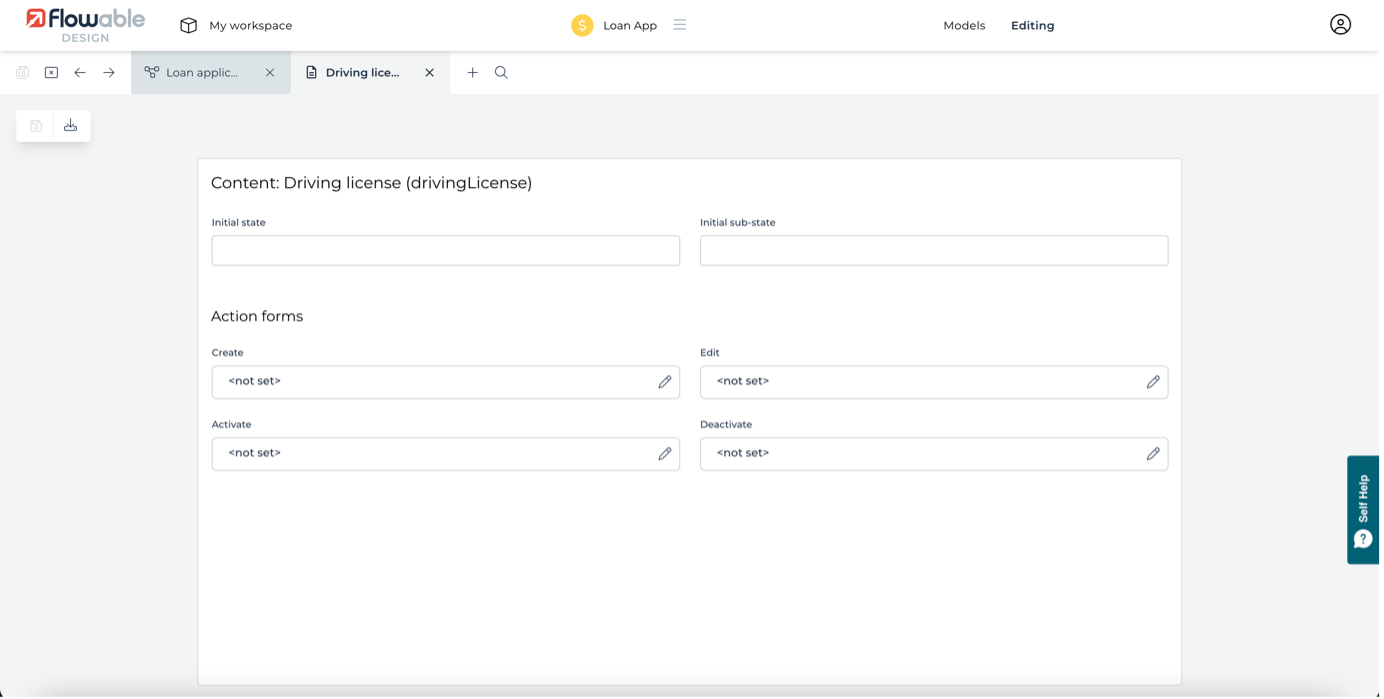
Creating a content model is as simple as creating a form and linking it to a new content model. If you go back to the Loan app and filter the Work models for Content models then edit one, you can see that you just need to set the Action to edit and select the form to use for the content model’s properties.
Summary
This tutorial has tried to show you a number of the features the Flowable provides. It’s impossible to show everything - you haven’t seen how you can create custom design palettes, or how to embed the Flowable Forms runtime into your own applications, or so many other things. However, there is lots of detailed documentation available to explore further.