Database Data Objects - How it was put together
Remembering customers
In the original loan app, there was no attempt to check if the person applying for a loan was already known. The first thing we want to do is add this capability, so that we can use previous interactions to help in the loan decision. Click on the Loan application process model to open it in the editor. You'll see a pool, Loan process with two lanes, Loans team and Services to separate the human and system tasks. There's no executable change that comes by adding the pool and lanes, but they can help the visualization of a more complex process.
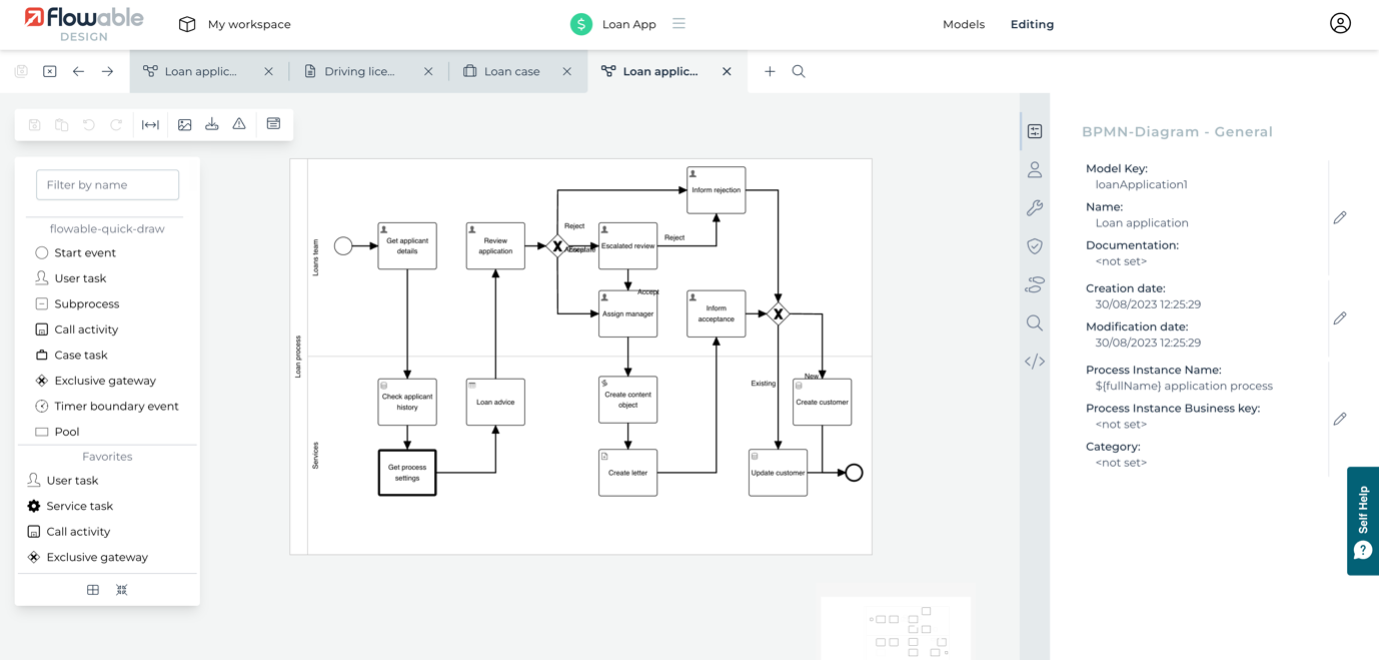
To use customer history, we want to add a check to see if we already know the applicant, as well as add a step to remember the applicant for any future interactions. We've done that by adding a Data Object lookup task, Check applicant history just after we've got their details. We can then use any of this history data later in the process to guide our recommendations. Select the Check applicant history task to see its attributes.
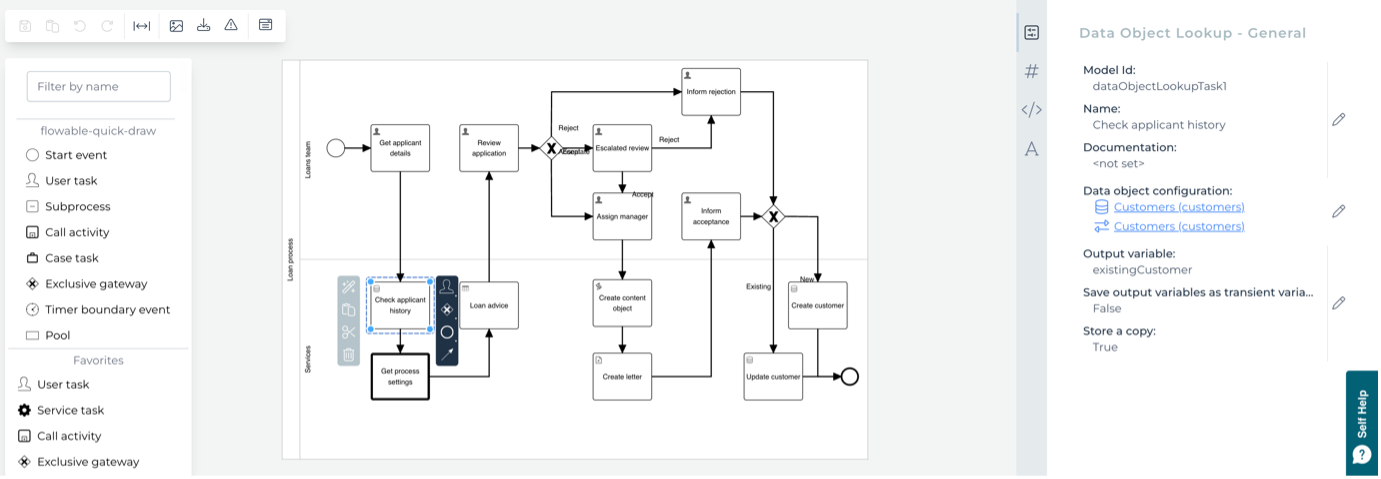
The key one is the Data object configuration, which identifies the Data Object to be accessed. There's also the Output variable that defines where the result of the lookup will go. We'll come back to the Operation configured later. An important attribute is Store a copy. This defines whether the returned result is treated as an live Data Object, or just a copy of the Data Object's values. More on this later, too, but for this use, we just need a copy of anything we know. If there's no matching result from the lookup, the existingCustomer variable will be empty.
Let's explore the Data Object now. Select the Customers link in the Data object configuration attribute, which will display the Customers Data Object model.
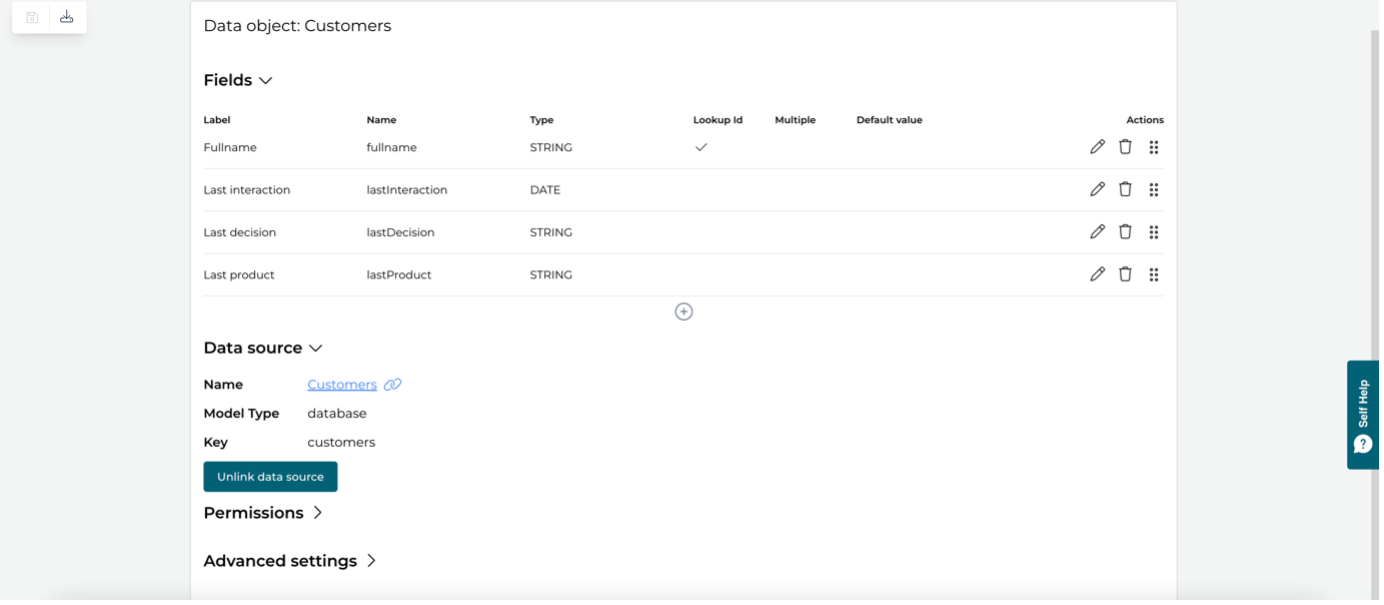
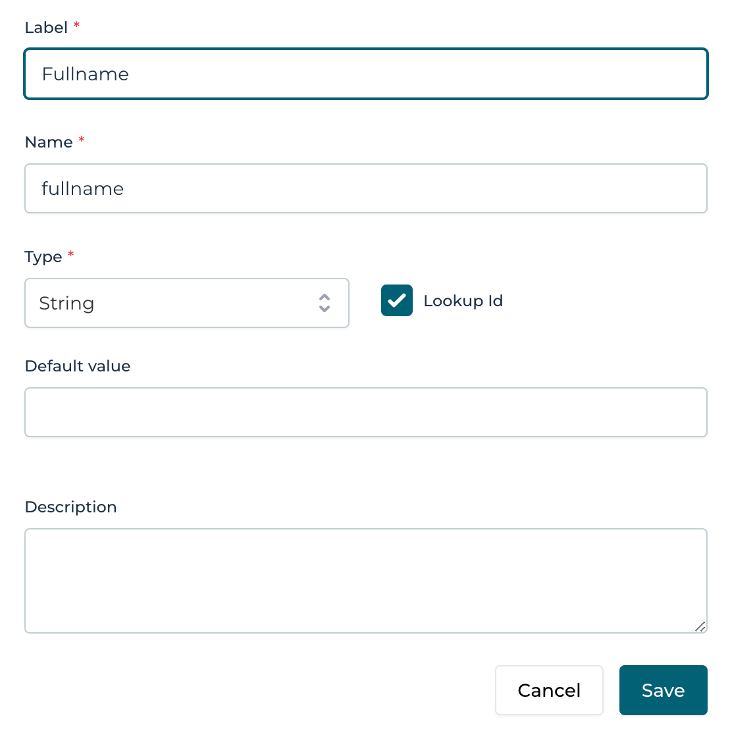
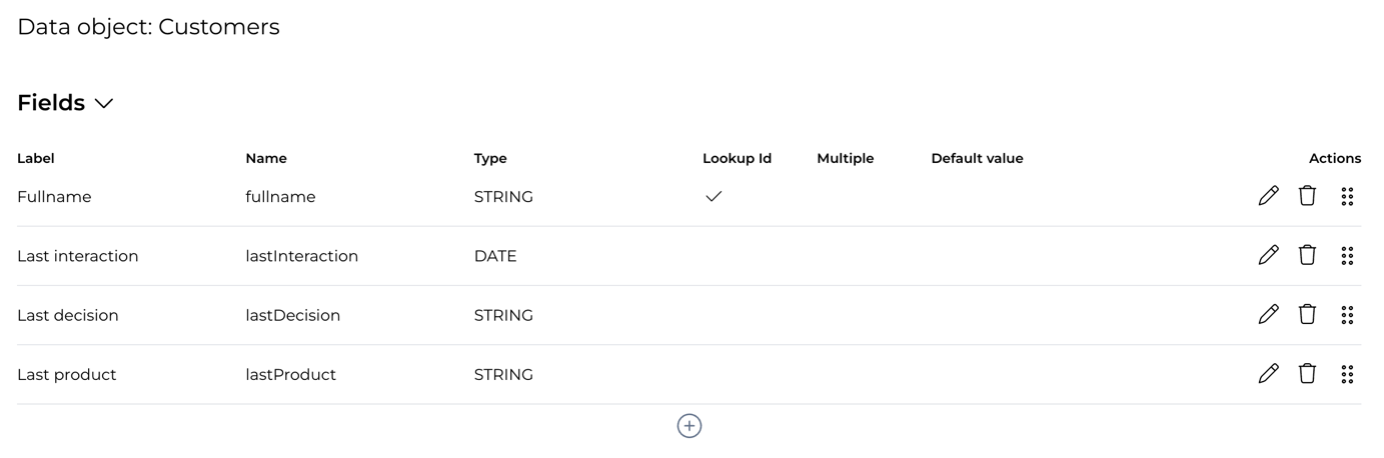
You'll see that the model has four fields, Fullname, Last interaction, Last decision and Last product. The first of these has been defined as the Lookup ID. For this simple example, we're just using the applicant's fullname as their unique identifier, which is not what you'd do in a real solution.
A Data Object is an abstract definition of the data for an object. Here, we have four fields of data, three are strings and one a date. At this abstract level, we can also define permissions on who can access any data. Click on the Permissions header to see the defaults.
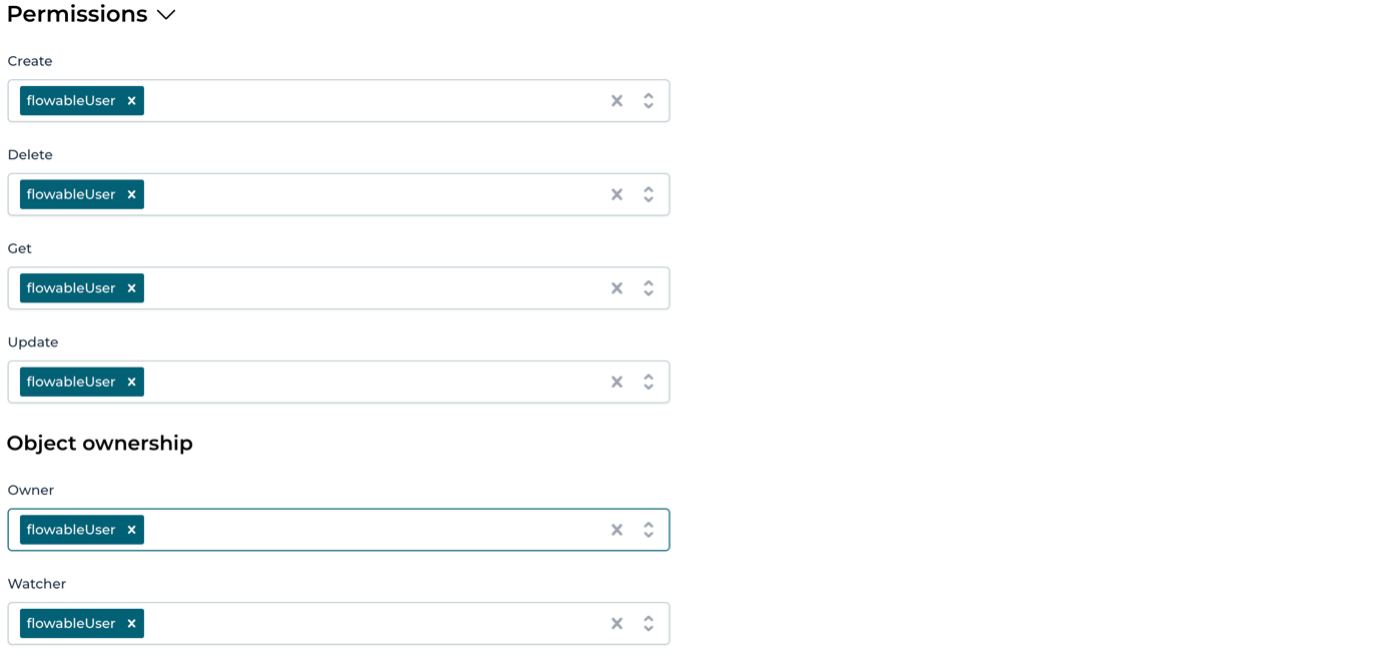
The default is that any member of the Flowable User group can see and do anything. We're not going to change that for our example, so click on the Permissions header again to hide the details.
Once you have a Data Object defined, the next detail is where the data for it is held, for access and update. Click on the Data source header (but not on the Customers link itself) to see the details of the data source we're going to use.

As you can see, this Data Object is linked to a relational database source. There are different types of data source provided, as well as custom options, with relational database and REST being the most commonly used. To see the full definition of the Customers data source, click on the Customers link in the Data source heading. This will show the Customers data source model.
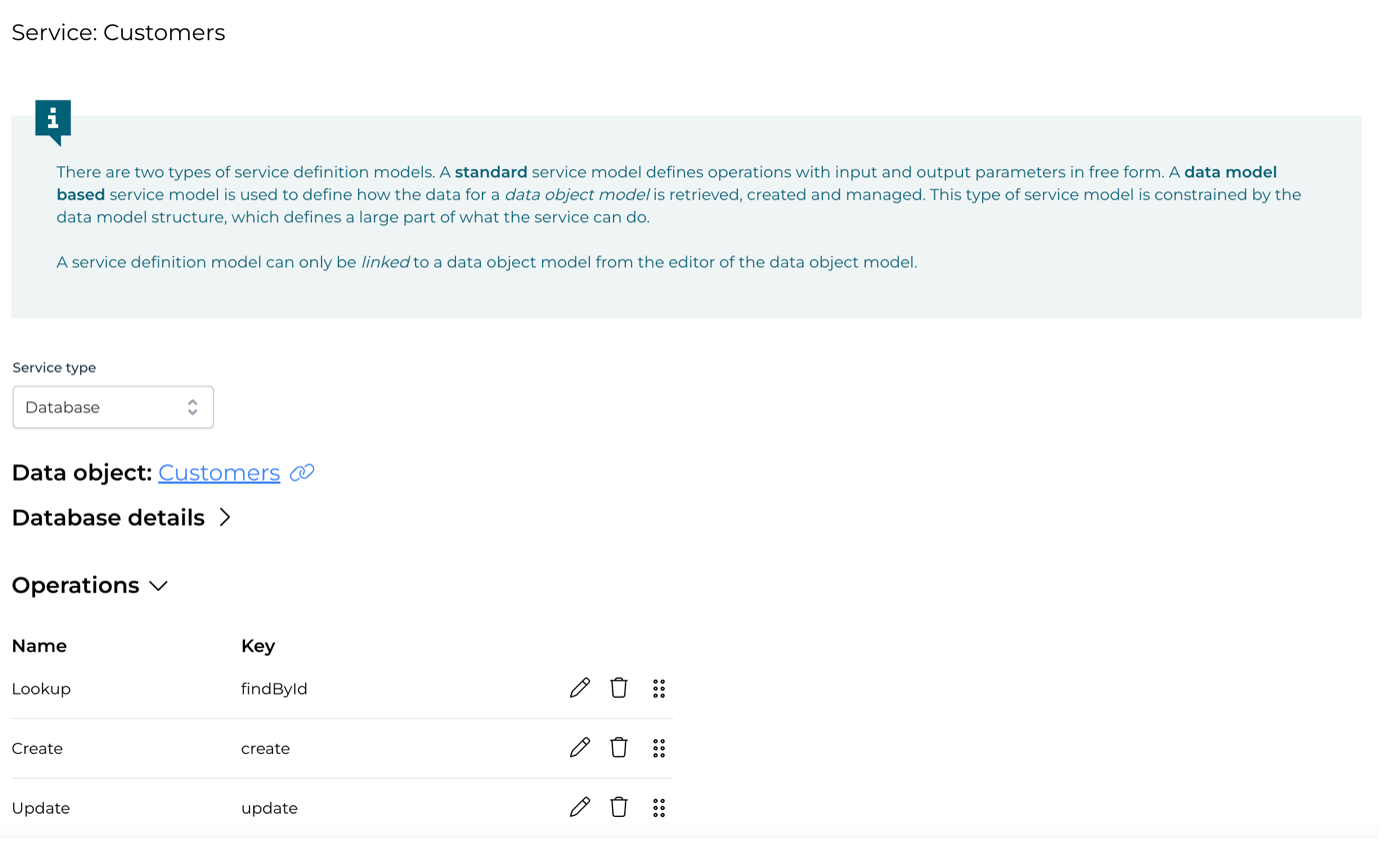
Here we can see a link back to the Customers Data Object model, as well as a list of Operations. First, we'll look at the details of the data service. Click on the Database details header.
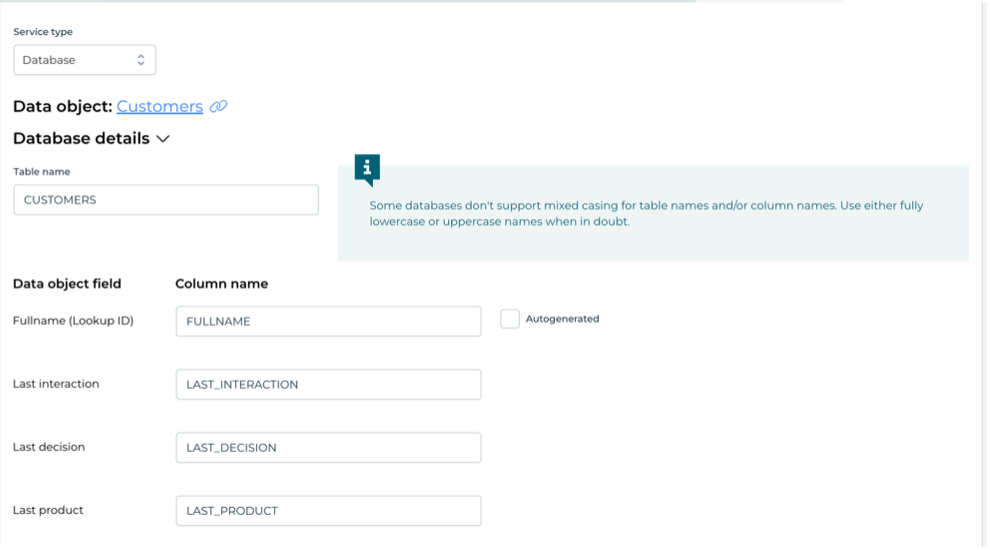
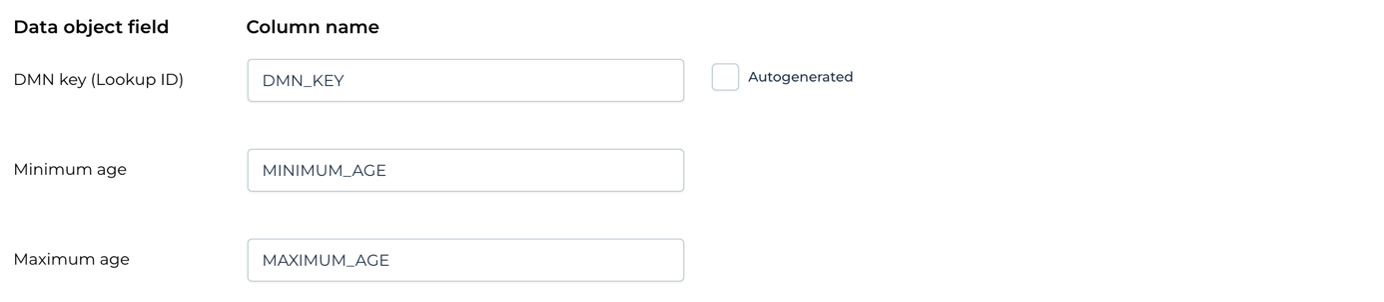
This shows the database schema details for this data service. The customer details will be maintained in a database table named CUSTOMERS, with the four Data Object fields mapped to columns in that table. Note that the lookup Fullname field has the Autogenerated option set as off. If you'd like Flowable to generate unique IDs for your Data Objects, you would turn this on.
There's also a schema that's been generated for this database table - a Liquibase log. This is what is needed to actually create the database table in a runtime system. The schema model will need to be initialized once the app is published to the runtime before the new Data Object can be used. That's what we did in Flowable Control before we first used the updated Loan app.
With a database-backed Data Object, most of the operations can be generated automatically. For our app, we also want to be able to list all customers that we know about, so an extra search operation has been added. Select the Find all operation to see how this has been defined.
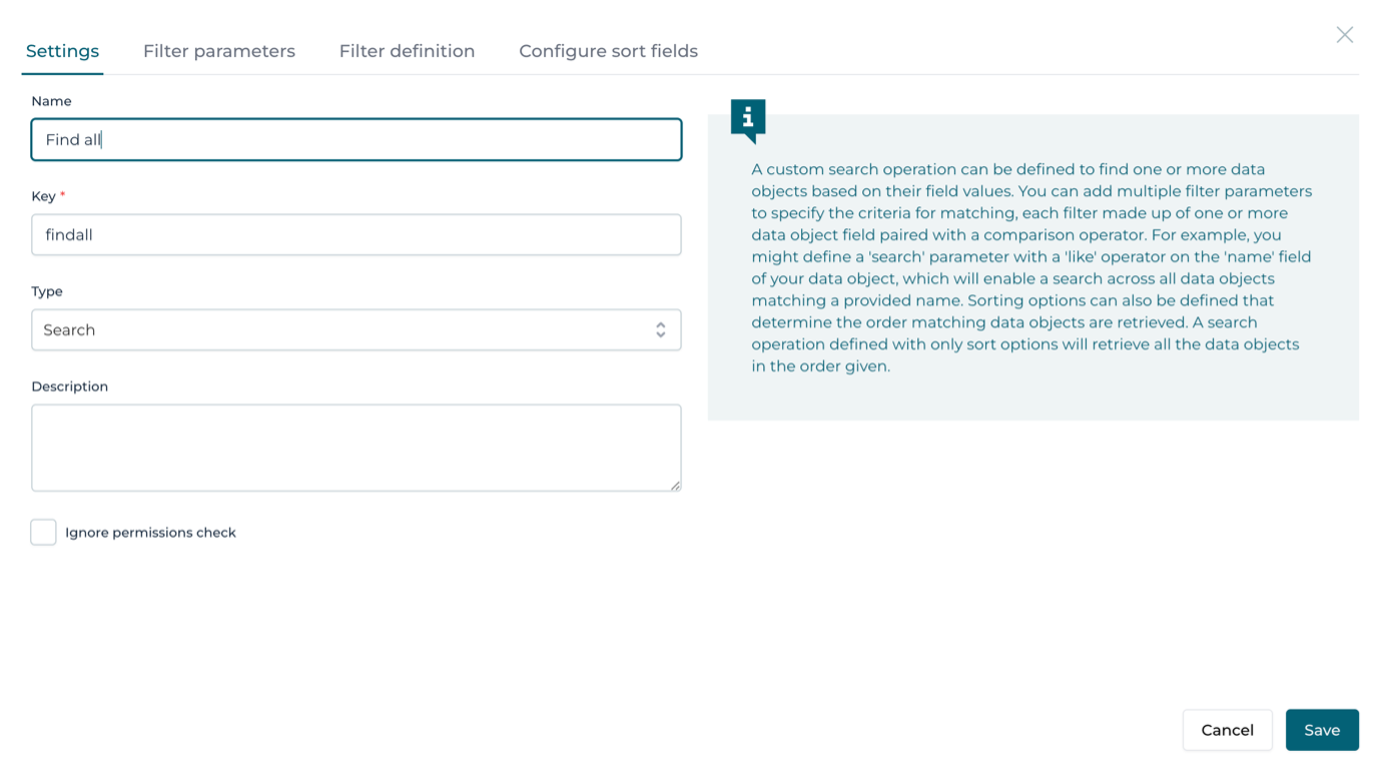
All that has been defined is a sort field. With no filter parameters defined to limit what customers are required, all customers will be returned, so all we want to do for convenience is have them returned sorted by their name. Click on the Configure sort fields option to see how this was done.
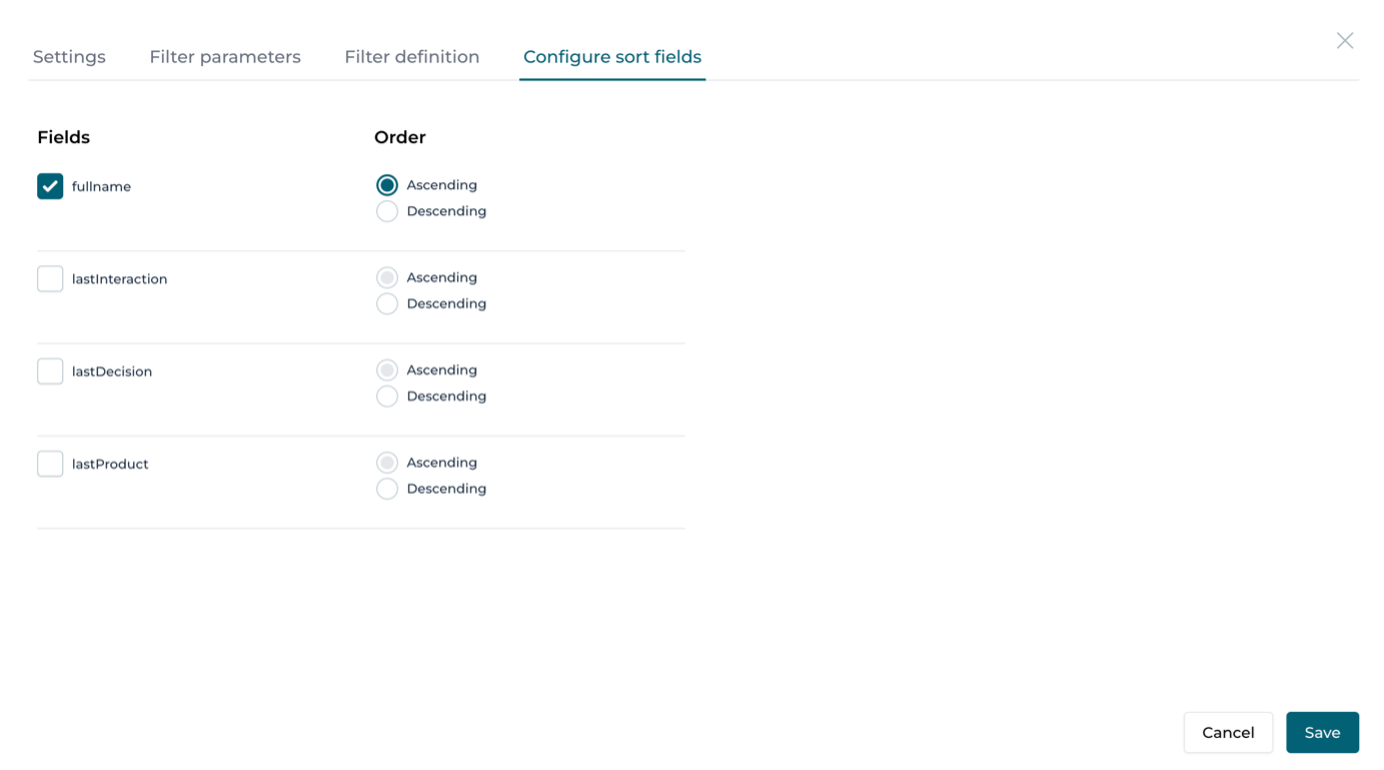
The customers will be returned sorted only on their fullname in ascending order. Click the Cancel button to close the dialog. Click the Cancel button below it to close the dialog.
With all this in mind, go back to the Loan application model, which should still be available in a tab in the editor. The Check applicant details task should still be selected and showing its attributes (if not, find and select it).
The Lookup operation has been selected, and it needs us to say what variable we want to use from our process as the value to lookup in the Data Object's Fullname field. It's set as ${fullName}, which is the form field variable that we collect from the user at the start of this process.
Now we have the capability to lookup any previous interaction with the applicant, we can use that information, if it exists, in the process. An example of that is in the details review form for the Review application user task. Go to that user task in the Loan application model and open the link to its form.
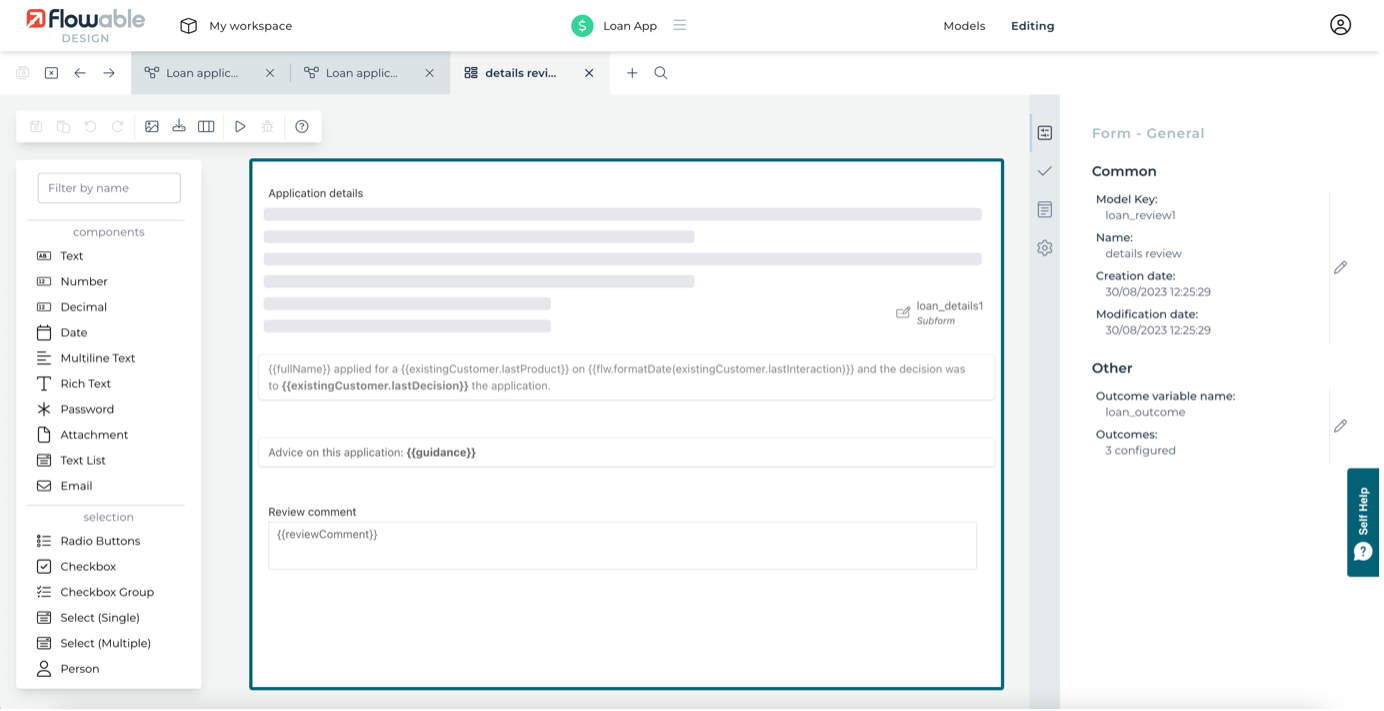
We've added an extra Text display field to the form, to show any information we have available. Click on the field to see the text that will be shown on the right-hand side panel.
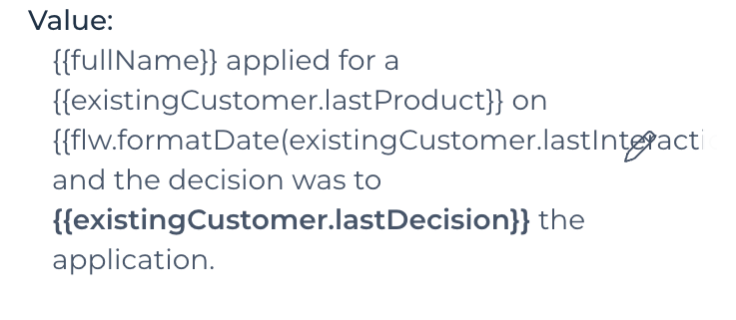
You can see that we can reference the fields of the retrieved Data Object using the result variable, existingCustomer, from the lookup task, with dot notation for the individual fields. So, existingCustomer.lastInteraction will reference the date field from our Customers Data Object, which we format more nicely for display. The Condition Builder and Variable Assistant can be used to reference Data Objects and their fields.
At the end of the process, we want to store the fact that this applicant did or didn't get approval. Go back to the Loan application model and look at the end of the process. We have a gateway that goes to either a Data object create task, or a Data Object update task, based on whether the Data Object we tried to lookup earlier existed or not. Select the Create customer task to see how its attributes have been set.
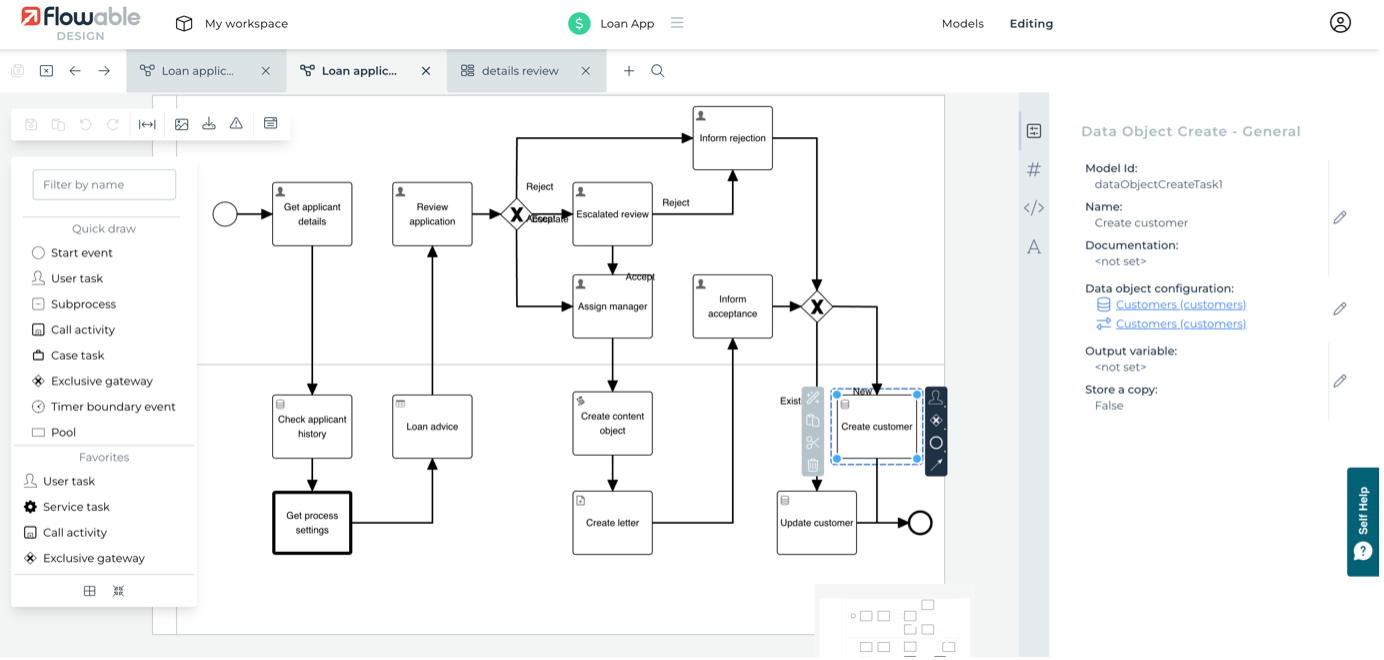
As you'd expect, we've selected Customers as the Data object configuration. We don't need an output variable defined this time, as we're not going to do anything more with it. We do need an operation, so click on Customers(customers) under the Data object configuration and click the edit icon.
The Fullname is being set from the variable where we collected the applicant's name. The interaction date is generated with an expression from the current time value, stripped back to just the date part. The outcome of the application is mapped, and the product is set to the fixed value of loan. When this task is executed, a new row in the database will be created with these four values. If we'd chosen the lookup field for Customers to be autogenerated, then we wouldn't need (or have the opportunity) to set that field's value here, as it will be created automatically.
If you look at the Update customer task, you'll see an identical configuration, as we're managing the unique identifier explicitly, rather than automatically.
Dashboard editing of Data Objects
Something that is useful to have is a view of all the customers we know about, plus the ability to edit them. We can use a Data Object Data table to achieve this. In the Manage app settings case model, there's a manually activated user task with a form containing a Data Object Data table. Open this Manage customers form.
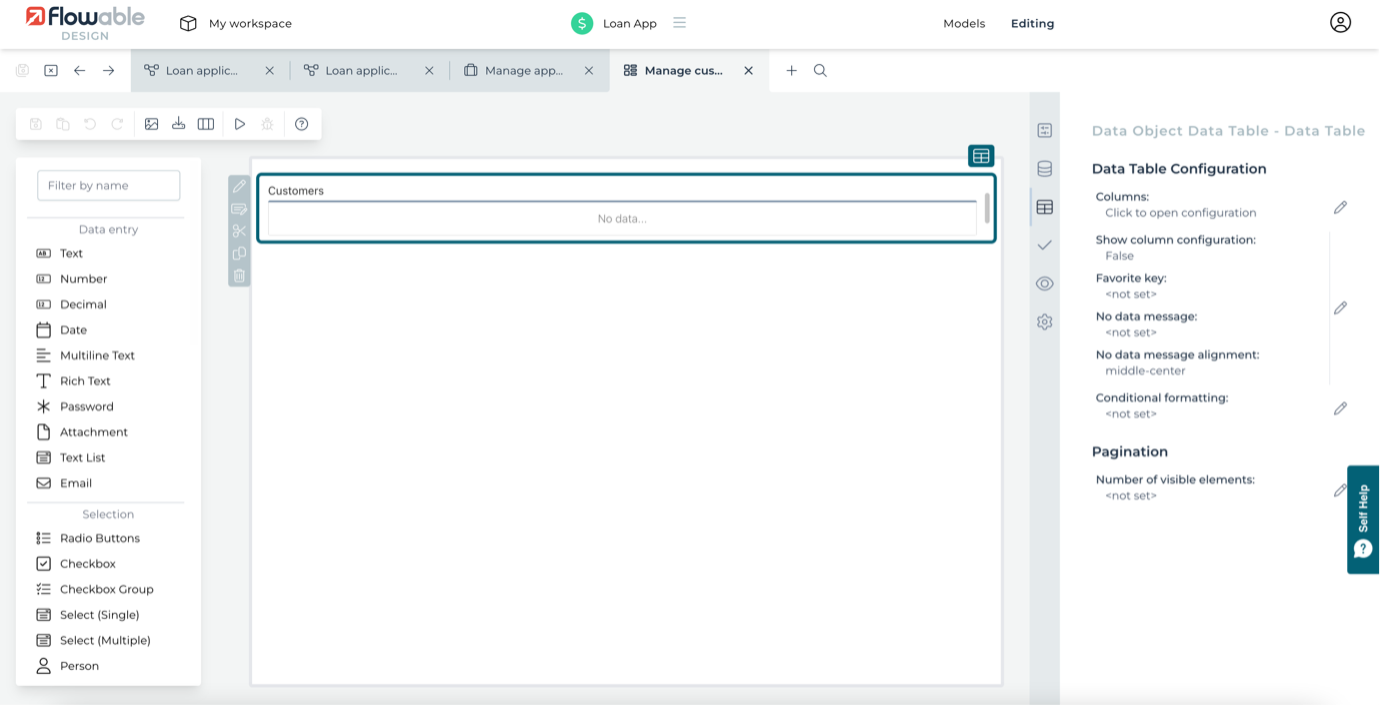 Click on the edit icon on the right-hand side panel under Data Table Configuration (Columns: Click to open configuration)
The table references the Customers Data Object and uses the find-all operation to return all the existing customers. The table is configured to allow viewing, editing and deleting of entries, as well as providing a search box to filter the entries. It's this that allows the live editing of the customer Data Object, through a user task. The table is defined to have 4 columns. Click on the Columns attribute to see how they're configured.
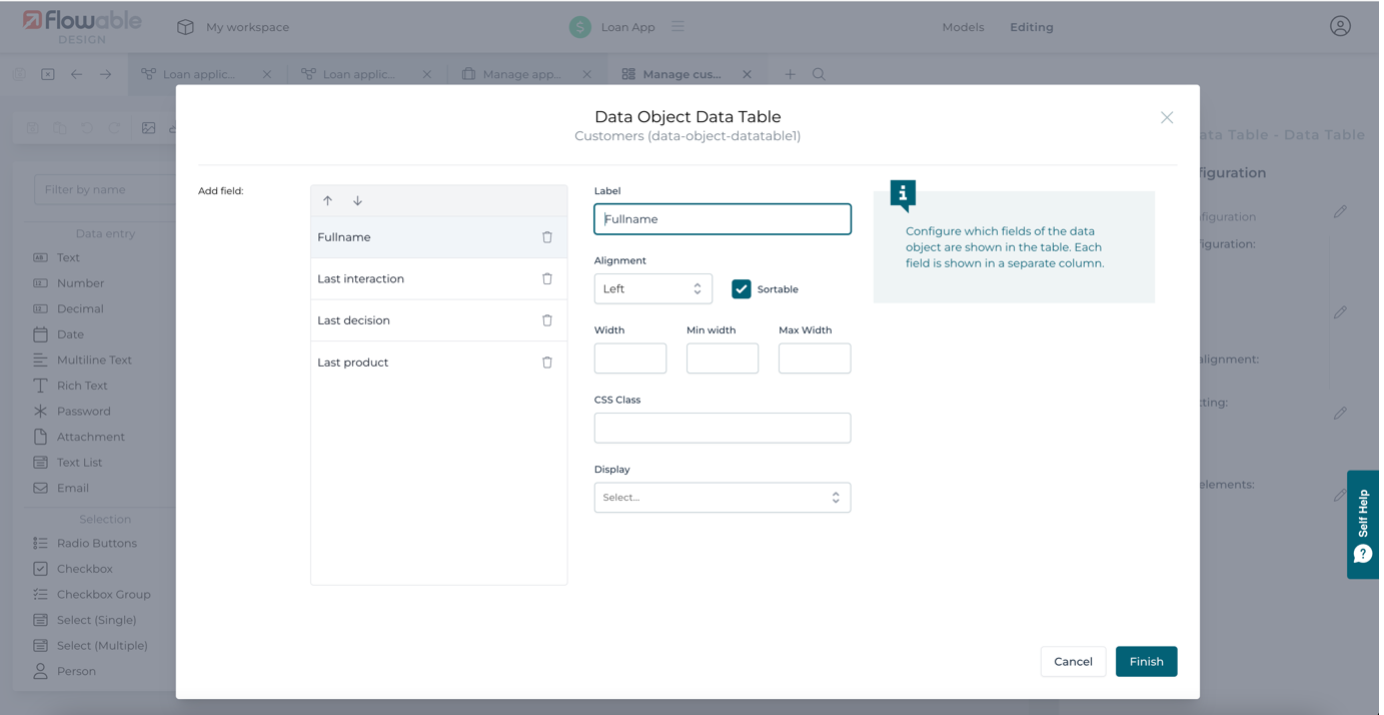
The only change from the defaults are to mark each column as sortable.
As well as using task forms with Data Object Data tables to manage a set of data, it's also useful to be able to do this with a dashboard. Click on the Configure pages button in the Loan App view.
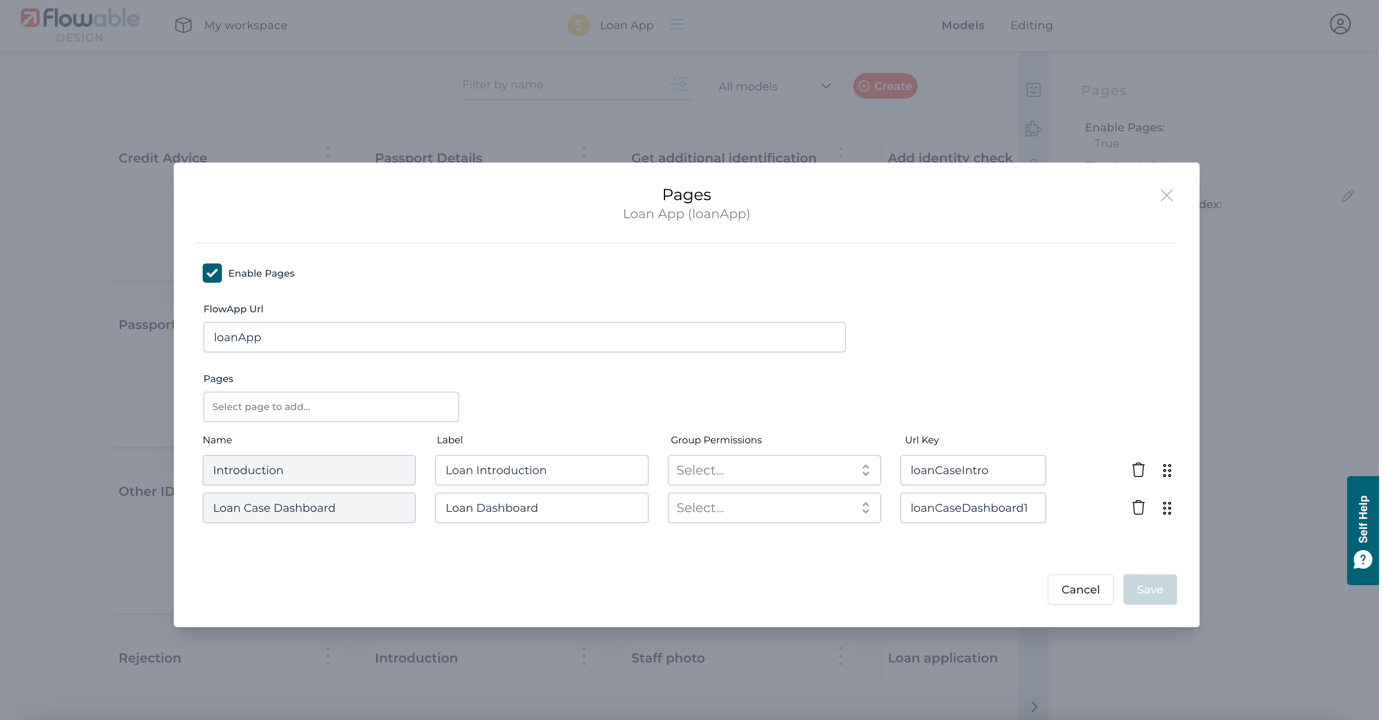
Then click on the link to the Customers page to open the referenced page model. The page just has a subform field that references the same Manage customers form as we used in the manually activated human task. We could use the permissions configuration on the dashboard to limit who has access to the dashboard, and as a result, the ability to make changes.
Using Data Objects for configuration
As Data Objects persist outside the execution of a case or process, we can also use them to provide business user configuration of cases and processes. The first example we'll look at is assignments. In the original Loan app, the assignment for the review task and escalation task were left to the initiator, automatically assigning to whoever started the process. It would be far more convenient if the assignees could be changed by an appropriate business manager with immediate effect, without having to update any process or case models and republish updated case and process definitions.
We can achieve this by having specific variables used in the process model to assign tasks, and have the values of those variables retrieved from a Data Object. In the Loan application process, select the Get process settings Call activity task.
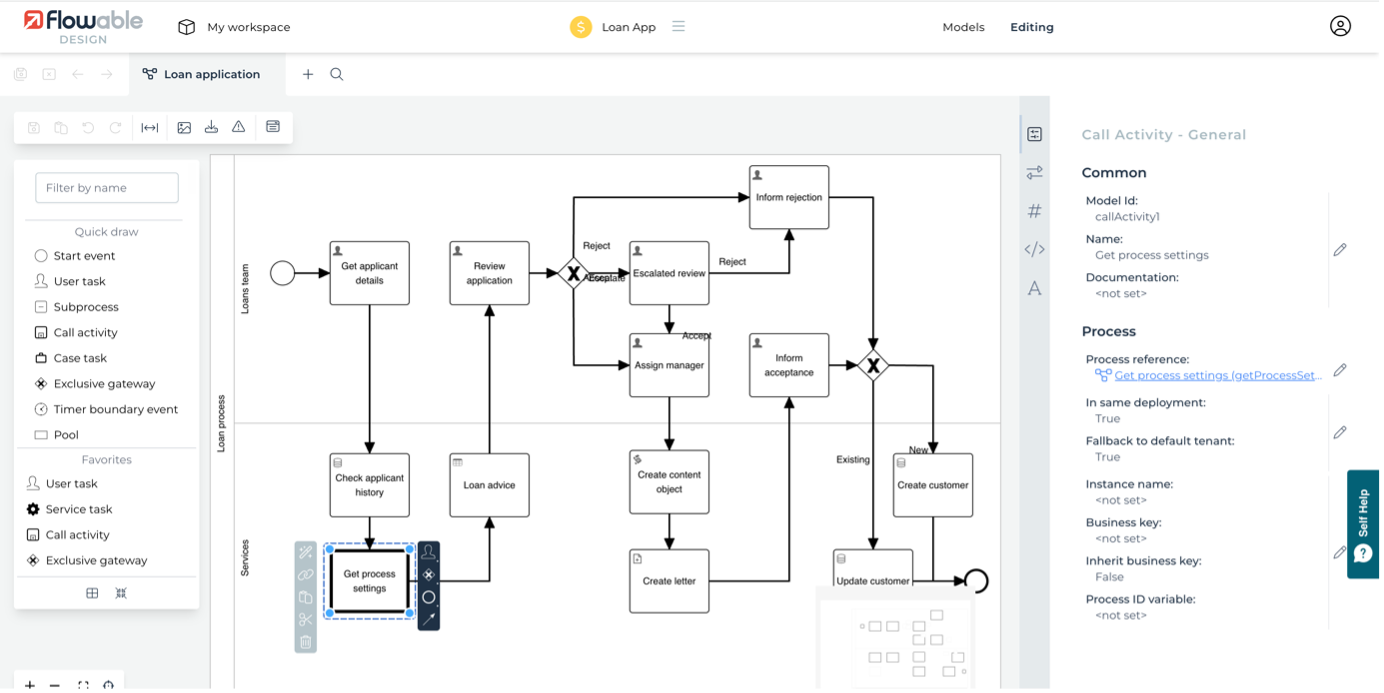
Note that this will call a process Get process settings and define a couple of Out variables: appAssignment and appDecision. Click on the Get process settings link to open its process model and select the Get assignment settings task.
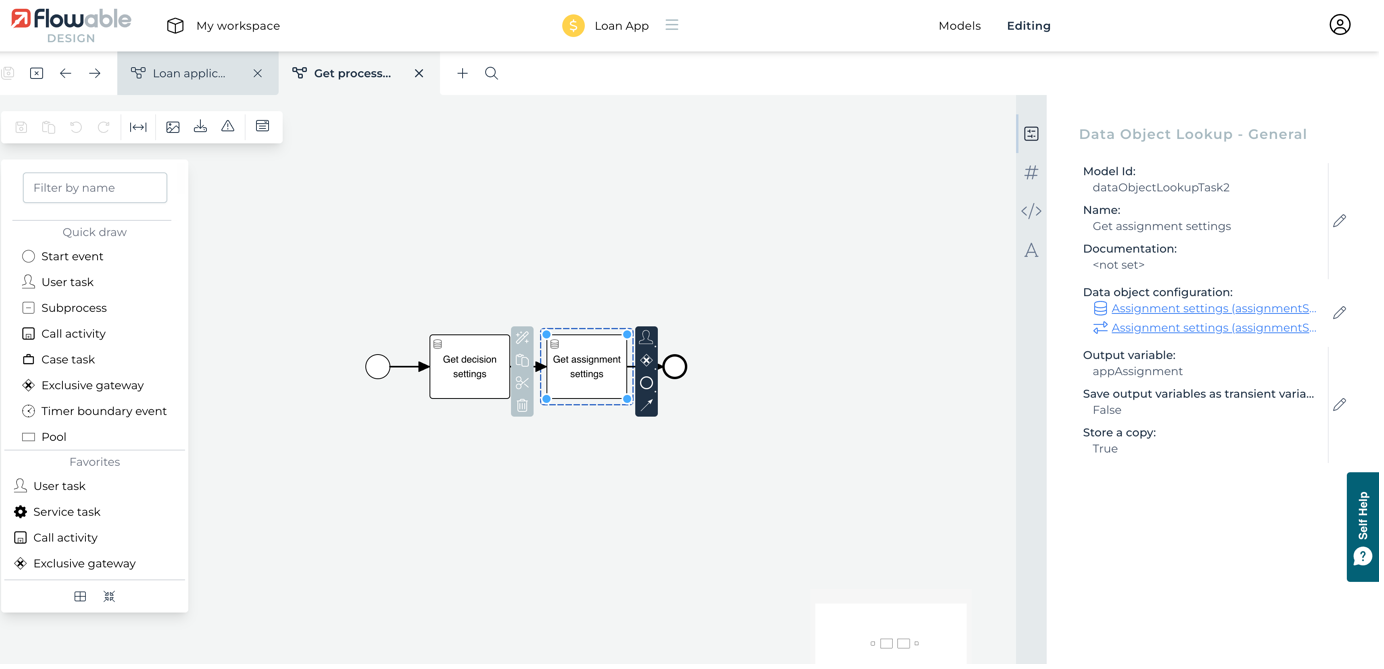
This is going to lookup the Assignment settings Data Object and set the result to the variable appAssignment. We're not going to change the Data Object, so we can just store it as a copy. Click on the Assignment settings link to open the Data Object.
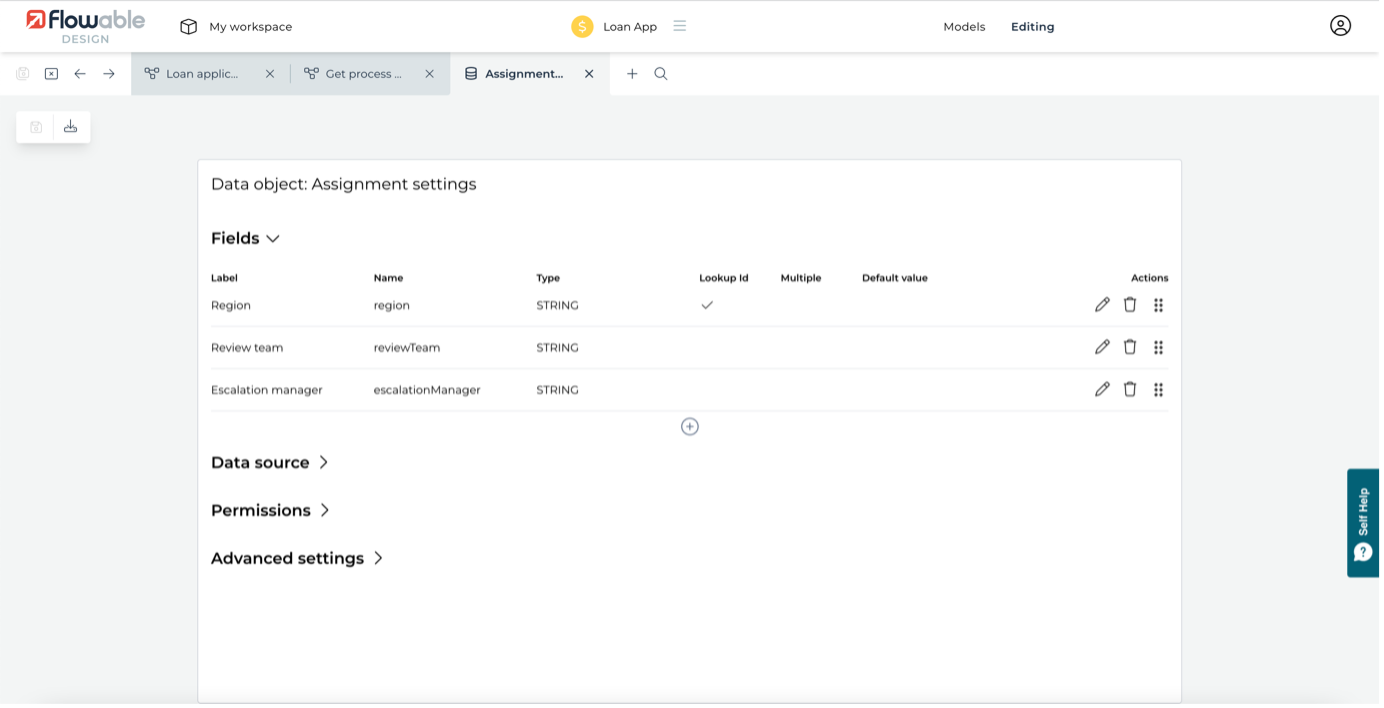
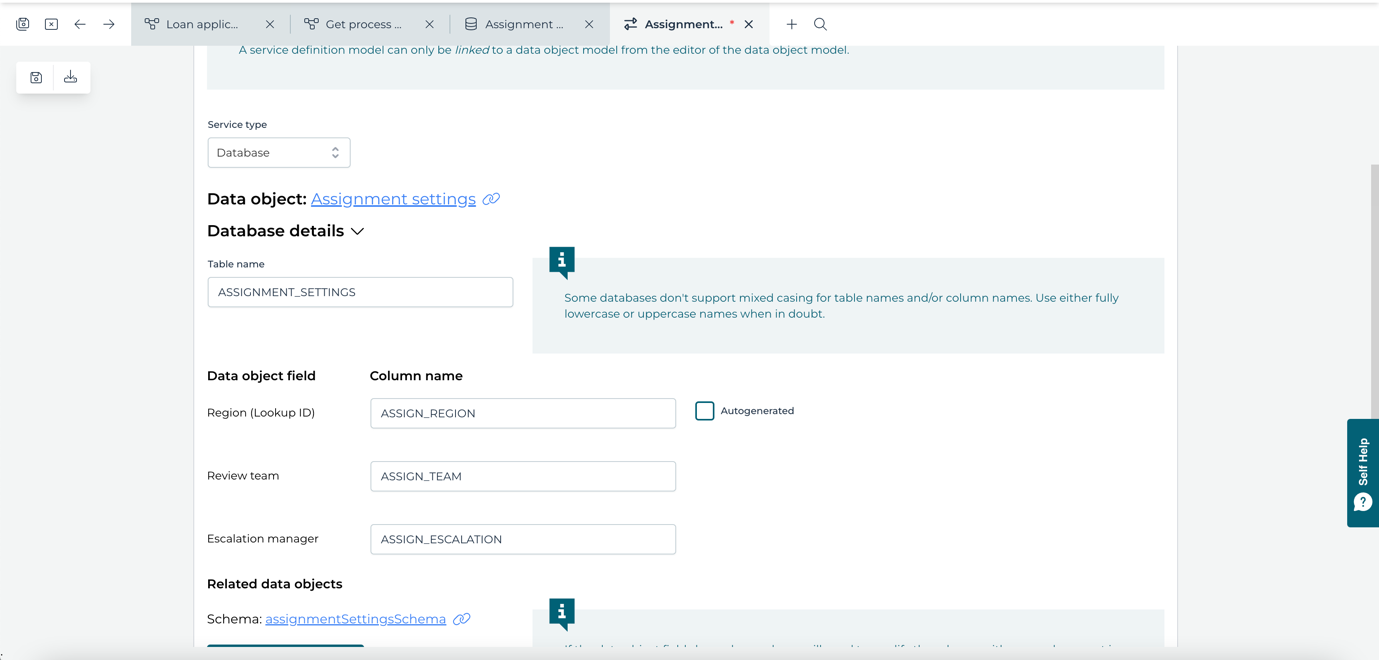
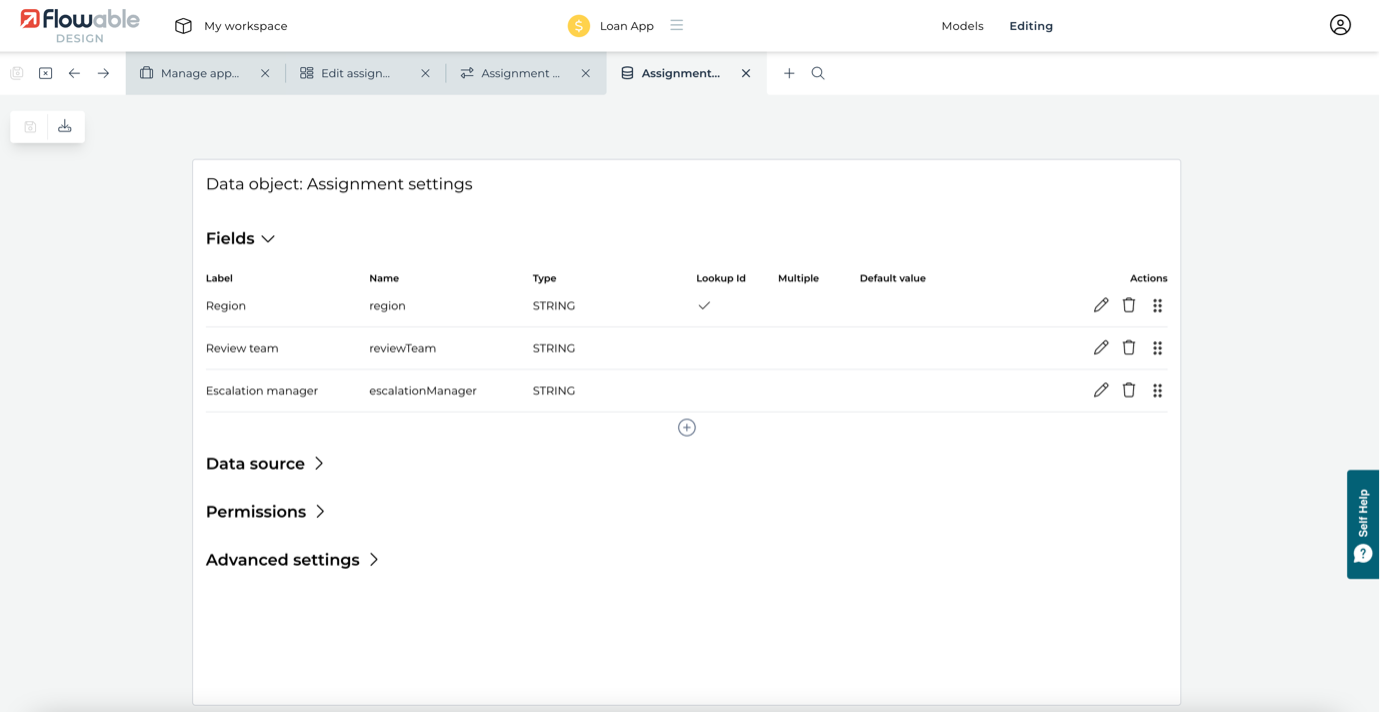
There are 3 fields for the assignment settings: a region, which is also a unique identifier for lookup; the review team, for the initial review task; and, the manager, for the escalation task. If you want, you can follow the details through to the database source settings, but they are very similar to what we have for the customers - mapping to a database table and adding a find-all search operation. It is the lookup operation that is configured in the Get assignment settings task, to return assignments based on the unique region.
Go to the attributes of the Get assignment settings task and click on second option under Data Object Configuration.
This shows that the nationality variable that was collected in the Get applicant details task of its parent process (Loan application) is used as the Data Object lookup through its Region field. So, depending on the nationality of the applicant, the process should use the corresponding region's assignment values.
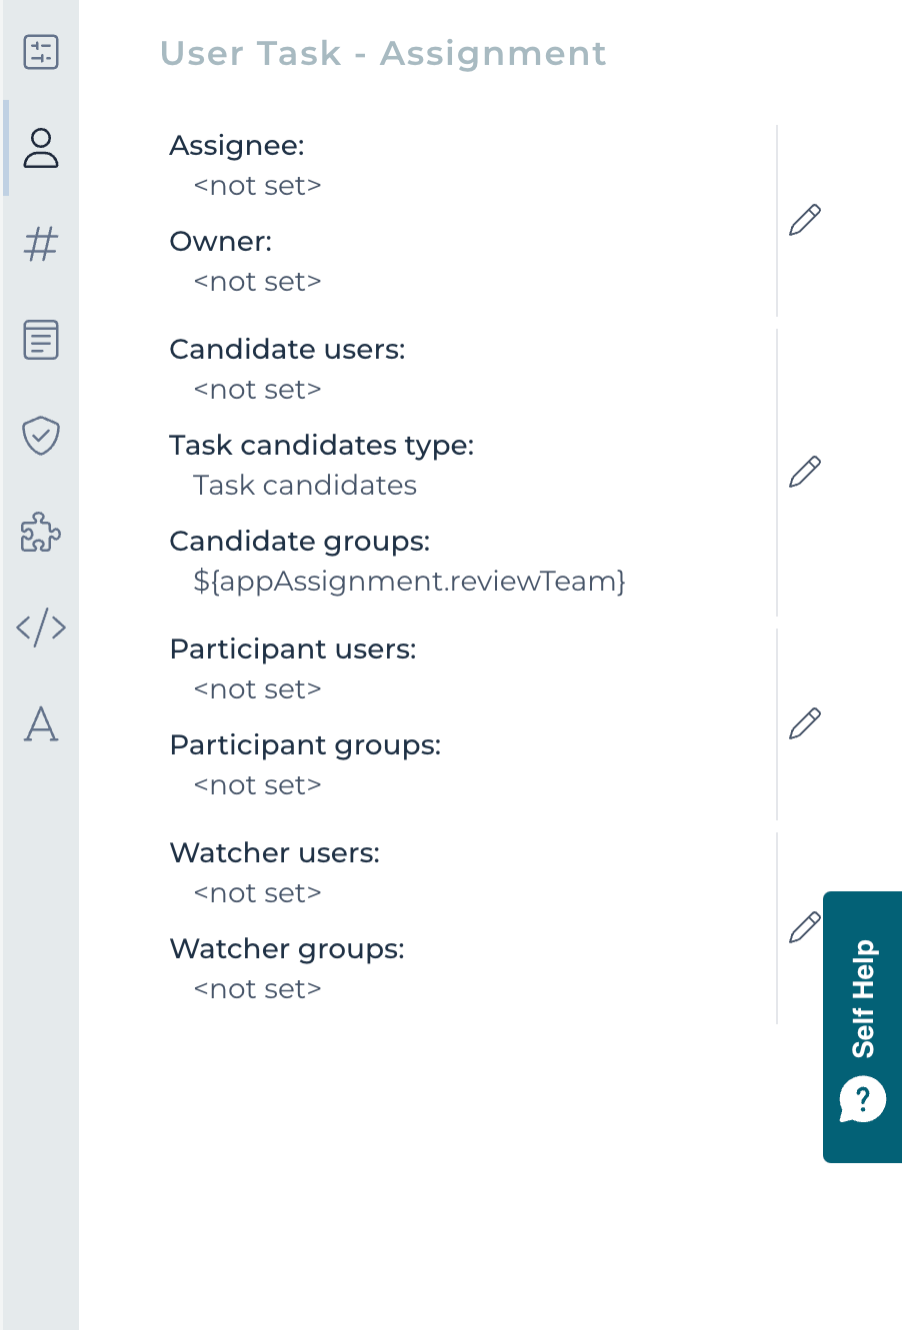
To see these in use, select the Review application task in the Loan application process.
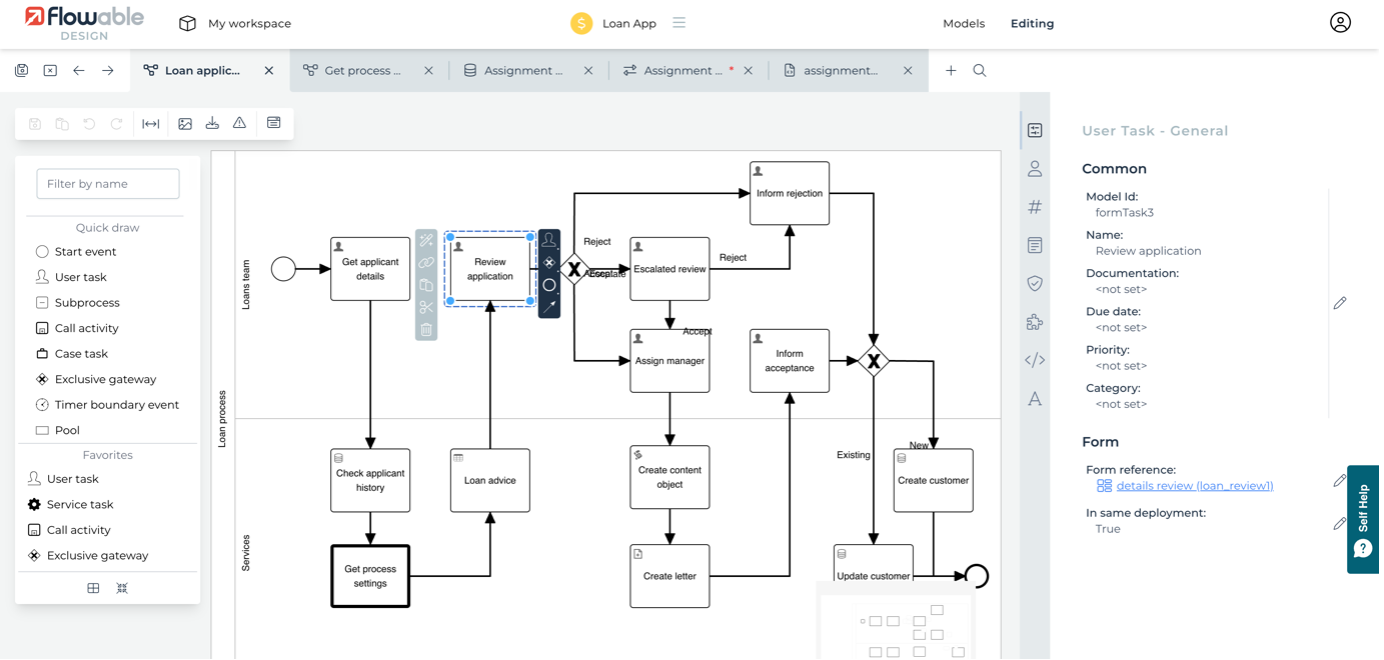
There's no assignee defined, but there is a variable ${appAssignment.reviewTeam} used in the candidate groups attribute. This means the task will be assigned to the group that was extracted from the Data Object for the appropriate region. Similarly, the assignee for the escalation task is set to a variable ${appAssignment.escalationManager}.
Now we can use the assignment settings in the process, we also need to have a way to add and edit those settings, without having to create new model versions or involve a Flowable administrator. There are a few ways this can be done. One is to have a user task that allows a user to create and edit the settings. As we have a couple of different settings and Data Object management tasks, we've used a case model to represent this. Open the Manage app settings case.
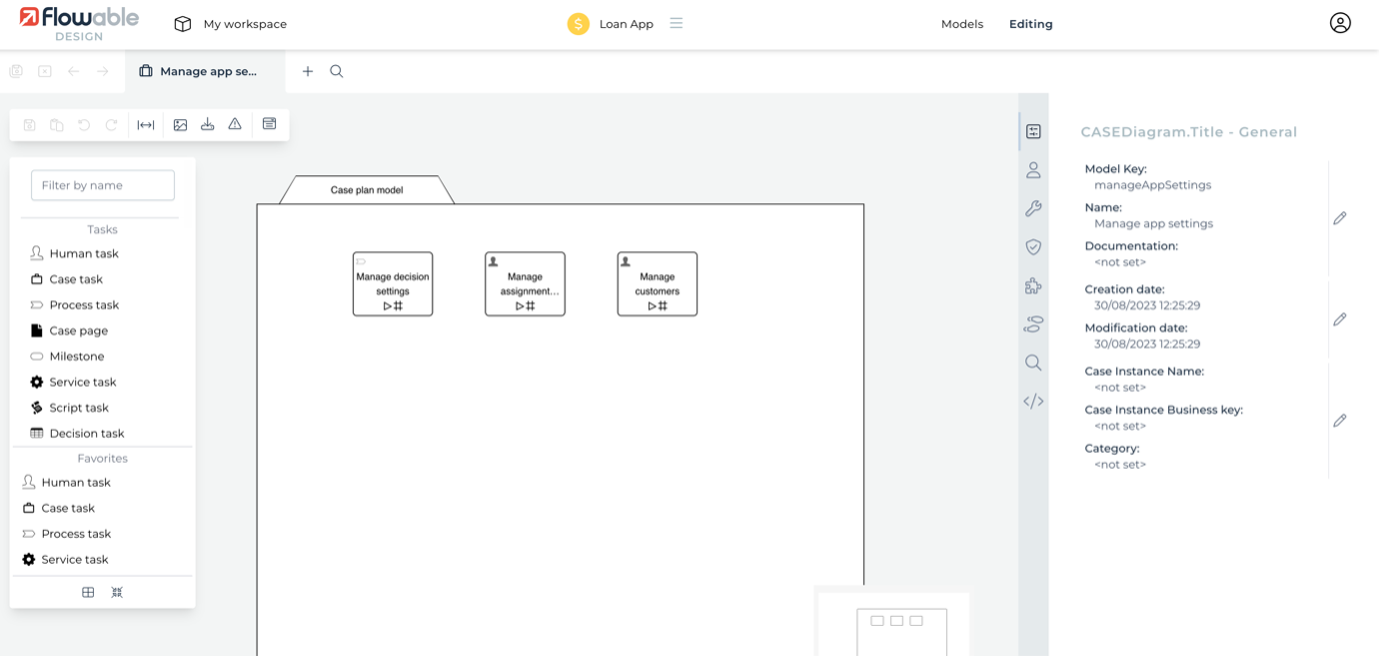
The case has three tasks, all manually activated. One of them starts a process, the other two are simply human tasks.
Select the Manage assignment settings human task and then click the link in its attributes to open its form.
All the work for managing the settings is done through a Data Object Data table. Select it to see how it's been configured.
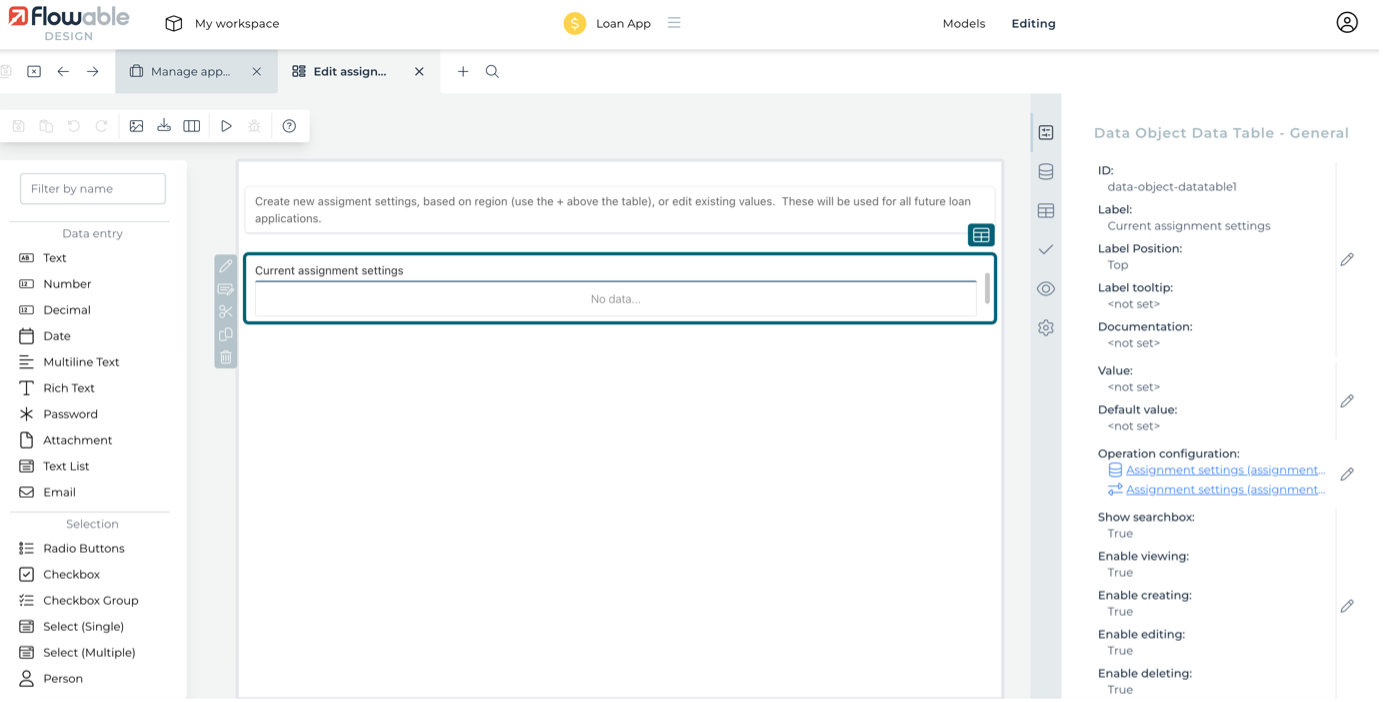
As expected, the Data object configuration is set to Assignment settings. The operation has been configured to the find-all search that returns all assignments sorted by region. The data table has also been set to allow viewing, editing and deleting of each Data Object displayed, as well as a searchbox for filtering the results through the UI. The Create form references the Edit assignment form. Click on it to open the form.
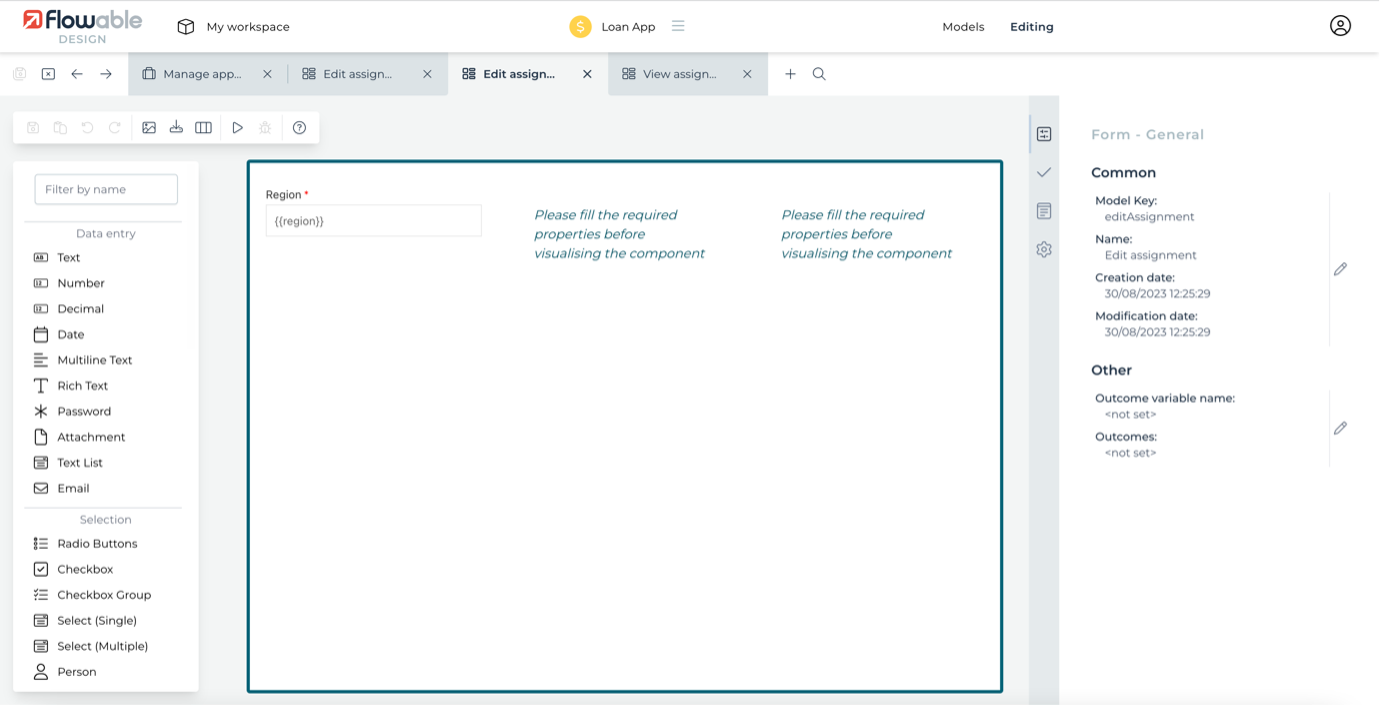
The form contains 3 fields that need to be completed to create an assignment entry. Switch tabs back to the Data Object Data Table and its attributes. The Edit form reuses the same form as creating assignments, while the View form uses a form that includes the edit form in a read-only mode. The important attribute for the table view itself is Columns. Click on the attribute to see the configuration.
Using Data Objects for dynamic decision criteria defined by business users
We use a similar approach for managing the decision settings, but in this case there's only one set of values for the decision table needed. To make the decision settings more general purpose, we've used a database table with a row for each settings for a specific decision table. To see how this was done, go back to the Manage app settings case and open the Manage decision settings process linked to the same named task.
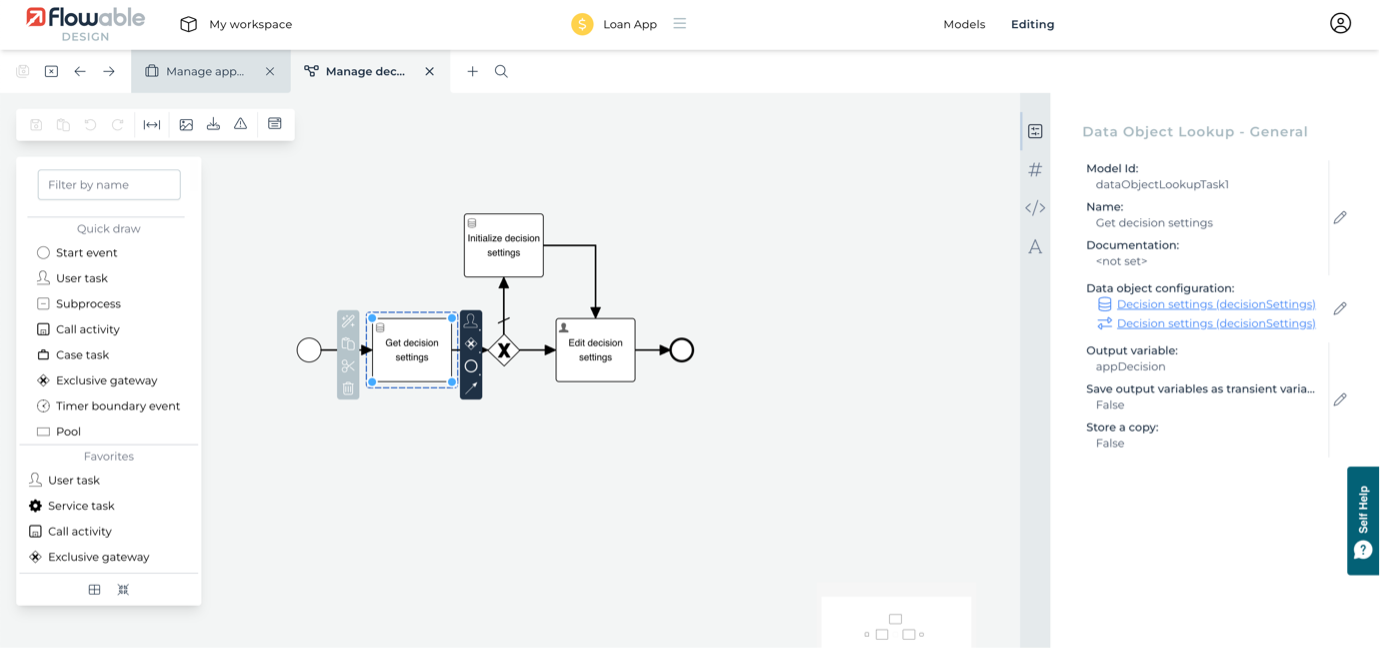
The first task uses the Decision settings Data Object, which is looked up and the result returned into the appDecision variable. As we're using the same Data Object for any decision table that needs to be configurable in any app, we need to set the lookup ID for the Operation configuration. Click to open it and you'll see we've used the decision table key, creditAdvice, as the unique lookup identifier. Note that we are not storing the retrieved Data Object as a copy, but keeping it live. This means as soon as the task forms referencing Data Object values are submitted, the corresponding database tables are automatically updated, without needing a separate task.
The first time this process is run, there won't be any setting found for our decision table, so the process has a gateway that tests the returned appDecision to see if some default values should be set. If so, a Create Data Object task is used to add the defaults. Select the Initialize decision settings task and click its Operation configured attribute.
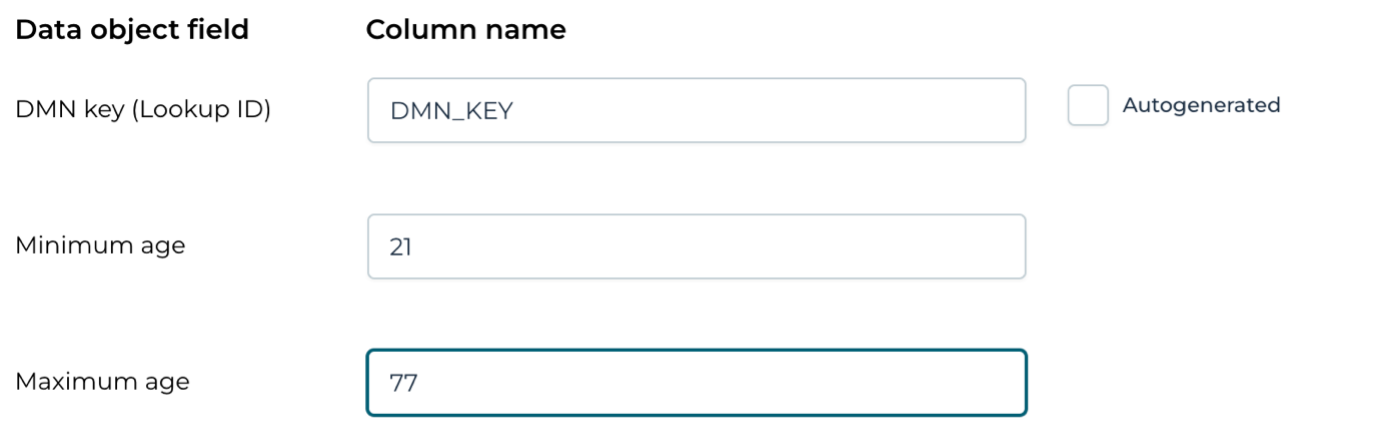
The defaults we want to use are mapped to the Data Object and a new database row will be created using them. Also note that we specify the same variable to reference the created Data Object. All this is to allow the live nature of this Data Object to be used in the editing task. Select the Edit decision settings user task and open its form through the link to the Edit decision settings.
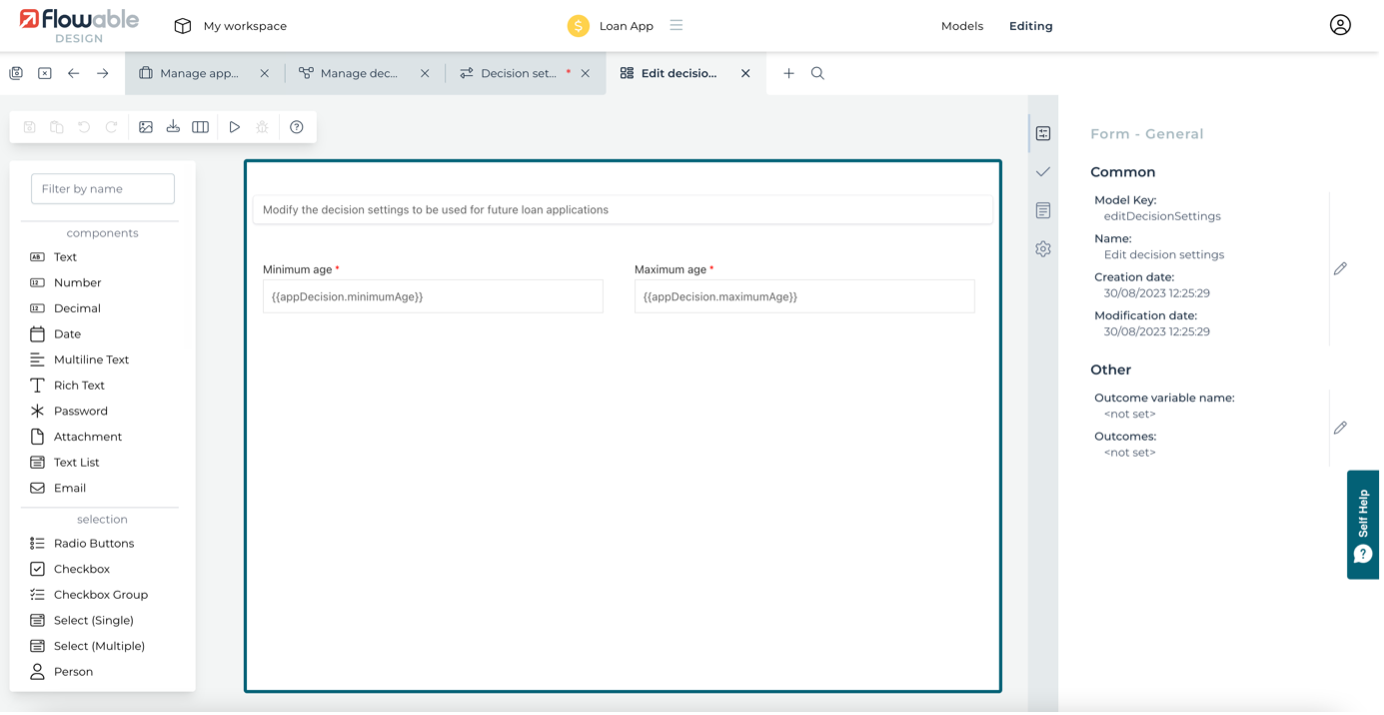
This has two fields for the minimum and maximum age settings. The fields reference their Data Object variables. As the Data Object is live, any changes made to the values in the form will be stored in the database automatically, without needing a separate Update Data Object task. As there's only a single decision task to be configured, the process stops once the user task with any edits has completed.
To use the decision settings in a decision table, we just need to reference the variables instead of fixed values. To see this, open the Credit Advice decision table.
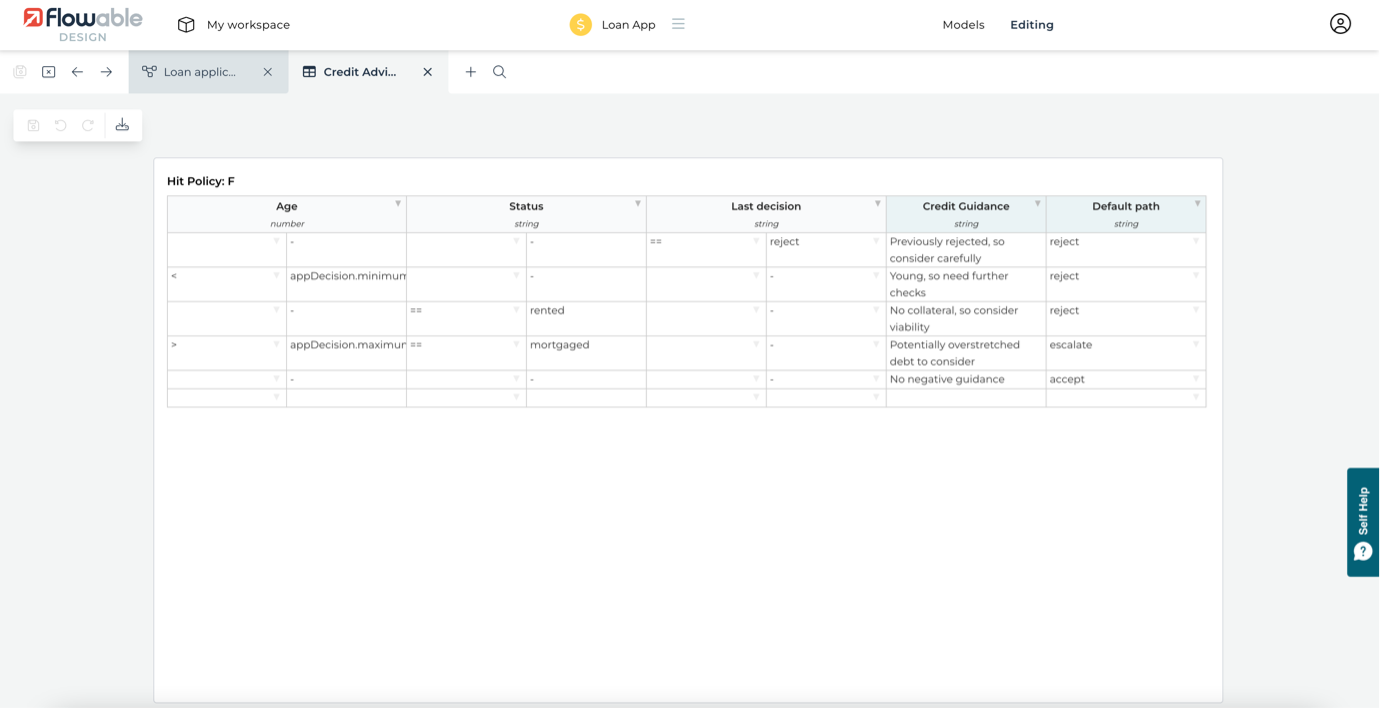
First, there's a new rule that states that if a previous application has failed (testing existingCustomer.lastDecision), then the default path should be to reject again. Also, instead of the values for Age being fixed in the decision table, they are now referencing the decision settings Data Object, appDecision.minimumAge and appDecision.maximumAge. If you remember, in the Loan application process, there was a Call Activity that executed a subprocess to retrieve all the process settings. You may have noticed a Lookup Data Object task that retrieved the settings for the Credit Advice decision table as part of that.
The case and process models for managing the application's configuration settings are constrained so that only Flowable Administrator group members are allowed as potential starters, but of course this could be set to whoever should be responsible for changing any setting values.
Summary
We have shown how Data Objects based on relational database sources can be used to provide ways for a business user to modify an app's configuration without needing to be a model designer, and without needing to deploy new versions of any models. Using this approach to enable business users to modify rules in Decision Tables in a fully managed way facilitates no-code "citizen developers". Also, we've shown how data collected as part of one instance of a process can be stored and used in another instance. All of this without writing one line of code!
See the Data Object modeling guide for more details, including REST-based Data Objects.