
Detailed Installation of Flowable Platform

The document describes basic information needed to install Flowable Platform. For the setup including the chat capabilities and the additional adapter add-ons like WhatsApp and WeChat specific installation requirements are needed and these are pointed out specifically.

Architecture Overview

Flowable Platform is a highly dynamic case management application and also allows real time communication between its users. . It is based on commonly used application frameworks, components and protocols such as:

Image Architecture Overview

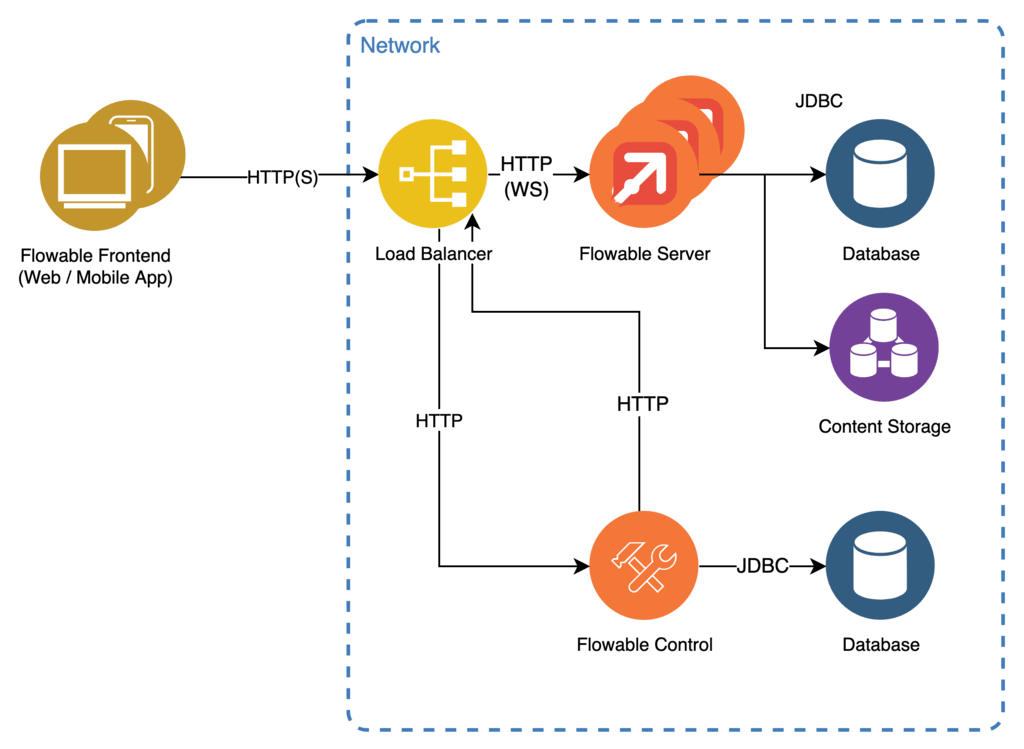
The Flowable Server is designed as a Java based Spring Boot web application providing its functionality over a stateless REST API.

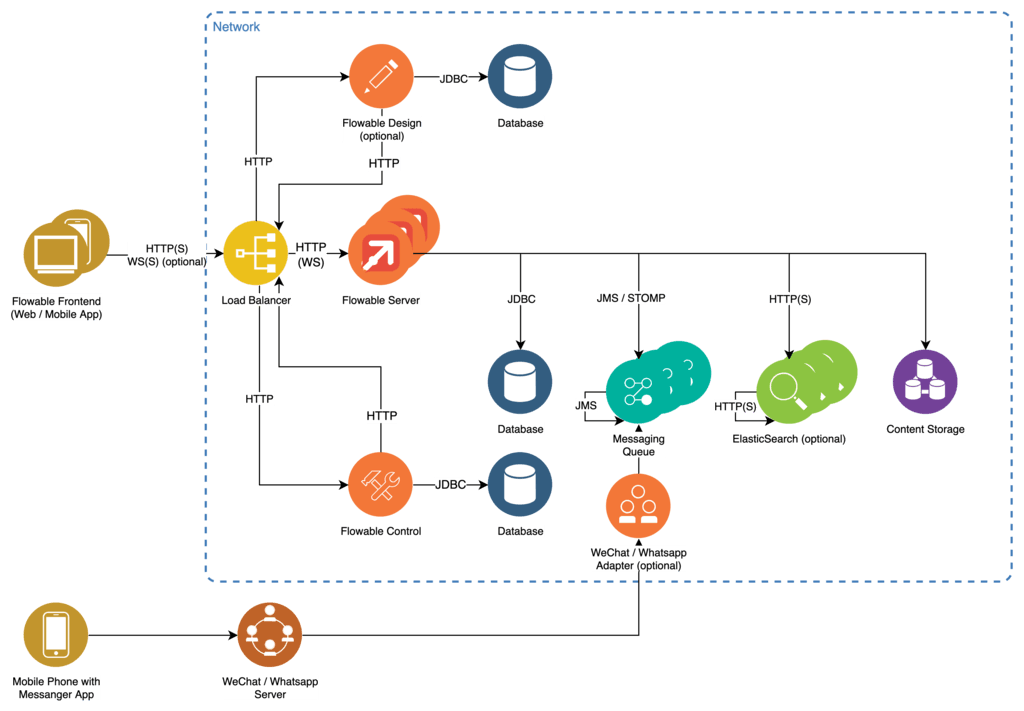
The Flowable Front End is a decoupled JavaScript browser application written in React communicating with the servers REST API over HTTP(S) and WebSockets with the help of SockJS. It can be served directly by the Flowable Server or by any HTTP server. Chat capabilities Only

Persistence is provided using a JDBC interface allowing for connection to the most commonly used database implementations. Database initialization and migration are automatically handled by the server by using Liquibase. It is possible, but not mandatory, to use the same database for all Flowable applications. The communication between the Flowable application happens through the Flowable REST APIs.

To ensure high performance query and reporting of data a clusterable index server based on Elasticsearch is used in addition to the database.

Connection to additional communication adapters (like WeChat, WhatsApp, LINE, Facebook, etc.) and stateless multi node clustering are achieved with the help of a messaging queue. This is accomplished by providing a JMS/STOMP compatible customer specific messaging queue implementation. Chat capabilities Only

Reverse proxy functions as well as load balancing between clustered instances of the Flowable Server are handled by any WebSocket capable load balancer such as NGINX.

Flowable Design is used to create the application models (BPMN, CMMN, DMN, Forms) and deploy them bundled as apps to the Flowable Work server.

Flowable Control provides information about runtime state of processes, cases, tasks, etc.

For lightweight use-cases it is possible to only use the required dependencies. A simplified setup could look like this:

Minimal Architecture with Flowable

Prerequisites

See the Flowable System Requirements and Supported Software documentation.

Additional specific requirements are listed in the sections

Content Storage

Content items which are uploaded to Flowable need to be stored on a persistent medium. By default, Flowable stores the documents on the file system of the running node at the following location: <USER-HOME>/content (e. g. /Users/myusername/content) The location can be customized by configuring the following application property flowable.content.storage.root-folder=<storage folder for content items>.

note

On multi-node environments and dockerized installations, the content storage needs to be configured to a persistent common storage system (for example a pvc volume) to not lose any content items.

Further, Flowable supports the configuration of database-based content storage, AWS S3, Azure Blob Storage, and the possibility to implement a custom content storage system. A detailed guide is provided under Content Object Storage customization.

WebSockets

Chat capabilities Only

The chat feature of Flowable uses advanced Web 2.0 technologies to allow real time communication directly within a browser.

To achieve this, all network components (routers, firewalls, proxies, browsers, etc.) need to support the WebSocket technology as specified in RFC 6455.

If your infrastructure is not WebSocket capable, a fallback is to use either the supported streaming or long polling options. These alternatives have some impact on your infrastructure requirements.

It is also possible to allow or deny the use of WebSockets on a user role level.

STOMP Messaging Queue

Chat capabilities Only

The chat feature of Flowable requires a messaging queue to enable real time communication between users that supports the STOMP protocol.

Any STOMP compatible messaging queue is supported but Flowable recommends ActiveMQ as the preferred messaging queue. For clustered environments you should choose a "network of brokers" over the master-slave configuration. It is best to have one ActiveMQ node per Flowable server node and let it connect to it.

Flowable Adapters

Chat capabilities Only

The chat feature of Flowable uses additional communication adapters to integrate with 3rd party messaging platforms (like WhatsApp, WeChat, LINE, Facebook, etc.). The communication adapters are built on Java and Spring Boot. They require Java 8, 11, or (since v3.12.0+) 17. All the adapters are stateless (without a database) and communicate via JMS with Flowable.

WhatsApp Adapter

Memory and disk space requirements depend on the specific use cases modelled, the number of users and the expected number and size of the documents.

CPURAMDisk
Minimum12 GB10 GB
Recommended24 GB20 GB

Apart from the the Flowable WhatsApp Adapter, the WhatsApp client provided by Facebook should be installed as well. Information on how to install the WhatsApp client provided by Facebook can be found here. You can find more information in Third-Party Messenger Integration.

WeChat Adapter

Memory and disk space requirements depend on the specific use cases modelled, the number of users and the expected number and size of the documents.

CPURAMDisk
Minimum12 GB10 GB
Recommended24 GB20 GB

You can find more information in Third-Party Messenger Integration.

LINE Adapter

Memory and disk space requirements depend on the specific use cases modelled, the number of users and the expected number and size of the documents.

CPURAMDisk
Minimum12 GB10 GB
Recommended24 GB20 GB

You can find more information in Third-Party Messenger Integration.

Step-by-Step Installation

The following sections describes the steps to get Flowable running in your environment.

We start by setting up a simple single node environment with the minimum viable number of components and corresponding configuration.

This setup is then augmented to include clustering and transport layer security (TLS) for the participating components.

A later section provides additional information on how to configure and to secure a production environment.

Single Node Installation

This section describes how to setup a minimal environment of components and configuration to get Flowable up and running.

Single Node

This is accomplished by following the following steps:

  • Download and configure an Apache Tomcat server containing the Flowable server together with an embedded Flowable Front End.

  • Download, install, and configure a database for the Flowable Server.

  • Download and install the Elasticsearch component required by the Flowable Server.

  • Download and install the ActiveMQ component required by the Flowable Server (Chat capabilities Only).

  • Configure a content storage (this is optional since the default is the usage of the filesystem as content storage).

Flowable Server

  • Download Tomcat from: https://tomcat.apache.org/index.html. Once you downloaded the package you should extract it. Do not run Tomcat yet, first follow the steps for installing the Flowable WARs.

  • Create (check Development Environment Setup) or download the executable Flowable WAR file as appropriate from the Flowable Maven Repository (appropriate access credentials are required).

  • Rename the downloaded .war file to flowable-work.war or as appropriate and copy it into the Tomcat’s webapps folder.

  • Flowable requires that you have a valid license for the Product. The license is either stored on the file system or in the database. If the license is provided as a file then it is typically located in the .flowable folder of your home directory. On Unix or macOS the file is ~/.flowable/flowable.license. The location of the license file can be changed in the application.properties file (see below).

flowable.license.location=file:/myCustomLocation/flowable.license

To store the license in the database then the following property must be set in the applications.properties file:

flowable.license.db-store-enabled=true

With the license database store mode enabled a license is uploaded using the Flowable Work application.

  • Add a file named application.properties in the Tomcat’s lib folder. The file is used later for additional configuration.

  • You can now start the Tomcat by running bin/catalina.sh (bin\catalina.bat on Windows). Alternatively, you can run bin/catalina.sh run to have it in the foreground.

  • You should now be able to access the applications by going to: http://localhost:8080/flowable-work.

  • You can login with the default administration user admin. The password is test. The password can be customized (only during first startup of the application) by setting the following property: flowable.platform.idm.default-password=<your custom password>

note

An executable .WAR file is a special variant of a .WAR file that can be both copied to a servlet container or executed directly with Java. In the second case an embedded Tomcat server starts that hosts the Flowable application. You can start the Flowable Server directly by executing java -jar flowable-work.war

The application can then be accessed at http://localhost:8090/flowable-work.

Database

By default, Flowable is configured to run with a built-in H2 database located in a folder flowable-db in your home directory. On Unix or macOS this is ~/flowable-db. If you want to change the location of the H2 database then add the following line (and change flowable-db to your preference) to the application.properties created previously in the lib directory:

spring.datasource.url=jdbc:h2:~/flowable-db/db;AUTO_SERVER=TRUE;AUTO_SERVER_PORT=9091;DB_CLOSE_DELAY=-1

The Flowable application is a Spring Boot application and can be configured in the standard Spring Boot fashion. This means that the database can be configured by setting the following properties in the application.properties file created previously:

spring.datasource.driver-class-name=<jdbc driver>
spring.datasource.url=<jdbc URL>
spring.datasource.username=<username>
spring.datasource.password=<password>

Here are example JDBC URLs for common databases:

  • MySQL: jdbc:mysql://localhost:3306/flowable

  • MariaDB v3.11.0+: jdbc:mariadb://localhost:3306/flowable

  • PostgreSQL: jdbc:postgresql://localhost:5432/flowable

  • Oracle: jdbc:oracle:thin:@localhost:1521:XE

  • MSSQL: jdbc:sqlserver://localhost:1433;database=flowable

Flowable does not ship any JDBC drivers other than one for the H2 database. Therefore, you need to download the appropriate JDBC driver and copy it to the Tomcat’s lib folder before starting Tomcat.

Example for setting up PostgreSQL

  1. Download and install PostgreSQL from https://www.postgresql.org/download/.

  2. Copy the JDBC driver for PostgreSQL (from https://jdbc.postgresql.org/download.html) to the lib directory of the Tomcat instance.

  3. Connect with psql and create a user and a database:

CREATE ROLE flowable WITH LOGIN PASSWORD 'flowable';
CREATE DATABASE flowable;
GRANT ALL PRIVILEGES ON DATABASE flowable TO flowable;
  1. Add the JDBC URL, driver, username and password of the schema you just created to the application.properties file in the lib folder of your Tomcat installation.
spring.datasource.driver-class-name=org.postgresql.Driver
spring.datasource.url=jdbc:postgresql://localhost:5432/flowable
spring.datasource.username=flowable
spring.datasource.password=flowable
  1. If you are manually creating the Database tables, and you don't want Flowable to validate you can add the following to the application.properties
flowable.database-schema-update=ignore

MSSQL Transaction Isolation

Microsoft recommends using the MSSQL specific READ_COMMITED_SNAPSHOT transaction isolation level for systems using optimistic locking with versioning. If you are operating with a high load and are experiencing deadlocks, you should enable this setting as follows:

# This will enable the usage of READ_COMMITED_SNAPSHOT
ALTER DATABASE flowable
SET ALLOW_SNAPSHOT_ISOLATION ON

# This will use READ_COMMITED_SNAPSHOT by default, without the need to alter application code or settings
ALTER DATABASE flowable
SET READ_COMMITTED_SNAPSHOT ON

Elasticsearch

An Elasticsearch (ES) server is required for Flowable Work:

  1. Download Elasticsearch from the Elastic website at https://www.elastic.co/downloads/elasticsearch.

  2. Extract the downloaded package to a desired folder on the filesystem.

  3. From a command prompt in the folder start Elasticsearch by submitting bin/elasticsearch.

Flowable expects Elasticsearch to be running on http://localhost:9200 which is the default for a vanilla Elasticsearch configuration. If you are running Elasticsearch on a different host or port, you can configure the address of Elasticsearch within the application.properties file you created in the prior section:

spring.elasticsearch.uris=http://localhost:9200
flowable.indexing.index-name-prefix=index-prefix-

If you are using security then you can set the following:

spring.elasticsearch.username=flowable
spring.elasticsearch.password=flowable

On certain installations, it is necessary to set a path prefix (e.g. when the Elasticsearch servers are behind a proxy server mandating this). If you are on such an installation, you may get 400 Bad Request errors when booting the application.

The path prefix can be set as follows:

flowable.indexing.path-prefix=/

Note that setting the path prefix to / is mandatory when using the Amazon AWS Elasticsearch Service.

SettingvalueDescription
action.auto_create_indexfalse (true by default)If set to true, an index will be created automatically when a request for a certain index is received by Elasticsearch. As Flowable uses a specific mapping for the indices it uses, this setting should be disabled to make sure Elasticsearch doesn't create an automatic mapping. If needed, it is also possible to specify a comma-separated list of index patterns to exactly match this to the Flowable indices only.

Should you want to use Flowable without Elasticsearch so that the instance and task lists are queried from the relational database instead. You can set the following property:

flowable.indexing.enabled=false

LDAP

The out of the box Flowable Application come with LDAP support. If you are creating your own Flowable Application, then have a look at LDAP Developer Guide additionally. In order to enable and configure LDAP the following properties should be set:

# LDAP Configuration properties
spring.ldap.base=dc=example,dc=com
spring.ldap.urls=<ldap location>
spring.ldap.username=<username>
spring.ldap.password=<password>

flowable.platform.idm.service-type=ldap

# The base is applied on top of the spring.ldap.base
# Group specific LDAP properties
flowable.ldap.group.query.base=ou=group
flowable.ldap.group.query.default-filter=(objectClass=group)
flowable.ldap.group.mappings.distinguished-name=distinguishedName
flowable.ldap.group.mappings.member=member:1.2.840.113556.1.4.1941:
flowable.ldap.group.mappings.id=sAMAccountName
flowable.ldap.group.mappings.key=cn
flowable.ldap.group.mappings.name=name
flowable.ldap.group.sort.mode=disabled

# User specific LDAP properties
flowable.ldap.user.query.base=ou=person
flowable.ldap.user.query.default-filter=(objectClass=user)
flowable.ldap.user.mappings.distinguished-name=distinguishedName
flowable.ldap.user.mappings.member-of=memberOf:1.2.840.113556.1.4.1941:
flowable.ldap.user.mappings.id=sAMAccountName
flowable.ldap.user.mappings.first-name=givenName
flowable.ldap.user.mappings.last-name=sn
flowable.ldap.user.mappings.display-name=displayName,name
flowable.ldap.user.mappings.email=mail
flowable.ldap.user.mappings.info-name.company=firm
flowable.ldap.user.mappings.info-name.location=site
flowable.ldap.user.sort.mode=disabled

# User definition from LDAP
flowable.ldap.user.mappings.user-definition-key=customAttribute
flowable.ldap.user.mappings.default-user-definition-key=user-default
flowable.ldap.user.mappings.value-user-definition-key.admin=user-admin
flowable.ldap.user.mappings.value-user-definition-key.reporter=user-reporter

# Tenant mappings for user from LDAP
flowable.ldap.user.mappings.tenant-id=location
flowable.ldap.user.mappings.default-tenant-id=Switzerland
flowable.ldap.user.mappings.value-tenant-id.BRN=Switzerland
flowable.ldap.user.mappings.value-tenant-id.ZRH=Switzerland
flowable.ldap.user.mappings.value-tenant-id.VLC=Spain
flowable.ldap.user.mappings.value-tenant-id.MAD=Spain

# Tenant mappings for group from LDAP
flowable.ldap.group.mappings.default-tenant-id=Switzerland
flowable.ldap.group.mappings.tenant-id=loc
flowable.ldap.group.mappings.value-tenant-id.BERN=Switzerland
flowable.ldap.group.mappings.value-tenant-id.ZURICH=Switzerland
flowable.ldap.group.mappings.value-tenant-id.VALENCIA=Spain
flowable.ldap.group.mappings.value-tenant-id.MADRID=Spain

There are multiple groups of properties that can be used to configure different aspects of the LDAP support. Here we are going to explain what every property does.

LDAP Server Connection

This group of properties is for the connection to the LDAP Server.

PropertyDescriptionValue
spring.ldap.baseBase suffix from which all operations should originatedc=example,dc=com
spring.ldap.urlsLDAP URLs of the serverldap://example.com:389
spring.ldap.usernameLogin username of the serveradmin
spring.ldap.passwordLogin password of the serveradmin
note

If you are connecting to Active Directory, you may experience the following error. org.springframework.ldap.PartialResultException: Unprocessed Continuation Reference(s); nested exception is javax.naming.PartialResultException: Unprocessed Continuation Reference(s); remaining name '/' This error is specific to Active Directory and only occurs with certain configurations. To resolve this error, add the following property to your application configuration:

flowable.ldap.ignore-partial-result-exception=true

Flowable Specific Properties

The main property to instruct Flowable to use LDAP is flowable.platform.idm.service-type=ldap. This makes sure that Flowable will use the IDM Identity Service.

User Properties

The following properties are used when the Flowable Identity Service queries for users.

PropertyDescriptionValue
flowable.ldap.user.query.baseThe base suffix that should be applied on top of the spring.ldap.baseou=person
flowable.ldap.user.query.default-filterThe default LDAP filters that should be applied to all user queries(objectClass=user)

The following properties are used when the Flowable Identity Service maps the LDAP attributes into a Flowable User. This the first value of each mapping is also used to perform sorting if sorting is enabled.

PropertyDescriptionValue
flowable.ldap.user.mappings.distinguished-nameLDAP attribute for the user distinguished namedistinguishedName
flowable.ldap.user.mappings.member-ofLDAP attribute for the member of groups attributememberOf
flowable.ldap.user.mappings.idLDAP attribute for the id of the usersAMAccountName
flowable.ldap.user.mappings.first-nameLDAP attribute for the first name of the usergivenName
flowable.ldap.user.mappings.last-nameLDAP attribute for the last name of the usersn
flowable.ldap.user.mappings.display-nameLDAP attribute for the display name of the userdisplayName,name
flowable.ldap.user.mappings.emailLDAP attribute for the email of the usermail
flowable.ldap.user.mappings.info-name.<ldap-attribute-name>=<info-name-in-Flowable>Mapping between LDAP Attributes and Flowable user info parametersmail

All of the properties above except distinguished-name and member-of can be specified as a comma separated list. This means that the first attribute that is not empty from the LDAP response would be used.

e.g.

When flowable.ldap.user.mappings.display-name=displayName,name the display name of the user is mapped from the LDAP attribute displayName if it is not empty, otherwise from the name attribute.

Expose custom LDAP attributes to Flowable workflows

The property flowable.ldap.user.mappings.info-name.<ldap-Attribute>=<info-name> can be used to expose certain custom LDAP attributes under a specific name. For example in order to get some attributes for the authenticated user we can do the following in Flowable workflows.

We are going to map The LDAP Attribute location to a name available under site.

e.g.

flowable.ldap.user.mappings.info-name.location=site

This can then be used in the following way in an expression: ${platformIdentityService.createUserQuery().userId(authenticatedUserId).singleResult().site}

User definition key and tenant mapping

It is also possible to map the user tenant id and user definition key from an LDAP attribute by using the appropriate mapping property. However, in most cases those properties are not in LDAP and somehow existing values from LDAP need to be mapped into the appropriate Flowable values.

e.g.

We want to use the LDAP location attribute to map into the appropriate tenant. In LDAP we have the following locations:

  • BRN - belongs to tenant Switzerland
  • ZRH - belongs to tenant Switzerland
  • VLC - belongs to tenant Spain
  • MAD - belongs to tenant Spain

In order to configure that we are going to use the following properties

flowable.ldap.user.mappings.tenant-id=location
flowable.ldap.user.mappings.default-tenant-id=Switzerland
flowable.ldap.user.mappings.value-tenant-id.BRN=Switzerland
flowable.ldap.user.mappings.value-tenant-id.ZRH=Switzerland
flowable.ldap.user.mappings.value-tenant-id.VLC=Spain
flowable.ldap.user.mappings.value-tenant-id.MAD=Spain

The flowable.ldap.user.mappings.tenant-id property is used to determine which LDAP attribute should be used to get the tenant value. In our example this would be location.

The flowable.ldap.user.mappings.default-tenant-id property is used to determine the default tenant id that is used in case the user has no location set. In our example the default tenant would be Switzerland

The flowable.ldap.user.mappings.value-tenant-id.<value> property, where <value> is any value that you have in your location LDAP attribute, is used to provide the mapping between your LDAP value and the Flowable value. In our example we are mapping BRN to Switzerland, VLC to Spain, etc.

The concept is similar for the user definition key.

e.g.

We want to use the LDAP description attribute to map into the appropriate user definition key. In LDAP we have the following descriptions:

  • admin - Should map to the user definition key user-admin
  • reporter - Should map to the user definition key user-reporter

In order to configure that we are going to use the following properties

flowable.ldap.user.mappings.user-definition-key=description
flowable.ldap.user.mappings.default-user-definition-key=user-default
flowable.ldap.user.mappings.value-user-definition-key.admin=user-admin
flowable.ldap.user.mappings.value-user-definition-key.reporter=user-reporter

The flowable.ldap.user.mappings.user-definition-key property is used to determine which LDAP attribute should be used to get the user definition key value. In our example this would be description.

The flowable.ldap.user.mappings.default-user-definition-key property is used to determine the default user definition key that is used in case the user has no description set. In our example the default user definition key would be user-default

The flowable.ldap.user.mappings.value-user-definition-key.<value> property, where <value> is any value that you have in your description LDAP property, is used to provide the mapping between your LDAP value and the Flowable value. In our example we are mapping admin to user-admin, reporter to user-reporter, etc.

There is also an alternative way of mapping the user definition key. The alternative way is by using the membership of the user in a particular groups.

e.g.

flowable.ldap.user.mappings.default-user-definition-key=user-default
flowable.ldap.user.mappings.user-definition-key-mapping-type=groups
flowable.ldap.user.mappings.user-definition-group-mappings[0].group-key=Admin
flowable.ldap.user.mappings.user-definition-group-mappings[0].user-definition-key=user-admin
flowable.ldap.user.mappings.user-definition-group-mappings[1].group-key=Reporter
flowable.ldap.user.mappings.user-definition-group-mappings[1].user-definition-key=user-reporting

The flowable.ldap.user.mappings.default-user-definition-key property can still be used to determine the default user definition key that is used in case the user is not a member of the defined group mappings. In our example the default user definition key would be user-default

The flowable.ldap.user.mappings.user-definition-key-mapping-type needs to be set to groups in order to signal the logic for the group mapping type.

Finally, the flowable.ldap.user.mappings.user-definition-group-mappings[<index>].group-key and flowable.ldap.user.mappings.user-definition-group-mappings[<index>].user-definition-key properties can be used to define the mapping between a group with the given key and a user definition. In the example above if the user is a member of the group with a key "Admin" it will get the "user-admin" definition, if the user is a member of the group with a key "Reporter" they will get the "user-reporting" definition, all the rest of the users will get the "user-default" definition. The order of the group mappings is important since they will be processed in the defined order, i.e. if a user is a member of both groups they will get the definition of the first matching group from the group mappings.

Sorting

If you LDAP server supports server side sorting (RFC2891) then you can enable this by setting the flowable.ldap.user.sort.mode property to enabled or critical. Setting it to critical means that querying might fail if the server does not support sorting on the requested parameter. The parameter on which to sort is taken based on the user mappings properties. e.g. when the display named is mapped using flowable.ldap.user.mappings.display-name=displayName,name and sorting by display name is requested then we are going to request sorting using the displayName LDAP attribute.

note

Currently it is only supported sorting in an ascending order

Group Properties

The following properties are used when the Flowable Identity Service queries for groups.

PropertyDescriptionValue
flowable.ldap.group.query.baseThe base suffix that should be applied on top of the spring.ldap.baseou=group
flowable.ldap.group.query.default-filterThe default LDAP filters that should be applied to all group queries(objectClass=group)

The following properties are used when the Flowable Identity Service maps the LDAP attributes into a Flowable Group. This the first value of each mapping is also used to perform sorting if sorting is enabled.

PropertyDescriptionValue
flowable.ldap.group.mappings.distinguished-nameLDAP attribute for the group distinguished namedistinguishedName
flowable.ldap.group.mappings.memberLDAP attribute for the member attributemember
flowable.ldap.group.mappings.idLDAP attribute for the id of the groupsAMAccountName
flowable.ldap.group.mappings.keyLDAP attribute for the key of the groupcn
flowable.ldap.group.mappings.nameLDAP attribute for the name of the groupname

All the properties above except distinguished-name and member can be specified as a comma separated list. This means that the first attribute that is not empty from the LDAP response would be used.

When flowable.ldap.group.mappings.id is not set then flowable.ldap.group.mappings.key would be used both for the group id and key, and vice versa.

note

To access Flowable as an administrative user you need to have admin permissions. Please refer to the permissions section for further details.

Tenant mapping

It is also possible to map the group tenant id from an LDAP attribute by using the appropriate mapping property. However, in most cases the tenant is not in LDAP and somehow existing values from LDAP need to be mapped into the appropriate Flowable values.

e.g.

We want to use the LDAP loc attribute to map into the appropriate tenant. In LDAP we have the following locations:

  • BERN - belongs to tenant Switzerland
  • ZURICH - belongs to tenant Switzerland
  • VALENCIA - belongs to tenant Spain
  • MADRID - belongs to tenant Spain

In order to configure that we are going to use the following properties

flowable.ldap.group.mappings.tenant-id=loc
flowable.ldap.group.mappings.default-tenant-id=Switzerland
flowable.ldap.group.mappings.value-tenant-id.BERN=Switzerland
flowable.ldap.group.mappings.value-tenant-id.ZURICH=Switzerland
flowable.ldap.group.mappings.value-tenant-id.VALENCIA=Spain
flowable.ldap.group.mappings.value-tenant-id.MADRID=Spain

The flowable.ldap.group.mappings.tenant-id property is used to determine which LDAP attribute should be used to get the tenant value. In our example this would be loc.

The flowable.ldap.group.mappings.default-tenant-id property is used to determine the default tenant id that is used in case the group has no loc set. In our example the default tenant would be Switzerland

The flowable.ldap.group.mappings.value-tenant-id.<value> property, where <value> is any value that you have in your loc LDAP attribute, is used to provide the mapping between your LDAP value and the Flowable value. In our example we are mapping BERN to Switzerland, VALENCIA to Spain, etc.

Sorting

If you LDAP server supports server side sorting (RFC2891) then you can enable this by setting the flowable.ldap.group.sort.mode property to enabled or critical. Setting it to critical means that querying might fail if the server does not support sorting on the requested parameter. The parameter on which to sort is taken based on the user mappings properties. e.g. when the display named is mapped using flowable.ldap.group.mappings.name=name and sorting by name is requested then we are going to request sorting using the name LDAP attribute.

note

Currently it is only supported sorting in an ascending order

OAuth2

The out of the box Flowable Platform Application come with OAuth2 support. If you are creating your own Flowable Application, then have a look at OAuth2 Developer Guide additionally. Flowable uses Spring Security. Therefore, configuring the OAuth2 support is mostly configuring the Spring Security OAuth2 client and resource server.

There are different OAuth2 providers. In this section we are going to provide examples for Azure and Keycloak

Note: When using the Flowable platform application provided by Flowable you will also need to set application.security.type to oauth2

Azure OAuth2

Before you configure the application you will need to create an Application in your Azure Portal. Details about that step can be found here in the Azure documentation.

spring.security.oauth2.client.registration.azure.client-id=<The client id of your application>
spring.security.oauth2.client.registration.azure.client-secret=<The client secret of your application>
spring.security.oauth2.client.registration.azure.client-name=Azure SSO
spring.security.oauth2.client.registration.azure.authorization-grant-type=authorization_code
spring.security.oauth2.client.registration.azure.scope=openid,profile,email

spring.security.oauth2.client.provider.azure.issuer-uri=https://login.microsoftonline.com/<tenantId>/v2.0
spring.security.oauth2.client.provider.azure.user-name-attribute=email

The authorization_code OAuth2 workflow will redirect the users to the Azure SSO and then redirect them back to Flowable. We are requesting the openid and profile scopes in order to receive the OpenID and Profile information into the token and user info. The attribute for the username is changed to preferred_username, because we want to use the human readable username of the user as the id, instead of the Azure UUID.

The above configuration will make sure that users can login into Flowable using Azure SSO.

On top of the Spring Security Configuration we need to do some configuration for how to map certain user info attributes to Flowable groups, authorities, user definition.

Those properties are:

flowable.security.oauth2.client.mapper.authorities-attributes=roles
flowable.security.oauth2.client.mapper.groups-attributes=groups
flowable.security.oauth2.client.mapper.tenant-attribute=
flowable.security.oauth2.client.mapper.user-definition-key-attribute=
flowable.security.oauth2.client.mapper.load-authorities-from-identity-service=false
flowable.security.oauth2.client.mapper.user-definition-group-mappings[0].group-key=
flowable.security.oauth2.client.mapper.user-definition-group-mappings[0].user-definition-key=
flowable.security.oauth2.client.mapper.user-definition-group-mappings[1].group-key=
flowable.security.oauth2.client.mapper.user-definition-group-mappings[1].user-definition-key=

These properties are used for the following:

  • authorities-attributes - comma separated property that is used to get and map the token attributes / claims to granted authorities. This can be used to define application roles in your Azure portal and map those to Flowable roles. More about how to add roles to your application can be found here in the Azure documentation. This can be used by defining a role with a value USER_DEFINITION_KEY_user-admin to map users / groups to the user definition key user-admin, or access-actuators to grant users access to the Spring Boot Actuators in Flowable. Any of the known Flowable allowed features prefixed with access- can be used here. This can also be used to define groups by using a role with a prefix of GROUP_ e.g. if the role is GROUP_myCustomGroup then the user will have the group myCustomGroup assigned to them. In addition to that it can be used to define the tenant that the user belongs to by using a role with a prefix of TENANT_, e.g. if the user has the role TENANT_acme the user will belong to the acme tenant.
  • groups-attributes - comma separated property that is used to get the groups from the token attributes / claims. These values will be mapped to Flowable Groups. More about how to expose the groups in the token can be found here in the Azure documentation.
  • tenant-attribute - property pointing to the name of the attribute / claim containing the tenant id of the user in the token attributes / claims
  • user-definition-key-attribute - property pointing to the name of the attribute / claim containing the user definition key of the user in the token attributes / claims
  • load-authorities-from-identity-service - property to specify if the user information is loaded from the identity service. This might impact performance depending on the speed of your identity service and the backed service (e.g. LDAP).
  • user-definition-group-mappings - list of group key to user definition key mapping to determine the user definition key in case it is not provided with other authorities.
note

To access Flowable as an administrative user you need to have admin permissions. Please refer to the permissions section for further details.

In addition to the OAuth2 client configuration we can configure the application to be accessible through Access token using the Bearer authentication.

For this we need the following configuration:

spring.security.oauth2.client.provider.azure.issuer-uri=https://login.microsoftonline.com/<tenantId>/v2.0
spring.security.oauth2.client.provider.azure.user-name-attribute=preferred_username

On top of the Spring Security Configuration we need to do some configuration for how to map certain Token attributes / claims to Flowable groups, authorities, user definition.

Those properties are:

flowable.security.oauth2.resourceserver.jwt.principal-claim-name=preferred_username
flowable.security.oauth2.resourceserver.mapper.authorities-attributes=roles
flowable.security.oauth2.resourceserver.mapper.groups-attributes=groups
flowable.security.oauth2.resourceserver.mapper.tenant-attribute=
flowable.security.oauth2.resourceserver.mapper.user-definition-key-attribute=
flowable.security.oauth2.resourceserver.mapper.load-authorities-from-identity-service=false
flowable.security.oauth2.resourceserver.user-definition-group-mappings[0].group-key=
flowable.security.oauth2.resourceserver.user-definition-group-mappings[0].user-definition-key=
flowable.security.oauth2.resourceserver.user-definition-group-mappings[1].group-key=
flowable.security.oauth2.resourceserver.user-definition-group-mappings[1].user-definition-key=

The mapper properties are the same as the ones defined for the client configuration. However, it allows more granular configuration, since the user info and user token do not contain the same attributes. The jwt.principal-claim-name is needed because we want to have the human readable user id.

Keycloak OAuth2

Keycloak is an open source Identity and Access Management solution. It makes it easy to secure applications and services with very little code. Detailed information about Keycloak can be found on their website. In the following we are going to show how we can authenticate with it and use it as a user store. For this to work we assume that you already have an instance of Keycloak running somewhere, with a configured Realm and users in this realm.

Before we start configuring the Flowable side a client application should exist in Keycloak. Details about that step can be found here in the Keycloak documentation.

spring.security.oauth2.client.registration.keycloak.client-id=<The client id of your application>
spring.security.oauth2.client.registration.keycloak.client-secret=<The client secret of your application>
spring.security.oauth2.client.registration.keycloak.client-name=Keycloak
spring.security.oauth2.client.registration.keycloak.authorization-grant-type=authorization_code
spring.security.oauth2.client.registration.keycloak.scope=openid,profile
spring.security.oauth2.client.provider.keycloak.issuer-uri=<keycloakLocation>/auth/realms/<realmName>
spring.security.oauth2.client.provider.keycloak.user-name-attribute=preferred_username

The authorization_code OAuth2 workflow will redirect the users to the Keycloak SSO and then redirect them back to Flowable. We are requesting the openid and profile scopes in order to receive the OpenID and Profile information into the token and user info. The attribute for the username is changed to preferred_username, because we want to use the human readable username of the user as the id, instead of the Keycloak identifier.

The above configuration will make sure that users can login into Flowable using Keycloak SSO.

On top of the Spring Security Configuration we need to do some configuration for how to map certain token attributes to Flowable groups, authorities, user definition.

Those properties are:

flowable.security.oauth2.client.mapper.authorities-attributes=roles
flowable.security.oauth2.client.mapper.groups-attributes=groups
flowable.security.oauth2.client.mapper.tenant-attribute=
flowable.security.oauth2.client.mapper.user-definition-key-attribute=
flowable.security.oauth2.client.mapper.load-authorities-from-identity-service=false
flowable.security.oauth2.client.mapper.user-definition-group-mappings[0].group-key=
flowable.security.oauth2.client.mapper.user-definition-group-mappings[0].user-definition-key=
flowable.security.oauth2.client.mapper.user-definition-group-mappings[1].group-key=
flowable.security.oauth2.client.mapper.user-definition-group-mappings[1].user-definition-key=

These properties are used for the following:

  • authorities-attributes - comma separated property that is used to get and map the token attributes / claims to granted authorities. This can be used to define application roles in your Keycloak application and map those to Flowable roles. More about how to add roles to your application can be found here in the Keycloak documentation. This can be used by defining a role with a value USER_DEFINITION_KEY_user-admin to map users / groups to the user definition key user-admin, or access-actuators to grant users access to the Spring Boot Actuators in Flowable. Any of the known Flowable allowed features prefixed with access- can be used here. This can also be used to define groups by using a role with a prefix of GROUP_ e.g. if the role is GROUP_myCustomGroup then the user will have the group myCustomGroup assigned to them. In addition to that it can be used to define the tenant that the user belongs to by using a role with a prefix of TENANT_, e.g. if the user has the role TENANT_acme the user will belong to the acme tenant.
  • groups-attributes - comma separated property that is used to get the groups from the token attributes / claims. These values will be mapped to Flowable Groups. This can be exposed by creating a Group Membership Mapper type in your application.
  • tenant-attribute - property pointing to the name of the attribute / claim containing the tenant id of the user in the token attributes / claims
  • user-definition-key-attribute - property pointing to the name of the attribute / claim containing the user definition key of the user in the token attributes / claims
  • load-authorities-from-identity-service - property to specify if the user information is loaded from the identity service. This might impact performance depending on the speed of your identity service and the backed service (e.g. LDAP).
  • user-definition-group-mappings - list of group key to user definition key mapping to determine the user definition key in case it is not provided with other authorities.
note

To access Flowable as an administrative user you need to have admin permissions. Please refer to the permissions section for further details.

In addition to the OAuth2 client configuration we can configure the application to be accessible through Access token using the Bearer authentication.

For this we need the following configuration:

spring.security.oauth2.client.provider.keycloak.issuer-uri=<keycloakLocation>/auth/realms/<realmName>
spring.security.oauth2.client.provider.keycloak.user-name-attribute=preferred_username

On top of the Spring Security Configuration we need to do some configuration for how to map certain Token attributes / claims to Flowable groups, authorities, user definition.

Those properties are:

flowable.security.oauth2.resourceserver.jwt.principal-claim-name=preferred_username
flowable.security.oauth2.resourceserver.mapper.authorities-attributes=roles
flowable.security.oauth2.resourceserver.mapper.groups-attributes=groups
flowable.security.oauth2.resourceserver.mapper.tenant-attribute=
flowable.security.oauth2.resourceserver.mapper.user-definition-key-attribute=
flowable.security.oauth2.resourceserver.load-authorities-from-identity-service=false
flowable.security.oauth2.resourceserver.user-definition-group-mappings[0].group-key=
flowable.security.oauth2.resourceserver.user-definition-group-mappings[0].user-definition-key=
flowable.security.oauth2.resourceserver.user-definition-group-mappings[1].group-key=
flowable.security.oauth2.resourceserver.user-definition-group-mappings[1].user-definition-key=

The mapper properties are the same as the ones defined for the client configuration. However, it allows more granular configuration, since the user info and user token do not contain the same attributes. The jwt.principal-claim-name is needed because we want to have the human readable user id.

WebDAV (edit in Office)

In Flowable it is possible to enable the WebDAV functionality. With WebDAV enabled, an 'Edit in Office' button is shown for any Office document (Word/Excel/Powerpoint):

Edit in Office

When clicking this button, the local Office Word/Excel/Powerpoint application is started and the document is loaded. Whenever the document is then saved, the changes are persisted on the Flowable server. Any save action of the document is stored as a new version of that document, which allows to revert to any previous version. Behind the scenes, this uses the WebDAV protocol, hence the name of this feature.

To enable this feature the following dependency needs to be added to your project:

<dependency>
<groupId>com.flowable.platform</groupId>
<artifactId>flowable-webdav</artifactId>
</dependency>

Now, WebDAV support is added by default for your Flowable application.

Afterwards, following properties need to be set to enable WebDAV:

flowable.webdav.enabled=true

flowable.webdav.authentication-mode=basic-auth

Currently two authentication modes are supported through the flowable.webdav.authentication-mode property:

  • basic auth: This will show a popup in Office to authenticate with the proper user credentials. It is advised to use this setting.
  • none: This will disable any authentication.

Authentication mode none should only be used in development or demoing (because running with basic-auth has implications as described below).

Note that Flowable currently does not support Office authentication when an another authentication mechanism (like SSO) is used.

WebDAV and https

Using the WebDAV functionality with basic auth as authentication mode requires the server to be running with SSL (https) enabled.

It is possible to disable this requirement, client-side (so on the machine where Office is running on) by executing:

On Windows

Windows: using the registry editor, locate and then click one of the following registry subkeys:

HKEY_CURRENT_USER\Software\Microsoft\Office\16.0\Common\Internet

(Any Office 16.x version is stored under 16.0)

On the Edit menu, point to New, and then click DWORD Value. Type BasicAuthLevel, and then press Enter. Right-click BasicAuthLevel, and then click Modify and give it 2 as value.

On OS X

When using OS X, SSL/https is mandatory. There is no way of using Office with basic auth without the server running with SSL/https.

In this case, use the none mode in development, but make sure the production servers have proper SSL configured.

Troubleshooting

Problem: changed from https to http (or vice-versa) and opening a document gives a blank page or an error

Changing from https to http (or vice-versa) on some machines might lead to Office caching the previous setting of the server and not being able to connect.

The easiest solution is to use a different host or port, as this will circumvent the cache.

Another option is, on Windows, to use the registry editor and remove all entries below

HKEY_CURRENT_USER\Software\Microsoft\Office\<version>\Common\Internet\Server Cache\

For OS X, there currently is no such solution to clear the cache.

Problem: bullet points rendered as squares when using a Word template

This is a problem that can happen when running on Linux or OS X, due to not having the proper fonts installed.

This can be solved by placing the Wingdings true type font (from a Windows installation) in a custom folder and specify a path to that folder with the following property (taking in a comma separated list of paths):

flowable.content.rendition-converters.custom-font-folder-paths=...

Note: Check if font licensing is need, and read the EULA carefully before installing MS Fonts on any other system.

SharePoint

v3.15.0+

Introduction

There are 2 ways of integrating SharePoint into Flowable. Either by using a client-secret or by delegated authorization

note

The SharePoint integration is a connector that is not enabled in Flowable by default and requires an additional license.

Client-Secret Authorization

Using the client-secret method allows you to connect Flowable Work with an Azure enterprise application. It's important to note that this default setup grants the client-secret access to read all sites, folders, and files in your SharePoint environment. To ensure security, your SharePoint setup must be appropriately configured. You have the option to restrict the access scope of your enterprise application within SharePoint sites based on its clientId.

flowable.sharepoint.enabled=true
flowable.sharepoint.authentication-mode=client-secret-auth
flowable.sharepoint.login-url=https://login.microsoftonline.com/<tenantId>/oauth2/v2.0/token
flowable.sharepoint.client-secret=<clientSecret>
flowable.sharepoint.client-id=<clientId>
flowable.sharepoint.api-base-url=https://graph.microsoft.com/v1.0/
note

The property flowable.sharepoint.api-base-url is optional and https://graph.microsoft.com/v1.0/ is the default value

Delegated Authorization

This approach leverages the current user's token to make requests to the Microsoft Graph API, enabling access to SharePoint resources such as sites, folders, and files. To enable delegated authorization, certain properties must be configured as follows.

flowable.sharepoint.enabled=true
flowable.sharepoint.authentication-mode=delegated-auth
flowable.sharepoint.api-base-url=https://graph.microsoft.com/v1.0/
note

The property flowable.sharepoint.api-base-url is optional and https://graph.microsoft.com/v1.0/ is the default value

In addition, you need to configure Azure SSO in your system. Take a look at this How-to to get help setting up Azure SSO with Flowable Work.

After setting up the application properties it is crucial to modify the property spring.security.oauth2.client.registration.azure.scope to include the SharePoint related scopes.

spring.security.oauth2.client.registration.azure.scope=openid,profile,email,Sites.Read.All,Files.Read.All
note

Ignoring that step will result in http responses with status code 403.

Event Channels

When using the event registry features of Flowable, a connection to the relevant solution needs to be configured.

note

All properties exposed by the associated Spring Boot starter (e.g. all properties that can be set when using the spring-kafka starter when wanting to use Kafka) are available, too.

When using Kafka:

application.kafka-enabled=true
spring.kafka.bootstrap-servers=localhost:9092

When using Active MQ:

application.jms-enabled=true
spring.activemq.broker-url=tcp://localhost:61616

When using RabbitMQ:

application.rabbit-enabled=true
spring.rabbitmq.addresses=localhost:5672
spring.rabbitmq.username=guest
spring.rabbitmq.password=guest

Email

The out of the box Flowable Application comes with sending Emails through the Email Task. In order for that to work you can use the following properties to configure it:

flowable.mail.server.host=localhost
flowable.mail.server.port=1025
flowable.mail.server.ssl-port=1465
flowable.mail.server.username=
flowable.mail.server.password=
flowable.mail.server.default-charset=UTF-8
#Use SSL/TLS encryption should be enabled for the SMTP transport upon connection (SMTPS/POPS).
flowable.mail.server.use-ssl=false
#Use STARTTLS encryption.
flowable.mail.server.use-tls=false
# Sends all the outgoing emails with the configured from email address
flowable.mail.server.default-from=flowable@localhost

# Sends all the outgoing emails to the configured email address
# This is useful for testing purposes
flowable.mail.server.force-to=

Content Security Policy

v3.12.0+

If you need to configure your Flowable application to use Content Security Policy you need to set the following property:

flowable.security.rest.content-security-policy.policy-directives=default-src 'self'; img-src 'self' data:; object-src 'self'; style-src 'unsafe-inline'; style-src-elem 'self' 'unsafe-inline'; script-src 'self'; script-src-elem 'self'; frame-ancestors 'self'; frame-src 'self';

The property above is the minimum policy that is needed for all of the functionality of Flowable Work to work properly. If you are having problems with it we suggest reaching out to your Flowable contact.

If you want to only test it and only see the status in the browser you can use

flowable.security.rest.content-security-policy.report-only=true

This will force the use of the Content-Security-Policy-Report-Only header instead of Content-Security-Policy.

ActiveMQ

Chat capabilities Only

A JMS and STOMP protocol compatible messaging queue (MQ) is only needed for the real-time communication provided by Flowable with the chat capabilities feature.

You can use your own MQ. The following instructions describe the installation of the recommended ActiveMQ instance:

  1. Download the latest ActiveMQ version from http://activemq.apache.org/download.html.

  2. Extract the package to a desired folder on the filesystem.

  3. Update configuration for STOMP as explained here

  4. From a command prompt in that folder start ActiveMQ by entering bin/activemq start.

Flowable expects ActiveMQ to listen on port 61616 for JMS and on port 61613 for STOMP. These values are the default configuration for each vendor. If you are running ActiveMQ on a different host or port, you can configure the addresses of ActiveMQ in the application.properties file you created previously by setting these parameters:

flowable.websocket.stomp-broker-addresses=localhost:61613
spring.activemq.broker-url=tcp://localhost:61616

Additional information about ActiveMQ configuration is found here.

ActiveMQ (STOMP)

Due to the way ActiveMQ implements the STOMP protocol the amount of queues and topics keeps growing. For every user session (a user logs into Flowable) there will be a topic created with the format messages-user<sessionId>. If a user has two tabs open there will be two topics, etc. When a user logs out and then logs in, a new topic will be created. For every user that has logged in at least ones there will be a queue created with the format /user/<userId>/topic/messages.

ActiveMQ provides a way to remove inactive topics and queues by configuring a policy map. However, when using the default persistence (KahaDB) the policy map has no influence, because the KahaDB adapter doesn't do anything when the broker removes the inactive messages / queues. Therefore, the KahaDB file keeps growing.

Our recommendation is to use one non-persistent broker for STOMP and persistent brokers for other use cases (e.g. the whatsapp or wechat adapter). In order to do this, the conf/activemq.xml file needs to be adapted.

As a first step the transport connector for STOMP needs to be commented out.

As a second step the second broker needs to be configured using the following snippet:

<broker xmlns="http://activemq.apache.org/schema/core" brokerName="localhost-stomp" schedulePeriodForDestinationPurge="10000" persistent="false">
<destinationPolicy>
<policyMap>
<policyEntries>
<policyEntry topic=">" gcInactiveDestinations="true" inactiveTimoutBeforeGC="60000"/>
<policyEntry queue=">" gcInactiveDestinations="true" inactiveTimoutBeforeGC="60000"/>
</policyEntries>
</policyMap>
</destinationPolicy>

<!--
The managementContext is used to configure how ActiveMQ is exposed in
JMX. By default, ActiveMQ uses the MBean server that is started by
the JVM. For more information, see:

http://activemq.apache.org/jmx.html
-->
<managementContext>
<managementContext createConnector="false"/>
</managementContext>

<!--
The transport connectors expose ActiveMQ over a given protocol to
clients and other brokers. For more information, see:

http://activemq.apache.org/configuring-transports.html
-->
<transportConnectors>
<!-- DOS protection, limit concurrent connections to 1000 and frame size to 100MB -->
<transportConnector name="stomp" uri="stomp://0.0.0.0:61613?maximumConnections=1000&amp;transport.hbGracePeriodMultiplier=1&amp;wireFormat.maxFrameSize=104857600"/>
</transportConnectors>

<!-- destroy the spring context on shutdown to stop jetty -->
<shutdownHooks>
<bean xmlns="http://www.springframework.org/schema/beans" class="org.apache.activemq.hooks.SpringContextHook"/>
</shutdownHooks>

</broker>

This snippet configures a non-persistent (in memory) broker. Losing some STOMP messages is completely fine for Flowable, since we are only using this for sending notifications to the user browsers.

The schedulePeriodForDestinationPurge is the interval (in milliseconds, 10 seconds in the snippet) that ActiveMQ should use to check for inactive topics / queues. The policy entries are configured to remove all topics and queues (by using > for topic and queue respectively) that have been inactive for 60 seconds (using inactiveTimoutBeforeGC).

The transportConnectors has the default transport connector from the default broker configuration.

The parts for the managementContext and shutdownHooks are the same as for the default broker. You can tweak them as you need.

Clustering

In case Flowable is used in a high-availability scenario typically the Flowable Server receiving the request will handle it. This means that the execution of a case/process instance will be handled by this server until it is persisted to the database.

Assuming there are related asynchronous jobs to the request, the server will first try to schedule the job on the same server before it will hand it over to other nodes. In case a hand-over is happening, it will persist the job to the database. The executable jobs will be polled by other running Flowable Servers. Eventually one server will acquire the lock for the job and will execute it.

This means that there is no cluster synchronization for Flowable required. By using the same data storage (e.g. database) together with multiple Flowable Servers it will automatically work in a cluster mode together.

Clustering Prerequisites

This section builds on the installation process for a single node section and describes how to add additional components and configuration to set up a clustered Flowable application.

Clustering

The required steps are parts:

  • Download, install, and configure a NGINX load balancer.

  • Flowable Server clustering.

  • Database requirements and recommendations for clustering.

  • Install and configure multiple Elasticsearch nodes.

  • Install and configure a high available content storage.

  • Install and configure multiple ActiveMQ nodes. (Chat capabilities only)

Load Balancer

For proper clustering of the Flowable Server requests coming from a browser a load balancer is needed. The load balancer has to support either WebSockets or sticky sessions (if long polling is used or OpenID Connect). In this example we setup NGINX.

  1. Download NGINX from the NGINX Website at http://nginx.org/en/download.html (only for Windows, use either Homebrew for macOS, the packaging manager of your Linux distribution or even a Docker image).

  2. Add the following configuration to the nqinx.conf file lying in the conf directory of NGINX:

http {
upstream backend {
# nginx can use the client's source ip for load balancing
ip_hash;
server flowable01:8090; #hostname/IPs of the Flowable Server nodes
server flowable02:8090;
}

server {
listen 80;
location / {
proxy_pass http://backend;
proxy_set_header Host $host;
proxy_set_header X-Real-IP $remote_addr;
proxy_set_header X-Forwarded-For $proxy_add_x_forwarded_for;
proxy_set_header X-Forwarded-Proto $scheme;

# enables WS support
proxy_http_version 1.1;
proxy_set_header Upgrade $http_upgrade;
proxy_set_header Connection "upgrade";
}
}
}

Flowable Server Clustering

The Flowable Server itself is a stateless application and therefore does not need any additional synchronization mechanisms between its nodes (such as cache synchronizing) except for the database.

caution

The Flowable Server with chat capability is not fully stateless anymore as soon as WebSockets communication between browsers and the server is deactivated and long polling is used instead. This is because SockJS as a communication layer between browser and server then holds node dependent connection information. In this case sticky sessions need to be activated on the load balancer.

This also applies in case OpenID Connect is configured. Due to the fact that a session is required to establish the connection to the authorization server. Again, in this case sticky sessions need to be implemented on the load balancer.

Simultaneous auto deployments

When the Flowable Server boots up it can perform automatic deployment of resources configured on the classpath. By default, every node does this independently from the other nodes.

In some cases it might be needed to make sure that only one node is deploying, which can be achieved by enabling the deployment lock. When enabled, this effectively makes sure that during bootup only one node is executing the deployment. Every node will try to acquire the lock before deploying or wait until another node is finished and releases the lock.

Following properties can be set to enabled and configure the deployment locking:

flowable.auto-deployment.use-lock=false # Whether to use a lock when performing the auto deployment.
flowable.auto-deployment.lock-wait-time=PT5M # Duration to wait for the auto deployment lock before giving up.
flowable.auto-deployment.throw-exception-on-deployment-failure=true # Whether to throw an exception if there was some kind of failure during the auto deployment.
flowable.auto-deployment.lock-name=flowableAutoDeploymentLock # Name of the lock that should be used for the auto deployment.

The previous properties are configuring the global auto deployment, for all engines. It is also possible to configure this per engine (if a value is not set then the global one is used) using the following properties:

flowable.auto-deployment.engine.<engineType>.use-lock=
flowable.auto-deployment.engine.<engineType>.lock-wait-time=
flowable.auto-deployment.engine.<engineType>.throw-exception-on-deployment-failure=
flowable.auto-deployment.engine.<engineType>.lock-name=

In the above properties <engineType> should be replaced with one of the available engines:

  • action - for the Action Engine

  • app - for the App Engine

  • bpmn - for the Process Engine

  • cmmn - for the CMMN Engine

  • content - for the Content Engine

  • dataobject - for the Data Object Engine

  • dmn - for the DMN Engine

  • engage - for the Engage Engine

  • form - for the Form Engine

  • idm - for the IDM Engine

  • policy - for the Policy Engine

  • template - for the Template Engine

  • service-registry - for the Service Registry Engine

Simultaneous index mapping creation

When the Flowable Server boots up it checks and creates the required Index Mappings. In case every node should perform locking before creating the indexing then the following properties can be set:

flowable.indexing.use-lock-for-index-mapping-creation=false # Whether to use a lock when performing the index mappings create or update operations.
flowable.indexing.mapping-schema-lock-wait-time=PT5M # Duration to wait for the Index mappings lock before giving up.

Database Clustering

The Database acts as a synchronization anchor for the Flowable Server as it contains all the information about background job execution or case and process states.

Any clustering of the database has to be transparent to the Flowable Server. This means that Flowable Work expects to find and access the database as if there is only one single database connection.

For information about how to achieve this with your database please consult the appropriate database clustering documentation of the vendor.

Elasticsearch Clustering

A cluster of multiple Elasticsearch (ES) nodes can be configured by adapting the elasticsearch.yml file contained in the config directory of Elasticsearch.

Adapt and add the following configuration options to the file:

cluster.name: flowable-cluster # name of the flowable cluster
node.name: node2 # name of the specific node within the cluster
node.master: true
node.data: true
discovery.zen.ping.unicast.hosts: node1 #list of hostnames/IPs of other nodes in the cluster

Please be aware that at least a cluster of three nodes is recommended for a productive setup.

Please also check the Elasticsearch cluster manual for further information.

In addition, modify the Flowable Server properties to add the Elasticsearch nodes for failover purposes:

spring.elasticsearch.uris=http://node1:9200,http://node2:9200

Content Storage

Files uploaded to Flowable are stored in a content storage. Flowable expects in a multi-node setup that those files are accessible from all nodes.

By default, the content storage is on the file system, which would require a shared filesystem between the different nodes. Alternative approaches which do not require a shared file system are discussed in the Content Object Storage customization chapter of the documentation (e.g. S3).

ActiveMQ Clustering (Chat capabilities only)

The recommended setup for clustered ActiveMQ nodes is a Network of Brokers. For this, an additional networkConnector needs to be added to the activemq.xml configuration file lying in the conf directory of ActiveMQ:

<broker brokerName="receiver" persistent="false" useJmx="false">
<networkConnectors>
<networkConnector uri="static:(tcp://node2:61616,tcp://node3:61616)"/> <!-- addresses of all other nodes -->
</networkConnectors>
...
</broker>

In addition, modify the Flowable Server properties to add the ActiveMQ nodes for failover purposes:

flowable.websocket.stomp-broker-addresses=node1:61612,node2:61613,node3:61613
spring.activemq.broker-url=failover:(tcp://node1:61616,tcp://node2:61616,tcp://node3:61616)

HTTPS for the Flowable Front End

The choices for setting up encrypted HTTPS communication between the Browser and the Flowable components is determined by which components terminate the SSL connection.

If the connection between the load balancer and the Flowable Server can be considered safe, the load balancer can do the termination. If not, the termination needs to occur at the servlet container running the Flowable Server.

This section demonstrates how to do termination at a load balancer.

To set up an encrypted channel from the browser to the load balancer, the load balancer has to provide a valid certificate. Certificates are either self-signed (for use only in development and test environments) or signed by a recognized certificate authority (CA).

To create a self-singed certificate on a Linux like system execute the following command:

sudo openssl req -x509 -nodes -days 365 -newkey rsa:2048 -keyout /path/to/created/selfsigned.key -out /path/to/created/selfsigned.crt

You typically need to provide information like country and email address but they can be empty for a self-signed certificate.

Now add the certificates to the NGINX config file nginx.conf present in the conf directory. The configuration content is similar to:

http {
upstream backend {
# nginx can use the client's source ip for load balancing
ip_hash;
server flowable01:8090;
server flowable02:8090;
}

server {
listen 80;
server_name _;
return 301 https://$host$request_uri;
}

server {
listen 443 ssl;
ssl_certificate /path/to/created/selfsigned.crt;
ssl_certificate_key /path/to/created/selfsigned.key;
ssl_ciphers EECDH+AESGCM:EDH+AESGCM:AES256+EECDH:AES256+EDH;
ssl_protocols TLSv1.1 TLSv1.2;

location / {
proxy_pass http://backend;
proxy_set_header Host $host;
proxy_set_header X-Real-IP $remote_addr;
proxy_set_header X-Forwarded-For $proxy_add_x_forwarded_for;
proxy_set_header X-Forwarded-Proto $scheme;

# enables WS support
proxy_http_version 1.1;
proxy_set_header Upgrade $http_upgrade;
proxy_set_header Connection "upgrade";
}
}
}

This configuration also enables the forwarding of HTTP requests to HTTPS.

You can test the configuration by opening the Flowable Front End in a browser. The browser shows a warning because self-signed certificates are not trusted by the browser. You need to ignore the warning to access the front end.

Installation Options

This section provides information about additional installation options for Flowable and its components.

Development Environment Setup

To develop customizations or extensions to Flowable, the following are some guidelines on creating a development environment.

Using JMS

Chat capabilities Only

The Flowable application uses JMS to communicate with the adapters that are responsible for communicating with the third party external systems (e.g., WhatsApp, WeChat, LINE, etc.).

note

Flowable listens to the defined queues only if the appropriate external system dependency is present.

Queues

These are the queues that the Flowable Application is subscribed to:

Flowable Queues
Third Party SystemPropertyDefault Value
WhatsAppflowable.external-system.whatsapp.inbound-payloadwhatsapp-inbound-payload
WhatsAppflowable.external-system.whatsapp.inboundwhatsapp-inbound
WhatsAppflowable.external-system.whatsapp.inbound-statuswhatsapp-inbound-status
WhatsAppflowable.external-system.whatsapp.inbound-errorwhatsapp-inbound-error
WeChatflowable.external-system.wechat.inboundwechat-inbound
WeChatflowable.external-system.wechat.inbound-statuswechat-inbound-status
WeChatflowable.external-system.wechat.inbound-errorwechat-inbound-error
WeChatflowable.external-system.wechat.get-access-tokenwechat-get-access-token
WeChatflowable.external-system.wechat.store-access-tokenwechat-store-access-token
LINEflowable.external-system.line.inbound-payloadline-inbound-payload
LINEflowable.external-system.line.inboundline-inbound
LINEflowable.external-system.line.inbound-statusline-inbound-status
LINEflowable.external-system.line.inbound-errorline-inbound-error
Flowable WhatsApp Adapter Queues
PropertyDefault Value
flowable.adapter.whatsapp.jms.outboundwhatsapp-outbound
Flowable WeChat Adapter Queues
PropertyDefault Value
flowable.adapter.wechat.jms.outboundwechat-outbound
Flowable LINE Adapter Queues
PropertyDefault Value
flowable.adapter.line.jms.outboundline-outbound

These are the JMS queues (and properties) that the Flowable applications are sending to:

Flowable destination queues
Third Party systemPropertyDefault Value
WhatsAppflowable.external-system.whatsapp.outboundwhatsapp-outbound
WeChatflowable.external-system.wechat.outboundwechat-inbound
LINEflowable.external-system.line.outboundline-inbound
Flowable WhatsApp Adapter destination queues
PropertyDefault Value
flowable.adapter.whatsapp.jms.inbound-payload-destinationwhatsapp-inbound-payload
flowable.adapter.whatsapp.jms.inbound-message-destinationwhatsapp-inbound
flowable.adapter.whatsapp.jms.inbound-status-destinationwhatsapp-inbound-status
flowable.adapter.whatsapp.jms.inbound-error-destinationwhatsapp-inbound-error
Flowable WeChat Adapter destination queues
PropertyDefault Value
flowable.adapter.wechat.jms.inbound-message-destinationwechat-inbound
flowable.adapter.wechat.jms.inbound-status-destinationwechat-inbound-status
flowable.adapter.wechat.jms.inbound-error-destinationwechat-inbound-error
flowable.adapter.wechat.jms.inbound-get-access-token-destinationwechat-get-access-token
flowable.adapter.wechat.jms.inbound-store-access-token-destinationwechat-store-access-token
Flowable LINE Adapter destination queues
PropertyDefault Value
flowable.adapter.line.jms.inbound-payload-destinationline-inbound-payload
flowable.adapter.line.jms.inbound-message-destinationline-inbound
flowable.adapter.line.jms.inbound-status-destinationline-inbound-status
flowable.adapter.line.jms.inbound-error-destinationline-inbound-error

IBM MQ

Flowable provides out of the box support for using the IBM MQ client. In order to use the IBM client you need to add the following dependency:

<dependency>
<groupId>com.flowable.platform</groupId>
<artifactId>flowable-spring-boot-starter-ibm-mq</artifactId>
<version>${com.flowable.platform.version}</version>
</dependency>

This dependency pulls in the needed transitive dependencies for communicating with IBM MQ.

info

When using IBM MQ the values for the queues should be changed. The reason for the changes is that IBM MQ does not support the use of the "-" character in the name of the queue.

Default Configuration

The selected default options have been set in order to match the IBM MQ Docker Container development configuration. The created MQConnectionFactory is by default wrapped in a Spring CachingConnectionFactory.

The default values are:

flowable.ibm.mq.host=localhost
flowable.ibm.mq.port=1414
flowable.ibm.mq.channel=DEV.APP.SVRCONN
flowable.ibm.mq.queue-manager=QM1
flowable.ibm.mq.application-name=
flowable.ibm.mq.user=app
flowable.ibm.mq.password=

Extended Configuration Options

Changing the default configuration is done by defining your properties in an application.properties file, environment properties, system properties, etc. For more information see Using Spring Boot Properties.

Pooled Connection Factory Options

There is an option to enable using the JmsPoolConnectionFactory. This is disabled by default. It can be configured by using the following properties:

IBM MQ Pool Connection Factory properties
PropertyDescriptionDefault Value

flowable.ibm.mq.pool.enabled

Use JmsPoolConnectionFactory.

false

flowable.ibm.mq.pool.block-if-full

Block a connection when the pool is full.

true

flowable.ibm.mq.pool.block-if-full-timeout

Blocking period before throwing an exception if the pool is still full.

-1

flowable.ibm.mq.pool.idle-timeout

Connection idle timeout.

30 seconds

flowable.ibm.mq.pool.max-connections

Maximum number of pooled connections.

1

flowable.ibm.mq.pool.max-sessions-per-connection

Maximum number of pooled sessions per connection in the pool.

500

flowable.ibm.mq.pool.time-between-expiration-check

Time to sleep between runs of the idle connection eviction thread. When negative, no idle connection eviction thread runs.

-1

flowable.ibm.mq.pool.use-anonymous-producers

Whether to use only one anonymous "MessageProducer" instance. Set it to false to create one "MessageProducer" every time one is required.

true

Cached Connection Factory Options

By default the Spring CachingConnectionFactory is used with the following properties:

IBM MQ Cached Connection Factory properties
PropertyDescriptionDefault Value

spring.jms.cache.enabled

Whether to cache sessions.

true

spring.jms.cache.consumers

Whether to cache message consumers.

false

spring.jms.cache.producers

Whether to cache message producers.

true

spring.jms.cache.session-cache-size

Size of the session cache (per JMS Session type).

-1

ActiveMQ

Chat capabilities Only

Flowable provides out of the box support (via Spring Boot) for using the ActiveMQ client. In order to use ActiveMQ add the following dependency:

<dependency>
<groupId>org.springframework.boot</groupId>
<artifactId>spring-boot-starter-activemq</artifactId>
</dependency>

This dependency pulls in the needed transitive dependencies for communicating with ActiveMQ.

Configuration Options

Configuring the connection with ActiveMQ is done by defining your properties in an application.properties file, environment properties, system properties, etc. For more information see Using Spring Boot Properties.

ActiveMQ Connection Factory Options
ActiveMQ Connection Factory properties
PropertyDescriptionDefault Value

spring.activemq.broker-url

URL of the ActiveMQ broker. Auto-generated by default.

-

spring.activemq.in-memory

Whether the default broker URL should be in memory. Ignored if an explicit broker has been specified.

true

spring.activemq.user

Login user of the broker.

-

spring.activemq.password

Login password of the broker.

-

spring.activemq.close-timeout

Time to wait before considering a close complete.

15 seconds

spring.activemq.non-blocking-delivery

Whether to stop message delivery before re-delivering messages from a rolled back transaction. This implies that message order is not preserved when this is enabled.

false

spring.activemq.non-blocking-delivery

Time to wait on message sends for a response. Set it to 0 to wait forever.

0

spring.activemq.package.trust-all

Whether to trust all packages.

-

spring.activemq.package.trusted

Comma-separated list of specific packages to trust (when not trusting all packages).

-

Pooled Connection Factory Options

There is an option to enable using the JmsPoolConnectionFactory. This is disabled by default. It can be configured by using the following properties:

ActiveMQ Pool Connection Factory properties
PropertyDescriptionDefault Value

spring.activemq.pool.enabled

Use JmsPoolConnectionFactory.

false

spring.activemq.pool.block-if-full

Block a connection when the pool is full.

true.

spring.activemq.pool.block-if-full-timeout

Blocking period before throwing an exception if the pool is still full.

-1

spring.activemq.pool.idle-timeout

Connection idle timeout.

30 seconds

spring.activemq.pool.max-connections

Maximum number of pooled connections.

1

spring.activemq.pool.max-sessions-per-connection

Maximum number of pooled sessions per connection in the pool.

500

spring.activemq.pool.time-between-expiration-check

Time to sleep between runs of the idle connection eviction thread. When negative, no idle connection eviction thread runs.

-1

spring.activemq.pool.use-anonymous-producers

Whether to use only one anonymous "MessageProducer" instance. Set it to false to create one "MessageProducer" every time one is required.

true

Cached Connection Factory Options

By default the Spring CachingConnectionFactory is used with the following properties:

ActiveMQ Cached Connection Factory properties
PropertyDescriptionDefault Value

spring.jms.cache.enabled

Whether to cache sessions.

true

spring.jms.cache.consumers

Whether to cache message consumers.

false

spring.jms.cache.producers

Whether to cache message producers.

true

spring.jms.cache.session-cache-size

Size of the session cache (per JMS Session type).

-1

Spring Boot Skeleton

Flowable Work is based on Spring Boot and therefore requires it as a base for any development environment.

The easiest way to setup a Flowable development project is to use the Flowable Initializr.

Choose the following options and hit "Generate Project" to get a Flowable skeleton for a Flowable development project:

Spring Initilizr

You can now import the project into the IDE of your choice (like IntelliJ IDEA or Eclipse).

Dependency Management

With the help of Maven dependency management you can delegate the specifying the correct versions of all the dependencies to a BOM (Bill of Materials). The BOM defines and provides all the specific version information for all direct and transient dependencies. You just need to define the to-be-used Flowable version one by to use the the correct BOM.

Add the following section to the pom.xml file of the project you just created as a child tag of the <project> tag:

<dependencyManagement>
<dependencies>
<!-- Imports the bill-of-materials POM. -->
<dependency>
<groupId>com.flowable</groupId>
<artifactId>flowable-platform-bom</artifactId>
<version>${com.flowable.platform.version}</version>
<type>pom</type>
<scope>import</scope>
</dependency>
</dependencies>
</dependencyManagement>

Choose the Flowable version either by replacing the ${com.flowable.platform.version} part with a Flowable version number or by defining an appropriate Maven parameter specifying version you require.

Flowable Dependencies

Flowable utilizes multiple Maven dependencies to access the required Flowable services.

Add the following dependencies as children of the existing <dependencies> tag of the pom.xml file to set up Flowable Work:

<!-- Flowable -->
<!-- =============== -->
<dependency>
<groupId>com.flowable.platform</groupId>
<artifactId>flowable-spring-boot-starter-platform-rest</artifactId>
</dependency>
<dependency>
<groupId>com.flowable.platform</groupId>
<artifactId>flowable-tenant-setup</artifactId>
</dependency>
<dependency>
<groupId>com.flowable.platform</groupId>
<artifactId>flowable-platform-default-models</artifactId>
</dependency>

Flowable with Chat capabilities Dependencies

Flowable with chat capabilities utilizes multiple Maven dependencies to access the required Flowable services.

Add the following dependencies as children of the existing <dependencies> tag of the pom.xml file to set up Flowable with chat capabilities:

<!-- Flowable -->
<!-- =============== -->
<dependency>
<groupId>com.flowable.engage</groupId>
<artifactId>flowable-spring-boot-starter-engage-rest</artifactId>
</dependency>
<dependency>
<groupId>com.flowable.platform</groupId>
<artifactId>flowable-tenant-setup</artifactId>
</dependency>
<dependency>
<groupId>com.flowable.platform</groupId>
<artifactId>flowable-platform-default-models</artifactId>
</dependency>
<dependency>
<groupId>com.flowable.engage</groupId>
<artifactId>flowable-engage-default-models</artifactId>
</dependency>

<!-- Spring Boot -->
<!-- =========== -->
<dependency>
<groupId>org.springframework.boot</groupId>
<artifactId>spring-boot-starter-activemq</artifactId>
</dependency>

Flowable Inspect Dependencies

To add Flowable Inspect to your application, add the following dependency:

<dependency>
<groupId>com.flowable.inspect</groupId>
<artifactId>flowable-spring-boot-starter-inspect-rest</artifactId>
</dependency>

Note that you need an appropriate license to enable Flowable Inspect.

Flowable User Definitions

Flowable manages features and permissions of an application user by defining user definitions.

User definitions follow a "template" pattern for each different types of user using the system. Example include: administrators, superusers, operators, client advisers, clients, etc. They all have different feature sets available, different member groups, different permissions, etc.

To define the user definitions for your Flowable Work setup create a file like:

src/main/resources/com/flowable/users/custom/<users>-definitions.user.json

where <users> is a meaningful name for the set of user definitions.

Use the following content to define an admin user with full permissions to the Flowable:

[
{
"key": "admin",
"name": "Flowable Administration User",
"description": "Creates a new administration user.",
"allowedFeatures": [
"contacts",
"createUser",
"reports",
"reportsMetrics",
"actuators",
"user-mgmt",
"search-api",
"workobject-api",
"templateManagement",
"work",
"tasks",
"cases",
"editAvatar"
]
}
]

Flowable with chat capabilities User Definitions

Flowable with chat capabilities manages features and permissions of an application user by defining user definitions.

User definitions follow a "template" pattern for each different types of user using the system. Example include: administrators, superusers, operators, client advisers, clients, etc. They all have different feature sets available, different member groups, different permissions, etc.

To define the user definitions for your Flowable with chat capabilities setup create a file like:

src/main/resources/com/flowable/users/custom/<users>-definitions.user.json

where <users> is a meaningful name for the set of user definitions.

Use the following content to define an admin user with full permissions to the Flowable with chat capabilities:

[
{
"key": "admin",
"name": "Flowable Administration User",
"description": "Creates a new, administration user.",
"allowedFeatures": [
"contacts",
"createUser",
"reports",
"reportsMetrics",
"actuators",
"user-mgmt",
"search-api",
"workobject-api",
"templateManagement",
"conversations",
"websockets",
"createConversation",
"sendMessageFromProfile",
"emojiPicker",
"markdownInput",
"editMessage",
"deleteMessage",
"fileUpload",
"audioMessage",
"videoMessage",
"slashActions",
"work",
"tasks",
"editAvatar"
]
}
]

Flowable with chat capabilities Configuration

Flowable with chat capabilities uses Spring Messaging for real time communication and needs an additional annotation to initialize the messaging components.

For this, you need to add the @EnableWebSocketMessageBroker annotation to your Spring Boot application class so it looks like this:

@SpringBootApplication
@EnableWebSocketMessageBroker
public class <MainClass>Application {
public static void main(String[] args) {
SpringApplication.run(<mainclass>Application.class, args);
}
}

where <mainclass> is the name of the main class specific to your application.

Embedded Front End

Flowable provides a dedicated JavaScript front end that can either be deployed to any HTML capable server or run embedded directly within the Flowable Server.

To run the front end embedded within the Flowable Server add the following dependency to the pom.xml file of the project:

<dependency>
<groupId>com.flowable.work</groupId>
<artifactId>flowable-work-frontend</artifactId>
</dependency>

In addition you need to provide the correct Spring Boot Security configuration to allow access to the embedded front end. This is done by adding a class e.g., called SecurityConfiguration as a sibling of the Spring Boot Application class containing the following configuration:

import org.springframework.beans.factory.ObjectProvider;
import org.springframework.context.annotation.Configuration;
import org.springframework.core.annotation.Order;
import org.springframework.http.HttpStatus;
import org.springframework.security.config.annotation.web.builders.HttpSecurity;
import org.springframework.security.config.annotation.web.configuration.EnableWebSecurity;
import org.springframework.security.web.SecurityFilterChain;
import org.springframework.security.web.authentication.HttpStatusEntryPoint;
import org.springframework.security.web.authentication.logout.HttpStatusReturningLogoutSuccessHandler;
import org.springframework.security.web.util.matcher.AnyRequestMatcher;

import com.flowable.autoconfigure.frontend.FrontendProperties;
import com.flowable.autoconfigure.security.FlowableHttpSecurityCustomizer;
import com.flowable.core.spring.security.web.authentication.AjaxAuthenticationFailureHandler;
import com.flowable.core.spring.security.web.authentication.AjaxAuthenticationSuccessHandler;
import com.flowable.platform.common.security.SecurityConstants;

@Configuration(proxyBeanMethods = false)
@EnableWebSecurity
public class SecurityConfiguration {

@Autowired
protected ObjectProvider<FrontendProperties> frontendPropertiesProvider;

@Bean
@Order(10)
public SecurityFilterChain basicDefaultSecurity(HttpSecurity http, ObjectProvider<FlowableHttpSecurityCustomizer> httpSecurityCustomizers) throws Exception {
for (FlowableHttpSecurityCustomizer customizer : httpSecurityCustomizers.orderedStream()
.collect(Collectors.toList())) {
customizer.customize(http);
}

http
.logout()
.logoutUrl("/auth/logout");

FrontendProperties frontendProperties = frontendPropertiesProvider.getIfAvailable();
if (frontendProperties != null && frontendProperties.getFeatures().containsKey("formBasedLogout")
&& frontendProperties.getFeatures().get("formBasedLogout")) {
http
.logout()
.logoutSuccessUrl("/");
} else {
http
.logout()
.logoutSuccessHandler(new HttpStatusReturningLogoutSuccessHandler());
}

http
// Non authenticated exception handling. The formLogin and httpBasic configure the exceptionHandling
// We have to initialize the exception handling with a default authentication entry point in order to return 401 each time and not have a
// forward due to the formLogin or the http basic popup due to the httpBasic
.exceptionHandling()
.defaultAuthenticationEntryPointFor(new HttpStatusEntryPoint(HttpStatus.UNAUTHORIZED), AnyRequestMatcher.INSTANCE)
.and()
.formLogin()
.loginProcessingUrl("/auth/login")
.successHandler(new AjaxAuthenticationSuccessHandler())
.failureHandler(new AjaxAuthenticationFailureHandler())
.and()
.authorizeRequests()
.antMatchers("/analytics-api/**").hasAuthority(SecurityConstants.ACCESS_REPORTS_METRICS)
.antMatchers("/work-object-api/**").hasAuthority(SecurityConstants.ACCESS_WORKOBJECT_API)
// allow context root for all (it triggers the loading of the initial page)
.antMatchers("/").permitAll()
.antMatchers(
"/**/*.svg", "/**/*.ico", "/**/*.png", "/**/*.woff2", "/**/*.css",
"/**/*.woff", "/**/*.html", "/**/*.js",
"/**/index.html").permitAll()
.anyRequest().authenticated()
.and()
.httpBasic();

return http.build();
}

}

Tenant File

Flowable provides an internal identity management (IDM) component that can manage tenants, users and groups. The internal IDM component is populated with tenants, users and groups defined in a tenant file. This file is read and loaded at initial system startup.

To use the internal IDM add the following dependency to the pom.xml file of the project:

<dependency>
<groupId>com.flowable.platform</groupId>
<artifactId>flowable-tenant-setup</artifactId>
</dependency>

To populate the internal IDM at database initialization create a file of the form:

src/main/resources/com/flowable/tenant-setup/custom/<tenants>.json

where <tenants> is a meaningful name for the set of tenant definitions.

For example, the tenant json file for the 'demo' tenant is named demo.json. A tenantKey is defined in the file that is unique to this group of users for this tenant. The file is similar to:

{
"name": "Flowable Demo",
"tenantKey": "demo",
"groups": [
{
{"key": "flowableAdministrator", "name": "Flowable Administrator"},
{"key": "flowableUser", "name": "Flowable User"},
],
"users": [
{
"firstName": "Flowable",
"lastName": "Admin",
"login": "admin",
"email": "admin@demo.flowable.io",
"language": "en",
"theme": "flowable",
"userDefinitionKey": "admin"
}
]
}

Note: A tenant setup file without tenantKey has all the users and groups created in the default tenant.

Infrastructure and Initial Startup

You now have a minimal setup with which to run the application. But first you have to setup the appropriate infrastructure to get Flowable running. Please review Step-by-Step Installation for a description on how to set up the proper infrastructure for Flowable.

For the current development setup at least one instance of Elasticsearch is needed. A docker image can be helpful to get the environment up and running quickly. The following docker-compose.yml file provides an Elasticsearch instance running locally on port 9200 and an ActiveMQ running on ports 61616 (JMS) and 616163 (STOMP).

version: "3.4"

elasticsearch01:
image: docker.elastic.co/elasticsearch/elasticsearch-oss:7.10.0
ports:
- 9200:9200
- 9300:9300
ulimits:
memlock:
soft: -1
hard: -1

activemq01:
image: rmohr/activemq
ports:
- 8161:8161
- 61616:61616
- 61613:61613

After you started Elasticsearch/ActiveMQ and the Spring Boot project from your IDE an Elasticsearch instance running locally on port 9200.

version: "3.4"

elasticsearch01:
image: docker.elastic.co/elasticsearch/elasticsearch-oss:7.10.0
ports:
- 9200:9200
- 9300:9300
ulimits:
memlock:
soft: -1
hard: -1

After you started Elasticsearch and the Spring Boot project from your IDE, Flowable is available at http://localhost:8080.

You can login with the administrator user you created in the tenant file.

  • Username: admin

  • Password: test

Running Behind a Proxy

When running behind a proxy or a load balancer Flowable uses the X-Forwarded headers in order to provide better linking support and to create secure cookies.

Therefore, when running behind a proxy or load balancer it is important that the proxy is properly setting the different X-Forwarded headers. The crucial headers are:

  • X-Forwarded-For - This helps identity the IP address of the original request.

  • X-Forwarded-Proto - This helps identify the protocol of the original request.

  • X-Forwarded-Port - This helps identify the destination port of the original request.

Apart from configuring the proxy or load balancer the application needs to be configured as well.

Embedded Mode

When running the application in an embedded mode (as a Spring Boot application with java -jar) the property server.forward-headers-strategy needs to be set to native. This property ensures that the X-Forwarded-* headers are applied to the HttpRequest.

Running Within Tomcat

When running the application as a WAR withing Tomcat you need to configure the Remote IP Valve.

Flowable Design

This section describes how Flowable Design can be installed and configured to be able to create models and deploy them as Apps to Flowable.

  1. Download Tomcat 8.5.x (latest version of the 8.5.x line) from: https://tomcat.apache.org/download-80.cgi or Tomcat 9.x from https://tomcat.apache.org/download-90.cgi. Once you downloaded the package you should unpack it. Do no run the Tomcat yet, first follow the steps for the installing the Flowable Design WAR.

  2. Download the Flowable Design WAR file from the Flowable Maven Repository (appropriate access credentials are needed): Flowable Design.

  3. Rename the .war file to flowable-design.war and copy it into the Tomcat’s webapps folder.

  4. Flowable requires that you have a valid license for the Product. The license is either stored on the file system or in the database. If the license is provided as a file then it is typically located in the .flowable folder of your home directory. On Unix or macOS the file is ~/.flowable/flowable.license. The location of the license file can be changed in the application.properties file (see below).

    flowable.design.license-location=file:/myCustomLocation/flowable.license

    To store the license in the database then the following property must be set in the applications.properties file:

    flowable.design.db-store-enabled=true

    With the license database store mode enabled a license is uploaded using the Flowable Design application.

  5. Add a file named application.properties in the Tomcat’s lib folder. The file is used later to configure Flowable Design.

  6. To be able to deploy/undeploy Apps directly into an instance of Flowable add the following properties to the application.properties file you just created. Remember to adapt the values (e.g., server, port, context, etc.) to your specific installation values:

    flowable.design.deployment-api-url=http://localhost:8080/flowable-work/app-api
    flowable.design.undeployment-api-url=http://localhost:8080/flowable-work/platform-api/app-deployments
    flowable.design.remote.authentication.user=admin
    flowable.design.remote.authentication.password=test
  7. To be able to select users / groups in the Design Assignment section add the following to the application.properties. Remember to adapt the values (e.g., server, port, context, etc.) to your specific values.

    flowable.common.app.idm-url=http://localhost:8080/flowable-work
  8. If you are manually creating the Database tables for Design, and you don't want Flowable to validate you can add the following to the application.properties

    flowable.design.database-schema-update=ignore
  9. You can now start the Tomcat by running bin/catalina.sh (bin\catalina.bat on Windows). Alternatively you can run bin/catalina.sh run to have it run in the foreground.

  10. You can now access Flowable Design by going to: http://localhost:8080/flowable-design.

  11. You can login with the user admin and password test.

Flowable Control

This section describes how Flowable Control can be installed and configured to be able to monitor instances of Flowable.

  1. Download Tomcat 8.5.x (latest version of the 8.5.x line) from: https://tomcat.apache.org/download-80.cgi or Tomcat 9.x from https://tomcat.apache.org/download-90.cgi. Once you downloaded the package you should unpack it. Do not run the Tomcat yet, first follow the steps for the installing the Flowable Control WAR.

  2. Download the Flowable Control WAR file from the Flowable Maven Repository (appropriate access credentials are required): Flowable Control.

  3. Rename the .war file into flowable-control.war and copy it into the Tomcat’s webapps folder.

  4. Flowable Control requires that you have a valid license for the product. The license is either stored on the file system or in the database. If the license is provided as a file then it is typically located in the .flowable folder of your home directory. On Unix or macOS the file is ~/.flowable/flowable.license. The location of the license file can be changed in the application.properties file (see below).

    flowable.control.app.license-location=file:/myCustomLocation/flowable.license

    To store the license in the database then the following property must be set in the applications.properties file:

    flowable.control.app.db-store-enabled=true

    With the license database store mode enabled a license is uploaded using the Flowable Control application.

  5. Add a file named application.properties in the Tomcat’s lib folder. The file is used to configure Flowable Control and other applications.

  6. To manage apps from an instance of Flowable add the following properties to the application.properties file just created. The properties defined below are used to create the initial data values and are typically used during initial system startup. After that the values are stored internally and these properties are not used.

    flowable.control.app.cluster-config.name=Default Cluster
    flowable.control.app.cluster-config.description=Default Flowable Cluster
    flowable.control.app.cluster-config.server-address=http://localhost
    flowable.control.app.cluster-config.port=8090
    flowable.control.app.cluster-config.context-root=flowable-work
    flowable.control.app.cluster-config.user-name=admin
    flowable.control.app.cluster-config.password=test

Remember to adapt the values (e.g., server, port, context, etc.) to your specific installation values.

  1. If you are manually creating the Database tables for Control, and you don't want Flowable to validate you can add the following to the application.properties

    flowable.control.app.database-schema-update=ignore
  2. You can now start the Tomcat by running bin/catalina.sh (bin\catalina.bat on Windows). Alternatively you can run bin/catalina.sh run to have it run in the foreground.

  3. You should now be able to access Flowable Control by going to: http://localhost:8080/flowable-control.

  4. You can login with the user admin and password test.

Flowable Actuators

Spring Boot Actuators

As a Spring Boot 2 application Flowable supports Spring Boot Actuators which provide production ready features such as health and metrics endpoints.

To have Spring Boot base support for actuate you need to add the Spring Boot actuator dependency (if not already added by choosing it in the Spring Initializer):

<dependency>
<groupId>org.springframework.boot</groupId>
<artifactId>spring-boot-starter-actuator</artifactId>
</dependency>

Additional configuration properties in the application.properties file are needed to be able to access the actuator endpoints:

# Enable actuator endpoints over HTTP
management.endpoints.web.exposure.include=*
management.endpoint.health.show-details=ALWAYS

Actuator endpoints are queried by opening the following URLs in the browser:

For a full list of endpoints please check the Spring Boot Actuator documentation. Also remember to adjust the host and port as needed for your site.

Flowable Actuator Extensions

Flowable provides additional extensions to the default Spring Boot Actuators by adding the following dependency:

<dependency>
<groupId>com.flowable.platform</groupId>
<artifactId>flowable-platform-actuate-autoconfigure</artifactId>
</dependency>

Adding this dependency adds a health endpoint at:

which provides information about the health of the connected Elasticsearch cluster.

Securing the Actuator Endpoints

To secure the endpoints provided by the actuators some additional Spring Security configuration code is needed. This is accomplished by adding file named SecurityActuatorConfiguration.java to your Spring Boot project. The Java file contains the following code:

@ConditionalOnClass(EndpointRequest.class)
@Configuration
public class SecurityActuatorConfiguration {

@Bean
@Order(6) // Actuator configuration should kick in before the Form Login there should always be HTTP basic for the endpoints
public SecurityFilterChain basicActuatorSecurity(HttpSecurity http) throws Exception {

http
.sessionManagement()
.sessionCreationPolicy(SessionCreationPolicy.STATELESS)
.and()
.csrf()
.disable();

http
.requestMatcher(new ActuatorRequestMatcher())
.authorizeRequests()
.requestMatchers(EndpointRequest.to(InfoEndpoint.class, HealthEndpoint.class)).permitAll()
.requestMatchers(EndpointRequest.toAnyEndpoint()).hasAuthority(SecurityConstants.ACCESS_ACTUATORS)
.anyRequest().denyAll()
.and().httpBasic();

return http.build();
}
}

This enables unauthorized access to the health and info endpoints and activates basic authentication for the other actuator endpoints.

Flowable Adapter Configuration

WhatsApp Adapter Configuration

The Flowable WhatsApp Adapter is able to run in a single account or multiple business accounts setup.

The WhatsApp on Premise support will expire onOctober 23, 2025. The adapter can be configured to run either with the WhatsApp Cloud API (v3.13.13+v3.14.7+v3.15.3+) or the On-Premise API

Single WhatsApp Business Account Configuration

Cloud API
v3.13.13+v3.14.7+v3.15.3+

The WhatsApp Adapter needs to be configured via properties to connect to the WhatsApp Cloud API.

flowable.adapter.whatsapp.default-account-mode=cloud
flowable.adapter.whatsapp.default-api-endpoint=https://graph.facebook.com/v18.0/
flowable.adapter.whatsapp.default-api-webhook-verification-token=webhookVerificationToken
flowable.adapter.whatsapp.default-api-secret=appSecret
flowable.adapter.whatsapp.default-business-account-phone-number-id=BusinessPhoneNumberID
flowable.adapter.whatsapp.default-api-access-token=accessToken

And on the other side, the WhatsApp Developer Console, the webhook needs to be configured to send inbound messages to the WhatsApp Adapter with the following https endpoint: Visit that link

Webhook URLs = https://<<WhatsApp-Adapter-URL>>/whatsapp-api/cloud/webhook

Api Secret You can find the secret in the WhatsApp Developer Console. WhatsApp App Secret

note

Since v3.13.13+v3.14.7+v3.15.4+ the api secret supports a list of string values. This feature facilitates seamless migration following the refresh of your WhatsApp app secret. New WhatsApp app secrets become valid after a specified period. To avoid longer downtime during the refresh, you can create a new WhatsApp app secret, configure the WhatsAppAdapter with the additional api secret and restart the adapter. After the time period, WhatsApp will stop sending signatures based on the old secret and will use the new secret. The sequence of these values is critical. If any API secret fails to validate the WhatsApp signature, it is immediately invalidated and will no longer be used. Therefore, it is recommended to configure the API secret values in the following manner:

flowable.adapter.whatsapp.default-api-secret=oldSecret,newSecret

Webhook Verification Token

You can pick whatever you want for your webhook verification token WhatsApp App Secret

API Access Token

Check out the WhatsApp documentation to create a permanent access token

Phone Number ID WhatsApp App Secret

On-Premise

The WhatsApp Adapter needs to be configured via properties to connect to the WhatsApp client On-Premise API.

flowable.adapter.whatsapp.default-account-mode=on-premise
flowable.adapter.whatsapp.default-api-endpoint=https://whatsapp-clientXY.flowable.io/
flowable.adapter.whatsapp.default-username=admin
flowable.adapter.whatsapp.default-password=secret_password
flowable.adapter.whatsapp.default-namespace=default_namespace

And on the other side, the WhatsApp Client needs to be configured to send inbound messages to the WhatsApp Adapter with the following http/https endpoint:

Webhook URLs = https://<<WhatsApp-Adapter-URL>>/whatsapp-api/webhook

For the single WhatsApp Business Account setup it is also important that the businessId is not set when creating a UserAccount in Flowable.

UserAccount userAccount = userAccountService.createNewUserAccountBuilder()
.name(name)
.userId(userId)
.externalUserId(externalUserId)
.businessAccountId(null)
.userAccountDefinitionKey(userAccountDefinitionKey)
.subType(subType)
.save();

Multiple WhatsApp Business Account Configuration

Also in the multiple WhatsApp Business Account setup the WhatsApp Adapter needs to be configured via properties.

For the configuration example, let's assume there are two WhatsApp Business Accounts your application needs to connect to, and let's call them flowable (cloud api) and mimacom (on premise api).

flowable.adapter.whatsapp.accounts.flowable.account-mode=cloud
flowable.adapter.whatsapp.accounts.flowable.api-endpoint=https://graph.facebook.com/v18.0/
flowable.adapter.whatsapp.accounts.flowable.api-webhook-verification-token=webhookVerificationToken
flowable.adapter.whatsapp.accounts.flowable.api-secret=appSecret
flowable.adapter.whatsapp.accounts.flowable.business-account-phone-number-id=BusinessPhoneNumberID
flowable.adapter.whatsapp.accounts.flowable.api-access-token=accessToken

flowable.adapter.whatsapp.accounts.mimacom.account-mode=on-premise
flowable.adapter.whatsapp.accounts.mimacom.api-endpoint=http://whatsapp-client.mimacom.io
flowable.adapter.whatsapp.accounts.mimacom.username=admin
flowable.adapter.whatsapp.accounts.mimacom.password=secret_mimacom_password
flowable.adapter.whatsapp.accounts.mimacom.namespace=mimacom_namespace
Cloud API

Now, on the WhatsApp Developer Console, the Webhook configuration needs to be configured based on the following pattern:

Webhook URLs = https://<<WhatsApp-Adapter-URL>>/whatsapp-api/cloud/webhook/account/<<account-id>>
On-Premise

Now, on the WhatsApp Client configuration, the Webhook configuration needs to be configured based on the following pattern:

Webhook URLs = https://<<WhatsApp-Adapter-URL>>/whatsapp-api/webhook/account/<<account-id>>

The <<account-id>> in our example would be flowable and mimacom and thus, the Webhook URL would be like following:

  • For the flowable WhatsApp Client: https://<<WhatsApp-Adapter-URL>>/whatsapp-api/cloud/webhook/account/flowable
  • For the mimacom WhatsApp Client: https://<<WhatsApp-Adapter-URL>>/whatsapp-api/webhook/account/mimacom

For the multiple WhatsApp Business Account setup it is important that the businessAccountId of the UserAccount reflects the WhatsApp Business Account the UserAccount is interacting with.

UserAccount userAccount = userAccountService.createNewUserAccountBuilder()
.name(name)
.userId(userId)
.externalUserId(externalUserId)
.businessAccountId(accountId)
.userAccountDefinitionKey(userAccountDefinitionKey)
.subType(subType)
.save();

Also here, the accountId variable needs to reflect the Whatsapp Account ID and thus, in our example flowable or mimacom.

If the businessAccountId is empty, then the UserAccount interacts with the default-api-endpoint as described in the Single WhatsApp Business Account configuration above.

WhatsApp Adapter Content Handling Configuration

To work with media messages, i.e. attachments send through WhatsApp, the following properties need to be configured in the WhatsApp Adapter:

flowable.adapter.content.enabled=true
flowable.adapter.content.rest-endpoint=http://<hostname of Flowable>/<application root>/content-api/
flowable.adapter.content.admin-username=<admin username>
flowable.adapter.content.admin-password=<admin password>
flowable.adapter.whatsapp.content-authorization=Basic Zmxvd2FibGU6bWltYWNvbQ==
flowable.adapter.whatsapp.receive-content-max-size=-1

The property flowable.adapter.content.enabled enables the servlet for content handling. The credentials provided in flowable.adapter.content.admin-username and flowable.adapter.content.admin-password are used to access the content endpoint in Flowable defined in flowable.adapter.content.rest-endpoint.

This applies to the default security configuration with Basic Authentication in Flowable. If you have a custom authentication like Kerberos or OAuth2, you need to customize the WebClient in the WhatsApp Adapter to use the same authentication.

The property flowable.adapter.whatsapp.content-authorization secures the content REST endpoint in the WhatsApp adapter by the chosen authorization (in the above example it’s a base64 encoded basic authentication with username flowable and password mimacom). This must be in sync with the credentials configured in flowable.external-system.whatsapp.content.rest-username and flowable.external-system.whatsapp.content.rest-password in Flowable (see below).

The flowable.adapter.whatsapp.receive-content-max-size can be used to limit the content data size when receiving WhatsApp content (by default it is set to -1, which means unlimited).

After this has been set, then the REST endpoint will be available with the configured authorization:

GET https://<<WhatsApp-Adapter-URL>>/whatsapp-api/content/<<content-id>>“.

Additionally, the Flowable application requires the following properties to be set in order to fetch the message attachments from the WhatsApp adapter. The credentials must match the ones used to create the base64 token in flowable.adapter.whatsapp.content-authorization:

flowable.external-system.whatsapp.content.base-content-url=http://<hostname of WhatsApp Adapter>:<port>/whatsapp-api/content/
flowable.external-system.whatsapp.content.rest-username=<admin username>
flowable.external-system.whatsapp.content.rest-password=<admin password>

These configurations enable content, i.e. all other supported message types in addition to text, to be retrieved from WhatsApp. See WhatsApp Message Type Configuration to configure the supported WhatsApp message types.

WhatsApp Adapter Additional Configuration

The WhatsApp Adapter is a Spring Boot application and can be configured by the following properties.

server.port=31331
flowable.adapter.whatsapp.webhook-servlet-path=/whatsapp-api
flowable.adapter.whatsapp.webhook-load-on-startup=-1

spring.activemq.broker-url=tcp://localhost:61616

It runs by default on port 31331 and creates a webhook servlet on the path whatsapp_api. The Servlet is lazy-loaded by default, but if no lazy loading is desired, this can be configured by flowable.adapter.whatsapp.webhook-load-on-startup=1.

The WhatsApp Adapter uses an ActiveMQ broker for the following inbound and outbound queues (which can be reconfigured to your own requirements).

flowable.adapter.whatsapp.jms.inbound-payload-destination=whatsapp-inbound-payload
flowable.adapter.whatsapp.jms.inbound-message-destination=whatsapp-inbound
flowable.adapter.whatsapp.jms.inbound-status-destination=whatsapp-inbound-status
flowable.adapter.whatsapp.jms.inbound-error-destination=whatsapp-inbound-error
flowable.adapter.whatsapp.jms.outbound=whatsapp-outbound

flowable.adapter.whatsapp.jms.send-message-wait-duration=PT10S

If the default queue names are changed in the WhatsApp Adapter, it is necessary to also change the Flowable configuration to match the queue names. This can be achieved by the Flowable properties described here.

WeChat Adapter Configuration

The Flowable WeChat Adapter is able to run in a single account or multiple business accounts setup.

Single WeChat Business Account Configuration

The WeChat Adapter needs to be configured via properties to connect to the WeChat Business Account.

flowable.adapter.wechat.default-app-id=<<<WeChat-App-ID>>>
flowable.adapter.wechat.default-app-secret=<<<WeChat-App-Secret>>>
flowable.adapter.wechat.default-app-token=<<<WeChat-App-Token>>>
flowable.adapter.wechat.default-aes-key=<<<WeChat-Aes-Key>>>

And on the other side, the WeChat Business Account needs to be configured to send inbound messages to the WeChat Adapter using the following http/https endpoint:

Webhook URLs = https://<<WeChat-Adapter-URL>>/wechat-api/webhook

For the single WeChat Business Account setup it is also important that the businessId is not set when creating a UserAccount in Flowable.

UserAccount userAccount = userAccountService.createNewUserAccountBuilder()
.name(name)
.userId(userId)
.externalUserId(externalUserId)
.businessAccountId(null)
.userAccountDefinitionKey(userAccountDefinitionKey)
.subType(subType)
.save();

Multiple WeChat Business Account Configuration

In the multiple WeChat Business Account setup, the WeChat Adapter needs to be configured via properties.

For the configuration example let's assume there are two WhatsApp Business Accounts your application needs to connect to, and let's call them flowable and mimacom.

flowable.adapter.wechat.accounts.flowable.app-id=<<<WeChat-App-ID for flowable>>>
flowable.adapter.wechat.accounts.flowable.app-secret=<<<WeChat-App-Secret for flowable>>>
flowable.adapter.wechat.accounts.flowable.app-token=<<<WeChat-App-Token for flowable>>>
flowable.adapter.wechat.accounts.flowable.aes-key=<<<WeChat-Aes-Key for flowable>>>

flowable.adapter.wechat.accounts.mimacom.app-id=<<<WeChat-App-ID for mimacom>>>
flowable.adapter.wechat.accounts.mimacom.app-secret=<<<WeChat-App-Secret for mimacom>>>
flowable.adapter.wechat.accounts.mimacom.app-token=<<<WeChat-App-Token for mimacom>>>
flowable.adapter.wechat.accounts.mimacom.aes-key=<<<WeChat-Aes-Key for mimacom>>>

Now, on the WeChat Business Account configuration the Webhook configuration needs to be configured based on the following pattern:

Webhook URLs = https://<<WeChat-Adapter-URL>>/wechat-api/webhook/account/<<account-id>>

The <<account-id>> in our example would be flowable and mimacom and thus, the Webhook URL would be like following:

  • For the flowable WeChat Business Account: https://<<WeChat-Adapter-URL>>/wechat-api/webhook/account/flowable
  • For the mimacom WeChat Business Account: https://<<WeChat-Adapter-URL>>/wechat-api/webhook/account/mimacom

For the multiple WeChat Business Account setup it is important that the businessAccountId of the UserAccount reflects the WhatsApp Business Account the UserAccount is interacting with.

UserAccount userAccount = userAccountService.createNewUserAccountBuilder()
.name(name)
.userId(userId)
.externalUserId(externalUserId)
.businessAccountId(accountId)
.userAccountDefinitionKey(userAccountDefinitionKey)
.subType(subType)
.save();

Also here, the accountId variable needs to reflect the Whatsapp Account id and thus, in our example flowable or mimacom.

If the businessAccountId is empty, then the UserAccount interacts with the default-app-* as described in the Single WeChat Business Account configuration above.

WeChat Adapter Content Handling Configuration

To work with media messages, i.e. attachments send through WeChat, the following properties need to be configured in the WeChat Adapter:

flowable.adapter.content.enabled=true
flowable.adapter.content.rest-endpoint=http://<hostname of Flowable>/<application root>/content-api/
flowable.adapter.content.admin-username=<admin username>
flowable.adapter.content.admin-password=<admin password>
flowable.adapter.wechat.content-authorization=Basic Zmxvd2FibGU6bWltYWNvbQ==
flowable.adapter.wechat.receive-content-max-size=-1

The property flowable.adapter.content.enabled enables the servlet for content handling. The credentials provided in flowable.adapter.content.admin-username and flowable.adapter.content.admin-password are used to access the content endpoint in Flowable defined in flowable.adapter.content.rest-endpoint.

This applies to the default security configuration with Basic Authentication in Flowable. If you have a custom authentication like Kerberos or OAuth2, you need to customize the WebClient in the WeChat Adapter to use the same authentication.

The property flowable.adapter.wechat.content-authorization secures the content REST endpoint in the WeChat adapter by the chosen authorization (in the above example it’s a base64 encoded basic authentication with username flowable and password mimacom). This must be in sync with the credentials configured in flowable.external-system.wechat.content.rest-username and flowable.external-system.wechat.content.rest-password in Flowable (see below).

The flowable.adapter.wechat.receive-content-max-size can be used to limit the content data size when receiving WeChat content (by default it is set to -1, which means unlimited).

After this has been set, then the REST endpoint will be available with the configured authorization:

GET https://<<WeChat-Adapter-URL>>/wechat-api/content/<<content-id>>“.

Additionally, the Flowable application requires the following properties to be set in order to fetch the message attachments from the WeChat adapter. The credentials must match the ones used to create the base64 token in flowable.adapter.wechat.content-authorization:

flowable.external-system.wechat.content.base-content-url=http://<hostname of WeChat Adapter>:<port>/wechat-api/content/
flowable.external-system.wechat.content.rest-username=<admin username>
flowable.external-system.wechat.content.rest-password=<admin password>

These configurations enable content, i.e. all other supported message types in addition to text, to be retrieved from WeChat. See WeChat Message Type Configuration to configure the supported WeChat message types.

WeChat Adapter Additional Configuration

The WeChat Adapter is a Spring Boot application and can be configured by the following properties.

server.port=31330
flowable.adapter.wechat.webhook-servlet-path=/wechat-api
flowable.adapter.wechat.webhook-load-on-startup=-1

spring.activemq.broker-url=tcp://localhost:61616

It runs by default on port 31330 and creates a webhook servlet on the path wechat_api. The Servlet is lazy-loaded by default, but if no lazy loading is desired, this can be configured by flowable.adapter.whatsapp.webhook-load-on-startup=1.

The WeChat Adapter uses an ActiveMQ broker for the following inbound and outbound queues (which can be reconfigured to your own requirements).

flowable.adapter.wechat.jms.inbound-message-destination=wechat-inbound
flowable.adapter.wechat.jms.inbound-status-destination=wechat-inbound-status
flowable.adapter.wechat.jms.inbound-error-destination=wechat-inbound-error
flowable.adapter.wechat.jms.outbound=wechat-outbound
flowable.adapter.wechat.jms.get-access-token-destination=wechat-get-access-token
flowable.adapter.wechat.jms.store-access-token-destination=wechat-store-access-token

flowable.adapter.wechat.jms.send-message-wait-duration=PT10S

If the default queue names are changed in the WeChat Adapter, it is necessary to also change the Flowable configuration to match the queue names. This can be achieved by the Flowable properties described here.

Furthermore, the WeChat API endpoints and more connectivity configuration can be addressed by the following properties:

flowable.adapter.wechat.api.base-url=https://api.weixin.qq.com/cgi-bin/
flowable.adapter.wechat.api.token-url=https://api.weixin.qq.com/cgi-bin/token
flowable.adapter.wechat.api.user-profile-url=https://api.weixin.qq.com/cgi-bin/user/info
flowable.adapter.wechat.api.custom-message-url=https://api.weixin.qq.com/cgi-bin/message/custom/send
flowable.adapter.wechat.api.template-message-url=https://api.weixin.qq.com/cgi-bin/message/template/send

flowable.adapter.wechat.unsupported-message-type-error=
flowable.adapter.wechat.user-profile-fetching=true
flowable.adapter.wechat.default-user-name=Unknown
flowable.adapter.wechat.secure-communication=false

LINE Adapter Configuration

The Flowable LINE Adapter is able to run in a single account or multiple business accounts setup.

Single LINE Business Account Configuration

The LINE Adapter needs to be configured via properties to connect to the LINE Messaging API Bot Channel.

flowable.adapter.line.default-channel-secret=<<<LINE-Channel-Secret>>>
flowable.adapter.line.default-channel-token=<<<LINE-Channel-Token>>>

And on the other side, the LINE Messaging API Bot Channel needs to be configured to send inbound messages to the LINE Adapter with the following https endpoint:

Webhook URL = https://<<LINE-Adapter-URL>>/line-api/webhook

For the single LINE Business Account setup it is also important that the businessId is not set when creating a UserAccount in Flowable.

UserAccount userAccount = userAccountService.createNewUserAccountBuilder()
.name(name)
.userId(userId)
.externalUserId(externalUserId)
.businessAccountId(null)
.userAccountDefinitionKey(userAccountDefinitionKey)
.subType(subType)
.save();

Multiple LINE Business Account Configuration

Also in the multiple LINE Business Account setup the LINE Adapter needs to be configured via properties.

For the configuration example, let's assume there are two LINE Business Accounts your application needs to connect to, and let's call them flowable and mimacom.

flowable.adapter.line.accounts.flowable.channel-secret=<<<LINE-Flowable-Channel-Secret>>>
flowable.adapter.line.accounts.flowable.channel-token=<<<LINE-Flowable-Channel-Token>>>

flowable.adapter.line.accounts.mimacom.channel-secret=<<<LINE-Mimacom-Channel-Secret>>>
flowable.adapter.line.accounts.mimacom.channel-token=<<<LINE-Mimacom-Channel-Token>>>

Now, on the LINE Messaging API Bot Channel configuration, the Webhook configuration needs to be configured based on the following pattern:

Webhook URLs = https://<<LINE-Adapter-URL>>/line-api/webhook/account/<<account-id>>

The <<account-id>> in our example would be flowable and mimacom and thus, the Webhook URL would be like following:

  • For the flowable LINE Bot Channel: https://<<LINE-Adapter-URL>>/line-api/webhook/account/flowable
  • For the mimacom LINE Bot Channel: https://<<LINE-Adapter-URL>>/line-api/webhook/account/mimacom

For the multiple LINE Business Account setup it is important that the businessAccountId of the UserAccount reflects the LINE Business Account the UserAccount is interacting with.

UserAccount userAccount = userAccountService.createNewUserAccountBuilder()
.name(name)
.userId(userId)
.externalUserId(externalUserId)
.businessAccountId(accountId)
.userAccountDefinitionKey(userAccountDefinitionKey)
.subType(subType)
.save();

Also here, the accountId variable needs to reflect the LINE Account ID and thus, in our example flowable or mimacom.

If the businessAccountId is empty, then the UserAccount interacts with the default-api-endpoint as described in the Single LINE Business Account configuration above.

LINE Adapter Content Handling Configuration

To work with media messages, i.e. attachments send through LINE, the following properties need to be configured in the LINE Adapter:

flowable.adapter.content.enabled=true
flowable.adapter.content.rest-endpoint=http://<hostname of Flowable>/<application root>/content-api/
flowable.adapter.content.admin-username=<admin username>
flowable.adapter.content.admin-password=<admin password>
flowable.adapter.line.content-authorization=Basic Zmxvd2FibGU6bWltYWNvbQ==
flowable.adapter.line.receive-content-max-size=-1
flowable.adapter.line.jms.engage-rest-endpoint=http://<hostname of Flowable>/<application root>/engage-api/

The property flowable.adapter.content.enabled enables the servlet for content handling. The credentials provided in flowable.adapter.content.admin-username and flowable.adapter.content.admin-password are used to access the content endpoint in Flowable defined in flowable.adapter.content.rest-endpoint.

This applies to the default security configuration with Basic Authentication in Flowable. If you have a custom authentication like Kerberos or OAuth2, you need to customize the WebClient in the LINE Adapter to use the same authentication.

The property flowable.adapter.line.content-authorization secures the content REST endpoint in the LINE adapter by the chosen Authorization (in the above example it’s a base64 encoded Basic Authentication with username flowable and password mimacom). This must be in sync with the credentials configured in flowable.external-system.line.content.rest-username and flowable.external-system.line.content.rest-password in Flowable (see below).

The flowable.adapter.line.receive-content-max-size can be used to limit the content data size when receiving LINE content (by default it is set to -1, which means unlimited).

The property flowable.adapter.line.jms.engage-rest-endpoint points to the location of the Engage API where the special LineOutboundContentResource is located. When this property is not set then sending content from Flowable to LINE is not possible.

The way outbound content (from Flowable to LINE) works a bit differently than WhatsApp. For WhatsApp we upload the content to the WhatsApp servers and then send a message with the content id. However, LINE does not support such functionality. Therefore, we have to provide publicly accessible URLs for accessing the content from the user device. The LineOutboundContentResource is needed for this exact reason. In order to access the content we generate a special token secured with the specific Flowable properties that allows accessing that particular content through a special API for a configurable time.

After this has been set, then the REST-Endpoint will be available with the configured Authorization:

GET https://<<LINE-Adapter-URL>>/line-api/content/<<content-id>>“.

Additionally, the Flowable application requires the following properties to be set in order to fetch and serve the message attachments from the LINE adapter:

flowable.external-system.line.content.base-content-url=http://<hostname of LINE Adapter>:<port>/line-api/content/
flowable.external-system.line.content.rest-username=<admin username>
flowable.external-system.line.content.rest-password=<admin password>

flowable.external-system.line.outbound-content.enabled=true
flowable.external-system.line.outbound-content.base-content-public-url=https://<publicly accessible LINE Adapter URL>/line-api
flowable.external-system.line.outbound-content.content-token-signing-secret=<custom secret with a length of at least 32 characters>
# How long should the outbound content token be valid
flowable.external-system.line.outbound-content.content-token-expiration-duration=PT1

These configurations enable content, i.e. all other supported message types in addition to text, to be retrieved from LINE. It also allows sending content to LINE by exposing the content through publicly accessible URLs with special token handling.

LINE Adapter Additional Configuration

The LINE Adapter is a Spring Boot application and can be configured by the following properties.

server.port=31332
flowable.adapter.line.webhook-servlet-path=/line-api
flowable.adapter.line.webhook-load-on-startup=-1

spring.activemq.broker-url=tcp://localhost:61616

It runs by default on port 31332 and creates a webhook servlet on the path line_api. The Servlet is lazy-loaded by default, but if no lazy loading is desired, this can be configured by flowable.adapter.line.webhook-load-on-startup=1.

The LINE Adapter uses an ActiveMQ broker for the following inbound and outbound queues (which can be reconfigured to your own requirements).

flowable.adapter.line.jms.inbound-payload-destination=line-inbound-payload
flowable.adapter.line.jms.inbound-message-destination=line-inbound
flowable.adapter.line.jms.inbound-status-destination=line-inbound-status
flowable.adapter.line.jms.inbound-error-destination=line-inbound-error
flowable.adapter.line.jms.outbound=line-outbound

flowable.adapter.line.jms.send-message-wait-duration=PT10S

If the default queue names are changed in the LINE Adapter, it is necessary to also change the Flowable configuration to match the queue names. This can be achieved by the Flowable properties described here.

Download Environmental Information

1, Log into Control

2, Select System Info on the right hand side

3, Then click on the "Download File" option at the top.

Environmental Info

This will give you all the Environmental Information in a .json file.

If you want to learn more about the information that is provided here you can read in the System Information section

Javascript for Scripting

Depending on the Java version that you are using and / or whether you are using the Flowable docker images some extra steps might be needed in order to make sure that Javascript works for scripting.

When using Java 8, Java 11, or the Flowable docker images then Javascript for scripting can be used without any modifications.

When using Java 17 then there are 2 possible approached to enable Javascript for scripting:

  • When building a custom project the Nashorn Core dependency needs to be added to the project
  • When using the out-of-the-box WAR applications the Nashorn Core and its dependencies need to be available on the classpath

How to install Nashorn when using standalone WAR

NOTE: This is only needed if when using Java 17 with the out-of-the-box WAR applications

Download the following JAR files from the listed site references

  1. Download the latest Nashorn JAR file from Maven.org. For example the Nashorn version 15.4 jar file (nashorn-core-15.4.jar) can be downloaded here https://search.maven.org/artifact/org.openjdk.nashorn/nashorn-core/15.4/jar

  2. Download the following required Nashorn dependencies (as per the Nashorn pom.xml file)

The main org.ow2 main Maven page is here: https://central.sonatype.com/namespace/org.ow2.asm

Deployment of Nashorn into Apache Tomcat

Copy all the JAR files above (five in total) into the Apache Tomcat lib folder. Tomcat will need to restart if it is currently running.