Step-by-Step Installation
The following sections describes the steps to get Flowable running in your environment.
We start by setting up a simple single node environment with the minimum viable number of components and corresponding configuration.
This setup is then augmented to include clustering and transport layer security (TLS) for the participating components.
A later section provides additional information on how to configure and to secure a production environment.
Single Node Installation
This section describes how to setup a minimal environment of components and configuration to get Flowable up and running.
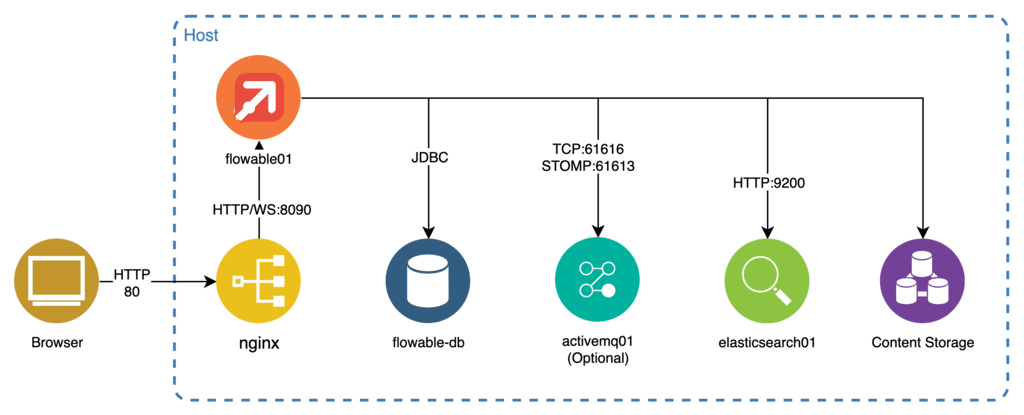
This is accomplished by following the following steps:
-
Download and configure an Apache Tomcat server containing the Flowable server together with an embedded Flowable Front End.
-
Download, install, and configure a database for the Flowable Server.
-
Download and install the Elasticsearch component required by the Flowable Server.
-
Configure a content storage (this is optional since the default is the usage of the filesystem as content storage).
Flowable Server
-
Download Tomcat from: https://tomcat.apache.org/index.html. Once you downloaded the package you should extract it. Do not run Tomcat yet, first follow the steps for installing the Flowable WARs.
-
Create (check Development Environment Setup) or download the executable Flowable WAR file as appropriate from the Flowable Maven Repository (appropriate access credentials are required).
-
Rename the downloaded
.warfile toflowable-work.waror as appropriate and copy it into the Tomcat’swebappsfolder. -
Flowable requires that you have a valid license for the Product. The license is either stored on the file system or in the database. If the license is provided as a file then it is typically located in the
.flowablefolder of your home directory. On Unix or macOS the file is~/.flowable/flowable.license. The location of the license file can be changed in theapplication.propertiesfile (see below).
flowable.license.location=file:/myCustomLocation/flowable.license
To store the license in the database then the following property must be set in the applications.properties file:
flowable.license.db-store-enabled=true
With the license database store mode enabled a license is uploaded using the Flowable Work application.
-
Add a file named
application.propertiesin the Tomcat’slibfolder. The file is used later for additional configuration. -
You can now start the Tomcat by running
bin/catalina.sh(bin\catalina.baton Windows). Alternatively, you can runbin/catalina.sh runto have it in the foreground. -
You should now be able to access the applications by going to: http://localhost:8080/flowable-work.
-
You can login with the default administration user
admin. The password istest. The password can be customized (only during first startup of the application) by setting the following property:flowable.platform.idm.default-password=<your custom password>
 note
noteAn executable .WAR file is a special variant of a .WAR file that can be both copied to a servlet container or executed directly with Java.
In the second case an embedded Tomcat server starts that hosts the Flowable application.
You can start the Flowable Server directly by executing java -jar flowable-work.war
The application can then be accessed at http://localhost:8090/flowable-work.
Database
By default, Flowable is configured to run with a built-in H2 database
located in a folder flowable-db in your home directory.
On Unix or macOS this is ~/flowable-db.
If you want to change the location of the H2 database then add the following line
(and change flowable-db to your preference) to the application.properties created previously in the lib directory:
spring.datasource.url=jdbc:h2:~/flowable-db/db;AUTO_SERVER=TRUE;AUTO_SERVER_PORT=9091;DB_CLOSE_DELAY=-1
The Flowable application is a Spring Boot application and can be configured in the standard Spring Boot fashion.
This means that the database can be configured by setting the following properties in the application.properties file created previously:
spring.datasource.driver-class-name=<jdbc driver>
spring.datasource.url=<jdbc URL>
spring.datasource.username=<username>
spring.datasource.password=<password>
Here are example JDBC URLs for common databases:
-
MySQL:
jdbc:mysql://localhost:3306/flowable -
MariaDB v3.11.0+:
jdbc:mariadb://localhost:3306/flowable -
PostgreSQL:
jdbc:postgresql://localhost:5432/flowable -
Oracle:
jdbc:oracle:thin:@localhost:1521:XE -
MSSQL:
jdbc:sqlserver://localhost:1433;database=flowable
Flowable does not ship any JDBC drivers other than one for the H2 database.
Therefore, you need to download the appropriate JDBC driver and copy it to the Tomcat’s lib folder before starting Tomcat.
Example for setting up PostgreSQL
-
Download and install PostgreSQL from https://www.postgresql.org/download/.
-
Copy the JDBC driver for PostgreSQL (from https://jdbc.postgresql.org/download.html) to the
libdirectory of the Tomcat instance. -
Connect with
psqland create a user and a database:
CREATE ROLE flowable WITH LOGIN PASSWORD 'flowable';
CREATE DATABASE flowable;
GRANT ALL PRIVILEGES ON DATABASE flowable TO flowable;
- Add the JDBC URL, driver, username and password of the schema
you just created to the
application.propertiesfile in thelibfolder of your Tomcat installation.
spring.datasource.driver-class-name=org.postgresql.Driver
spring.datasource.url=jdbc:postgresql://localhost:5432/flowable
spring.datasource.username=flowable
spring.datasource.password=flowable
- If you are manually creating the Database tables, and you don't want Flowable to validate you can add the following to the
application.properties
flowable.database-schema-update=ignore
MSSQL Transaction Isolation
Microsoft recommends using the MSSQL specific READ_COMMITED_SNAPSHOT transaction isolation level for systems using optimistic locking with versioning.
If you are operating with a high load and are experiencing deadlocks, you should enable this setting as follows:
# This will enable the usage of READ_COMMITED_SNAPSHOT
ALTER DATABASE flowable
SET ALLOW_SNAPSHOT_ISOLATION ON

# This will use READ_COMMITED_SNAPSHOT by default, without the need to alter application code or settings
ALTER DATABASE flowable
SET READ_COMMITTED_SNAPSHOT ON
Elasticsearch
An Elasticsearch (ES) server is required for Flowable Work:
-
Download Elasticsearch from the Elastic website at https://www.elastic.co/downloads/elasticsearch.
-
Extract the downloaded package to a desired folder on the filesystem.
-
From a command prompt in the folder start Elasticsearch by submitting
bin/elasticsearch.
Flowable expects Elasticsearch to be running on
http://localhost:9200 which is the default for a vanilla Elasticsearch configuration.
If you are running Elasticsearch on a different host or port, you can configure the address of Elasticsearch within
the application.properties file you created in the prior section:
spring.elasticsearch.uris=http://localhost:9200
flowable.indexing.index-name-prefix=index-prefix-
If you are using security then you can set the following:
spring.elasticsearch.username=flowable
spring.elasticsearch.password=flowable
On certain installations, it is necessary to set a path prefix (e.g. when the Elasticsearch servers are behind a proxy server mandating this).
If you are on such an installation, you may get 400 Bad Request errors when booting the application.
The path prefix can be set as follows:
flowable.indexing.path-prefix=/
Note that setting the path prefix to / is mandatory when using the Amazon AWS Elasticsearch Service.
Recommended Elasticsearch Settings
| Setting | value | Description |
|---|---|---|
action.auto_create_index | false (true by default) | If set to true, an index will be created automatically when a request for a certain index is received by Elasticsearch. As Flowable uses a specific mapping for the indices it uses, this setting should be disabled to make sure Elasticsearch doesn't create an automatic mapping. If needed, it is also possible to specify a comma-separated list of index patterns to exactly match this to the Flowable indices only. |
Should you want to use Flowable without Elasticsearch so that the instance and task lists are queried from the relational database instead. You can set the following property:
flowable.indexing.enabled=false
LDAP
The out of the box Flowable Application come with LDAP support. If you are creating your own Flowable Application, then have a look at LDAP Developer Guide additionally. In order to enable and configure LDAP the following properties should be set:
# LDAP Configuration properties
spring.ldap.base=dc=example,dc=com
spring.ldap.urls=<ldap location>
spring.ldap.username=<username>
spring.ldap.password=<password>

flowable.platform.idm.service-type=ldap

# The base is applied on top of the spring.ldap.base
# Group specific LDAP properties
flowable.ldap.group.query.base=ou=group
flowable.ldap.group.query.default-filter=(objectClass=group)
flowable.ldap.group.mappings.distinguished-name=distinguishedName
flowable.ldap.group.mappings.member=member:1.2.840.113556.1.4.1941:
flowable.ldap.group.mappings.id=sAMAccountName
flowable.ldap.group.mappings.key=cn
flowable.ldap.group.mappings.name=name
flowable.ldap.group.sort.mode=disabled

# User specific LDAP properties
flowable.ldap.user.query.base=ou=person
flowable.ldap.user.query.default-filter=(objectClass=user)
flowable.ldap.user.mappings.distinguished-name=distinguishedName
flowable.ldap.user.mappings.member-of=memberOf:1.2.840.113556.1.4.1941:
flowable.ldap.user.mappings.id=sAMAccountName
flowable.ldap.user.mappings.first-name=givenName
flowable.ldap.user.mappings.last-name=sn
flowable.ldap.user.mappings.display-name=displayName,name
flowable.ldap.user.mappings.email=mail
flowable.ldap.user.mappings.info-name.company=firm
flowable.ldap.user.mappings.info-name.location=site
flowable.ldap.user.sort.mode=disabled

# User definition from LDAP
flowable.ldap.user.mappings.user-definition-key=customAttribute
flowable.ldap.user.mappings.default-user-definition-key=user-default
flowable.ldap.user.mappings.value-user-definition-key.admin=user-admin
flowable.ldap.user.mappings.value-user-definition-key.reporter=user-reporter

# Tenant mappings for user from LDAP
flowable.ldap.user.mappings.tenant-id=location
flowable.ldap.user.mappings.default-tenant-id=Switzerland
flowable.ldap.user.mappings.value-tenant-id.BRN=Switzerland
flowable.ldap.user.mappings.value-tenant-id.ZRH=Switzerland
flowable.ldap.user.mappings.value-tenant-id.VLC=Spain
flowable.ldap.user.mappings.value-tenant-id.MAD=Spain

# Tenant mappings for group from LDAP
flowable.ldap.group.mappings.default-tenant-id=Switzerland
flowable.ldap.group.mappings.tenant-id=loc
flowable.ldap.group.mappings.value-tenant-id.BERN=Switzerland
flowable.ldap.group.mappings.value-tenant-id.ZURICH=Switzerland
flowable.ldap.group.mappings.value-tenant-id.VALENCIA=Spain
flowable.ldap.group.mappings.value-tenant-id.MADRID=Spain
There are multiple groups of properties that can be used to configure different aspects of the LDAP support. Here we are going to explain what every property does.
LDAP Server Connection
This group of properties is for the connection to the LDAP Server.
| Property | Description | Value |
|---|---|---|
| spring.ldap.base | Base suffix from which all operations should originate | dc=example,dc=com |
| spring.ldap.urls | LDAP URLs of the server | ldap://example.com:389 |
| spring.ldap.username | Login username of the server | admin |
| spring.ldap.password | Login password of the server | admin |
noteIf you are connecting to Active Directory, you may experience the following error. org.springframework.ldap.PartialResultException: Unprocessed Continuation Reference(s); nested exception is javax.naming.PartialResultException: Unprocessed Continuation Reference(s); remaining name '/' This error is specific to Active Directory and only occurs with certain configurations. To resolve this error, add the following property to your application configuration:
flowable.ldap.ignore-partial-result-exception=true
Flowable Specific Properties
The main property to instruct Flowable to use LDAP is flowable.platform.idm.service-type=ldap.
This makes sure that Flowable will use the IDM Identity Service.
User Properties
The following properties are used when the Flowable Identity Service queries for users.
| Property | Description | Value |
|---|---|---|
| flowable.ldap.user.query.base | The base suffix that should be applied on top of the spring.ldap.base | ou=person |
| flowable.ldap.user.query.default-filter | The default LDAP filters that should be applied to all user queries | (objectClass=user) |
The following properties are used when the Flowable Identity Service maps the LDAP attributes into a Flowable User. This the first value of each mapping is also used to perform sorting if sorting is enabled.
| Property | Description | Value |
|---|---|---|
| flowable.ldap.user.mappings.distinguished-name | LDAP attribute for the user distinguished name | distinguishedName |
| flowable.ldap.user.mappings.member-of | LDAP attribute for the member of groups attribute | memberOf |
| flowable.ldap.user.mappings.id | LDAP attribute for the id of the user | sAMAccountName |
| flowable.ldap.user.mappings.first-name | LDAP attribute for the first name of the user | givenName |
| flowable.ldap.user.mappings.last-name | LDAP attribute for the last name of the user | sn |
| flowable.ldap.user.mappings.display-name | LDAP attribute for the display name of the user | displayName,name |
| flowable.ldap.user.mappings.email | LDAP attribute for the email of the user | |
flowable.ldap.user.mappings.info-name.<ldap-attribute-name>=<info-name-in-Flowable> | Mapping between LDAP Attributes and Flowable user info parameters |
All of the properties above except distinguished-name and member-of can be specified as a comma separated list.
This means that the first attribute that is not empty from the LDAP response would be used.
e.g.
When flowable.ldap.user.mappings.display-name=displayName,name
the display name of the user is mapped from the LDAP attribute displayName
if it is not empty, otherwise from the name attribute.
Expose custom LDAP attributes to Flowable workflows
The property flowable.ldap.user.mappings.info-name.<ldap-Attribute>=<info-name> can be used to expose certain custom LDAP attributes under a specific name.
For example in order to get some attributes for the authenticated user we can do the following in Flowable workflows.
We are going to map The LDAP Attribute location to a name available under site.
e.g.
flowable.ldap.user.mappings.info-name.location=site
This can then be used in the following way in an expression:
${platformIdentityService.createUserQuery().userId(authenticatedUserId).singleResult().site}
User definition key and tenant mapping
It is also possible to map the user tenant id and user definition key from an LDAP attribute by using the appropriate mapping property. However, in most cases those properties are not in LDAP and somehow existing values from LDAP need to be mapped into the appropriate Flowable values.
e.g.
We want to use the LDAP location attribute to map into the appropriate tenant. In LDAP we have the following locations:
- BRN - belongs to tenant Switzerland
- ZRH - belongs to tenant Switzerland
- VLC - belongs to tenant Spain
- MAD - belongs to tenant Spain
In order to configure that we are going to use the following properties
flowable.ldap.user.mappings.tenant-id=location
flowable.ldap.user.mappings.default-tenant-id=Switzerland
flowable.ldap.user.mappings.value-tenant-id.BRN=Switzerland
flowable.ldap.user.mappings.value-tenant-id.ZRH=Switzerland
flowable.ldap.user.mappings.value-tenant-id.VLC=Spain
flowable.ldap.user.mappings.value-tenant-id.MAD=Spain
The flowable.ldap.user.mappings.tenant-id property is used to determine which LDAP attribute should be used to get the tenant value.
In our example this would be location.
The flowable.ldap.user.mappings.default-tenant-id property is used to determine
the default tenant id that is used in case the user has no location set.
In our example the default tenant would be Switzerland
The flowable.ldap.user.mappings.value-tenant-id.<value> property, where <value>
is any value that you have in your location LDAP attribute,
is used to provide the mapping between your LDAP value and the Flowable value.
In our example we are mapping BRN to Switzerland, VLC to Spain, etc.
The concept is similar for the user definition key.
e.g.
We want to use the LDAP description attribute to map into the appropriate user definition key.
In LDAP we have the following descriptions:
- admin - Should map to the user definition key
user-admin - reporter - Should map to the user definition key
user-reporter
In order to configure that we are going to use the following properties
flowable.ldap.user.mappings.user-definition-key=description
flowable.ldap.user.mappings.default-user-definition-key=user-default
flowable.ldap.user.mappings.value-user-definition-key.admin=user-admin
flowable.ldap.user.mappings.value-user-definition-key.reporter=user-reporter
The flowable.ldap.user.mappings.user-definition-key property is used to determine
which LDAP attribute should be used to get the user definition key value.
In our example this would be description.
The flowable.ldap.user.mappings.default-user-definition-key property is used to determine
the default user definition key that is used in case the user has no description set.
In our example the default user definition key would be user-default
The flowable.ldap.user.mappings.value-user-definition-key.<value> property, where <value>
is any value that you have in your description LDAP property,
is used to provide the mapping between your LDAP value and the Flowable value.
In our example we are mapping admin to user-admin, reporter to user-reporter, etc.
There is also an alternative way of mapping the user definition key. The alternative way is by using the membership of the user in a particular groups.
e.g.
flowable.ldap.user.mappings.default-user-definition-key=user-default
flowable.ldap.user.mappings.user-definition-key-mapping-type=groups
flowable.ldap.user.mappings.user-definition-group-mappings[0].group-key=Admin
flowable.ldap.user.mappings.user-definition-group-mappings[0].user-definition-key=user-admin
flowable.ldap.user.mappings.user-definition-group-mappings[1].group-key=Reporter
flowable.ldap.user.mappings.user-definition-group-mappings[1].user-definition-key=user-reporting
The flowable.ldap.user.mappings.default-user-definition-key property can still be used to determine
the default user definition key that is used in case the user is not a member of the defined group mappings.
In our example the default user definition key would be user-default
The flowable.ldap.user.mappings.user-definition-key-mapping-type needs to be set to groups in order to signal the logic for the group mapping type.
Finally, the flowable.ldap.user.mappings.user-definition-group-mappings[<index>].group-key and flowable.ldap.user.mappings.user-definition-group-mappings[<index>].user-definition-key
properties can be used to define the mapping between a group with the given key and a user definition.
In the example above if the user is a member of the group with a key "Admin" it will get the "user-admin" definition,
if the user is a member of the group with a key "Reporter" they will get the "user-reporting" definition, all the rest of the users will get the "user-default" definition.
The order of the group mappings is important since they will be processed in the defined order, i.e. if a user is a member of both groups they will get the definition of the first matching group from the group mappings.
Sorting
If your LDAP server supports server side sorting (RFC2891) then you can enable this by setting the flowable.ldap.user.sort.mode property to enabled or critical.
Setting it to critical means that querying might fail if the server does not support sorting on the requested parameter.
The parameter on which to sort is taken based on the user mappings properties.
e.g. when the display named is mapped using flowable.ldap.user.mappings.display-name=displayName,name and sorting by display name is requested then we are going to request sorting using the displayName LDAP attribute.
noteCurrently it is only supported sorting in an ascending order
Group Properties
The following properties are used when the Flowable Identity Service queries for groups.
| Property | Description | Value |
|---|---|---|
| flowable.ldap.group.query.base | The base suffix that should be applied on top of the spring.ldap.base | ou=group |
| flowable.ldap.group.query.default-filter | The default LDAP filters that should be applied to all group queries | (objectClass=group) |
The following properties are used when the Flowable Identity Service maps the LDAP attributes into a Flowable Group. This the first value of each mapping is also used to perform sorting if sorting is enabled.
| Property | Description | Value |
|---|---|---|
| flowable.ldap.group.mappings.distinguished-name | LDAP attribute for the group distinguished name | distinguishedName |
| flowable.ldap.group.mappings.member | LDAP attribute for the member attribute | member |
| flowable.ldap.group.mappings.id | LDAP attribute for the id of the group | sAMAccountName |
| flowable.ldap.group.mappings.key | LDAP attribute for the key of the group | cn |
| flowable.ldap.group.mappings.name | LDAP attribute for the name of the group | name |
All the properties above except distinguished-name and member can be specified as a comma separated list.
This means that the first attribute that is not empty from the LDAP response would be used.
When flowable.ldap.group.mappings.id is not set then flowable.ldap.group.mappings.key
would be used both for the group id and key, and vice versa.
noteTo access Flowable as an administrative user you need to have admin permissions. Please refer to the permissions section for further details.
Tenant mapping
It is also possible to map the group tenant id from an LDAP attribute by using the appropriate mapping property. However, in most cases the tenant is not in LDAP and somehow existing values from LDAP need to be mapped into the appropriate Flowable values.
e.g.
We want to use the LDAP loc attribute to map into the appropriate tenant.
In LDAP we have the following locations:
- BERN - belongs to tenant Switzerland
- ZURICH - belongs to tenant Switzerland
- VALENCIA - belongs to tenant Spain
- MADRID - belongs to tenant Spain
In order to configure that we are going to use the following properties
flowable.ldap.group.mappings.tenant-id=loc
flowable.ldap.group.mappings.default-tenant-id=Switzerland
flowable.ldap.group.mappings.value-tenant-id.BERN=Switzerland
flowable.ldap.group.mappings.value-tenant-id.ZURICH=Switzerland
flowable.ldap.group.mappings.value-tenant-id.VALENCIA=Spain
flowable.ldap.group.mappings.value-tenant-id.MADRID=Spain
The flowable.ldap.group.mappings.tenant-id property is used to determine which LDAP attribute should be used to get the tenant value.
In our example this would be loc.
The flowable.ldap.group.mappings.default-tenant-id property is used to determine
the default tenant id that is used in case the group has no loc set.
In our example the default tenant would be Switzerland
The flowable.ldap.group.mappings.value-tenant-id.<value> property, where <value>
is any value that you have in your loc LDAP attribute,
is used to provide the mapping between your LDAP value and the Flowable value.
In our example we are mapping BERN to Switzerland, VALENCIA to Spain, etc.
Sorting
If your LDAP server supports server side sorting (RFC2891) then you can enable this by setting the flowable.ldap.group.sort.mode property to enabled or critical.
Setting it to critical means that querying might fail if the server does not support sorting on the requested parameter.
The parameter on which to sort is taken based on the user mappings properties.
e.g. when the display named is mapped using flowable.ldap.group.mappings.name=name and sorting by name is requested then we are going to request sorting using the name LDAP attribute.
noteCurrently it is only supported sorting in an ascending order
Microsoft Entra ID
2025.1.02+The out-of-the-box Flowable Application comes with support for using Microsoft Entra ID as an identity provider.
Configuring Entra ID
Before configuring Flowable to use Microsoft Entra ID, an App Registration is required. Please also check the documentation from Microsoft on how to create App Registrations in the Azure Portal or Entra Admin Center.
Create an App Registration with the Graph API permissions for:
- User.Read.All
- Group.Read.All
Detailed steps to create an App Registration
To do so, execute the following steps in the Microsoft Azure Portal:
- Search and open the App registrations panel.
- Click New Registration in the top toolbar.
- Choose a name for the App registration (e.g. Flowable IDM). Usually account type can stay "Single-Tenant". No Redirect URI is needed.
- Click Register to create the App registration.
- In the created App registration select Certificates & secrets from the left panel.
- On the Client secrets tab choose to create a New client secret. Choose an expiration time and click Add
- Copy the value of the created secret. You will need it and it will not be visible again later.
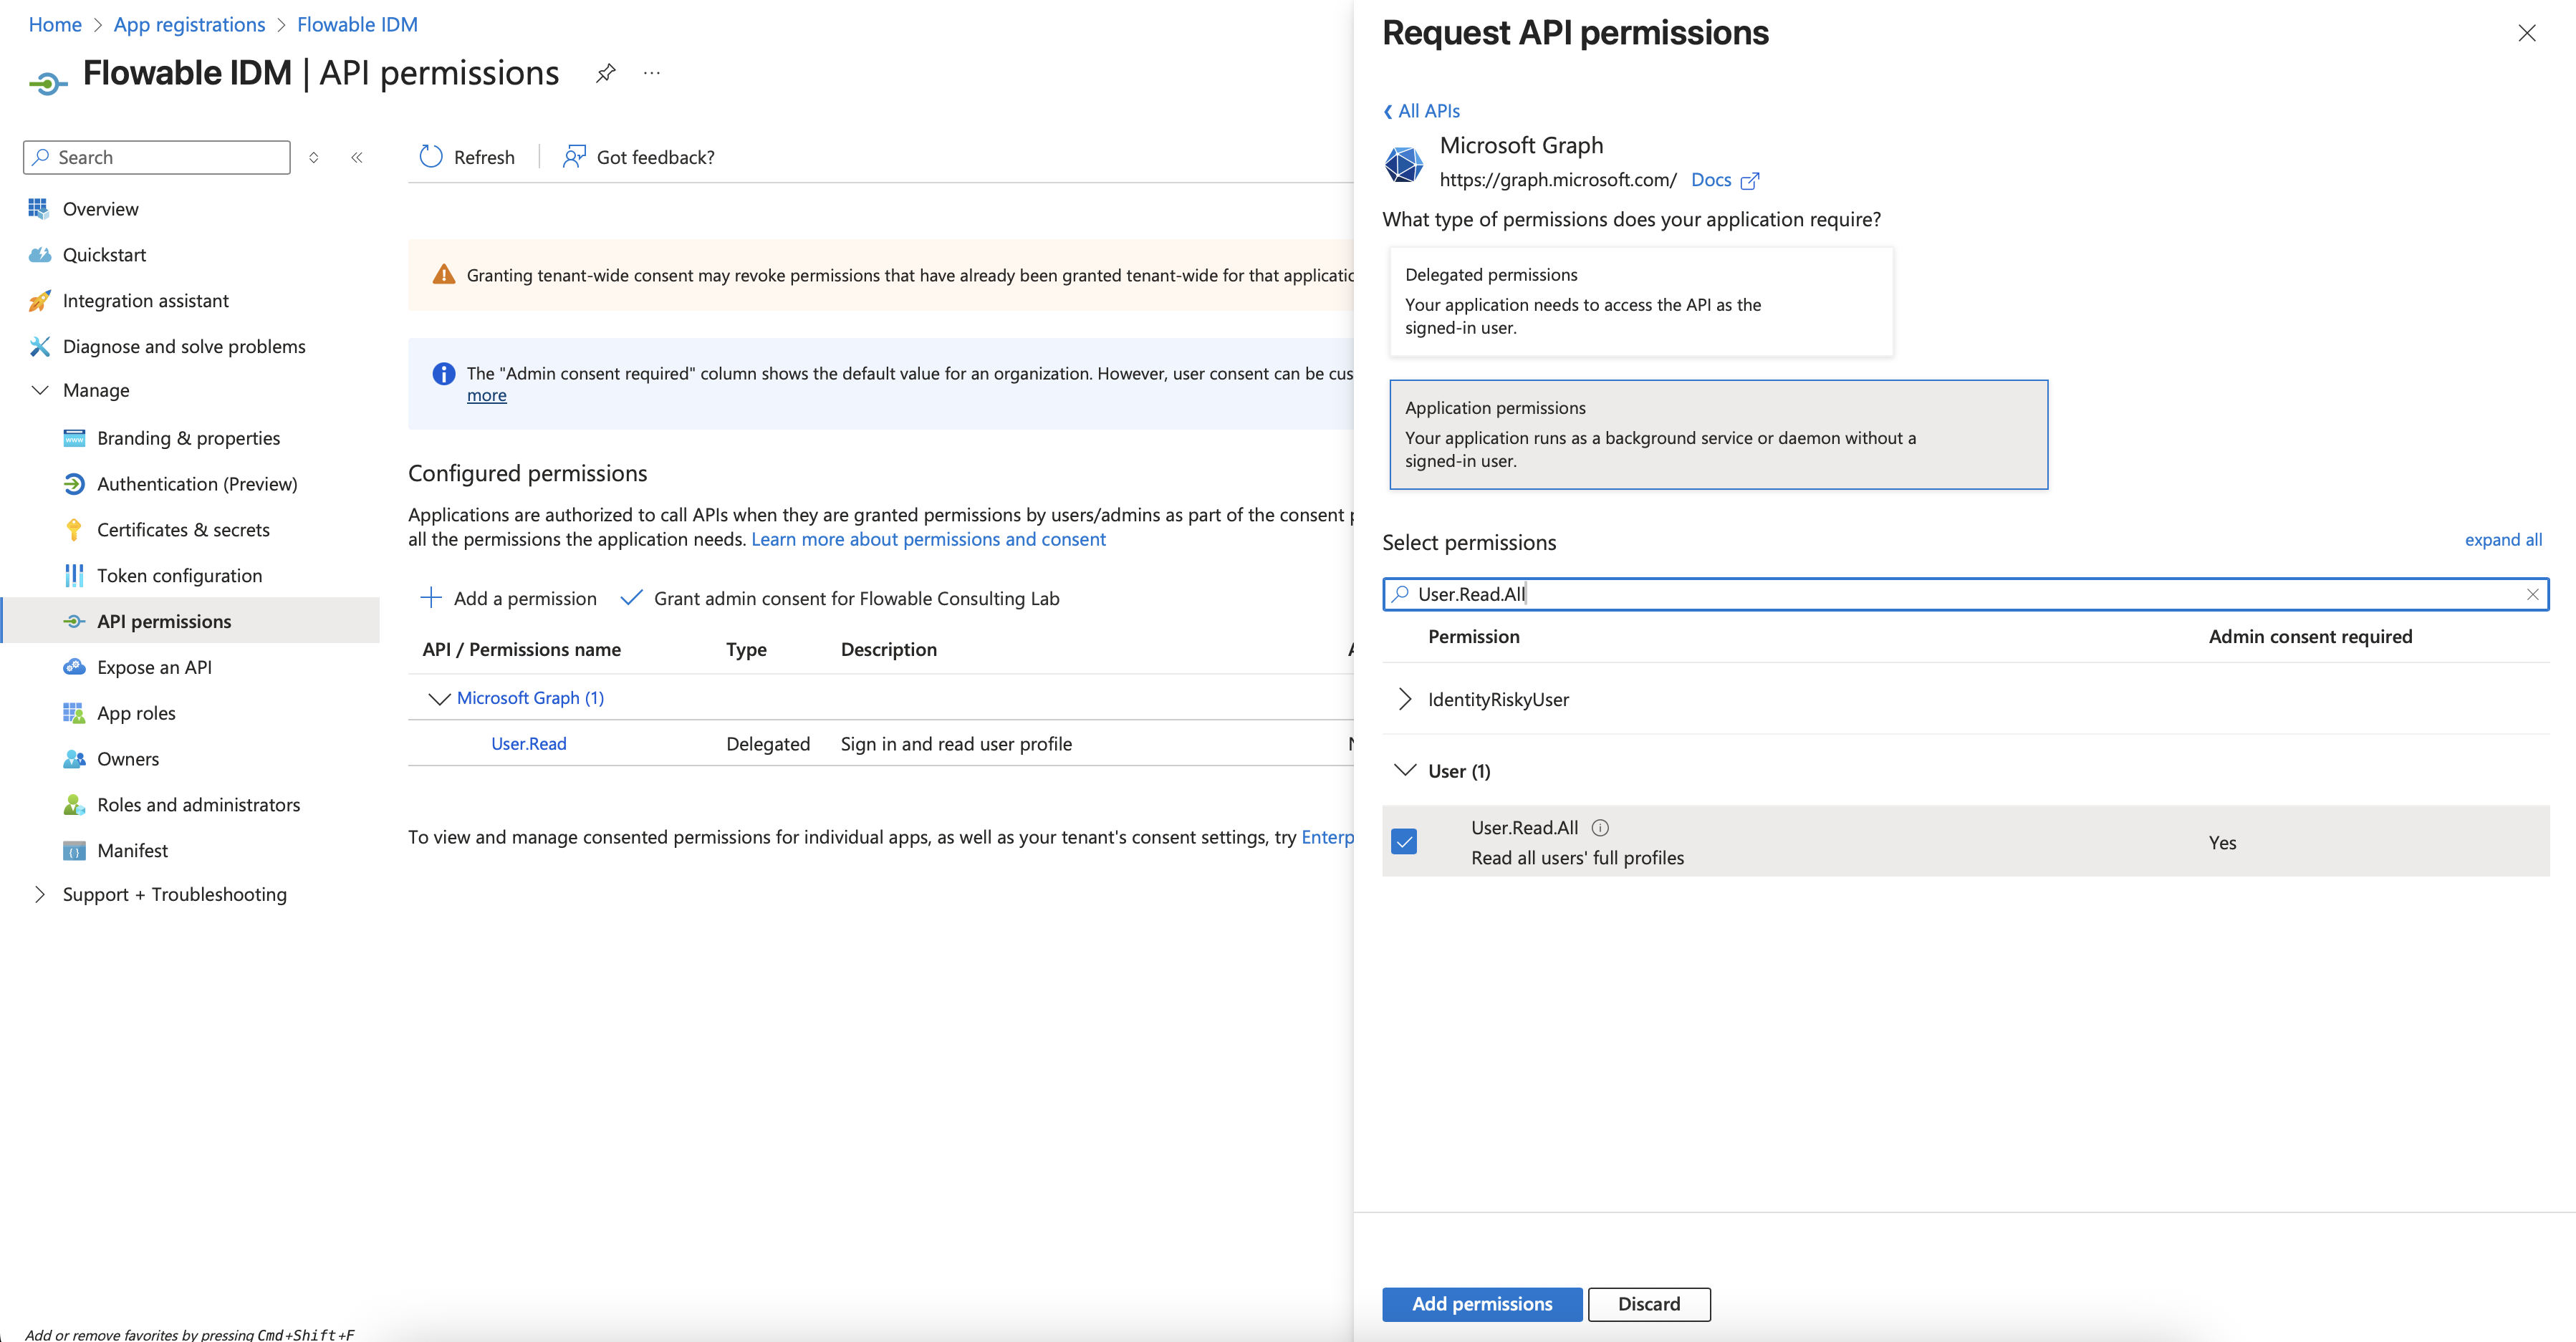
- Select API Permissions in the left panel.
- Click Add a permission and select the Microsoft Graph API. Choose to create Application permissions.
- Search for User.Read.All and check this permission in the User section.
- Search for Group.Read.All and check this permission in the Group section.
- Click on Add permissions.
- The existing User.Read delegated permission can be removed by clicking the three dots on the entry and then Remove permission. Confirm.
- Grant the 2 new permissions admin consent by clicking Grand Admin Consent for... in the table toolbar. Confirm.
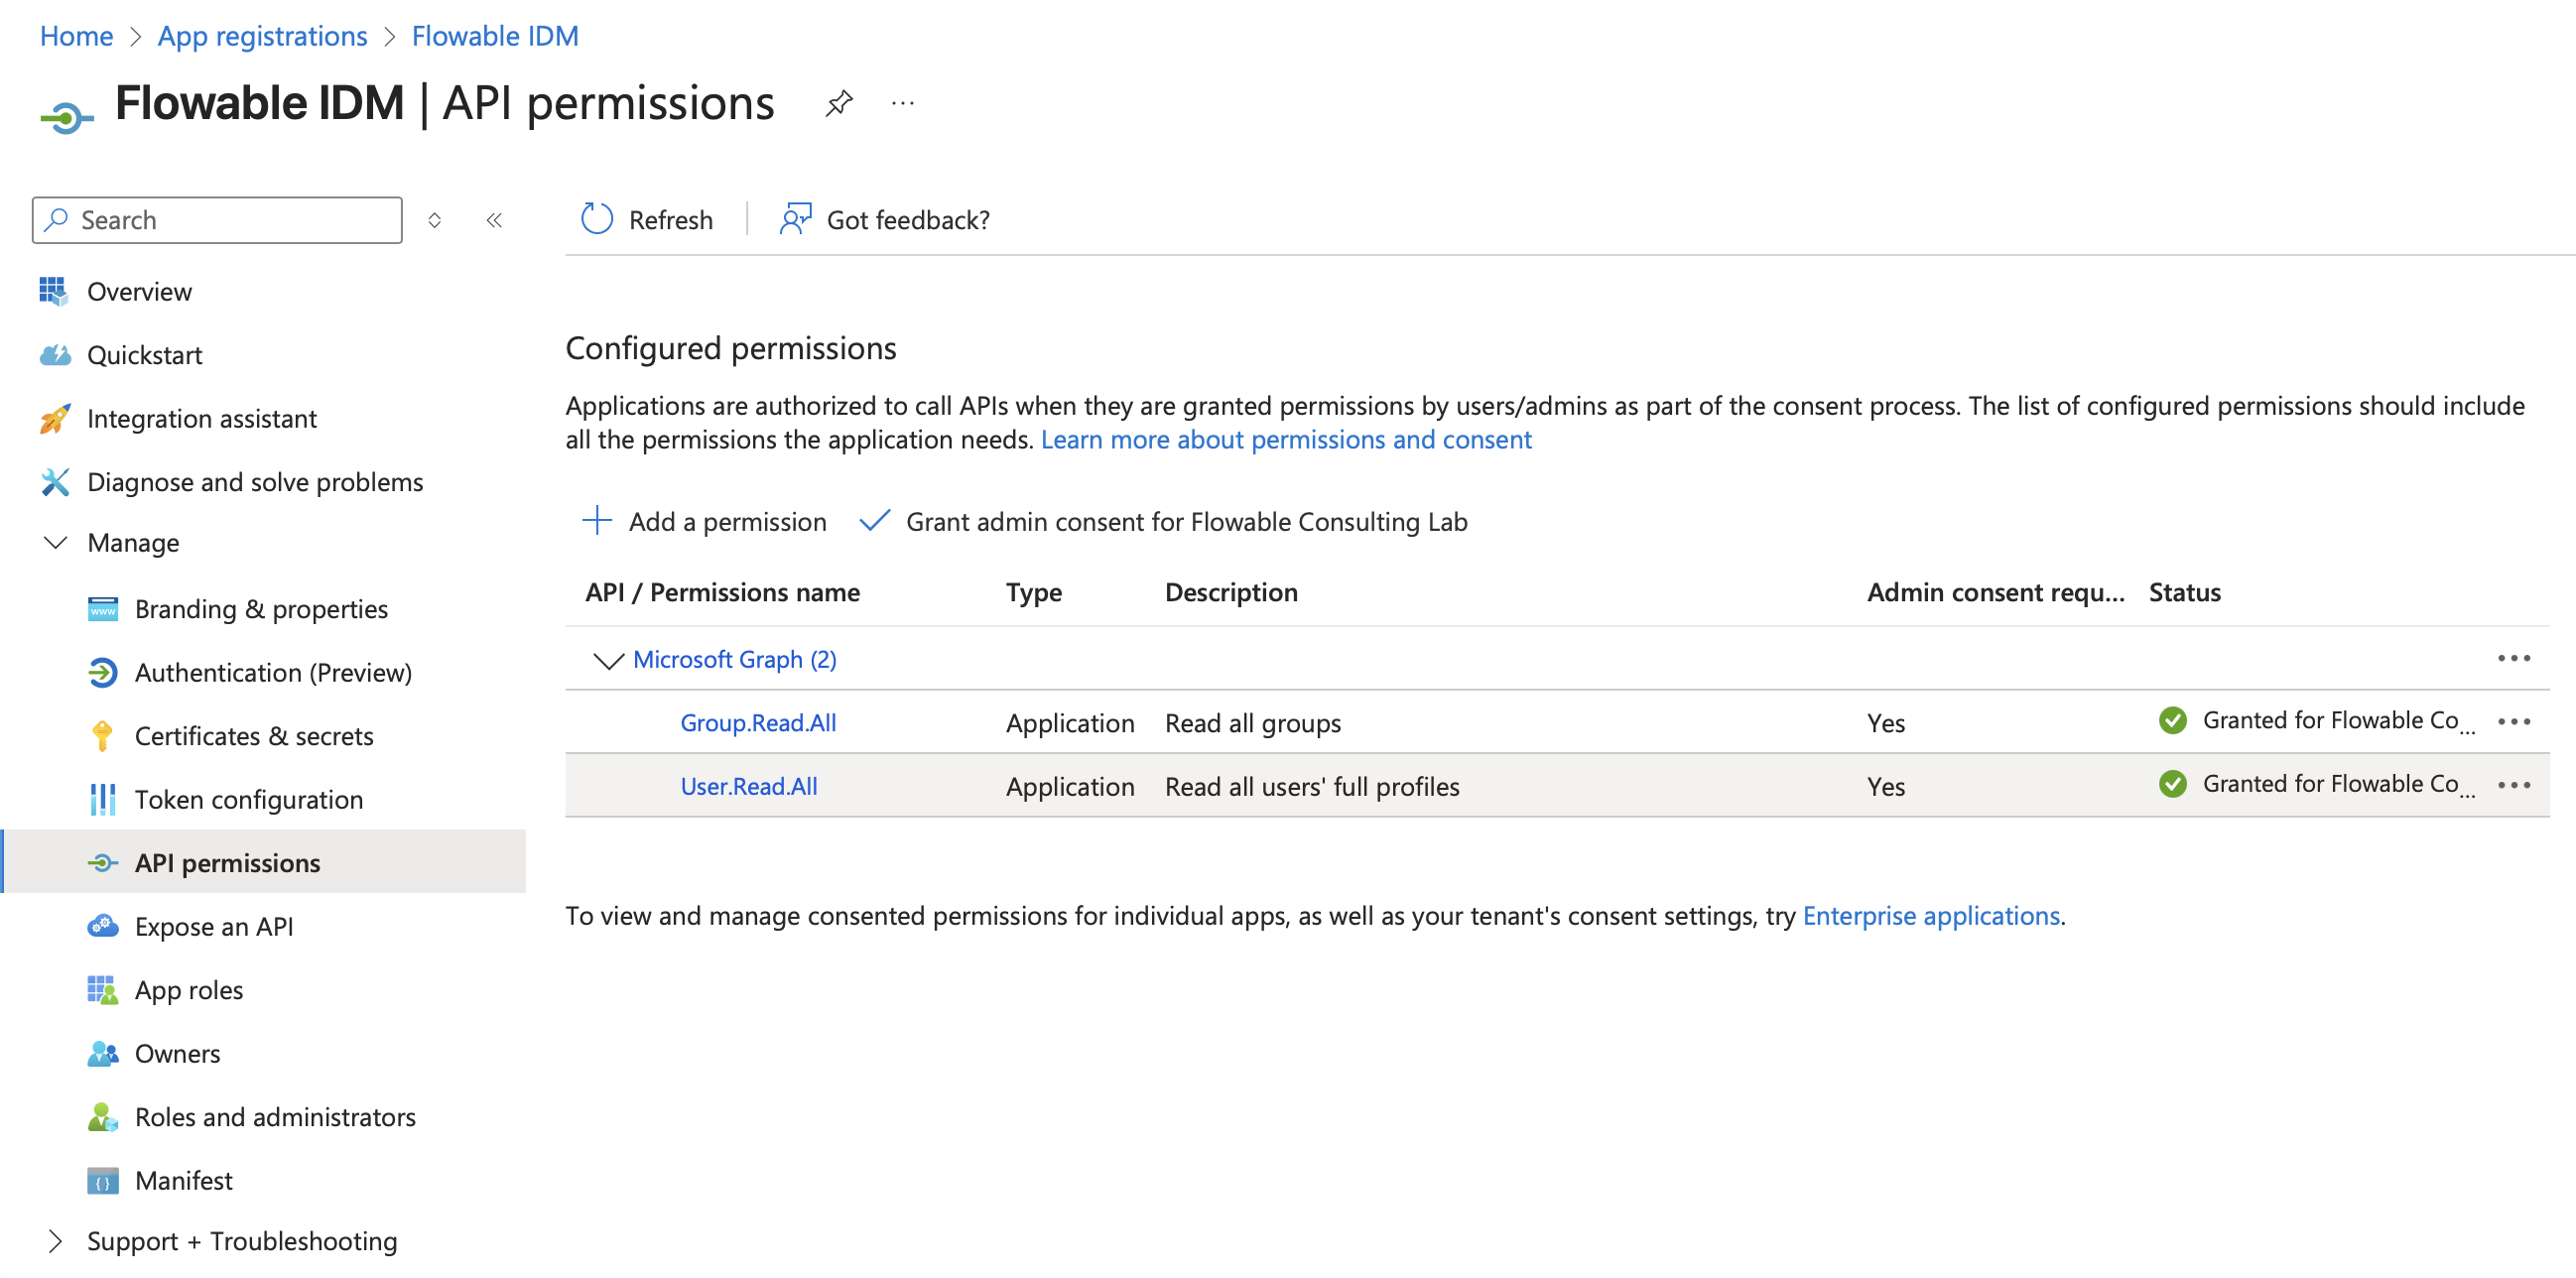
- Copy the Client ID and Tenant ID from the Overview panel on the left side. You will need them for the Flowable IDM Configuration.
Configuring Flowable
The Client ID, Client Secret, and Tenant ID can be found in the App Registration. To enable and configure the Flowable IDM for Microsoft Entra ID, the following minimal property-set should be set:
flowable.platform.idm.service-type=microsoft-graph

# Configures the Spring Security OAuth2 client registration for Microsoft Entra ID
spring.security.oauth2.client.registration.ms-graph.client-id=<Client ID>
spring.security.oauth2.client.registration.ms-graph.client-secret=<Client Secret>
spring.security.oauth2.client.registration.ms-graph.scope=https://graph.microsoft.com/.default
spring.security.oauth2.client.registration.ms-graph.authorization-grant-type=client_credentials
spring.security.oauth2.client.provider.ms-graph.issuer-uri=https://login.microsoftonline.com/<tenantId>/v2.0

# This should be the Spring Security OAuth2 Client Registration ID used above.
flowable.idm.microsoft-graph.client.registration-id=ms-graph
Optionally, the following properties are supported to configure filtering and mapping of Entra ID fields to Flowable IDM properties. Consider the appropriate default values if the properties are not set.
# Group specific Entra properties
flowable.idm.microsoft-graph.group.query.default-filter=(startsWith(displayName, 'flowable-'))
flowable.idm.microsoft-graph.group.query.value-group.flowableUser=<Group Object ID>
flowable.idm.microsoft-graph.group.query.value-group.someOtherGroup=<Group Object ID>
flowable.idm.microsoft-graph.group.mappings.key=id
flowable.idm.microsoft-graph.group.mappings.name=displayName
flowable.idm.microsoft-graph.group.mappings.type=groupType

# User specific Entra properties
flowable.idm.microsoft-graph.user.query.base-group=<Group Object ID>
flowable.idm.microsoft-graph.user.query.default-filter=(userType eq 'test')
flowable.idm.microsoft-graph.user.mappings.id=userPrincipalName
flowable.idm.microsoft-graph.user.mappings.first-name=givenName
flowable.idm.microsoft-graph.user.mappings.last-name=surname
flowable.idm.microsoft-graph.user.mappings.language=preferredLanguage
flowable.idm.microsoft-graph.user.mappings.display-name=displayName
flowable.idm.microsoft-graph.user.mappings.email=mail

# User definition from Entra
flowable.idm.microsoft-graph.user.mappings.user-definition-key=role
flowable.idm.microsoft-graph.user.mappings.default-user-definition-key=user-default
flowable.idm.microsoft-graph.user.mappings.value-user-definition-key.admin=user-admin
flowable.idm.microsoft-graph.user.mappings.value-user-definition-key.reporter=user-reporter

# Tenant mappings for user from Entra
flowable.idm.microsoft-graph.user.mappings.tenant-id=location
flowable.idm.microsoft-graph.user.mappings.default-tenant-id=Switzerland
flowable.idm.microsoft-graph.user.mappings.value-tenant-id.BRN=Switzerland
flowable.idm.microsoft-graph.user.mappings.value-tenant-id.ZRH=Switzerland
flowable.idm.microsoft-graph.user.mappings.value-tenant-id.VLC=Spain

# Tenant mappings for group from Entra
flowable.idm.microsoft-graph.group.mappings.tenantId=company
flowable.idm.microsoft-graph.group.mappings.default-tenant-id=Switzerland
flowable.idm.microsoft-graph.group.mappings.value-tenant-id.BERN=Switzerland
flowable.idm.microsoft-graph.group.mappings.value-tenant-id.ZURICH=Switzerland
flowable.idm.microsoft-graph.group.mappings.value-tenant-id.VALENCIA=Spain
There are multiple groups of properties that can be used to configure different aspects of the Entra support. Here we are going to explain what every property does.
noteThe default configuration uses the userPrincipalName as an identifier for the user.
This means that the OAuth2 Authentication should be configured to use the email for the username attributes.
e.g.
spring.security.oauth2.client.provider.<providerId>.user-name-attribute=email
Communication with Microsoft Entra ID
This group of properties is for the connection and communication to the LDAP Server.
| Property | Description | Value |
|---|---|---|
| spring.security.oauth2.client.registration.ms-graph.client-id | The App Registration Client ID | |
| spring.security.oauth2.client.registration.ms-graph.client-secret | The App Registration Client Secret | |
| spring.security.oauth2.client.registration.ms-graph.scope | The scope to use when requesting an access token | https://graph.microsoft.com/.default |
| spring.security.oauth2.client.registration.ms-graph.authorization-grant-type | The OAuth2 authorization grant type | client_credentials |
| spring.security.oauth2.client.provider.ms-graph.issuer-uri | The Microsoft Issuer URI | https://login.microsoftonline.com/{tenantId}/v2.0 |
| flowable.idm.microsoft-graph.client.registration-id=ms-graph | The Spring Security Client Registration ID | ms-graph |
Flowable Specific Properties
The main property to instruct Flowable to use Microsoft Entra ID is flowable.platform.idm.service-type=microsoft-graph.
This makes sure that Flowable will use the IDM Identity Service.
User Properties
The following properties are used when the Flowable Identity Service queries for users.
| Property | Description | Value |
|---|---|---|
| flowable.idm.microsoft-graph.user.query.base-group | When configured Flowable will only return transitive members of this group | |
| flowable.idm.microsoft-graph.user.query.default-filter | The default Microsoft Graph filter that should be applied to all user queries |
The following properties are used when the Flowable Identity Service maps the Microsoft Graph User into a Flowable User. This the first value of each mapping is also used to perform sorting if sorting is enabled.
| Property | Description | Value |
|---|---|---|
| flowable.idm.microsoft-graph.user.mappings.id | Entra attribute for the user id | userPrincipalName |
| flowable.idm.microsoft-graph.user.mappings.first-name | Entra attribute for the first name of the user | givenName |
| flowable.idm.microsoft-graph.user.mappings.last-name | Entra attribute for the last name of the user | surname |
| flowable.idm.microsoft-graph.user.mappings.display-name | Entra attribute for the display name of the user | displayName |
| flowable.idm.microsoft-graph.user.mappings.language | Entra attribute for the language for the user | preferredLanguage |
| flowable.idm.microsoft-graph.user.mappings.email | Entra attribute for the email of the user | |
flowable.idm.microsoft-graph.user.mappings.info-name.<ldap-attribute-name>=<info-name-in-Flowable> | Mapping between Entra Attributes and Flowable user info parameters |
All the properties above except id can be specified as a comma-separated list.
The value for the id property should either be userPrincipalName or id.
This means that the first attribute that is not empty from the LDAP response would be used.
e.g.
When flowable.idm.microsoft-graph.user.mappings.display-name=displayName,name
the display name of the user is mapped from the Entra attribute displayName
if it is not empty, otherwise from the name attribute.
Expose custom Entra attributes to Flowable workflows
The property flowable.idm.microsoft-graph.user.mappings.info-name.<ldap-Attribute>=<info-name> can be used to expose certain custom Entra attributes under a specific name.
For example, to get some attributes for the authenticated user, we can do the following in Flowable workflows.
We are going to map The Entra Attribute location to a name available under site.
e.g.
flowable.idm.microsoft-graph.user.mappings.info-name.location=site
This can then be used in the following way in an expression:
${platformIdentityService.createUserQuery().userId(authenticatedUserId).singleResult().site}
User definition key and tenant mapping
It is also possible to map the user tenant id and user definition key from an Entra attribute by using the appropriate mapping property. However, in most cases those properties are not in Entra and somehow existing values from Entra need to be mapped into the appropriate Flowable values.
e.g.
We want to use the Entra location attribute to map into the appropriate tenant. In Entra we have the following locations:
- BRN - belongs to tenant Switzerland
- ZRH - belongs to tenant Switzerland
- VLC - belongs to tenant Spain
- MAD - belongs to tenant Spain
To configure that, we are going to use the following properties
flowable.idm.microsoft-graph.user.mappings.tenant-id=location
flowable.idm.microsoft-graph.user.mappings.default-tenant-id=Switzerland
flowable.idm.microsoft-graph.user.mappings.value-tenant-id.BRN=Switzerland
flowable.idm.microsoft-graph.user.mappings.value-tenant-id.ZRH=Switzerland
flowable.idm.microsoft-graph.user.mappings.value-tenant-id.VLC=Spain
flowable.idm.microsoft-graph.user.mappings.value-tenant-id.MAD=Spain
The flowable.idm.microsoft-graph.user.mappings.tenant-id property is used to determine which Entra attribute should be used to get the tenant value.
In our example this would be location.
The flowable.idm.microsoft-graph.user.mappings.default-tenant-id property is used to determine
the default tenant id that is used in case the user has no location set.
In our example the default tenant would be Switzerland
The flowable.idm.microsoft-graph.user.mappings.value-tenant-id.<value> property, where <value>
is any value that you have in your location Entra attribute,
is used to provide the mapping between your Entra value and the Flowable value.
In our example we are mapping BRN to Switzerland, VLC to Spain, etc.
The concept is similar for the user definition key.
e.g.
We want to use the Entra description attribute to map into the appropriate user definition key.
In Entra we have the following descriptions:
- admin - Should map to the user definition key
user-admin - reporter - Should map to the user definition key
user-reporter
To configure that, we are going to use the following properties
flowable.idm.microsoft-graph.user.mappings.user-definition-key=description
flowable.idm.microsoft-graph.user.mappings.default-user-definition-key=user-default
flowable.idm.microsoft-graph.user.mappings.value-user-definition-key.admin=user-admin
flowable.idm.microsoft-graph.user.mappings.value-user-definition-key.reporter=user-reporter
The flowable.idm.microsoft-graph.user.mappings.user-definition-key property is used to determine
which Entra attribute should be used to get the user definition key value.
In our example this would be description.
The flowable.idm.microsoft-graph.user.mappings.default-user-definition-key property is used to determine
the default user definition key used in case the user has no description set.
In our example the default user definition key would be user-default
The flowable.idm.microsoft-graph.user.mappings.value-user-definition-key.<value> property, where <value>
is any value that you have in your description Entra property,
is used to provide the mapping between your Entra value and the Flowable value.
In our example we are mapping admin to user-admin, reporter to user-reporter, etc.
There is also an alternative way of mapping the user definition key. The alternative way is by using the membership of the user in a particular groups.
e.g.
flowable.idm.microsoft-graph.user.mappings.default-user-definition-key=user-default
flowable.idm.microsoft-graph.user.mappings.user-definition-key-mapping-type=groups
flowable.idm.microsoft-graph.user.mappings.user-definition-group-mappings[0].group-key=Admin
flowable.idm.microsoft-graph.user.mappings.user-definition-group-mappings[0].user-definition-key=user-admin
flowable.idm.microsoft-graph.user.mappings.user-definition-group-mappings[1].group-key=Reporter
flowable.idm.microsoft-graph.user.mappings.user-definition-group-mappings[1].user-definition-key=user-reporting
The flowable.idm.microsoft-graph.user.mappings.default-user-definition-key property can still be used to determine
the default user definition key used in case the user is not a member of the defined group mappings.
In our example the default user definition key would be user-default
The flowable.idm.microsoft-graph.user.mappings.user-definition-key-mapping-type needs to be set to groups in order to signal the logic for the group mapping type.
Finally, the flowable.idm.microsoft-graph.user.mappings.user-definition-group-mappings[<index>].group-key and flowable.ldap.user.mappings.user-definition-group-mappings[<index>].user-definition-key
properties can be used to define the mapping between a group with the given key and a user definition.
In the example above if the user is a member of the group with a key "Admin" it will get the "user-admin" definition,
if the user is a member of the group with a key "Reporter" they will get the "user-reporting" definition, all the rest of the users will get the "user-default" definition.
The order of the group mappings is important since they will be processed in the defined order, i.e. if a user is a member of both groups they will get the definition of the first matching group from the group mappings.
noteThe user definition key here is only used for displaying information when querying users. The assumption is that the Azure SSO is being used for Authentication and the user definition key is retried through that configuration. We advise not to use groups for user definition key mapping as it can lead to performance problems, since for each user we have to do a REST call to the Microsoft Graph API to get the groups for the user and then check if the user is a member of the group.
Paging
The Microsoft Entra ID Service does not support paging, at least not in the way that we can get results within a page that we want to. The pagination is implemented using a skip token approach and querying for the next page. We are doing the best effort implementation to get the requested page. However, we advise not to use infinite scrolling or paging with the REST API and instead rely on additional filtering.
Sorting
The Microsoft Graph API does not support sorting for the same attributes that Flowable supports. Therefore, it is currently only possible to sort on user id and display name.
Group Properties
The following properties are used when the Flowable Identity Service queries for groups.
| Property | Description | Value |
|---|---|---|
| flowable.idm.microsoft-graph.group.query.default-filter | The default Microsoft Graph filters that should be applied to all group queries | (startsWith(displayName, 'flowable-')) |
In the example above, we are only querying for groups that start with the prefix flowable-.
The following properties are used when the Flowable Identity Service maps the Entra attributes into a Flowable Group.
| Property | Description | Value |
|---|---|---|
| flowable.idm.microsoft-graph.group.mappings.key | Entra attribute for the key of the group. We advise not to change the default value | id |
| flowable.idm.microsoft-graph.group.mappings.name | Entra attribute for the name of the group | displayName |
All the properties can be specified as a comma-separated list. This means that the first attribute that is not empty from the Entra response would be used.
When flowable.idm.microsoft-graph.group.mappings.key is not set then id would be used both for it.
noteTo access Flowable as an administrative user you need to have admin permissions. Please refer to the permissions section for further details.
Group Key mapping
Sometimes it is not possible to create a new group in Entra and you would like to use an existing group, but name it differently in Flowable.
e.g., you would like to use the group flowableUser and flowableAdministrator through the Flowable User Definitions and use it in Models.
The property flowable.idm.microsoft-graph.group.query.value-group.<groupKey>=<Azure Group Object Id> can be used to map the group key to the Azure Group Object Id.
Tenant mapping
It is also possible to map the group tenant id from an Entra attribute by using the appropriate mapping property. However, in most cases the tenant is not in Entra and somehow existing values from Entra need to be mapped into the appropriate Flowable values.
e.g.
We want to use the Entra loc attribute to map into the appropriate tenant.
In LDAP we have the following locations:
- BERN - belongs to tenant Switzerland
- ZURICH - belongs to tenant Switzerland
- VALENCIA - belongs to tenant Spain
- MADRID - belongs to tenant Spain
To configure that we are going to use the following properties
flowable.idm.microsoft-graph.group.mappings.tenant-id=loc
flowable.idm.microsoft-graph.group.mappings.default-tenant-id=Switzerland
flowable.idm.microsoft-graph.group.mappings.value-tenant-id.BERN=Switzerland
flowable.idm.microsoft-graph.group.mappings.value-tenant-id.ZURICH=Switzerland
flowable.idm.microsoft-graph.group.mappings.value-tenant-id.VALENCIA=Spain
flowable.idm.microsoft-graph.group.mappings.value-tenant-id.MADRID=Spain
The flowable.idm.microsoft-graph.group.mappings.tenant-id property is used to determine which Entra attribute should be used to get the tenant value.
In our example this would be loc.
The flowable.idm.microsoft-graph.group.mappings.default-tenant-id property is used to determine
the default tenant id that is used in case the group has no loc set.
In our example the default tenant would be Switzerland
The flowable.idm.microsoft-graph.group.mappings.value-tenant-id.<value> property, where <value>
is any value that you have in your loc LDAP attribute,
is used to provide the mapping between your LDAP value and the Flowable value.
In our example we are mapping BERN to Switzerland, VALENCIA to Spain, etc.
Paging
The Microsoft Entra ID Service does not support paging, at least not in the way that we can get results within a page that we want to. The pagination is implemented using a skip token approach and querying for the next page. We are doing the best effort implementation to get the requested page. However, we advise not using infinite scrolling or paging with the REST API and instead rely on additional filtering.
Sorting
The Microsoft Graph API does not support sorting for the same attributes that Flowable supports. Therefore, it is currently only possible to sort on user id and display name.
OAuth2
The out of the box Flowable Platform Application come with OAuth2 support. If you are creating your own Flowable Application, then have a look at OAuth2 Developer Guide additionally. Flowable uses Spring Security. Therefore, configuring the OAuth2 support is mostly configuring the Spring Security OAuth2 client and resource server.
There are different OAuth2 providers. In this section we are going to provide examples for Azure and Keycloak
Note: When using the Flowable platform application provided by Flowable you will also need to set
application.security.typetooauth2
Azure OAuth2
Before you configure the application you will need to create an Application in your Azure Portal. Details about that step can be found here in the Azure documentation.
spring.security.oauth2.client.registration.azure.client-id=<The client id of your application>
spring.security.oauth2.client.registration.azure.client-secret=<The client secret of your application>
spring.security.oauth2.client.registration.azure.client-name=Azure SSO
spring.security.oauth2.client.registration.azure.authorization-grant-type=authorization_code
spring.security.oauth2.client.registration.azure.scope=openid,profile,email

spring.security.oauth2.client.provider.azure.issuer-uri=https://login.microsoftonline.com/<tenantId>/v2.0
spring.security.oauth2.client.provider.azure.user-name-attribute=email
The authorization_code OAuth2 workflow will redirect the users to the Azure SSO and then redirect them back to Flowable. We are requesting the openid and profile scopes in order to receive the OpenID and Profile information into the token and user info. The attribute for the username is changed to preferred_username, because we want to use the human readable username of the user as the id, instead of the Azure UUID.
The above configuration will make sure that users can login into Flowable using Azure SSO.
On top of the Spring Security Configuration we need to do some configuration for how to map certain user info attributes to Flowable groups, authorities, user definition.
Those properties are:
flowable.security.oauth2.client.mapper.authorities-attributes=roles
flowable.security.oauth2.client.mapper.groups-attributes=groups
flowable.security.oauth2.client.mapper.tenant-attribute=
flowable.security.oauth2.client.mapper.user-definition-key-attribute=
flowable.security.oauth2.client.mapper.load-authorities-from-identity-service=false
flowable.security.oauth2.client.mapper.idm-user-id-attributes=sub
flowable.security.oauth2.client.mapper.user-definition-group-mappings[0].group-key=
flowable.security.oauth2.client.mapper.user-definition-group-mappings[0].user-definition-key=
flowable.security.oauth2.client.mapper.user-definition-group-mappings[1].group-key=
flowable.security.oauth2.client.mapper.user-definition-group-mappings[1].user-definition-key=
These properties are used for the following:
authorities-attributes- comma separated property that is used to get and map the token attributes / claims to granted authorities. This can be used to define application roles in your Azure portal and map those to Flowable roles. More about how to add roles to your application can be found here in the Azure documentation. This can be used by defining a role with a value USER_DEFINITION_KEY_user-admin to map users / groups to the user definition key user-admin, or access-actuators to grant users access to the Spring Boot Actuators in Flowable. Any of the known Flowable allowed features prefixed with access- can be used here. This can also be used to define groups by using a role with a prefix ofGROUP_e.g. if the role isGROUP_myCustomGroupthen the user will have the groupmyCustomGroupassigned to them. In addition to that it can be used to define the tenant that the user belongs to by using a role with a prefix ofTENANT_, e.g. if the user has the roleTENANT_acmethe user will belong to the acme tenant.groups-attributes- comma separated property that is used to get the groups from the token attributes / claims. These values will be mapped to Flowable Groups. More about how to expose the groups in the token can be found here in the Azure documentation.tenant-attribute- property pointing to the name of the attribute / claim containing the tenant id of the user in the token attributes / claimsuser-definition-key-attribute- property pointing to the name of the attribute / claim containing the user definition key of the user in the token attributes / claimsload-authorities-from-identity-service- property to specify if the user information is loaded from the identity service. This might impact performance depending on the speed of your identity service and the backed service (e.g. LDAP).idm-user-id-attributes- property to specify the claim of the token to be used to identitfy the user in the identity service. By default, thesubclaim in the token is used to lookup a person in the configured identity service. Only applicable whenload-authorities-from-identity-serviceis set totrueuser-definition-group-mappings- list of group key to user definition key mapping to determine the user definition key in case it is not provided with other authorities.
noteTo access Flowable as an administrative user you need to have admin permissions. Please refer to the permissions section for further details.
In addition to the OAuth2 client configuration we can configure the application to be accessible through Access token using the Bearer authentication.
For this we need the following configuration:
spring.security.oauth2.client.provider.azure.issuer-uri=https://login.microsoftonline.com/<tenantId>/v2.0
spring.security.oauth2.client.provider.azure.user-name-attribute=preferred_username
On top of the Spring Security Configuration we need to do some configuration for how to map certain Token attributes / claims to Flowable groups, authorities, user definition.
Those properties are:
flowable.security.oauth2.resourceserver.jwt.principal-claim-name=preferred_username
flowable.security.oauth2.resourceserver.mapper.authorities-attributes=roles
flowable.security.oauth2.resourceserver.mapper.groups-attributes=groups
flowable.security.oauth2.resourceserver.mapper.tenant-attribute=
flowable.security.oauth2.resourceserver.mapper.user-definition-key-attribute=
flowable.security.oauth2.resourceserver.mapper.load-authorities-from-identity-service=false
flowable.security.oauth2.resourceserver.mapper.idm-user-id-attributes=sub
flowable.security.oauth2.resourceserver.mapper.user-definition-group-mappings[0].group-key=
flowable.security.oauth2.resourceserver.mapper.user-definition-group-mappings[0].user-definition-key=
flowable.security.oauth2.resourceserver.mapper.user-definition-group-mappings[1].group-key=
flowable.security.oauth2.resourceserver.mapper.user-definition-group-mappings[1].user-definition-key=
The mapper properties are the same as the ones defined for the client configuration.
However, it allows more granular configuration, since the user info and user token do not contain the same attributes.
The jwt.principal-claim-name is needed because we want to have the human readable user id.
Keycloak OAuth2
Keycloak is an open source Identity and Access Management solution. It makes it easy to secure applications and services with very little code. Detailed information about Keycloak can be found on their website. In the following we are going to show how we can authenticate with it and use it as a user store. For this to work we assume that you already have an instance of Keycloak running somewhere, with a configured Realm and users in this realm.
Before we start configuring the Flowable side a client application should exist in Keycloak. Details about that step can be found here in the Keycloak documentation.
spring.security.oauth2.client.registration.keycloak.client-id=<The client id of your application>
spring.security.oauth2.client.registration.keycloak.client-secret=<The client secret of your application>
spring.security.oauth2.client.registration.keycloak.client-name=Keycloak
spring.security.oauth2.client.registration.keycloak.authorization-grant-type=authorization_code
spring.security.oauth2.client.registration.keycloak.scope=openid,profile
spring.security.oauth2.client.provider.keycloak.issuer-uri=<keycloakLocation>/auth/realms/<realmName>
spring.security.oauth2.client.provider.keycloak.user-name-attribute=preferred_username
The authorization_code OAuth2 workflow will redirect the users to the Keycloak SSO and then redirect them back to Flowable. We are requesting the openid and profile scopes in order to receive the OpenID and Profile information into the token and user info. The attribute for the username is changed to preferred_username, because we want to use the human readable username of the user as the id, instead of the Keycloak identifier.
The above configuration will make sure that users can login into Flowable using Keycloak SSO.
On top of the Spring Security Configuration we need to do some configuration for how to map certain token attributes to Flowable groups, authorities, user definition.
Those properties are:
flowable.security.oauth2.client.mapper.authorities-attributes=roles
flowable.security.oauth2.client.mapper.groups-attributes=groups
flowable.security.oauth2.client.mapper.tenant-attribute=
flowable.security.oauth2.client.mapper.user-definition-key-attribute=
flowable.security.oauth2.client.mapper.load-authorities-from-identity-service=false
flowable.security.oauth2.client.mapper.idm-user-id-attributes=sub
flowable.security.oauth2.client.mapper.user-definition-group-mappings[0].group-key=
flowable.security.oauth2.client.mapper.user-definition-group-mappings[0].user-definition-key=
flowable.security.oauth2.client.mapper.user-definition-group-mappings[1].group-key=
flowable.security.oauth2.client.mapper.user-definition-group-mappings[1].user-definition-key=
These properties are used for the following:
authorities-attributes- comma separated property that is used to get and map the token attributes / claims to granted authorities. This can be used to define application roles in your Keycloak application and map those to Flowable roles. More about how to add roles to your application can be found here in the Keycloak documentation. This can be used by defining a role with a value USER_DEFINITION_KEY_user-admin to map users / groups to the user definition key user-admin, or access-actuators to grant users access to the Spring Boot Actuators in Flowable. Any of the known Flowable allowed features prefixed with access- can be used here. This can also be used to define groups by using a role with a prefix ofGROUP_e.g. if the role isGROUP_myCustomGroupthen the user will have the groupmyCustomGroupassigned to them. In addition to that it can be used to define the tenant that the user belongs to by using a role with a prefix ofTENANT_, e.g. if the user has the roleTENANT_acmethe user will belong to the acme tenant.groups-attributes- comma separated property that is used to get the groups from the token attributes / claims. These values will be mapped to Flowable Groups. This can be exposed by creating a Group Membership Mapper type in your application.tenant-attribute- property pointing to the name of the attribute / claim containing the tenant id of the user in the token attributes / claimsuser-definition-key-attribute- property pointing to the name of the attribute / claim containing the user definition key of the user in the token attributes / claimsload-authorities-from-identity-service- property to specify if the user information is loaded from the identity service. This might impact performance depending on the speed of your identity service and the backed service (e.g. LDAP).idm-user-id-attributes- property to specify the claim of the token to be used to identitfy the user in the identity service. By default, thesubclaim in the token is used to lookup a person in the configured identity service. Only applicable whenload-authorities-from-identity-serviceis set totrueuser-definition-group-mappings- list of group key to user definition key mapping to determine the user definition key in case it is not provided with other authorities.
noteTo access Flowable as an administrative user you need to have admin permissions. Please refer to the permissions section for further details.
In addition to the OAuth2 client configuration we can configure the application to be accessible through Access token using the Bearer authentication.
For this we need the following configuration:
spring.security.oauth2.client.provider.keycloak.issuer-uri=<keycloakLocation>/auth/realms/<realmName>
spring.security.oauth2.client.provider.keycloak.user-name-attribute=preferred_username
On top of the Spring Security Configuration we need to do some configuration for how to map certain Token attributes / claims to Flowable groups, authorities, user definition.
Those properties are:
flowable.security.oauth2.resourceserver.jwt.principal-claim-name=preferred_username
flowable.security.oauth2.resourceserver.mapper.authorities-attributes=roles
flowable.security.oauth2.resourceserver.mapper.groups-attributes=groups
flowable.security.oauth2.resourceserver.mapper.tenant-attribute=
flowable.security.oauth2.resourceserver.mapper.user-definition-key-attribute=
flowable.security.oauth2.resourceserver.mapper.load-authorities-from-identity-service=false
flowable.security.oauth2.resourceserver.mapper.idm-user-id-attributes=sub
flowable.security.oauth2.resourceserver.user-definition-group-mappings[0].group-key=
flowable.security.oauth2.resourceserver.user-definition-group-mappings[0].user-definition-key=
flowable.security.oauth2.resourceserver.user-definition-group-mappings[1].group-key=
flowable.security.oauth2.resourceserver.user-definition-group-mappings[1].user-definition-key=
The mapper properties are the same as the ones defined for the client configuration.
However, it allows more granular configuration, since the user info and user token do not contain the same attributes.
The jwt.principal-claim-name is needed because we want to have the human readable user id.
Refresh Token
v3.16.6+When using OAuth2 the offline_access scope can be used for the client registration.
This will enable the Flowable Platform Application to refresh the access token when it expires.
e.g. when using SharePoint with delegated authentication.
For this purpose there is also the property application.security.oauth2.authorized-client-repository-type with a default value of session.
With this the refresh token is stored in the HTTP session and can be used to refresh the access token when it expires.
If you are running a single node then this can be changed to default, which will use an in memory implementation.
Technical User
A technical user can be set up to authenticate with Flowable. Once this user is configured, it allows authentication with the REST API via HTTP Basic Authentication, irrespective of the Flowable Platform Application's authentication settings. For instance, it remains usable even when OAuth2 is enabled. This functionality is beneficial for communication between Flowable Design/Control and Flowable Work, among other applications.
The properties to configure this are:
flowable.security.basic-auth.enabled=true
flowable.security.basic-auth.username=technical-user
flowable.security.basic-auth.password=test
flowable.security.basic-auth.granted-authorities=USER_DEFINITION_KEY_user-default,GROUP_flowableUser,TENANT_flowable
The configuration above will allow accessing the REST API using the username technical-user and the password test.
The user will have the user definition key user-default, be part of the flowableUser group, and belong to the flowable tenant.
See Authentication and Authorization for the available options for the granted authorities.
WebDAV (edit in Office)
In Flowable it is possible to enable the WebDAV functionality. With WebDAV enabled, an 'Edit in Office' button is shown for any Office document (Word/Excel/Powerpoint):
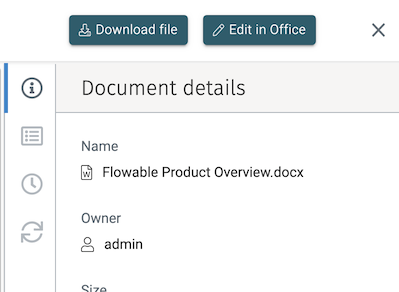
When clicking this button, the local Office Word/Excel/Powerpoint application is started and the document is loaded. Whenever the document is then saved, the changes are persisted on the Flowable server. Any save action of the document is stored as a new version of that document, which allows to revert to any previous version. Behind the scenes, this uses the WebDAV protocol, hence the name of this feature.
To enable this feature the following dependency needs to be added to your project:
<dependency>
    <groupId>com.flowable.platform</groupId>
    <artifactId>flowable-webdav</artifactId>
</dependency>
Now, WebDAV support is added by default for your Flowable application.
Afterwards, following properties need to be set to enable WebDAV:
flowable.webdav.enabled=true

flowable.webdav.authentication-mode=basic-auth
Currently two authentication modes are supported through the flowable.webdav.authentication-mode property:
basic auth: This will show a popup in Office to authenticate with the proper user credentials. It is advised to use this setting.none: This will disable any authentication.
Authentication mode none should only be used in development or demoing (because running with basic-auth has implications as described below).
Note that Flowable currently does not support Office authentication when an another authentication mechanism (like SSO) is used.
WebDAV and https
Using the WebDAV functionality with basic auth as authentication mode requires the server to be running with SSL (https) enabled.
It is possible to disable this requirement, client-side (so on the machine where Office is running on) by executing:
On Windows
Windows: using the registry editor, locate and then click one of the following registry subkeys:
HKEY_CURRENT_USER\Software\Microsoft\Office\16.0\Common\Internet
(Any Office 16.x version is stored under 16.0)
On the Edit menu, point to New, and then click DWORD Value. Type BasicAuthLevel, and then press Enter. Right-click BasicAuthLevel, and then click Modify and give it 2 as value.
On OS X
When using OS X, SSL/https is mandatory. There is no way of using Office with basic auth without the server running with SSL/https.
In this case, use the none mode in development, but make sure the production servers have proper SSL configured.
Troubleshooting
Problem: changed from https to http (or vice-versa) and opening a document gives a blank page or an error
Changing from https to http (or vice-versa) on some machines might lead to Office caching the previous setting of the server and not being able to connect.
The easiest solution is to use a different host or port, as this will circumvent the cache.
Another option is, on Windows, to use the registry editor and remove all entries below
HKEY_CURRENT_USER\Software\Microsoft\Office\<version>\Common\Internet\Server Cache\
For OS X, there currently is no such solution to clear the cache.
Problem: bullet points rendered as squares when using a Word template
This is a problem that can happen when running on Linux or OS X, due to not having the proper fonts installed.
This can be solved by placing the Wingdings true type font (from a Windows installation) in a custom folder and specify a path to that folder with the following property (taking in a comma separated list of paths):
flowable.content.rendition-converters.custom-font-folder-paths=...
Note: Check if font licensing is need, and read the EULA carefully before installing MS Fonts on any other system.
SharePoint
v3.15.0+Introduction
There are 2 ways of integrating SharePoint into Flowable. Either by using a client-secret or by delegated authorization
noteThe SharePoint integration is a connector that is not enabled in Flowable by default and requires an additional license.
Client-Secret Authorization
Using the client-secret method allows you to connect Flowable Work with an Azure enterprise application. It's important to note that this default setup grants the client-secret access to read all sites, folders, and files in your SharePoint environment. To ensure security, your SharePoint setup must be appropriately configured. You have the option to restrict the access scope of your enterprise application within SharePoint sites based on its clientId.
flowable.sharepoint.enabled=true
flowable.sharepoint.authentication-mode=client-secret-auth
flowable.sharepoint.login-url=https://login.microsoftonline.com/<tenantId>/oauth2/v2.0/token
flowable.sharepoint.client-secret=<clientSecret>
flowable.sharepoint.client-id=<clientId>
flowable.sharepoint.api-base-url=https://graph.microsoft.com/v1.0/
The property flowable.sharepoint.api-base-url is optional and https://graph.microsoft.com/v1.0/ is the default value
flowable.sharepoint.retrieve-item-preview =true
Whether you want to display an item preview in the SharePoint item selection dialog or not.
Delegated Authorization
This approach leverages the current user's token to make requests to the Microsoft Graph API, enabling access to SharePoint resources such as sites, folders, and files. To enable delegated authorization, certain properties must be configured as follows.
flowable.sharepoint.enabled=true
flowable.sharepoint.authentication-mode=delegated-auth
flowable.sharepoint.api-base-url=https://graph.microsoft.com/v1.0/
The property flowable.sharepoint.api-base-url is optional and https://graph.microsoft.com/v1.0/ is the default value
In addition, you need to configure Azure SSO in your system. Take a look at this How-to to get help setting up Azure SSO with Flowable Work.
After setting up the application properties it is crucial to modify the property spring.security.oauth2.client.registration.azure.scope to include the SharePoint related scopes.
spring.security.oauth2.client.registration.azure.scope=openid,profile,email,Sites.Read.All,Files.Read.All
Ignoring that step will result in http responses with status code 403.
Event Channels
When using the event registry features of Flowable, a connection to the relevant solution needs to be configured.
noteAll properties exposed by the associated Spring Boot starter (e.g. all properties that can be set when using the spring-kafka starter when wanting to use Kafka) are available, too.
When using Kafka:
application.kafka-enabled=true
spring.kafka.bootstrap-servers=localhost:9092
When using Active MQ:
application.jms-enabled=true
spring.activemq.broker-url=tcp://localhost:61616
When using RabbitMQ:
application.rabbit-enabled=true
spring.rabbitmq.addresses=localhost:5672
spring.rabbitmq.username=guest
spring.rabbitmq.password=guest
Email
The out of the box Flowable Application comes with sending Emails through the Email Task. In order for that to work you can use the following properties to configure it:
flowable.mail.server.host=localhost
flowable.mail.server.port=1025
flowable.mail.server.ssl-port=1465
flowable.mail.server.username=
flowable.mail.server.password=
flowable.mail.server.default-charset=UTF-8
#Use SSL/TLS encryption should be enabled for the SMTP transport upon connection (SMTPS/POPS).
flowable.mail.server.use-ssl=false
#Use STARTTLS encryption.
flowable.mail.server.use-tls=false
# Sends all the outgoing emails with the configured from email address
flowable.mail.server.default-from=flowable@localhost

# Sends all the outgoing emails to the configured email address
# This is useful for testing purposes
flowable.mail.server.force-to=
Content Security Policy (optional)
v3.12.0+If you need to configure your Flowable application to use Content Security Policy you need to set the following property:
flowable.security.rest.content-security-policy.policy-directives=default-src 'self'; img-src 'self' data:; object-src 'self'; style-src 'unsafe-inline'; style-src-elem 'self' 'unsafe-inline'; script-src 'self'; script-src-elem 'self'; frame-ancestors 'self'; frame-src 'self';
The property above is the minimum policy that is needed for all of the functionality of Flowable Work to work properly. If you are having problems with it we suggest reaching out to your Flowable contact.
If you want to only test it and only see the status in the browser you can use
flowable.security.rest.content-security-policy.report-only=true
This will force the use of the Content-Security-Policy-Report-Only header instead of Content-Security-Policy.
Tenant Variables (optional)
v3.16.0+A tenant variable is a variable similar to a process or case instance variable, with the difference the variable is available to all users of the tenant. Typical use cases include changing endpoints (e.g. a third party service endpoint that differs between the development and production environment), storing tokens that are used in service models to avoid hardcoding them, etc.
For example, instead of hardcoding any endpoint in your service, a tenant variable can be used to store that information.
The variable can be referenced in an expression using the tenant prefix: ${tenant.someUrl}.
In a staged environment, you can store someUrl as https://test.myService.com/api/v1, but in your production system you can use the production equivalent for the url like https://prod.myService.com/api/v1
Look here on how to create/update/delete tenant variables
Protected Tenant variables
Tenant variables can be flagged as protected resulting in:
- The tenant variable value can only be read.
- Retrieving the variable via REST will obfuscate the value.
- Protected variable values are stored encrypted (if encryption is active).
- Once enabled, the flag cannot be removed anymore.
Encrypting Tenant Variables
To enable the tenant variable value encryption, an initialization vector and secret property need to be set (in Work):
flowable.platform.protected-variable-encryption.initialization-vector=testVectorSecret
flowable.platform.protected-variable-encryption.secret=testSecretSecret