Installation Options
This section provides information about additional installation options for Flowable and its components.
Development Environment Setup
To develop customizations or extensions to Flowable, the following are some guidelines on creating a development environment.
IBM MQ
Flowable provides out of the box support for using the IBM MQ client. In order to use the IBM client you need to add the following dependency:
<dependency>
    <groupId>com.flowable.platform</groupId>
    <artifactId>flowable-spring-boot-starter-ibm-mq</artifactId>
    <version>${com.flowable.platform.version}</version>
</dependency>
This dependency pulls in the needed transitive dependencies for communicating with IBM MQ.
 important
When using IBM MQ the values for the queues should be changed. The reason for the changes is that IBM MQ does not support the use of the "-" character in the name of the queue.
Default Configuration
The selected default options have been set in order to match the
IBM MQ Docker Container development
configuration. The created MQConnectionFactory is by default wrapped in a Spring CachingConnectionFactory.
The default values are:
flowable.ibm.mq.host=localhost
flowable.ibm.mq.port=1414
flowable.ibm.mq.channel=DEV.APP.SVRCONN
flowable.ibm.mq.queue-manager=QM1
flowable.ibm.mq.application-name=
flowable.ibm.mq.user=app
flowable.ibm.mq.password=
Extended Configuration Options
Changing the default configuration is done by defining your properties in
an application.properties file, environment properties, system properties, etc.
For more information see Using Spring Boot Properties.
Pooled Connection Factory Options
There is an option to enable using the JmsPoolConnectionFactory.
This is disabled by default. It can be configured by using the following properties:
| Property | Description | Default Value |
|---|---|---|
| Use |
|
| Block a connection when the pool is full. |
|
| Blocking period before throwing an exception if the pool is still full. | -1 |
| Connection idle timeout. | 30 seconds |
| Maximum number of pooled connections. | 1 |
| Maximum number of pooled sessions per connection in the pool. | 500 |
| Time to sleep between runs of the idle connection eviction thread. When negative, no idle connection eviction thread runs. | -1 |
| Whether to use only one anonymous "MessageProducer" instance. Set it to |
|
Cached Connection Factory Options
By default the Spring CachingConnectionFactory is used with the following properties:
| Property | Description | Default Value |
|---|---|---|
| Whether to cache sessions. |
|
| Whether to cache message consumers. |
|
| Whether to cache message producers. |
|
| Size of the session cache (per JMS Session type). | -1 |
Using Kafka
Flowable supports Apache Kafka as an event streaming solution for sending and receiving events through channels. The Kafka integration is disabled by default.
Enabling Kafka
To enable Kafka, add the following properties to your application.properties configuration file (changing the server URL if needed):
application.kafka-enabled=true
spring.kafka.bootstrap-servers=localhost:9092
All properties exposed by the Spring Boot Kafka starter are available as well.
Dependencies
The Kafka dependencies are included by default when using Flowable Work or Flowable Engage.
If you are building your own Spring Boot project with Flowable dependencies, you need to add the Kafka starter dependency to your pom.xml:
Spring Kafka Dependencies
For 2025.2+ and later:
<dependency>
    <groupId>org.springframework.boot</groupId>
    <artifactId>spring-boot-starter-kafka</artifactId>
</dependency>
For versions prior to 2025.2+:
<dependency>
    <groupId>org.springframework.kafka</groupId>
    <artifactId>spring-kafka</artifactId>
</dependency>
Using Kafka Channels
Once Kafka is enabled, you can create Kafka channel models in Flowable Design to send and receive events through Kafka topics. See the Getting Started with Channels and Events guide for a walkthrough on setting up Kafka inbound and outbound channels.
For detailed reference documentation on all Kafka channel configuration options, see:
- Kafka Inbound Channel - configure topics, partitions, consumer groups, retry and dead letter topics
- Kafka Outbound Channel - configure topic, partition provider and key expression
Spring Boot Skeleton
Flowable Work is based on Spring Boot and therefore requires it as a base for any development environment.
The easiest way to setup a Flowable development project is to use the Flowable Initializr.
Choose the following options and hit "Generate Project" to get a Flowable skeleton for a Flowable development project:
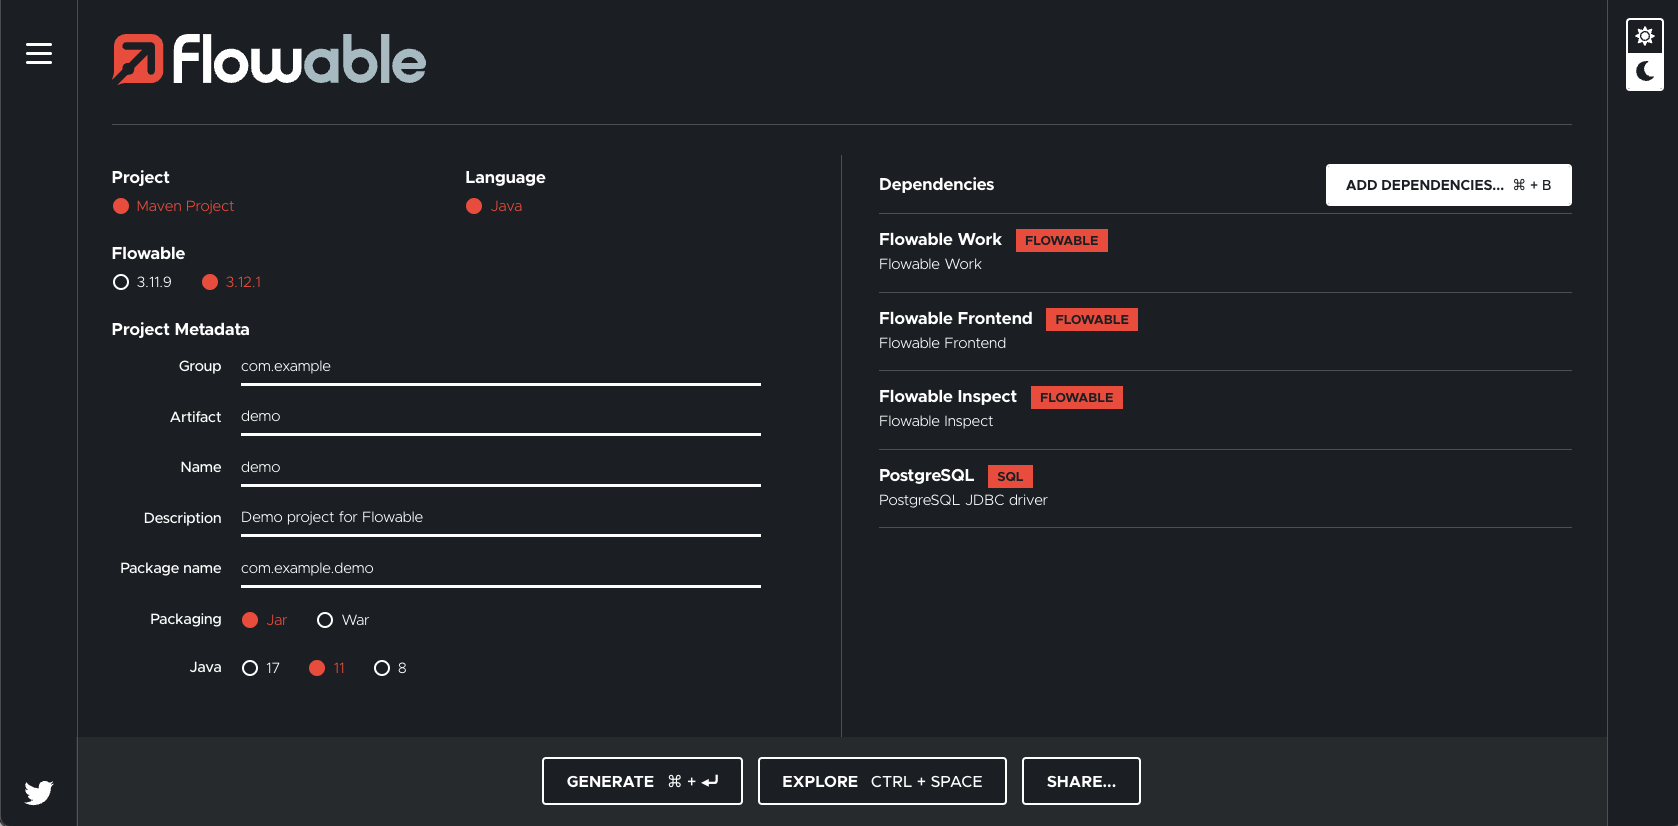
You can now import the project into the IDE of your choice (like IntelliJ IDEA or Eclipse).
Dependency Management
With the help of Maven dependency management you can delegate the specifying the correct versions of all the dependencies to a BOM (Bill of Materials). The BOM defines and provides all the specific version information for all direct and transient dependencies. You just need to define the to-be-used Flowable version one by to use the correct BOM.
Add the following section to the pom.xml file of the project you just created as a child tag of the <project> tag:
<dependencyManagement>
    <dependencies>
        <!-- Imports the bill-of-materials POM. -->
        <dependency>
            <groupId>com.flowable</groupId>
            <artifactId>flowable-platform-bom</artifactId>
            <version>${com.flowable.platform.version}</version>
            <type>pom</type>
            <scope>import</scope>
        </dependency>
    </dependencies>
</dependencyManagement>
Choose the Flowable version either by replacing the ${com.flowable.platform.version} part with a Flowable version
number or by defining an appropriate Maven parameter specifying version you require.
Flowable Dependencies
Flowable utilizes multiple Maven dependencies to access the required Flowable services.
Add the following dependencies as children of the existing <dependencies> tag
of the pom.xml file to set up Flowable Work:
<!-- Flowable -->
<!-- =============== -->
<dependency>
    <groupId>com.flowable.platform</groupId>
    <artifactId>flowable-spring-boot-starter-platform-rest</artifactId>
</dependency>
<dependency>
    <groupId>com.flowable.platform</groupId>
    <artifactId>flowable-tenant-setup</artifactId>
</dependency>
<dependency>
    <groupId>com.flowable.platform</groupId>
    <artifactId>flowable-platform-default-models</artifactId>
</dependency>
Flowable Inspect Dependencies
To add Flowable Inspect to your application, add the following dependency:
<dependency>
    <groupId>com.flowable.inspect</groupId>
    <artifactId>flowable-spring-boot-starter-inspect-rest</artifactId>
</dependency>
Note that you need an appropriate license to enable Flowable Inspect.
Flowable User Definitions
Flowable manages features and permissions of an application user by defining user definitions.
User definitions follow a "template" pattern for each different types of user using the system. Example include: administrators, superusers, operators, client advisers, clients, etc. They all have different feature sets available, different member groups, different permissions, etc.
To define the user definitions for your Flowable Work setup create a file like:
src/main/resources/com/flowable/users/custom/<users>-definitions.user.json
where <users> is a meaningful name for the set of user definitions.
Use the following content to define an admin user with full permissions to the Flowable:
[
  {
    "key": "admin",
    "name": "Flowable Administration User",
    "description": "Creates a new administration user.",
    "allowedFeatures": [
      "contacts",
      "createUser",
      "reports",
      "reportsMetrics",
      "actuators",
      "user-mgmt",
      "search-api",
      "templateManagement",
      "work",
      "tasks",
      "cases",
      "editAvatar"
    ]
  }
]
Embedded Front End
Flowable provides a dedicated JavaScript front end that can either be deployed to any HTML capable server or run embedded directly within the Flowable Server.
To run the front end embedded within the Flowable Server add the following dependency to the pom.xml file of the project:
<dependency>
    <groupId>com.flowable.work</groupId>
    <artifactId>flowable-work-frontend</artifactId>
</dependency>
In addition, you need to provide the correct Spring Boot Security configuration to allow access to the embedded front end.
This is done by adding a class e.g., called SecurityConfiguration as a sibling of the Spring Boot Application class containing the following configuration:
import org.springframework.beans.factory.ObjectProvider;
import org.springframework.context.annotation.Bean;
import org.springframework.context.annotation.Configuration;
import org.springframework.core.annotation.Order;
import org.springframework.http.HttpStatus;
import org.springframework.security.config.Customizer;
import org.springframework.security.config.annotation.web.builders.HttpSecurity;
import org.springframework.security.config.annotation.web.configuration.EnableWebSecurity;
import org.springframework.security.web.SecurityFilterChain;
import org.springframework.security.web.authentication.HttpStatusEntryPoint;
import org.springframework.security.web.util.matcher.AnyRequestMatcher;

import com.flowable.autoconfigure.security.FlowableHttpSecurityCustomizer;
import com.flowable.autoconfigure.security.servlet.PlatformPathRequest;
import com.flowable.core.spring.security.web.authentication.AjaxAuthenticationFailureHandler;
import com.flowable.core.spring.security.web.authentication.AjaxAuthenticationSuccessHandler;
import com.flowable.platform.common.security.SecurityConstants;

@Configuration(proxyBeanMethods = false)
@EnableWebSecurity
public class SecurityConfiguration {

    @Bean
    @Order(10)
    public SecurityFilterChain basicDefaultSecurity(HttpSecurity http, ObjectProvider<FlowableHttpSecurityCustomizer> httpSecurityCustomizers) throws Exception {

        for (FlowableHttpSecurityCustomizer customizer : httpSecurityCustomizers.orderedStream().toList()) {
            customizer.customize(http);
        }

        http
            .logout(logout -> logout.logoutUrl("/auth/logout").logoutSuccessUrl("/"))
            // Non authenticated exception handling. The formLogin and httpBasic configure the exceptionHandling
            // We have to initialize the exception handling with a default authentication entry point in order to return 401 each time and not have a
            // forward due to the formLogin or the http basic popup due to the httpBasic
            .exceptionHandling(exceptionHandling -> exceptionHandling.defaultAuthenticationEntryPointFor(new HttpStatusEntryPoint(HttpStatus.UNAUTHORIZED),
                    AnyRequestMatcher.INSTANCE))
            .formLogin(formLogin -> formLogin
                    .loginProcessingUrl("/auth/login")
                    .successHandler(new AjaxAuthenticationSuccessHandler())
                    .failureHandler(new AjaxAuthenticationFailureHandler()))
            .authorizeHttpRequests(configurer -> configurer
                    .requestMatchers(PlatformPathRequest.toStaticResources().atCommonLocations()).permitAll()
                    .anyRequest().authenticated()
            )
            .httpBasic(Customizer.withDefaults());

        return http.build();
    }

}
Tenant File
Flowable provides an internal identity management (IDM) component that can manage tenants, users and groups. The internal IDM component is populated with tenants, users and groups defined in a tenant file. This file is read and loaded at initial system startup.
To use the internal IDM add the following dependency to the pom.xml file of the project:
<dependency>
    <groupId>com.flowable.platform</groupId>
    <artifactId>flowable-tenant-setup</artifactId>
</dependency>
To populate the internal IDM at database initialization create a file of the form:
src/main/resources/com/flowable/tenant-setup/custom/<tenants>.json
where <tenants> is a meaningful name for the set of tenant definitions.
For example, the tenant json file for the 'demo' tenant is named demo.json. A tenantKey is defined in the file that is unique to this
group of users for this tenant. The file is similar to:
{
  "name": "Flowable Demo",
  "tenantKey": "demo",
  "groups": [
    {
      {"key": "flowableAdministrator", "name": "Flowable Administrator"},
      {"key": "flowableUser", "name": "Flowable User"},
  ],
  "users": [
    {
      "firstName": "Flowable",
      "lastName": "Admin",
      "login": "admin",
      "email": "admin@demo.flowable.io",
      "language": "en",
      "theme": "flowable",
      "userDefinitionKey": "admin"
    }
  ]
}
Note: A tenant setup file without tenantKey has all the users and groups created in the default tenant.
Infrastructure and Initial Startup
You now have a minimal setup with which to run the application. But first you have to setup the appropriate infrastructure to get Flowable running. Please review Step-by-Step Installation for a description on how to set up the proper infrastructure for Flowable.
For the current development setup at least one instance of Elasticsearch is needed.
A docker image can be helpful to get the environment up and running quickly.
The following docker-compose.yml file provides an Elasticsearch instance running locally on port 9200 and
an ActiveMQ running on ports 61616 (JMS) and 616163 (STOMP).
version: "3.4"

elasticsearch01:
  image: docker.elastic.co/elasticsearch/elasticsearch-oss:7.10.0
  ports:
    - 9200:9200
    - 9300:9300
  ulimits:
    memlock:
      soft: -1
      hard: -1

activemq01:
  image: rmohr/activemq
  ports:
    - 8161:8161
    - 61616:61616
    - 61613:61613
After you started Elasticsearch/ActiveMQ and the Spring Boot project from your IDE an Elasticsearch instance running locally on port 9200.
version: "3.4"

elasticsearch01:
  image: docker.elastic.co/elasticsearch/elasticsearch-oss:7.10.0
  ports:
    - 9200:9200
    - 9300:9300
  ulimits:
    memlock:
      soft: -1
      hard: -1
After you started Elasticsearch and the Spring Boot project from your IDE, Flowable is available at http://localhost:8080.
You can login with the administrator user you created in the tenant file.
-
Username:
admin -
Password:
test
Running Behind a Proxy
When running behind a proxy or a load balancer Flowable uses the X-Forwarded headers in order to provide better linking support
and to create secure cookies.
Therefore, when running behind a proxy or load balancer it is important that the proxy is
properly setting the different X-Forwarded headers. The crucial headers are:
-
X-Forwarded-For- This helps identity the IP address of the original request. -
X-Forwarded-Proto- This helps identify the protocol of the original request. -
X-Forwarded-Port- This helps identify the destination port of the original request.
Apart from configuring the proxy or load balancer the application needs to be configured as well.
Embedded Mode
When running the application in an embedded mode (as a Spring Boot application with
java -jar) the property server.forward-headers-strategy needs to be set to native.
This property ensures that the X-Forwarded-* headers are applied to the HttpRequest.
Running Within Tomcat
When running the application as a WAR within Tomcat you need to configure the Remote IP Valve.
Flowable Design
This section describes how Flowable Design can be installed and configured to be able to create models and deploy them as Apps to Flowable.
-
Download Tomcat 8.5.x (latest version of the 8.5.x line) from: https://tomcat.apache.org/download-80.cgi or Tomcat 9.x from https://tomcat.apache.org/download-90.cgi. Once you downloaded the package you should unpack it. Do not run the Tomcat yet, first follow the steps for the installing the Flowable Design WAR.
-
Download the Flowable Design WAR file from the Flowable Maven Repository (appropriate access credentials are needed): Flowable Design.
-
Rename the
.warfile toflowable-design.warand copy it into the Tomcat’swebappsfolder. -
Flowable requires that you have a valid license for the Product. The license is either stored on the file system or in the database. If the license is provided as a file then it is typically located in the
.flowablefolder of your home directory. On Unix or macOS the file is~/.flowable/flowable.license. The location of the license file can be changed in theapplication.propertiesfile (see below).flowable.design.license-location=file:/myCustomLocation/flowable.licenseTo store the license in the database then the following property must be set in the
applications.propertiesfile:flowable.design.db-store-enabled=trueWith the license database store mode enabled a license is uploaded using the Flowable Design application.
-
Add a file named
application.propertiesin the Tomcat’slibfolder. The file is used later to configure Flowable Design. -
To be able to deploy/undeploy Apps directly into an instance of Flowable add the following properties to the
application.propertiesfile you just created. Remember to adapt the values (e.g., server, port, context, etc.) to your specific installation values:flowable.design.deployment-api-url=http://localhost:8080/flowable-work/app-apiflowable.design.undeployment-api-url=http://localhost:8080/flowable-work/platform-api/app-deploymentsflowable.design.remote.authentication.user=adminflowable.design.remote.authentication.password=test -
To be able to select users / groups in the Design Assignment section add the following to the
application.properties. Remember to adapt the values (e.g., server, port, context, etc.) to your specific values.flowable.common.app.idm-url=http://localhost:8080/flowable-work -
If you are manually creating the Database tables for Design, and you don't want Flowable to validate you can add the following to the
application.propertiesflowable.design.database-schema-update=ignore -
You can now start the Tomcat by running
bin/catalina.sh(bin\catalina.baton Windows). Alternatively you can runbin/catalina.sh runto have it run in the foreground. -
You can now access Flowable Design by going to: http://localhost:8080/flowable-design.
-
You can login with the user
adminand passwordtest.
Flowable Control
This section describes how Flowable Control can be installed and configured to be able to monitor instances of Flowable.
-
Download Tomcat 8.5.x (latest version of the 8.5.x line) from: https://tomcat.apache.org/download-80.cgi or Tomcat 9.x from https://tomcat.apache.org/download-90.cgi. Once you downloaded the package you should unpack it. Do not run the Tomcat yet, first follow the steps for the installing the Flowable Control WAR.
-
Download the Flowable Control WAR file from the Flowable Maven Repository (appropriate access credentials are required): Flowable Control.
-
Rename the
.warfile intoflowable-control.warand copy it into the Tomcat’swebappsfolder. -
Flowable Control requires that you have a valid license for the product. The license is either stored on the file system or in the database. If the license is provided as a file then it is typically located in the
.flowablefolder of your home directory. On Unix or macOS the file is~/.flowable/flowable.license. The location of the license file can be changed in theapplication.propertiesfile (see below).flowable.control.app.license-location=file:/myCustomLocation/flowable.licenseTo store the license in the database then the following property must be set in the
applications.propertiesfile:flowable.control.app.db-store-enabled=trueWith the license database store mode enabled a license is uploaded using the Flowable Control application.
-
Add a file named
application.propertiesin the Tomcat’slibfolder. The file is used to configure Flowable Control and other applications. -
To manage apps from an instance of Flowable add the following properties to the
application.propertiesfile just created. The properties defined below are used to create the initial data values and are typically used during initial system startup. After that the values are stored internally and these properties are not used.flowable.control.app.cluster-config.name=Default Clusterflowable.control.app.cluster-config.description=Default Flowable Clusterflowable.control.app.cluster-config.server-address=http://localhostflowable.control.app.cluster-config.port=8090flowable.control.app.cluster-config.context-root=flowable-workflowable.control.app.cluster-config.user-name=adminflowable.control.app.cluster-config.password=test
Remember to adapt the values (e.g., server, port, context, etc.) to your specific installation values.
-
If you are manually creating the Database tables for Control, and you don't want Flowable to validate you can add the following to the
application.propertiesflowable.control.app.database-schema-update=ignore -
You can now start the Tomcat by running
bin/catalina.sh(bin\catalina.baton Windows). Alternatively you can runbin/catalina.sh runto have it run in the foreground. -
You should now be able to access Flowable Control by going to: http://localhost:8080/flowable-control.
-
You can login with the user
adminand passwordtest.
Flowable Actuators
Spring Boot Actuators
As a Spring Boot 2 application Flowable supports Spring Boot Actuators which provide production ready features such as health and metrics endpoints.
To have Spring Boot base support for actuate you need to add the Spring Boot actuator dependency (if not already added by choosing it in the Spring Initializer):
<dependency>
    <groupId>org.springframework.boot</groupId>
    <artifactId>spring-boot-starter-actuator</artifactId>
</dependency>
Additional configuration properties in the application.properties file are needed to be able to access the actuator endpoints:
# Enable actuator endpoints over HTTP
management.endpoints.web.exposure.include=*
management.endpoint.health.show-details=ALWAYS
Actuator endpoints are queried by opening the following URLs in the browser:
For a full list of endpoints please check the
Spring Boot Actuator
documentation. Also remember to adjust the host and port as needed for your site.
Flowable Actuator Extensions
Flowable provides additional extensions to the default Spring Boot Actuators by adding the following dependency:
<dependency>
    <groupId>com.flowable.platform</groupId>
    <artifactId>flowable-platform-actuate-autoconfigure</artifactId>
</dependency>
Adding this dependency adds a health endpoint at:
which provides information about the health of the connected Elasticsearch cluster.
Securing the Actuator Endpoints
To secure the endpoints provided by the actuators some additional Spring Security configuration code is needed. This is accomplished by adding file
named SecurityActuatorConfiguration.java to your Spring Boot project. The Java file contains the following code:
import org.springframework.boot.actuate.autoconfigure.security.servlet.EndpointRequest;
import org.springframework.boot.actuate.health.HealthEndpoint;
import org.springframework.boot.actuate.info.InfoEndpoint;
import org.springframework.context.annotation.Bean;
import org.springframework.context.annotation.Configuration;
import org.springframework.core.annotation.Order;
import org.springframework.security.config.Customizer;
import org.springframework.security.config.annotation.web.builders.HttpSecurity;
import org.springframework.security.config.annotation.web.configurers.AbstractHttpConfigurer;
import org.springframework.security.config.http.SessionCreationPolicy;
import org.springframework.security.web.SecurityFilterChain;

import com.flowable.actuate.autoconfigure.security.servlet.ActuatorRequestMatcher;
import com.flowable.platform.common.security.SecurityConstants;

@Configuration
public class SecurityActuatorConfiguration {

    @Bean
    @Order(6) // Actuator configuration should kick in before the Form Login there should always be HTTP basic for the endpoints
    public SecurityFilterChain basicActuatorSecurity(HttpSecurity http) throws Exception {

        http
            .sessionManagement(sessionManagement -> sessionManagement.sessionCreationPolicy(SessionCreationPolicy.STATELESS))
            .csrf(AbstractHttpConfigurer::disable);

        http
            .securityMatcher(new ActuatorRequestMatcher())
            .authorizeHttpRequests(configurer -> configurer
                    .requestMatchers(EndpointRequest.to(InfoEndpoint.class, HealthEndpoint.class)).permitAll()
                    .requestMatchers(EndpointRequest.toAnyEndpoint()).hasAuthority(SecurityConstants.ACCESS_ACTUATORS)
                    .anyRequest().denyAll())
            .httpBasic(Customizer.withDefaults());

        return http.build();
    }
}
This enables unauthorized access to the health and info endpoints and activates basic authentication for the other actuator endpoints.