Clustering
In case Flowable is used in a high-availability scenario typically the Flowable Server receiving the request will handle it. This means that the execution of a case/process instance will be handled by this server until it is persisted to the database.
Assuming there are related asynchronous jobs to the request, the server will first try to schedule the job on the same server before it will hand it over to other nodes. In case a hand-over is happening, it will persist the job to the database. The executable jobs will be polled by other running Flowable Servers. Eventually one server will acquire the lock for the job and will execute it.
This means that there is no cluster synchronization for Flowable required. By using the same data storage (e.g. database) together with multiple Flowable Servers it will automatically work in a cluster mode together.
Clustering Prerequisites
This section builds on the installation process for a single node section and describes how to add additional components and configuration to set up a clustered Flowable application.
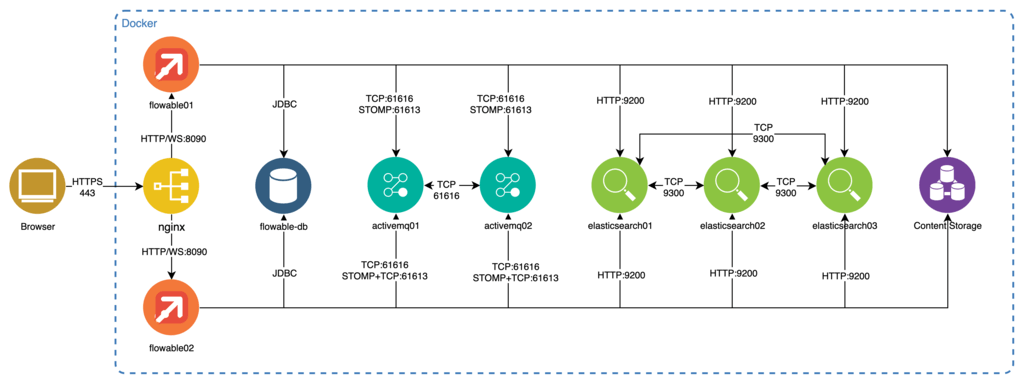
The required steps are parts:
-
Download, install, and configure a NGINX load balancer.
-
Flowable Server clustering.
-
Database requirements and recommendations for clustering.
-
Install and configure multiple Elasticsearch nodes.
-
Install and configure a high available content storage.
Load Balancer
For proper clustering of the Flowable Server requests coming from a browser a load balancer is needed. The load balancer has to support either WebSockets or sticky sessions (if long polling is used or OpenID Connect). In this example we setup NGINX.
-
Download NGINX from the NGINX Website at http://nginx.org/en/download.html (only for Windows, use either Homebrew for macOS, the packaging manager of your Linux distribution or even a Docker image).
-
Add the following configuration to the
nginx.conffile lying in theconfdirectory of NGINX:
http {
    upstream backend {
        # nginx can use the client's source ip for load balancing
        ip_hash;
        server flowable01:8090; #hostname/IPs of the Flowable Server nodes
        server flowable02:8090;
    }

    server {
        listen 80;
        location / {
            proxy_pass http://backend;
            proxy_set_header Host $host;
            proxy_set_header X-Real-IP $remote_addr;
            proxy_set_header X-Forwarded-For $proxy_add_x_forwarded_for;
            proxy_set_header X-Forwarded-Proto $scheme;

            # enables WS support
            proxy_http_version 1.1;
            proxy_set_header Upgrade $http_upgrade;
            proxy_set_header Connection "upgrade";
        }
    }
}
Flowable Server Clustering
The Flowable Server itself is a stateless application and therefore does not need any additional synchronization mechanisms between its nodes (such as cache synchronizing) except for the database.
Simultaneous auto deployments
When the Flowable Server boots up it can perform automatic deployment of resources configured on the classpath. By default, every node does this independently from the other nodes.
In some cases it might be needed to make sure that only one node is deploying, which can be achieved by enabling the deployment lock. When enabled, this effectively makes sure that during bootup only one node is executing the deployment. Every node will try to acquire the lock before deploying or wait until another node is finished and releases the lock.
Following properties can be set to enabled and configure the deployment locking:
# Whether to use a lock when performing the auto deployment.
flowable.auto-deployment.use-lock=true
# Duration to wait for the auto deployment lock before giving up.
flowable.auto-deployment.lock-wait-time=PT5M
# Whether to throw an exception if there was some kind of failure during the auto deployment.
flowable.auto-deployment.throw-exception-on-deployment-failure=true
# Name of the lock that should be used for the auto deployment.
flowable.auto-deployment.lock-name=flowableAutoDeploymentLock
The previous properties are configuring the global auto deployment, for all engines. It is also possible to configure this per engine (if a value is not set then the global one is used) using the following properties:
flowable.auto-deployment.engine.<engineType>.use-lock=
flowable.auto-deployment.engine.<engineType>.lock-wait-time=
flowable.auto-deployment.engine.<engineType>.throw-exception-on-deployment-failure=
flowable.auto-deployment.engine.<engineType>.lock-name=
In the above properties <engineType> should be replaced with one of the available engines:
-
action- for the Action Engine -
app- for the App Engine -
bpmn- for the Process Engine -
cmmn- for the CMMN Engine -
content- for the Content Engine -
dataobject- for the Data Object Engine -
dmn- for the DMN Engine -
engage- for the Engage Engine -
form- for the Form Engine -
idm- for the IDM Engine -
policy- for the Policy Engine -
template- for the Template Engine -
service-registry- for the Service Registry Engine
Simultaneous index mapping creation
When the Flowable Server boots up it checks and creates the required Index Mappings. In case every node should perform locking before creating the indexing then the following properties can be set:
# Whether to use a lock when performing the index mappings create or update operations.
flowable.indexing.use-lock-for-index-mapping-creation=true
# Duration to wait for the Index mappings lock before giving up.
flowable.indexing.mapping-schema-lock-wait-time=PT5M
Simultaneous database schema updates
When the Flowable Server boots up it can perform database schema create or update operations. In case every node should perform locking before creating or updating the database schema then the following properties can be set:
# Whether to use a lock when performing the database schema create or update operations.
flowable.use-lock-for-database-schema-update=true
# Duration between the checks when acquiring a lock.
flowable.lock-poll-rate=PT10S
# Duration to wait for the DB Schema lock before giving up.
flowable.schema-lock-wait-time=PT5M
Database Clustering
The Database acts as a synchronization anchor for the Flowable Server as it contains all the information about background job execution or case and process states.
Any clustering of the database has to be transparent to the Flowable Server. This means that Flowable Work expects to find and access the database as if there is only one single database connection.
For information about how to achieve this with your database please consult the appropriate database clustering documentation of the vendor.
Elasticsearch Clustering
A cluster of multiple Elasticsearch (ES) nodes can be configured by adapting
the elasticsearch.yml file contained in the config directory of Elasticsearch.
Adapt and add the following configuration options to the file:
cluster.name: flowable-cluster # name of the flowable cluster
node.name: node2 # name of the specific node within the cluster
node.master: true
node.data: true
discovery.zen.ping.unicast.hosts: node1 #list of hostnames/IPs of other nodes in the cluster
Please be aware that at least a cluster of three nodes is recommended for a productive setup.
Please also check the Elasticsearch cluster manual for further information.
In addition, modify the Flowable Server properties to add the Elasticsearch nodes for failover purposes:
spring.elasticsearch.uris=http://node1:9200,http://node2:9200
Content Storage
Files uploaded to Flowable are stored in a content storage. Flowable expects in a multi-node setup that those files are accessible from all nodes.
By default, the content storage is on the file system, which would require a shared filesystem between the different nodes. Alternative approaches which do not require a shared file system are discussed in the Content Object Storage customization chapter of the documentation (e.g. S3).
HTTPS for the Flowable Front End
The choices for setting up encrypted HTTPS communication between the Browser and the Flowable components is determined by which components terminate the SSL connection.
If the connection between the load balancer and the Flowable Server can be considered safe, the load balancer can do the termination. If not, the termination needs to occur at the servlet container running the Flowable Server.
This section demonstrates how to do termination at a load balancer.
To set up an encrypted channel from the browser to the load balancer, the load balancer has to provide a valid certificate. Certificates are either self-signed (for use only in development and test environments) or signed by a recognized certificate authority (CA).
To create a self-signed certificate on a Linux like system execute the following command:
sudo openssl req -x509 -nodes -days 365 -newkey rsa:2048 -keyout /path/to/created/selfsigned.key -out /path/to/created/selfsigned.crt
You typically need to provide information like country and email address but they can be empty for a self-signed certificate.
Now add the certificates to the NGINX config file nginx.conf
present in the conf directory. The configuration content is similar to:
http {
    upstream backend {
        # nginx can use the client's source ip for load balancing
        ip_hash;
        server flowable01:8090;
        server flowable02:8090;
    }

    server {
        listen 80;
        server_name _;
        return 301 https://$host$request_uri;
    }

    server {
        listen 443 ssl;
        ssl_certificate /path/to/created/selfsigned.crt;
        ssl_certificate_key /path/to/created/selfsigned.key;
        ssl_ciphers         EECDH+AESGCM:EDH+AESGCM:AES256+EECDH:AES256+EDH;
        ssl_protocols       TLSv1.1 TLSv1.2;

        location / {
            proxy_pass http://backend;
            proxy_set_header Host $host;
            proxy_set_header X-Real-IP $remote_addr;
            proxy_set_header X-Forwarded-For $proxy_add_x_forwarded_for;
            proxy_set_header X-Forwarded-Proto $scheme;

            # enables WS support
            proxy_http_version 1.1;
            proxy_set_header Upgrade $http_upgrade;
            proxy_set_header Connection "upgrade";
        }
    }
}
This configuration also enables the forwarding of HTTP requests to HTTPS.
You can test the configuration by opening the Flowable Front End in a browser. The browser shows a warning because self-signed certificates are not trusted by the browser. You need to ignore the warning to access the front end.