Managing Customers with Data Objects
Data object models are supported in Flowable Work.
Data objects and everything that's related are not an easy topic. As such, this documentation is written using an example that introduces and describes the various models, BPMN/CMMN tasks with corresponding configurable properties and the runtime behavior. Using the example, the goal is to have a better understanding how things fit together which is hopefully more useful than documenting the different parts in isolation.
In the example that follows next, most of the sections are agnostic of whether the data object is backed by a database table or a REST API. The parts that are specific to database or REST, are marked as such. If you're reading through the example and want to focus on only one implementation, you can skip the sections marked with the other implementation.
Download the Example
The example as described below can be downloaded and imported into Flowable Design:
- Example using a database table.
- Example using a REST API.
- When following the REST example, it can be useful to run the mock REST application.
Introduction
In this tutorial, we’ll look at creating data objects of which the data is either fully managed by Flowable or the data exists somewhere else and it can be accessed via a REST API. We'll call these database-backed or REST-backed data objects from this point on.
In the database option, Flowable will use a relational database table to store the data and generate the required SQL automatically behind the scenes. This is a great choice when you want to use the benefits of data objects and the data doesn't exist yet in an external system.
In the REST option, Flowable will not store any data itself except a reference to the external service. Whenever the data is needed or changed, a REST call that is configured through a related service model is executed.
The only difference between the two is when it comes to the service model. All the other steps are exactly the same for both approaches. The sections that are specific for the database and REST implementation are clearly marked in the title. If you're interested in one flavour of implementation only, you can skip the other.
The steps we’ll go through are
-
Create the app and data object model
-
Create the service model based on the data object model (database or REST)
-
Create a Liquibase changelog for the data object model (database only)
-
Create an example case model and form models
-
Publish the app and create the database table in Flowable Control
-
Run the case instances showing the usage of the data objects in Flowable Work
App and Data Object Model
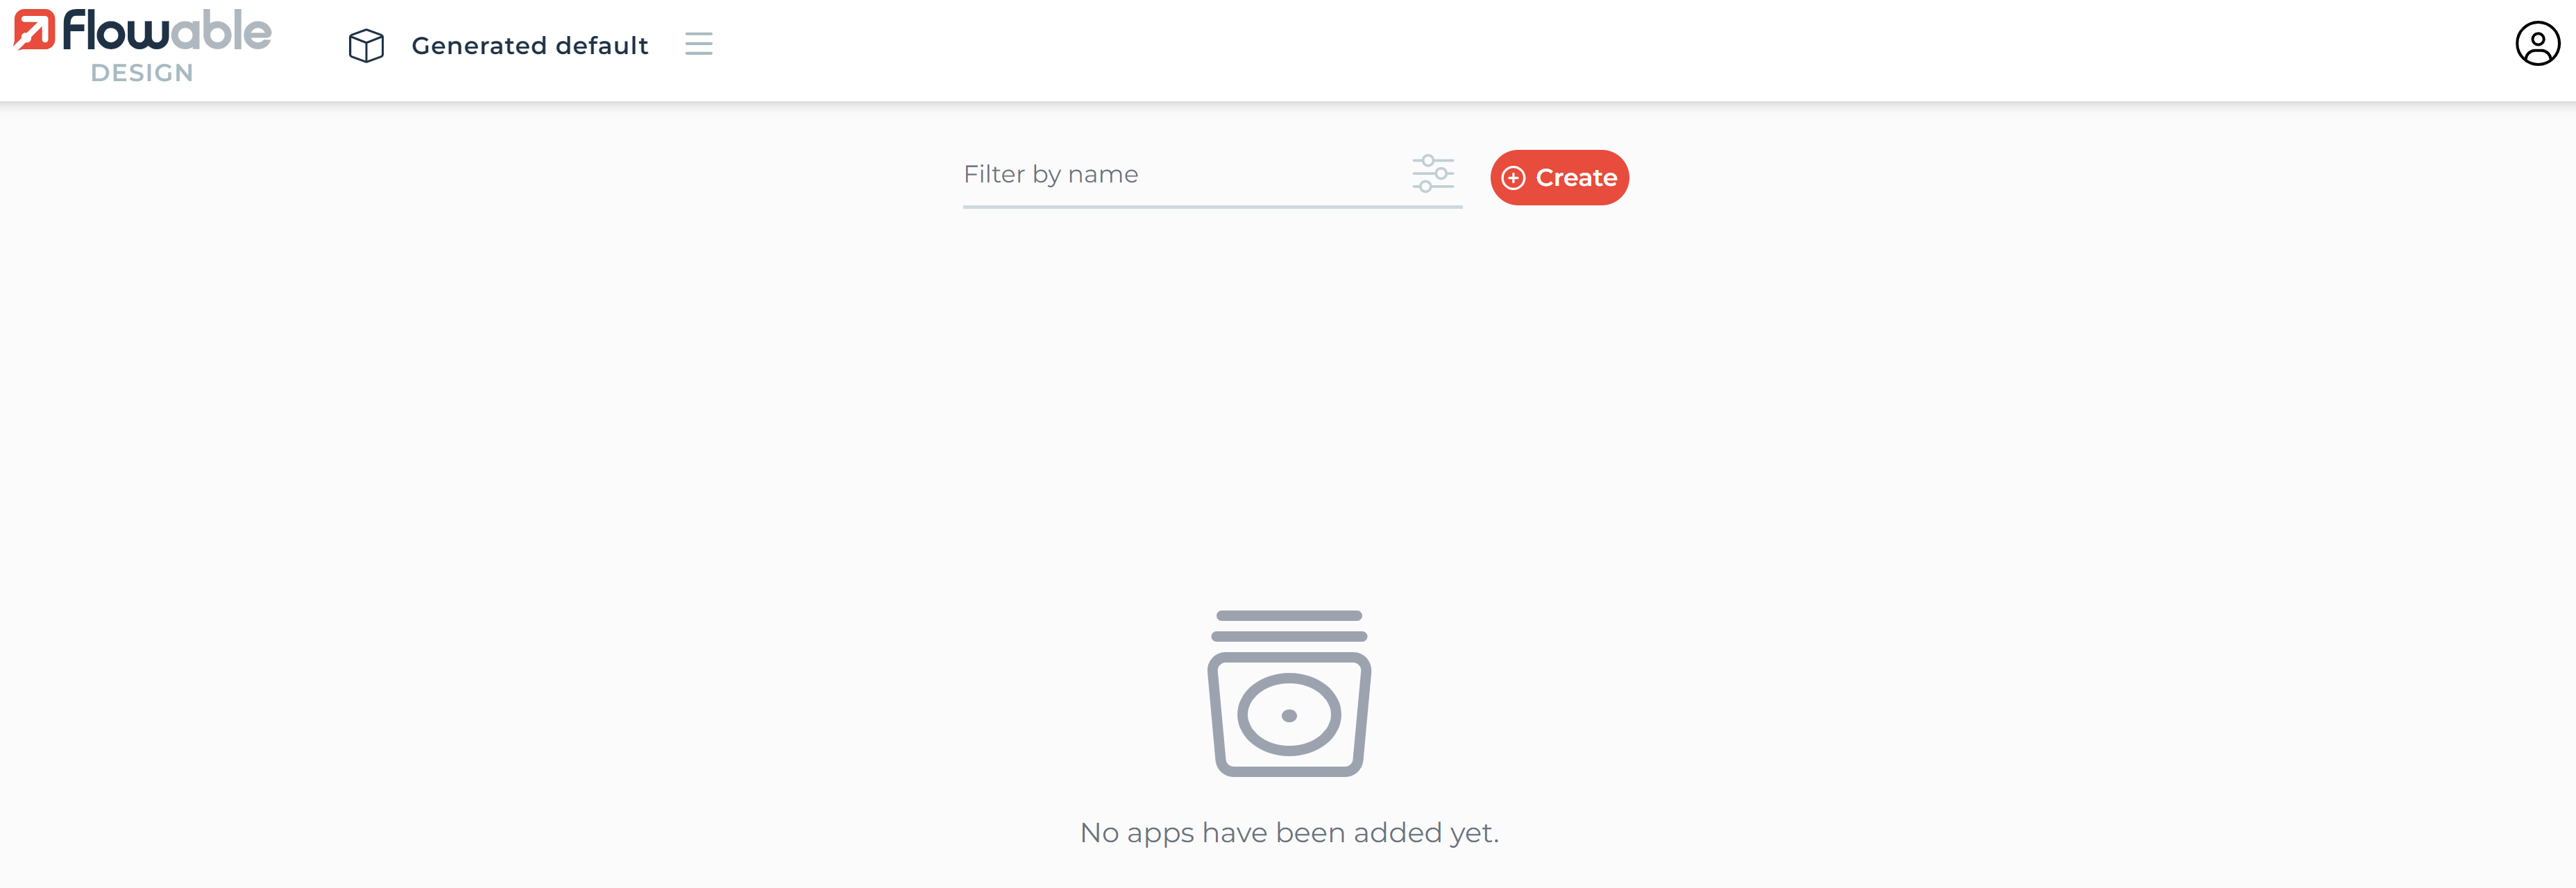
In Flowable Design, select the workspace you will be working in, then click on the Create a new app button:
Fill in a name and key in the subsequent popup and click on the Create button:

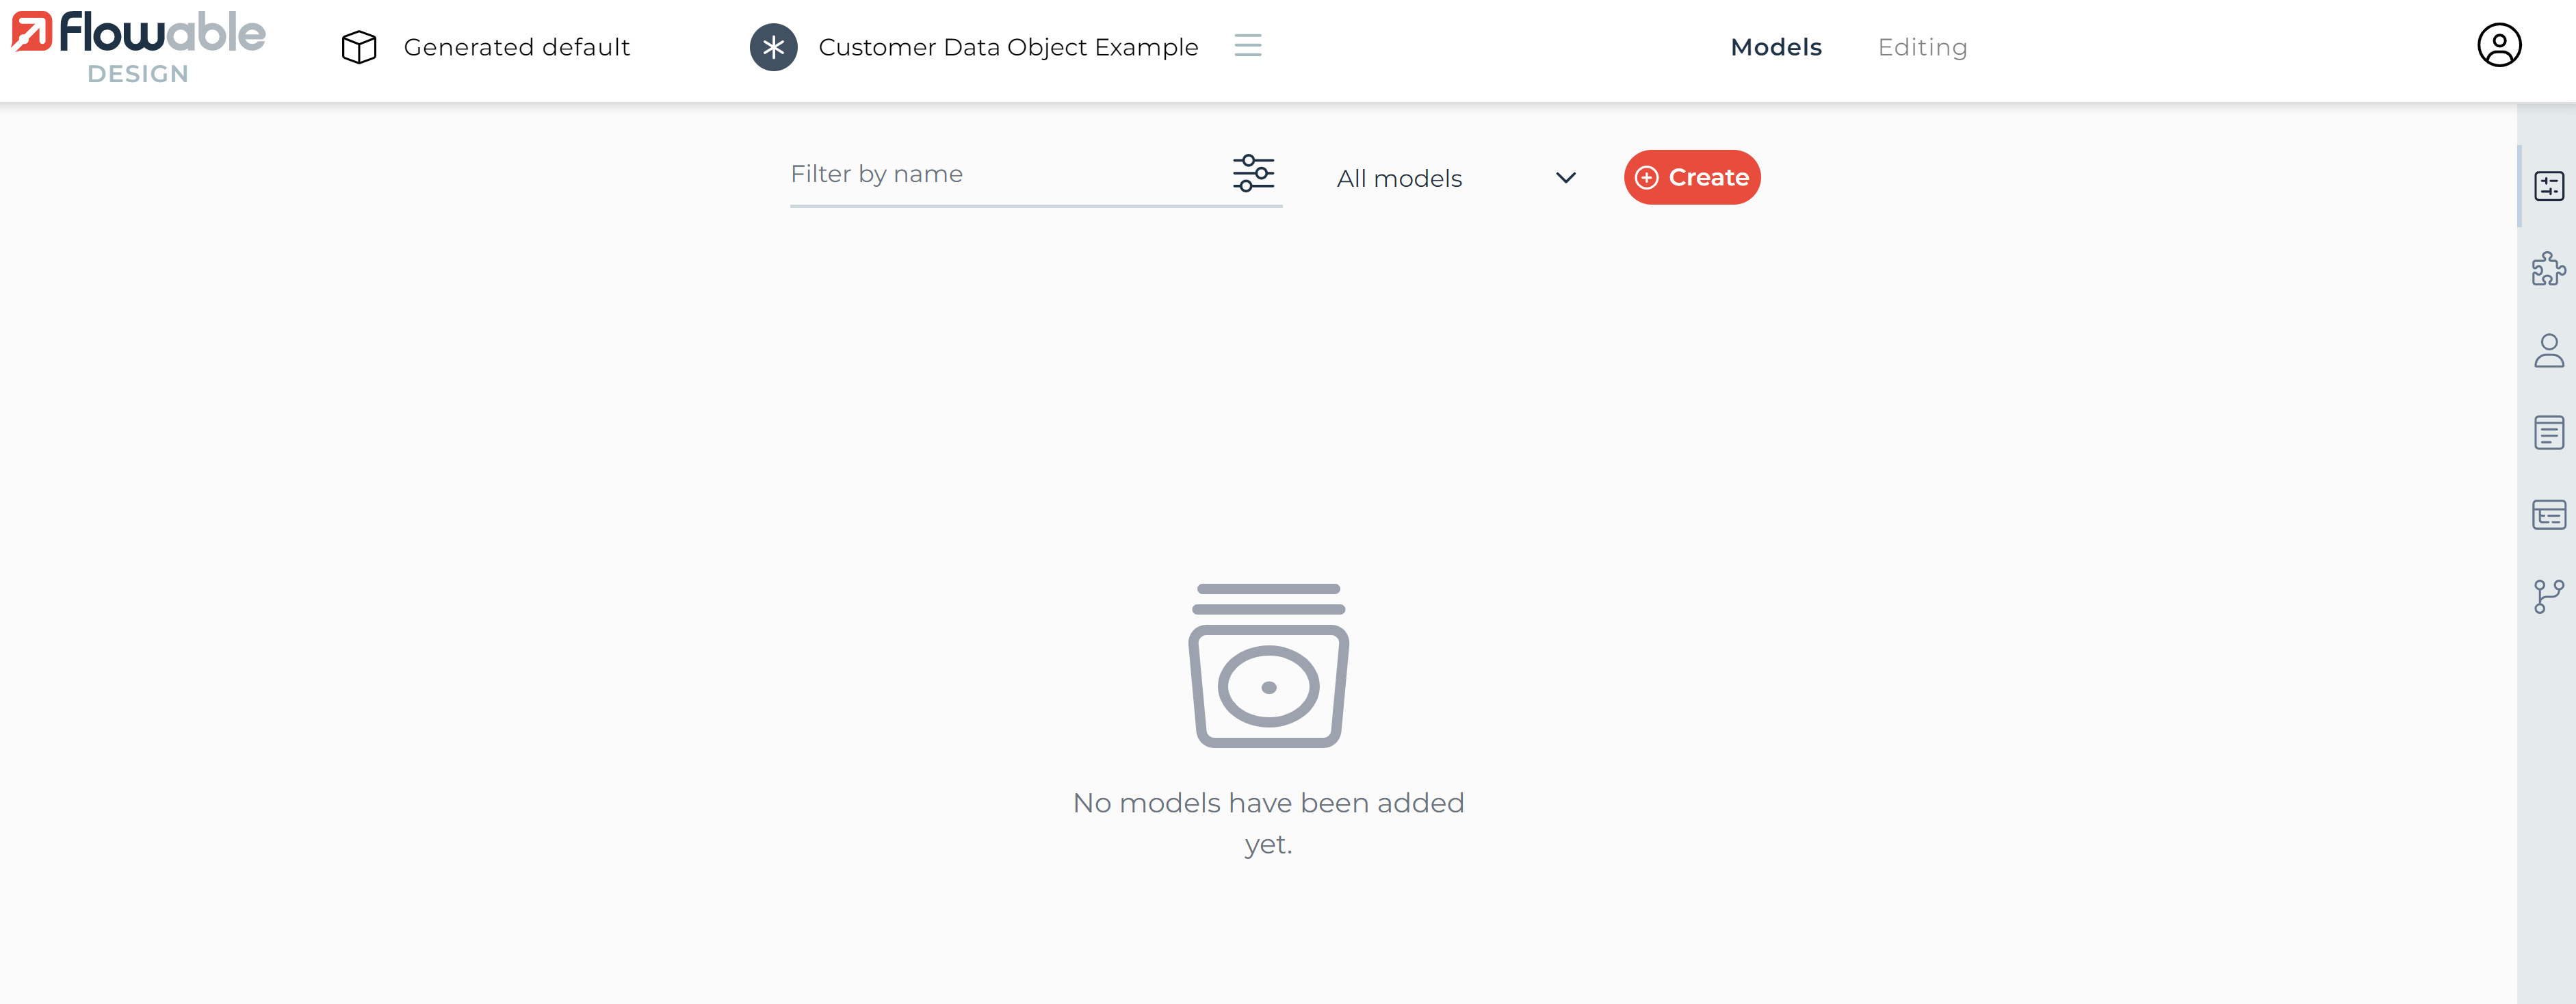
An empty app model is now created and the Flowable Design UI switches to the app model edit view. Now click the Create button:
Once clicked, the Open or create new model modal is shown. Give the data object model a name, set the key, and optionally
add a meaningful description for it. Once all the information is entered then click on the Create button. This will
automatically link the data object model with our app.

Once created, the Data Object Model editor opens, and we can start defining it.
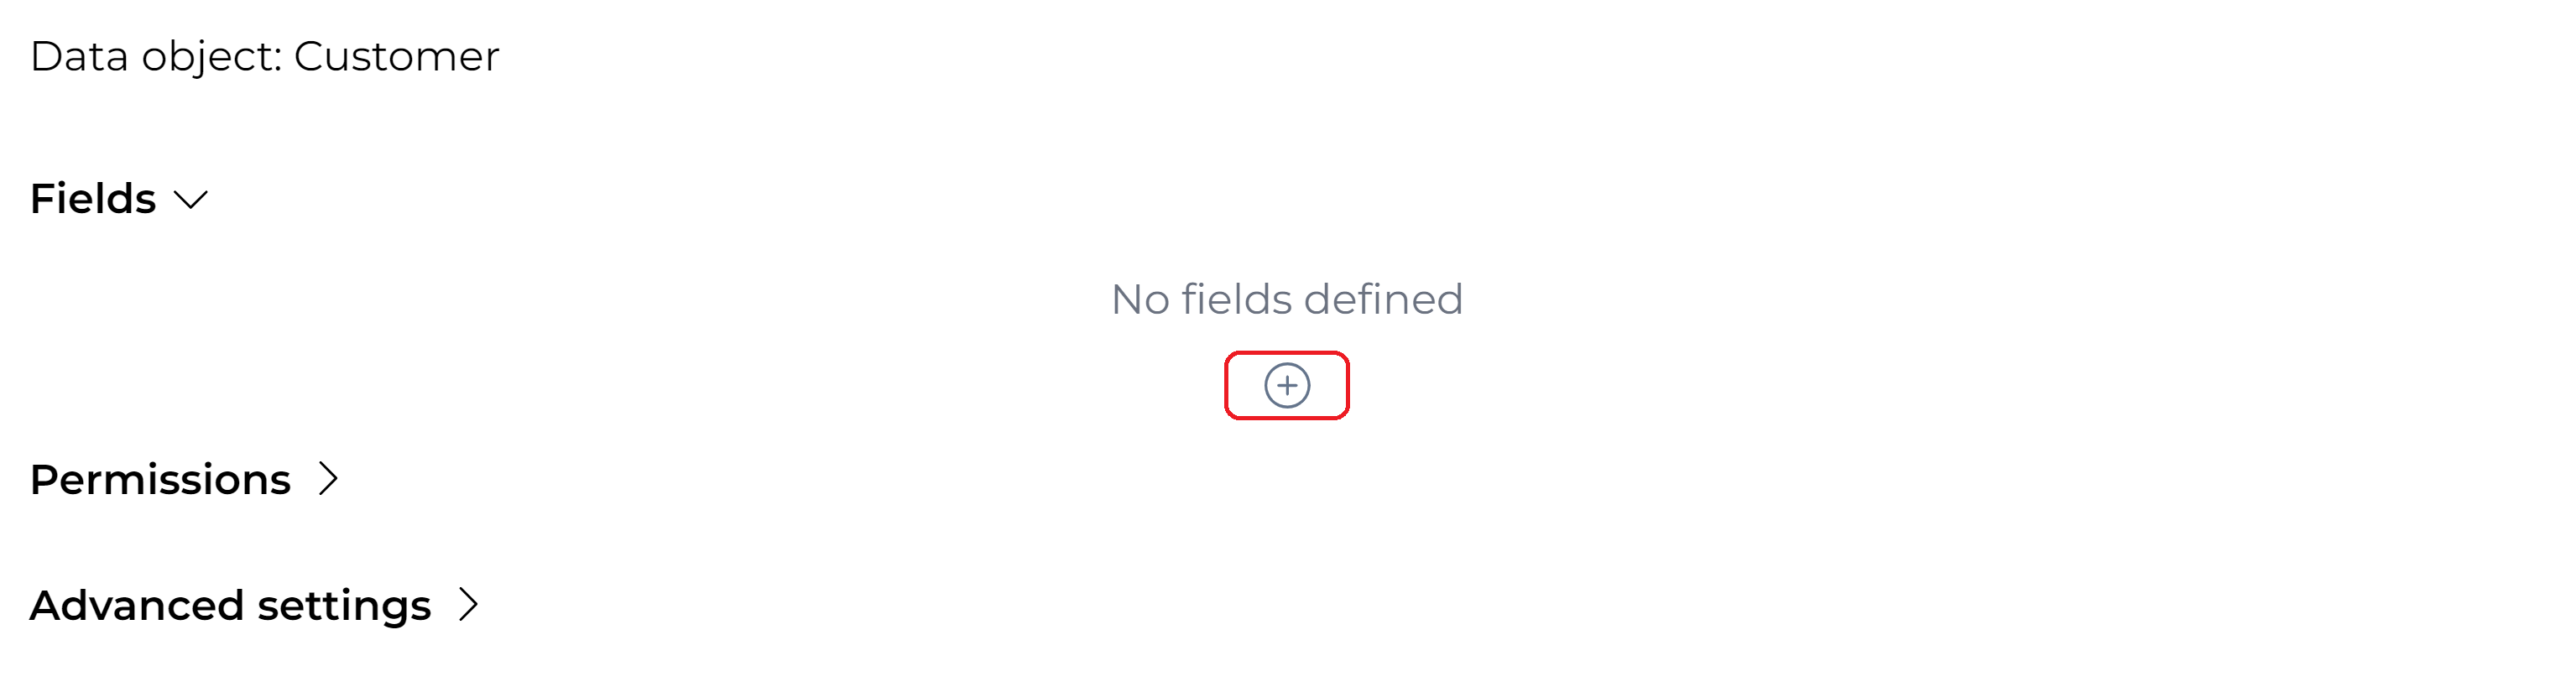
Defining the Data Object Fields
A data object consists of one or more fields. New fields can be added by clicking the Add button.
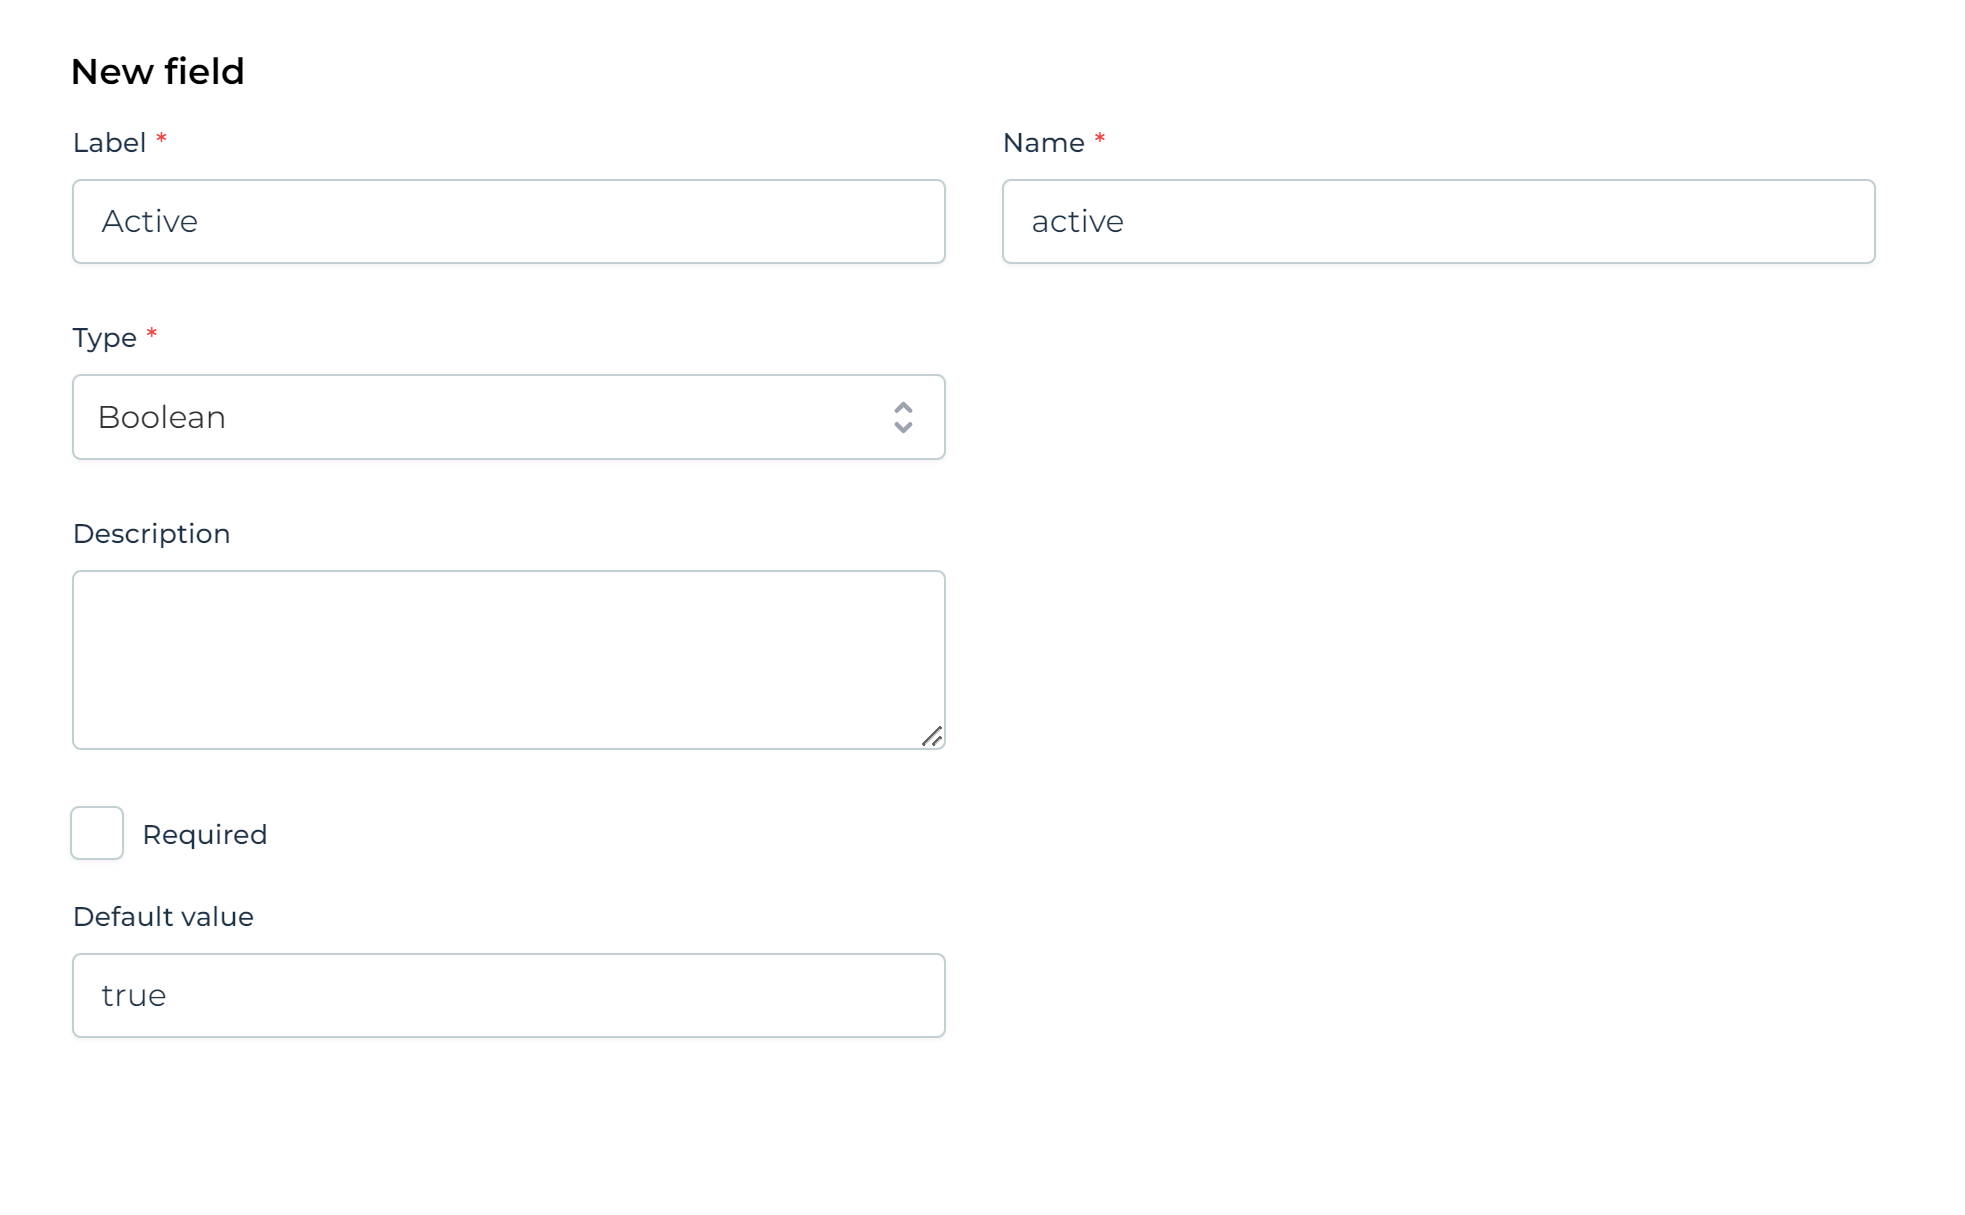
The following form is shown:
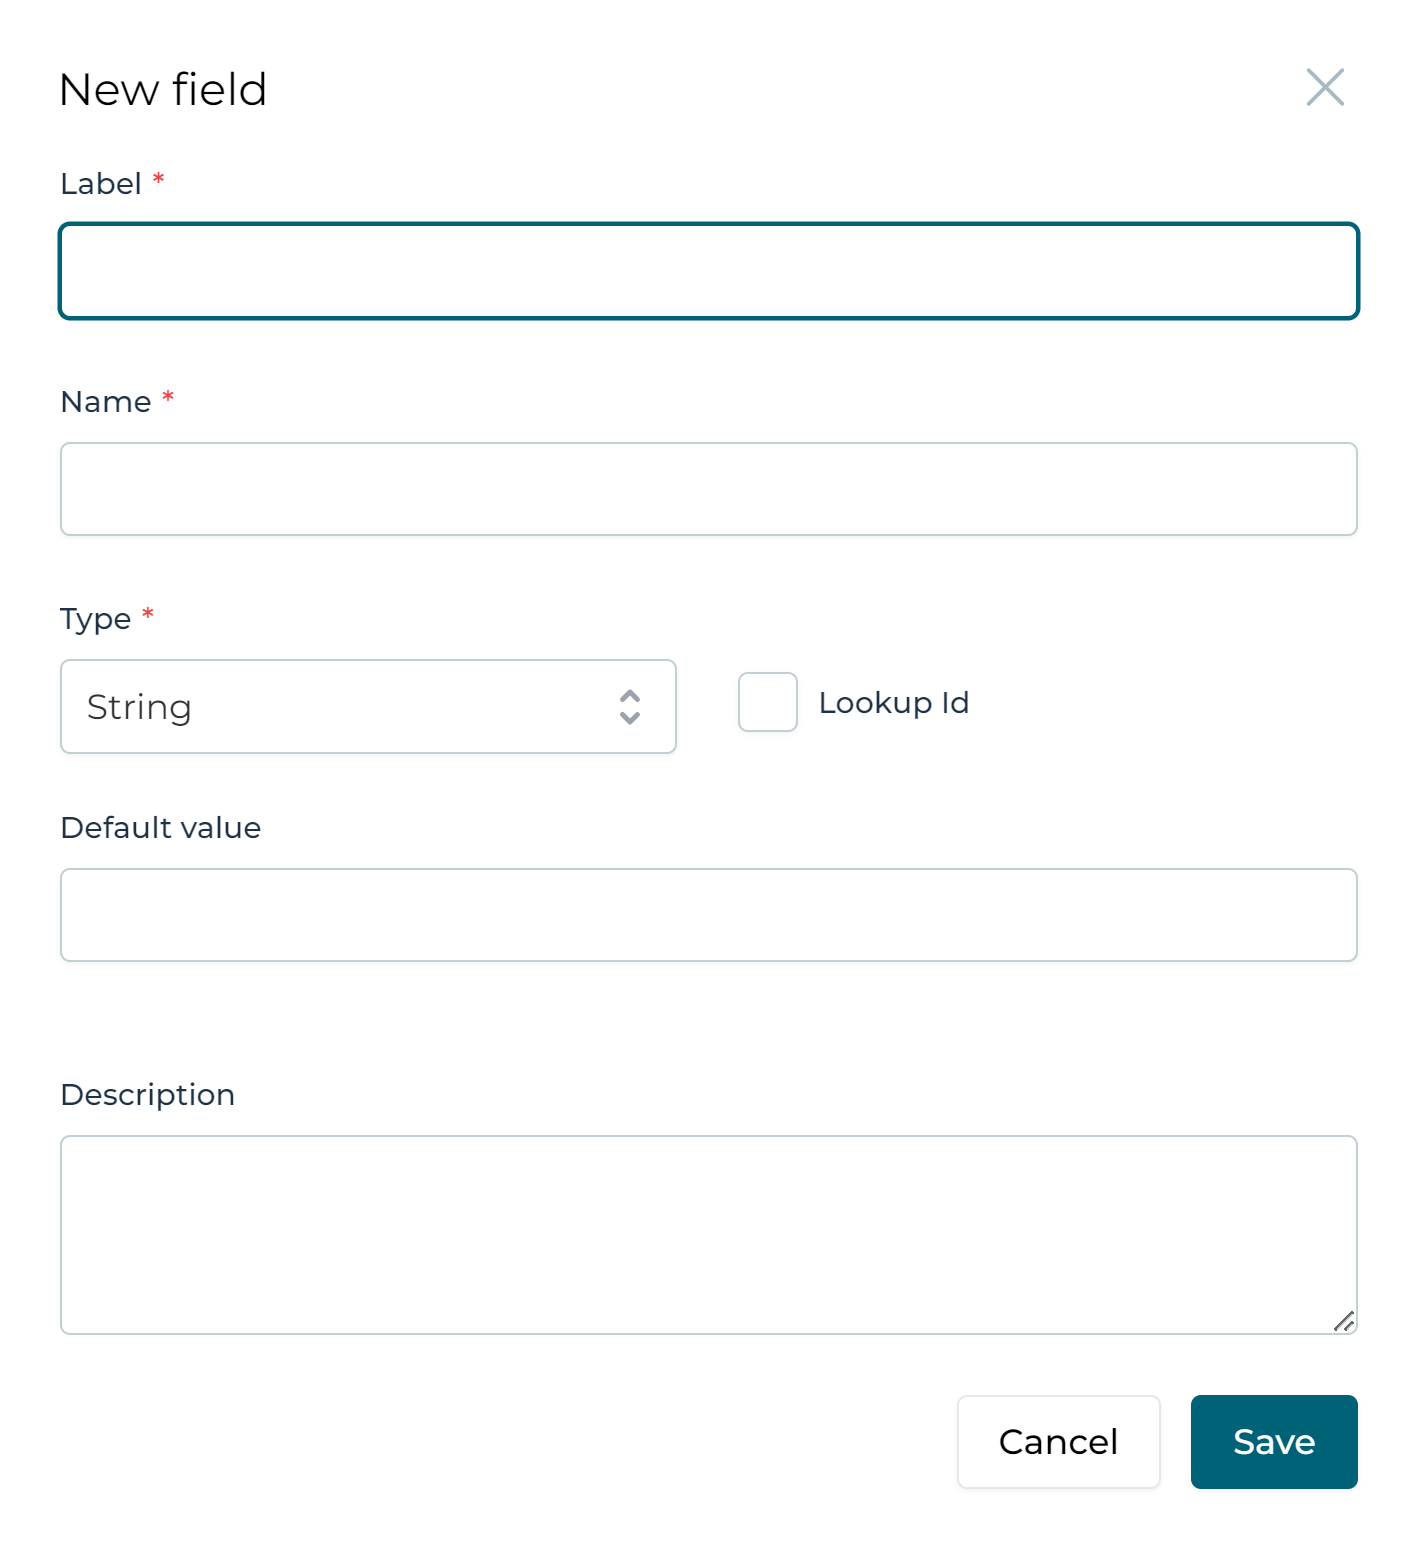
Following properties can be set:
-
Label (required): a human-readable version of the (technical) name of the field.
-
Name (required): the (technical) name of the field. This is the name that is used for example in expressions in process or case models (e.g. in
${customer.country === 'Belgium'}the technical name is country). -
Type (required): the type of the field. Currently supported are String/Date/Boolean/Integer/Double/Long/Json fields.
-
Default value (optional): a value for the field that is set in case when a value would not have been set.
-
Description (optional): a human-readable explanation of the purpose of this field.
Let’s add following fields to the data object:
-
Name (string): the name of the customer
-
Active (boolean): a flag indicating whether this is an active customer or not
-
Country (string): the country where the customer resides.
-
Yearly fee (double): a monetary value indicating a monetary value the customer pays every year.
This should result in something that looks like this:
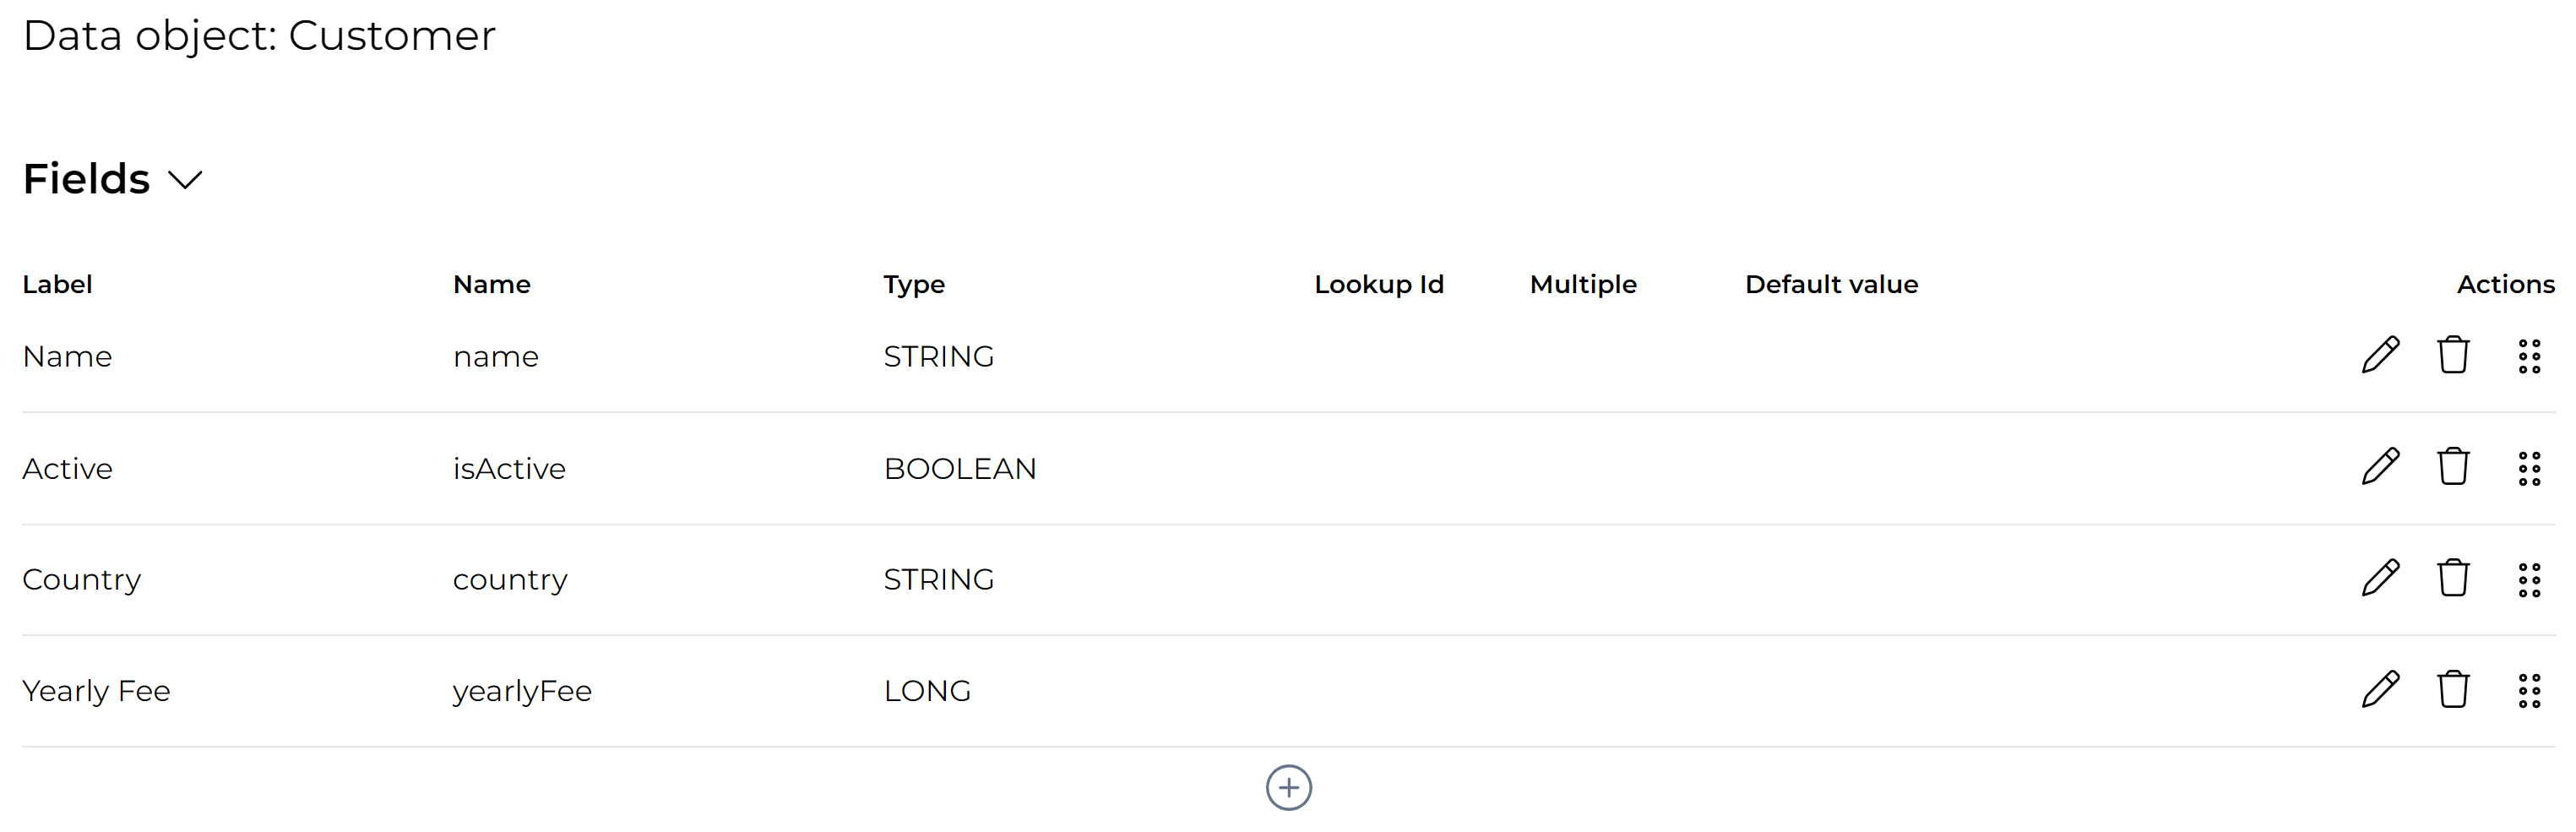
The actions column of the table shows the following actions (from left to right):
-
Grip dots: moves the field up or down.
-
Edit: this will allows changing the field settings.
-
Delete: this deletes the field. A confirmation will be asked before deleting.
You might have noticed when creating fields that there is a Lookup ID flag. Don't worry about that yet, we'll come back to that below.
Before looking into the Data source section, let's first have a quick look at the Permissions and the Advanced Settings section.
Permissions
Permissions as described here are only applicable for the database-backed data objects. When using REST, you need to pass the relevant information (such as e.g. the current user, groups, etc.) to the REST API that's being called using expressions in e.g. the body or URL.
The permissions section can be clicked open by clicking on the arrow icon next to it. Once opened, permissions can be configured:
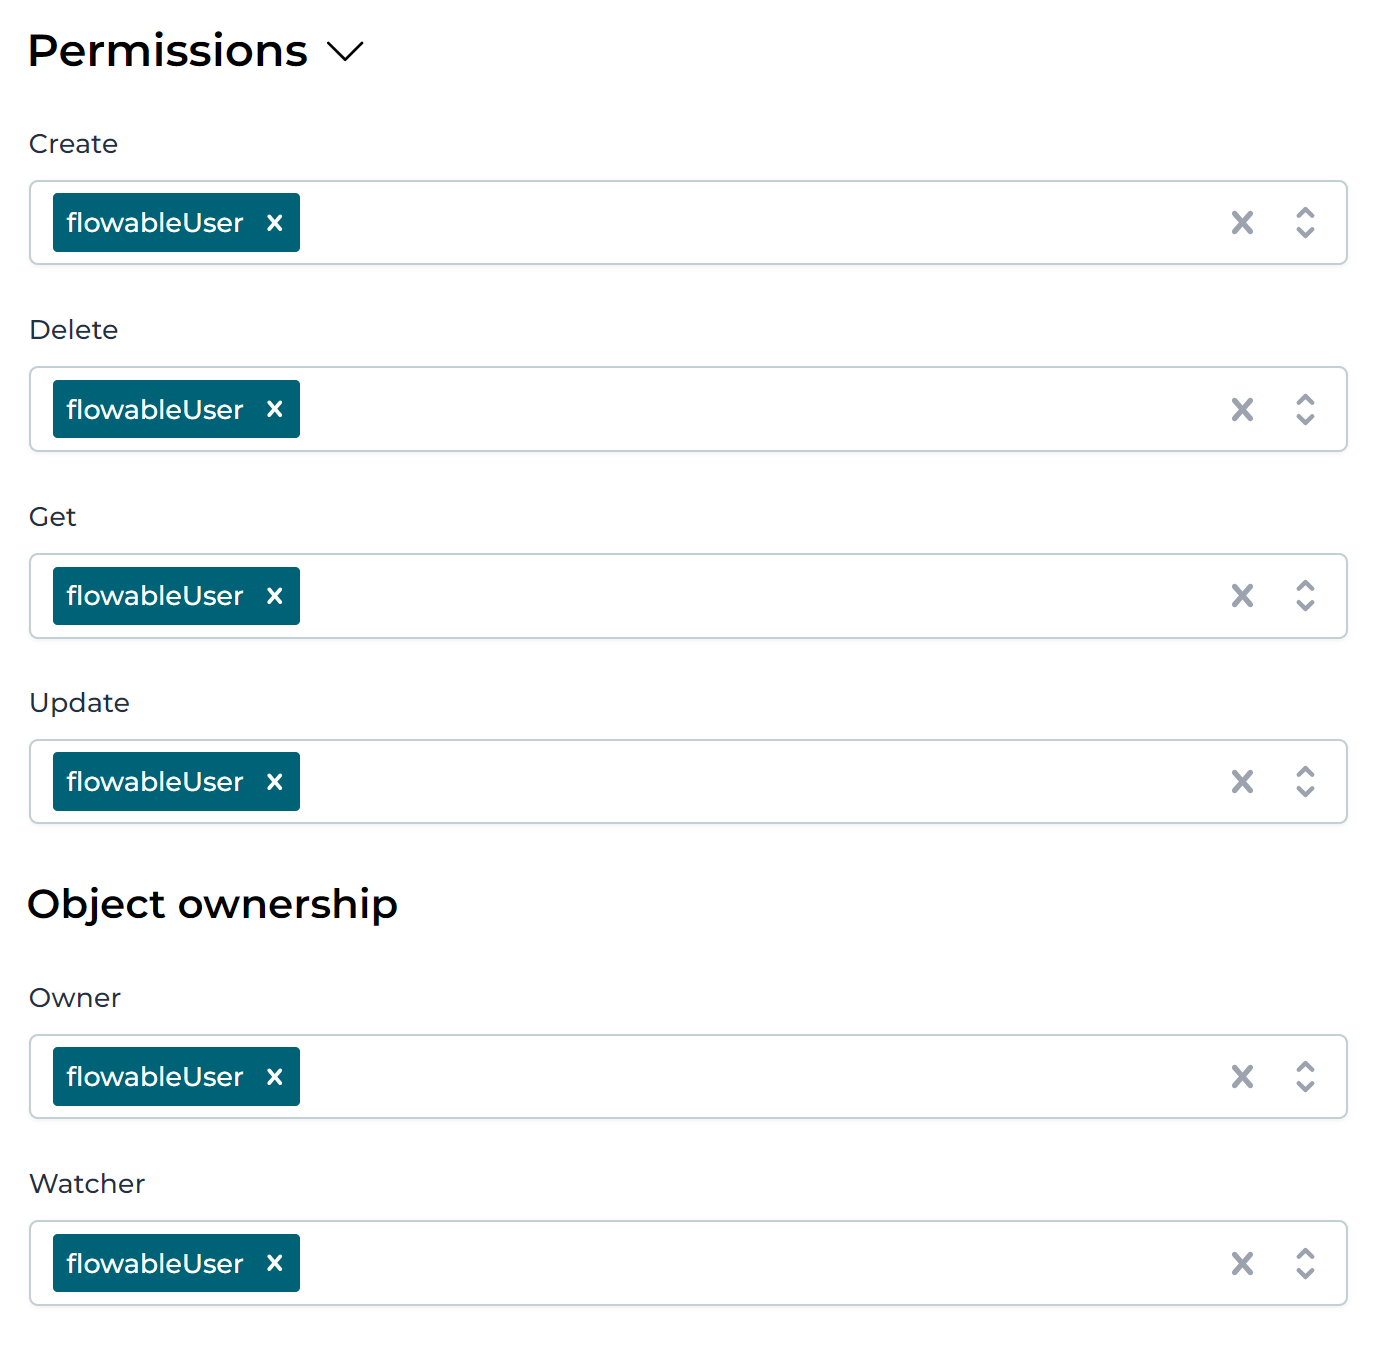
By default, any operation is possible by any user, which is expressed by having Flowable User in each row (any user in Flowable is part of this group).
The capabilities allow to configure which groups can execute which operation (Create, Delete, Get, Update). For example: the permissions could be configured that all users can see the customer data, but only certain groups can create or delete them.
The Object ownership section allows to configure which groups automatically get a certain role when a data object is created, following the owner and watcher concept from other places in Flowable.
In this tutorial, it is okay that any user can do anything with our customer data objects. Leave everything to the default settings.
Advanced Settings
The last section of the data object model view allows to set advanced settings. When clicked open the optional advanced settings are displayed:
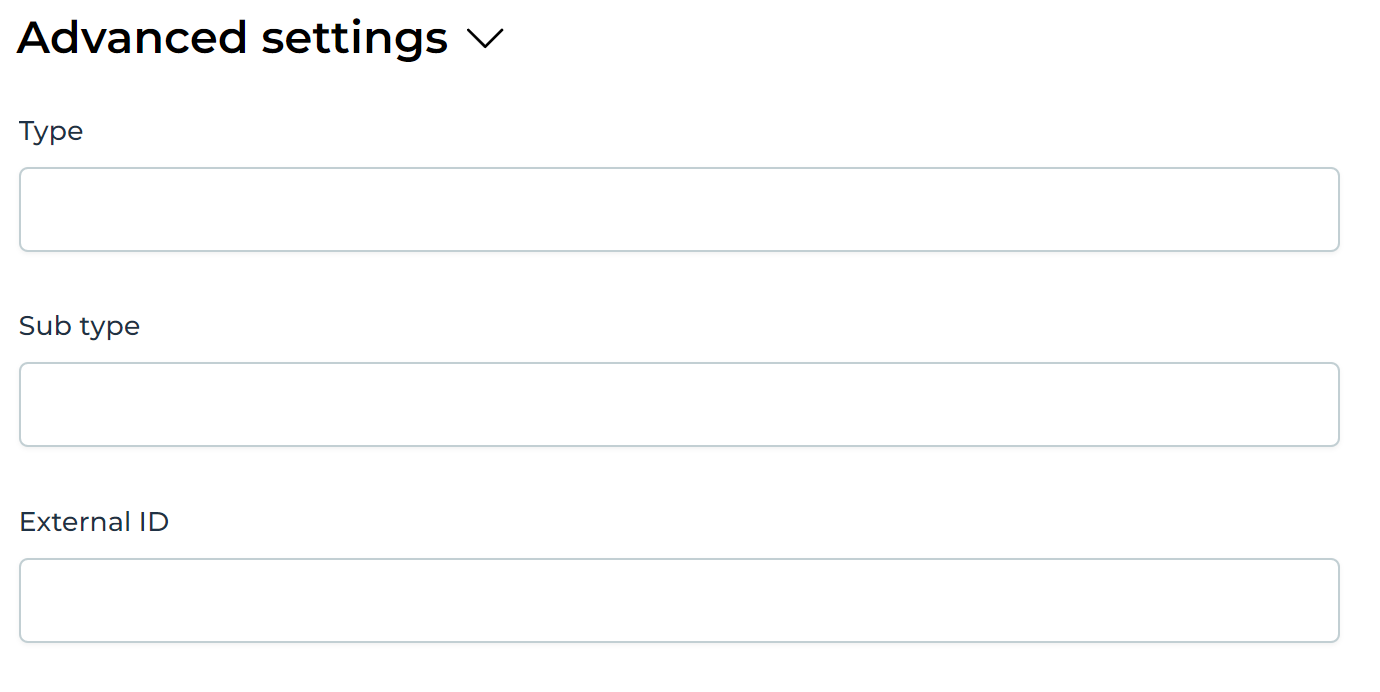
All these fields are (technical) metadata settings:
-
Type: A custom type for the data object.
-
Sub type: A custom sub type for the data object.
-
External Id: An external id to identify the data object.
The main use case for these is to categorize or easily query and retrieve data objects and its deployed definition via the API’s by setting a hard-coded value here.
In this tutorial, we won't need those settings, and we leave them empty.
Service Model / Data Source
In this part, we’ll create the service model needed to retrieve and manipulate the data for the customer data objects. The customer data object model defines the various fields of the data object, but it is the service model that is linked to the data object model that defines how the data is actually handled.
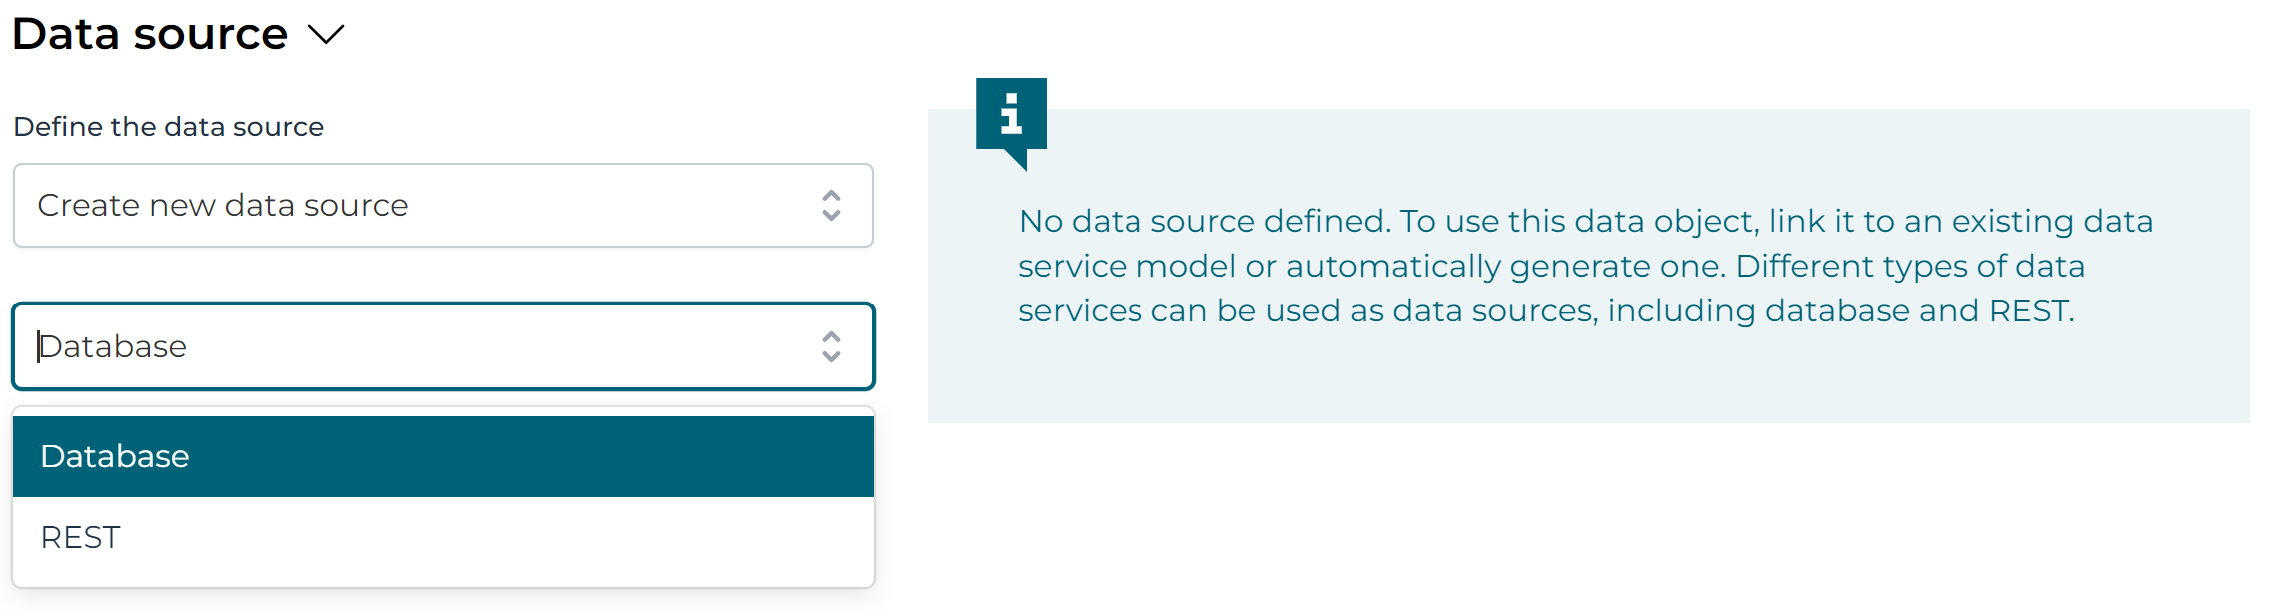
The service model, in the context of data objects, is also called the data source here:
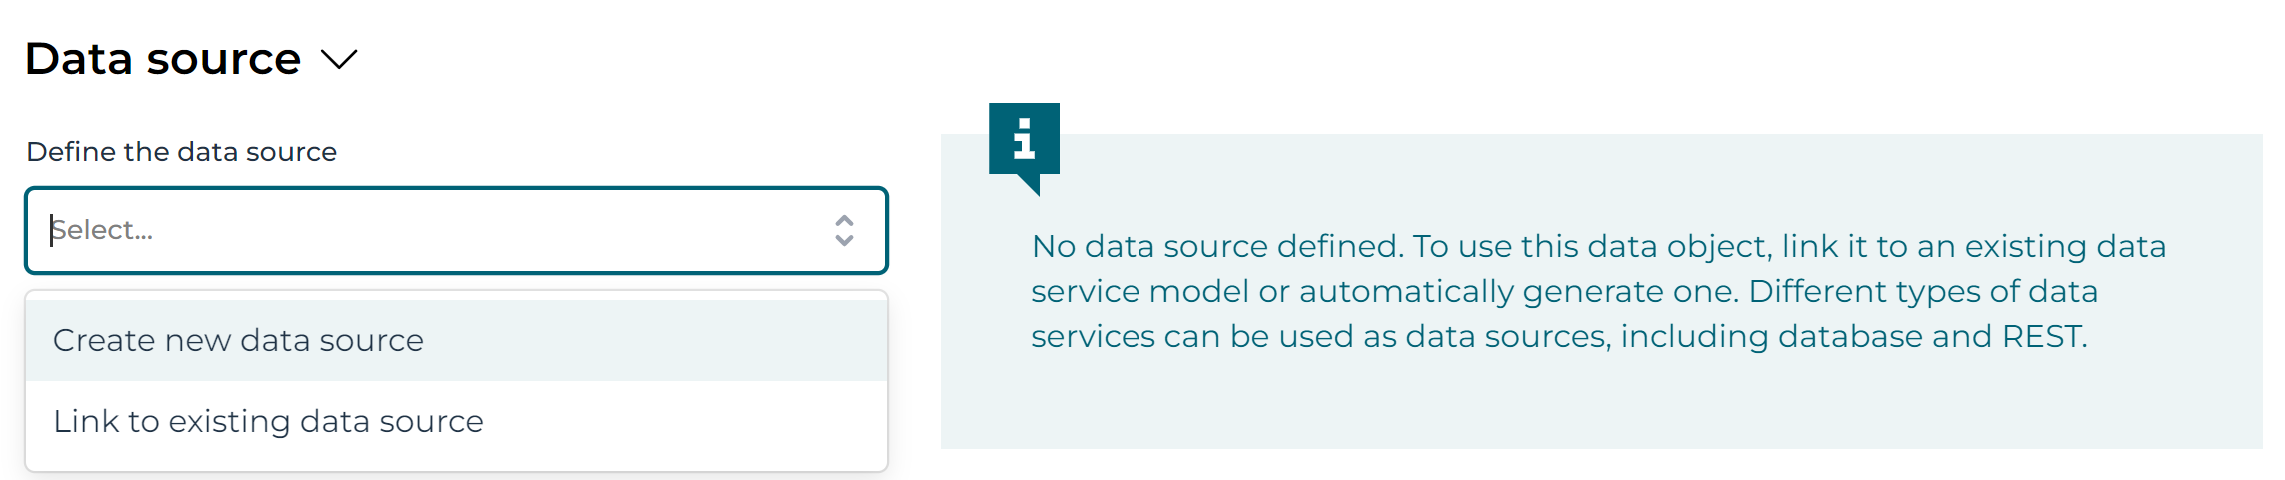
After selecting Create new data source other fields will appear, such as the Type field. In the Type field, it's now possible to choose either to have database-backed or REST-backed data objects. The next sections will handle each option separately.
Service Model (Database)
If you're interested in the REST version, you can skip this part.
After selecting Database, the text fields will reflect the minimal settings needed to create a service model for a database-backed data object:
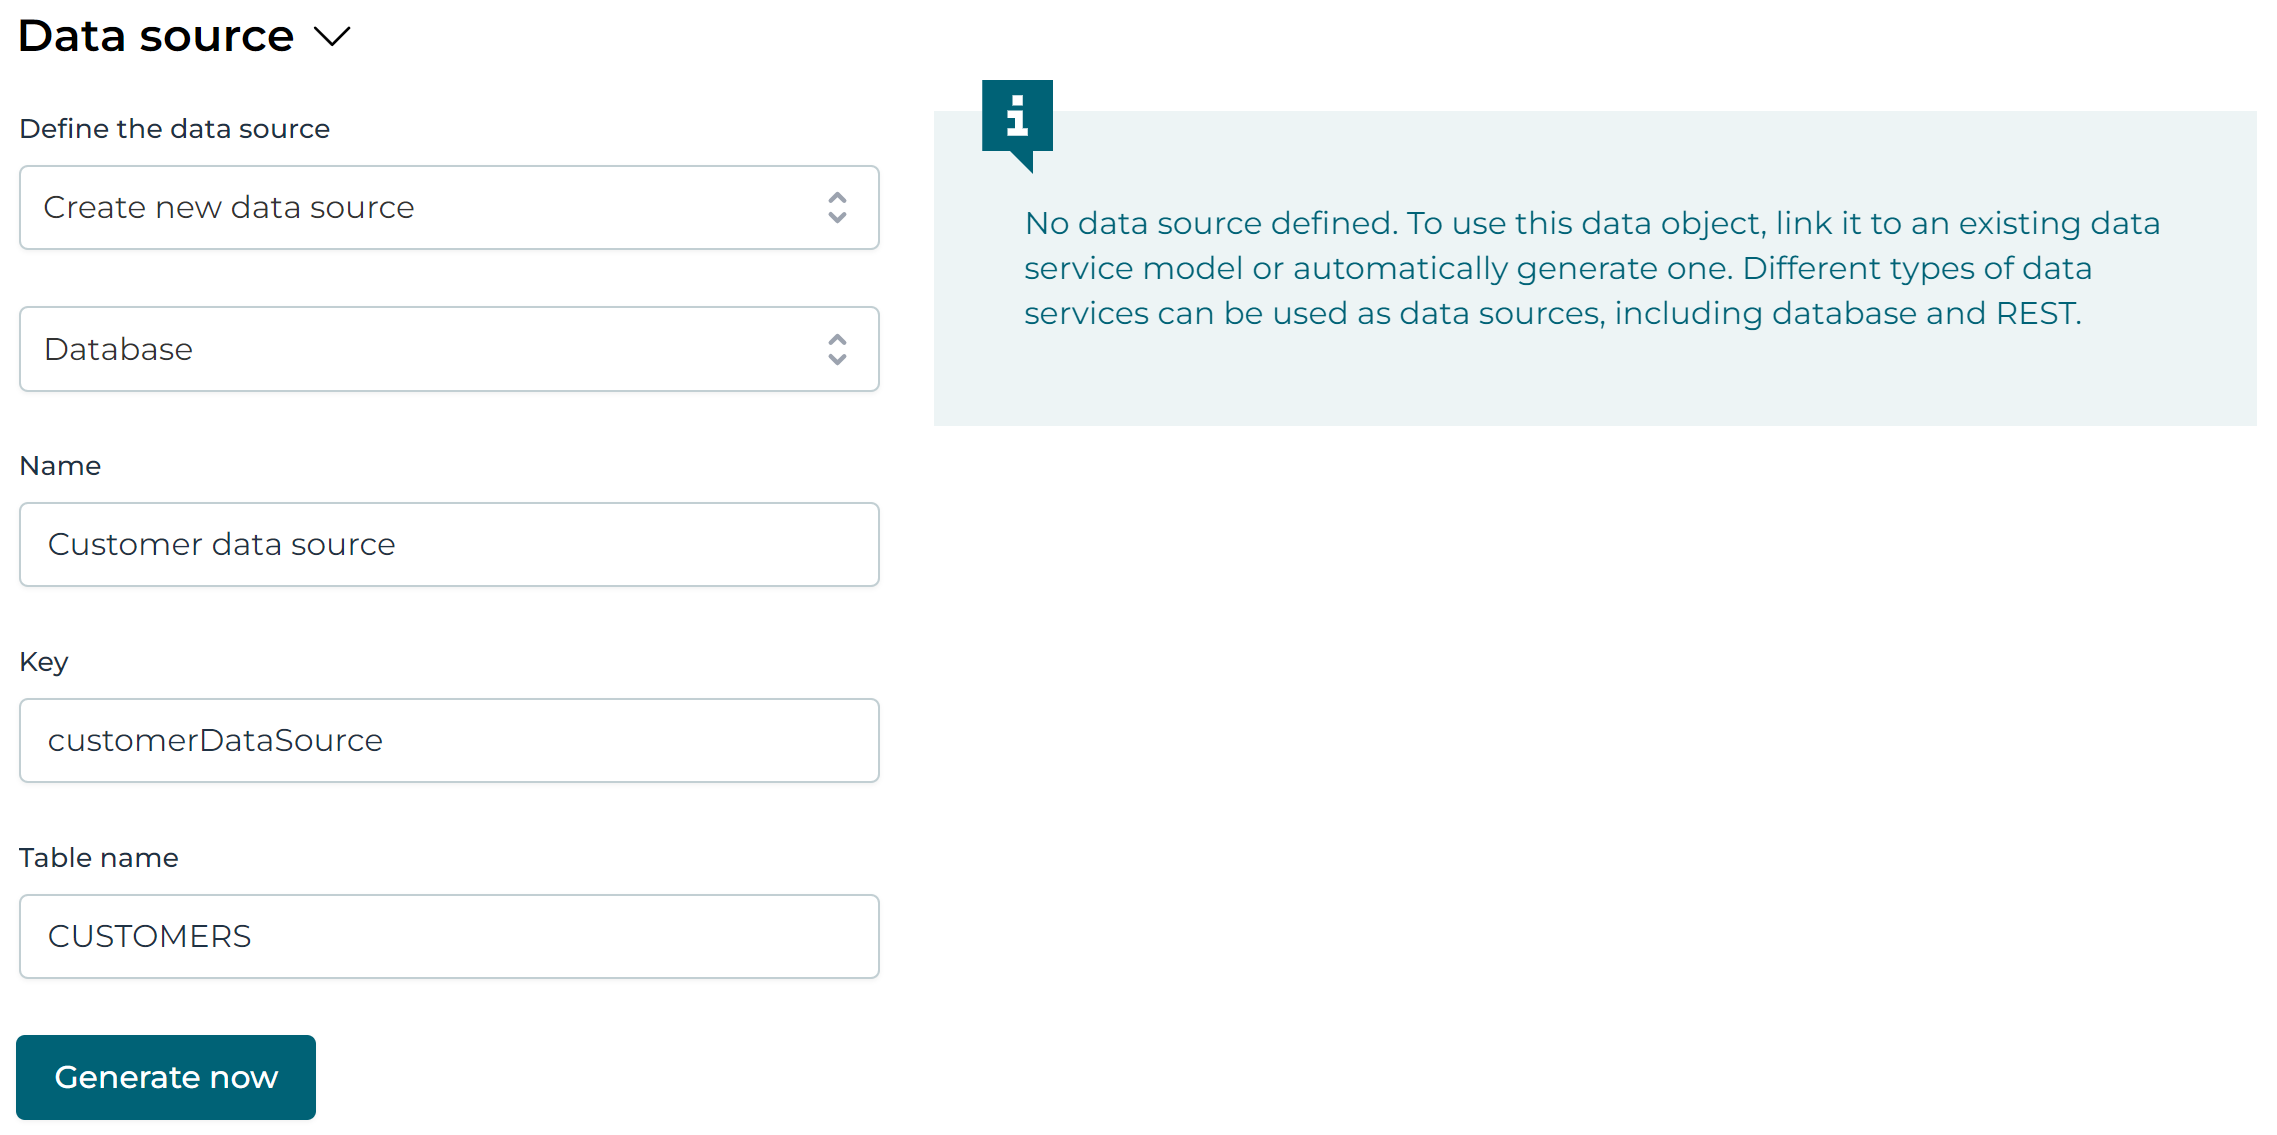
Fill in the following details:
- Name: the name of the service model that will be created, for example
Customer data source. - Key: a unique key for the service model, similar to all model keys in Flowable, for example
customerDataSource. - Table name: the name of the relational database table that will hold the data object date, for example
CUSTOMERS.
After filling in these fields, click the Generate now button.
The following popup is now shown:
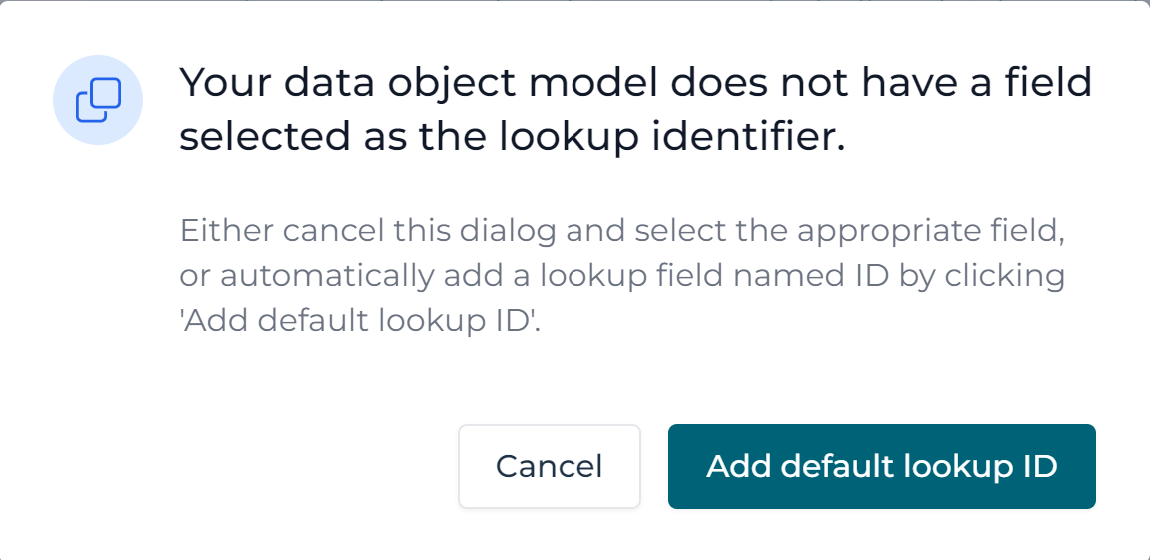
This popup indicates - correctly - that we have not set a Lookup ID yet. Indeed, when we added the fields to the data object model
we didn't create a field where the Lookup ID flag was ticked. Since a data object backed by a database table always needs to have
Lookup ID, we can generate one now by clicking the Add default Lookup ID. It will add a field ID to the data object model as the first field.
 Lookup ID?
Only one field can be marked as the Lookup ID, which is a value that uniquely identities the data object.
Behind the scenes, Flowable will store this value as a process or case instance variable and use it to
lookup the data object data when needed.
Typically, this value is automatically generated, but it can also be a value that is set manually based on a form value for example.
After having clicked the Add default Lookup ID button, following things happen:
- A new service model is created.
- The service model is linked to the data object model.
- The data object model is automatically saved.
- The service model is added to the app model
A new tab appears for the service model. The UI automatically switches to it:
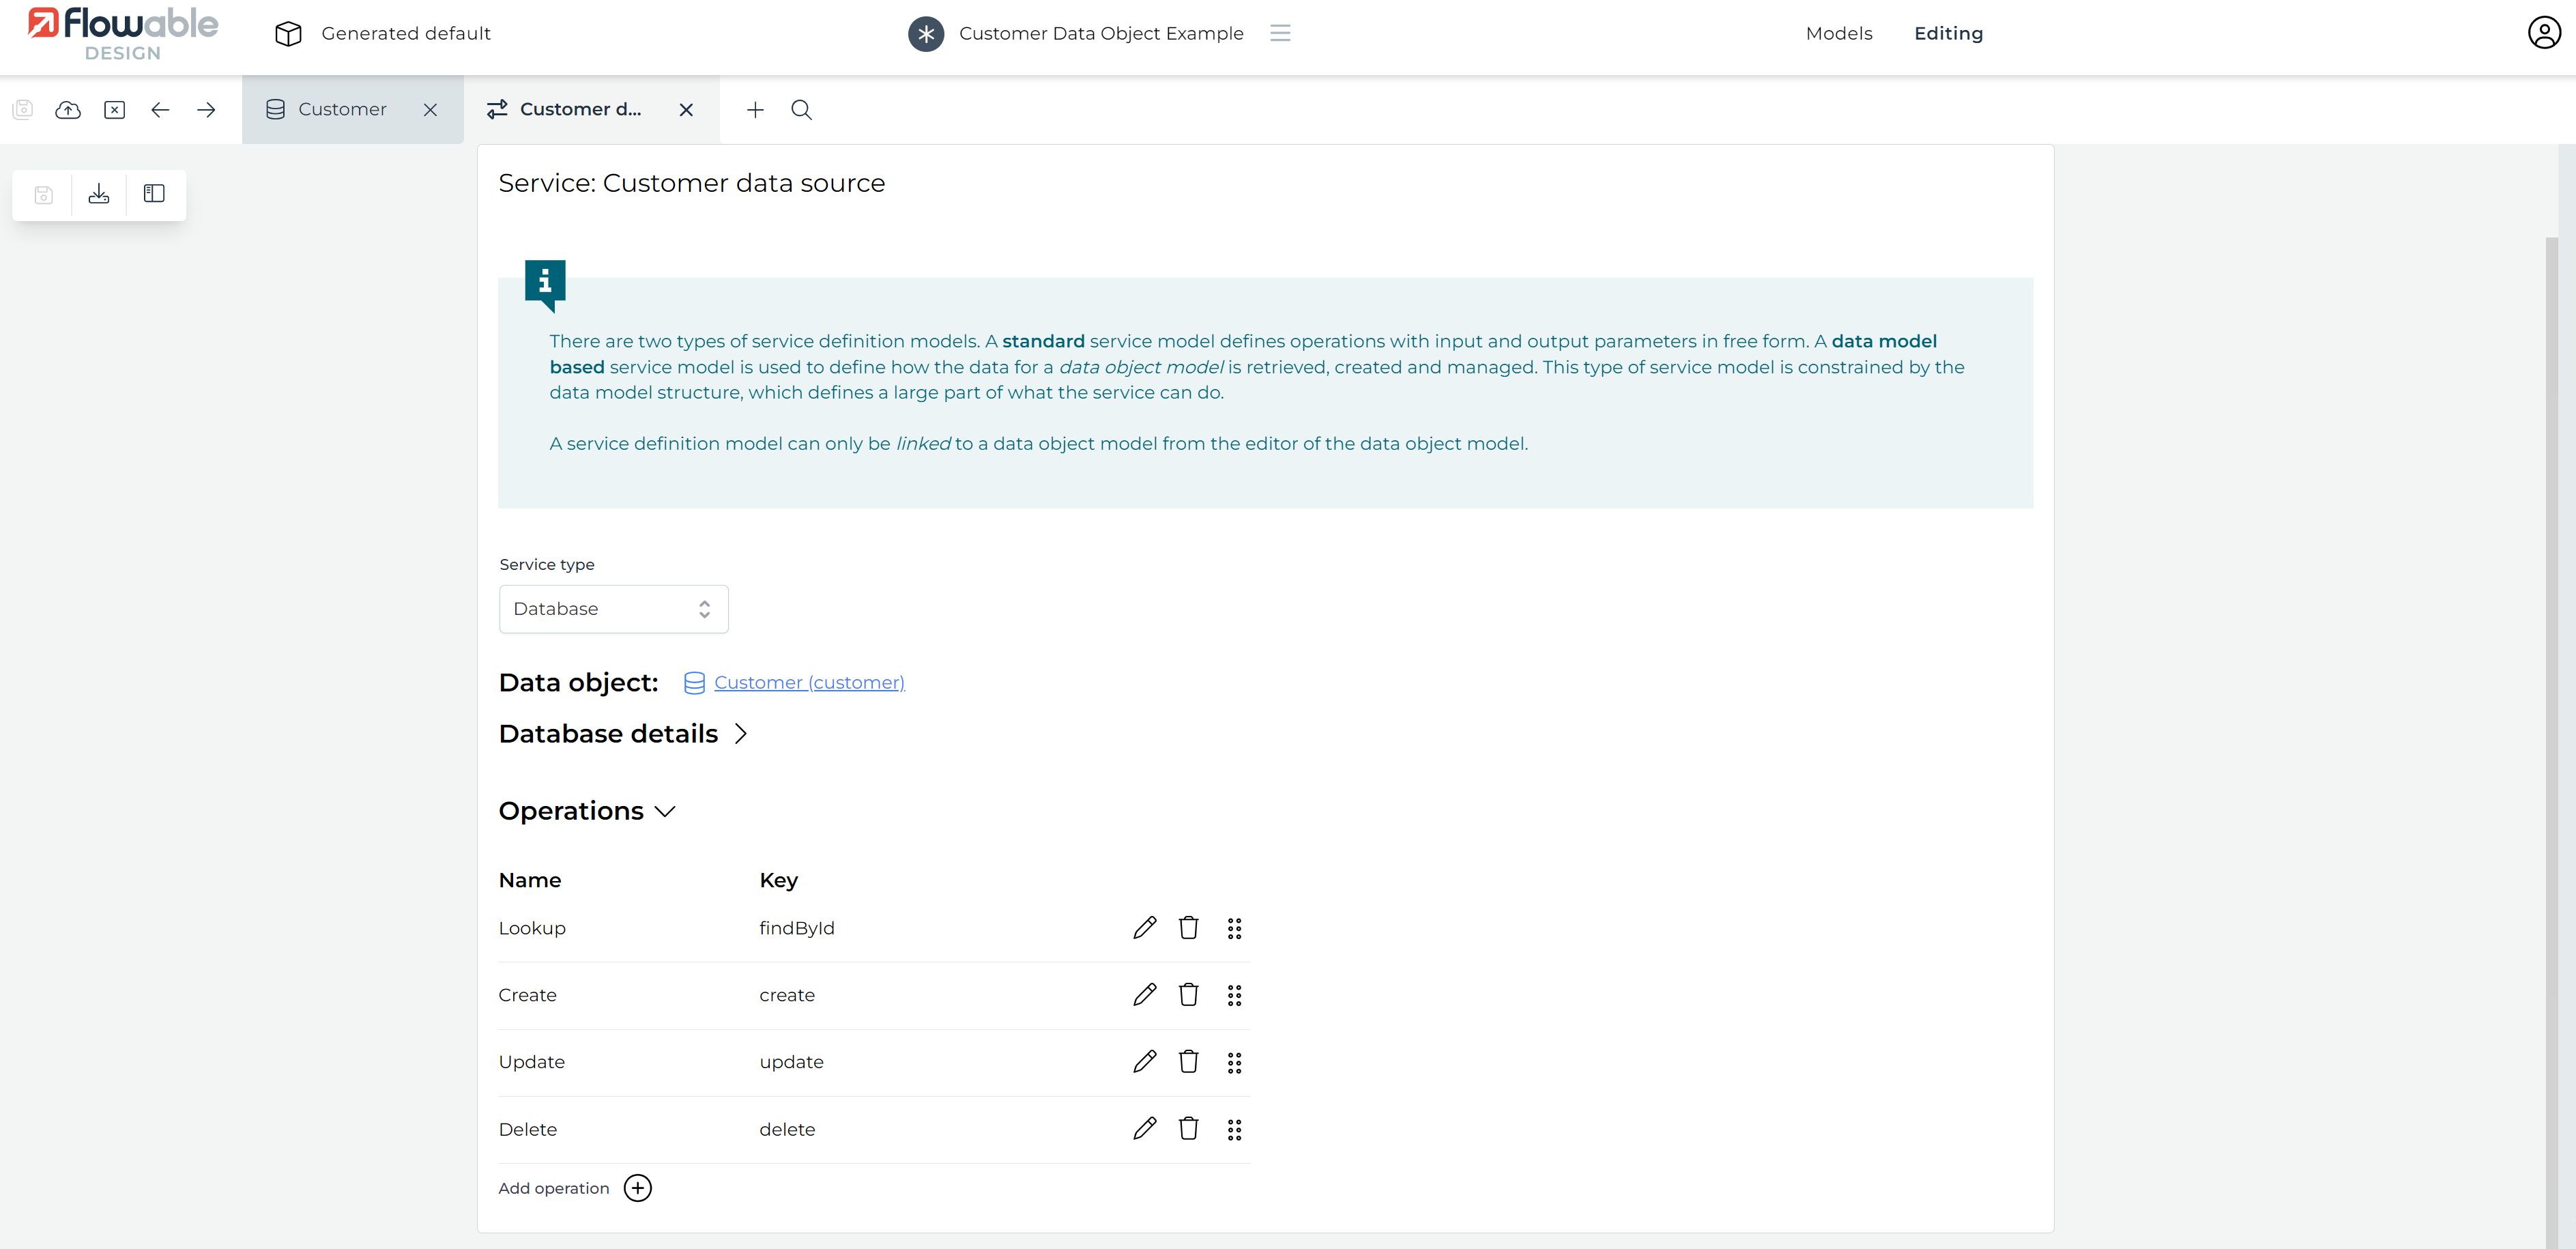
Configuring the Service Model (Database)
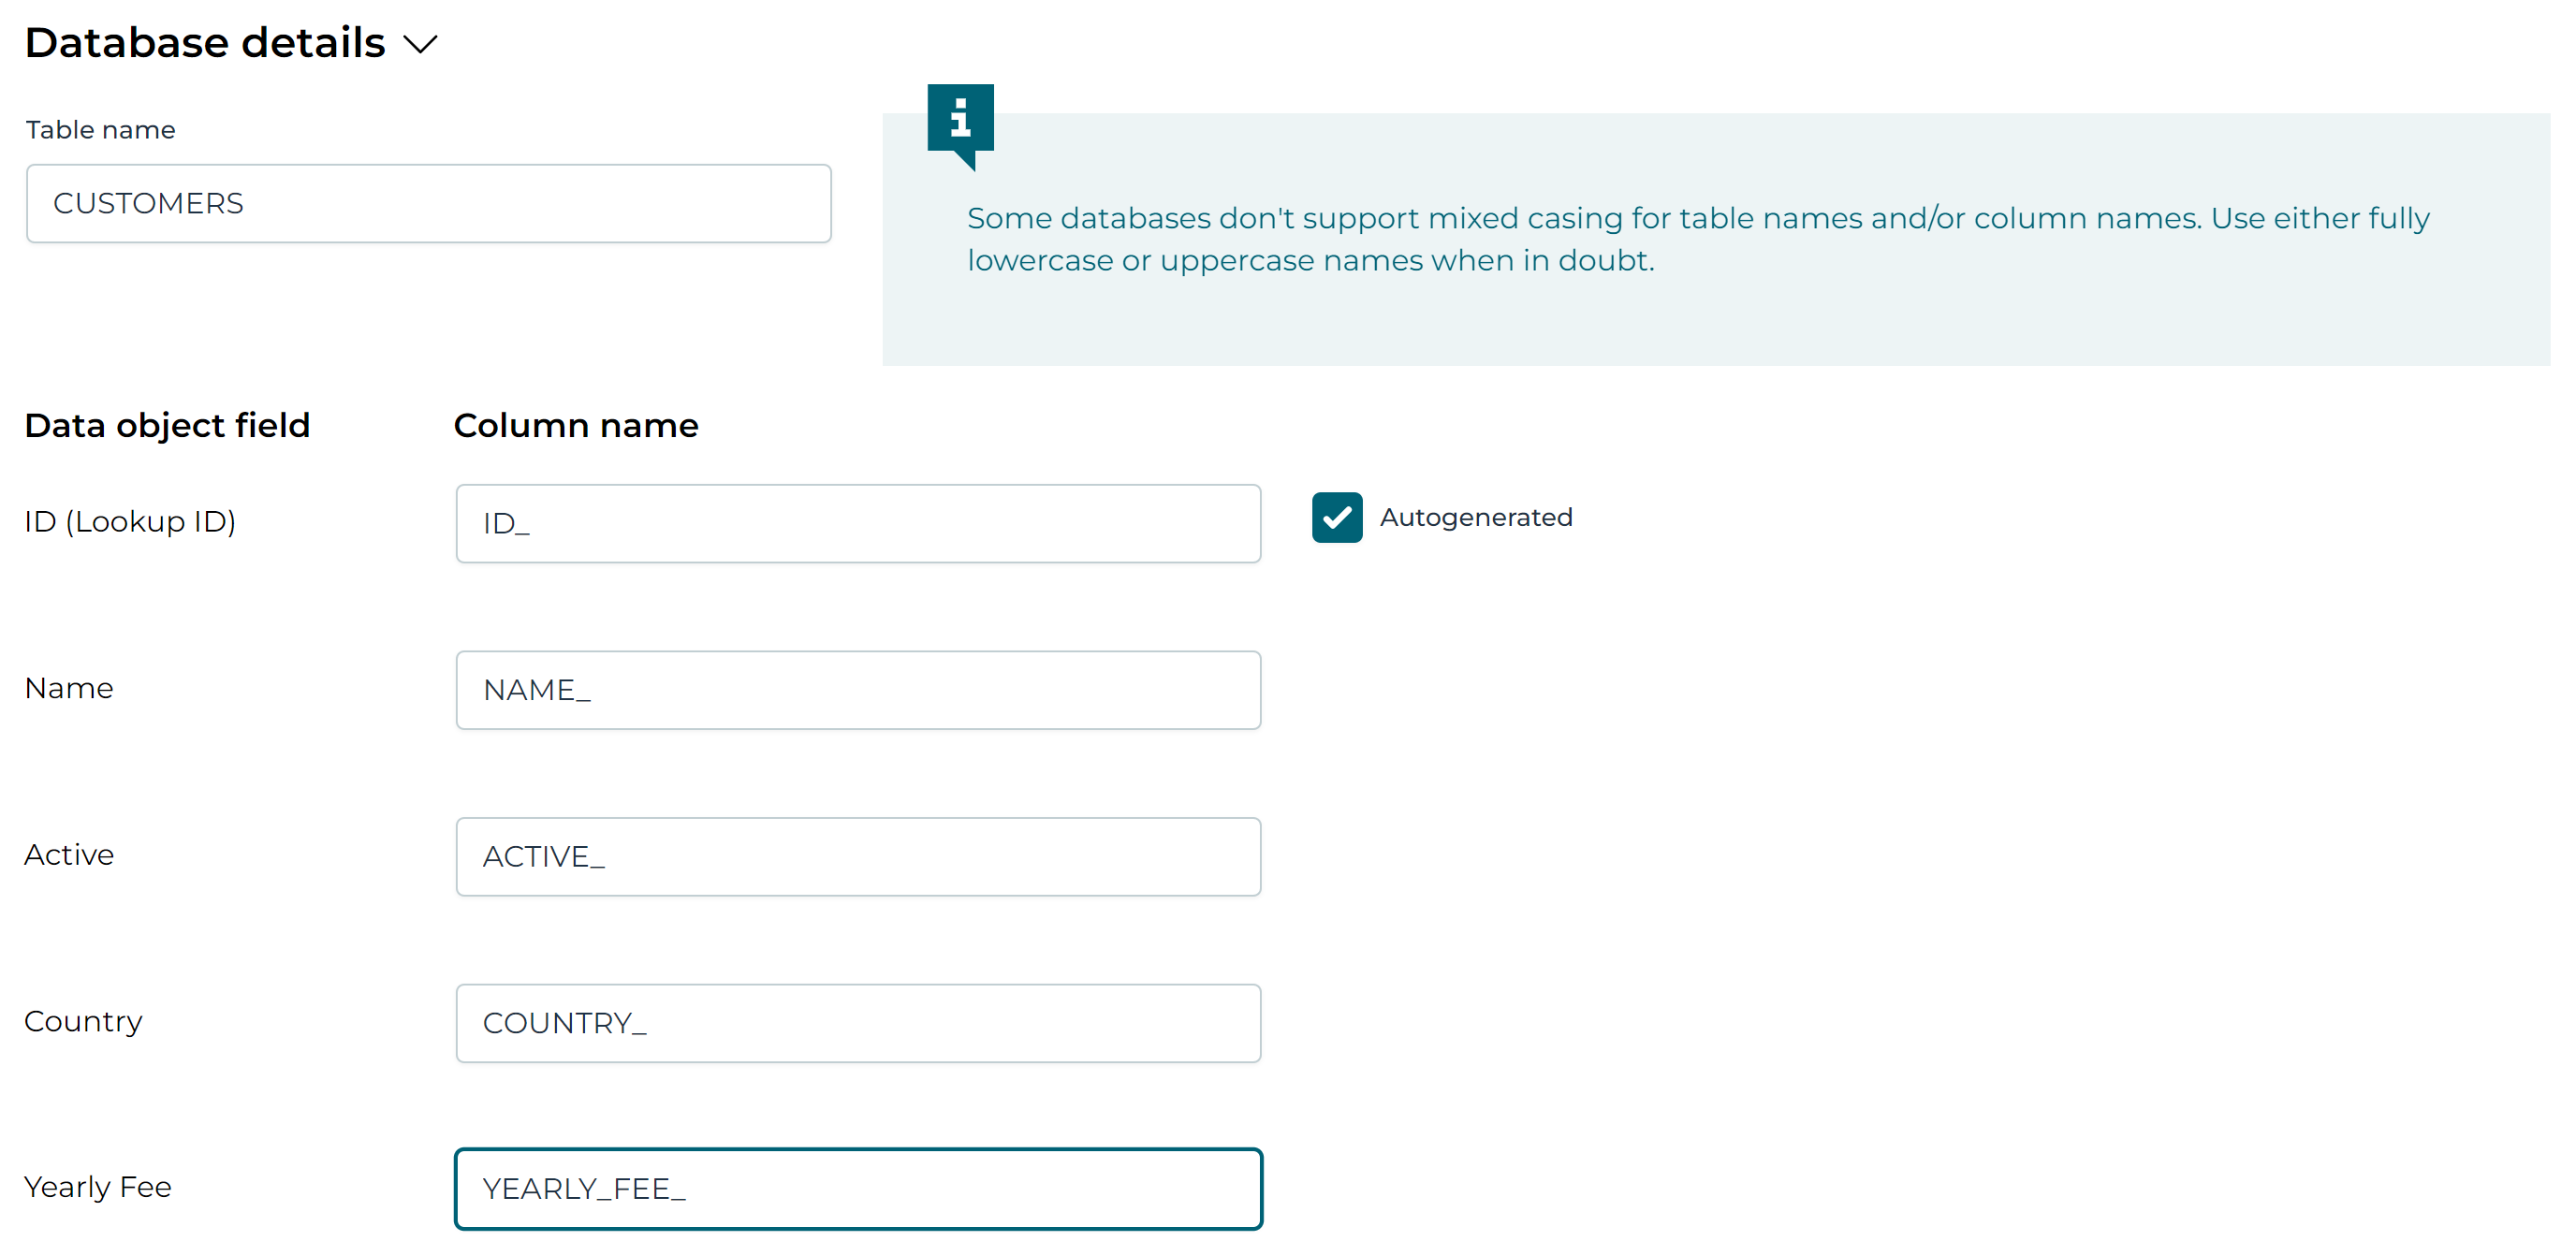
In the middle of the screen, the section Database details is shown. Click on it to open it.
A few things need to be configured now:
-
Table name: this should already be populated with the value we've filled in when the service model was generated.
-
Column mappings: Every data object field needs to be mapped to a column name. In the example here, we’ve simply used the uppercased name of the field, with a
_suffix. -
The ID field, which is the Lookup ID has the
Autogeneratedflag checked by default, which we leave that way
Auto-generated Lookup ID?
If checked (the default for a database data object model), Flowable will generate a unique identifier for each new data object. If unchecked, the modeler will be responsible for making sure each new data object gets a unique value for its lookup ID.
Technically, the lookup id value will be used for the primary key of the table of the data objects.
The Database details should look like this now:
Liquibase Changelog Model (Database)
You might have noticed that a new Related data objects section appeared at the bottom of the Database details section once the column mappings were filled in.
This section allows to generate and link a Liquibase Changelog Model or Database Schema Model to the service model.
Liquibase?Liquibase is an open source, database-independent library for tracking, managing, and applying database schema changes. All database schema changes are stored in a human-readable form (XML).
 caution
Liquibase scripts are not automatically applied on publish. Flowable Control has special handling for these models, as we'll see later in this tutorial.
A name and key for this model are automatically generated:

Click the Generate now button to generate and link a Liquibase Changelog Model.
Doing so will save the current service model and generate a new Liquibase Changelog Model based on the data object model fields and the column mappings defined earlier. A new tab with the Liquibase Changelog Model appears and the Design UI automatically switches to it:
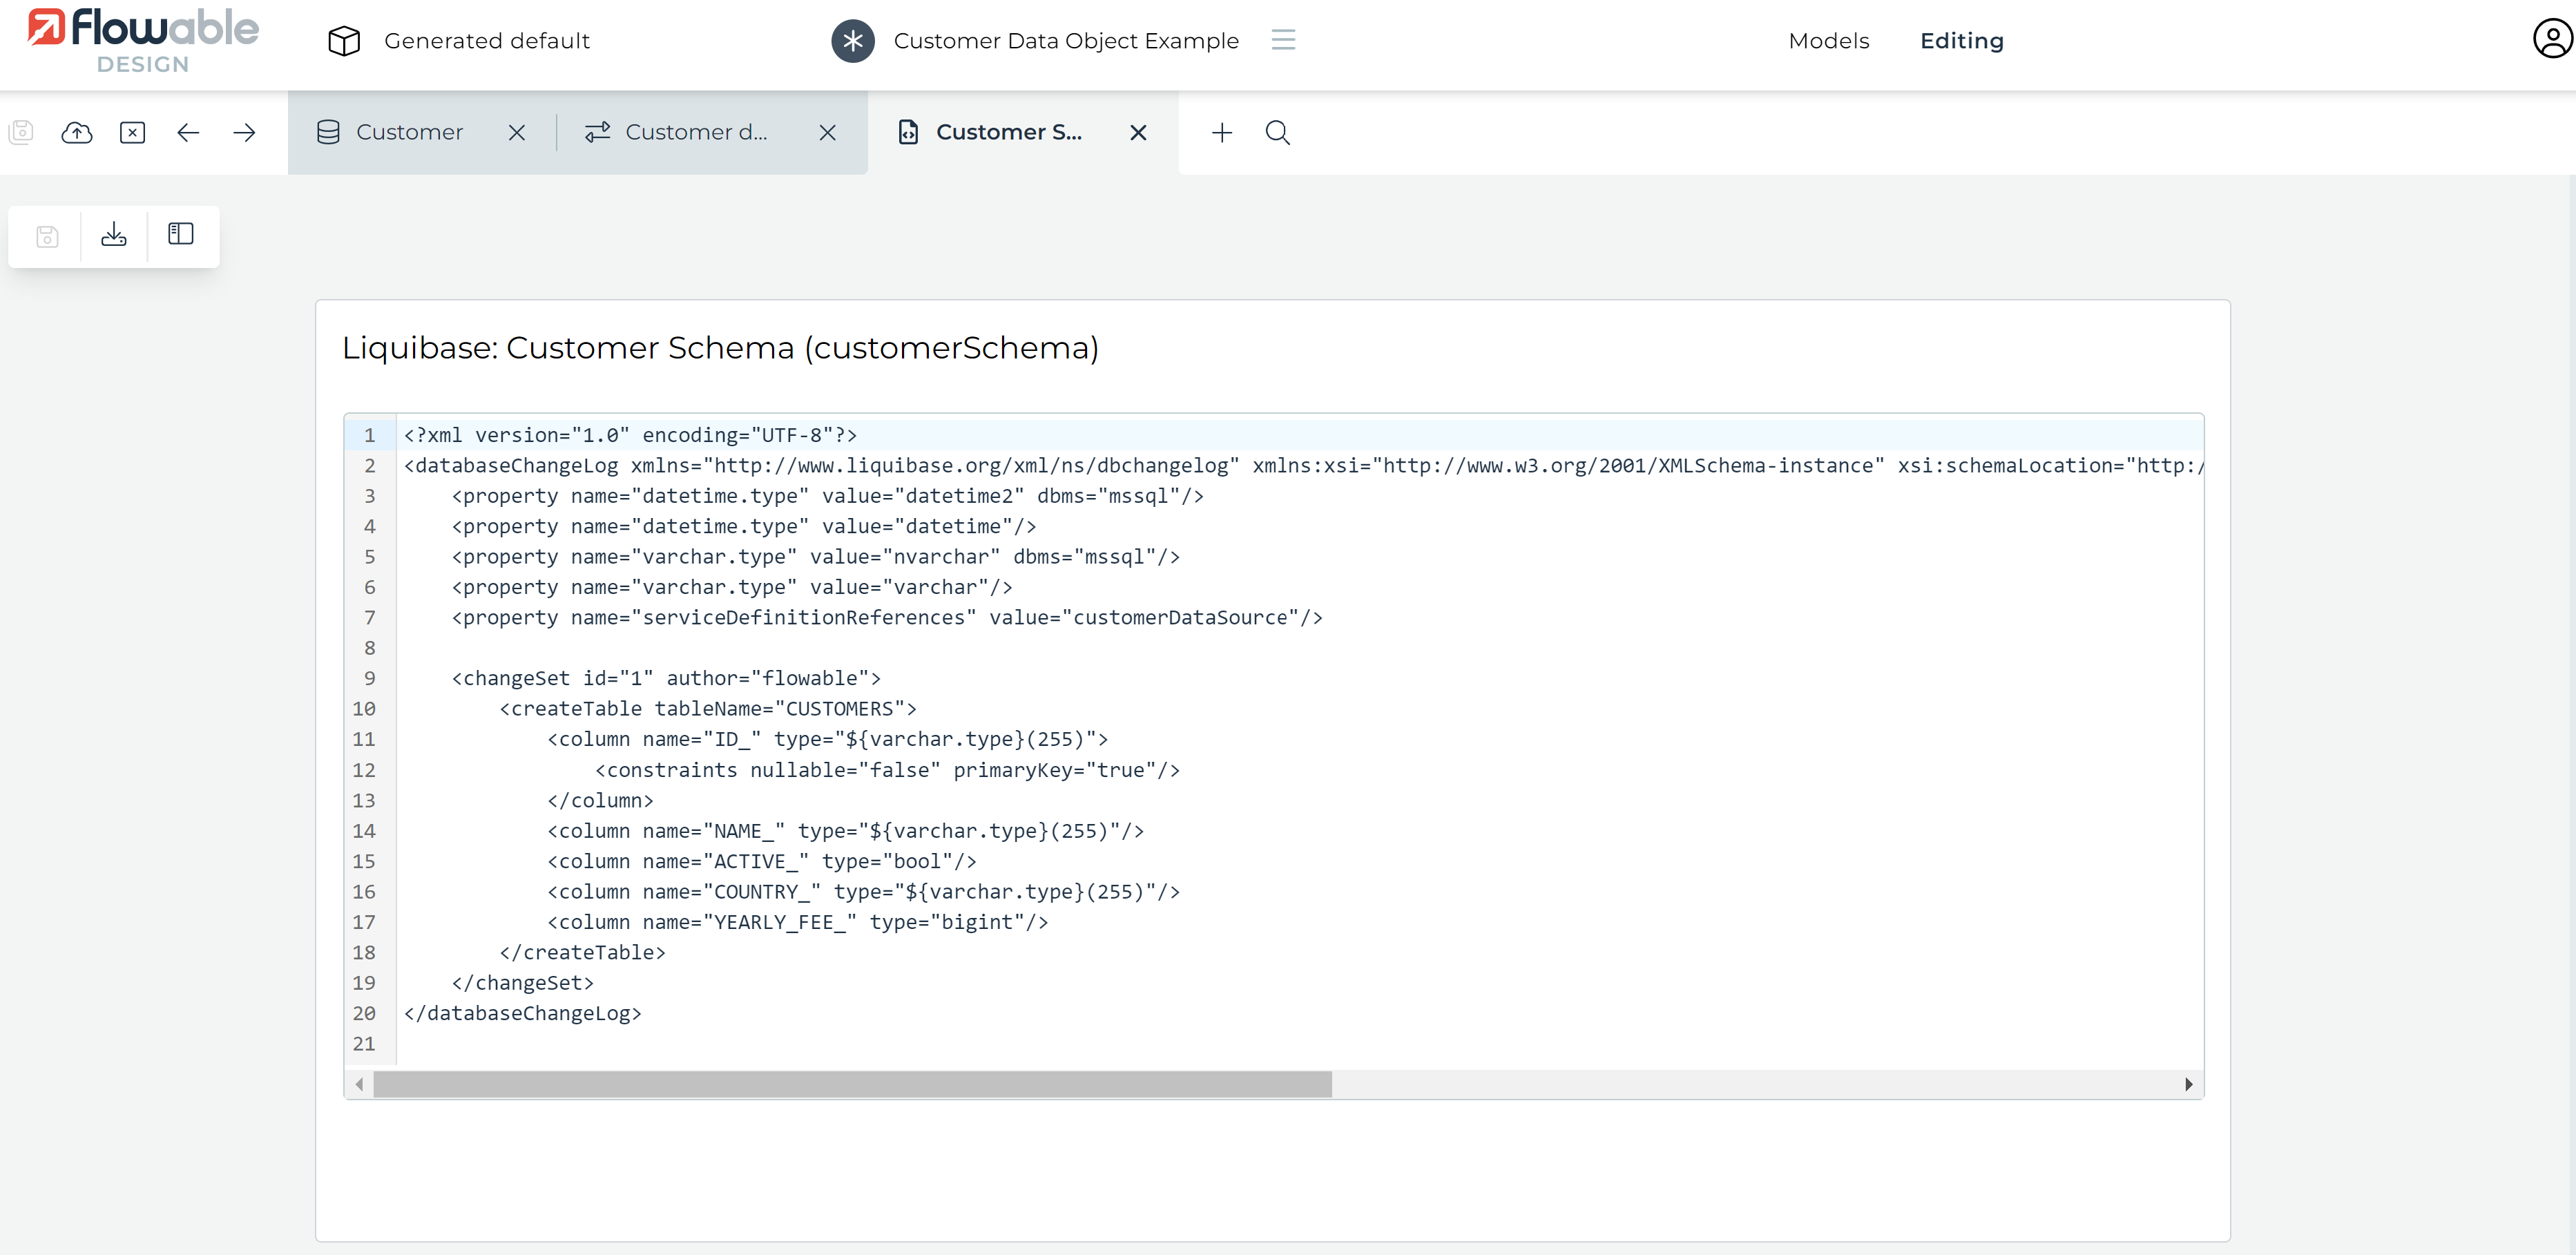
Inspecting the generated XML, we can see it will create a table with the name we've picked and a column with the correct type for each of the data object fields. We don't need to change anything, the Liquibase Changelogs Model is good to go.
More information about all possible options of the Liquibase databaseChangelog can be read in the Liquibase documentation.
Service Model (REST)
If you're interested in the database version, you can skip this part.
After selecting REST the text fields will reflect the minimal settings needed to create a service model for a REST-backed data object:
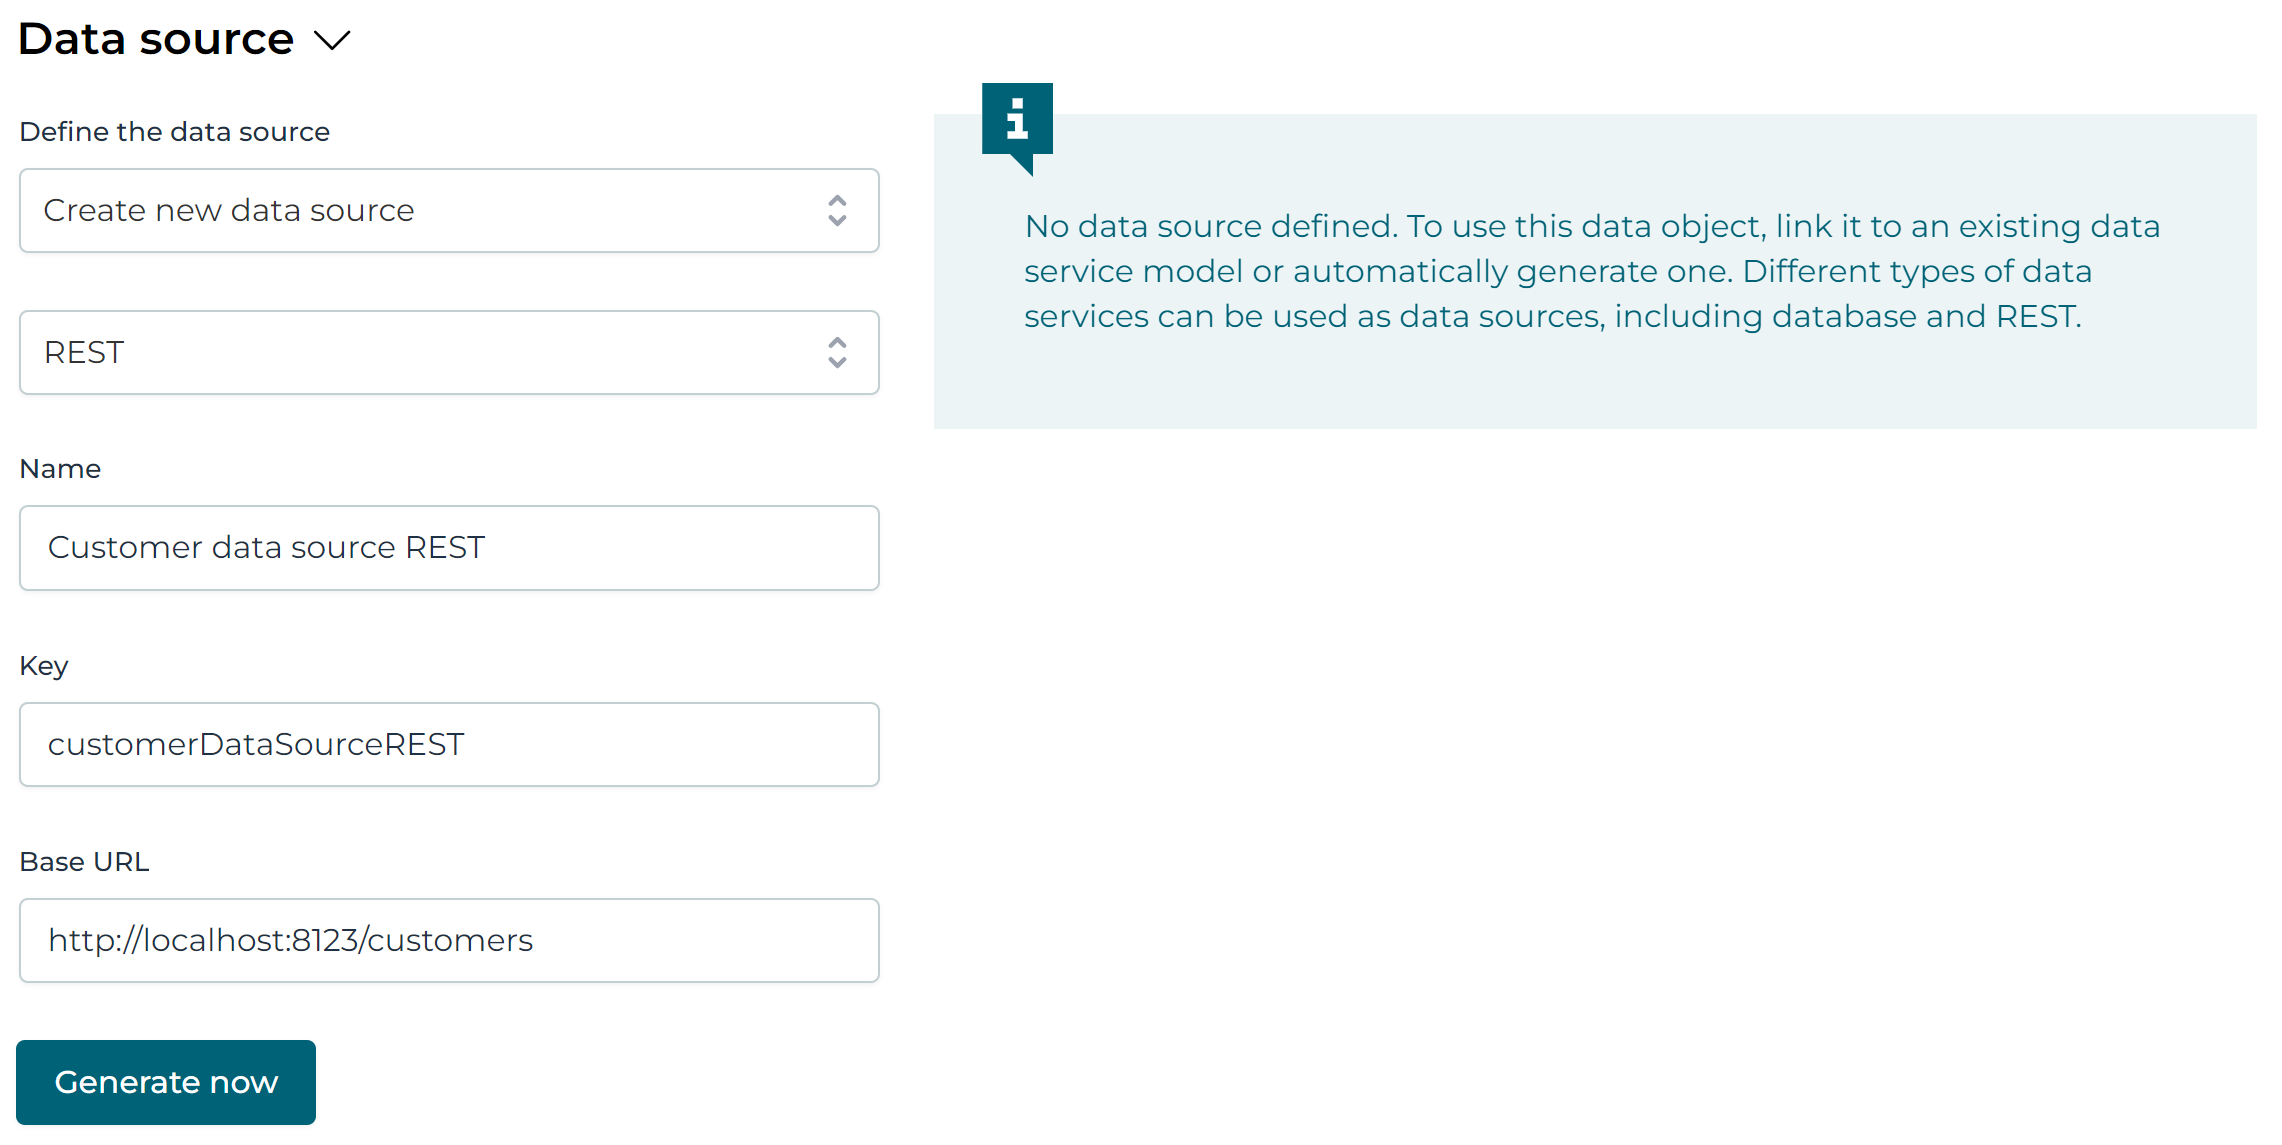
Fill in the following details:
- Name: the name of the service model that will be created, for example
Customer data source REST. - Key: a unique key for the service model, similar to all model keys in Flowable, for example
customerDataSourceREST. - Base URL: the base url of all REST calls. This is the url that will be prefixed to all operations. Since it's the same for all our example operations, we can set it to
http://localhost:8123/customers(port8123is the port that the mock REST api application is configured to).
After filling in these fields, click the Generate now button.
The following popup is now shown:
This popup indicates - correctly - that we have not set a Lookup ID yet. Indeed, when we added the fields to the data object model
we didn't create a field where the Lookup ID flag was ticked. Since a data object backed by a database table always needs to have
Lookup ID, we can generate one now by clicking the Add default Lookup ID. It will add a field ID to the data object model as the first field.
Lookup ID?Only one field can be marked as the Lookup ID, which is a value that uniquely identities the data object.
Behind the scenes, Flowable will store this value as a process or case instance variable and use it to
lookup the data object data when needed.
Typically this value is automatically generated, but it can also be value that is set manually based on a form value for example.
After having clicked the Add default Lookup ID button, following things happen:data-object-database-column-mapping
- A new service model is created.
- The service model is linked to the data object model.
- The data object model is automatically saved.
- The service model is added to the app model
A new tab appears for the service model. The UI automatically switches to it:
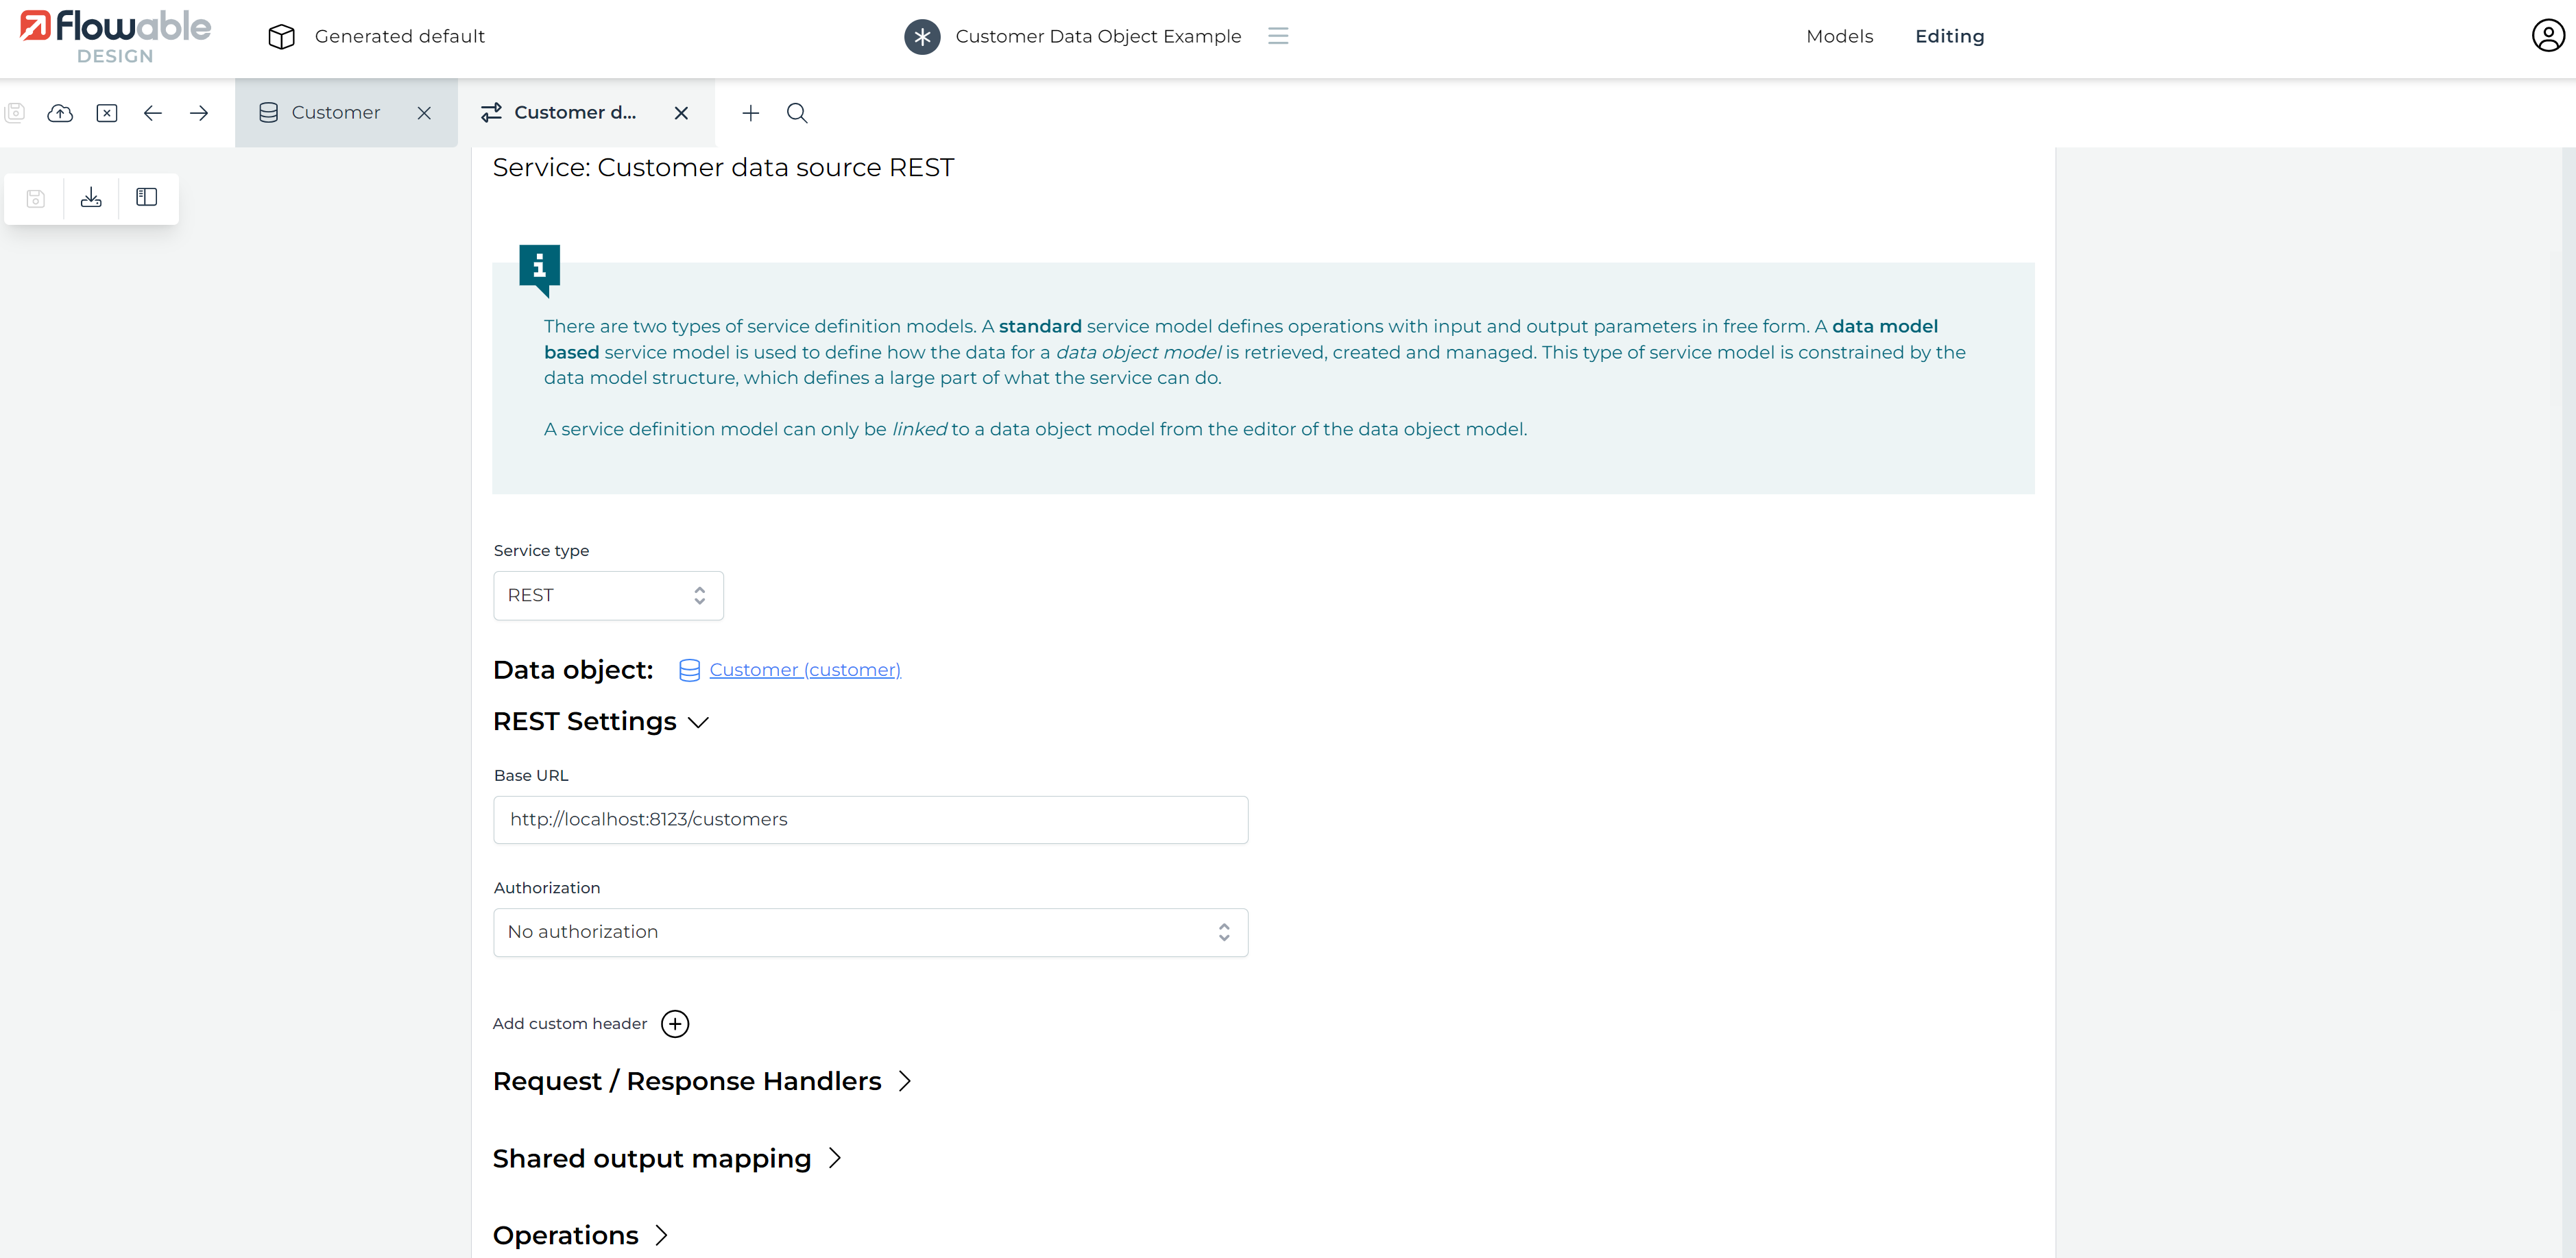
Configuring the Service Model (REST)
In the middle of the screen, the section REST Settings is shown. As we're not using any authentication or custom headers, we can leave this section as-is.
Http HeadersAs many systems these days use custom headers in sometimes exotic ways, it's good to remember that headers can use expressions to do customizations.
Now let's have a look at the different operations provided out-of-the-box.
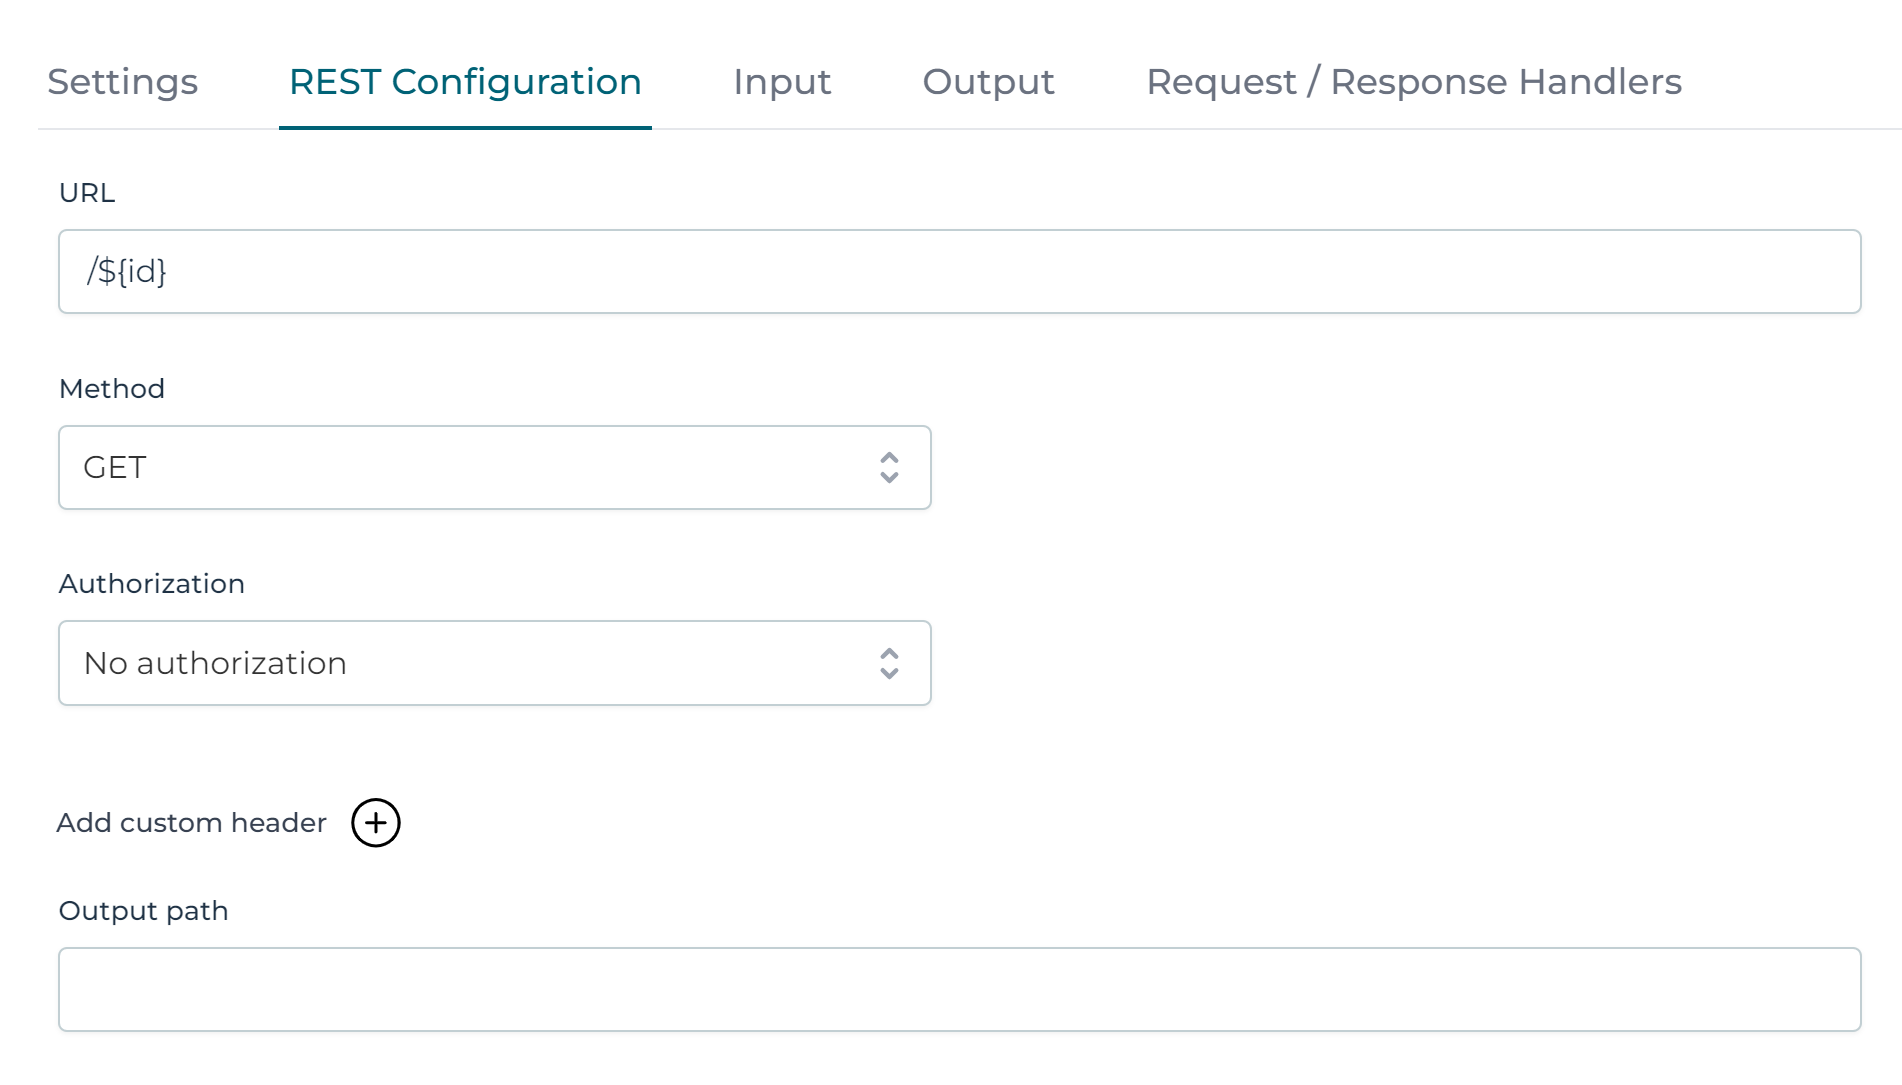
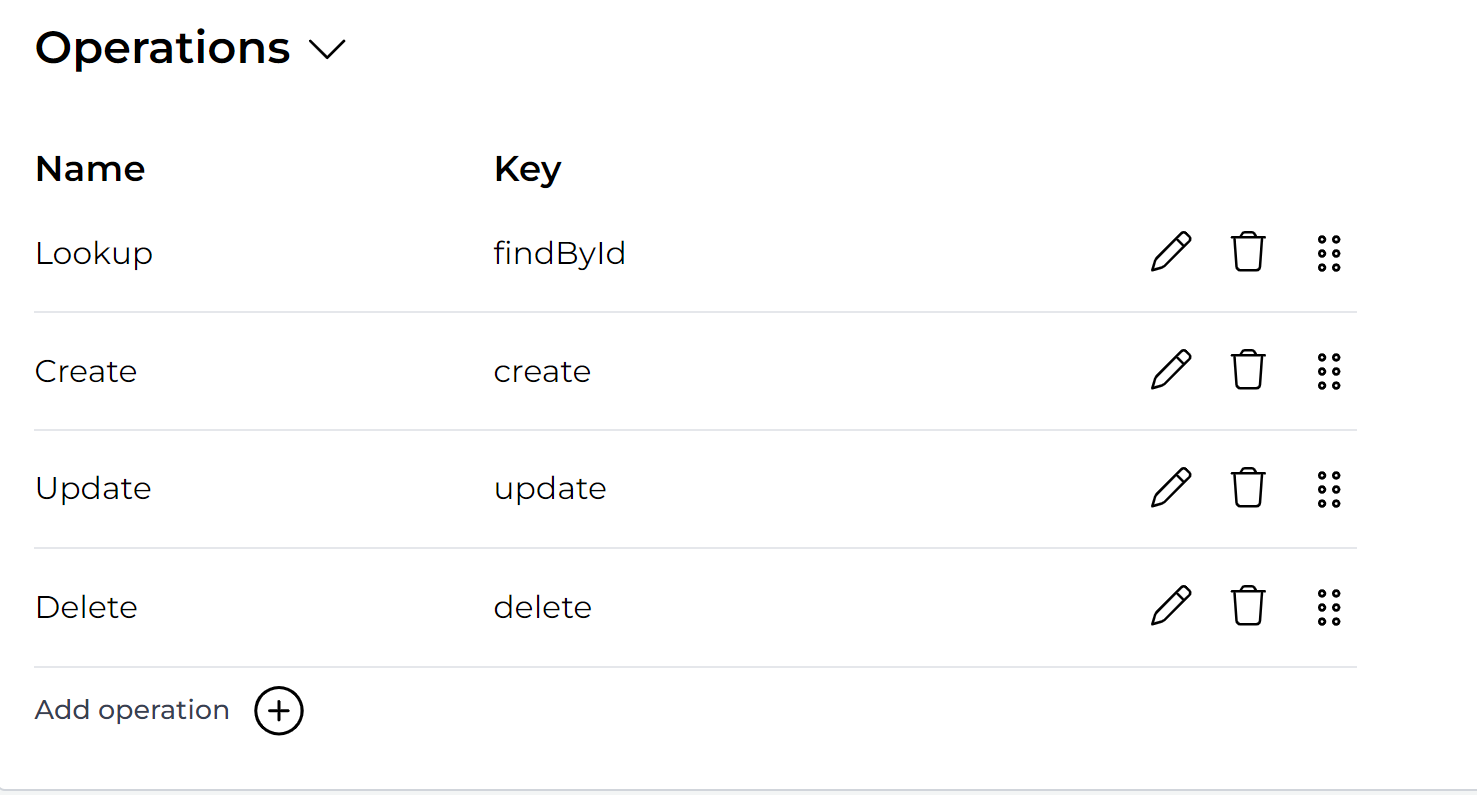
In the Operations section click the chevron-right icon to expand it, and for each operation click the edit icon,
go to the REST Configuration section, and confirm or edit the settings for each one.
All the operations have been already configured out-of-the-box following default patterns for REST API's.
- The
Lookupoperation with theGETmethod. - The
Createoperation with thePOSTmethod. - The
Updateoperation with thePUTmethod. - The
DELETEoperation with theDELETEmethod.
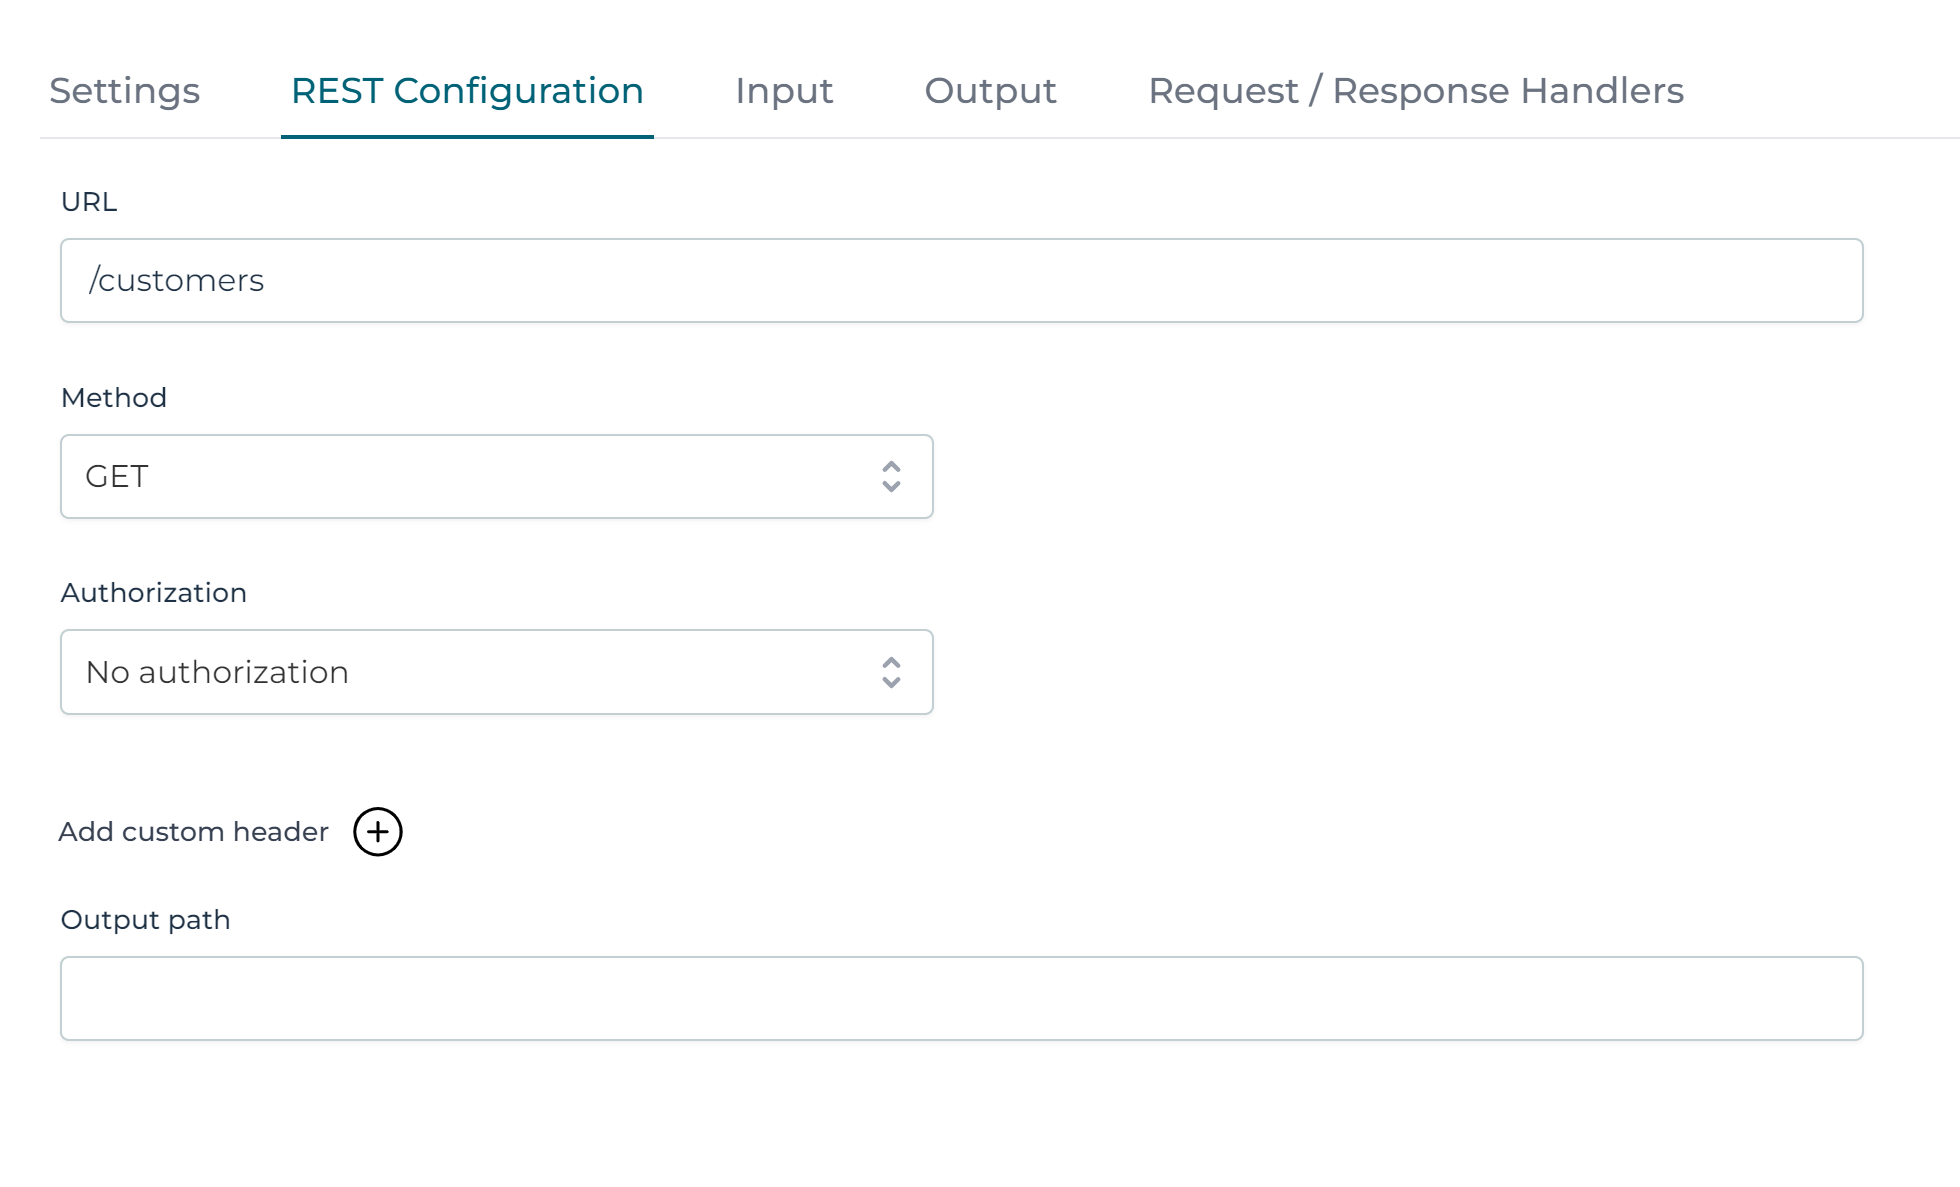
For example, the /customers/{id} lookup is already configured with the method GET and to inject the data object id:
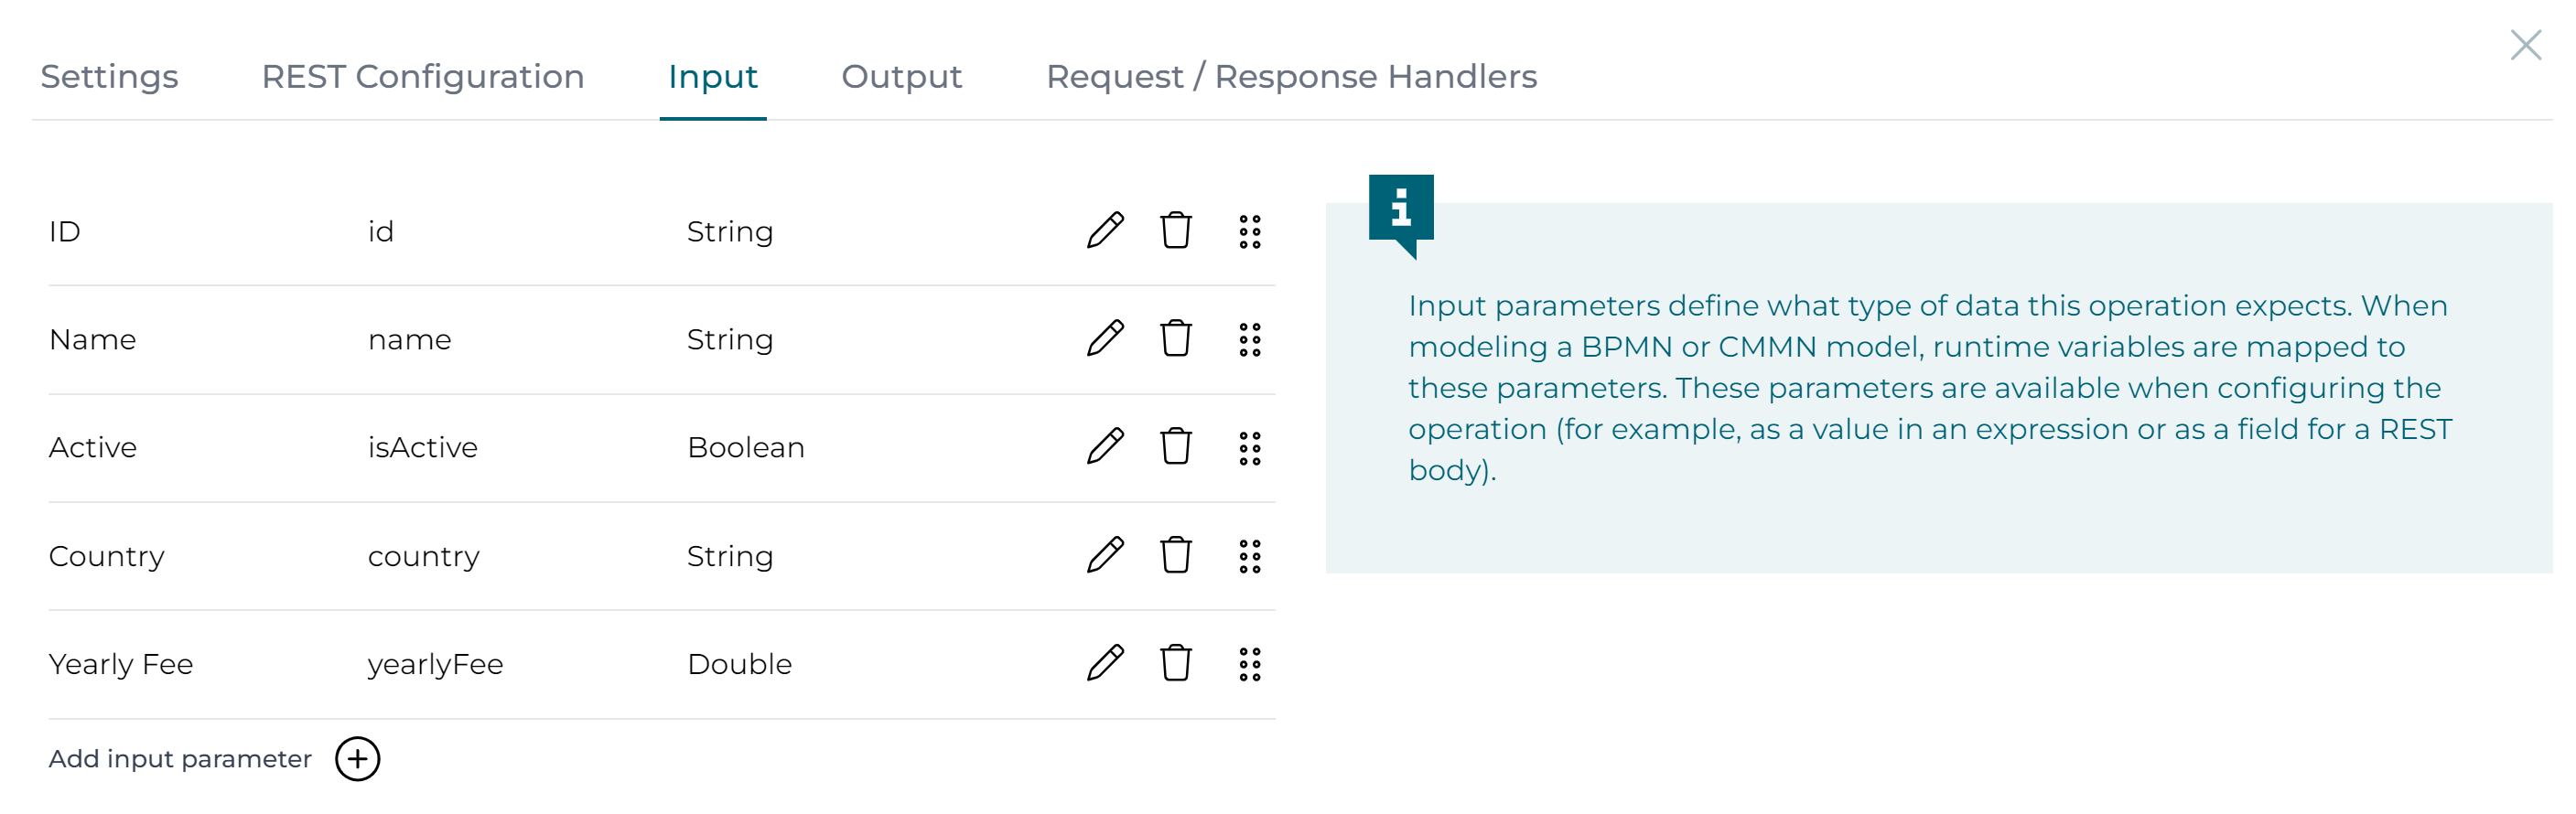
Also the input parameters have already been automatically generated, for example for the create operation:
For a REST service, the output mapping is typically the same for each operation, therefore the output mappings can be generated to avoid having to repeat it for each one. An operation without an output mapping will use this mapping.
Under the Shared output mapping section click the Generate mapping button:

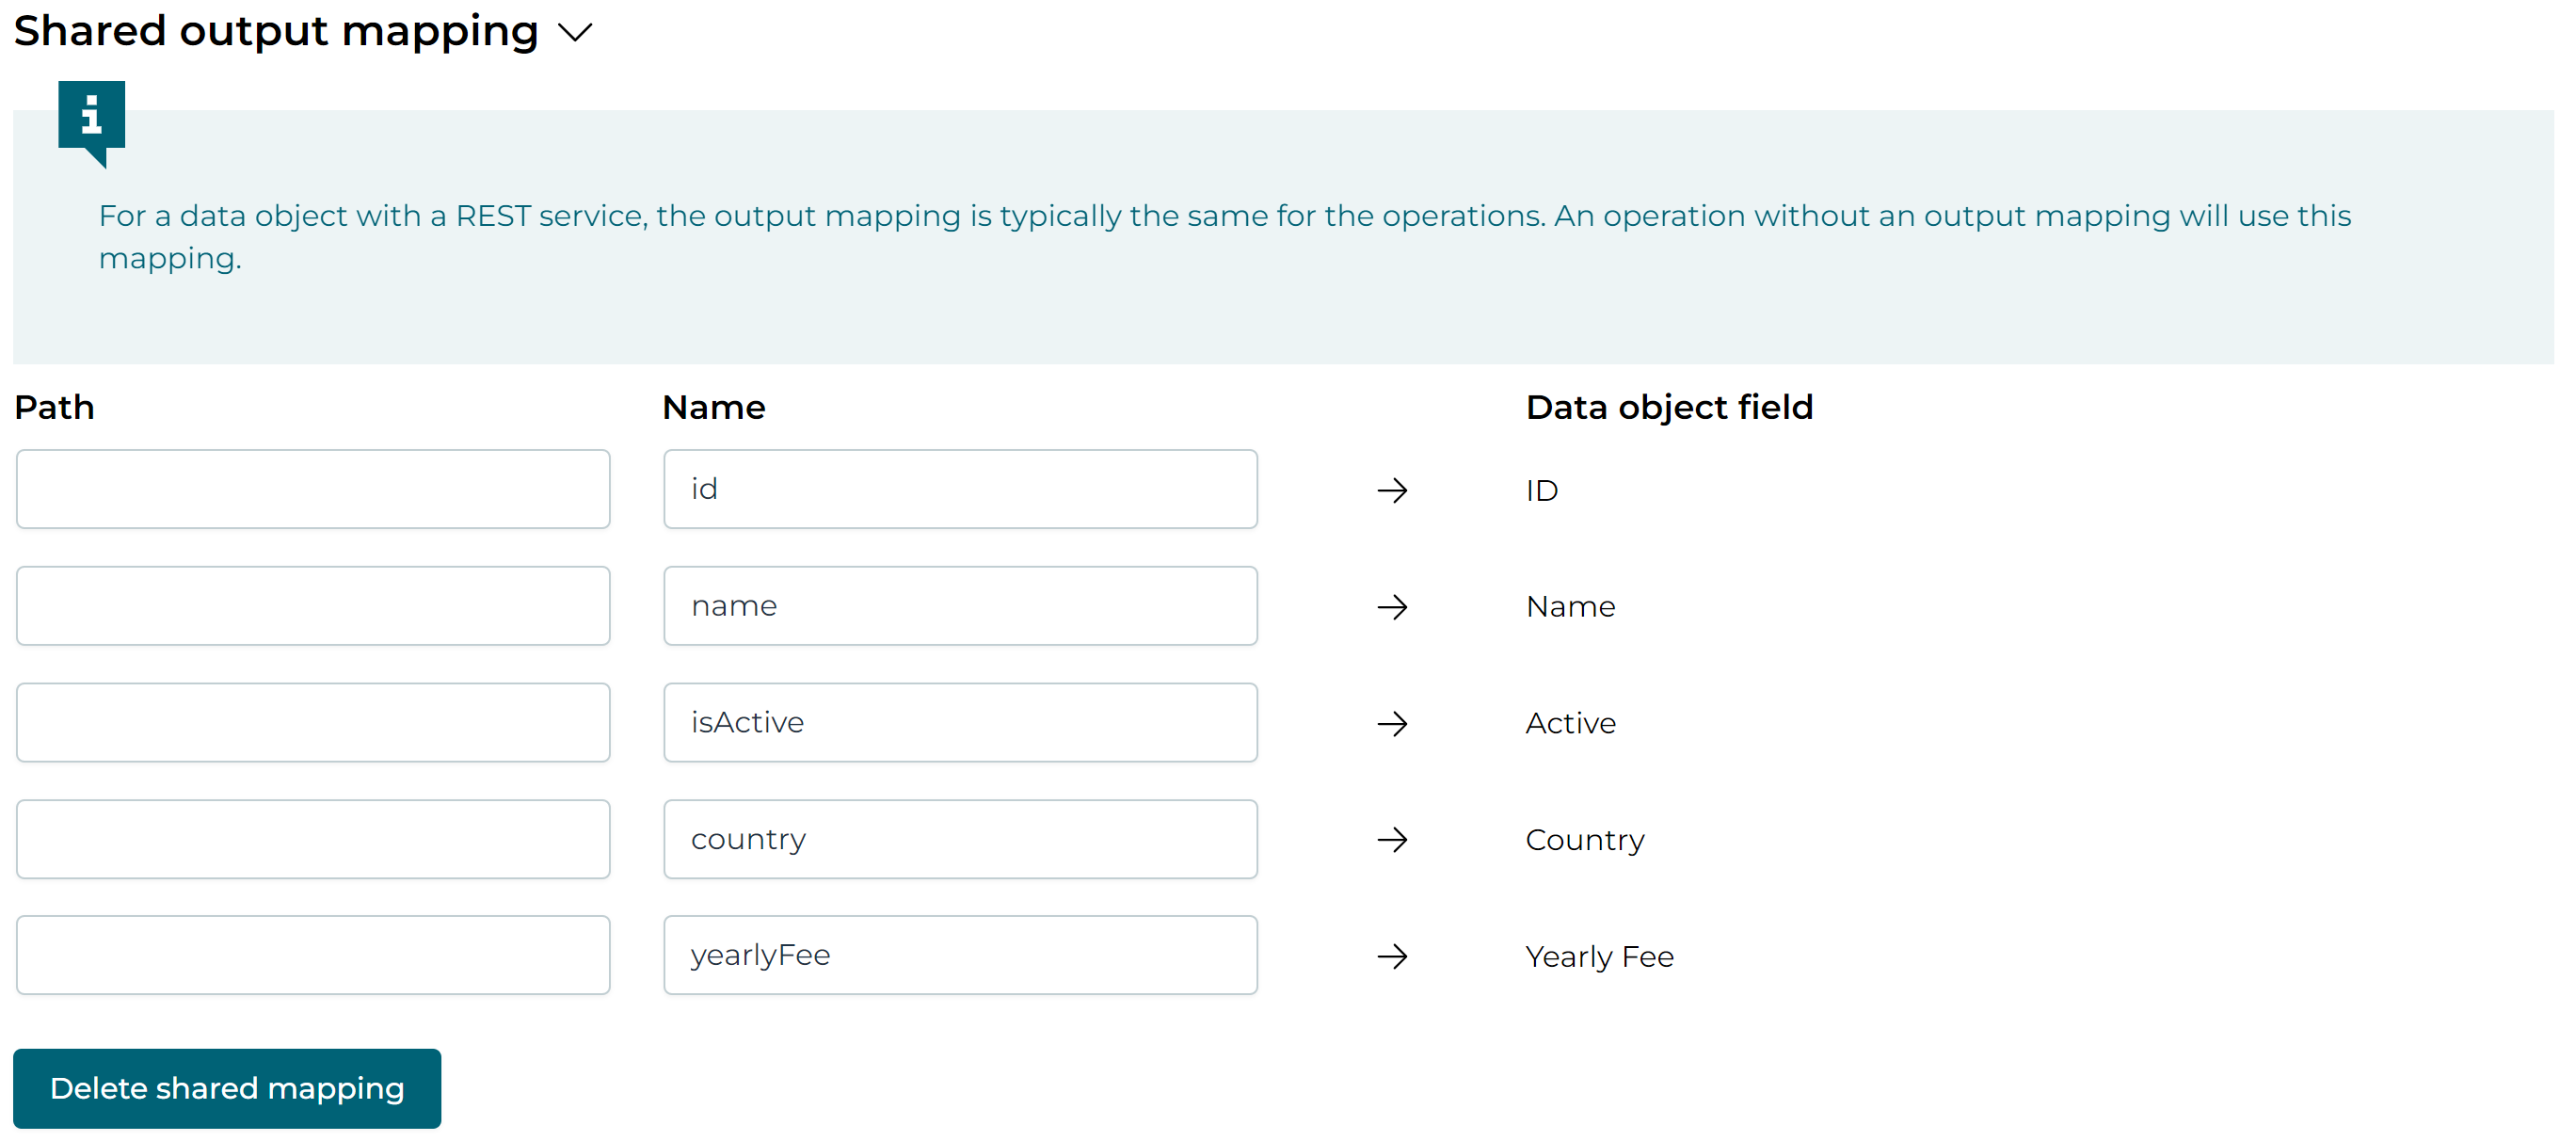
Since the REST API is simple here, all values go on the root of the JSON body. In a more complex scenario, the Body location column can be used. This can for example have a value like data.customer.field, which means that the value will be placed in the field property of the customer object, which is part of the data object. Note that the Body location overrides anything in the name column. Only when Body location is missing, the name value will be used.
Alternatively to mapping the JSON body with this table, a body template resource can be placed on the classpath of the Flowable installation. If set, the table is ignored and the template resource (using Spring resource reference syntax) will be used to generate the body. This template is a Freemarker template and has all data variables available to build the body.
Note that the Body location and Path settings don’t use the same syntax. The Path settings uses JSON-Pointer syntax, but the Body location uses a much simpler 'name and dots' syntax.
REST Configuration Options
The following configuration options aren't used in this example, but it's worthwhile describing them:
- Headers on an operation: any HTTP headers configured at the root level (above the operations in the Design UI) will be added to the Custom Headers. When a header name is added on an operation and also exists globally, the value on the operation will be used and it will override the global setting.
- Output path: Calling the REST API will return a JSON response. If all data for the data object is not on the root level, it’s possible to define the general path of this data. Note that this can be further configured in the output parameters of the operation. For example, if for some reason the REST API would return the data in the first element of a data array, it could be something like
/data/0. The syntax for the path is JSON-Pointer syntax.
Using Data Objects in a CMMN Case Model
What about BPMN?All the following sections also apply to BPMN: the data object tasks, the various properties and built-in support for forms is exactly the same when used in a BPMN model.
Let’s use the models from above to show how the customer data objects can be used. The goal is to create a CMMN case model that can be used to create and centralize the management of data for customers.
In this tutorial, we'll create:
- One case instance for each customer, managing the lifecycle of one customer in one case instance.
- One page where we'll allow to search and list customers.
There are of course plenty alternatives possible. For example, in some industries the regulations for working with customer data are strict. There, one case model could be used to manage all customers, using user event listeners to start new customer onboardings or update existing data and use BPMN process models to implement the various steps needed with a BPMN process model containing various regulatory steps. In a simpler scenario, a page using a data table and the ability to create and change data from the table could be enough, without needing CMMN or BPMN models. Pages are often used together with data objects, as they are a logical place to add data tables and searches that span all data objects.s
In the example here, we'll use a mix of everything, to showcase as much features and options as possible. However, keep in mind that you can make things as simple or complex as you like, depending on your specific requirements.
The end result will be a CMMN model that looks like:
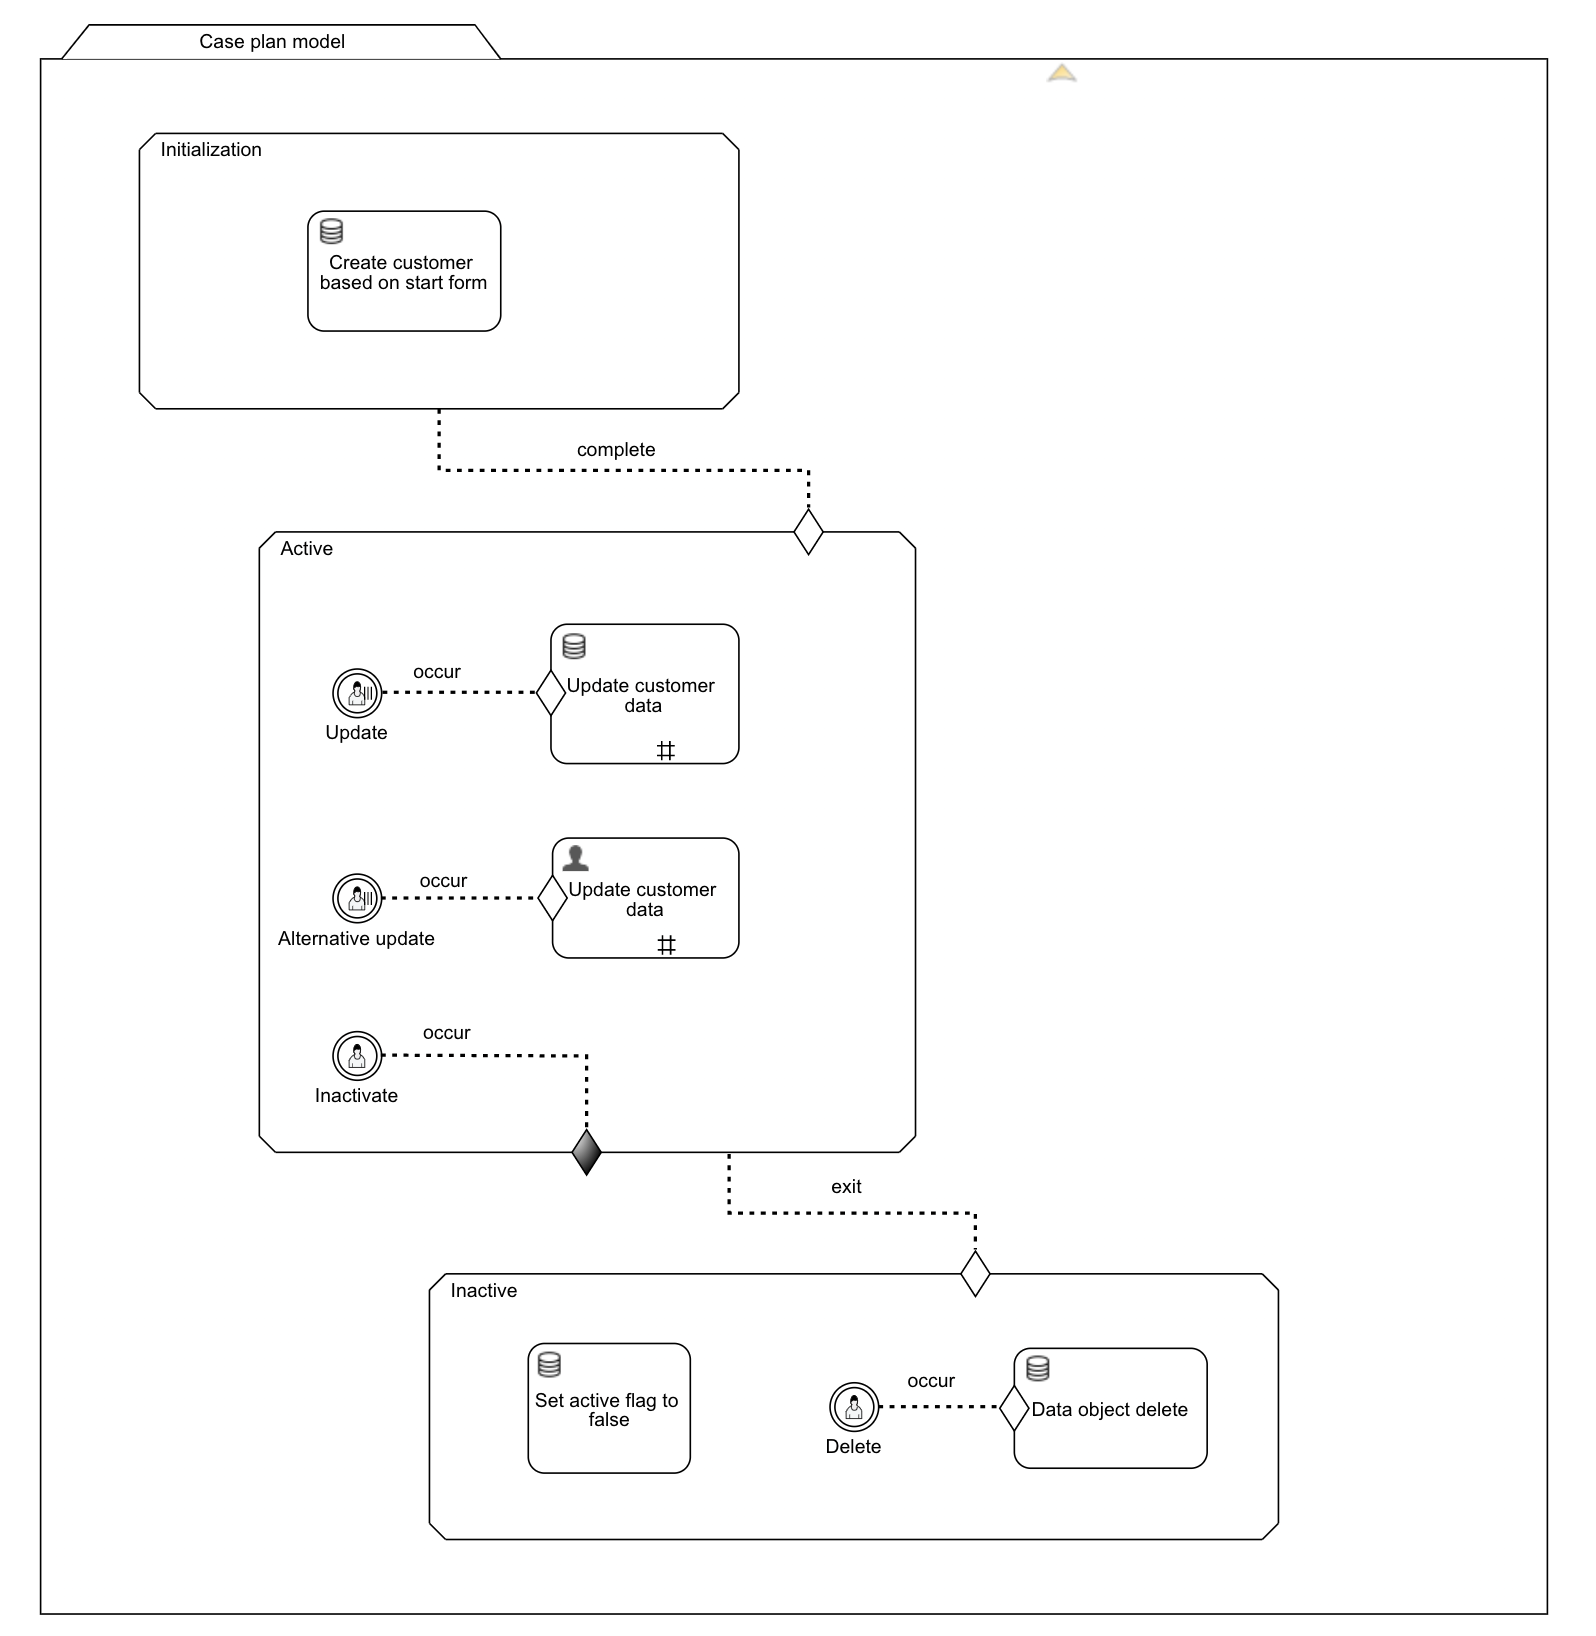
Of course, this is but a minimal model highlighting specifically the relevant bits of a data object model (backed by a service model). A realistic customer case model would have way more steps and details than this example.
The CMMN Case Model
To create a new CMMN model, click on the plus icon to the right of the last model tab on the canvas and go to
the Create section and select the Case model type.

Give the model a name and a key and click on the Create button`:
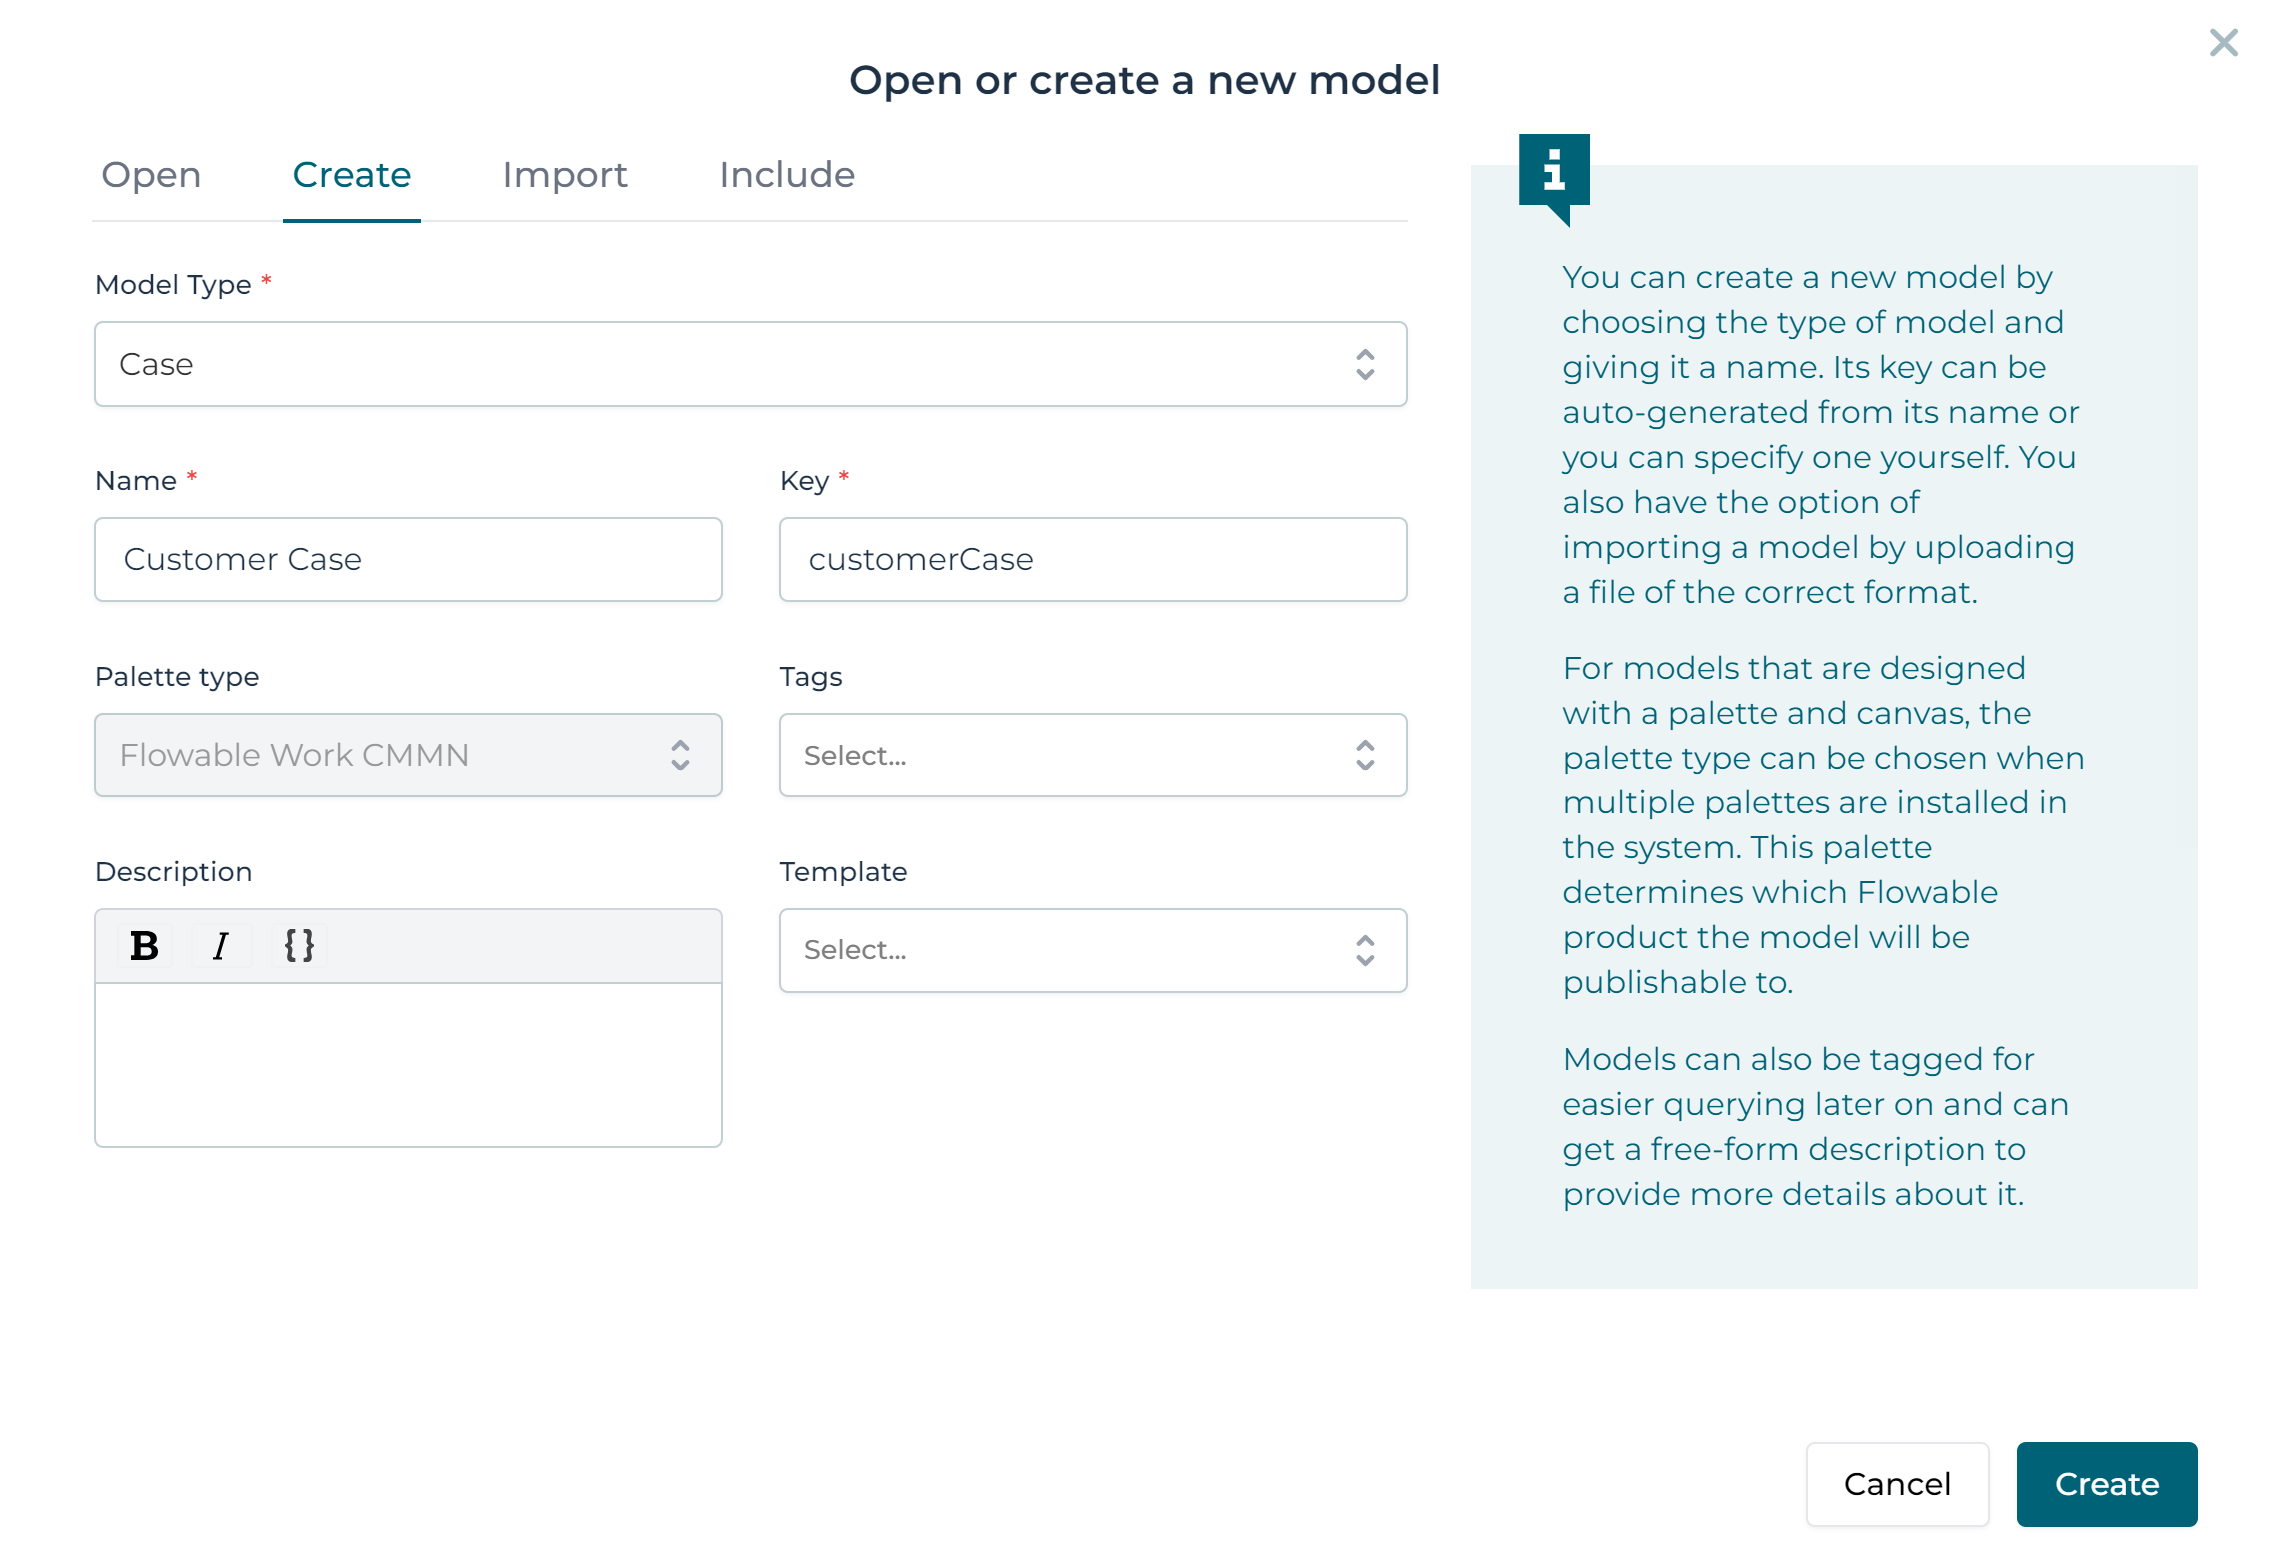
noteThe new model will automatically be included in the current app.
A new tab with the CMMN model will now be opened and the Design UI will automatically switch to it.
The first thing we'll do is to add a start form that collects the basic customer information when a case instance is started.
To do that, select the plan model (the large rectangle on the screen) and click on the Start form property in the property panel on the right-hand side.
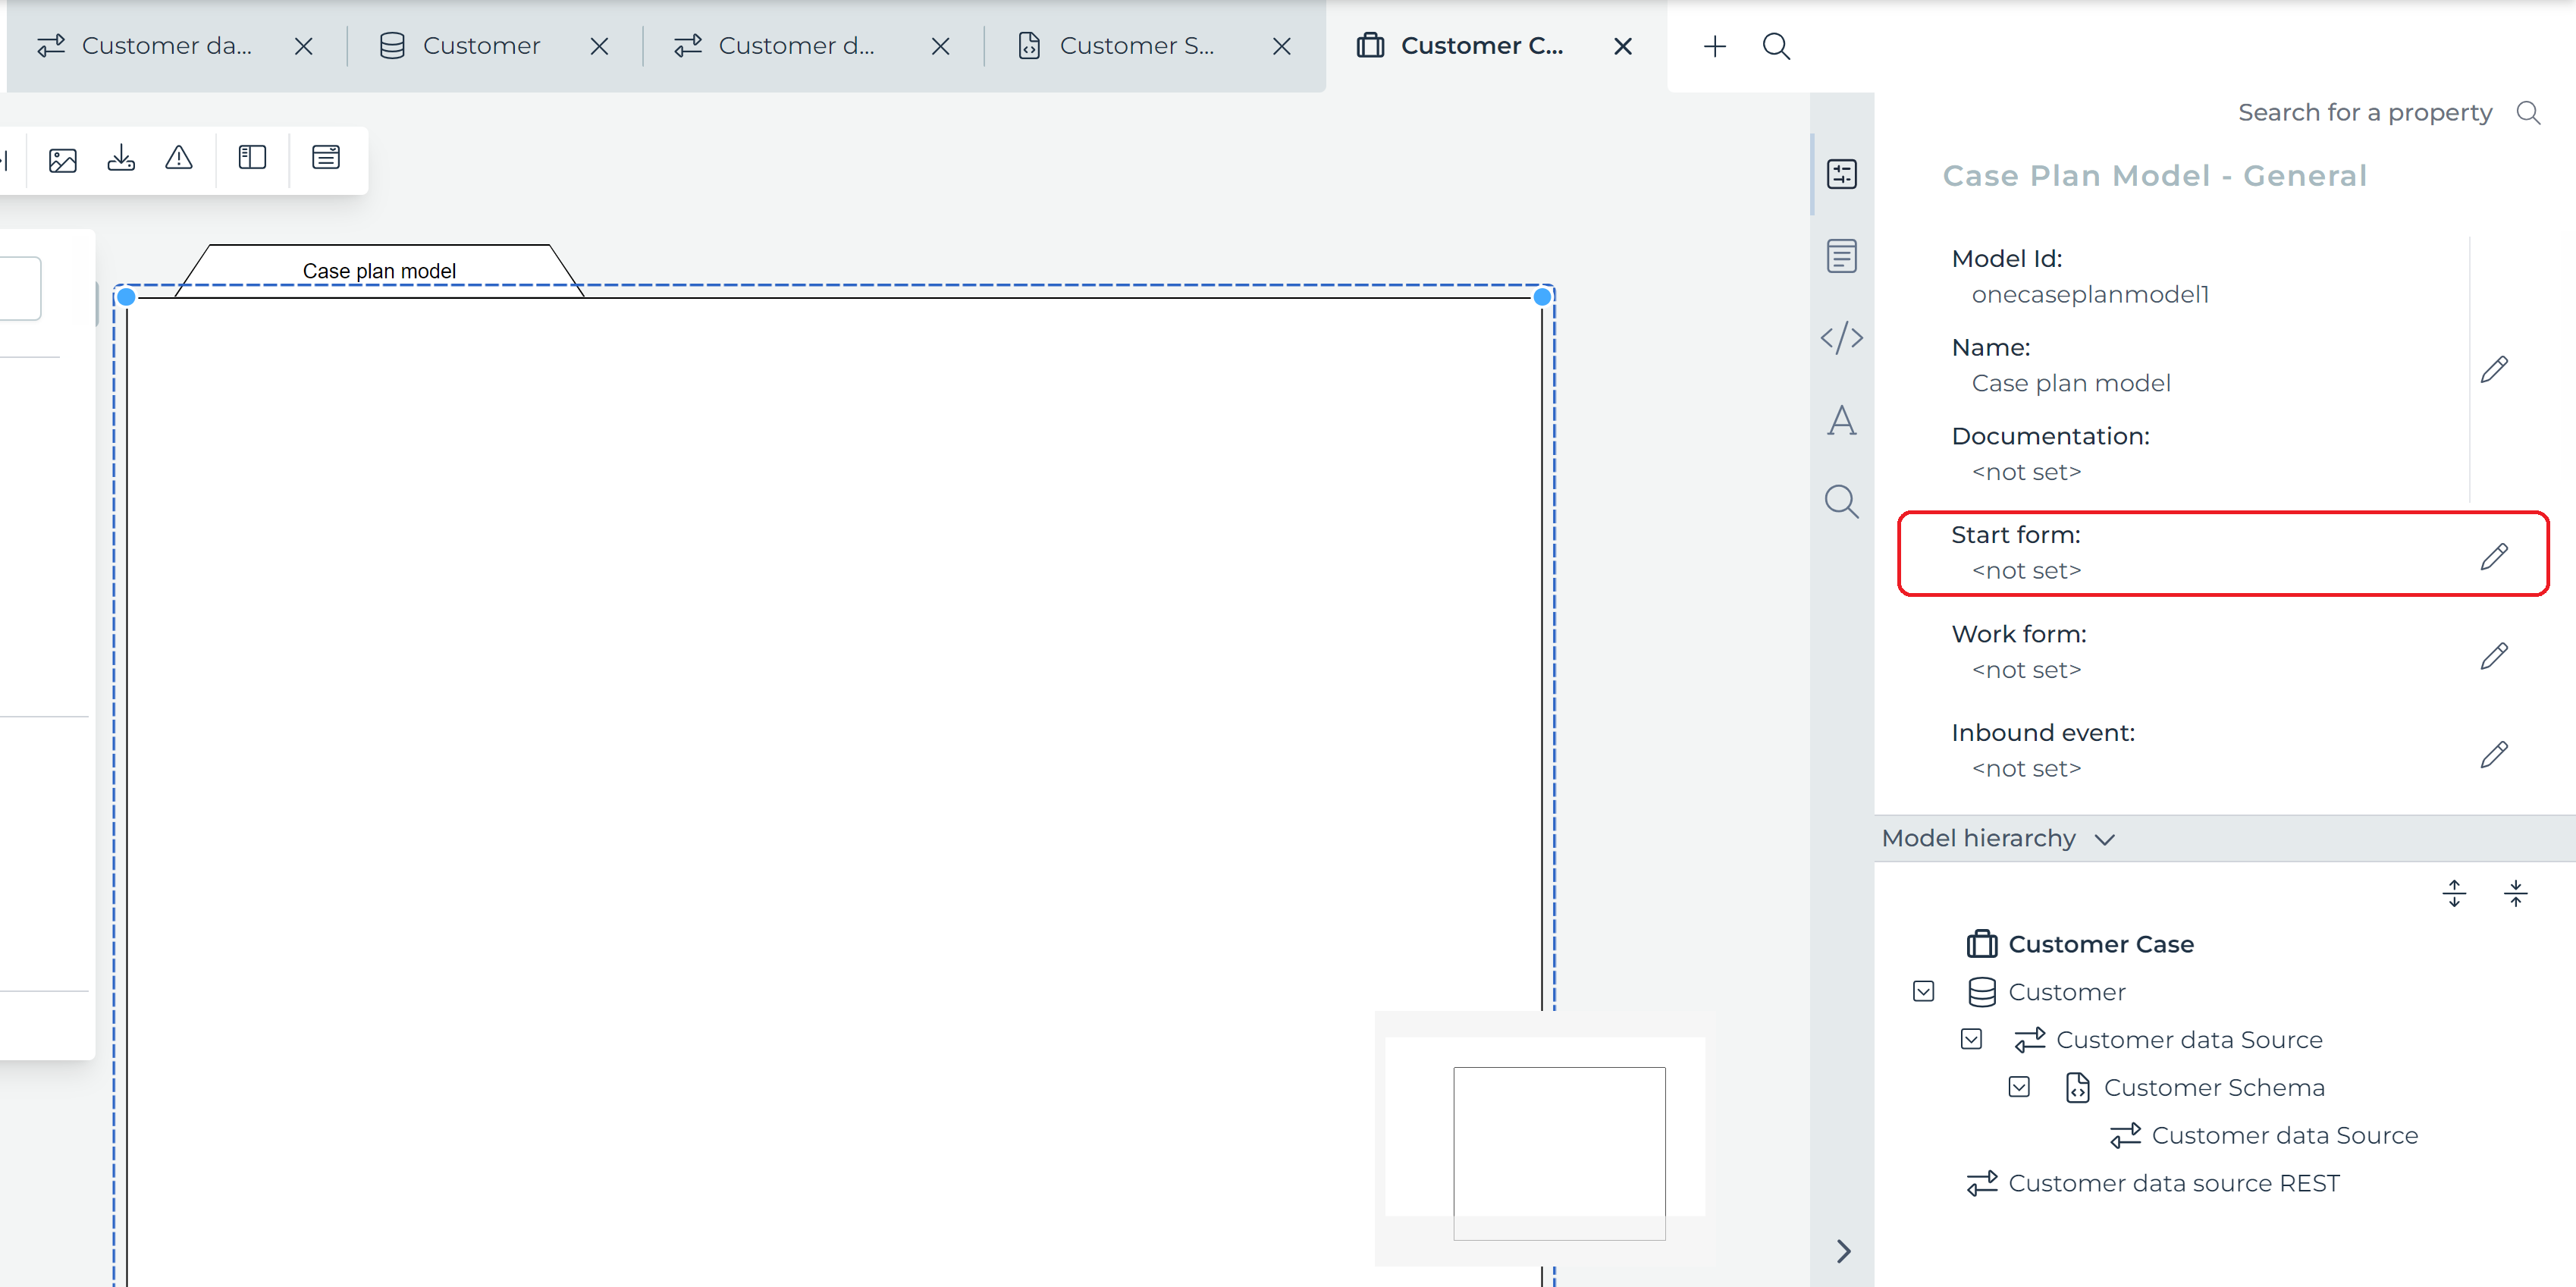
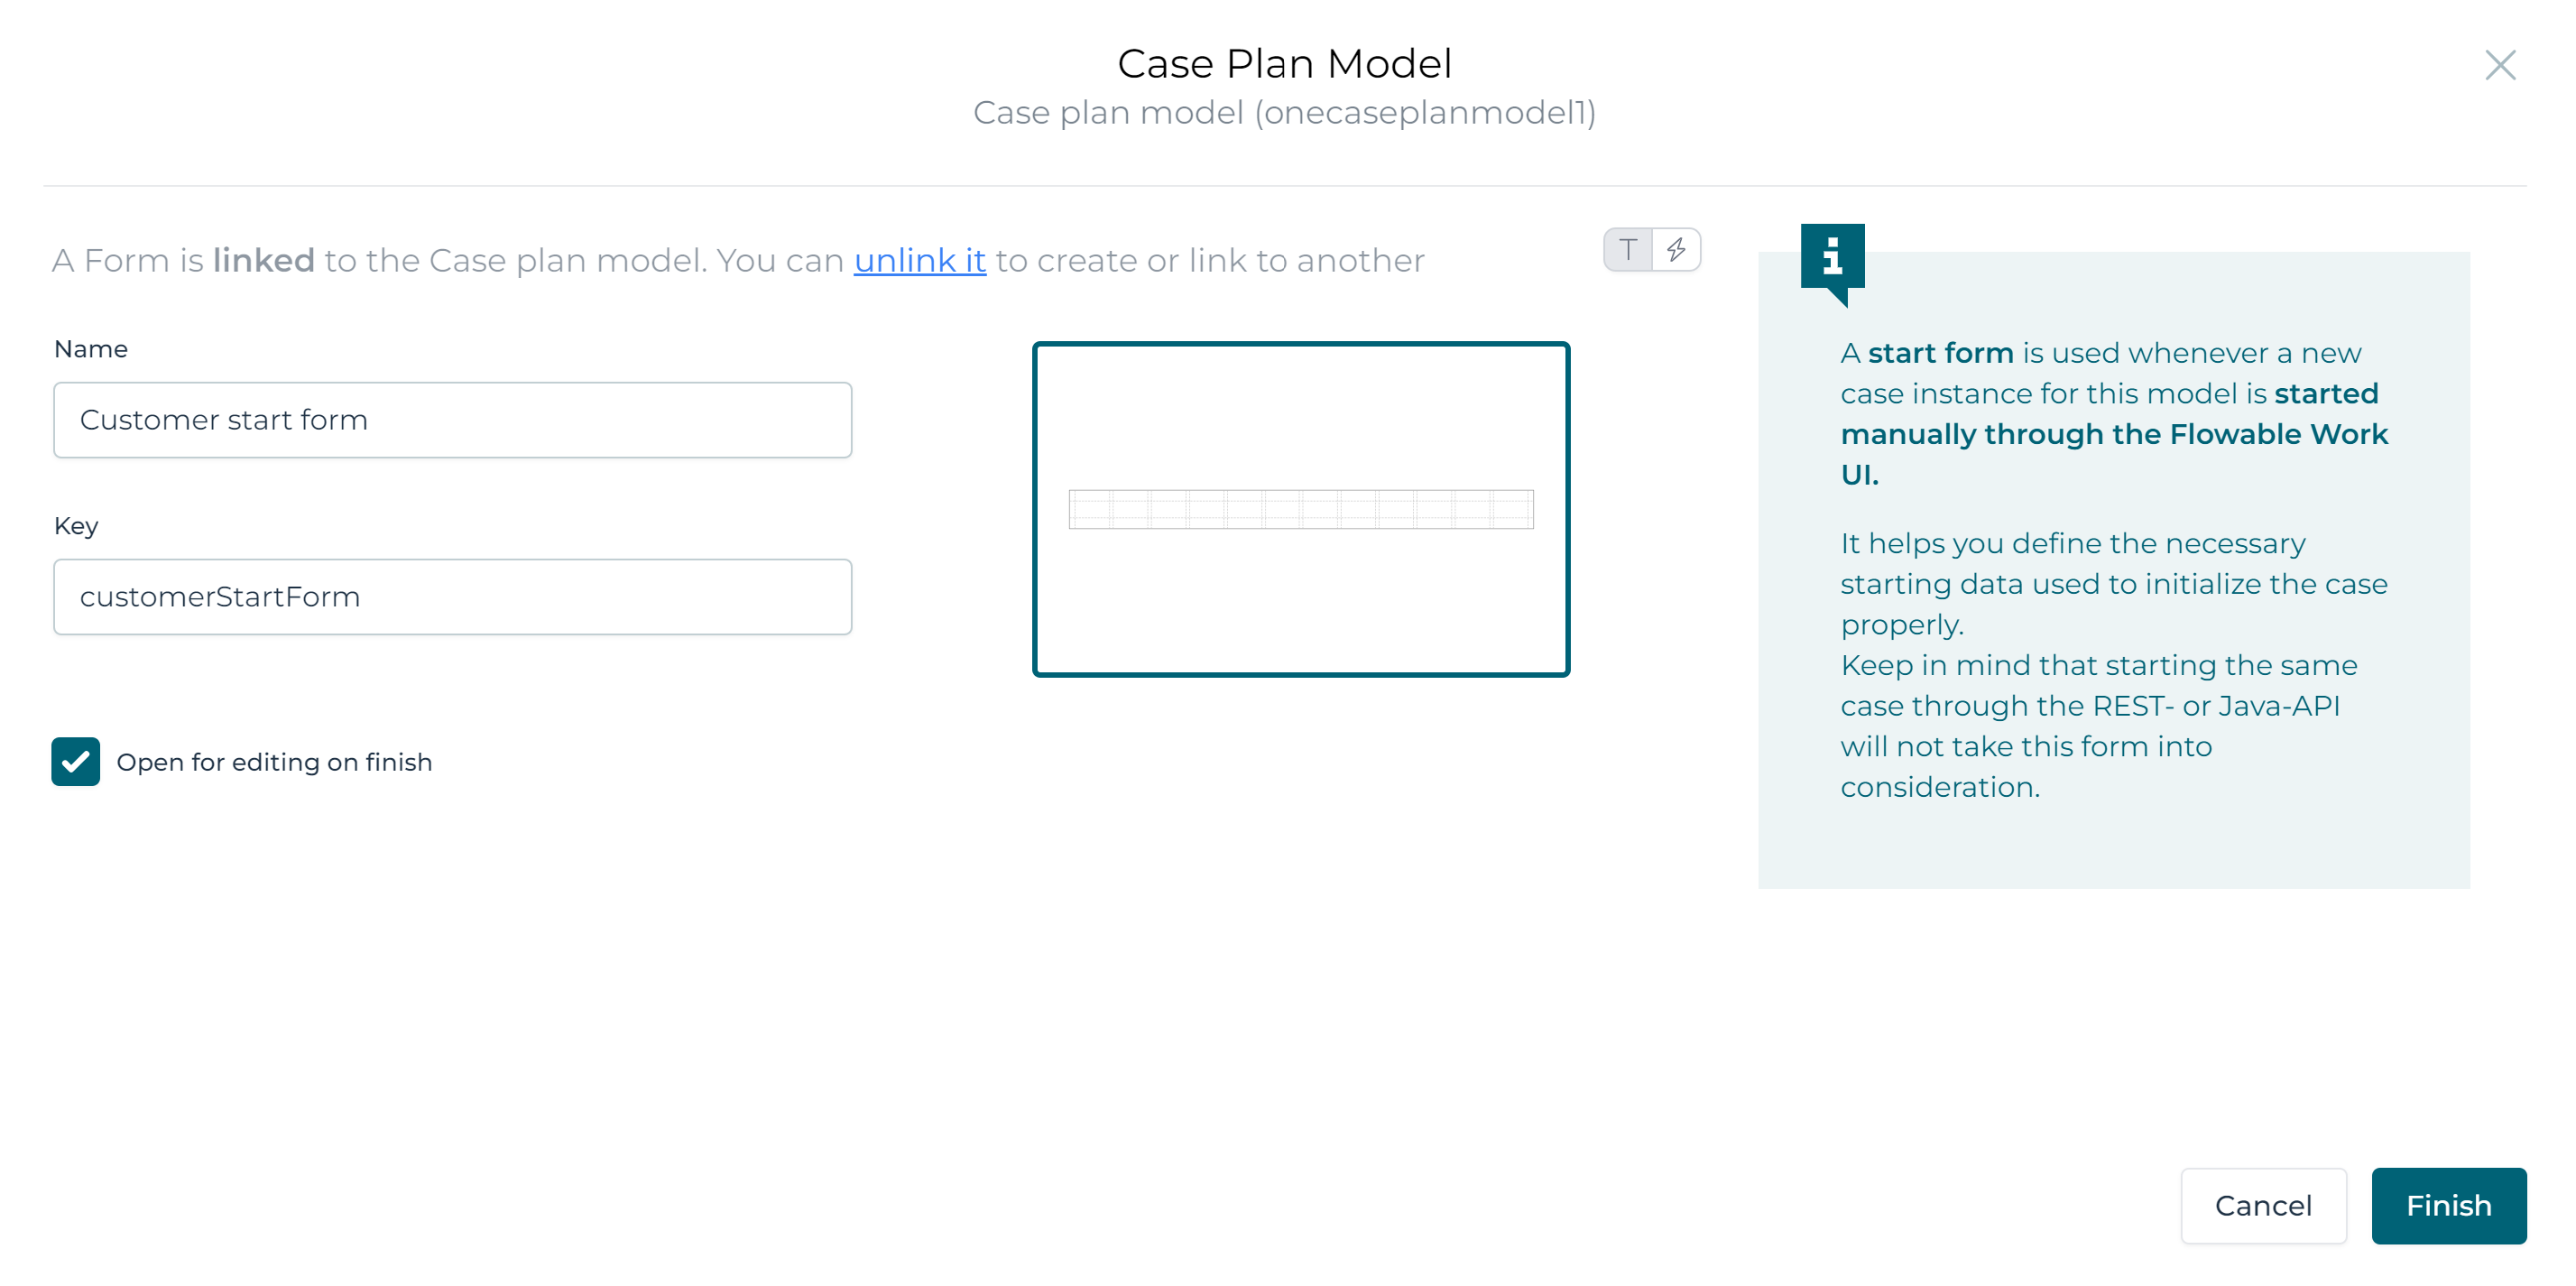
Pick a name and key for the start form:
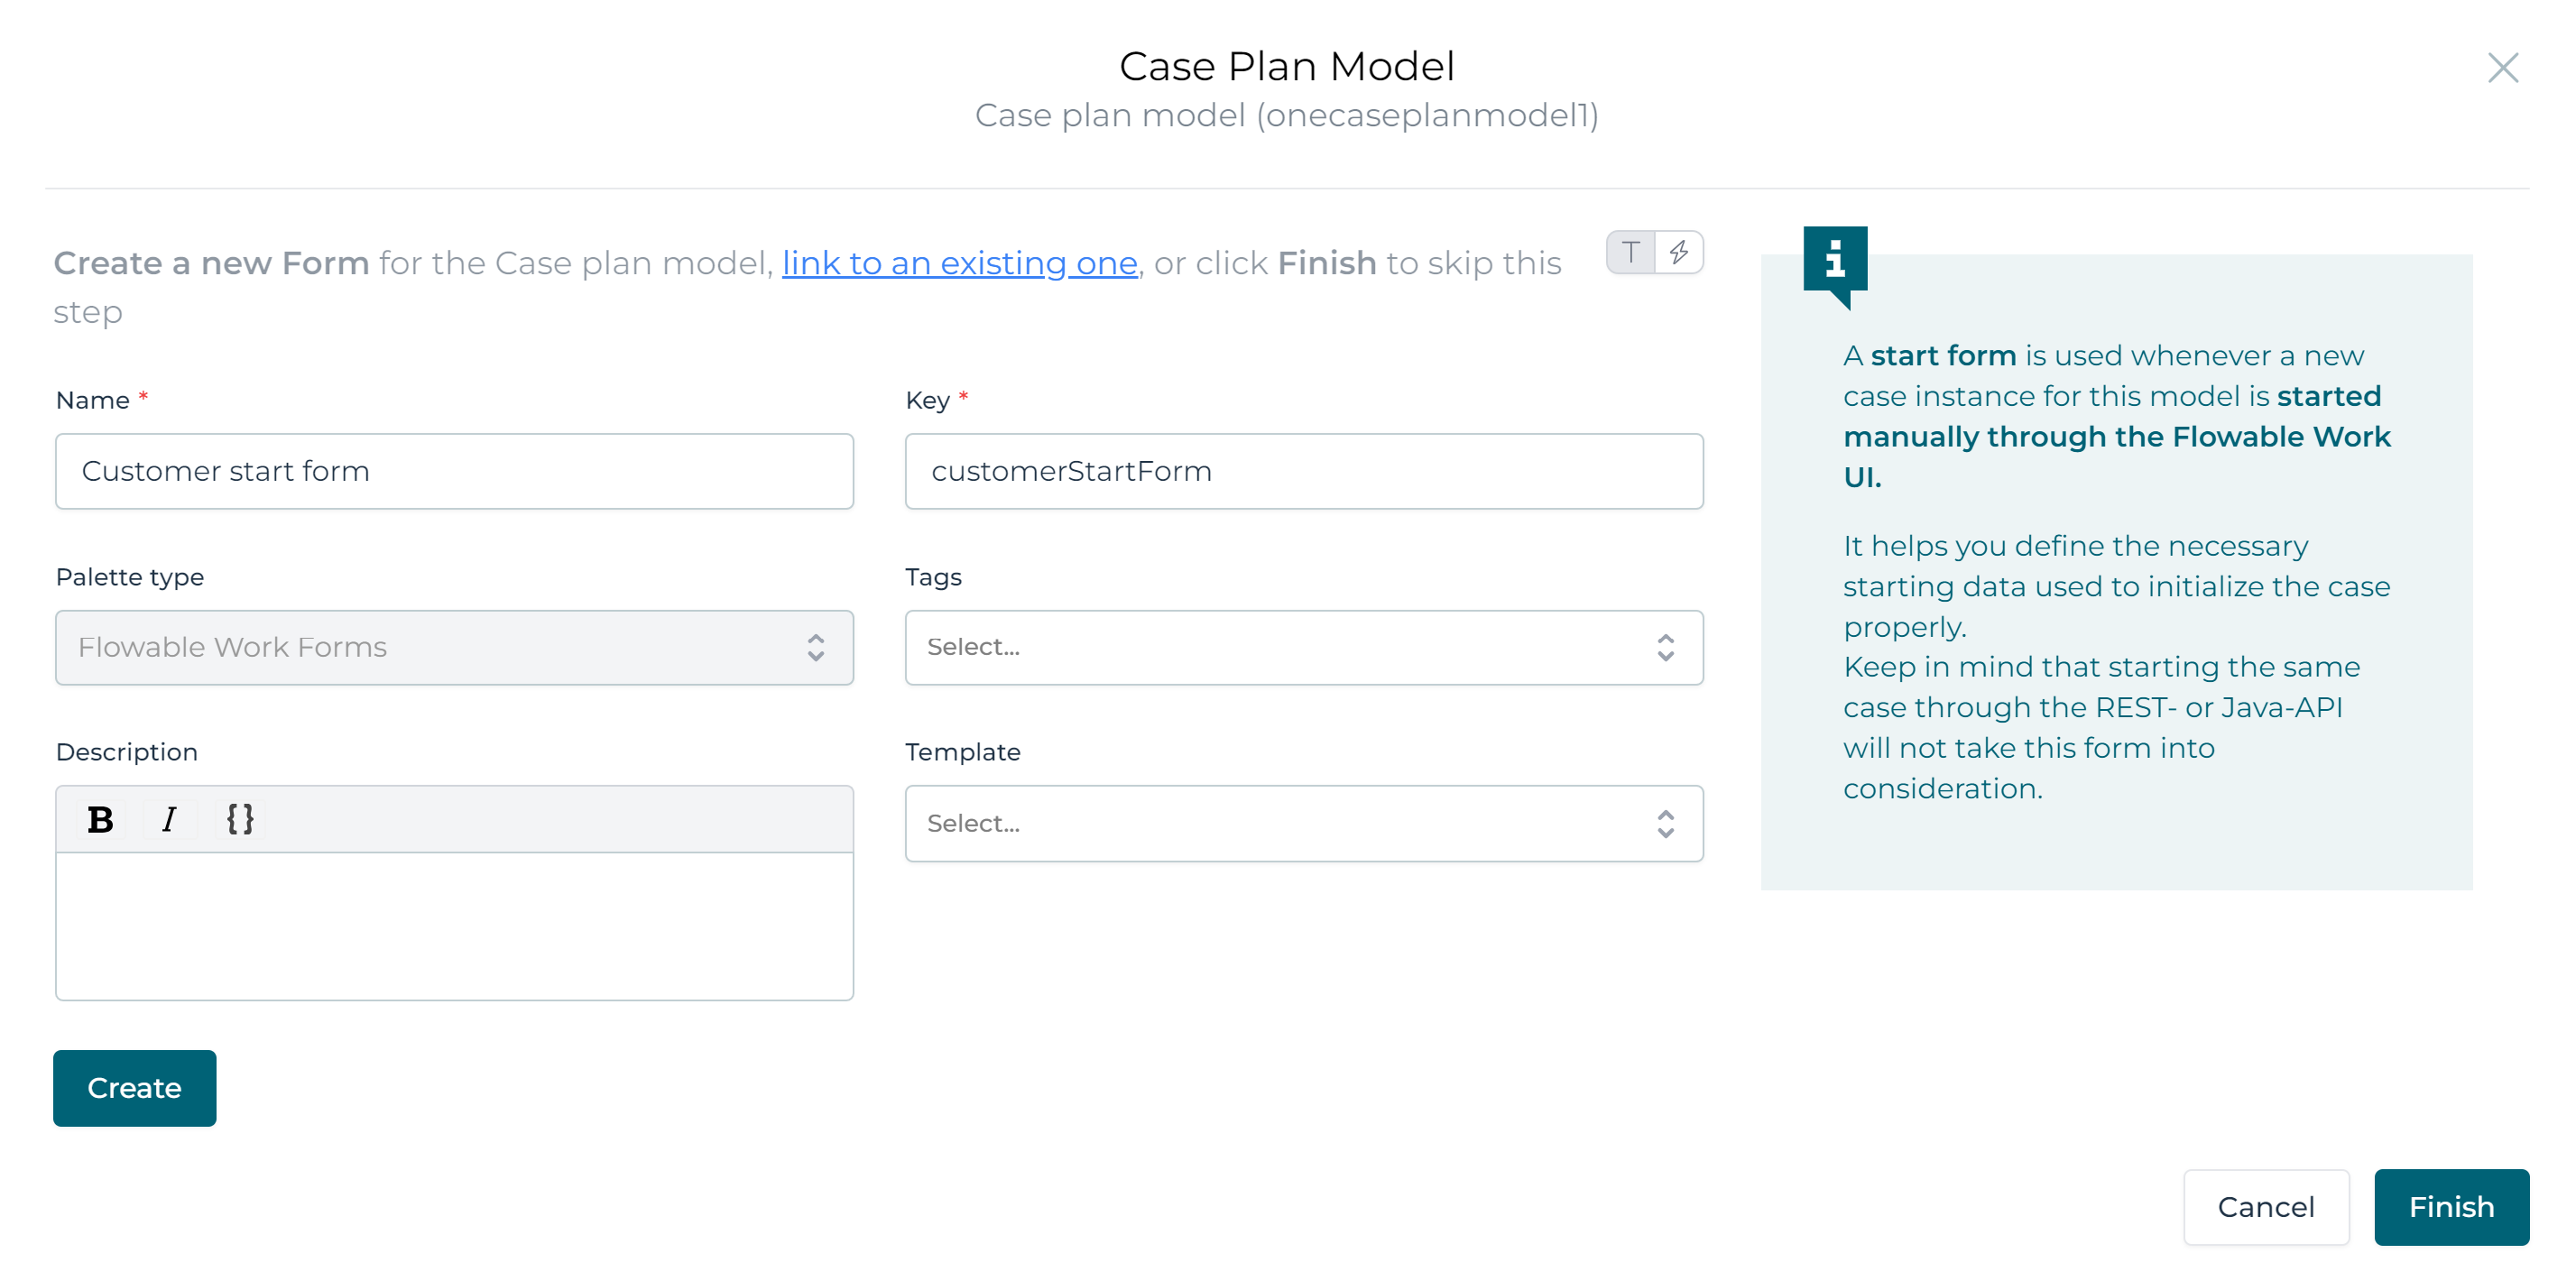
Click the Create button, and the start form model will be created for you. Now click the `Finish' button, a new tab with the start form model will be automatically
opened.
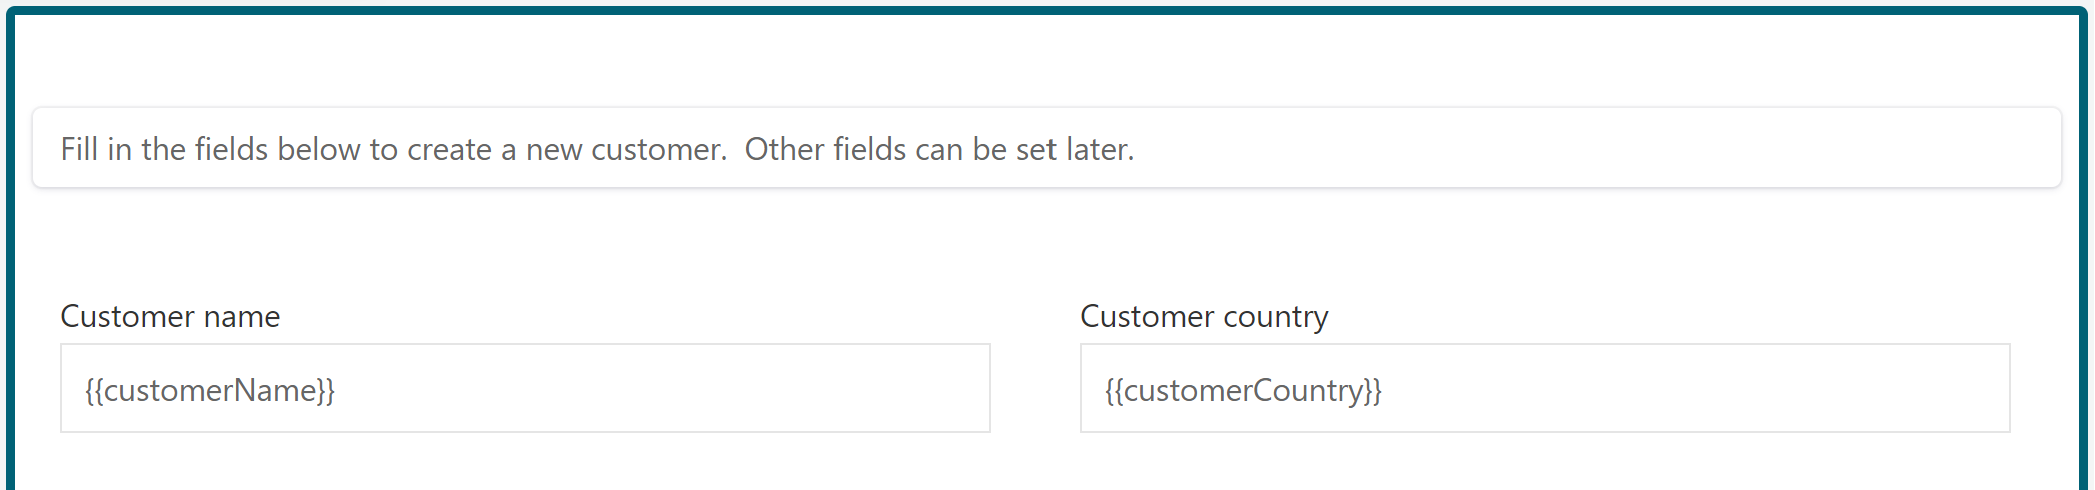
Add two text fields to the form (by dragging from the palette on the left) and bind them to the customerName and customerCountry variable.
Add some help text above it using the Text Display component, if you want:
The Data Object Create Task
At this point, we've added a start form that will collect two textual variables, but we've not yet create a data object.
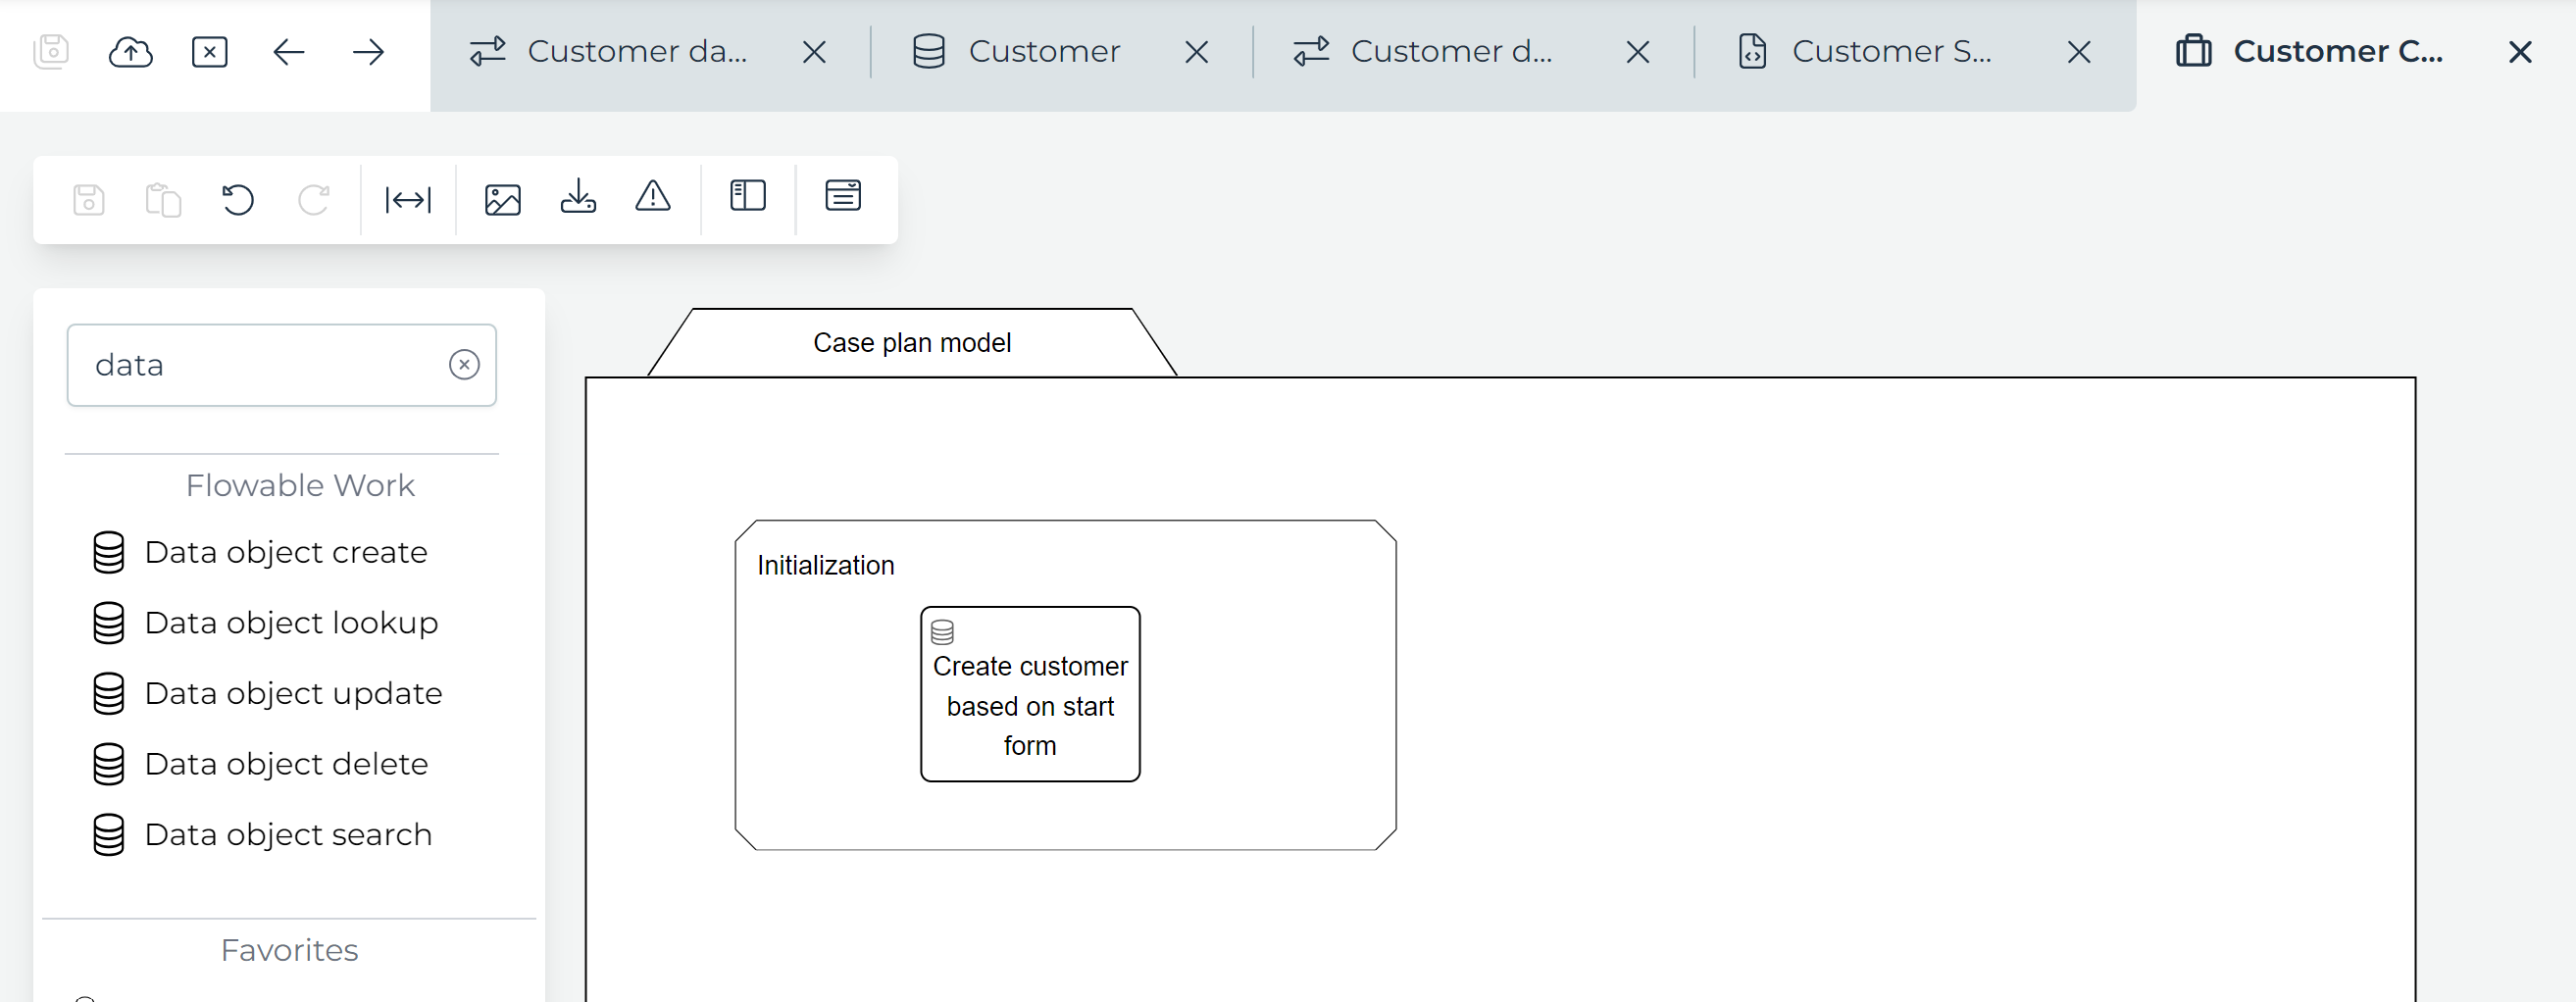
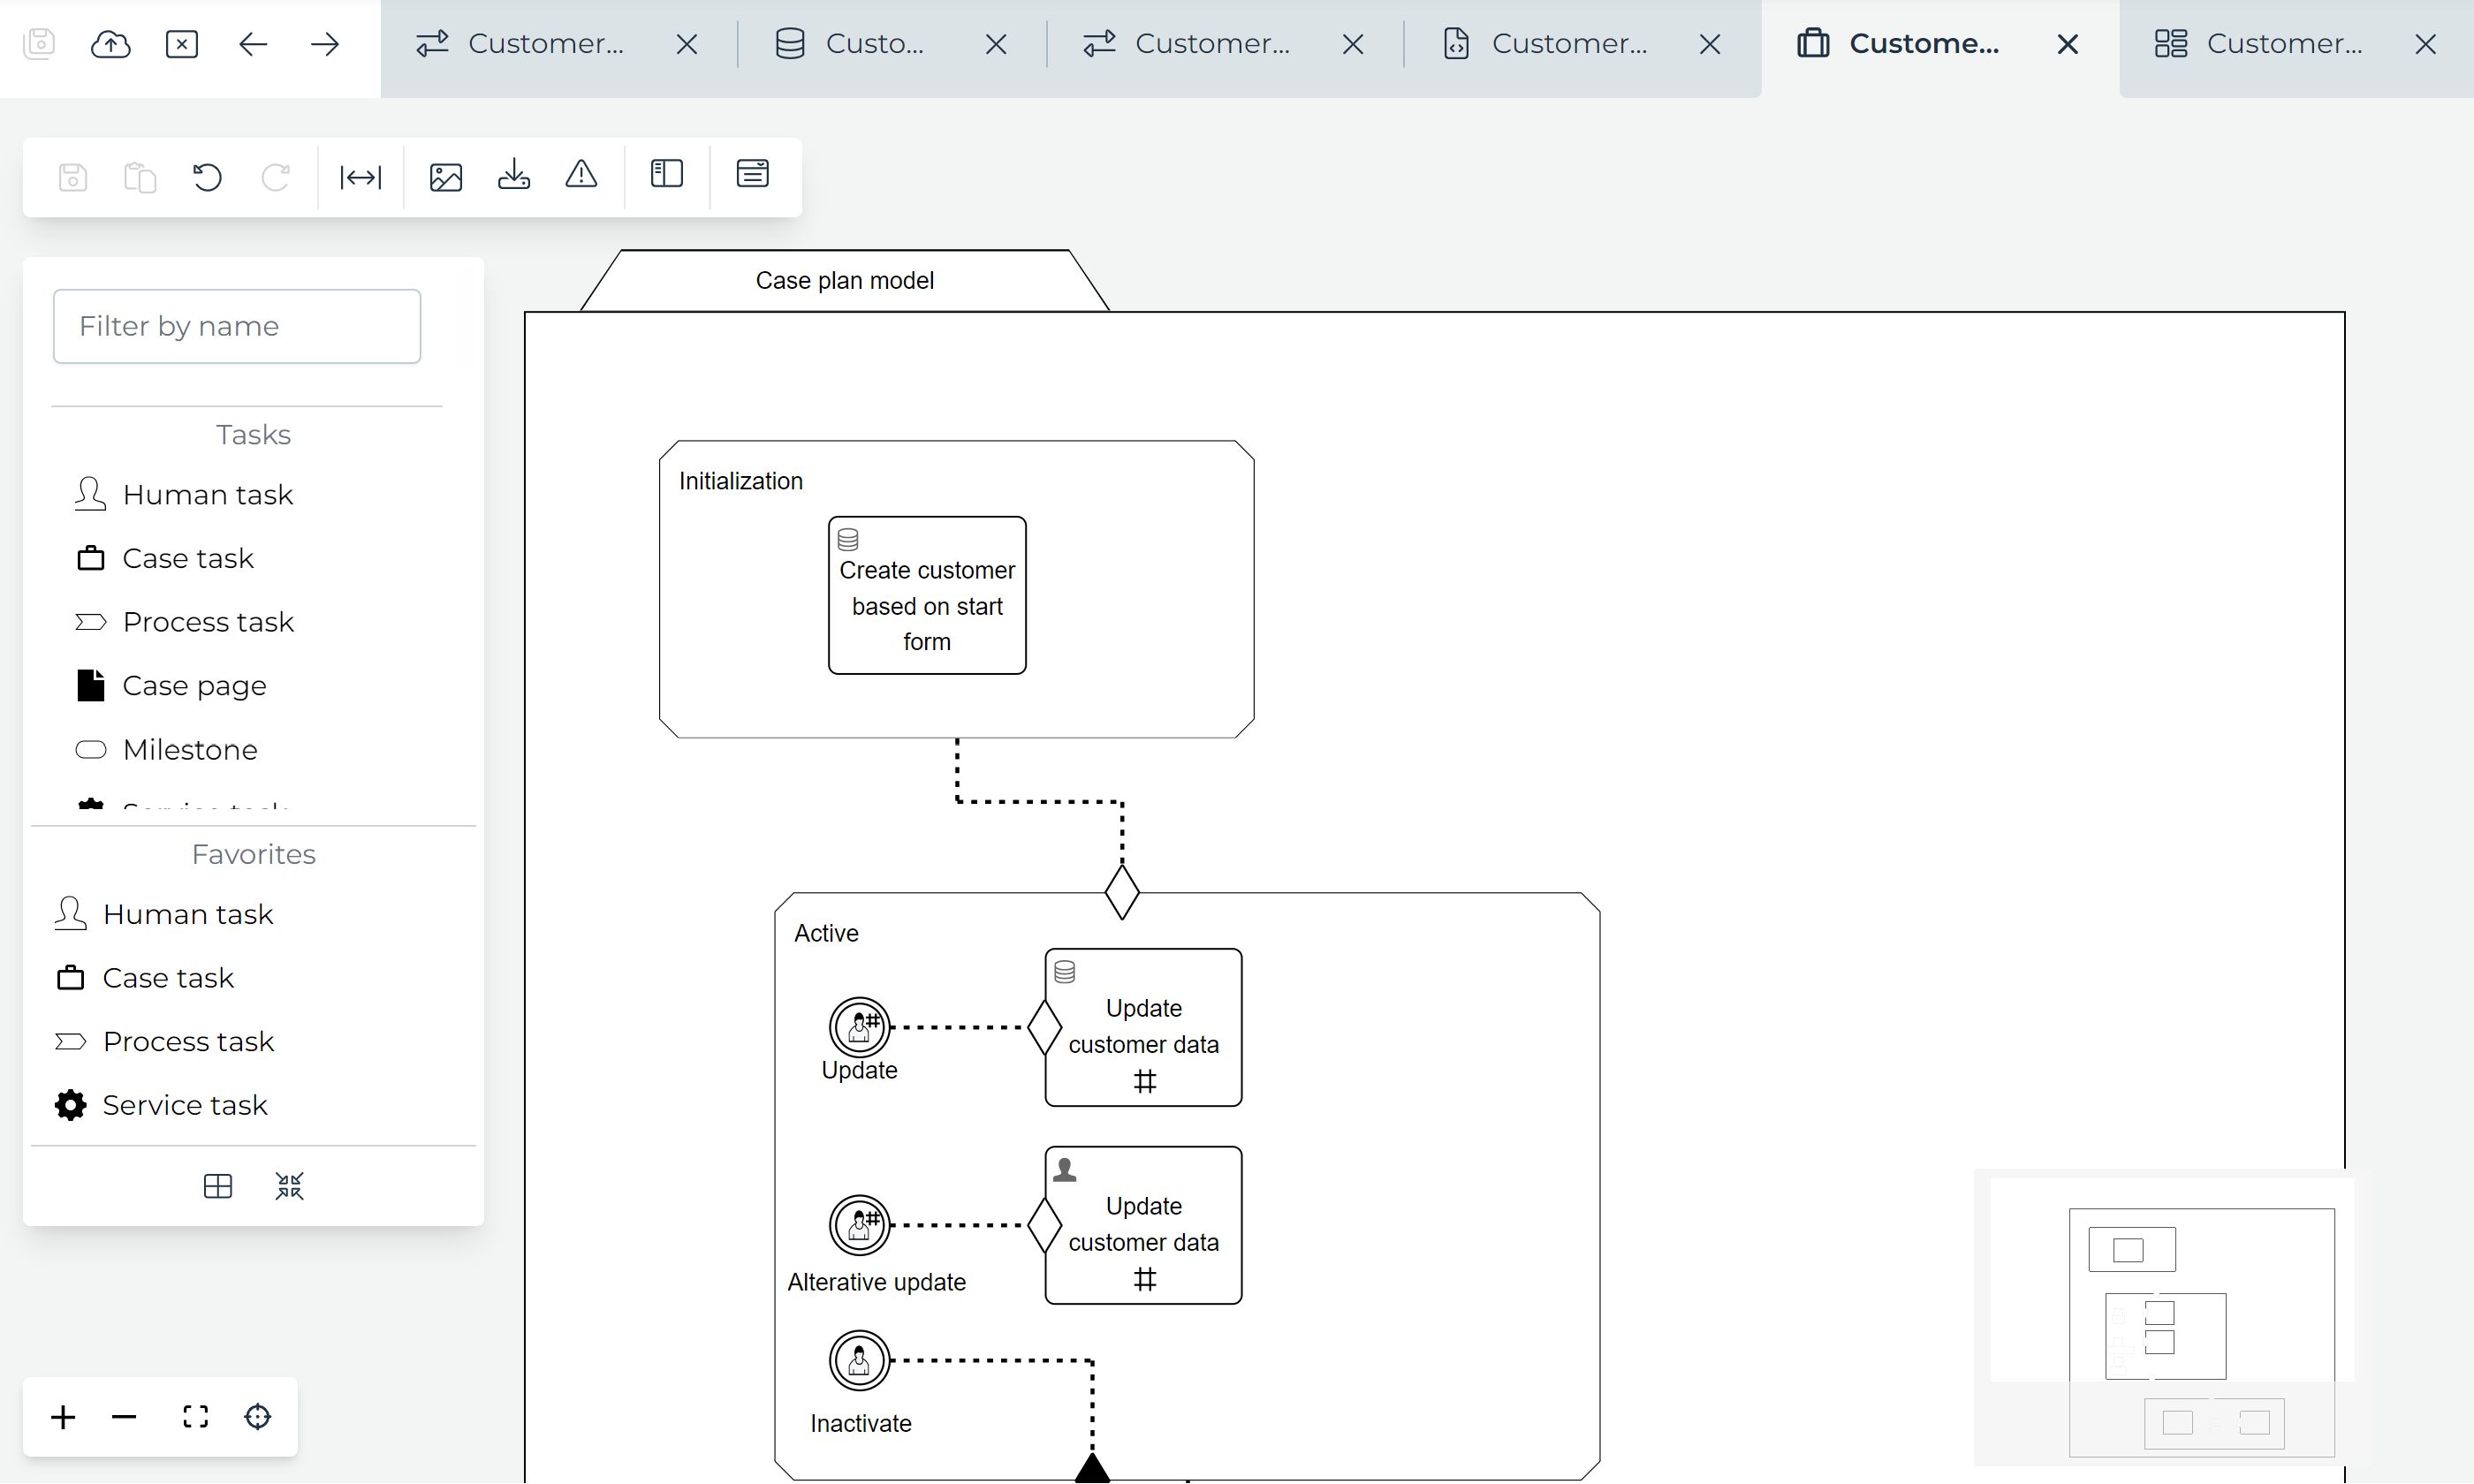
To do that, we need to use the Data object create task. Go back to the Customer Case plan model and find this
task in the palette and drag it on the canvas.
It's a good practice to add a Container>Stage first, which we'll name Initialization.
By adding all plan items (like this task)
in distinct stages that map to customer states, we can glance the state of the customer just by looking at the diagram.
The goal of this task is to create new data objects.
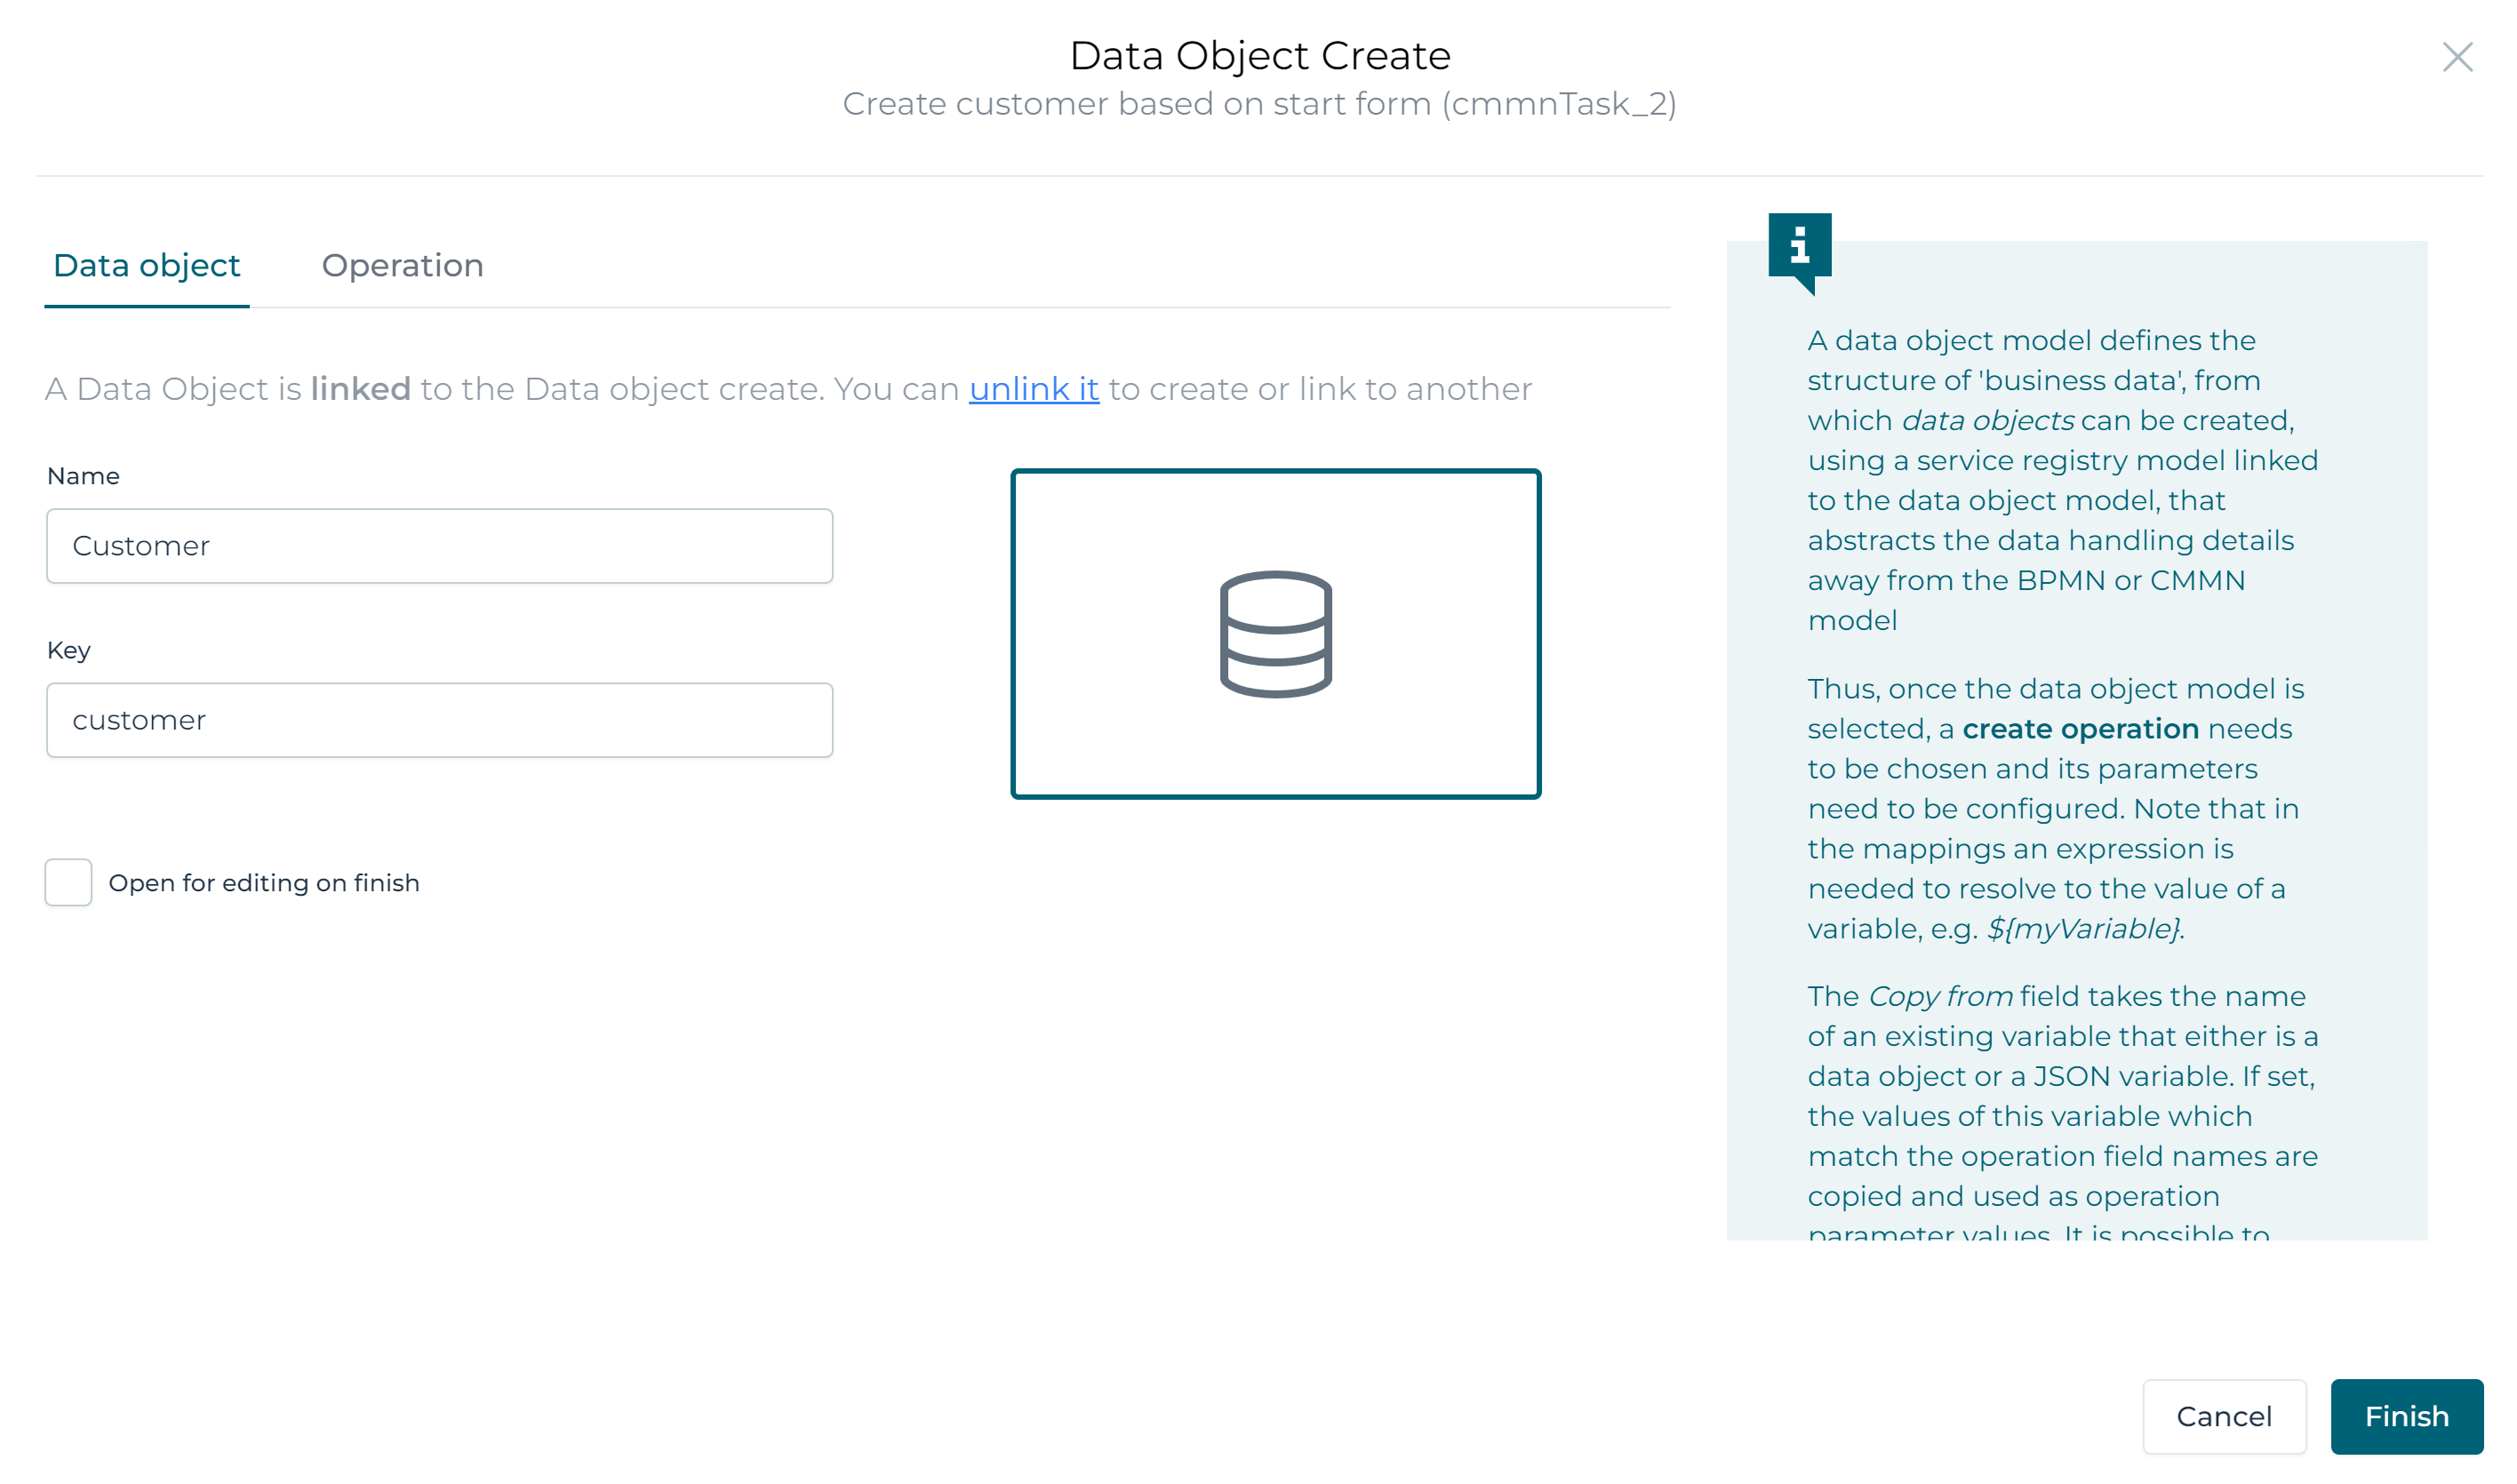
To do this, we need to configure this task to use the Customer data object model we've created earlier.
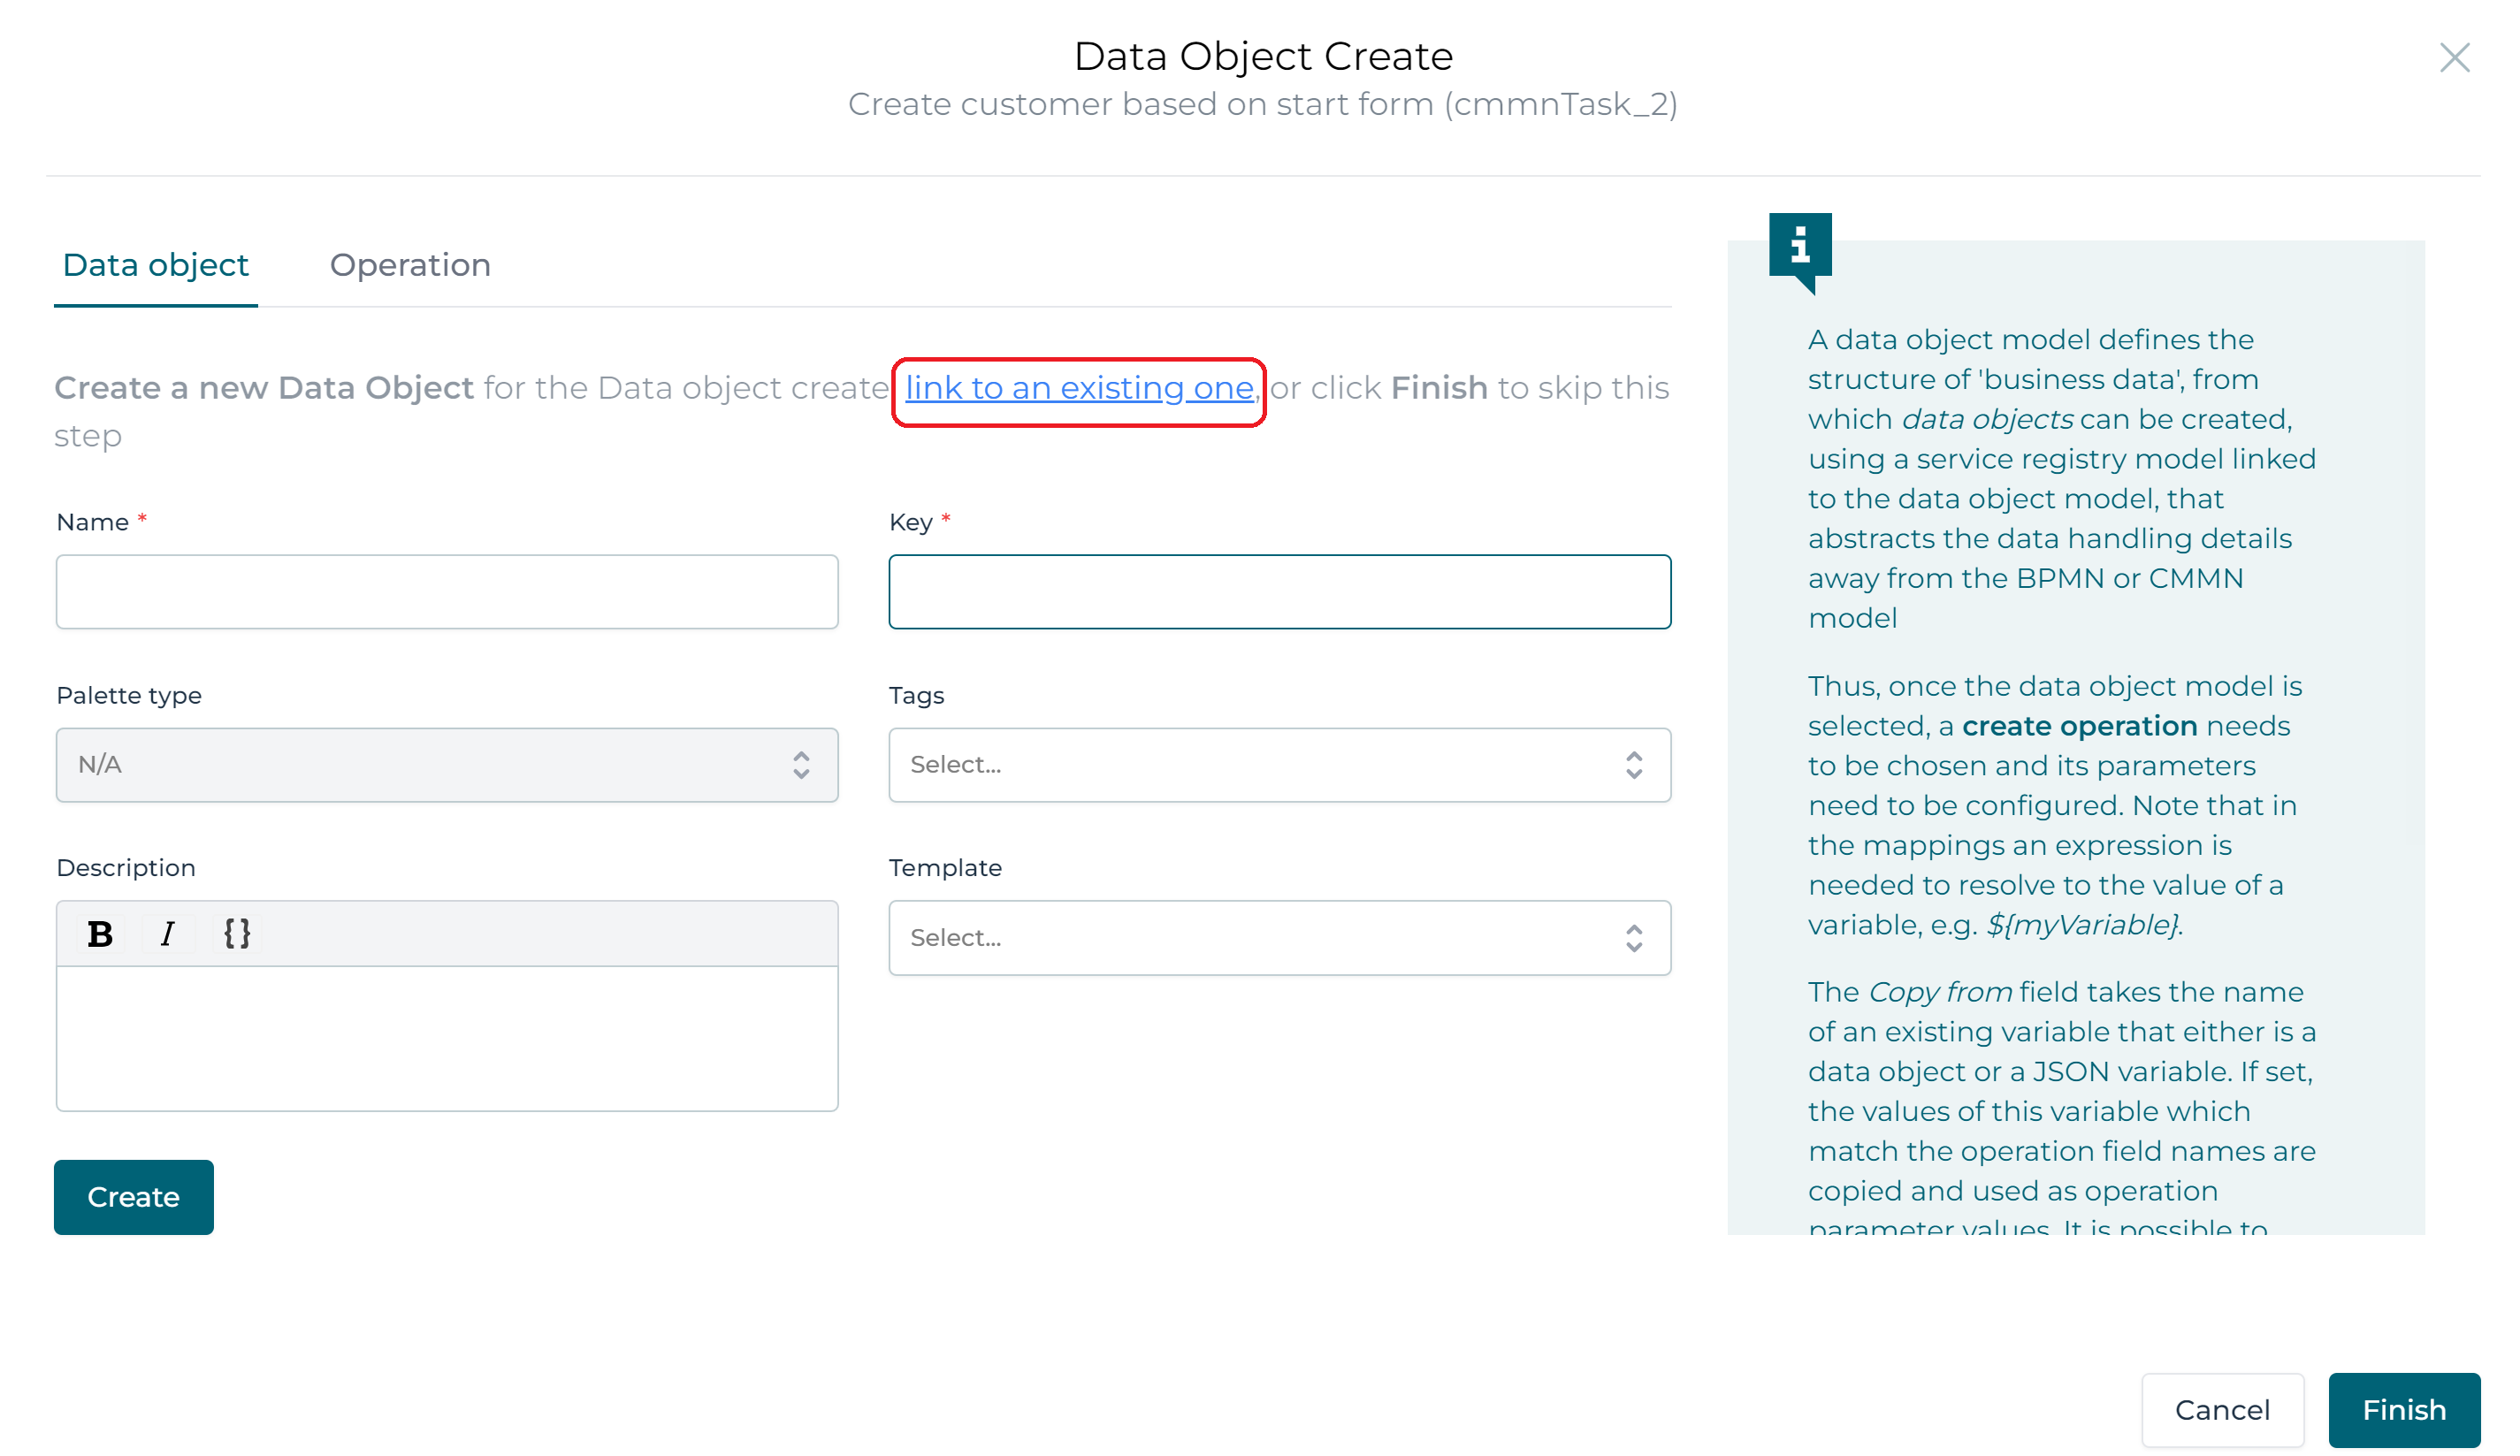
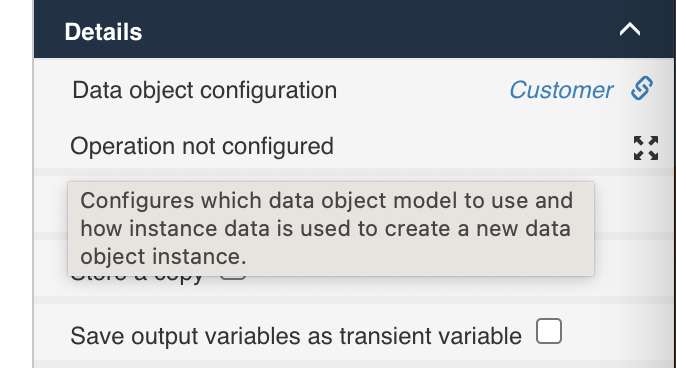
Select the task. In the property panel, find the Data object configuration property in the Data Object Create - General section.
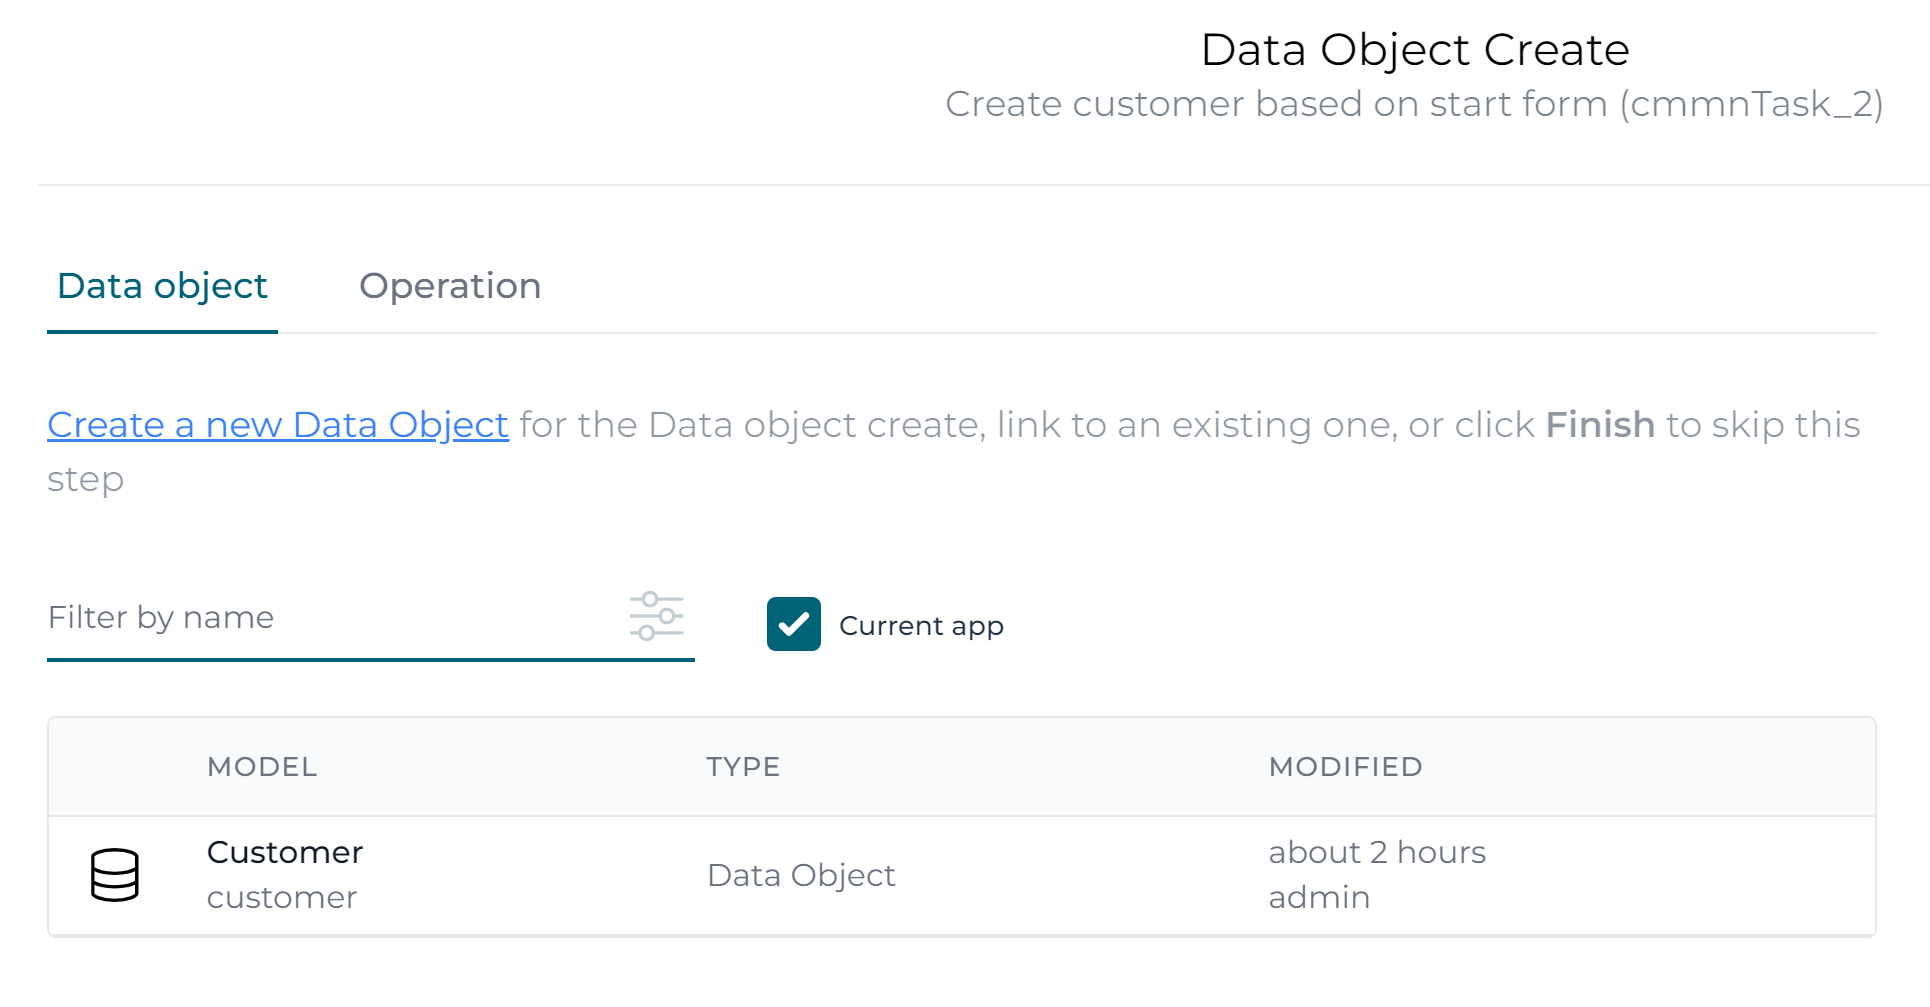
Click on it and in the popup, click on the link to an existing one link and select the Customer data object model.
Once selected click the Operation section.
This allows for the configuration of the create operation. Since there is only one create operation, it was automatically selected. The Copy from field can be left empty (it's optional), as we don't want to copy data from another variable.
The Mapping table with two columns:
the column on the left shows the fields of the data object, The column on the right shows text fields.
Using this table, we can map case instance data into the fields of a new data object:
- Map
${customerName}into the name field. Remember: thecustomerNamevalue comes from the start form. - Map
${true}into the active fields. After initialization, the customer is always active this way. - Map
${customerCountry}into the name field. Remember: thecustomerCountryvalue comes from the start form. - Leave the Yearly fee field empty for now. Click the
Finishbutton.
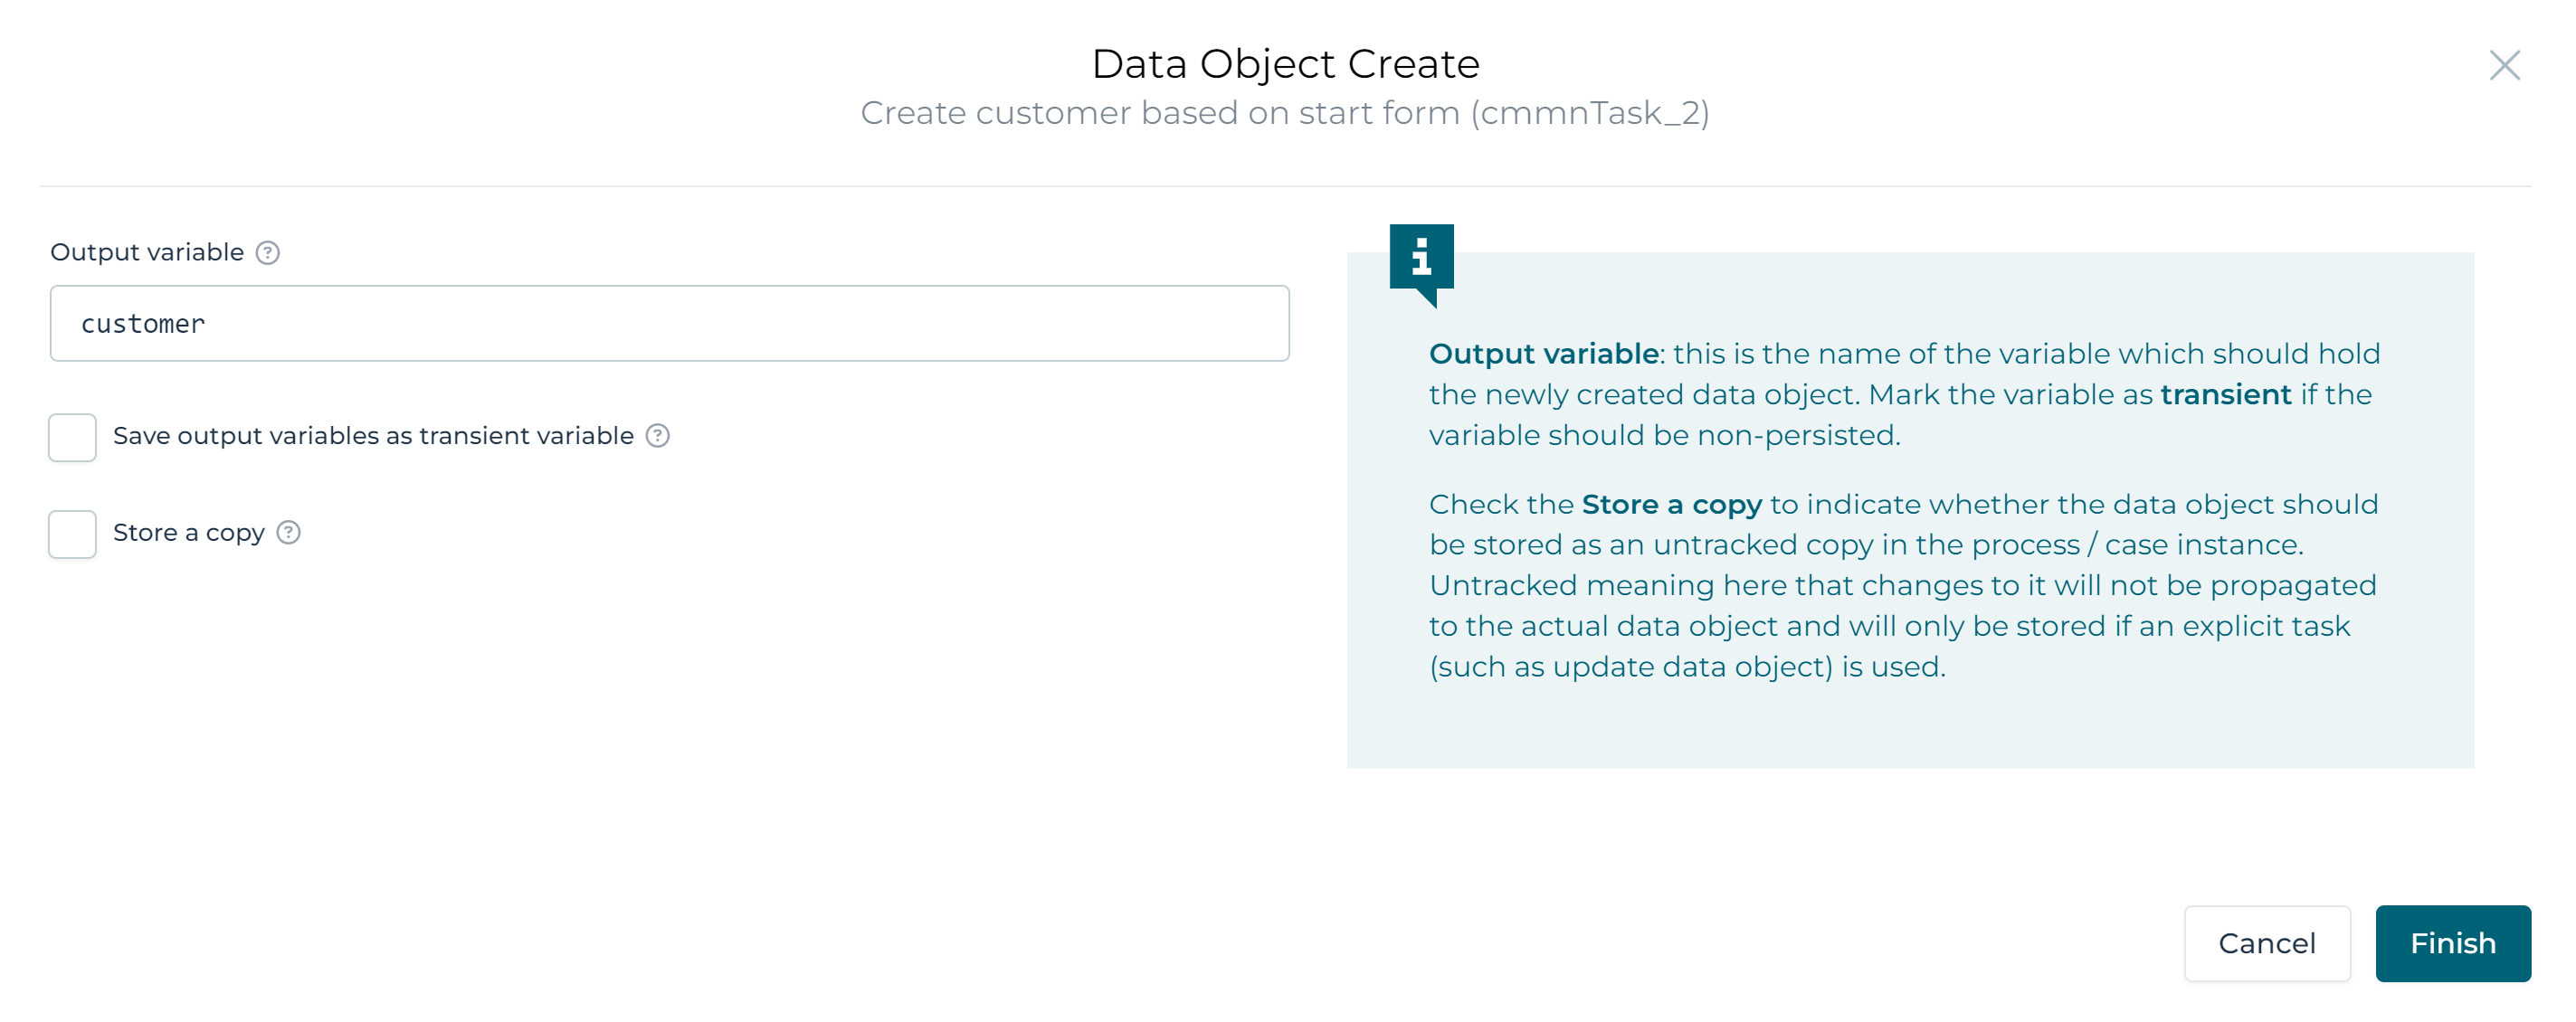
Next, fill in customer in the Output Variable property and click the Finish button.
This will store the newly create data object in a case instance variable named customer.
Persistence of data objectsWhen data objects are persisted, like when using the Output variable property above, the following happens:
- The data object engine uses the referenced data object model and its linked service model to determine what to do. As the service model is a database one, a new row in the database table will be inserted with the field values set in the task above.
- A new variable is created for the case instance. This variable will not contain any of the data object field values except for the Lookup ID.
- Whenever the data object is referenced, this ID is used to fetch the actual values of the data object. This happens automatically behind the scenes.
- Any changes to the data object fields are automatically propagated to the column values in the row of the data object table.
There are a few additional properties on the Data Object Create Task, which we won't use:
- Store a copy: When this flag is checked, the
output variableis actually not stored as a 'tracked' data object but as a JSON variable containing all the values. The row in the database table is still created. As the variable is 'untracked' however, changes won't automatically be propagated to the table. - Save output variable as transient variable: When this flag is checked, the
output variablewill be transient (i.e. not persisted and only available until the next wait state in the case or process instance is reached). - Input Data Object Variable Name: This property can be used instead of filling in the mapping table of the operation. It takes the name of an existing variable that either is a data object of the same type or a JSON variable with the same fields. If set, the values of this variable are used as values for the data object fields.
The Data Object Update Task
In the previous section, we've used the start form values to create a data object. Let's see how we can model updates to that data object, using the Data object update task.
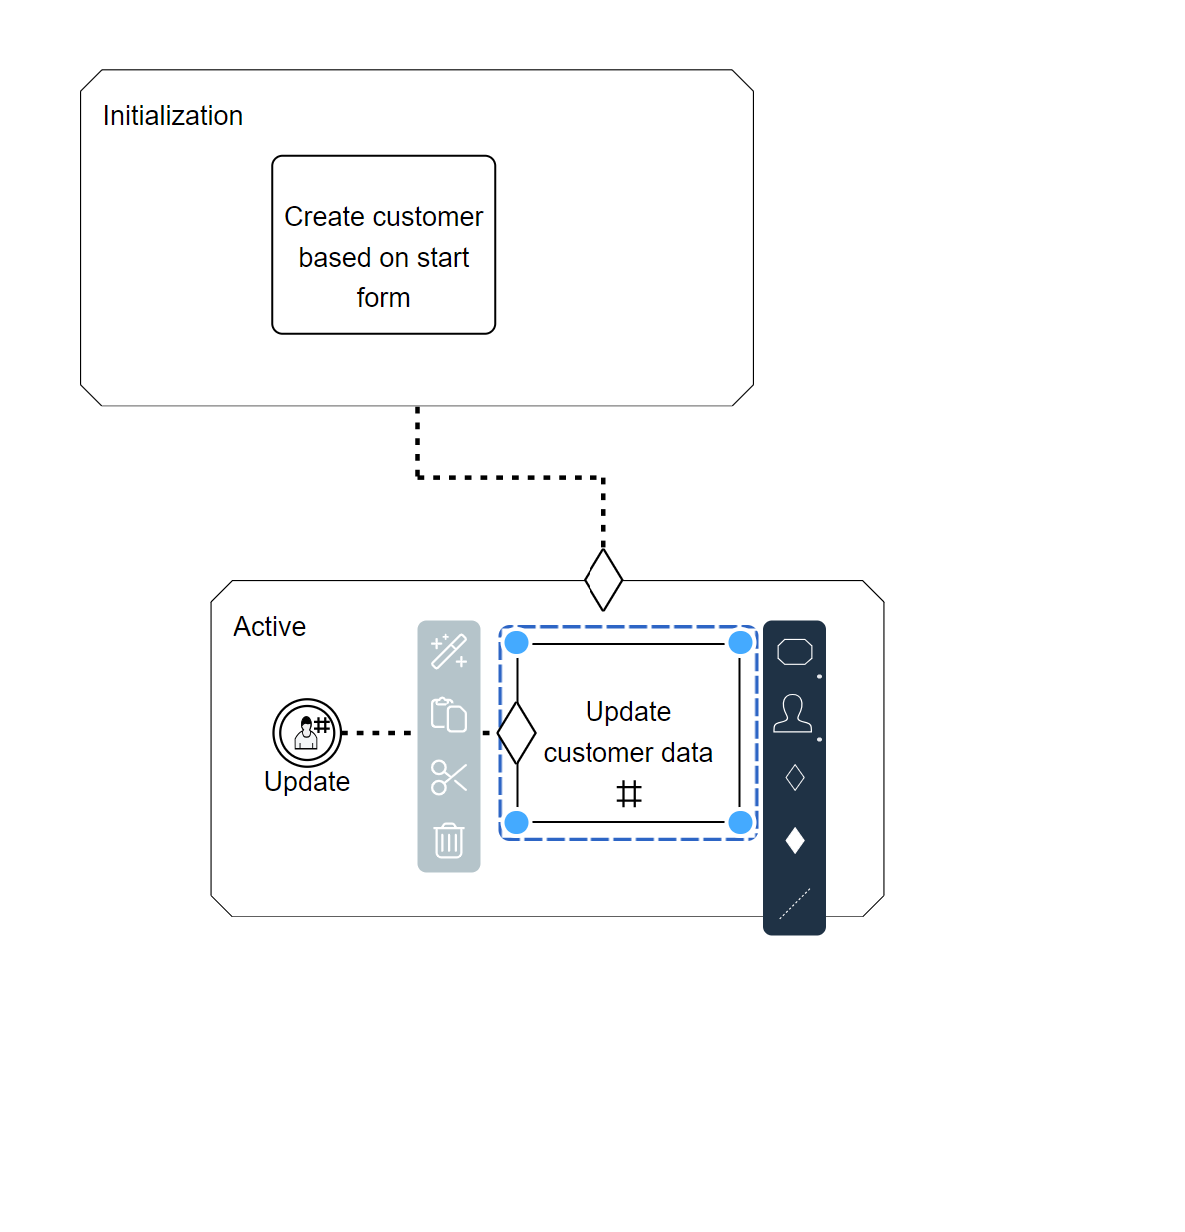
Continuing the CMMN model from above, add the following:
- Add a new stage
Activeto the case model. - Add a sentry (with event
complete, which is the default) to this stage and link it with theInitializationstage. This will activate the stage when the data object is created. - Add a user event listener named
Updateto the new stage. Make it repeatable by checking therepetitionproperty. - Add the data object update task to the new stage. Add a sentry to it and link it to the user event listener with the event
occur(which is the default for event listeners). Make this task also repeatable by checking therepetition property.
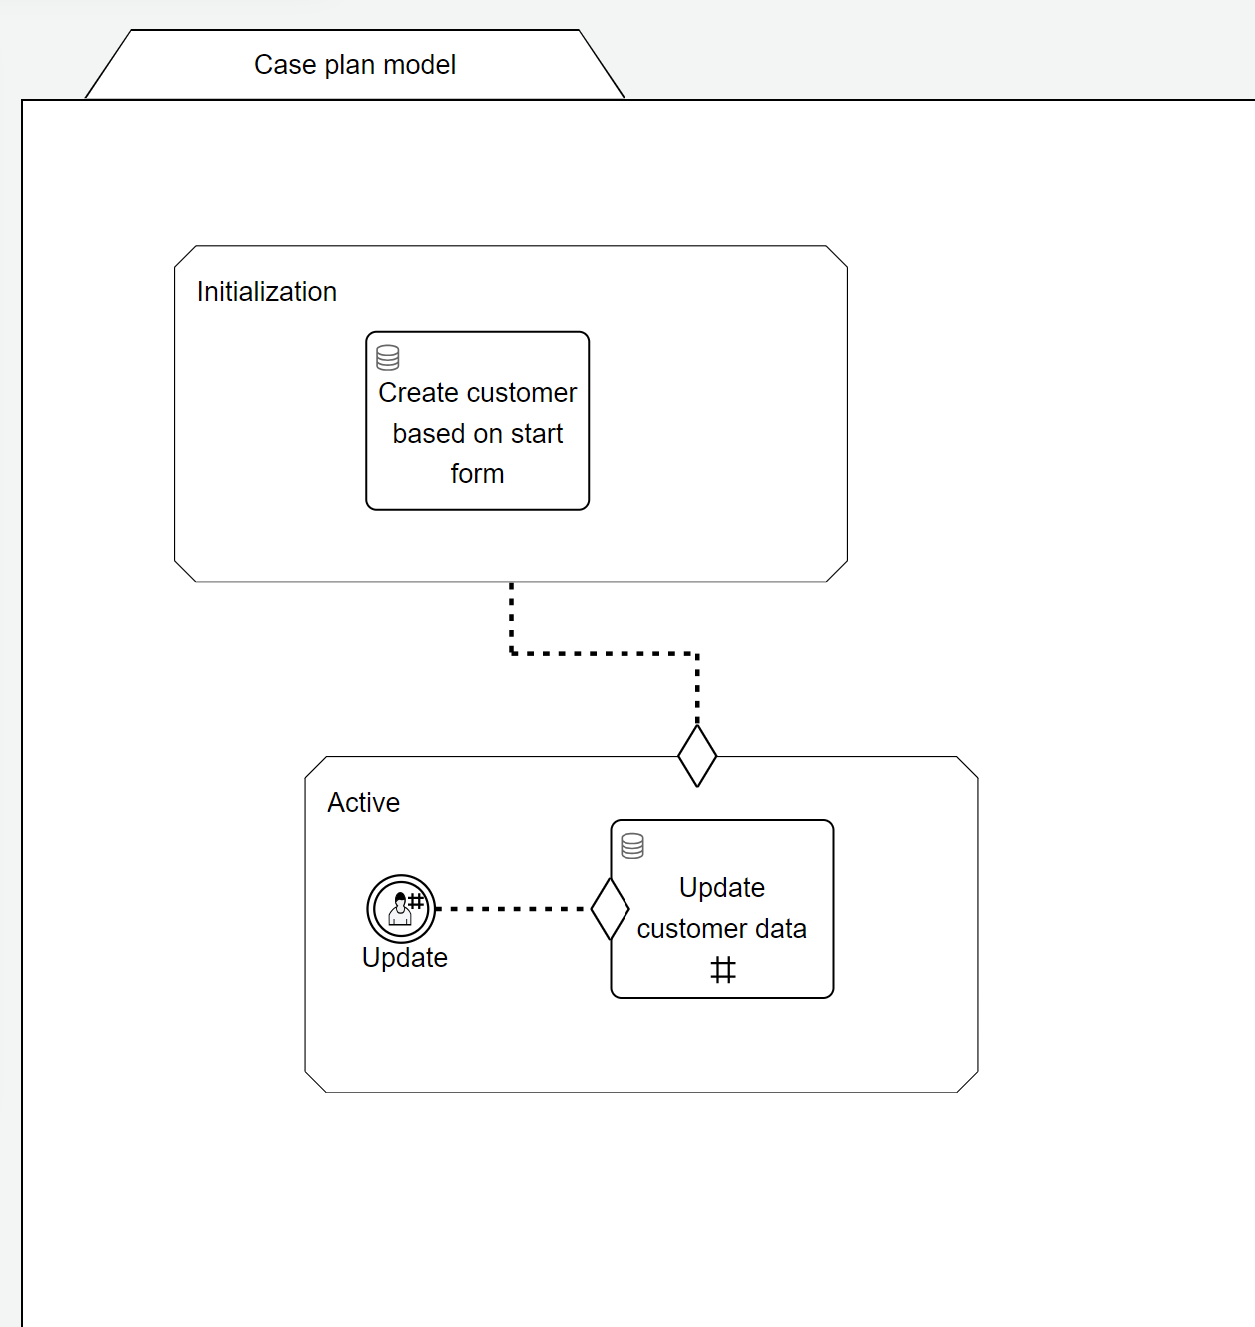
This should result in something that looks as follows:
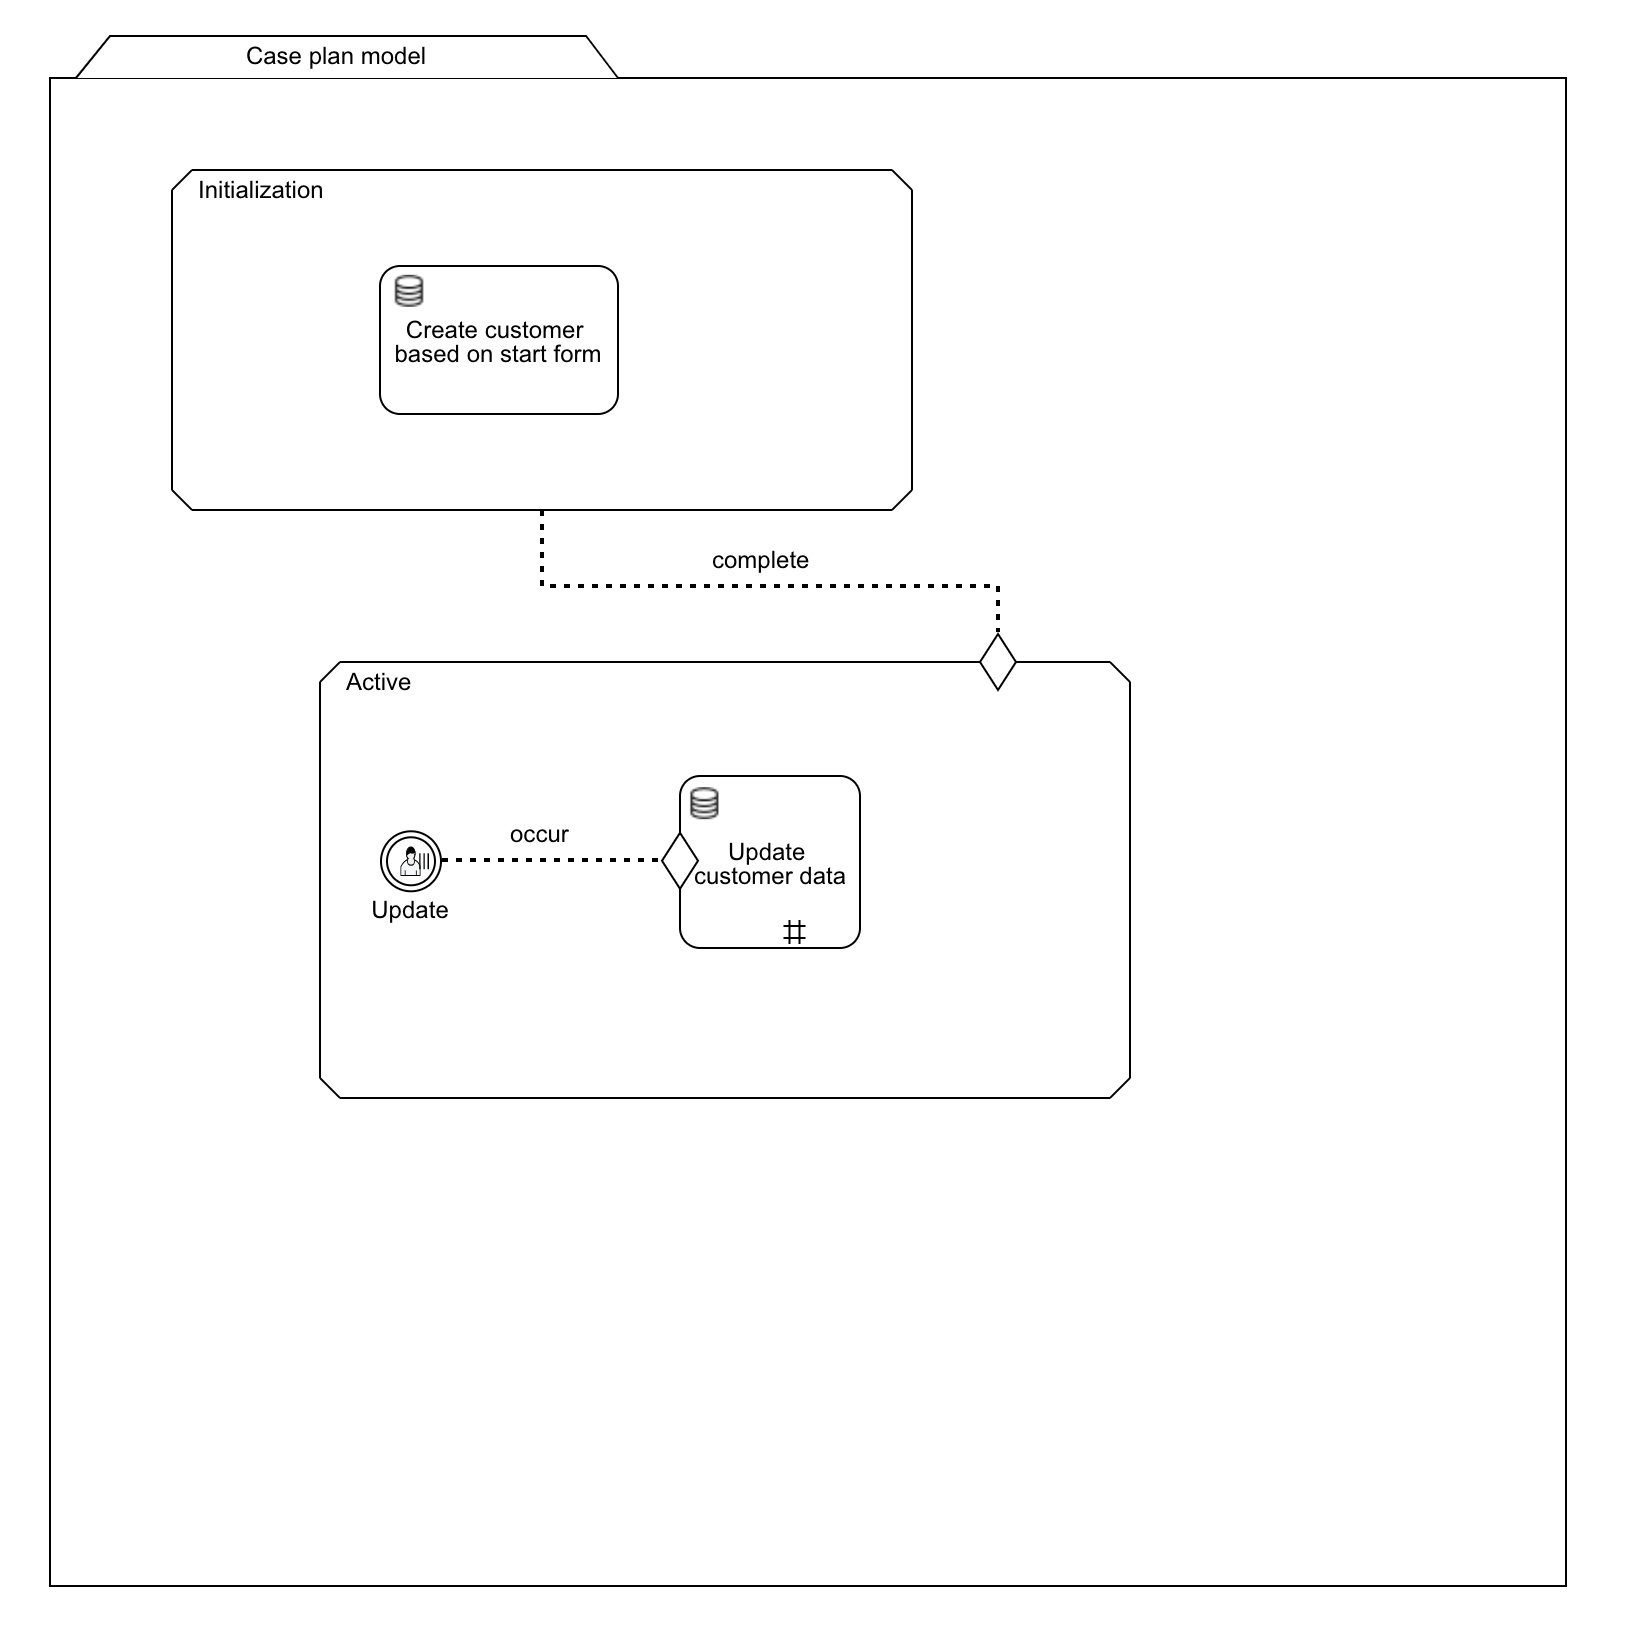
This setup will show a button in Flowable Work. When clicked, it will trigger an update of our customer data object we've created earlier. Since we've made both the user event listener and the task repeatable, the button will always reappear after the update is executed.
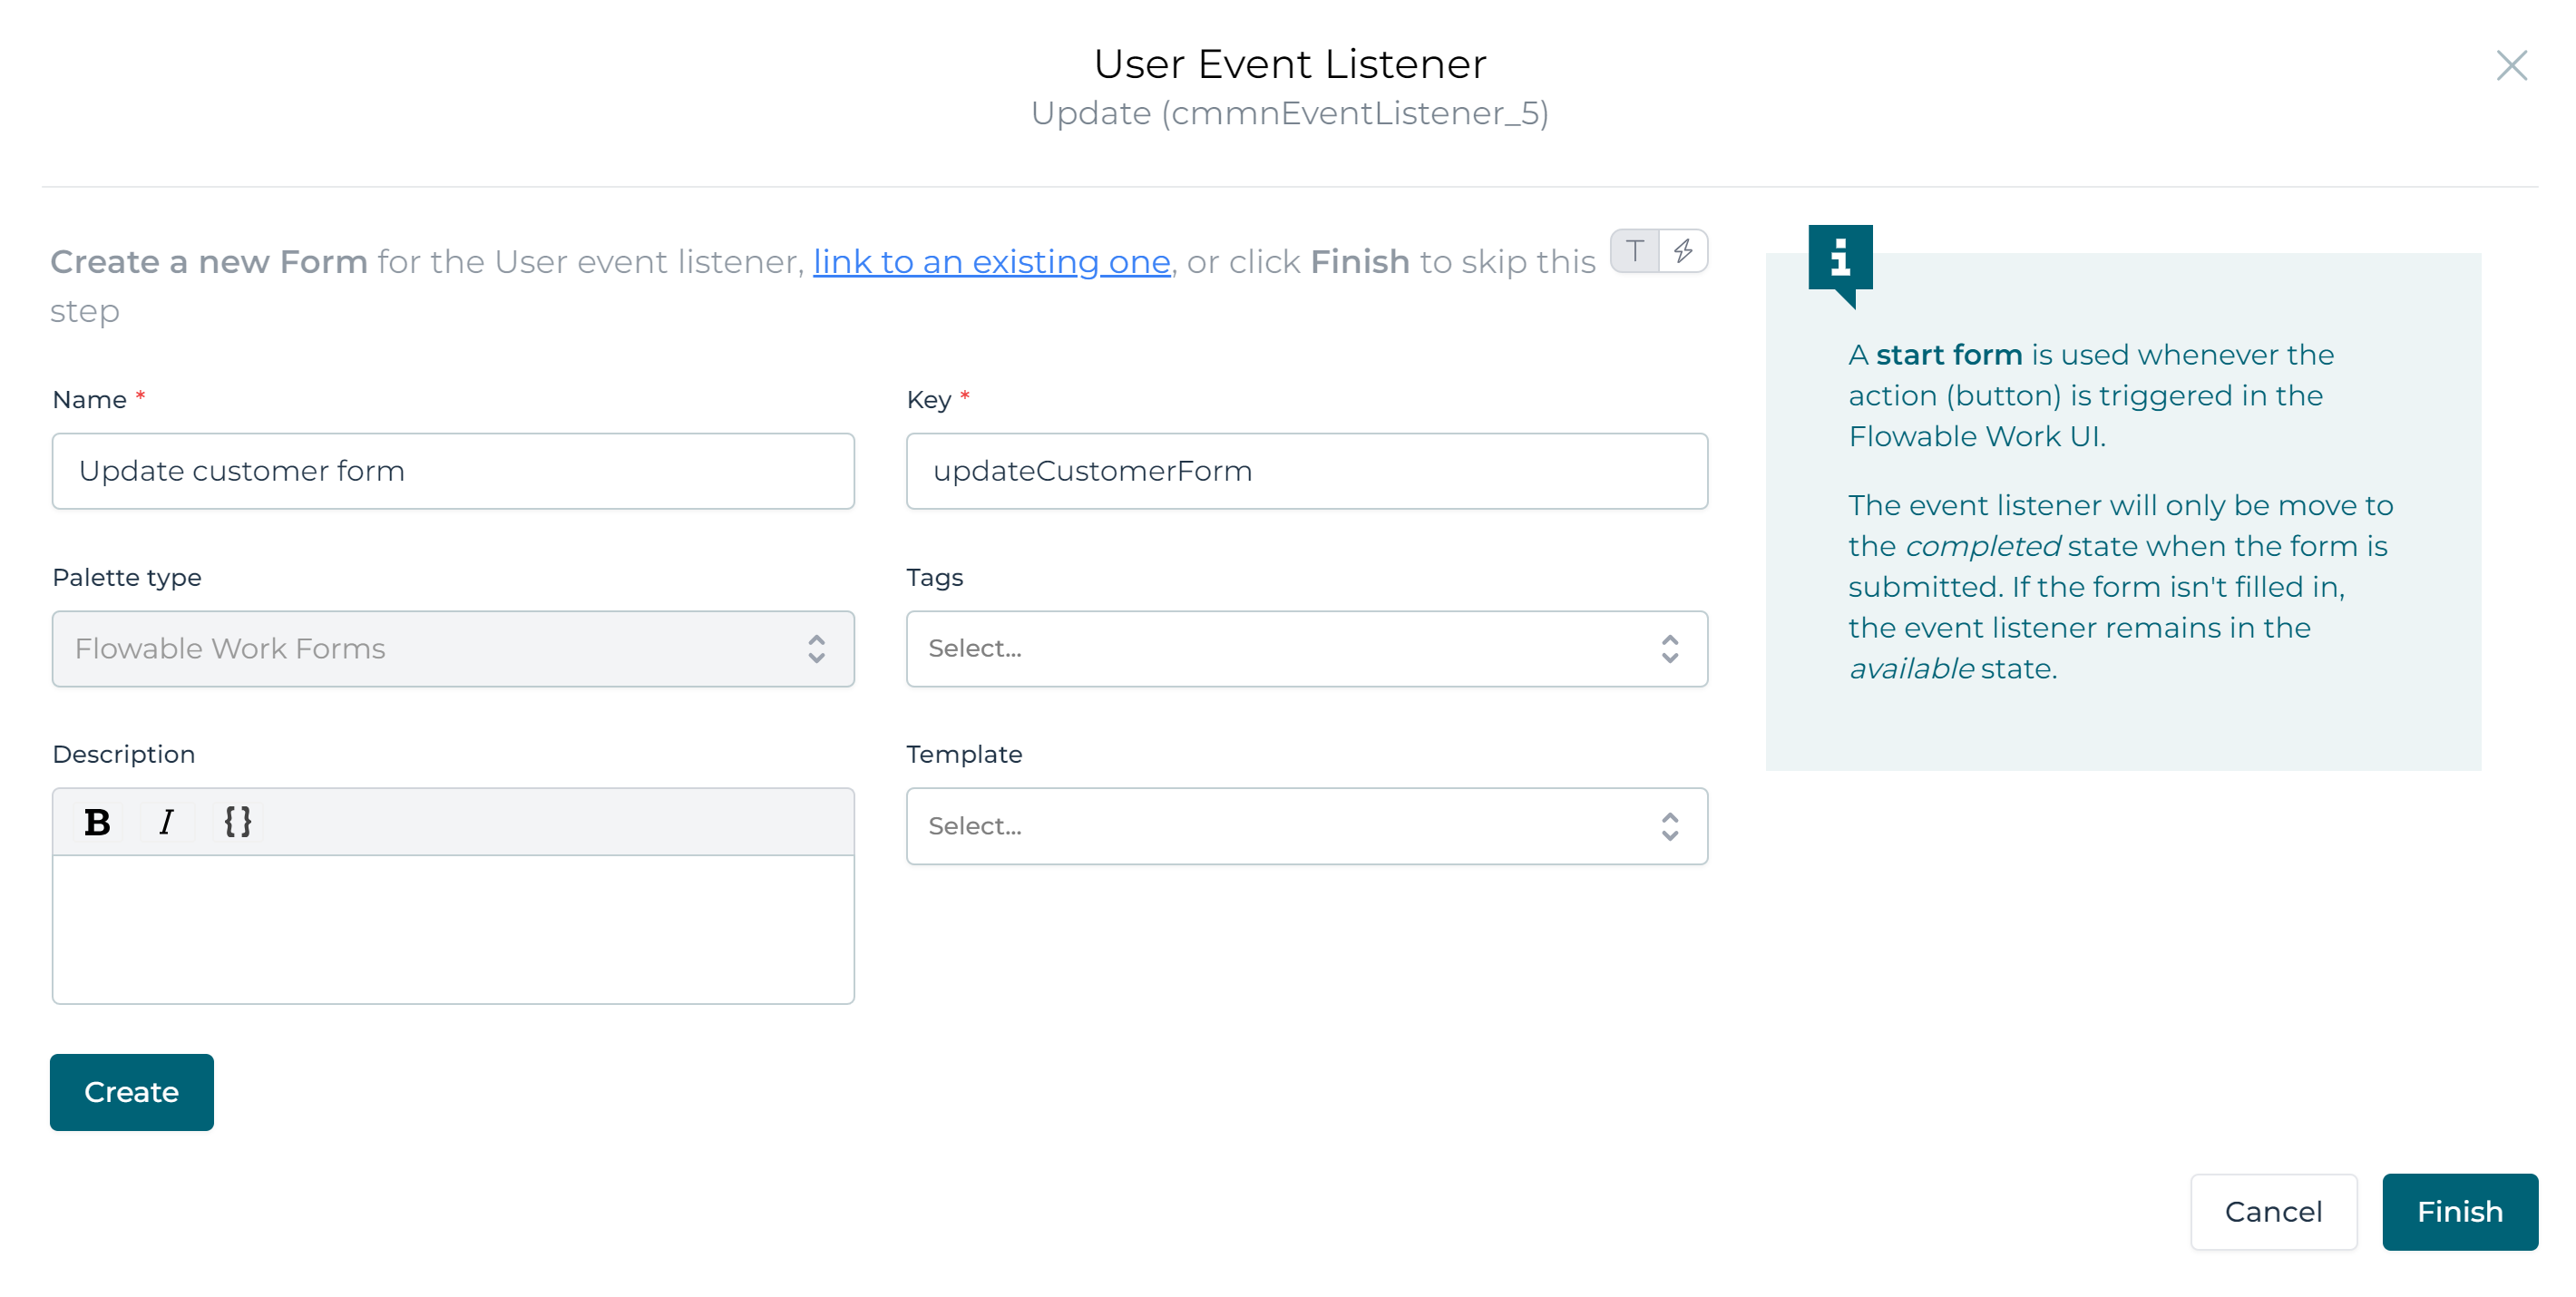
We can now trigger the update, but we still need to capture the data to change the data object. To do this, select the user event listener.
Find the Start form property click it and fill in a name and key for the form. Then, click the Create followed by the Finish button:
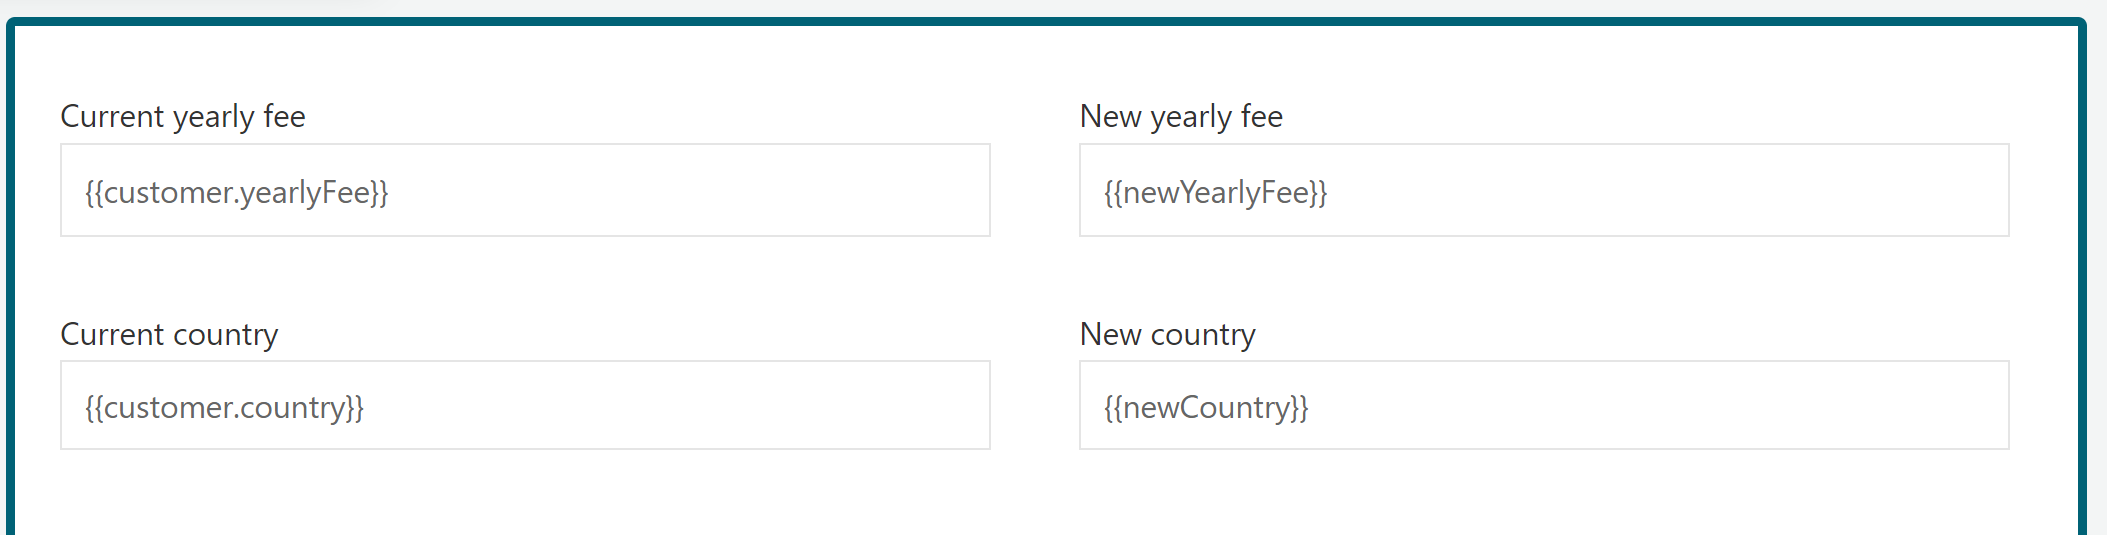
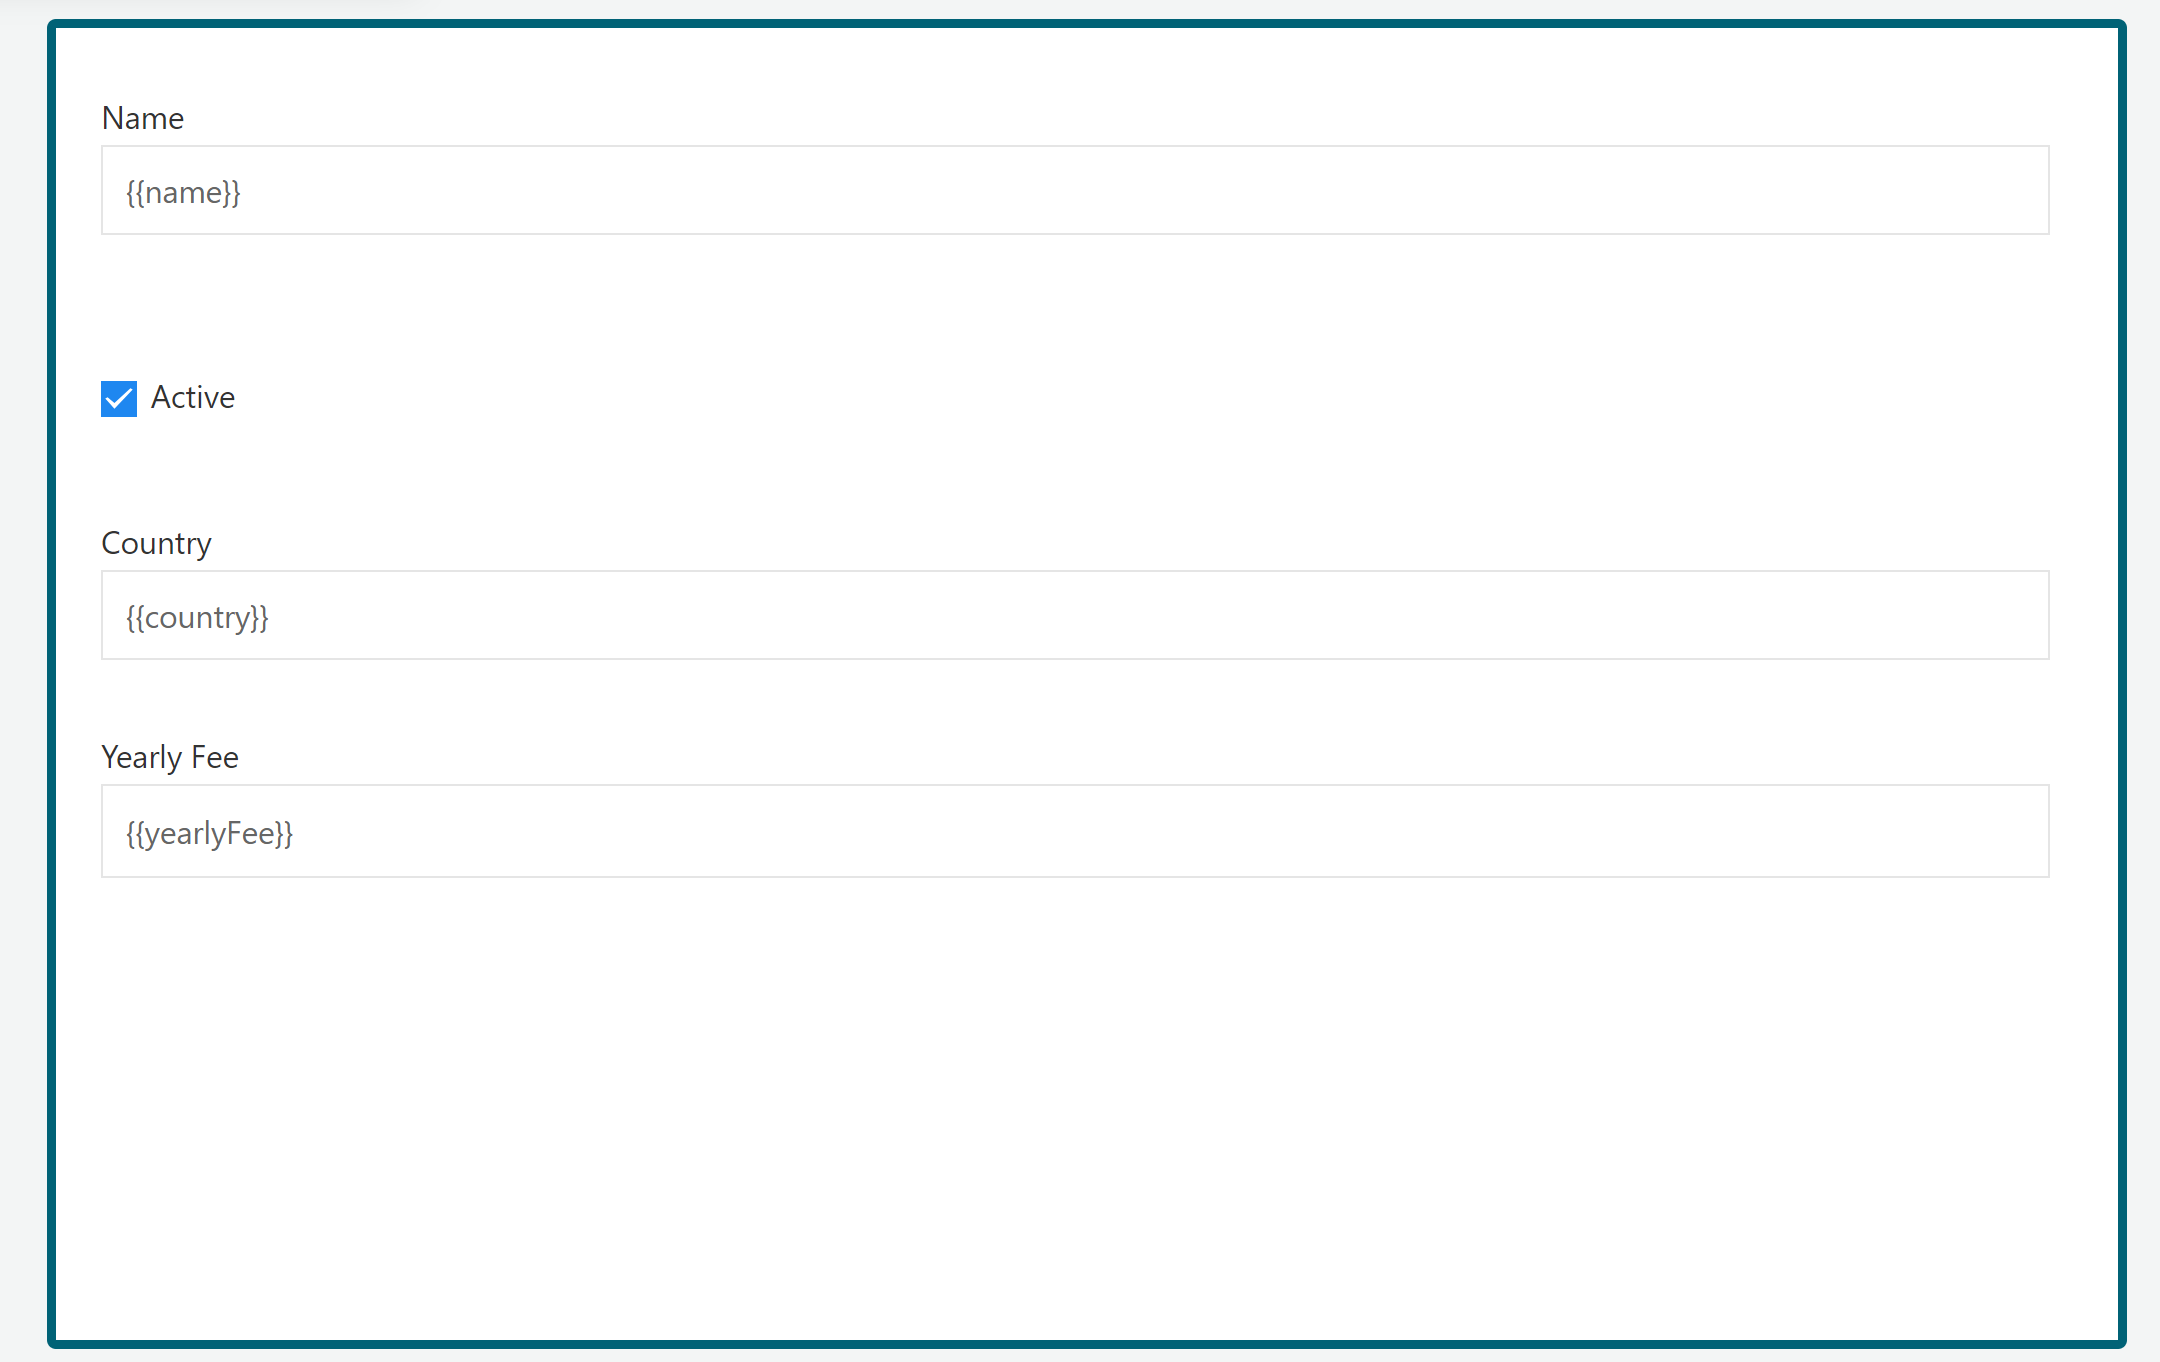
A new tab will now be added and the Design UI will automatically swap to the new form. Let's say we want to allow updating the Yearly fee (which we haven't set in the create step above) and the Country of a customer data object.
Add the following four fields to the form:
- A number field, bound to
{{customer.yearlyFee}}. This will show the current value. Uncheck theenabledflag, as we don't want this field to be editable. - A number field, bound to
{{newYearlyFee}}. This will be the value that we'll feed into the update task. - A text field, bound to
{{customer.country}}. This will show the current country for the customer. Uncheck theenabledflag, as we don't want this field to be editable. - A text field, bound to
{{newCountry}}. This will be the value that we'll feed into the update task.
The end result should look like this:
With the data to update captured, let's configure the Data object update task. Select it.
Find the Data object configuration property and click on it. In the popup click on the link to an existing one link and select the Customer data object model:

Select the Operation section. We need to fill in a table with the new values on the right-hand side and the fields shown on the right.
Fill the table in as follows:
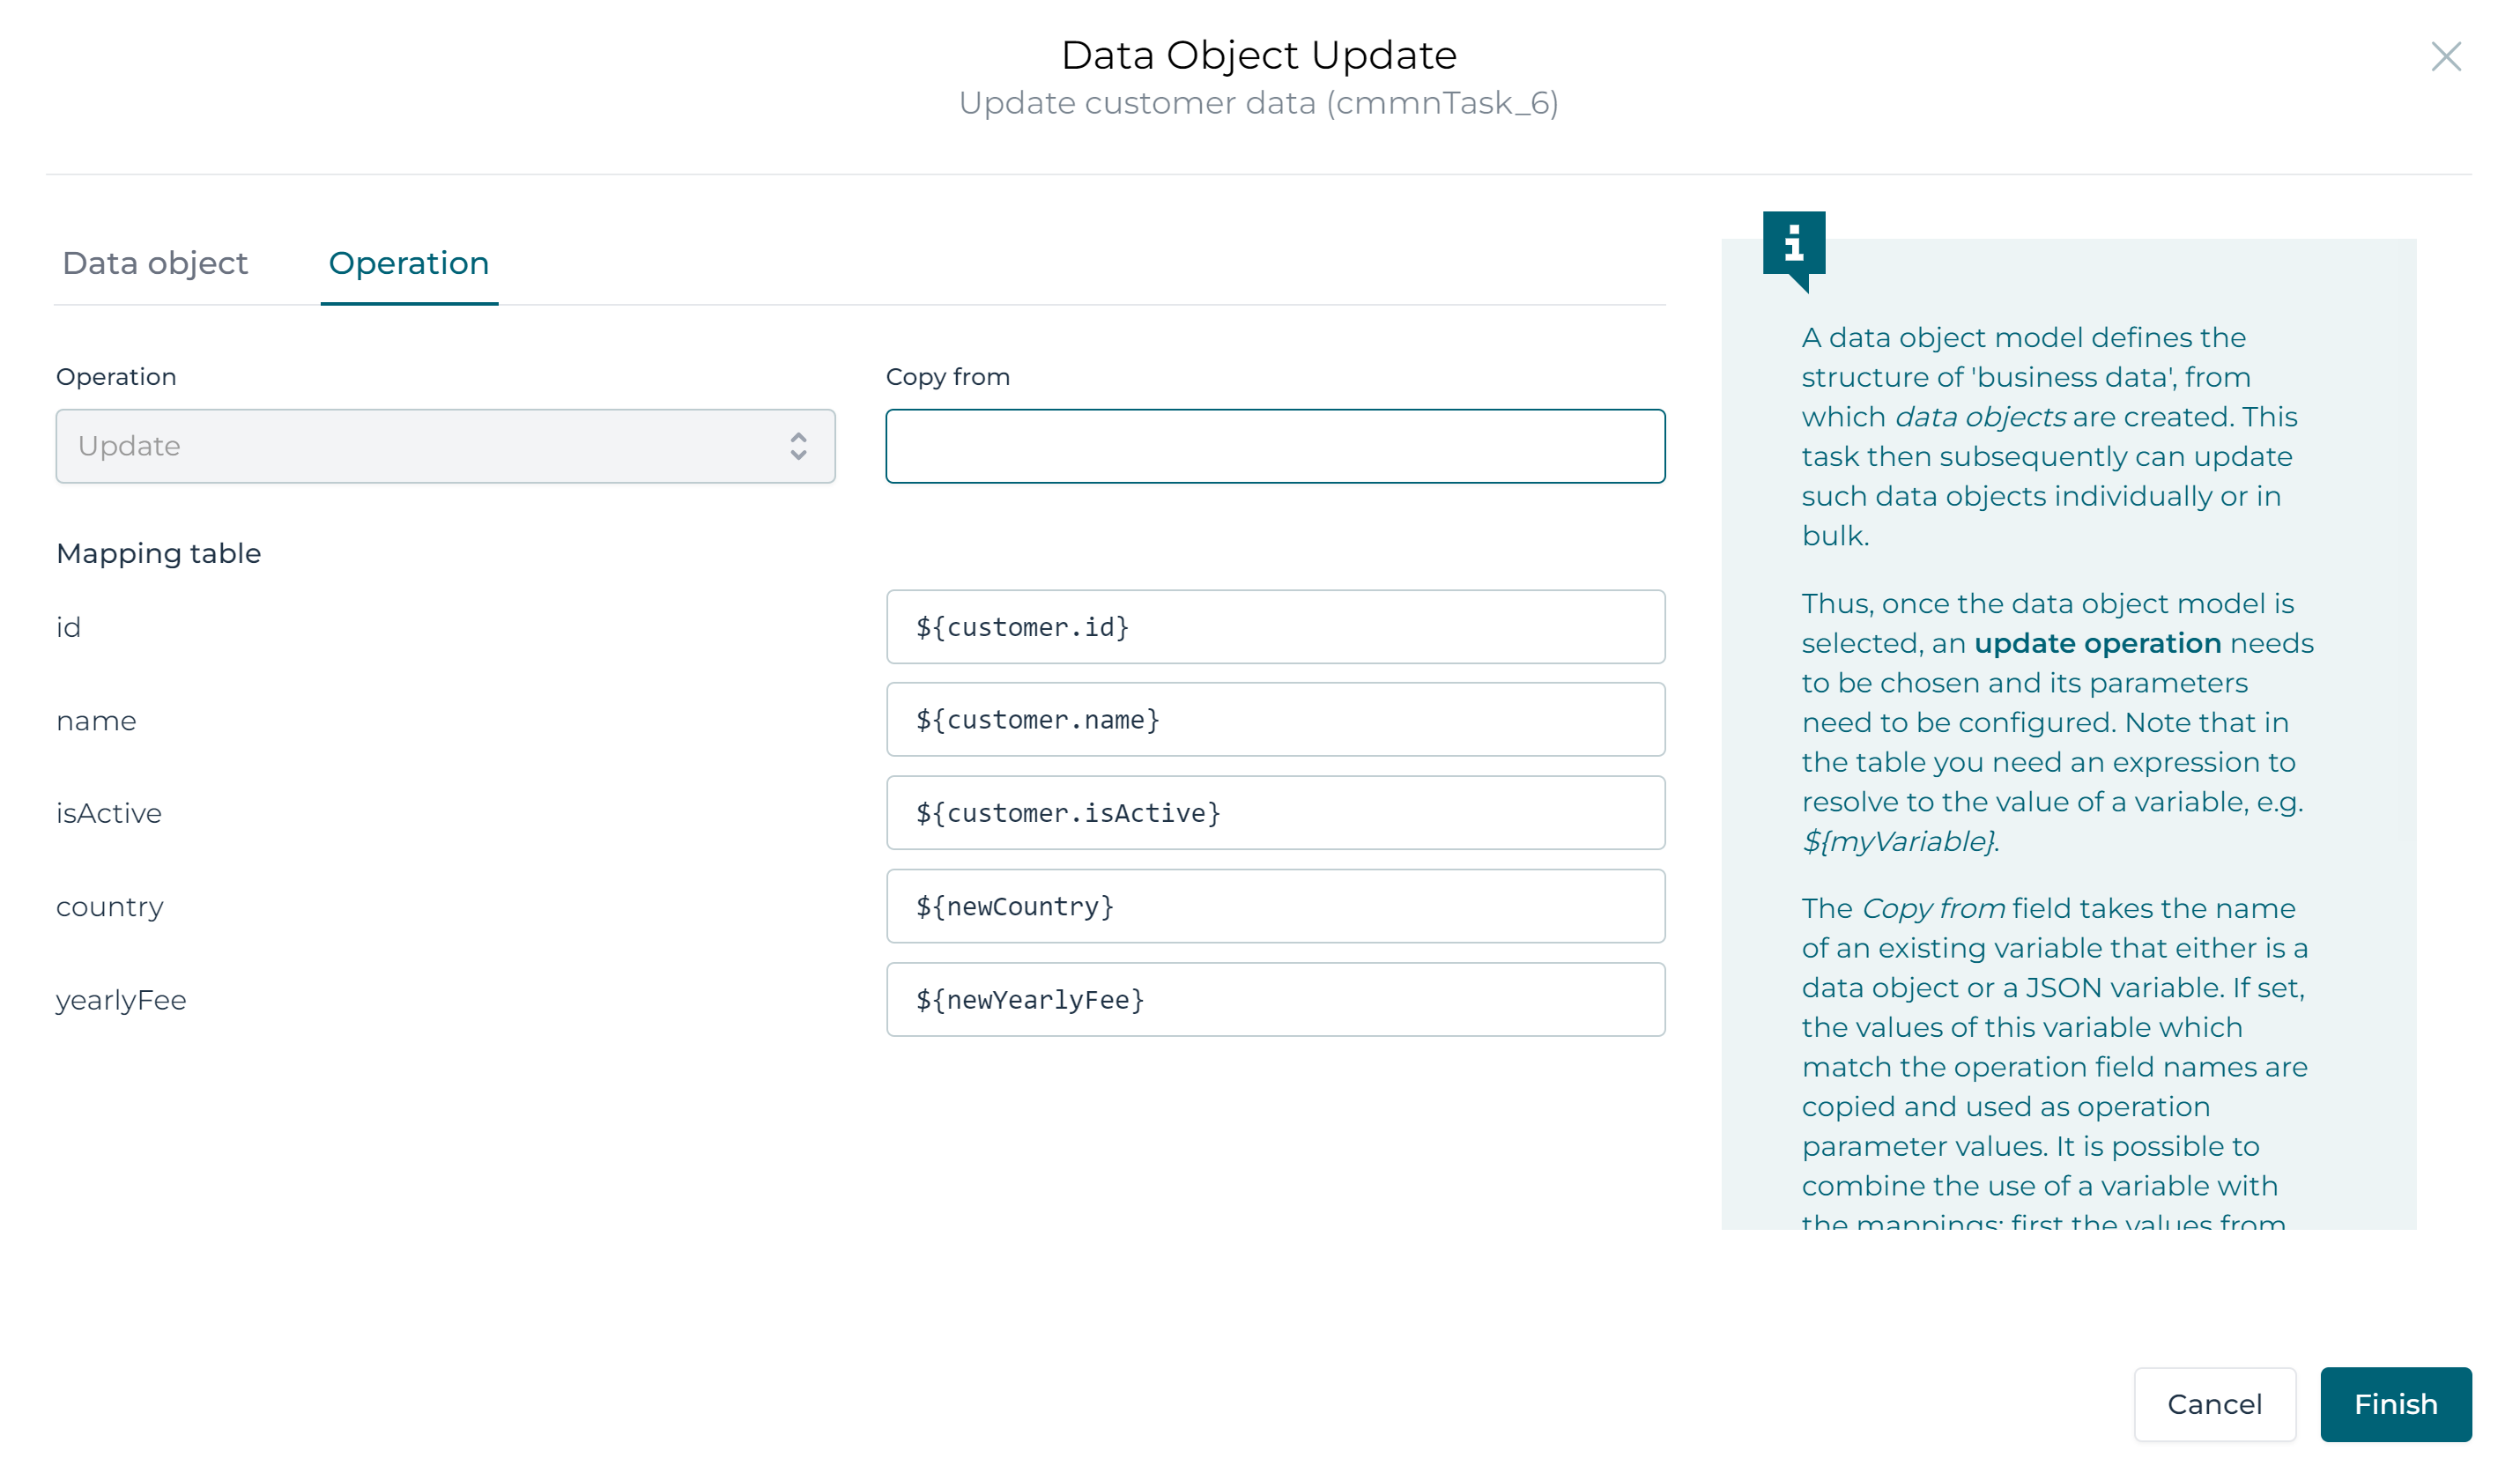
Note that we're copying the original values for the first three fields and we're using the values from the user event listener form for the Yearly fee and Country.
There are a few more properties we aren't using here, but let's have a look at them:
- Output variable: this allows to store the data object that was updated in a new variable. The value is the name of this new variable. We're leaving it empty, as we want to continue using the existing
customervariable. - Store a copy: When this flag is checked, the
output variableis actually not stored as a 'tracked' data object but as a JSON variable containing all the values. The row in the database table is still created. As the variable is 'untracked' however, changes won't automatically be propagated to the table. - Save output variable as transient variable: When this flag is checked, the
output variablewill be transient (i.e. not persisted and only available until the next wait state in the case or process instance is reached). - Input Data Object Variable Name: This property can be used instead of filling in the mapping table of the operation. It takes the name of an existing variable that either is a data object of the same type or a JSON variable with the same fields. If set, the values of this variable are used as values for the data object fields.
Alternative: Updating Data Objects in a Human Task Form
There's an alternative to updating data objects, using human task forms instead of using the update task. When to use this approach, depends on the use case or taste. Sometimes it's easier, but often the explicit update is clearer in the diagram.
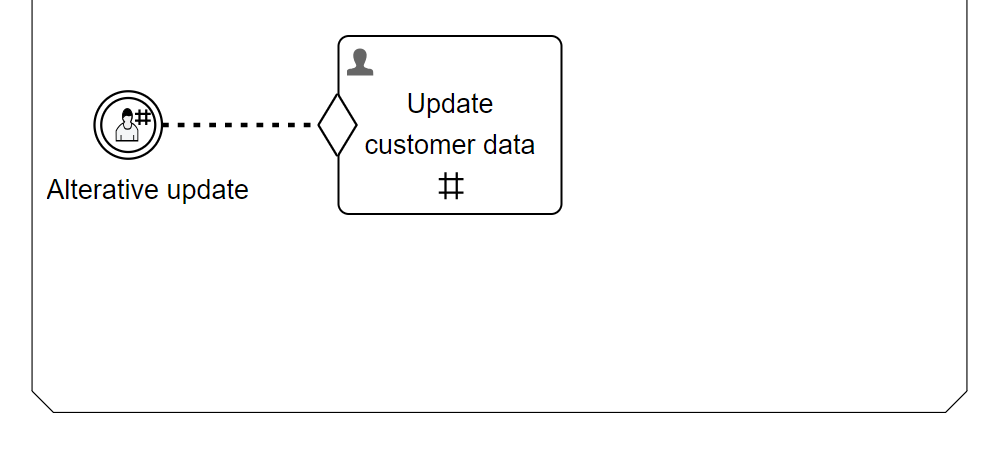
Continuing the model from above, add a new user event listener in the Active stage and name it Alternative update. Add a user task to the right of it and make it dependent on the event listener with an entry sentry. Make both the event listener and the user task repeatable by checking the repetition property.
This should look like below.
Select the human task, find the Form reference property, click it and fill in a name and key:
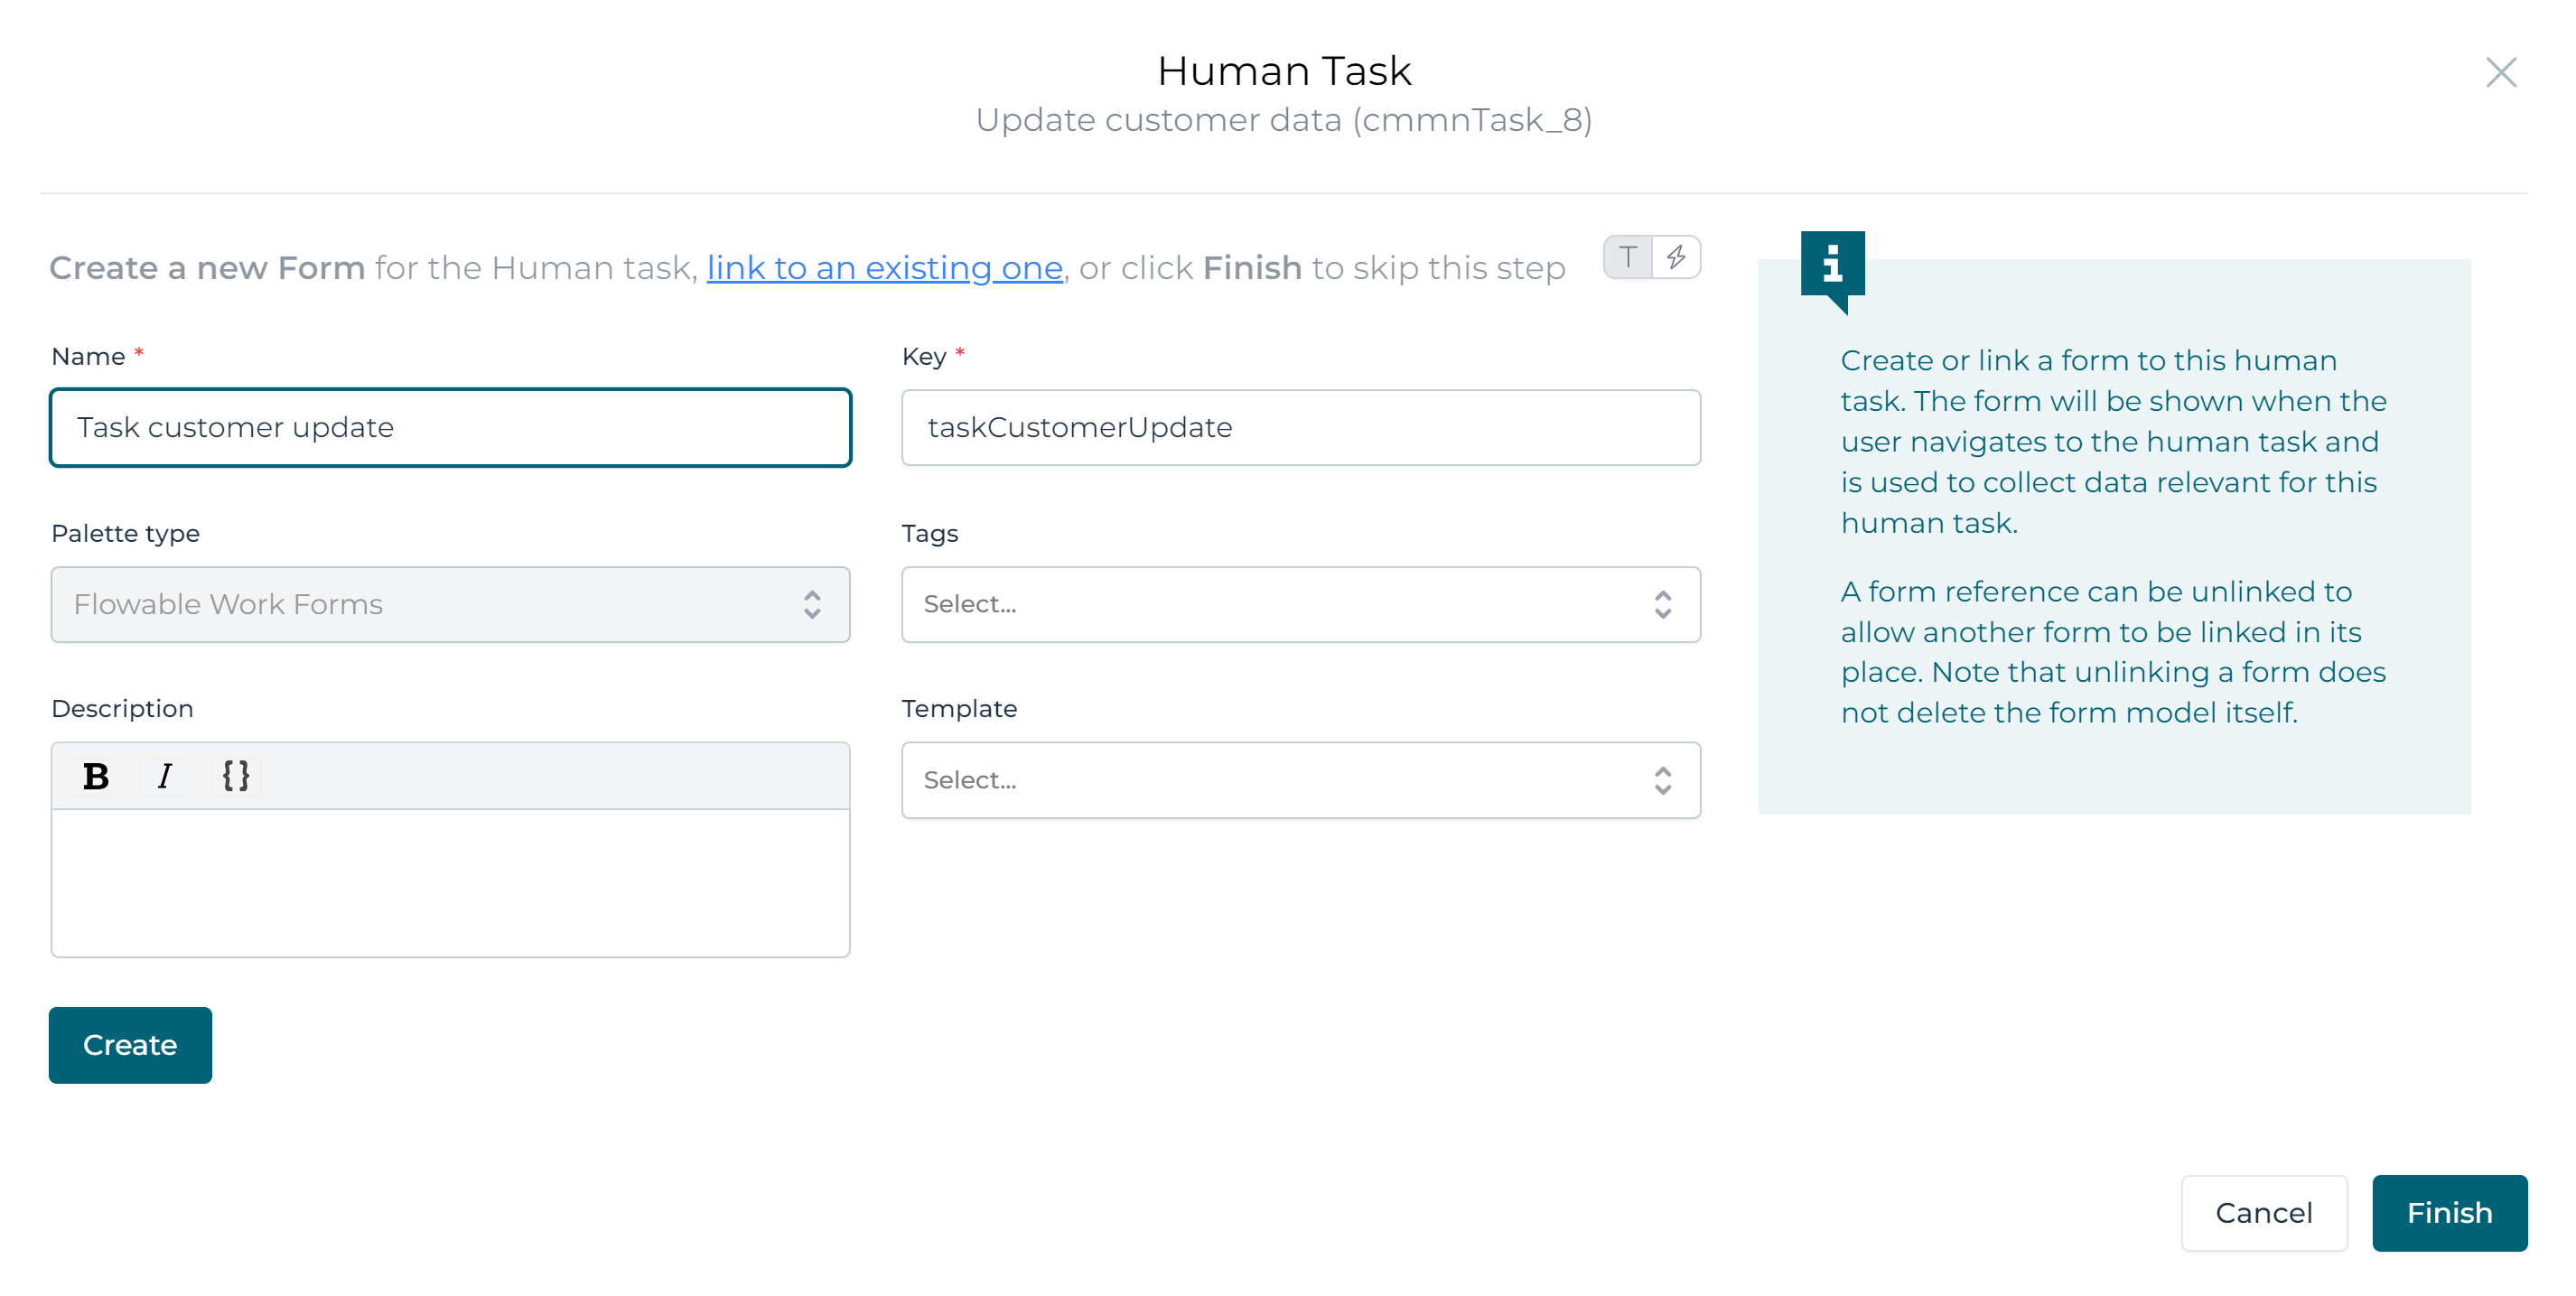
Click the Create followed by the Finish button. A new tab is now added and the Design UI automatically switches to it. Add following fields to the form:
- A number field bound to
{{customer.yearlyFee. - A text field bound to
{{customer.country}}.
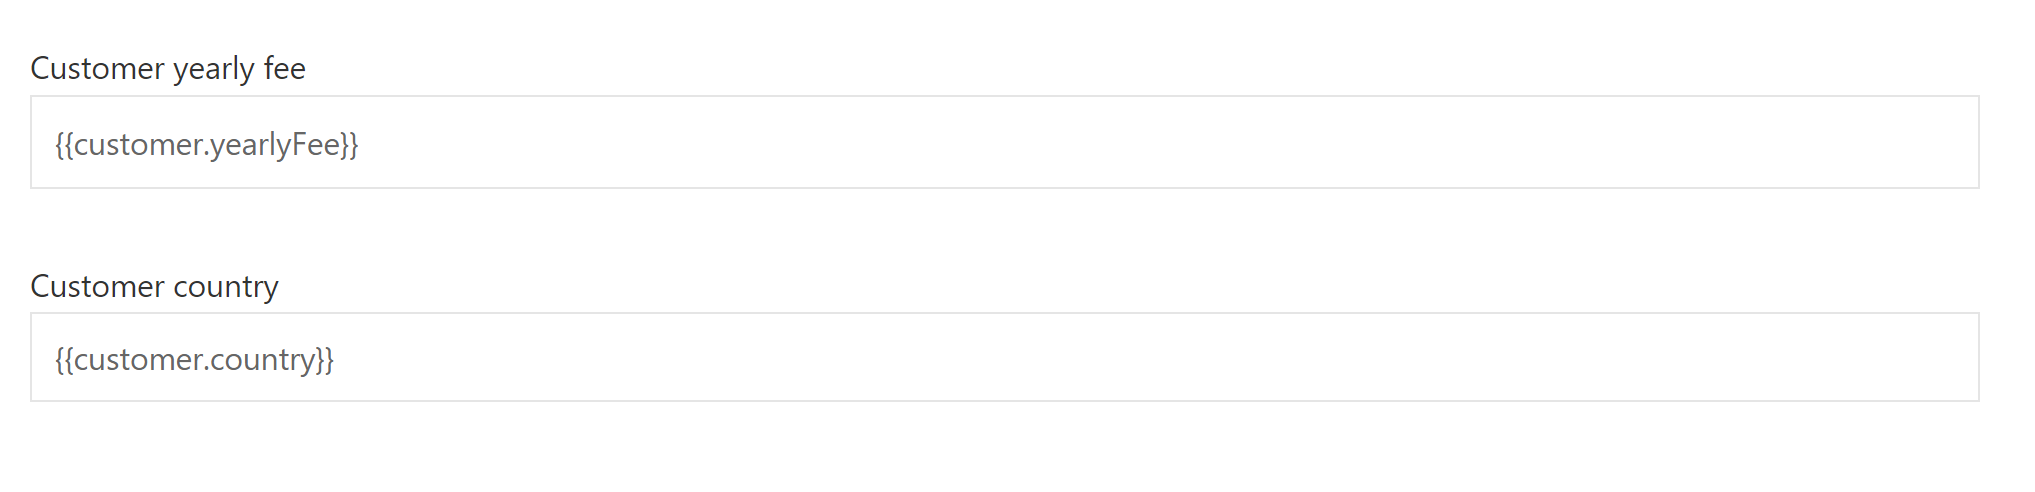
When the user task form is completed, due to the bindings, the customer data object will automatically be updated.
How does this work technically?On form completion, the form engine notices that the field is bound to a data object. It will fetch the current field values, apply the updates and save the values to the database table automatically.
The Data Object Delete Task
So far, we've created a data object based on a form and have updated the data object, either explicitly through the update task or implicitly through a user task form. Let's now look at deleting a data object, using the Data object delete task.
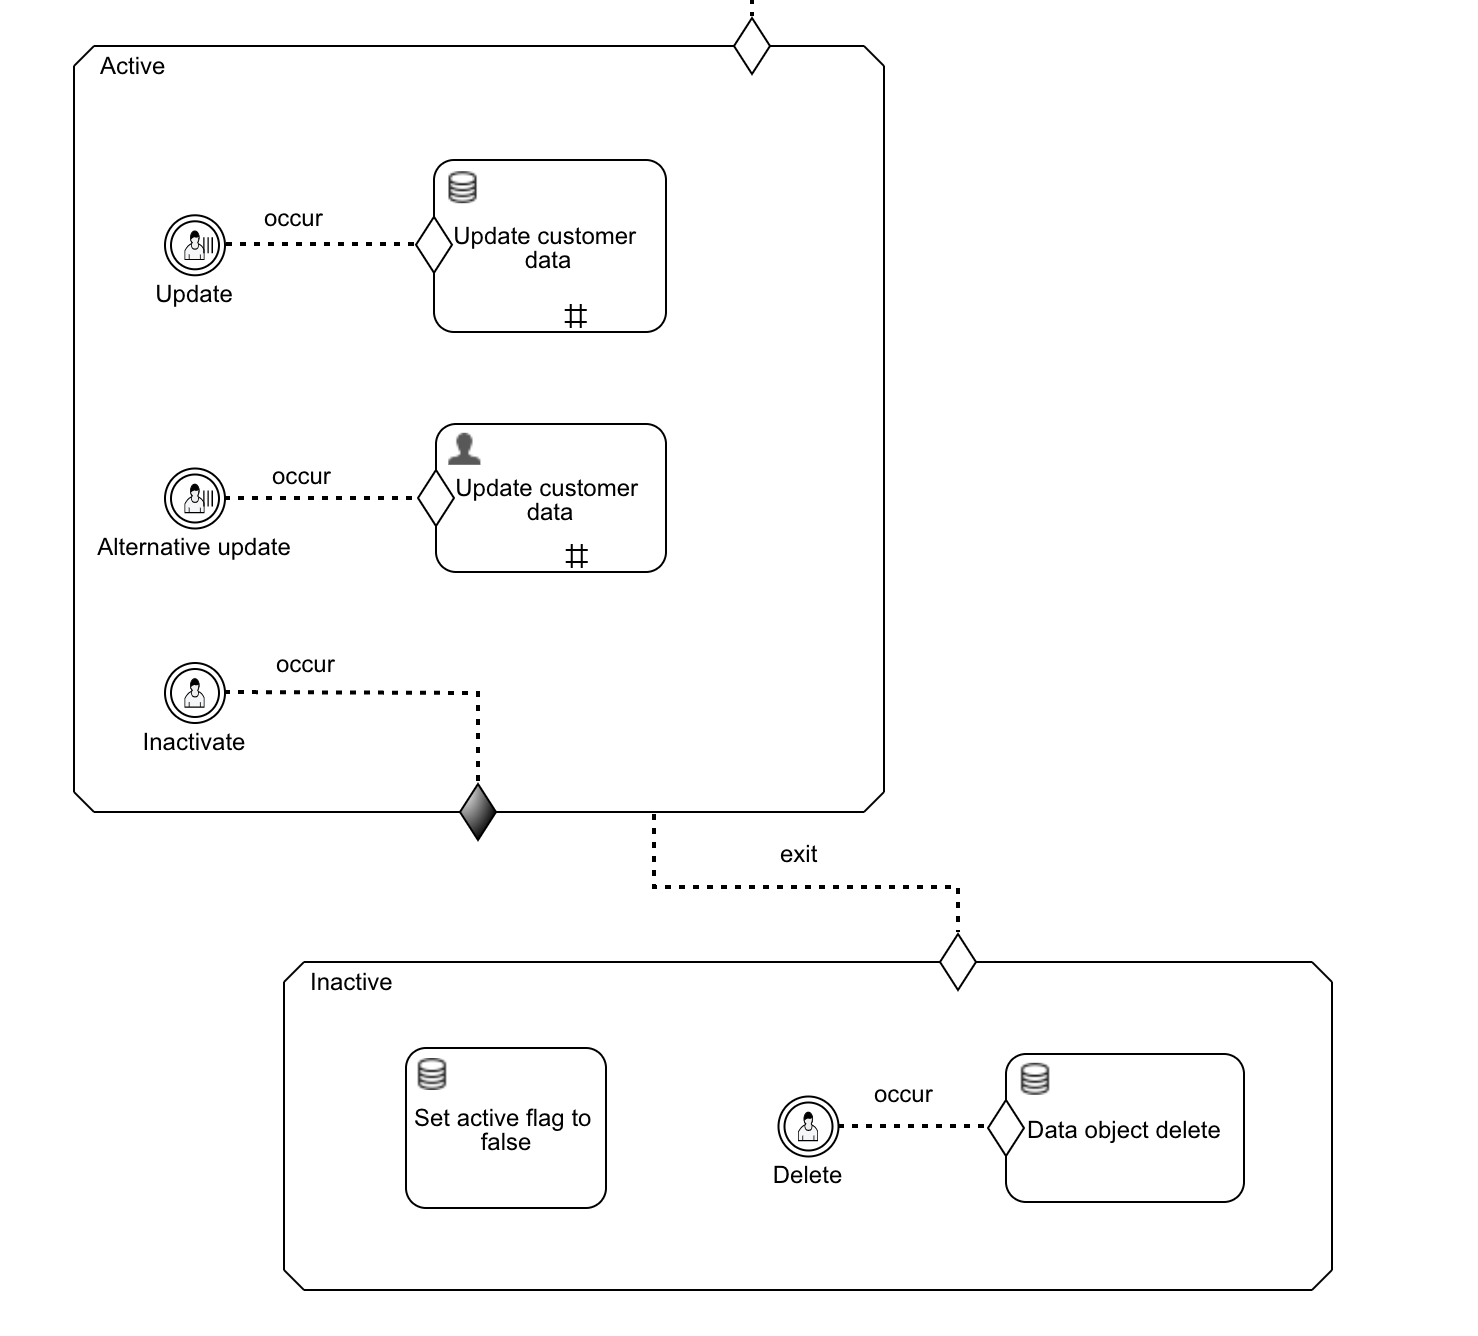
Continuing the CMMN model from the previous sections, enhance it as follows:
- Add a new stage named
Inactive. We'll now have three 'states' a customer can have: being initialized, active or inactive. The stages clearly visualize this. - In the
Inactivestage add a user event listener namedDelete, that is followed by aDelete data object task. This one doesn't need to be repeating, as we only can trigger it once which will delete the data object. - Add a user event listener named
Inactivateto theActivestage. Add an exit sentry to that stage and link the new user event listener with it. - Add an entry sentry to the
Inactivestage and link it with theActivestage. Use theexitevent now, as the defaultcompleteevent won't trigger due to the stage being exited explicitly instead of completing normally. - Add an
Data object update taskto theInactivestage. We want to use this to change theinactiveflag of the customer data object automatically when this stage is reached.
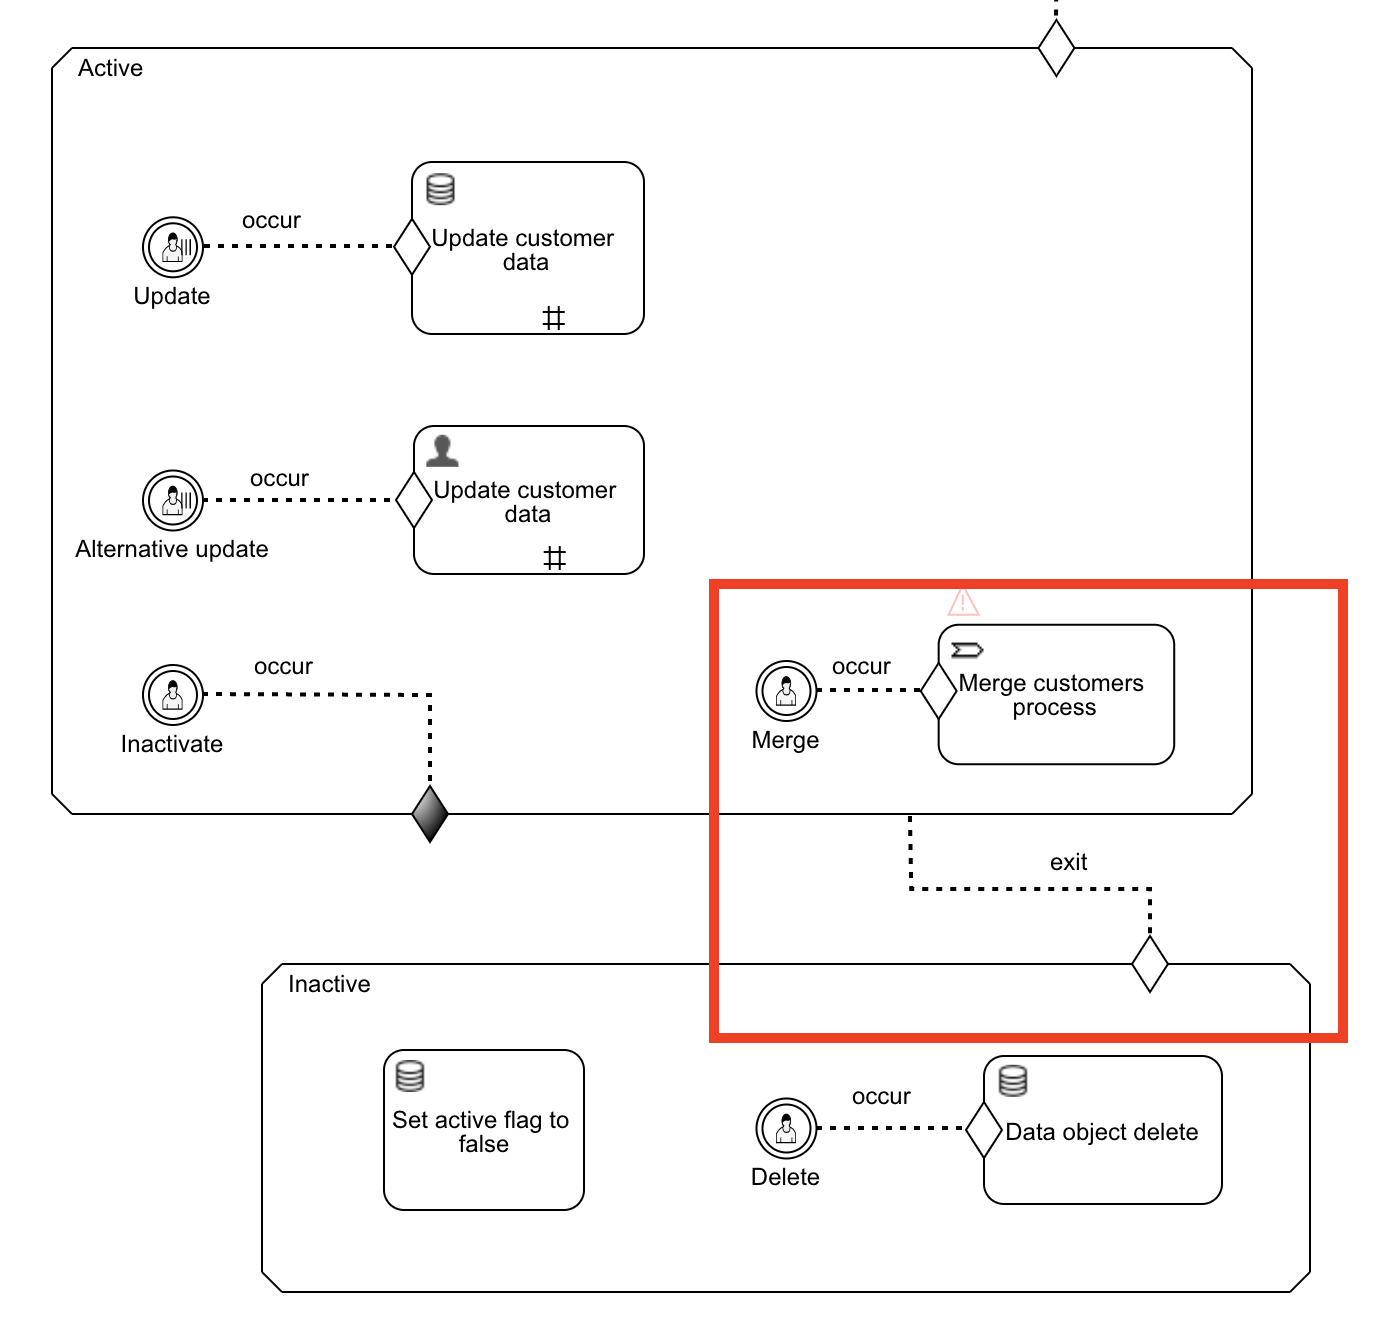
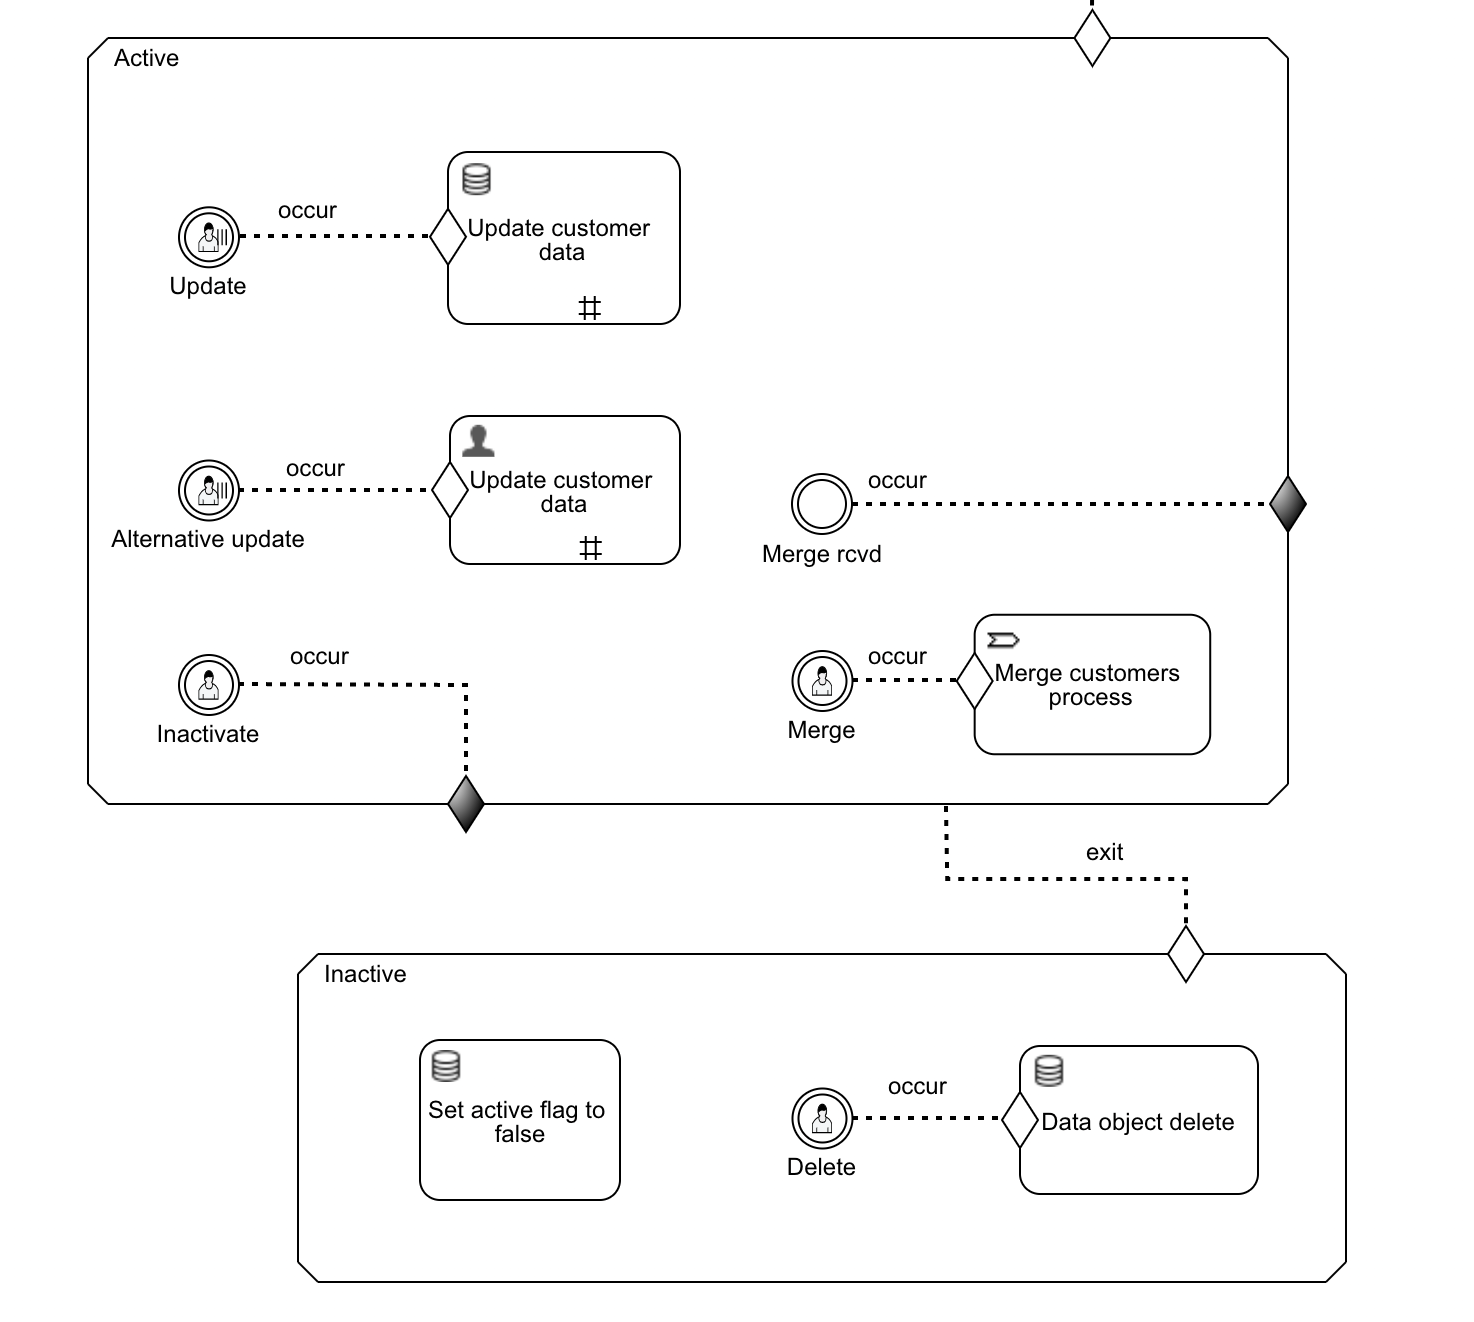
The CMMN model should now look as follows:
How does this work?When the Inactivate user event listener is triggered (by clicking the Inactivate button in Flowable Work that is shown due to the user event listener being active), the Active stage exits due to the exit sentry being reached.
This will terminate the Update and Alternative update event listeners and the other tasks that are in the available state.
The entry sentry on the Inactive stage will now kick in, due to listening to the exit event. The active flag will be set to false and the user will now see the Delete button due to the user event listener becoming active.
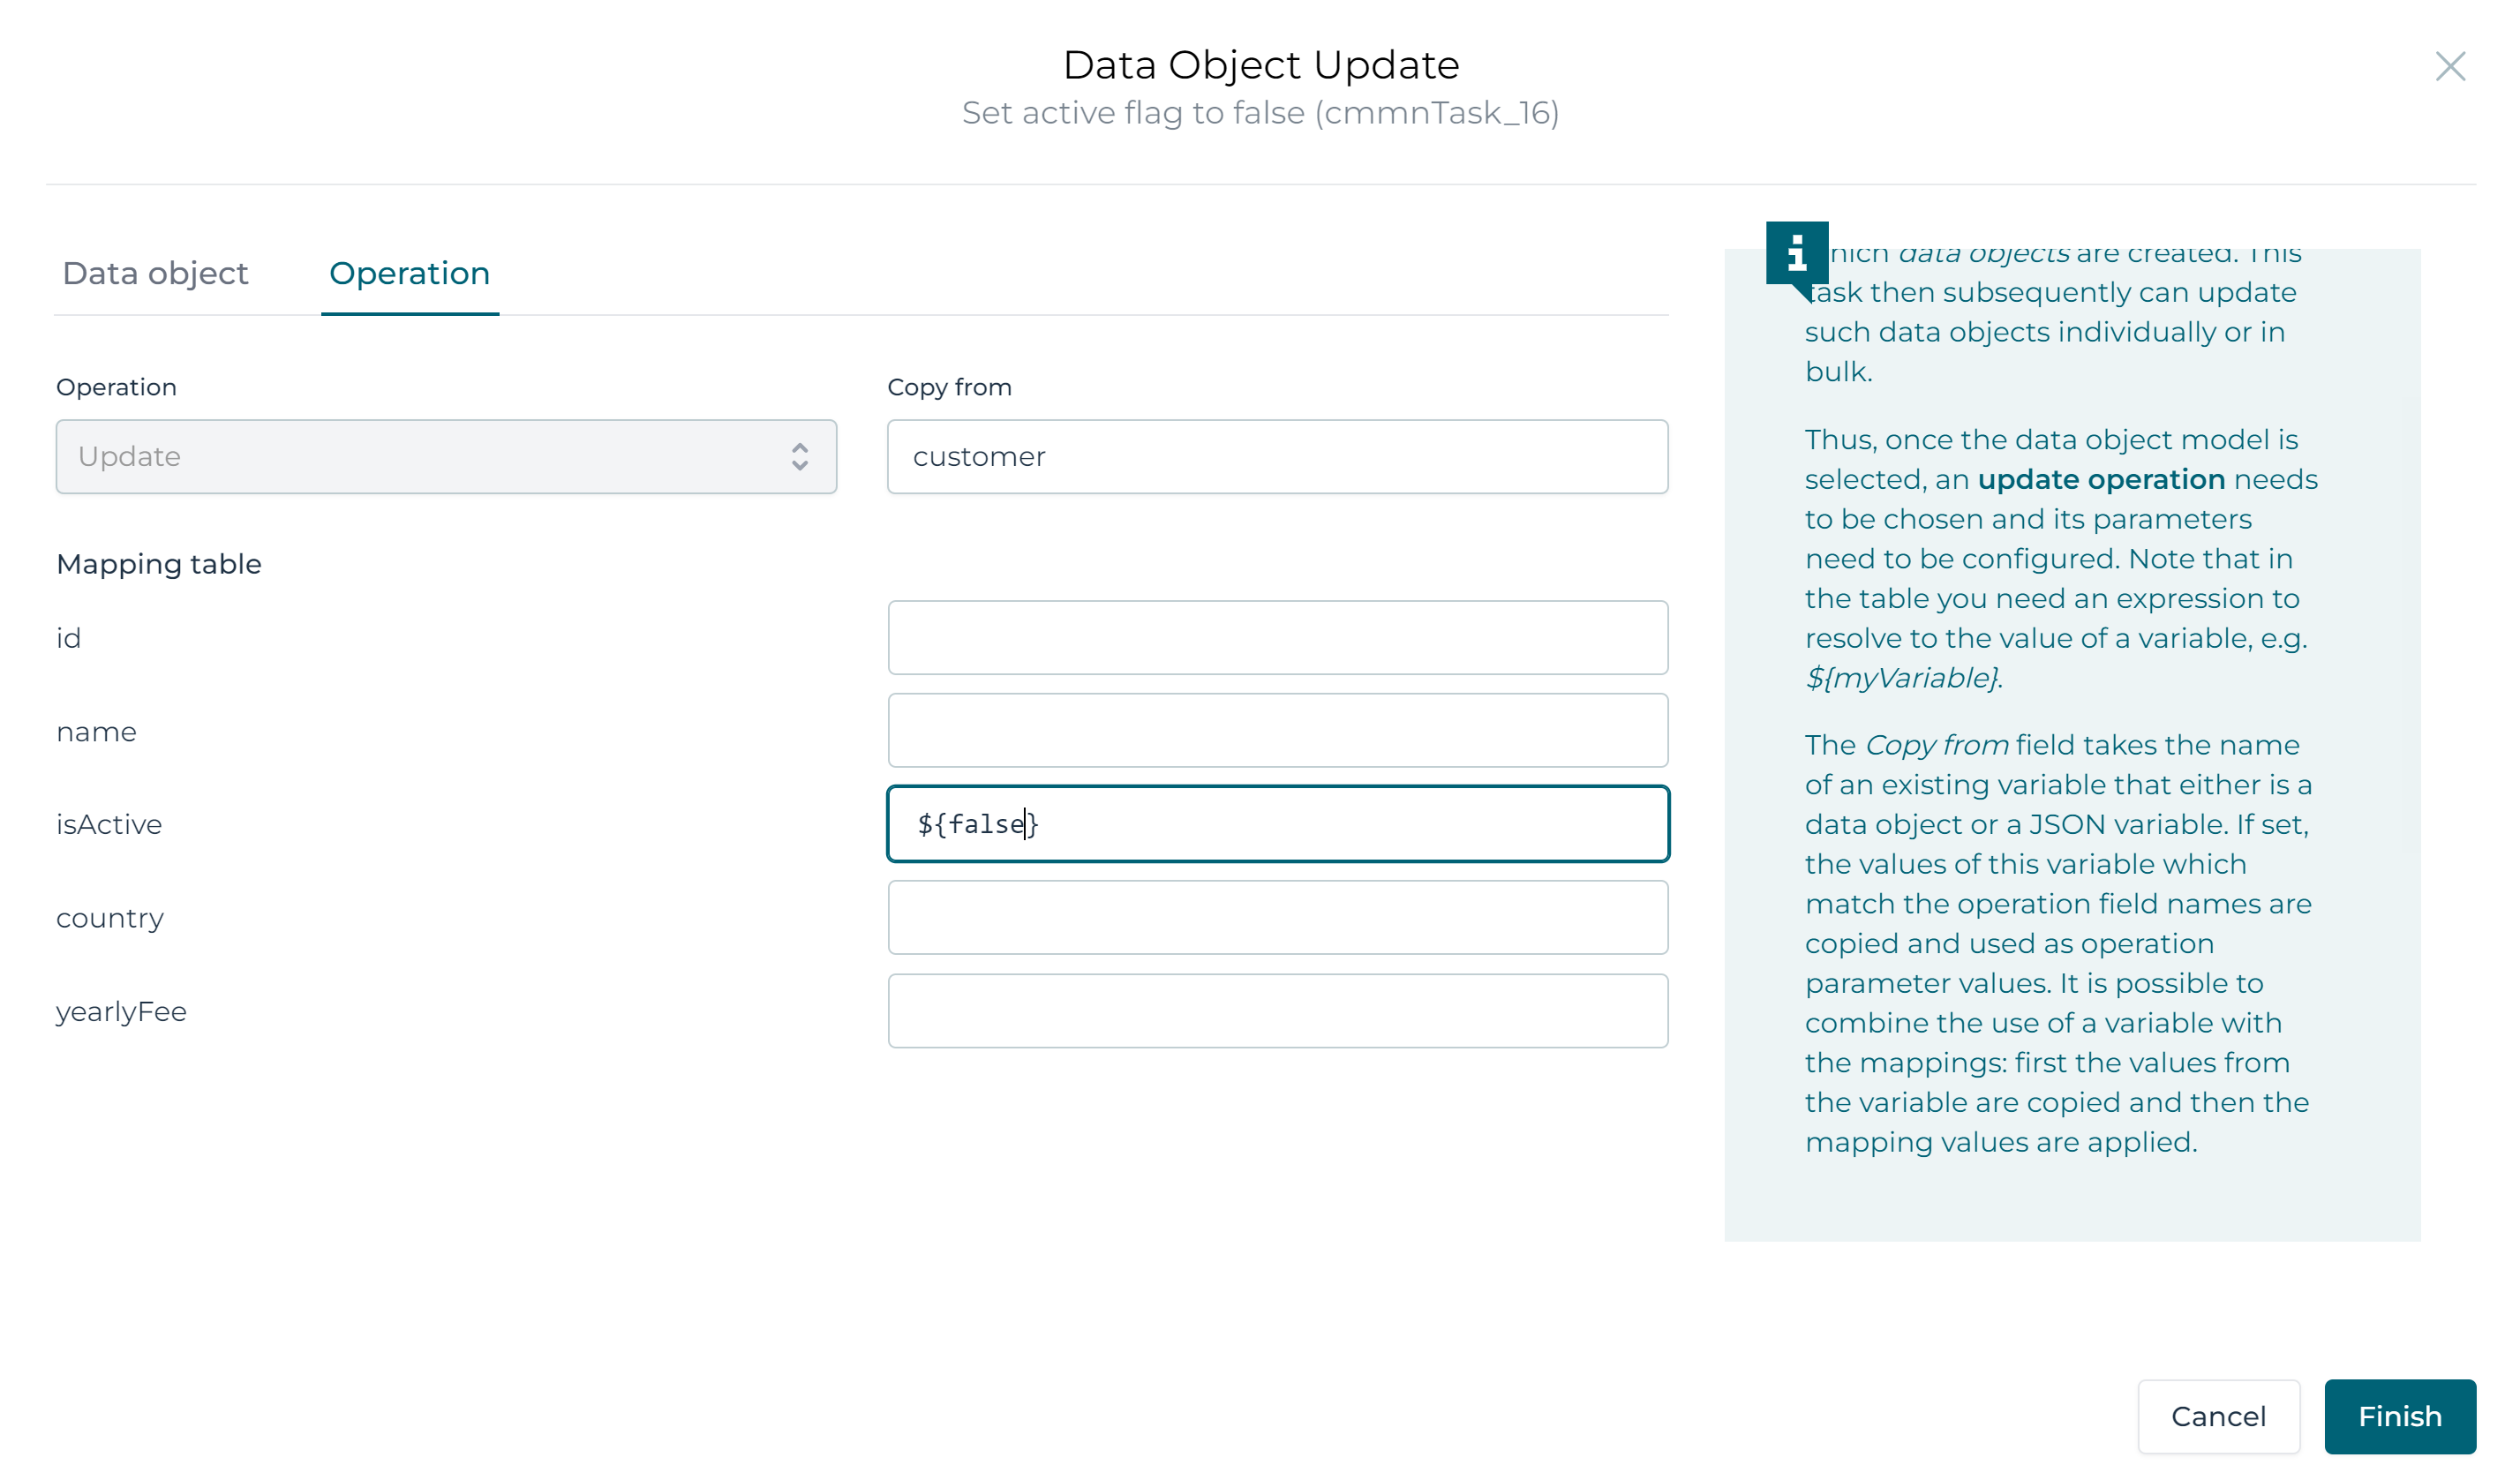
Let's configure the update task 'Set active flag to false' first.
Select the Customer data object like before, but now fill in customer
for the Input data object variable name property.
By doing this, we're instructing the update task to take all existing values
for the data object fields, except for those we'll model explicitly.
By doing this, we only need to set the active flag to false:
The only thing left to do is configuring the Data object delete task.
Link it up with the Customer data object model, configure it by passing the
existing customer data object variable in the Input Variable property:
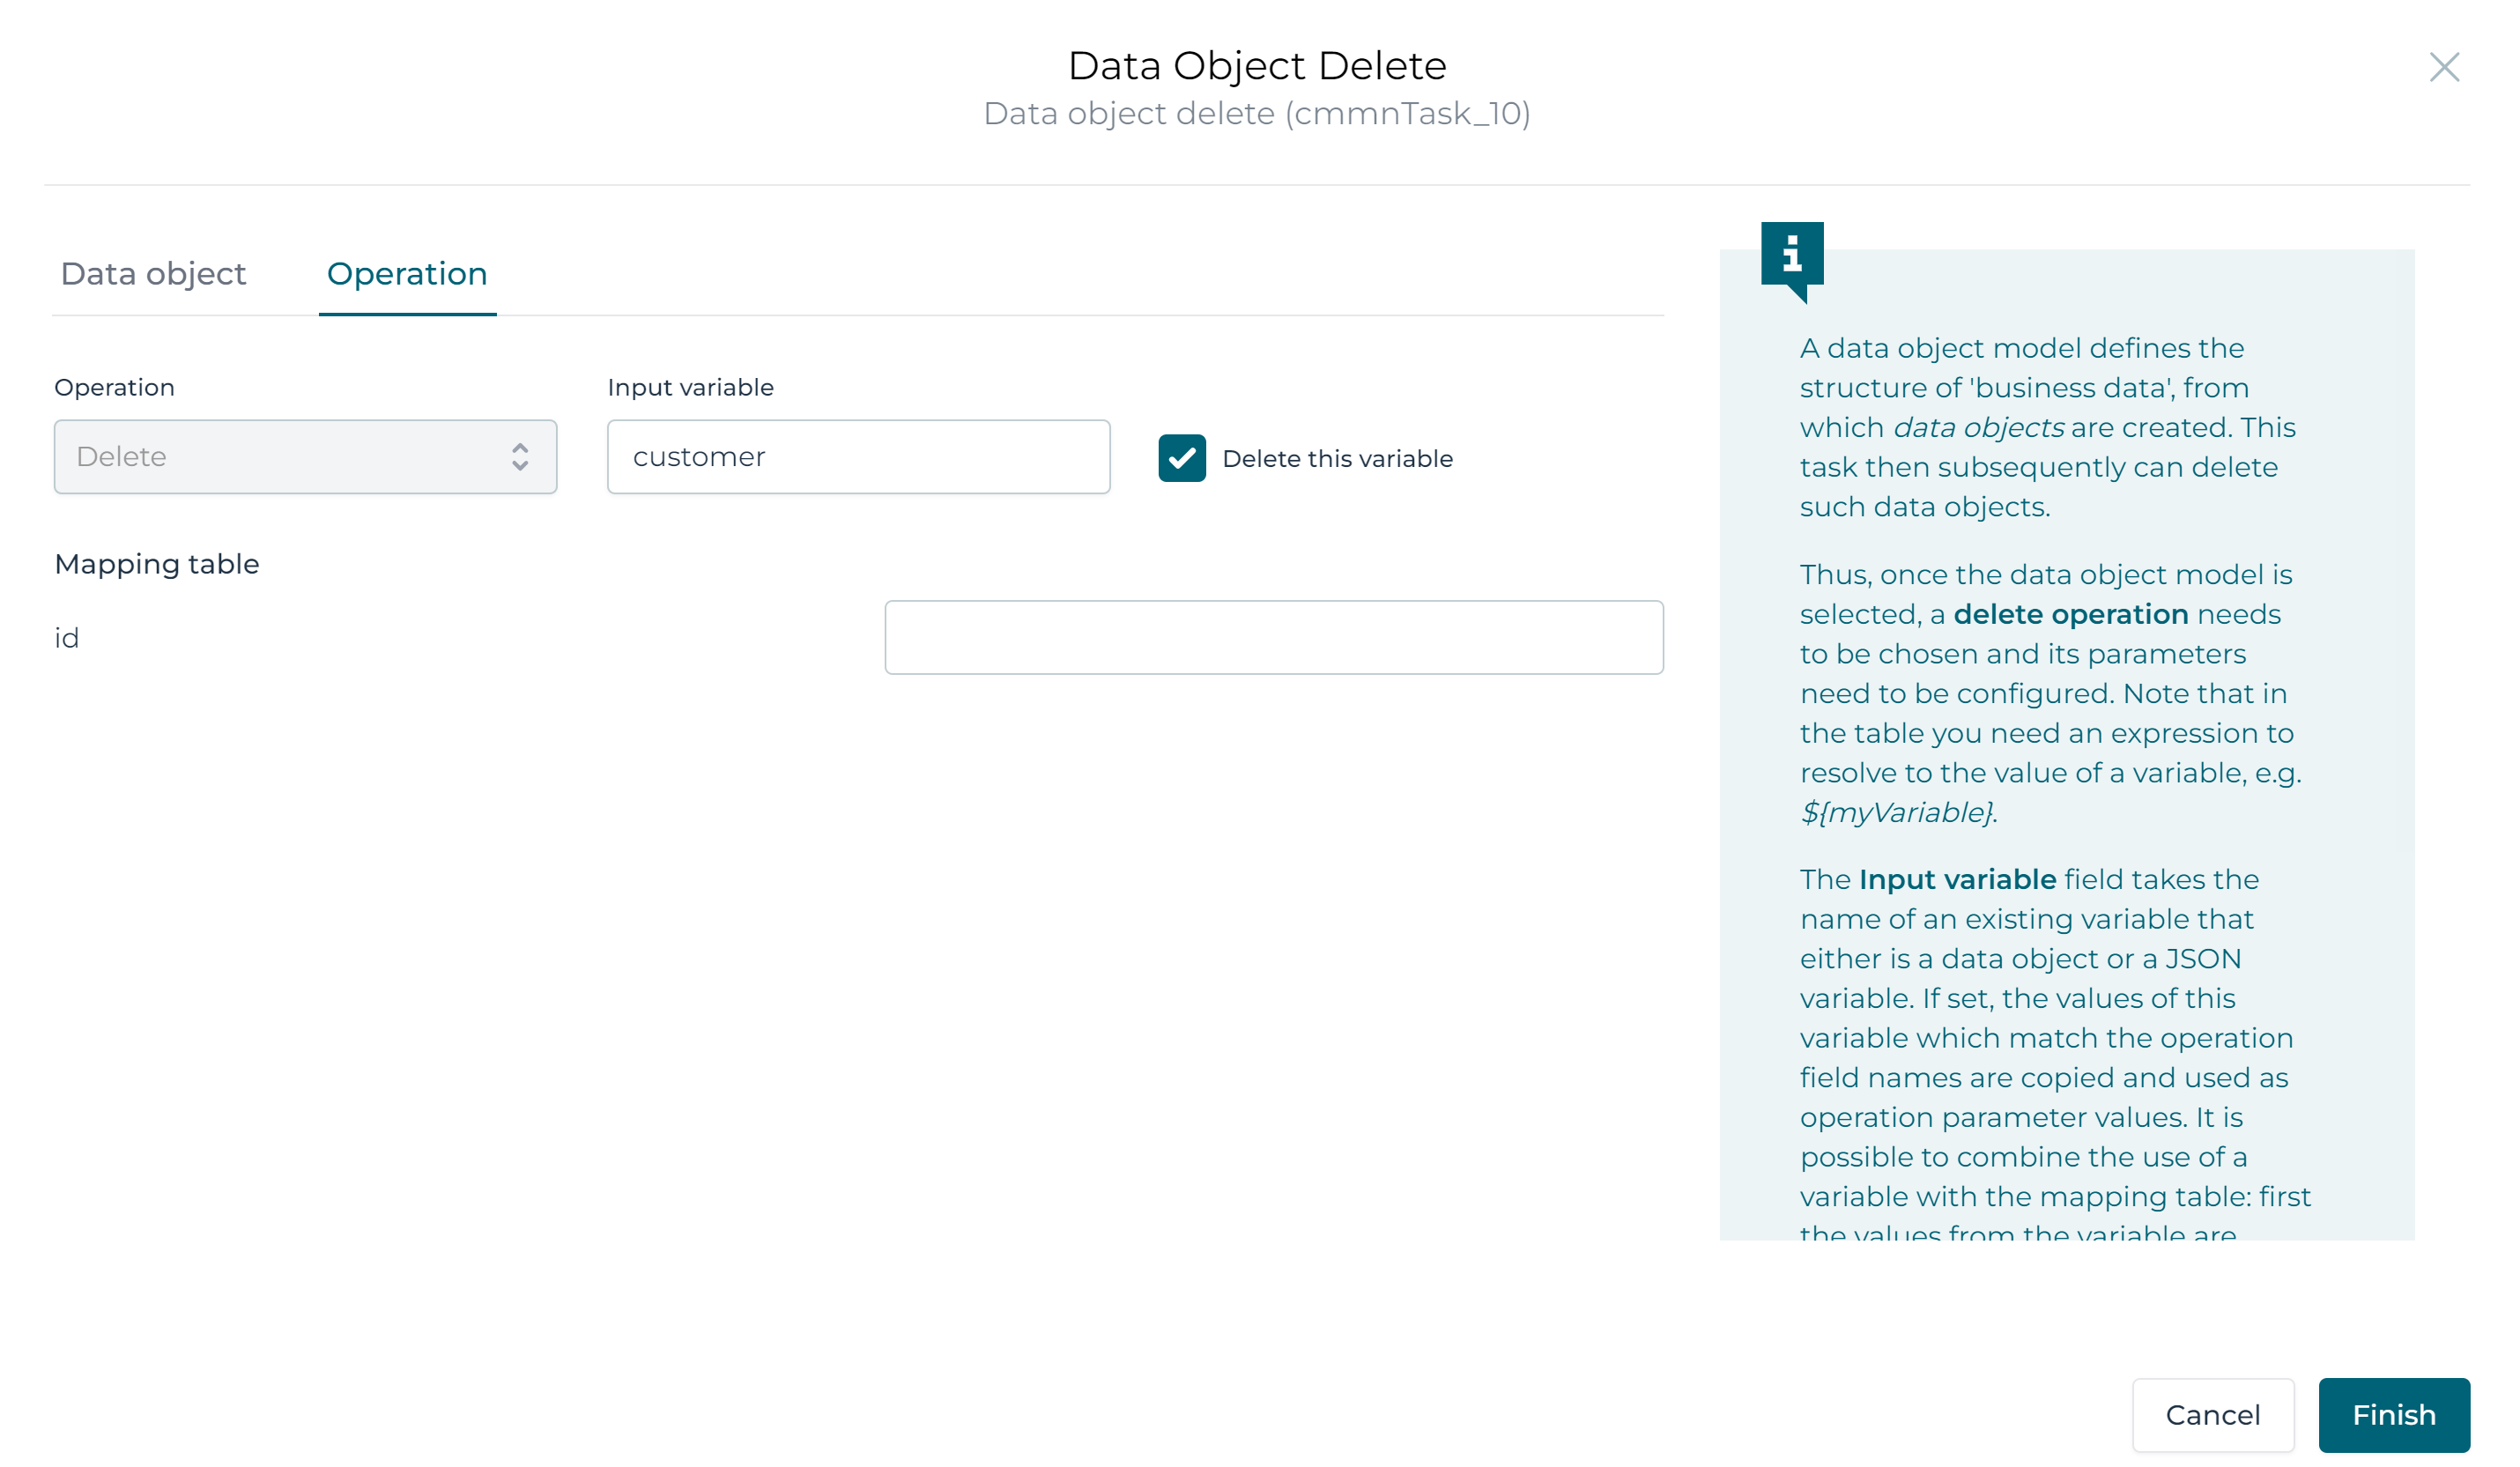
We don't need to configure the table anymore, as the customer data object variable has the ID field already and the value will be copied from it.
Sidetrack: the 'copy from' and 'input variable' field
noteThis is extra information. You can skip this if you're only interested in getting the app running.
In both the create and update task, there is a field in the operation configuration popup named Copy from. In it, the name of a data object or JSON variable can optionally be written. If so, the following applies:
- The value of the fields of the variable that match the name of the operation parameter is used as input for the parameter.
- If a value is provided in the table in the operation configuration popup, that value will overwrite any value from the previous step.
For the create operation, the obvious two use cases for it are:
- Copying the values of another data object (either a real one or one that was marked with
store a copy) - Gathering input in a (JSON) variable before passing it into the create operation.
Note that also the ID can be passed (if exposed in the operation). However, it will depend on the underlying service model whether the ID is actually used. For auto-generated database ID's for example, the value is ignored. However, it could very well be a third party REST API needs an ID set on creation.
For the update operation, the use case about copying values or gathering input is the same.
The point about IDs is more prevalent here, as an update typically needs an ID (unless it is a bulk update). In this case, the copy from can easily be used to copy the ID value of the data object variable you want to update and overwrite any field value with data from forms in the table.
Lastly, the delete operation has a similar Input variable field. The use case of copying values is the same, but will most likely only apply to a bulk delete operation. More typical is setting the name of a data object variable to capture its ID and remove the variable.
Publishing the Example
We've now added a data object create, two data object updates and a data object delete. Let's publish and execute this example in Flowable Work to see if everything works as we've designed.
To publish the app, find the publish icon on the toolbar and click it:
This shows a popup, where a deployment environment can be selected. Click the Publish button:
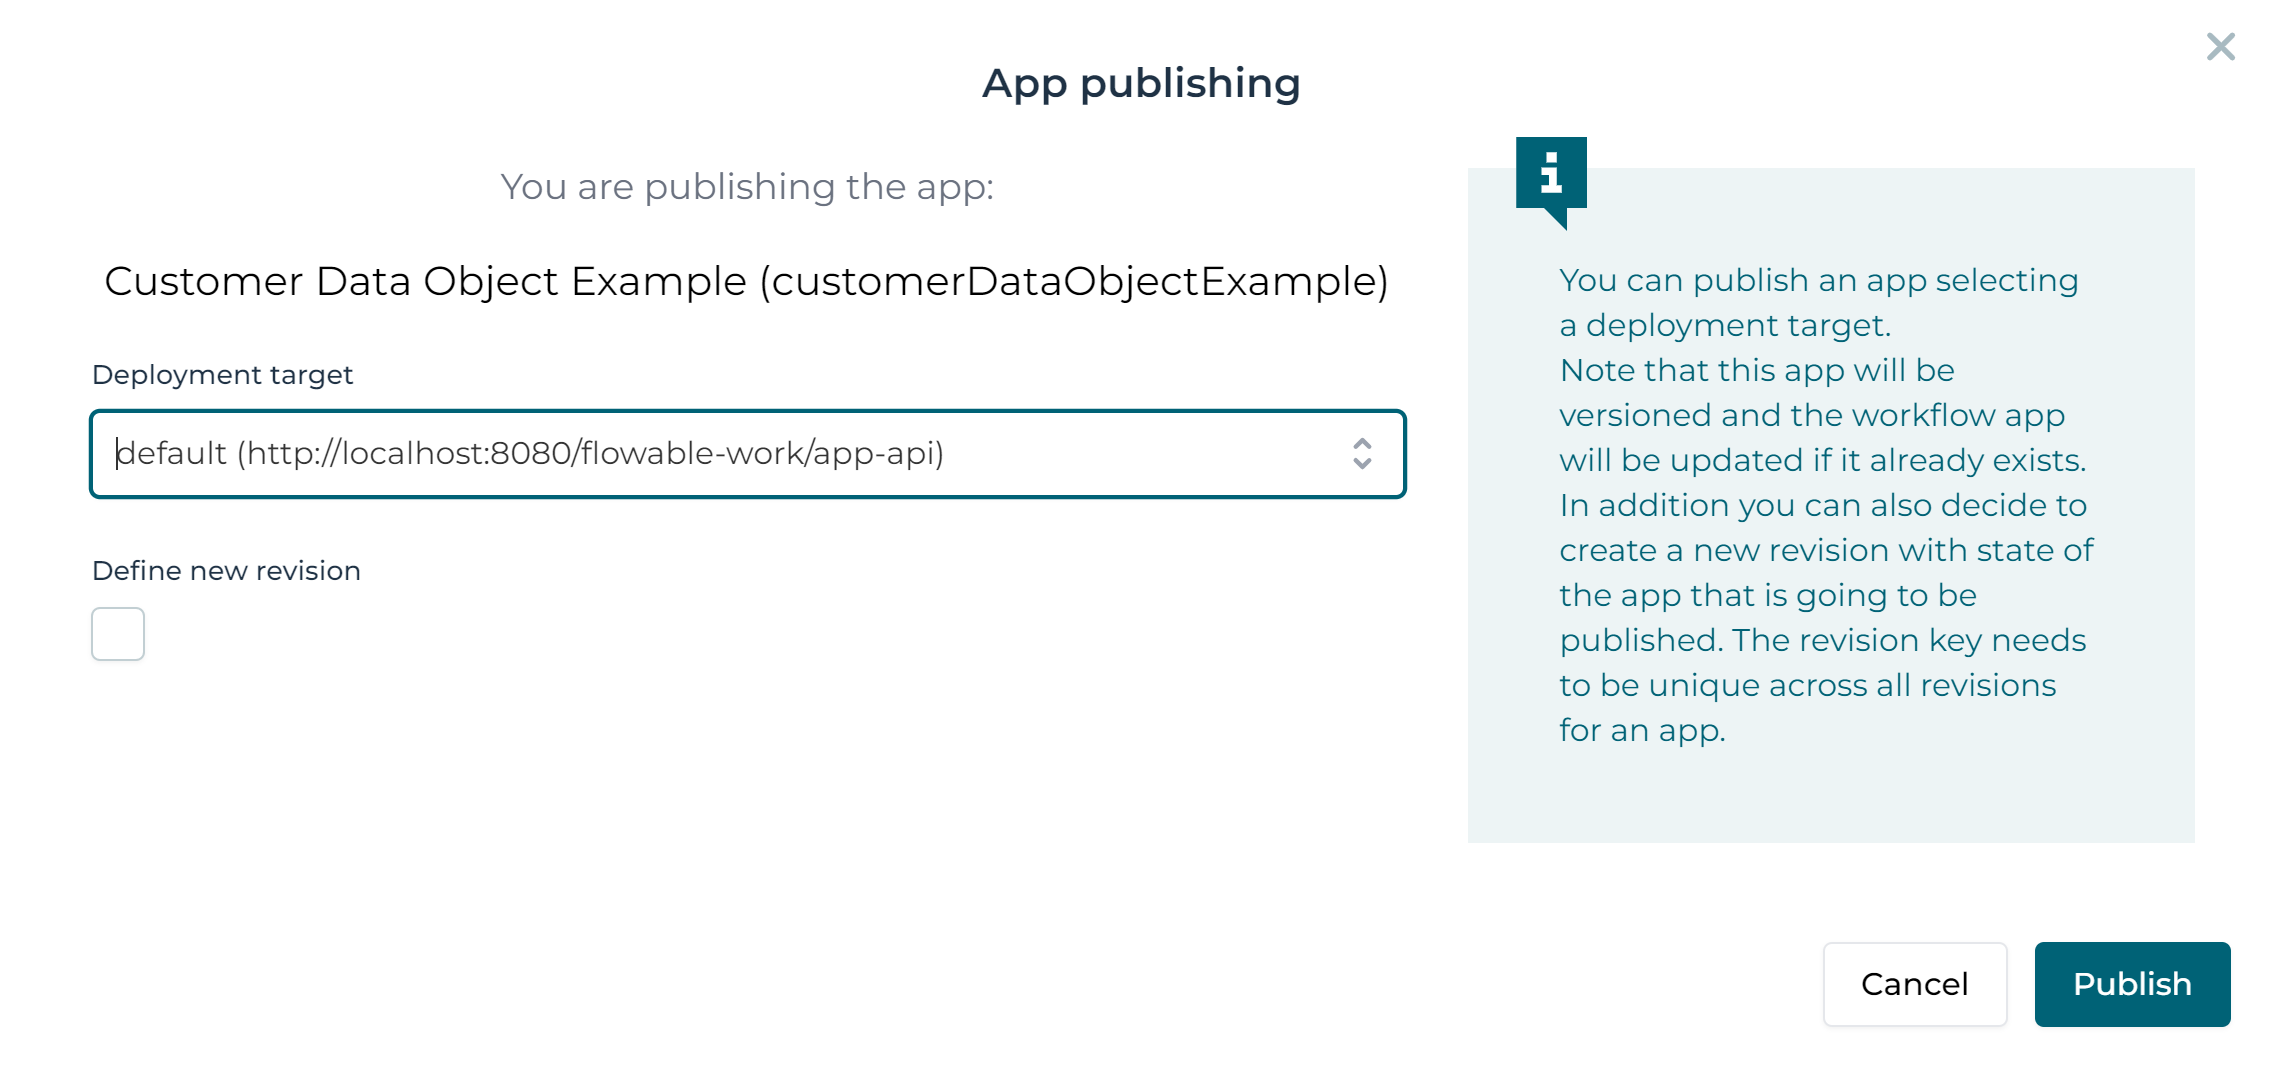
This now publishes the app and makes the case definition and data object model available for the Flowable runtime.
Creating the Database Schema (Database only)
There is however, one extra step needed in Flowable Control to actually create the database table when using database-backed data objects.
Why is this extra step needed?Creating a new database table is an invasive operation that shouldn't be done lightly, especially in production environments. As such, it can only done by administrators that have access to Flowable Control.
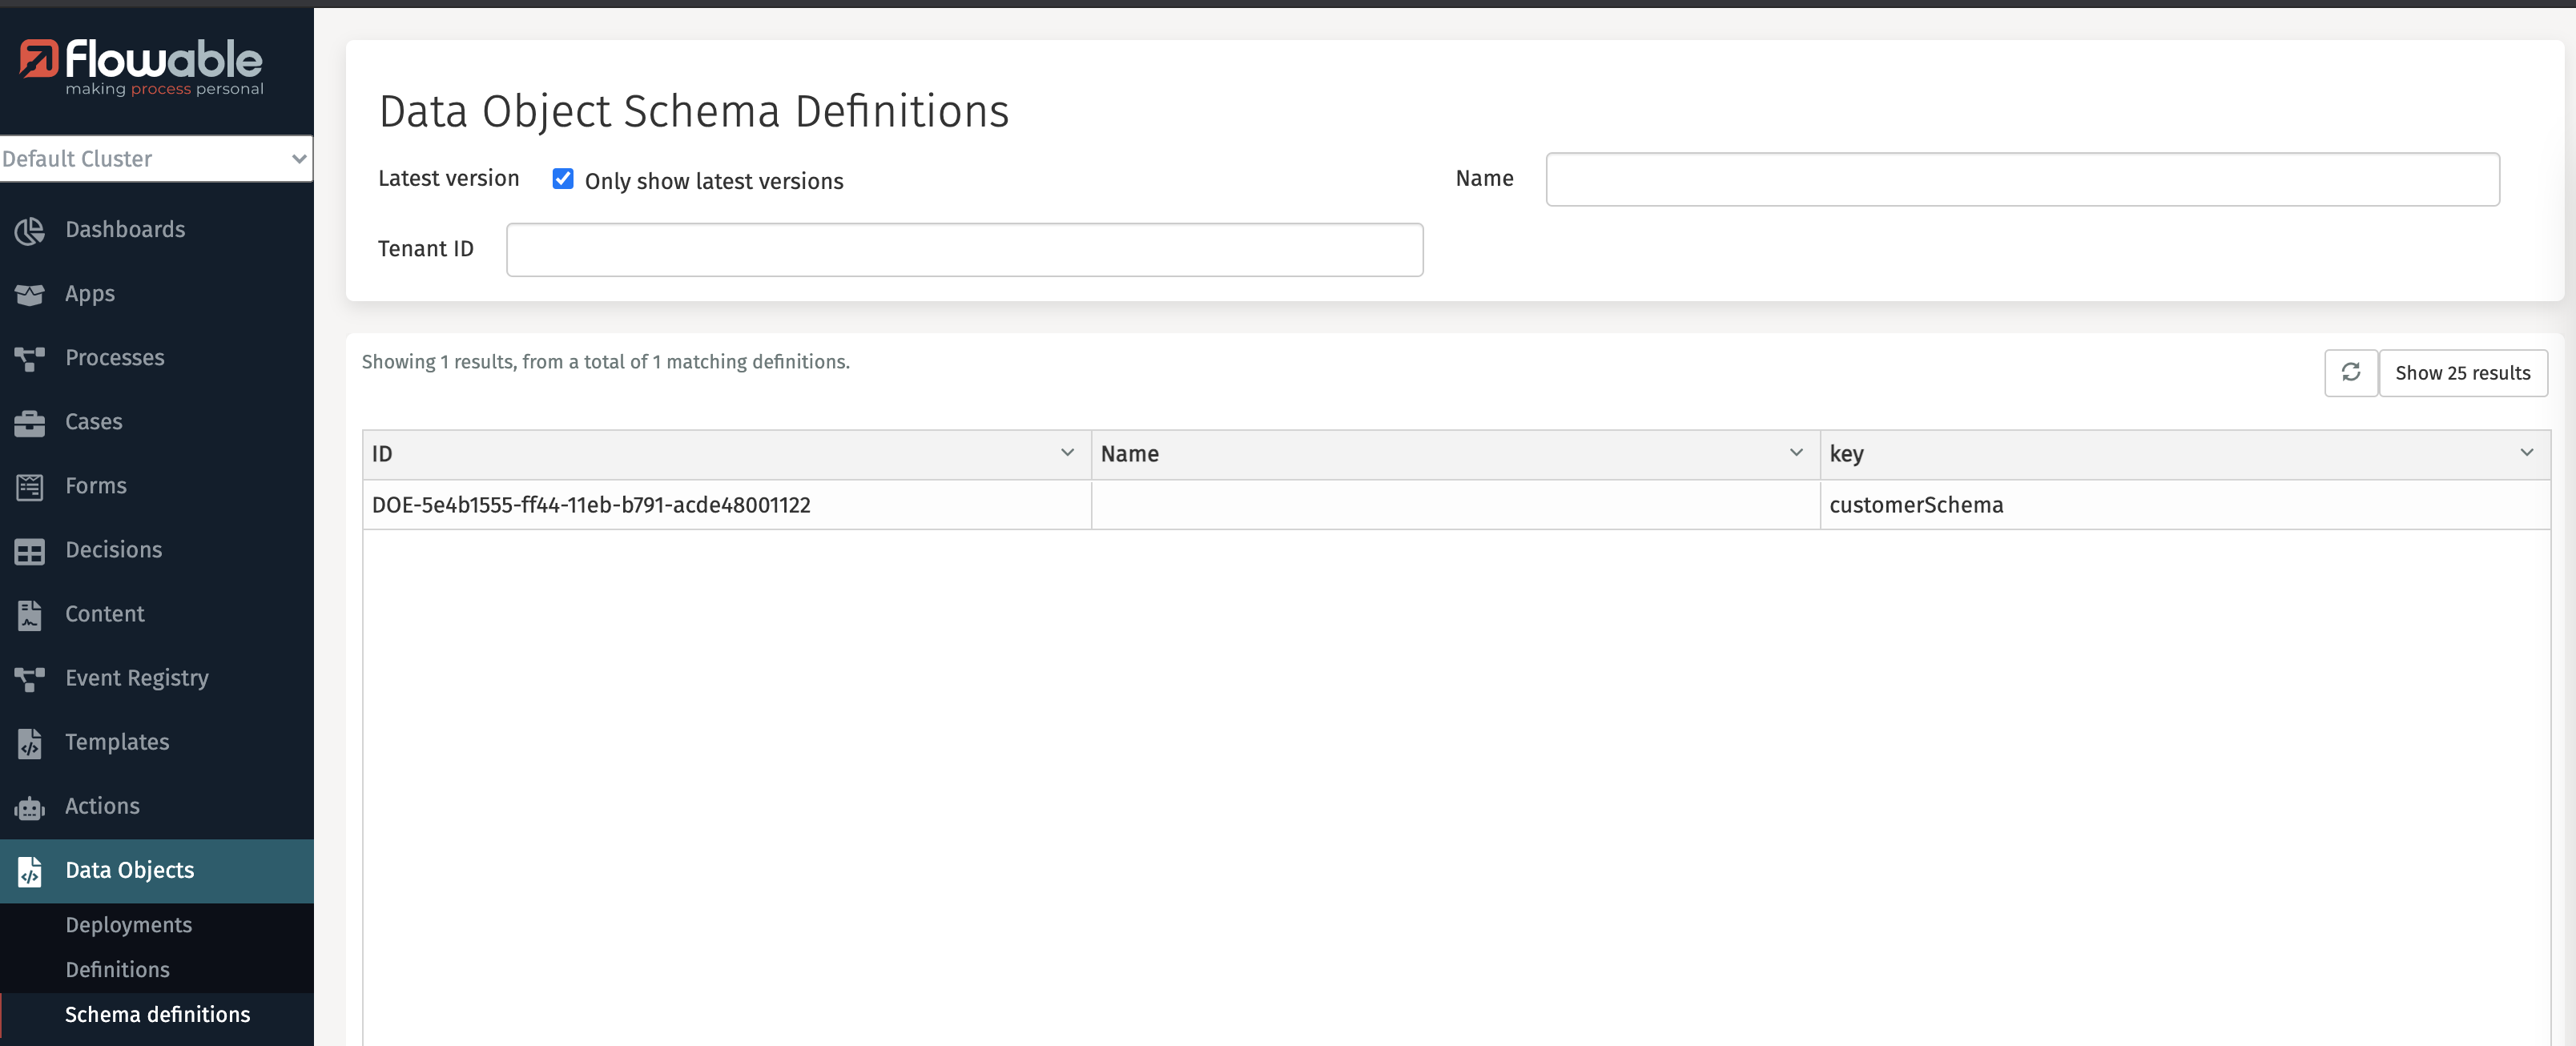
Log in to Flowable Control, click to the Data Objects section in the left-hand menu and click on the Schema definitions. The customerSchema we've defined as the Liquibase model should be shown now:
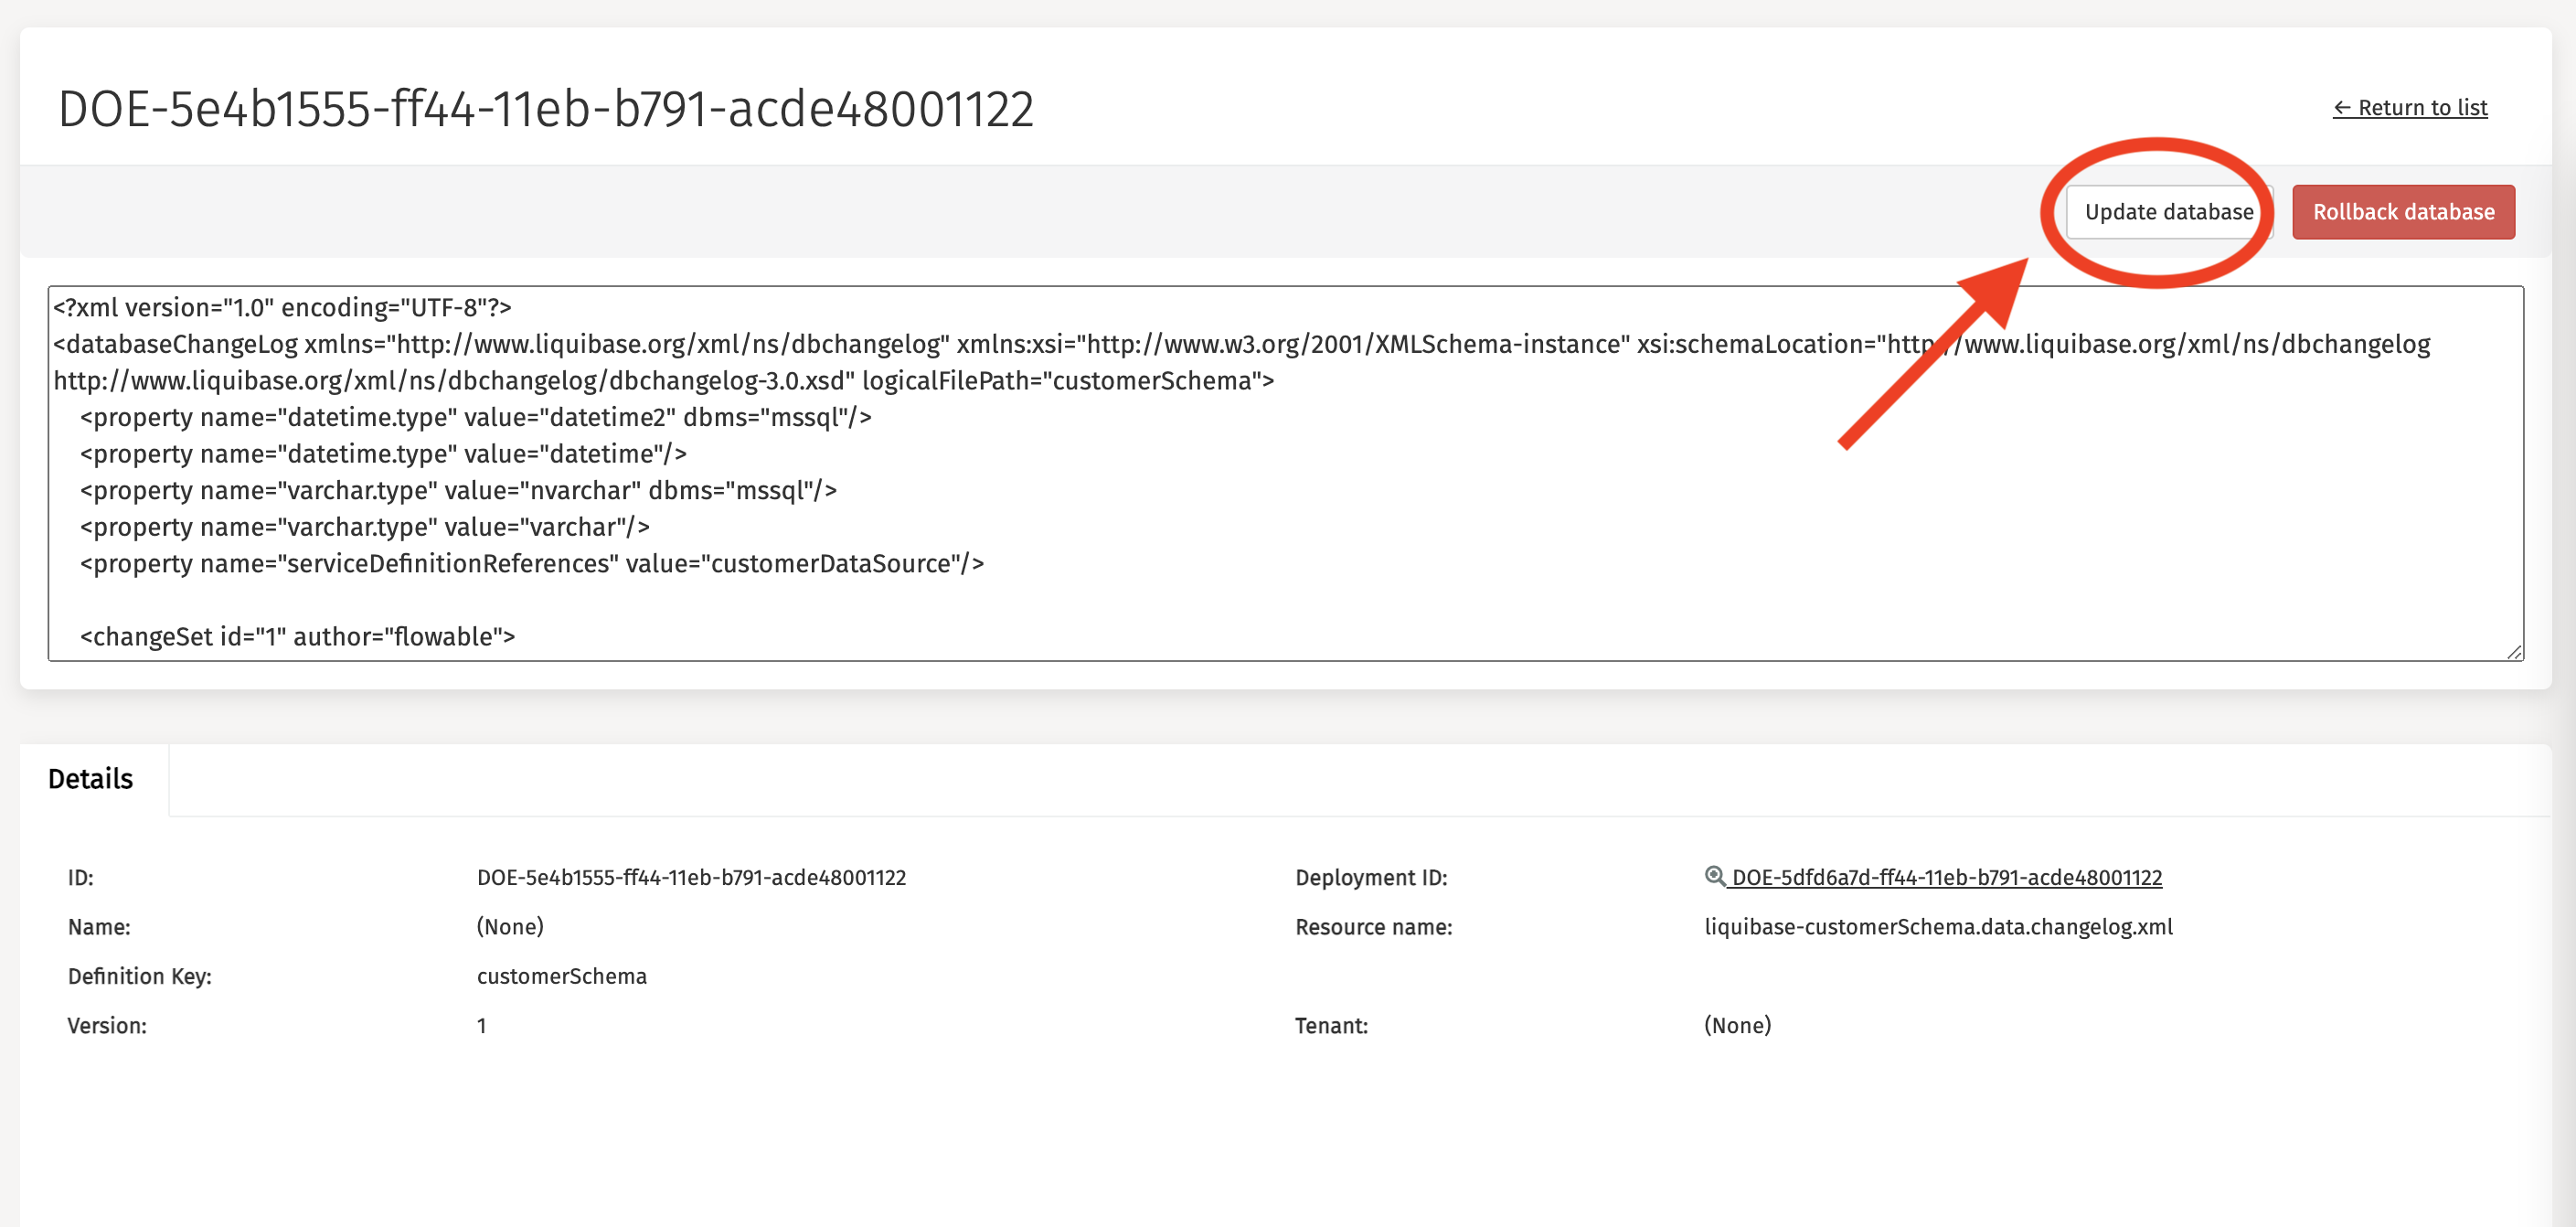
Click on the row that contains the customerSchema in the table. On the screenshot above there's only one row, but in your environment there could be more. This shows the details of the Liquibase schema definition. Click the Update database button on the right-hand side.
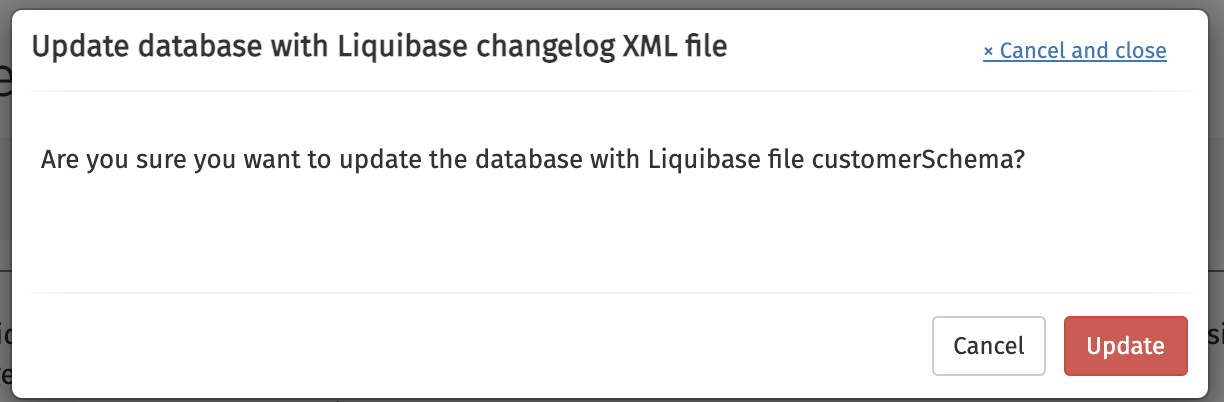
This will show a confirmation popup. Click Update to continue.
Executing the Example
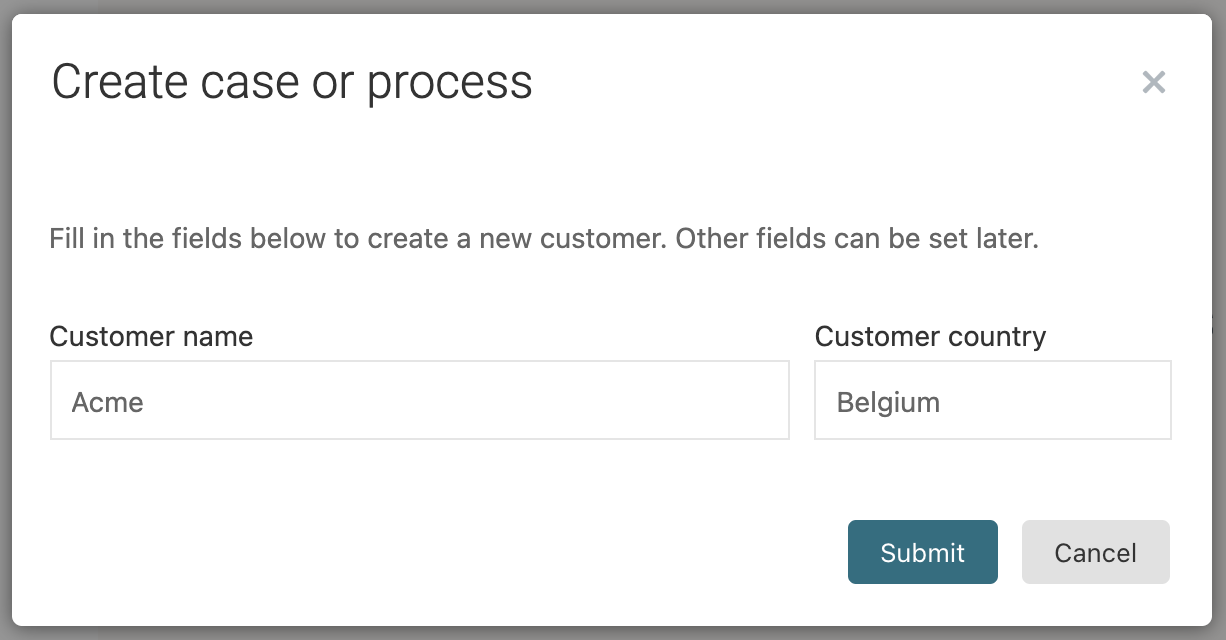
With the app published and the database table created, we can now log in into Flowable Work. There, click the New button and then click the Work icon. If you're running on an environment where apps already were deployed, you'll need to find the Customer Case definition. On a clean environment with only the example app from above deployed, the start form is immediately shown. Fill in a customer name and country:
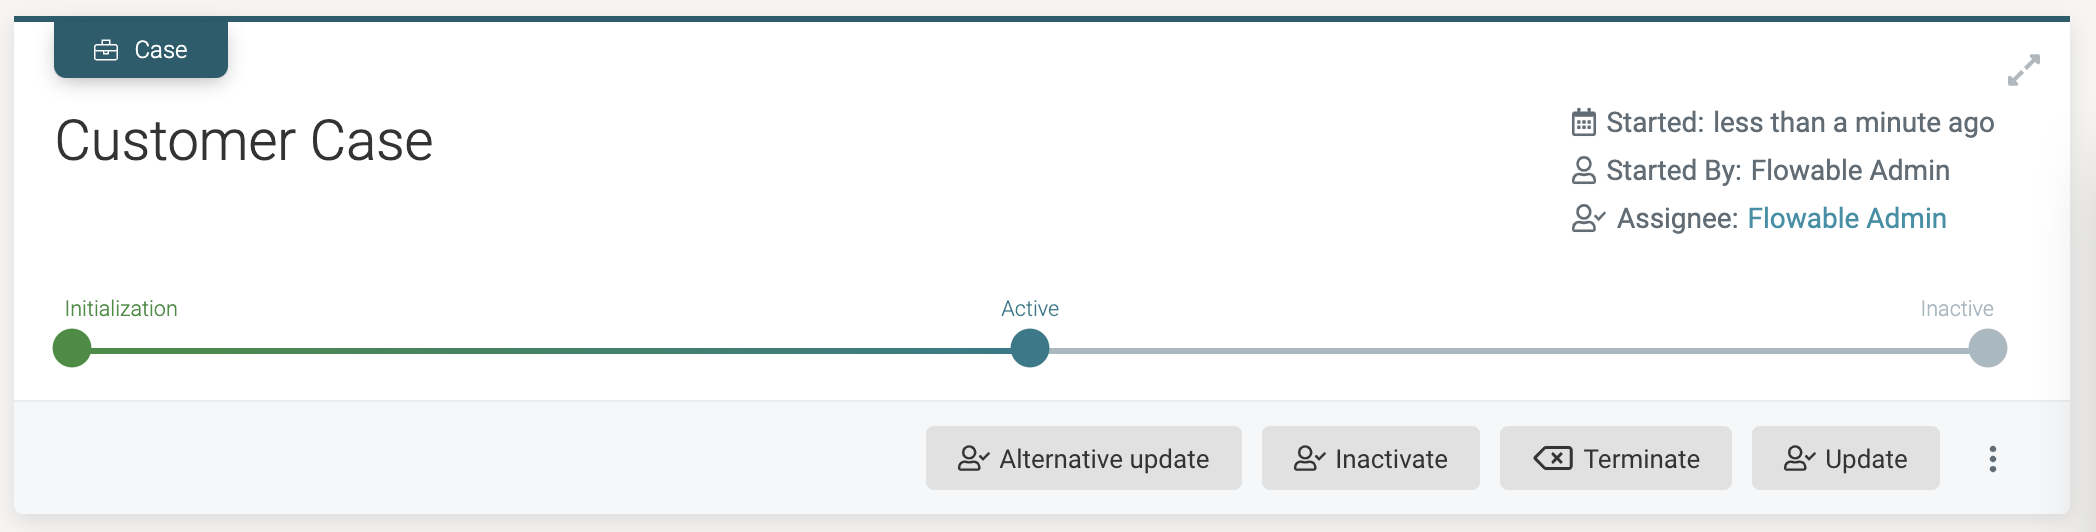
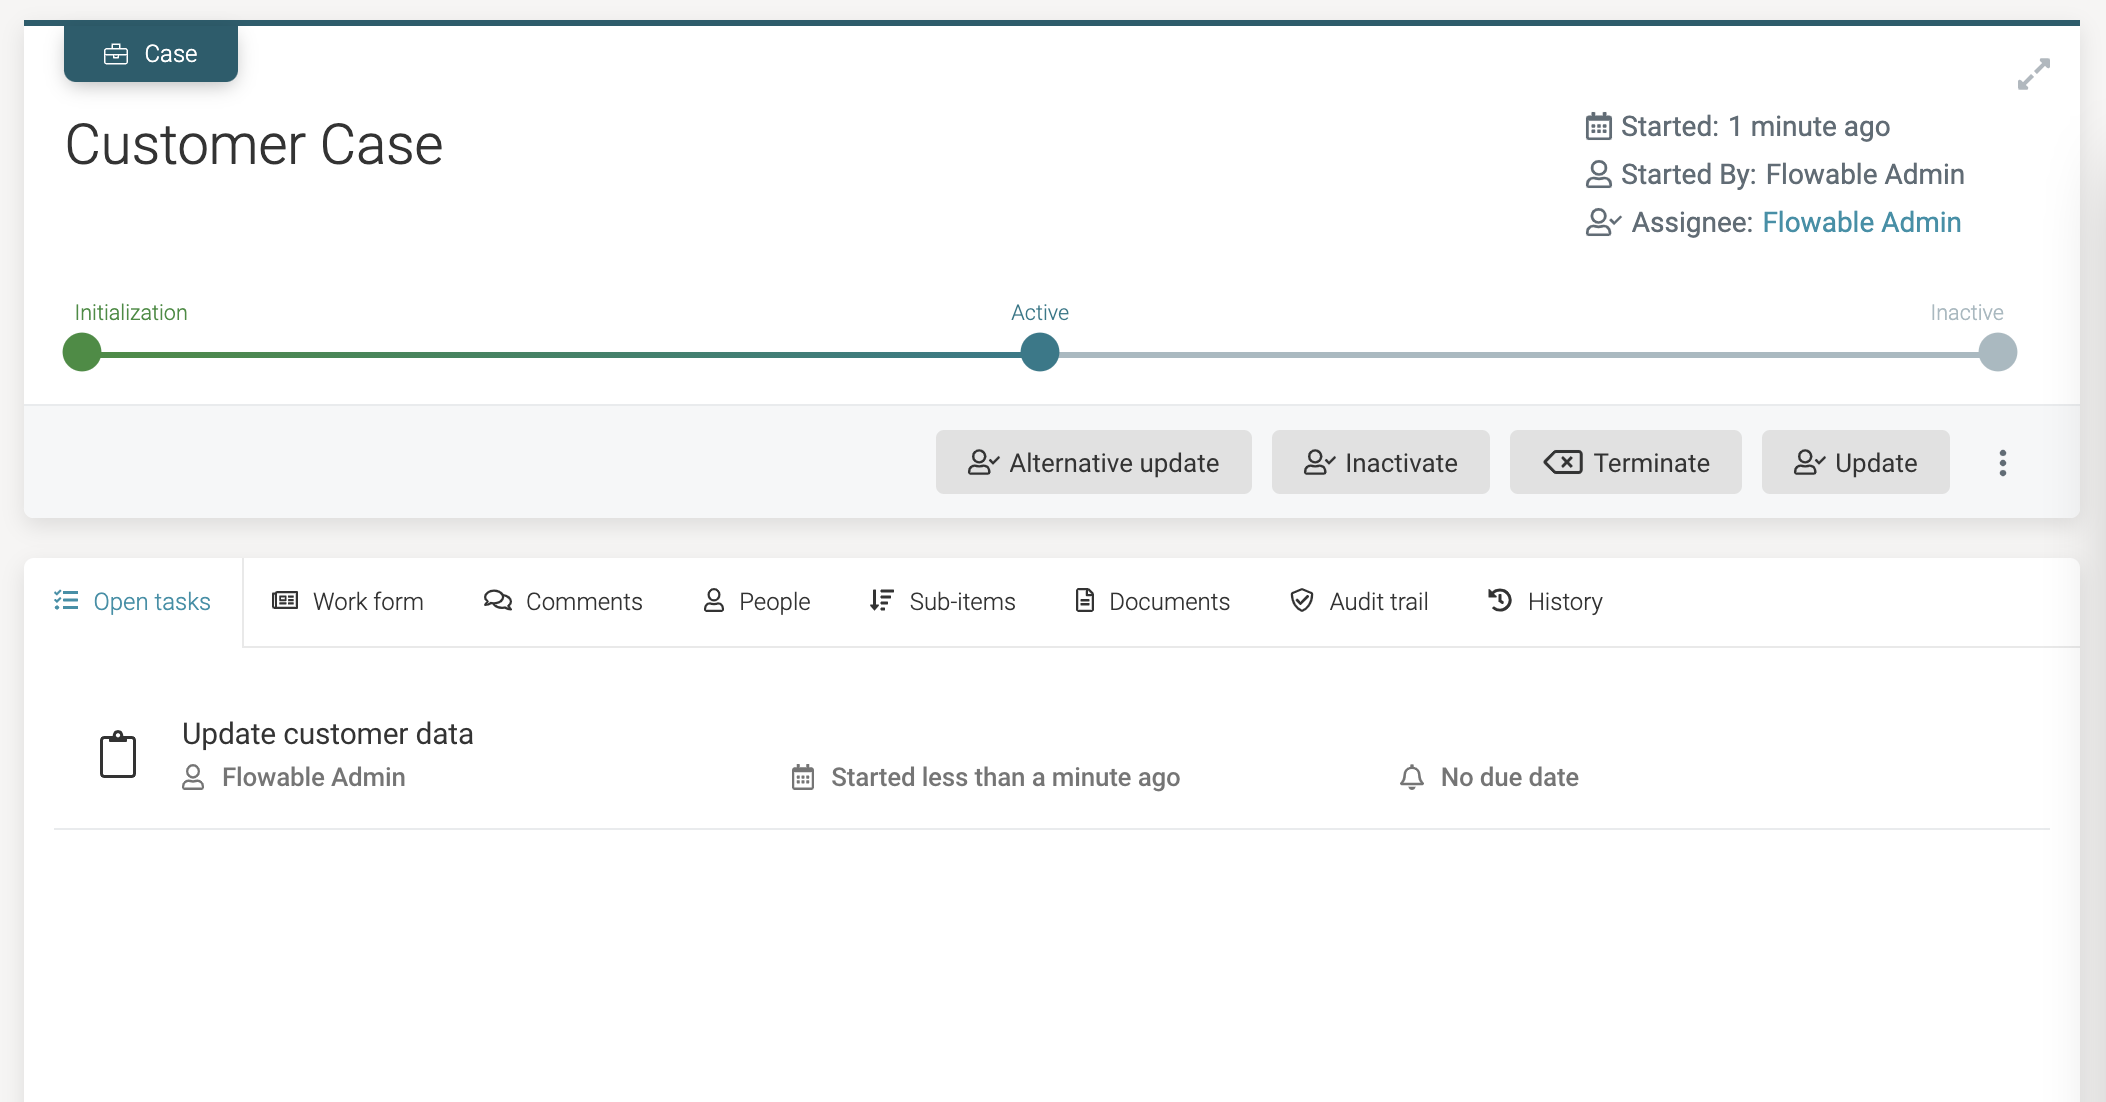
When clicking the Submit buttons, a few things will now happen: the case instance is started and the values from the start form are used to create a customer data object. The Flowable Work UI will show that we're passed the Initialization stage and are now in the Active stage. The three user event listeners we've defined are shown as action buttons:
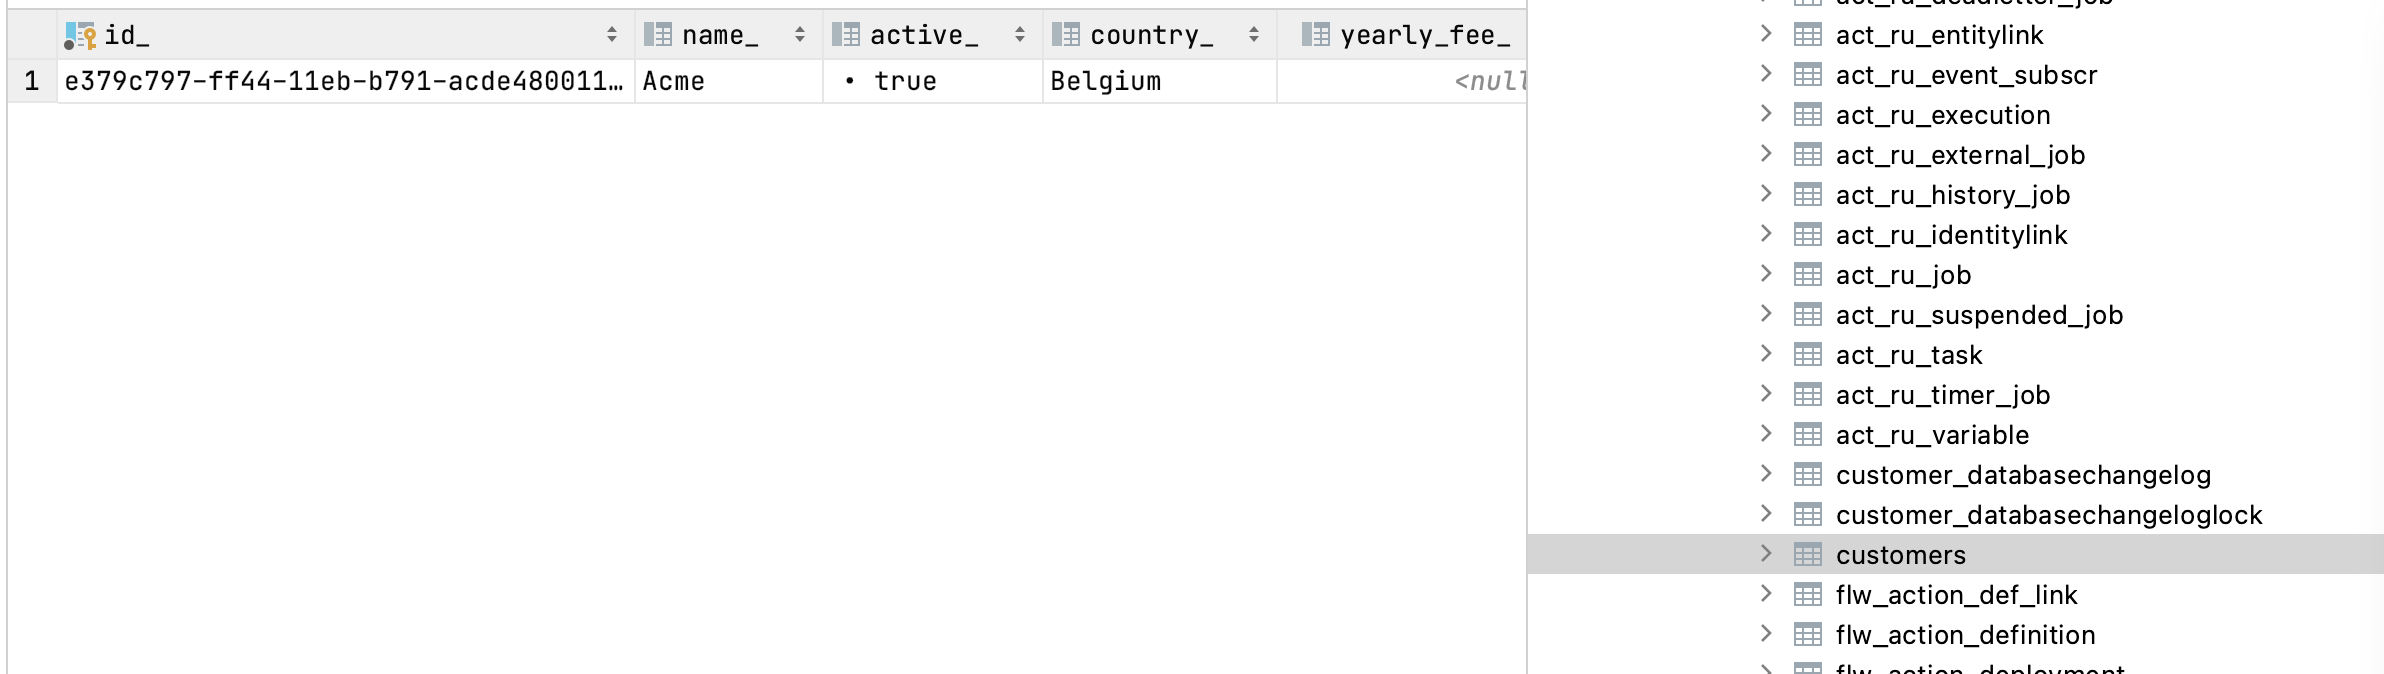
Verifying the dataIf we connect to the database (using any standard SQL tool) and execute a select on the customers table, we can see a row was inserted with the values we wrote in the start form:
When using the REST API application, in the logs the following is shown:
Created customer Customer{id='93288fc6-e1fb-4845-ae84-cce972886f56', name='Acme', active=false, country='Belgium', yearlyFee=0}
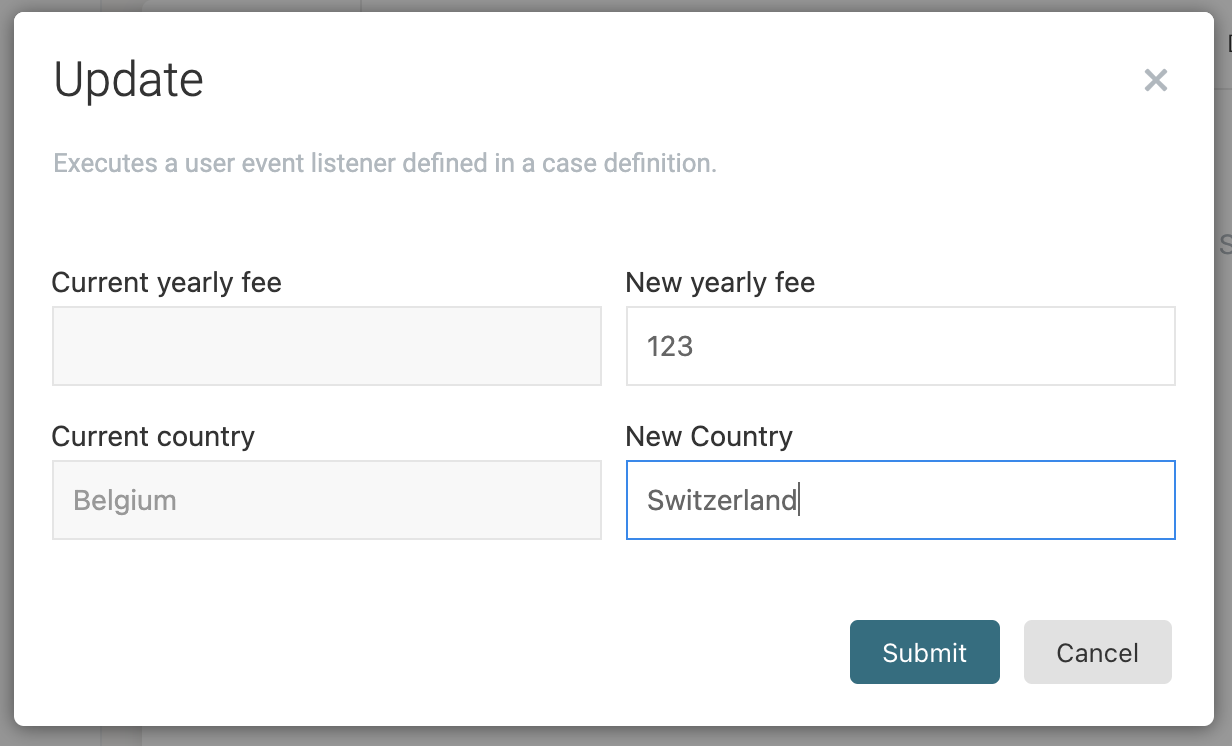
Let's click the Update button now. Remember that we added a form to the event listener, which shows the existing values (as we bound those two fields to the customer data object) and two fields to fill in new values:
When clicking the Submit button, the Data object update task will update the data object values.
Verifying the dataChecking the database again, we can indeed see that the changes have been executed:

When using the REST API application, in the logs the following is shown:
Updated customer to Customer{id='93288fc6-e1fb-4845-ae84-cce972886f56', name='Acme', active=false, country='Switzerland', yearlyFee=123}
Let's click the Alternative update button now. Doing so won't show a form, but shows a new user task exists in the case instance:
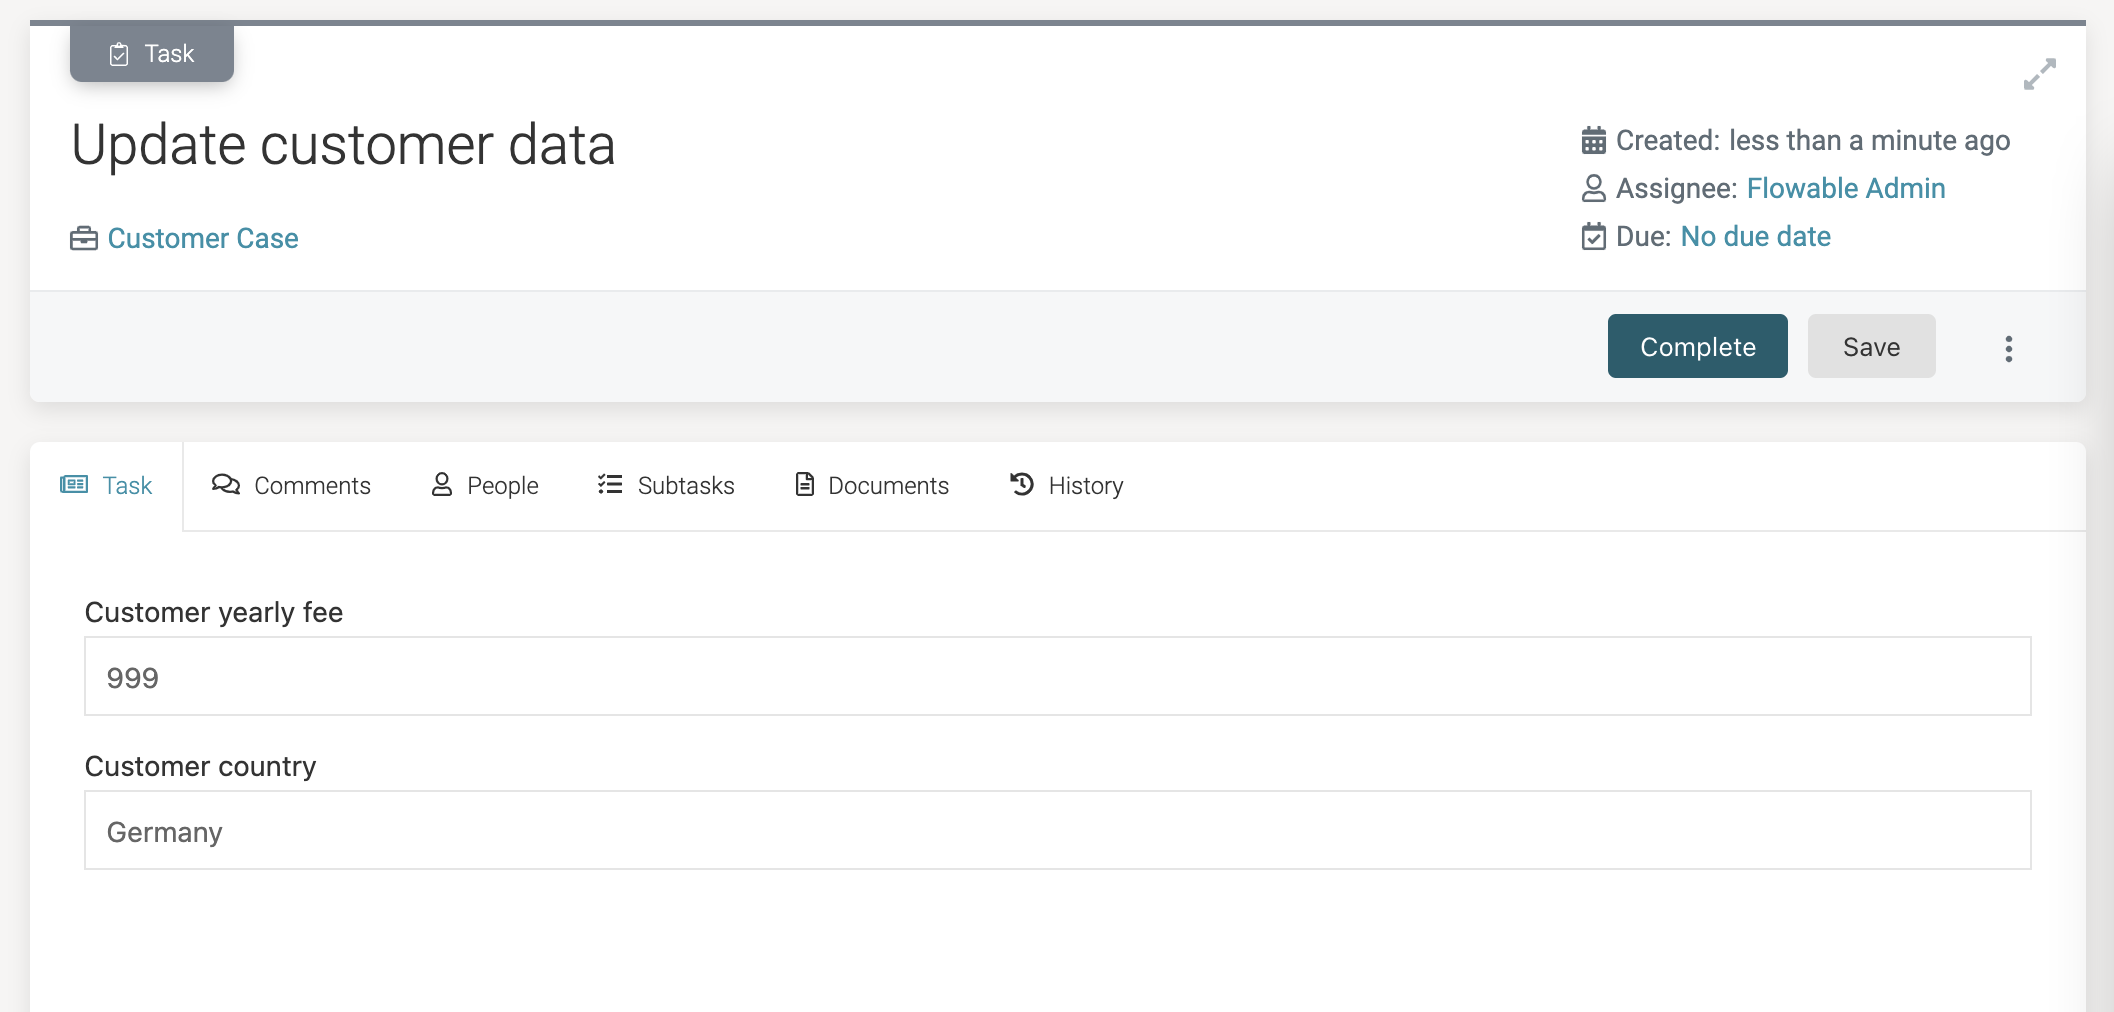
Clicking the user task will now show the form we've defined earlier. Notice how it shows the existing values of the data object and allows us to update them.

noteThe values of these form fields are not stored as regular variables nor are they stored as variables in the case instance. Due to being bound to a data object variable, the values are automatically fetched (and updated) as needed. Only the database table will ever hold the values. This makes data objects a very powerful mechanism
Fill in some values and click the Complete button:
Verifying the dataChecking the contents of the customers database table again, we can see that the values filled in into the task form also were persisted:

When using the REST API application, in the logs the following is shown:
Updated customer to Customer{id='93288fc6-e1fb-4845-ae84-cce972886f56', name='Acme', active=false, country='Germany', yearlyFee=999}
Finally, the Inactivate button can be clicked in the case instance. When doing so, the case instance will end, as there's no active plan item anymore. Checking the database, it would now show an empty database table.
Expanding the Example with a data object data table
Let's enhance the example CMMN case model further. Let's imagine that we have the requirement to model 'merging' of customers, for example due to acquisitions. To implement it, we'll want to show the customers on the screen, select a few and then merge them together (obviously this is extremely simplified and nowhere near realistic).
As the actual merging follows a fixed set of steps, we'll use a BPMN process for this. Add the following elements to the Active stage:
- A user event listener named
Merge - A process task named
Merge customer process
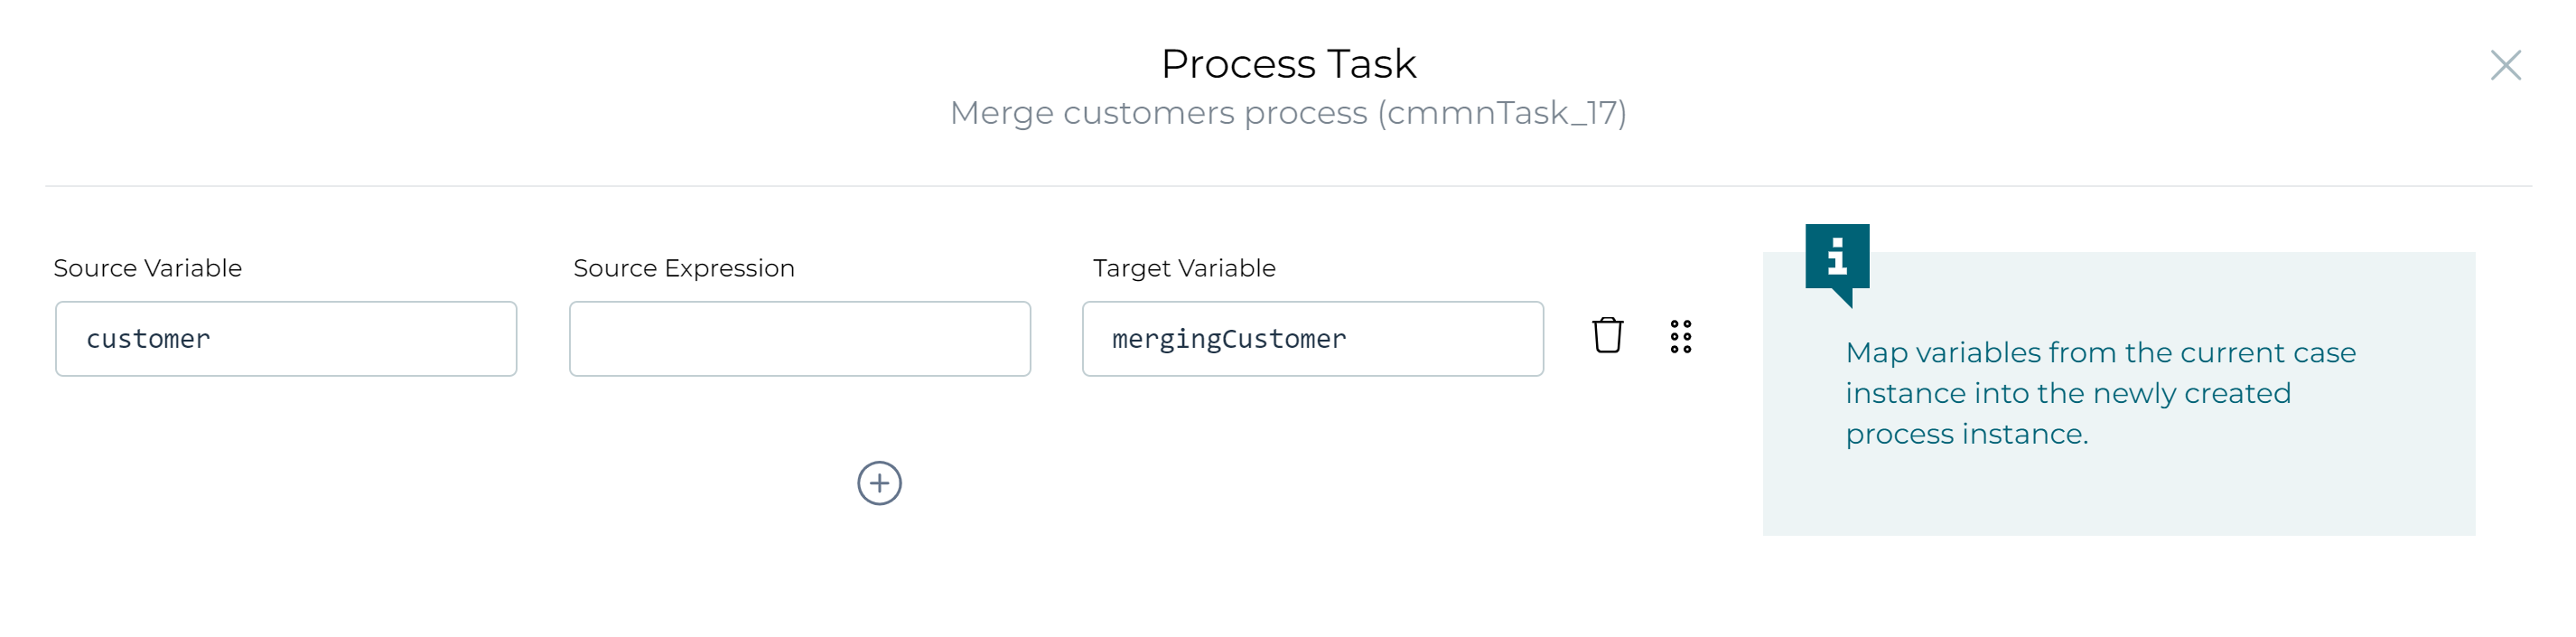
Select the process task. The process needs access to the data object variable. We could reference it using root.customer in the process model, but we can also pass it in the In property of the process task. Map the customer data object variable of the case into the mergingCustomer variable of the process:
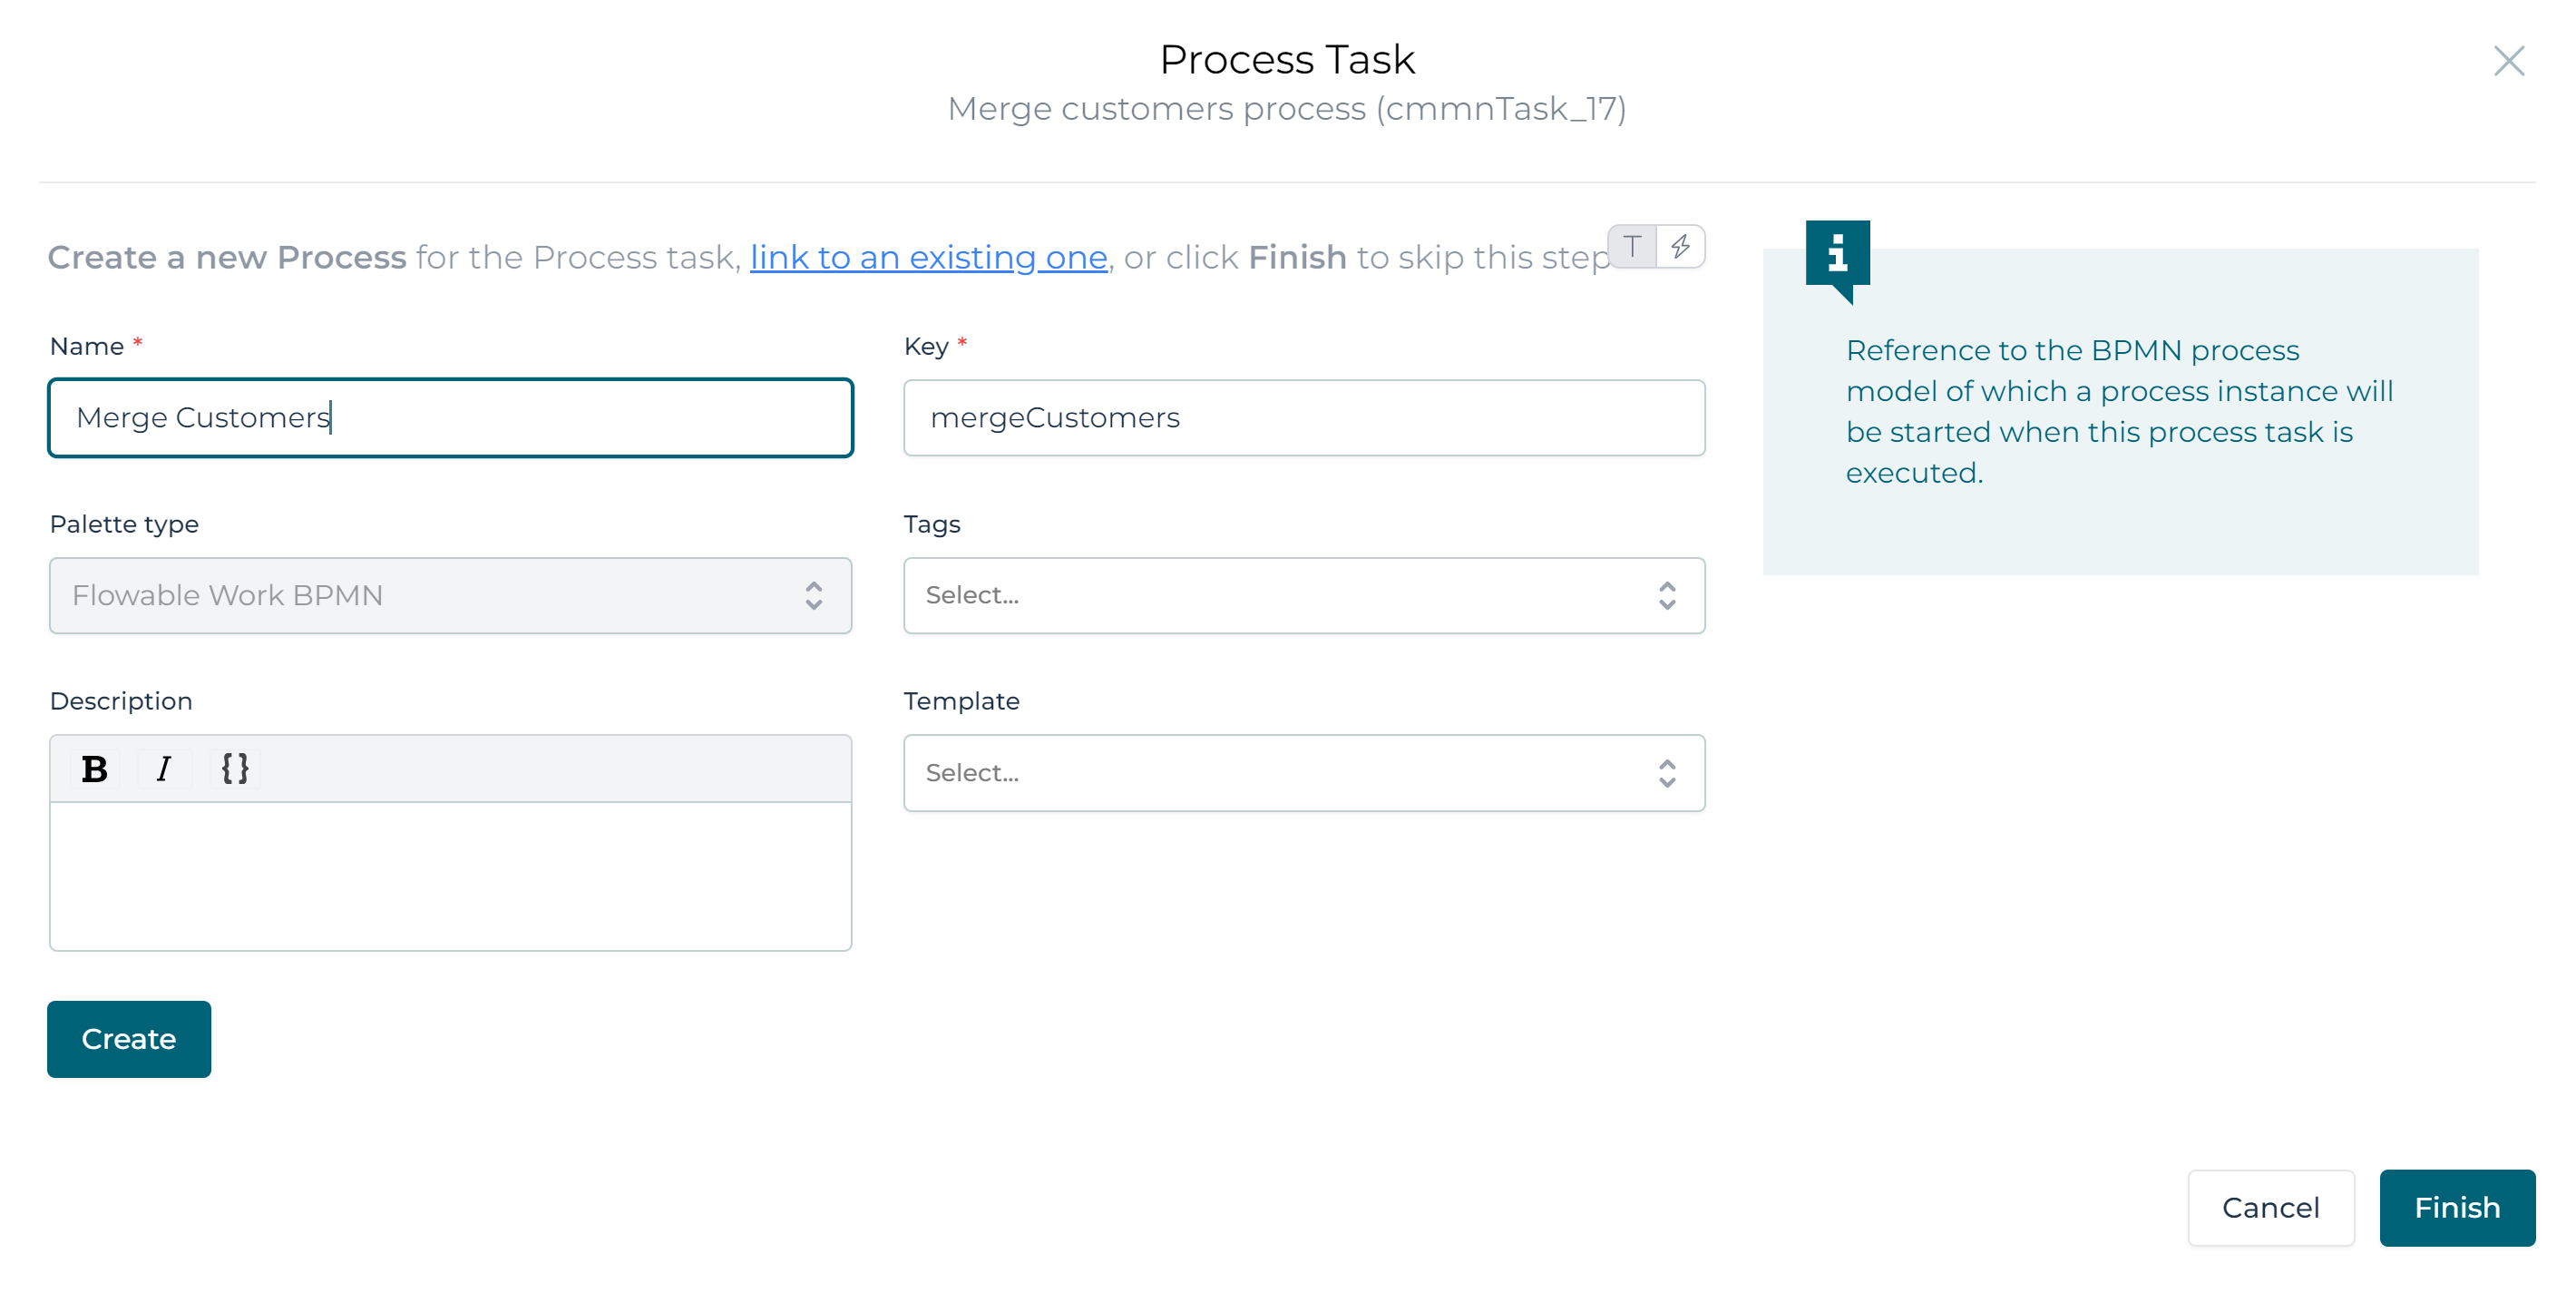
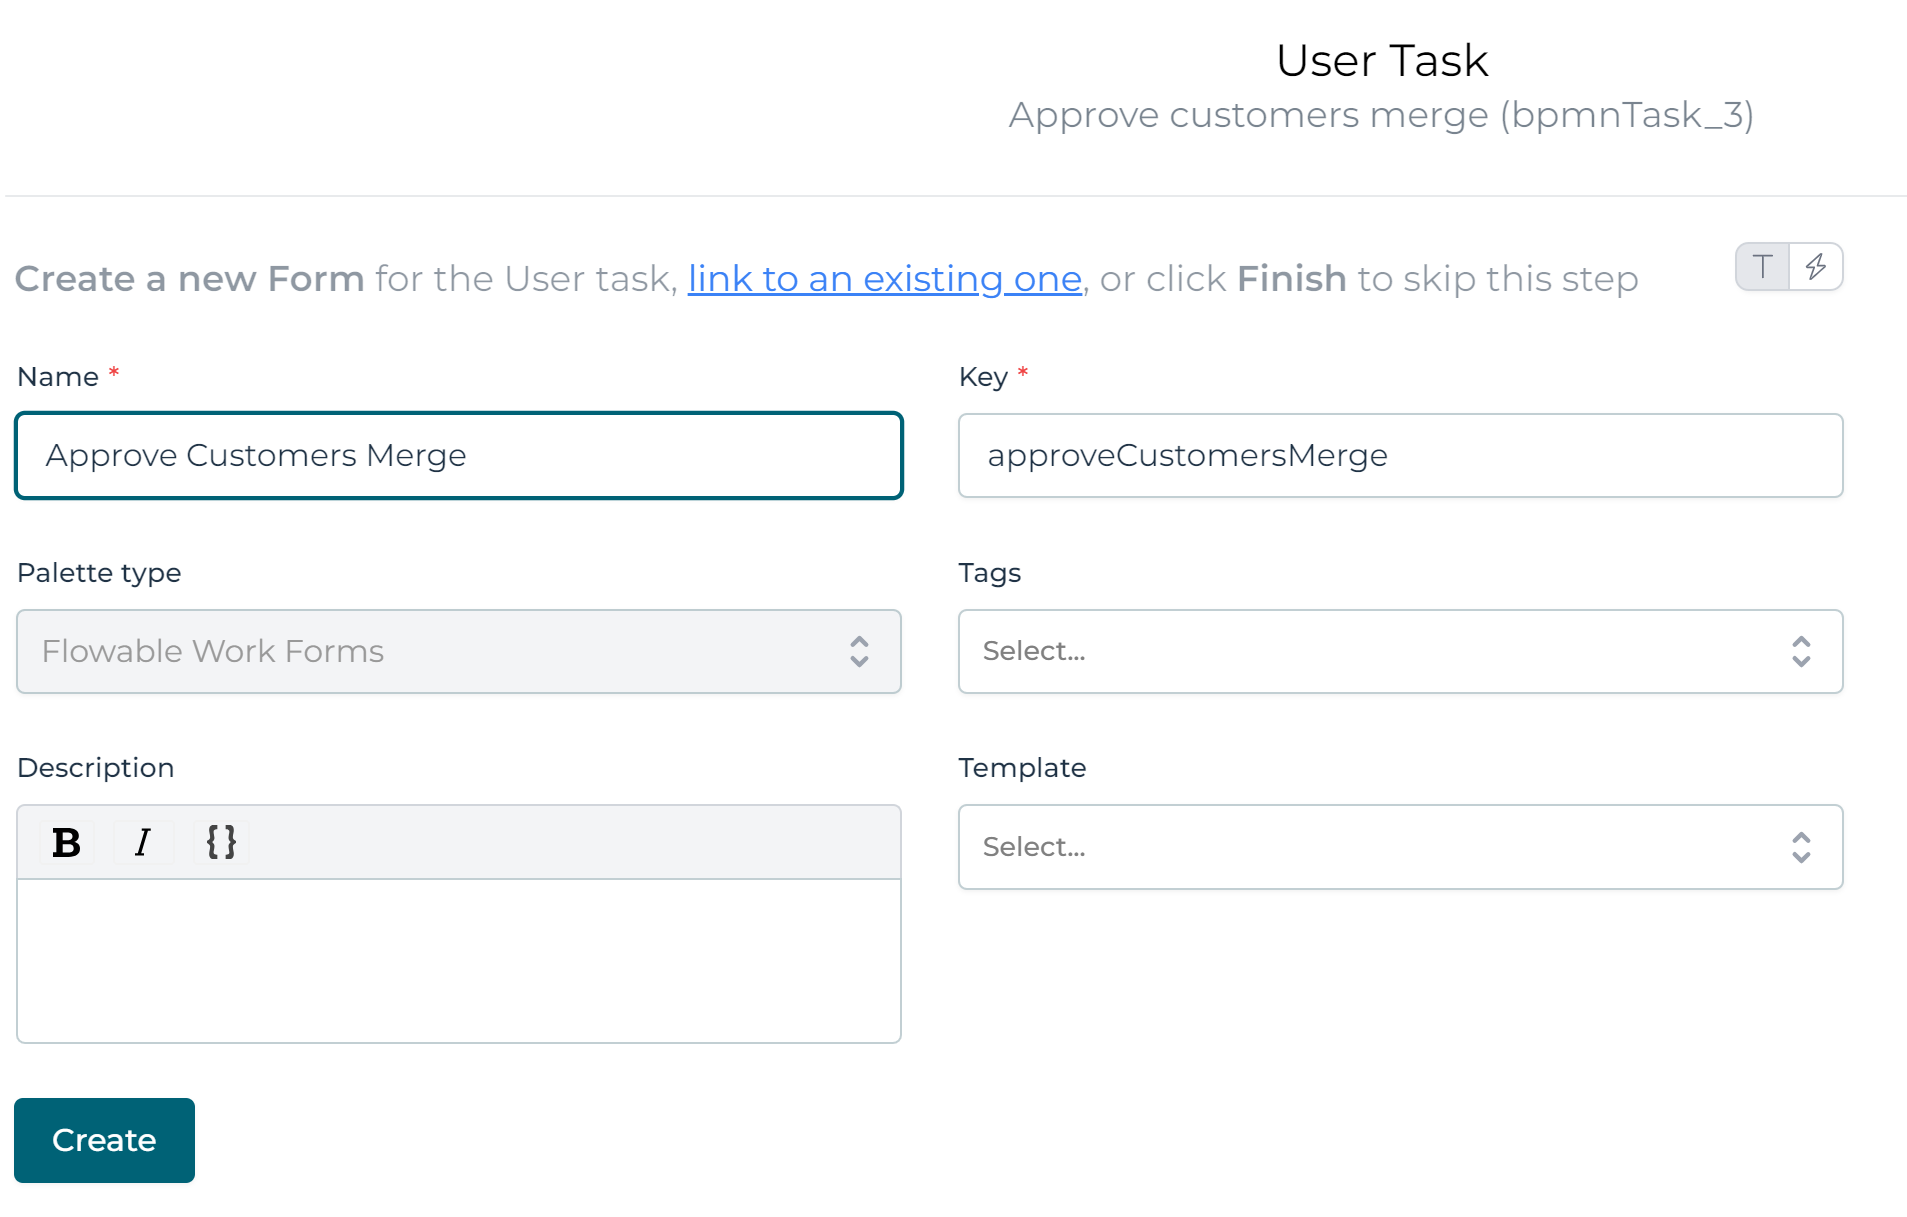
Still keeping the process task selected, fill in a name and key for the process in the Process reference property. Then click the Create, followed by the Finish button:
We'll model a simple flow in BPMN, with a user task that displays a data table followed by an approval user task. If approved, we'll send a 'merge event' using the Send event task. The flow should look something like this:

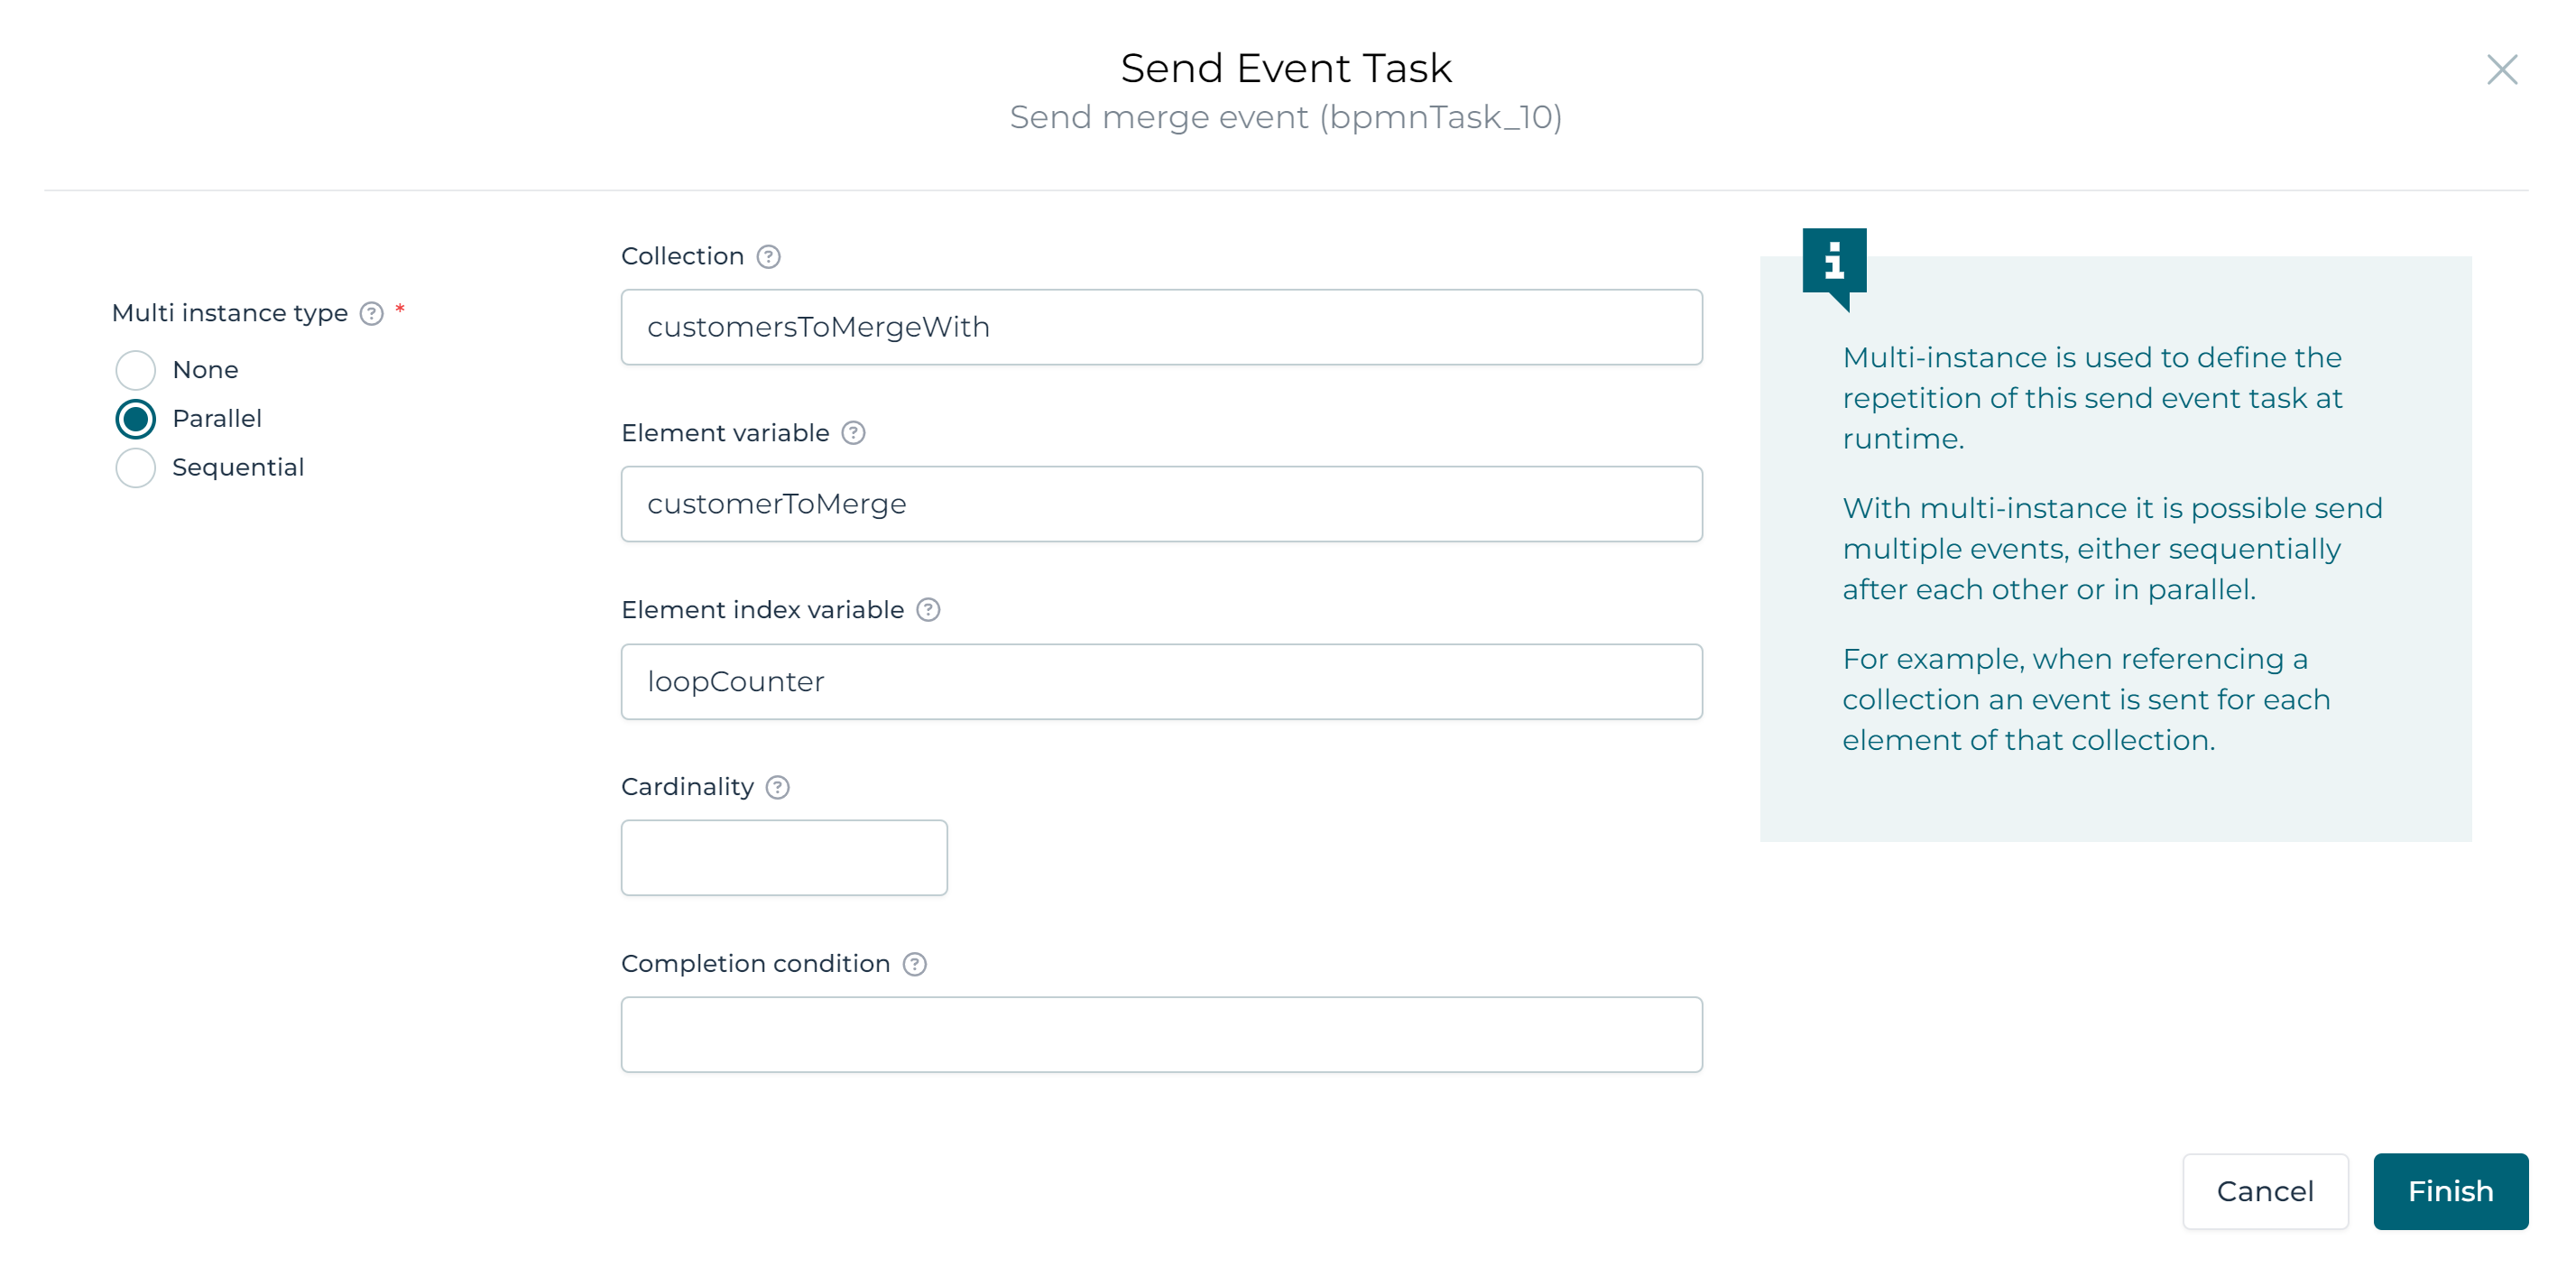
Before looking into the details of the event, let's first configure the multi-instance properties of the send event task. We'll be getting a customer data object variable in when the process instance started. In the first user task, we'll select a few other customer data objects. For each of the selected customers, after approval, we want to send one event. In the case instance related to those customers, we'll want to react on that event (we'll cover that later).
As such, let's assume we'll put the selected customers in a variable named customersToMergeWith. We'll name the element of each iteration of the multi-instance customerToMerge. The multi-instance section of the Send merge event step should look like this:
Check the Send on internal event channel property. This way, we don't need to create a channel to pass these events on (like e.g. a Kafka queue).
Let's quickly create a simple event that will define the structure of the data we want to exchange when sending this event. Click the plus icon to the right of the last open model tab on the canvas, select the Create section
and choose the Event model type from the drop-down. Give the event a name and key, and click the Create button. A new event model will appear
on the canvas.
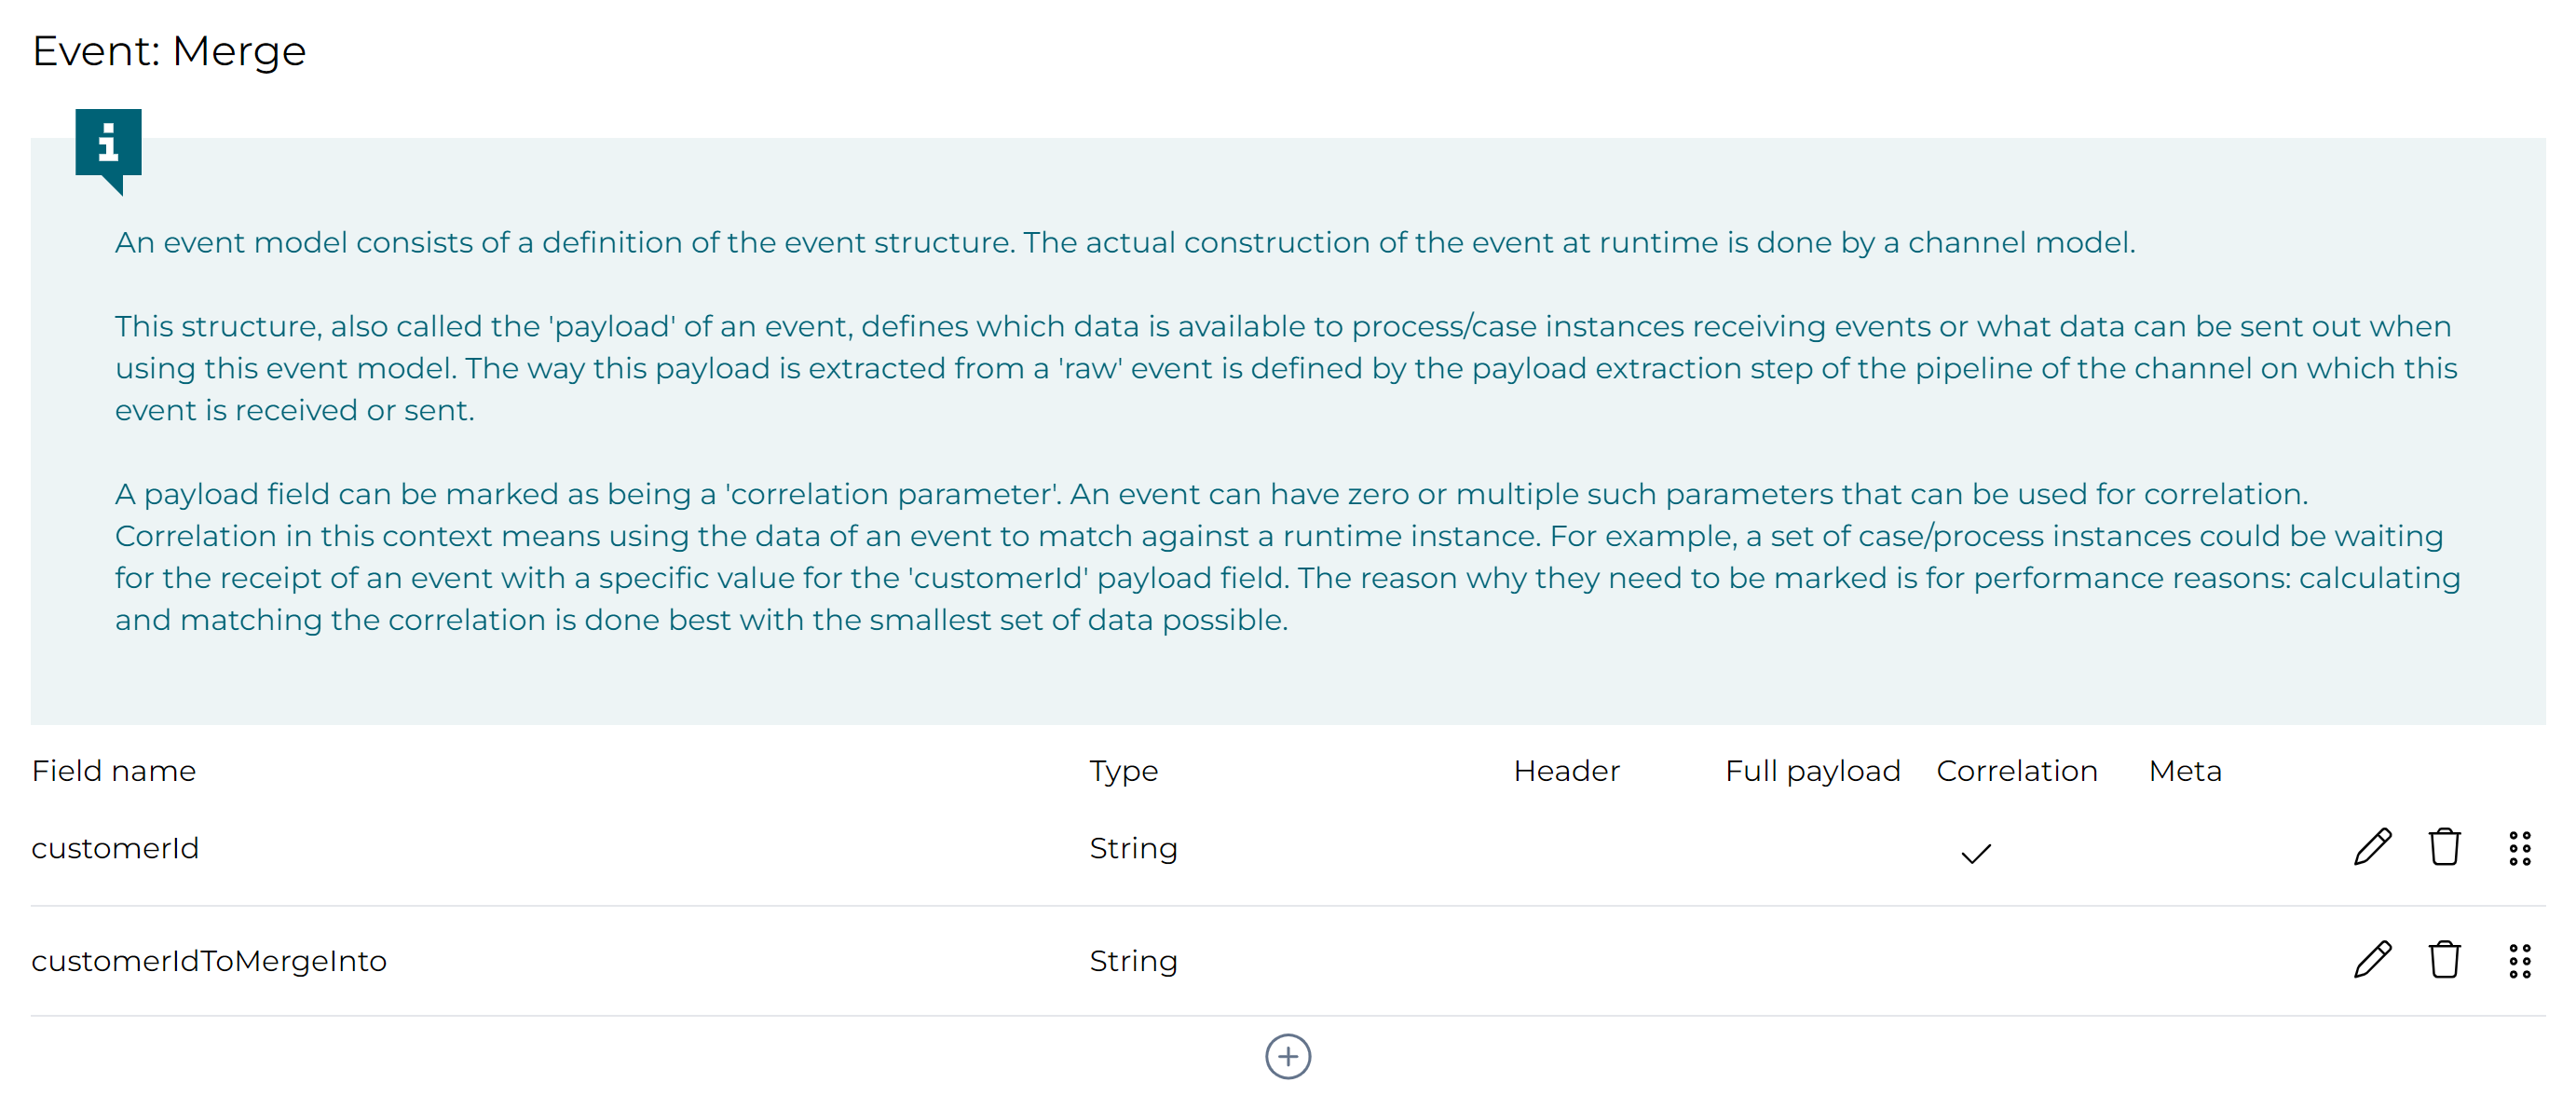
Add two fields to the event:
- A
CustomerId, which we'll mark as the correlation parameter (see later). This represents one customer we have selected in the data table. - A
CustomerIdToMergeIntowhich is the ID of the customer we want to merge into (from which the process instance was started).
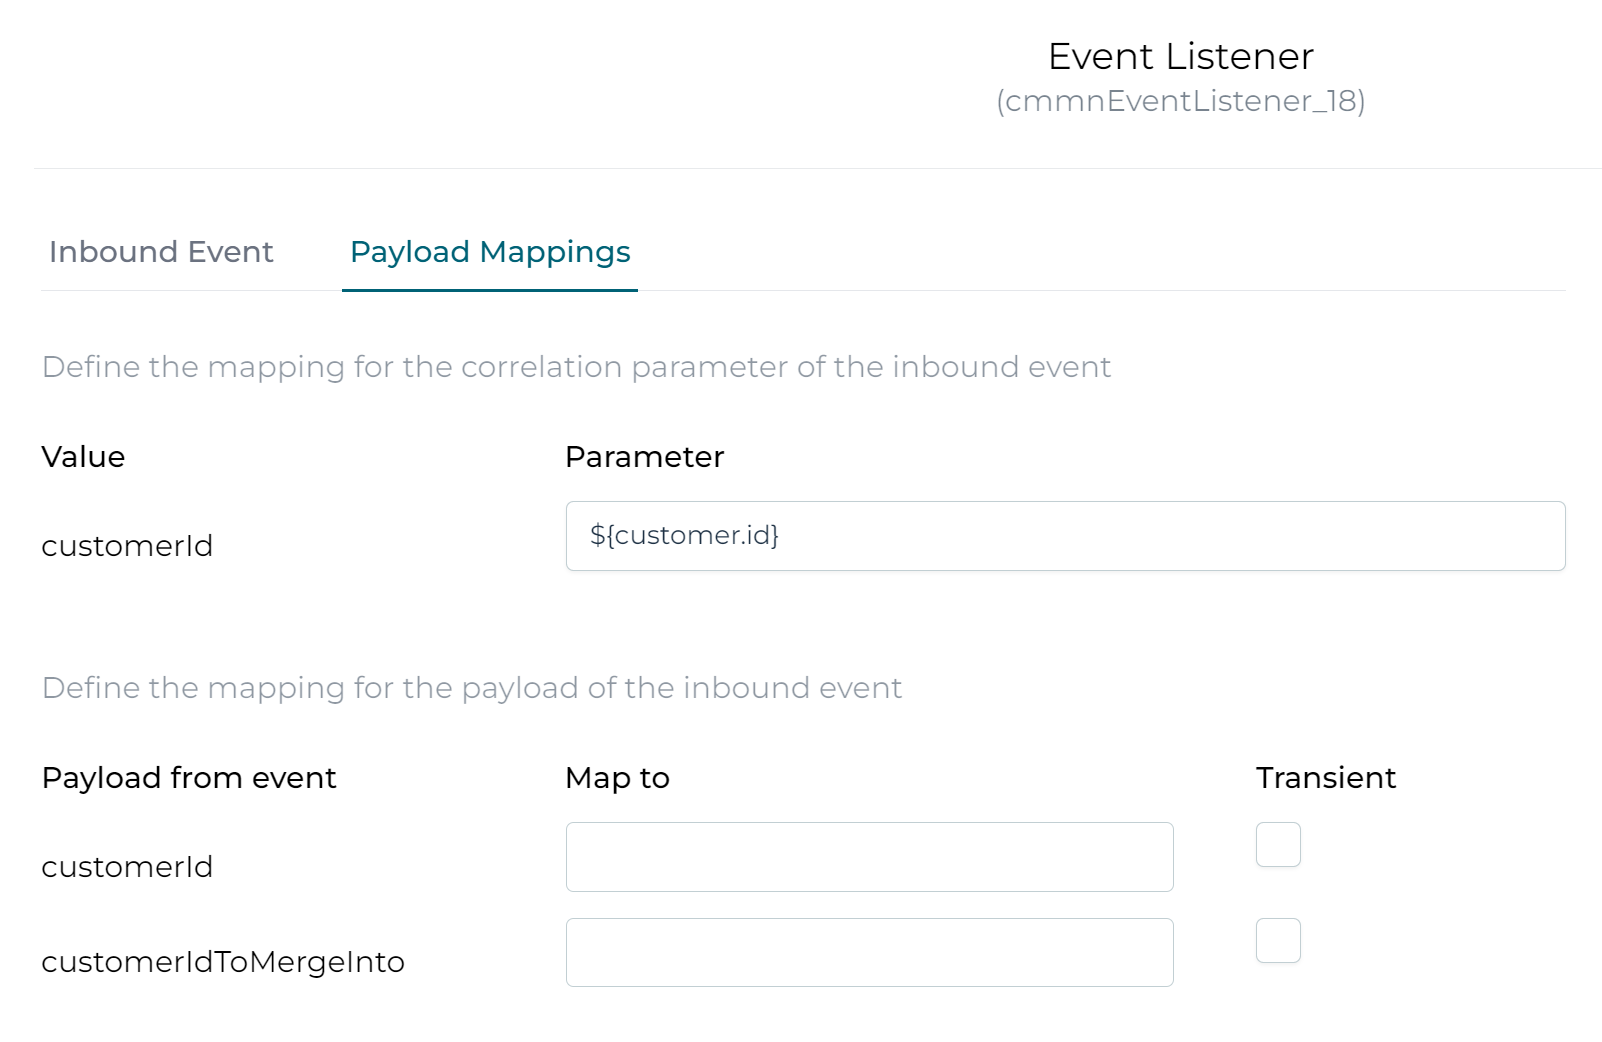
Save everything. Then go back to the BPMN process model, select the Send merge event task and reference the event we've just created.
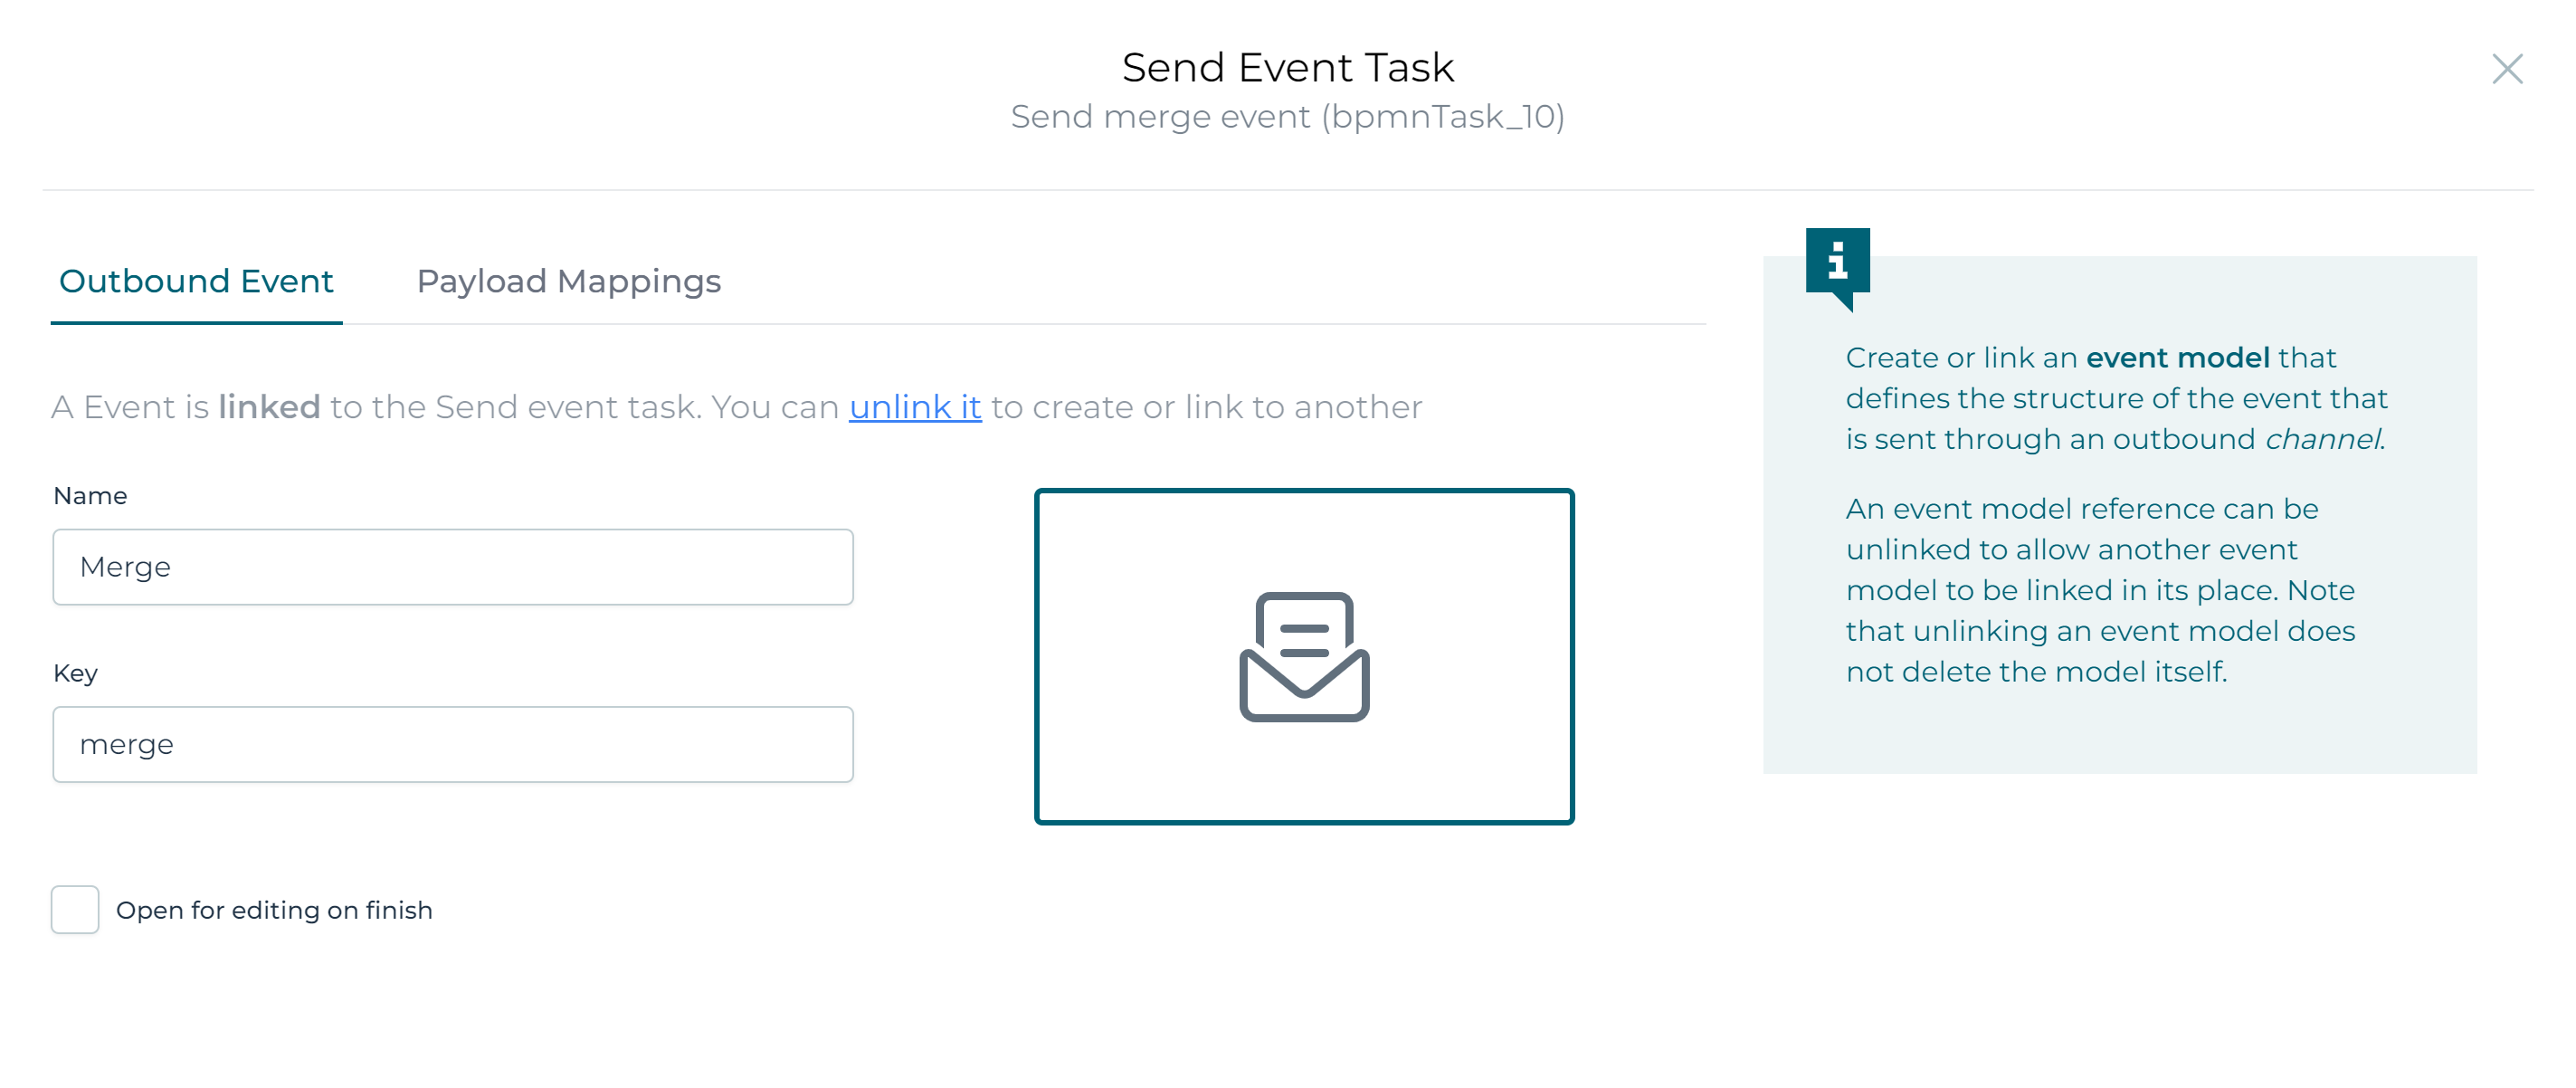
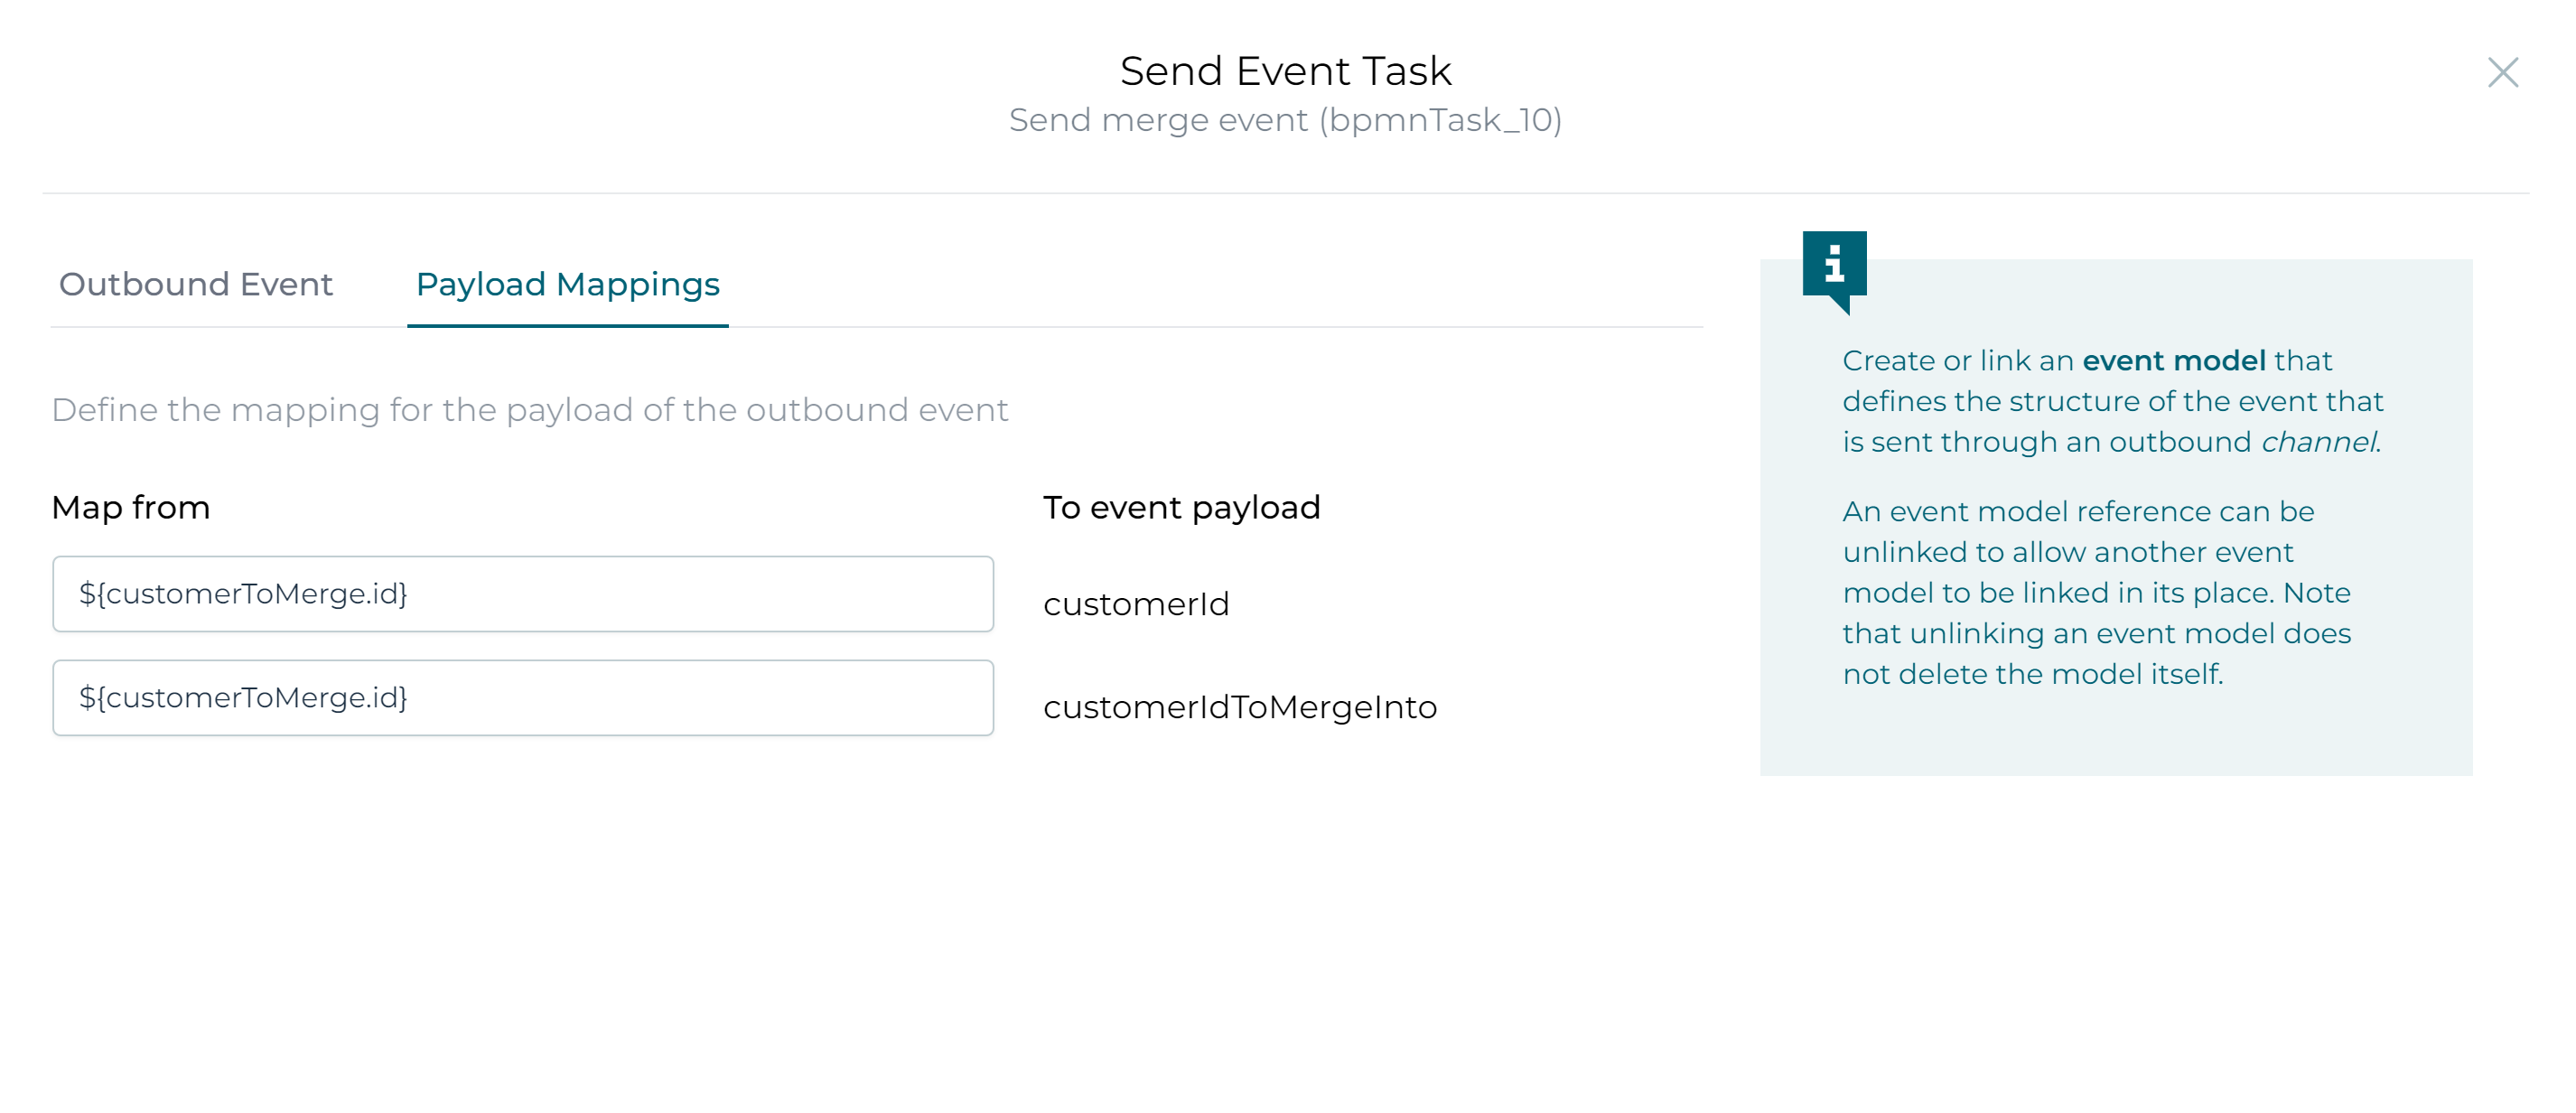
Then click the Payload Mappings section.
- Fill in
${customerToMerge.id}for the first field. Remember,customerToMergewas how we called the element in each iteration of the multi-instance. - Fill in
${mergingCustomer.id}for the second field, referencing the name we've picked in theInmapping of the process task.
With the event and sending of the event now configured, let's switch now to actually gathering the data in a form. Select the first user task, and create a new form for it:

On that form, drag a Data Object Data Table to the canvas:

Bind it to {{customersToMergeWith}} and select Multiple in the Selectable property. This will store all checked customers into a variable customersToMergeWith.
Enthusiastically, we now want to configure the Data object configuration property, select it and link the Customer data object to it.
Now select the Operation section, initially you will see the following message, click the Finish button for now.
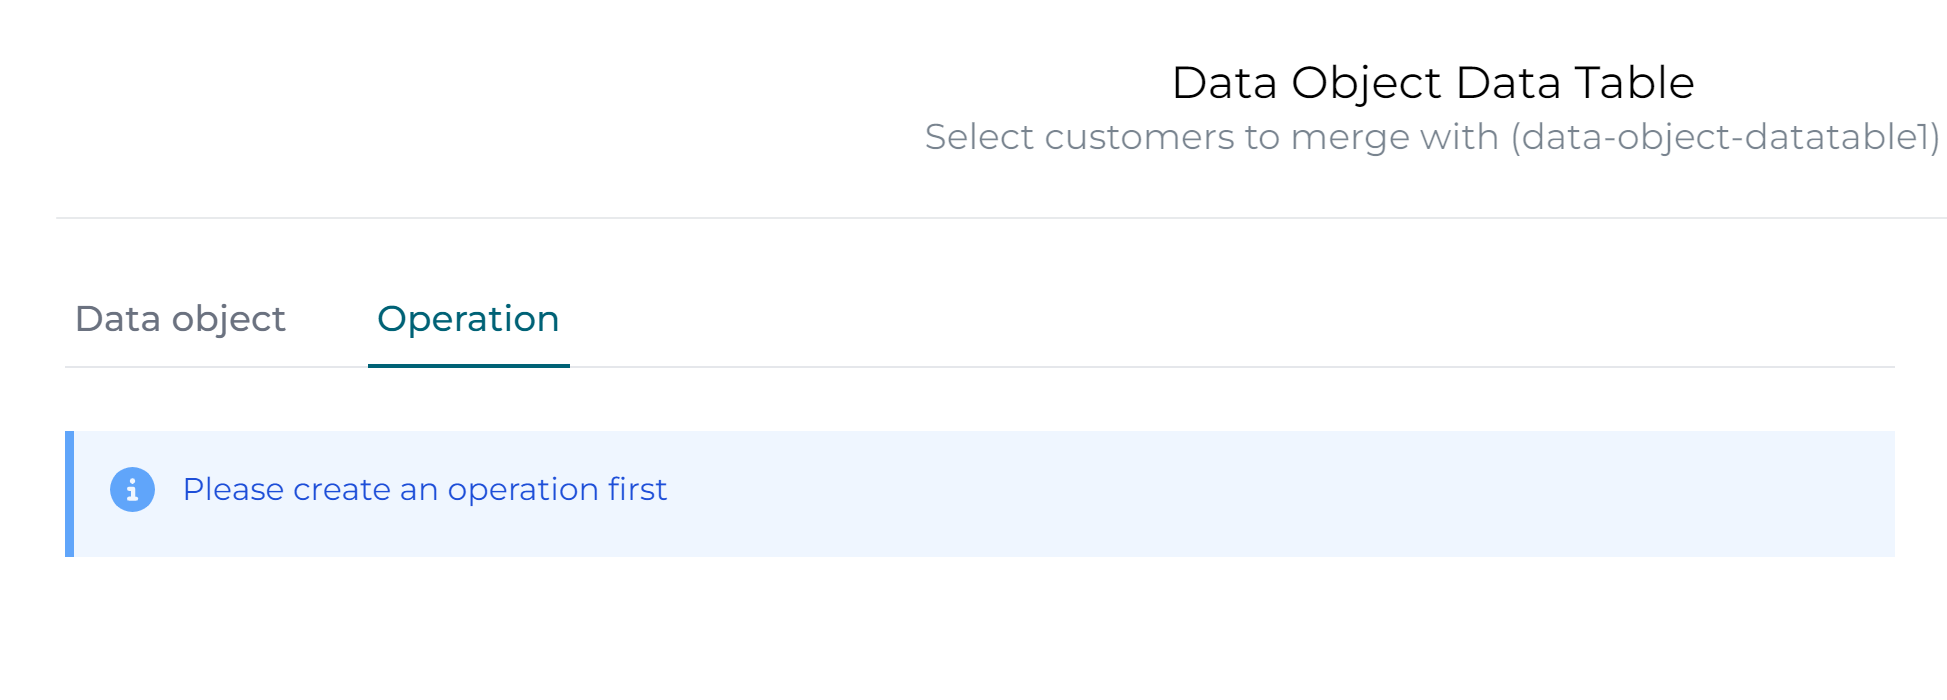
This is logical: by default the CRUD operations have been generated, but we haven't added any search operation we can link our data table with. Let's add that now.
New Search Operation (Database)
Switch back to the service model for the data object. You'll see the standard operations listed on the left-hand side. Click Add operation:
Give the new operation a name, like Search Active customers. Give it a key and select Search as type:
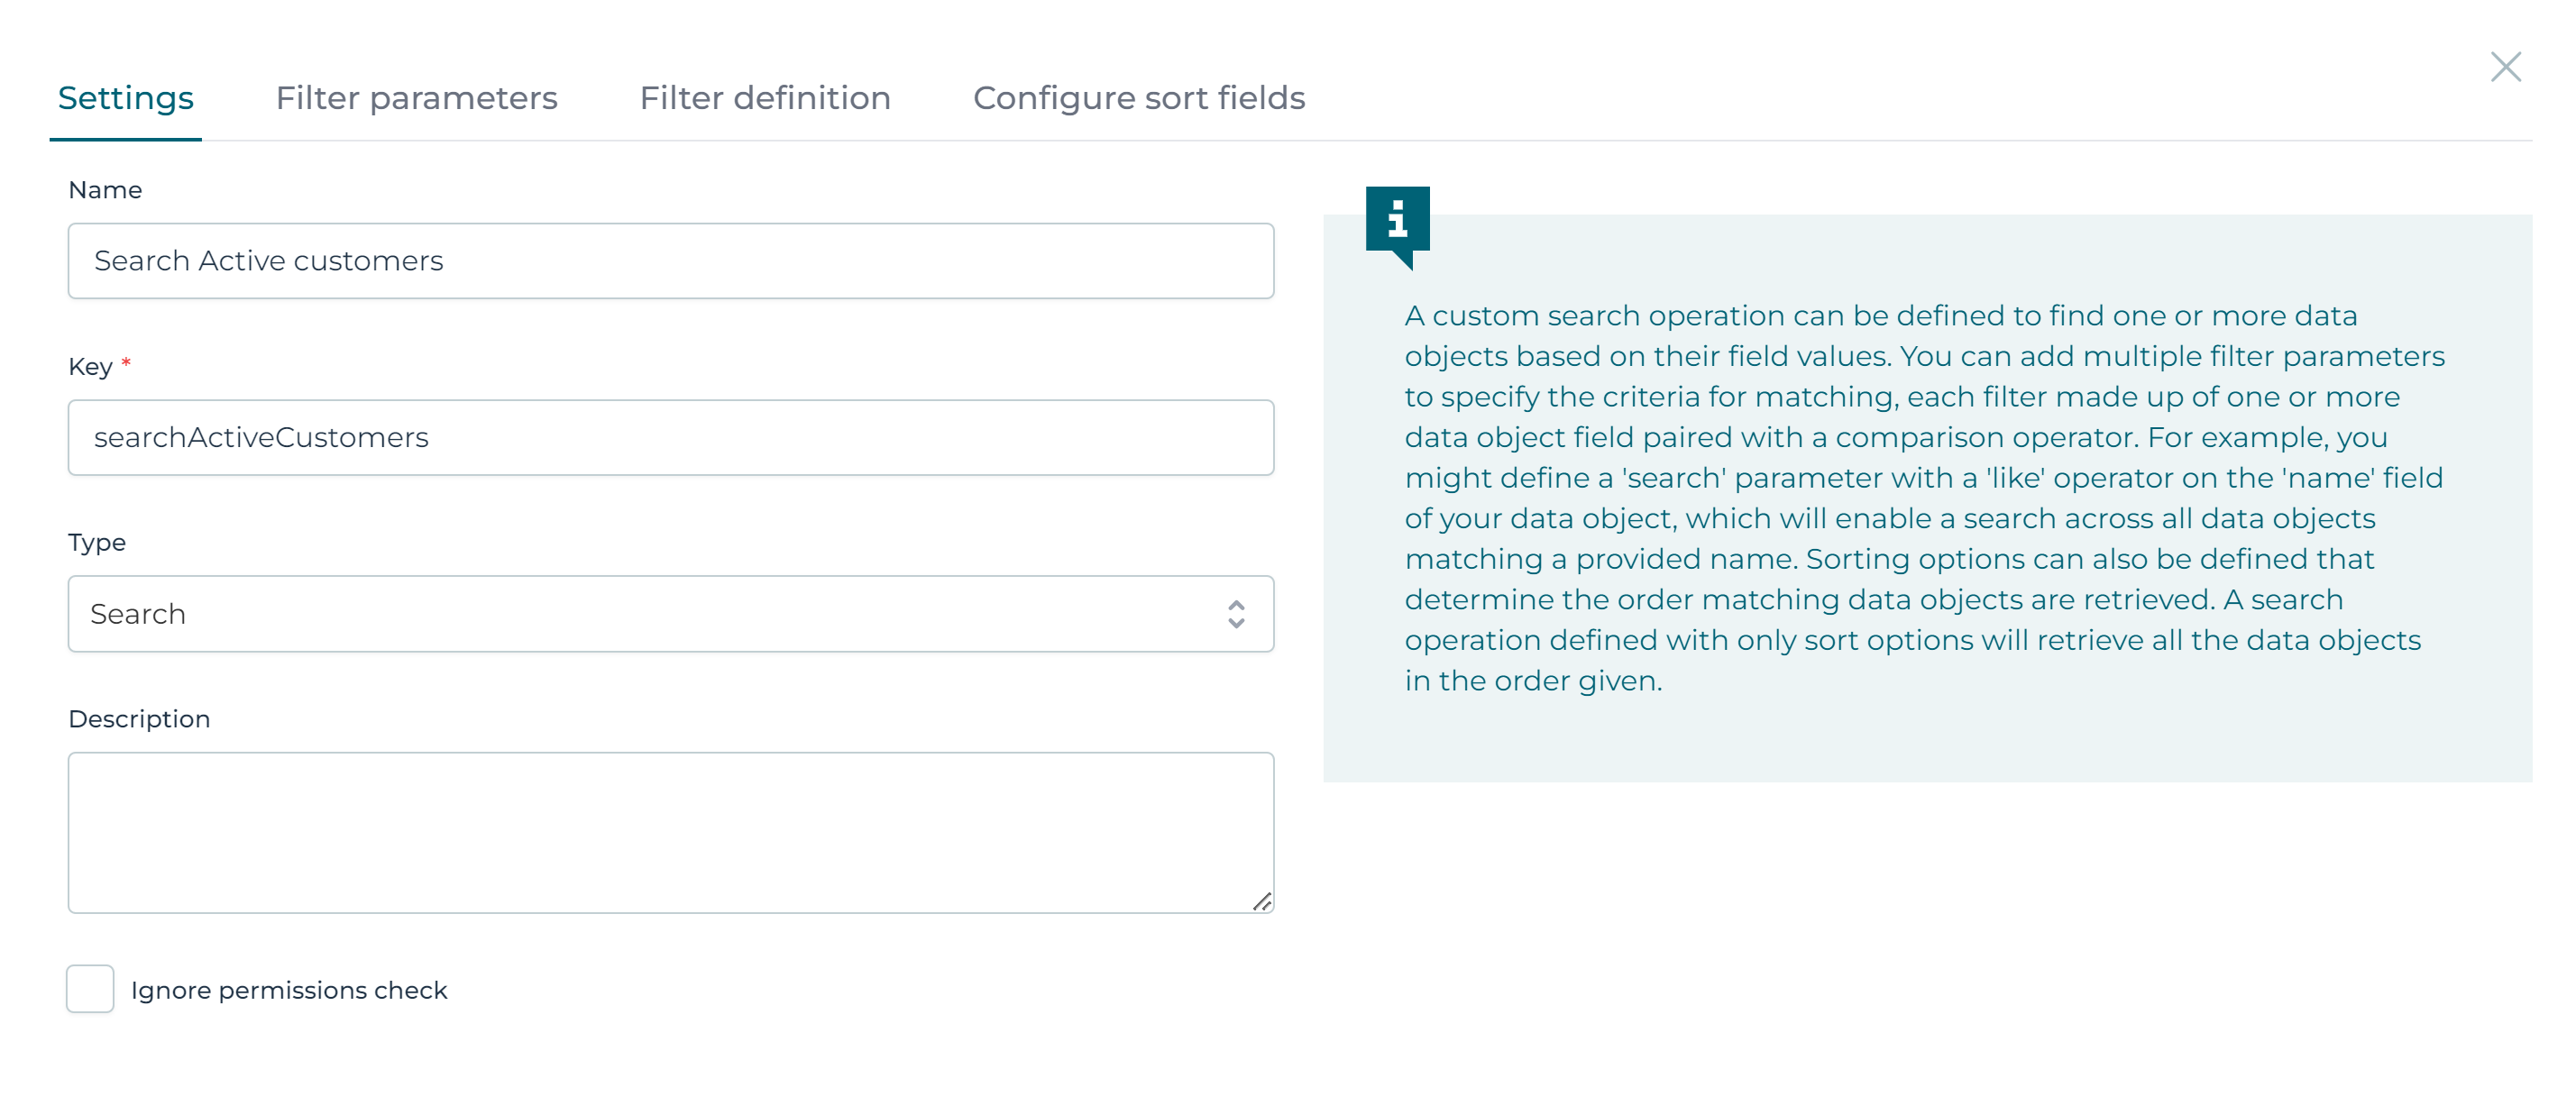
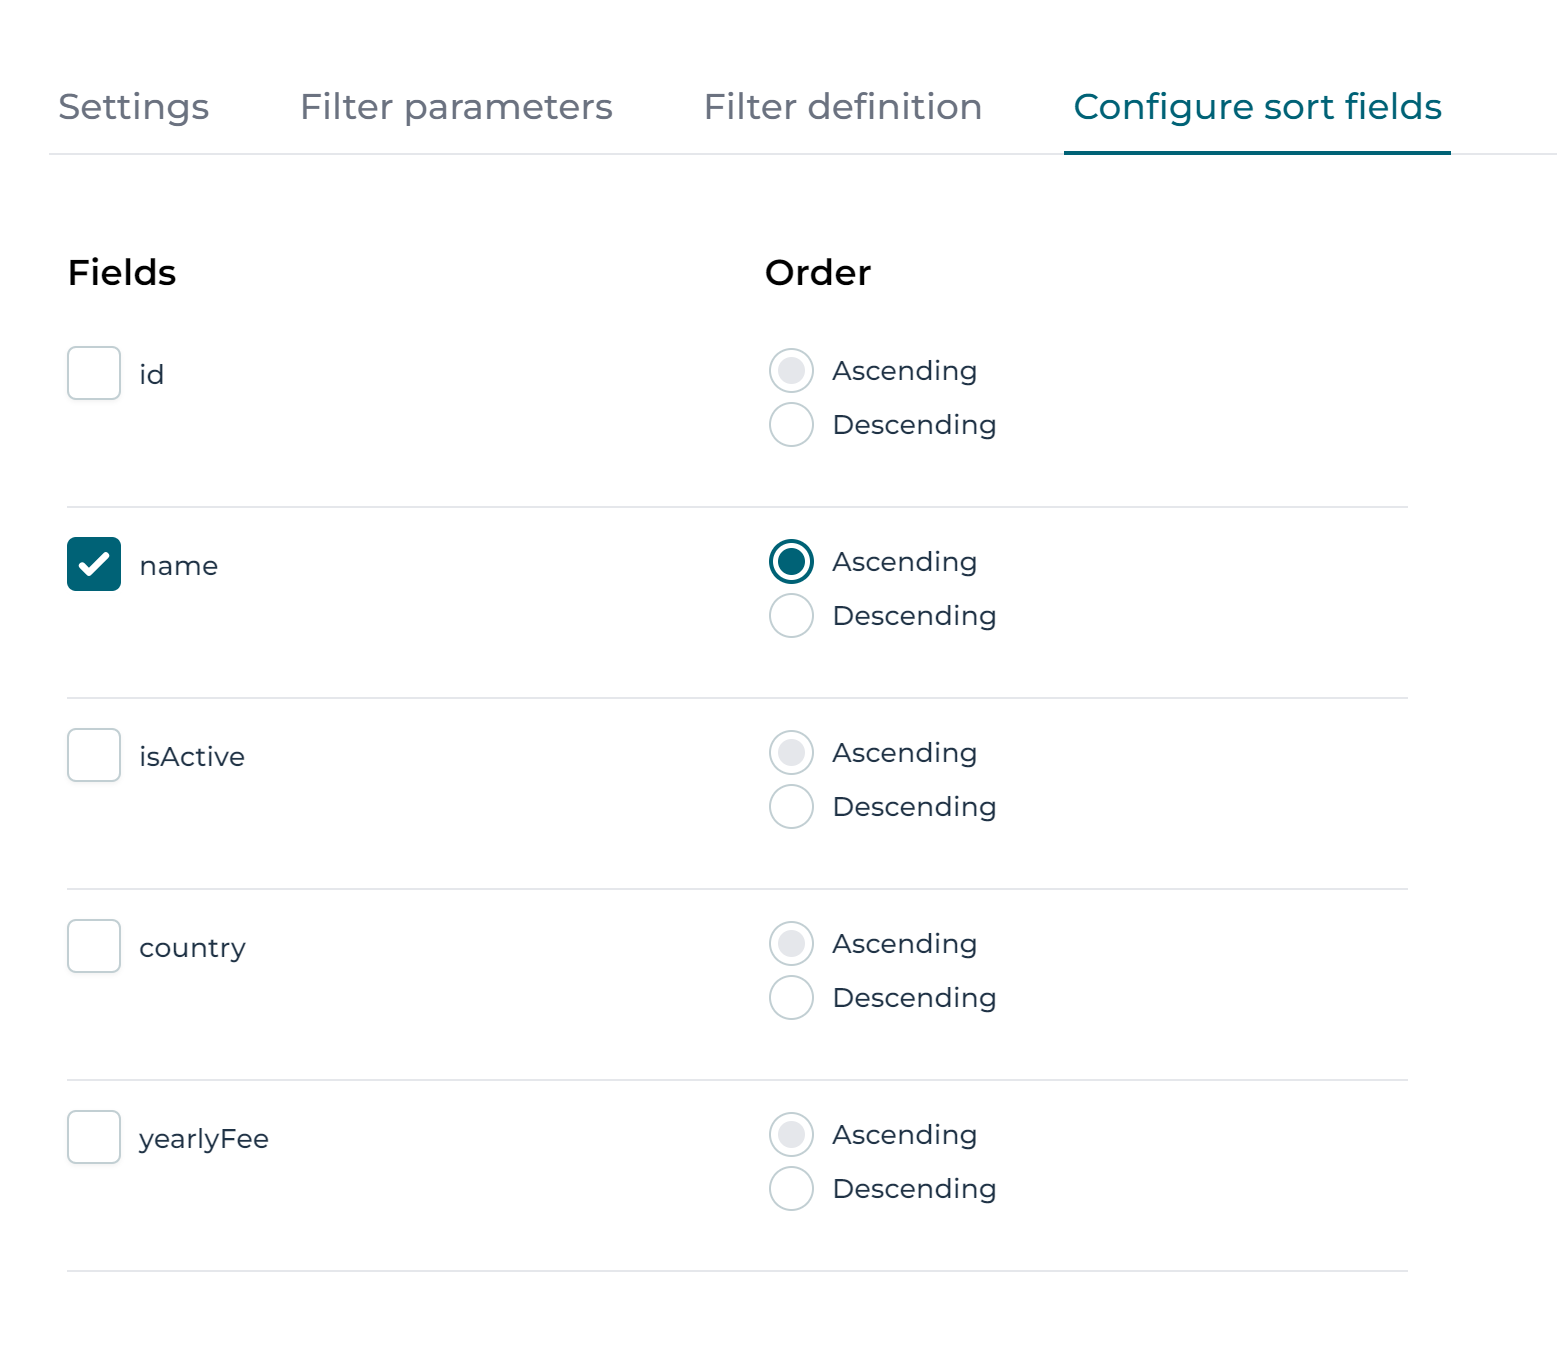
Now click the Configure sort fields section:
We'll keep it simple and order the customers by their name only:
Now click on the Filter parameter section. We'll want to only get the active customers, so add a boolean parameter that filters on the Active
field, when finished click the Save button.
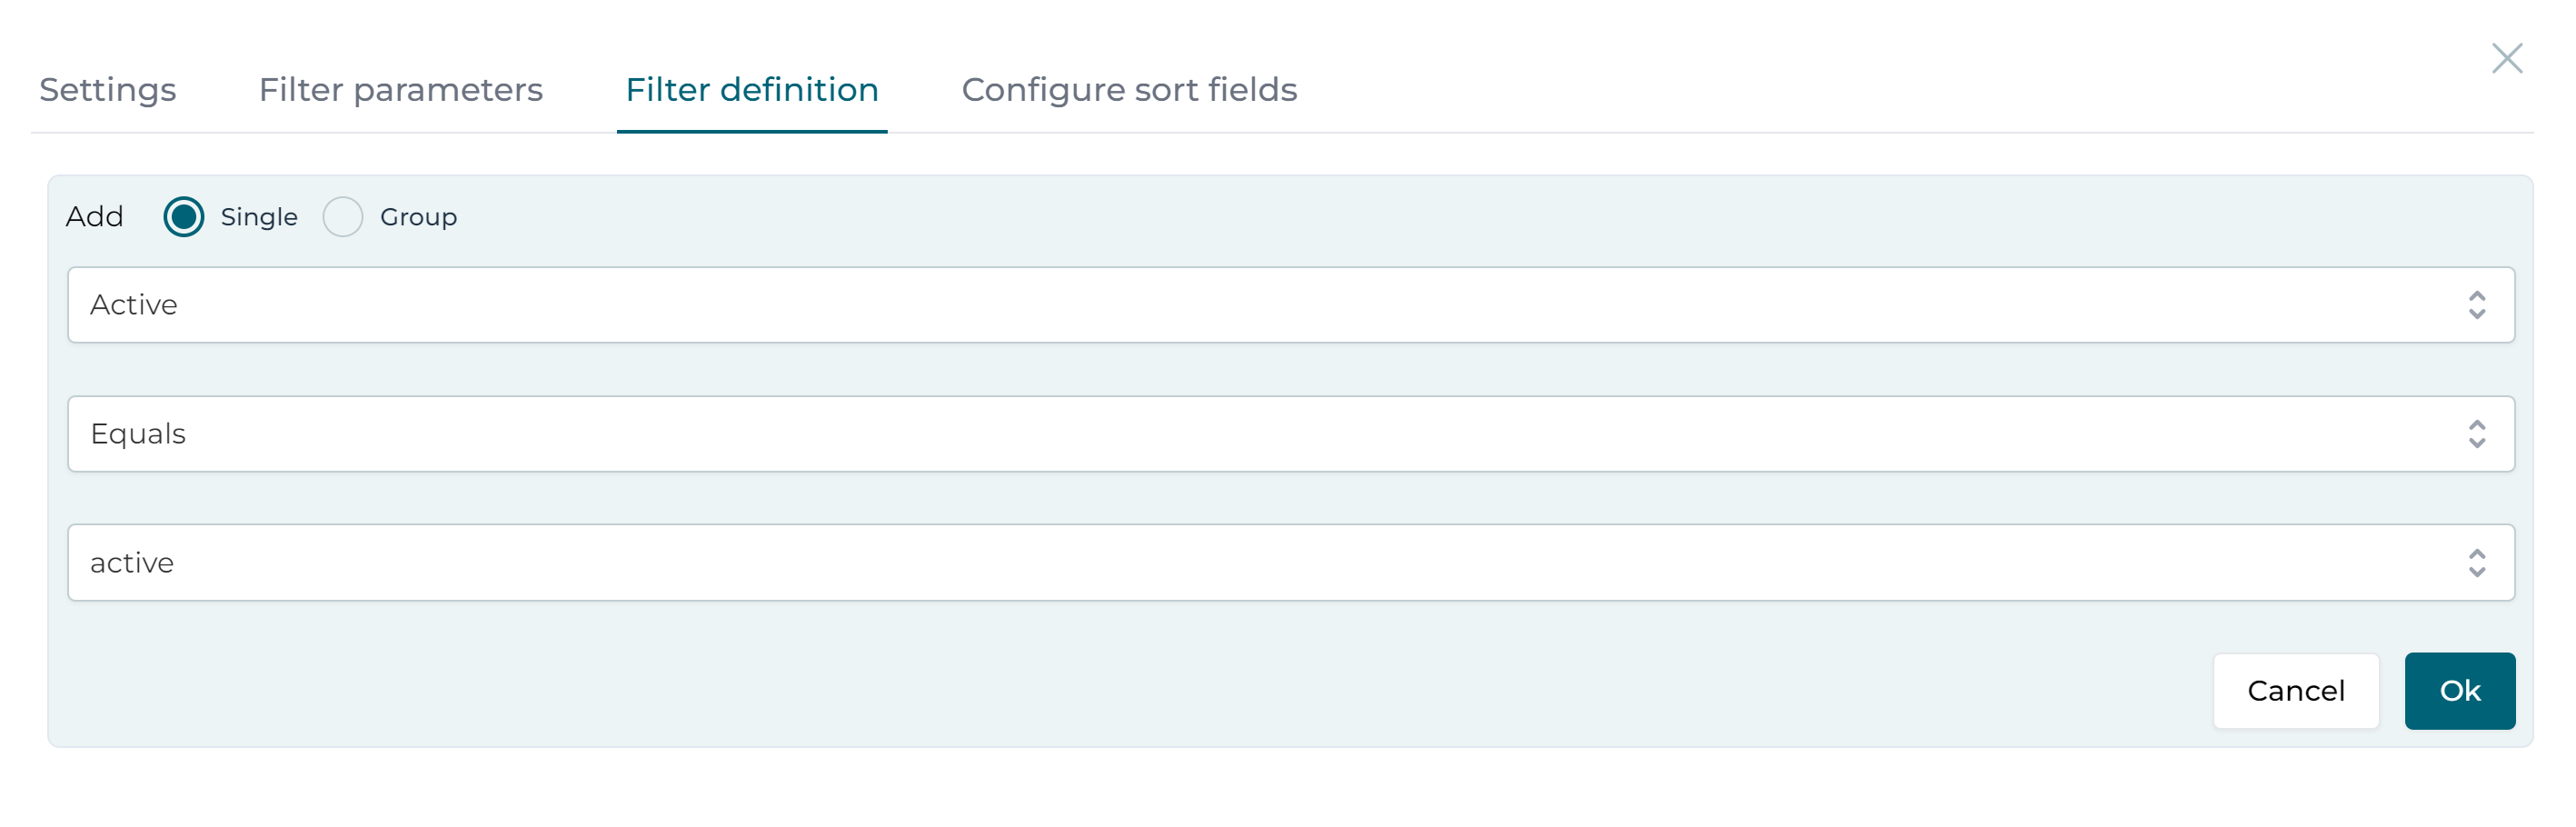
From here select the Filter definition section and configure it for the Active field with an equals clause and click Ok:
The available filter definitions are:
- Equals
- Not equals
- Equals Ignore Case
- Not Equals Ignore Case
- Like
- Not like
- Greater Than
- Greater Than Or Equals
- Less Than
- Less Than Or Equals
- v3.17.0+ Is null
- v3.17.0+ Is not null
New Search Operation (REST)
Switch back to the service model for the data object. You'll see the standard operations listed on the left-hand side. Click the Add operation:
Give the new operation a name, like Search Active customers. Give it a key and select Search as type:
The REST API to search for customers is a GET on /customers that takes in an optional active parameter.
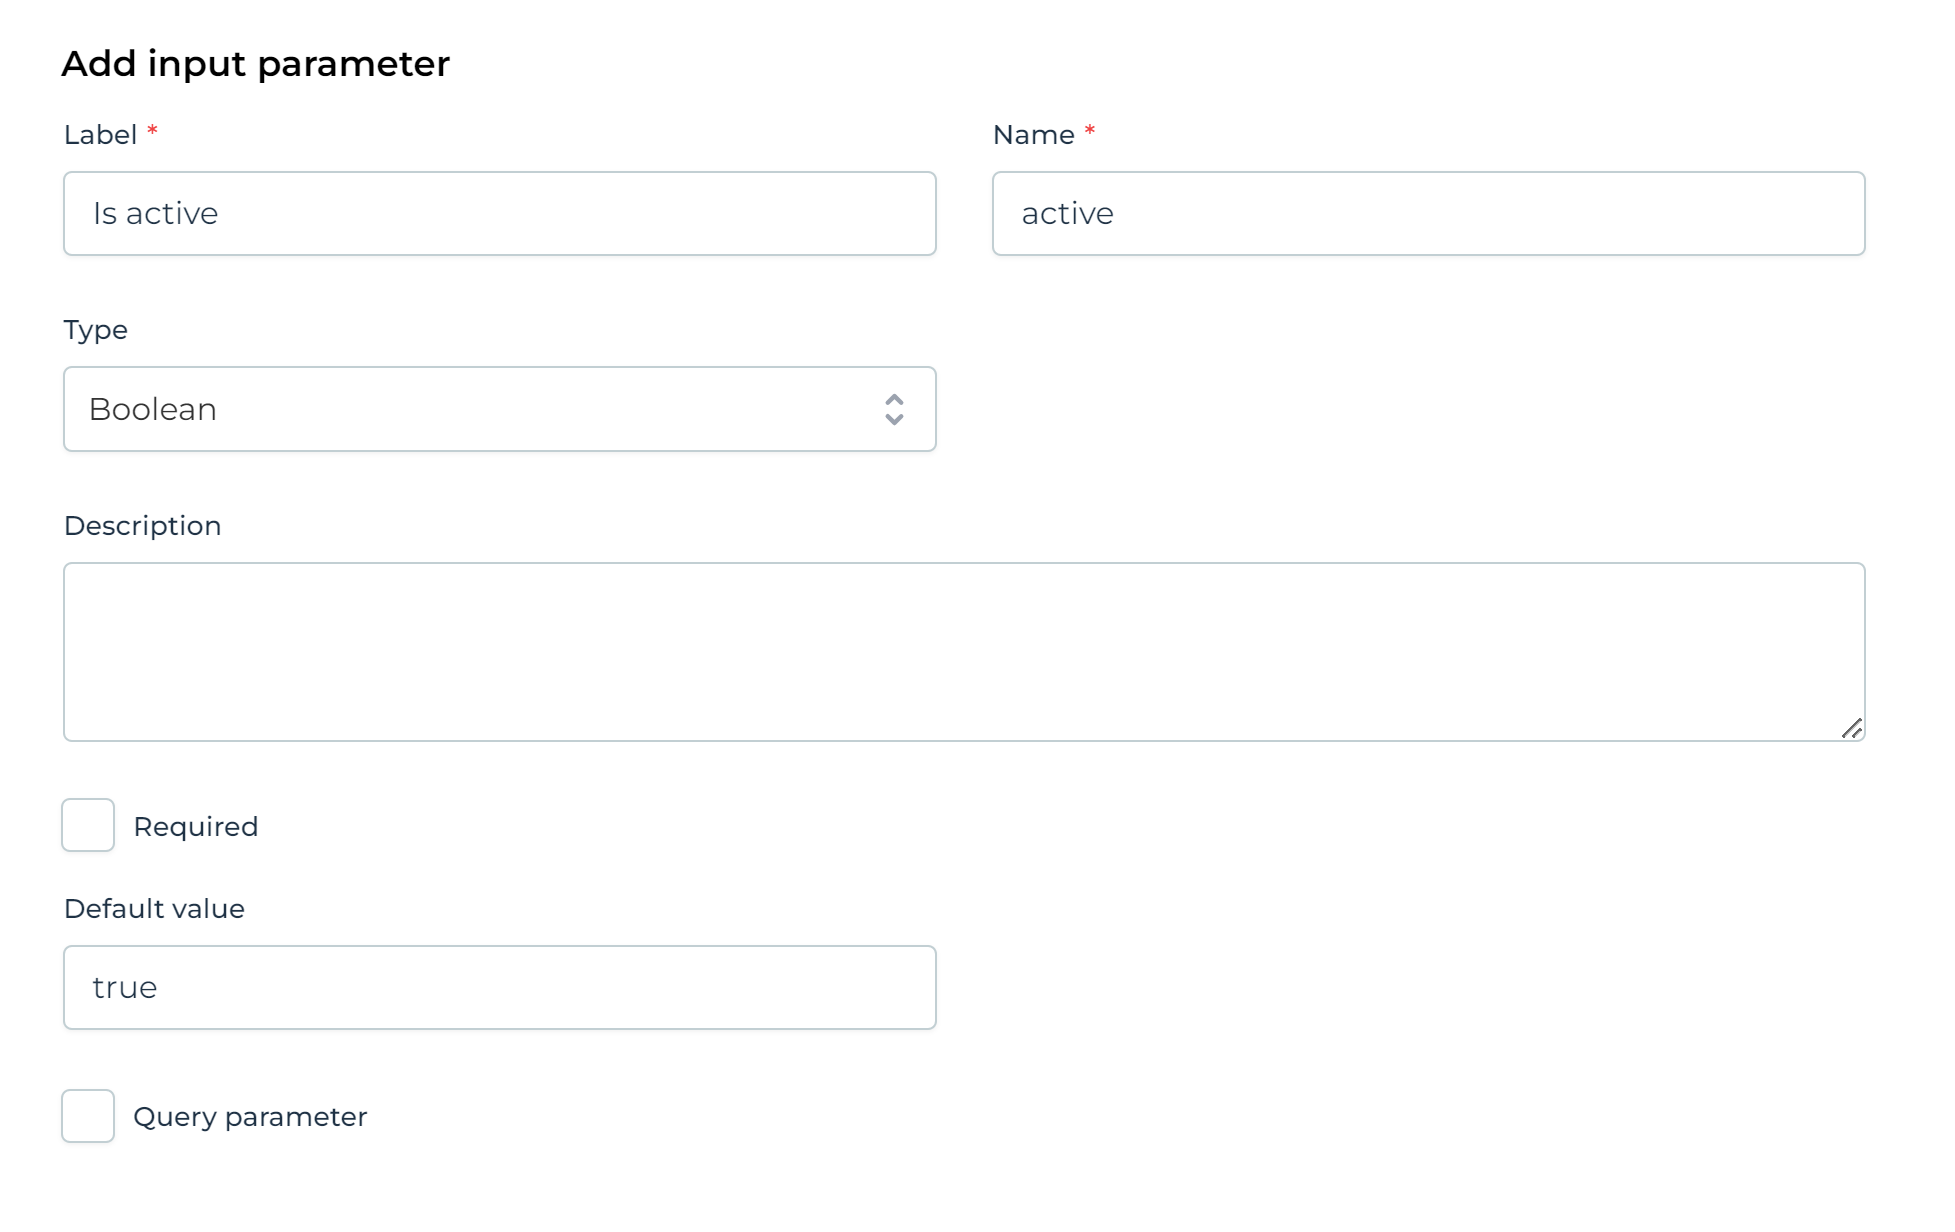
In the UI, click the Input section and add a boolean parameter with name active and a default value of true:
Next, click the Output section and add the output parameters of all fields of the data object using the Add output parameter for each field:
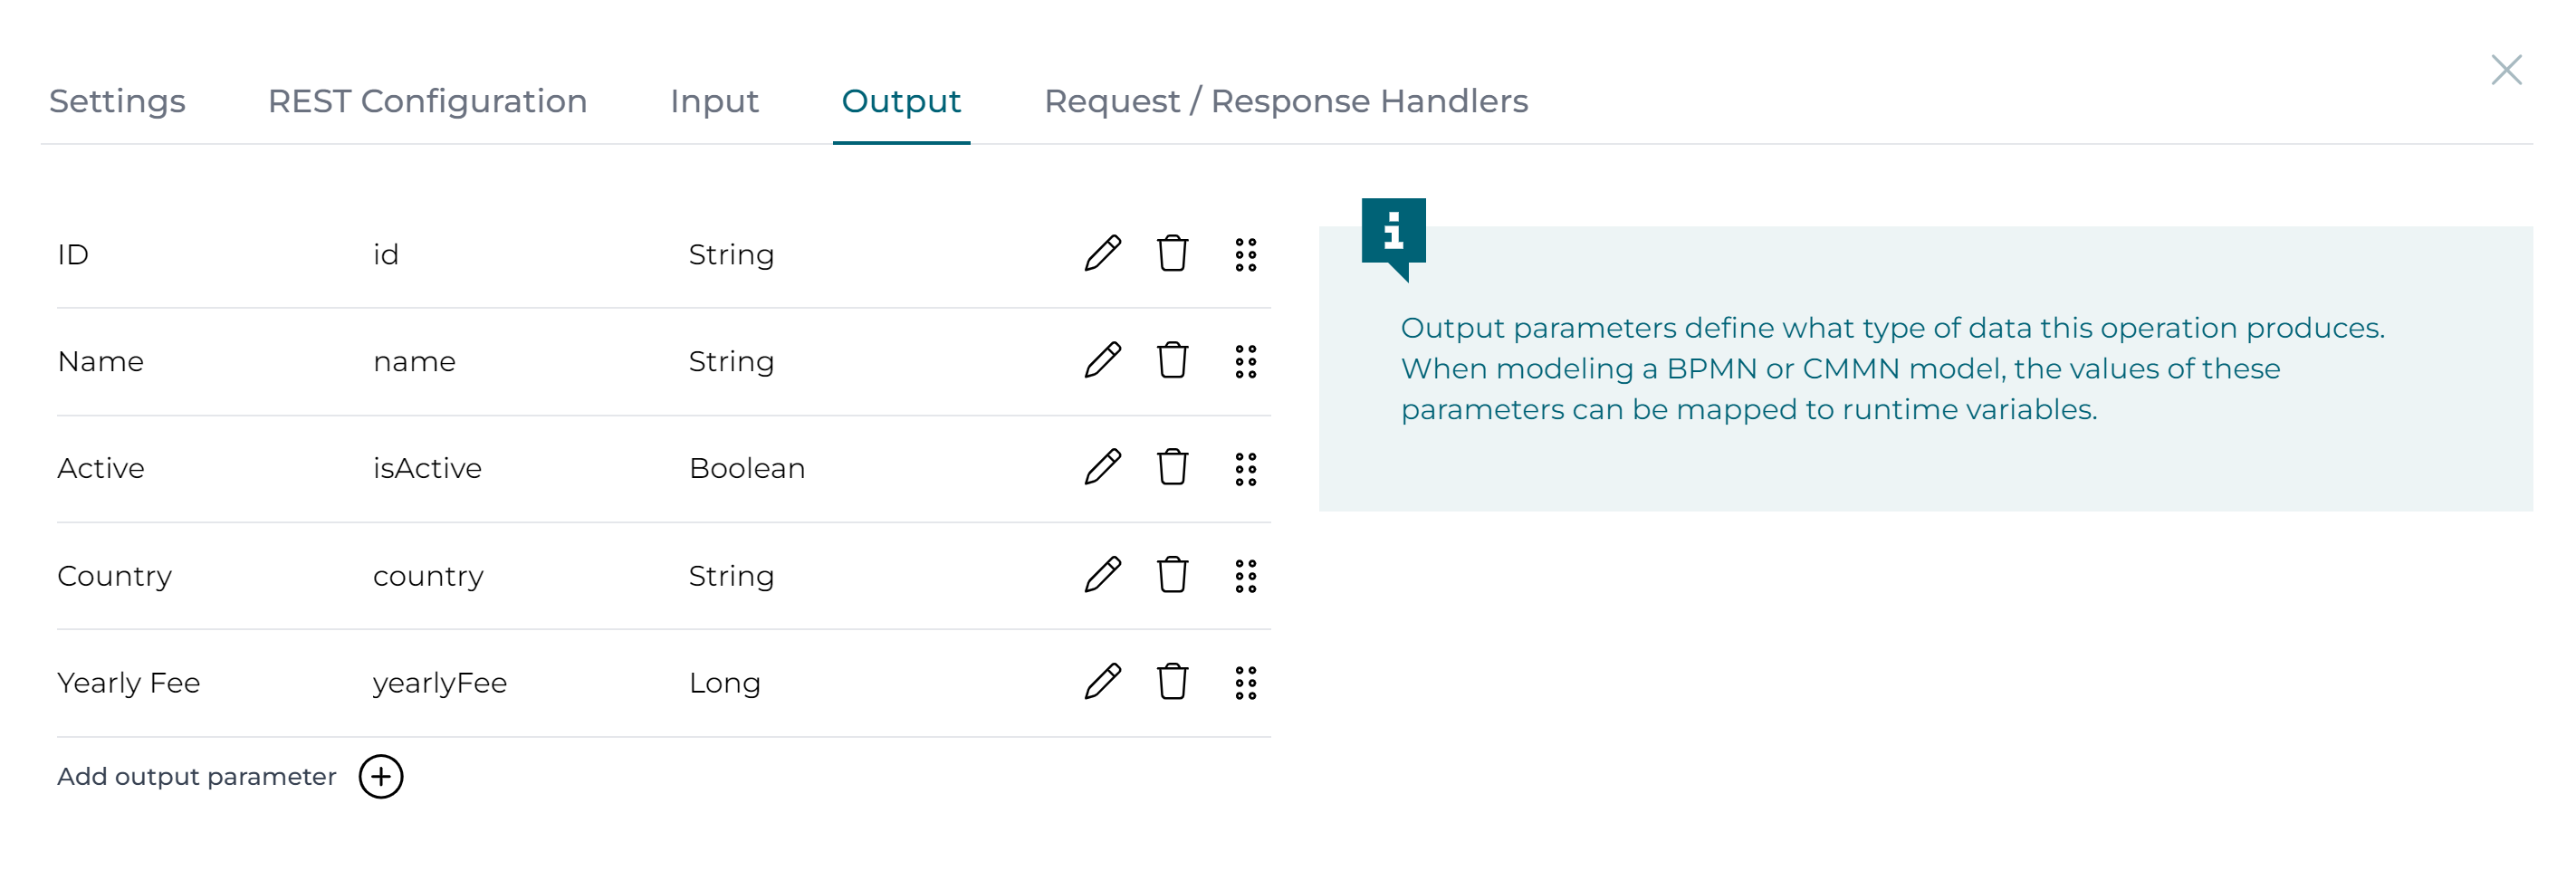
How does this work?Being a search operation, it is assumed a list (JSON array) will be returned. What we're mapping here is each element of that list individually, i.e. we're configuring how we want to map the JSON object element of the returned JSON array in the REST API response.
Configuring the Search Operation
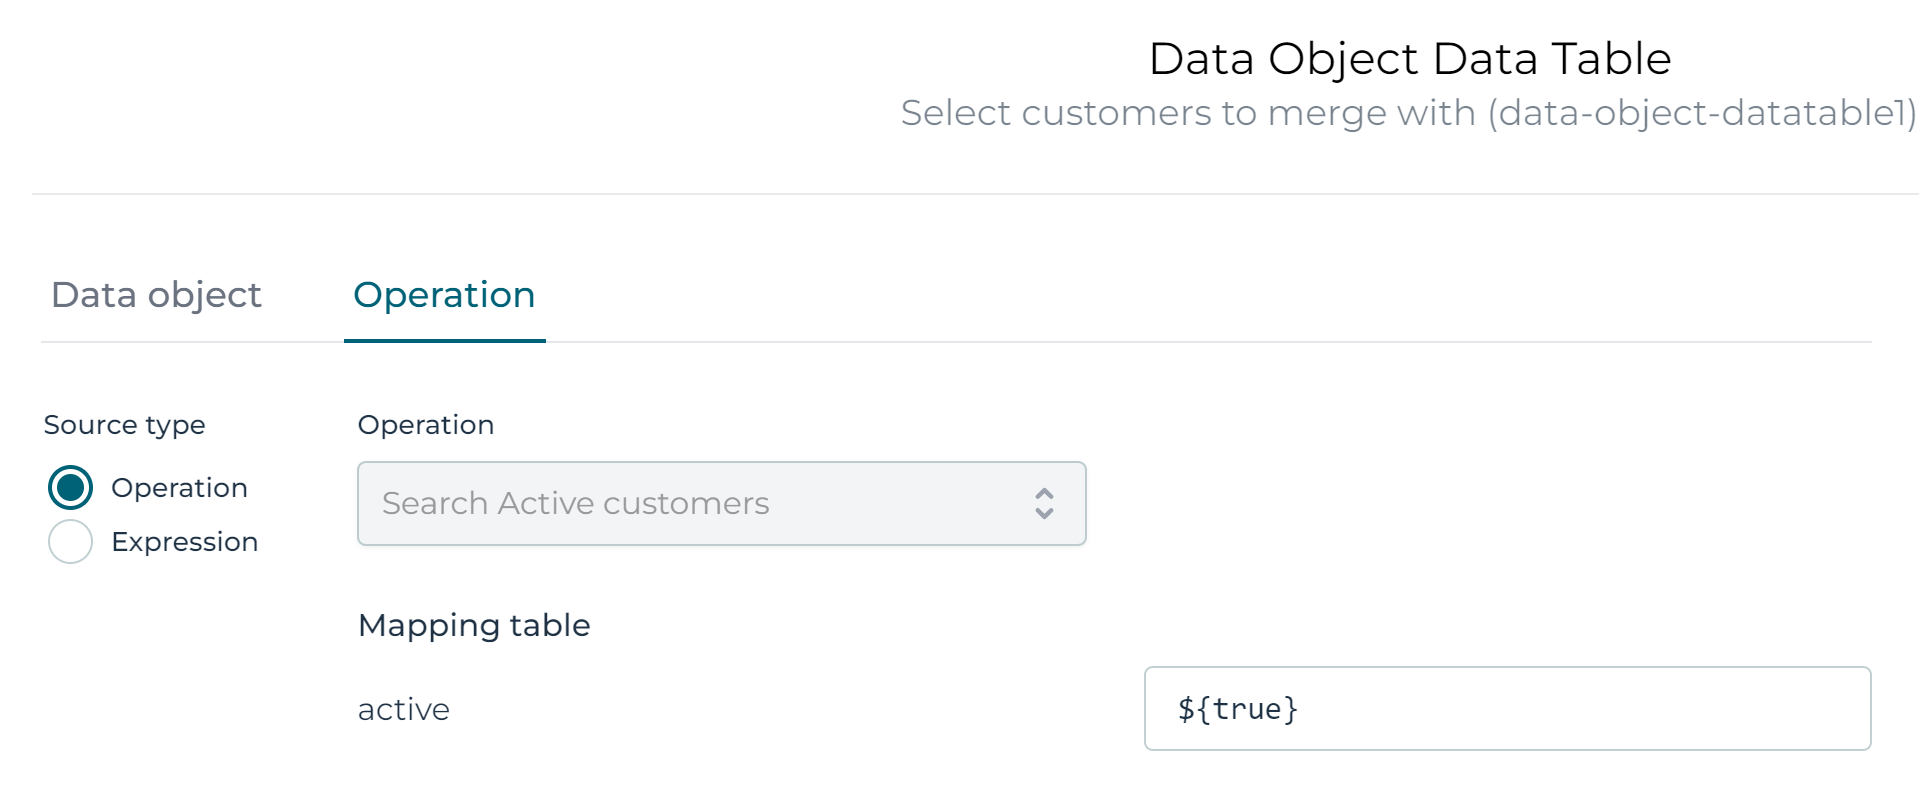
Save everything. Go back to the form and try to configure the data object operation for the data table again. The previous error message in the popup is gone now, and it linked automatically to the operation we've just created (as there is but only one search operation, otherwise we'd have to chose).
As we want to return only active customers, simply set the parameter to a hardcoded ${true} value:
Lastly, let's create a 'view form'. Check Enable viewing. This is the form that is displayed when clicking on a row in the data table:
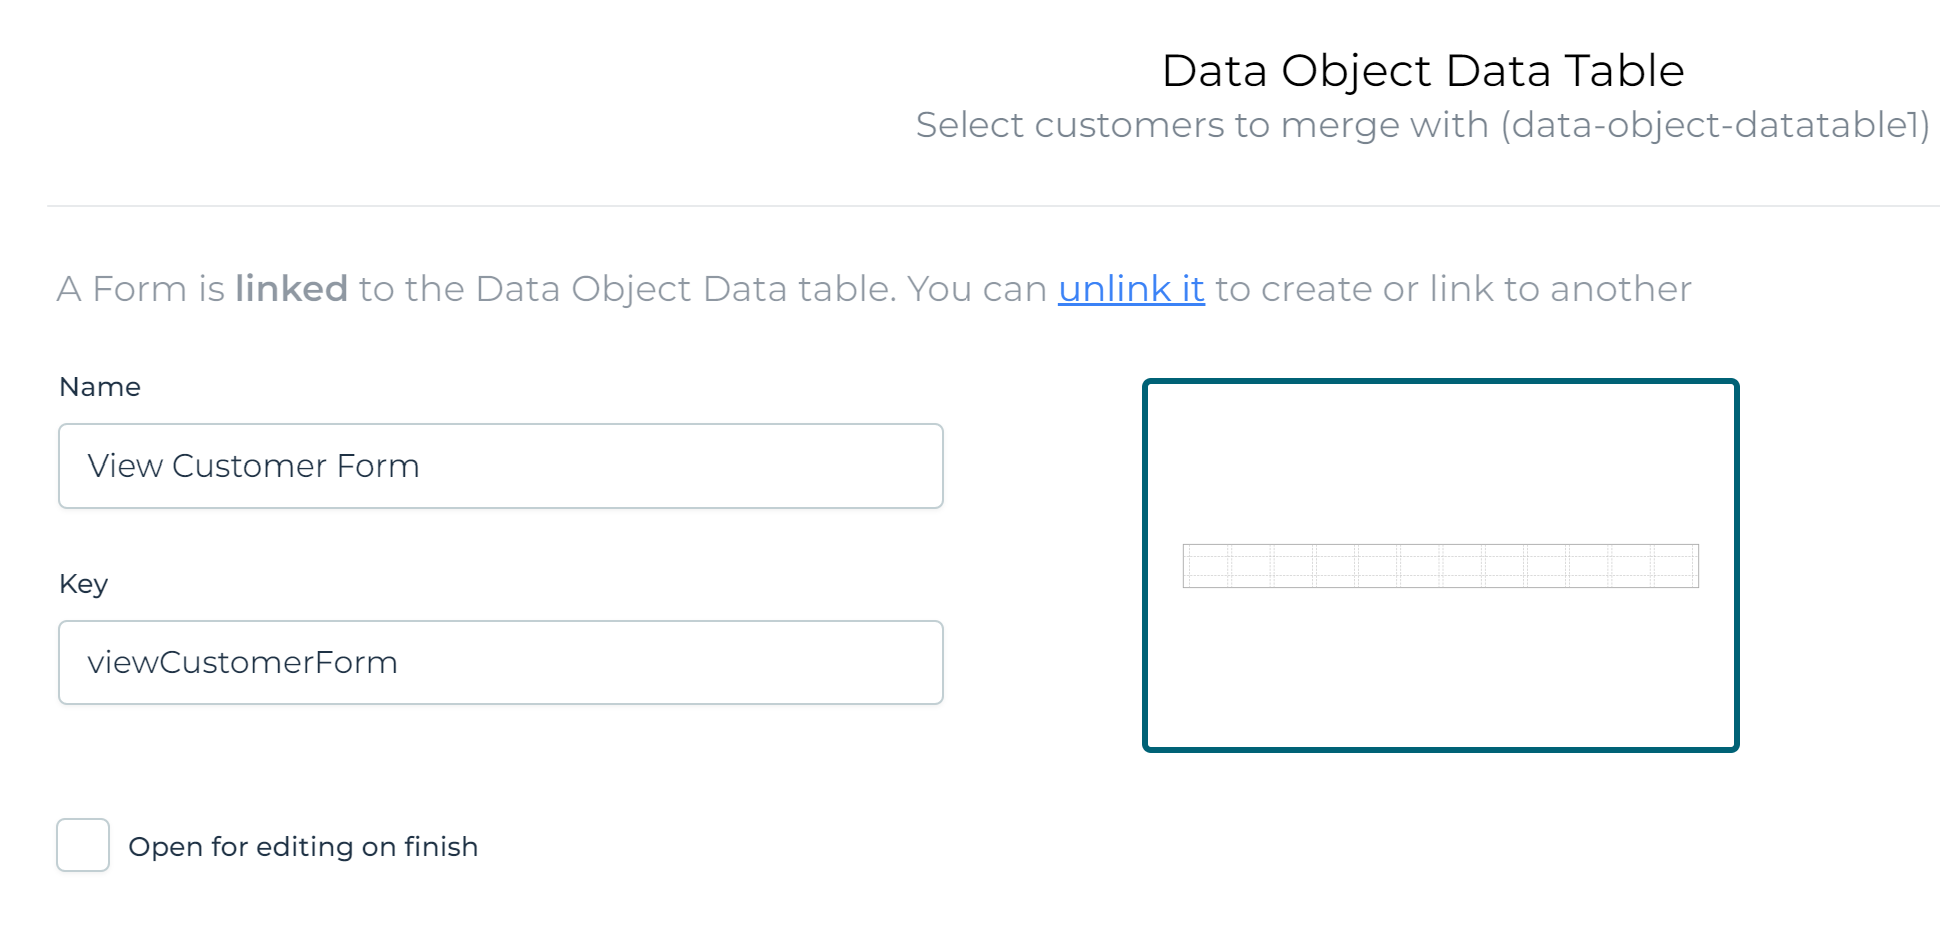
You'll notice that a default form is generated, based on the data object model. We don't need to do anything.
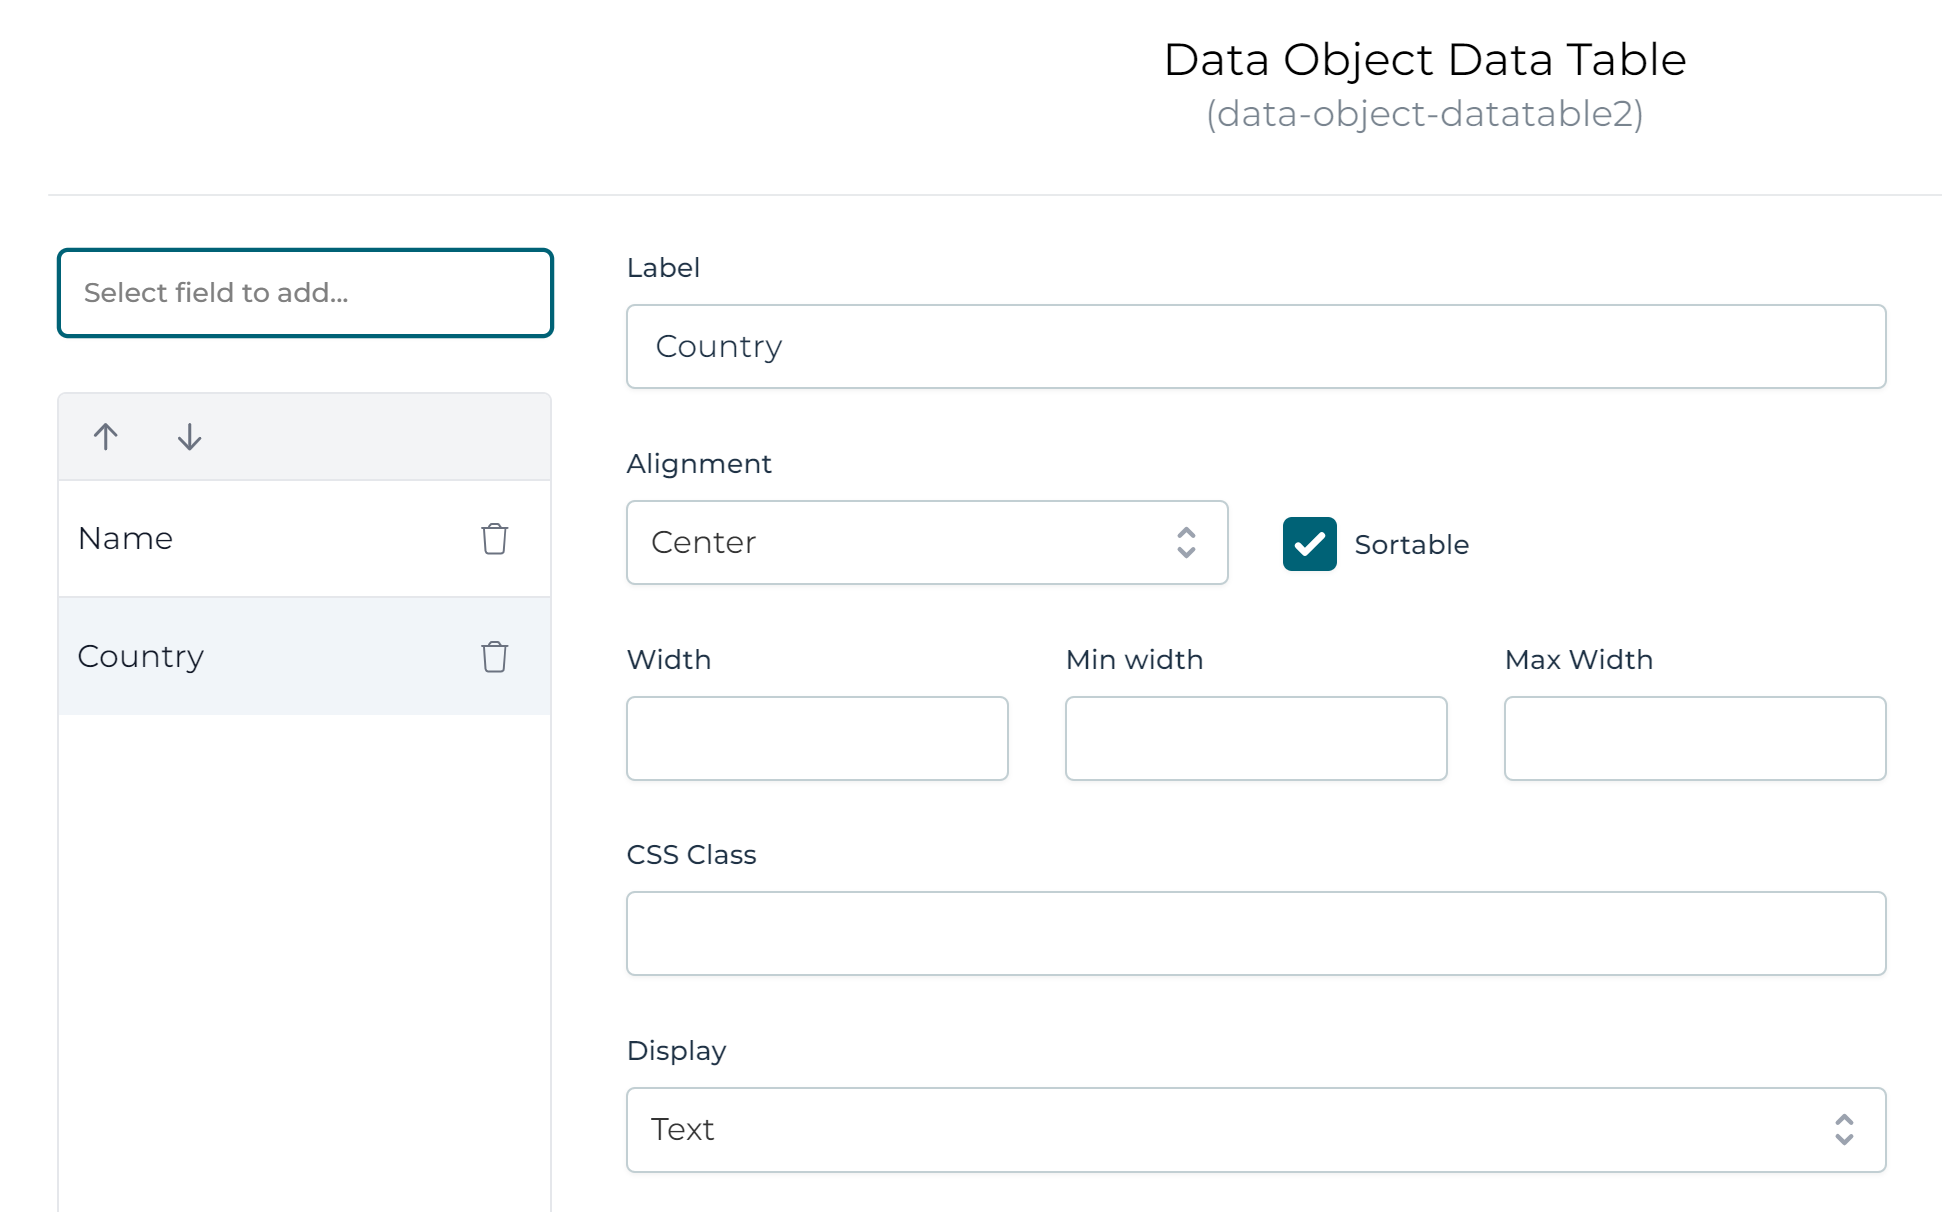
Finally, let's configure which data we want to display in the data table. Click the Select a field to add drop-down and select the Name and Country property:
Other Data Table Properties
There are a few properties we aren't using in this example. Let's quickly have a look at them:
- Show searchbox: if checked, a searchbox will be shown above the data table. In the operation configuration, you can use
$searchTextin a frontend expression to pass the value that is typed in this searchbox e.g. Use{{$searchText}}in the Map from field of the operation configuration to pass the search text typed by the user. If the user does not enter anything in the search box, the searchText will not be passed to the data object operation. In case a value is required, you can define a default value in the input parameters configuration of the operation: See service input parameters Default Value description. - Enable editing: this allows to define a form that, when the edit action is selected in the data table for a row, updates a data object.
- Enable deleting: if checked, an action to delete the data object is added to each row of the data table.
Referencing Data Object Variables in a Form
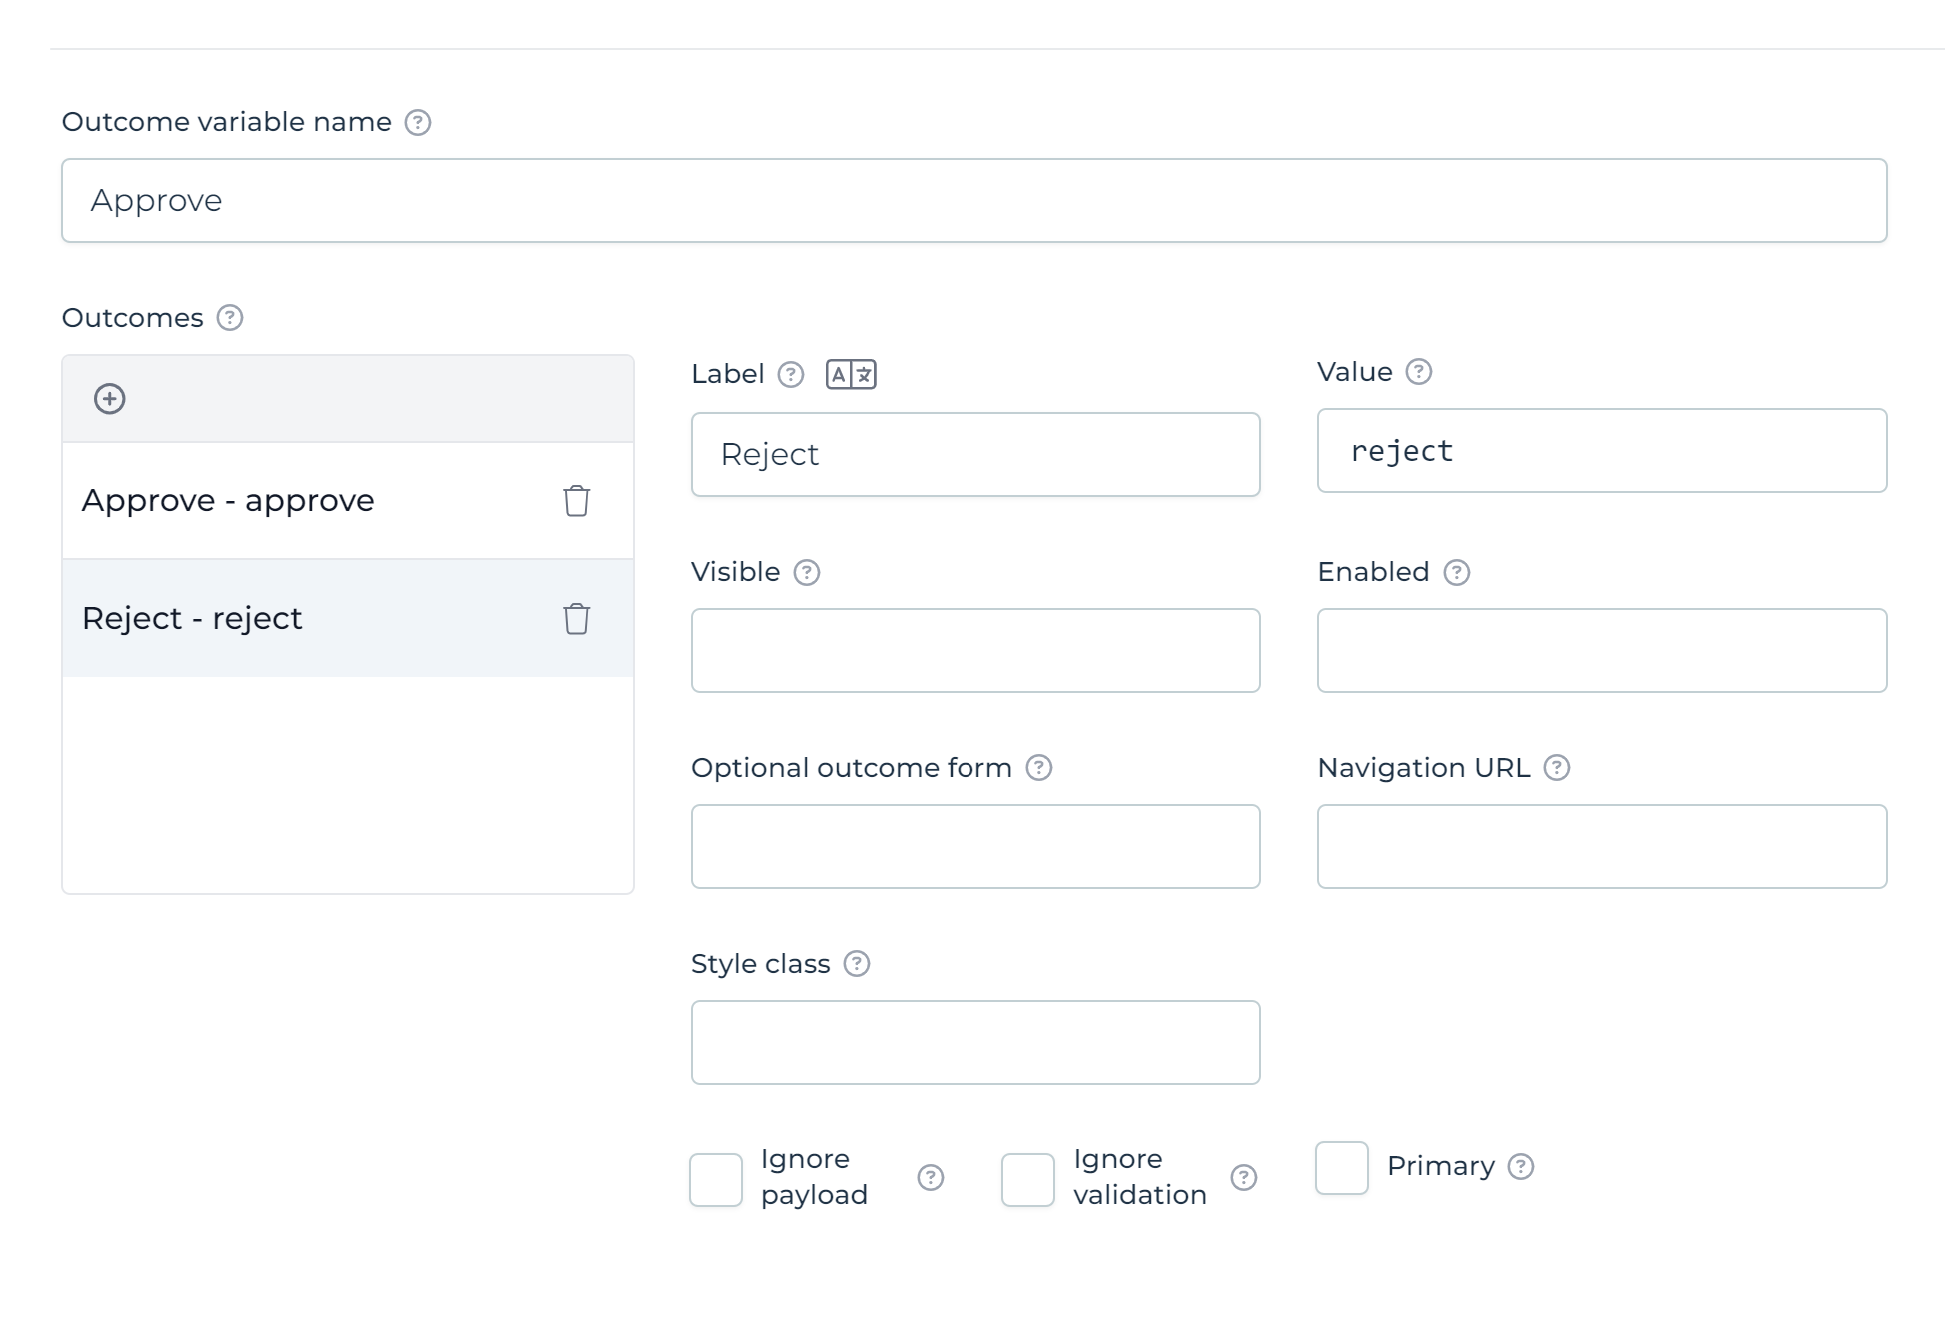
Let's add a simple approval form to the second user task:
Add two outcomes to the form, Approve and Reject:
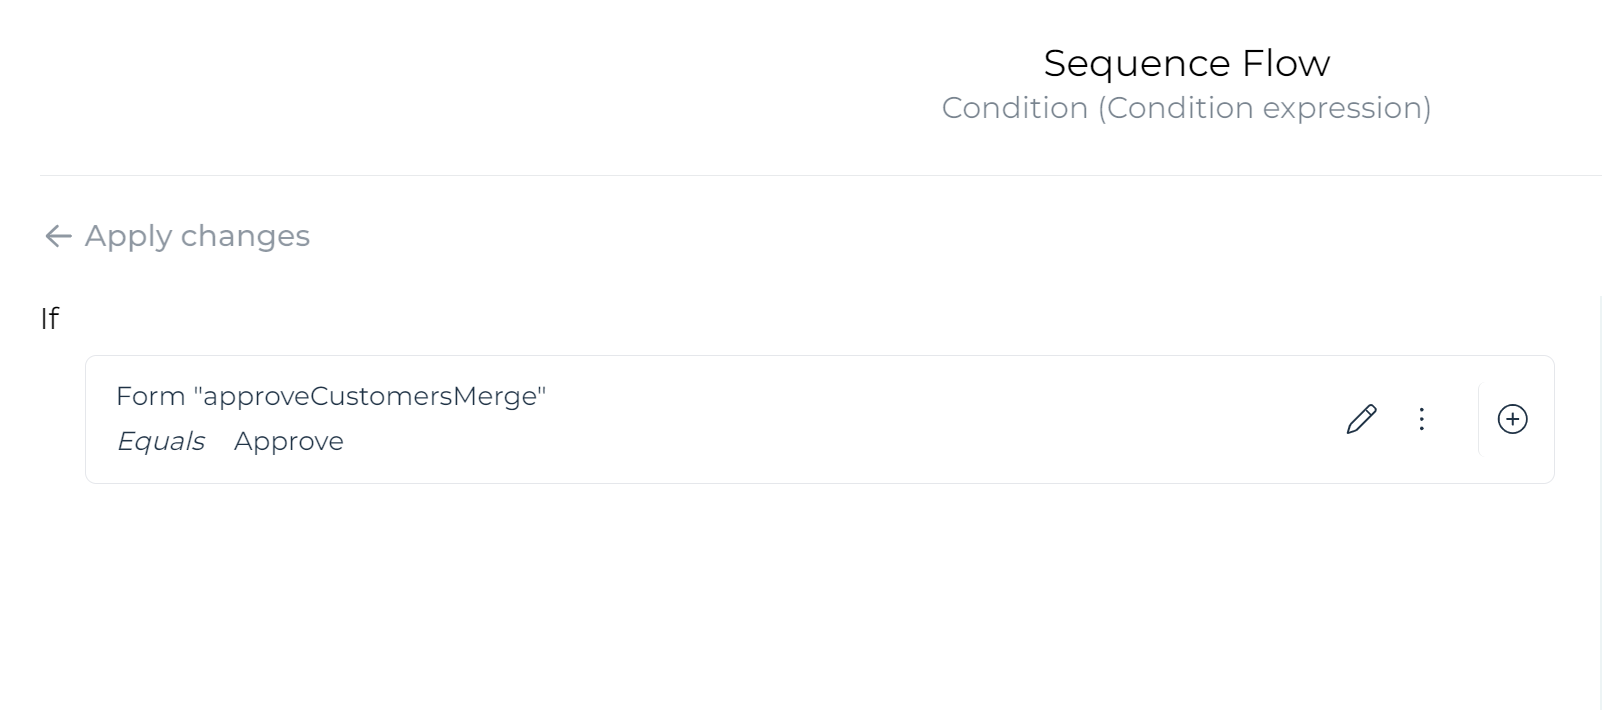
On the sequence flow leaving the exclusive gateway, use those outcomes to go up or down. Use the condition builder to quickly configure this:
Add a text display to the form. Fill in the following text:
The following customers will be merged into {{mergingCustomer.name}}:
The mergingCustomer was the name of the variable that gets passed into the process. When referencing a field, like name here, the data will automatically be fetched behind the scenes.
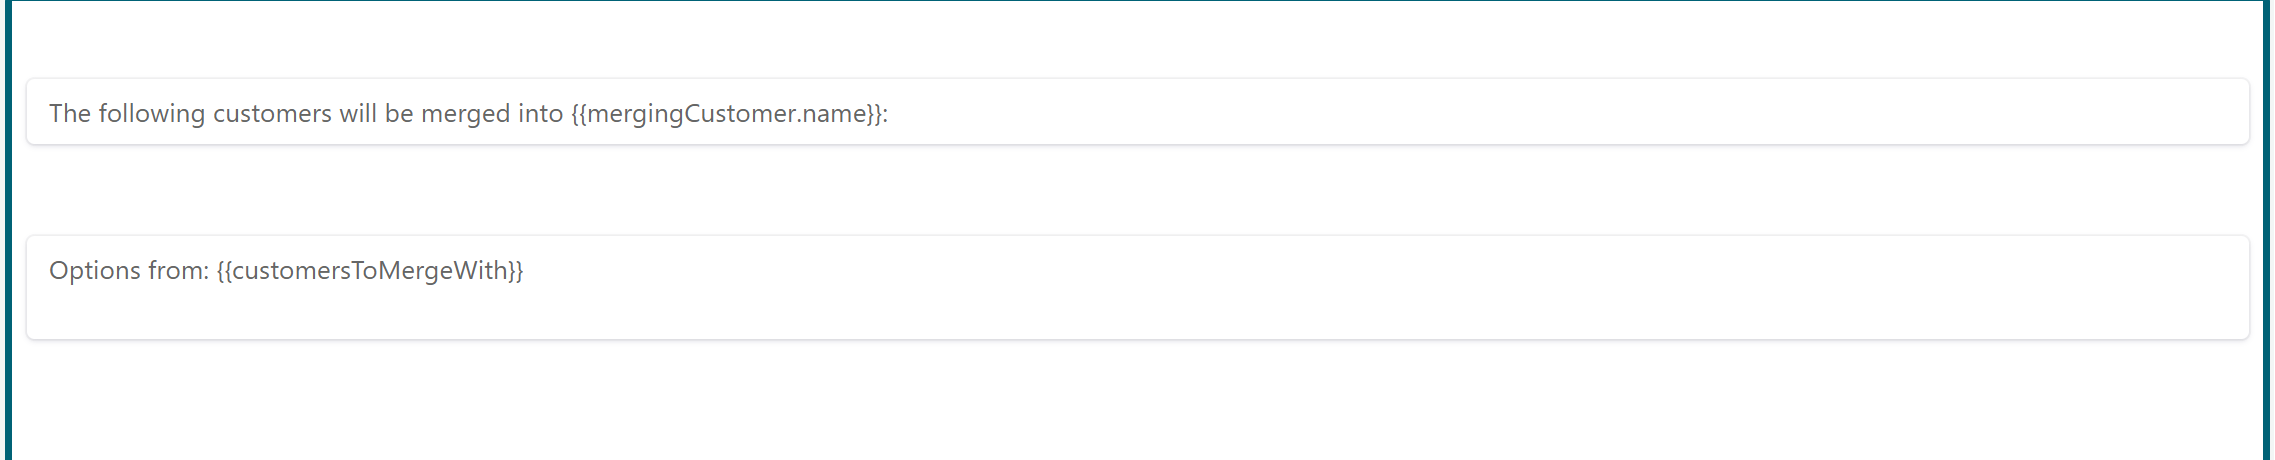
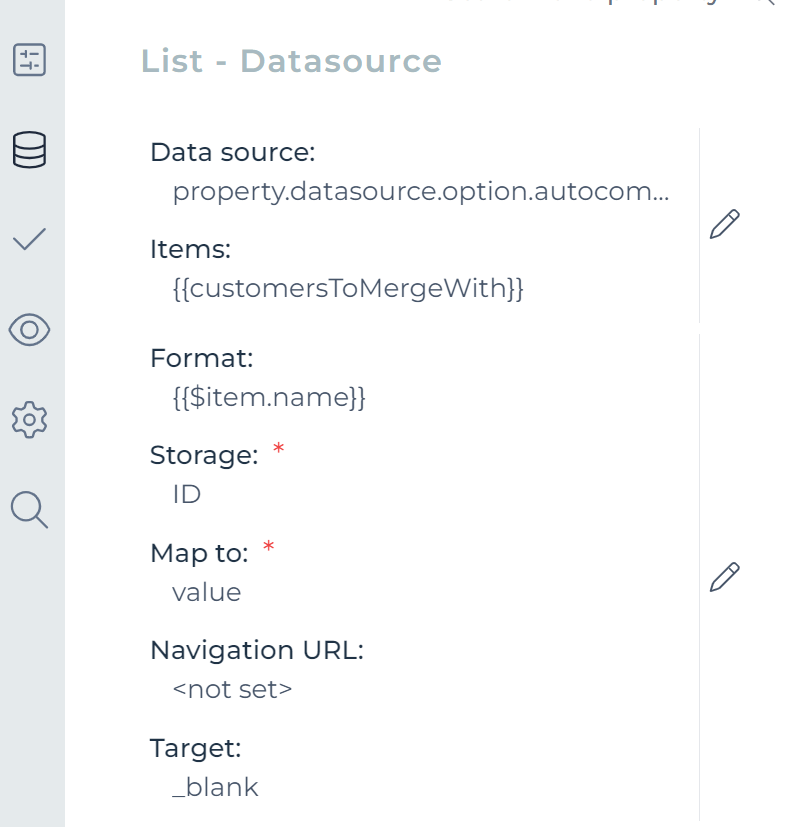
Add a List element to the form canvas. Configure the Items property to {{customersToMergeWith}}. Remember, this was the variable in which we store the selected customers in the data table
Reacting to the Merge Event
We've now built a process model that allows to select customers, approve that and send an event with that data. The last step is doing something when that event arrives.
Add a Generic event listener to the Active stage of our CMMN case model to listen to those events. Link a new exit sentry with it. When the merge event comes in, it will move to the Inactive stage and inactivate the merged customer.
Link it with the Merge event we created earlier and fire from a process above.
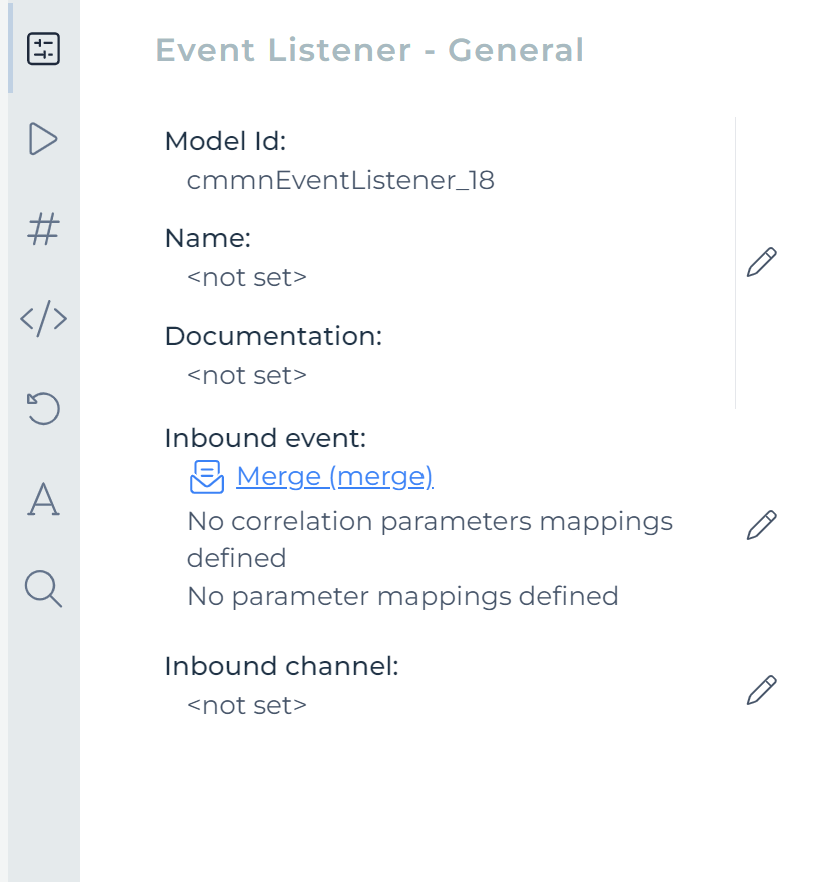
Configuring the incoming event is easy: we need to set the correlation parameter to ${customer.id}. Remember, customer was the name of the data object variable in the case. What we're saying with this configuration is that we want to receive an event where the correlation parameter matches with the ID of the customer of the case.
Executing the Example: the Data Table
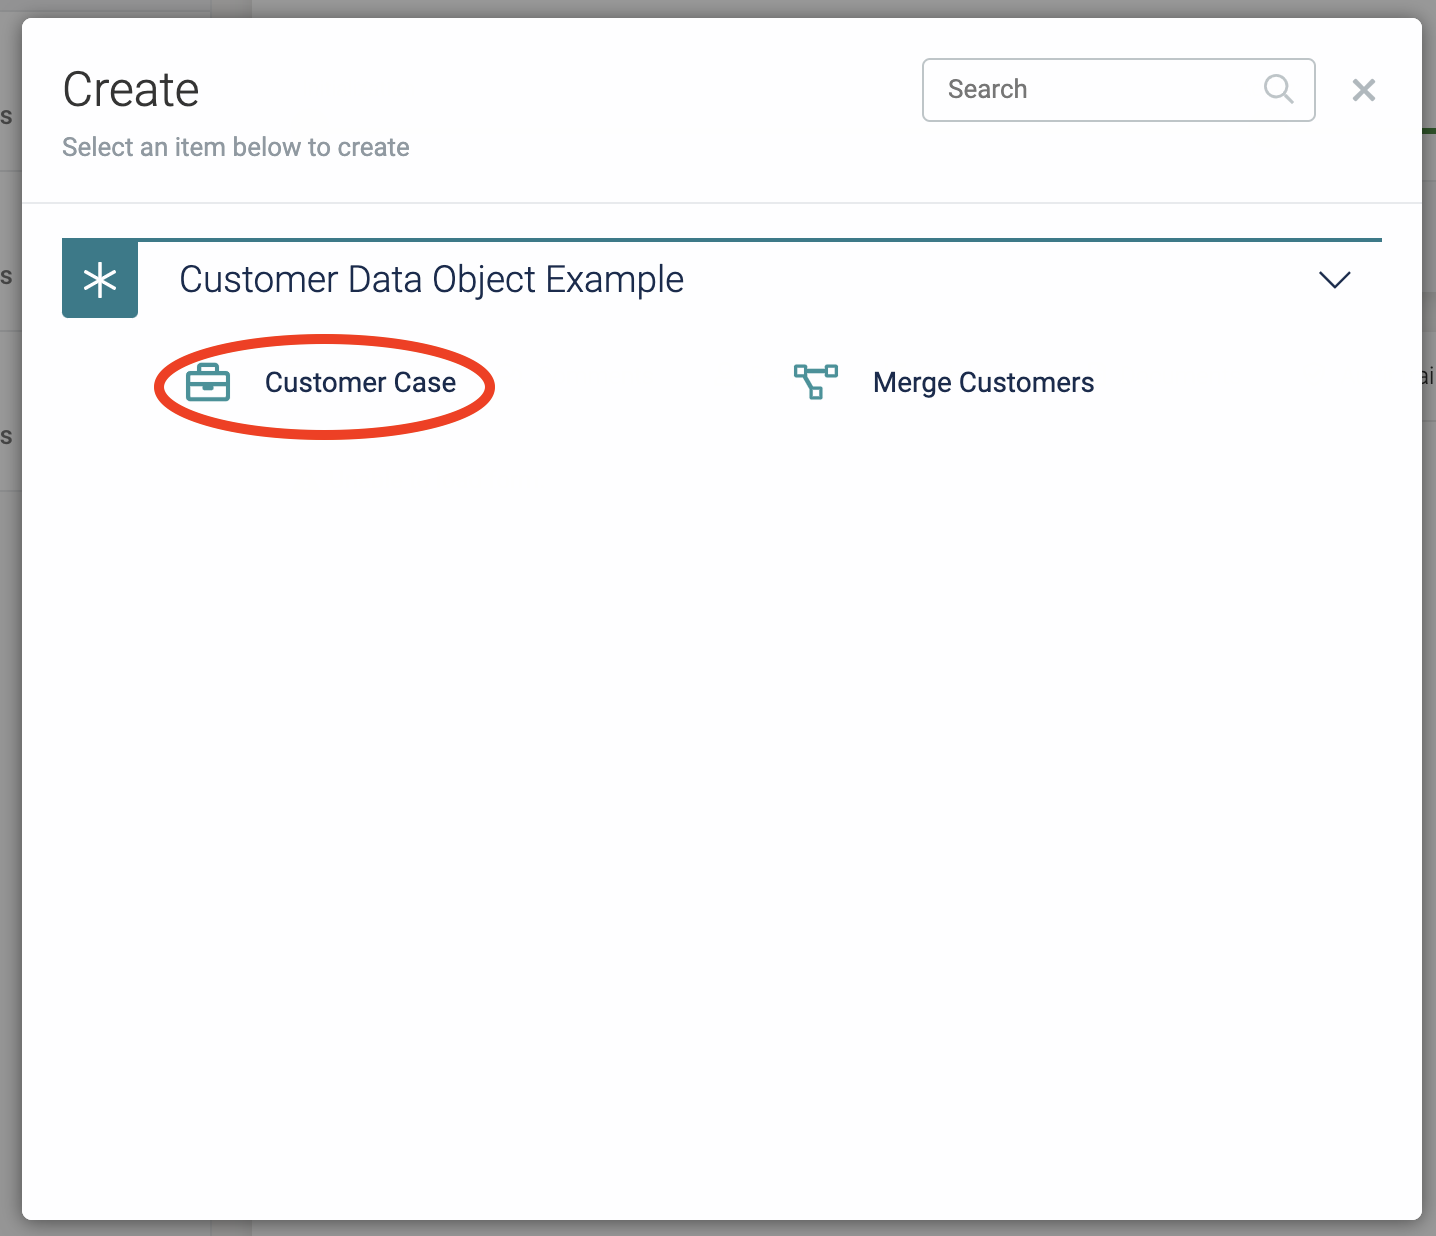
Let's execute the example again in Flowable Work. Select Customer Case after clicking on New and then Work:
Create a few example customers, as we need at least two to try the merge functionality we've built.
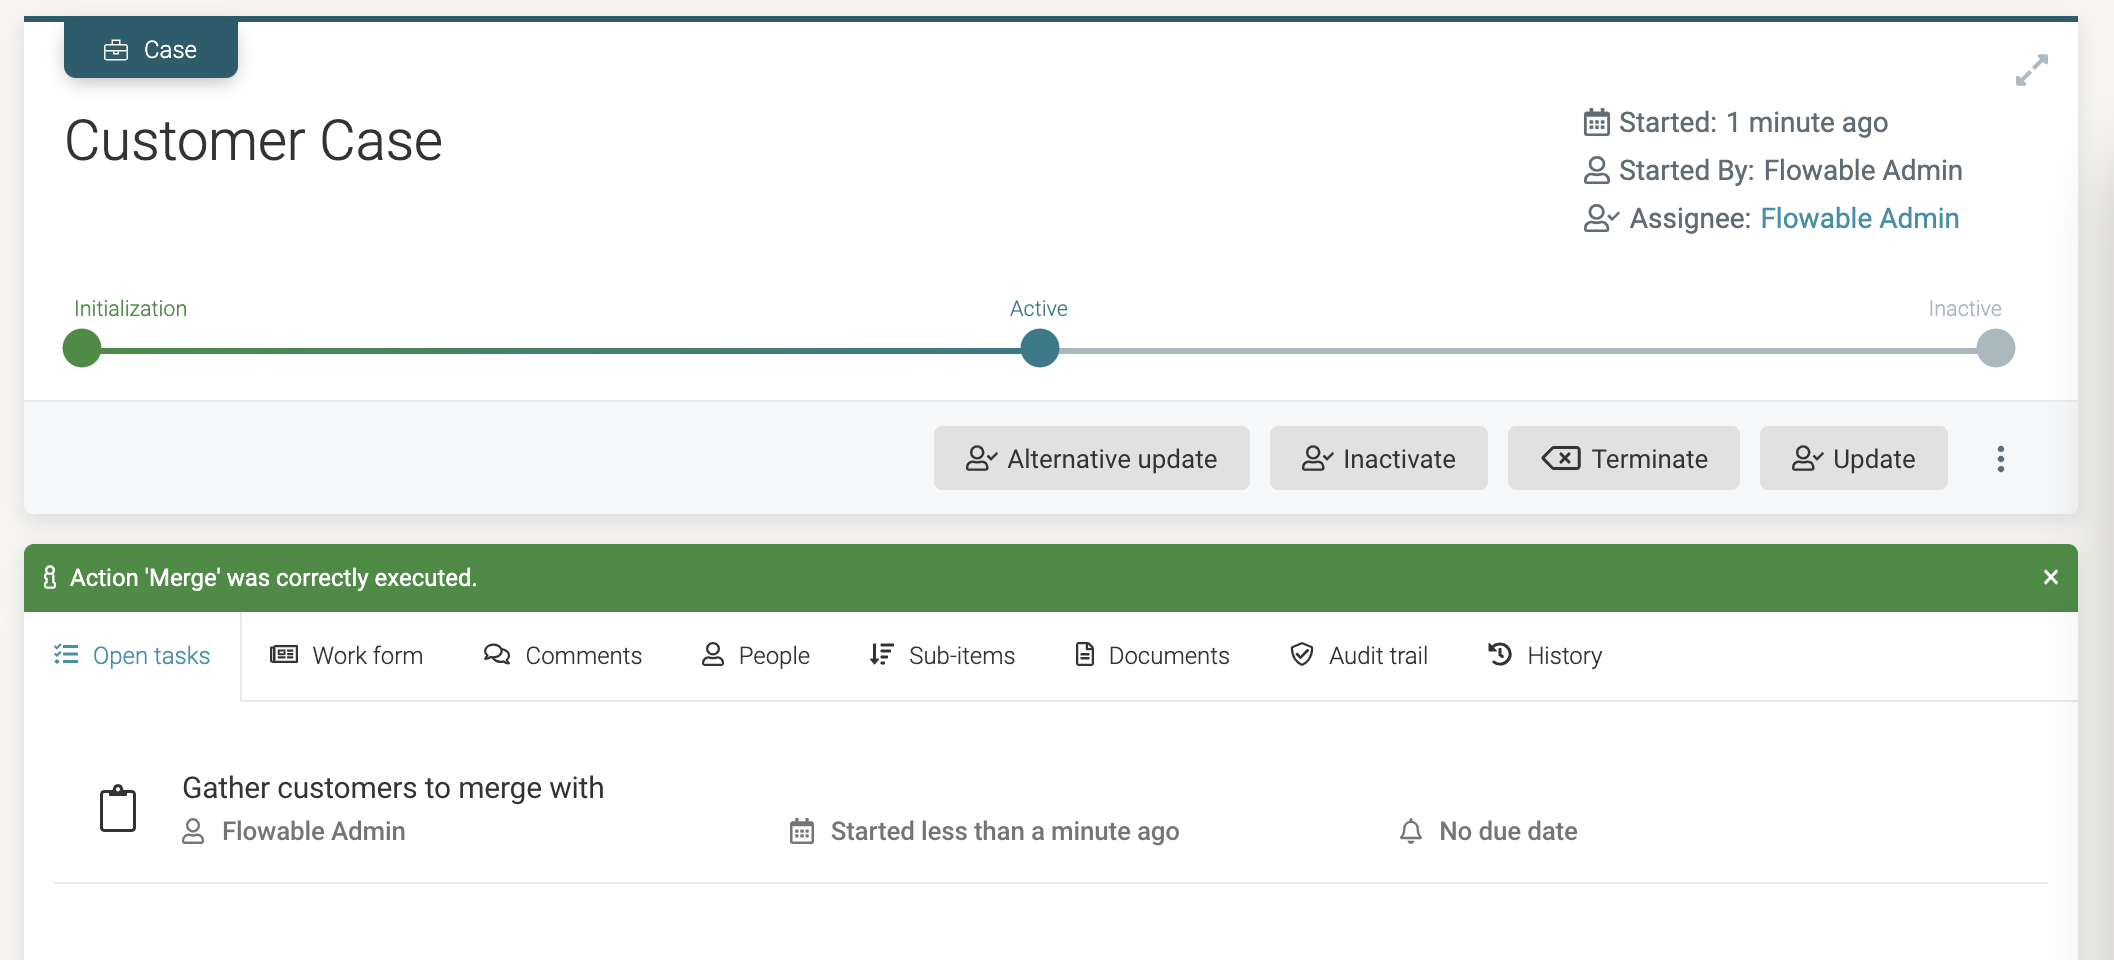
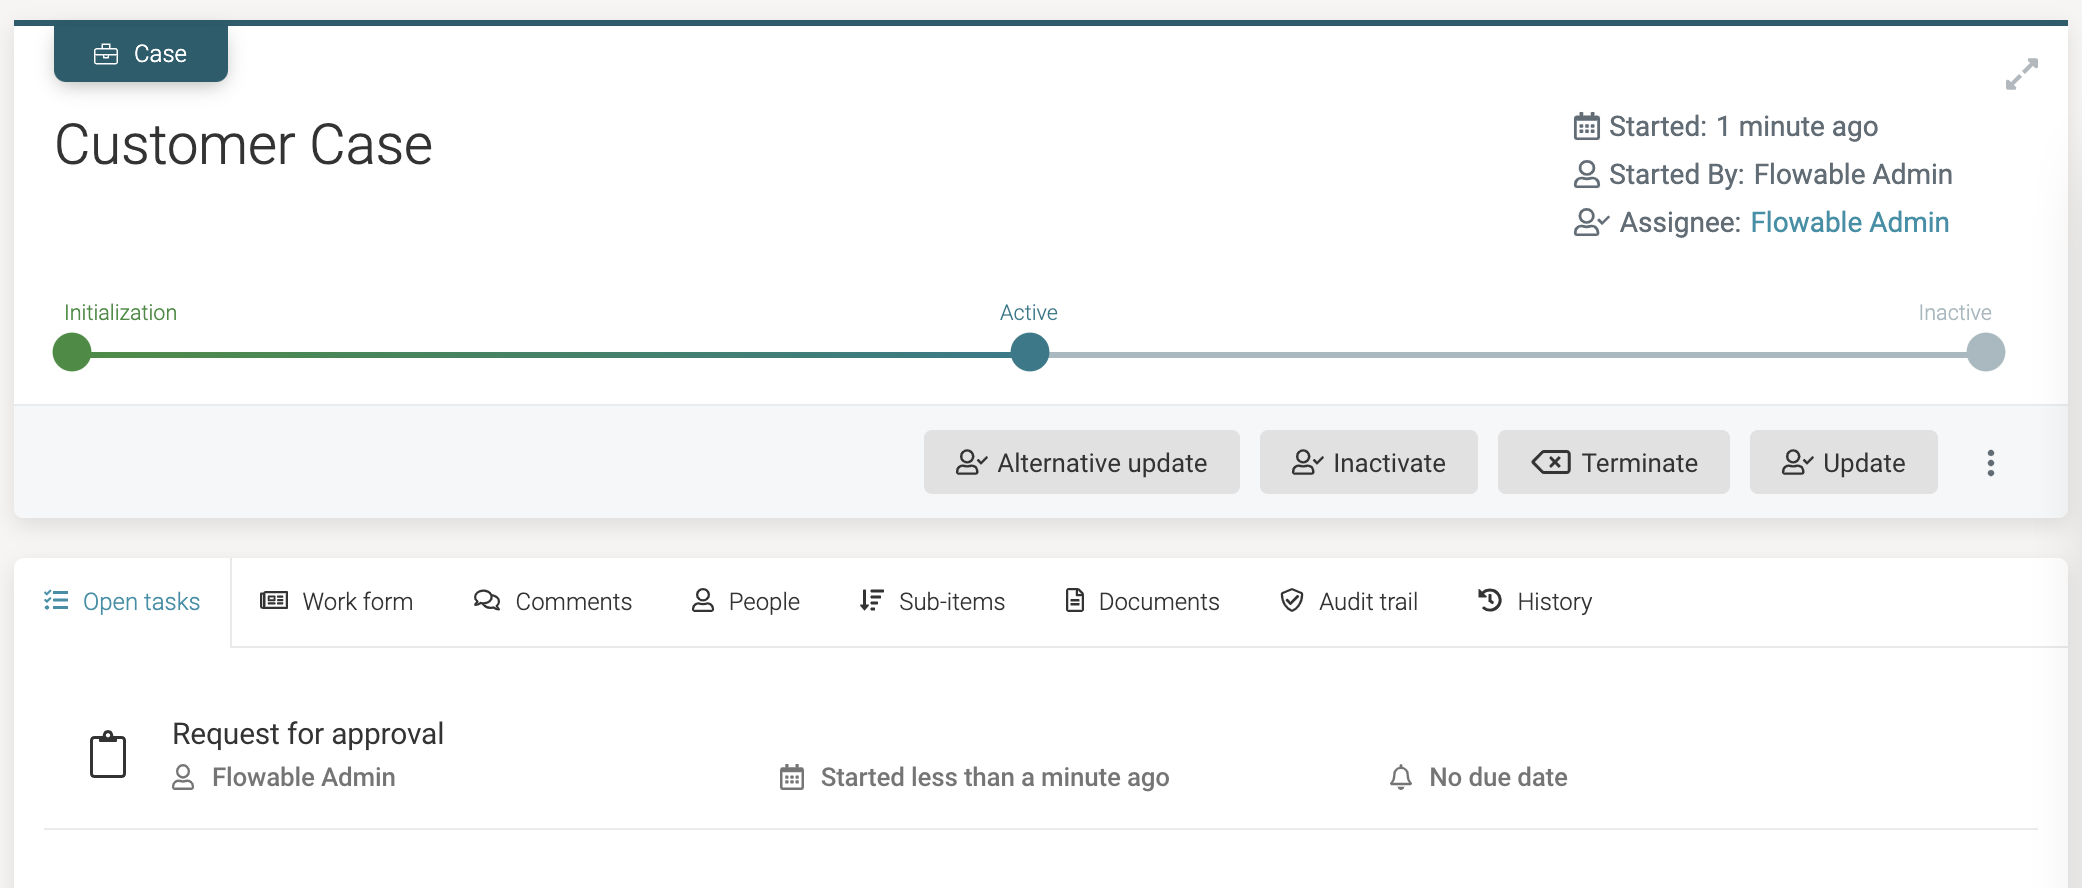
A new action button now appears on the case instance detail page:
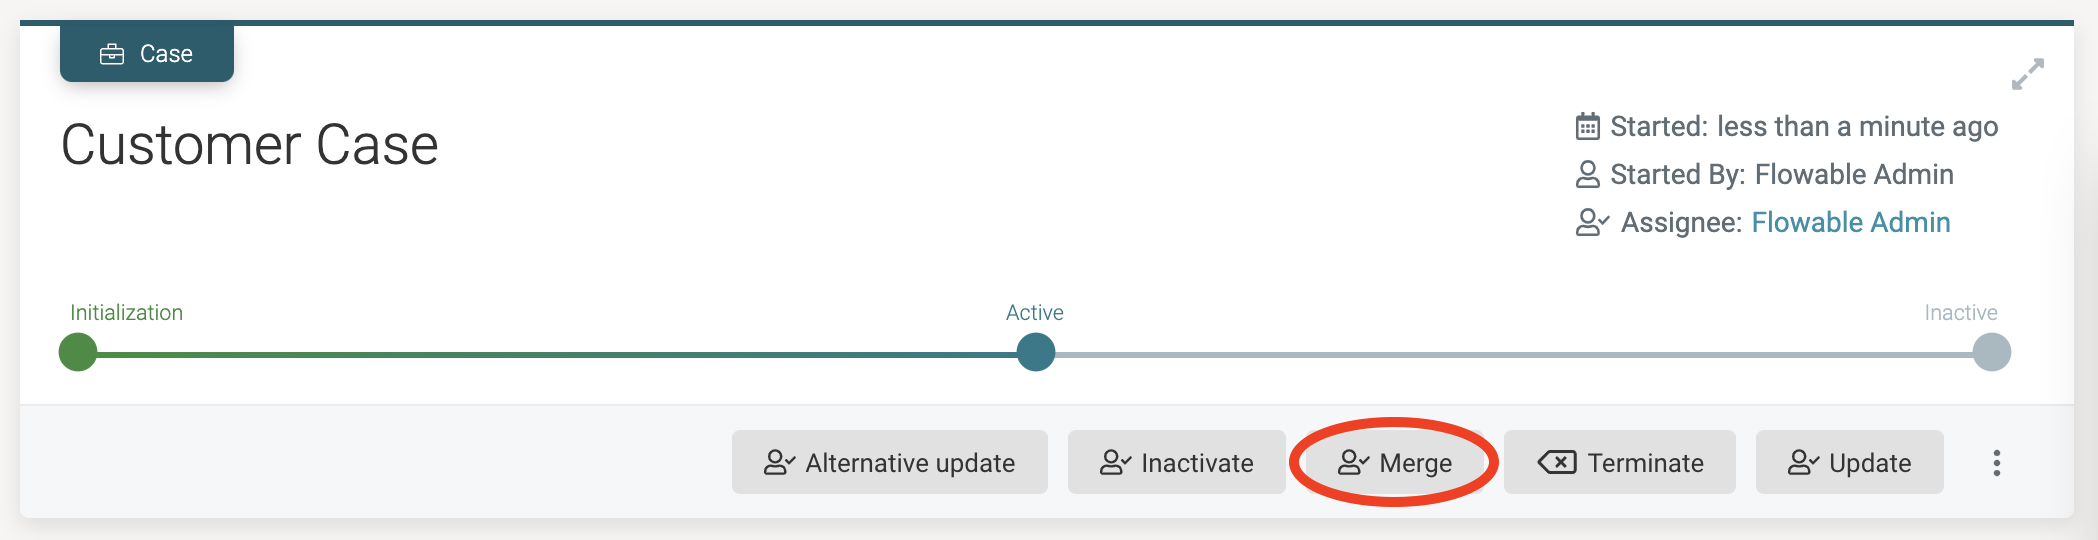
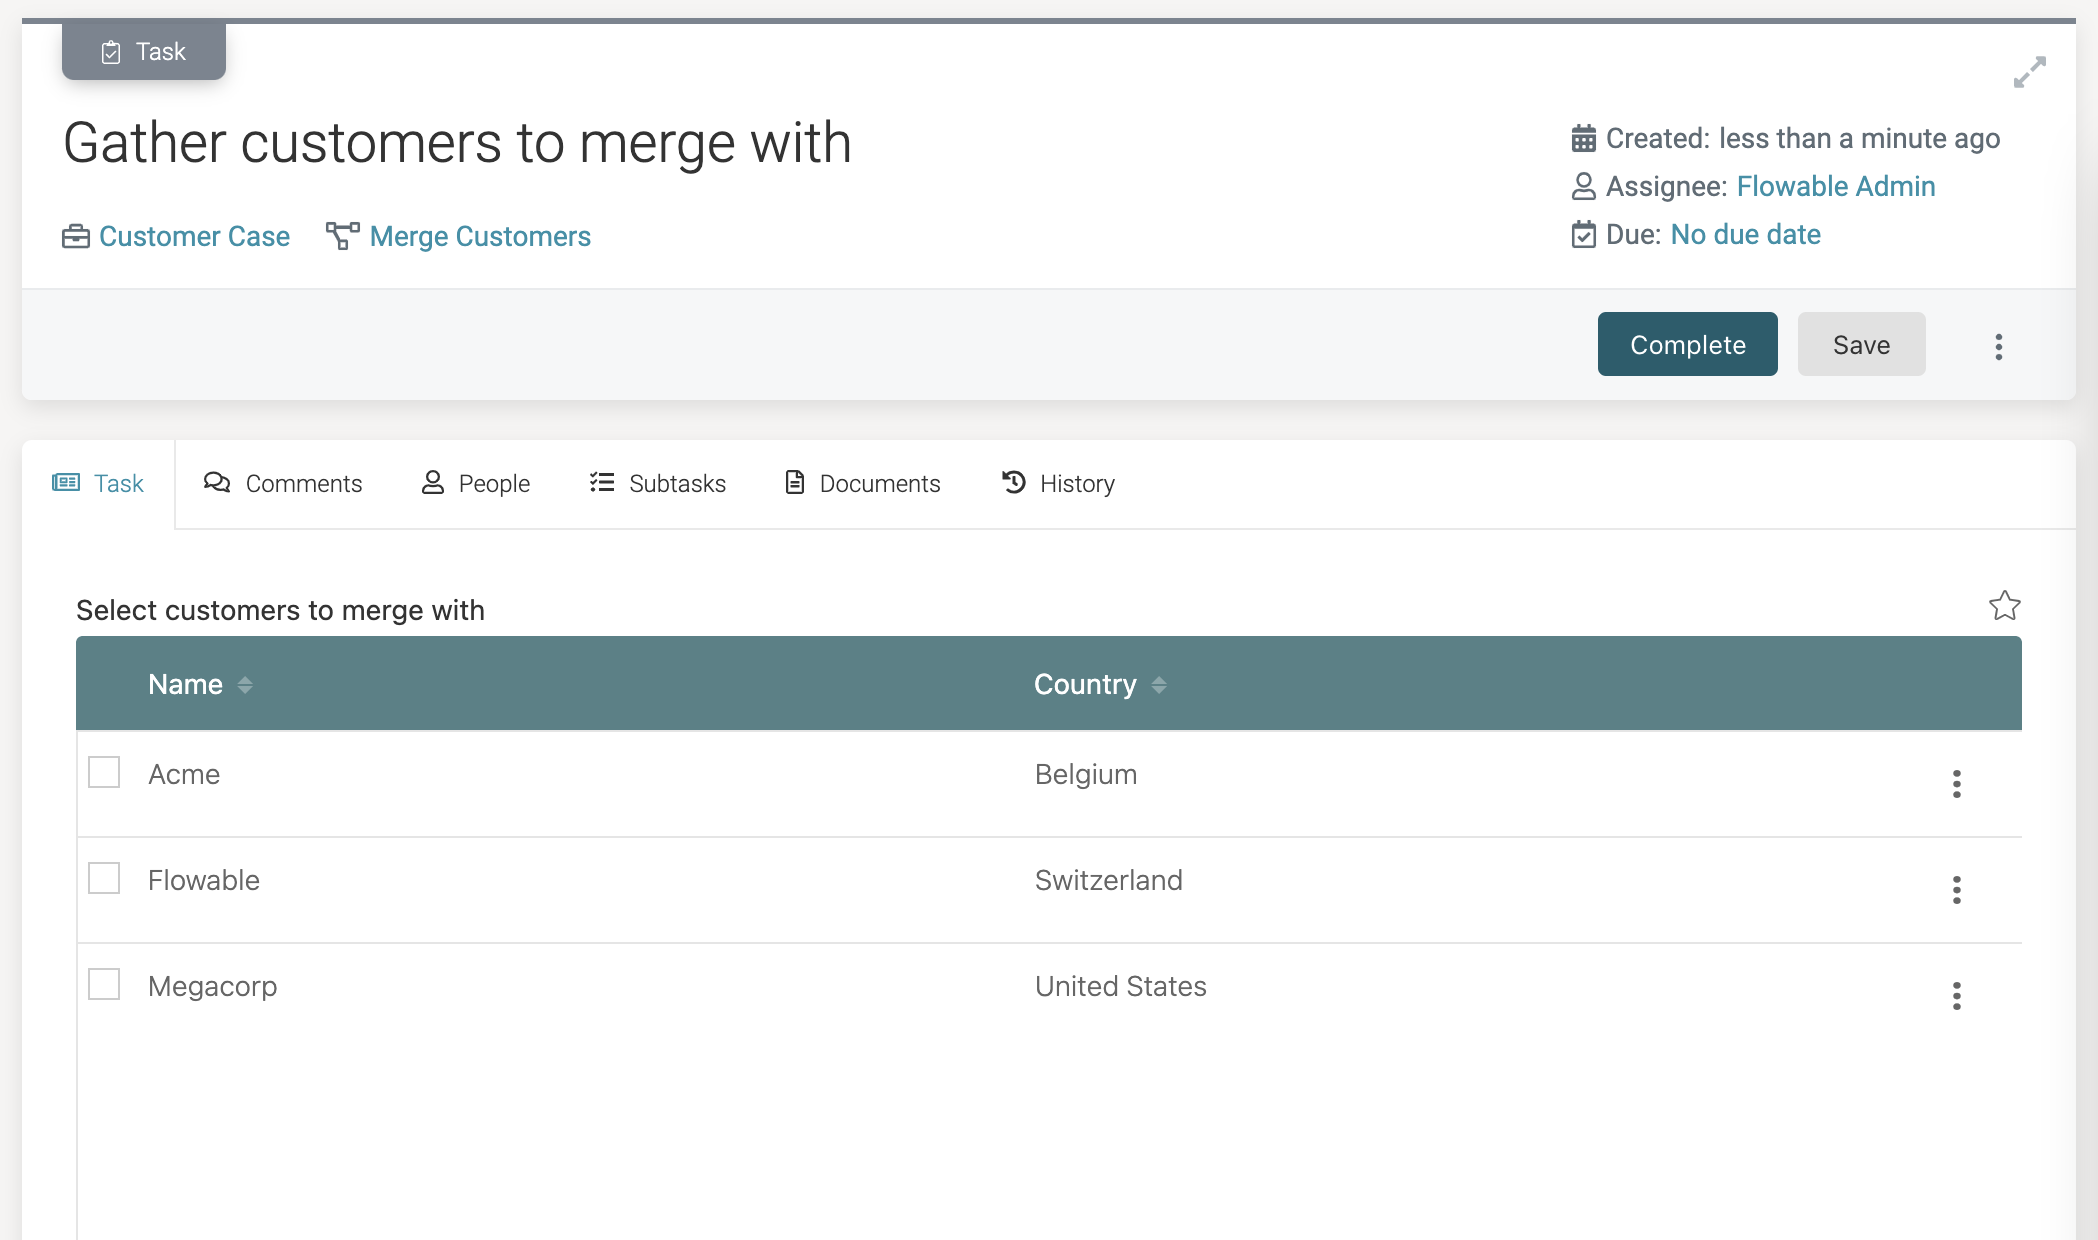
Clicking it, starts the process instance behind the scenes. The first step of the process is the Gather customers to merge with user task, which is shown in the tasks of the case instance:
Click on the task. The form with the data table is now shown. Notice that we can select each row (as we've made the table selectable with multiple values). Only the fields we've selected in the Columns property are shown. The data is fetched behind the scenes using the new search operation we created, hence why the customers are ordered by name:
Select a few rows. You can also see how the possible actions (click the three dots at the end of the row) show the view action we've configured:
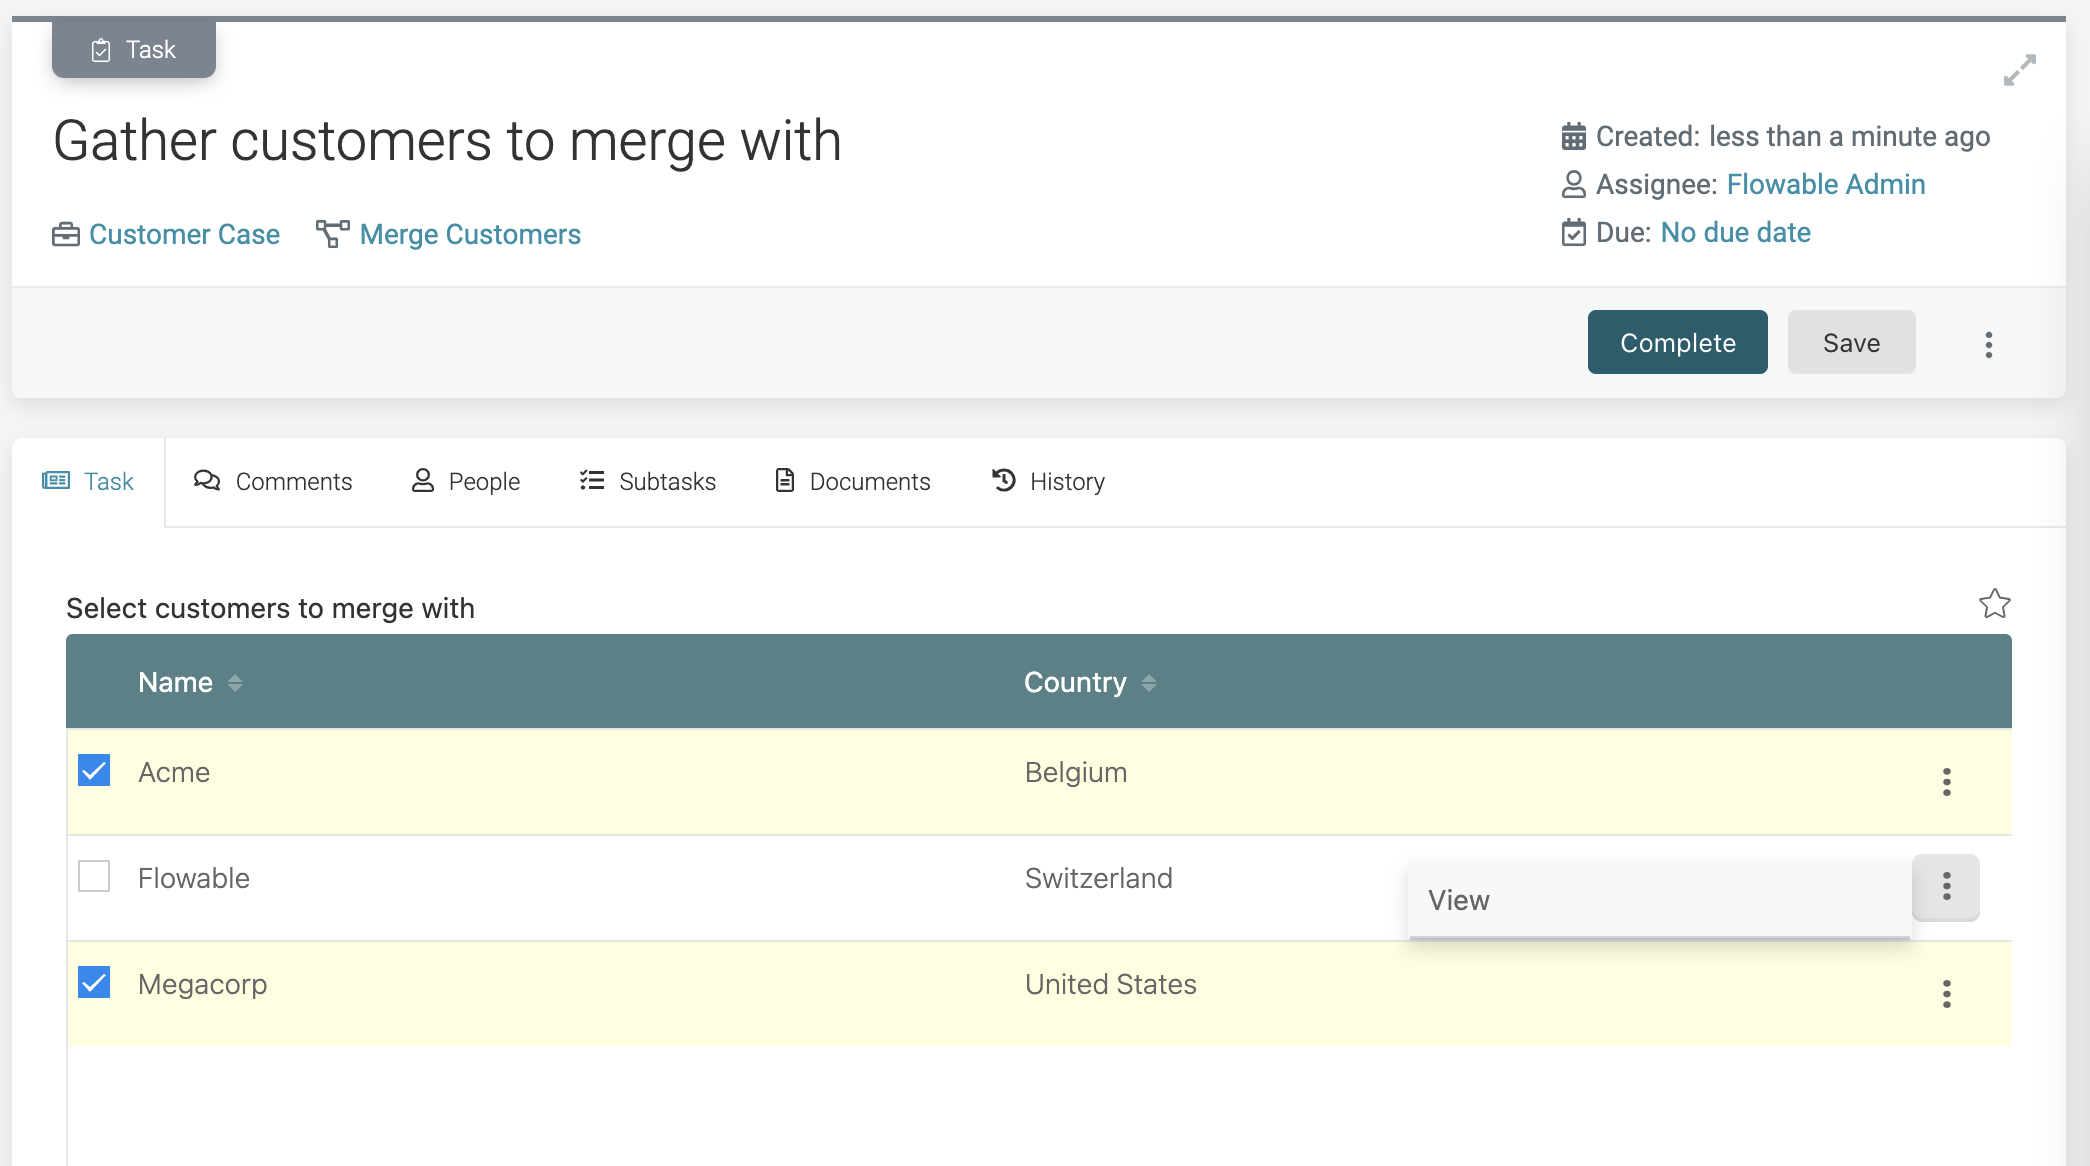
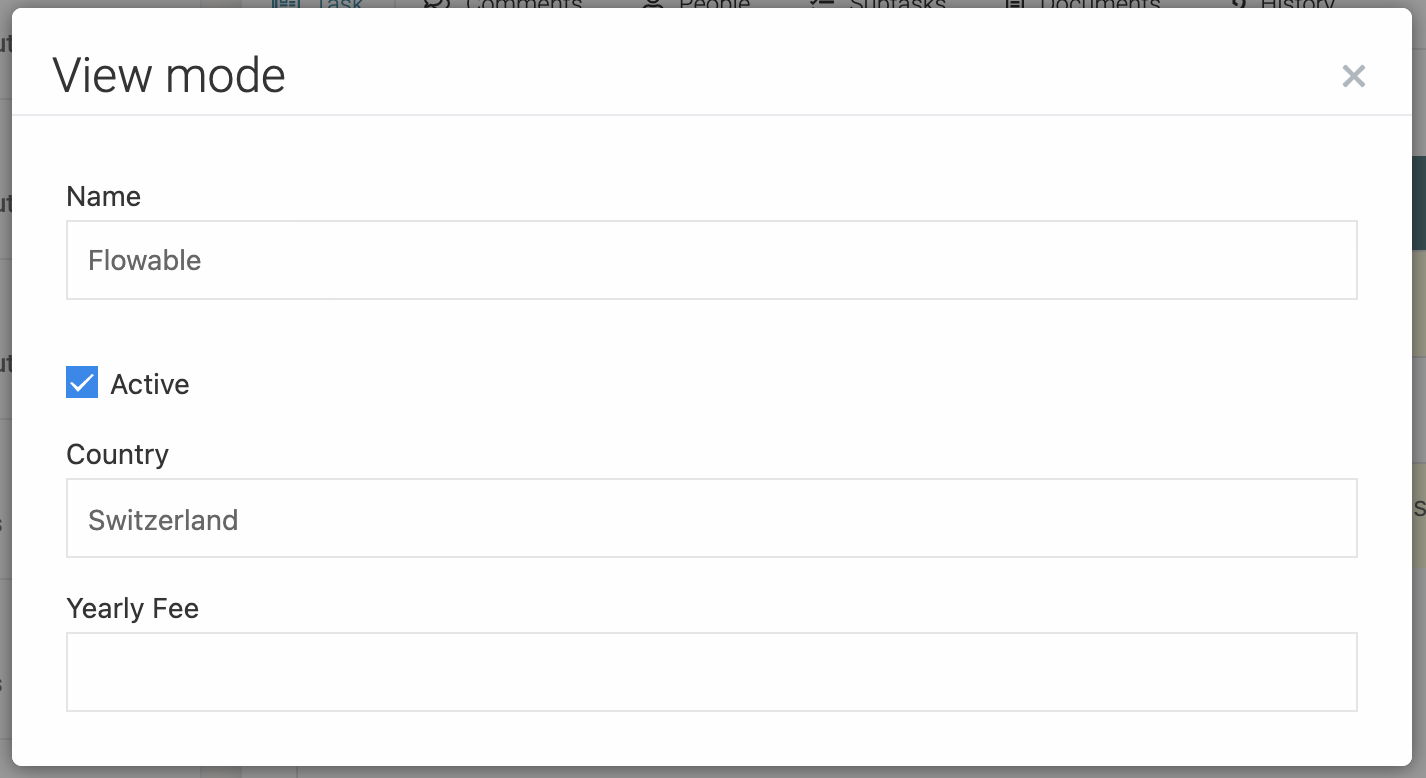
Clicking the view action shows the view form. Note that it would have been better if we had marked these fields as read-only. However, don't worry. The view form doesn't allow updating (so any changes here are not propagated).
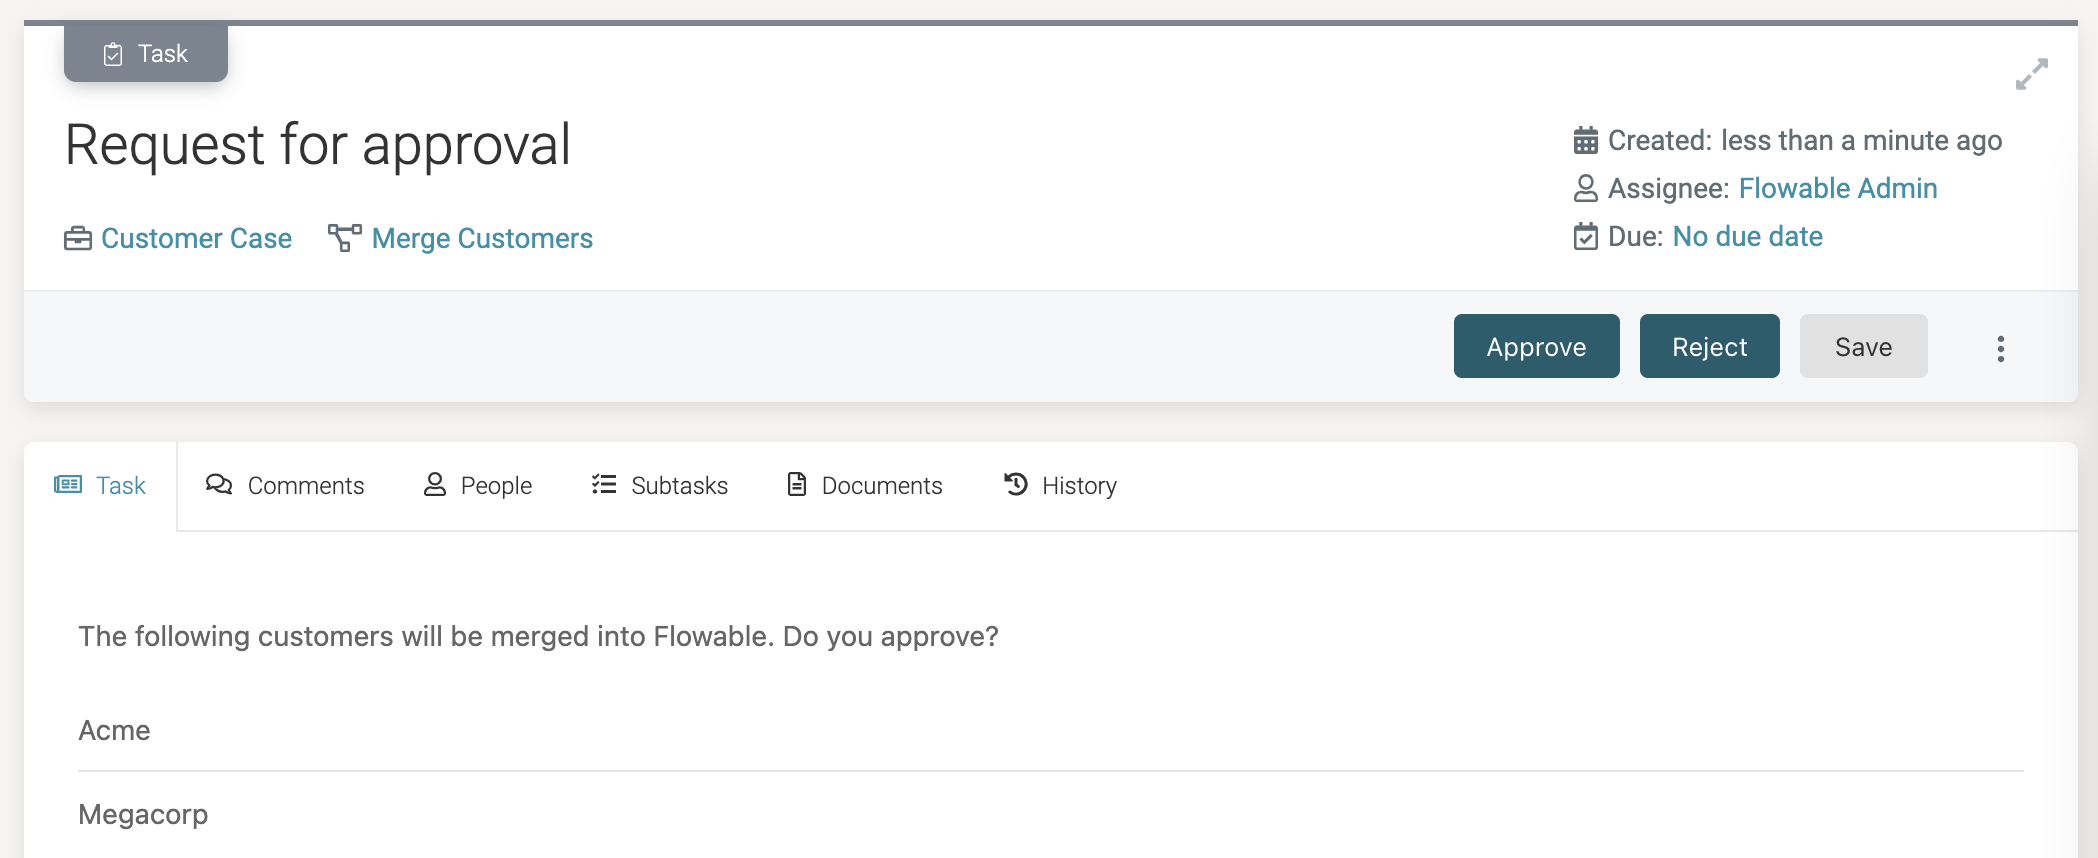
Completing the task leads us to the approval user task:
On the approval form, note how the selected customer data objects are displayed:
Data Object Variable ReferencesLike before, the collection of selected data tables does not store a copy of the data of the customers. It fetches the data when needed, like in the List component here.
Clicking the Approve button will now trigger the following:
- For each selected customer, an event is sent out (the multi-instance send event)
- For each event, the correlation parameter is used to look up the case instance that has a matching customer ID.
- For each such match, the case instance moves to the
Inactivestage.
Verifying the dataLooking into the database table, shows that all the steps were executed as we wanted: both customers we selected are now marked as inactive:

When using the REST api application, all changes should be shown in the logs
Data table Paging and Sorting
The data table we've bound to the search query is configured to use infinite scrolling by default. This means that if we would add more data than the default page size (10), we would see weird behavior in the data table.
To solve this, we need to add paging support to the service model. Let's configure the REST service model to handle the paging.
What about database-backed data objects?As Flowable is fully in control of what happens when using database-backed data objects, there's no need to do anything. The paging parameters of the data table are passed and applied automatically to the queries.
If you're using the Mock Rest API application, the search REST API can be enhanced to take into account a start and size parameter:
   @GetMapping("/customers")
    public Collection<Customer> getCustomers(@RequestParam(value = "active", required = false) Boolean active,
            @RequestParam(value = "start", required = false) Integer start,
            @RequestParam(value = "size", required = false) Integer size) {

        System.out.println("Getting all customers");

        // very inefficient way of doing this! Demo Code!

        Stream<Customer> customerStream = customers.values().stream();
        if (active != null) {
            customerStream = customerStream.filter(customer -> active.equals(customer.isActive()));
        }

        customerStream = customerStream.sorted(Comparator.comparing(Customer::getName));
        List<Customer> sortedCustomers = customerStream.collect(Collectors.toList());

        if (start != null && size != null) {
            System.out.println("Using start = " + start + " and size " + size);
            return sortedCustomers.subList(start, start + Math.min(size, sortedCustomers.size() - start));
        }
        return sortedCustomers;
    }
When scrolling down in the data table, the underlying logic will automatically pass two parameters with a fixed name to the backend:
- __flowableFirstResult for the start index of the page.
- __flowableMaxResults for the size of the page.
As every REST API is different when it comes to paging, we'll need to map these values into the parameters of the REST API. In our example, we're using start and size, which we can map using expressions into
?active=${active}&start=${__flowableFirstResult}&size=${__flowableMaxResults}
Which looks as follows in the service model:

If you add now more than 10 customers, the data table will fetch and display new pages when scrolling down.
Data table sorting
Similarly as the paging parameters, there are two fixed parameters passed by the data table form component:
- __flowableSortProperties is an array and contains the properties on which the user has clicked to sort in the data table.
- __flowableSortPropertiesOrder is an array containing 'asc' or 'desc' indicating the sorting order chosen by the user.
For example, they can be used the URL configuration of a REST call:
?sort=${__flowableSortProperties[0]}&order=${__flowableSortPropertiesOrder[0]}
As Flowable is fully in control of what happens when using database-backed data objects, there's no need to do anything for sorting. The chosen sort column and order are automatically passed.
Error Handling (REST)
v3.13.0+When one of the operations returns a status code that is not 2xx then a BPMN Error will be thrown with a specific error code.
Within a process a boundary error event can be used to capture that error and handle it.
The error code for the BPMN error is created based on the operation that was executed.
The format is the key of the operation plus the status code. e.g. if a status code of 400 is received for the create operation the error code would be create500.
noteThe only exception for when an error is thrown are the lookup operations.
If a lookup operation returns a status code of 404 (Not found) then no error will be thrown and instead null is returned for the data object
Error mapping (REST)
v3.14.0+The error boundary event allows for mapping data from the error into your process. The BPMN errors produced by the Data Object REST error provide the following additional information:
- restErrorResponseBody - The body of the REST call as JSON
- restErrorResponseStatusCode - The status code for the REST call
- restErrorResponseHeadersAsString - All the headers for the REST call as string
- restErrorResponseHeaders - All the headers for the rest call as JSON
- "Header Name" - The name of the header that should be extracted. If the header has a single value then a string is returned, otherwise an array node of all the values for that header are returned. e.g. for getting the content type of the REST Response in the source section you should use Content-Type
Appendix: Mock REST API
The example above uses a 'mock REST API application' as basis for the REST service model for a data object model. This application is a simple Spring Boot application that can run locally.
It can be downloaded here.
This REST API application is by no means a production-ready setup: there is no persistency, logging is done with System.out, there is no security, etc. The only purpose is to have something to try out the different models.
Either import this project into a Java IDE such as IntelliJ or Eclipse, or run the application from the command line (after unzipping):
mvn clean package
java -jar target/customer-rest-example-0.0.1-SNAPSHOT.jar
If you'd like to enhance this application, the code can be found in the zip above.
In general, this REST API should
-
Return a customer JSON object on a GET request
-
Take in a customer JSON object as body for a POST, returning the created Customer JSON.
-
Take in a customer JSON object as body for a PUT request, returning the updated Customer JSON.
-
Delete the customer when a DELETE request is issued.
The JSON representation of the customer data looks as follows:
{
    "id": "some_unique_id",
    "name": "The name",
    "active": true,
    "country": "A country",
    "yearlyFee": 12345
}
The Spring Boot application:
import org.springframework.boot.SpringApplication;
import org.springframework.boot.autoconfigure.SpringBootApplication;

@SpringBootApplication
public class DemoApplication {

    public static void main(String[] args) {
        SpringApplication.run(DemoApplication.class, args);
    }

}
The Customer Pojo:
public class Customer {
    private String id;
    private String name;
    private boolean active;
    private String country;
    private long yearlyFee;

    // Getters and setters
And the actual REST controller:
import java.util.*;
import org.springframework.web.bind.annotation.*;

@RestController
public class CustomerController {

    private final Map<String, Customer> customers = new HashMap<>();

    @GetMapping("/customers/{id}")
    public ResponseEntity<Customer> getCustomer(@PathVariable String id) {
        Customer customer = customers.get(id);
        System.out.println("Retrieved customer by id " + id + ") " + customer);

        if (customer != null) {
            return new ResponseEntity<>(customer, HttpStatus.OK);
        } else {
            return new ResponseEntity(HttpStatus.NOT_FOUND);
        }
    }

    @PostMapping("/customers")
    public Customer createCustomer(@RequestBody Customer createCustomer) {
        Customer customer = new Customer();
        customer.setId(UUID.randomUUID().toString());
        customer.setName(createCustomer.getName());
        customer.setActive(createCustomer.isActive());
        customer.setCountry(createCustomer.getCountry());
        customer.setYearlyFee(createCustomer.getYearlyFee());
        customers.put(customer.getId(), customer);
        System.out.println("Created customer " + customer);
        return customer;
    }

    @PutMapping("/customers/{id}")
    public Customer updateCustomer(@PathVariable String id, @RequestBody Customer updateCustomer) {
        Customer customer = customers.get(id);
        customer.setName(updateCustomer.getName());
        customer.setActive(updateCustomer.isActive());
        customer.setCountry(updateCustomer.getCountry());
        customer.setYearlyFee(updateCustomer.getYearlyFee());
        System.out.println("Updated customer to " + customer);
        return customer;
    }

    @DeleteMapping("/customers/{id}")
    public ResponseEntity deleteCustomer(@PathVariable String id) {
        Customer customer = customers.remove(id);
        System.out.println("Deleted customer " + customer);
        return new ResponseEntity(HttpStatus.NOT_FOUND);
    }

    @GetMapping("/customers")
    public Collection<Customer> getCustomers(@RequestParam(value = "active", required = false) Boolean active) {
        System.out.println("Getting all customers");

        Stream<Customer> customerStream = customers.values().stream();
        if (active != null) {
            customerStream = customerStream.filter(customer -> active.equals(customer.isActive()));
        }

        customerStream = customerStream.sorted(Comparator.comparing(Customer::getName));
        return customerStream.collect(Collectors.toList());
    }

}