Part 4: Repetition of Stages and Tasks
Overview
In part 4 of the CMMN introduction series we are looking into details around repeating stages and tasks.
Repetition is a great way to model repetitive work with single plan items (e.g. tasks), but also stages or listeners.
Stages With Repetition
Intro and First Example
First we are going to look into stage repetition.
The idea is to have two stages, A and B and by completing Stage A you reach Stage B (we've seen that before in this series), but this time we want to have the
option to go back to Stage A and repeat it, as many times as needed.
In other words we want to loop between Stage A and Stage B, if needed.
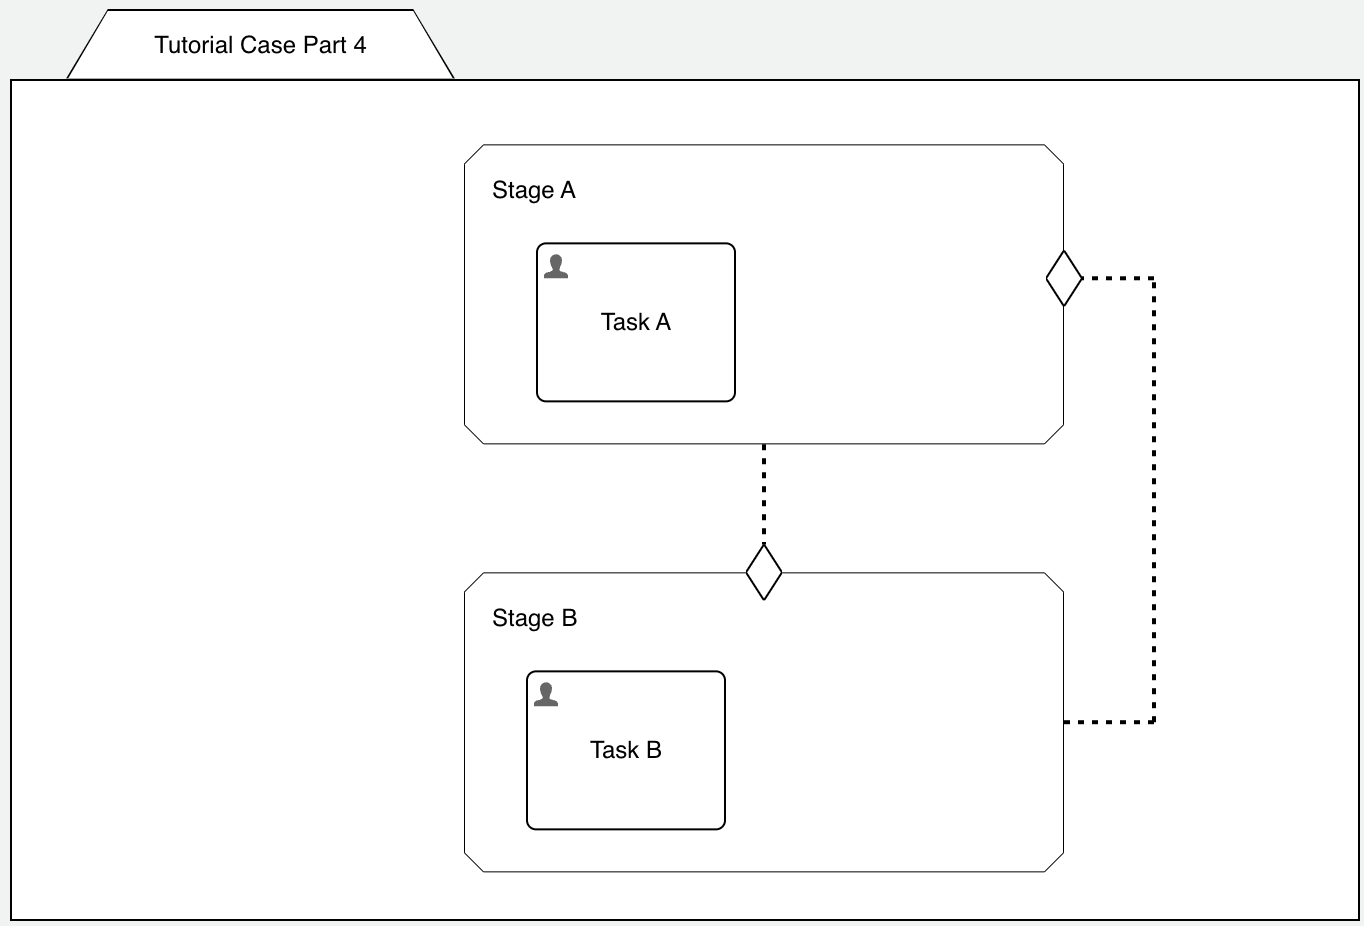
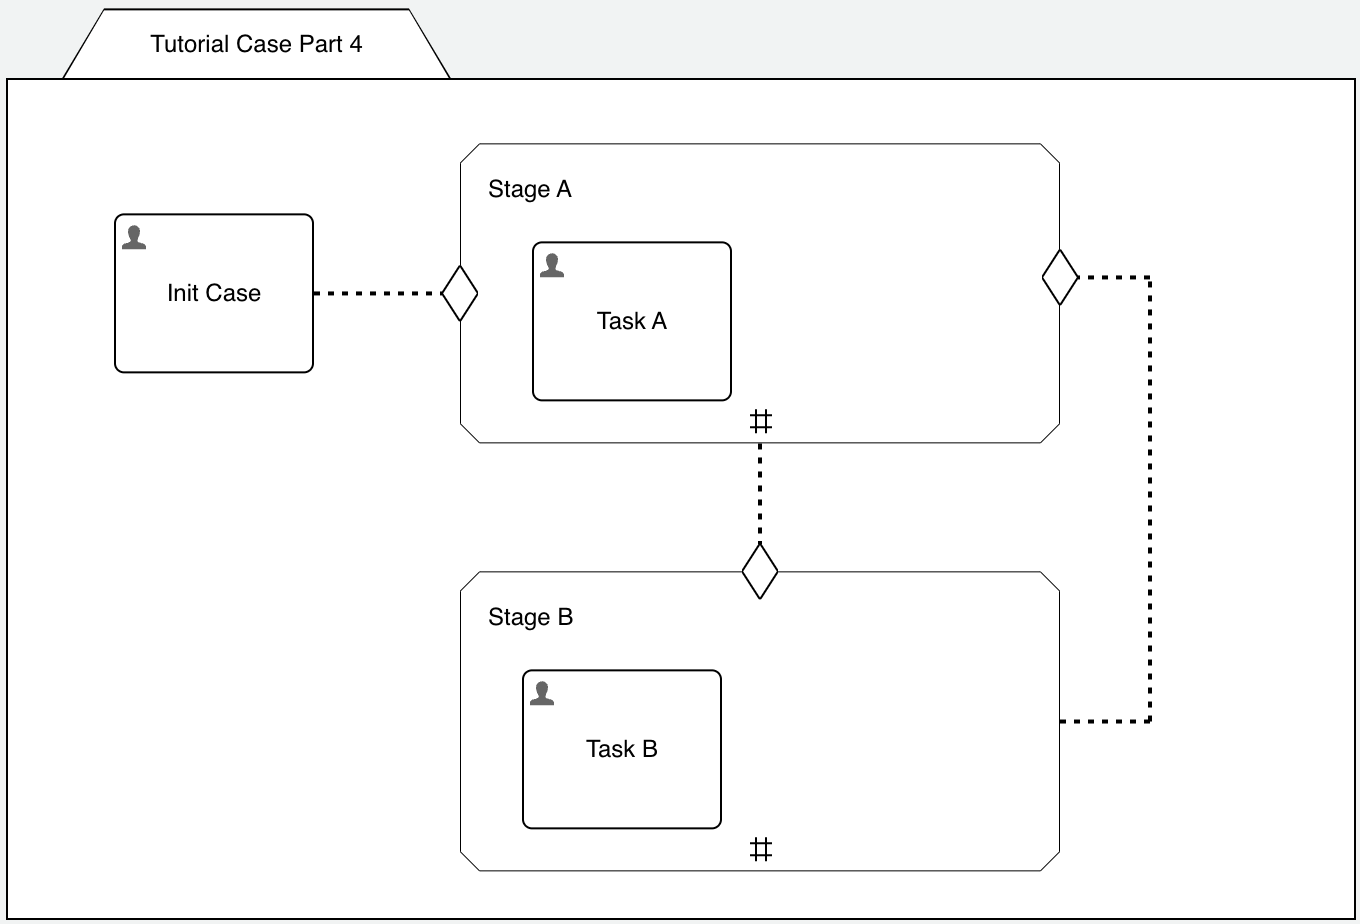
Create a new App, name it Tutorial App - Part 4 (or whatever you fancy) and start a new case model, Tutorial Case Part 4. Add two stages, Stage A and Stage B and connect Stage A through a connector and entry sentry to Stage B and vice versa.
In order to not let the stage complete immediately, add a human task in each one of the stages, like Task A in Stage A and Task B in Stage B.
You should now have something like this:
What do you expect when starting this example? Having Stage A active with Task A to be completed?
Well, almost. If you start the case based on this model, you will see the following plan item instances when you open Flowable Inspect to analyse the situation:
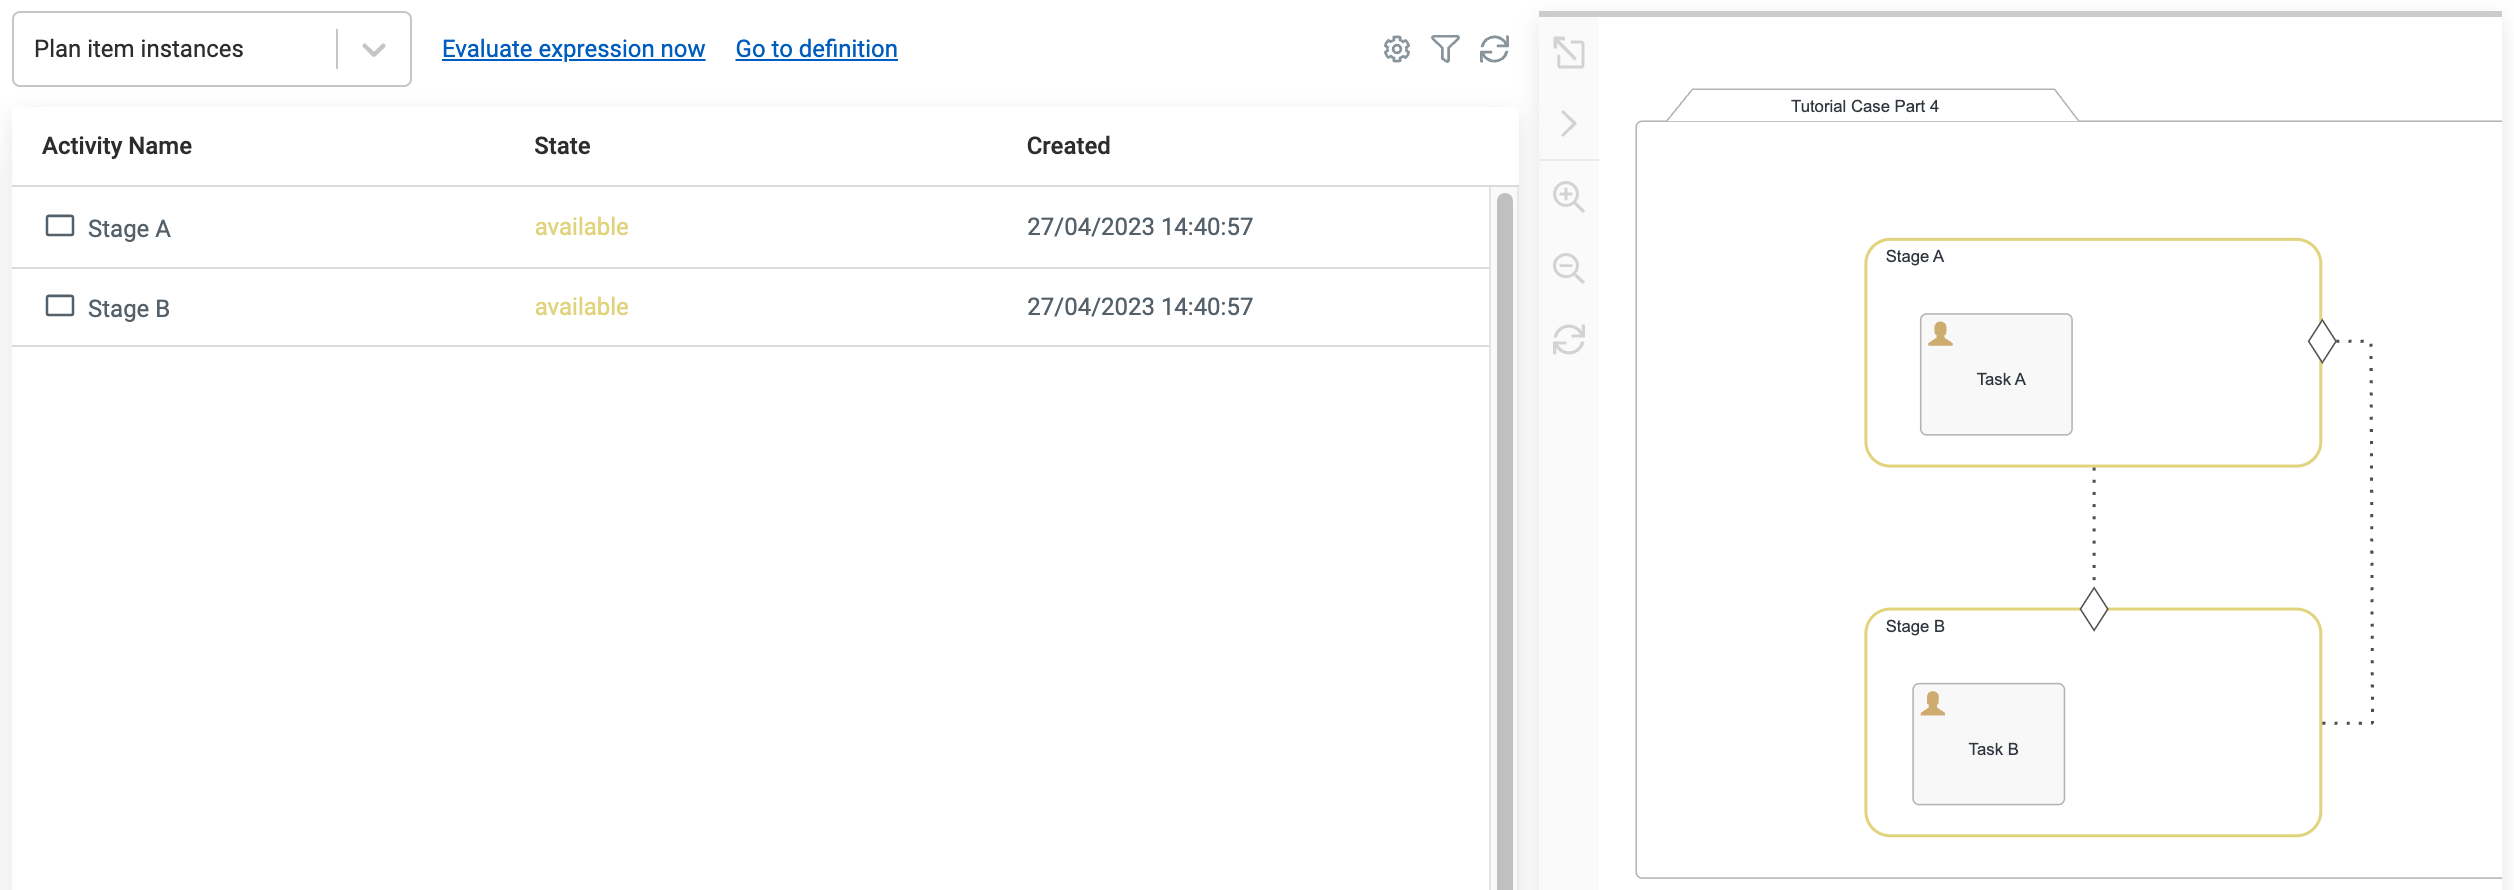
Both stages are in available state and specially Stage A has not been started. How so? Well, as we added an entry sentry from Stage B back
to Stage A, of course with the intention to be able to repeat Stage A, it did not start right away, because as soon as there is at least one
entry sentry on a plan item, it will prevent it from being started right away but waits for the entry sentry to trigger.
In other words we have created kind of a chicken-egg situation here as we can't start Stage A, but without Stage A, we can't Stage B either.
The best way to solve this would be a connector from the case plan model to the stage to tell the case engine we want to start Stage A as soon as the case
starts to overcome the chicken-egg situation. But at the time of writing this tutorial, this was not yet possible.
Another easy way is to place another plan item in from of Stage A, in a typical use case, you need to initialize some values whenever the case starts to sort
of initialize it maybe in the form of a process task or at least a variable initialization task. But out of simplicity, we just place another human task
in front of Stage, so our model looks like this:
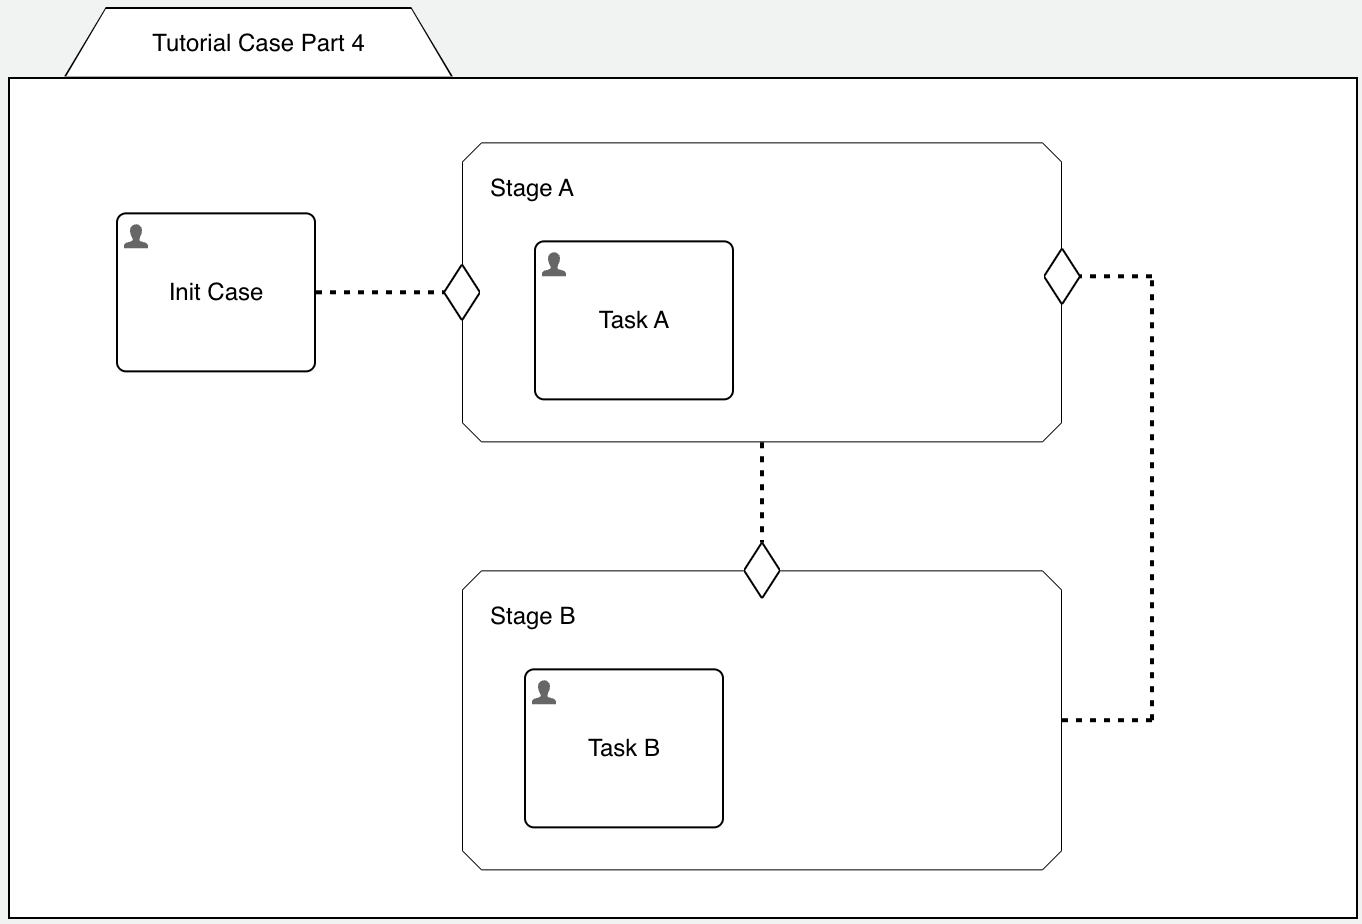
With this approach we have a well defined starting point with the initial task and if you remember form our last part, Part 3: Sentries, the two entry sentries form OR semantics, so either one can trigger and will independently start Stage A, exactly what we want.
If you start the case now, it is still not exactly what we want, right?
By completing the Init Case task, we start Stage A and hence Task A and by completing it, Stage B gets activated and along with it Task B
as well, BUT, when completing Task B, the stage and the full case is completed, why? We have a connector and sentry back to Stage A, right?
Well, yes, we do, but at the time the connector and the sentry trigger, there is no more Stage A plan item instance available as we already completed it even before Stage B started.
Adding Repetition to the Stage
The reason Stage A was not activated again was the fact, we only had one instance and completed it by completing Task A. That's where repetition
comes into play.
By activating repetition to Stage A, we tell the case engine, that there might be more than one instance of this stage as we move through the case
model.
As with everything in the Flowable case engine, repetition is no exception and offers a lot of options, so let's dive into it.
If you open the repetition property dialog for Stage A and turn on repetition, you see some more options available:
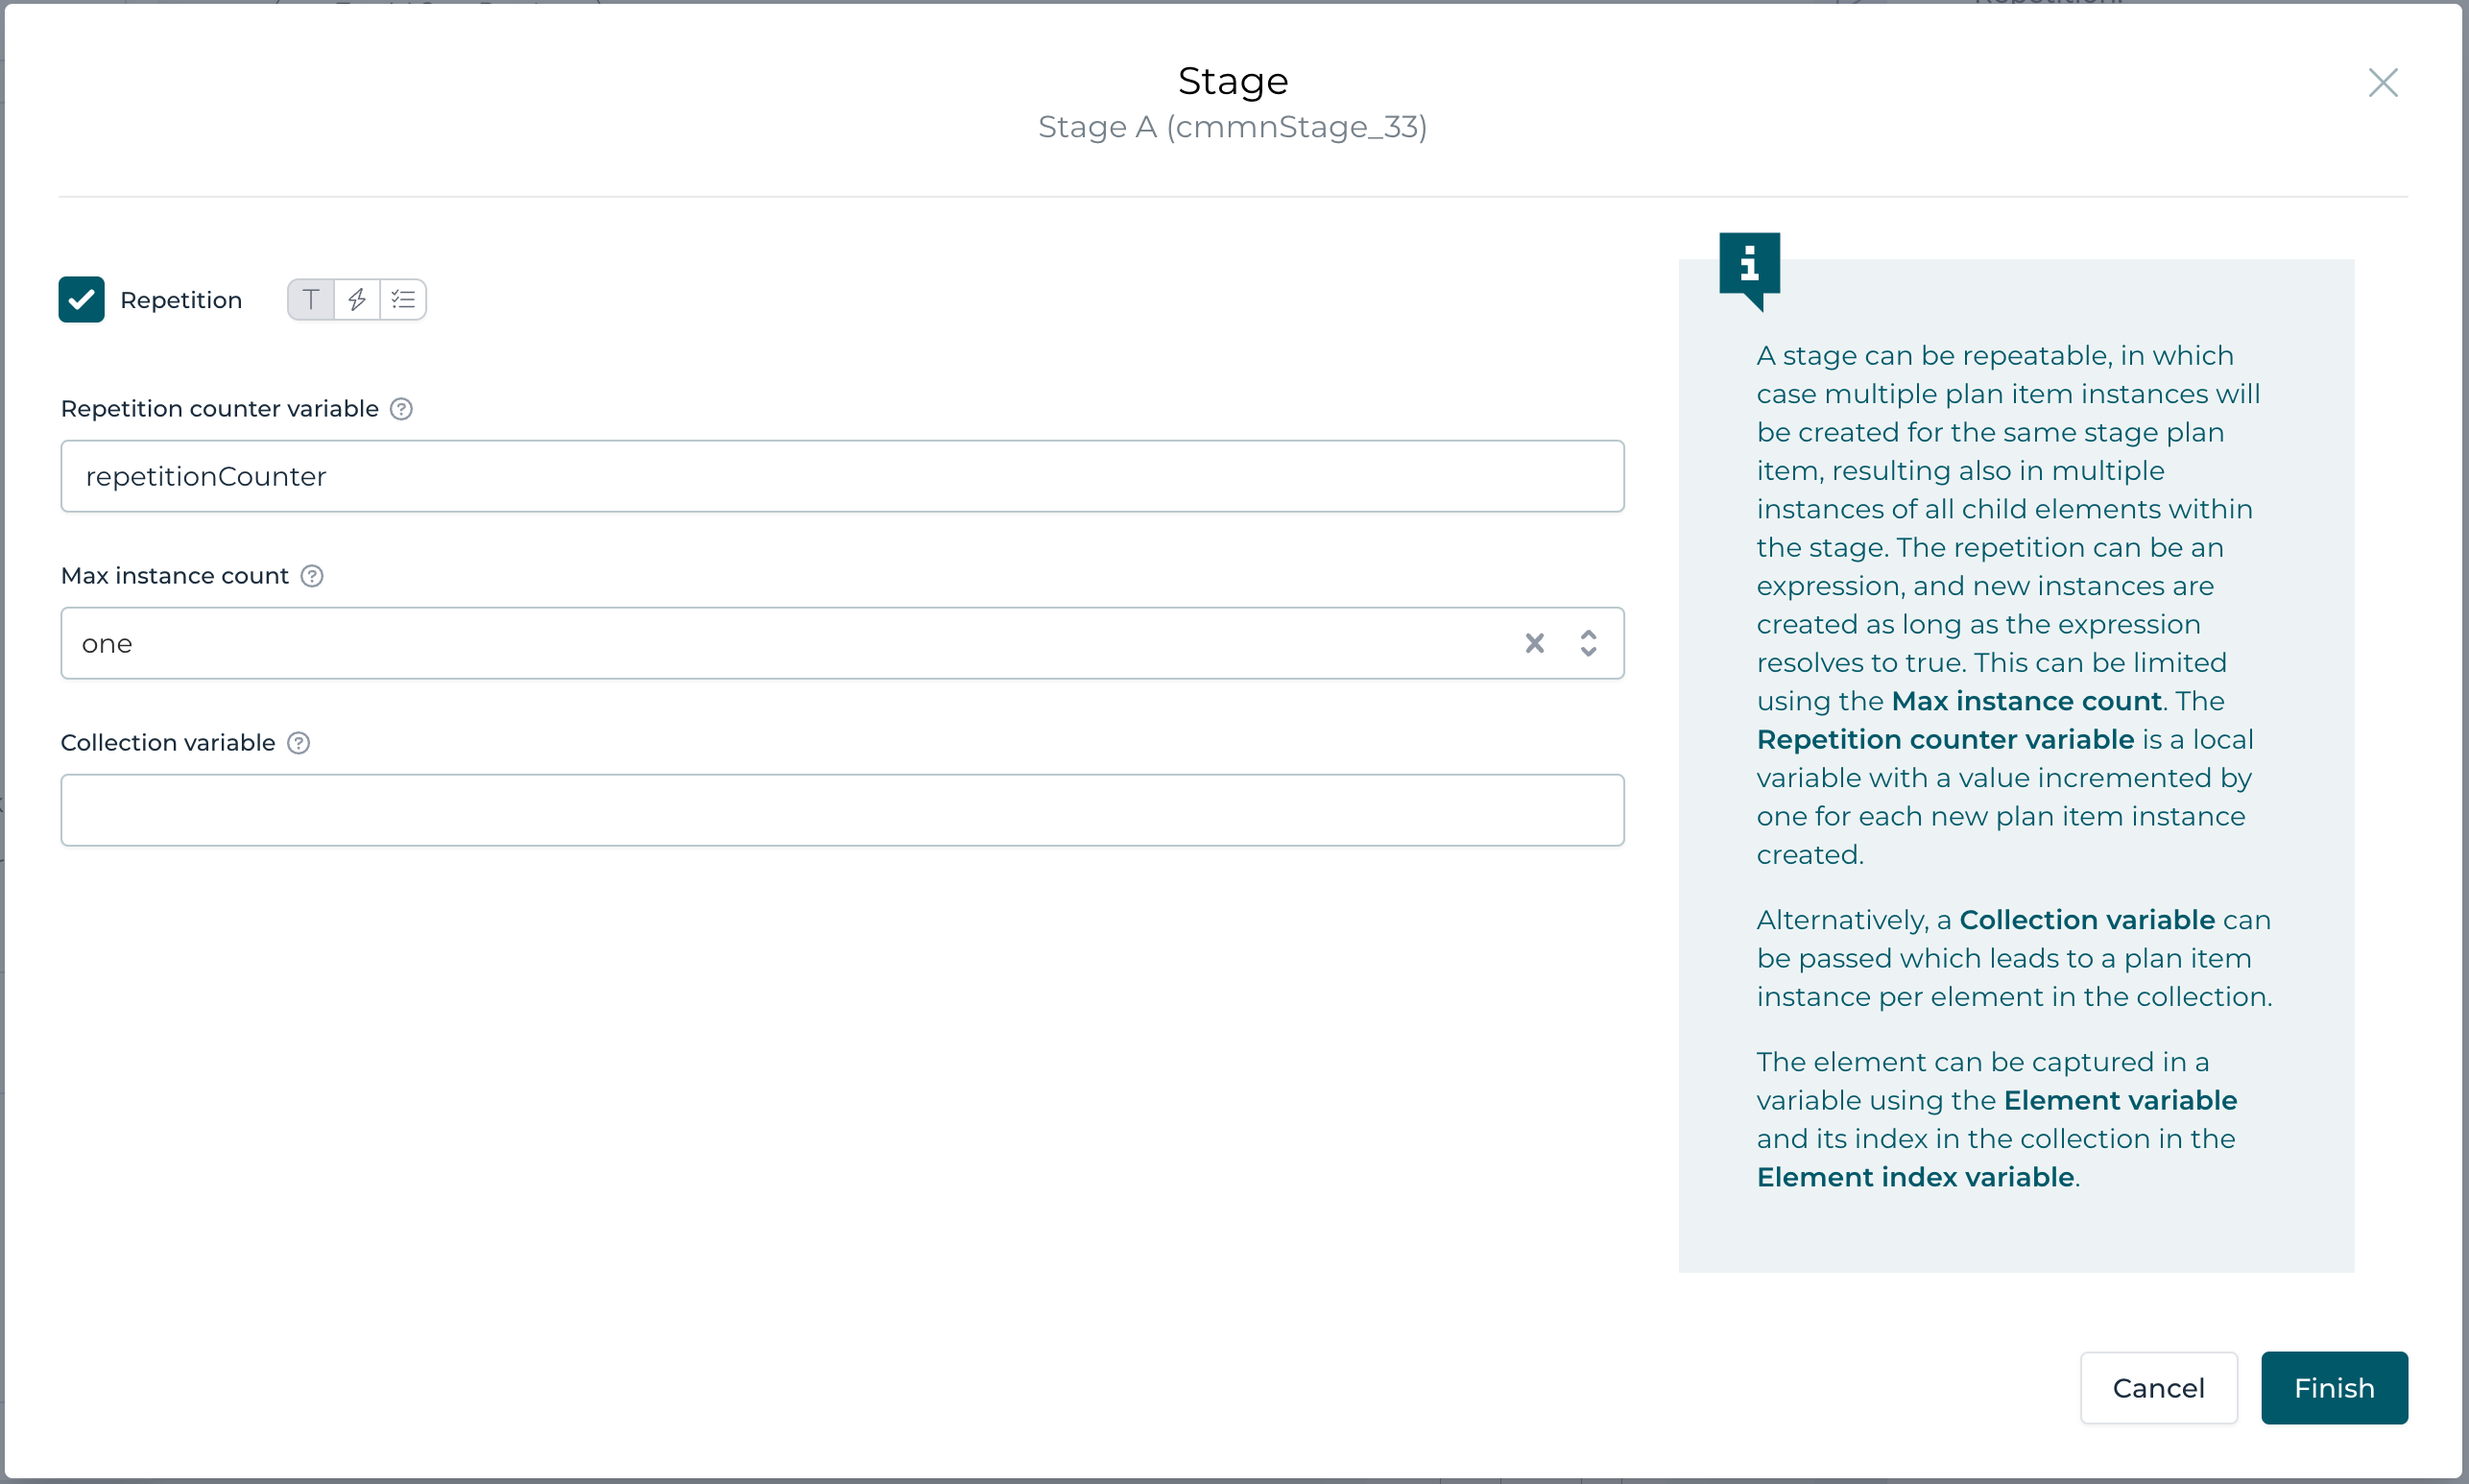
We can add a variable counting the stage instances (defaults to repetitionCounter). This might be interesting when you need that information within the stage for whatever reason (e.g. knowing that this is already the third attempt to this stage, etc).
The second option is very powerful, the max instance count, which defaults to one, but might be set to unlimited. By default it limits the number of
instances (in our case the number of instances of Stage A) to just one being active in parallel. Normally that is exactly what you need. There is no sense in
having Stage A being active more than once (and hence Task A too) at any given time. To be honest, in our scenario, even if we would put it to unlimited, there
would still only be one instance as there is a clear trigger using the entry sentry at the beginning and later the trigger from Stage B, and one entry sentry
trigger would start it only once. But of course, as we will see later in this series, there are many more options where in fact there might be more triggers
at once resulting in multiple instances of Stage A at the same time.
Just think of two initial tasks, both being connected to Stage A through a connector and entry sentry and whenever one of them is completed, we already want
to start Stage A, but not twice. This would be an example where we would need that max count property to be set to one instance only.
The collection variable is a very powerful feature and allows us to create as many instances as there are element in a collection variable. But this is a bit advanced and we are going to look into it in one of the following parts of this series.
Long story short: activate repetition for both Stage A and Stage B and leave the max instance count at its default value one:
As soon as you turn on repetition for a plan item (our stages for now), you see them tagged with the # icon.
This is is now, right? Well, not quite, but with saving and deploying, we can find out:
- starting the case and completing the initial task and Task A as well completes Stage A
- once Stage A is completed the first time, Stage B and Task B are started (as excpected)
- once Task B is completed, Stage A and Task A are started again
- and so on, forever
You can only terminate the case at some point as we created an endless loop between Stage A and Stage B.
Distinguish Between Stage Completion And Exit
As almost always there are several ways we could break that endless-loop, but we are going to look into one approach which leaves our case history in a very clean way when, at some point, we look back to see what actually happened during the full lifecycle of a case instance.
If we look at the loop to be something we need to repeat until "fixed", or Stage A being the preparation and Stage B being the review / approval, then we don't want to complete Stage B until we are satisfied with the result produced by Stage A or in other words, we keep repeating Stage A until we can complete Stage B.
And here is an option on how to do this:
- add a user event listener to exit (terminate) Stage B, if we're not satisfied and repeat Stage A
- if we complete Task B and thus Stage B as well, we're done and can also finish the case
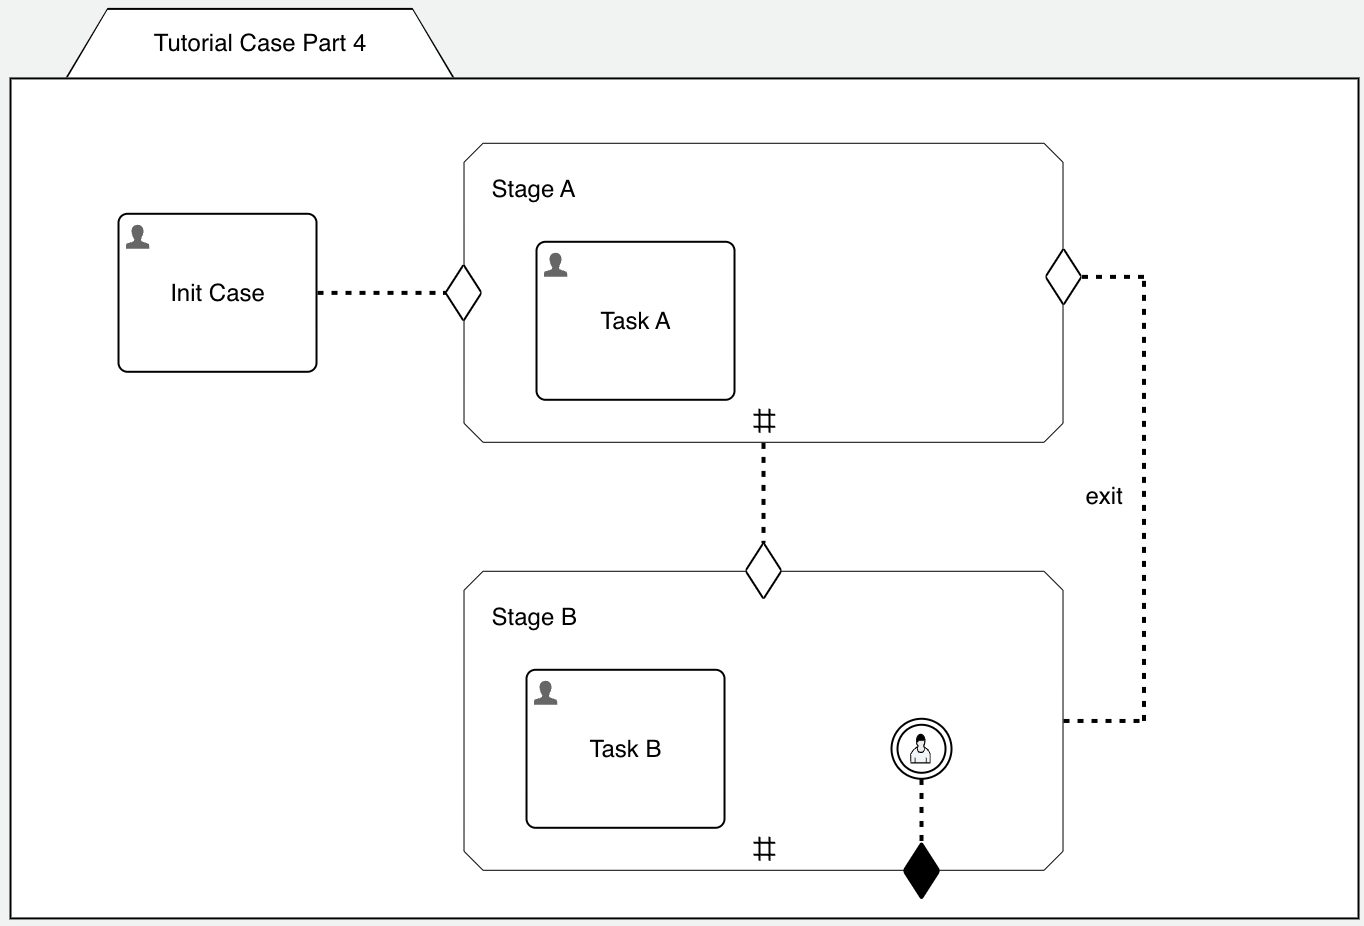
As we have learned in the last part, add a new user event listener to Stage B, name it Repeat Stage A and connect it to an exit sentry attached to the boundary of Stage B. Make sure to set the impact on parent completion to ignore in the advanced property tab of the user event listener as otherwise we could not complete Stage B. We don't want the user event listener to interfere when it comes to stage completion as it is a help for us to move back to Stage A only.
But how can we ensure that the connector and entry sentry back to Stage A only triggers when we exit Stage B? Well, that's easy, just select the connector
going back to Stage A and change its event from complete to exit. This will ensure that this connector and its entry sentry only trigger on the
exit event (when we trigger the user event listener and hence terminate the stage).
On a regular stage complete (by completing Task B) the stage and the case will complete and if we need to first go back to Stage A, we trigger the user listener
and exit the stage and go back to Stage A.
It is a good practice to display the name of the event listened to on a connector if it is another one than the default (every other than complete or
occur). As we are listening to the exit event, turn on the display name in diagram property on the connector.
As soon as you have a lot of connectors, only labeling the once not listening to the default event makes the whole case model way more readable as there are
less labels around and you know that no label means default event.
The case model should now look like this:
If we run the case now again, we can loop back to Stage A as many times as we want by triggering the Repeat Stage A button (and hence the user event listener) when in Stage B or complete Task B which then completes both the Stage B and case.
Use Condition to Distinguish Between Complete And Loop Back
In the last chapter we have used a user event listener with an exit sentry to distinguish between stage completion or stage termination and how to continue afterwards with either looping back to Stage A or completing the case.
In this chapter we are going to look into another way to reach the same goal; by making a decision in Task B (in Stage B) whether we consider the stage / case to be completable or if we want to loop back to Stage A. This might be the better way when we look at the "flow" of work coming from having completed Task A (or most likely another case worker) and being on Task B and to see that we need to repeat Task A again.
Duplicate the case model if you want to keep the first variation intact and then modify it in the following way:
- remove the user event listener and its connector and exit sentry on Stage B
- change the event from exit back to complete on the connector from Stage B back to the entry sentry on Stage A
Now we need to create and attach a task form to Task B, so we can make the decision whether to loop back to Stage A or complete the stage and case.
Select Task B, click on the Form reference property, enter a new name for the form (like Tutorial 4 Task B Form), click Create, select the
Open for editing on finish checkbox and then hit Finish.
Imagine the form would contain a lot of information or additional data to enter, but is depending on what was done in Stage A / Task A previously. So whether
you can complete that task and the stage heavily depends whether Task A was done properly or not.
Out of simplicity, we leave the form empty, but we add outcomes to it for making that decision.
Open the Outcomes property of the form and enter the following options:
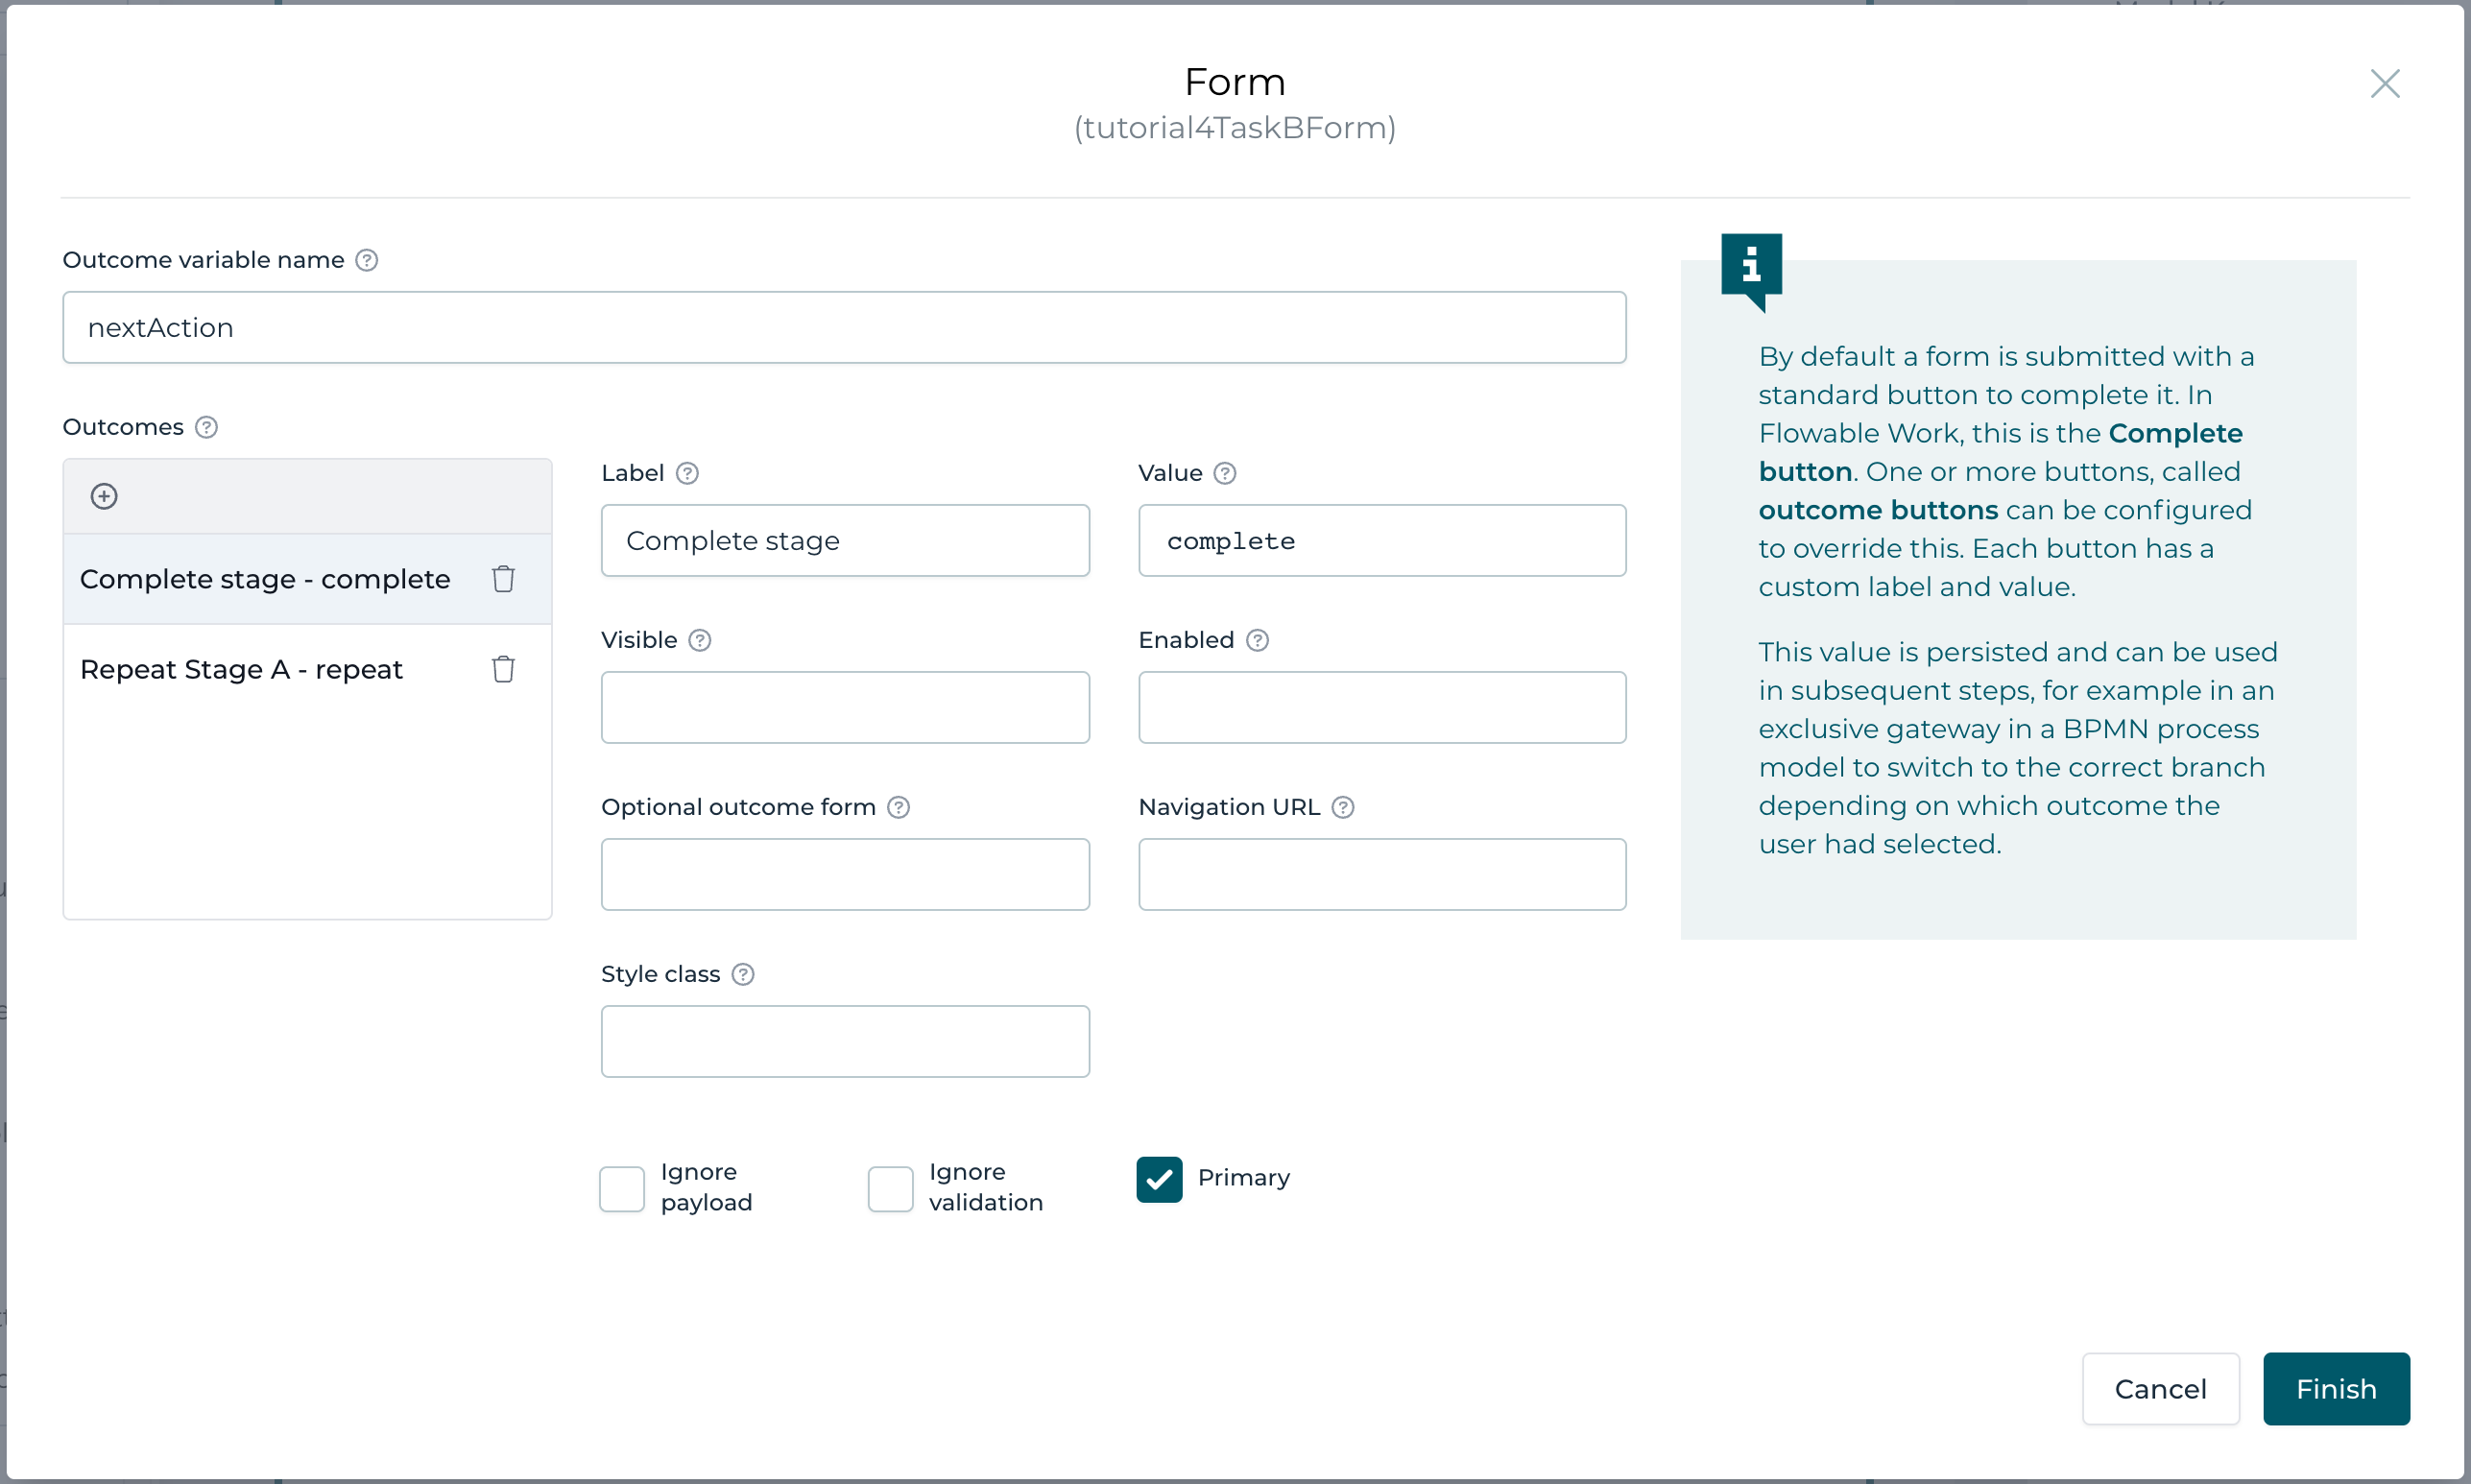
First we can give the outcome a name which results in a variable stored in our case with the value of the chosen outcome (button). We name it nextAction for now. Furthermore, we add all the options we have for the outcome:
- Complete stage with value complete, making this one the primary (check the Primary option)
- Repeat Stage A with value repeat, making this a less prominent option by unchecking the Primary option and by checking the ignore validation option, we don't validate the rest of the form as we are going to repeat Stage A anyway and later on end up on this task again
Saving the form and going back to the case model, select the entry sentry with the connector from Stage B (the one looping back from Stage B) and open
the condition property.
If you open the condition builder (top right button of the condition input field), you can easily define the condition by selecting our outcome variable
(nextAction), choose Equals as the operator and then select our desired outcome option (Repeat Stage A):
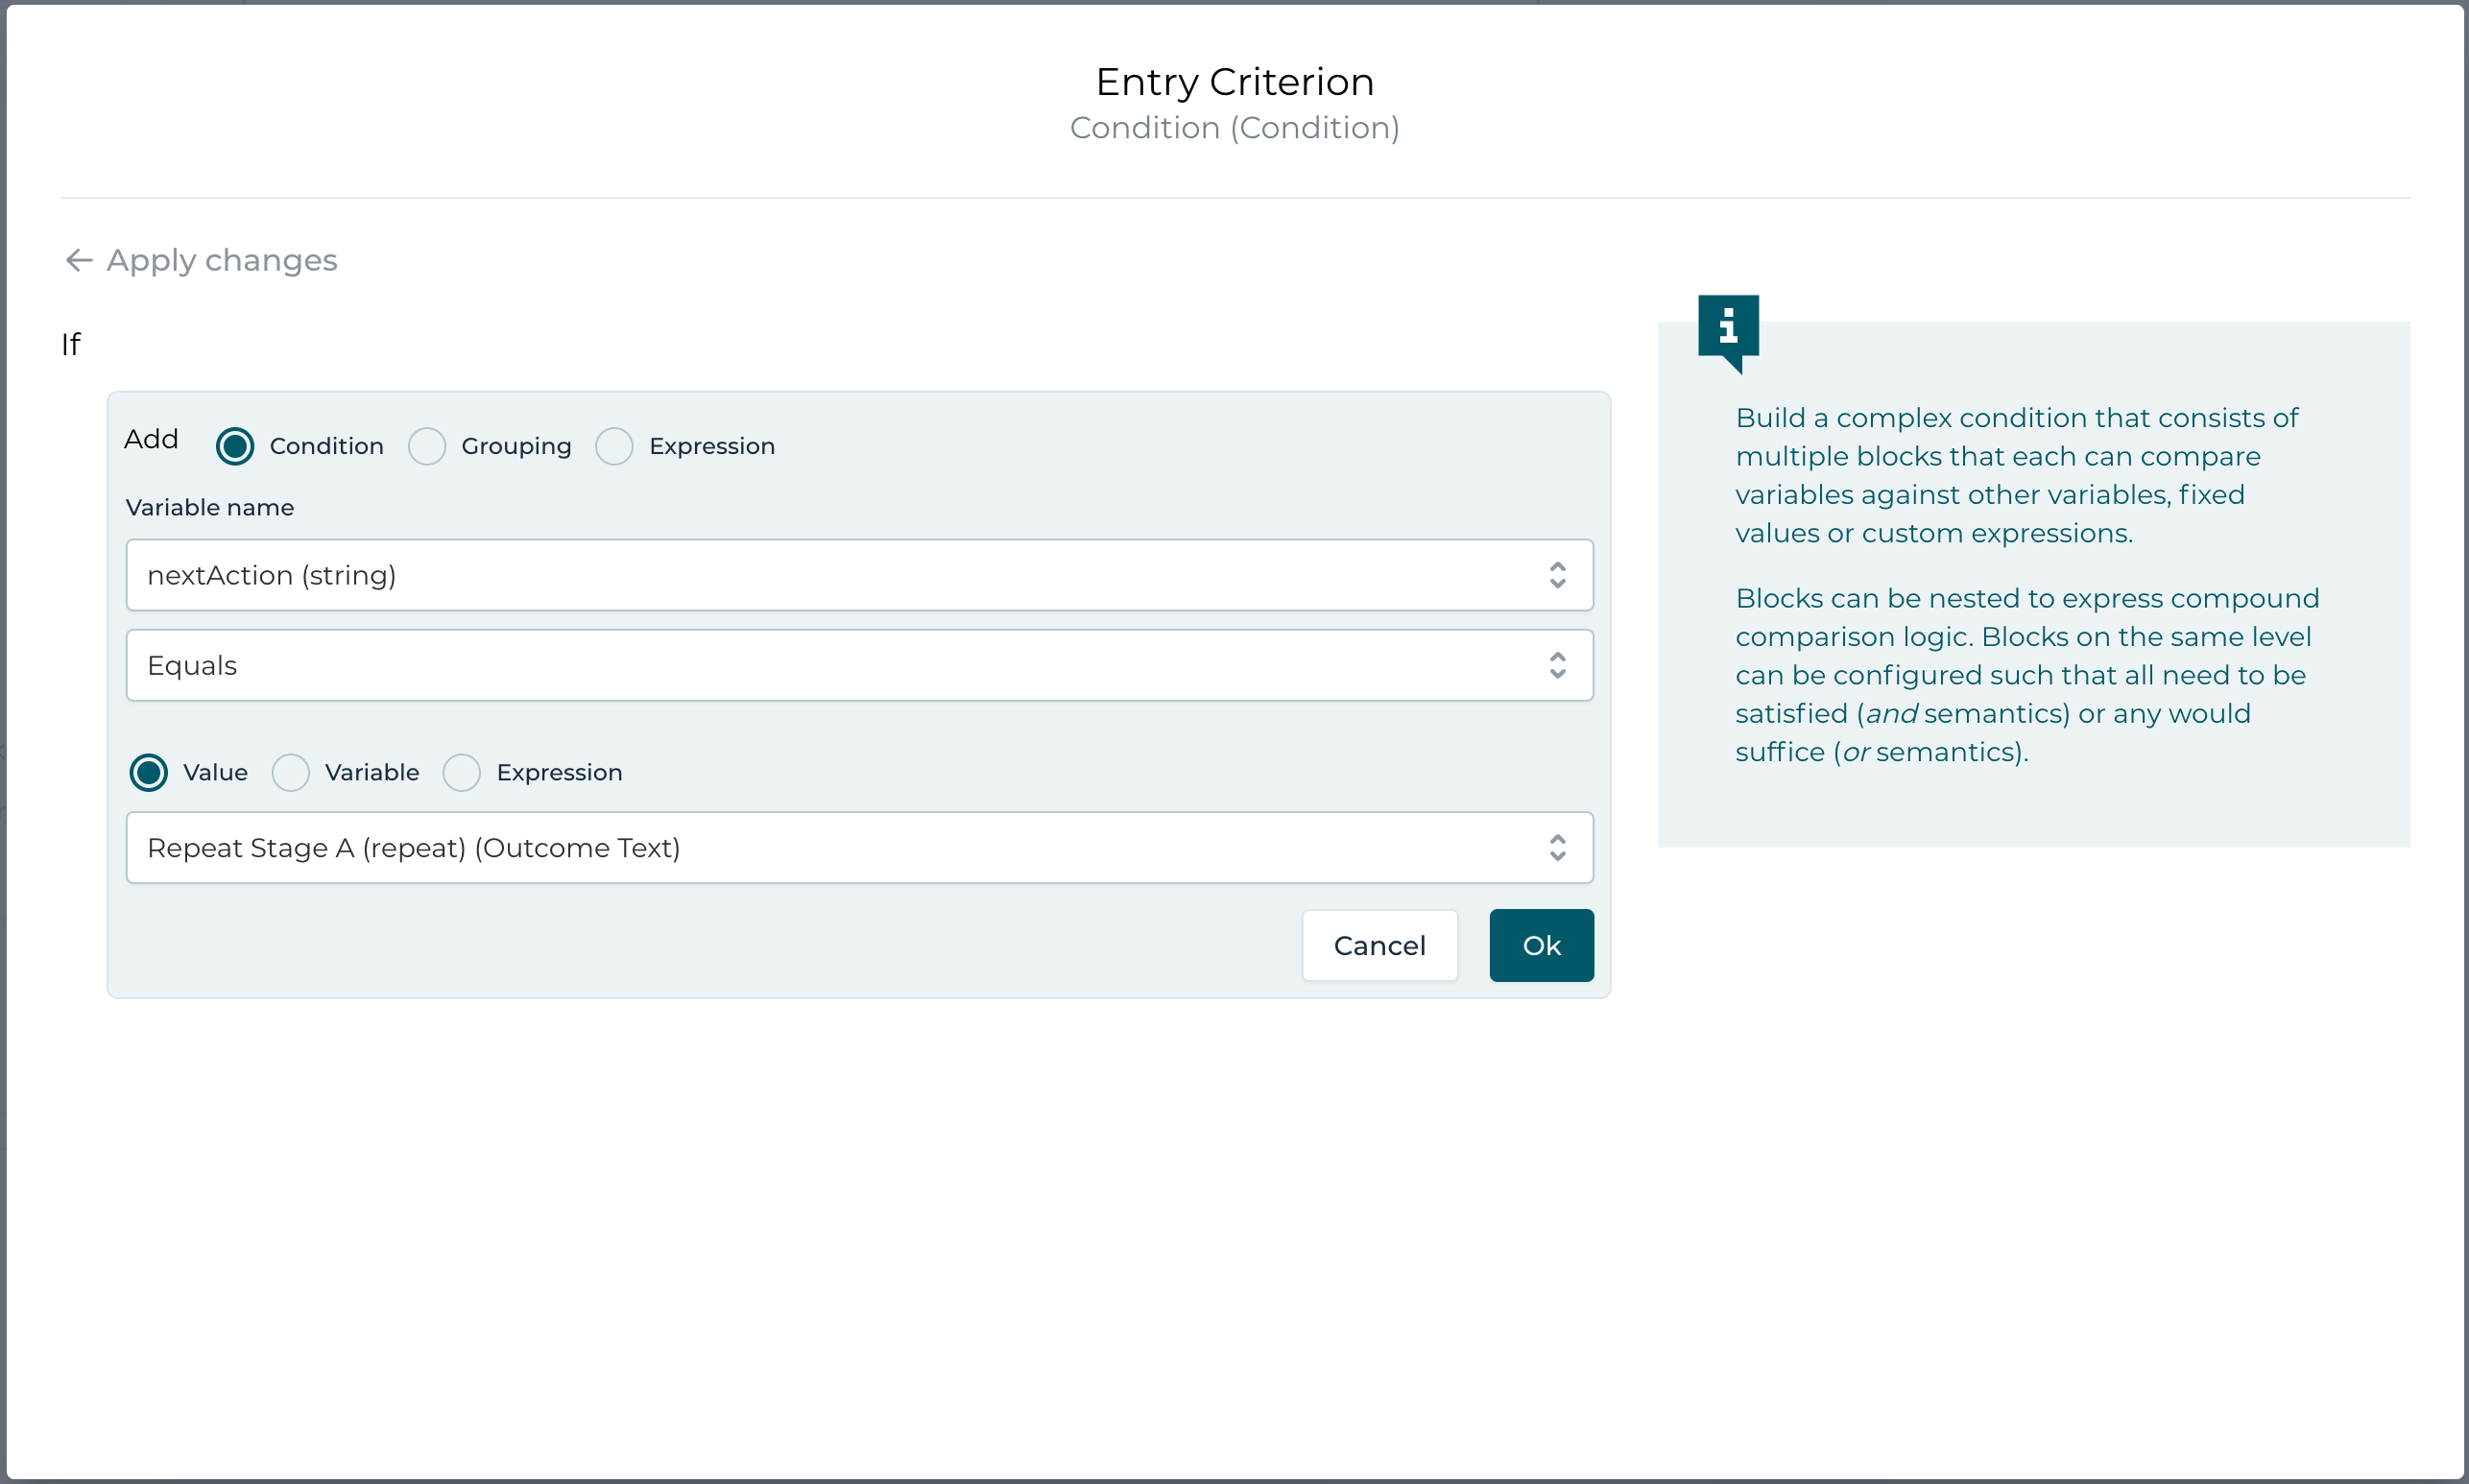
Also make sure to set the trigger mode on the entry sentry to on event! If you remember what we have learned about sentries in a previous part of this series, we need to make sure that the condition is evaluated exactly when the connector triggers it (on event), because otherwise the sentry will have "memory" and once we have chosen repeat as the option, which makes the condition evaluating to true, it will be memorized (as being true), so next time should you choose complete, it would still trigger as it was true in the past already.
Repetition On Tasks
As we have seen with stages, repetition is a great way to have one particular part of a case model (e.g. a stage) being repeated as many times as needed.
Of course this works for other plan items like human tasks too.
Create a new case model, named Tutorial Case Part 4c, add a stage to it with two human tasks, Task A and Task B.
Turn on repetition for both of them and connect them through a connector and an entry sentry. Additionally turn on manual activation for Task A.

How is this model supposed to work?
- we can start Task A manually at any time (manual activation) and because of repetition, we can start it as many times as we want
- whenever we complete Task A, the entry sentry of Task B is triggered and as we don't have a condition set, it will start Task B
- Task B has repetition as well, so we can start Task B as many times as we complete Task A (not just once)
If you run this example, there is something interesting:
- completing Task A the first time starts Task B as expected
- if we complete Task B and then the next Task A, another, new Task B is started
- if we complete the next Task A BEFORE we complete Task B, there is NO new Task B started (as there can only be one active instance at any given time)
This is the default behavior, only one active instance can exist at any given time, hence we only see one Task B active, even if we complete Task A multiple times (without completing Task B in between).
If the desired behavior is to start Task B for EVERY Task A, we can of course change the default behavior. Select Task B, open the repetition property panel and choose unlimited for the max instance count property. This will always start a new instance of Task B whenever we complete Task A, no matter if there is still an active instance of it at that moment.
Summary
We have learned the basics about repetition and how some details like max instance count have an impact on repetition.
Keep in mind that whenever you need a plan item (e.g. a stage or a task) to be active again after it was completed, it only works, if there is repetition turned on.
What we will learn in another part of this series is how to combine repetition and conditions, which might be a bit tricky in certain situations and how we can use repetition based on a collection of data to process it in some way.