Part 3: Sentries
Overview
In this third part of the CMMN Modeling Series, we are going to have a closer look into a very important concept in CMMN: Sentries.
Sentries have an impact on the lifecycle of plan items (we had a closer look into the lifecycle of plan items in
Part 2: Tasks and Plan Items).
There are entry sentries, controlling the start of a plan item and exit sentries, controlling the termination of plan items.
Entry Sentry
An entry sentry can be attached to any plan item and acts kind of like a "guard" for the plan items activation (start). If you look at the lifecycle diagram of a plan item (like we have explained in part 2 of this series), it becomes clear that when a plan item has an entry sentry, it will not be activated directly, when created, but goes into available state and waits for the entry sentry to be satisfied, which is the case, once the sentry is triggered and it either has no condition or that condition is evaluating to true.
Entry Sentry Without Condition
A lot to take in, so let's look at it with an example.
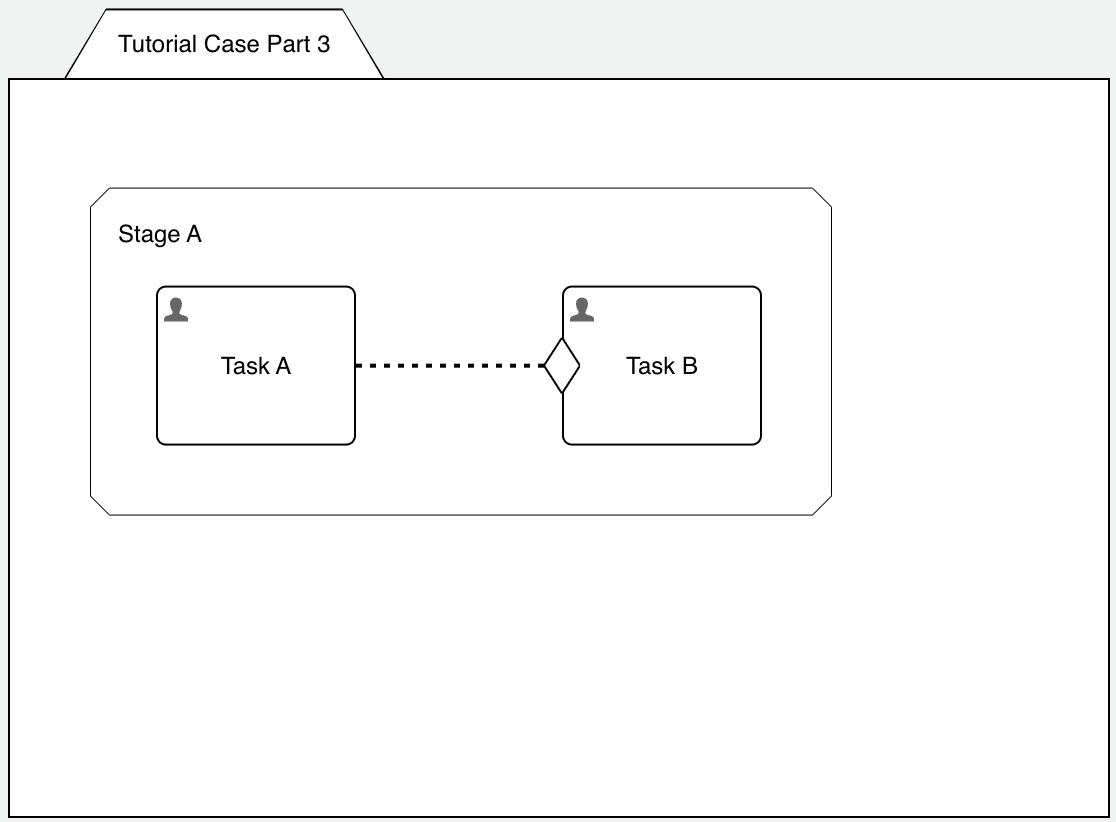
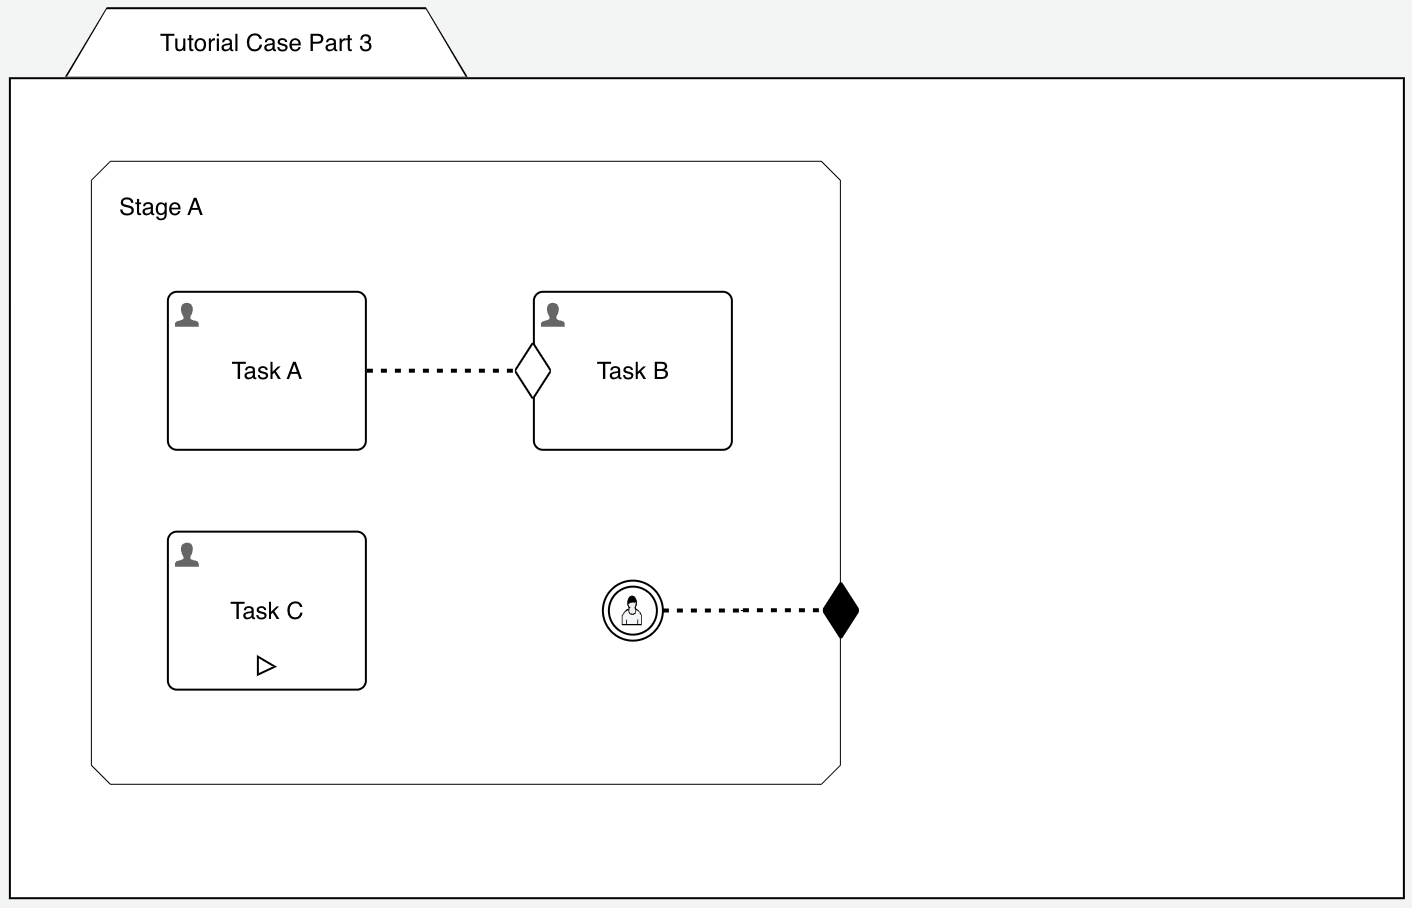
We can get started with the same example as in the last part, where we had a stage named Stage A containing two human tasks, named Task A and Task B.
Remove the manual activation and repetition from Task B, so we have two default, regular human tasks.
Now connect them together using an entry sentry (easiest way is by selecting Task A and then dragging an entry sentry - white diamond - to the
boundary of Task B).
The case model should now look something similar like this:
First select the connector (dotted line) and we can see some interesting information and options there:
- Standard event: this is the most important property as it defines what the connector is reacting for / listening to. Unless using with an event listener, the standard event is complete and in our case, the connector will trigger the connected element once its source (Task A) is completed.
- Display name in diagram: as a good practice, turn it off for all standard events like complete or occur and turn it on for everything else, this helps with the readability as only the non-standard events are being labeled.
In our example, listening to the complete event is exactly what we want as once Task A is completed, it will trigger our entry sentry for Task B and activate it.
Now let's select the entry sentry as well and have a look at the various properties:
- Trigger mode: you have two options here Event deferred or On event. Let's start with the easier one: on event, whenever the connector triggers, the condition of the sentry is evaluated (if there is any) and if evaluating to true, the sentry is satisfied and will activate the plan item. If there is no connector, the sentry is evaluated whenever its parent (e.g. stage) is activated. If you use a condition with on event, make sure it is ok that the condition is evaluated exactly when the sentry triggers and if NOT evaluating to true at that very moment, the sentry will never be satisfied! If this is not the desired behavior, you might want to use event deferred as it will give the sentry a "memory" and it will memorize whenever it was triggered and even if the condition is not (yet) evaluating to true, it waits until it does and will activate the plan item later. Or if the condition is already evaluating to true, but the connector did not yet trigger, this is memorized as well so at the time the connector triggers, the plan item is activated, even if the condition is no longer true at that time!
- Condition: an optional expression to be evaluated whenever the connector triggers (on event) or at any evaluation of the case model and memorized for event deferred trigger mode.
In our simple example, we don't need a condition and hence the trigger mode does not matter and can be set to on event which is a bit more optimized as it does not need any memory.
To recap: we have connected Task A and Task B through a connector and an entry sentry without condition, listening to the complete event on its source, Task A, and then triggering (activating) Task B, it's target.
As mentioned and seen before, you can use Flowable Inspect with the Plan item instances view to see the lifecycle state of the plan item instances and
if you start this example, you first see Task A being in active state and Task B - as expected - in available state.
Once you complete Task A, the connector / sentry triggers and as we don't have a condition, Task B is started and now must be completed for the stage
to complete.
Entry Sentry With Condition
As we have seen before, we can make use of an entry sentry to activate a particular task (or any plan item for that matter) once the source has been completed. This way we can sort of define a particular sequence in which tasks (plan items) are activated and completed / executed.
In this chapter, we want to drive it a bit further and experiment with conditions on entry sentries.
As seen and explained earlier, we can add a condition to an entry sentry and choose the trigger mode to tell the engine how to handle the condition.
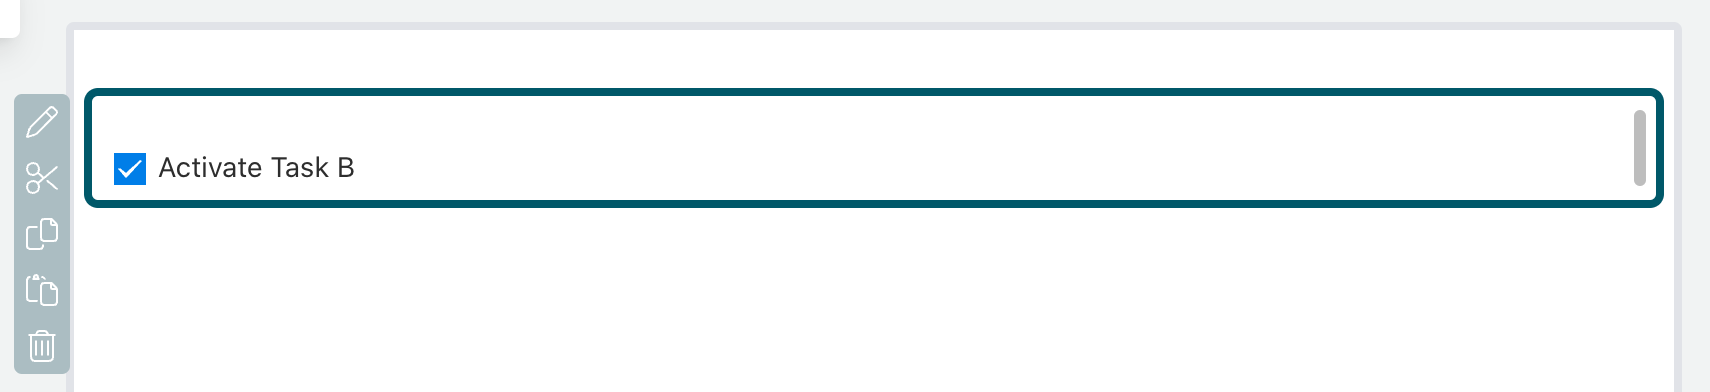
In order to easily experiment with conditions, we add a form to Task A to select whether we want to activate Task B or not.
Select Task A and click the Form reference property. In the dialog, enter a name for the new form, like Tutorial Part 3 Conditional Form, then click the Create and Finish button, but make sure to activate the option open for editing so the form editor opens automatically after creating the new form.
You should now be in the form editor, where we can add a checkbox and name it Activate Task B (or something similar).
Save all models, redeploy and test the case again and you will see that when starting it, the form is shown, where you can choose to either activate Task B or not.
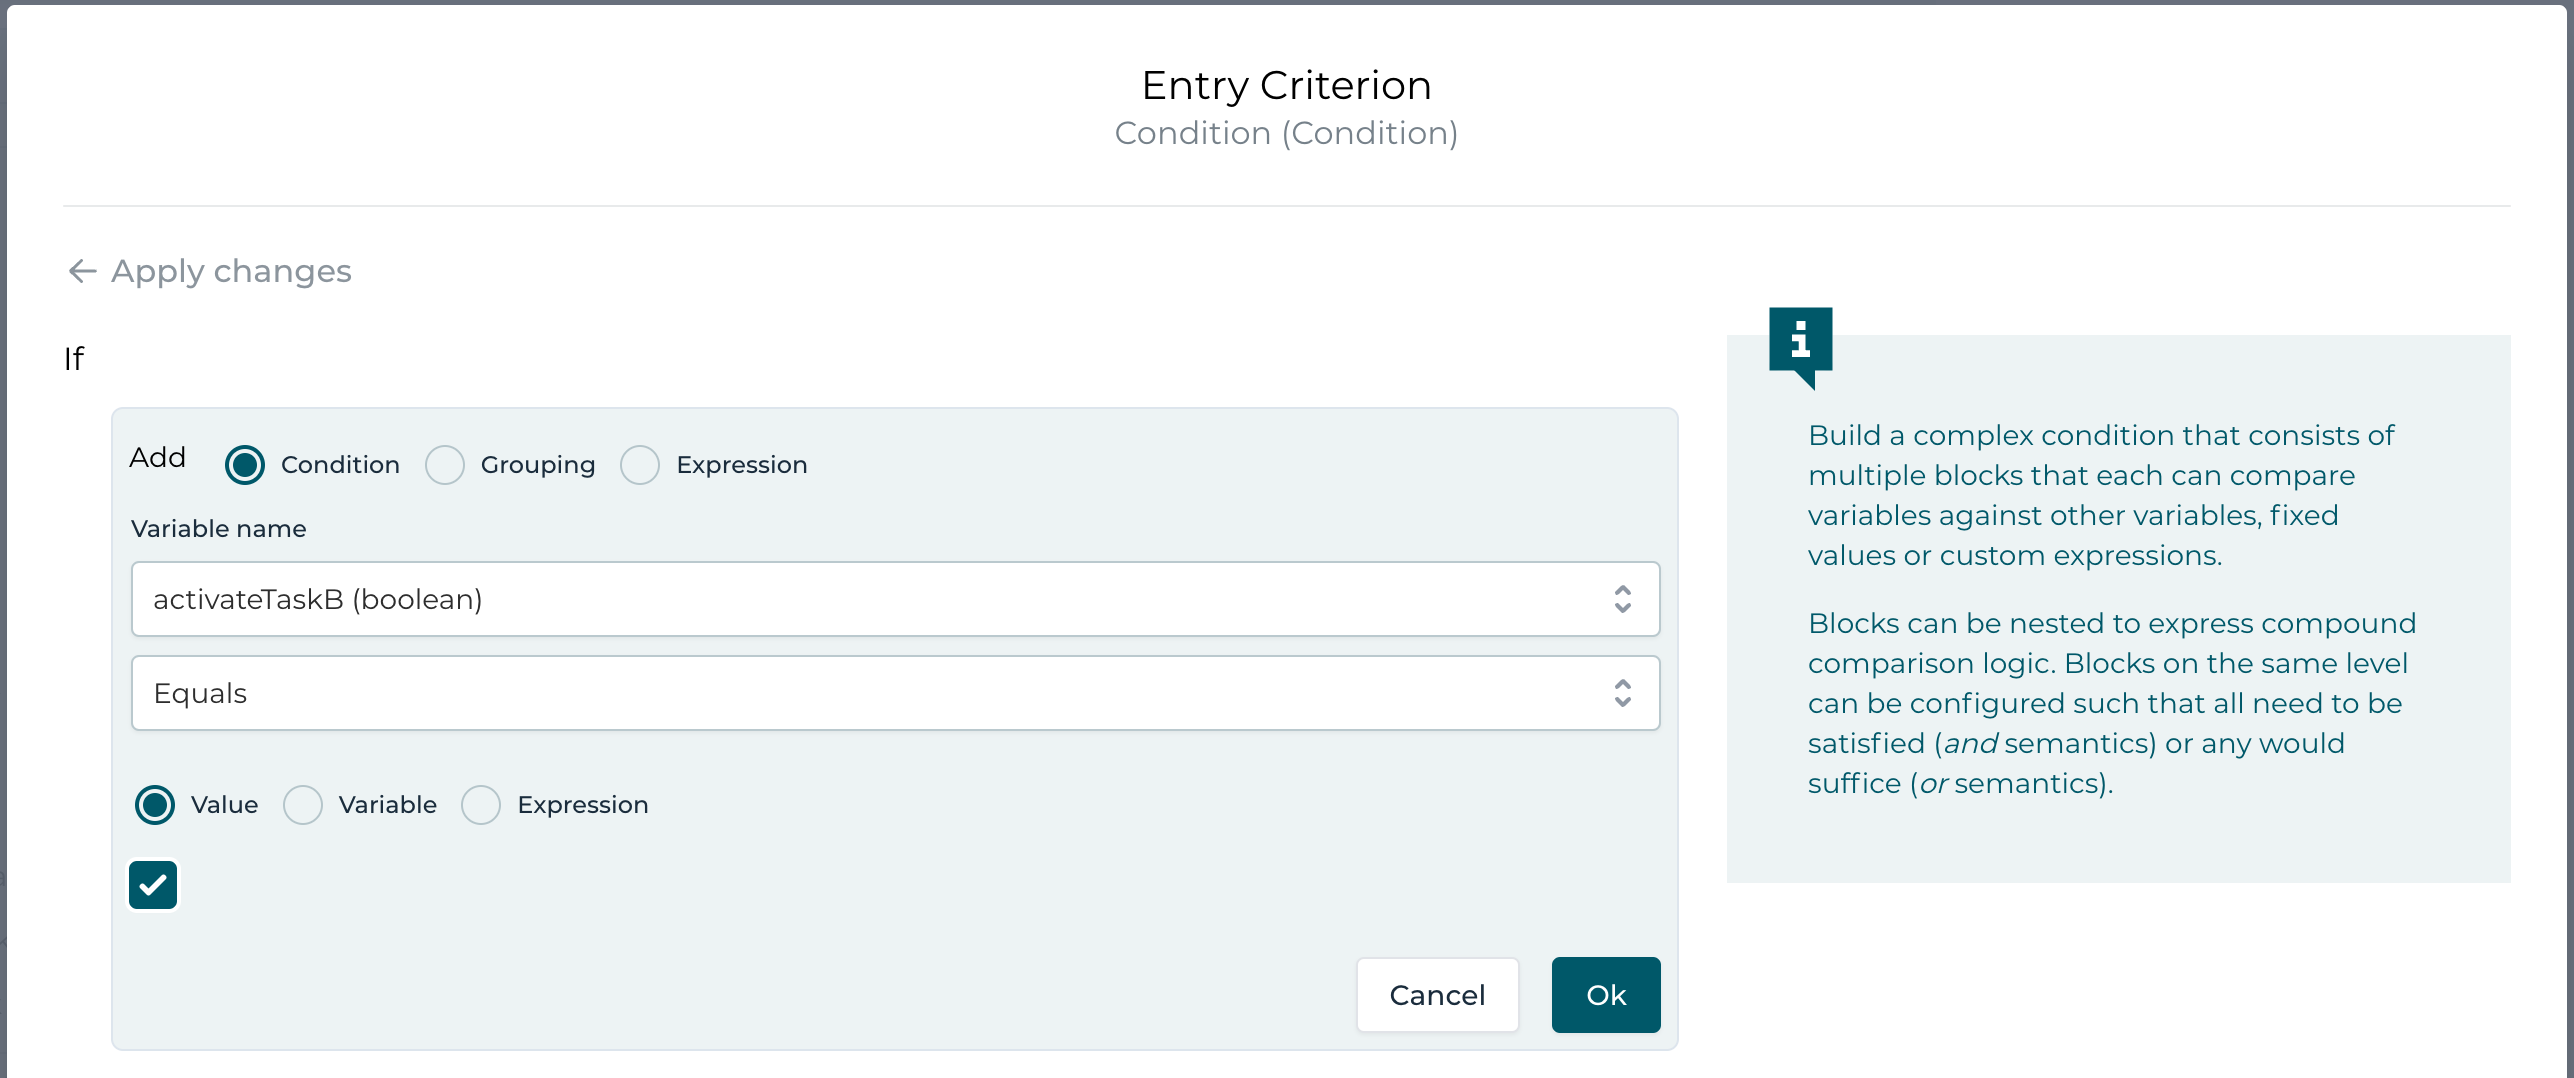
But of course we did not yet set that condition on the entry sentry, so go back to the case model, select the entry sentry and open the Condition property
dialog. There are two ways to enter that condition, either directly in the field by typing in the condition as an expression or by using the
condition builder allowing us to easily setup the condition without having to know the expression language. The condition builder can be reached by clicking
the top-right button.
You should now be able to choose the variable you used in the form (e.g. "activateTaskB"), select the operator equals and select the checkbox.
The condition builder should show something like this now:
Also make sure you have chosen on event as the trigger mode on the entry sentry (same property dialog as the condition).
If you test the app now, you can choose to either activate Task B or not and if you do, it will start Task B, once you have completed Task A, so you don't see
them both the same time in the open tasks section of the case, which is expected of course.
If you choose to NOT activate Task B and complete Task A, the case gets stuck as the stage will never complete, there is no way to activate Task B, if you
chose not to activate it when starting the case.
The only way is to terminate the case to finish it.
If you open Flowable Inspect and choose the Plan item instances view on the case, you can see that Stage A is still in active state and Task B is available as it has an entry sentry, which will never trigger as its condition evaluated to false.
We have seen before that we can get stuck with sentries having conditions. As we have seen in Part 2: Tasks and Plan Items, there are several ways on how to fix this:
- set Stage A to autocomplete
- set the impact on parent completion of Task B to ignore if available
Both options work in our simple example, but maybe the stage has more complex stuff and we don't want to set it to autocomplete, so I'd prefer the second option to define the behavior of Task B concerning the stage completion. Basically, we are telling the case engine to ignore Task B, should we have chosen to not activate it when Task A completes.
Entry Sentry With Condition and Memory
We have seen some basics for entry sentries, connectors and even conditions, but of course there is way more to it.
So far we have a case model with Stage A having two tasks, Task A and Task B, connected through a connector with an entry sentry having
a condition to start Task B.
We have chosen the trigger mode on the entry sentry to be on event as whenever Task A completes, we know at that moment, whether to start
Task B or not.
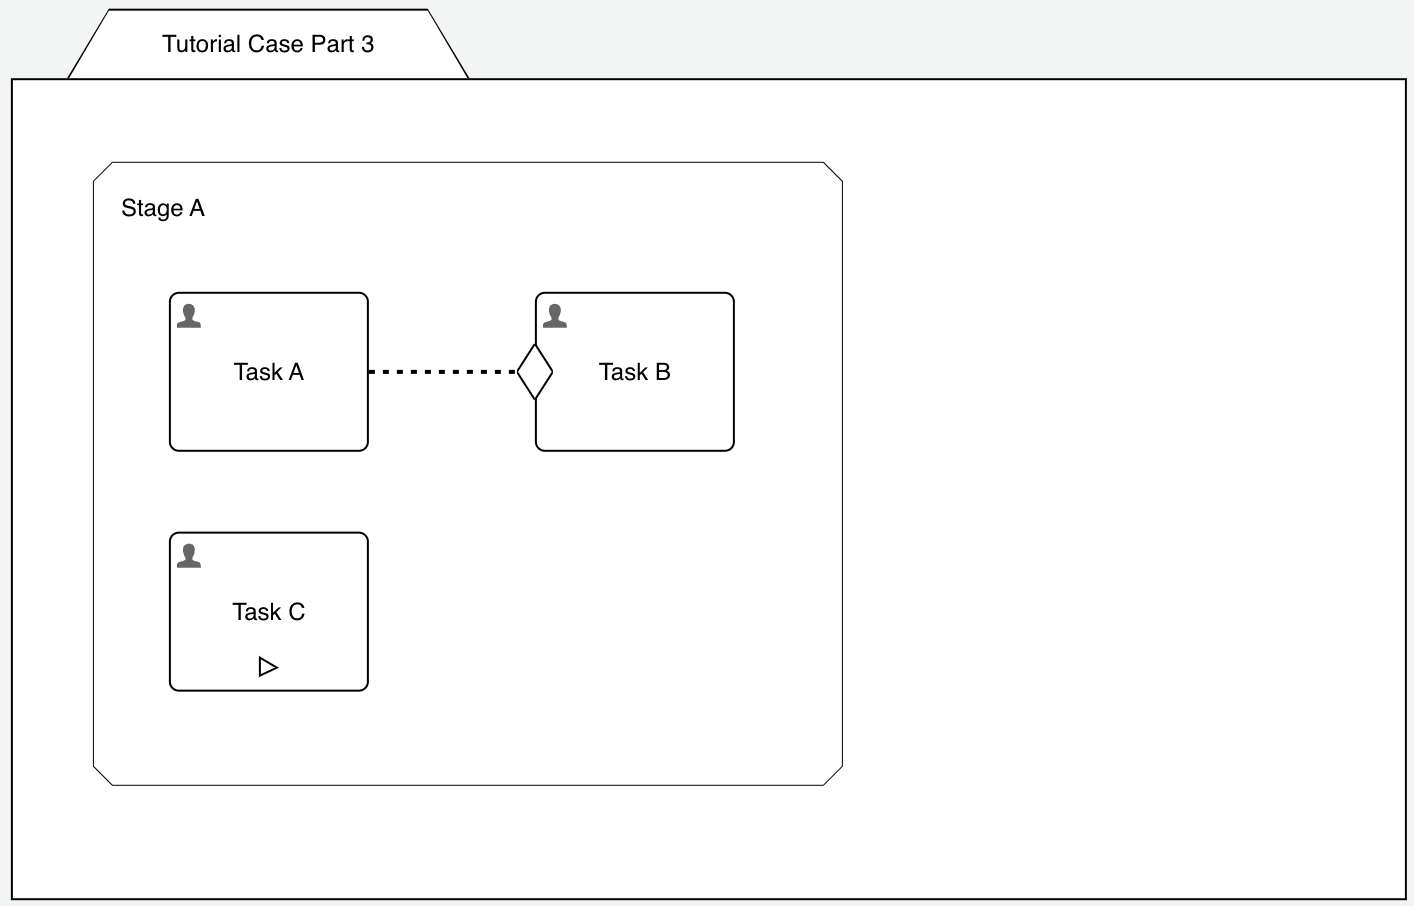
So far so good. What if we add a third task, Task C, where we could change our mind and still want to activate Task B, at any moment after Task A completes?
Add a third task, Task C, make it manually activated and attach the same task from as we have with Task A (you can reuse / reference the very same form and don't have to create yet another one).
The model should look something like this now:
If you run this version of the model with the following steps:
- complete Task A without selecting the checkbox to activate Task B
- after Task A completes, Task B obviously does not start
- manually activate Task C, and this time select the checkbox and complete it
- Task B still does not get activated!
We changed the condition to become true, eventually, but still Task B does not get activated, why?
Remember the trigger mode being on event on the entry sentry with the condition? The condition will be evaluated exactly at the moment when
Task A completes and triggers the sentry (on event) and at this very moment, the condition is not true, so we don't start Task B.
Now our mechanism changed, and we decided to also be able to decide to start Task B, even after Task A was completed. We need a "memory" on the sentry to memorize, whether the connector already triggered, but the condition was not yet true or vice-versa.
We can achieve this by choosing event deferred as the trigger mode which turns on memory for the sentry.
Select the entry sentry and change the trigger mode to be event deferred instead of on event, then save and redeploy the app again.
If you follow the same flow as before, Task B will now be activated, once Task C completes (even after Task A) as we added memory to the sentry.
But here is an interesting aspect as well:
- before completing Task A, manually activate Task C and complete it with the checkbox being selected
- of course Task B is not yet activated, as the trigger (Task A) was not yet reached
- now complete Task A, but remove the select for the checkbox!
- Task B still gets activated, with turning on the memory, we also memorized that the condition became true already before the sentry was triggered
Exit Sentry
We have seen the entry sentry working to activate a plan item (e.g. a human task) depending on a trigger like completing another plan item and optionally even guarding it with a condition and choose the sentry to have memory or not.
In this chapter, we want to get to know the counterpart of the entry sentry, named exit sentry.
As the name implies, this sentry will terminate (exit) the plan item it is attached to, and it has the same features as the entry sentry like having a condition and choosing the trigger mode.
Completing the Stage With A User Listener
One thing we can use an exit sentry for is to end a stage with a manual trigger like a user event listener.
We will explore some options as we move forward. First add a user event listener into Stage A and then connect it to the stage with an exit sentry (the black diamond shaped element). For now, we keep all the properties with their default values. The only thing we do, is naming the user event listener something like Finish stage as this name will be used for the triggering button rendered in the Flowable Work UI.
Here is how it should look like:
If you save, deploy and start a case, here is what we experience as the new behavior:
- task-wise we have the very same behavior as before, which was of course expected
- we now see a new button on the case in the UI, named Finish stage
- if that button is clicked, no matter the current state of the tasks, the stage is terminated (exit) and hence the case terminates as well as there is nothing more to be done once the stage is finished
This is the default behavior of an exit sentry according the CMMN specification. And there is no more to it, but in Flowable, we went beyond the spec and have the exit sentry way more options than just terminating (exiting) a plan item (like a task, a stage or even the full case plan model).
Select the exit sentry and open the exit type / exit event type on the advanced property tab.
We will look into the exit type a bit later as we first want to see the exit event type options. As seen, by default it is exit (according the spec) and will simply exit (terminate) the plan item the exit sentry is attached to, regardless of its current state.
But what happened to the still active tasks when we terminated their stage? They have been terminated as well as whenever a plan item terminates and still has non-ended child plan items (like with our stage), they are all terminated as well and their children (e.g. for a sub-stage) and so on.
But we can choose another exit event type, like complete instead of exit. Let's choose this one, save and redeploy and see how it behaves at runtime.
If you try to trigger the Finish stage button (user event listener behind it) at a time when we still have active tasks (e.g. when Task A is not yet completed, or we activated Task B, and it is still open, etc), triggering the user event listener and hence the exit sentry with complete semantics will fail as we want to complete the stage but at that given moment, it is not yet completable.
We can solve this in two ways depending on our requirements:
- by using force complete as the exit event type option, we will complete the stage, no matter if we still have active tasks
- using an available condition on the user event listener to only show it, once the stage would be completable and hence avoiding to run into that failure
In most cases, the second option is the better, you want to make sure the stage is completable, all necessary work has been done before actually completing it. But maybe you know that there are only active tasks remaining you don't care if they will be completed, and you still look at the stage being completed and not terminated (exited).
If you change to force complete, the behavior is the same as we had before with exit: you can trigger it whenever you want and the stage will end, BUT it will remain in completed state, not terminated as before with exit.
For the second option, select the user event listener and open the advanced property options where you find the available option property. Here, set
the condition to this expression: ${cmmn:isStageCompletable()}. This is a built-in function of the cmmn namespace, returning true, if the stage of
the plan item the function is used for, is currently completable, which is the case, if auto-completion would actually complete the stage.
If you run the model now, you only see the Finish stage button, if there are no more active tasks in the stage. This is very useful as an alternative to
either the auto-complete option or moving all the tasks into ignore if available, as this might complete the stage too early.
With the current user event listener and exit sentry option, we can only complete the stage, if possible, but manually triggered.
To further optimize, you can choose ignore for the Impact on parent completion property (in the advanced property section of the user event listener). This way, if there is no more open tasks and no more manual options available, the stage will automatically complete and not wait for the user to manually complete it.
Terminating a Plan Item With An Exit Sentry
The second use case for an exit sentry we want to have a look at is to use it on a plan item (e.g. a human task).
Assume Task C might or might not be used depending on how Task A "goes" (to be decided when working on Task A). Of course this does not relate anymore why we brought Task C into the picture in the first place, but for the sake of seeing the exit sentry in action on a plan item like a human task, we will use it on Task C.
Add a new checkbox to the form assigned to Task A and name it Terminate Task C (or similar):

Now drag an exit sentry (the black, filled diamond shape) from Task A onto Task C and add a condition (using the condition builder) like this:
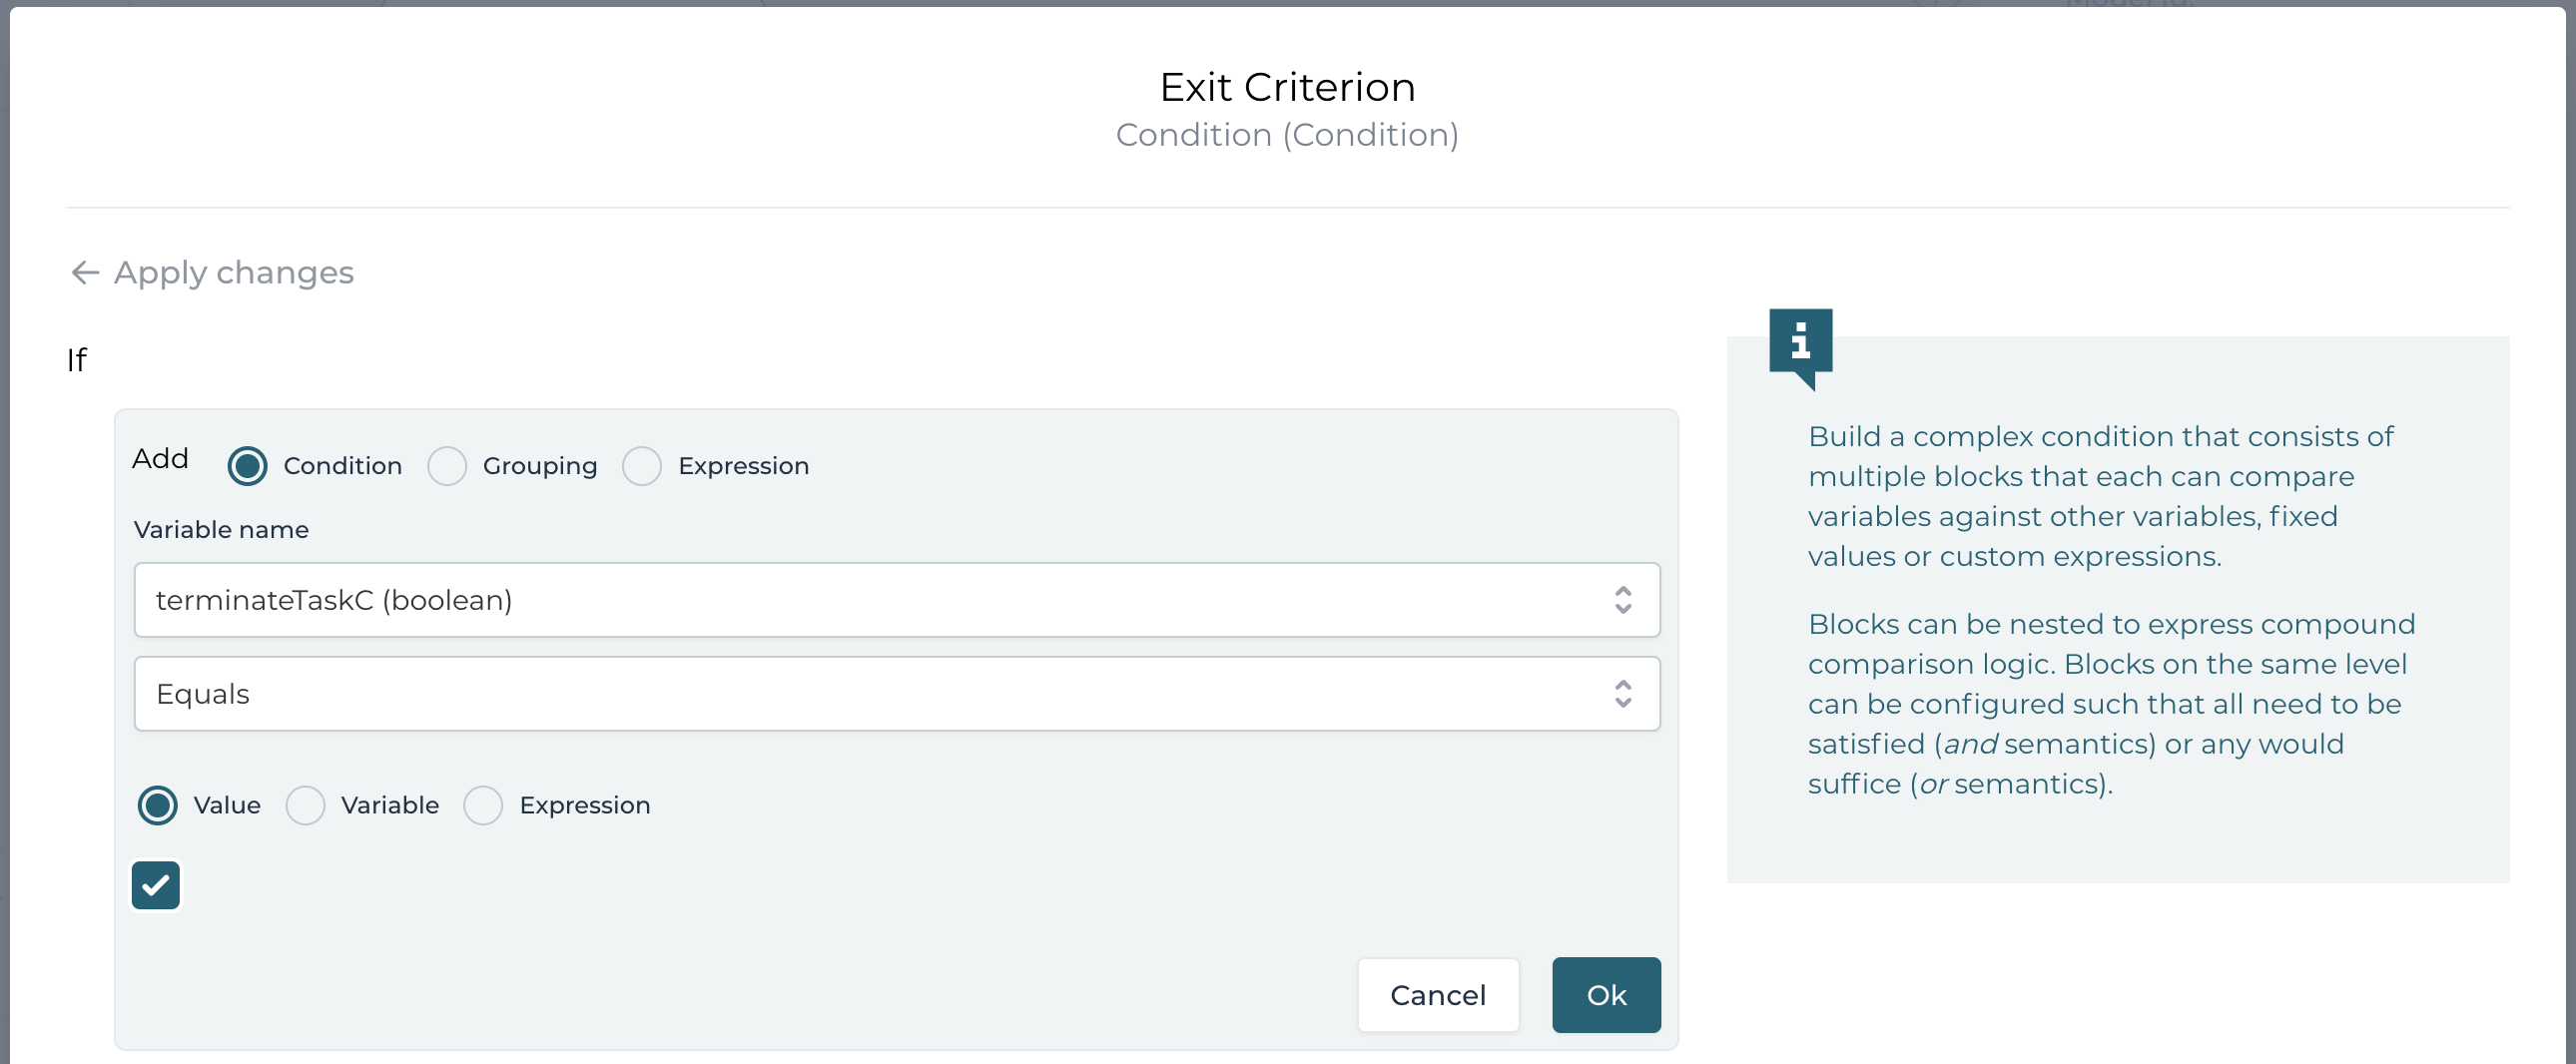
The case model should look like this by now:
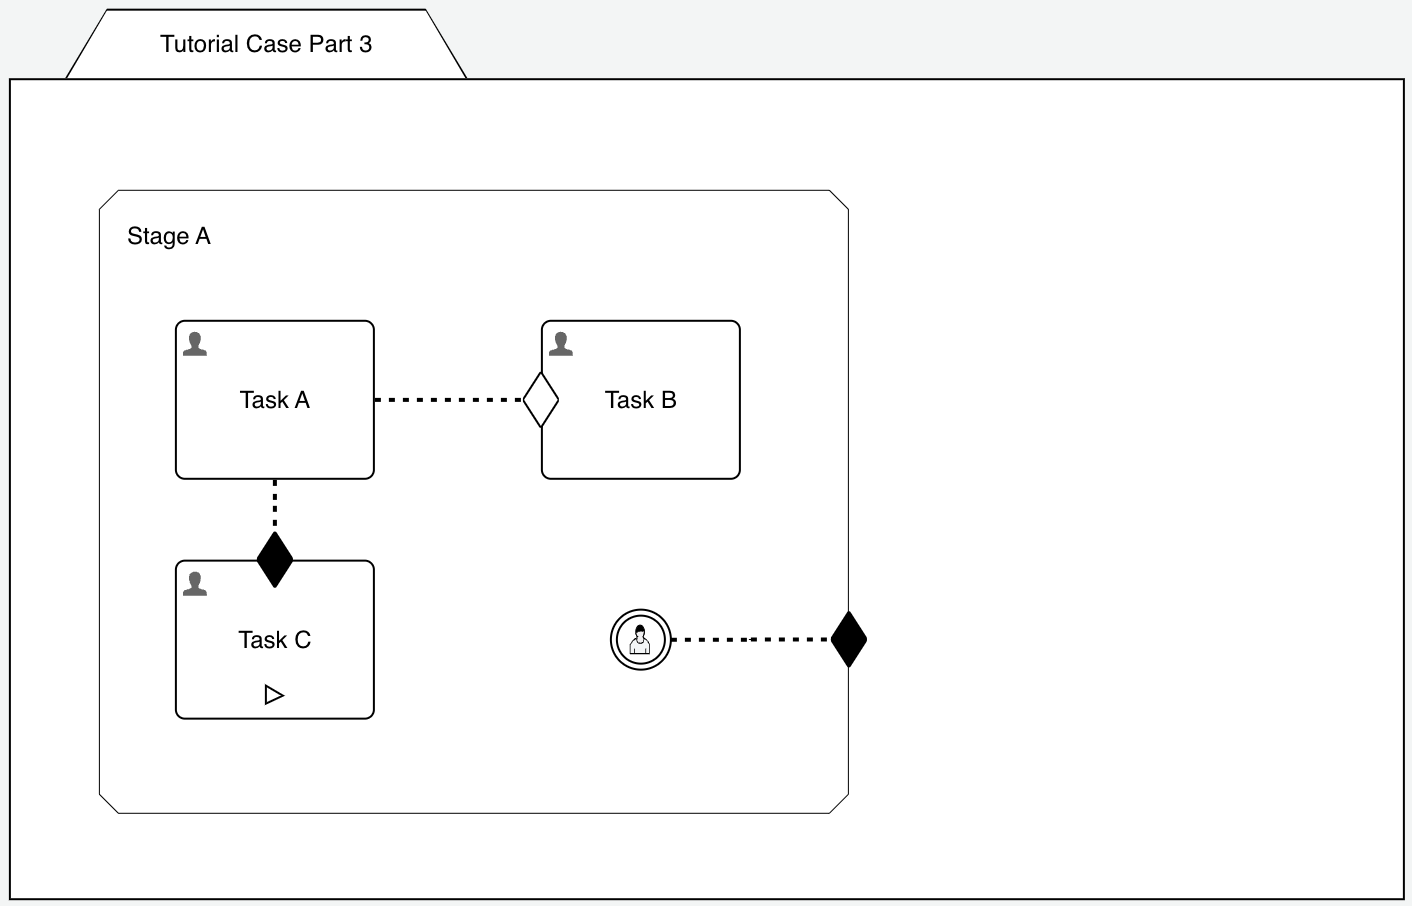
If we deploy and run it, we can terminate Task C when completing Task A and selecting that checkbox. If Task C was not yet manually activated (the button is still there), the exit sentry actually terminates the option to start Task C. If the task was manually started before Task A was completed, but not yet completed, it will be terminated.
The same option we saw on the stage, like setting the exit event type to force complete is available as well, although it might not make much sense to leave the terminated task in completed state as this could be misleading when looking into the history of the case.
But the Exit type property might be interesting for us, which offers three options:
- default: this will terminate the plan item, no matter what, active instances will be terminated as well as available or enabled ones
- active instances: only active instances will be terminated, for our Task C, this would only terminate Task C, if it was already started and if not, we can still start it afterwards
- active and enabled instances: unlike the default option, this one would terminate all instances, but the ones in available state (e.g. waiting for an entry sentry to become satisfied and activate the plan item)
Multiple Entry Sentries
We can add more than one connector to an entry sentry (or exit sentry for that matter) and we can also add more than one entry sentry to a plan item.
In this chapter we want to explore the different behavior and options for such a scenario.
Entry Sentry with AND Semantics
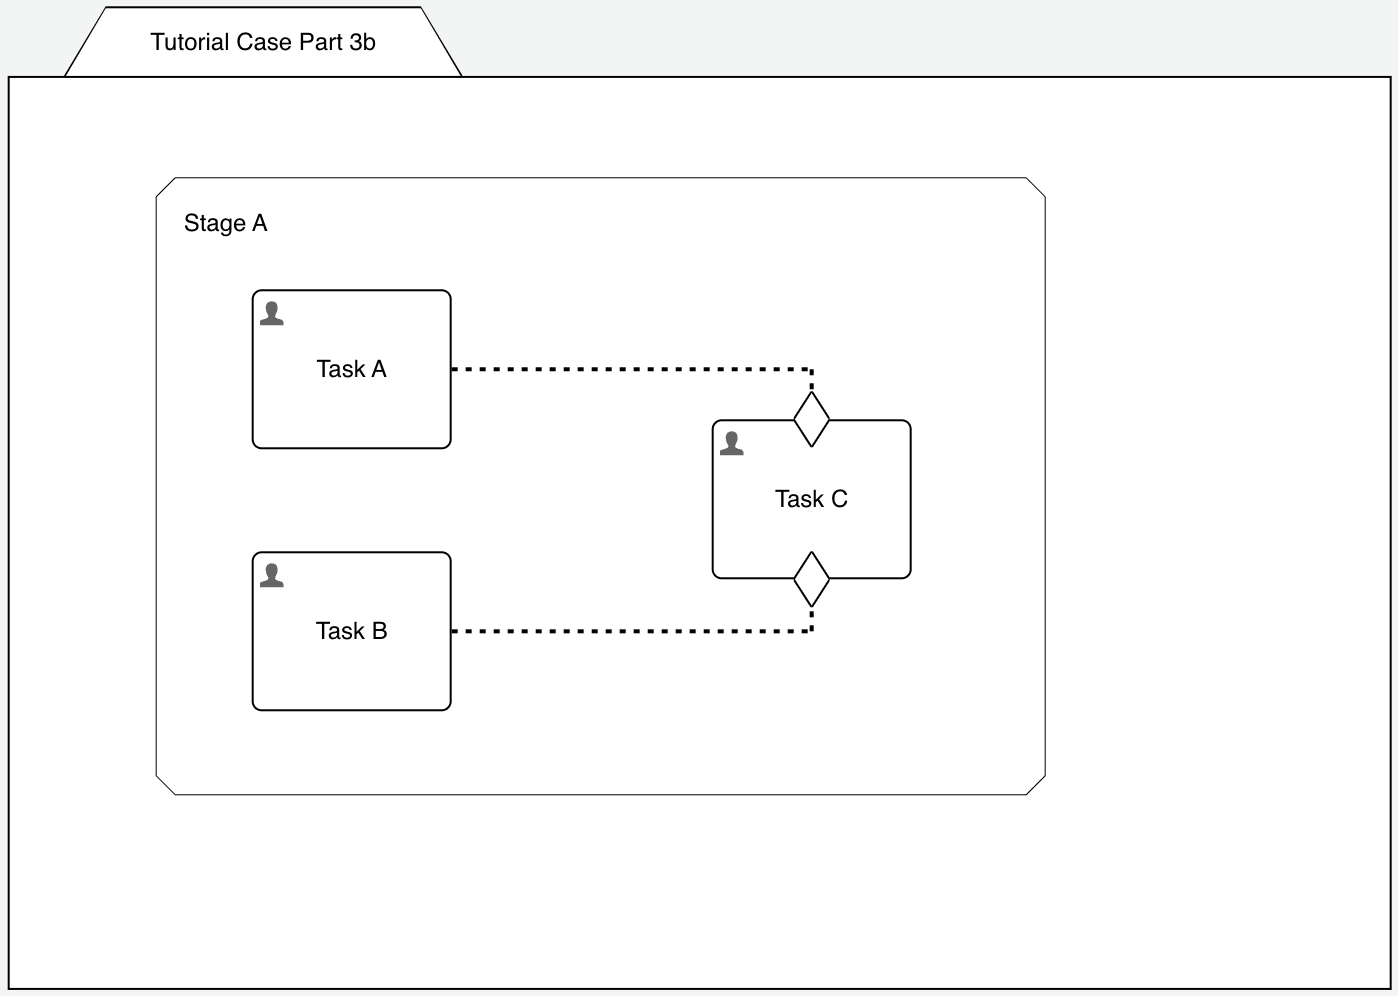
Best probably to start with a new, clean case model (maybe named Tutorial Case Part 3b). Add a stage and three tasks and connect Task A and Task B both to the same entry sentry on Task C to have something like this:
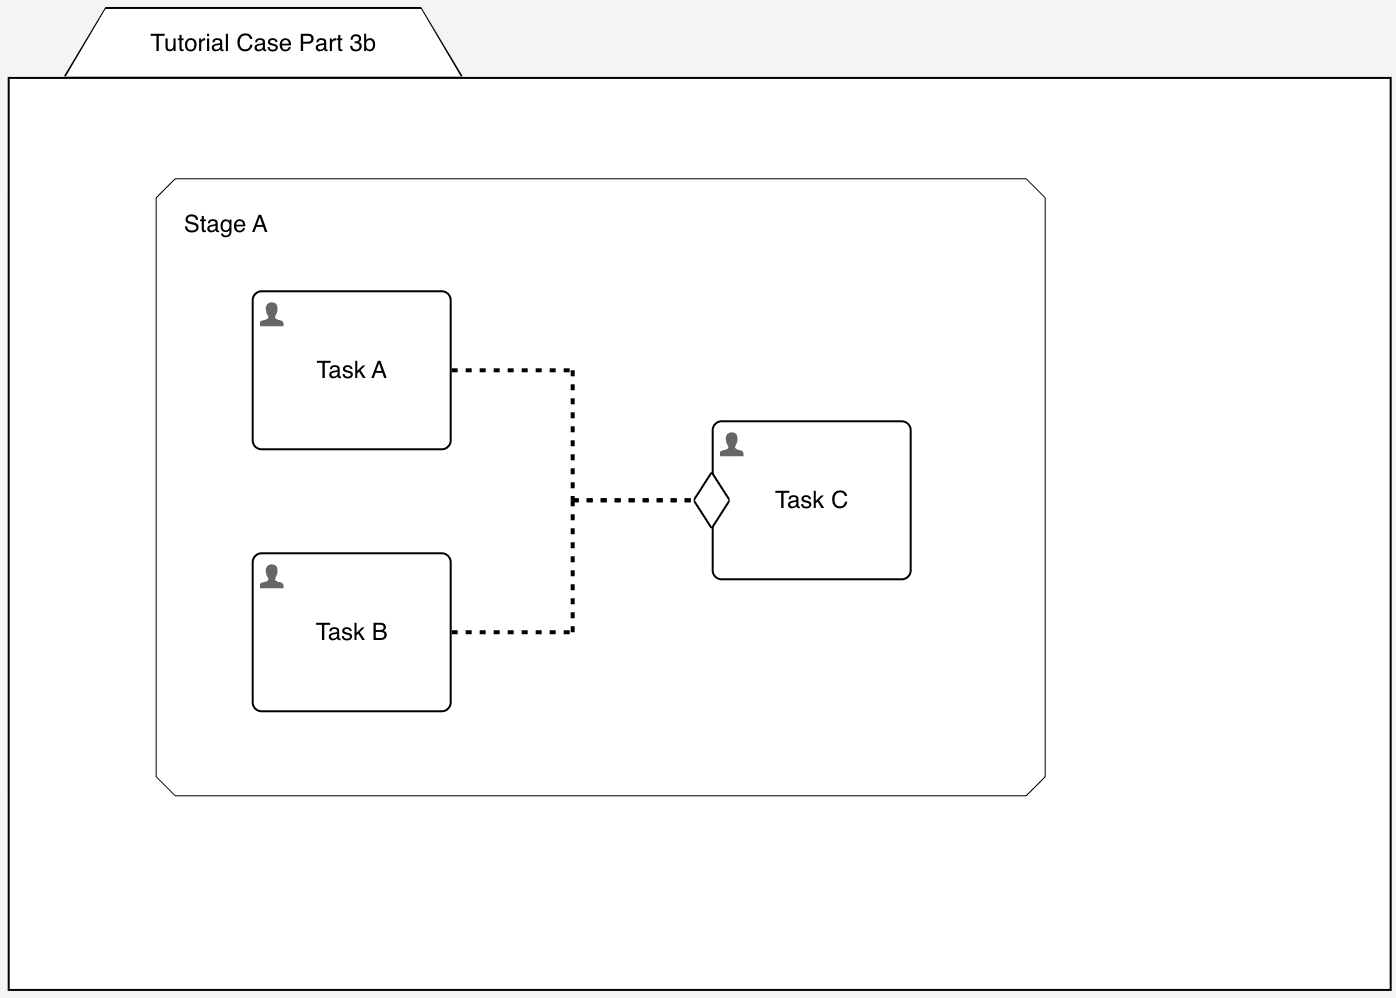
If we connect two (or more sources) to an entry sentry, it behaves like and AND, so all the sources connected to it need to trigger in order for the
entry sentry to be satisfied.
Make sure you have configured the entry sentry with trigger mode event deferred, because otherwise, with AND semantics, the entry sentry would
never be satisfied unless you can complete both tasks exactly within the same case evaluation cycle, which is impossible. But with event deferred with
add memory to the entry sentry to memorize with connectors already triggered and when all of them have, we trigger the entry sentry.
Of course, we can optionally add a condition to the entry sentry, which would work exactly the same as explored before and if we do, the entry sentry will only be satisfied, once all connections have been triggered and the condition evaluated to true at some point.
Entry Sentries with OR Semantics
We saw an entry sentry having multiple connectors and hence uses AND semantics for triggering the sentry and of course we also have support for OR
semantics.
To use OR semantics, we use two (or more) entry sentries on the same plan item and connect them with multiple sources to achieve OR semantics.
Something like this:
In this case, we can also use on event for the trigger mode as when we only have one connector per sentry, we don't need memory.
As you can experience when running that modified example, either task, Task A or Task B when completed will activate Task C (whatever comes first).
But what happens if we have repetition on Task C and trigger both sentries with Task A and Task B? Let's find out.
Activating repetition for Task C offers us the max instance count option besides pure repetition:
- one (default): only one instance can be active at the same time, if we use this option and complete Task A, that starts Task C and if we complete Task B next, there is no other Task C started as there is still one active, but if we complete Task C first and then complete Task B, that would start Task C again
- unlimited: whenever an entry sentry triggers, it will start a new instance right away as there might be more than one active at the same time, so regardless whether we complete Task B or Task C first, there will always be two Task C's
Depending on the requirements, both options might make sense, that's why you can choose in details how to handle repetition with multiple entry sentries.
Entry Sentries with Mixed Semantics
We learned how to combine entry sentries with both OR or AND semantics but of course we can also combine it.
Adding a new task named Task D and connect it to the same entry sentry like with Task B (AND semantics), so we will have something like this:
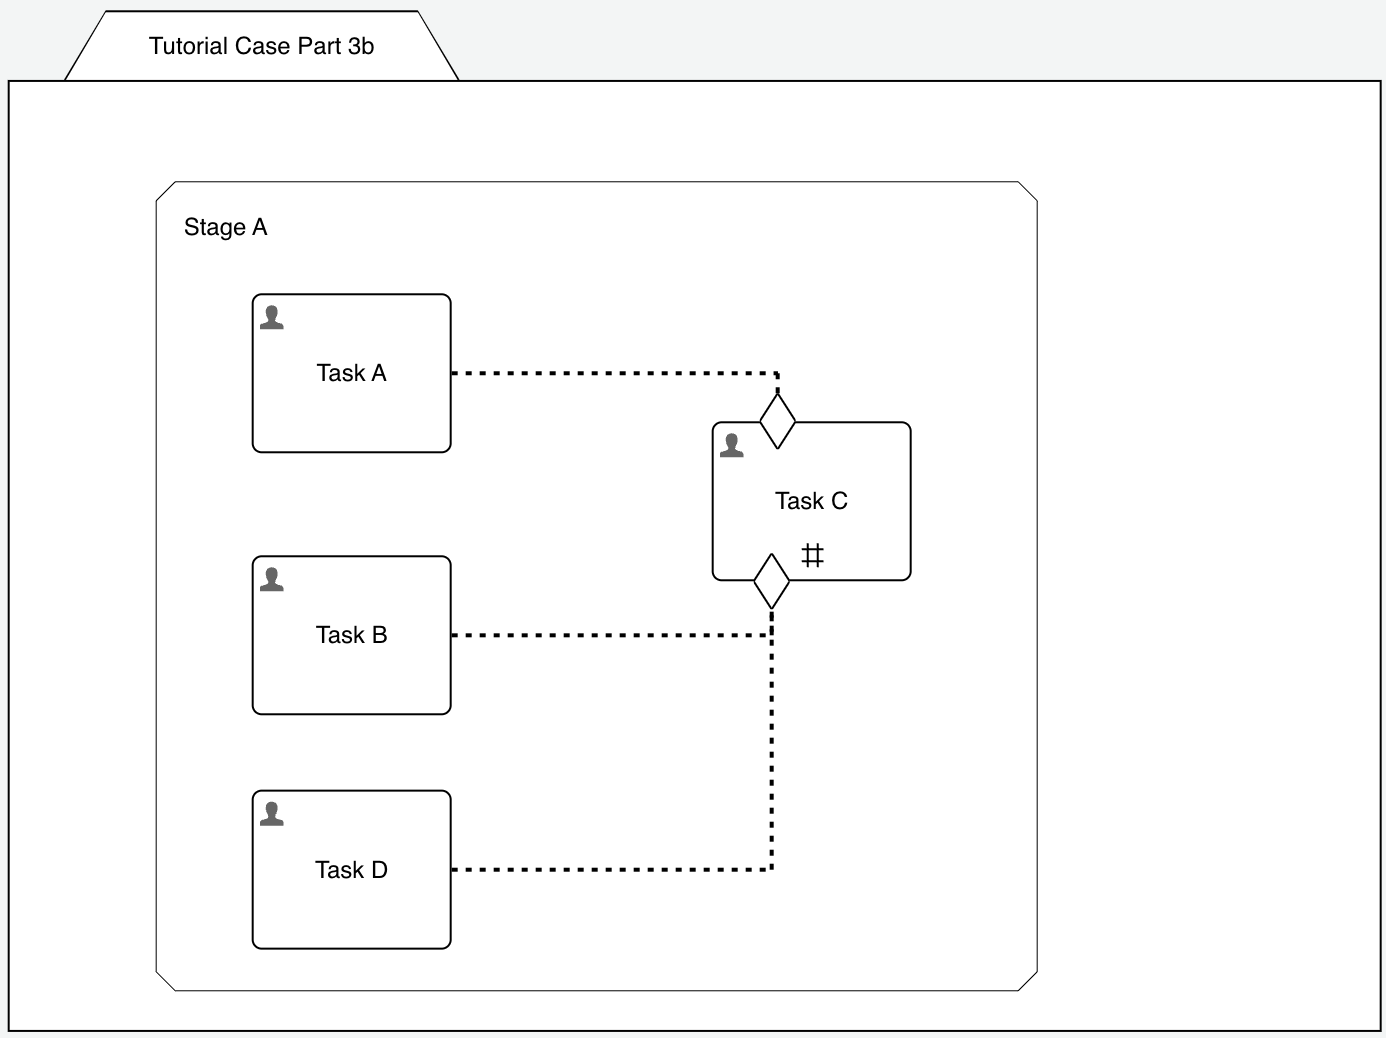
How does this work now? We only need Task A to be completed to start Task C, but both, Task B and Task D to trigger it again, so we have Task A OR (Task B AND Task D) as a result.
Conditions, repetition, trigger mode and max instance count of course are working the same as discussed before.
Summary
In this part we have introduces two very important elements: entry sentries and exit sentries with their variations like having conditions, memory and several further options like the exit type or exit event type.
Sentries are a very important part controlling or should I say guarding plan items as if and when they are activated (started) or when they need to be completed or terminated.
We also learned a very important pattern to manually complete a stage and not have to relay on the auto-complete option or miss the chance to manually start plan items, if we didn't do it at the right moment before it was too late the stage already completed.