Part 1: Stages, Plan Fragments and Milestones
CMMN Introduction Series Overview
The goal of this CMMN modeling series is to provide an introduction to case modeling with CMMN, to learn about its various elements and how to use them, and to share some good practices, various patterns and useful tips and tricks.
If you’re coming to this from a BPMN background, or a procedural and process-oriented viewpoint, it’s worth adjusting your mind to think about things in CMMN in a declarative way. CMMN describes what a situation looks like, its elements and phases; what actions and options are available to a person or system to take; and events that might trigger some action. You can think of CMMN defining what you can do in different situations, with BPMN defining how you do it. BPMN tells you how to ride your bike from A-Z, while CMMN says here’s a bike when it’s needed.
There is an overlap in how you can describe a solution in BPMN and CMMN, with some saying you can do everything you need with BPMN (and occasionally, the other way around). Of course, you could do all of it in assembler programming language if you had the time, but that’s really not the point. One of the main reasons for using models rather than code to describe a solution is that it’s easy to share an understanding of what’s being described, as well as easy to change quickly. Naturally, you need to rely on a fast and scalable tool to run these models, but that’s precisely what Flowable can do.
| BPMN | CMMN |
|---|---|
| you define a sequence of activities to solve a business need | you define a collection of activities to solve a business need |
| the sequence seldom changes | activities occur in an unpredictable order |
| the process is predictable and repeatable | events determine how work progresses |
| the process determines the order of events | activities are not directly linked to one another |
| the activities are linked to one another | people determine the activities |
| activities can be automated |
A lot of introductory background so far, but coming to CMMN with the right perspective is important for you to gain its advantages. So, let’s get into it and explain the main elements you work with.
It's not about BPMN vs CMMN, but how best to combine the two to get the most out of an automation platform like Flowable.
Overview
In part 1 of the CMMN modeling series, we will learn three basic elements of the CMMN standard: stages, plan fragments and milestones. We see what they represent and how to connect them and of course how they are arranged within their parent element: the case plan model.
Case Plan Model
Everything in a case is contained in its outermost element: the case plan model. When a case instance is created, its corresponding case plan model is
started and the case engine inspects all the elements in that model, start them if needed and of course track their lifecycle.
Once a case plan model has no more elements to start or track, the case plan model is completed which then also completes the case instance.
You can look at the case plan model as the lifecycle bound to a case instance from start to end.
Stage
A stage within a case plan model can be looked at like a phase, a step or a period in the lifecycle of a case. If you look at the end-to-end lifecycle
of a case from a business perspective (the full use case it represents), then a stage is a phase within that lifecycle.
But stages might not only represent a business meaning when looking at the use case the case model is representing, they might also be used for more
technical / modeling purposes to group certain elements together.
Whatever is added to a stage needs to be completed before the stage itself completes, but of course there are a lot of details to mark elements as required, manually started, repeating and many things more to define the overall behavior of a stage. We will have a close look at all those details as we move on with this CMMN modeling series.
Practical example
Enough of the theory, let's see how this all works in practice.
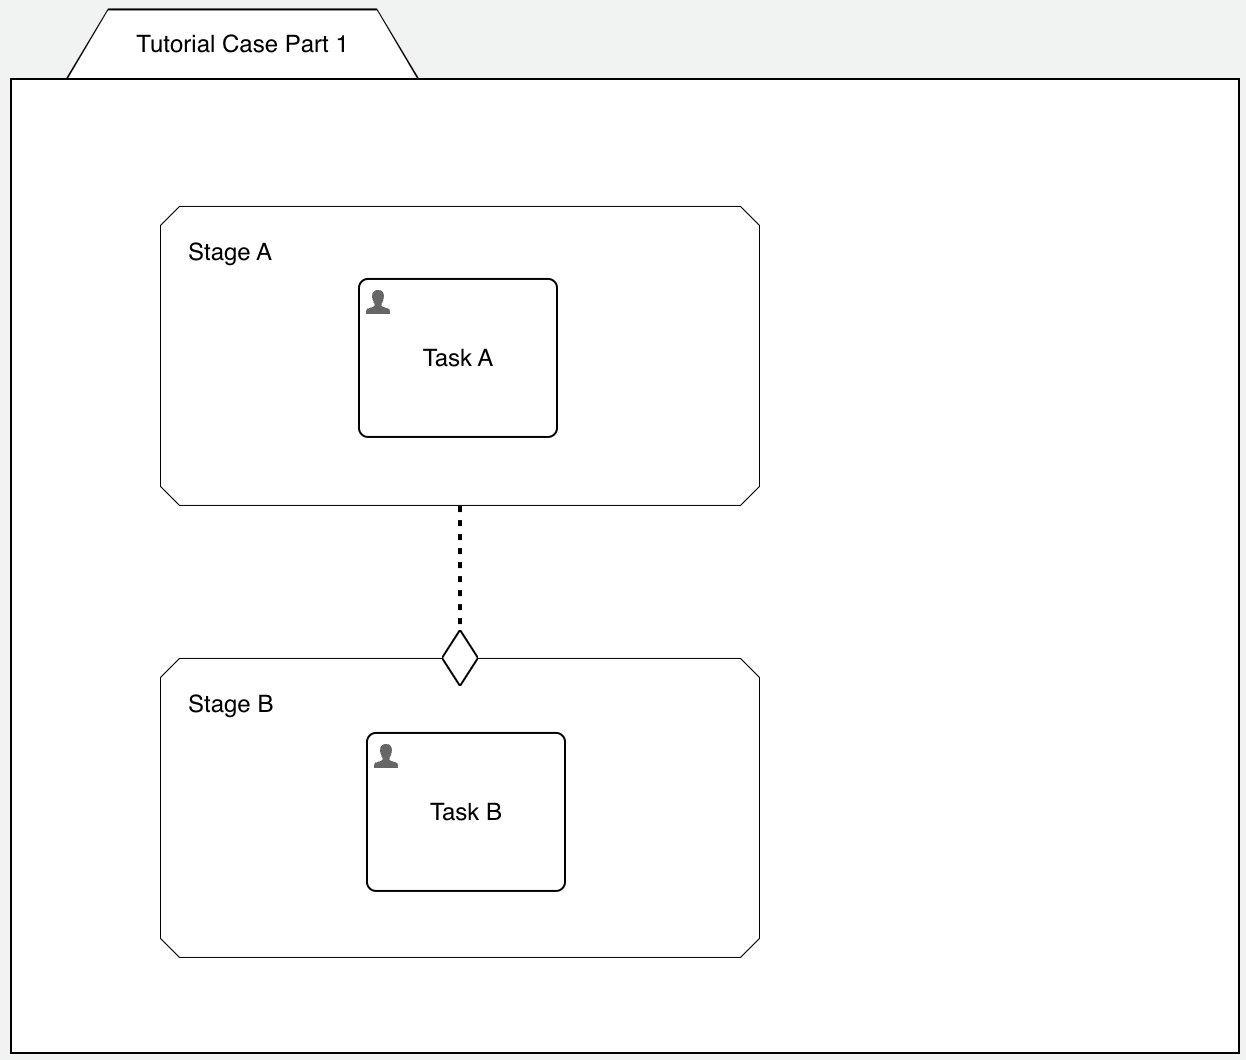
We start a new app in Flowable Design with name Tutorial App - Part 1 and add a new case model to it, named Tutorial Case Part 1.
Add two stages to the case plan model and name them Stage A and Stage B. Additionally add a user task named Task A to Stage A and another user task named Task B to Stage B.
If we don't add anything to a stage, it would obviously not make any sense as it would be started and completed immediately, not adding anything to the case plan model from an execution point of view.
If we want to have an order in the stages, we can use a sentry to connect them and bring them into a particular order. Drag an entry-sentry (the little diamond shape, not the filled one) from Stage A onto Stage B.
Your case model should now look something like this:
So far we only used the default properties for the stages as well as for the user tasks and the sentry. Before we go a bit more into details, let's deploy the app and test it out in the runtime, Flowable Work.
If you have published the app and created a new case instance based on our tutorial case model, then it might look something like this in the runtime:
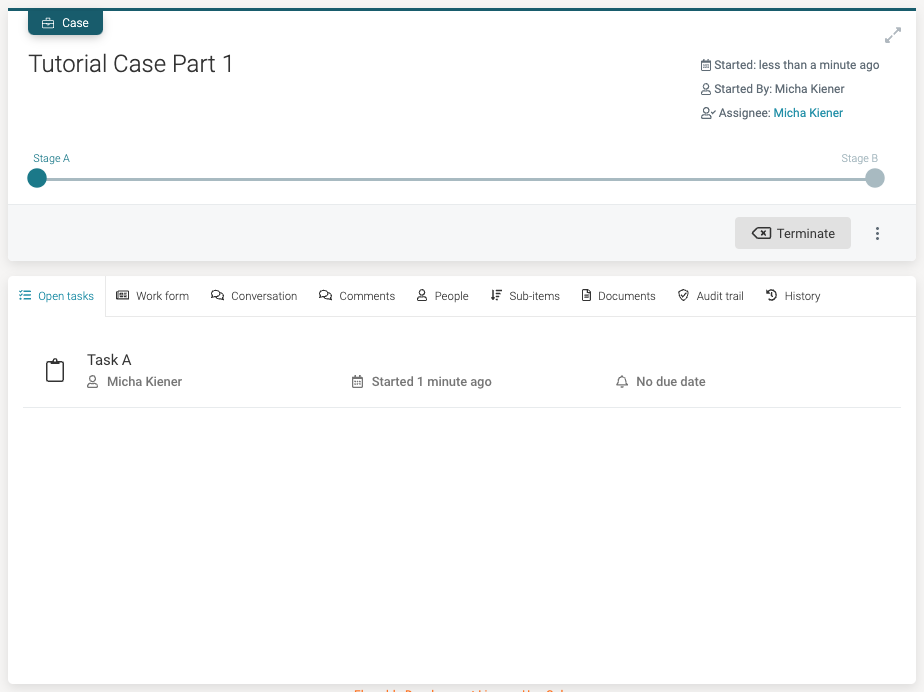
Maybe you already noticed that a lot of information from the case model is actually visible in the runtime, like the two stages, the case and task names and many small things more.
As we named the stages in a way their alphabetical order also makes sense from their sequence, all is looking fine, however, this is not always the case.
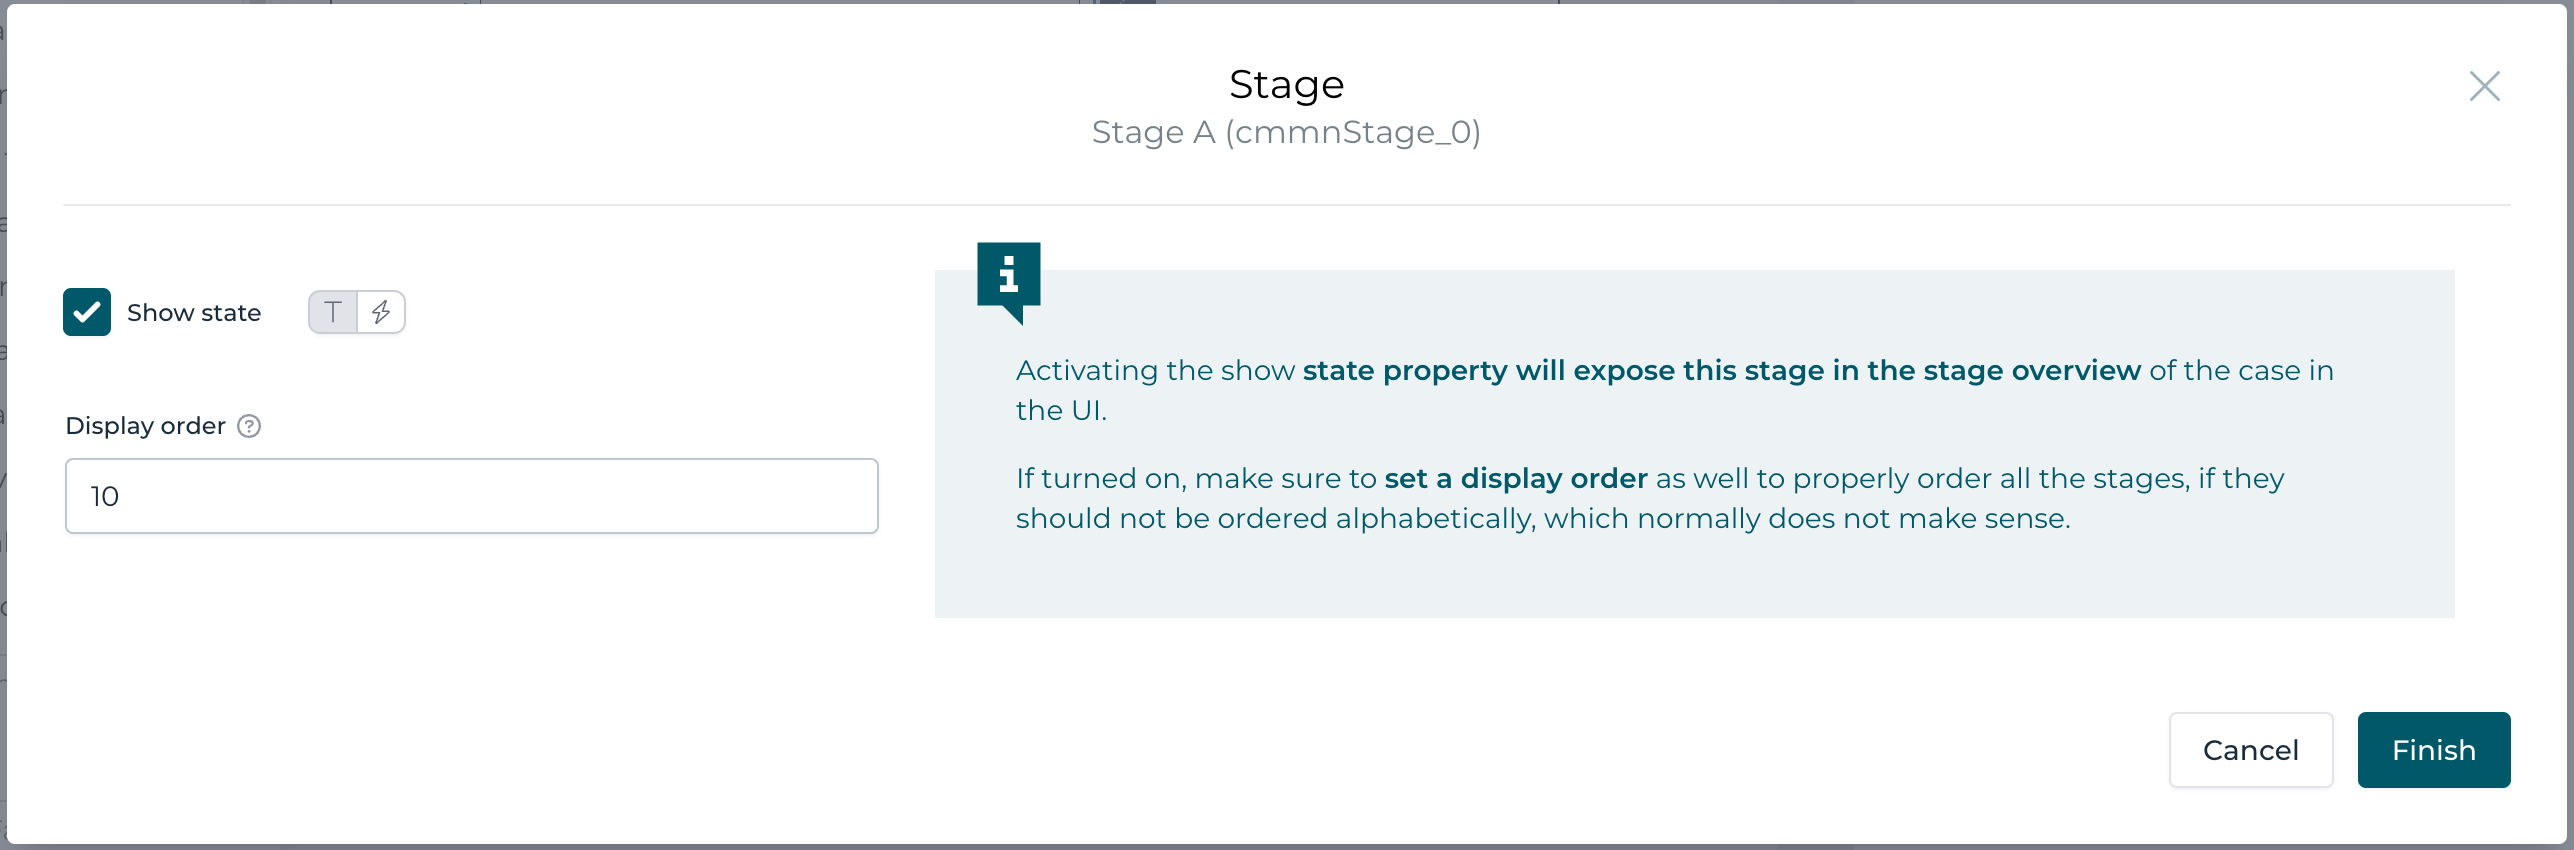
If you go back to Design and select one of the stages and the Stage Details property tab, there are two properties we want to have a closer look at (you can also use the stage wizard and in the second step you can find the same properties):
| Property name | Property description |
|---|---|
| Show state | If checked (which is the default), the stage will be shown in the stage overview component in the UI of Flowable Work. If you uncheck, the stage is treated more as a 'technical' stage used to just group elements together rather than having a meaning from a business point of view and hence it will not show up in the UI. |
| Display order | Using this property, you can create your own order / sequence of the stages in the stage overview component. As a good practice, don't use a sequence like 1, 2, 3 but more like 10, 20, 30, etc. If there is a new stage to be added in between, you don't have to renumber them all. |
The properties for Stage A could now look something like this:
There are way more properties, but we will learn them gradually as we move through the CMMN modeling series.
Maybe you also realized that first, Stage A was created and with it Task A as well. You need to complete Task A and then Stage A will be completed as
well as there is no other element in the same stage. Once Stage A is completed, Stage B activates and with it Task B as well.
Completing Task B not only completes Stage B with it, but the full case plan model and obviously the case instance as well.
If you want to have a closer look into the case engine running the case behind the scenes, Flowable Inspect might be a great help. You can activate it
in the menu in the bottom left corner of the UI.
For our case, after starting a new instance, it shows the following picture (when choosing 'plan items' instead of 'variables' in the menu):
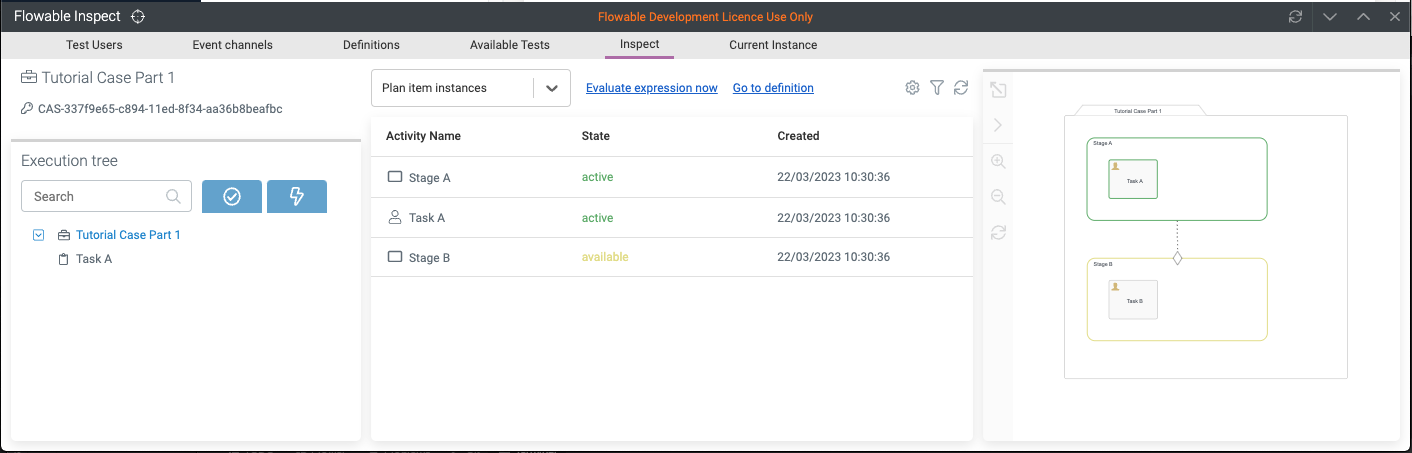
In the left part, you can see the execution tree of the whole case, in our simple example, we only see the case instance and the task for now, but as we will create more complex models, the execution tree becomes more and more interesting.
For the middle section you can choose the information you want to see, which is the data (variables) by default. And if you switch to 'plan item instances', you can see all the current plan item instances and their state. As an example, we see the two stages, one is active (Stage A) and one is available (Stage B) which means it is still waiting to be activated and that's why we can't see Task B for now, it is not yet created as a plan item instance, but will be as soon as Stage B becomes active. Task A obviously is represented with its active plan item instance as well.
Flowable Inspect is a very helpful tool to understand the case model execution in details, specially in moments where the case might not behave as you would have expected and then the plan item instance view might reveal why.
Plan Fragment
A plan fragment is very similar to a stage, however, it has no implication during execution, it is only useful for a visual representation of elements belonging together, but not from an execution point of view.
If we add a plan fragment to the case model, name it Global Tasks and add two user tasks Task C and Task D to it, deploy and run the example,
we cannot see the plan fragment anywhere in the UI and not even in the plan item instance view in Flowable Inspect.
As mentioned before, the plan fragment has no impact on the runtime, is not even visible, but only helps to improve the visual representation of the case
model by grouping elements in a box together.
Obviously, this is also why you can't attach any sentries to a plan fragments or get any events out of it, as it is only a visual element in the case model.
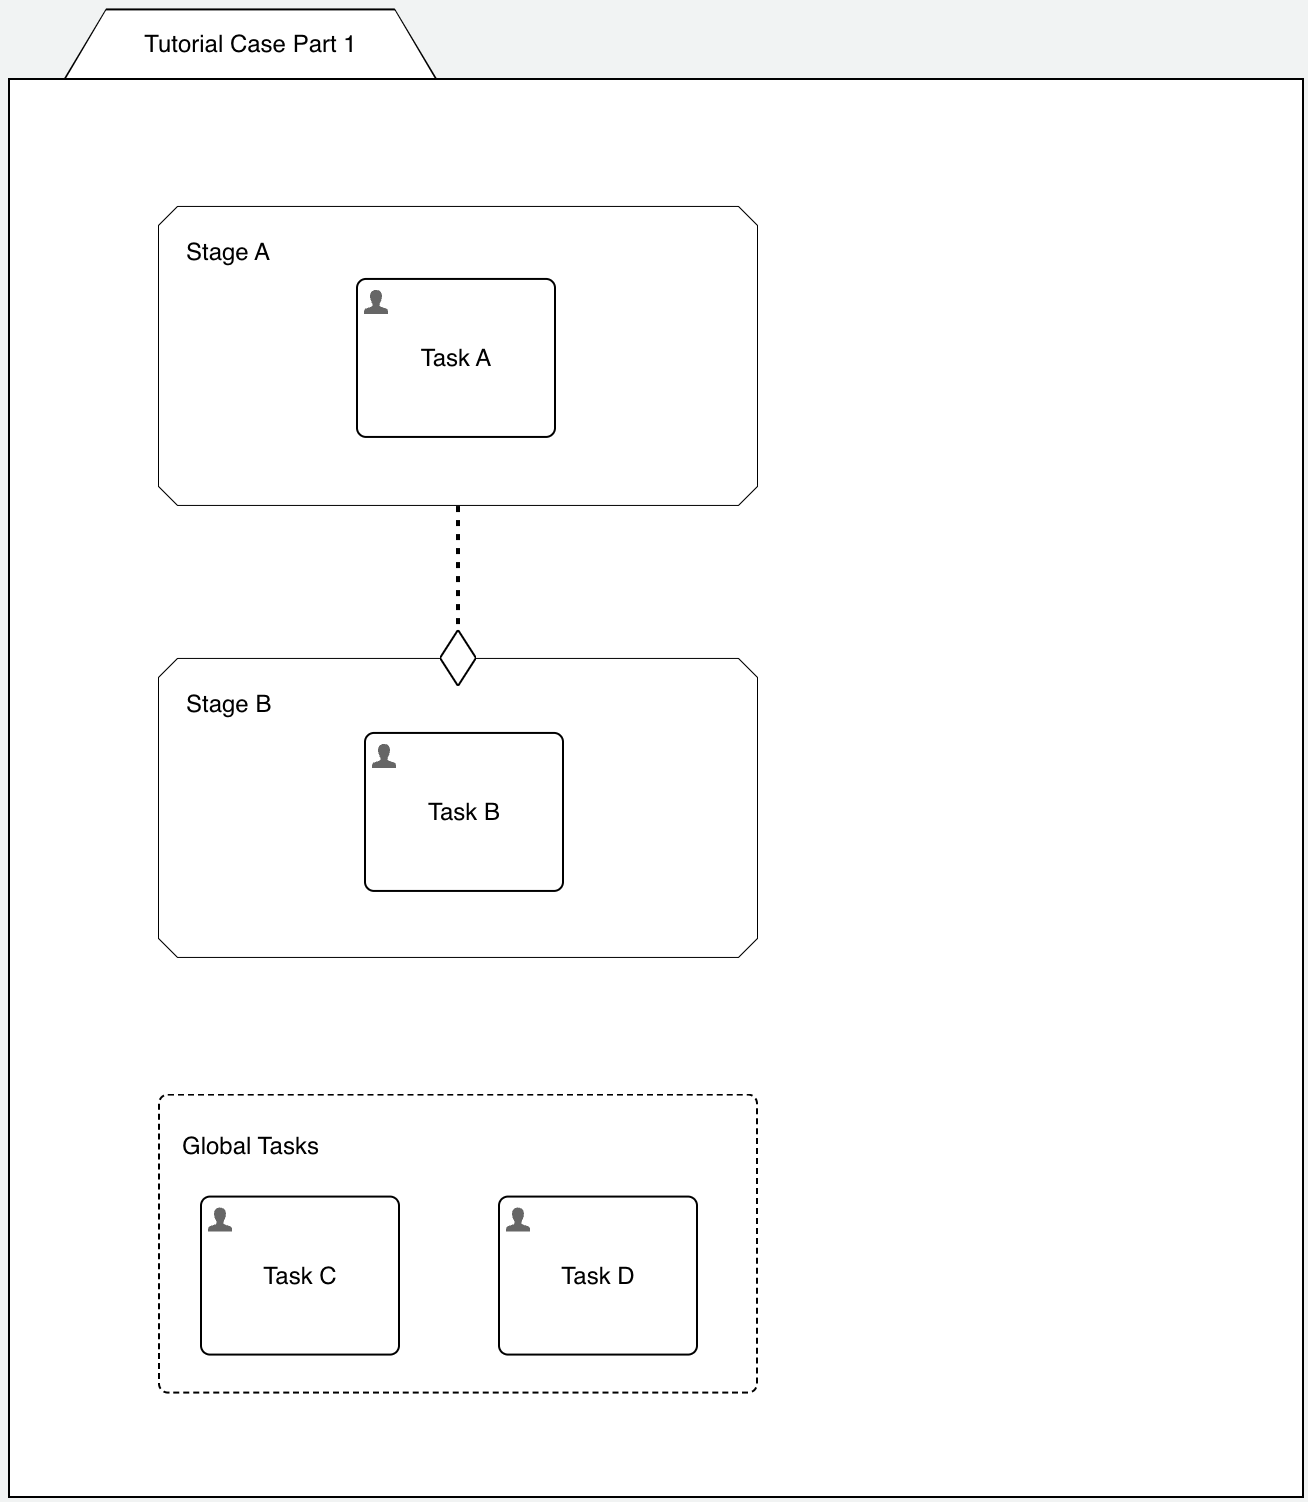
Deploying and running this new version of the case model will create two more tasks from the beginning, Task C and Task D, like global tasks as they are not related to any stage, but of course still need to be completed, if you want to complete the case. They don't have any relation to the other tasks belonging to a stage.
Milestone
A milestone represents, as the name implies, an important step within the lifecycle of a case to be reached at some point. A milestone, from a CMMN element
point of view, does not have an active state, it typically goes from available directly to completed state at the point where the milestone is reached as
a milestone does not contain "work" to be done like a stage and only represents an important step being reached.
If we add a milestone to the case model and connect an entry sentry from Stage A to it, the milestone will be reached once Stage A is completed.
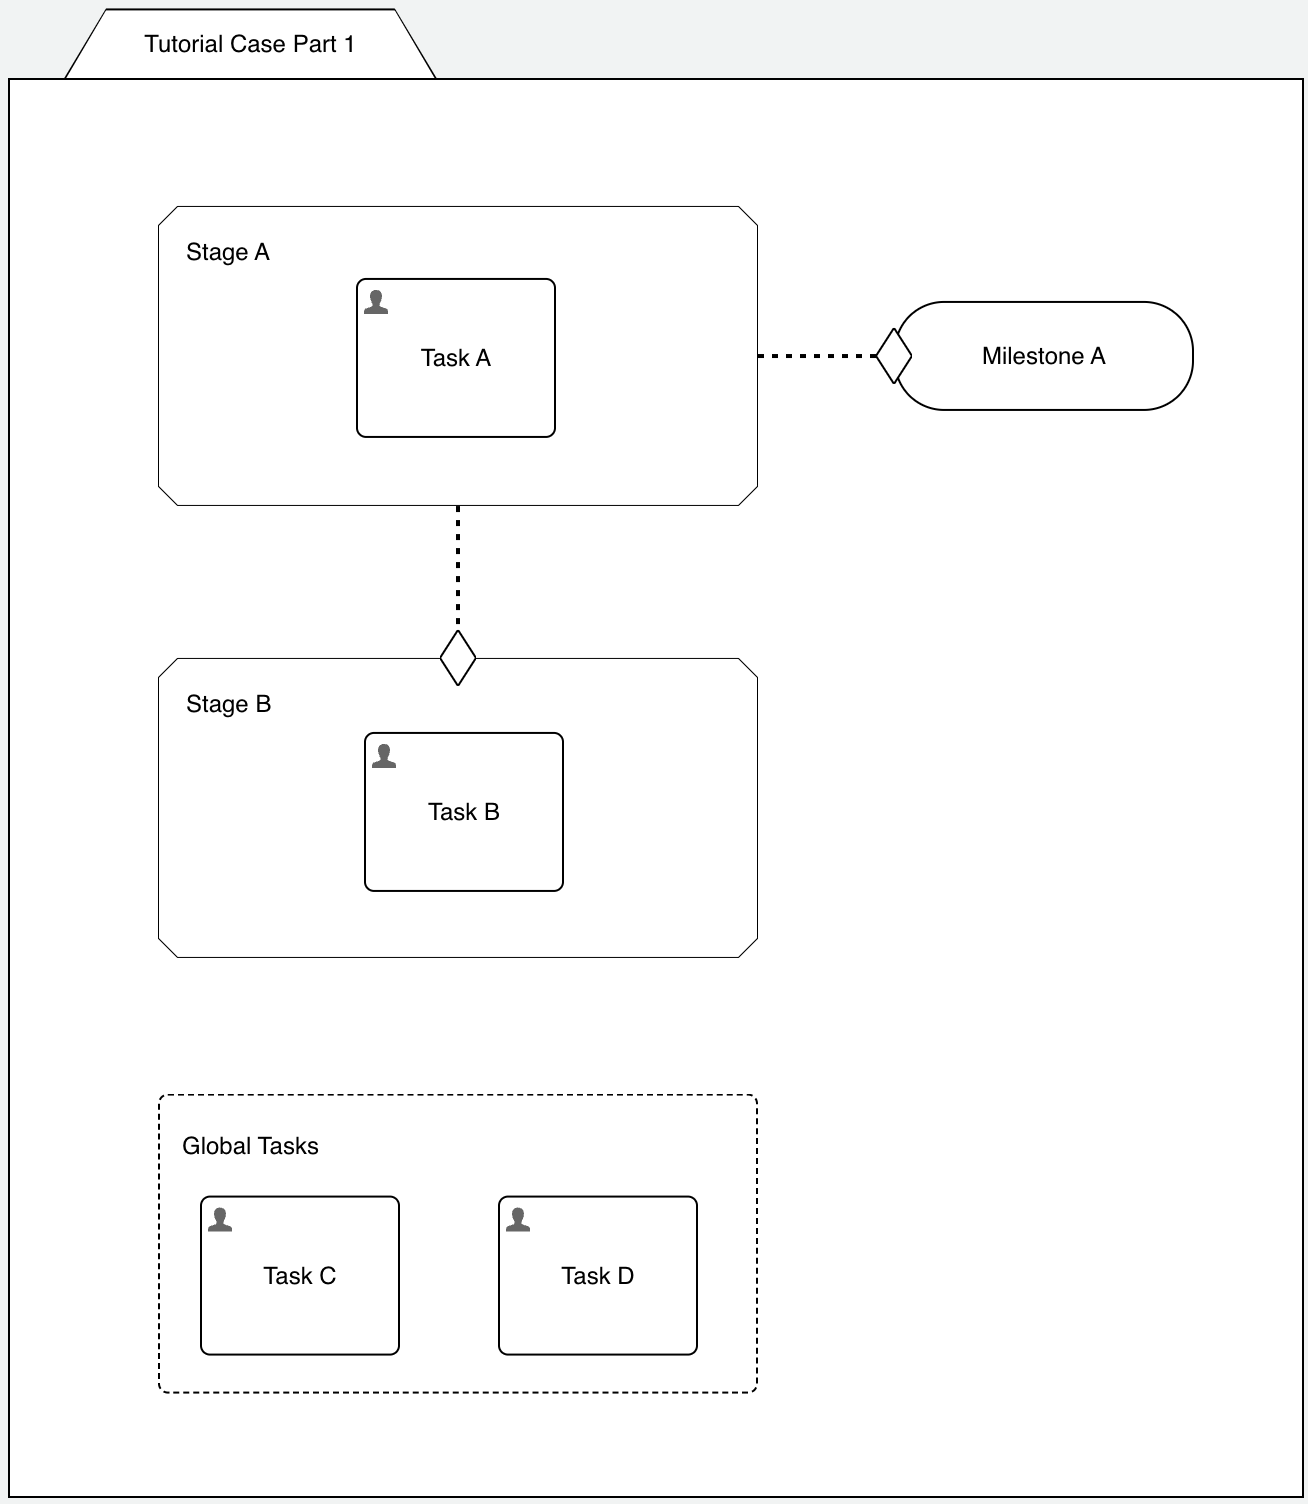
If you deploy the new version of the model and create a new case instance, open Flowable Inspect again, you will see the milestone being in available state
until you complete Task A (which completes Stage A) which then completes the milestone.
A milestone is added to the same stage overview component in the case UI of Flowable Work. So you also find the Show state and Display order property on
a milestone like on a stage.
If you entered 10 and 20 (as an example) for the display order for Stage A and B, you might now want to use 15 for the display order of the milestone, if you
used 1 and 2 instead, you might need to renumber Stage B to 3 to insert the milestone in between.
A milestone can also be used to further activate other elements by connecting it to any entry sentries being triggered (activated) once the milestone is reached.
Summary
In this part of the CMMN modeling series, we got to know the Stage, the Plan fragment and the Milestone as the first elements and how we can use stages
to group related other elements (like user tasks) together.
In a future part, we will learn more details about how stages are marked for completion, how you can manually interact with the overall plan for the case model and many more details.