Part 1: Decision Table
 Outdated documentation page
This is an old version of the documentation for Flowable until version 3.13 and for the Angular-based Flowable Design 3.14/3.15. If you are running the latest version of Flowable please check out the current version of this page.
Introduction
In Flowable there is support to use decision tables directly in a case or process model, but it's also possible to model decision services to orchestrate the data of multiple decision tables. In this model guide we will look into both approaches, starting with the basic decision table approach.
In the second part, modeling decision services is discussed and an example is provided on how to use a decision service model in a case or process model.
Decision table: Model the Process
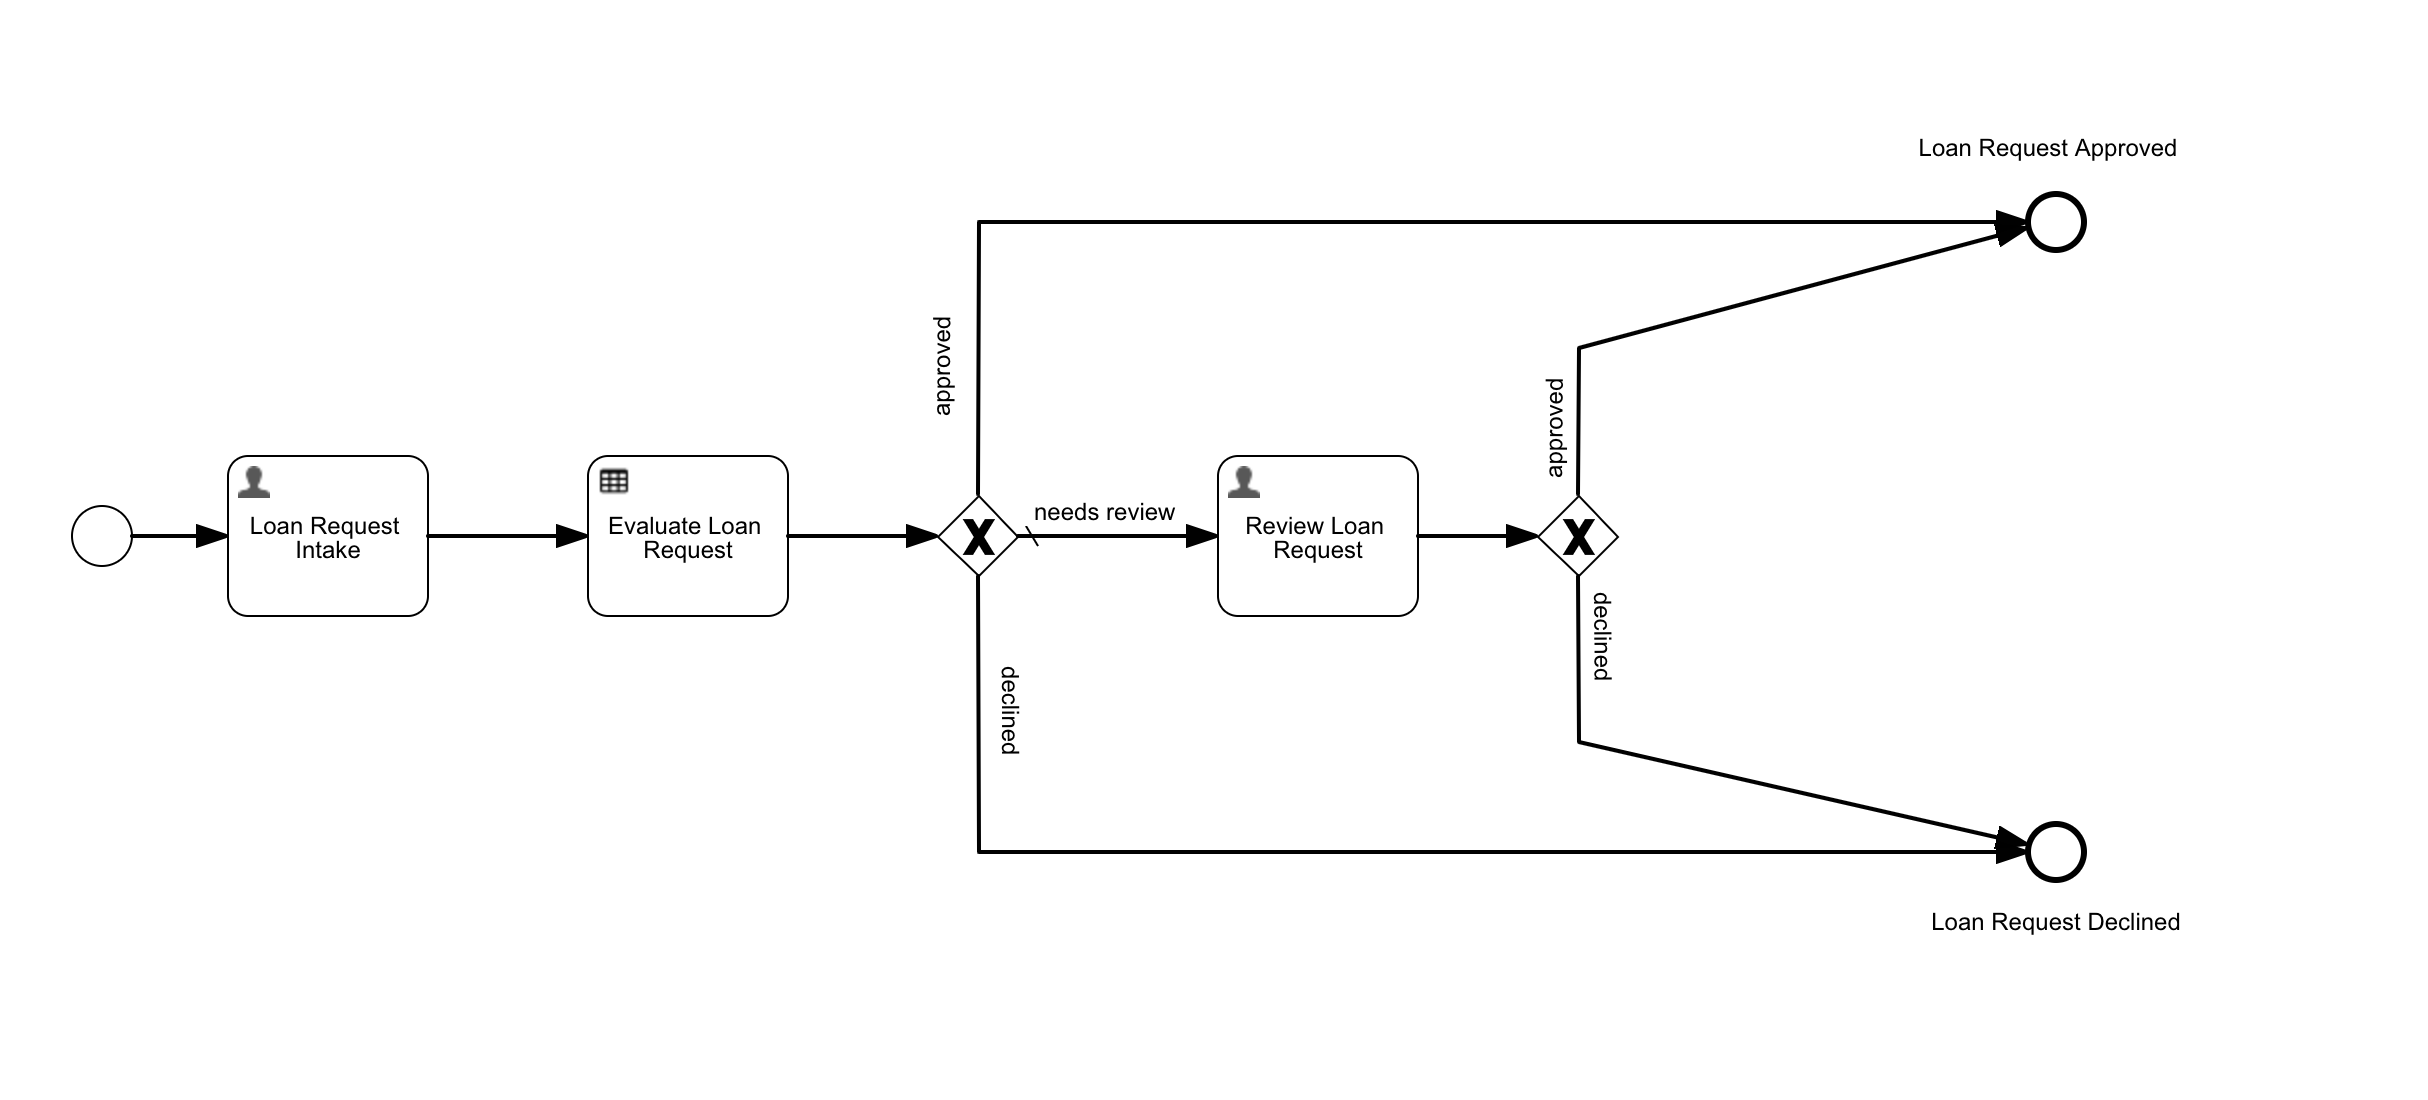
We start by creating the process 'Loan Request Approval'. This process consists of a two-step happy path:
-
Make the Loan Request: a user task form for providing the required data about the loan.
-
Evaluate the Loan Request: a DMN decision table that evaluates the loan request.
The result of the decision execution is one of: "APPROVED", "DECLINED" or "REVIEW". In the last case, the process navigates to an additional review step.
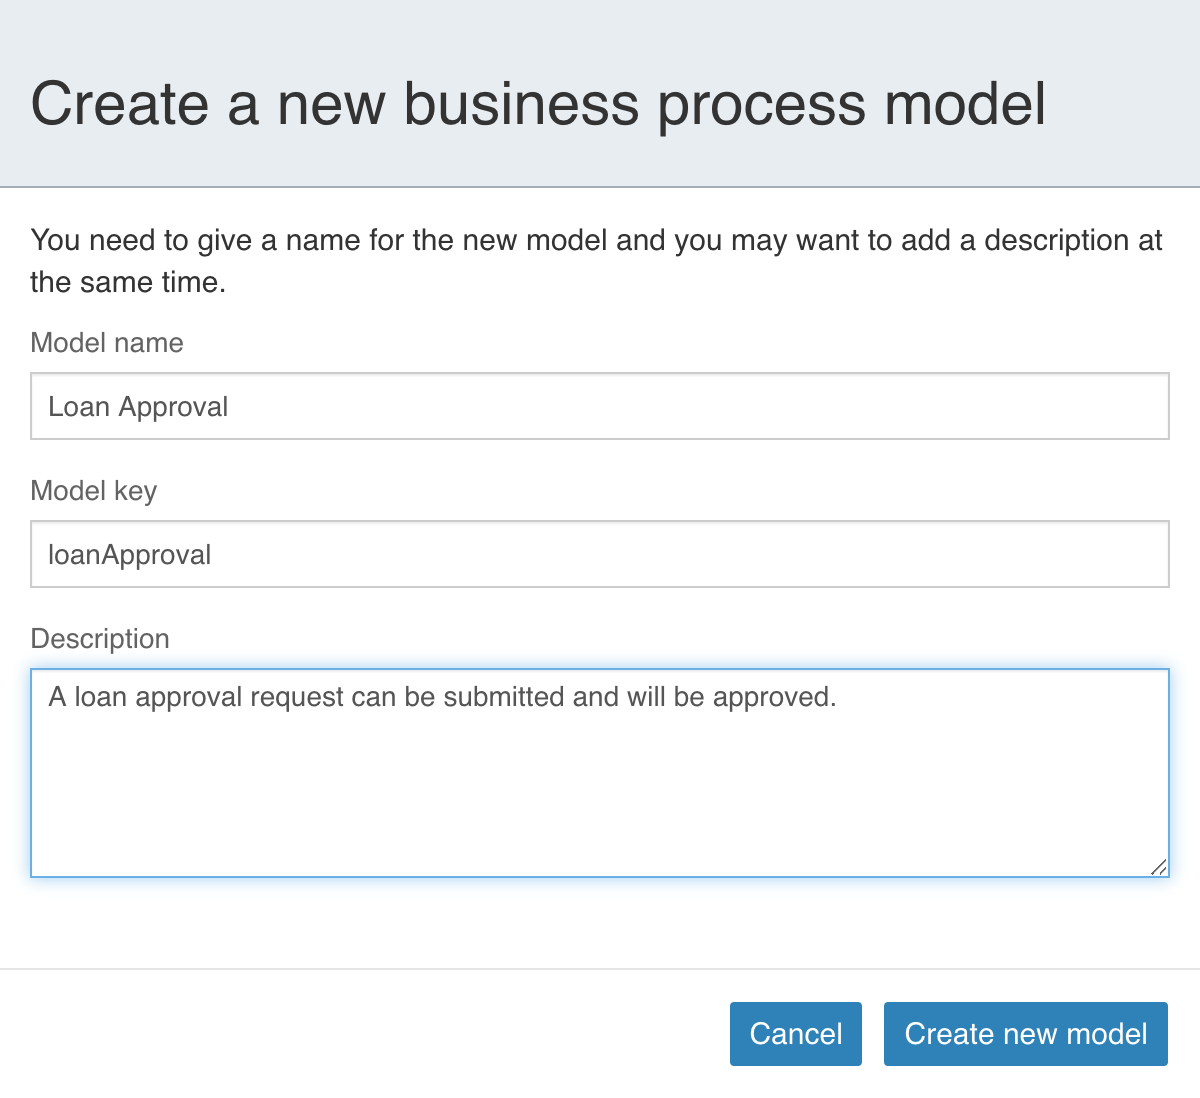
Step 1: Create the Business Process Model
In Flowable Design, select the Processes section and then Create process.
Enter Loan Approval as the 'Model name', loanApproval as the 'Model key'
and A loan approval request can be submitted and will be approved. as the
'Description'.
To create the model, select the Create new model button.
Step 2: Create the 'Loan Request Intake' Step
After creating the process model, you are directed to the BPMN designer. Here we can model our process.
We start by creating the Intake Form. For this, we create a
BPMN User task with a form.
Step 2A: Create the 'Loan Request Intake User Task'
Select the User task from the palette on the left-hand side and
drag it to the canvas (the middle section).
Double click the User task and rename it to Loan Request Intake.
Connect the Start event with the newly created User task by selecting
the Start event and selecting the arrow from the popover options
and drag it to the Loan Request Intake User task.
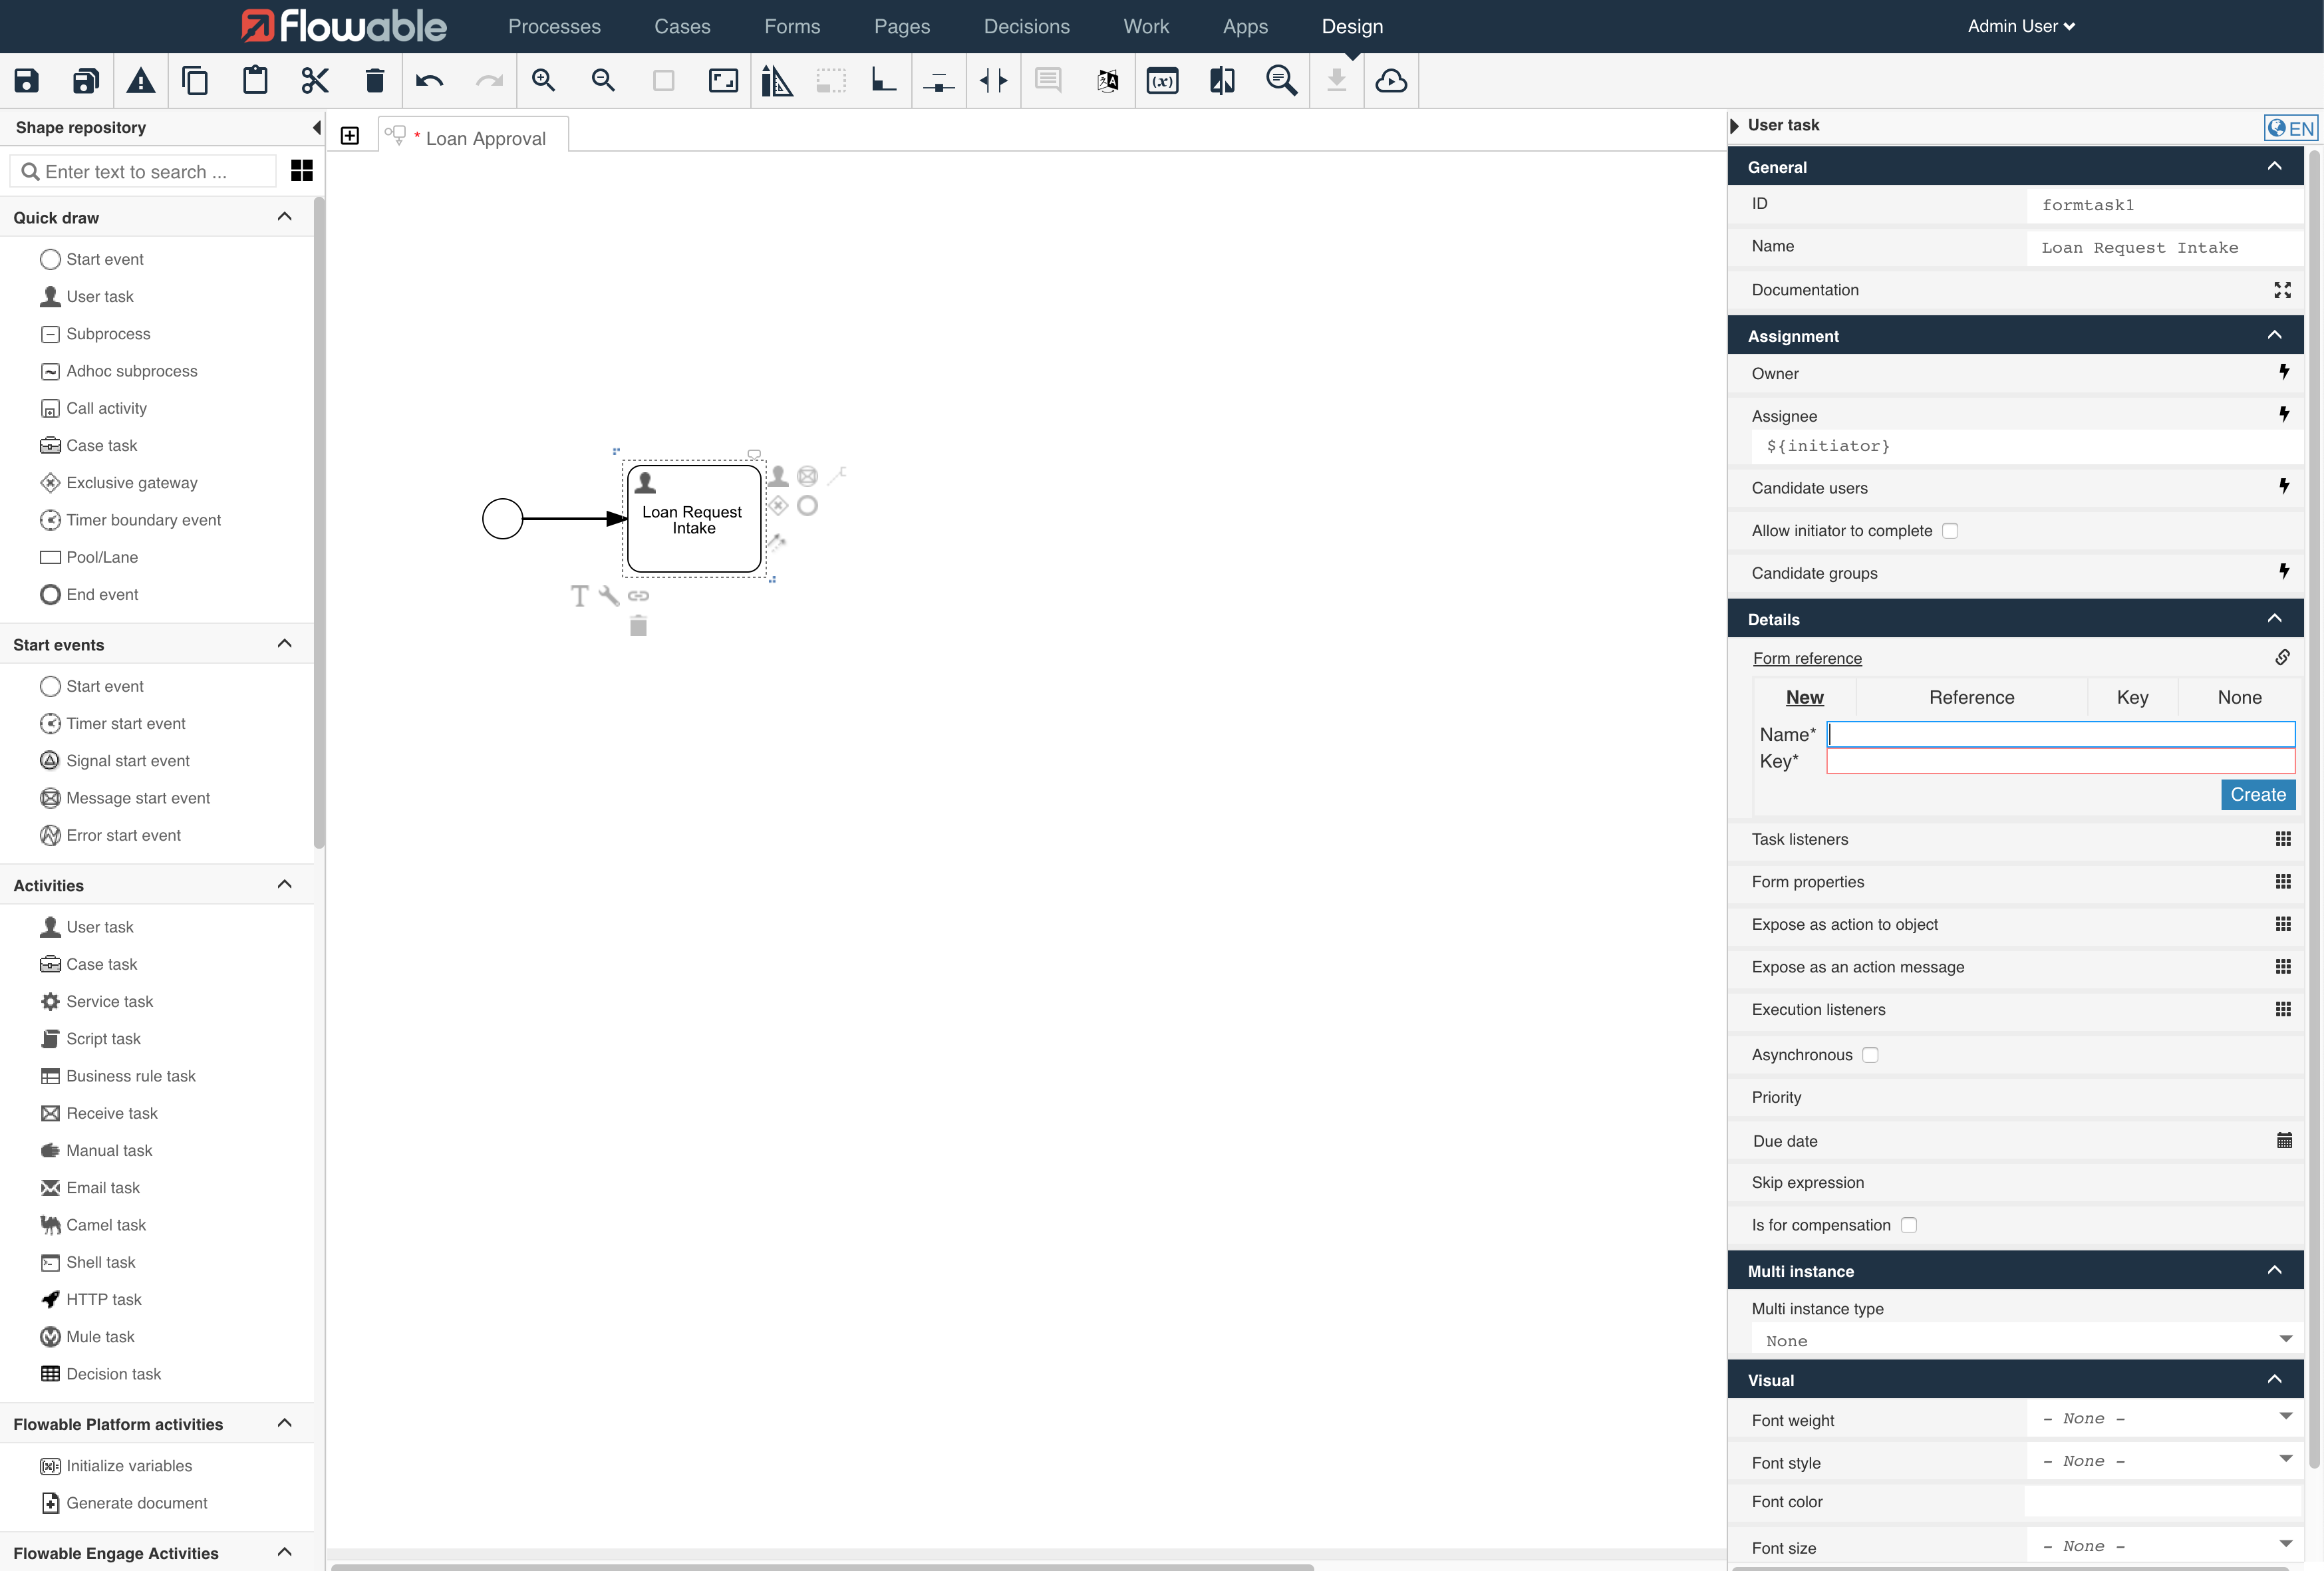
Next, we create a new form and attach it to the user task.
Select Details>Form reference in the panel on the right.
(After you select the Loan Request Intake.)
In the New tab enter Loan Request Intake as 'Name' and loanRequestIntake
as 'Key'. Then select Create.
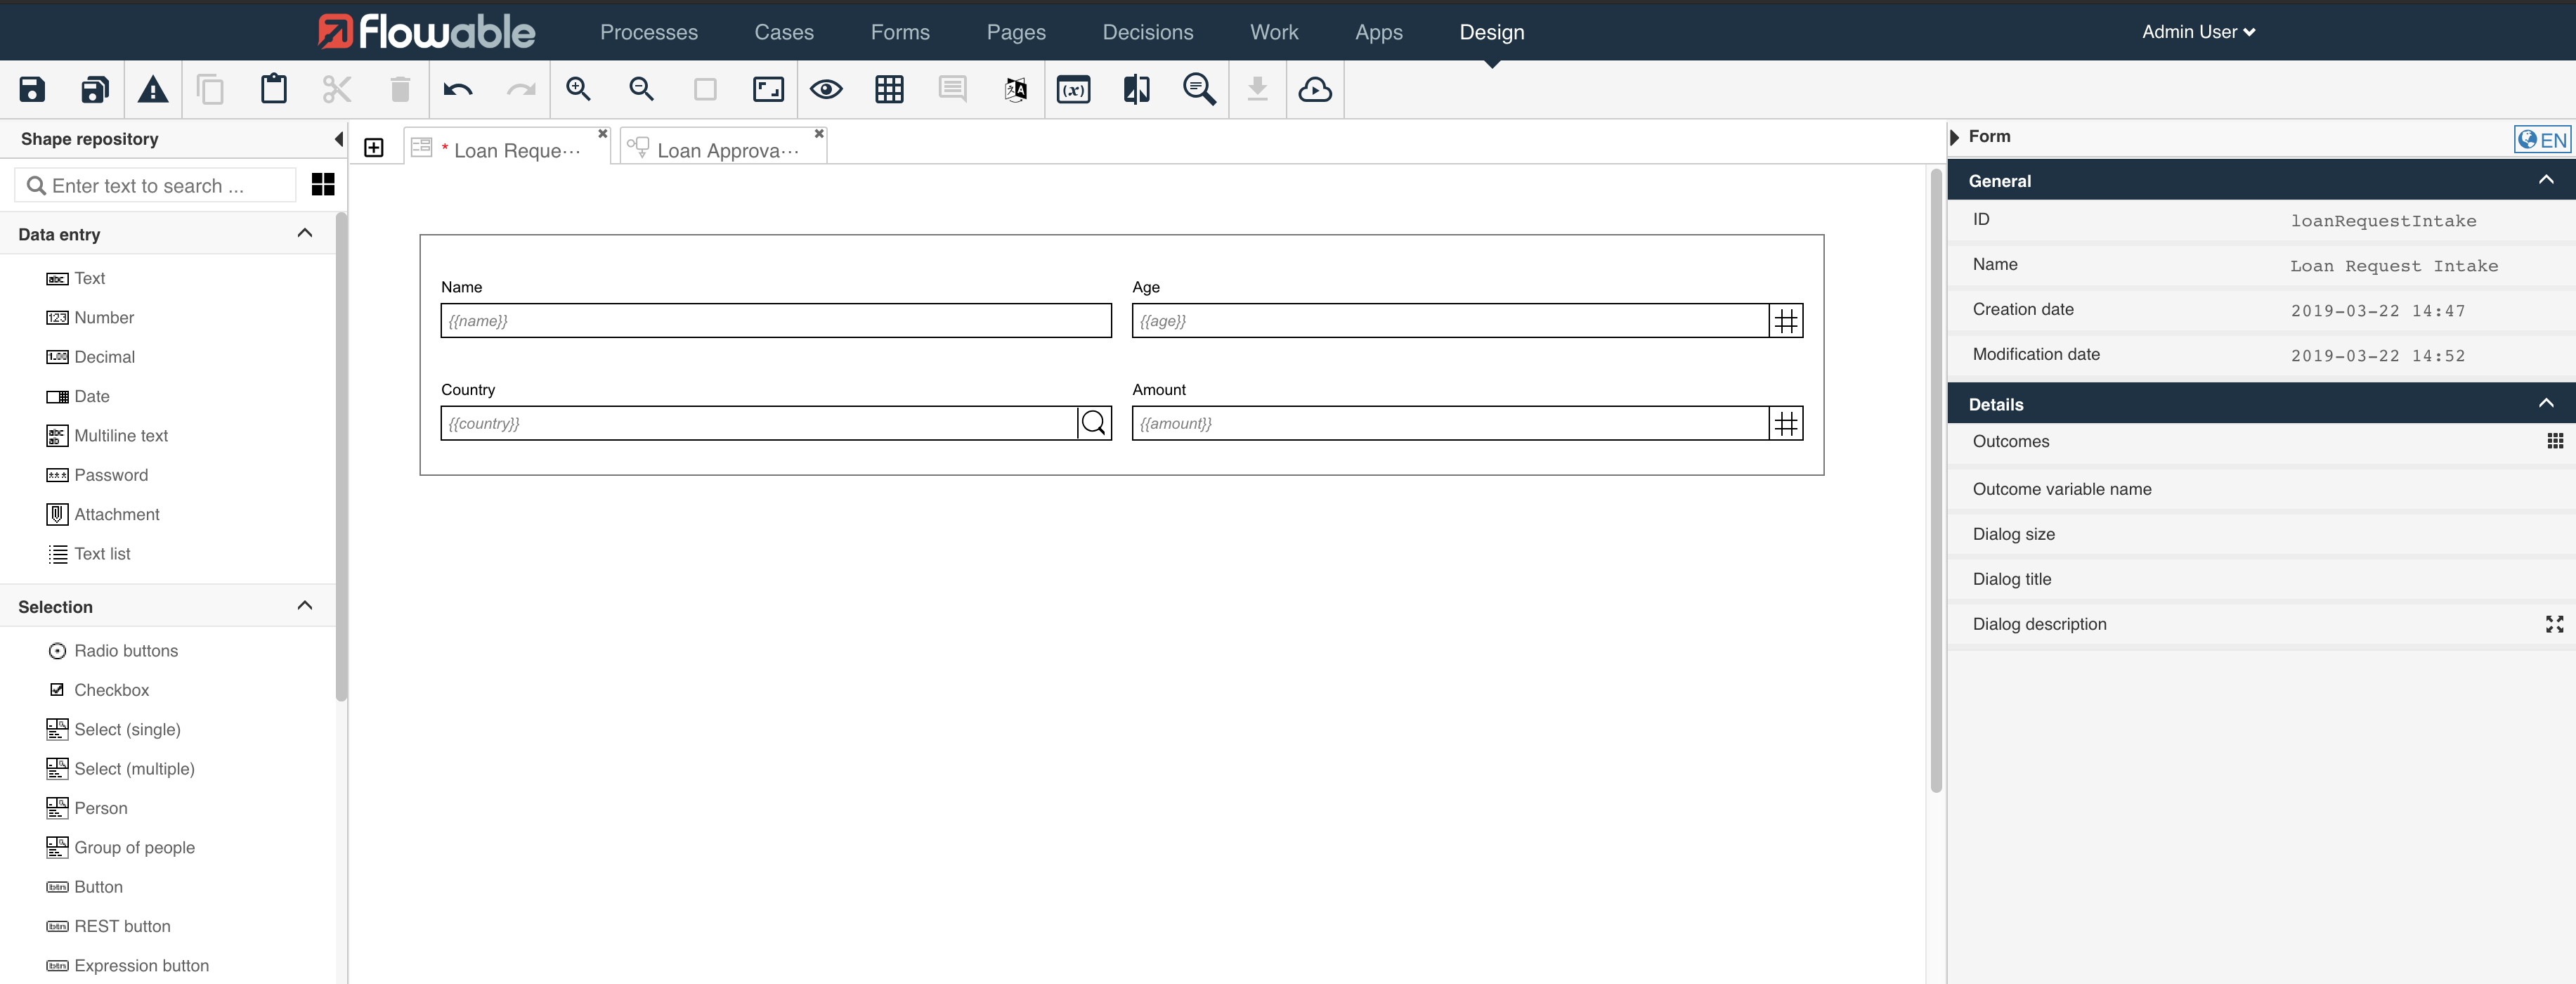
Step 2B: Create the 'Loan Request Intake Form'
In the Form Designer, we create the Intake form by dragging the required input fields onto the canvas.
Select the following data entry items from the palette on the left side and drag them to the canvas (the middle section).
When placing the fields on the canvas give them the following names and ids:
-
type: 'Text', name: Name, id: name.
-
type: 'Number', name: Age, id: age.
-
type: 'Select (single)', name: Country, id: country.
-
type: 'Number', name: Amount, id: amount.
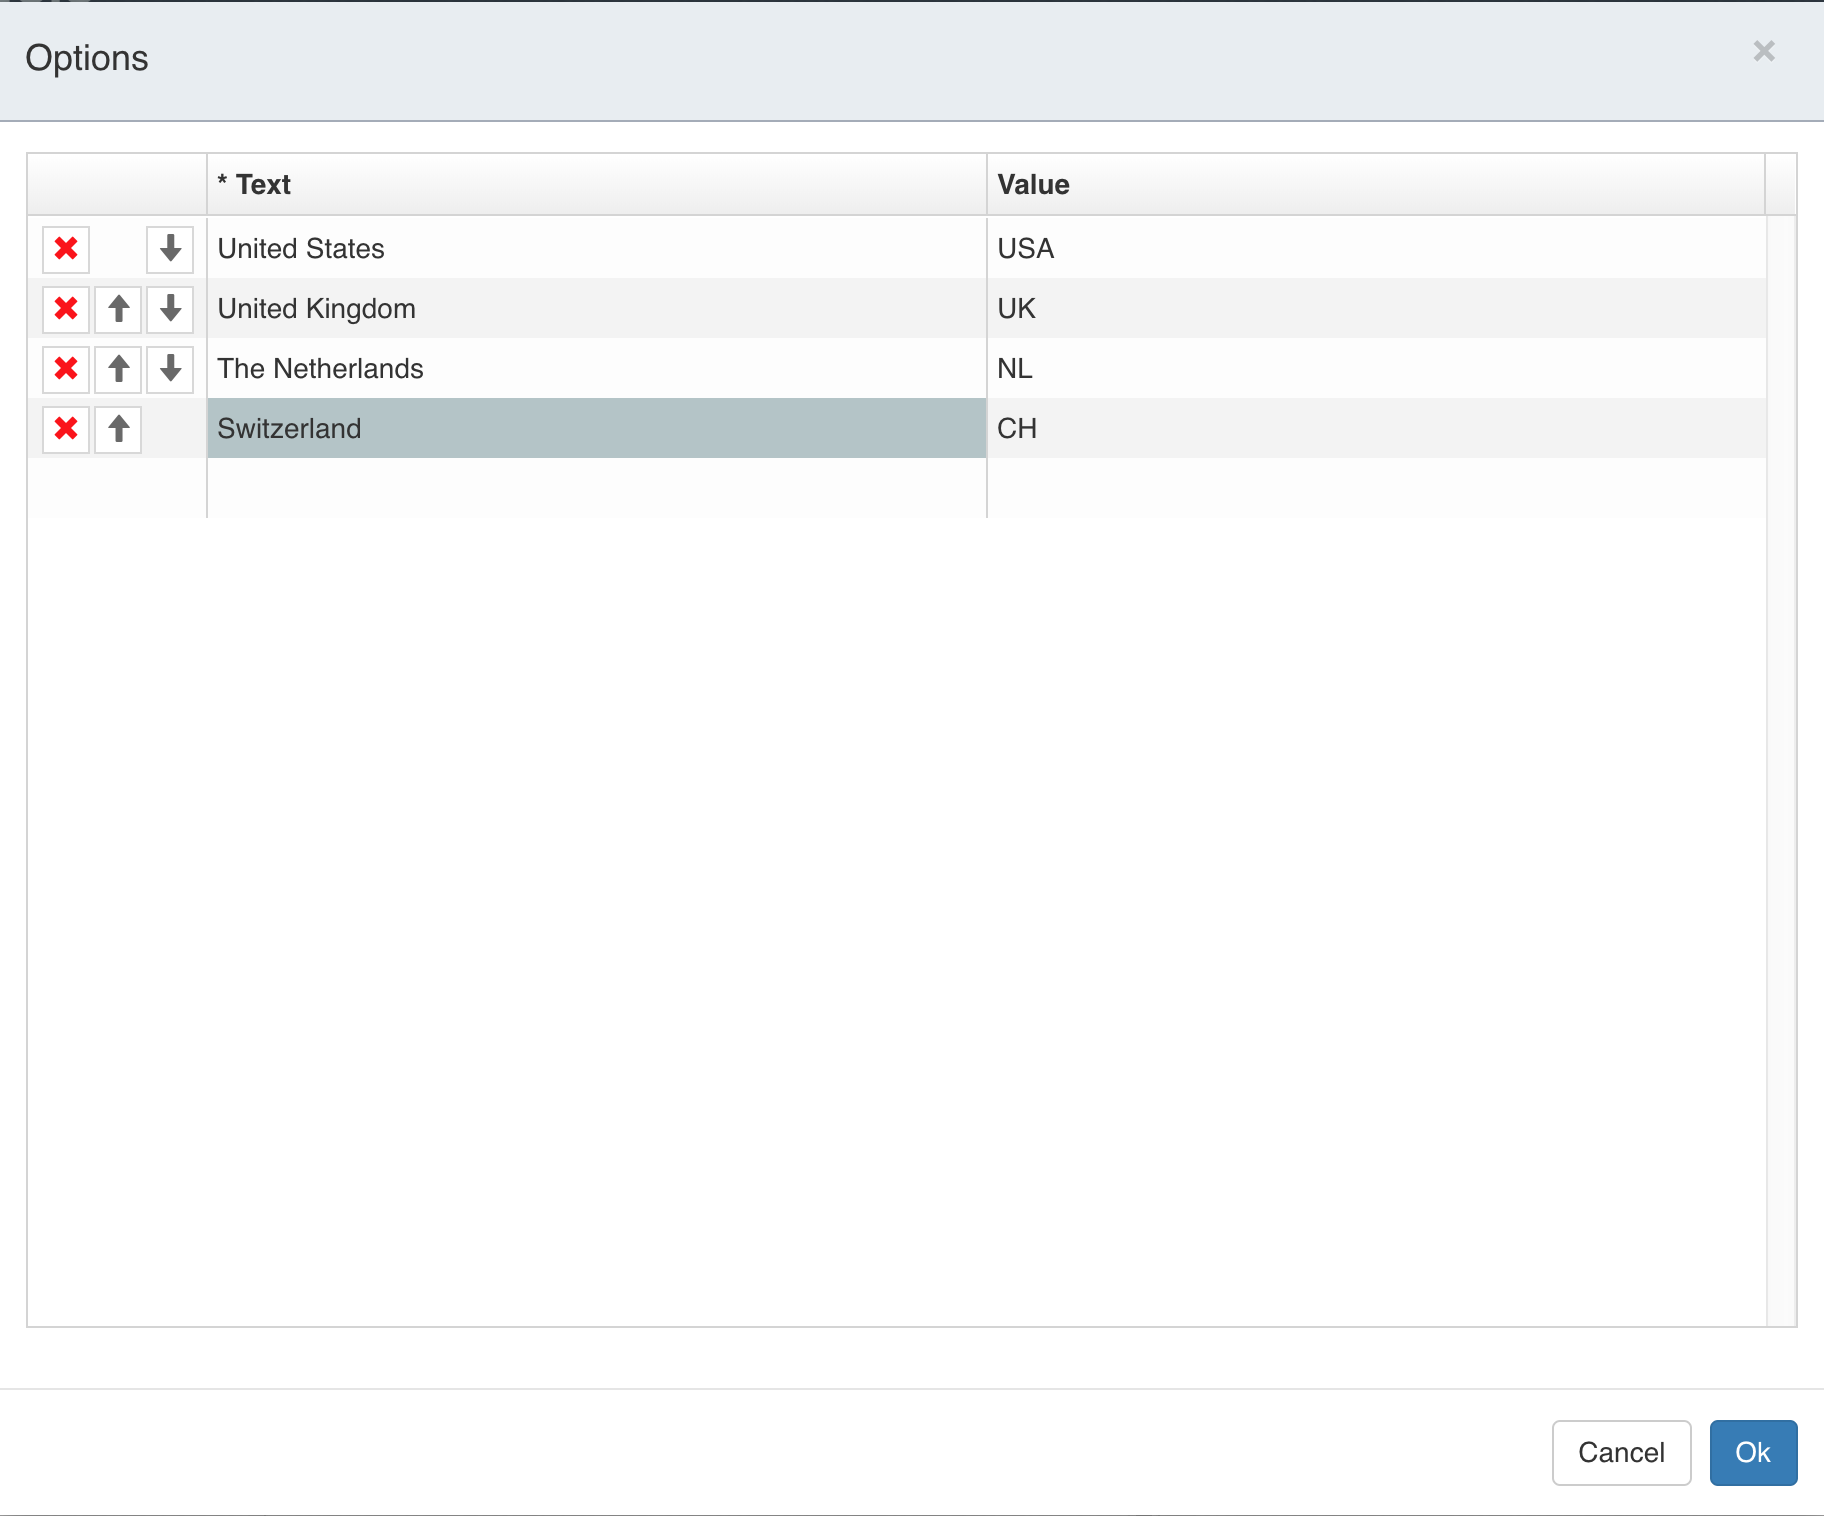
The 'Single select' field country needs to have a list of values configured.
This is done by selecting the field and then selecting Data source>Items
in the panel on the right side of the screen.
Fill in the following country values:
-
Text: United States, Value: USA
-
Text: United Kingdom, Value: UK
-
Text: The Netherlands, Value: NL
-
Text: Switzerland, Value: CH
Finally, select Ok.
The form is done and is saved by selecting the Save button in the toolbar. After the form is saved, navigate back to the process by selecting the 'Loan Approval Process' tab.
Step 3: Create the 'Evaluate Loan Request' step
In this step, a DMN decision table is used to evaluate the loan request. The decision about the loan is accomplished evaluating rules that utilize the data entered on the submitted form (intake).
The decision table can determine if a request is declined, approved, or if there is the need for a review.
The table consists of the following rules:
-
When the requester’s age is under 21 the request is declined.
-
When the requester’s age is 21 or over, lives in The Netherlands or Switzerland, and the requested amount is equal to or greater than 100000, a review is required.
-
When the requester’s age is 21 or over, does not live in The Netherlands or Switzerland, and the requested amount is equal to or greater than 100000, the request is declined.
-
When the requester’s age is 21 or over, and the amount is less than 100000, the request is approved.
A decision table can have different 'hit policies'. The hit policy determines what the result of the decision table is when multiple rules are valid. In this case, we want that only one rule can be valid. For this, we chose the hit policy 'Unique'. If we design a table that, depending on the input data, has multiple valid rules, this would result in an invalid result.
Step 3A: Create the 'Evaluate Loan Request Decision Task'
Select the Activites>Decision task from the palette on the left-hand side and drag
it to the canvas (the middle section).
Double click the Decision task and rename it to Evaluate Loan Request.
Connect the Loan Request Intake task with the newly created Decision task by
selecting the Loan Request Intake task and selecting the arrow from the
popup options and drag it to the Evaluate Loan Request decision task.
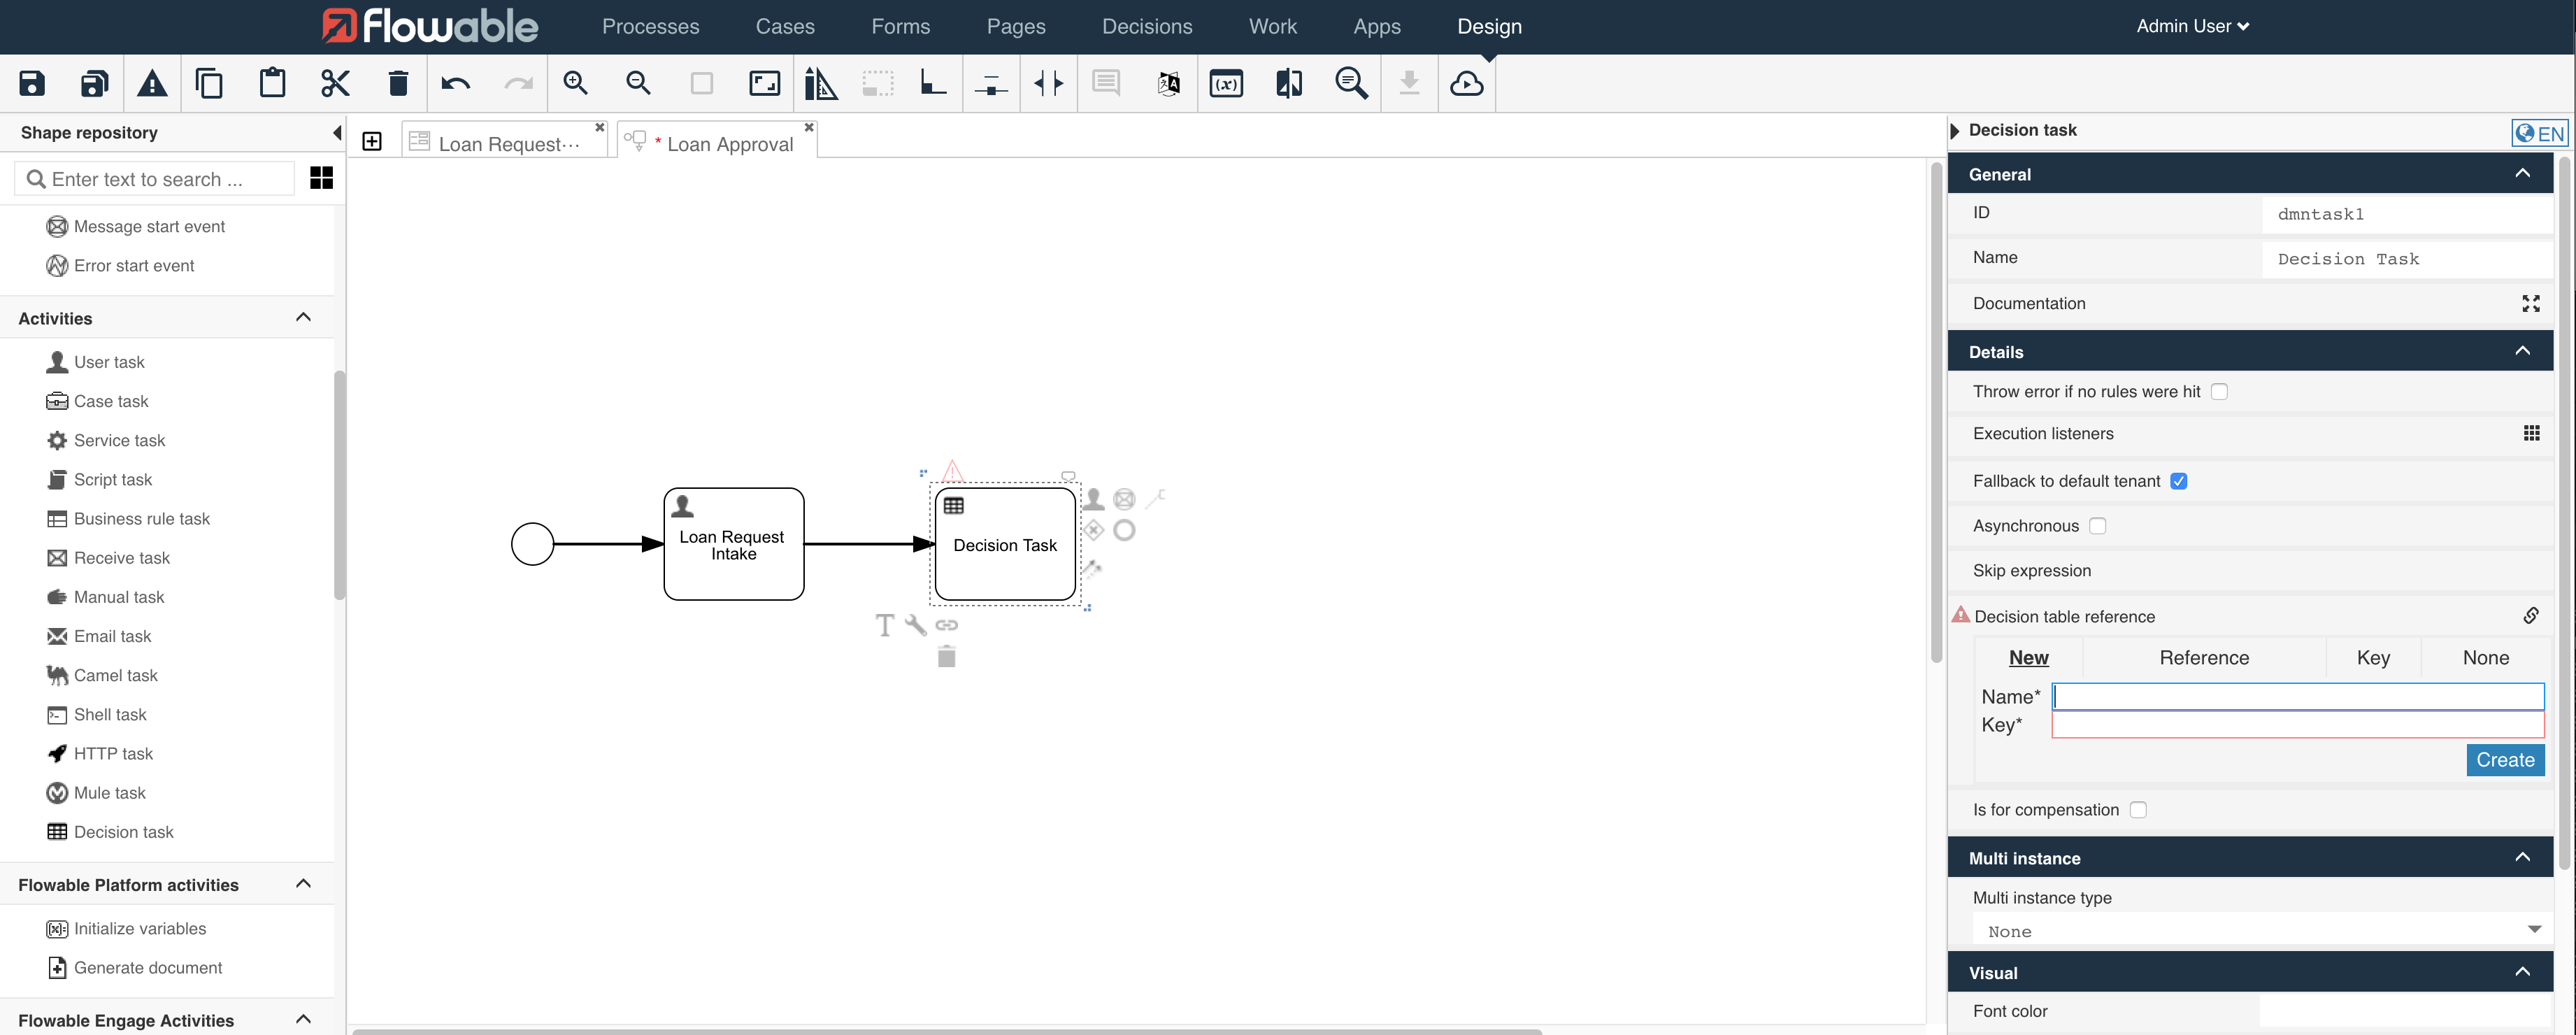
We can now create the Decision Table and attach it to the Decision task by clicking the
Details>Decision table reference attribute in the panel on the right side of the screen.
In the New tab set the 'Name' to Evaluate Loan Request and the 'Key' equal
to evaluateLoanRequest.
Finally, select the Create button.
Step 3B: Create the 'Evaluate Loan Request Decision Table'
The DMN Decision Table Editor is automatically opened after creating the decision table.
A decision table consists of rules that have one or more expressions and one or more outcomes (outputs). The expressions are evaluated using the defined input data (inputs). In this case, some of the data from our intake form are used. This is done by referring to the variable names used in the definition of the intake form.
Inputs
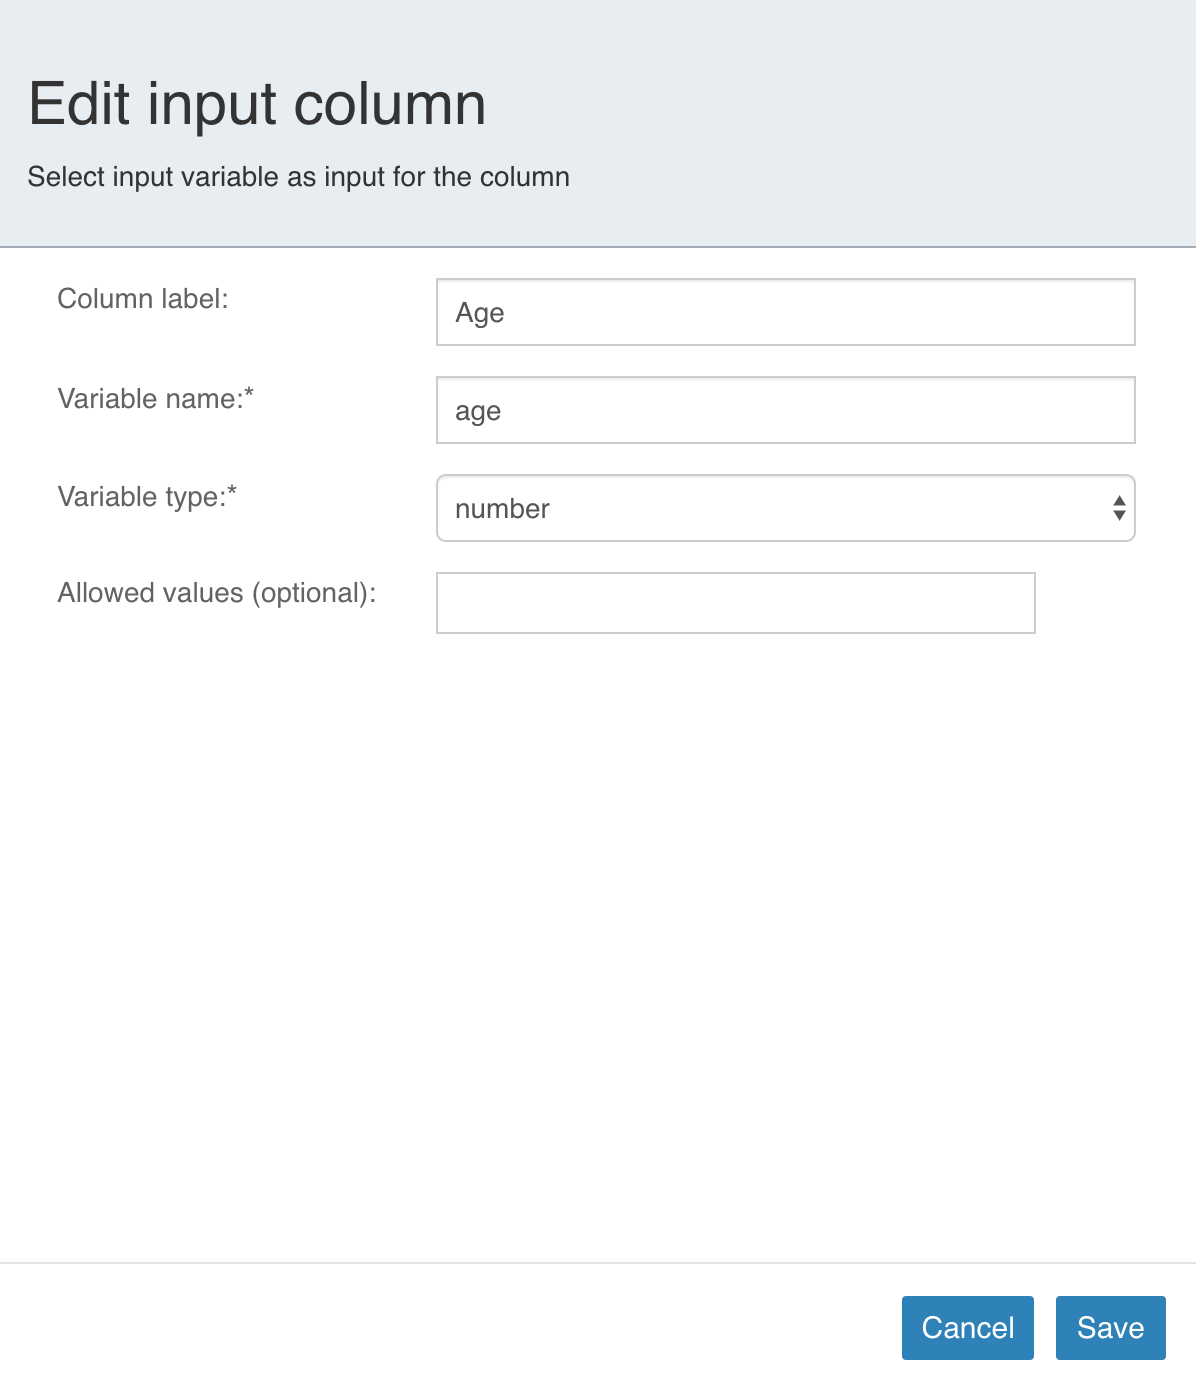
Let us start by defining the inputs. Select the left column header New Input and
enter the following values:
- Column label: Age, Variable name: age, Variable type: number.
Next, select Save and then create two more input columns by
selecting the 'plus sign' in the Age column.
Specify the following information for each of the two new columns:
-
Column label: Country, Variable name: country, Variable type: string
-
Column label: Amount, Variable name: amount, Variable type: number
Outputs
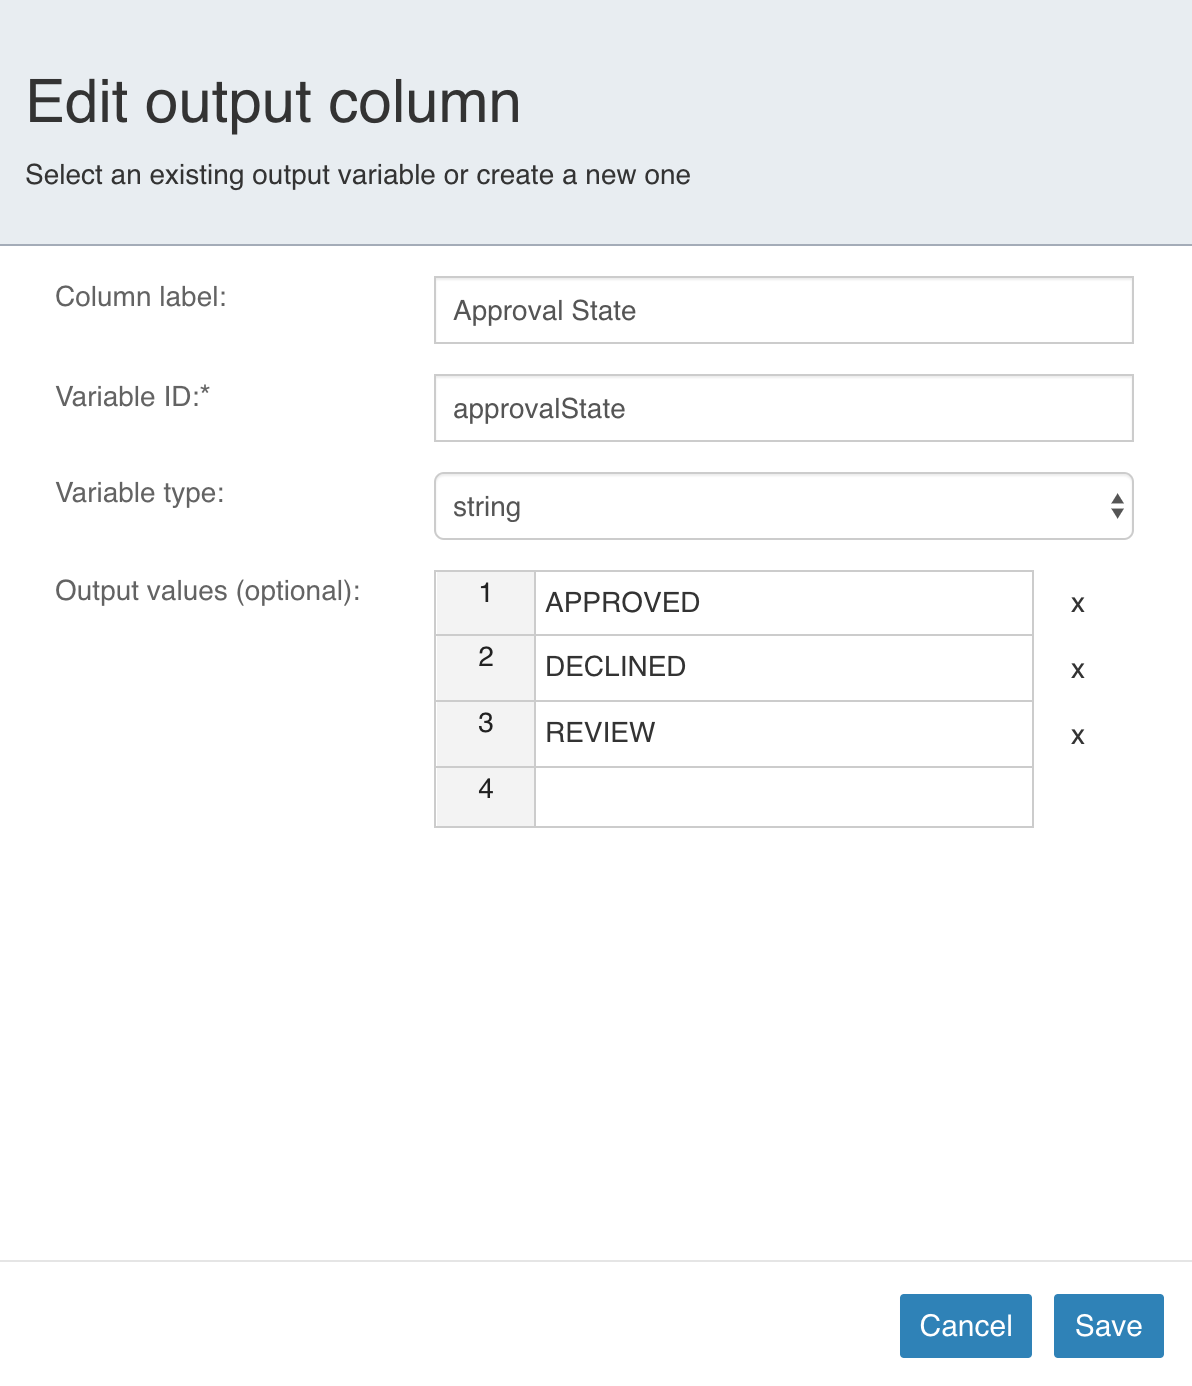
Now we define the output column. Select the most right column header
New Output and fill in the 'Column label' with Approval State, the
'Variable' with approvalState, and the 'Variable type' with string.
For 'Output values', enter APPROVED, DECLINED, and REVIEW each
into a row of their own.
Again select Save. We now have the inputs and outputs defined and can
proceed with constructing the rules.
Rules
Each condition of a rule is constructed by specifying a value and an operator. The available operators depend on the variable type of the 'column'.
 note
noteThere are two exceptions. One is when using the 'dash value'. The other is when using a custom Java Unified Expression Language (JUEL) expression. The dash operator ('-') means that the expression for that rule is ignored when evaluating the table. A custom JUEL expression is declared with surrounding '=' of '$' syntax.
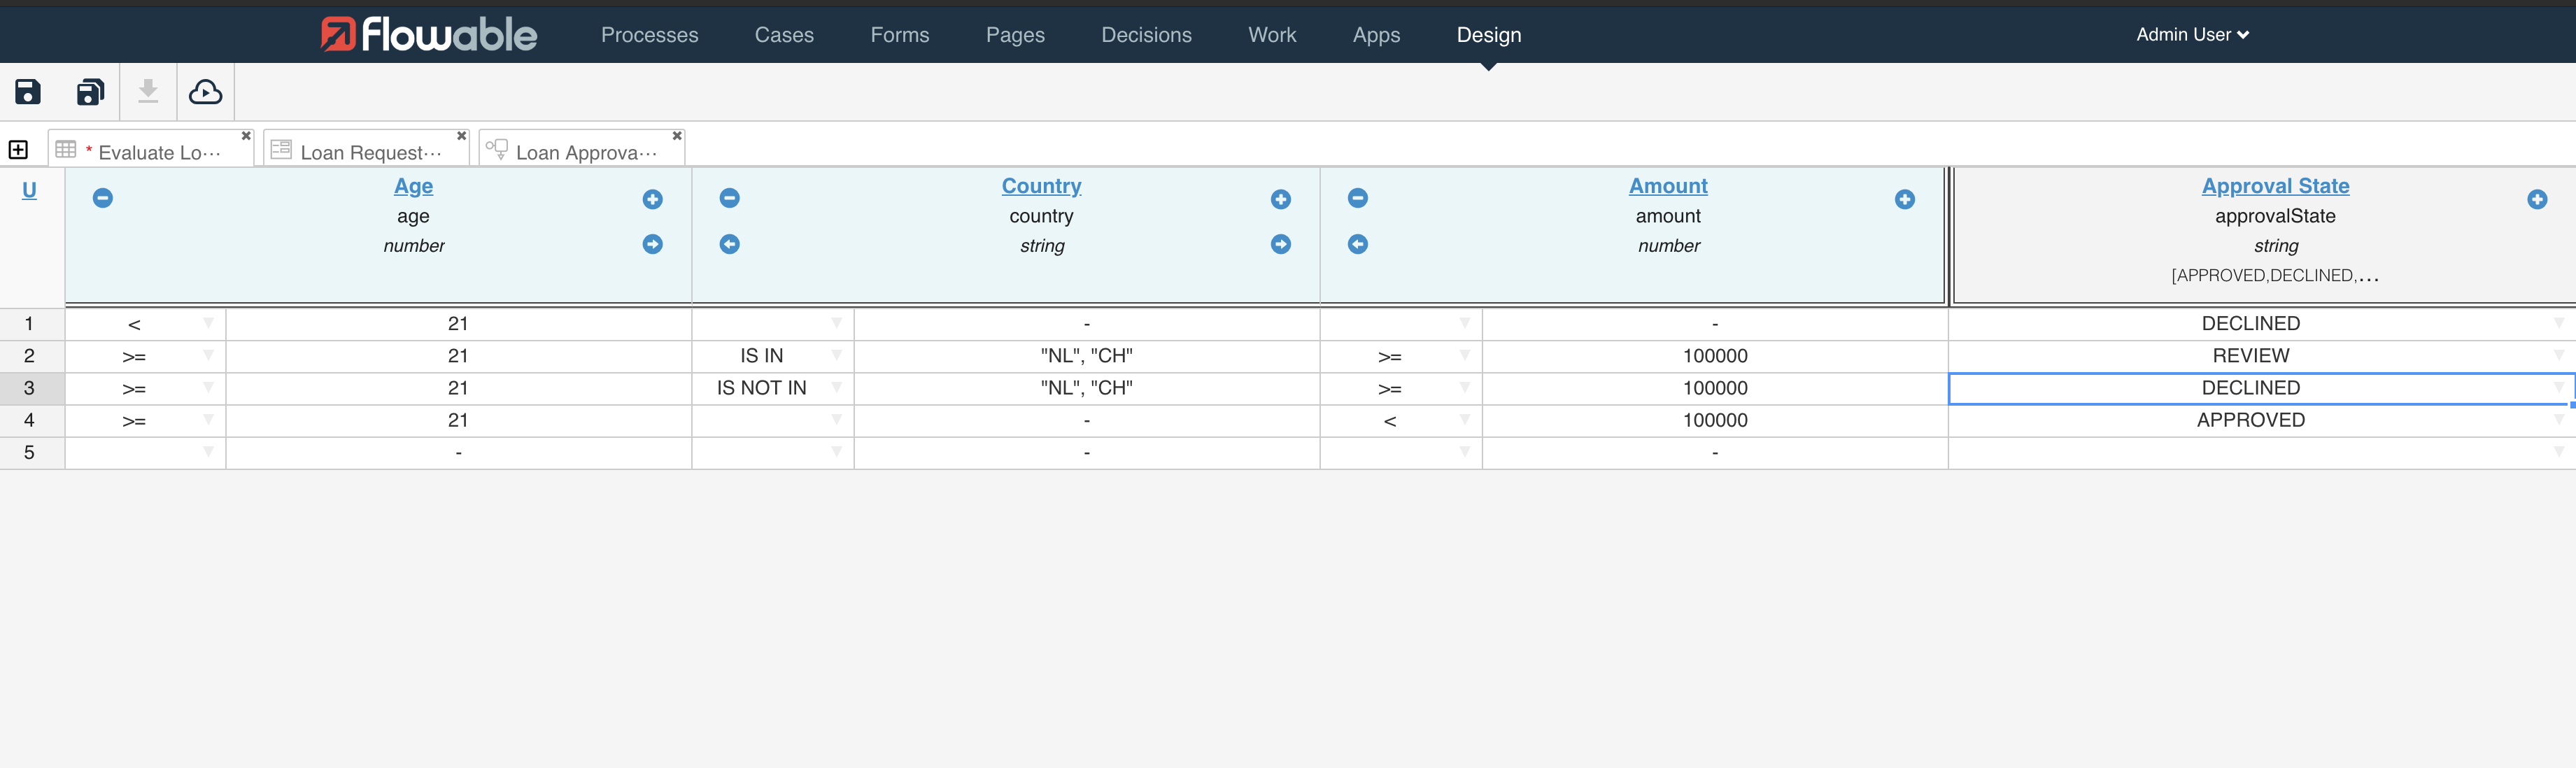
For this example, Create the following rules:
-
Age: < 21 / Country: - / Amount: - / Approval State: DECLINED
-
Age: >= 21 / Country: IS IN "NL", "CH" / Amount: >= 100000 / Approval State: REVIEW
-
Age: >= 21 / Country: IS NOT IN "NL", "CH" / Amount: >= 100000 / Approval State: DECLINED
-
Age: >= 21 / Country: - / Amount: < 100000 / Approval State: APPROVED
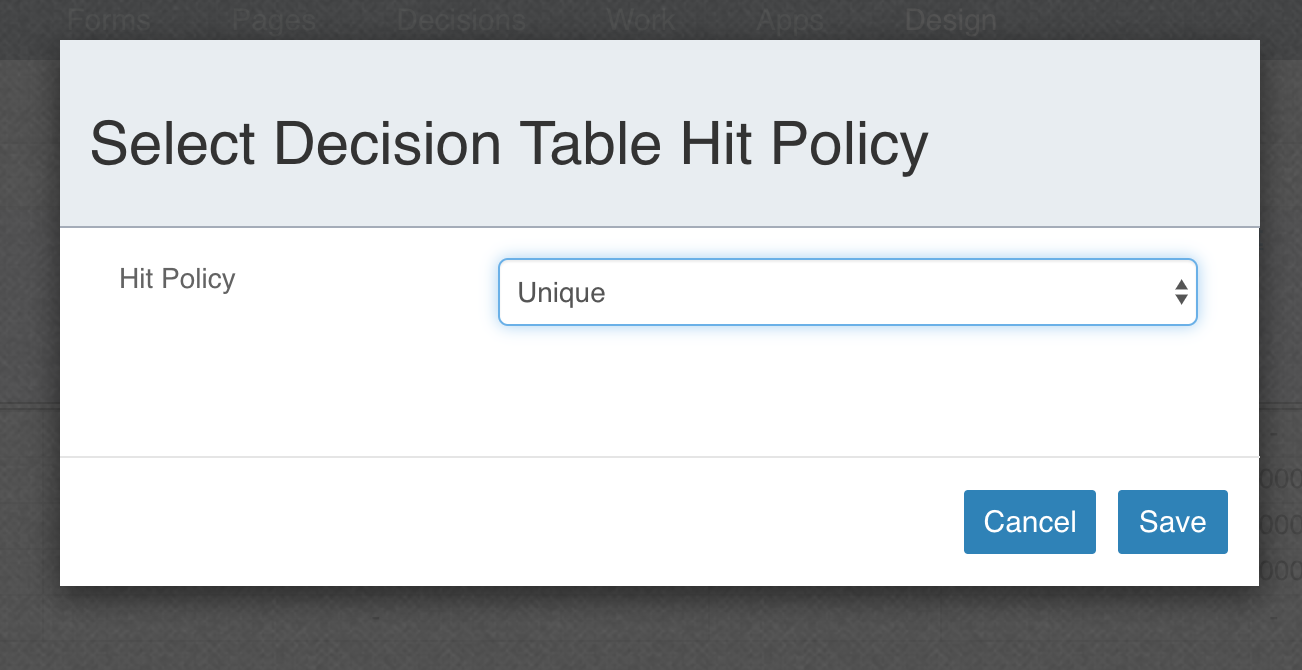
Finally set the hit policy by selecting the hit policy indicator in the upper
left-hand corner of the table. (By default there is an F for First.)
Select Unique as the policy and then Save.
Finally, save the Decision Table and return to the process view.
Step 4: Create the Exclusive Gateway (and End Events)
The resulting output of the valid rule is set as the value of the defined
output variable. In this case, there is a variable with the name approvalState
with the value, 'APPROVED', 'DECLINED' or 'REVIEW' on the process execution scope.
We can use that value to route our process to the next stage. Let us do that
by creating an exclusive gateway and conditional sequence flows.
Step 4A: Exclusive Gateway
Select the Exclusive gateway from the Gateways section of the palette on the
left and drag it to the canvas.
Connect the Decision task with the Exclusive gateway with a sequence
flow (the arrow type line connector).
Step 4B: End Events
The result of the loan request is either approved or declined.
We, therefore, want the process to have two different end states.
We do that by defining two end events: APPROVED and DECLINED.
Select the End event in the palette and drag it to the canvas. Repeat the
same drag action for another End event.
Double click each End event and rename one to APPROVED and the other
DECLINED.
Step 4C: Conditional Sequence Flows
To navigate the process to one of the two end events based on a value, we set a condition on the sequence flow.
Let us connect the 'Exclusive gateway' to both 'End events'.
Name the one connecting the APPROVED end event approved,
and the other one declined.
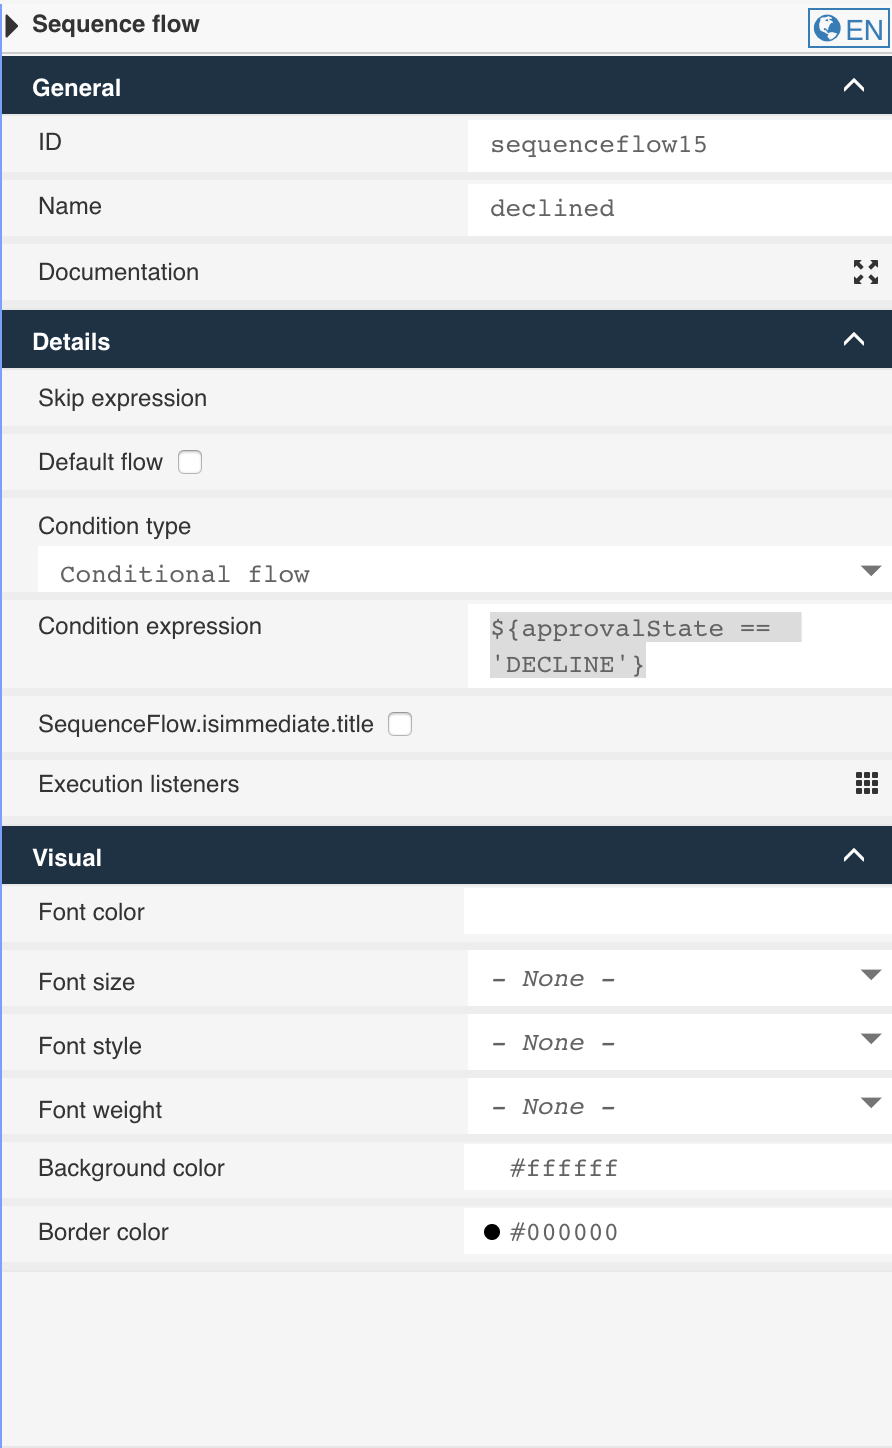
Now set the conditions by selecting the sequence flow and filling out
the Condition expression.
Set the field to ${approvalState == 'APPROVED'} for the approved sequence flow
and set ${approvalState == 'DECLINED'} for the declined sequence flow.
The process is defined to navigate to one of the two end events based on the
value of the variable approvalState.
Step 5: Create the 'Review Loan Request' Step
In the previous step, we defined the routing of the process based on
the decision table outcomes APPROVED and DECLINED.
There was another outcome: REVIEW. In this step, we create a review task
with which an appropriate user can manually approve or decline the request.
Step 5A: Create the 'Review Loan Request User Task'
Select the User task from the palette on the left and drag it to the canvas.
Double click the User task and rename it to Review Loan Request.
Connect the Exclusive gateway with the newly created User task using
a Sequence flow as we want to navigate to the Review Loan Request User Task
in all cases other than APPROVED and DECLINED mark this sequence flow as
the Default flow.
The default is set by selecting the sequence flow and then
Details>Default flow in the panel on the right and select the checkbox.
Step 5B: Create the 'Loan Request Intake Form'
To review the current loan request, we want to display the data
from Loan Request Intake Form.
Let us create a form as done in Step 2 above. First, create the
Loan Request Intake Form and in addition to the fields described in Step 2, add:
- type: 'Text', name: Remarks, id: remarks, value:
{{remarks}}
For approving or declining the loan request, we configure two custom outcomes.
Select the form canvas; make sure you do not select a form field. Then in
Details>Outcomes and enter the following values:
-
Label: Approve, Value: APPROVE
-
Label: Decline, Value: DECLINE
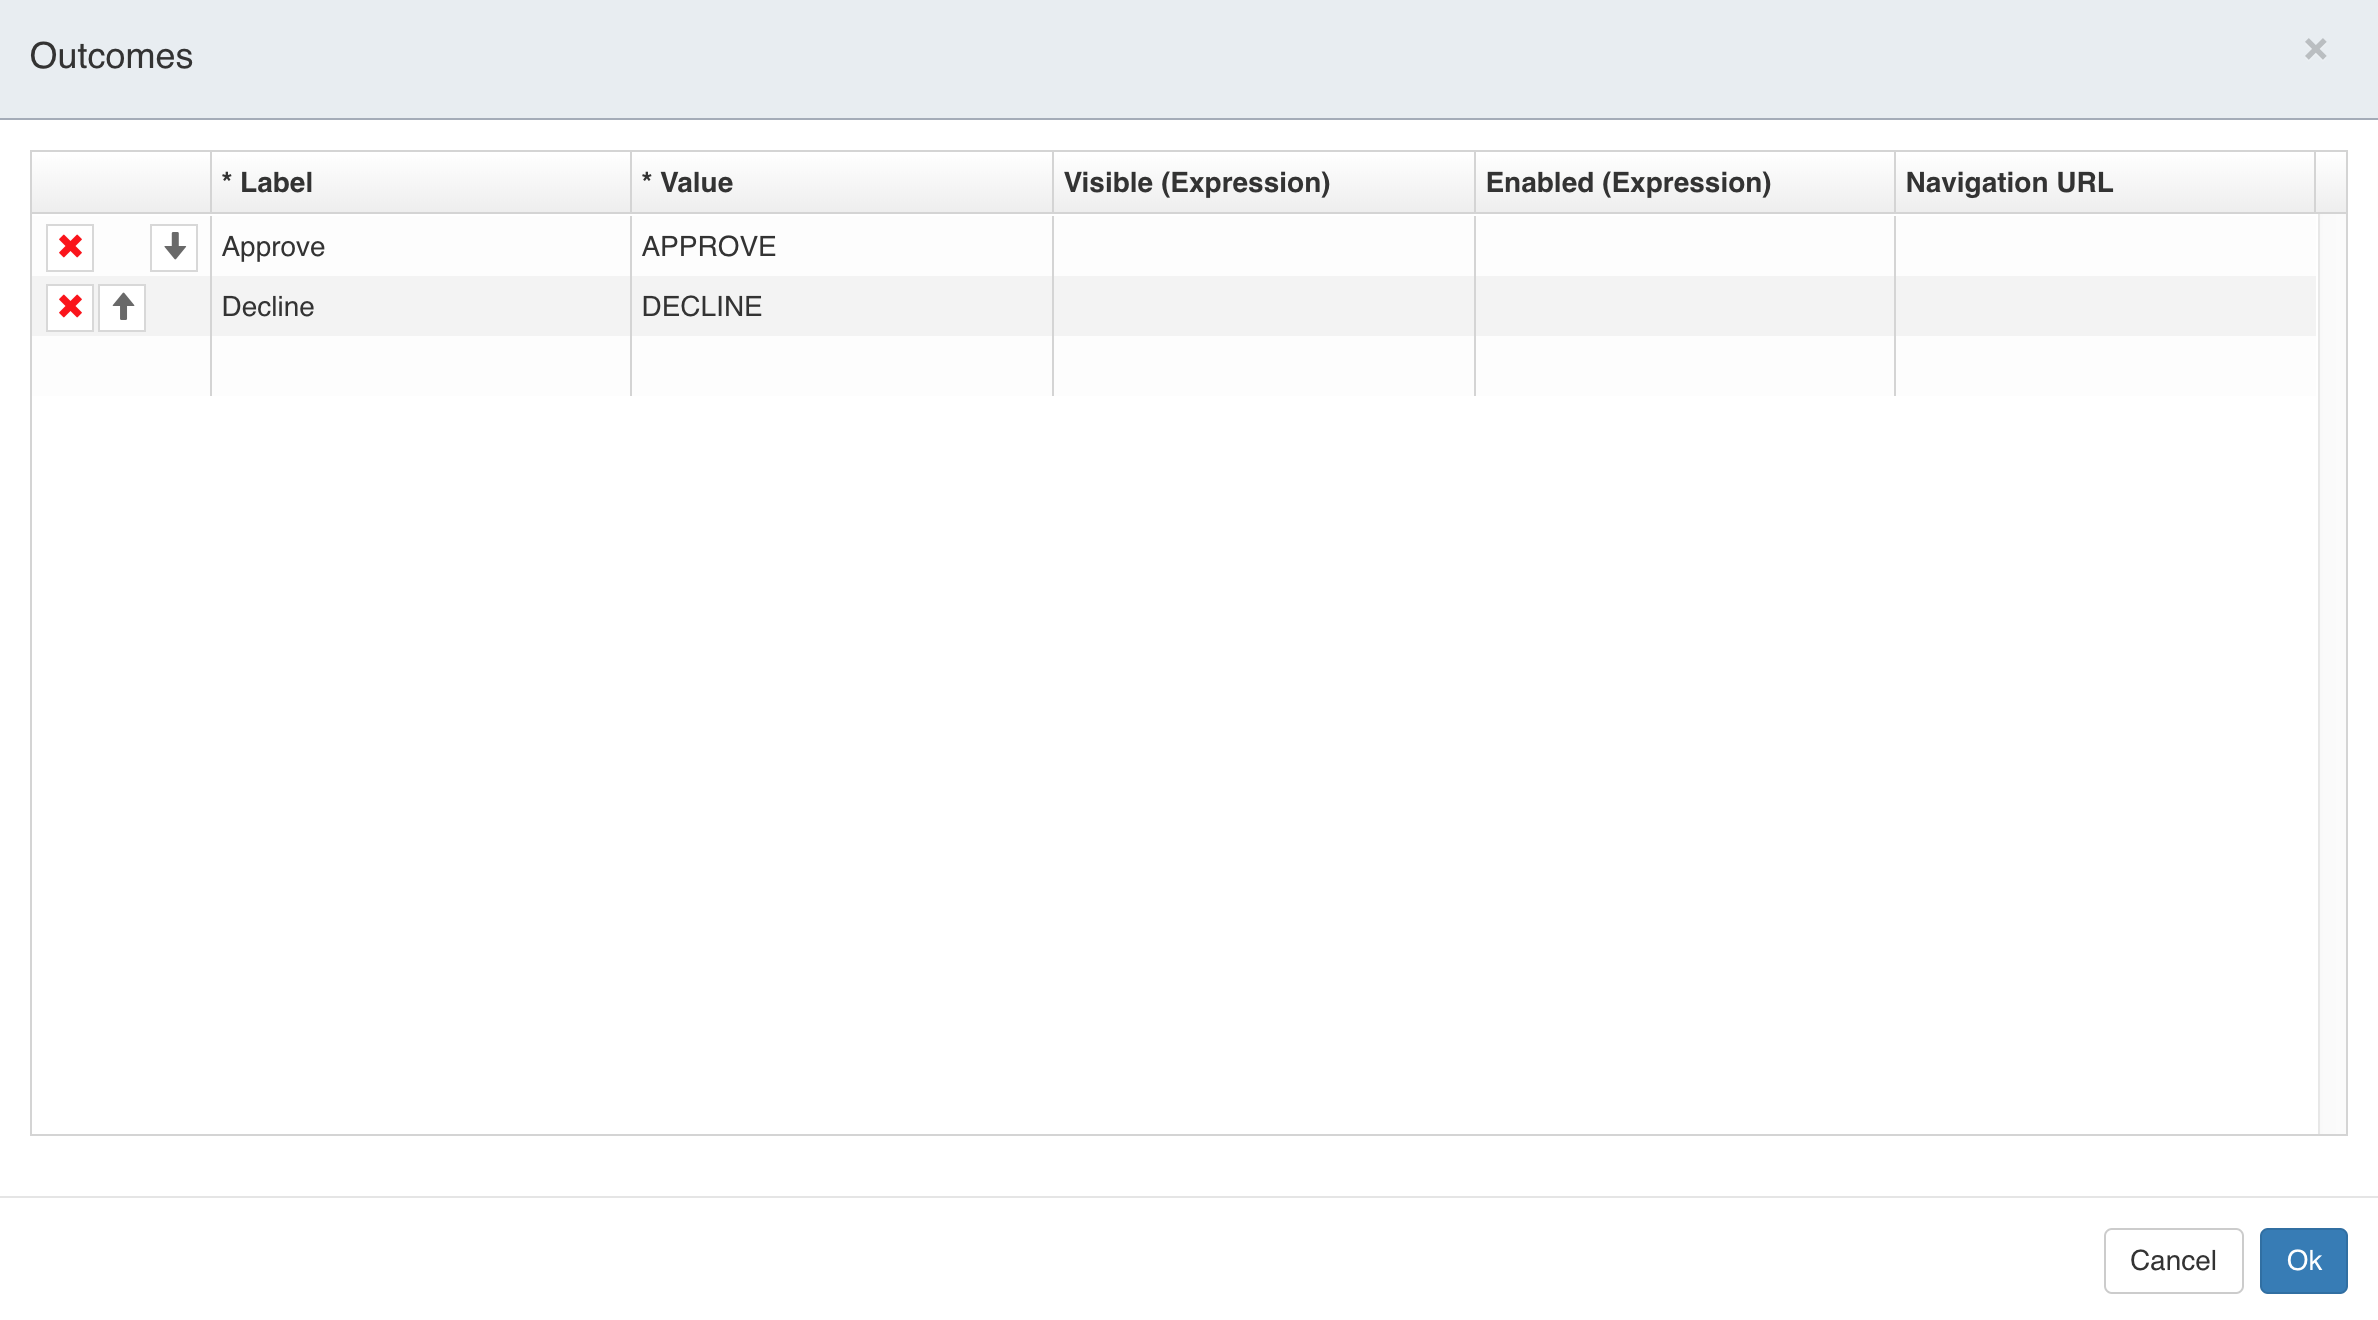
Next select Ok to save the information.
Finally set reviewState as the variable name in
Details>Outcome variable name in the attribute panel on the right.
Step 5C: Exclusive Gateway
Add another Exclusive gateway and connect the Review Loan Request User task
with a sequence flow.
Connect the sequence flows from the Exclusive gateway to both the APPROVED
and DECLINED End events.
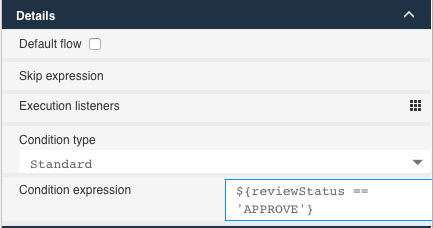
Next set the condition expression: ${reviewState == 'APPROVED'}
for the sequence flow connecting to the APPROVED' End event.
And enter the condition expression: ${reviewState == 'DECLINED'} for the
sequence flow connecting to the DECLINED End event.
Save the process model, and you are done modeling the Loan Request Approval Process.
Decision table: Deploy the Process
To execute the process in Flowable Work or Flowable Engage, we package the process (and the related artifacts; forms and decision table) into an App.
Create the App
Go to Apps in the top toolbar and select Create app.
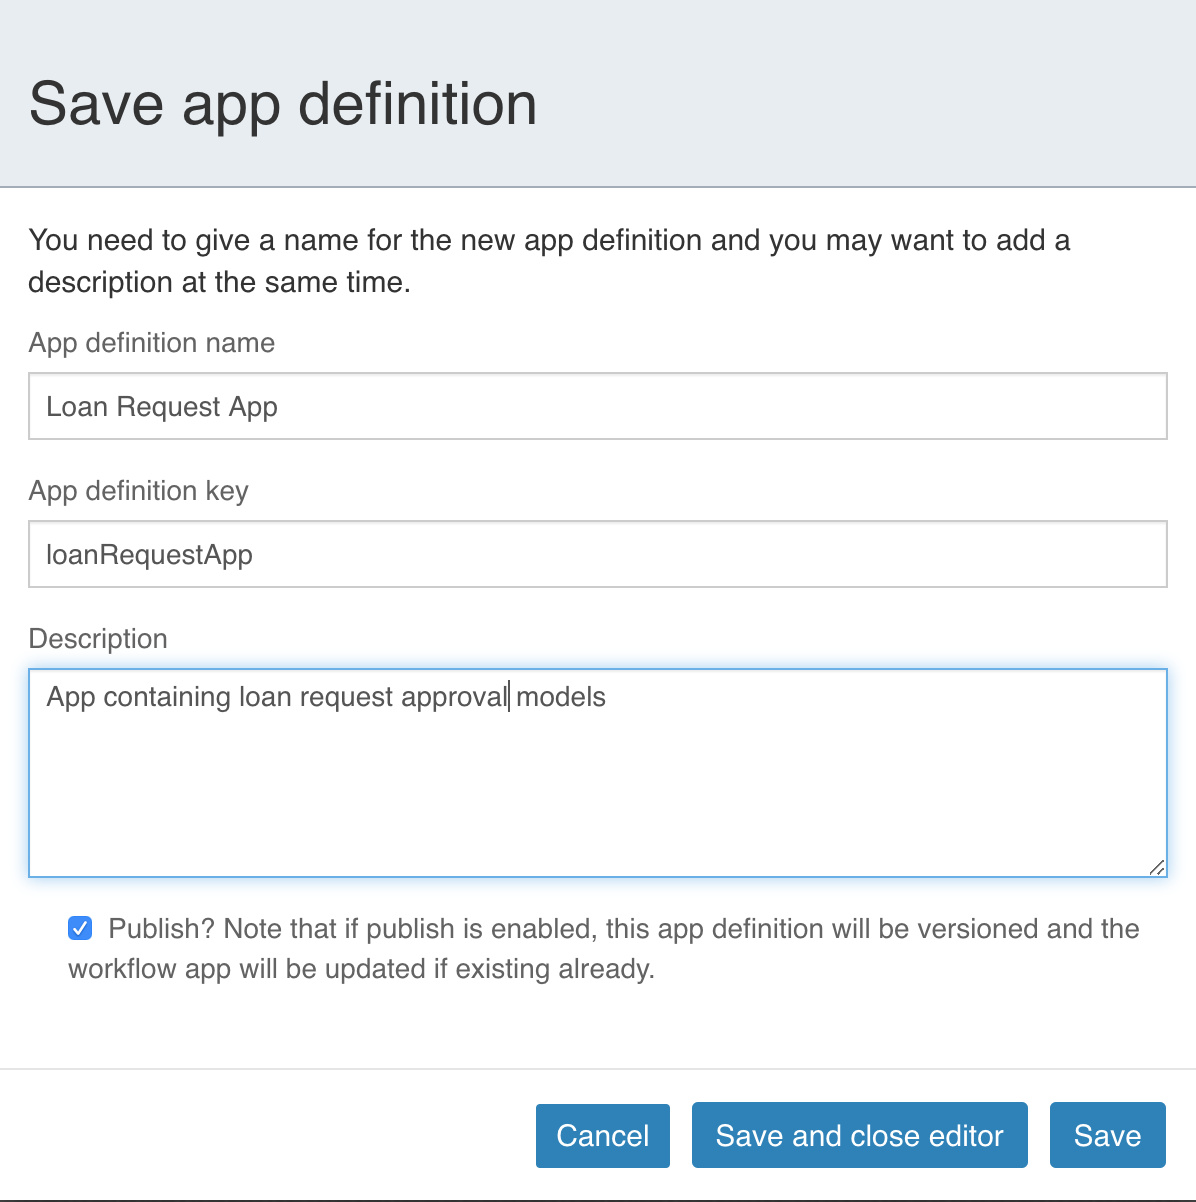
Then provide the following values:
-
App definition name: Loan Request App
-
App definition key: loanRequestApp
-
Description: App containing loan request approval models
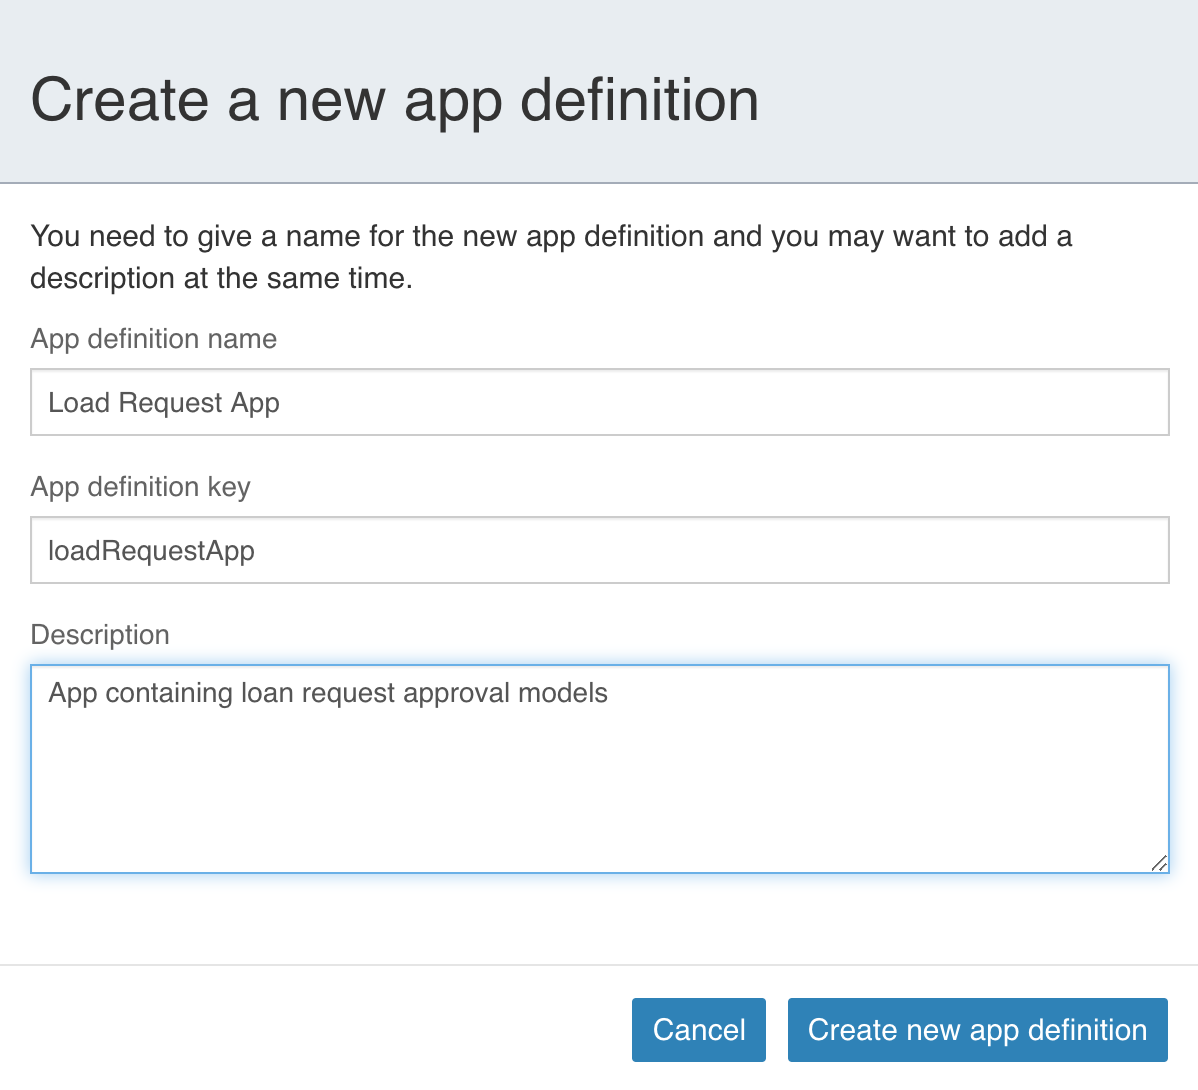
Select Create new app definition and the app is created.
In the next view, select the models you want to add to the app by clicking on
the Edit included models button.
In this case, select the Loan Approval Process in the BPMN Models section.
Then save the app definition by selecting the Save button (in the top left).
In the dialog, make sure to check the Publish? checkbox. Then select
Save and close editor.
The process (and associated forms and the decision table) is now deployed.
Decision table: Execute the Process
Flowable Engage is used to demonstrate the process and two different scenarios are showing the various potential outcomes of the decision table.
Scenario 1
In Flowable Engage select Work>Create new in the left menu.
Select the Loan Request Approval Process from the Loan Request App.
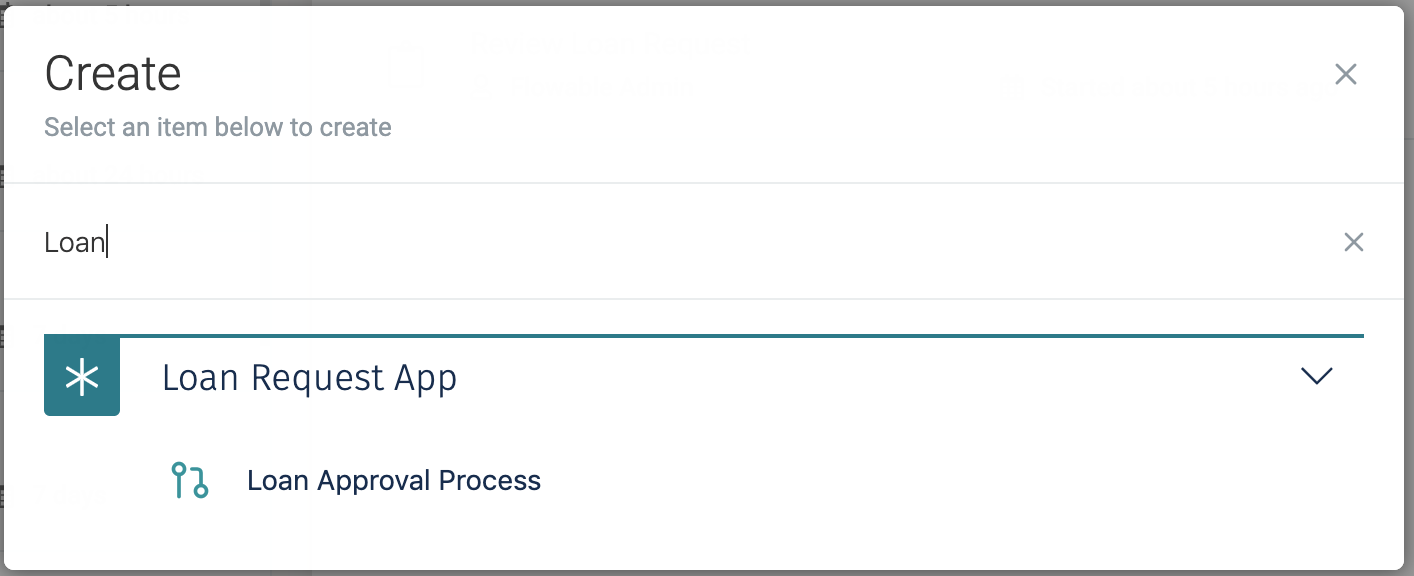
Select Continue.
A process instance is started and the process execution halts at the
first step; the Loan Request Intake user task.
Select the task in the Open tasks list.
The form is presented. In this first scenario, enter the following data:
-
name: Requestor One
-
age: 35
-
country: Switzerland
-
amount: 500.000
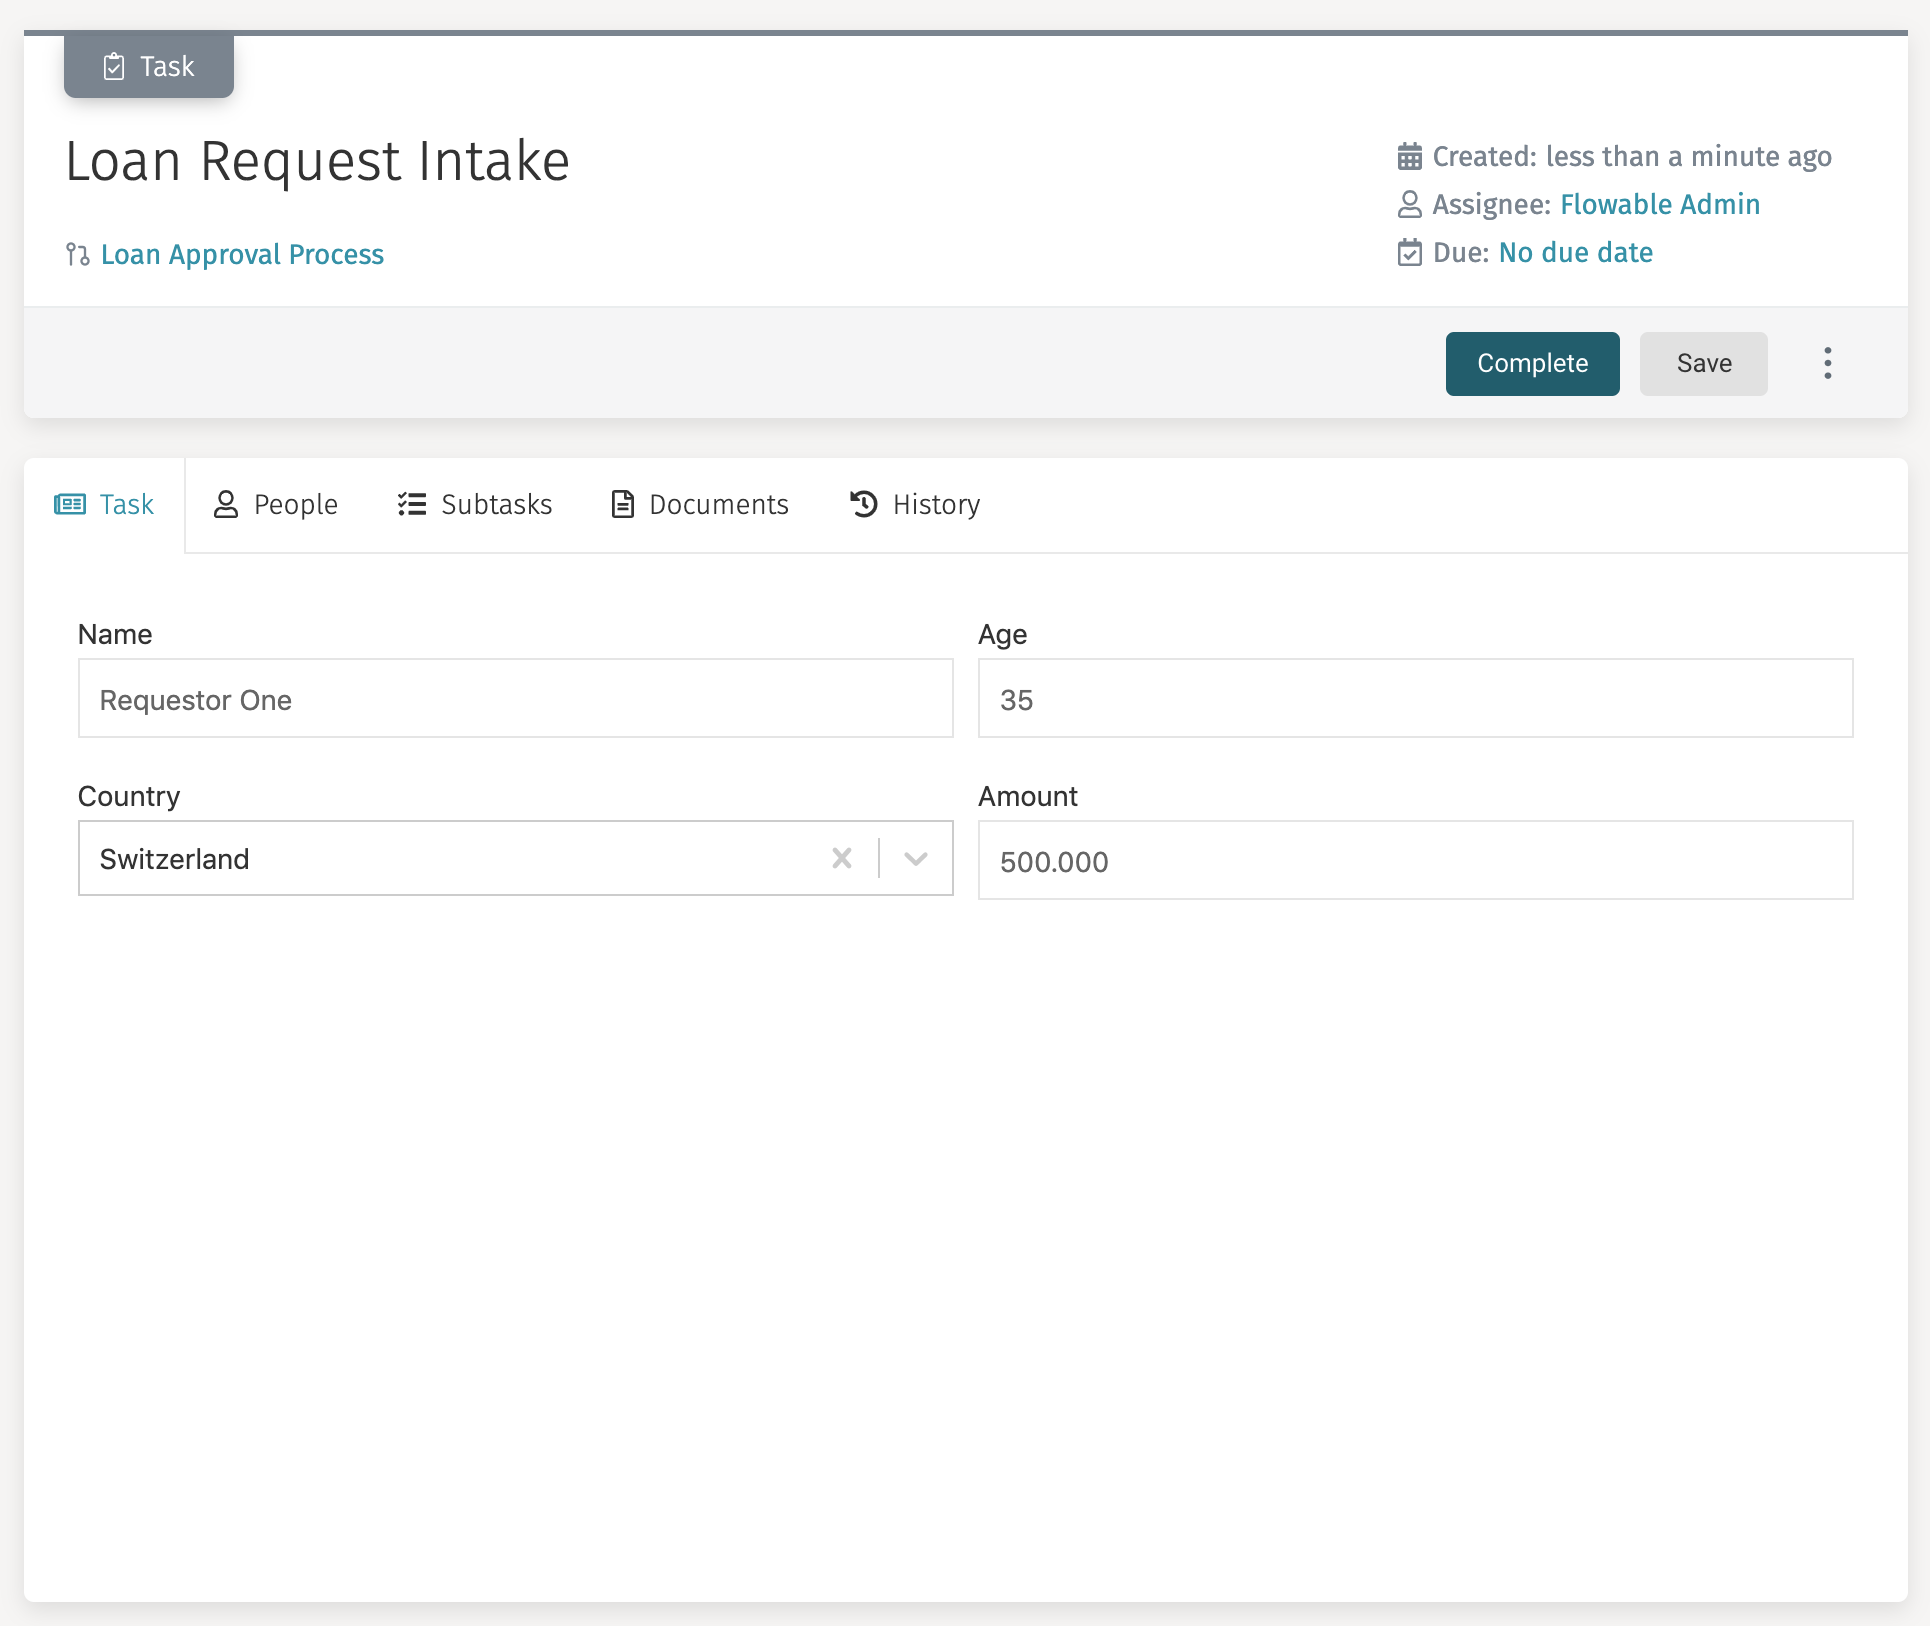
Next, select the Complete button.
There is now an open task named Review Loan Request. To find out why
the process is in that state we look at the decision table audit.
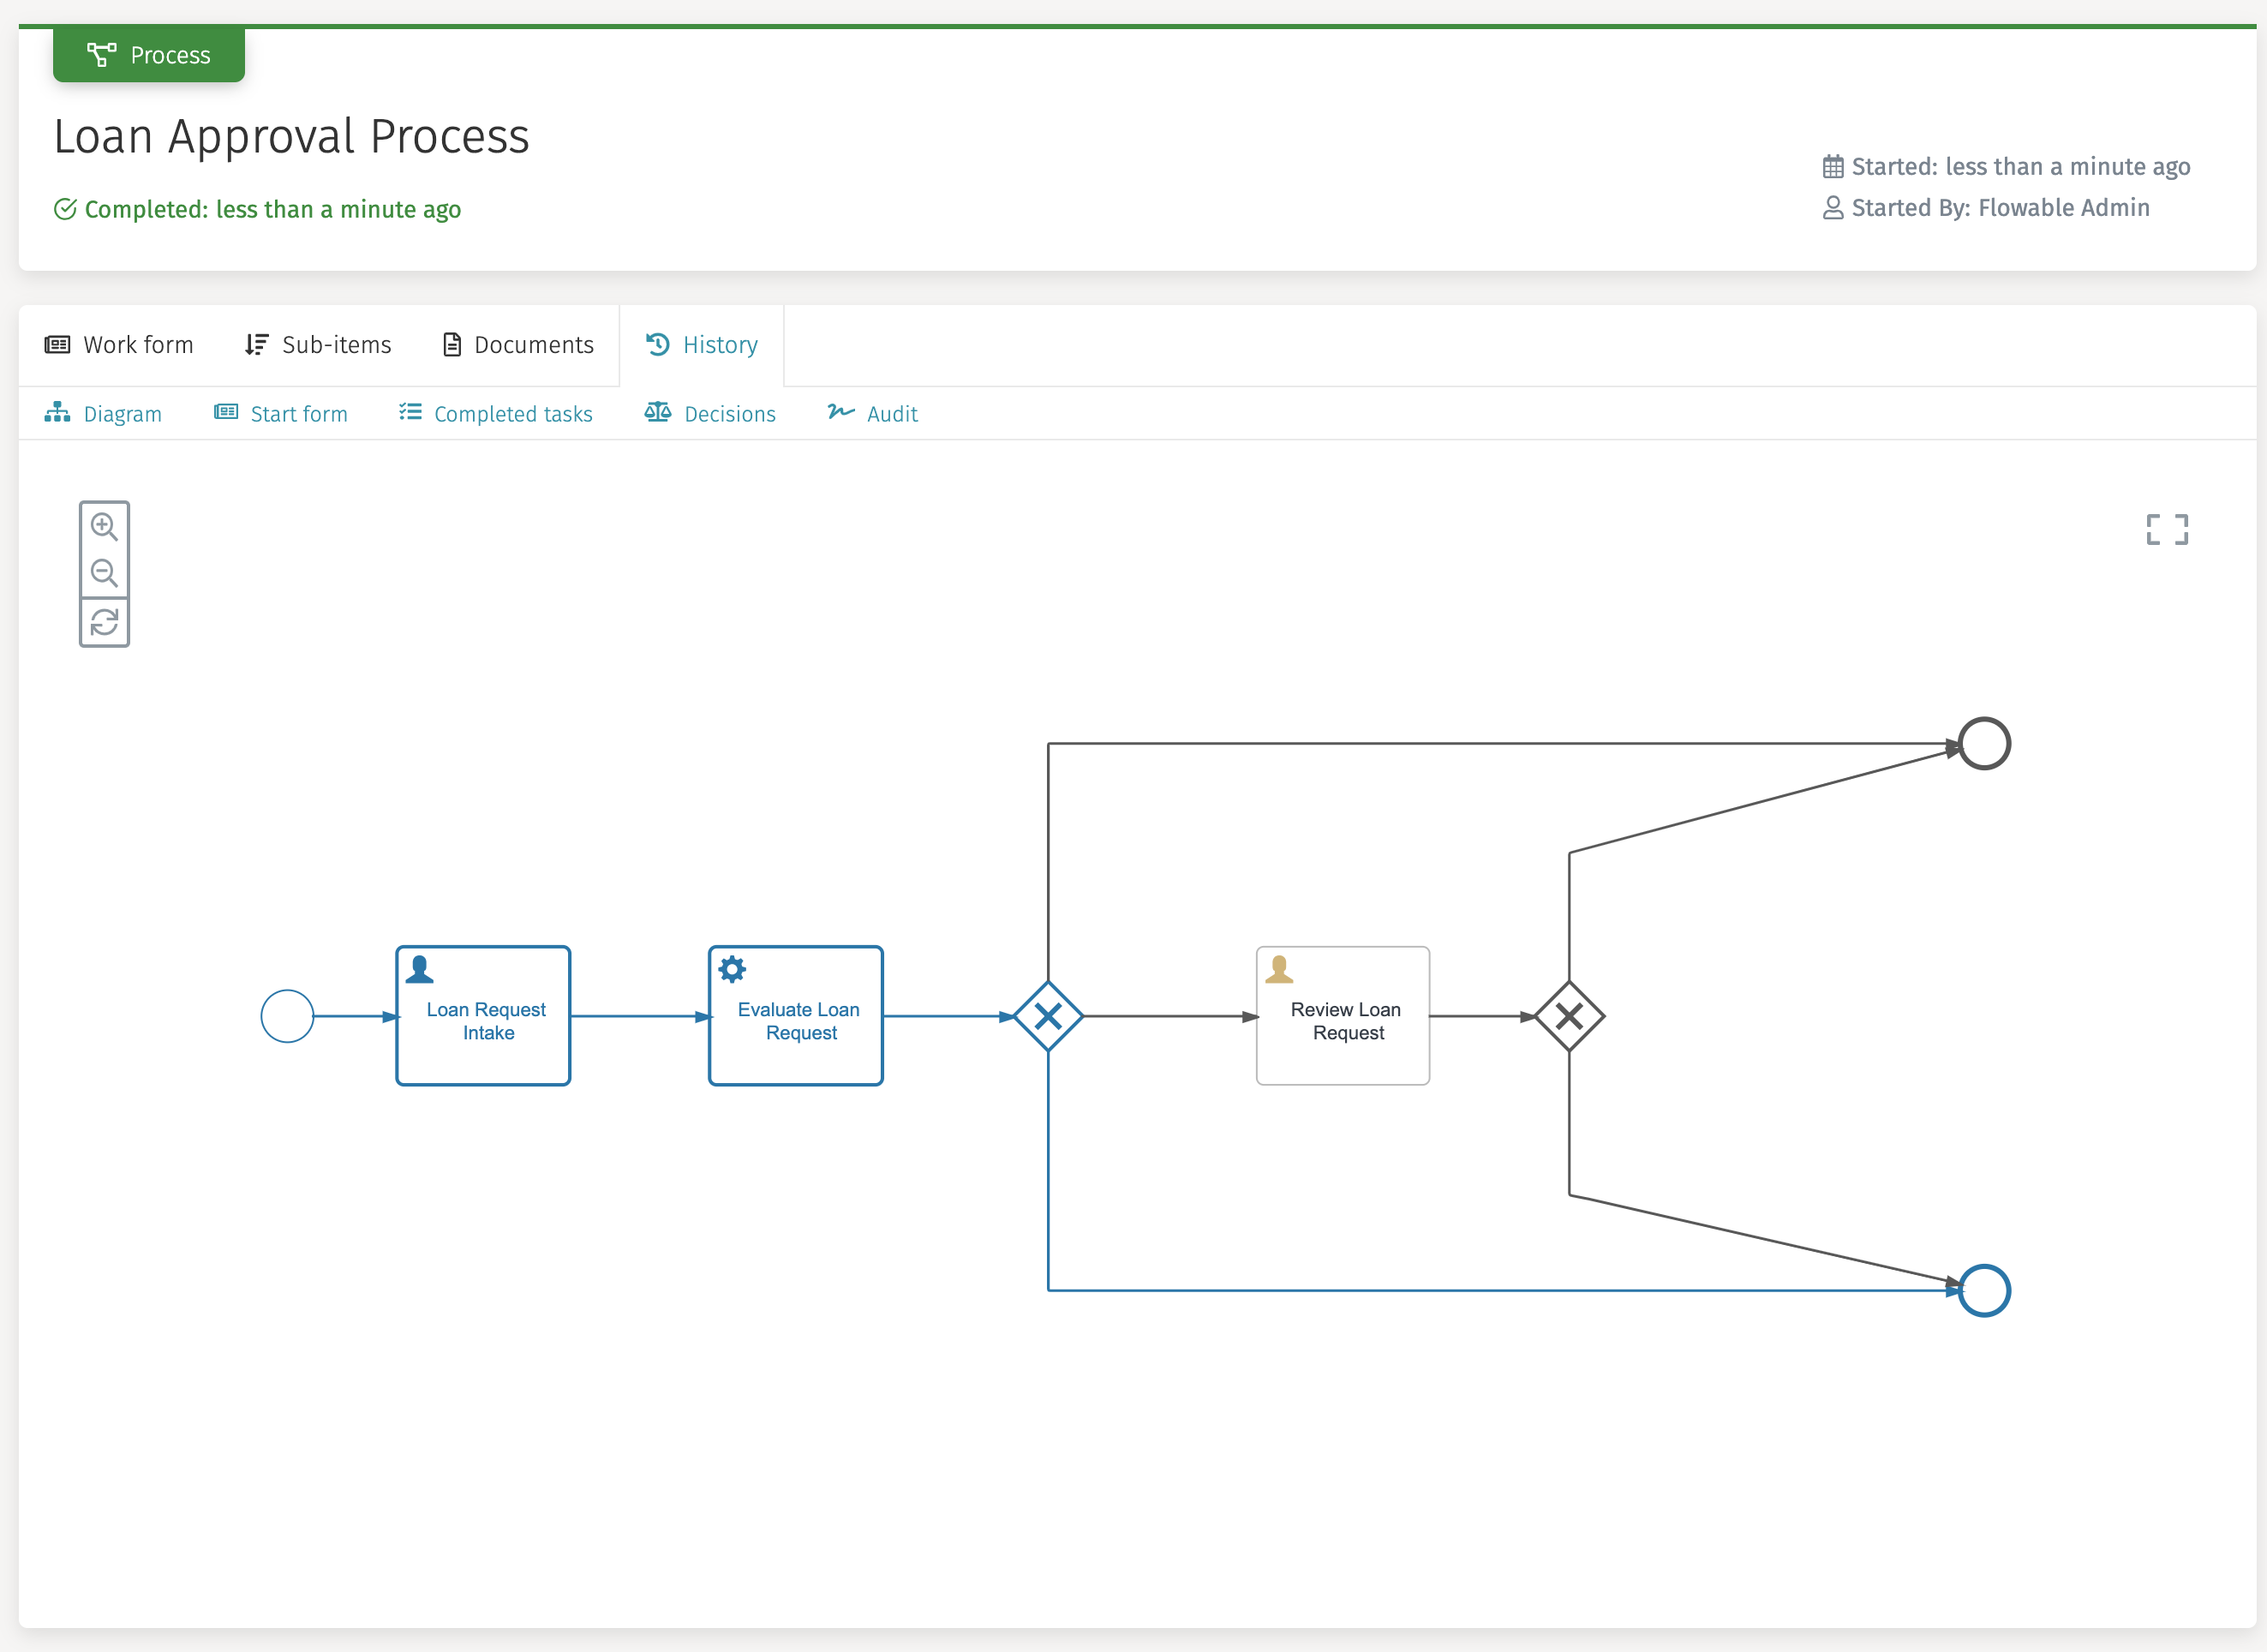
Select History in the toolbar and see a process instance diagram depicting
the current state of the process.
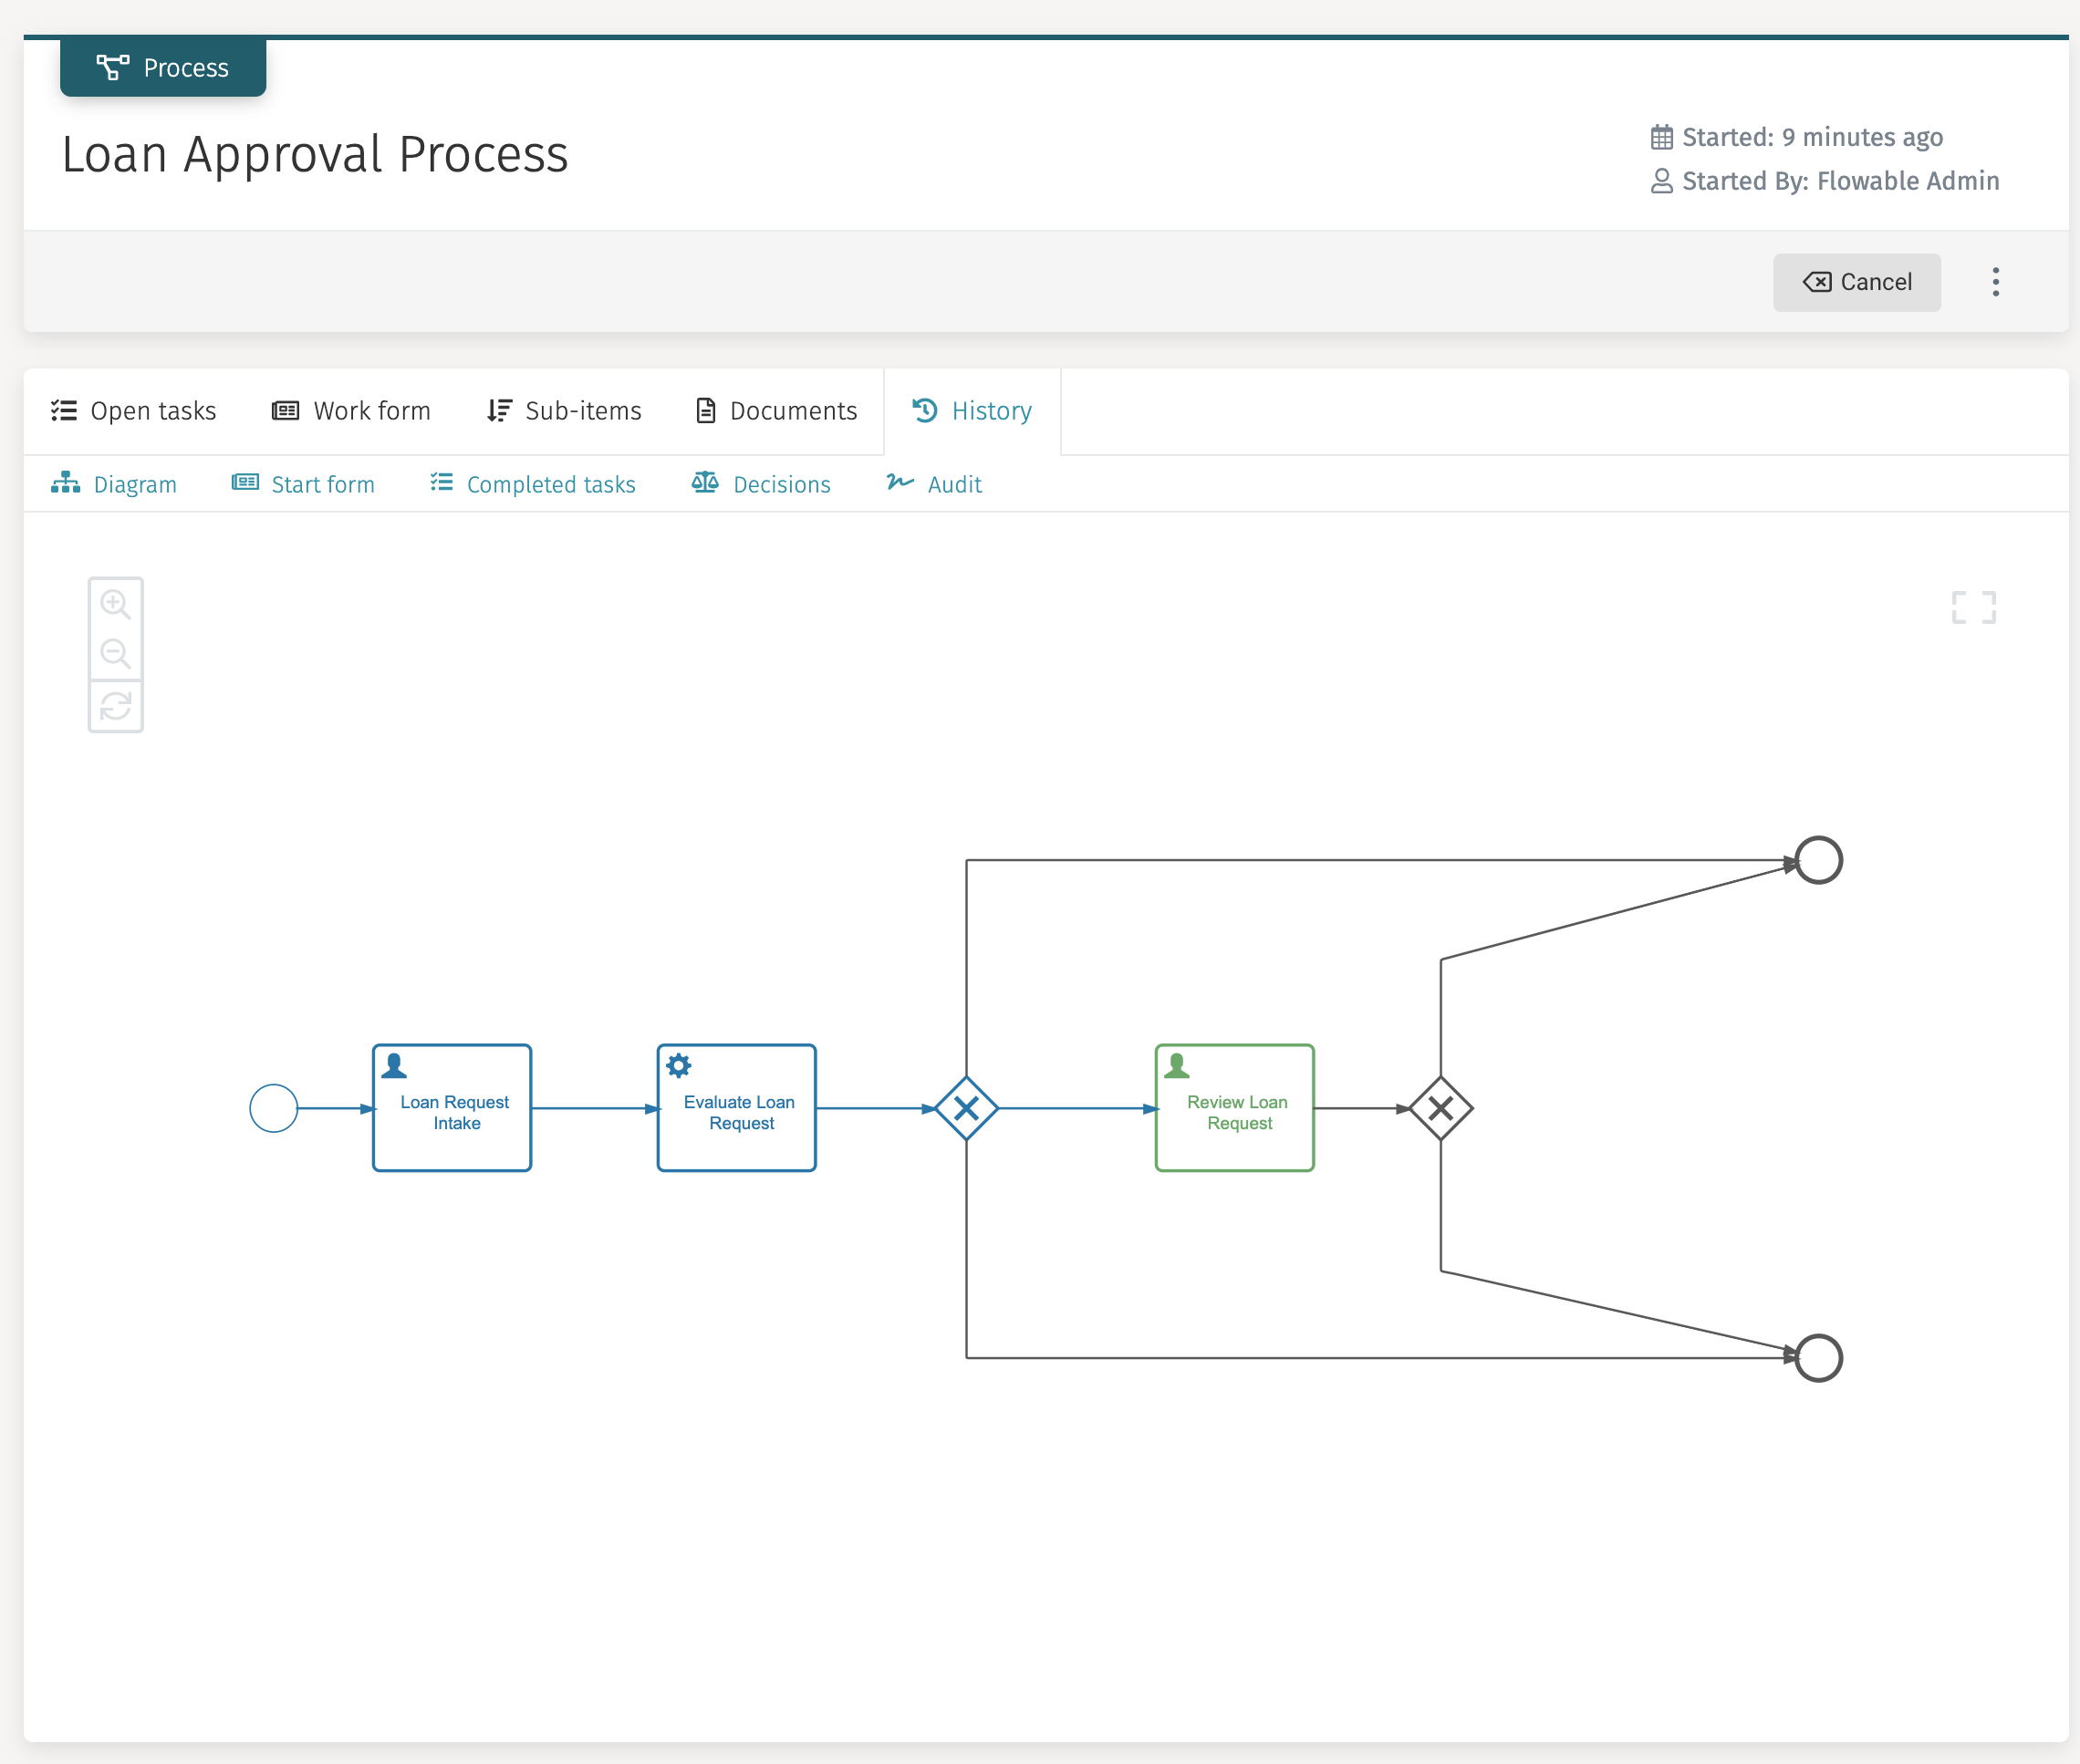
As you can see, the process navigated to the Review Loan Request user task.
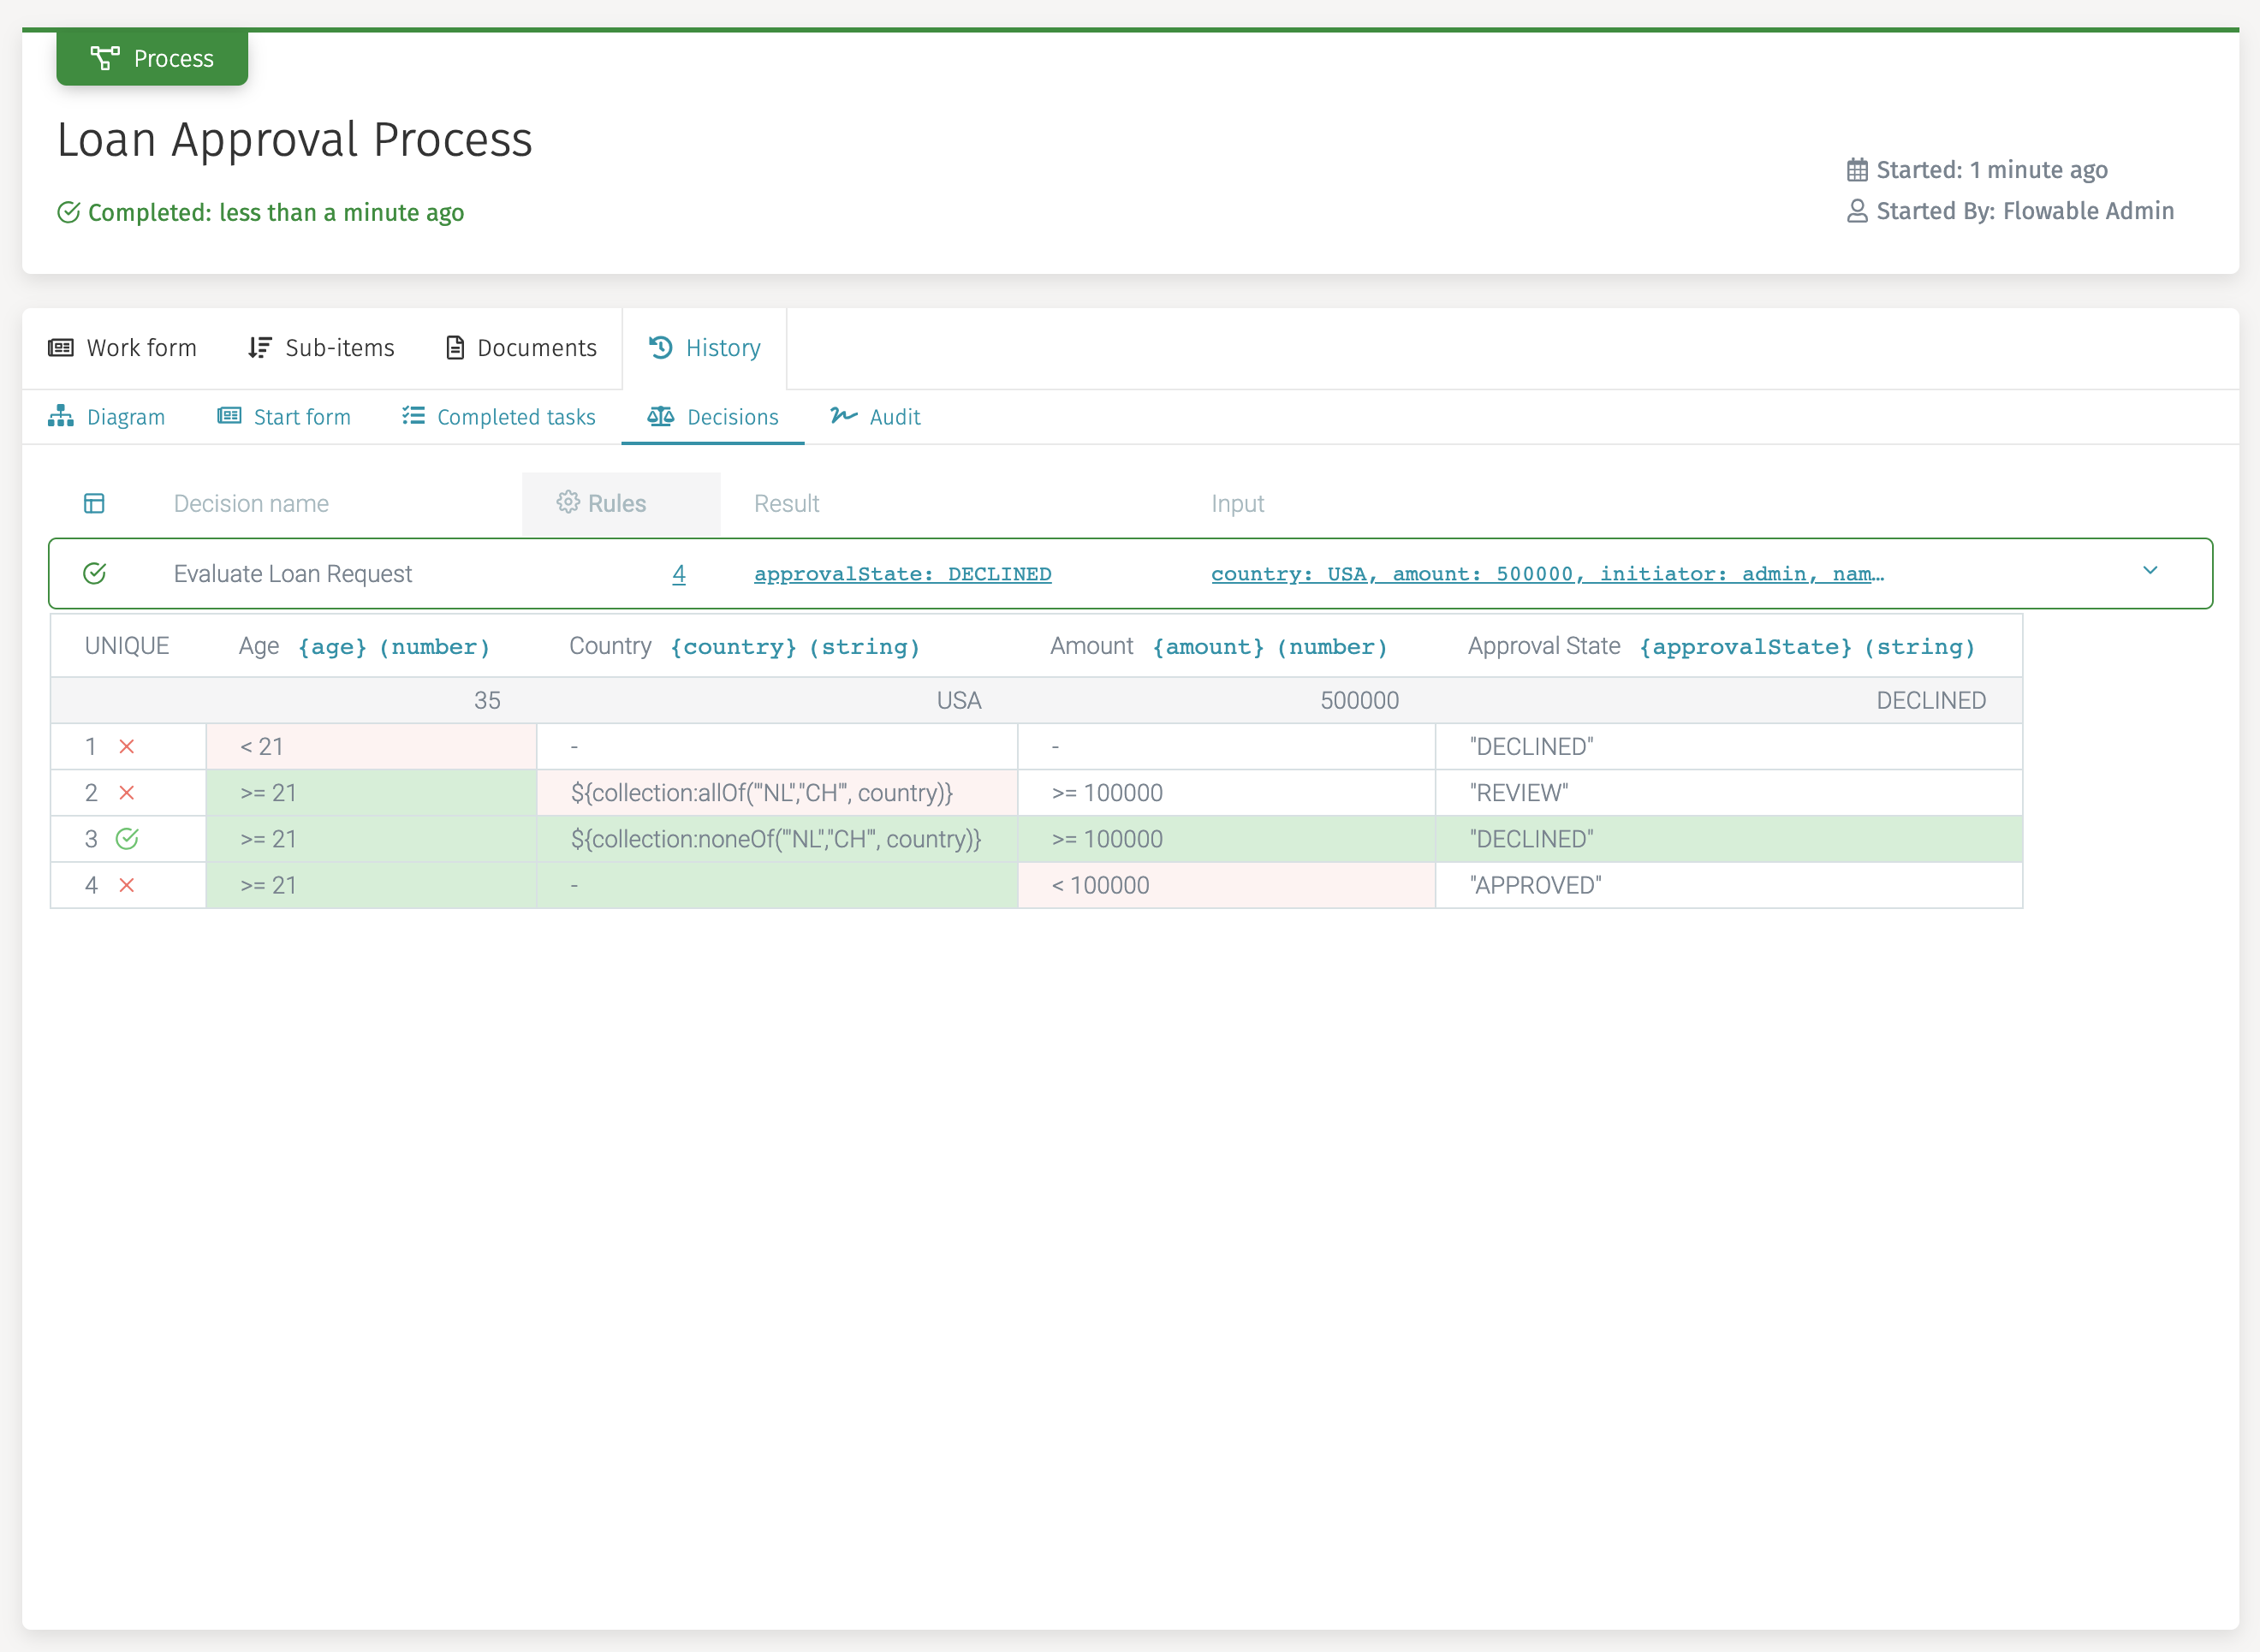
To find out what the result of the decision table was select Decisions in
the submenu.
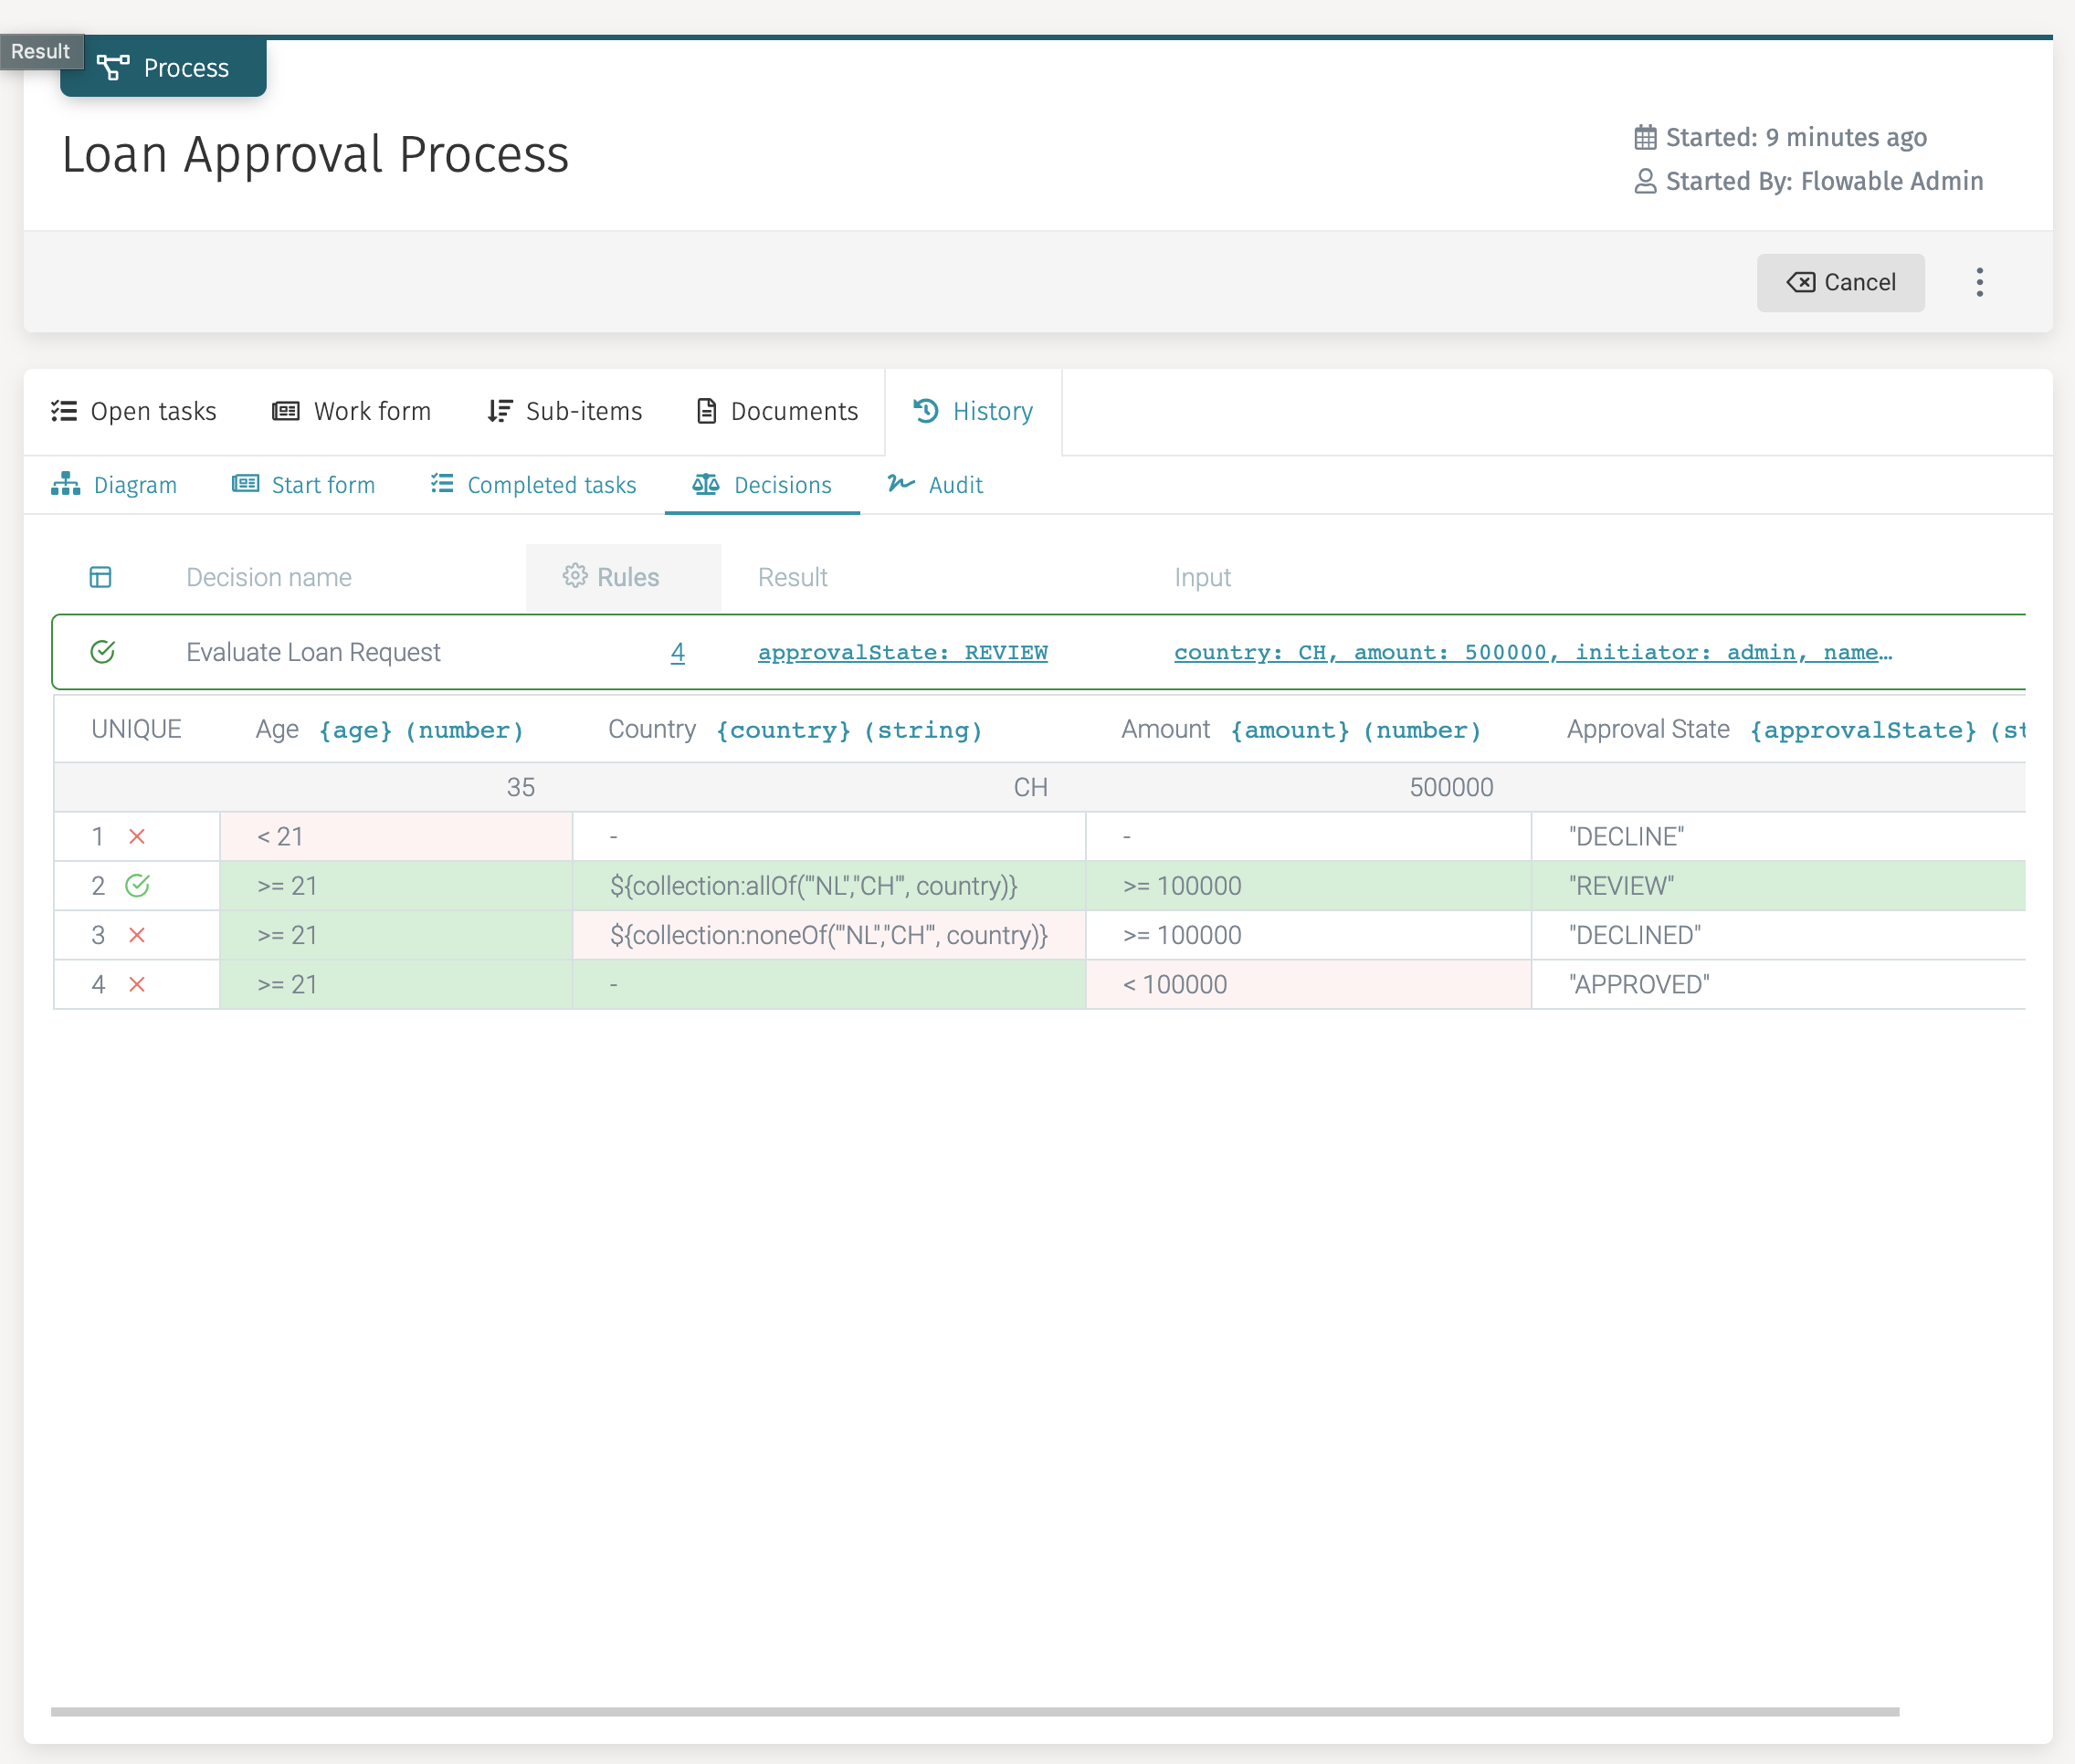
Here you can see that rule two was valid, and therefore, REVIEW is
the outcome of the decision.
Now select Open tasks again and select the Review Loan Task. After
reviewing the data, enter an optional remark and select Approve.
The process is now completed and the request is approved.
Scenario 2
Let us execute another Loan Approval process instance and this time
provide the following data in the Loan Request Intake user task;
-
name: Requestor Two
-
age: 35
-
country: United States
-
amount: 500.000
This time the decision table evaluation results in DECLINED, and
the process ends.