Part 1: The Basic Process
This is an old version of the documentation for Flowable until version 3.13 and for the Angular-based Flowable Design 3.14/3.15. If you are running the latest version of Flowable please check out the current version of this page.
Overview
The goal of this modeling guide is as an extensive introduction into Case Management Model and Notation (CMMN), Business Process Model and Notation (BPMN), and Decision Model and Notation (DMN). Included are conversational features built into the case model. This modeler guide does not have any prerequisites (other than the knowledge and ability to launch the various Flowable products) and as such is a full overview of the modeling capabilities of Flowable Design.
In part 1 of this guide, a new travel request case is created with three stages: defining the travel data, approving the travel, and organizing it. The approval process is straightforward with only one approver.
Part 2 makes the simple approval process more sophisticated using a DMN based decision table in front to define, if and how many approvers are needed. It also uses a multi-instance process to do the approval.
In part 3, we add Flowable Engage based features to the case so we can make use of conversations and messages within the travel request.
Chapter 1: Create a Basic Case Model, App and Deploy
Create Travel Request App
Models in Flowable are app focused. An app is a container of all the items related to a specific process, and in this example, all the content related to the case model we are building.
Go to the Apps section of Flowable Design and hit Create app.
Set the name to Travel Request, the key to travelRequest and optionally add a meaningful description of what the app contains.
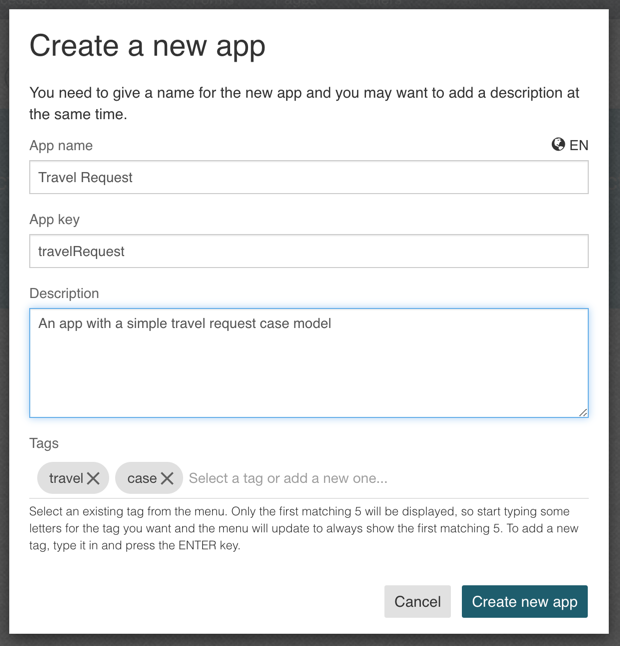
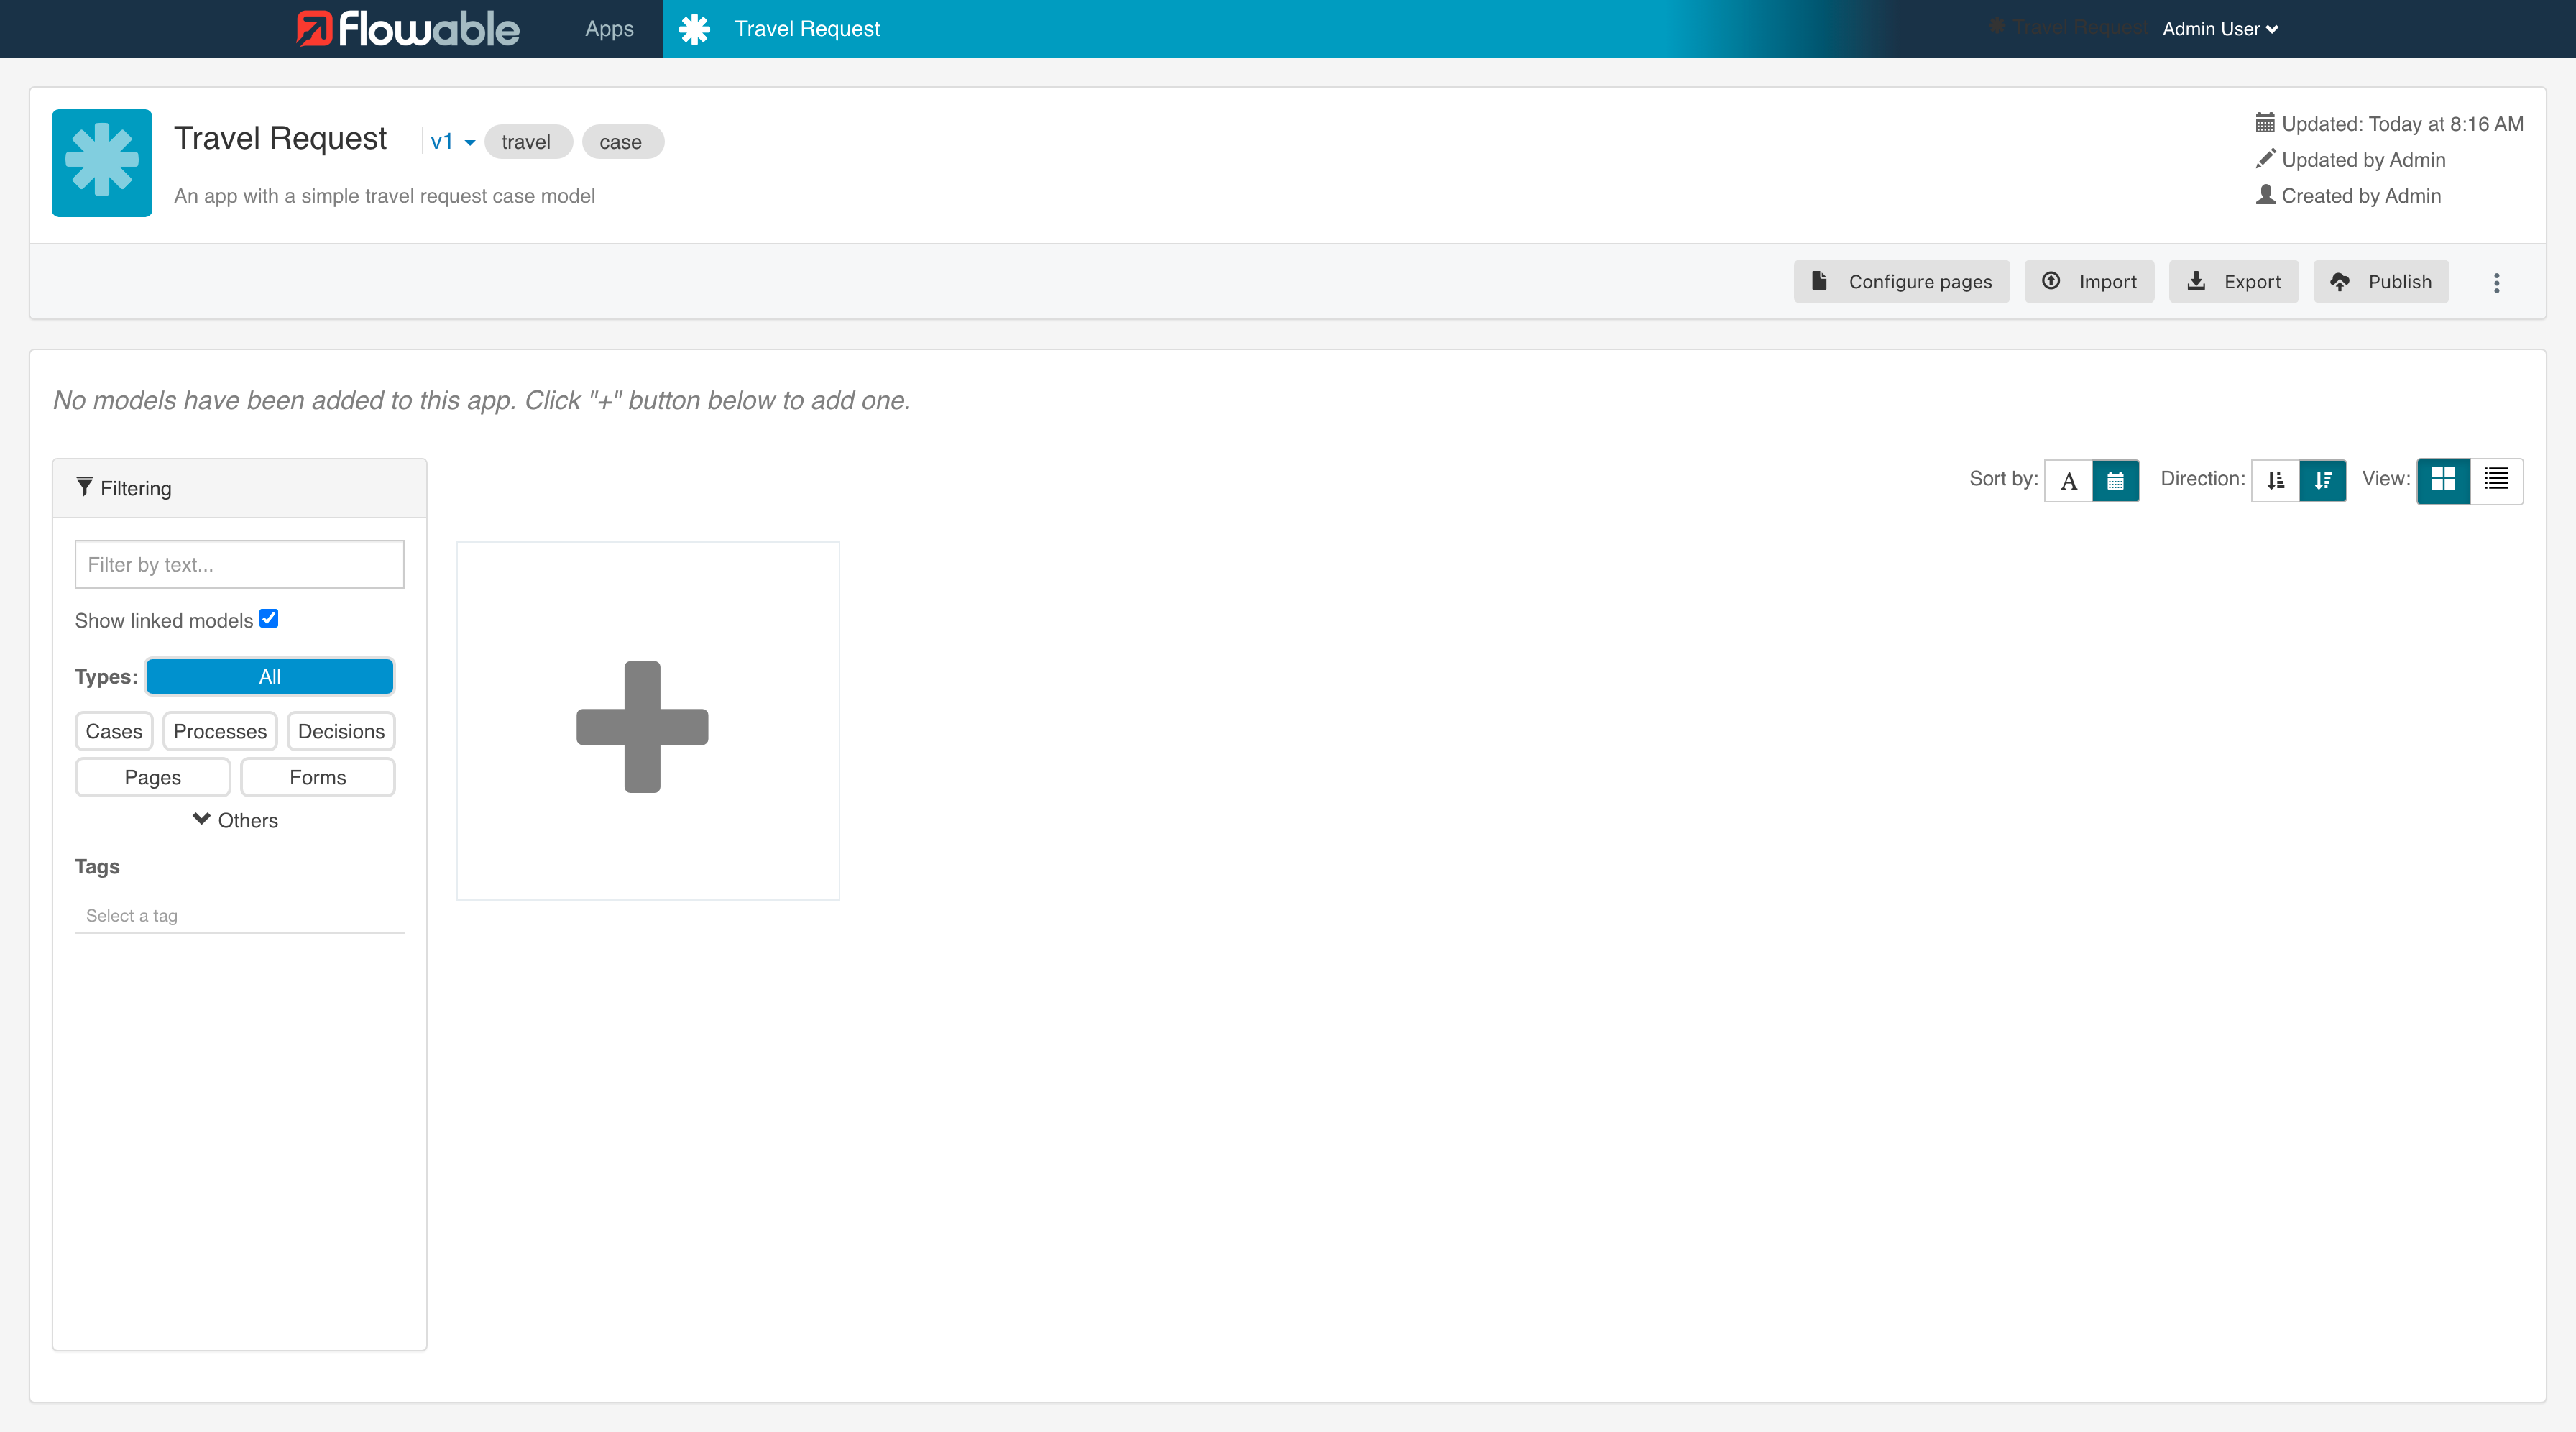
Click on Create new app and you are in the app view:
Create the Case
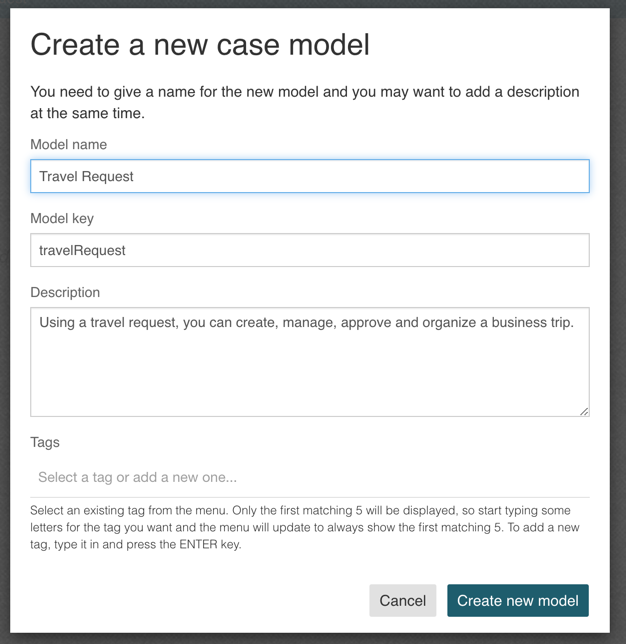
In the app view, click on the large plus button, select Create a new model for the app, followed by Case.
In the dialog, name the case model Travel Request,
set the key to travelRequest
and optionally add a meaningful description of the case model. Then
select Create new model.
Once created, the case editor opens, and we can start defining our travel request case.
Double click the Case plan model title and rename it to Travel Request.
The name has no execution relevance but makes more sense from a business
model perspective.
Add Case Stages
Now let us add some stages. A stage is like a phase within the case lifecycle and can mean anything, from a technical to a business perspective. Think of your case at a high level and ask yourself: through what kind of phases (stages) is the case going? What needs to be accomplished in the case?
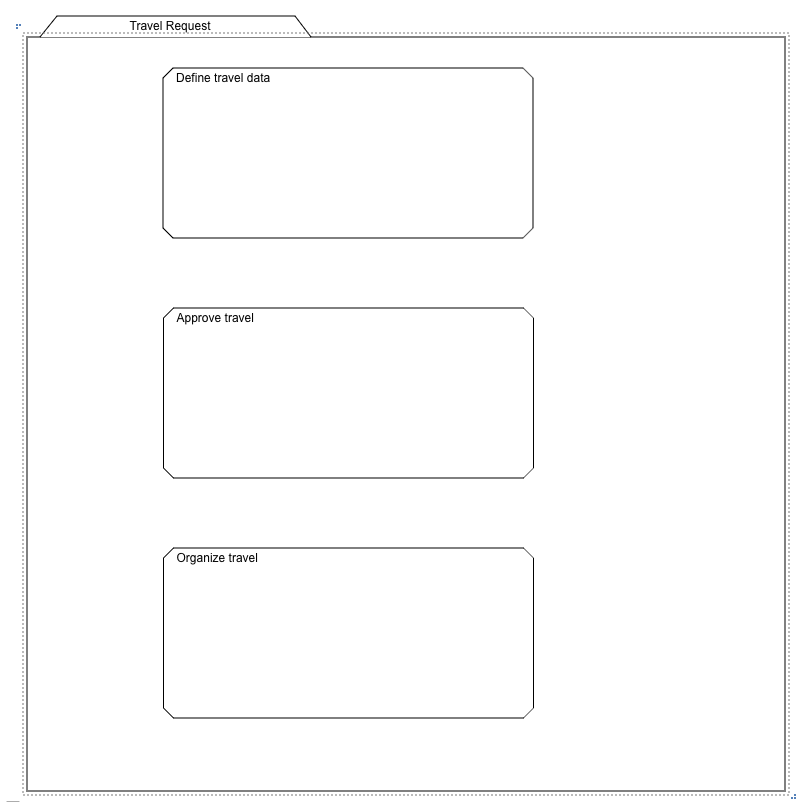
Let us add three stages (Containers>Stage) for our travel request model:
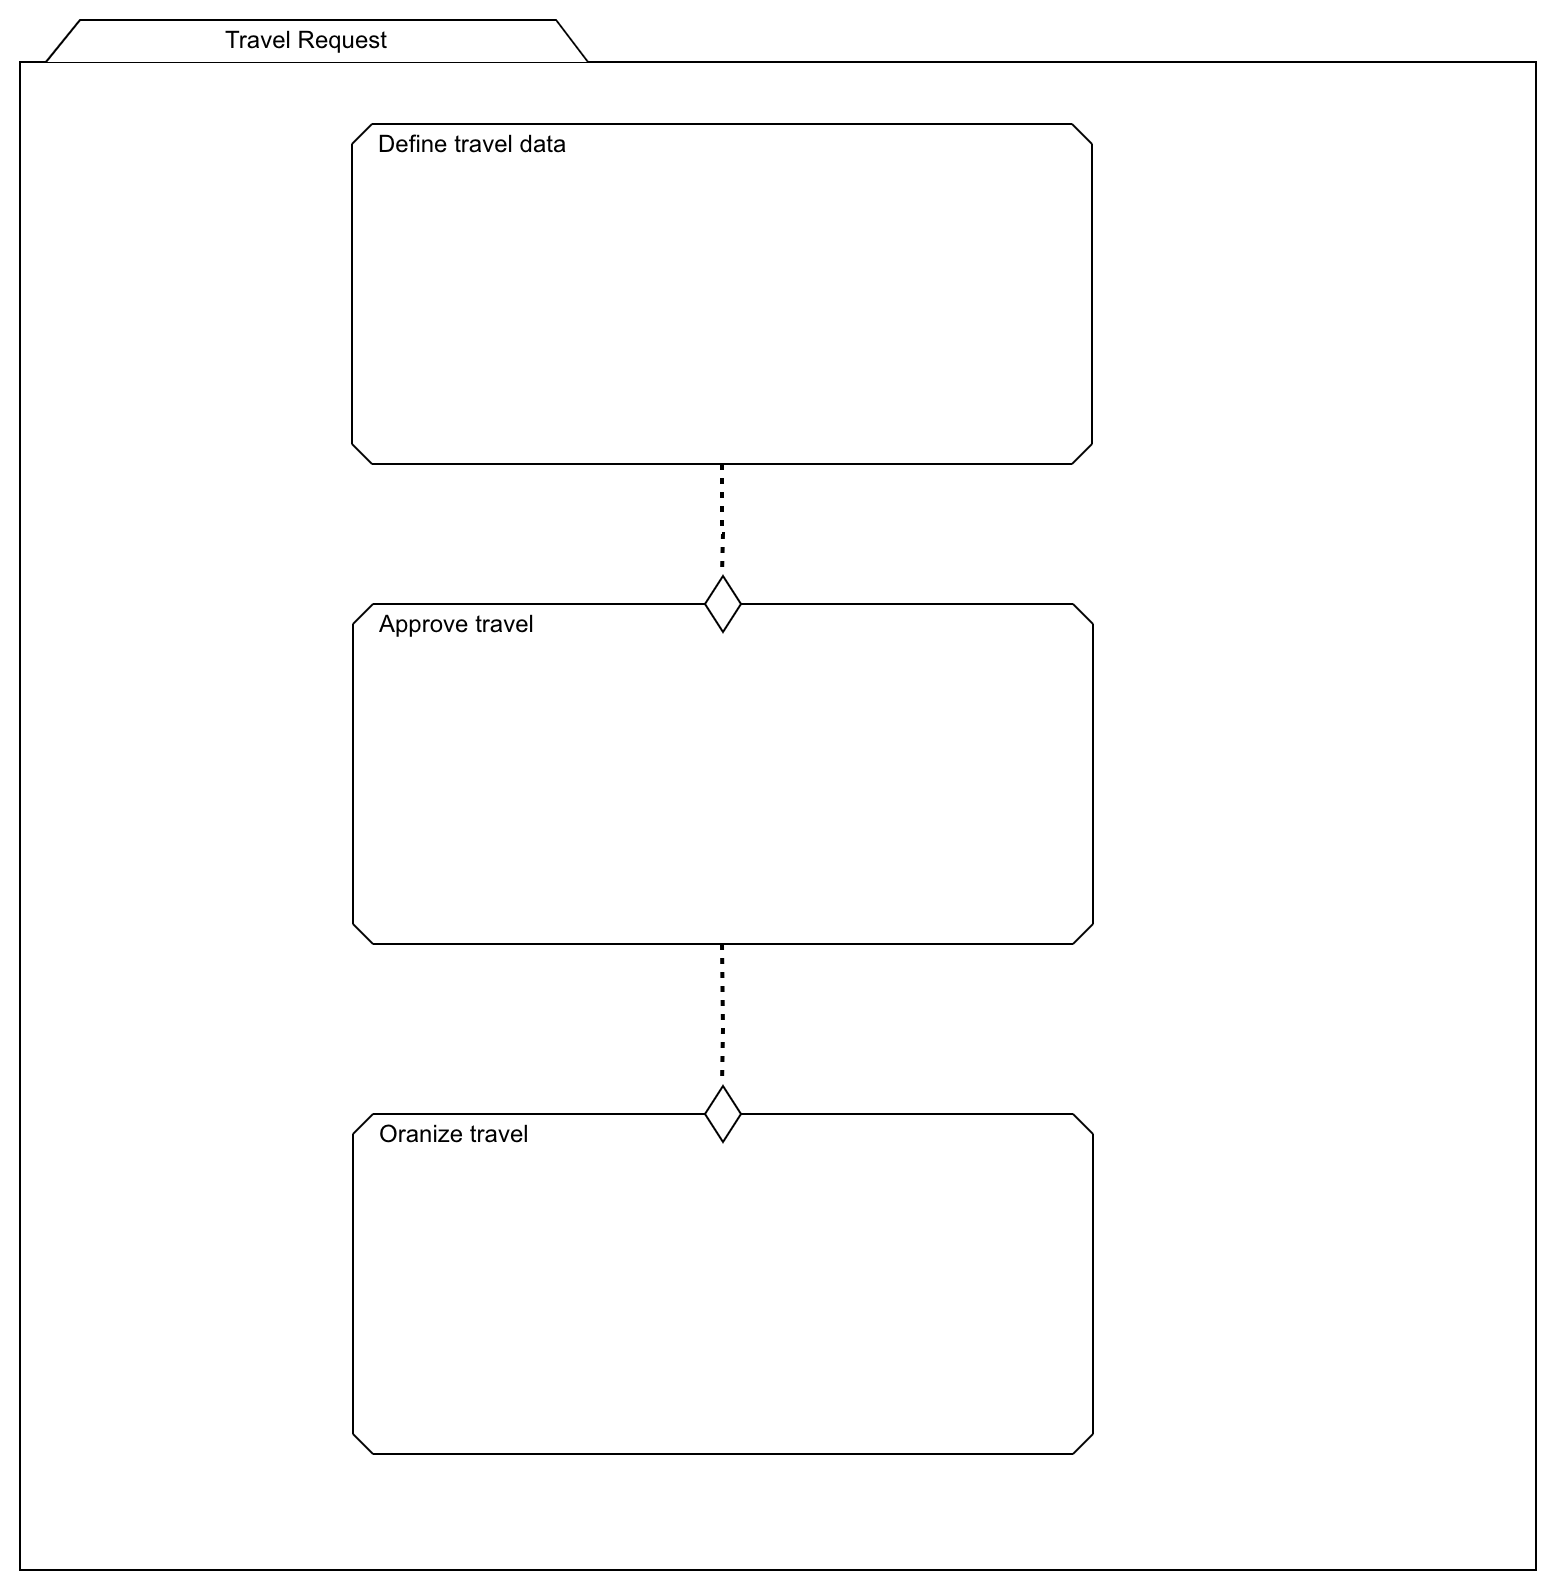
Define travel data, Approve travel and Organize travel.
The resulting case looks like:
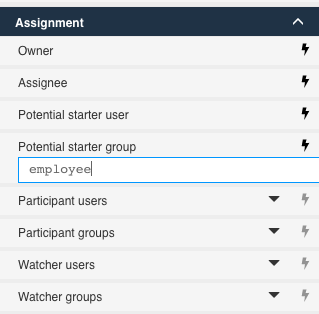
Define Starting User Group
First, we need to define who can start this case.
Click outside the case model to select the Assignment>Potential starter group
attributes of the case model and set the group to employee.
Setting this attribute allows all users of the group employee the
ability to start a travel request case.
Create Travel Request App and Publish it
To deploy our case model, we need to include it in an app that we can then use as a deployment unit. Since we created the case model inside the app context, it is automatically assigned to the app.

In the toolbar of your case model you can press the Publish button to deploy the app and make it available for use.
To successfully publish the app requires that
Flowable Design is configured to publish (deploy)
to your local runtime environment or wherever you want to run and test your app.
First Run of the Travel Request Case
Now that we have published the very first and basic version of our app, let us run it and create a first case instance.
Go to the Flowable Work runtime, log in with any user (e.g., shane.bowen) and
select the Work>Create new app in the left-hand side menu.
Choose our Travel Request in the dialog and confirm the
creation of a new case instance.
You should now see your first case instance in the inbox and the case details. If you go to the "History" tab, you can even see our case model, showing that we already completed all the stages and the case itself is already completed.
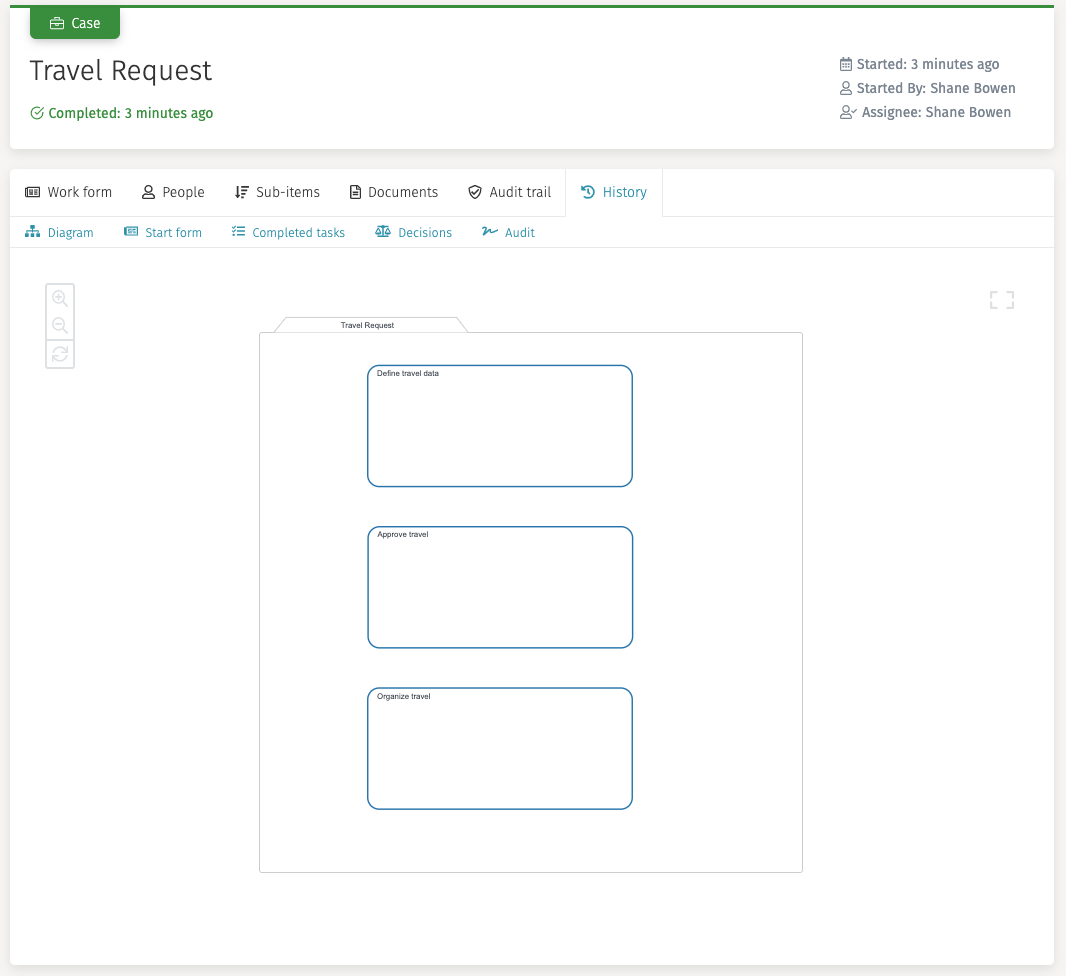
As we did not add any necessary work to any stage, and we did not create a start and work form there nothing to do. That is why the engine started the case and immediately completed it. However, do not worry, we are going to change that behavior in the next chapter.
Chapter 2: Add a Start and Work Form
Add and Define a Start Form
In this chapter, we are going to add a start and work form to our travel request case model, so we can add and display some travel relevant data of the case.
Go back to Flowable Design and select the case plan model element (outer container)
named Travel Request. In the attribute section click the Details\Start form
attribute and enter Travel Request Start Form for the "Name" in
the "New" section of
that attribute, hit Tab to create a default key, then select Create
(or hit Enter). A new form definition is created and linked as the
start form for that case model.
Drag and drop a Data entry>Text field unto the form
canvas, name its label Travel subject
and hit Enter. This action creates a value binding (variable name),
named travelSubject. As we want the requester to enter a subject,
either click the red star to make it mandatory or check the
Validation\Required attribute in the attribute section for that input field.
Next, we want to allow the user to enter any additional notes, requests, or
whatever is needed to describe the need and details for the travel.
Add a Data entry\Multiline text field to the form and name it Travel notes.
You can also add some description (General>Description) to further give
hints on what the user should enter.
Let us add two more fields for origin and destination of the travel; both are Text fields and name them Origin and Destination. The fields are both required.
Next, we add two Date fields (Data entry>Date) to enter
the beginning and return dates, name the
fields Outward trip date and Return trip date. We make them mandatory,
and we want to add a validation only to be able to enter a trip date in
the future as we cannot organize a trip in the past. Select the
Outward trip date and then the
Validation>Minimum date attribute. In the attribute
choose Relative to define a date relative to the current day.
Let us choose 0, so we could even create a travel request for the same day.
For the Return trip date field, we also choose Validation>Minimum date
and this time, select Expression where we enter the binding (value expression)
of the first date field as the return date cannot be before the outward date.
Enter {{outwardTripDate}} into the expression field which means the minimal
date entered in the return date picker cannot be before the date selected
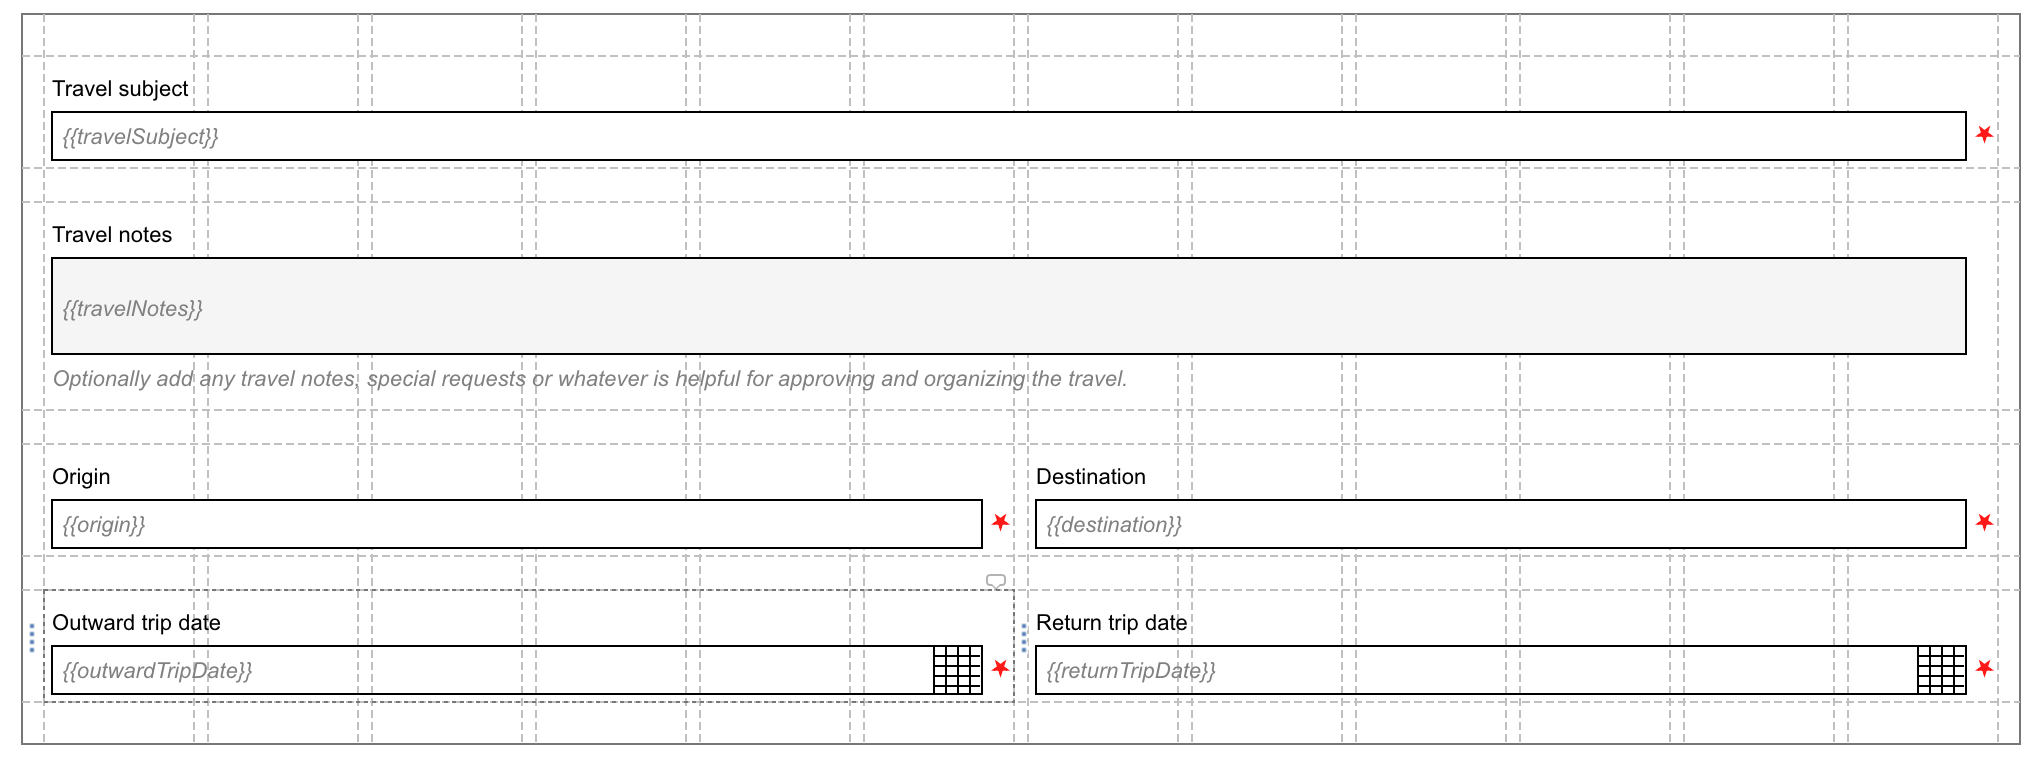
in the outward date picker, represented by that value expression.
The form should look something similar to this one:
We also want to modify the Submit button, so let us define the outcomes
section of the form by selecting the Details>Outcomes attribute on the form
(you may have to first click outside the form canvas to see its global attributes).
Open the Outcomes dialog and enter one item to specify our submit
button for the start form:
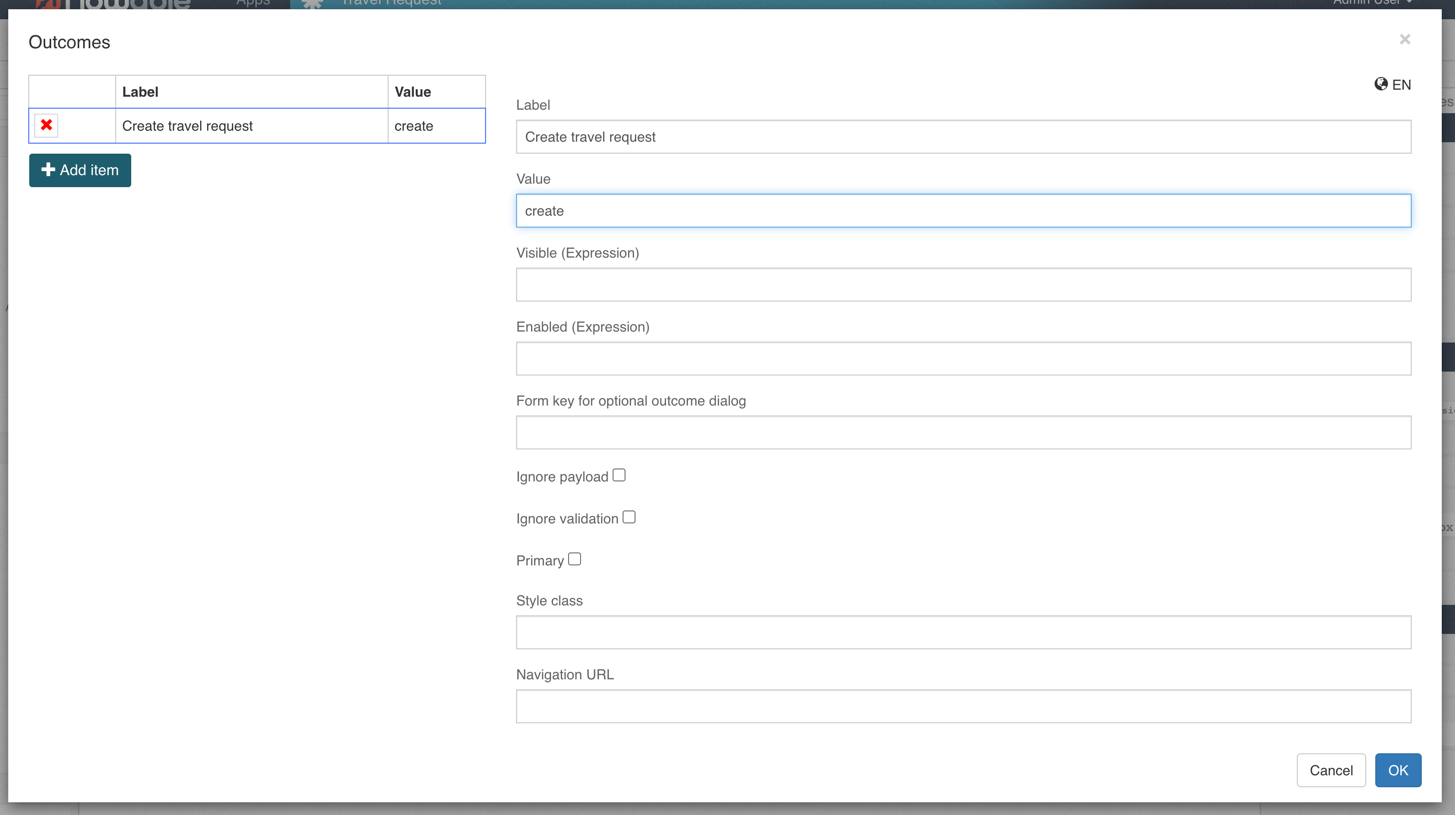
Select OK to save the outcomes.
Save the form and go back to the case model. We have now defined a form to enter the data to start the travel request case.
Add and Define a Work Form
The start form is used to collect data required to start a case. The work form is used to show information of a case once created. A work form can be read-only, but it might also contain fields allowing to change data associated with the case. In our example, we want to make it read-only and only allow case data changes through tasks.
Select the case plan model (top-level container) again and select the
Details\Work form attribute. Name the new form Travel Request Work Form,
hit Tab and then Enter (or press Create) to create and
open a new form.
We want to display the same data as we enter on the start form, so
let us add a subform and re-use the start form directly, but make it read-only.
Add a Container\Subform component and name it Travel data.
We want it to display the case data directly, so no variable binding is needed.
Remove the check from the General\Store subform data in single variable
and leave it unchecked.
Select the attribute Details\Form reference and select
Travel Request Start Form
(the one we just created) in the "Reference" tab.
Within the case work form, we do not allow the
travel data to change, so uncheck the General>Enabled attribute which
makes the whole subform non-editable (not enabled).
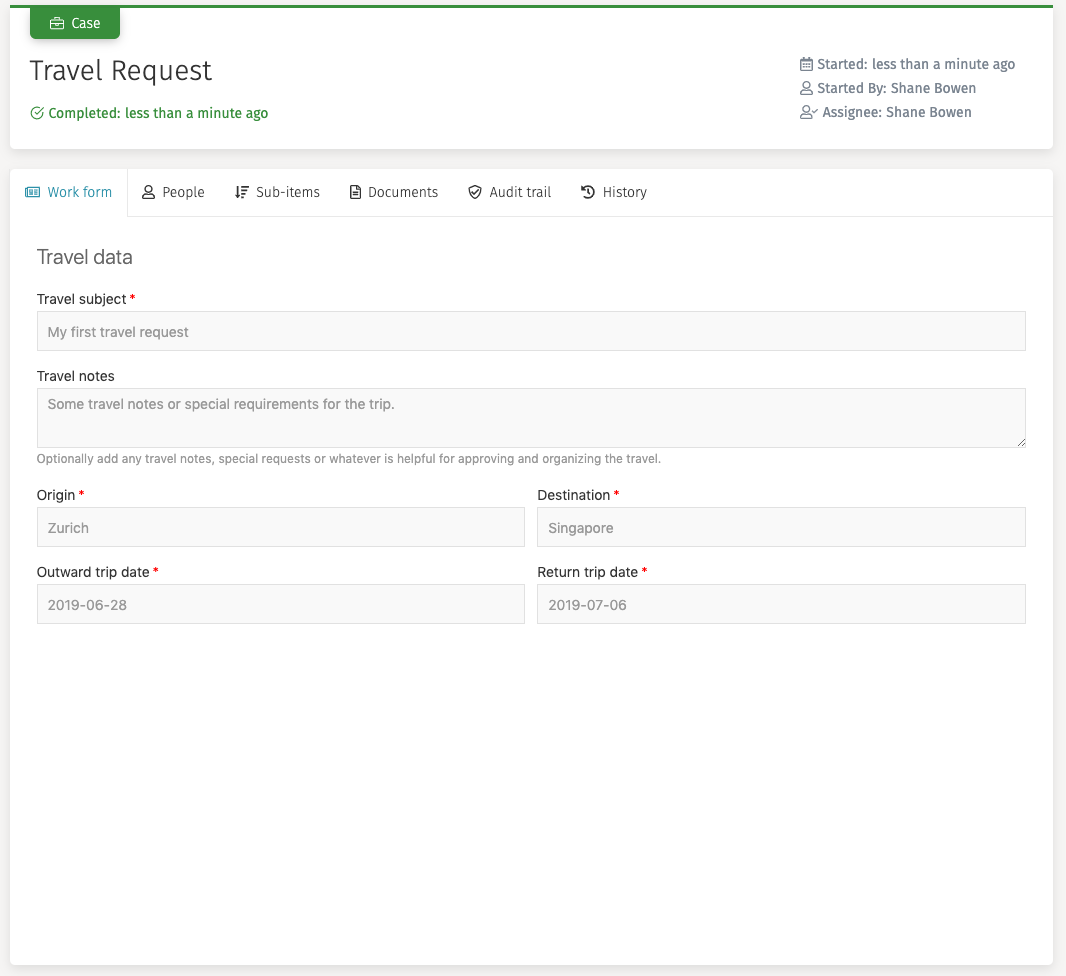
The work form should now look something like this:

This is a good start so let us save the form for now and return to the case model.
As we added a start and work form to the case model, we also need to save the case, and then we can directly deploy again to test the additions.
Deploy and Run the Travel Request Again
We can deploy directly from within the editor, so click the Cloud icon
to publish and select the Travel Request app.
Now switch back to Flowable Work. It is a good practice to use at least two tabs in the browser when modeling: one with Flowable Design and another one with Flowable Work or Engage where you can directly deploy to and run your models.
In Flowable Work, select the Work>Create new item and choose our Travel Request
model again. You should now see the start form, so let us enter some trip
data and click on Create travel request.
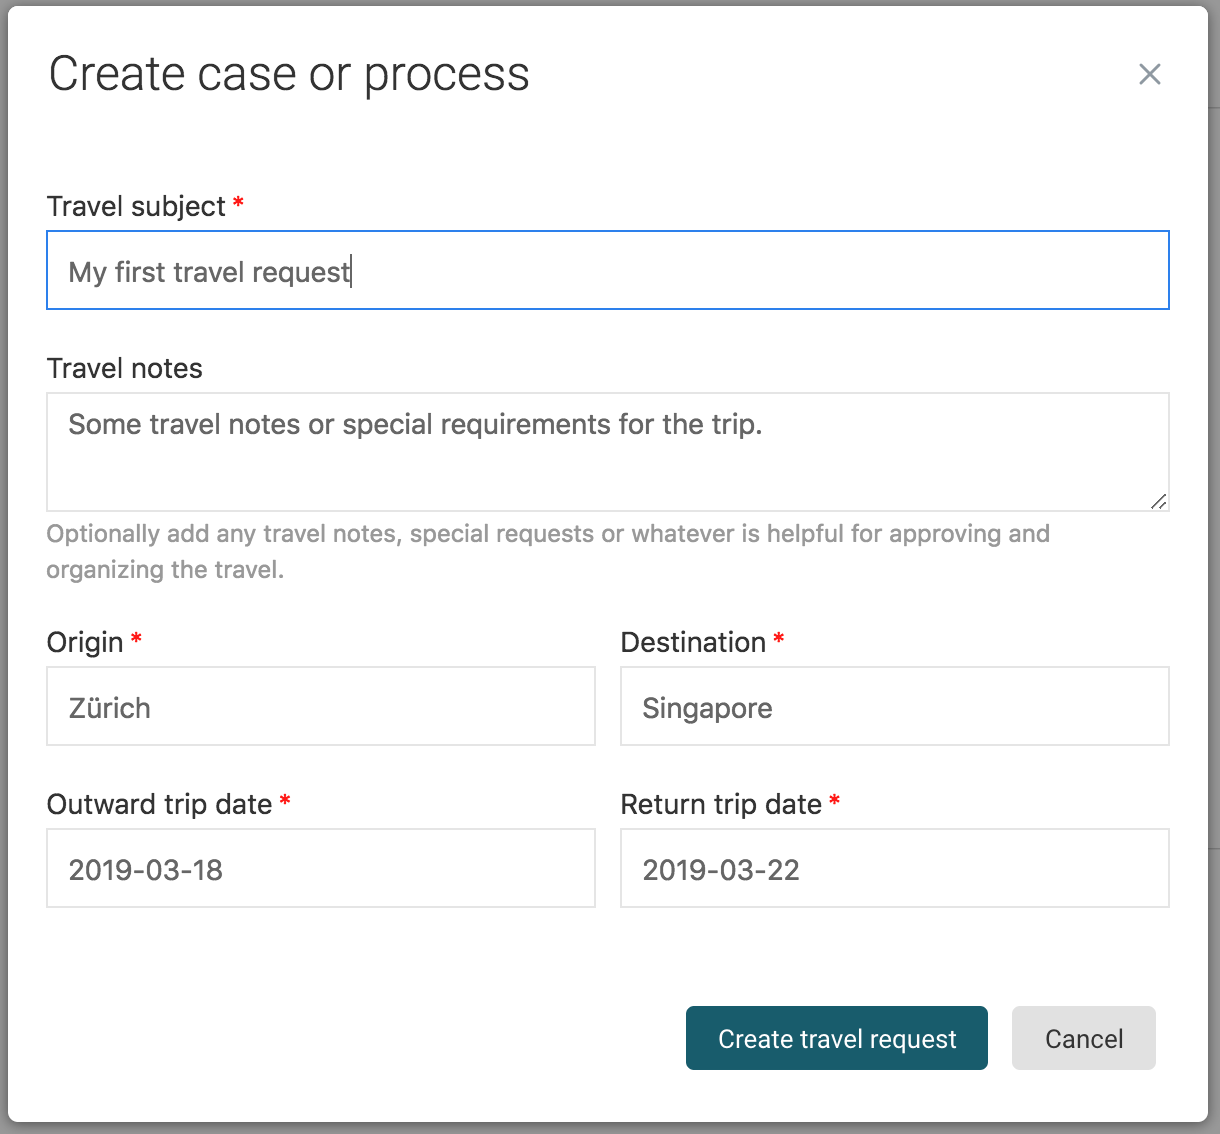
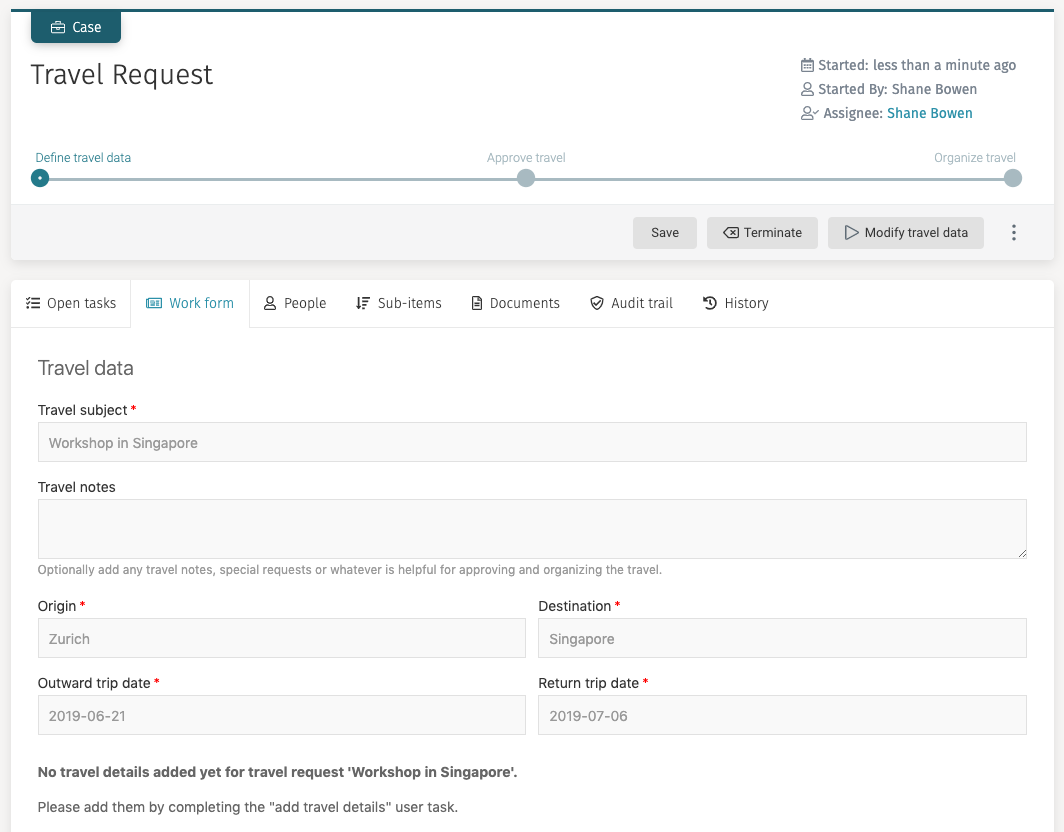
We now have our first travel request containing some structured data:
Of course, the case is again directly completed as we only added a start and a work form and did not change the case model itself. That is our next move, so stay tuned.
Chapter 3: Add Work and Dependencies to the Stages
In this chapter, we are going to enhance the case model by adding dependencies between stages and add some work to the first stage.
Add Dependencies Between Stages
Although in CMMN, there might be more than one stage active at the same time, we want our stages to be sequential, one after the other. We use entry sentries for that, but first, let us define the stage display order.
Select the first stage named Define travel data and set its
Details\Display order attribute to 0.
Then drag and drop the little diamond icon in the upper right
corner of the stage onto the second Approve travel stage (drop it once
the second stage becomes green).
As complete is the default event type, we do not need to display it, so
select the connector between the stages (the dotted line) and uncheck the
Details>Display name in diagram checkbox.
Now select the second stage named Approve travel, set its display order
to 1 and also drag and drop the entry sentry from its upper right corner
to the last stage and uncheck its display name attribute.
Lastly, select the third stage named Organize travel and
set its display order to 2.
We have now specified the display order in which the stages are displayed at runtime and set the dependencies between them. Now only the first stage does not have an entry criterion (entry sentry), and it is immediately activated once the case is started. The second and third stages depend on completing its previous stage, so they are enabled once the case starts, but only activated if that complete event is triggered when the previous stage is completed.
Add an Optional Task to a Stage
In the first stage, we can add an optional task to modify the travel data at any time by the creator of the case (the requestor). As we have already specified the necessary data within the start form, we make it optional.
Drag and drop a Controls\Human task onto the first stage and
name it Modify travel data.
The assignee is specified to be the initiator of the case by default, which is
fine for us in this case. Additionally, check the Execution\Repetition
attribute, so we can start this task as many times as we want.
Also check the Activation\Manual activation attribute, as we offer this as
an option to the user to start this task.
Now select the Details\Form reference attribute, choose, "New" and enter
Modify Travel Request Data Task Form, hit Tab and Enter and you
have a new task form to model.
We can again use that start form as a subform, so drag and drop a
Container\Subform
to the form canvas and label it Modify travel data.
Similar to the work form, remove the
General>Store subform data in a single variable
check and leave it unchecked as we directly want to modify the case
data with the subform. Next select the Travel Request Start Form
in the "Reference" tab of the Details>Form reference attribute.
We want to change the outcomes for this task form as we want the Submit
(complete) button labeled Modify travel data. Select the
Details>Outcomes section and enter into the outcome item
Modify travel data for the "Label" and modify as the "Value".
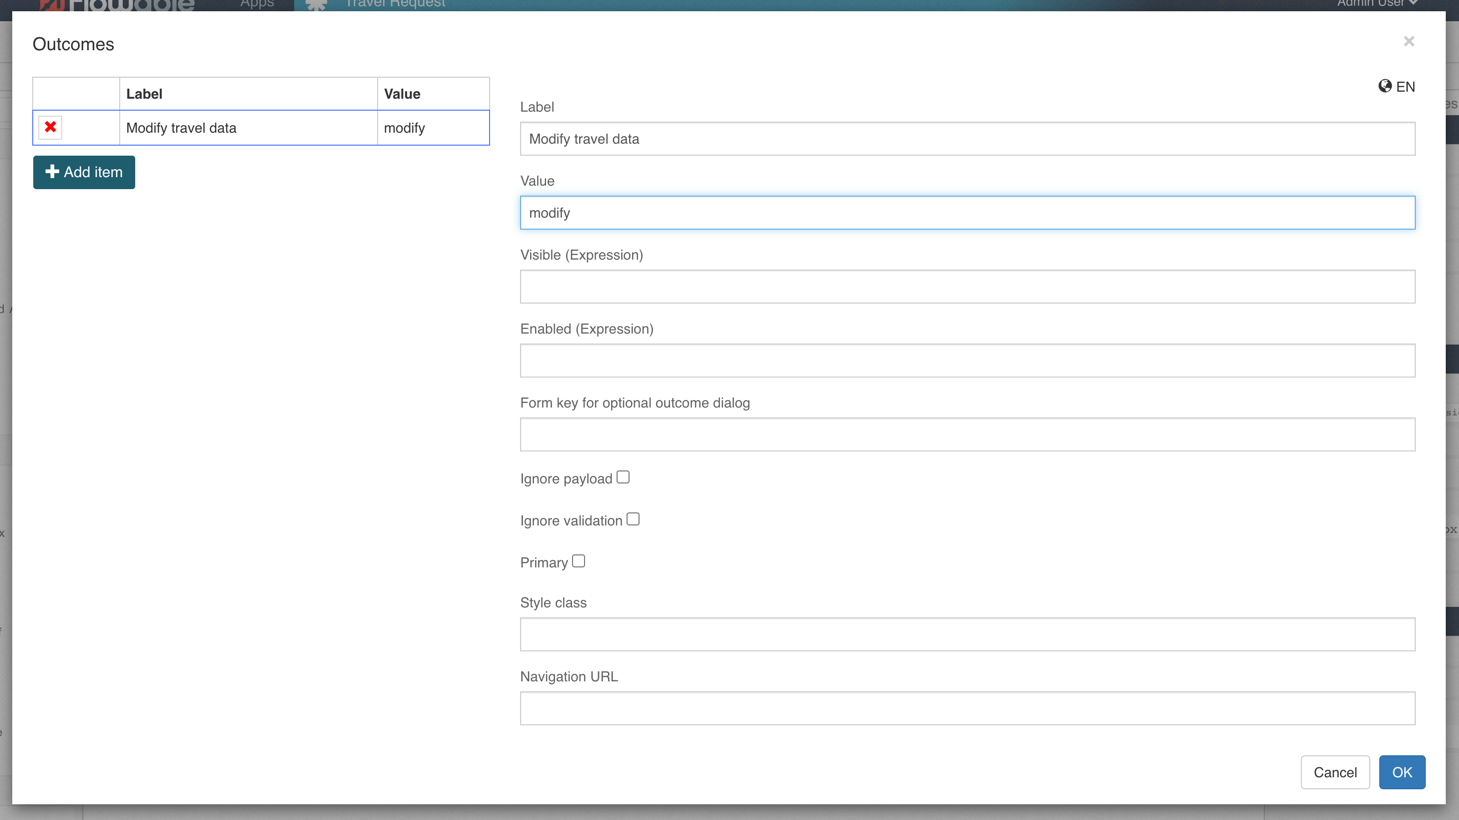
Click OK on the Outcomes dialog and save the form,
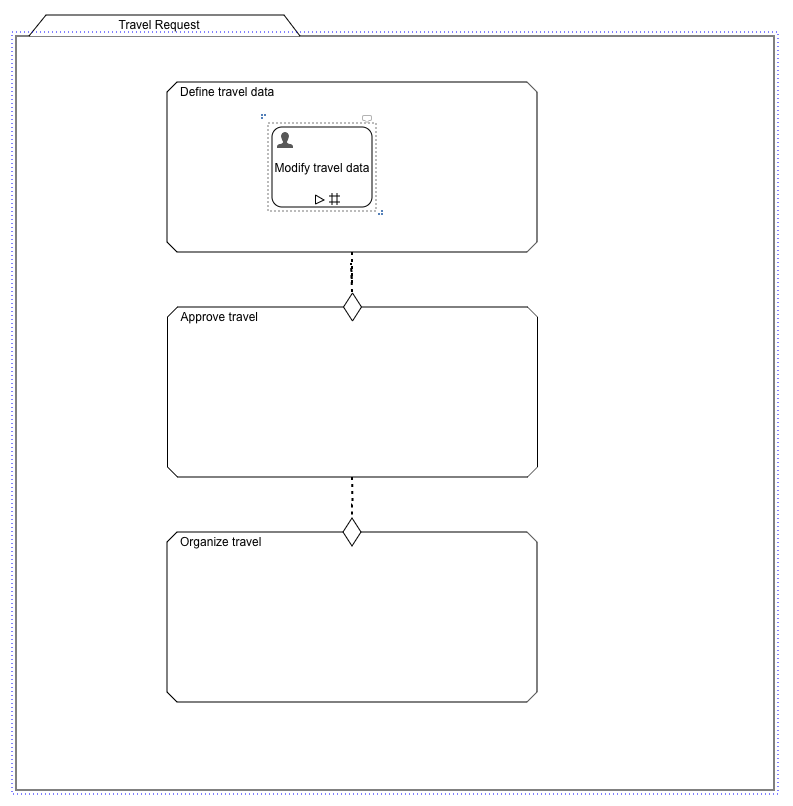
return to the case model and save that again, it should look like this:
Deploy and Run the Travel Request Again
As before, we want to test that next step in our modeling, so publish again
using the Cloud icon in the editor, then switching to the runtime tab in
your browser and create a new case again for our Travel Request case.
After providing the travel details on the start form and clicking on
the Create travel request button we see that this time
the case is not completed immediately, and we see the stages
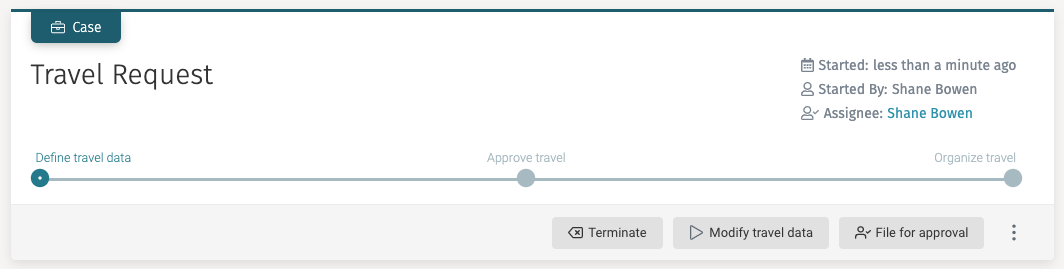
rendered to reflect the current state of the case:
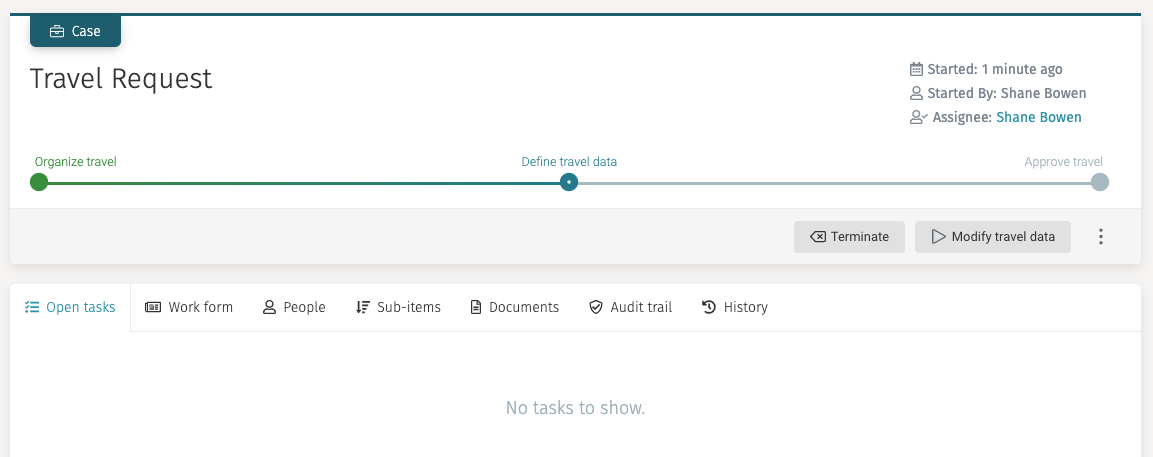
Also, pay attention to the buttons in the header bar: we now see Terminate
(which is a default action to terminate the case, if needed) and the
Modify travel data button.
Let us modify the travel data by hitting Modify travel data, and it
creates our task to modify the case data. Select the task by clicking on it,
and we have our travel form again where we can modify the basic travel data.
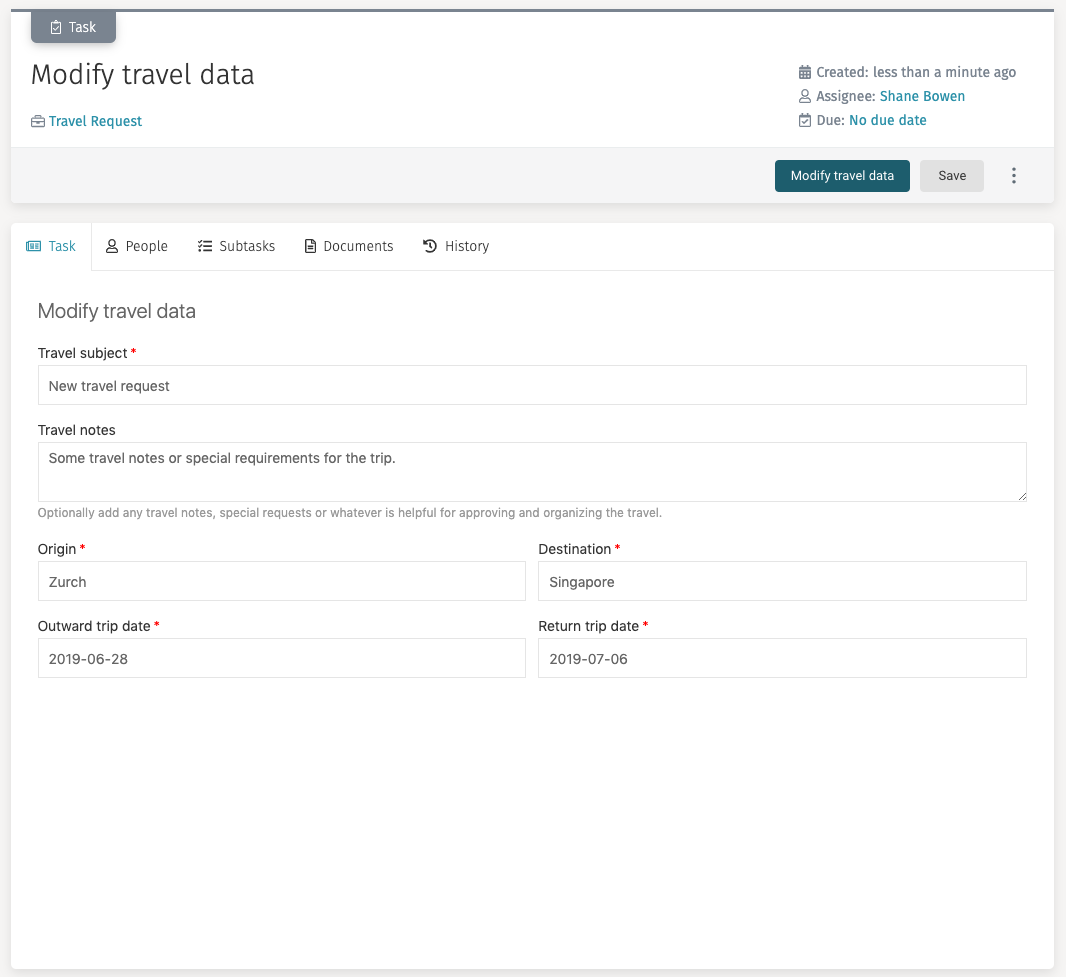
Modify some data, hit Modify travel data and then select "Work form"
in the case where you see your changed data in a read-only mode.
If you go to the tab "Sub-items", you see your completed task and exactly what you entered in that form.
Explore the History of the Case
The "History" tab of a case shows information about the current state and the history of a case.
The first one is the diagram showing the current state of the case from its model point of view:
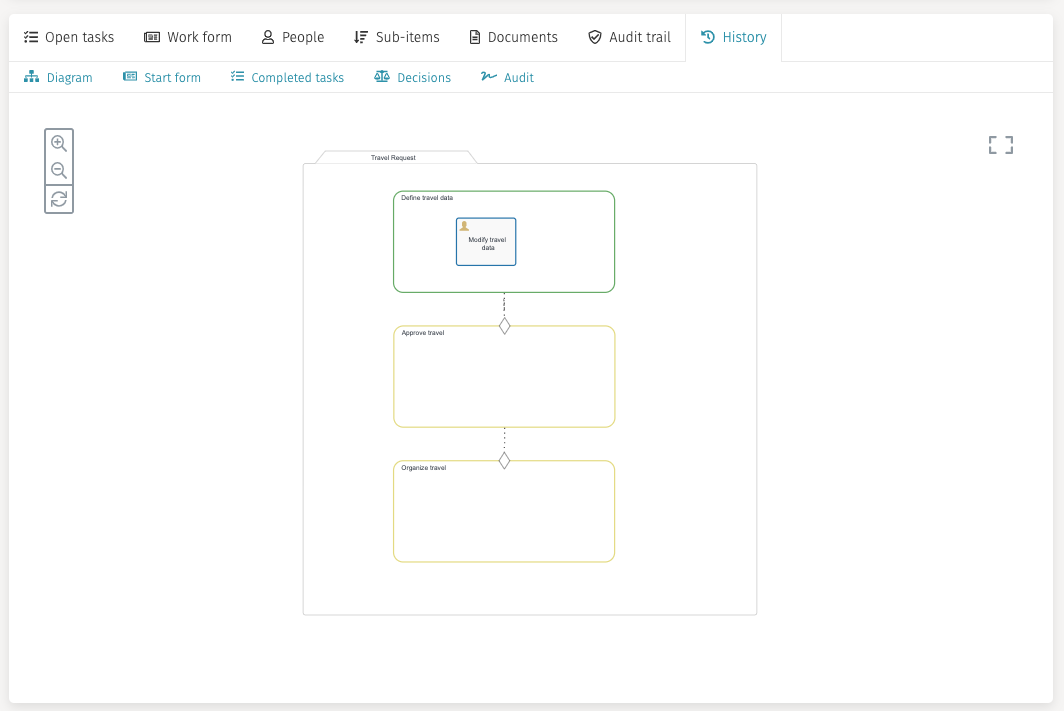
We see the first stage being green, meaning it is currently active, the other two are yellow, which represents an enabled stage, but not yet active as their entry sentries are not triggered (the first stage did not complete yet).
The task is blue which means the task was created and completed.
Selecting the "Start form" sub-tab shows the initially entered case data with the start form for audit purposes, to see the initial data.
In the "Completed tasks" section you find all tasks already being completed, we should see our completed modifying task there and also what data we entered if you select it.
We do not have any decisions yet, so the "Decisions" section does not show anything.
The "Audit" section has some interesting information too, especially for us as
modelers; it shows all the elements of the case and in which state
they are, like AVAILABLE, ENABLED, or COMPLETED. This tab is also
a big help once the case is not behaving like we would expect as it
might give us valuable hints.
Chapter 4: Adding a User Listener to Complete the First Stage
Maybe you have already realized: how can we complete the first stage? The case does not move any further before we can complete that stage.
There are various options to complete a stage:
- The stage completes automatically if there is no more work (not even optional work) to be started or completed.
In the initial stage of this example, this is not working, as we have an optional task with manual activation and repetition, which means, the engine cannot know if we do not want to start that task again, so it never completes the stage automatically.
- Make use of auto complete.
We could mark the stage "Auto complete", but because we have a manually activated, optional task, the engine would again immediately complete the stage once we start the case. Why? Because there is no mandatory work to be done, only optional work and hence the engine would complete the stage immediately. In this case, we do not even time to start that manually activated task as the stage is already completed.
- Create a user listener to manually complete the stage once we are ready with whatever we needed to do in that stage.
This last alternative is the best choice for our example.
Create a User Listener and Exit Sentry in the First Stage
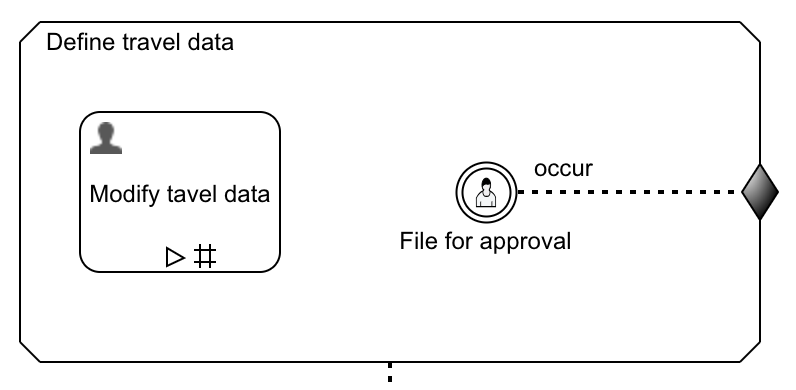
Add a Listeners\User event listener to the first stage and
name it File for approval.
A user listener is quite similar to a manually activated plan item in the
user interface:
it appears as an action button in the case header and once clicked,
executes whatever you trigger with it. Optionally, it can also have a
start form where you can enter additional data, once triggering that
user event. We only want to finish the first stage, so we do not need
a start form. However, we want to terminate the first stage, once selected.
We only want to make that user event listener available, if the stage is
completable and does not have unfinished work left. For this, we can specify
a condition (expression) when the user listener should become available.
Use ${cmmn:isStageCompletable()} as the expression within the
Details\Available condition attribute of the user event listener.
Add an Sentries>Exit criterion (exit sentry) to the stage by dropping it on its
right-hand side boundary (once the boundary becomes green, you can drop
it there). An exit sentry is used to finish (terminate) a stage and
optionally can have a condition associated with it, for example,
an expression which needs to evaluate to true, to trigger that sentry.
Now we need to use the user event to trigger that exit sentry,
so select the user listener again, drag and drop the connector
icon (small arrow icon) from the user event listener to the exit sentry.
For the connector, select Occur as the Details>Standard event
attribute to listen to whenever that user listener is triggered.
Now, this is how our first stage should appear:
An exit sentry according to the CMMN specification terminates a stage and does not complete it. Stage termination is quite a limitation as in our case, as we want to complete the stage, not terminate it. Termination kills all existing, still active plan items if there are any. Termination is different than completing it. Given that we added the available condition on the user listener, we can only access that user listener, if the stage can be completed. We need to add that option in the future, so on an exit sentry, you can choose whether to terminate or complete the stage. For now, it terminates the stage, which means we need to change the connector connecting the first and second stage and listen to the exit event, not the complete event.
Select the connector between the first and second stage and change the
Details>Standard event from Complete to Exit.
Deploy and Run the Travel Request Again
As before, save the case model, hit the publish button again, switch to the Flowable Work runtime view, and start a new travel request case again.
Right after creation, as we did not start that optional modifying task
yet, you now see the File for approval action button in the header of the case:
If you start the Modify travel data task, the File for approval
action is hidden as the stage is then not completable. Once you
completed the task, it becomes available again. Select the button to complete
the first stage, and you see that the case is completed
automatically as we do not have any work to perform in the other stages.
Chapter 5: Add a Required Task to the Stage
Let us assume that we want the requester to start the travel case with not much information and let them add additional data later. That is what we did by not having much detail about the travel request in the start form. However, we do need additional information before we can approve the request, so let us add another user task to define that additional data. This new task is a required task.
Add Travel Details Task
Drag and drop another Controls\Human task to the first stage and label it
Add travel details. Ensure that the task is required and non-repeating
(these attributes are found in the Execution section).
Also Activation\Manual activation must be unchecked so the task is
started automatically by the case engine once the stage is activated.
Next, select Details\Form reference, enter Add Travel Details Task Form,
hit Tab and Enter to create a new task form.
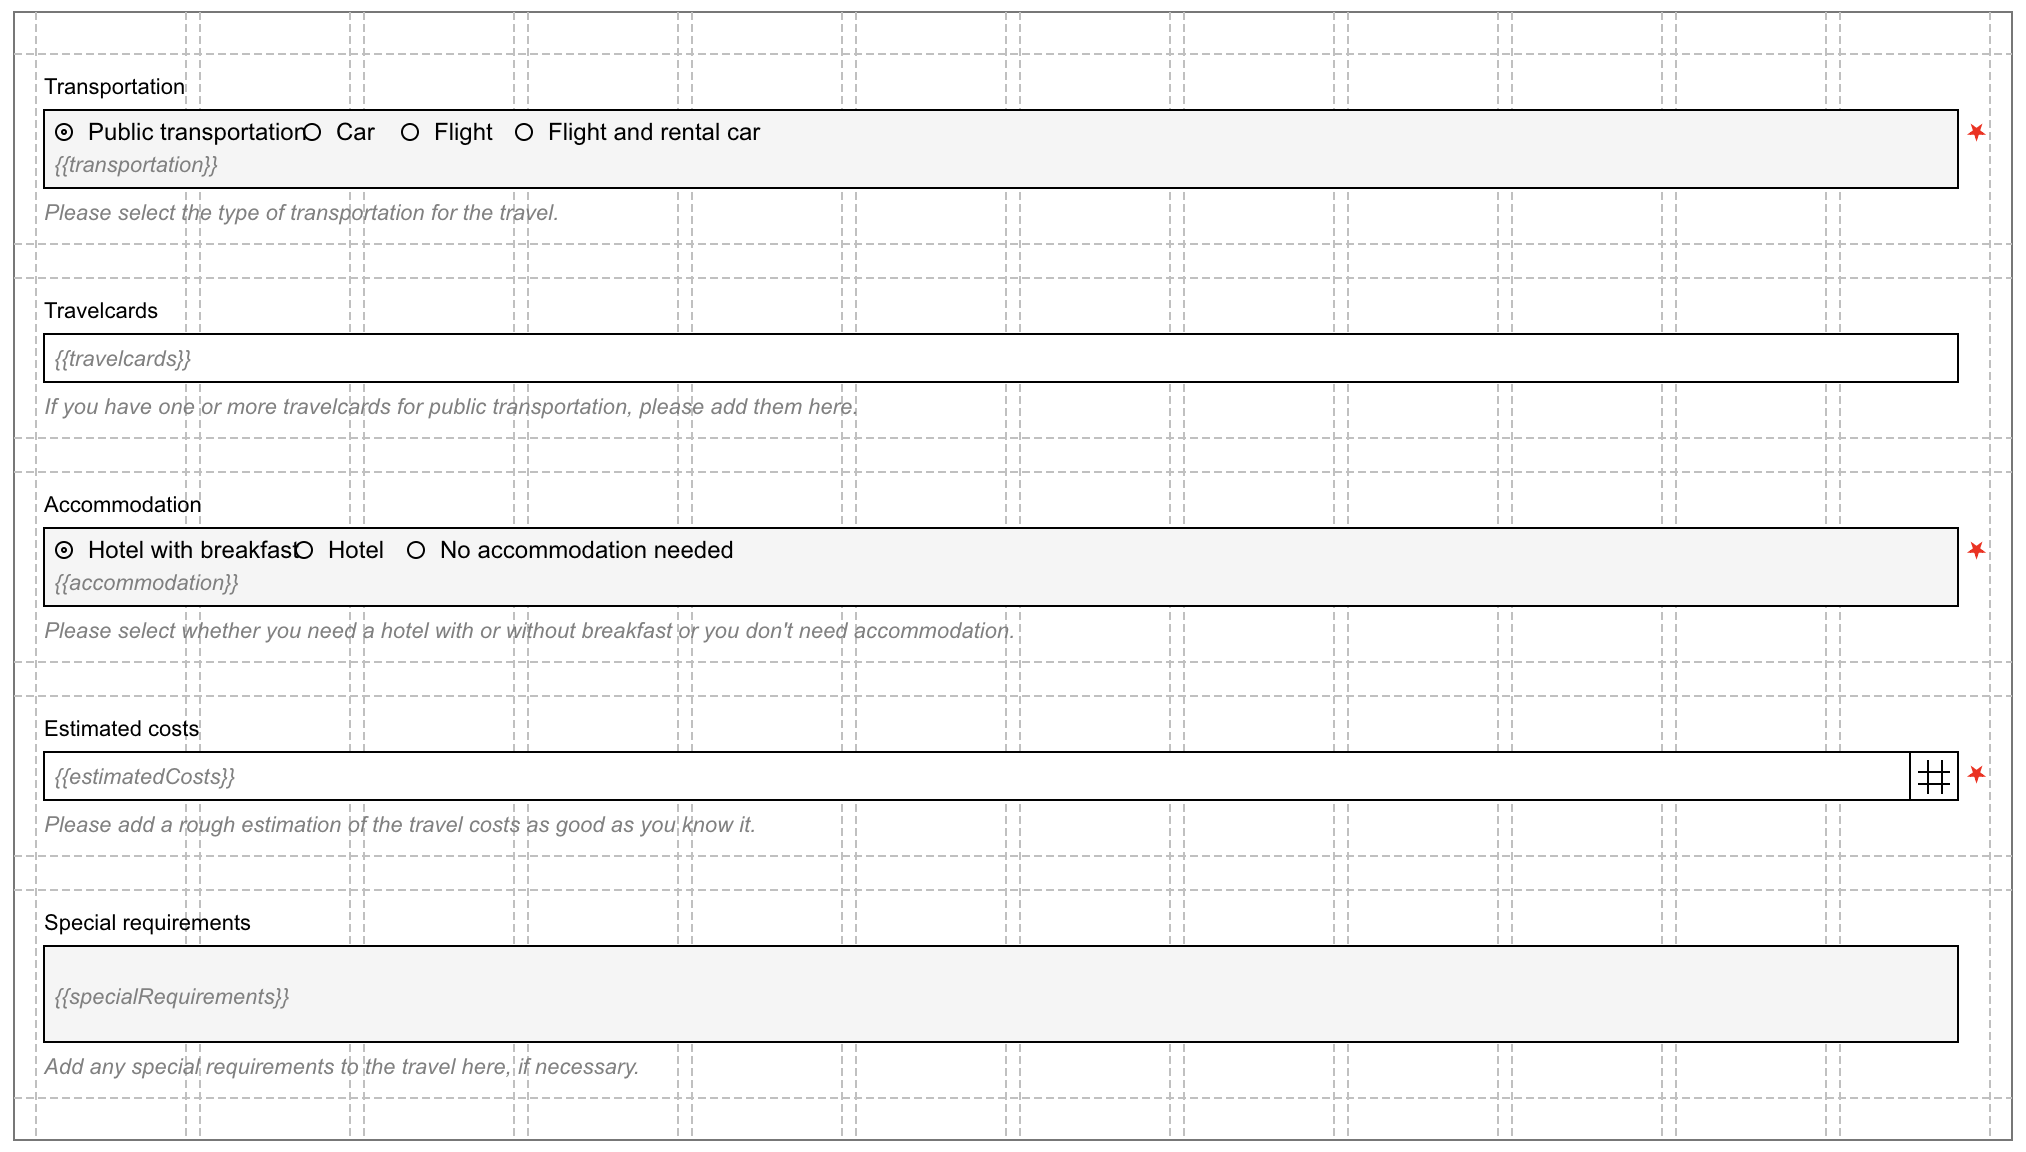
In the new form, drag and drop a Selection>Radio buttons component to the form
and label it Transportation.
By default, it has a static data source, which means we define the selection
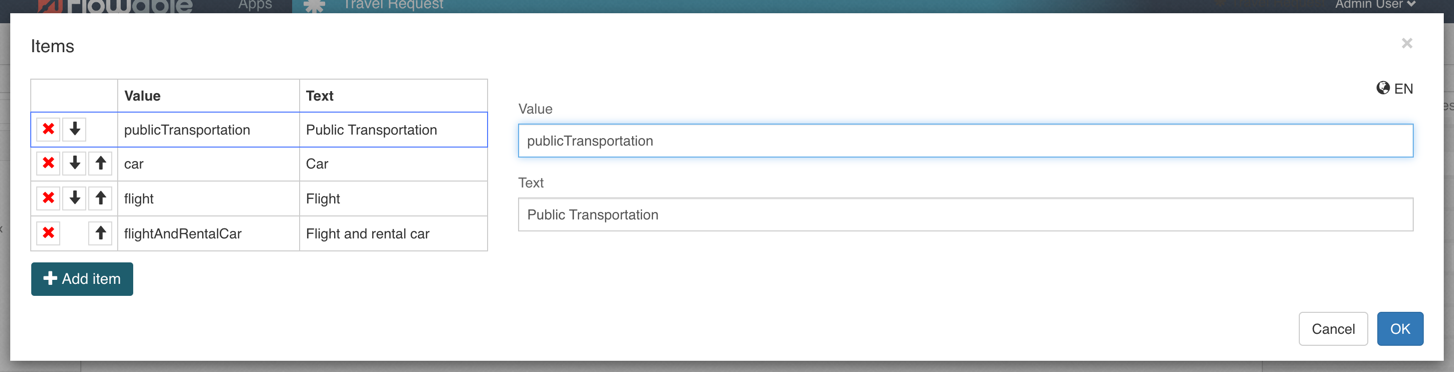
items directly within the form. Click on Data source>Items
to define our options for travel transportation.
Add Public transportation, Car, Flight and Flight and rental car to the options list (remembering to add a corresponding value):
We can either arrange the radio buttons horizontally or vertically,
let us choose Horizontal in the Details>Orientation attribute, to align our
options horizontally.
Drag and drop a new Data entry>Text input field and name
it Travelcards where
we can enter the travelcards of the requestor to optimize the travel.
However, we only want to show it, if we choose public transportation, so
let us use the General>Ignored option and enter the following expression:
{{transportation != 'publicTransportation'}}.
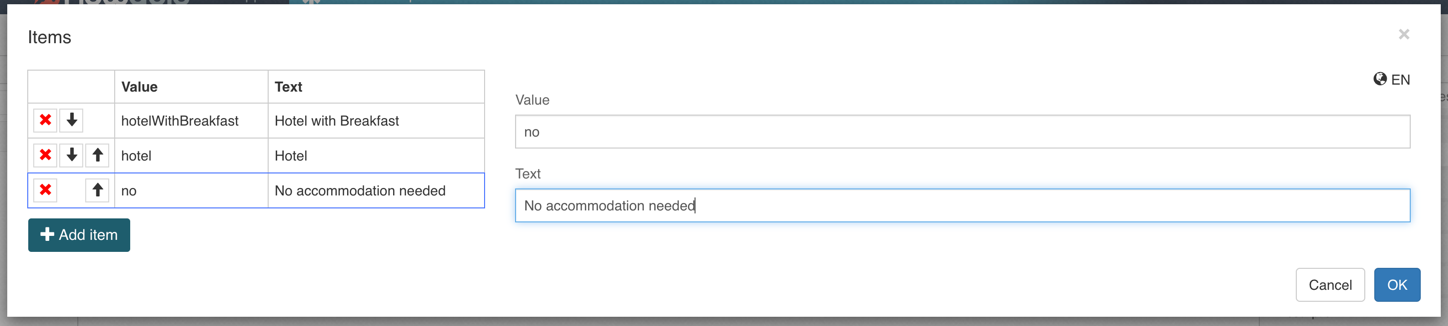
We also want to capture if we need a hotel, so let us drag and drop another
Selection>Radio buttons component, give it the label, Accommodation,
change its orientation to horizontal too and add options
like Hotel with breakfast, Hotel and
No accommodation needed to the
list of options. Enter {{transportation == 'publicTransportation'}}
in the General>Ignored attribute so the component is shown only
if we do not choose to use public transportation.
Let us make both selections mandatory, either click on the red star or
check the Validation>Required attribute for both radio groups.
If the outward and return date is on the same date, then we do not need
any accommodations so let us use an expression for the default value of the
hotel selection by setting the attribute General>Default value to the
following expression:
{{((outwardTripDate == returnTripDate) && 'no') || ((outwardTripDate != returnTripDate) && 'hotel')}}
What does the expression do? The first part is true if both dates are
identical and sets the default value to no; the second part is
the opposite and sets the default value to hotel.
Let us also add a Data entry\Decimal field, name it
Estimated costs, make it a required field and add
a Data entry\Multiline text component and name it Special requirements.
Optionally add descriptions to the input fields to give some hints on what to enter for the user. The form should now look like this:
Now save the form, go back to the case model, and save it as well.
Add New Details to the Case Work Form
As we added new detail data to the travel request, we want to include that too in the case overview (work) form.
Go back to the Travel Request Work Form tab in the editor, or you can also
reach it again by clicking the Travel Request Work Form link in the
case Details>Work form attribute.
We currently have one subform on there, let us add another one by dragging
and dropping a new Container>Subform, name it Travel details
and uncheck the
General>Store subform data in single variable checkbox.
Then select Details>Form reference, choose "Reference"
and select Add Travel Details Task Form as the subform reference.
We only want to show that detail data once we completed the details task
and added that information, so add an expression (condition) on when we
want that subform to render. Select the "lightning" icon on the
General\Ignored attribute which shows an expression
field where we simply enter {{!transportation}} as the expression
for the ignored attribute.
Setting this property means that the subform will only be visible once we enter the transportation
option, which is a mandatory field in the details task. When
we complete that task, the overview form shows the detail subform.
We could have also used the General\Visible attribute to hide the subform.
In that case the hidden subform would still be validated. If we tried to modify
the travel request before adding details the required fields would fail
validation and prevent us from completing it.
Also make the subform read-only like the first one by unchecking the
General>Enabled checkbox on the subform component.
We do not show that subform until the travel details are provided.
Add a Display>Text display component below the second subform and
add a message about why the subform is empty.
Add something like this to the content:
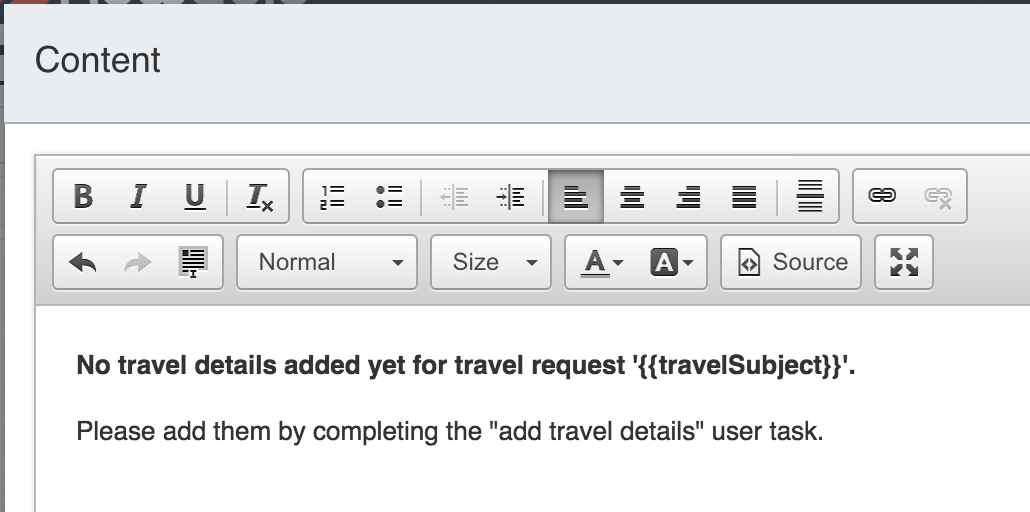
As you can see, we can also use expressions as part of such content. All case data variables are accessible.
Now finally, make that display component visible only if the details
are not yet provided. Select the "lightning" icon in the
General>Visible attribute
and set its condition to {{!transportation}}. The effect of this expression
is to show the component only if the transportation details are not filled out.
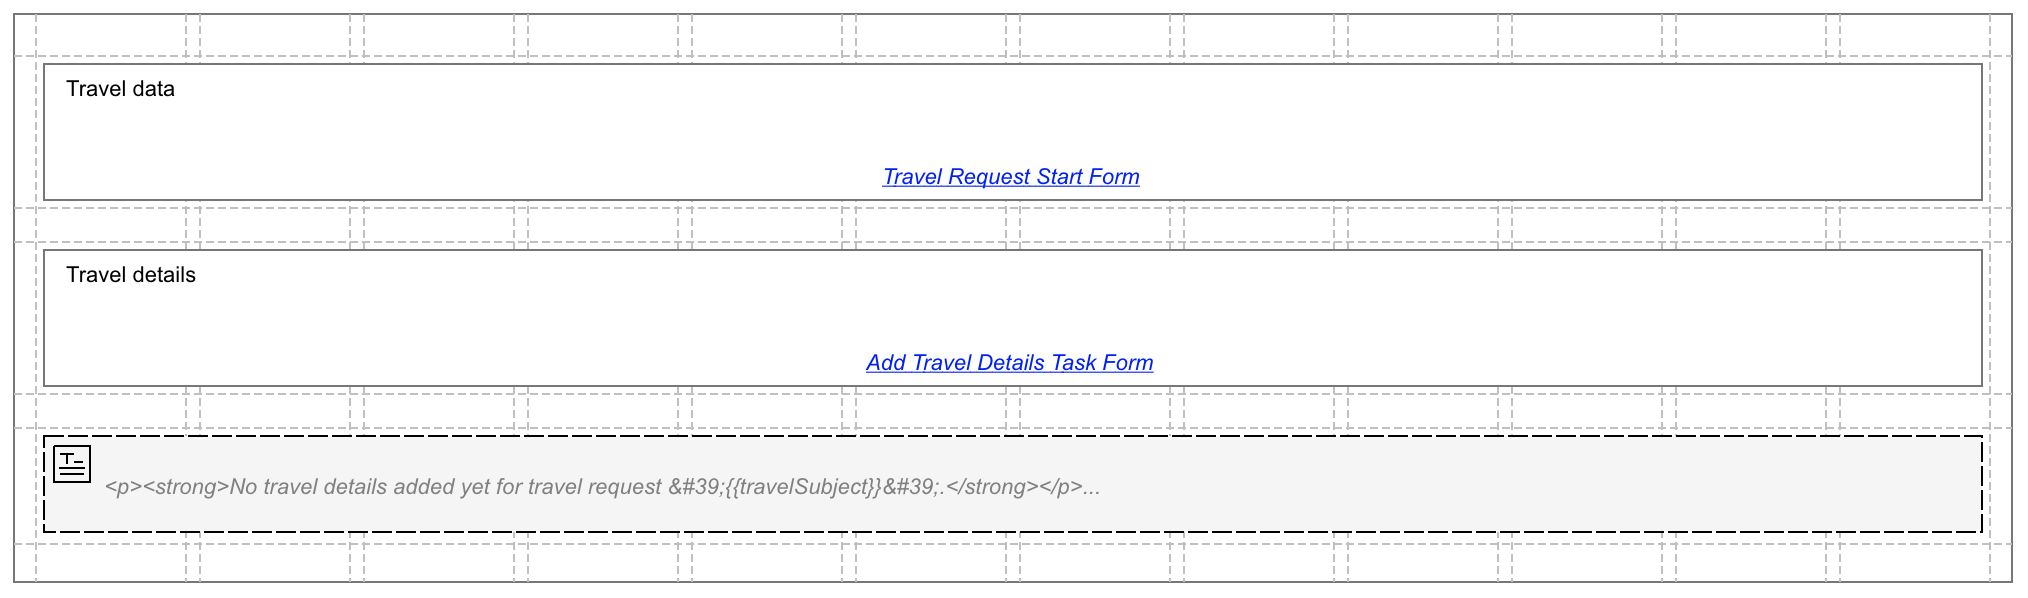
The case work form should now look like this:
Add the Details Option to the Modifying Task
In addition to the case work form, we also want to make sure the user can change those details again once entered already using the optional modifying task.
Go back to the case model, select the Modify travel data task and either
click the small link icon below the task or the
Details>Form reference attribute
link named Modify Travel Request Data Task Form. Either option takes you to
the form we want to modify.
We have one subform there at the moment, so let us add a second one with
the travel details like we did in the Travel Request Work Form. This time, let us
do it by copy and pasting the existing one from the case work form.
So switch back to that work form, select the Travel details
subform and either hit Command-C or the copy icon in the action bar of
the editor. Then go back to the Modify Travel Request Data Task Form
and either hit Command-V
or the paste icon in the action bar. This inserts that subform with
the same attributes as defined in the case work form.
We only have to make the details enabled (editable) for the task form, so
check the General>Enabled attribute checkbox for the subform
to allow editing at runtime.
We are ready for another test-drive, so let us save everything, and deploy the app again.
Deploy and Run the Travel Request Again
Now deploy the app again, switch to the Flowable work view and start yet another, new travel request.
Unlike the optional, manually activated task, the new task is created by the engine automatically, as it is a required one and shows up in the open task list of the case.
You can now play with the outwards and return date if they are the same, the "no accommodation" option is pre-selected, otherwise the "hotel" one. Also if you select the public transportation, see that the extra field shows up to enter the travelcards.
Also pay attention to our user listener to complete the stage: it does not show up until we have completed that mandatory task, and there are no more active tasks.
Moreover, when filling out that task form, you can also enter partial data and save the task without completing it. This saves the data, but you can come back to that task whenever you want and eventually complete it. Saving a task form does save that data in a temporary scope, so no data is yet saved to the case; this only happens once we complete the task. As there might be sentries or conditions waiting for some case data to be there or have certain values, we want to make sure they are only made available on the case level once we really complete the task and not when we temporarily save that task data.
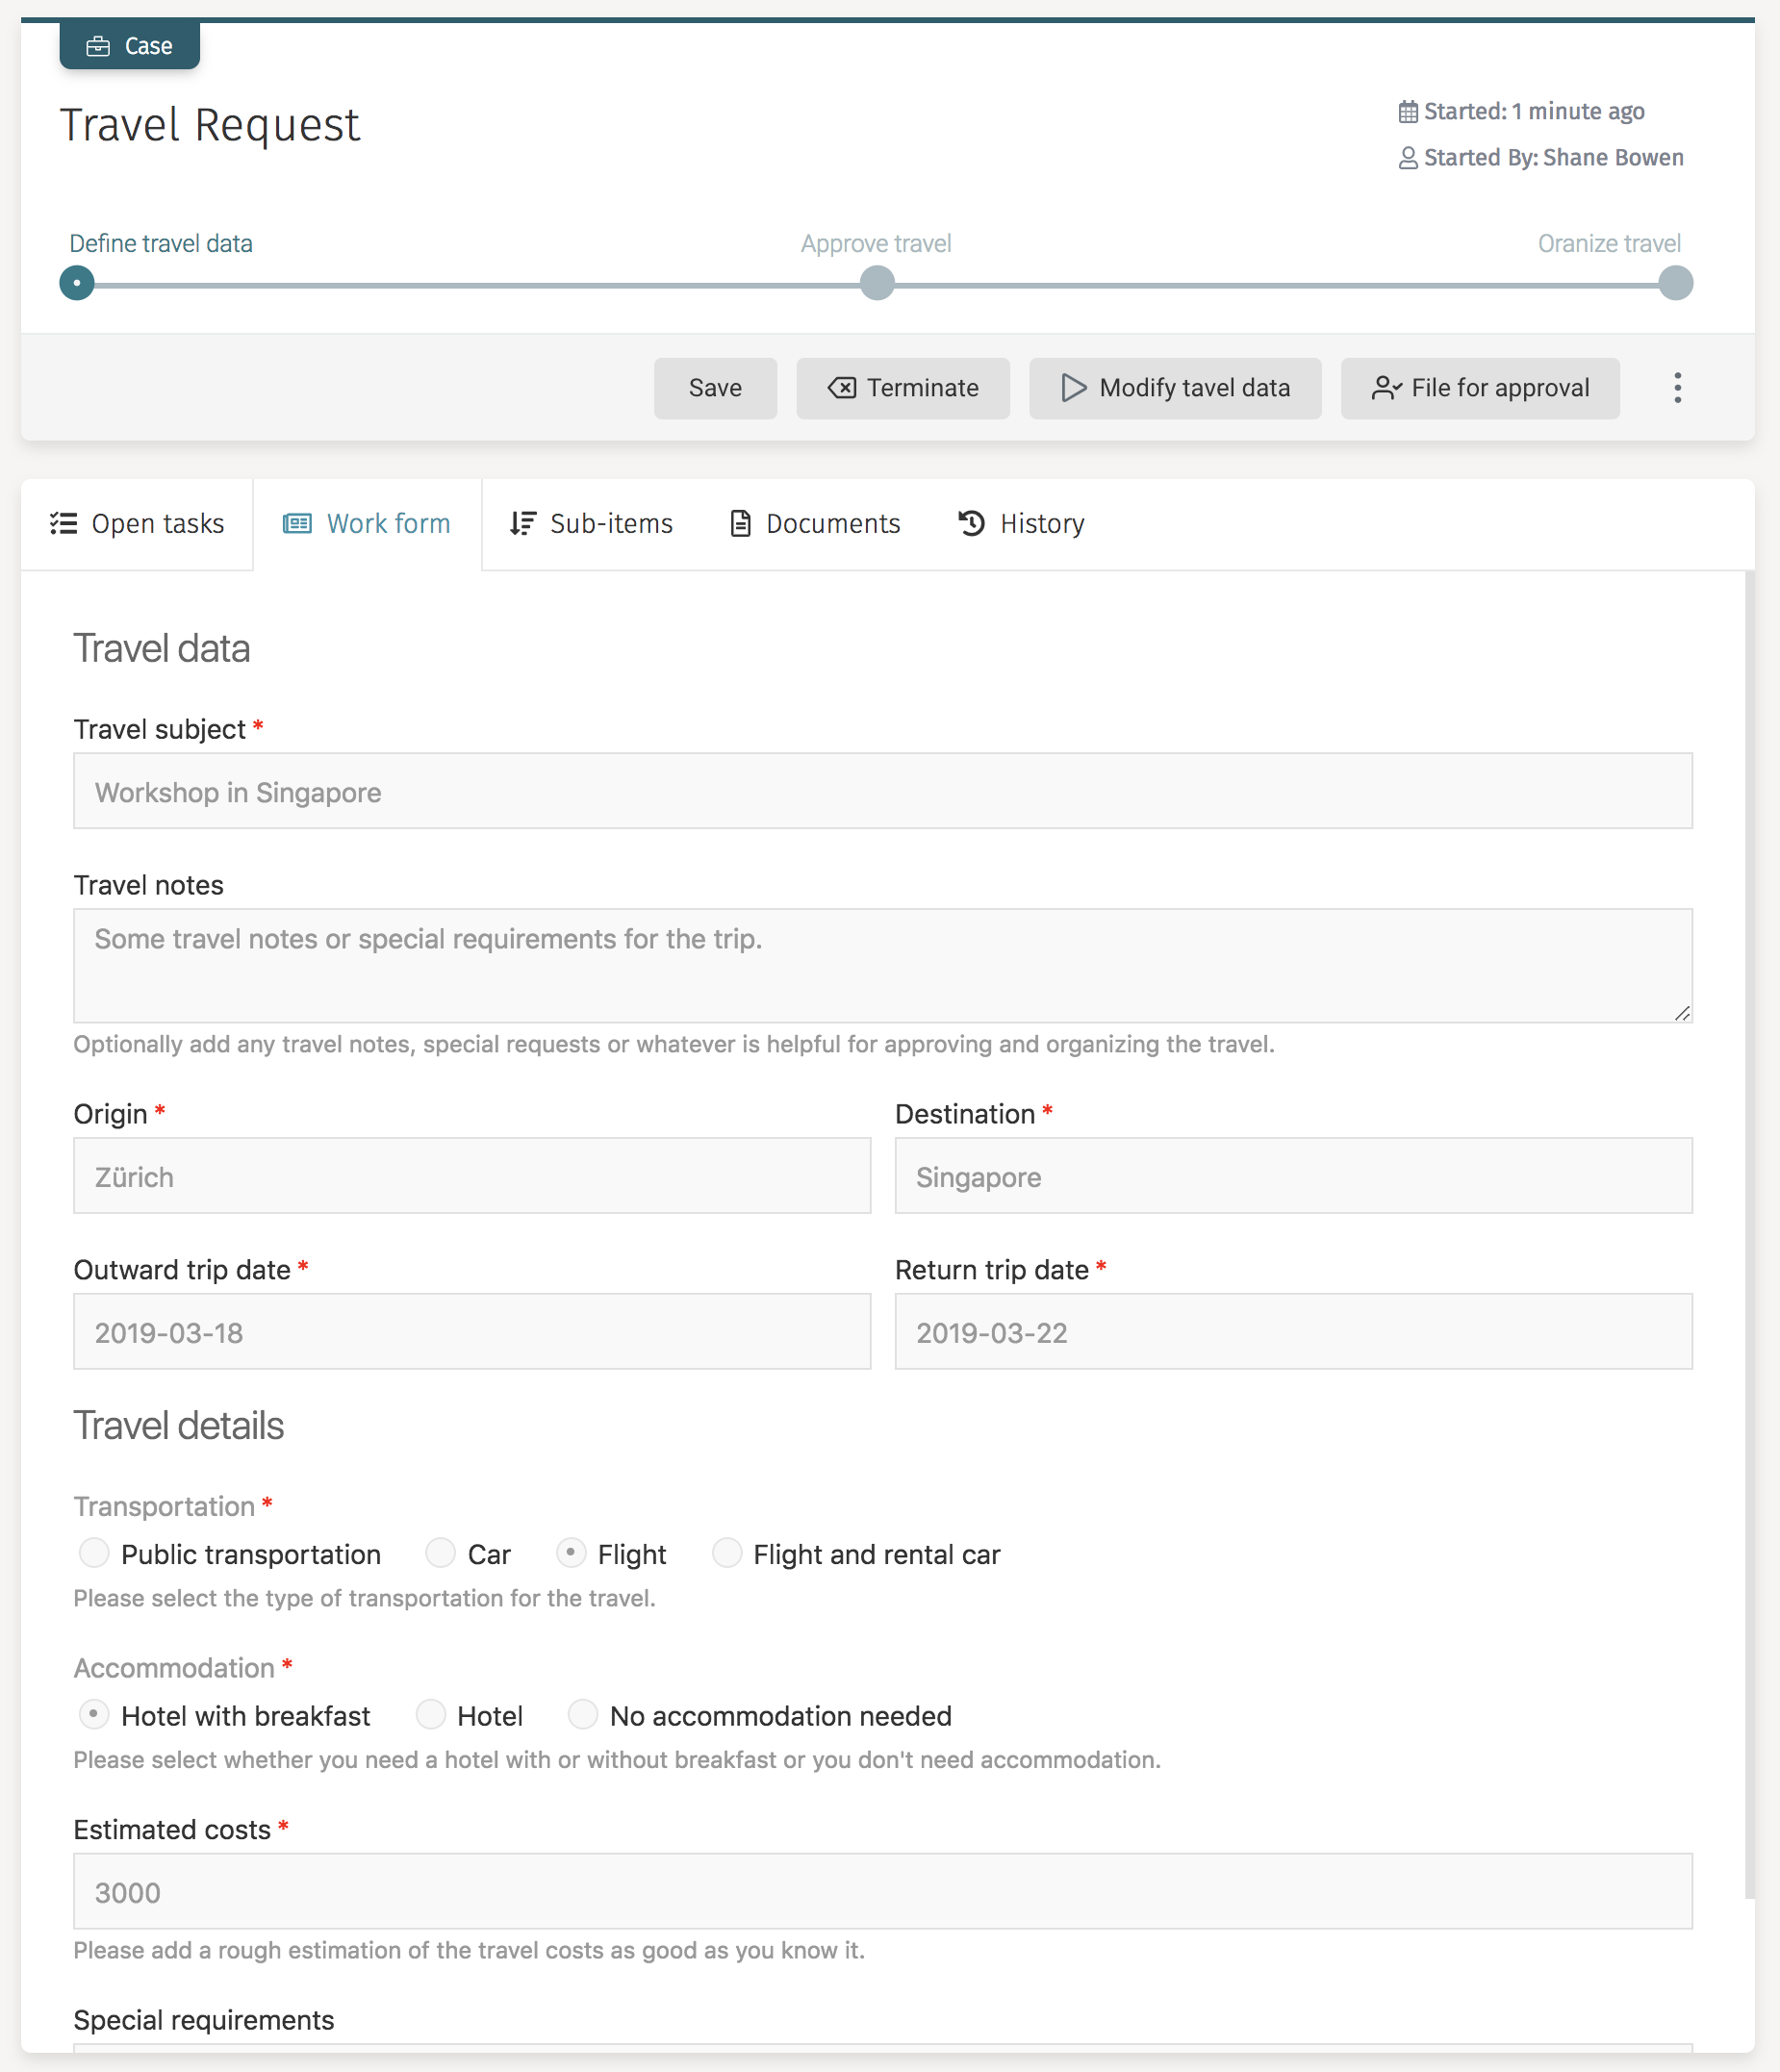
If all the details are not provided, this is how the case overview (work form) should now look like:
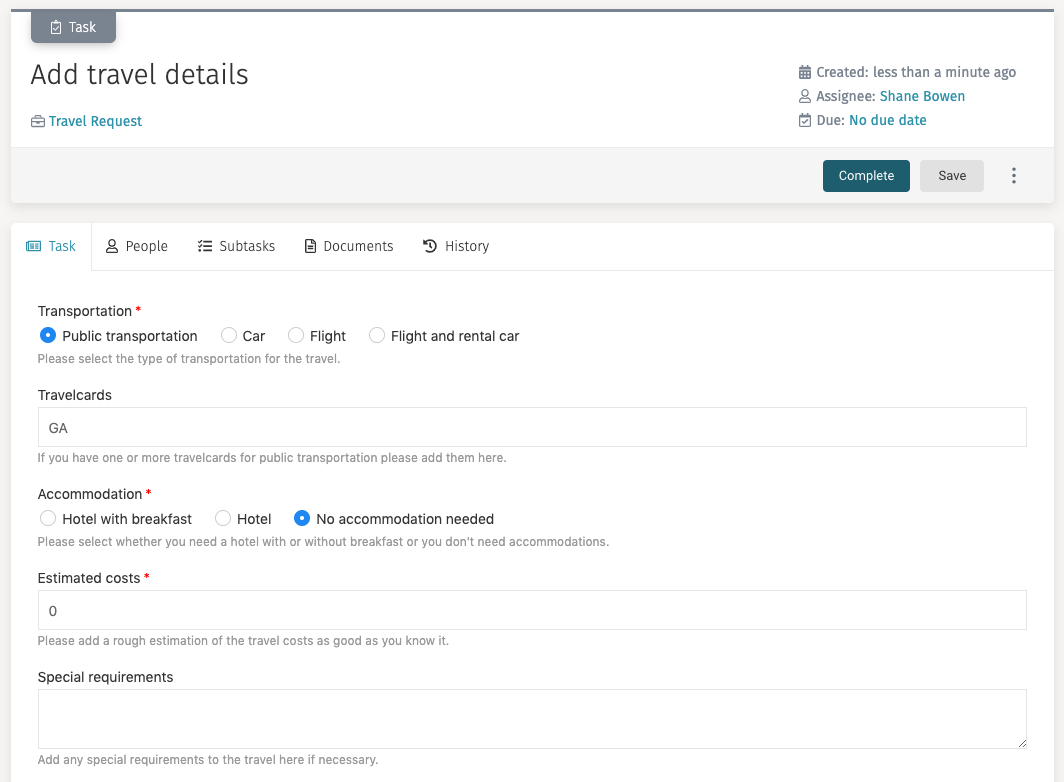
Once you provide all the details, the overview looks like this:
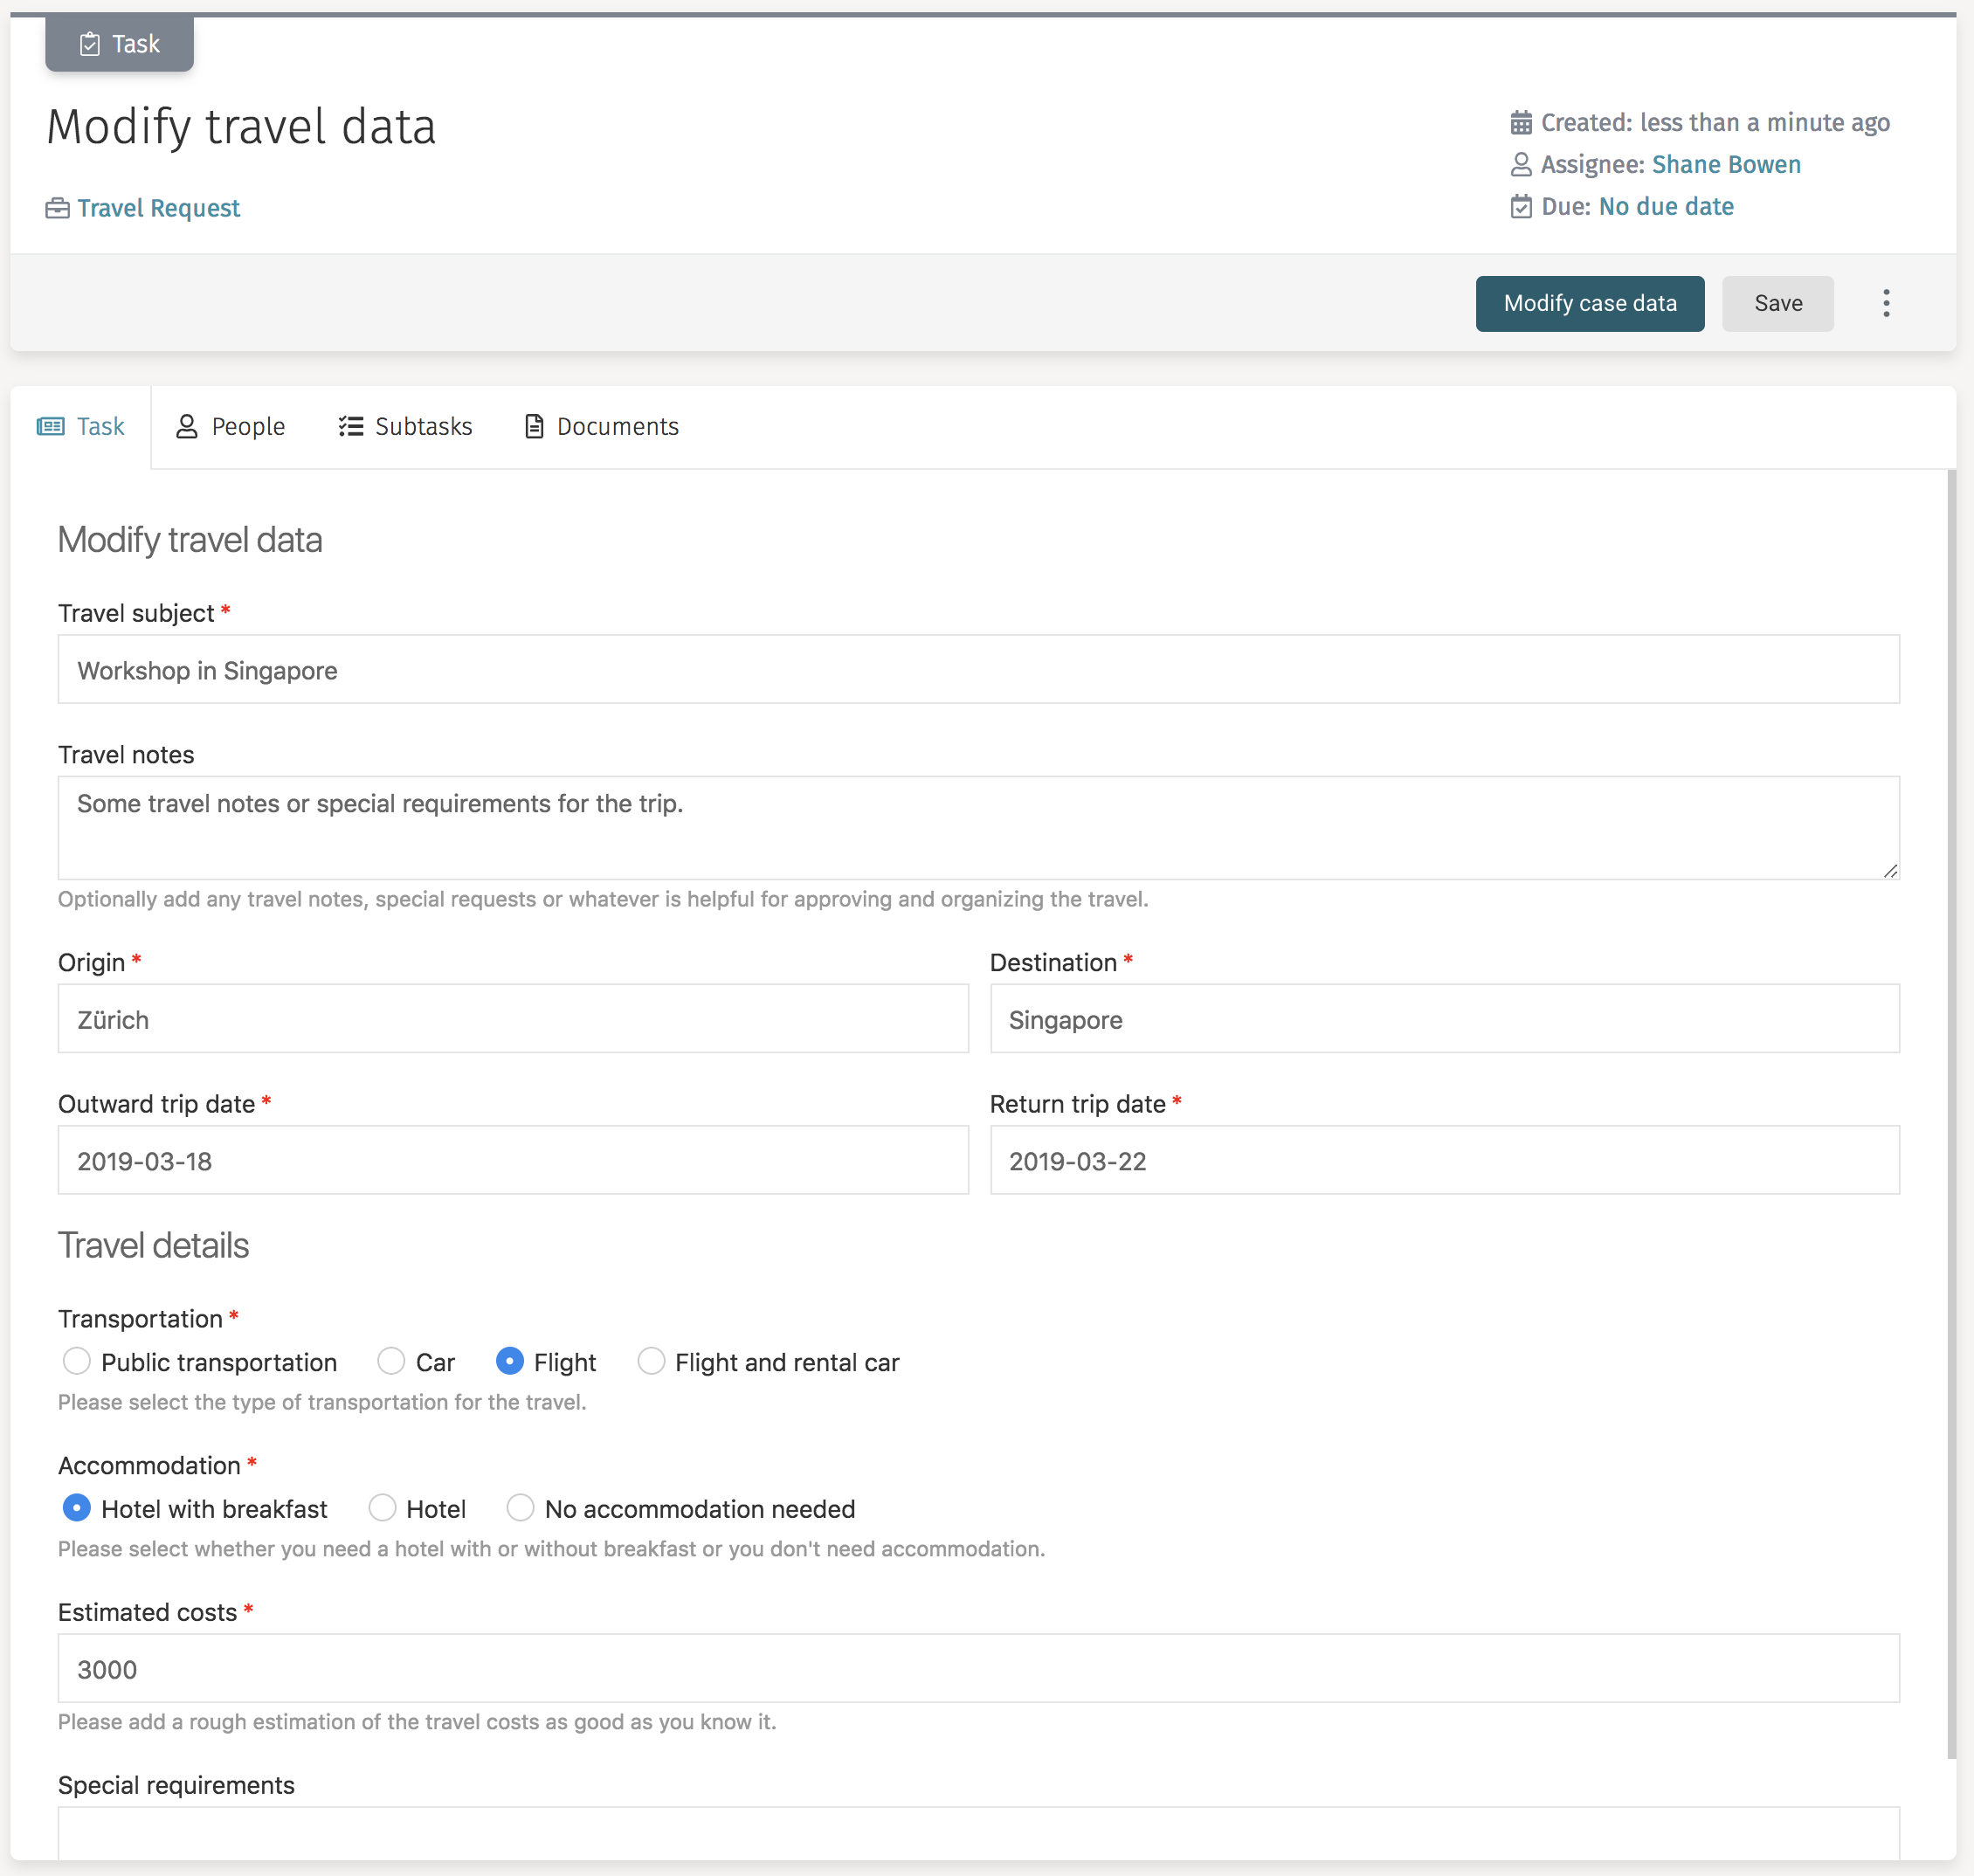
So this is how the modify travel data task looks once all the travel details are entered:
Chapter 6: Add and Define the Simple Approval Process
In this chapter, we are going to add a simple approval process to the travel request where the requestor has to choose a single approver with an approval task and feedback loop to eventually approve or decline the travel.
In a later chapter, we extend that approval process and make it a bit more sophisticated by using a DMN based decision table to automatically decide whether we need an approval and if yes, if we need one or two approvers.
Add the Approval Process Task to the Second Stage
Go back to the case model, drag and drop a Controls\Process task to the second stage
named Approve travel and label it Travel request approval process.
Select the attribute Details>Process reference, choose "New", and enter
Travel Request Approval Process in the name field, hit Tab and then
Enter to create a new process model for the approval process.
There is already a start event, so we could go ahead and directly start
defining that process, however, it is a good practice to always use a pool
and lanes to define the roles involved in a process. So delete that start event
and then drag and drop a Swimlanes>Pool/Lane element onto the process canvas.
We can name that pool the same as the process Travel request approval process.
By default, one lane is defined, so double-click its label and name it
Travel requestor. Add another lane by dragging and dropping a
Swimlanes>Pool/Lane element again below the existing lane (drop it once you
see that green box below the existing lane) and change its name to Travel approver.

Add a User Task to Select the Approver
Drag and drop a Start events>Start event to the requestor lane where we want to start
the process. Next, click the small user task icon on the left of the start event
to add a User task directly. Name the user task, Select approver for travel request.
Now click the link icon below the user task or select the
Details>Form reference
attribute of the user task, and enter Select Approver Task Form for the name,
hit Tab and then Enter to create a new task form.
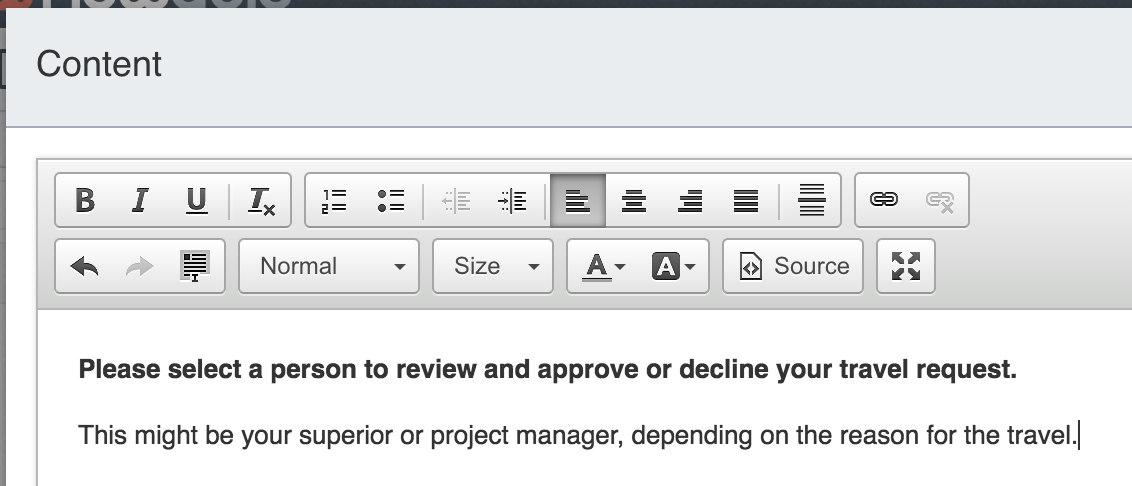
Now drag a new Display>Text display component onto the form
and add some text to describe the task:
Now add a selection for the person to approve our travel request by adding
a Selection>Person component to the form and changes its
name to Select approver.
This time the default variable name is not a great fit, so double click
the variable name {{selectApprover}} and rename it {{approverId}} as
it contains the ID of the selected person.
We are using Flowable’s Identity Management (IDM) subsystem to find the appropriate employees. A default URL is already configured and we can adapt this to our needs:
{{endpoints.idm}}/users?displayNameLikeIgnoreCase=%25{{$searchText}}%25&size=100&memberOfGroup=employee
We use an expression for the IDM REST endpoint, {{endpoints.idm}}. The
value of the expression is supplied automatically by the system.
Next, we search for users using a search text and ignore the case of the
string and use autocomplete matching. In addition, we only want members
of the group employee and to limit the number of returned employees to 100.
That is what this query URL actually means.
Finally, make that selection mandatory by either clicking the red star
or checking the Validation>Required attribute checkbox.
We can optionally add outcomes to define the name of the complete task button.
If desired, click the Details>Outcomes on the form canvas and label it
Set approver.
The form now looks like the following:

Now save the form and let us go back to the process model.
Add Approval User Task
Select the user task again and click the small user task icon again to
add another task. Name the new task, Approve travel request and move it into the
Travel approver lane. By default, a user task is assigned to the initiator
of the case, but for our approval task, we need it to be assigned to the
selected approver from the previous task, so change the attribute
Assignment>Assignee
to ${approverId} which resolves to the selected approving users
ID at runtime and assigns that user task to them.
Next, click on the Details>Form reference attribute and enter
Approve Travel Request Task Form, hit Tab and Enter to
create a new task form.
To the newly created form, add a Display>Text display component to the form
and add some description for this task:
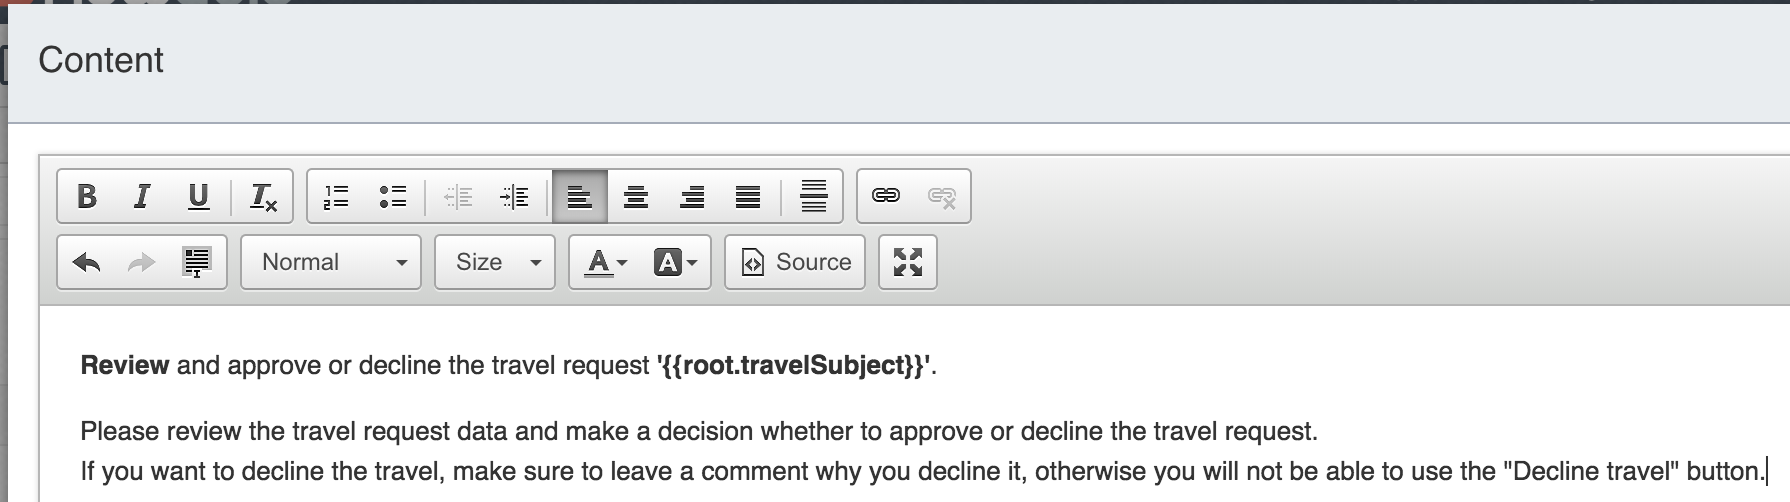
Now add some review comments by adding a Data entry>Multiline text component to the
form and name it Review comments.
We also want to include all travel request case data on that user task, so the approver does not have to switch back to the case overview to see it but directly has that data on the task form.
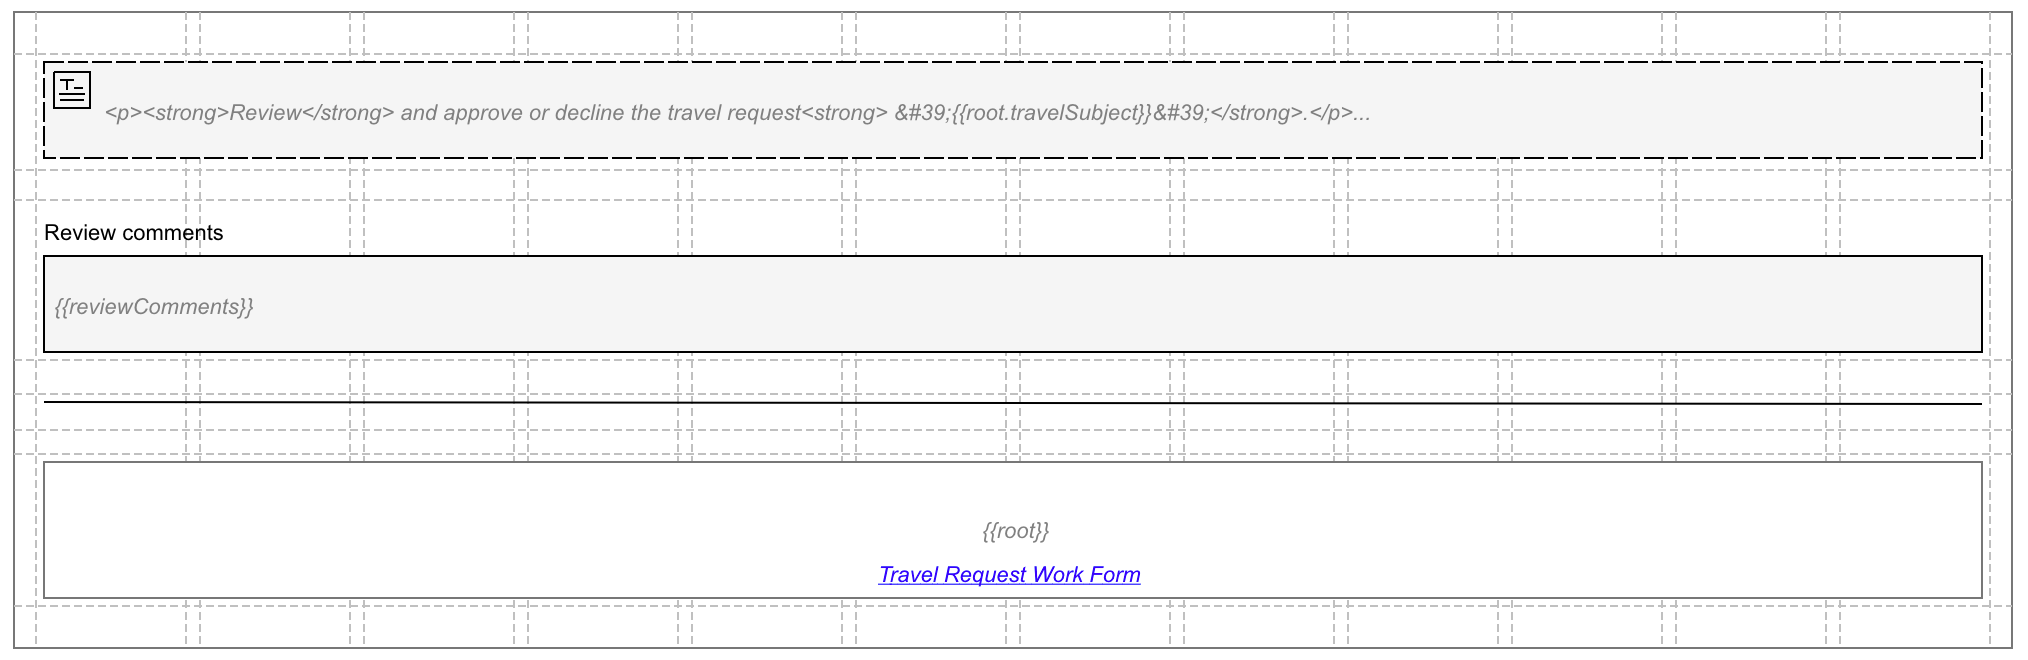
We can use a subform again, so drag and drop a Container>Subform component to the task
form, but do not enter a name, leave the label blank. Select Details>Form reference,
choose "Reference" and select the Travel Request Work Form. Now here is the
tricky part; we are now designing the form for a task which is part of the
approval process, not the case directly like the previous tasks. By default,
the data of a task form is mapped to its parent, which for the first tasks in
our example was the case directly, but this one now is part of a process, so
its parent is the process and its root is the case. This means we need to scope
that subform to "root" to get to the case data we want to display in
that subform. So set {{root}} as the value within the field below the
checkbox General>Store subform data in single variable and naturally leave it checked.
By specifying this value scopes the data for the subform to the case directly and not the
process (which would be the default).
Also, remove the General>Enabled check as we do not want to let the approver edit
the travel data directly.
To make that subform based data a stand out a little more, add a
Display>Horizontal line just between the comment field and the subform.
To let the approver make a decision, we can do it in several ways:
-
add a checkbox named approve which results in a Boolean variable having either value
trueorfalsefor the approval. -
add a radio button group with two options: approve and decline which results in a text variable either having a value of
approvedordeclined. -
use outcomes to let the approver decide and submit (complete) the task directly with a single action.
Let us go with option three for now. Click outside the form canvas and select
Details>Outcomes.
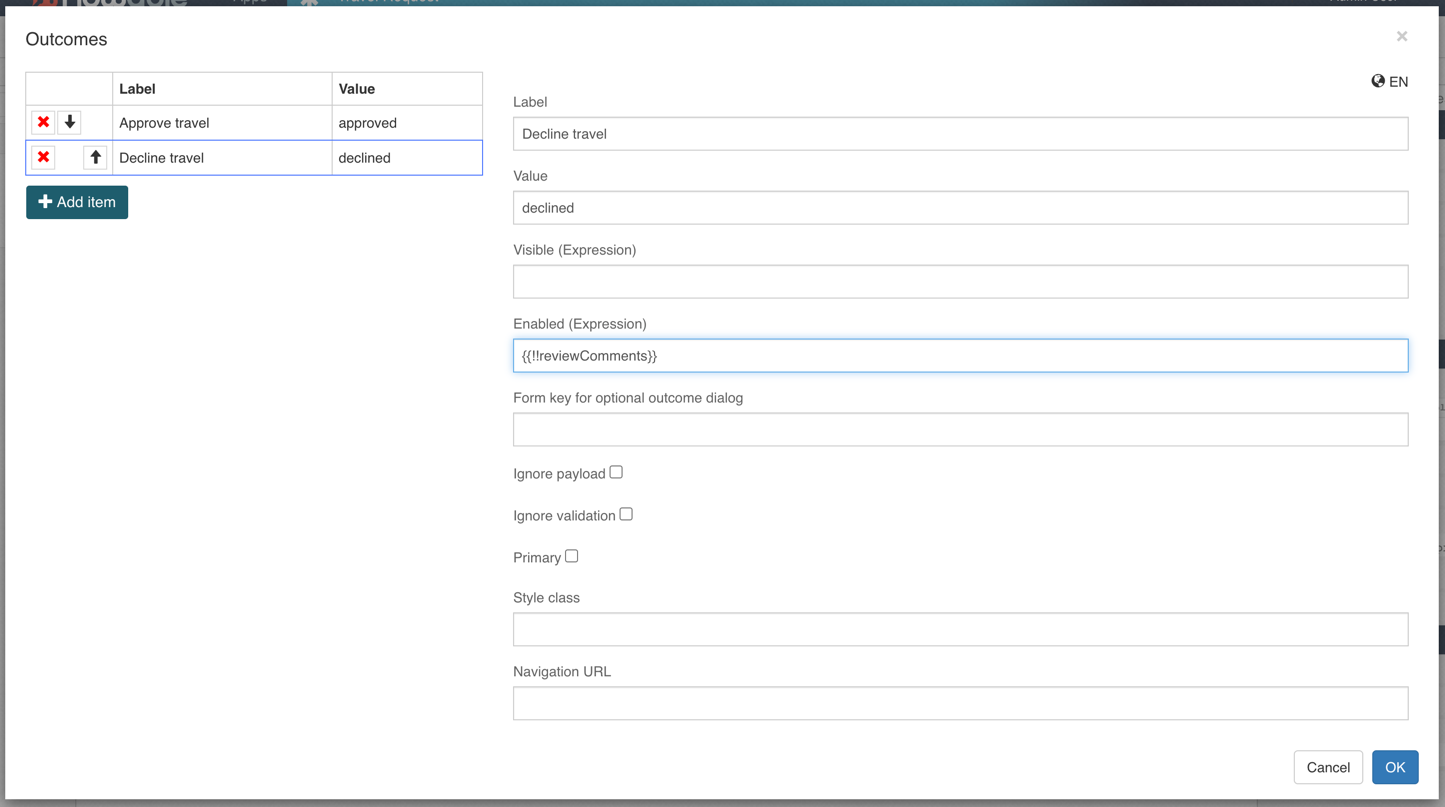
This time we add two options, Approve travel and Decline travel.
As we want to make sure the approver adds a comment when declining a travel request,
let us put an expression with that outcome and set it to {{!!reviewComments}}.
Pay attention to the double negation before the variable name, which is necessary
as you might enter some comments and then remove them again, which makes the
variable available once again, but empty. Using the double negation, the expression
is only true if the variable is not only there but also contains text.
The approval task form now looks like this:
Save the form, go back to the process, and save it as well.
Use Approval Outcome in the Case Model
Select the case model as we need to adapt it to the result of the approval process.
It is a very good practice to use scoped process data when using a process
task (here, Travel request approval process)
within a case to isolate its data from the case as long as the process
is running. Of course, this depends on the type of the process and
basically whether you want the data being entered or changed during the
process made visible on the case level immediately or not. For this we can
use the Details>In and Details>Out
mappings of a process task to store data from the
case within the process when it is started and the opposite; to get
data from the process back to the case once finished.
In our simple case, we do not need data from the case to be copied to the
process as we only show a read-only form of the case data which is bound
directly to root, so no need to copy that data in. However, we want the
result of the approval process taken back to the case level, so select
the Details>Out attribute and define some output mappings for the process:
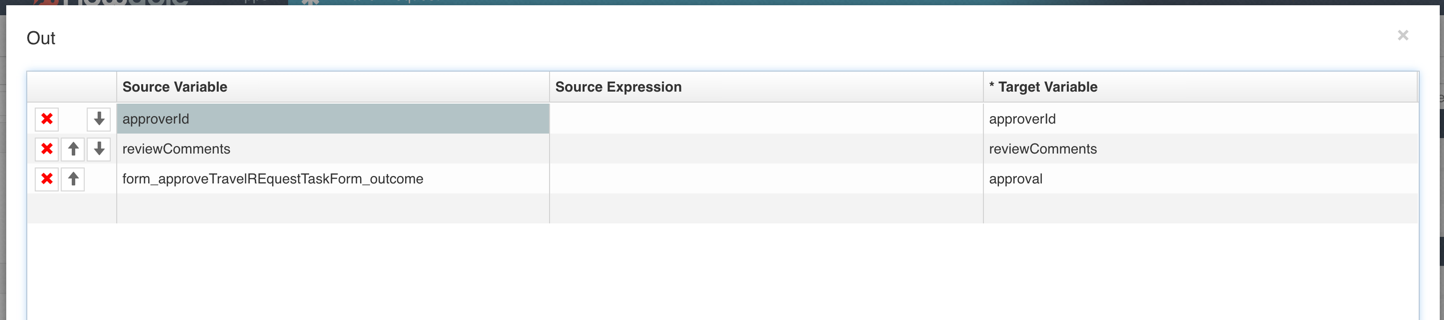
Remember, we used outcomes for the approval. They are stored in a variable
named form_{formKey}_outcome by default, so we map that one back to a
variable named approval on the case level.
As a next step, we need the organize travel stage. If the travel request was approved, add a condition to the entry sentry of that stage.
Select the entry criterion (entry sentry) of the last stage and click
the attribute Details>Condition and set it to:
${vars:getOrDefault('approval', null) == 'approved'}
As this condition is evaluated at the very beginning when created,
we need to use a special expression function if
the variable approval is yet available. We can use the variable
function, vars to either return the value of the variable named
approval or if the variable does not exist, return null instead.
Given the variable value then check
its content to be approved and only in that case, start the third stage.
Also, let us set the Case plan model to autocomplete by checking the
Details>Auto complete attribute on the main case plan model. This automatically
ends the case if it was not approved. Otherwise, the case engine would
wait for that entry condition of the last stage to eventually become
true and in our example (at least for now), this is never the case.
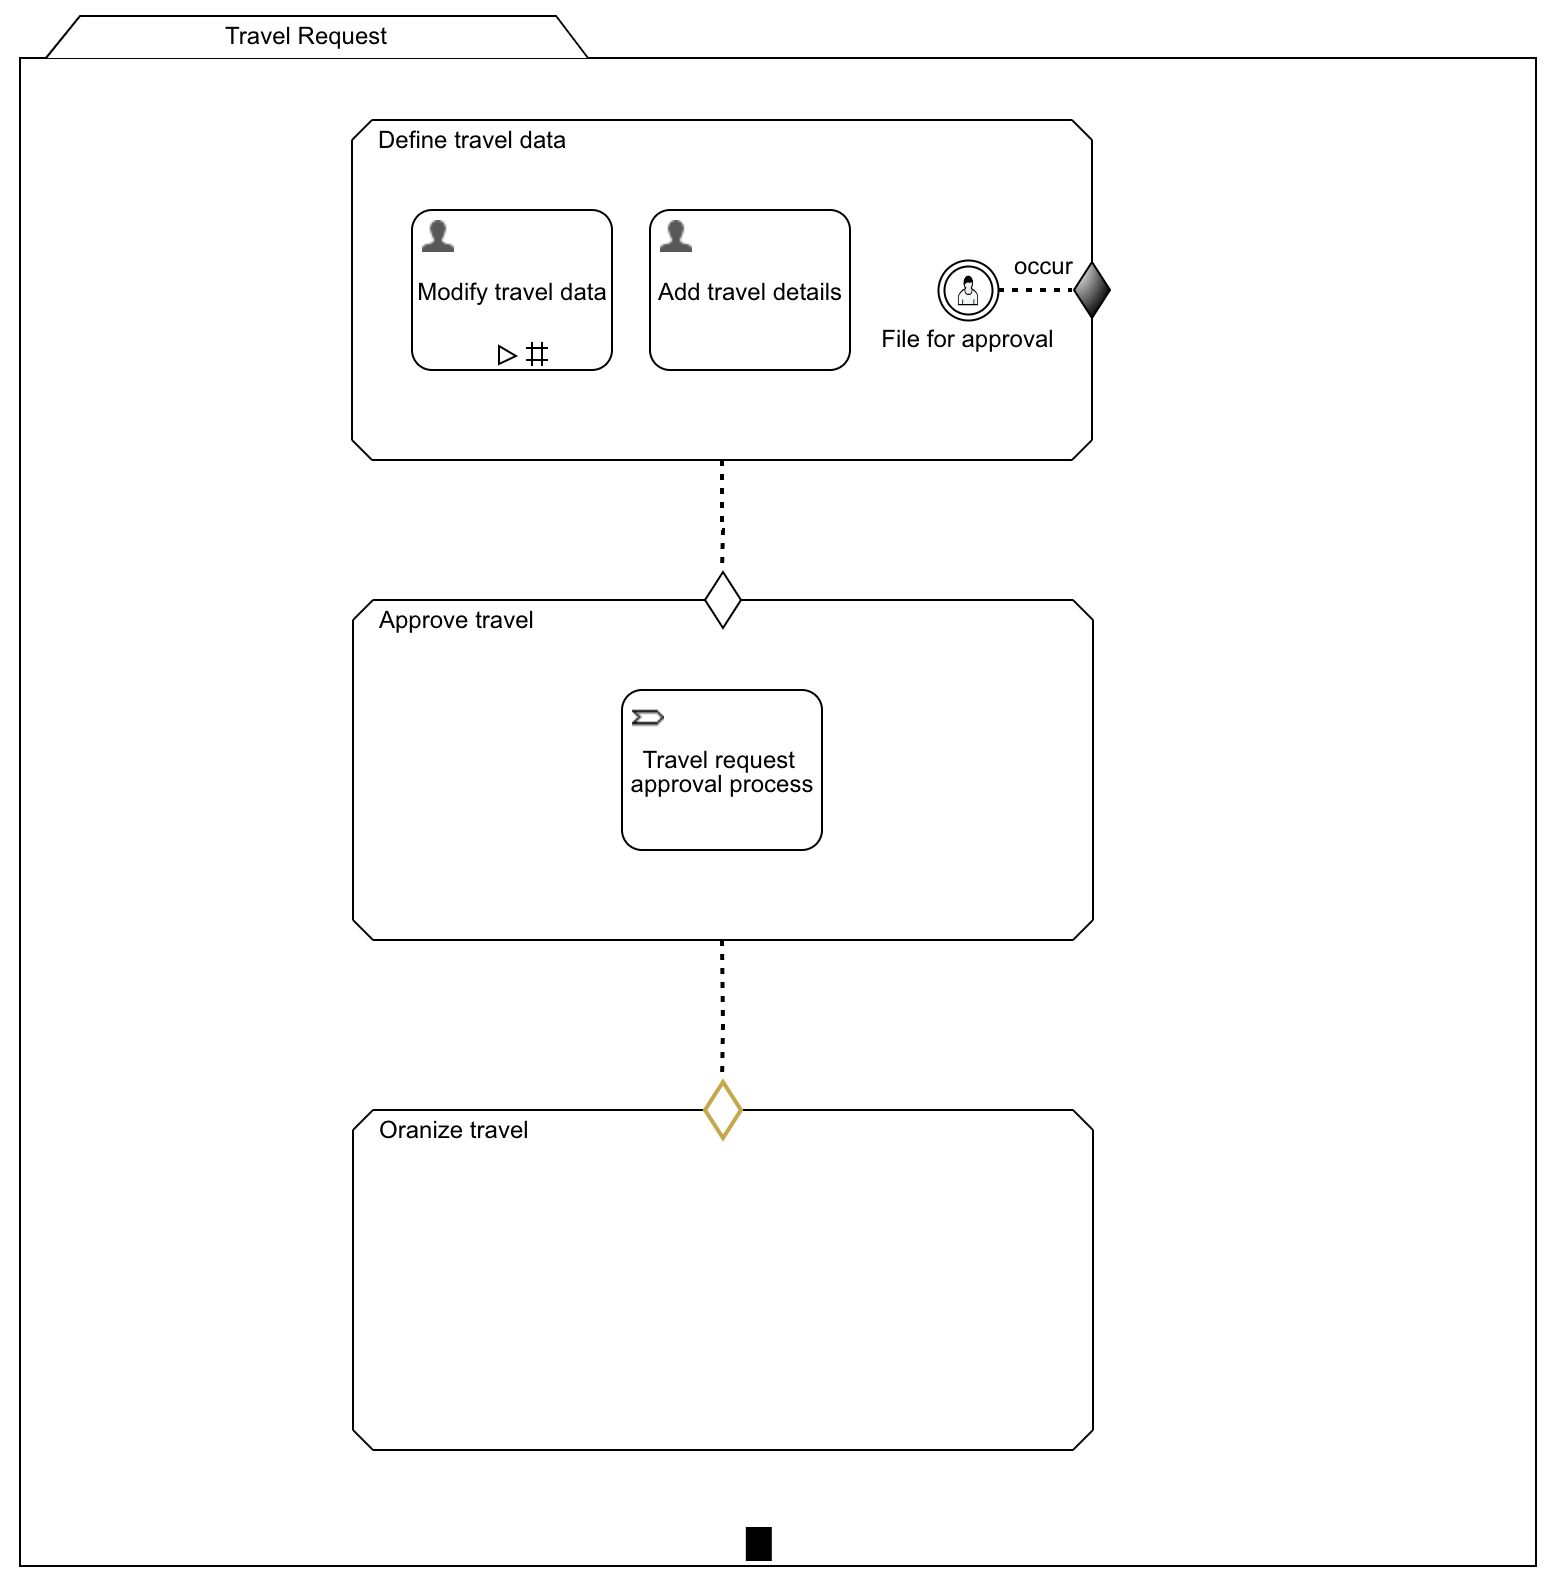
Our case model should now look like this:
Add Approval Result to Case Work Form
As we have added a simple approval process, let us add the approval result to the case overview form.
On the main case model click on the Details>Work form named
Travel Request Work Form to open the case overview form
(or navigate there if it is already open).
As the form contains quite some data, let us make both subforms collapsible
by checking the Details>Collapsible attribute. Let us even check the
Details>Collapsed
attribute on the second details subform, so by default, the first one
is opened, and the details are collapsed.
Next, add two Display>Text display components at the top of the form with the
three options for the outcome of the travel case. Note that the
second and third use the same text require modified by variable content.
-
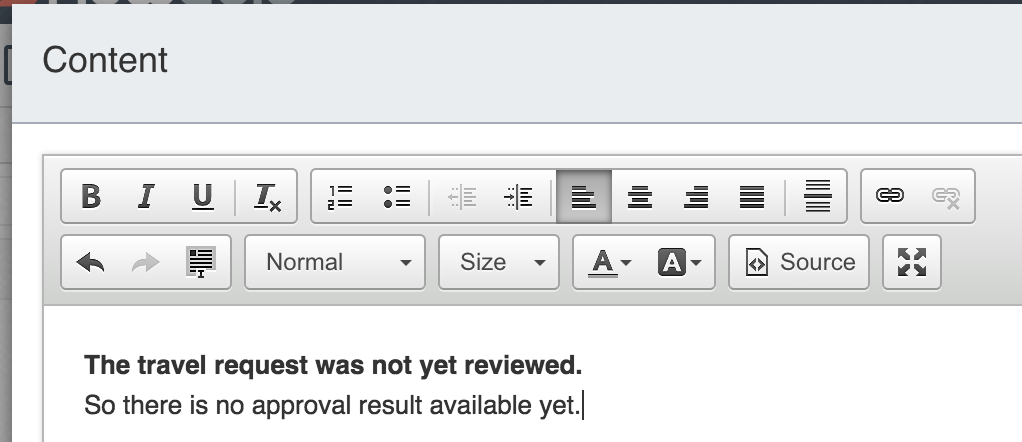
Option one: the travel case was not yet reviewed and approved or declined.
-
Option two: the case was reviewed and approved.
-
Option three: the case was reviewed and declined.
Here is the content for the first one:
And here for the second option:
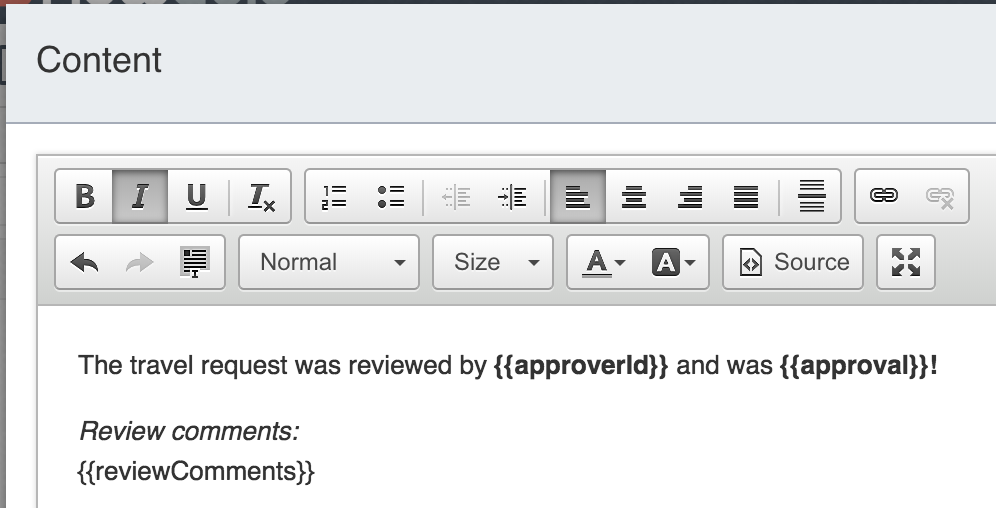
As we use the approval variable in the text, we can use one text display to render the result of the review.
Now we want to make sure only one of them is rendered, so we set the
General\Ignored attribute of the first text area to {{approval}} which
ignores (does not render) the first text area if we have the variable approval
already set. For the second text area, we do the opposite and set
General\Ignored to {{!approval}}.
Now save everything and execute another test round.
Deploy and Run the Travel Request Again
You know the drill by now, so publish the travel request app again, switch to the runtime view and create a new case of our adapted travel request.
At least complete the details task then hit File for approval and
the Select approver for travel request task in the cases open task list.
Select the task and choose an approver (for simplicity, you can even select yourself
so, you do not have to log out and log in again). Then play with the comment
field on the approval task: you can only choose to decline if you entered
a comment. As it is optional for the approval, that outcome action button
is always enabled.
In all cases, the travel request case is completed after the decision as the last stage does not yet contain any work items; however, declining it does not activate that last stage at all.
Also, pay attention to the updated case overview (work) form. Initially, the form contains a comment that the travel request is not yet reviewed. Once the request is reviewed, the comments are the result of the approval step.
Chapter 7: Add Travel Organization Tasks
In this chapter, we finally add some travel planning tasks for the travel agent to organize the travel once the request was approved.
Add a Travel Organization Task to Case
Go back to the case model and add a new Controls>Human task to the last stage and
label it Organize travel. As in the past, select the
attribute Details>Form reference,
choose "New", enter the name Organize Travel Task Form. Now hit Tab and
Enter to create a new task form.
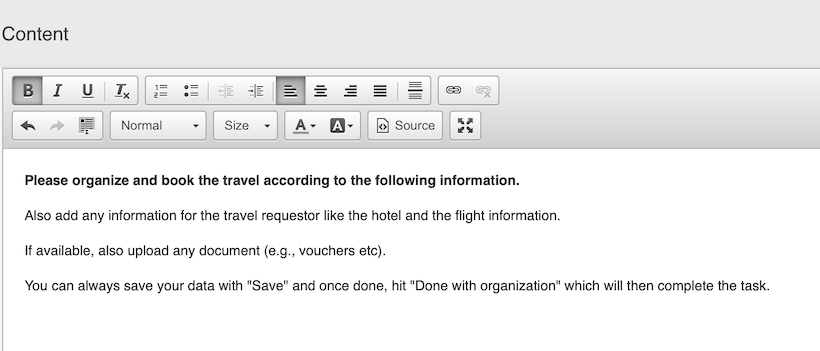
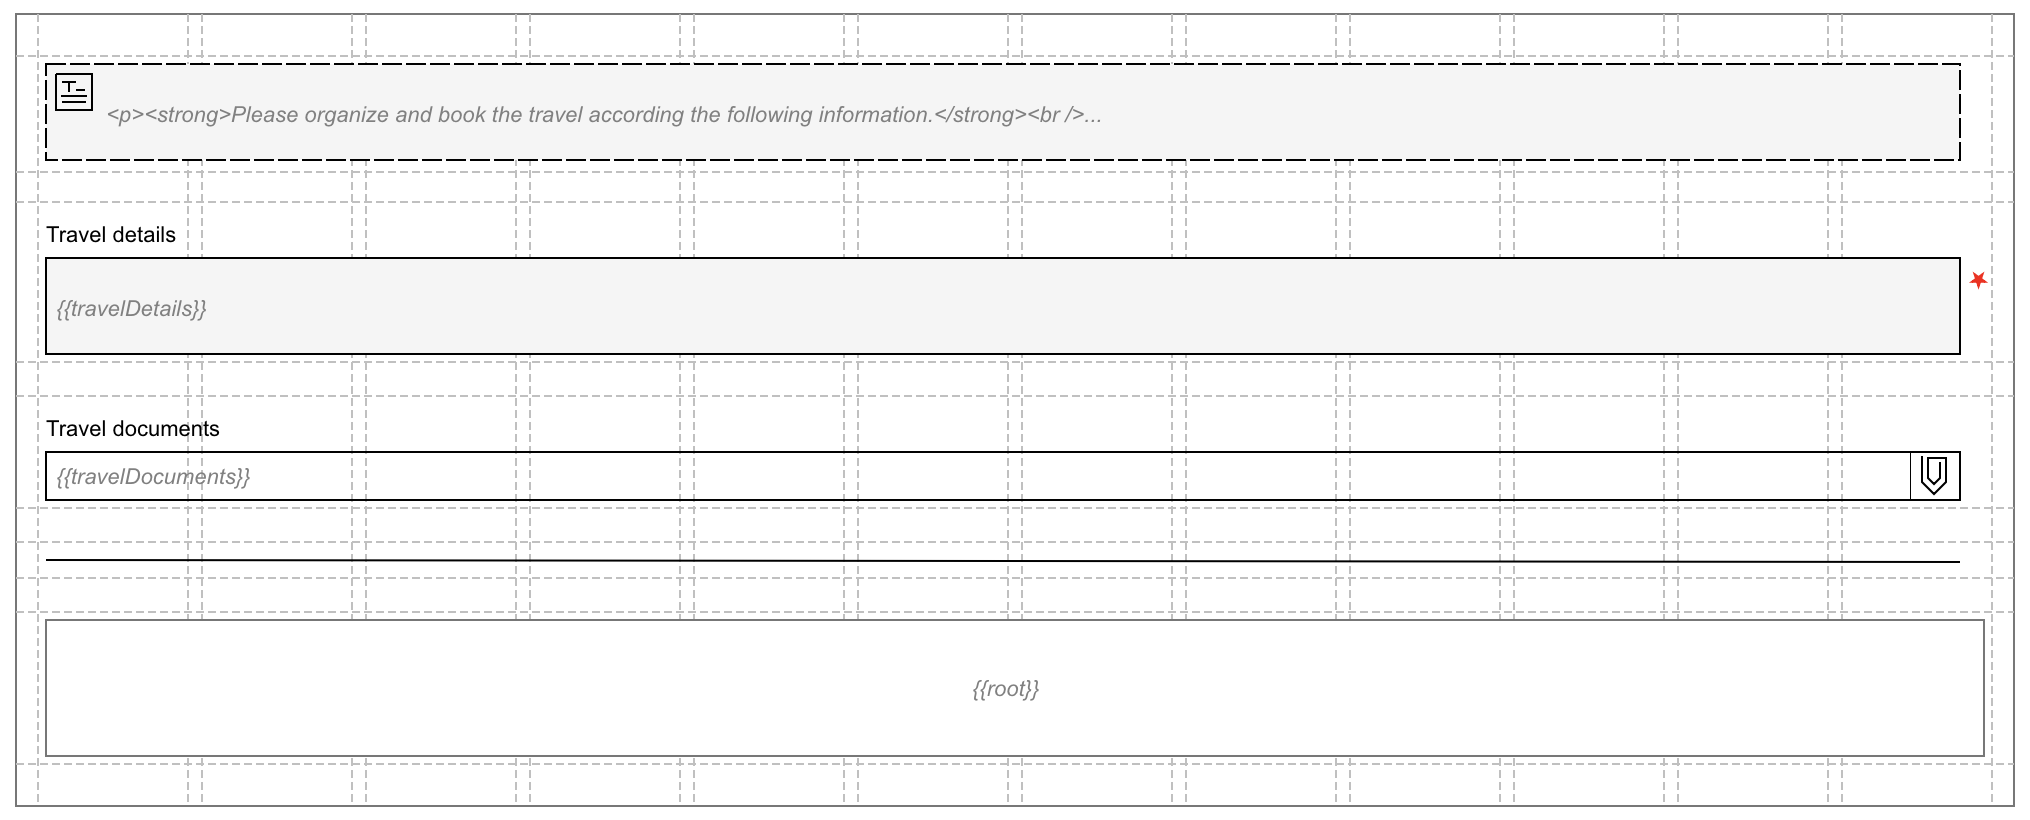
Let us add a new Display>Text display component to the form to describe the
task in more details:
Add a new Data entry>Multiline text component to the form and name it
Travel details. Make the new field required by
selecting then Validation>Required checkbox.
Here we can collect all the information and details about
the travel as it gets organized.
As we also want to be able to upload any travel documents, add a new
Data entry\Attachment component to the form and name it Travel documents.
Choose Yes in the attribute Details>Allow file deletions and Thumbnail
for the Details>Preview type property. Setting these two attributes
allows us to attach any
document to the task (and thus the case) and preview it using a thumbnail.
At the end of the task form, add the case overview form as a subform as we
did within the approval task. You can copy and paste the
Display>Horizontal line
and Container>Subform from the Approve Travel Request Task Form or add
and configure them from scratch.
The form should then look like this:
Add Travel Agent Selection to the Start Form and Use it as the Assignee
As we need to know the person organizing the travel, we add that selection to the start form of the case and then use it as the assignee for organizing the travel task.
Go back to the case and select the start form by clicking the Details>Start form
link of the case plan model (top container).
The easiest way is to go back to the Select Approver Task Form and copy
the Select approver user selection component and then paste it into the start form.
Change the label from Select approver to Select travel agent and the
General\Variable binding from {{approverId}} to {{travelAgentId}}.
Save the form and then go back to the case model and set the Assignment>Assignee
attribute of the recently added Organize travel task to ${travelAgentId}
to assign that user task to the selected travel agent.
Add an Optional Feedback Task
Often one needs feedback from the requestor to book or organize parts of the travel like if there are several options for flights, you want the requestor to choose the preferred one and so on. For this use case, add a feedback task for the travel agent to get information from the requestor.
Add a new Controls\Human task to the last stage and name it
Request feedback. As the task
is optional and might be used more than once, we check the Details>Repetition
attribute as well as the Activation>Manual activation checkbox.
As the travel agent needs to describe the kind of feedback needed, add a start
form for that manually activated task. Select Activation>Start form and name it
Request Feedback Task Start Form, then hit Tab and
Enter to create that start form.
As always it is a good practice to describe what you need to do in the form,
so add a Display>Text display and set its content to:
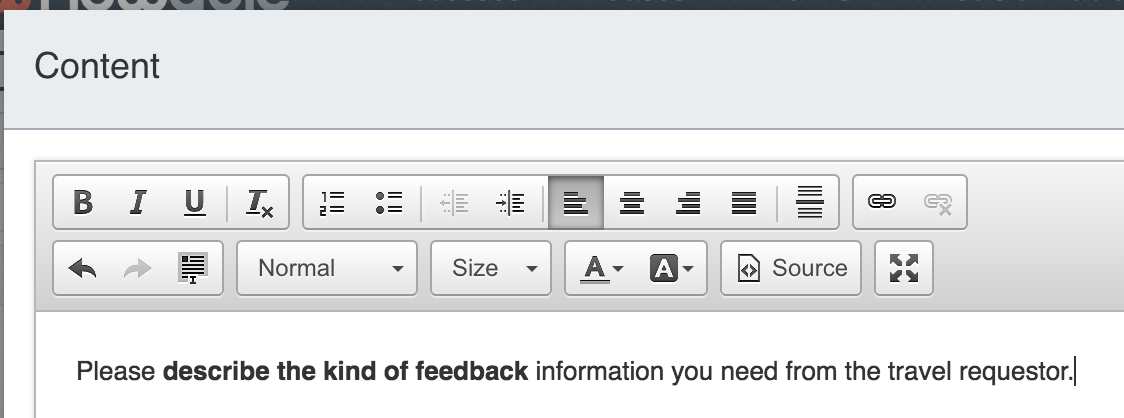
Add a new Data entry>Multiline text component to the form and name it
Feedback request and make it a required input by clicking the
Validation>Required attribute.
Save the form and go back to the case model, select that Request feedback task again
and go to the Details>Form reference property, select "New" and enter
Request Feedback Task Form, hit Tab and Enter to create the work form
for that task.
As usual, first, we add a new Display>Text display component and add
content like this:
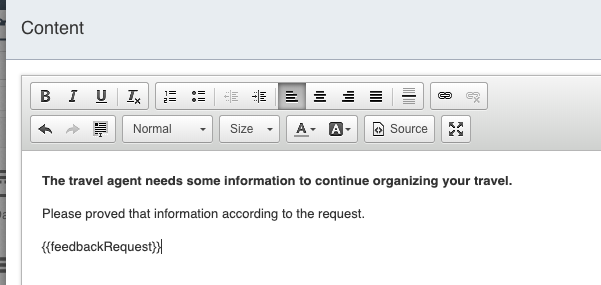
Below the text, add a new Data entry\Multiline text input field and
name it Feedback and make the field required by clicking the
Validation\Required box.
As we have now added some work to that last stage, let us think about how we
want to complete it. We could use the same manual mechanism as we did with
the first one, where we added a user event listener terminating the stage,
which is then manually triggered. As we have optional work with the request
feedback task, we cannot leave it as we did with the second stage where
we only have the approval process and once finished, the case engine
automatically completes the stage as there is nothing left to do. For the
third one, let us use the autocomplete mode by checking the
Details>Auto complete
checkbox in the stage properties. Why does it make sense for this stage
and not the first one?
Let us analyze it: we have the required Organize travel task, and as long
as it is not completed yet, we have the option to ask for feedback, and if
done, there is a second task active, waiting for the feedback to return.
Now, once we complete the Organize travel task, there is nothing
more to organize, and hence no feedback is required, and that is
the perfect moment for the engine to complete the stage, and that is why
we can use autocompletion here.
The case model now looks like this:

Save the form and go back to the case model and save it as well.
Deploy and Run the Travel Request Again
You can publish the changes again and run the travel request case up to the organizing stage and play with the request feedback task and its answer.