Part 3: Add Conversations to the Process with Flowable Engage
 Outdated documentation page
This is an old version of the documentation for Flowable until version 3.13 and for the Angular-based Flowable Design 3.14/3.15. If you are running the latest version of Flowable please check out the current version of this page.
Chapter 10: Start a Travel Case Based Conversation at Case Start
In this third part, we add Flowable Engage specific features like conversations to our travel case. Thus this part only applies, if using Flowable Engage and not Flowable Work.
In this chapter, we want to automatically start a conversation whenever we start a travel request case for asking questions, negotiations and especially during travel planning, so there is quick feedback between the travel agent and the travel requestor.
Add Case Initialization Process to the Case Model
Our current case model starts with the first stage activated immediately. We now want to add a process task that is triggered when we start the case, and the first stage should only be activated, once that initialization process finishes.
Open the case model again and drag and drop a new Controls>Process task just to the
left of the first stage and name it Case conversation initialization.
Then drag and drop the Entry criterion icon from the process task onto the
first stage. The entry criterion activates the stage once the process finishes.
You can then select the sequence flow in between and uncheck the
Details>Display name in diagram checkbox as the default Complete event label
is sufficient as the label has no additional value in the diagram.
Of course, we now need a new process, so select the process task again,
click the Details>Process reference property and name that process
Travel Request Initialization Process, hit Tab and then Enter to
create a new process model for the initialization.
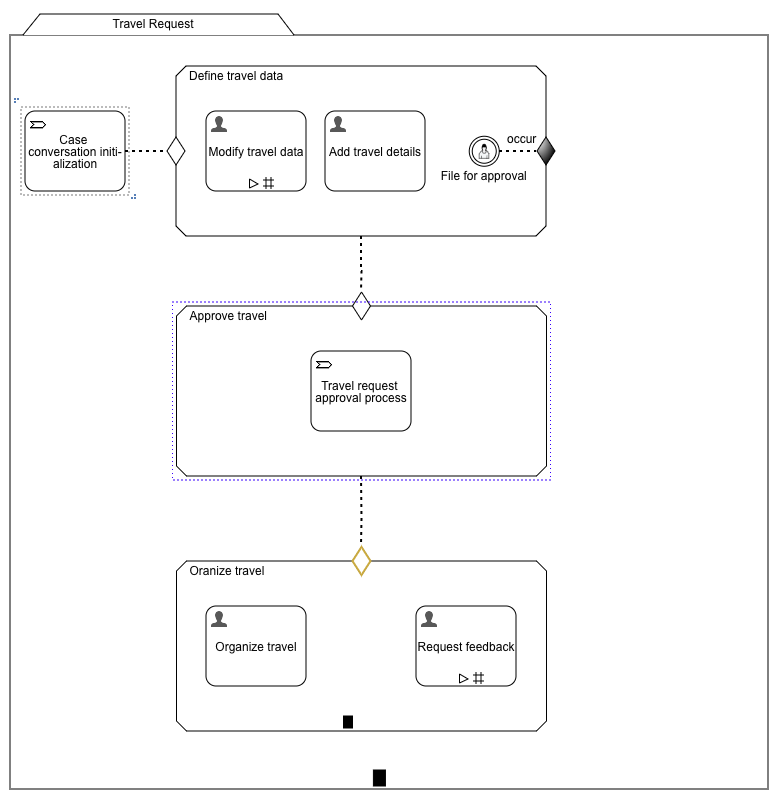
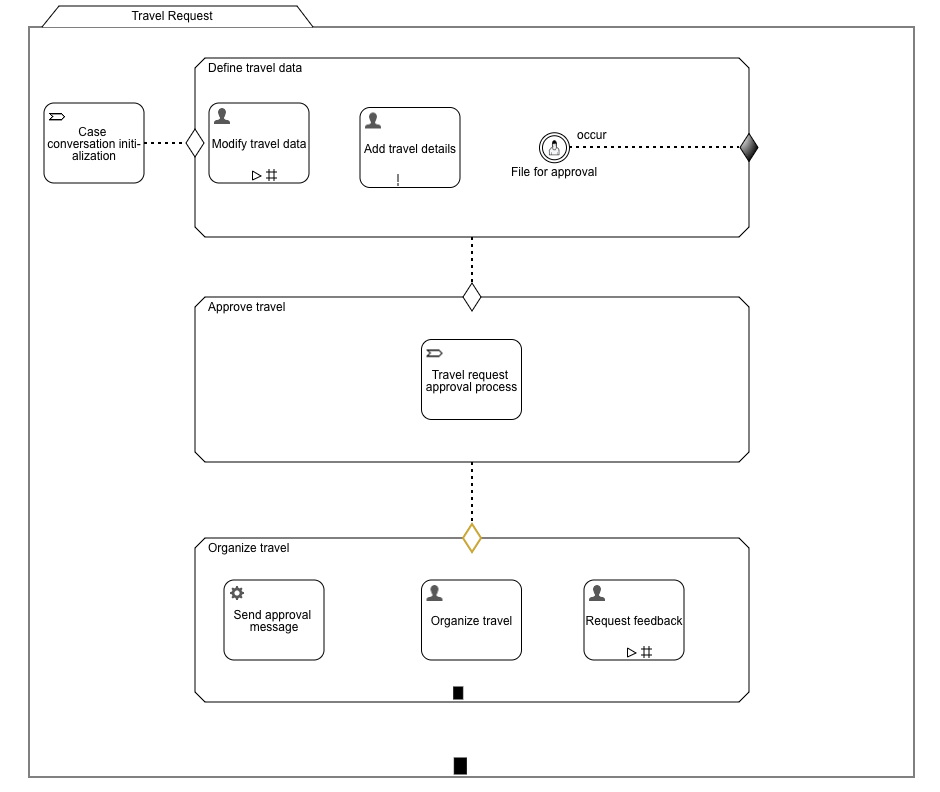
The case model should now look something like this:
On the new process model, select the start event and click on the end event icon, then use the spacing tool to make space between the start and end event so that we can drop some tasks in between them.
First, we want to give the case a meaningful name. The conversation can then re-use
the name as the conversation name. To set the name, drag and drop an
Flowable Work Activities>Initialize variables service task
onto the sequence flow between the
Start and End event and name it Set case name.
Click the Details>Init variables property and enter a new variable
initialized with the following values:
Travel case for ${platformIdentityService.findPlatformUserById(initiator).displayName} (${travelSubject})

As you can see, we use a combination of expressions and some fixed parts
for the case name. To have access to the travelSubject variable,
we need the variable passed into the process.
So go back to the case model, select the Case conversation initialization process task and
click the Details>In property and add travelSubject as a new in mapping
for both, source and target variable names.
If you have Flowable Engage enabled in Flowable Design as well, you
also have an Engage specific activity palette that includes a service task
named Flowable Engage Activities>Create conversation.
Drag and drop it to the sequence flow between
the Set case name service task and End event and name it
Start travel conversation (you may need to increase the space again
in order to drop the create conversation task on the sequence flow).
We can use one of the predefined conversation definitions to base our
conversation on, so default behaviors and permissions are automatically set
from that definition. Select the Details>Conversation definition key property
and set it to conv-group-messages, which allows us to start a group
conversation where we can dynamically add or even remove people later on.
Next, we want to create a meaningful name for the conversation,
so set the Details>Conversation name property to ${root.name} as we now can
directly re-use the case name we created previously as the conversation name.
We want to save the conversation id back to the case, so we can use it
later on for post messages by the digital assistant, adding new participants,
or even showing a link to that conversation in the case overview.
To do that, add conversationId to our
Details>Out mapping of the process task (Case conversation initialization)
on the case model.
Set the Details>Conversation id result variable on Start travel conversation
to conversationId,
which means once the conversation is started, its id is saved in a
process variable named conversationId.
Also, make sure the Details>Reuse existing conversation is unchecked, so we always
start a new conversation, even if there is an existing one from a
previous case.
The owner of the conversation is the current user, if we do not set
the Details>Conversation owner id property. Not setting the owner property is fine
for our use case. So let us just set the current user and the selected travel
agent as the participants in the conversation. It is helpful for the requestor
to get some information about the travel request, especially the
cost estimation, from the travel agent before approving the request.
Set the property
Details>Participant user id(s) to ${initiator},${travelAgentId}
which also means we need to add travelAgentId to the Details>In
parameters of the
process task on the case model. In order to add the variable go back to the
case model, select the Case conversation initialization process task and click
on the Details>In property and add a new row with travelAgentId to both the
source and target names.
As a next step, we want to post a message to that conversation to let people
know why we created it and maybe even some information about the travel.
Make some more space between the Start travel conversation task and the end event
to drop another element there. Then drag and drop a new
Flowable Engage Activities>Send message service task onto the
sequence flow between the Start travel conversation task and the End event and
name it Post initial message.
The message is sent to the value of the property Details>Conversation id. Set the
property to ${conversationId} as that is the name of the
variable that holds the id of the
newly created conversation. Most of the properties are left with their
default value, but we want to send the message as the digital assistant
helping us to understand the meaning of the created conversation.
By default, the conversation is sent in the name of the current user,
but as we do not want this, set the property Details>Sending user id
to digital.assistant.
It is a good practice to use a message template for standard messages,
but for simplicity, let us use the Details>Message content directly and
set it to something like:
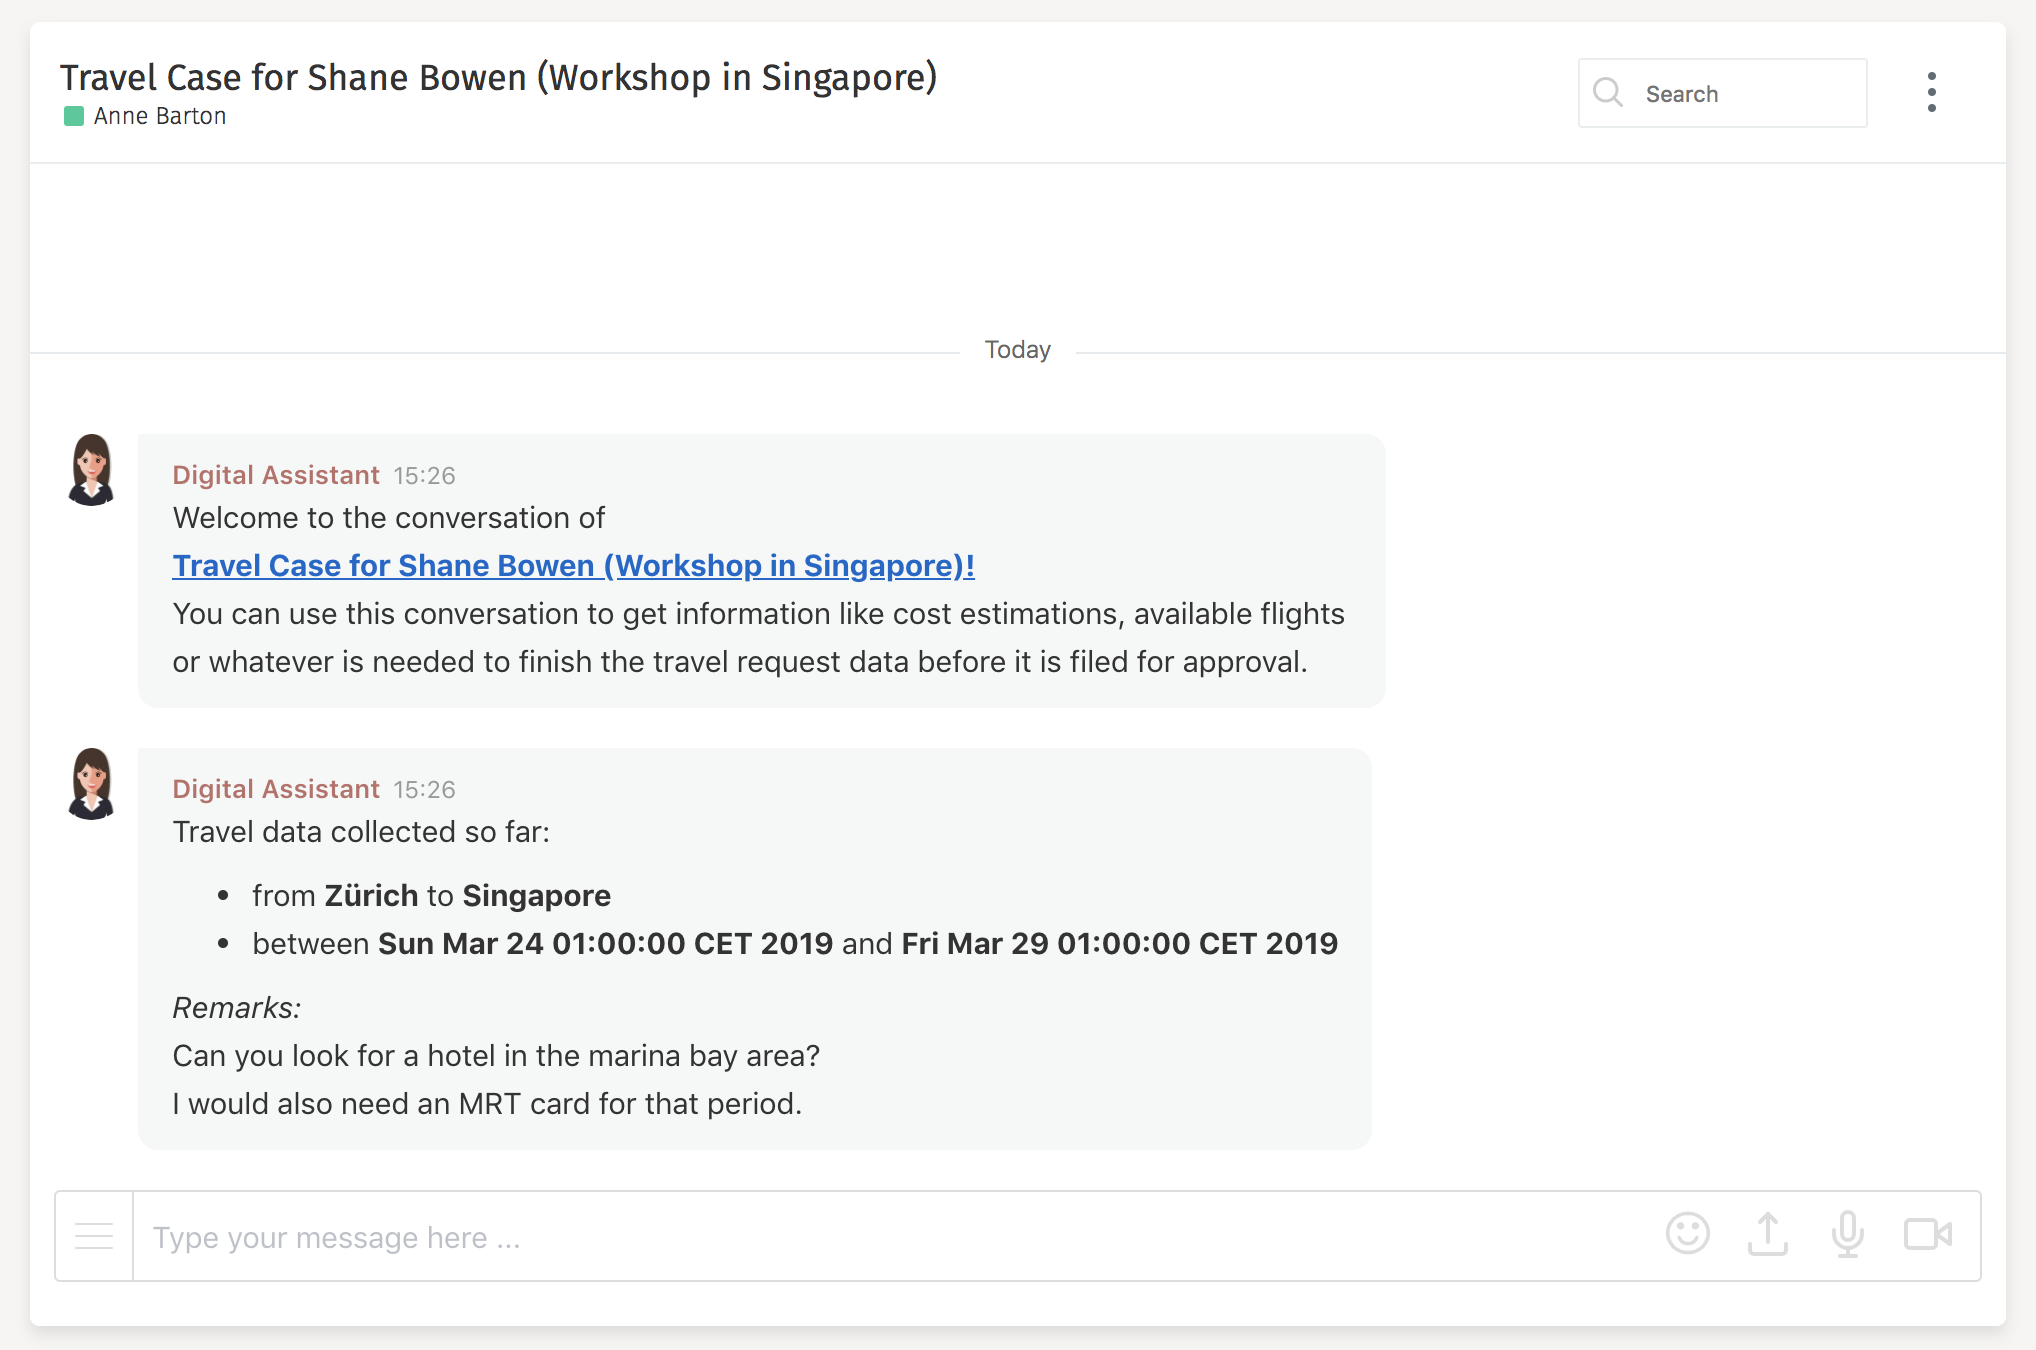
Welcome to the conversation of
[*${root.name}!*](#/work/open/case/${root.id}/tab/workForm)
You can use this conversation to get information like cost estimations, available flights or whatever is needed to finish the travel request data before filed for approval.
As we use the Markdown markup language in
our message, let us set the property
Details>Message content type to MD to let
the engine know on how to use the content. As you can see, we can use
expressions as part of the message and URL linking using Markdown, letting
us navigate back to the case from within the conversation.
Maybe we also want to post some travel details, so let us again make
some more space and drag and drop another
Flowable Engage Activities>Send message task onto the sequence
flow and name it Post travel data. As before, set the
Details>Conversation id property
to ${conversationId}, the
Details>Sending user id to digital.assistant, the
Details>Message content type to MD and set the
Details>Message content to something like:
Travel data collected so far:
- from *${origin}* to *${destination}*
- between *${outwardTripDate}* and *${returnTripDate}*
_Remarks:_
${travelNotes}
As we are using some more values within the message, add them to the
Details>In mapping of the process task on the case model.
You need to add origin, destination,
outwardTripDate, returnTripDate, and travelNotes.
Also verify that you have added conversationId to our Details>Out mapping
as we want to save it back to the case.
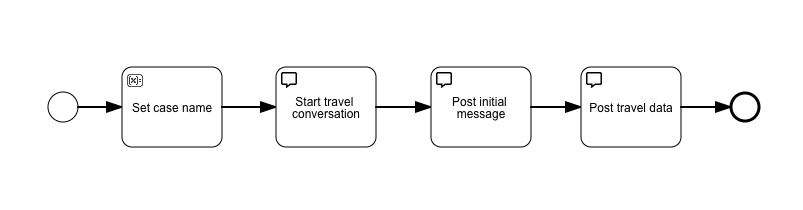
The initialization process now looks something like this:
Improve the Case Overview Form to Link to the Conversation
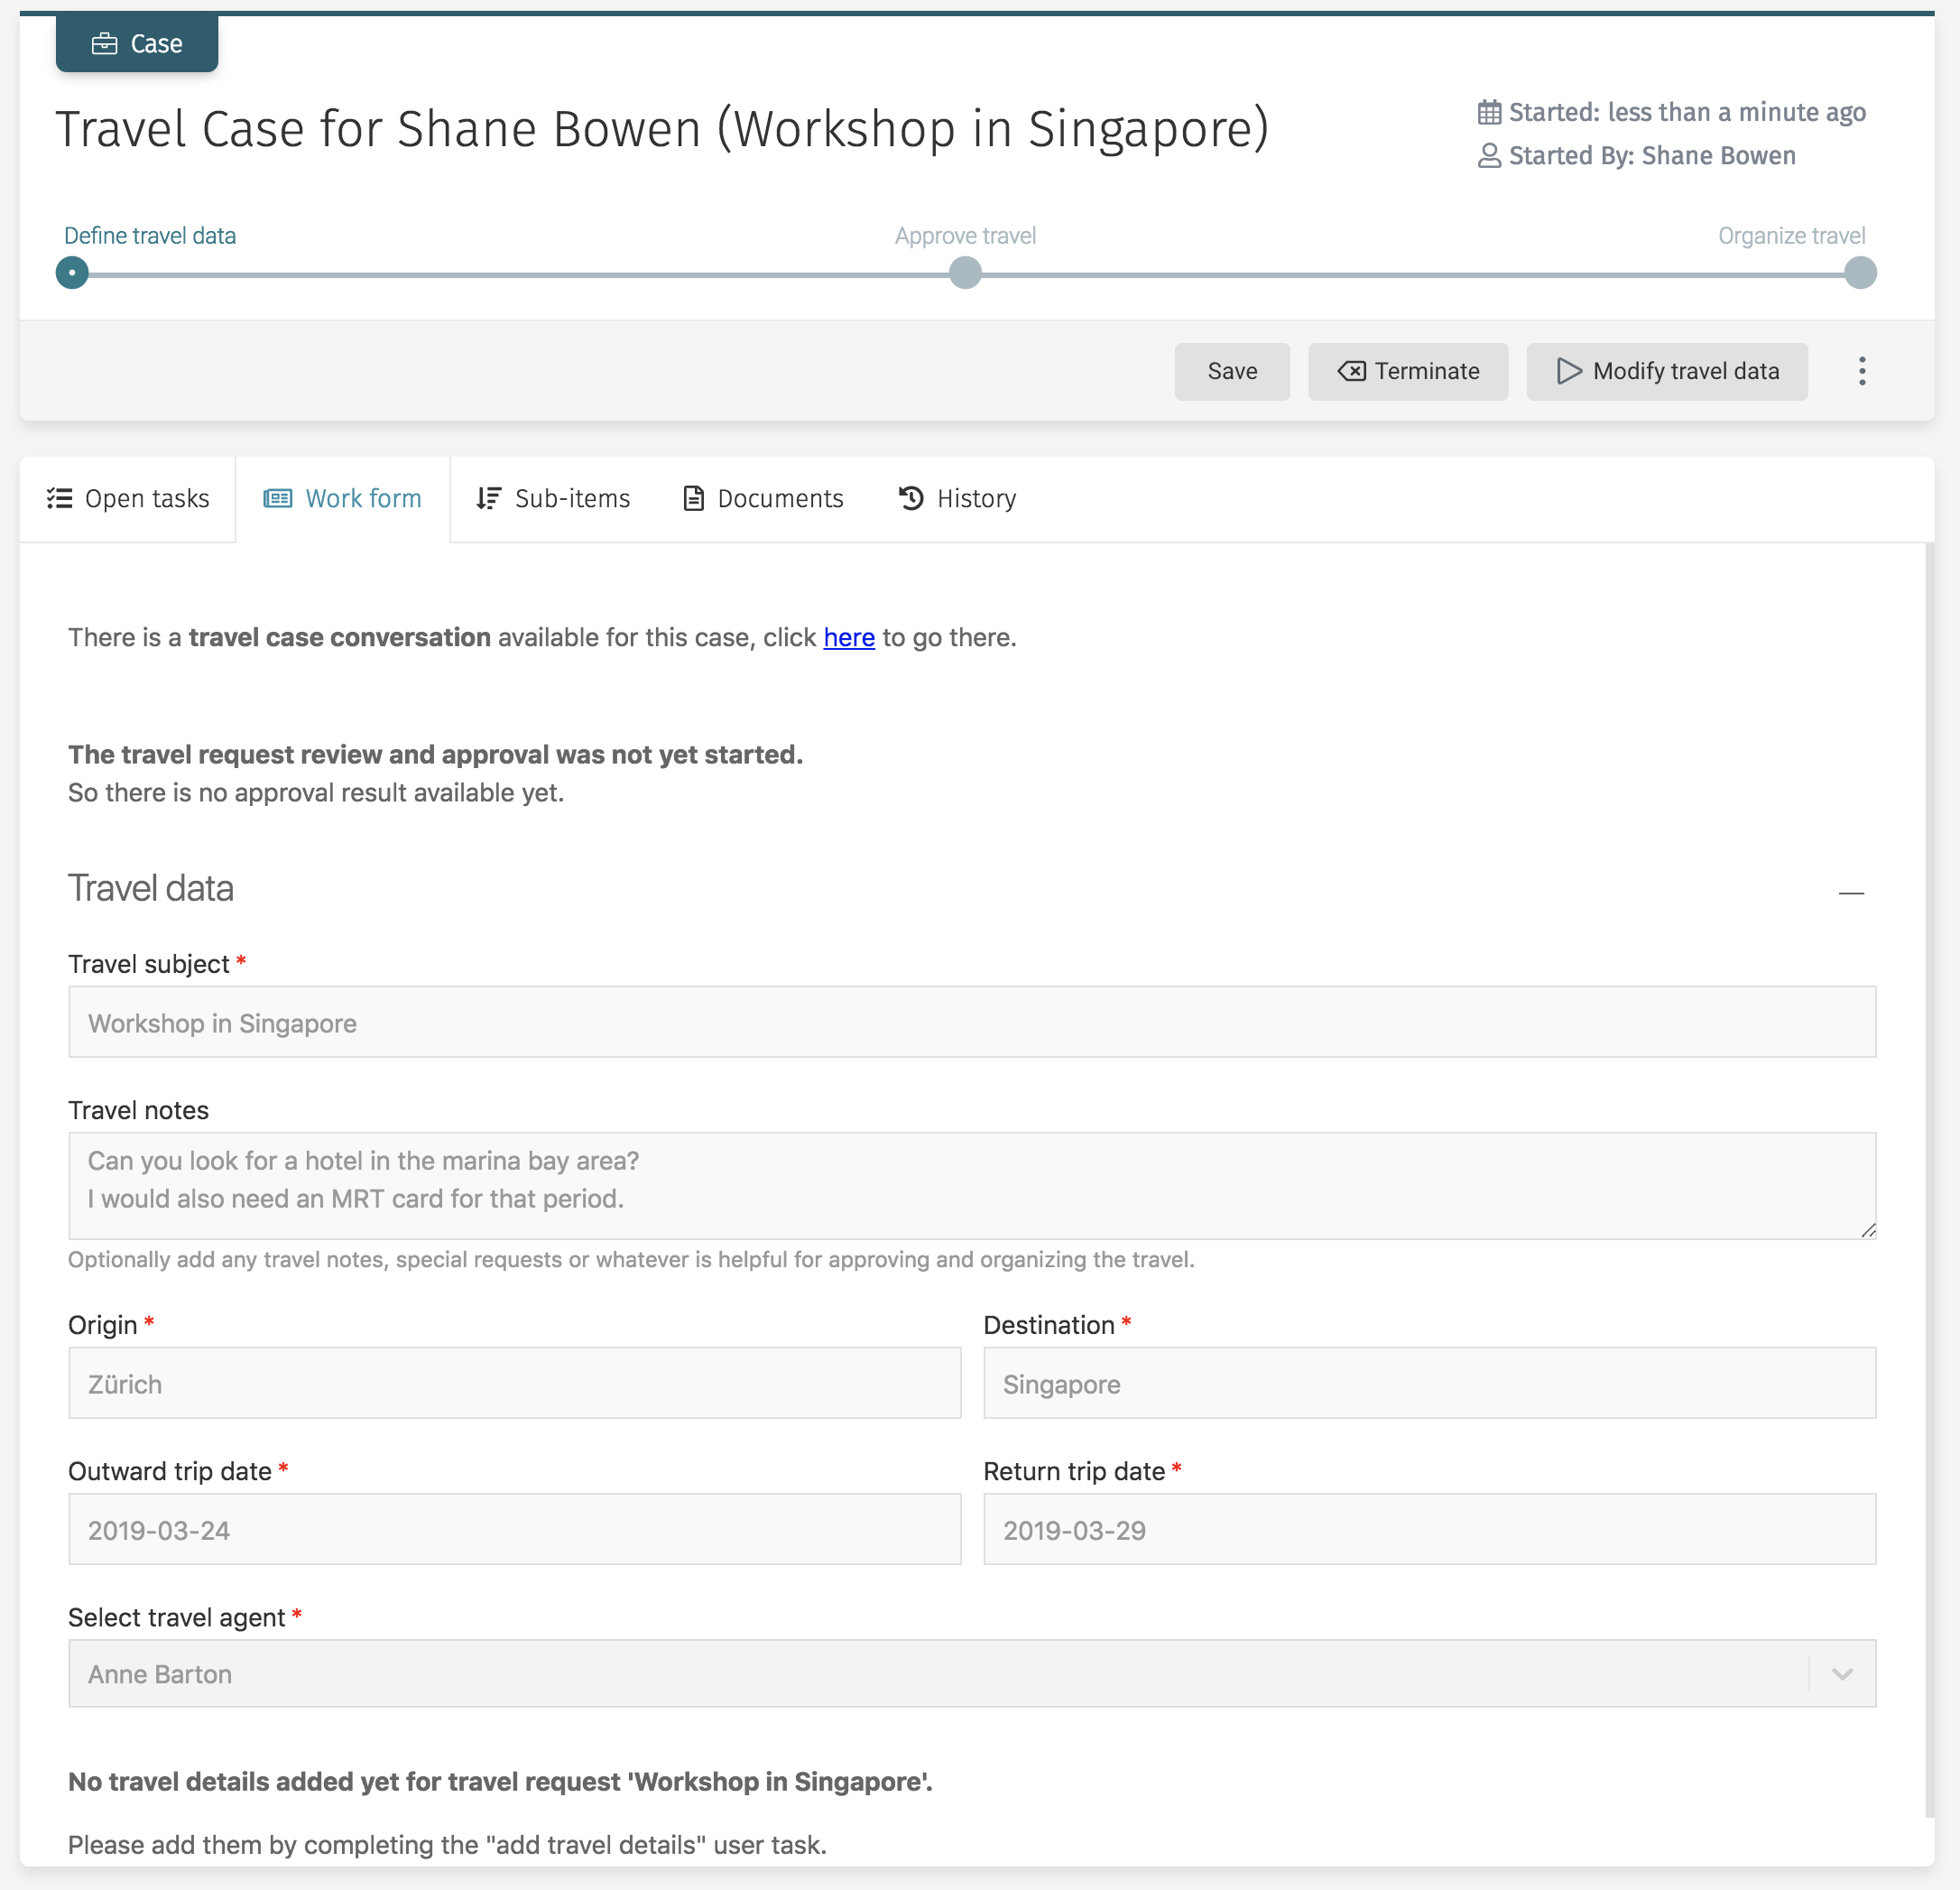
As we now start a conversation linked with the case, let us also improve the case overview (work) form to include a link we can use to navigate to the conversation from within the case directly.
Go to the case model and click the link Travel Request Work Form of the
Details>Work form property to open that case overview form.
Add a new Display>Text display widget on top of the form and set its content to
something like this:
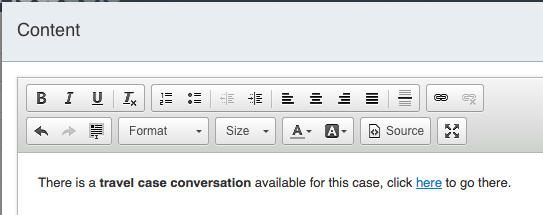
Instead of using Markup directly, you can also switch to the source view and set the text to:
<p>There is a <strong>travel case conversation</strong> available for this case, click <a href="#/conversations/all/{{conversationId}}">here</a> to go there.</p>
Deploy and Run the Travel Request Again
Let us take another test-drive, so deploy the app again, switch to the runtime view and start a new travel request. Then switch to the conversation inbox where you see a new conversation created automatically when starting the travel request case with our initial messages posted by the digital assistant:
You can now use that conversation to chat between the requestor and the travel agent to set the travel plans. When clicking the link in the first message, you directly navigate to the travel request case and its overview:
Chapter 11: Expose Tasks to the Conversation
We now have started a conversation and posted some initial messages whenever we start a new travel request, which allows us to use chat in the context of the travel request.
We can do much more within the conversation, so let us explore the possibilities.
Expose Travel Details Task to the Conversation
When we start the case, there is a mandatory task to add the travel details. We want that task exposed to the conversation, so it is either completed as part of the case through the task inbox or by completing it directly within the conversation.
Open the case model and select the Add travel details user task.
Click the Details>Expose human task as an action message property and add the
following entries to it:

If the user task is created, it additionally creates a form-based message and posts it as the digital assistant user to our conversation. At this point, the conversation is only visible to the initiator of the case.
We can also expose the Modify travel data user task. Select it and then
click the Activation>Expose as an action message property and add this row:

This exposes the activation (creation) of that modification user task as a sticky message in our conversation. Sticky means, it sticks at the top of the message input field, so even if the conversation goes on, it is always visible.
Once activated through the sticky message action, we can also expose the
task itself to the conversation (like with the one before). So click the
Details>Expose human task as an action message for this user task as well
and enter the same data as with our first one.
Now let us do exactly the same for the Organize travel and Request feedback
user tasks. For the Organize travel user task, use ${travelAgentId}
as the Receiving user ID and not as the initiator, as we want only to send that
message to the travel agent.
For the Request feedback user task, set the Receiving user ID also to
${travelAgentId} in the Activation>Expose as an action message property
and set its message to Request feedback from the travel requestor..
For the Receiving user ID in the Details>Expose human task as an action message,
again use ${initiator} as we want it to be visible to the requestor
and not the travel agent.
We can also expose the user event listener used to file the request as a sticky message so we can file the request from the conversation as well.
Go to the case model, select the User event listener named File for approval,
and click the Activation>Expose as an action message property, then enter this
data in there:

Save all changed models, and we are ready for another test-drive with all the new additions.
Deploy and Run the Travel Request Again
Deploy the app and start a new travel request case.
When started, you now see the travel details task as a conversational task directly within the conversation:
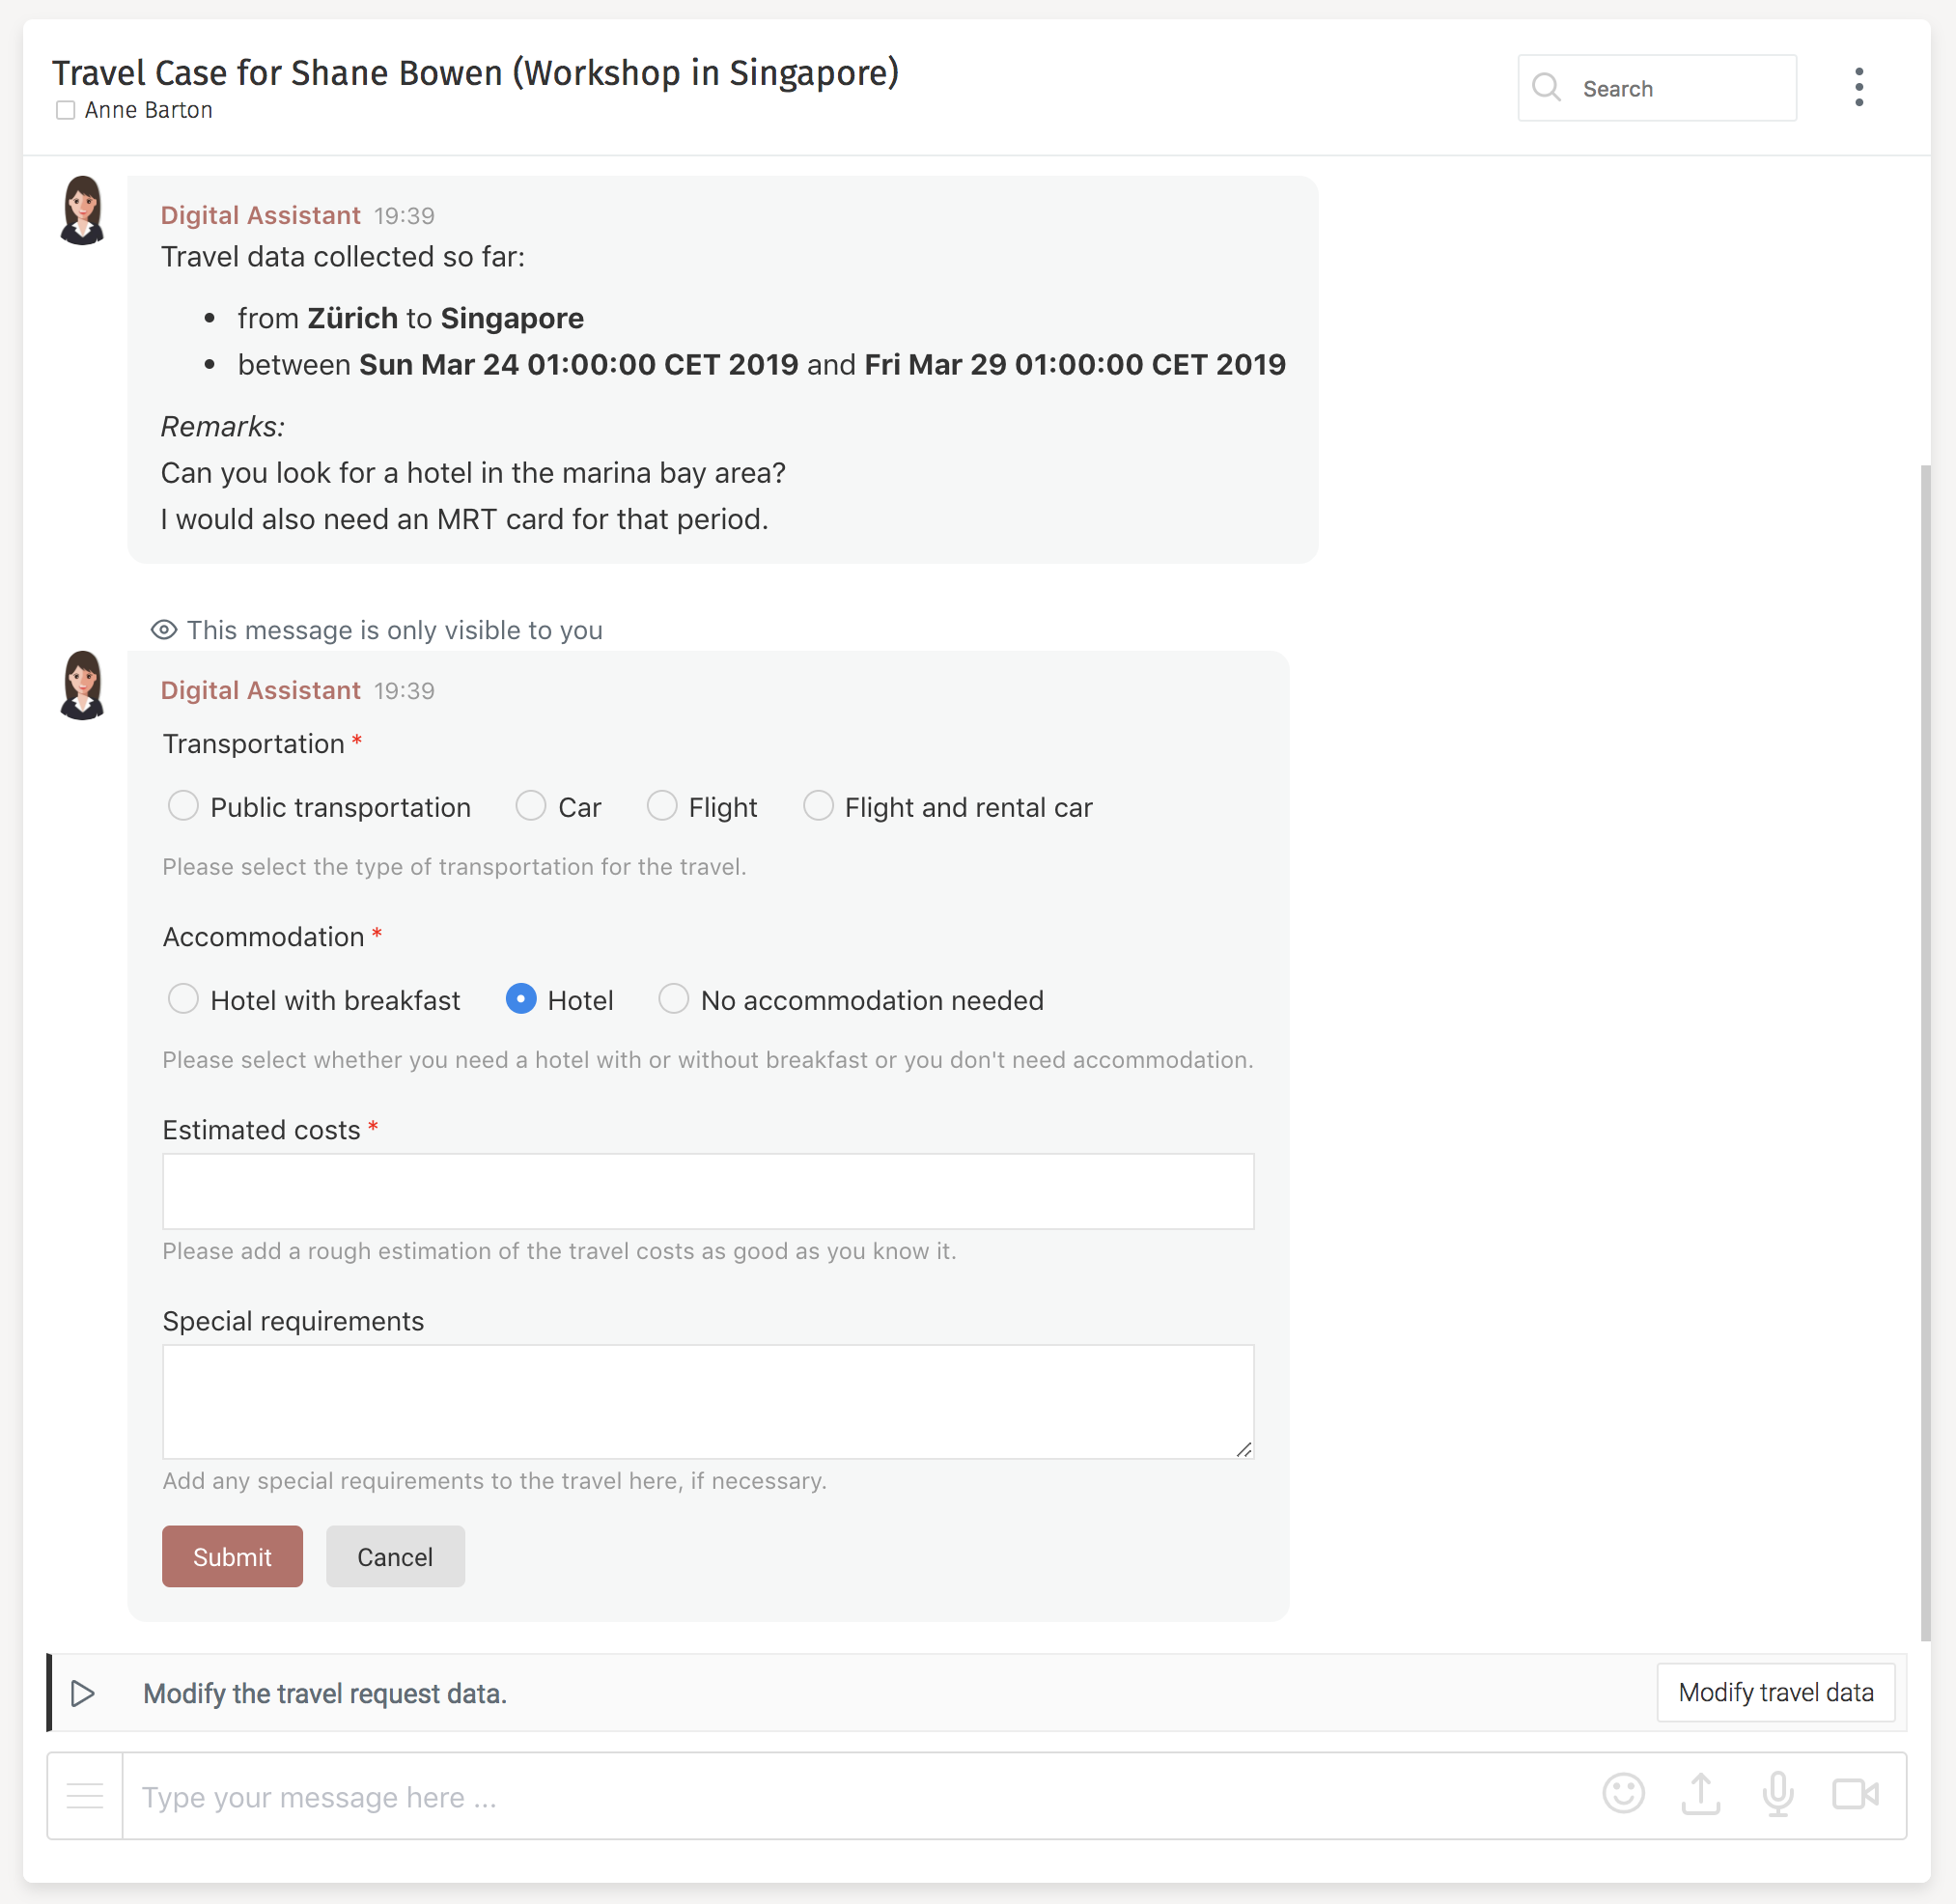
You can now complete that task by filling it out within the conversation or as before in the task or work app. It does not matter which way you complete it: once completed, it is gone from all the places automatically. Also, see the sticky message with the modify travel data action. You can click it, and it starts that optional task and posts it to the conversation as well.
Chapter 12: Make the Approval Process Part Conversational
Naturally, the tasks on a process can include conversational functionality.
Expose a Selection of Approvers as a Message
Go to the main approval process and select the Select approvers user task.
As before, expose the task to the conversation using the
Details>Expose as an action message property and using the same information as
before (the Receiving user ID is the ${initiator}).
Add the Approvers to the Conversation
Once we select the approvers, we want them to join the conversation.
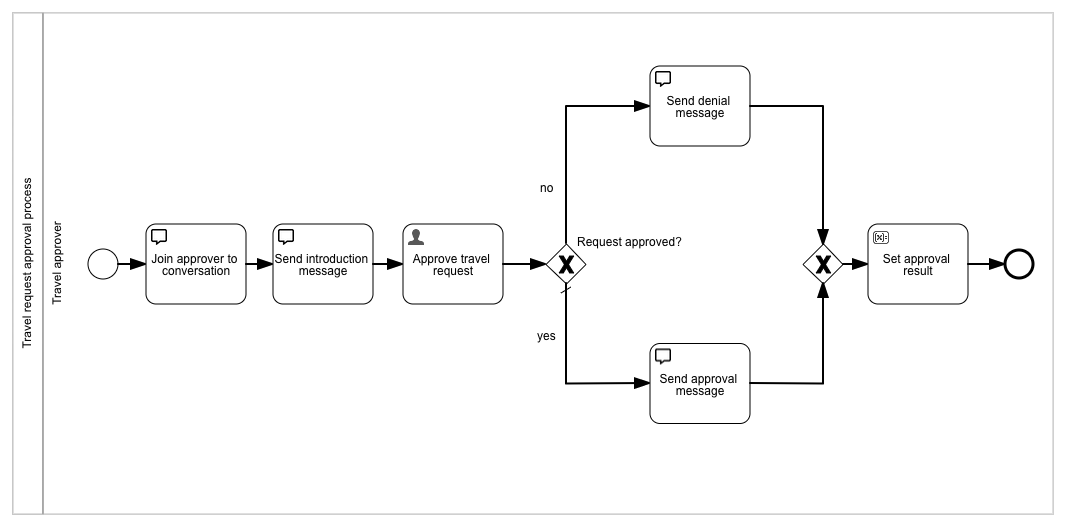
Open the multi-instance sub-process named Travel Request Approval Process
and make some space between the start element and the user task (named
Approve travel request) and drop a new
Flowable Engage Activities>Modify conversation
service task onto the sequence flow between
the start event and that user task. Give this new user task the name
Join approver to conversation. Set the property, Details>Conversation id
to ${conversationId} and the property
Details>Join participant id(s) to
${approver.approverId}. This adds our approver to the conversation.
To have access to the conversation id, we need to pass it into our sub-process,
so go back to the Travel Request Main Approval Process and select the
Approval subprocesses call activity element and add conversationId (both to
the target and the source) as a new mapping to the
Details>In property.
We also need to use the same in mapping on the main process task,
so go to our case model, select the Travel request approval process task
and add a new Details>In mapping of conversationId once again for
both the target and source in the attribute.
Let us say we want to send the approvers an introductory message about
why they are added to the conversation. Return to the Travel Request Approval Process and make some space between the
Join approver to conversation and the Approve travel request tasks.
Now drop a new
Flowable Engage Activities>Send message task onto that sequence flow in between
the tasks
and name it Send introduction message. Set the
Details>Conversation id property to ${conversationId},
the Details>Sending user id to digital.assistant, the
Details>Receiving user id to ${approver.approverId},
the Details>Message content type property to MD
(for Markdown formatting)
and the Details>Message content to something like:
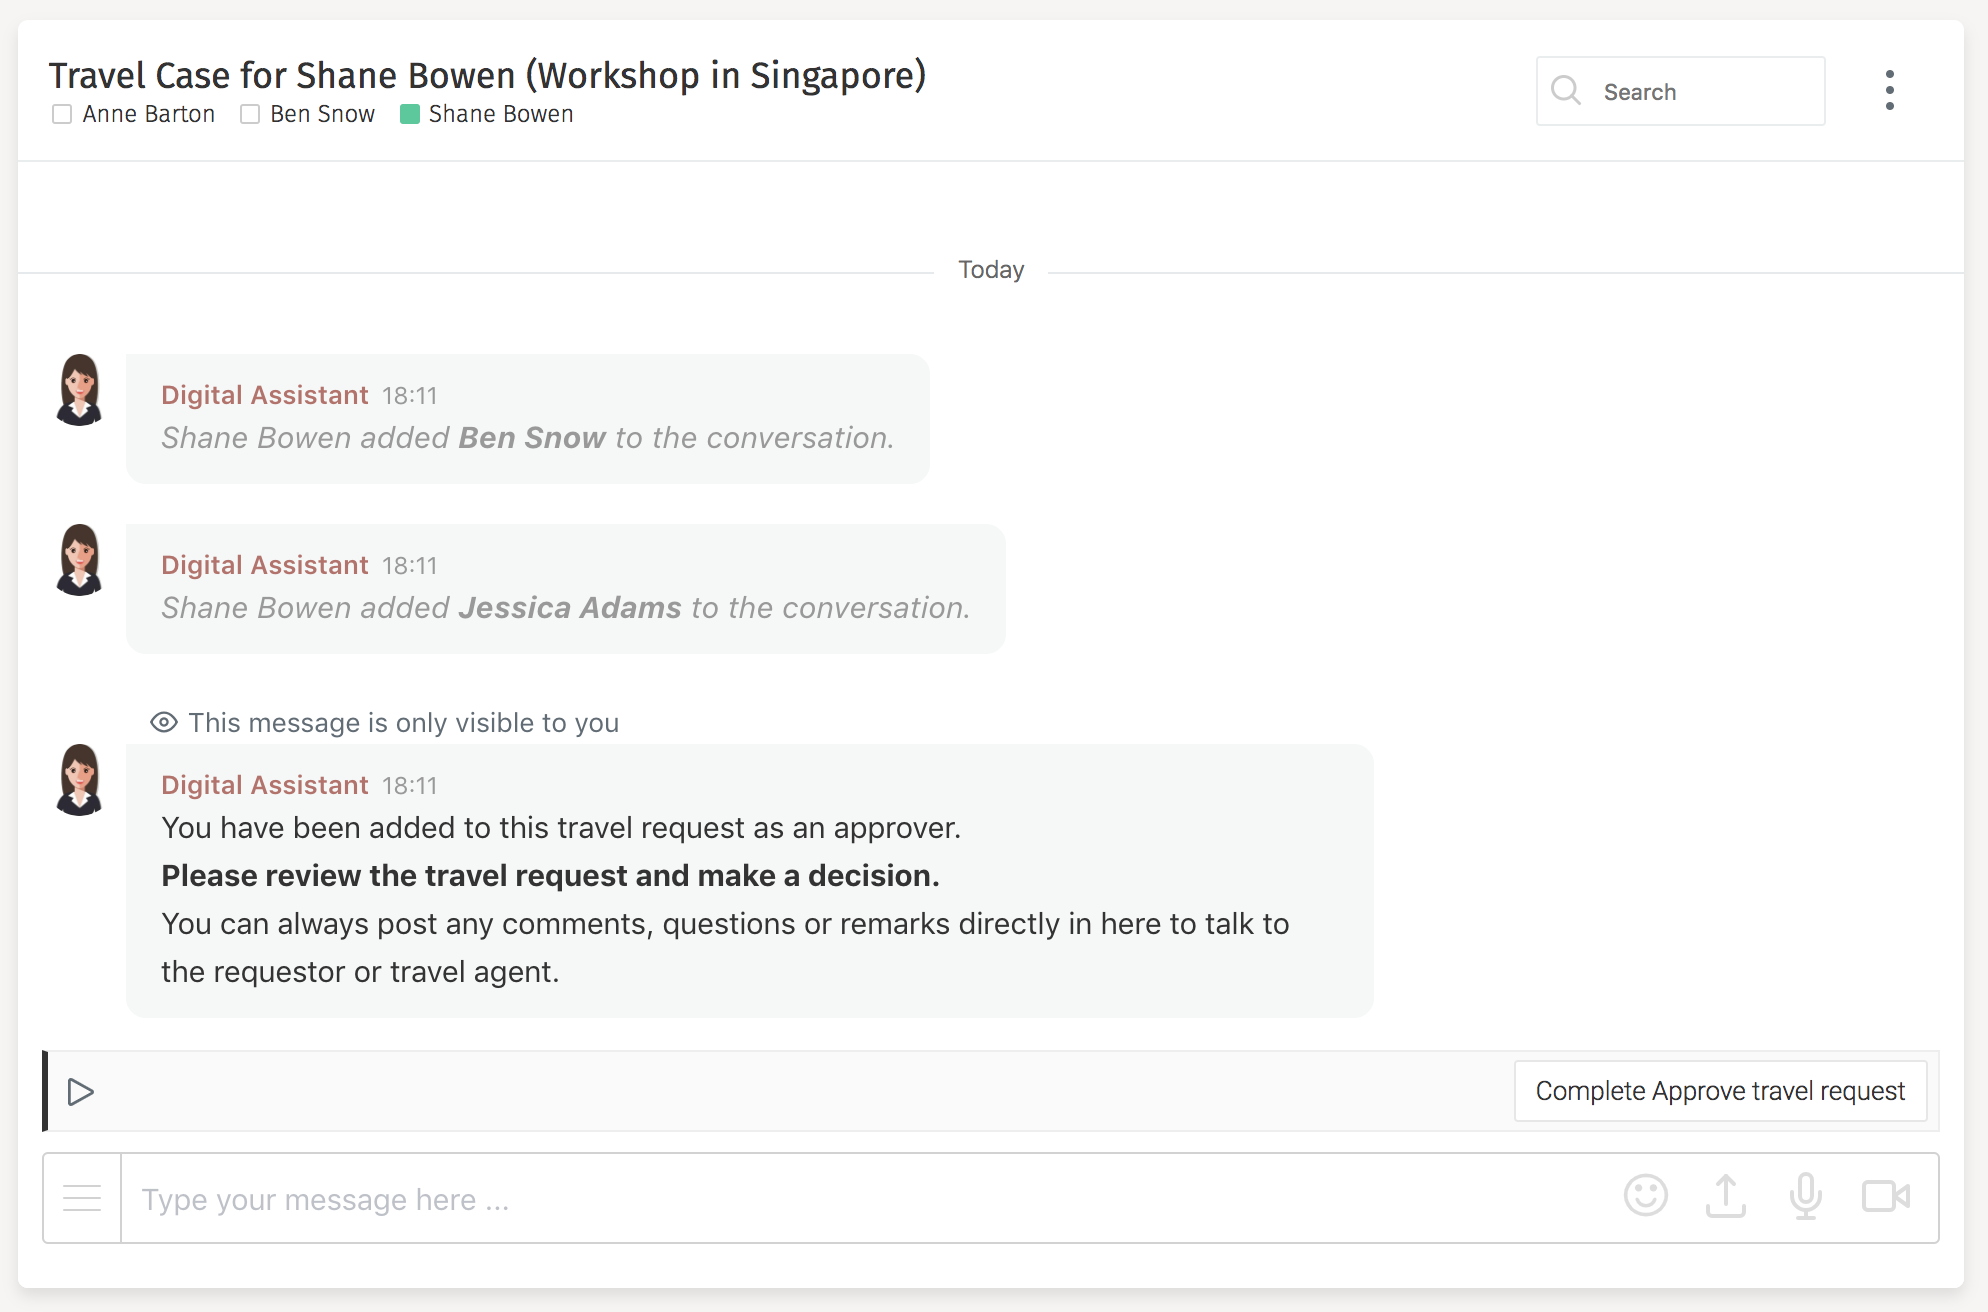
You have been added to this travel request as an approver.
*Please review the travel request and make a decision.*
You can always post any comments, questions or remarks directly in here to talk to the requestor or travel agent.
Expose the Approval Task as a Sticky Message Action
If the approver needs some additional clarification, we expose the approval user task only as a sticky action message to the conversation and not as a conversational inline task as was done for the requestor’s tasks.
Select the Approve travel request user task and click the
Details>Expose as an action message property, then add a new row with
Conversation ID set to ${conversationId}, the Sending user ID
with digital.assistant and the Receiving user ID set to
${approver.approverId}. Also, make sure the Sticky message checkbox is
checked as well.
Send Approval Result as a Message
Whenever an approver makes a decision, we want a message sent to the conversation.
Ensure you are at the Travel Request Approval Process and make
some space between the user task and the Set approval result service
task and drop a new
Gateways>Exclusive gateway onto the sequence flow there and
name it Request approved?. Again, make some more space and add another
Gateways>Exclusive gateway there (a joining gateway).
Select the sequence flow and name it yes as this is the default, happy path
by selecting the Details>Default flow checkbox.
Also, set the Details>Condition type to Default flow.
Next, select the first gateway again, drag its sequence flow (small arrow icon)
and drop it next to the second gateway and use its handle (small red bar
in the middle of the sequence flow which appears on hover) to position
it properly. Set the name of the gateway to no, choose the
Details>Condition type as Conditional flow and set the
Details>Condition expression to:
${flwJsonUtils.getAtIndex(root.approvers, loopCounter).reviewDecision == 'declined'}
Now drag and drop a new
Flowable Engage Activities>Send message service task to both sequence flows
between the gateways and name them one, Send approval message and
the other, Send denial message,
respectively. Set the property
Details>Conversation id of each to ${conversationId},
the Details>Sending user id to digital.assistant and
the Details>Message content type to MD.
Set the Details>Message content for the approval message to something like:
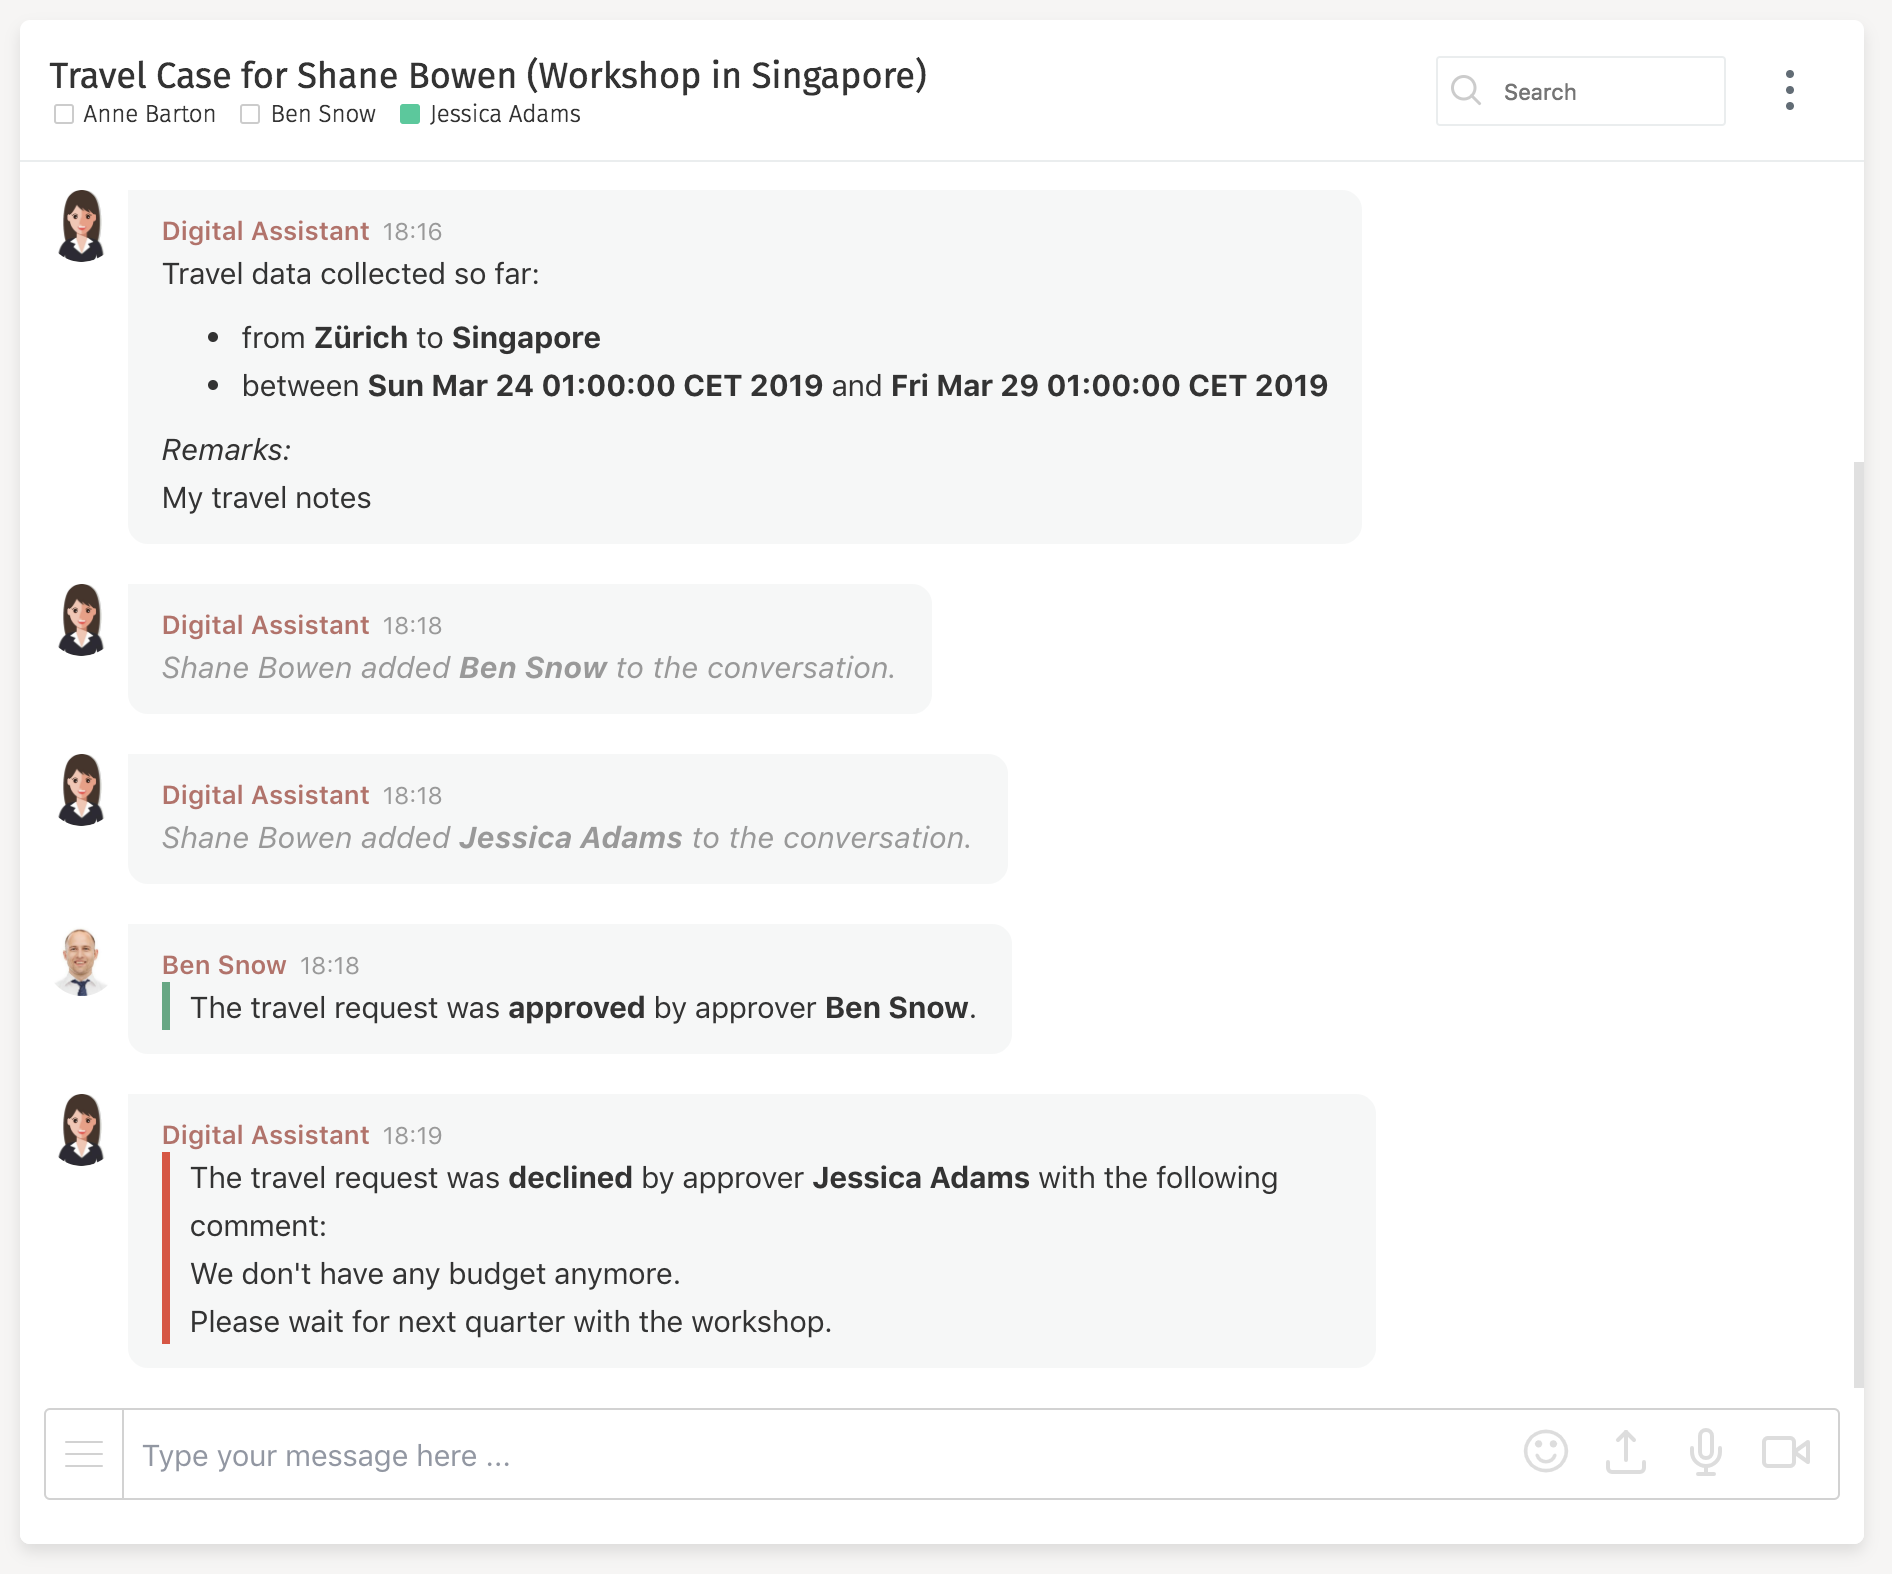
The travel request was *approved* by approver *${platformIdentityService.findPlatformUserById(approver.approverId).displayName}*.
In addition to the message, tag it with a category to make it more visual.
Set the message property, Details>Message tags to category_success.
Set the Details>Message content for the denial message to:
 The travel request was *declined* by approver *${platformIdentityService.findPlatformUserById(approver.approverId).displayName}* with the following comment:
${flwJsonUtils.getAtIndex(root.approvers, loopCounter).reviewComments}.
We can also tag this message by setting the Details>Message tags property to
category_error.
The overall approval subprocess now looks something like this:
Add an Overall Approval Message to the Conversation
Once the travel request is approved, we want to post this as another message.
Go back to the case model and add a new
Flowable Engage Activities>Send message service task to
the last stage named Organize travel and name it Send approval message.
As before, set the Details>Conversation id property to ${conversationId}, the
Details>Message content type to MD,
the property Details>Message tags to category_success,
the Details>Sending user id to digital.assistant, and finally,
the Details>Message content to:
The travel request was *approved!*
I now started the organization of the travel through the travel agent, which is taken care of by *${platformIdentityService.findPlatformUserById(travelAgentId).displayName}.*
You can still use this conversation for any questions or details you might need for organizing the travel.
The case model now looks like this:
Deploy and Run the Travel Request Again
Let us do another test-drive, so deploy the app again, switch to the runtime view and start a new travel request.
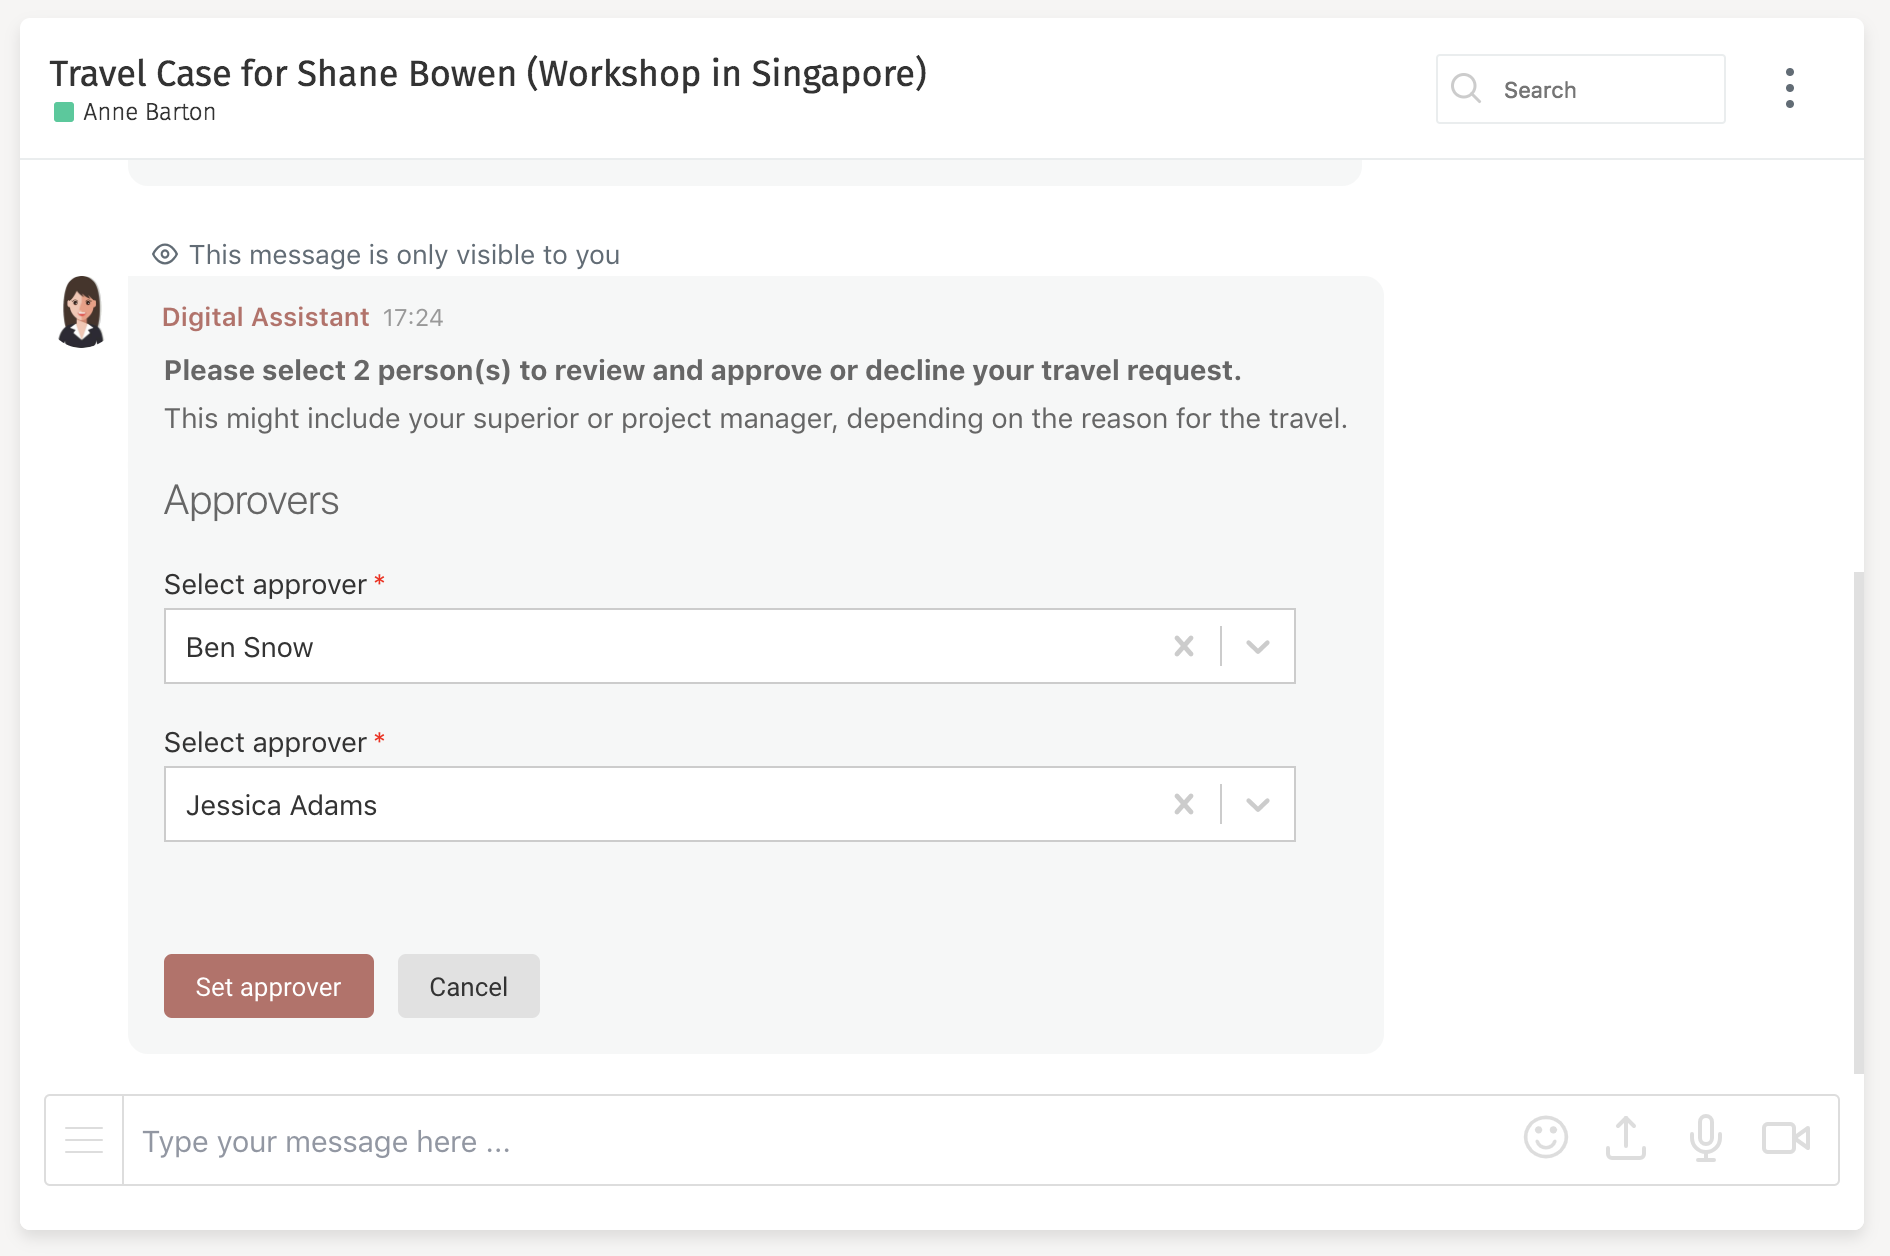
After having added the travel details and filed the request for approval, you can now see the select approver’s task posted as an action message to the conversation for the requestor to complete as an alternative to the user task in the task or work app:
Once the approvers are selected, they now join into the conversation and get a private introductory message:
You can either use the approval task as before or the sticky action message to complete the approval task.
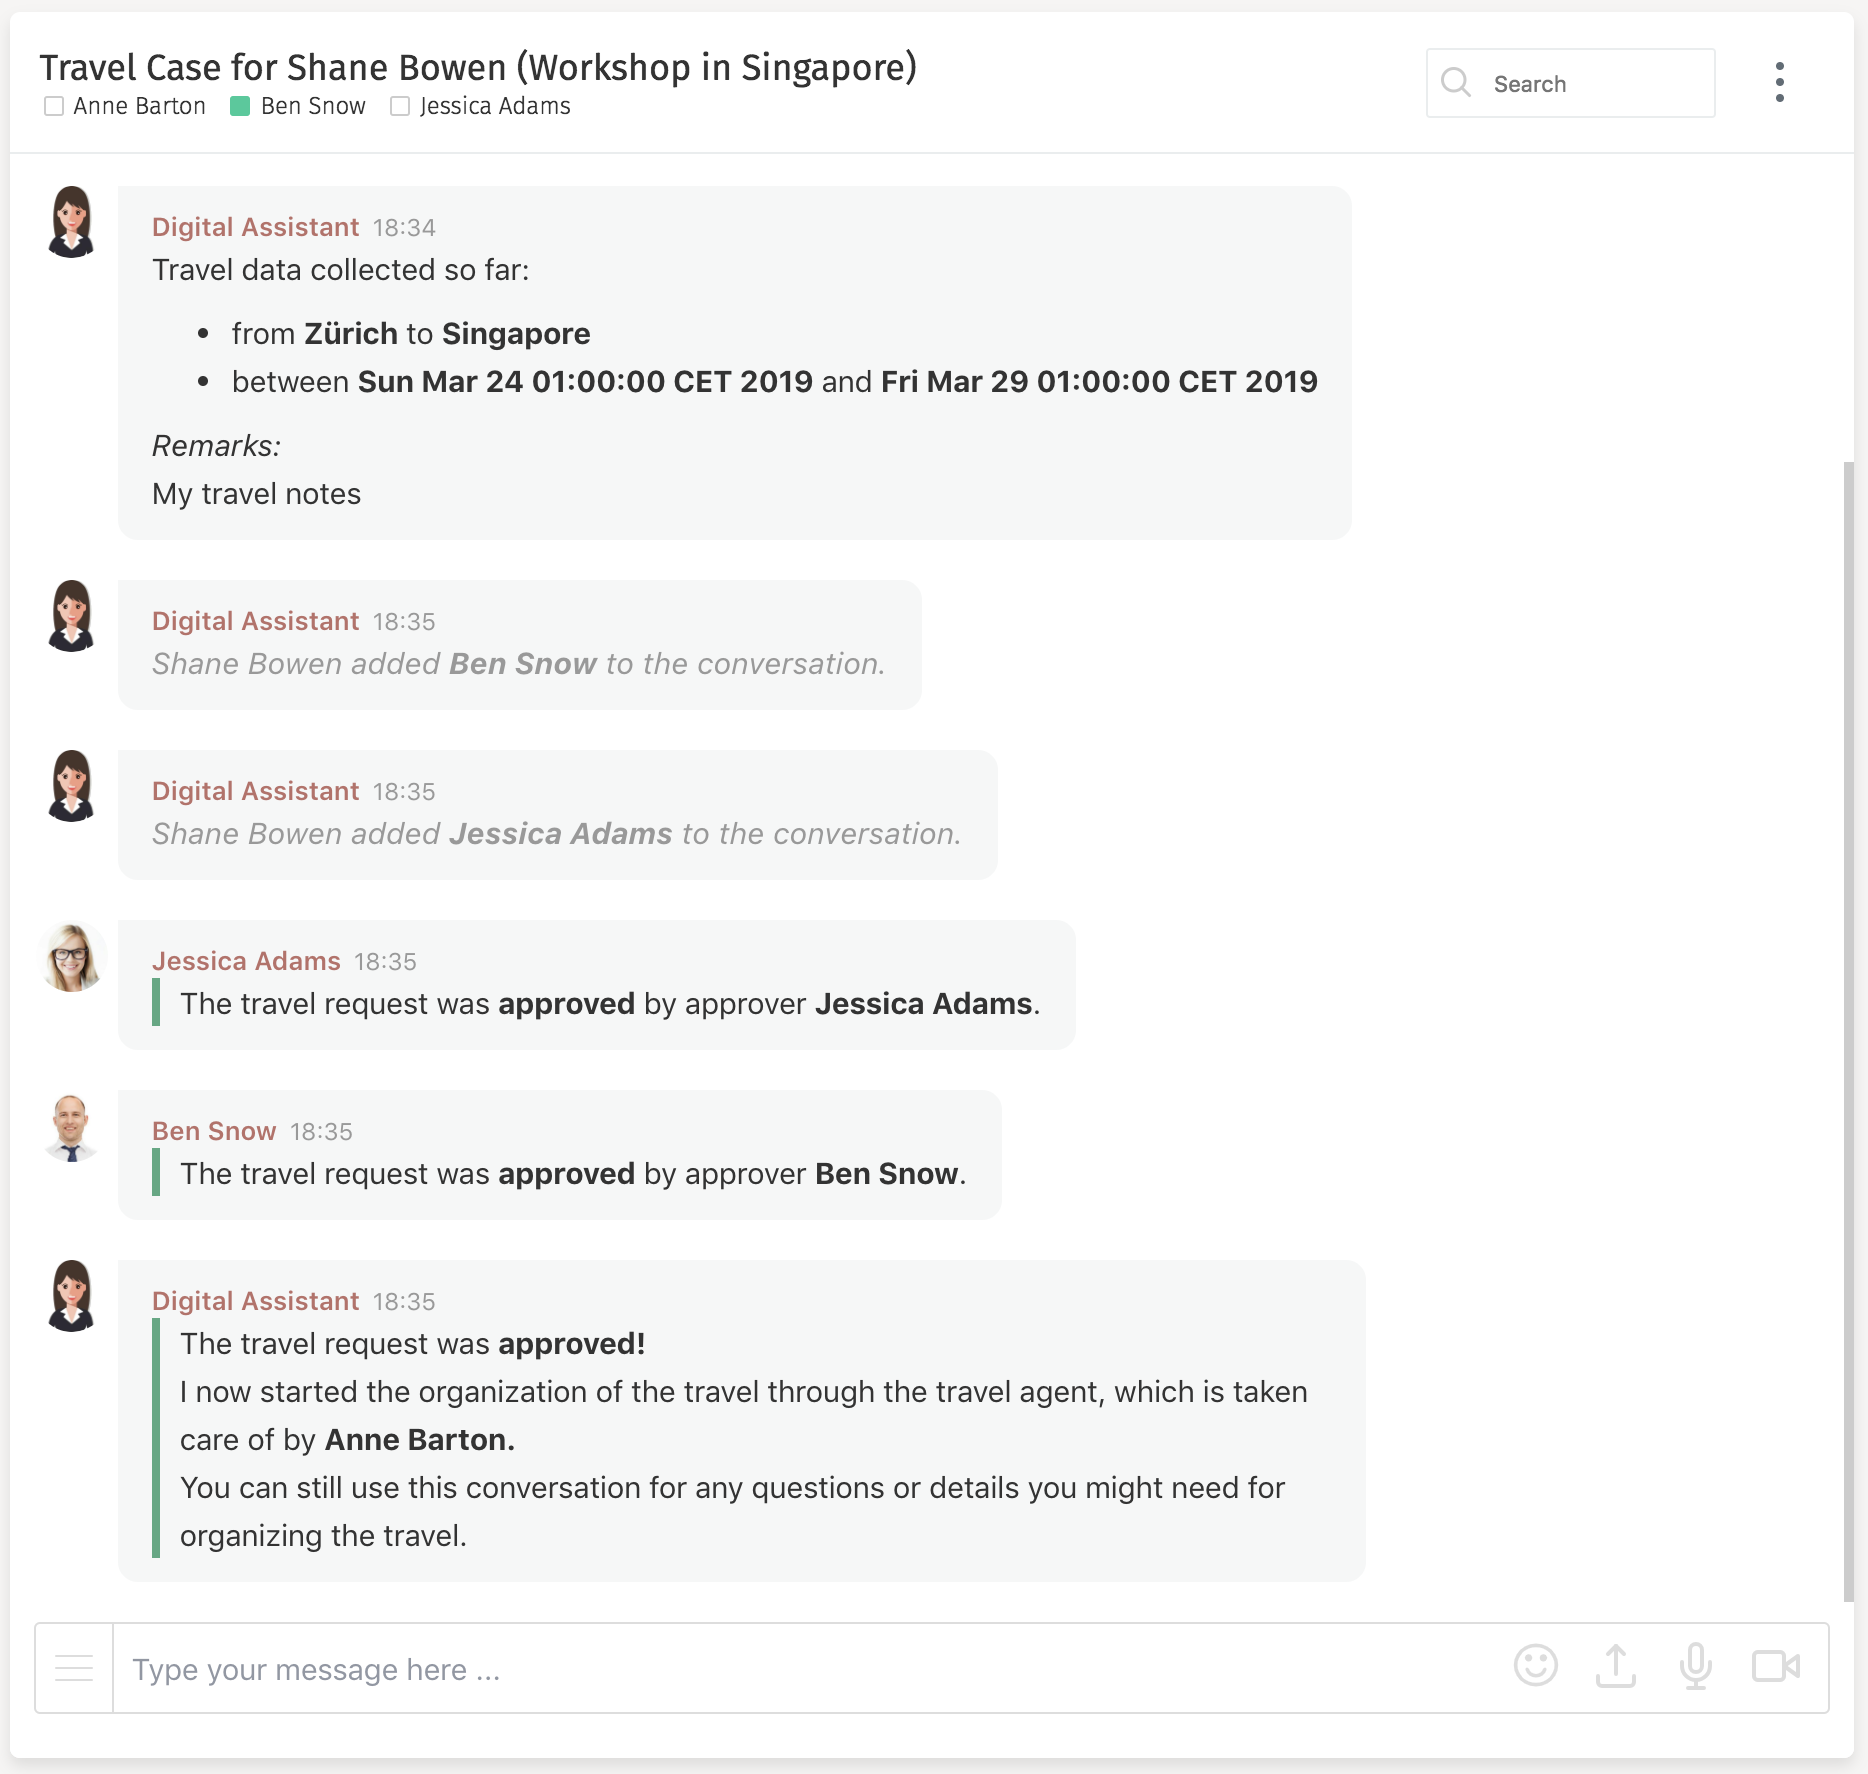
Once all approvals are completed, the conversation looks like this:
If all required approvers approve the travel request, then the approval message appears in the conversation as well: