Configuration Examples
This is an old version of the documentation for Flowable until version 3.13 and for the Angular-based Flowable Design 3.14/3.15. If you are running the latest version of Flowable please check out the current version of this page.
To clarify the descriptions above, let us look at some examples:
Getting a Simple JSON Value
In this example, we are using a REST service that fetches information that we want to store in a process or case instance.
Suppose we have a REST service that fetches client information using the URL
/clients/${id}. The service returns client information as follows:
{
    "id": 123,
    "firstName": "John",
    "lastName": "Doe",
    "address": "Somelane 3, 1234 City",
    "birthDate": "1970-01-01T01:02:03.456Z",
    "creditScore": 123
}
The service definition looks as follows:
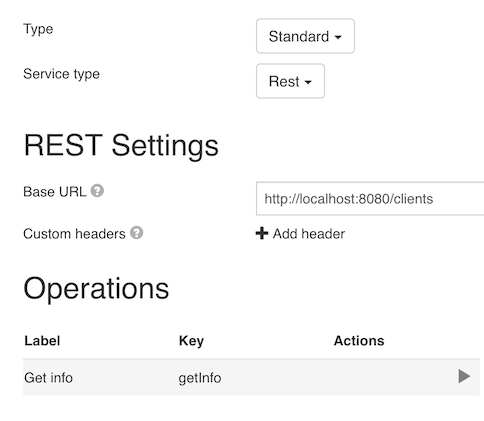
And its one operation:
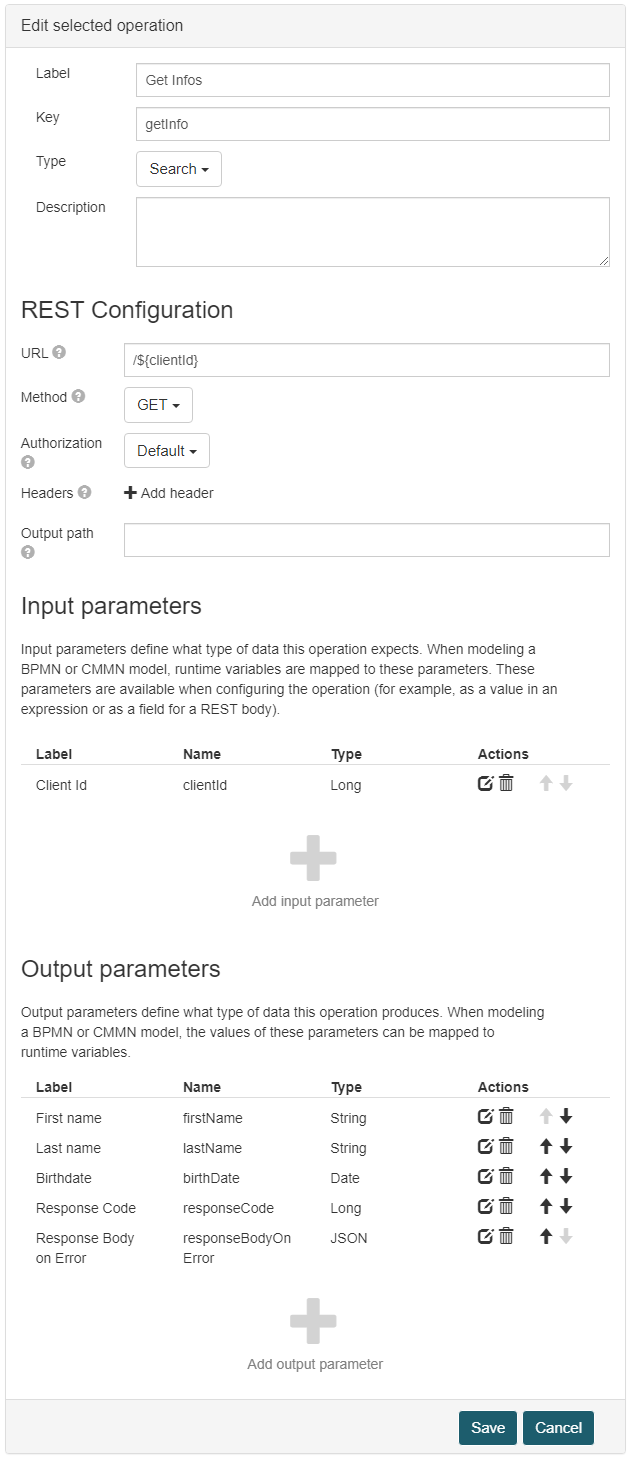
Note how the input parameter clientId is used as part of the URL
for this operation.
Also, note that we are only returning a handful of the available properties. Not having the other properties (e.g., creditScore) in the output parameter list filters those out.
We can now create a simple process that uses that service:
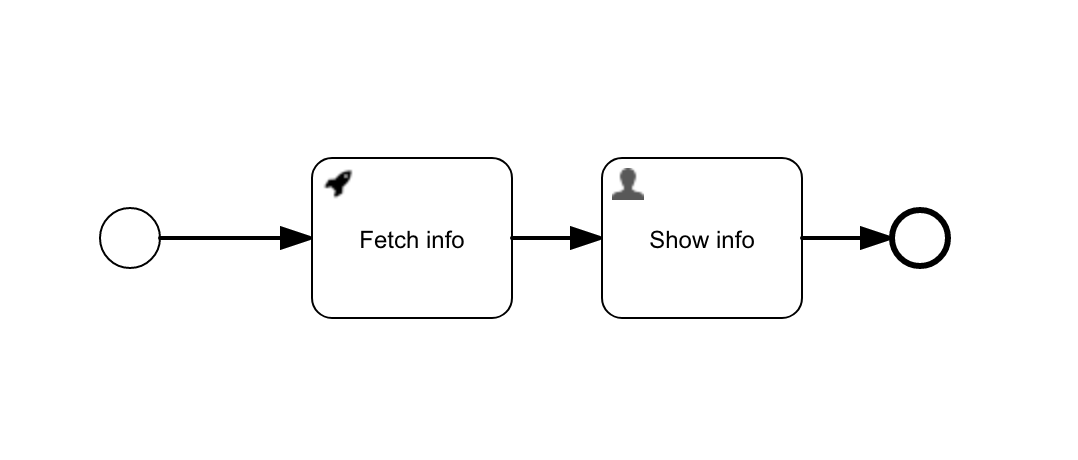
Assuming the process model has a start form with clientId,
the parameter mapping looks as follows:
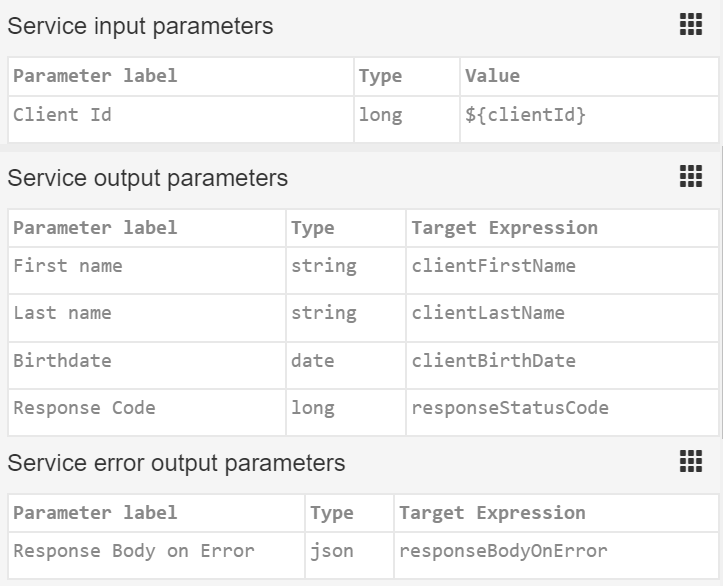
Here we are mapping the value of the clientId from the start form to the
single input parameter and the first name, last name, and birthDate are mapped to
specific output variables. If this process was part of a case, we could push
the variables upwards using ${root.clientFirstName} or ${parent.clientFirstName}.
The response code is stored in the variable responseCode. The error output parameter
responseBody is mapped to the variable responseBodyOnError.
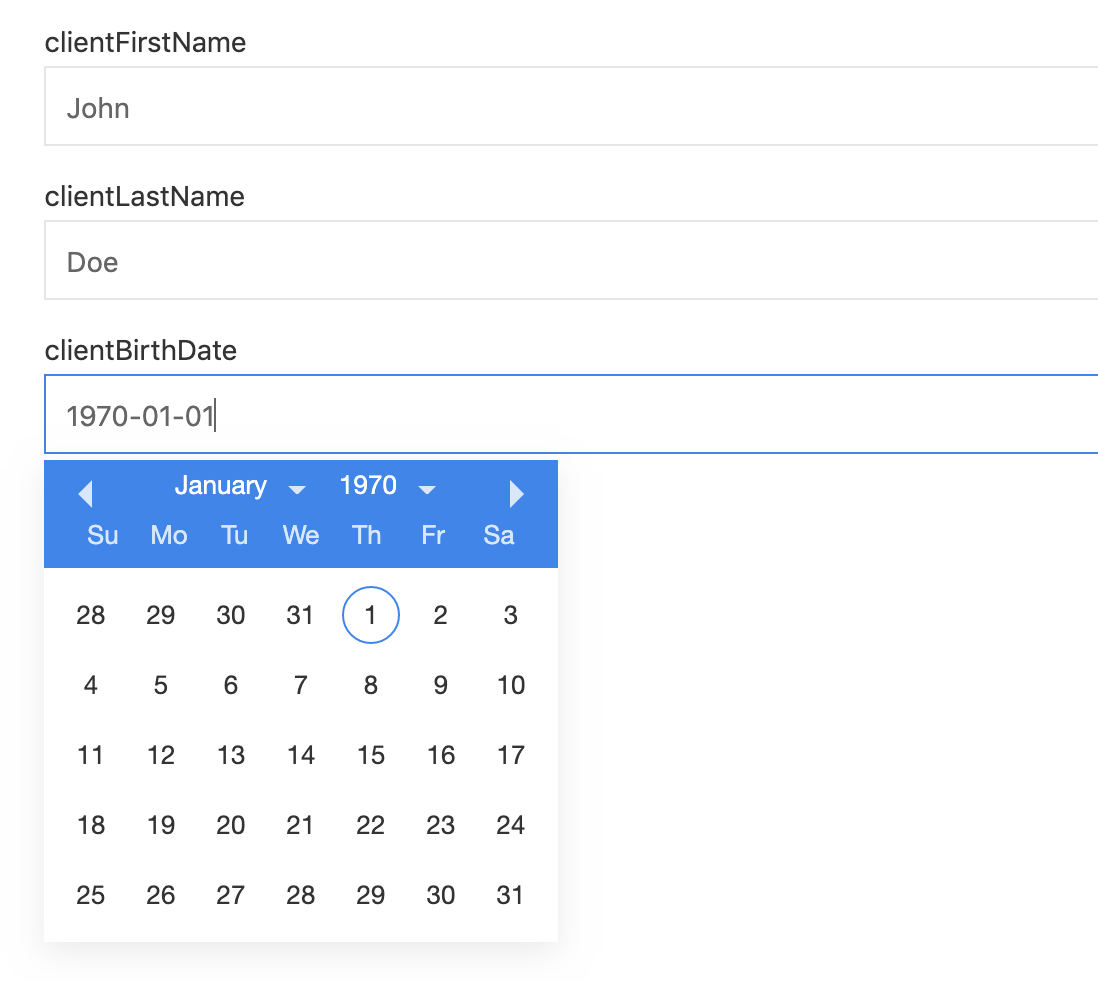
If we run this process say in Flowable Work, the user task after starting the process instance now shows something like this, which validates that the service was invoked and variables were passed back and forth correctly.
Using Paths to get a Nested Value
Let us adapt the example in the previous section to include nested fields in the response. For example, the firstName and lastName are under the info field and the birthDate is further nested under the dateInfo property:
{
    "id": 123,
    "info": {
        "firstName": "John",
        "lastName": "Doe",
        "address": "Somelane 3, 1234 City",
        "dateInfo": {
            "birthDate": "1970-01-01T01:02:03.456Z"
        },
        "creditScore": 123
    }
}
To make the example in the previous section work, the output path
is set to info (as everything is nested under that property), and the
path of the birthDate is set to dateInfo (the path is relative to the
output path of the operation):

And for the birthDate parameter:
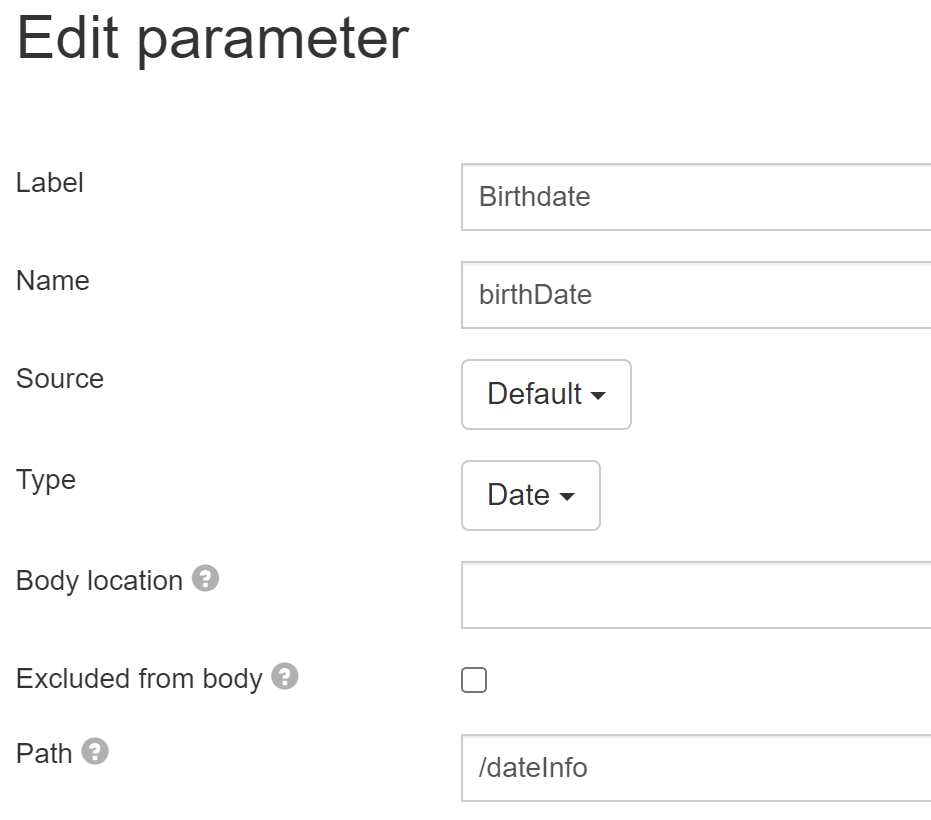
The Path is used to navigate to the object and the Name is used to denote the attribute in the json response body.
Creating error output parameter
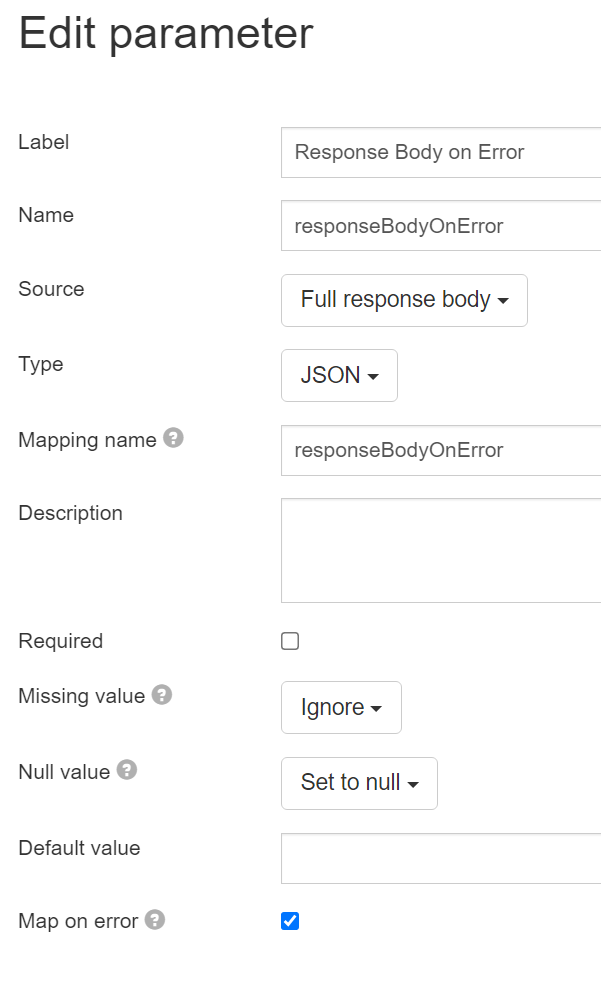
To create an error output parameter, the Map on error flag must be set to true.
Getting a List/Array of Values
In this example, we have a REST endpoint that returns an array of clients:
    [
        {
            "id": 123,
            "info": {
                "name": "John",
                "lastName": "Doe",
                "address": "Somelane 3, 1234 City",
                "dateInfo": {
                    "birthDate": "1960-01-01T01:02:03.456Z"
                },
                "creditScore": 123,
               "employer": {
                    "name": "Flowable",
                     "address": "Somelane 3, 4432 Bern"
               }
            }
        },
        {
            "id": 456,
            "info": {
                "name": "Jane",
                "lastName": "Doe",
                "address": "Somelane 3, 1234 City",
                "dateInfo": {
                    "birthDate": "1963-01-04T01:02:03.456Z"
                },
                "creditScore": 5,
                "employer": {
                    "name": "Acme",
                     "address": "Somelane 177, 10365 Berlin"
               }
            }
        },
        {
            "id": 789,
            "info": {
                "name": "Jimmy",
                "lastName": "Doe",
                "address": "Somelane 3, 1234 City",
                "dateInfo": {
                    "birthDate": "1990-01-01T01:02:03.456Z"
                },
                "creditScore": 123,
                "employer": {
                    "name": "Megacorp",
                    "address": "Somelane 256, 60604 Chicago"
               }
            }
        }
    ]
Again reusing the service definition from the previous example, we now add a new operation.
We map the required data from the returned array objects into service output parameters.
In this example we are only interested in the id, name and lastName of the person:
The operation configurations looks like follows:
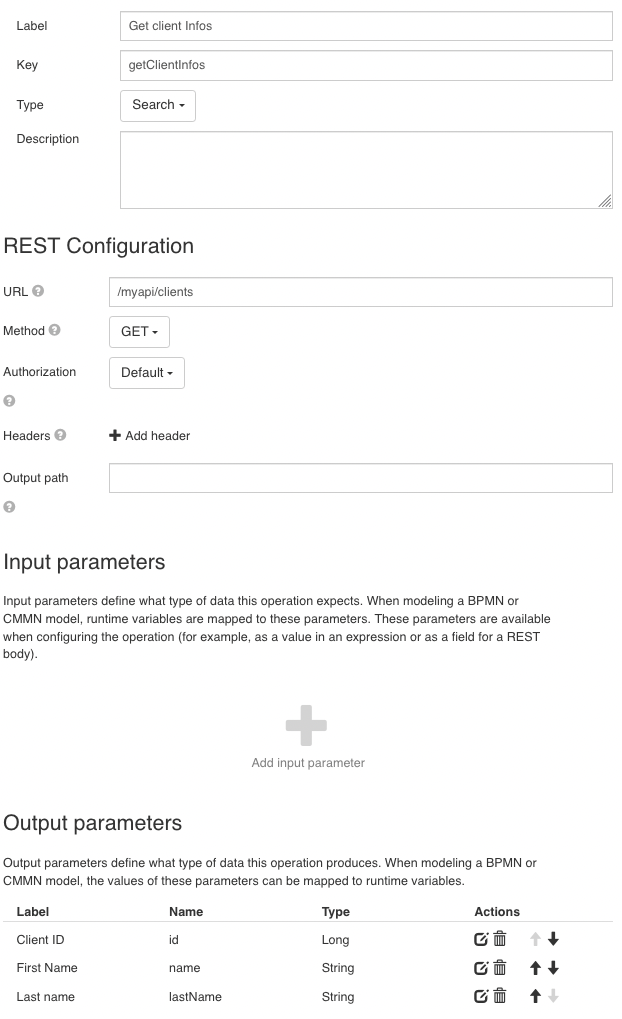
The individual output parameter configuration are listed in the tables below. Only required or non-default values are listed.
Client ID
| Parameter | Value |
|---|---|
| Label | Person ID |
| Name | id |
| Source | Default |
| Type | Long |
First Name
| Parameter | Value |
|---|---|
| Label | First Name |
| Name | name |
| Source | Default |
| Type | String |
| Path | /info |
Last Name
| Parameter | Value |
|---|---|
| Label | Last Name |
| Name | lastName |
| Source | Default |
| Type | String |
| Path | /info |
Note that this example uses Path and Name to point to the name and lastName attributes.
The Path is used to navigate to the object and the Name is used to denote the attribute in the JSON response body.
It is important to understand that in the case of arrays, the configuration of the output parameters is applied to each element of the array.
The result looks like this:
[
  {
    "name": "John",
    "lastName": "Doe",
    "employerName": "Flowable",
    "id": 123
  },
  {
    "name": "Jane",
    "lastName": "Doe",
    "id": 456
  },
  {
    "name": "Jimmy",
    "lastName": "Doe",
    "id": 789
  }
]
This service can now be used in a process or case model:
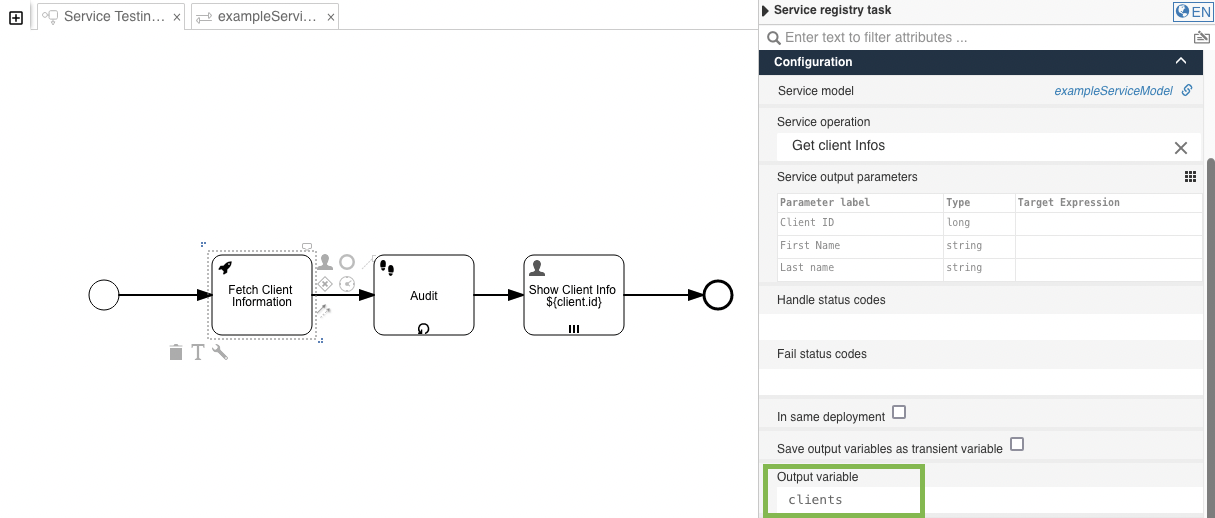
Note that only the Output variable is set. For array return types, the Service Output Parameters mapping can be ignored.
Internally, an ArrayNode is returned. This can be used to configure multi-instance activities, such as user tasks. The configuration of a multi-instance activity could look like this:
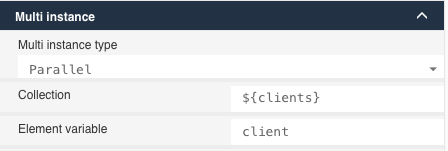
Using Mapping name to resolve name overlaps
Based on the JSON structure from the previous example, we now want to extend the service to additionally return the employer name and employer address line together with the client address line.
The problem is, the attribute names name and address overlap for the client info and the employer in this example.
This can be fixed using the Mapping name configuration field.
The service output parameter configuration looks like this:
Client Address
| Parameter | Value |
|---|---|
| Label | Client Address |
| Name | address |
| Source | Default |
| Type | String |
| Path | /info |
Employer Name
| Parameter | Value |
|---|---|
| Label | Employer Name |
| Name | name |
| Source | Default |
| Type | String |
| Path | /info/employer |
| Mapping name | employerName |
Employer Address
| Parameter | Value |
|---|---|
| Label | Employer Address |
| Name | address |
| Source | Default |
| Type | String |
| Path | /info/employer |
| Mapping name | employerAddress |
Note the usage of Mapping name, Path and Name in the output parameter configurations.
The target attribute in the service response JSON body is expressed by the Path to navigate to the object and the Name
to denote the attribute.
Mapping name is then used to resolve the overlapping names.
The result looks like this:
[
  {
    "name": "John",
    "lastName": "Doe",
    "address": "Somelane 3, 1234 City",
    "employerAddress": "Somelane 3, 4432 Bern",
    "employerName": "Flowable",
    "id": 123
  },
  {
    "name": "Jane",
    "lastName": "Doe",
    "address": "Somelane 3, 1234 City",
    "employerAddress": "Somelane 177, 10365 Berlin",
    "employerName": "Acme",
    "id": 456
  },
  {
    "name": "Jimmy",
    "lastName": "Doe",
    "address": "Somelane 3, 1234 City",
    "employerAddress": "Somelane 256, 60604 Chicago",
    "employerName": "Megacorp",
    "id": 789
  }
]
'Source': Returning the response payload and response headers
The Source configuration of the service output parameter configuration allows you to configure
to return the response payload, response headers, etc. The different options are showcased in this section.
It is possible to return the response payload as-is as a service output parameter.
To do this, the Source setting can be set to Response body. The entire response body will be assigned
to the output parameter.
Given this JSON payload:
{
    "id": 117,
    "info": {
      "name": "Jimmy",
      "lastName": "Doe",
      "address": "Somelane 3, 1234 City",
      "dateInfo": {
        "birthDate": "1990-01-01T01:02:03.456Z"
      },
      "creditScore": 123
}
The following output parameter configurations showcase all possible values for Source, when
applied to the response above.
Source: Status Code
| Parameter | Value |
|---|---|
| Label | Response Status Code |
| Name | responseStatusCode |
| Source | Status Code |
| Type | Long |
Source: Full response body
| Parameter | Value |
|---|---|
| Label | Full response body |
| Name | responsePayload |
| Source | Full response body |
| Type | JSON |
Source: All response headers
| Parameter | Value |
|---|---|
| Label | All response headers |
| Name | responseHeaders |
| Source | All response headers |
| Type | Array |
Source: Specific response header
| Parameter | Value |
|---|---|
| Label | Specific response header |
| Name | responseHeaderSpecific |
| Source | Specific response header |
| Type | String |
Given the configuration above, the result looks like this:
{
  "responseStatusCode": 200,
  "responseHeaders": [
    {
      "key": "Content-Type",
      "value": "application/json; charset=utf-8"
    },
    {
      "key": "Content-Length",
      "value": "309"
    }
  ],
  "responsePayload": {
    "id": 117,
    "info": {
      "name": "Jimmy",
      "lastName": "Doe",
      "address": "Somelane 3, 1234 City",
      "dateInfo": {
        "birthDate": "1990-01-01T01:02:03.456Z"
      },
      "creditScore": 123
    }
  },
  "responseHeaderSpecific": "application/json; charset=utf-8"
}
Caution with the Full response body and All response headers setting
In general, it is strongly recommended to define the output parameters to return only the data that is needed in the case or process model. In this way, the amount of data potentially stored as variables is kept to the required minimum.
List/Array Behavior
The behavior for arrays is a bit different in terms to the Source. As the output parameter configuration
is applied to every element in the array, the service output in the used configuration above would result in the following
service response when using this array response:
REST array response body
[
  {
    "id": 17,
    "info": {
      "name": "Jimmy",
      "lastName": "Doe",
      "creditScore": 5
    }
  },
  {
    "id": 456,
    "info": {
      "name": "Jane",
      "lastName": "Doe",
      "creditScore": 5
    }
  }
]
Service response after applying the output parameter mappings above
[
  {
    "responseStatusCode": 200,
    "responseHeaders": [
      {
        "key": "Content-Type",
        "value": "application/json; charset=utf-8"
      }
    ],
    "responsePayload":
      {
        "id": 17,
        "info": {
          "name": "Jimmy",
          "lastName": "Doe",
          "creditScore": 5
        }
      },
    "responseHeaderSpecific": "application/json; charset=utf-8"
  },
  {
    "responseStatusCode": 200,
    "responseHeaders": [
      {
        "key": "Content-Type",
        "value": "application/json; charset=utf-8"
      }
    ],
    "responsePayload":
      {
        "id": 456,
        "info": {
          "name": "Jane",
          "lastName": "Doe",
          "creditScore": 5,
        }
      },
    "responseHeaderSpecific": "application/json; charset=utf-8"
  }
]
Because the output parameter mappings are applied to each element individually, the resulting array contains
objects with the configured service output parameters.
This means that, for example, responseHeaders are repeated for each array element.
Posting to a REST Service
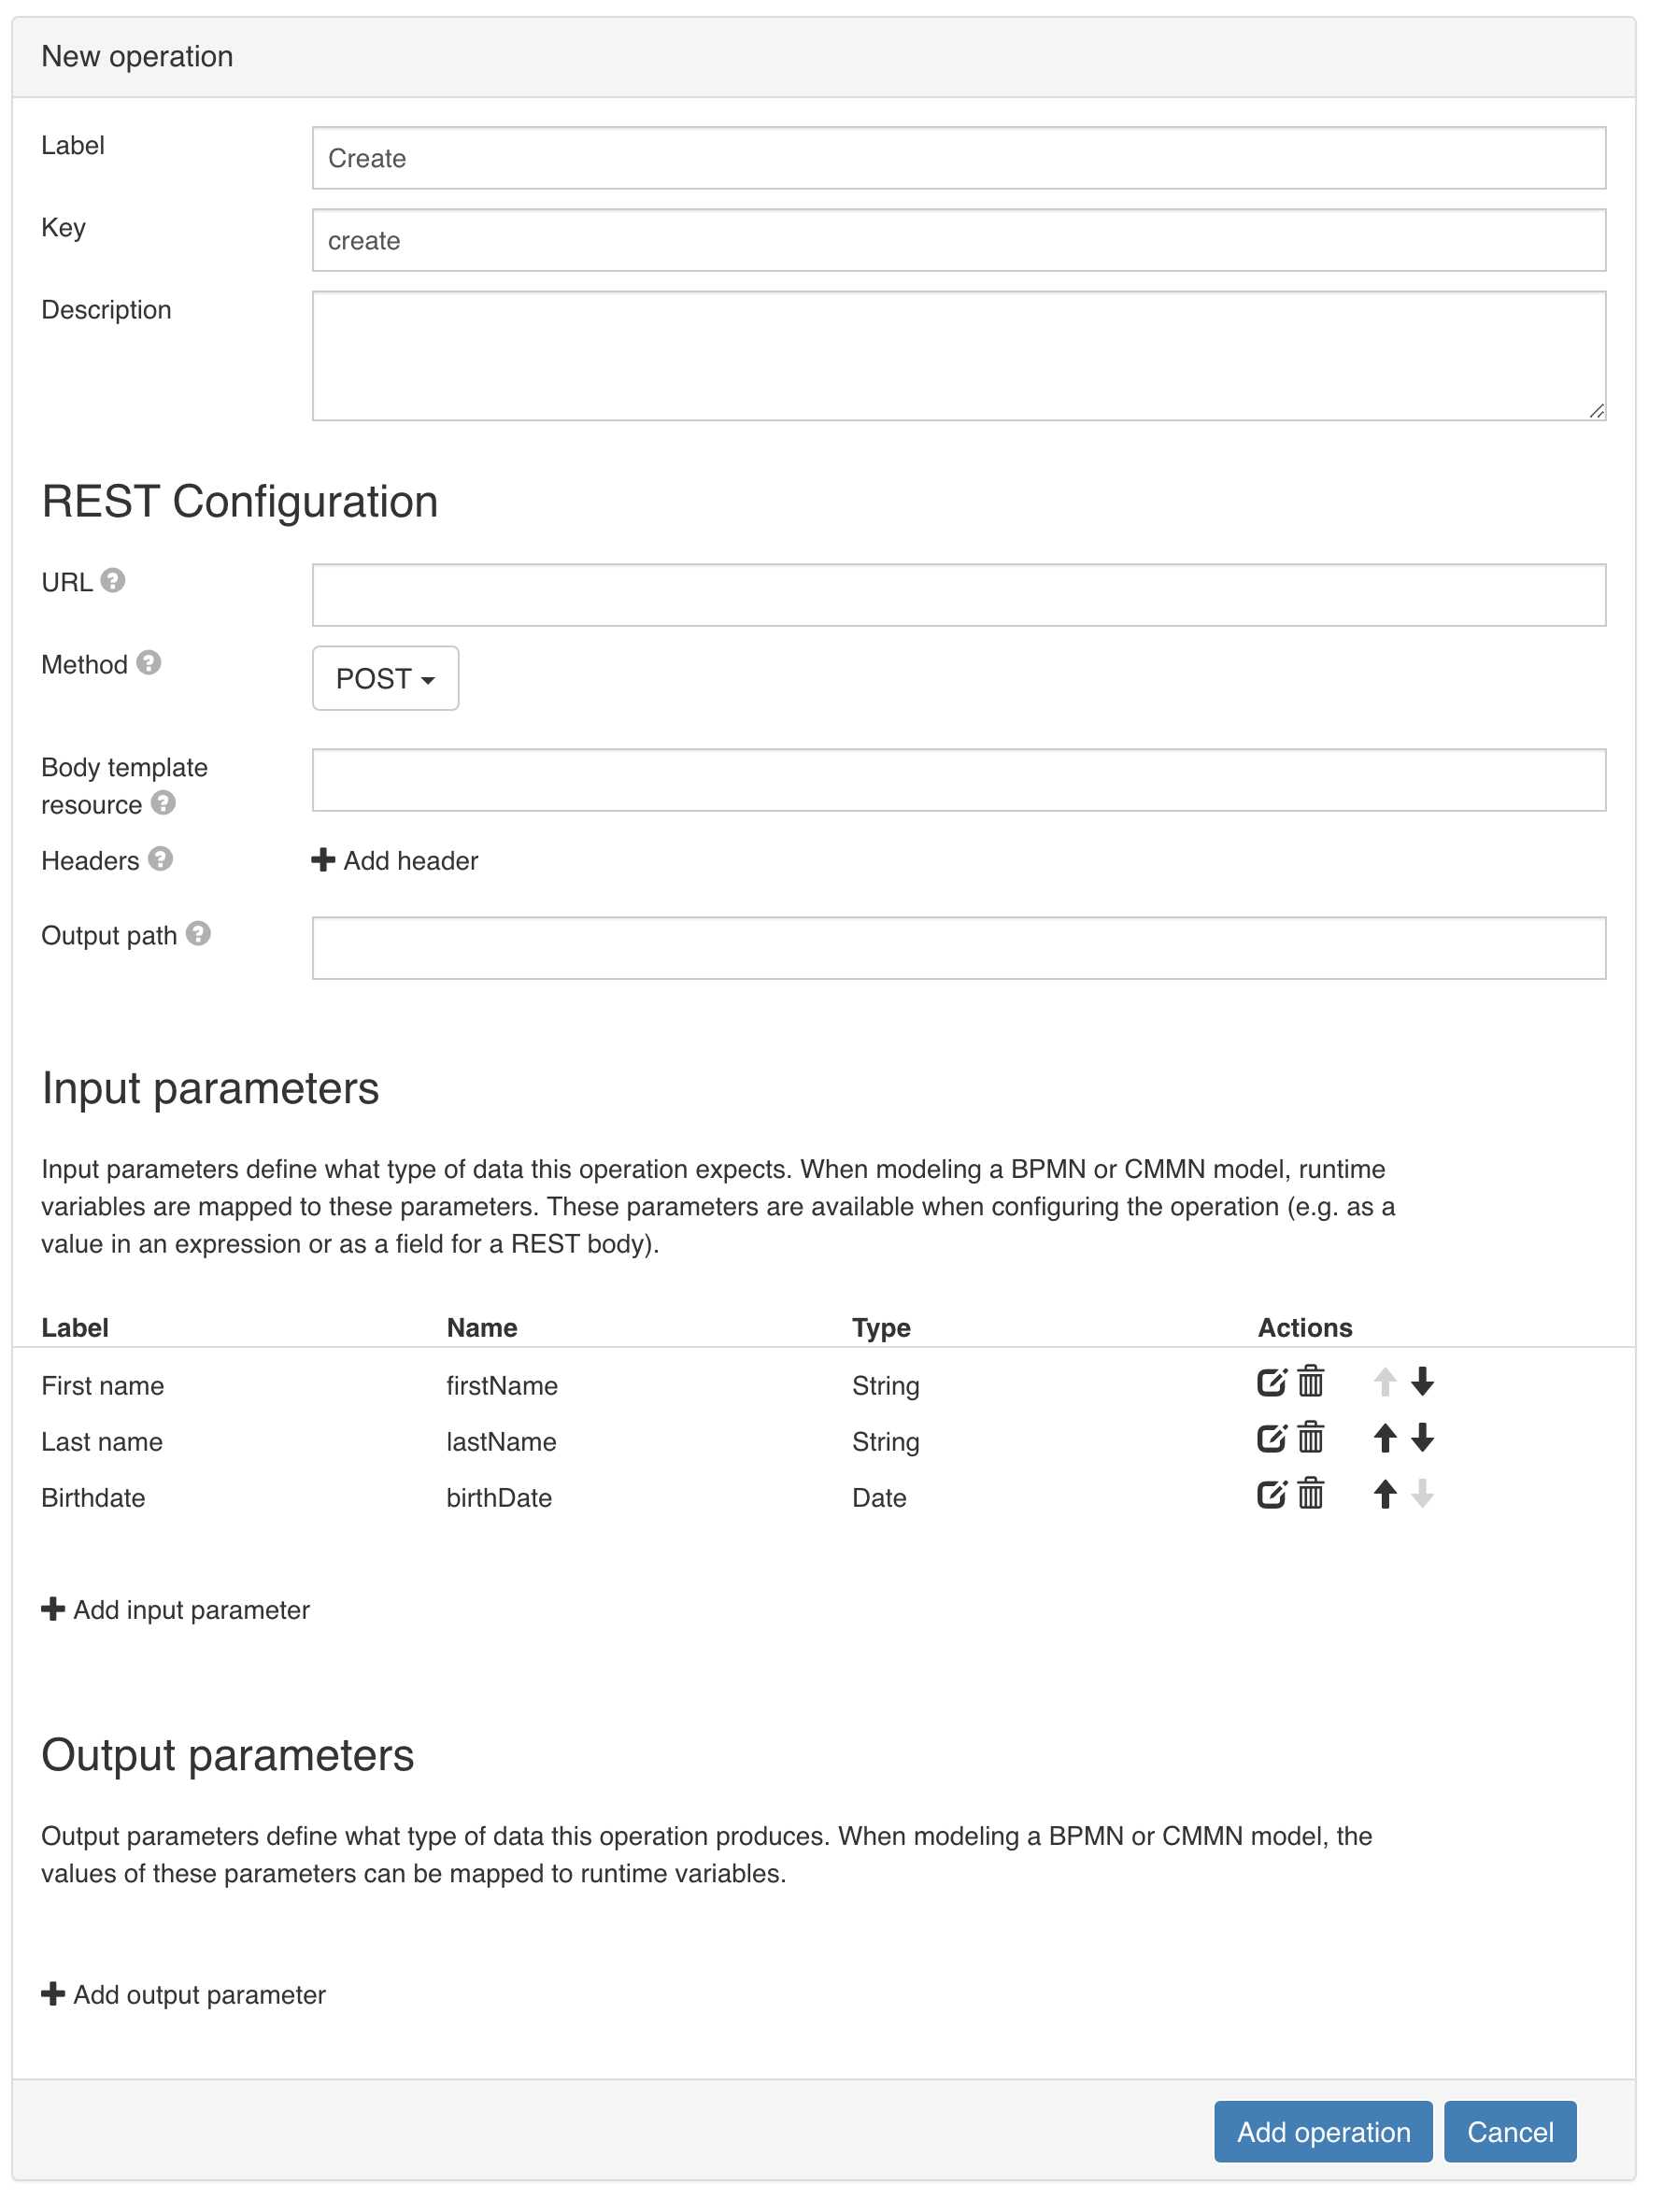
Suppose there exists another REST endpoint that allows creating a client object. Adding such an operation is similar to the steps above. First, add a new 'create' operation to the example from above and now:
-
Configure a set of input parameters that populate the JSON body when doing the POST.
-
For more complex use cases, a custom Freemarker template can be used (see the Service Registry Engine Developer Guide.
If the REST endpoint accepts a simple flat JSON structure for creating a client, the operation configuration could, for example, look like:
Authorization for a REST Service
Depending on how the REST-backed service is protected the service needs to be configured differently.
In most cases the Authorization header needs to be set.
Flowable offers an easy way to configure the Authorization header for HTTP Basic and HTTP Bearer authorizations by configuring the authorization for a model or an operation.
The images below are showing the configuration on the definition level (applicable for all operations). However, each operation can be configured separately (or overwrite the configuration from the model) if needed.
Basic Authorization

Bearer Authorization
