Part 2: Make the Approval Process Multi-instance
This is an old version of the documentation for Flowable until version 3.13 and for the Angular-based Flowable Design 3.14/3.15. If you are running the latest version of Flowable please check out the current version of this page.
Chapter 8: Create DMN Based Multi-instance Approval Process
In this second part, we are going to extend the approval process with a multi-instance activity based on the number of approvers we need. That number is calculated using a DMN decision table according to the specified travel data.
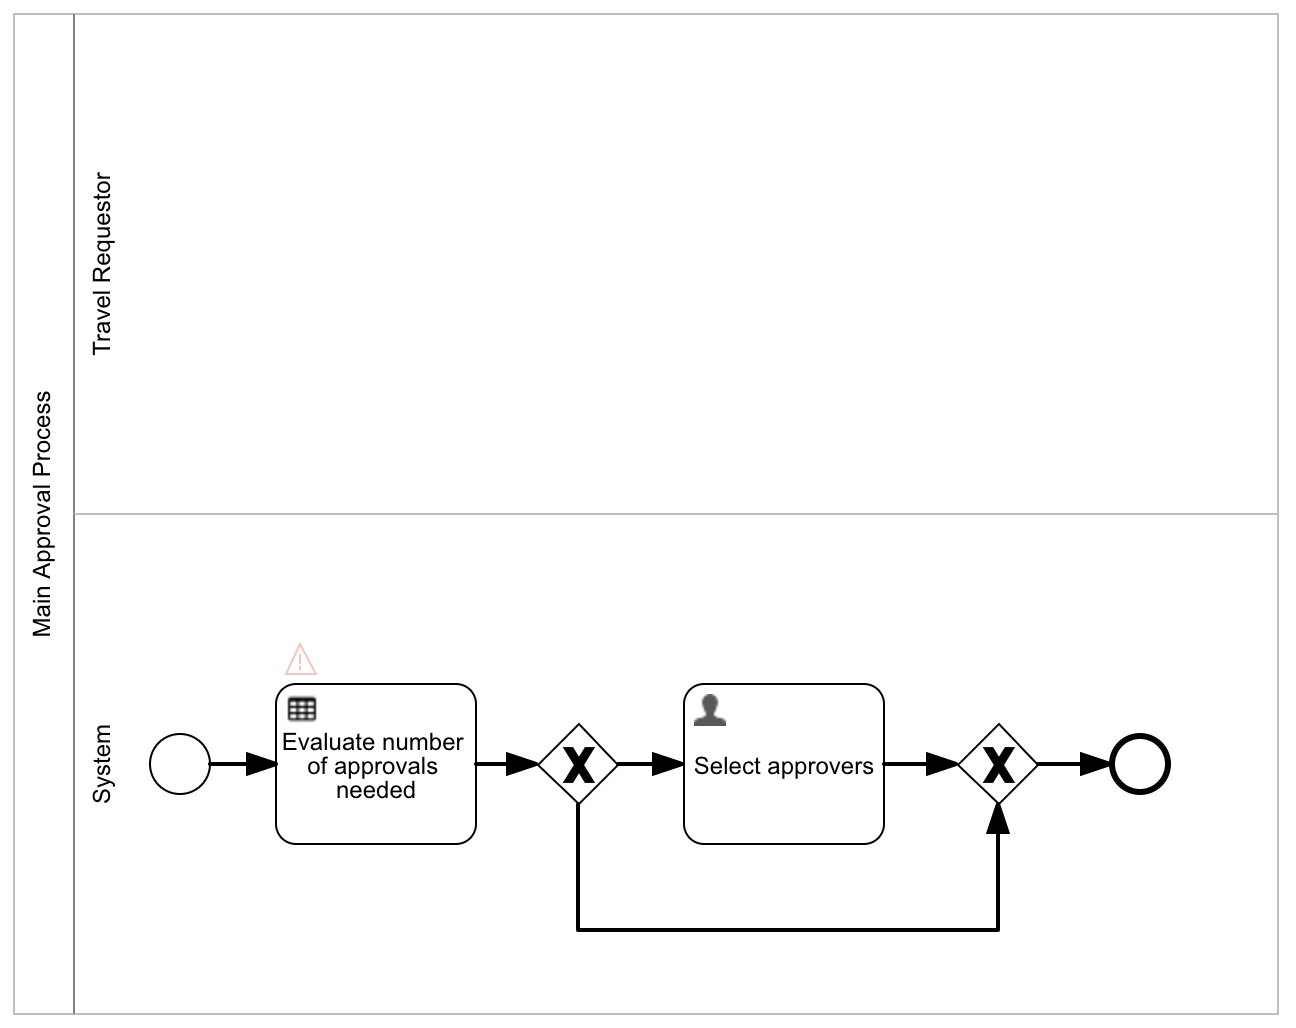
Add a New Main Approval Process
We currently have a straightforward, fixed approval process, and we are going to
make it a bit more sophisticated. To get started, go back to the case model
and select the Travel request approval process task in the Approval travel stage.
Select the Details>Process reference attribute (but not the referenced process link).
Select "New" as we cannot re-use the existing one later on as a sub-process.
So we create a new sub-process where we add the DMN based decision and
multi-instance path.
Set the new name to Travel Request Main Approval Process, hit Tab and then Enter to create the new main approval process.
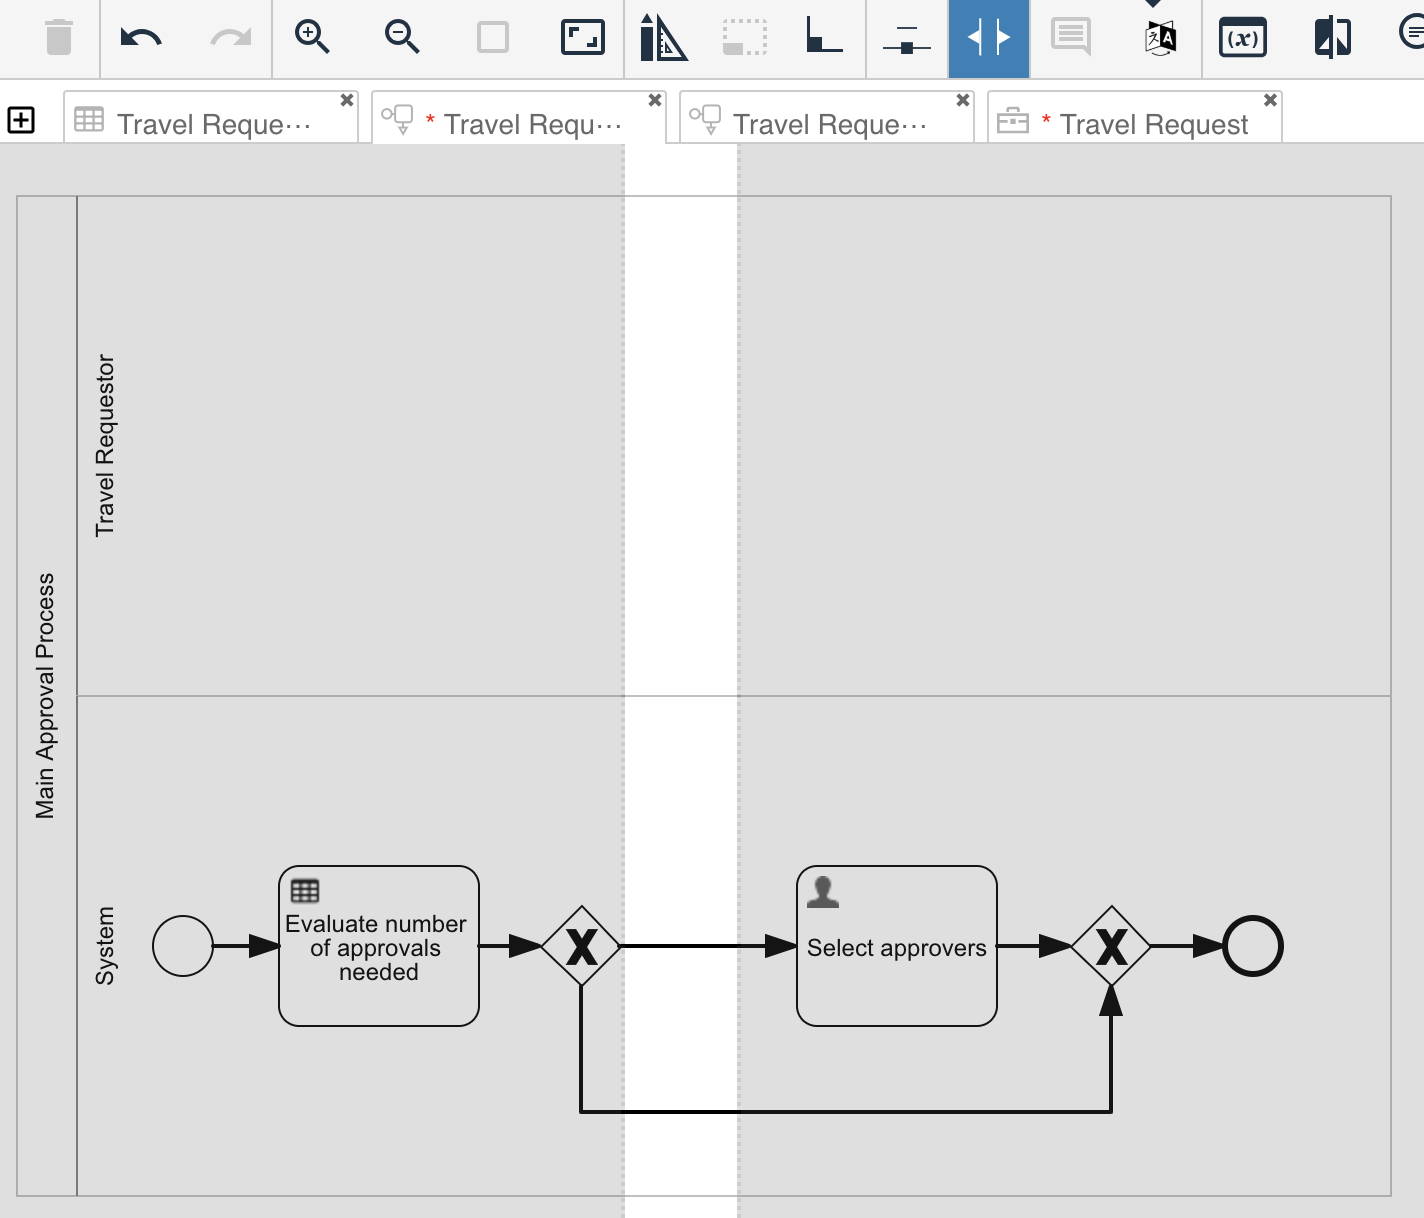
As before, delete the predefined Start event and drag a new
Swimlanes>Pool onto
the process diagram and name it Main Approval Process. Then name the
existing lane to Travel Requestor and add a new lane below (Swimlanes>Lane)
named System.
Add a Start events>Start event within the System lane and a new
Activities>Decision task,
name it Evaluate number of approvals needed. Next, connect Start event
with the Decision task by dragging the small sequence flow icon (arrows) from
the Start event onto the decision task.
Use the exclusive gateway icon after selecting the Decision task to
add a gateway and then the User task icon to add a new User
task after the gateway and name it Select approvers.
After the User task, add a gateway again by using that small icon,
then in the same fashion an end event.
Go back to the first gateway, use the sequence flow icon again and
drag it to the second gateway to add an alternative path, then use the
centric handle of that sequence flow to drag it below the user task.
The process model now looks like this:
Define a DMN Decision Table for the Number of Approval Evaluation
In the next step, we want to define a DMN based decision table to evaluate if and how many approvals we need for the travel request.
Select the Decision task and click the Details>Decision table reference property,
enter Travel Request Approval Decision Table, hit Tab and
then Enter to create a new decision table.
A DMN based decision table is defined using some input values and one or even
more output values. By default, the First hit policy is selected which
means, the engine evaluates all the conditions on the input values defined
and stops at the first row where all conditions are met and returns the
output value(s) specified on that row.
Click the New Input blue header to define our first input parameter
and modify it like this:
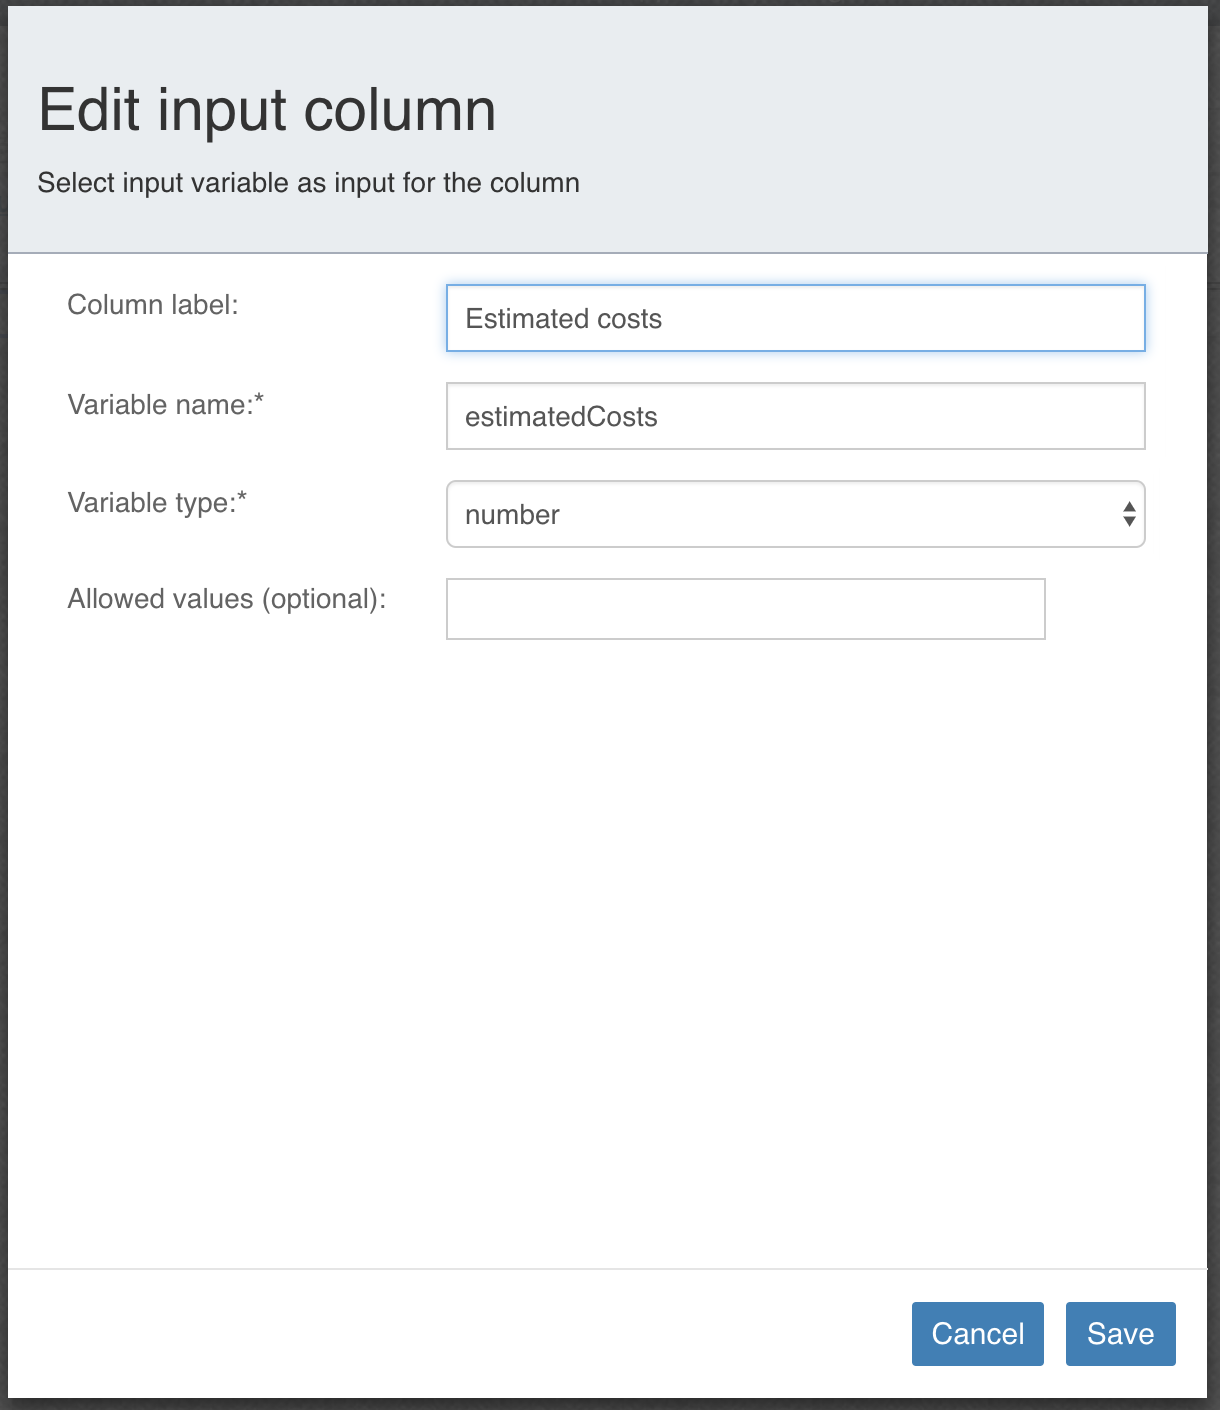
We can map process variable values to our DMN input columns on which to base our decisions.
For the next column, click the small, blue plus icon to add another input column and define it like this:
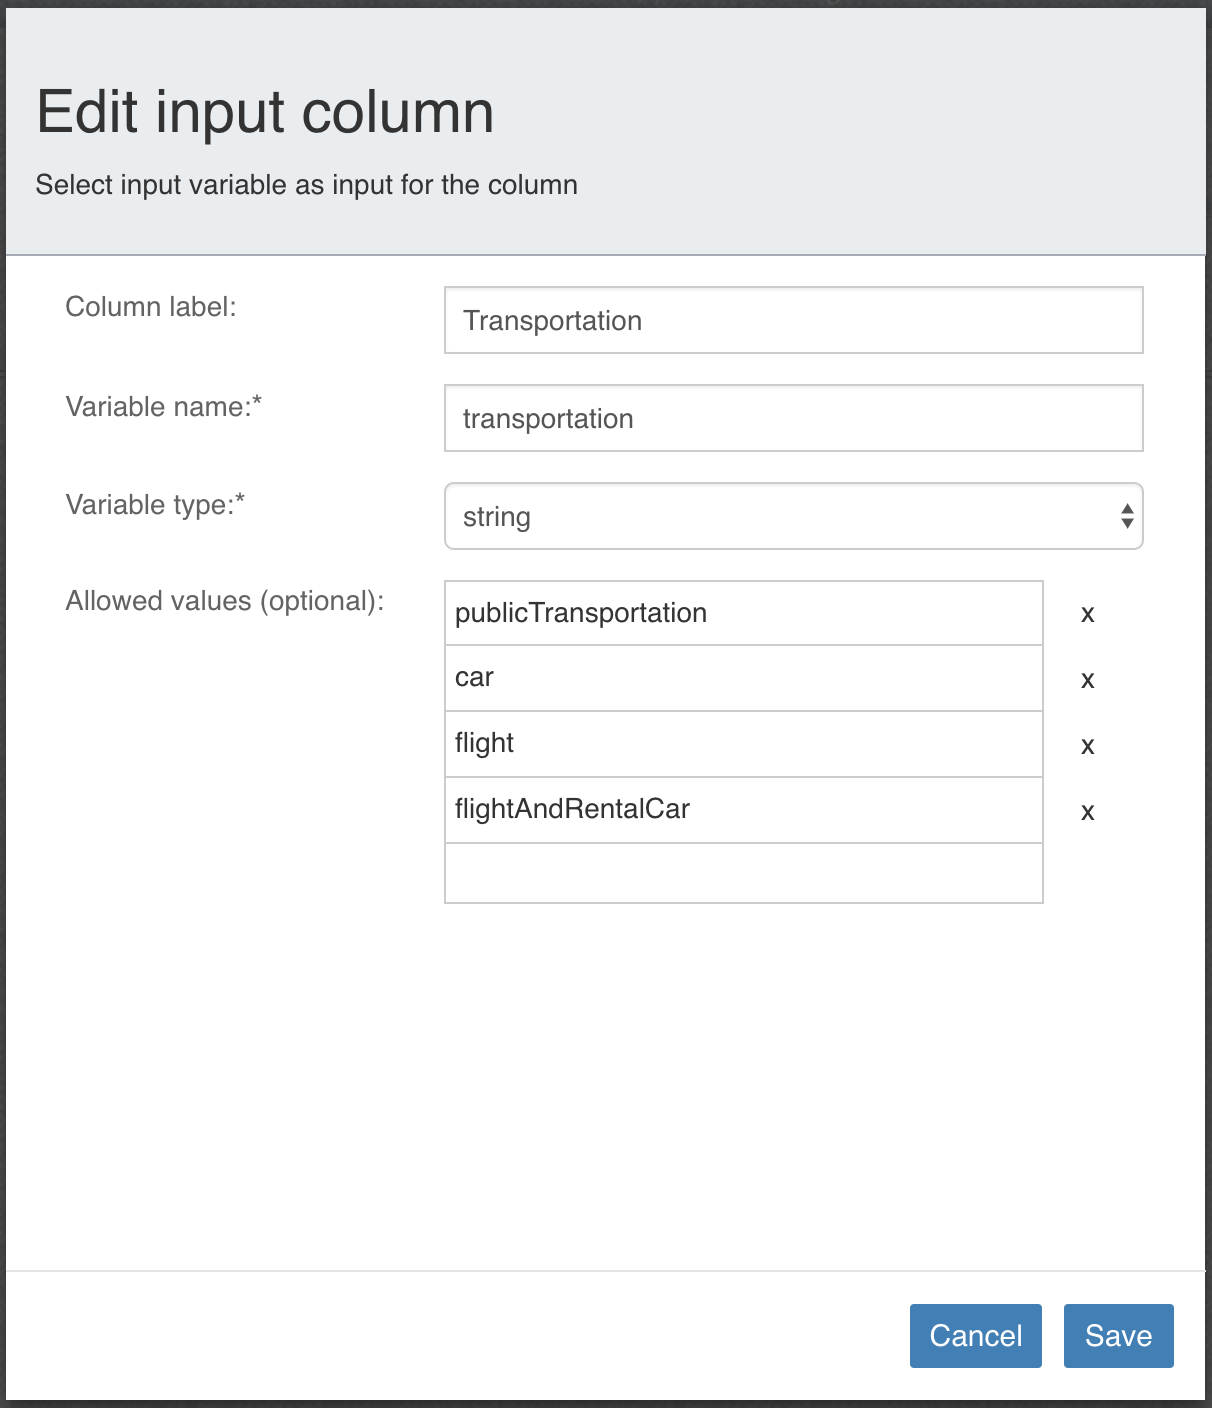
As you can see, we can use our previously defined transportation options, so it is easier to use those values within our table later on.
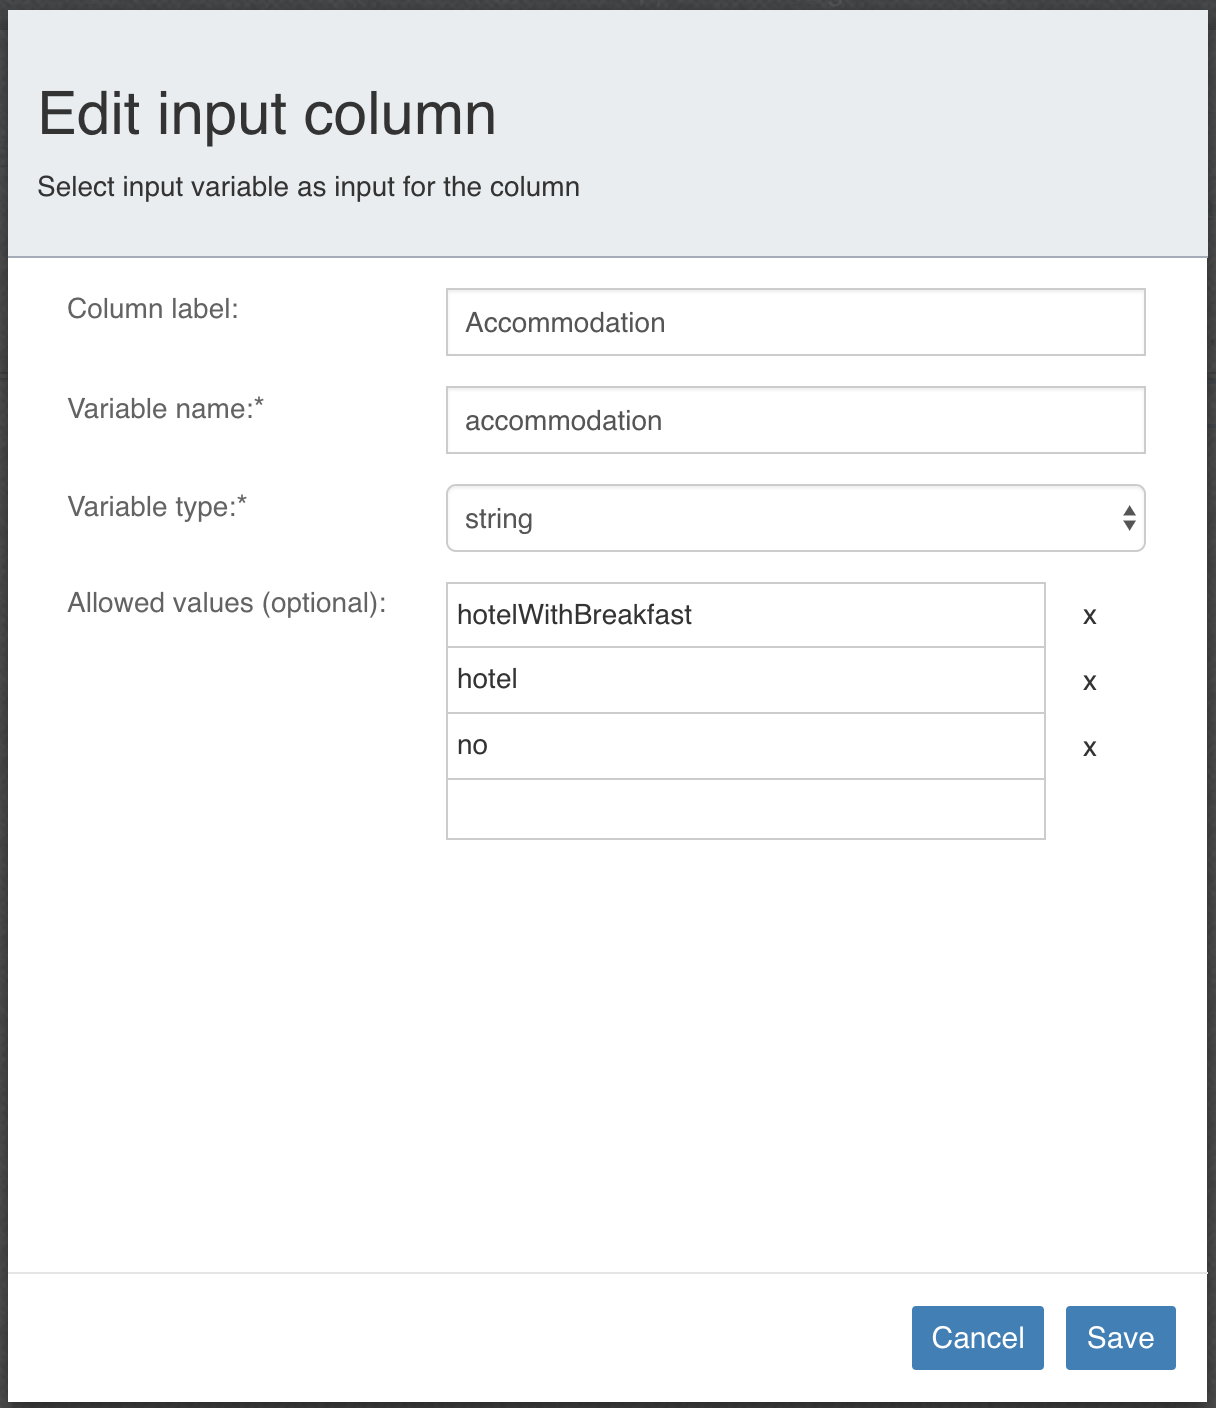
Let us add a third column with the following values:
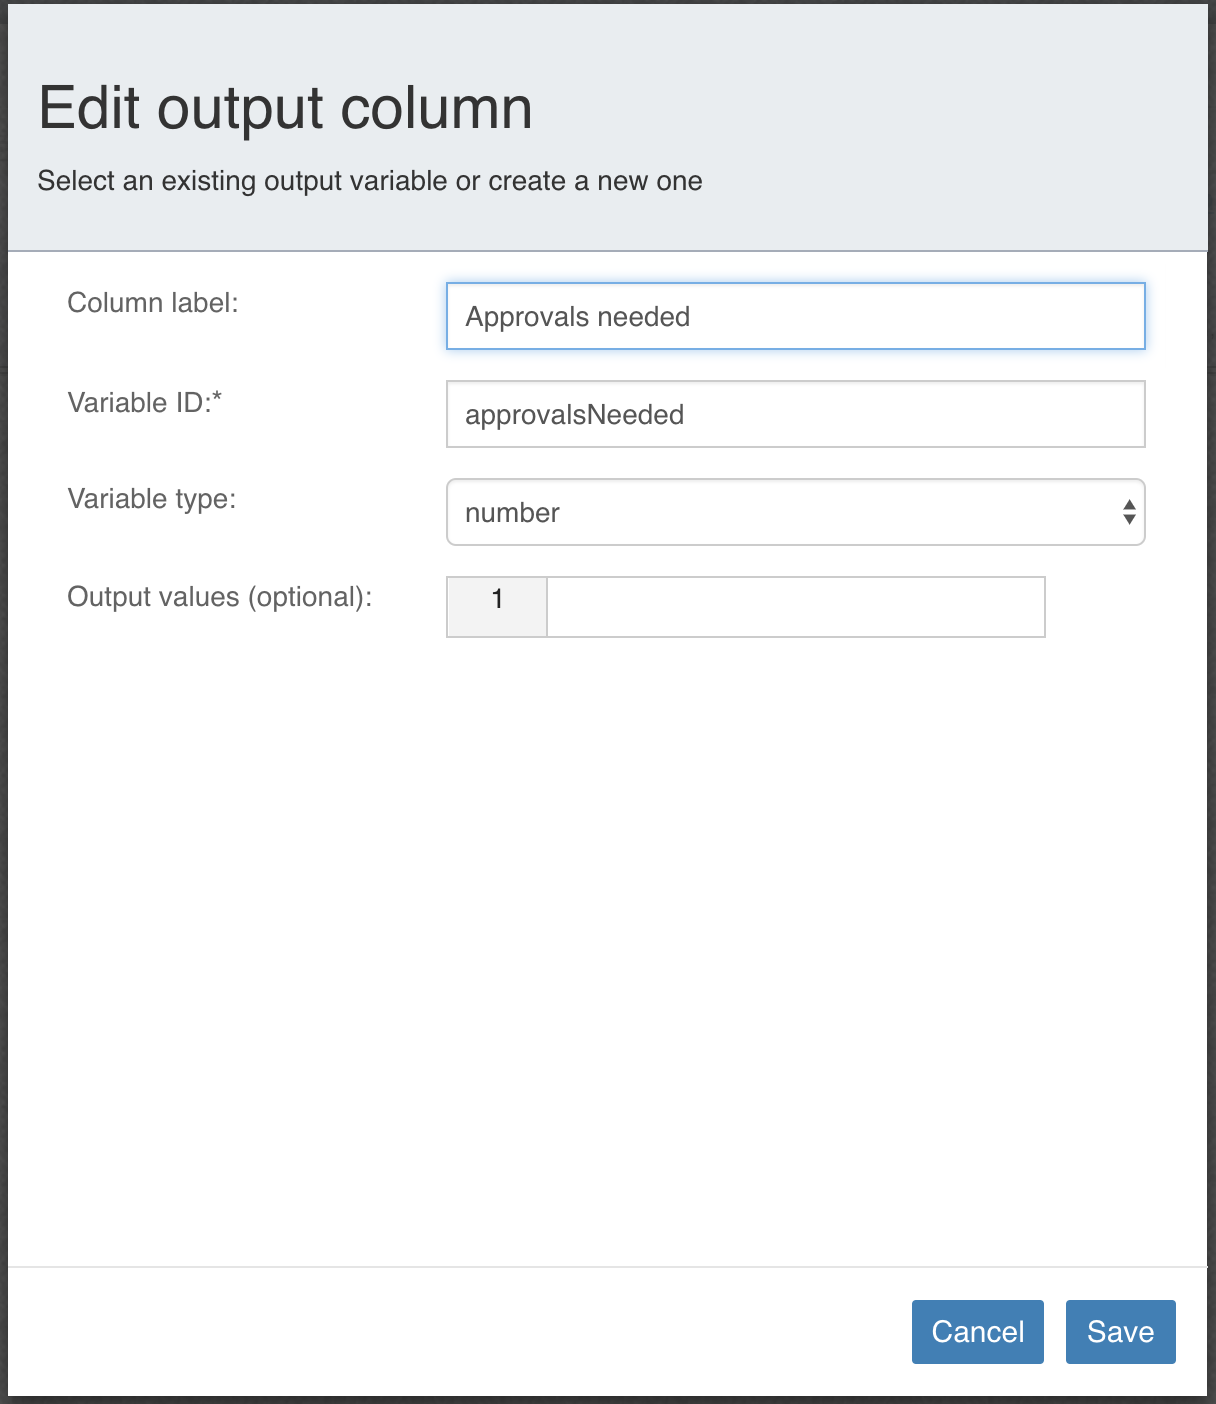
Finally, we want to define our outcome of the decision table, which is
the number of approvals needed for the travel request according to the
input values we have. For this click on the grey New Output header to
define our output value:
Now we have defined our input and output values. The next step is to add some rules for the decision table, playing with the input values:

It is a good practice for a first-hit policy table to add the last row without any conditions on the input values to ensure the table always produces an outcome.
In our example, we defined some rules (rows) according to the estimated costs and transportation; we did not take the accommodation into account. Of course, you can adapt the rules to your needs.
Make sure you save the decision table and then return to our process.
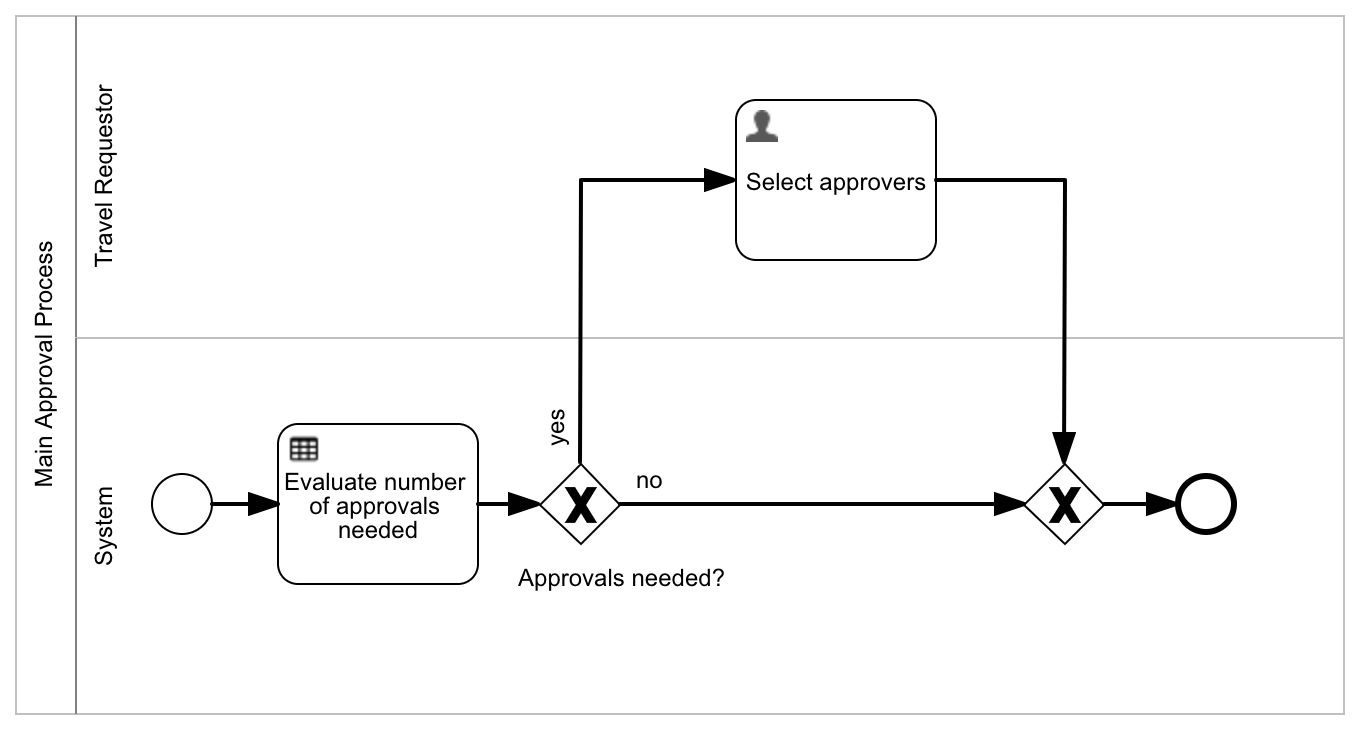
Now we want to make use of our outcome, so select the first gateway and name it Approvals needed? and place the label on top of the gateway.
Making more space
If you need more space between existing elements, select the Make space
tool in the toolbar and drag the elements away from each other to make more
space or towards each other to reduce the space between elements. Manipulating
the amount of space works
both horizontally and vertically (see the selected icon in the image below,
it must be activated to make use of the spacing tool):
Now select the first outgoing flow leading to the User task, name it yes,
set the Details>Condition type to Conditional flow and
enter ${approvalsNeeded > 0} as the Details>Condition expression.
The engine evaluates that condition and if
true (in our case, if the decision tables outcome was more than 0), it
follows that path.
Now select the other outgoing flow, name it no and check the
Details>Default flow checkbox. It is a good practice to always have one outgoing
flow set as the default. As an alternative, we also could make it a conditional
flow and set its condition to ${approvalsNeeded == 0}.
We also want to move the Select approvers user task to the Travel Requestor
lane. You can drag and drop it from one lane to the other. You can then
also rearrange the sequence flows and labels to get the process looking nice:
Modify the Task Form to Select Multiple Approvers
As there can be more than one approver, we need to modify the approver
selection task form. For this first select the Select approvers user task in our process,
then the Details>Form reference property and choose "Reference", as we already
have such a task form available, we need to modify it.
Select the Select Approver Task Form and then click on the form
link to open it.
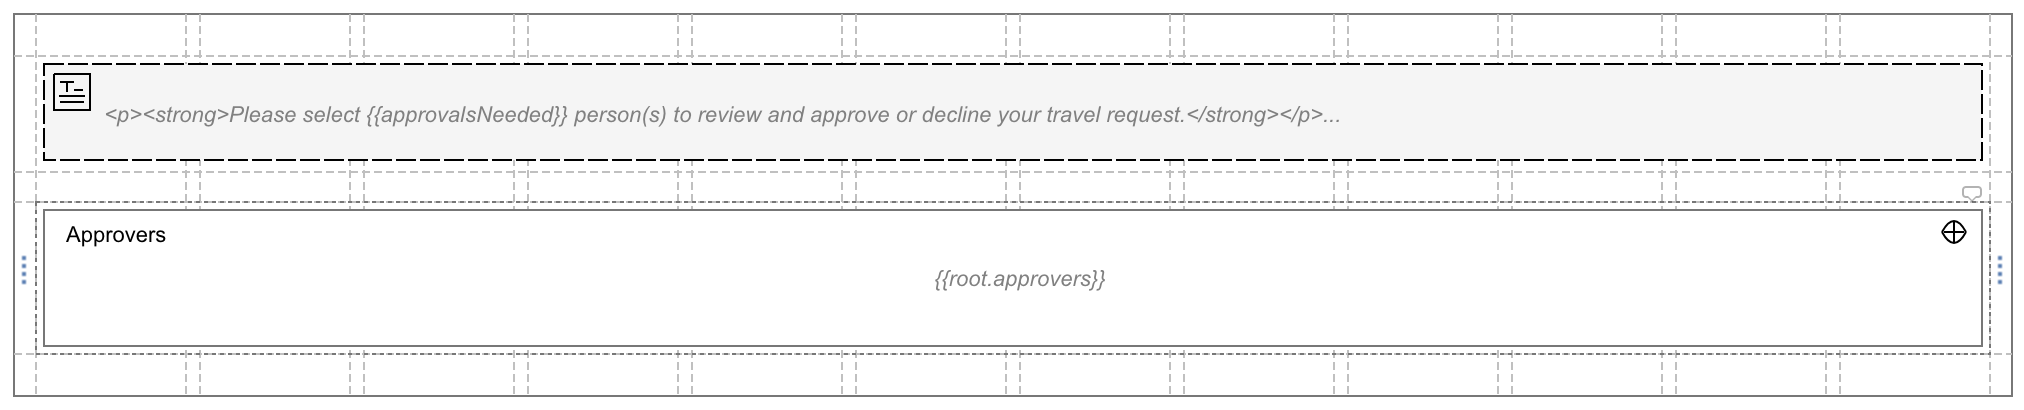
Double click the first text element and set its content to something similar to this:
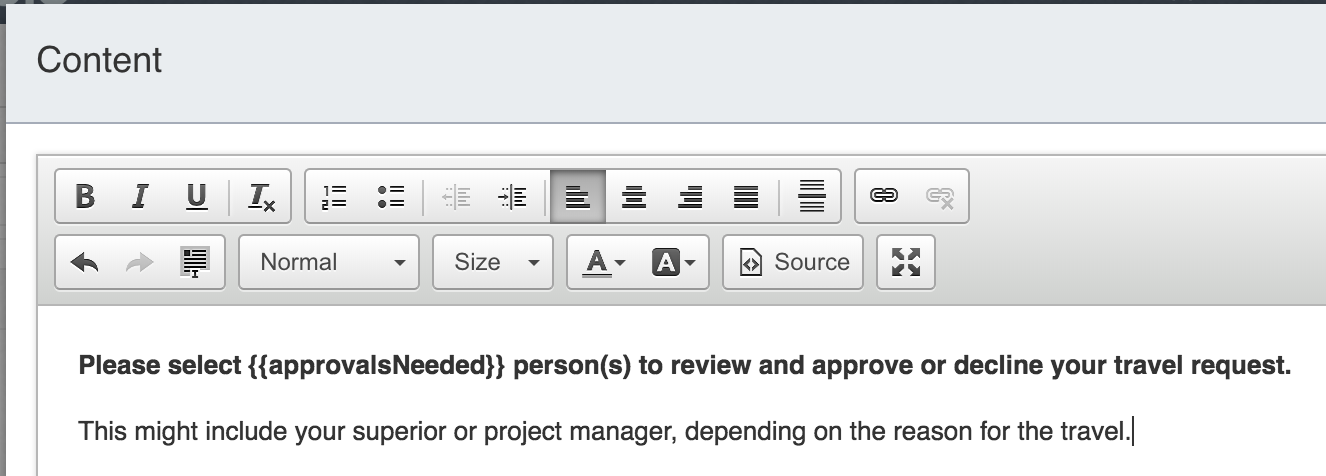
Please select {{approvalsNeeded}} person(s) to review and approve or decline your travel request.

This might be your superior or propject manager, depending on the reason for the travel.
We use the number of approvals needed from the output of our decision table as an expression.
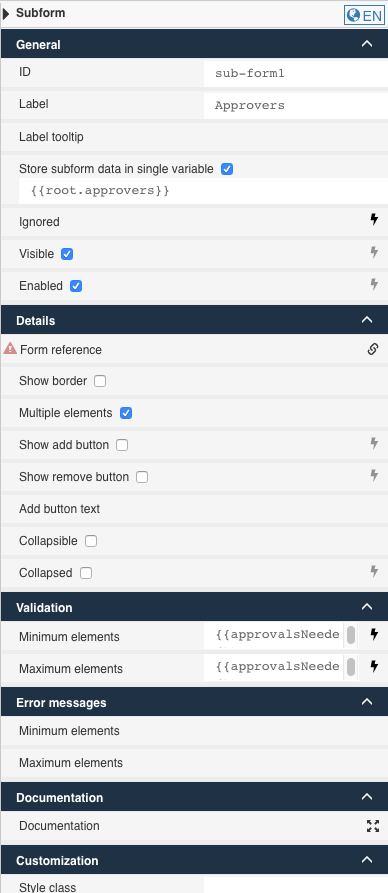
In our old selection task form, we just had one selection element where we selected one person as the approver. Now we might need more than one. The multi-entry subform now comes in handy for this.
So let us add a Container>Subform at the bottom of the form and
name it Approvers.
Check the Details>Multiple elements attribute, and two new properties
show up to enter the number of minimum and maximum elements for the subform.
We have that information as an output of our decision table, so use that
information by clicking the small "lightning" icon on the right and then
enter {{approvalsNeeded}} for both the Validation>Minimum elements
and Validation>Maximum elements.
As we want the user to enter exactly that amount of elements in the subform.
We do not need to add or remove elements, so uncheck the
Details>Show remove button and Details>Show add button.
We want to store the selected approvers and their approving result directly
on the case itself to be able to show the current state, even if the process
is not finished, so set the General>Store subform data in single variable
expression to {{root.approvers}} to save the subform data directly
on the case, rather than the process (which is the default). The properties
of the subform should look now like this:
Next, we need an actual subform, so select the Details>Form reference property,
enter Select Travel Request Approver Subform as its name, hit Tab and
then Enter to create a new subform. This new subform is used within that
list of elements of our root subform component. Each element, depending
on the number of approvers we need, renders that exact form.
Go back to the Select Approver Task Form where we added the subform widget and select
the Select approver component, then either hit command-X to delete it
(or use the scissor icon in the toolbar) as we want it moved to the subform.
Go to the subform by clicking the Details>Form reference property link
and paste the element from the clipboard onto the empty form.
The Select Approver Task Form now looks something like this:
and the Select Travel Request Approver Subform like this:

The final step is to define the input variables needed for our process.
Go back to the case model, select the Travel request approval process, and
click the Details>In property to open the in variable mapping for the process,
and enter this data there:

Now save everything (the best way is with the save-all toolbar icon), and we are ready for another test spin, at least to test the decision table output and the approver selection. Of course, we need to adapt the case again later, however, let us deploy and test in between nonetheless.
Deploy and Run the Travel Request Again
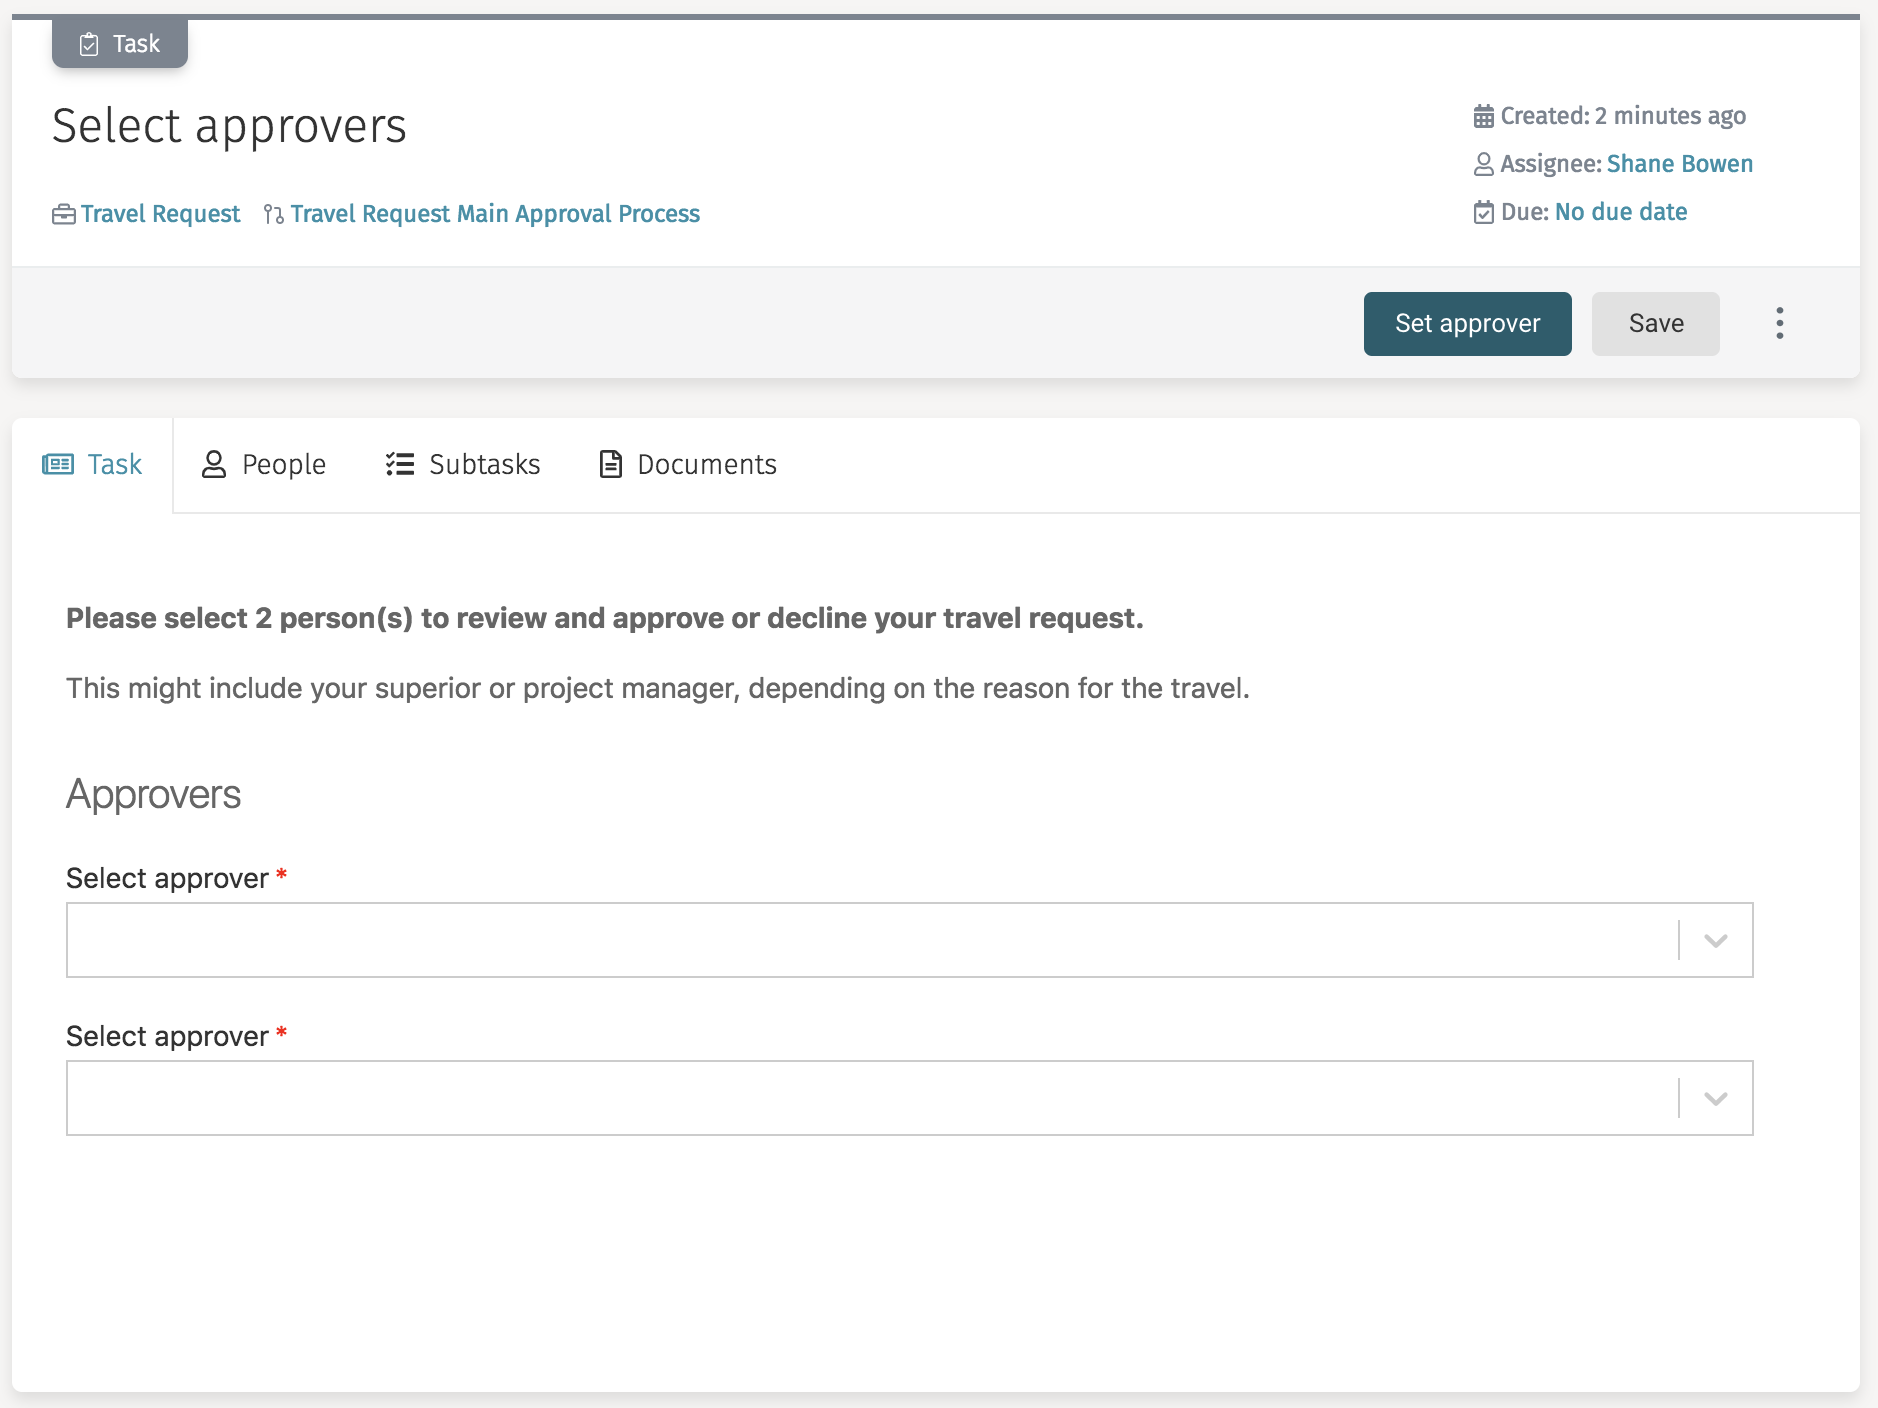
Publish the app again, switch to the runtime, and start a new travel request case.
Fill out the details and choose something larger than 1000 to make sure we
need two approvers to be selected. Then file the request, and you see a task
named Select approvers. Select it, and there should be two selections required
for approvers:
We want to see what the decision table outcome was as there is a
debug-view available at runtime. Select the Travel Request Main Approval Process in the header of the task to navigate to the process.
Next, select the "History" tab, and you can see the process diagram
with the Select approvers as the current state. Now navigate to
the sub-tab "Decisions" and the evaluated decision table is visible
with the data we entered in the travel request:
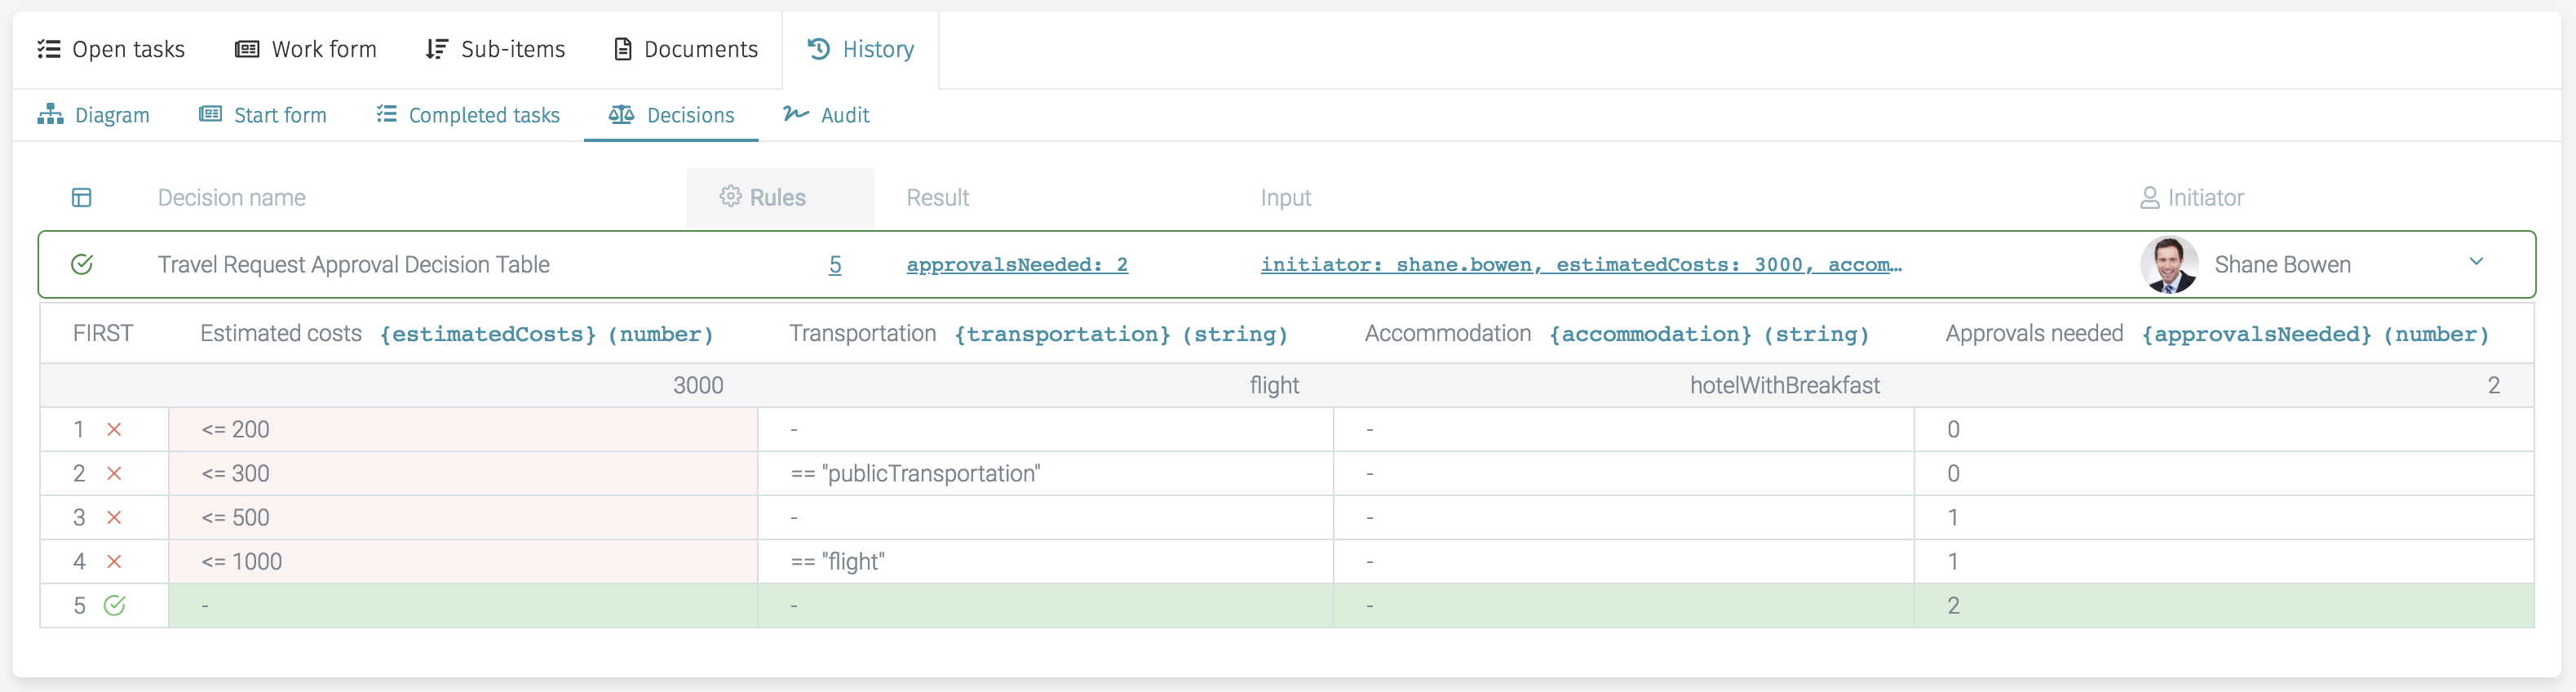
During modeling, this is very helpful, especially if the table does not produce the expected output. In this view, you can see how the rules are evaluated and which one was a hit or matched.
Chapter 9: Add a Multi-instance Call Activity for Approvals
In this chapter, we want to use the collection of selected approvers to repeat the approval sub-process for each of the selected approvers.
Add a Multi-instance Call Activity
Go back to our Travel Request Main Approval Process and make sure there is
some space between the User task and the gateway. See the discussion
in the last chapter for a review of the process of adding space in the diagram.
Add a Structural>Call activity by dragging and dropping it directly
onto the sequence flow between the User task and the second (joining) gateway and name it
Approval subprocesses. Select the Details>Process reference property and
use the tab "Reference" and select the Travel Request Approval Process
(the one from the first part we previously created).
Of course, we need to adapt that sub-process, but let us first set up the call activity to be multi-instance.
For this, go to the property Multi instance>Multi instance type
and set it to Parallel, which means, we start a new
sub-process instance in parallel for each of the selected approvers. We
could also choose Sequential, which would start them one after the other.
The Multi instance>Element index variable is predefined as loopCounter,
which is fine
and allows us to use it as the index counting for each of the sub-process
instances (starting with 0). We need to define the collection to loop for,
so we set the property Multi instance>Collection to
${root.approvers}.
That variable was previously created through our multi-entry subform and
contains a list (collection) of the selected approver user ids.
More data is added for each element through that sub-process later on.
Let us also specify an element variable which we can then use within the
sub-process to access our specific element. So set Multi instance>Element variable
to approver for that. Next, add some values we need within the
sub-process as in-variables. Select the Details>In property and set
the following values:

Now let us adapt the approval sub-process to be ready for multi-instance approvals.
Select that process by clicking on the Travel Request Approval Process
link on the Details>Process reference property of the call activity.
First, we remove (delete) the first user task (Select approver for travel request) where we previously
selected the approver as this is now done in the main process.
We also move the Start event into the second lane of the Travel approver and
later remove the travel requestor lane entirely, as we do not need it anymore.
If we add a feedback or adjusting loop between the approver and requestor
at some point, then it would make sense again to have that lane.
We also change the expression used for the assignee of the approval
user task which is just ${approverId} in our previous version,
but now needs the value of our local loop element variable.
Select the Approve travel request user task, go to the
Assignment>Assignee property and set
it to ${approver.approverId}. This uses the approver id variable
of the local element data we have on the sub-process scope.
Adapt Approver Task Form
Once done, let us adapt the approver task form, so select the user task,
then click on the Approve Travel Request Task Form link to open that task form.
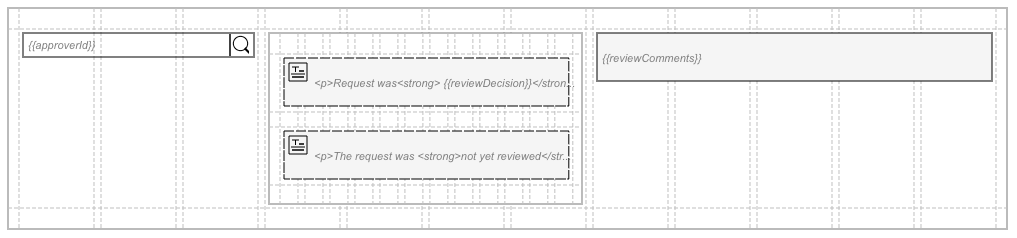
We need to change the binding of the review comments as it is added to each approver within our collection.
So select the Review comments input field and set its General>Value to
{{root.approvers[loopCounter].reviewComments}}. Remember: we have our
approver collection on the case level; hence, we need root to resolve it.
Then we set that review comment at the index of our multi-instance loop counter.
That is why we use the loopCounter as the index within the collection.
Lastly, we use the dot-notation and add a new field named reviewComments
to that collection. Now each comment is found at the same index as the
approver user id.
In the first version, we used the outcomes to approve or decline. Let us change
this also to see alternative outcomes. First, remove the outcomes by
clicking the Details>Outcomes and
then remove the two outcomes that are currently there.
Now drag and drop a Selection>Radio button component between the text display and the
comment field and name it Review decision. Of course, we want that review
decision stored in our approvers' collection as well, so set the General>Value of
the radio buttons to {{root.approvers[loopCounter].reviewDecision}}.
Now make the component required by selecting Validation>Required and
set its Details>Orientation property to Horizontal.
Click the Data source>Items property and add the following values to it:

We want the required option of the review comment to depend on the decision,
so click the lightning icon of the Validation>Required property and set its expression
to {{root.approvers[loopCounter].reviewDecision == 'declined'}}.
This expression means that whenever we select the declined option, the comment
field is mandatory; otherwise, it is optional.
Save the form and go back to the sub-process as we need to deal with the decision of the task (approve or decline).
Collect the Approval Result from Each Approver
Each approval user task produces a decision according to the approver’s selection
whether to approve or decline the travel request, which is stored back at
the same index within the approvers' collection. We want to add it to
the parent process level and combining it with all the other approval results.
To do that, add an Flowable Work Activities>Initialize variables
service task after the Approve travel request user task. Label the new task,
Set approval result and make sure Details>Overwrite if existing is checked
and add one variable initialization to the Details>Init variables property:
${parent.approval && flwJsonUtils.getAtIndex(root.approvers, loopCounter).reviewDecision == 'approved'}

We use parent as the target because we want to set that approval
variable on our parent main process instance. As the variable value,
we use an expression, where we use the currently set decision value
and combine it with the outcome of the local selection.
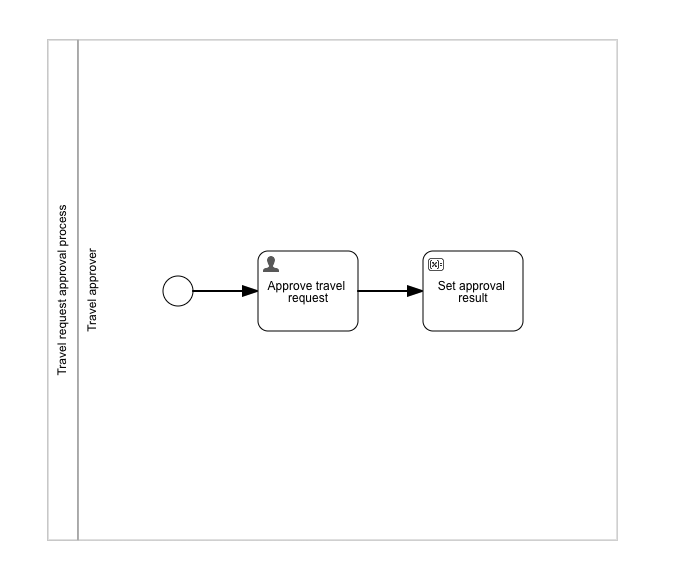
The Travel Request Approval Process now looks something like this:
Now the first part of the expression, parent.approval is a variable that
is not initialized the first time, so we need to make sure it exists and
is set to true, otherwise, we would never be able to approve the case.
So go back to the main travel request case model and select the
Travel request approval process task and open the Details>In variable mapping
and add initialization of our approval variable on the main process
instance level:

With the expression ${true}, we create a Boolean true value to
initialize the approval variable.
Now for the Details>Out mappings (what comes back from the process and is
saved on case level), we remove all the previous mappings and
only add approval to the list:

This means we store the final approval variable value from our main process
back to the case, once all approval sub-processes are finished. We
then have the final approval flag (true or false) back on the case and
all the detailed results in our approvers collection.
As our result now is a Boolean value, we need to adapt the entry sentry
expression (condition) on the entry criterion of our last stage. So select
the entry criterion and set the Details>Condition to
${vars:getOrDefault('approval',false)} to create a Boolean variable value
(from a string based in our first version of the approval process).
Improve the Case Overview Form
As we no longer have a single approver, let us modify the case overview (work) form by adding a multi-entry subform with an overview of the approvals.
Go back to the case model and open the work form (Travel Request Work Form).
Delete the two existing
text display components at the top of the form representing the approval review.
Add a Container>Subform component at the top of the form and name it
Approval overview.
Then set the value binding of General>Store subform data in single variable
to {{approvers}}. Also check the property
Details:>Multiple elements as we want to have more than one subform rendered,
as the variable approvers is representing a collection, not a single value.
Turn off the Details>Show add button and the Details>Show remove button
by unchecking each attribute.
We also need the form to be read-only, so uncheck the
General>Enabled property as well. Furthermore, we only want to show the form,
if the approvers are initialized, so use the lightning icon on the
General>Ignored property and set the expression to
{{!(approvers[0].approverId)}}.
The approvers[0].approverId part is only true, once we have at least one
approver set in the collection of approvers.
Now select the Details>Form reference property, set the name for the new
subform to Travel Request Approval Overview Subform, hit Tab and then
Enter to create a new subform for our overview list.
We want to put the selected approver, the decision, and comments in the form.
The easiest way is to go back to the approver selection
form we did for the Select approvers task or just by opening the
Select Travel Request Approver Subform. Select and copy that
Select approver widget and go back to our newly created subform
and paste it to the form. Remove its label and make it not required as we do not
need it here.
Add a new Data entry>Multiline text component, and do not set a label as it
is not needed, but set its General>Value property to {{reviewComments}}.
As the goal is to either display a text saying the review is not yet done
or as an alternative, show the review result, add a Container>Panel component on
the same row, in between the approver selection widget and the comment widget.
Make the selection widget use 3 columns in width, the panel use 4
columns, and the comment use 5 columns.
Now drop a Display>Text display widget onto the panel and set the content to
Request was {{reviewDecision}}.. You can even mark the expression and make
it bold for highlighting the decision result. The widget is shown once the
decision is made, so set the General>Ignored property to {{!reviewDecision}}.
Now drop another Display>Text display in the panel below the existing one and
set its content to The request was not yet reviewed and decided..
This widget is visible if the review is not yet completed, so set the
General>Ignored property to {{reviewDecision}}.
That subform now looks similar to this:
Save the subform and go back to its parent form. Drag and drop a
Display>Text display below the subform and set its content to something like:
The travel request review and approval was not yet started. So there is no approval result available yet.
Set the General>Ignored property to {{approvers[0].approverId}} so it is only
shown if there is no approver set.
Now save everything, and we should be ready for another test.
Deploy and Run the Travel Request Again
Publish the app again, switch to the runtime view, and start a new travel request case as before. Make sure the estimated costs are greater than 1000, so the outcome requires two approvers and then file the case for approval.
After selecting the two approvers and completing that task, you should now see two approval tasks in the list of open tasks of our case:
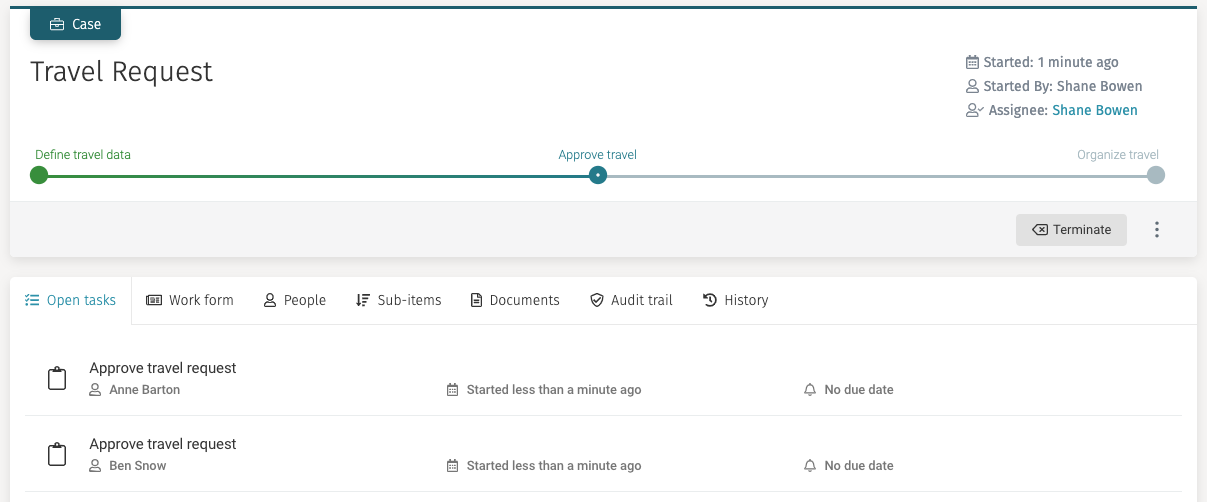
They are assigned to the approvers you selected in the previous task and are created in parallel.
Of course, you cannot complete those tasks as the travel requestor, so log in with each of the selected approvers, go to their task inbox, select the approval task and make a decision (works like before). When both users approve the task, then the travel request is approved. If either one declines the request, then the case is declined.
If you approved with both approvers, you can go back to the case and
see the Organize travel task like before.