Model a Simple Process
This is an old version of the documentation for Flowable until version 3.13 and for the Angular-based Flowable Design 3.14/3.15. If you are running the latest version of Flowable please check out the current version of this page.
Chapter 1: Create a Basic Process Model, App and Deploy
Create the Process
In Flowable Design, go to the Processes section and select the
Create process button.
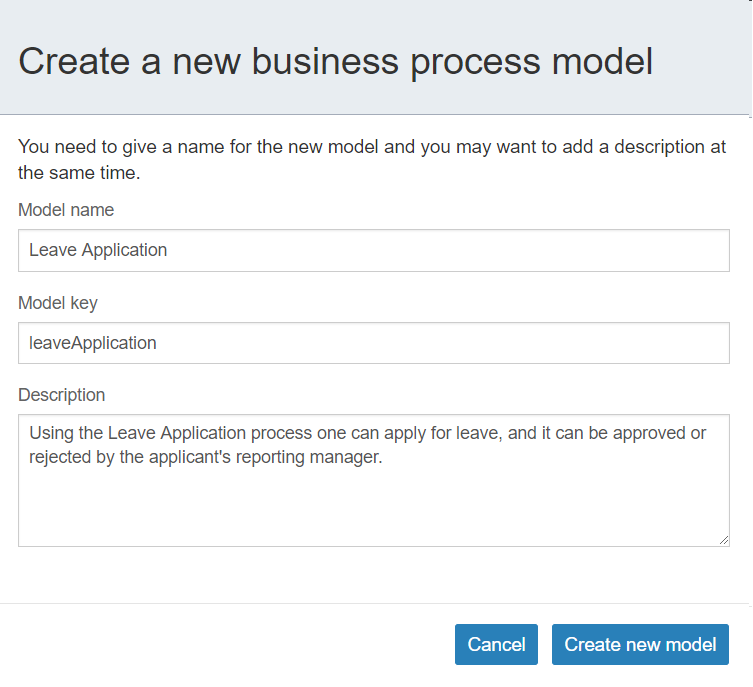
In the dialog, name the process model "Leave Application",
set the key to leaveApplication
and optionally add a meaningful description of the process model.
Once created, the process editor opens, and we can start defining our Leave Application process.
Add Pool, Lanes and User Tasks
By default there is a Start event, so we could go ahead and directly start
defining the process, however, it is always a good practice to use pool
and lanes to define the roles involved in a process. So delete that Start event
and then drag and drop a Swimlanes>Pool/Lane element onto the process canvas.
We can name that pool the same as the process Leave application process.
By default, one lane is defined, so double-click its label and name it
Employee. Add another lane by dragging and dropping a
"Pool/Lane" element again below the existing lane (drop it once you
see that green box below the existing lane). Name that lane Supervisor.
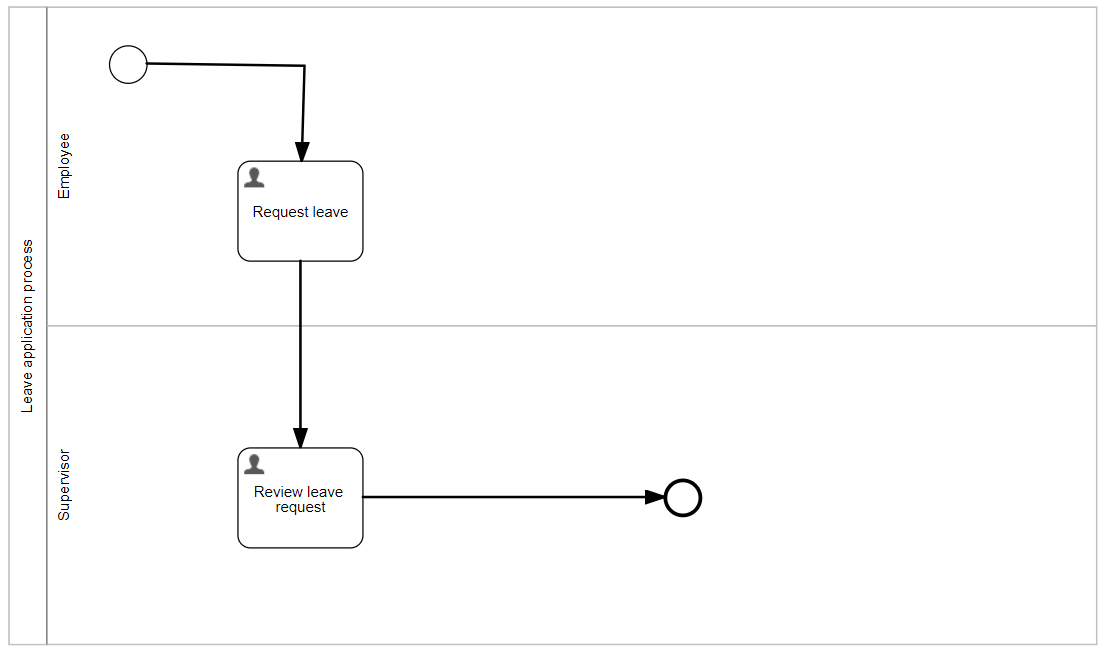
Drag and drop a Start events>Start event to the Employee lane
where we want to start
the process, then click the small User task icon on the right of the Start
event to directly add a User task. Name the task, Request leave. Now,
click the small user task icon on the right of this User task to
directly add another User task and drag it into the Reporting Manager lane.
Name it Review leave request. Click the End event icon on the
right of this user task to directly add the End event to the same lane.
The diagram now looks like the following:
Create Leave Application App and Publish it
To deploy our process model, we need to include it in an App that we can then use as a deployment unit. An App is a container of all the items related to a specific process and in this example, all the content related to the process model we are building.
Save the process model, and go to the Apps section of
Flowable Design and select the Create app button.
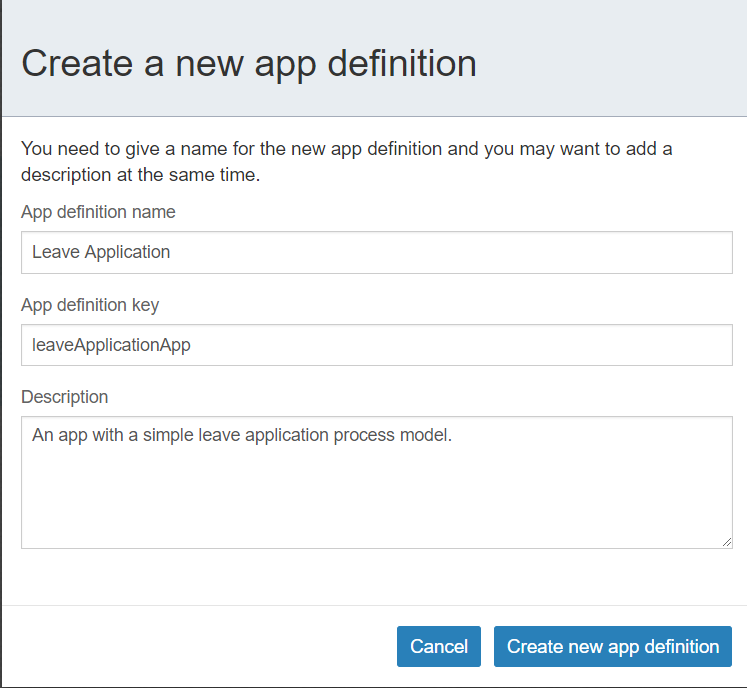
Set the app definition name to Leave Application, the key to leaveApplicationApp and optionally add a meaningful description of what the app contains.
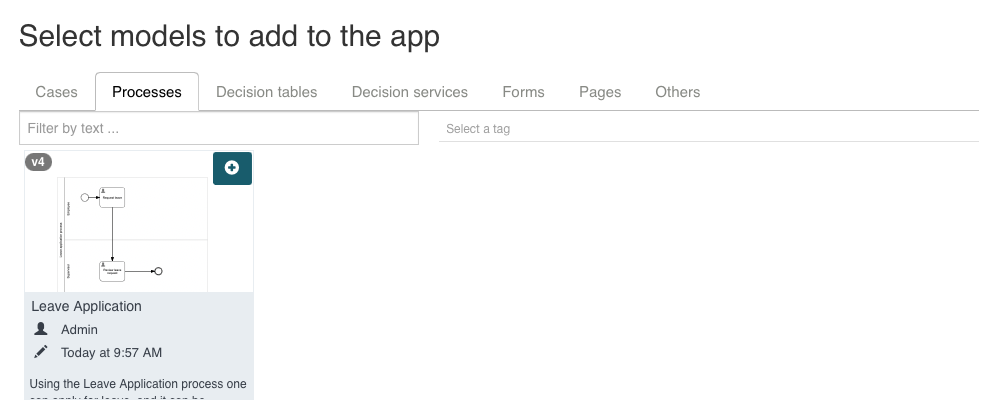
Once created, you are in the app editor. Select the Add model
button to Include an existing model into the app and the
Select models to add to the app dialog will open.
In the Processes tab, click our newly created process model: "Leave Application".
That is it. Now you can Close the dialog, click the Save button.
Now you can click on the Publish button. To successfully publish the app requires that
Flowable Design is configured to publish (deploy)
to your local runtime environment or wherever you want to run and test your app.
First Run of the Leave Application Process
Now that we have published the very first and basic version of our app let us run it and create the first process instance.
Go to the Flowable Work runtime, log in, and select Work>Create new
item in the left-hand side menu.
Choose our "Leave Application"
in the dialog and confirm the creation of a new process instance.
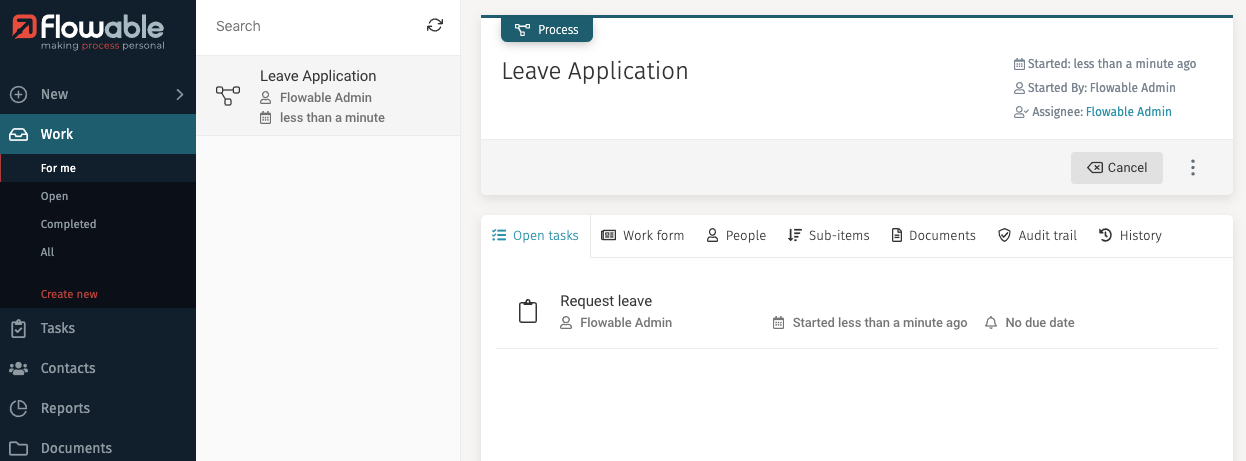
You should now see your first process instance in the inbox and
the process details. The Open tasks list already contains the
Request leave user task.
Although this task does not have a
task form attached to it as of now, it can still be completed.
Select the Tasks item and then the Complete. On completion, the next user task, Review leave, is displayed in the Tasks>Open` tasks list, and this can also be completed.
As we did not link any forms to these user tasks, there was nothing to be entered for these tasks. However, do not worry; we are going to change that behavior in the next chapter.
Chapter 2: Add Task Forms
In this chapter, we are going to add and link forms to the user
tasks in our Leave Application process model, so that we can add
and display some leave relevant data of the process.
Add "Request Leave Form"
Go back to Flowable Design and the Process editor view,
select the Request leave User task element
and click the link icon below it, otherwise, select Details>Form reference>New
in the attributes panel on the right. For Name, enter
Request Leave Form, hit Tab (which autofills the Key automatically with requestLeaveForm)
then hit Enter or click Create to create a new task form.
The form editor opens, and we can start defining the Request Leave Form.
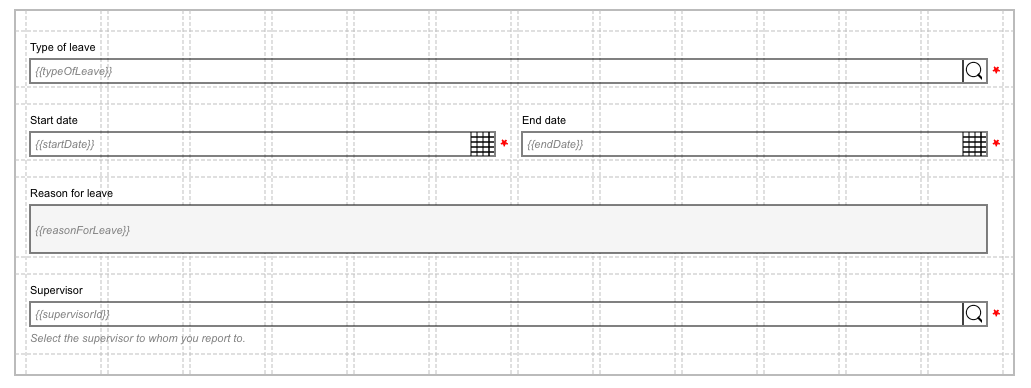
Drag and drop a Selection>Select (single) field to the form canvas and give
it a label Type of leave and hit Enter.
Adding the field automatically creates a value binding (variable name),
"typeOfLeave". Click on the Data source>Items for this field,
which opens a window with
a data table with "Value" and "Text" columns. Add a
few items for all the types of leaves that are typically allowed,
like Casual Leave with value casual, Medical Leave
with value medical, and Mergency Leave with value emergency.
Select the Ok button to save the entries.
As we want the requesting user to select a leave type, either click the
red star to make it mandatory or check the Validation>Required attribute in the
attribute section for this field.

Next, we add two Data entry>Date fields to enter the start and end dates, name the
fields Start date and End date. We make the dates mandatory,
and we want to add a validation only to be able to enter a start date in
the future. Select the Validation>Minimum date attribute and choose "Relative"
to define a date relative to the current day.
Let us choose 0, so we could even create a leave request for the same day.
For the End date field, we also choose the Validation>Minimum date
and this time, select "Expression" where we enter the binding (a value expression)
of the start date field as the end date cannot be before the start date.
Enter {{startDate}} into the expression field which means the minimal
date entered in the end date picker cannot be before the date selected
in the start date picker, represented by that value expression.
Next, drag and drop a Data entry>Multiline text field to the form canvas,
name its label Reason for leave and hit Enter.
This action creates a value binding (variable name),
named "reasonForLeave". This field is an optional
entry field allowing the user to provide the reason for going on leave.
Next, drag and drop a Selection>Person field to the form canvas,
name its label Supervisor and hit Enter.
This action creates a value binding (variable name), named "supervisor".
Change General>Value to "supervisorId", since it stores the id of the supervisor
who is responsible for reviewing the Leave request.
Add a suitable description in General>Description, such as
Select the supervisor to whom you report to.
As we want the requesting user to select his supervisor, either click the
red star to make it mandatory or check the Validation>Required attribute in the
attributes section for this field.
The form should look similar to this:
We also want to modify the Submit button, so let us define the outcomes
section of the form by selecting the Details>Outcomes attribute on the form
(you may have to first click outside the form canvas to see
its global attributes). Open the outcomes dialog and enter one
row/item with Label Create leave request and Value create
to specify our submit button for the Request leave:

Now, select Ok to save the outcomes.
Save the form and go back to the process model. We have now defined a form to enter the data to place a leave request.
Add "Review leave request" Task Form
Go back to the Process Editor view for the Leave Application and select
the Review leave request User task element
then click to the link icon below it or to select Details>Form reference>New
in the attributes' panel on the right. Enter for Name
Review Leave Request Form, hit Tab (which autofills the Key automatically with reviewLeaveRequestForm)
then hit Enter or click Create to create a new task form.
The form editor opens, and we can start defining the Review Leave Request Form.
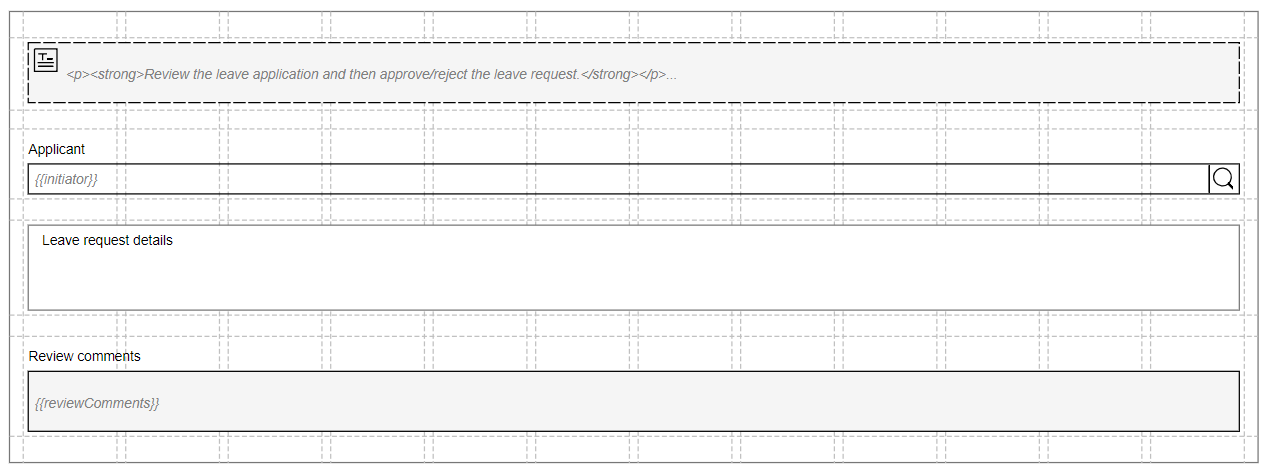
Add a new Display>Text display component to the form and add some content to
describe the task:

Next, drag and drop a Selection>Person field to the form canvas,
name its label Applicant and hit Enter and change the value
binding (variable name) to initiator, as this field
displays the name of the applicant who placed the leave request. The value binding
is found at General>Value in the attributes panel.
Since the applicant name should be read-only,
uncheck the General>Enabled attribute which makes this field non-editable.
Next, we want to display the same data as we enter on the
Request leave form, so let us add a subform and re-use
the Request leave form directly, but make it read-only.
Add a Container>Subform widget and
name it Leave request details. We want it to display the process data
directly, so no variable binding is needed.
Remove the check from the General>Store subform data in single variable
and leave it unchecked.
Select the attribute Details>Form reference and then Reference.
Start typing Request Leave Form (the form we created previously) and
select it when it appears. Within the current form,
we do not allow the leave data to change, so uncheck the
Details>Enabled attribute which makes the whole subform non-editable (not enabled).
Now add some review comments by adding a Data entry>Multiline text component
to the form and name it Review comments.
The Review Leave Request Form now looks like this:
Click outside the form canvas and select Details>Outcomes.
This time we add two options, Approve leave request with value
approved and Decline leave request with value declined.
As we want to make sure the approver
adds a comment when declining a leave request,
let us put an expression to that outcome. For that set the Field Enabled (Expression)
to {{!!reviewComments}}. Pay attention to the double negation
before the variable name, which is necessary
as you might enter some comments and then remove them later,
which makes the variable available once again, but empty.
Using the double negation means the expression is only true
if the variable is not only there but also contains text.

Again, select Ok to save the outcomes.
Save the form and return to the process model.
Now we have added forms to the user tasks in the process model.
Next, select the Review leave request User task and set
the Assignment>Assignee attribute to ${supervisorId}.
Save the process model.
We now deploy again and run the Leave Application process
in the next chapter.
Chapter 3: Run the Leave Application Process
We can deploy directly from within the process editor, so click the
Cloud icon to publish and select the Leave Application app.
Switch to the runtime tab with Flowable Work running. It is a good practice to use at least two tabs in the browser when modeling: one with Flowable Design and another one with Flowable Work or Engage where you can directly deploy to and run your models.
Click on Work>Create new and choose
our Leave Application model again. Next click on Tasks>Open and
you should now see our
"Request leave" form. Let us enter some leave
data, select a supervisor and hit the Create leave request button.
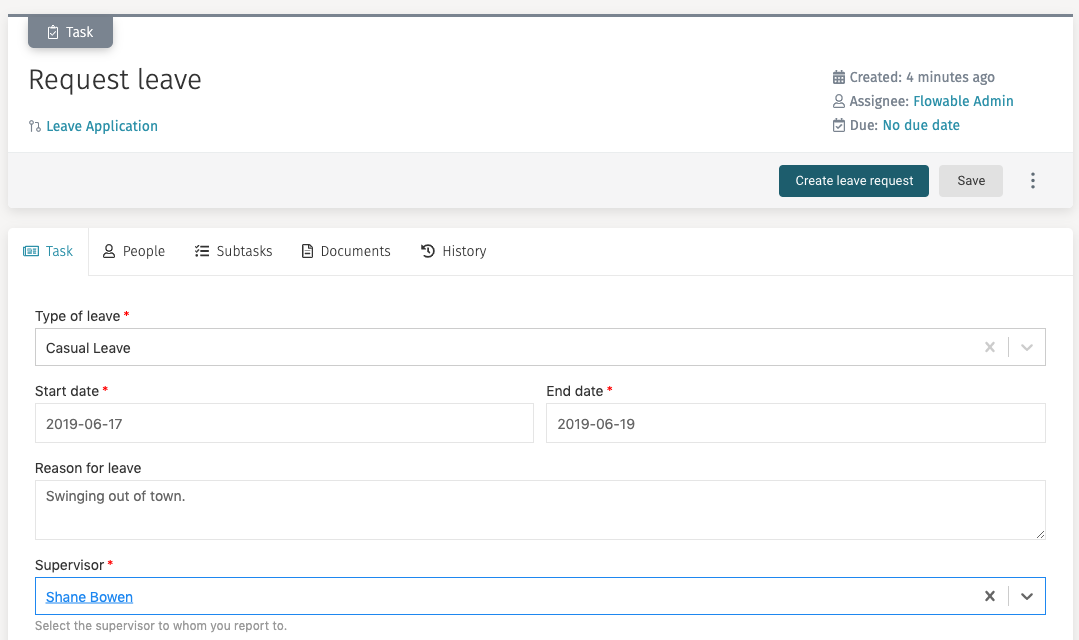
We now have our first leave request containing some structured data.
You can see that the Review leave request task is created and
assigned to the supervisor selected in the Request leave task form.
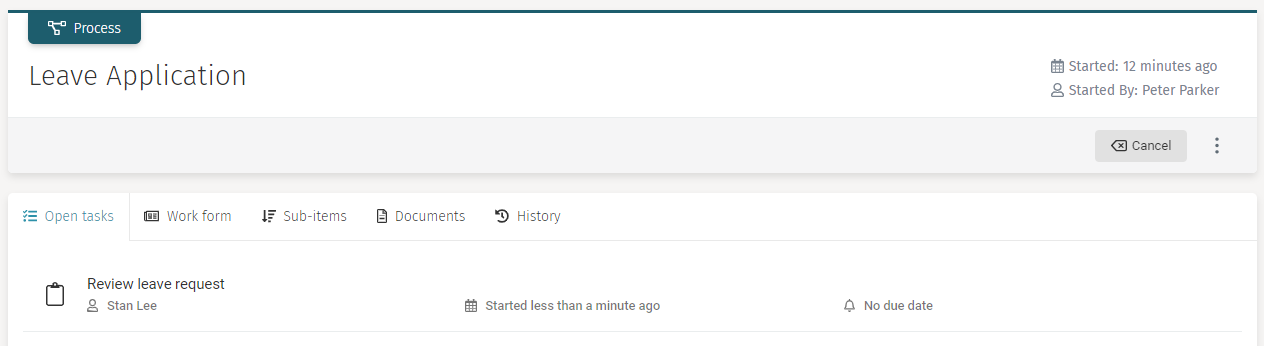
Now log out of Work and log in as the supervisor who is
assigned the review task. Go to Work>All
and click on Leave Application to see the Review leave request
task in the open tasks list. Click on it to view the task form.
Let us enter some comment in the Review comments field, so
the Decline leave request button is enabled.
Now the form would look something like this.
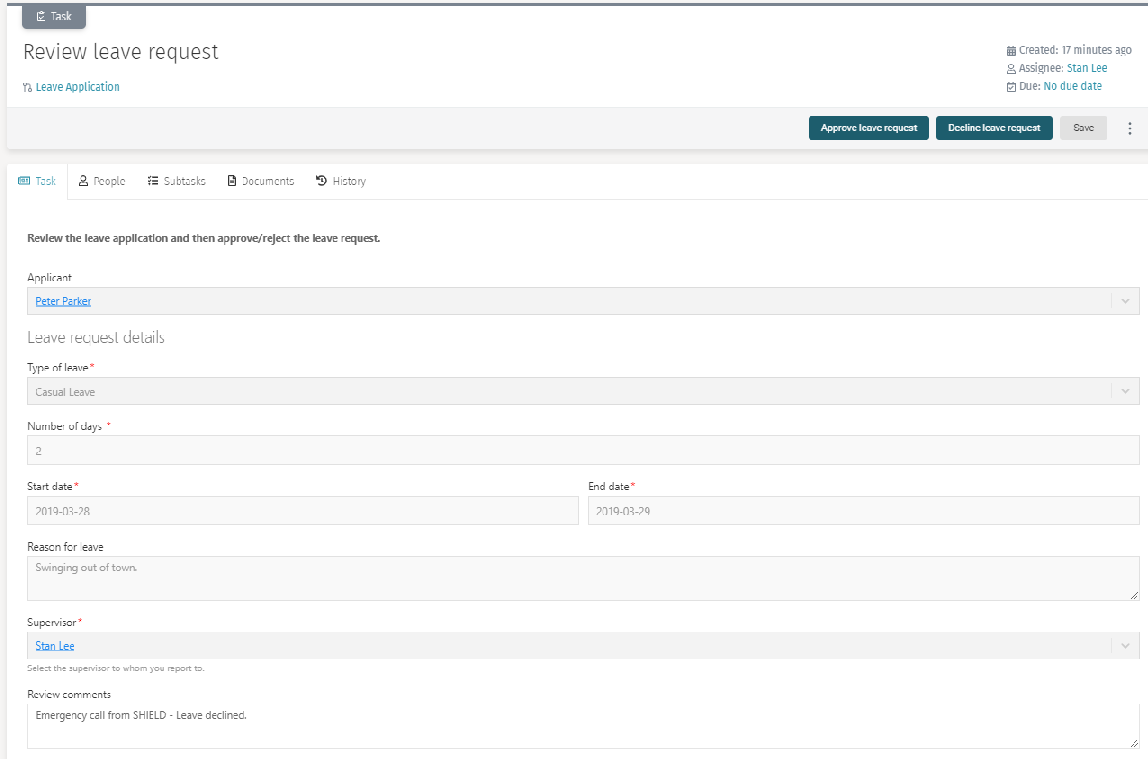
Next, hit either of the Approve leave request or the
Decline leave request buttons to complete the task.
We have now completed the designing, deploying, and running of a
simple Leave Application process in Flowable Design and Flowable
Work applications.