Create an AI Service
 Outdated documentation page
This is an old version of the documentation for Flowable 3.17. If you are running the latest version of Flowable please check out the agent models.
Introduction
In this How-To, we are going to create and use an AI-based service definition with several operations in a step-by-step way.
The use case we are exploring in this tutorial is from a financial institution, improving the handling of customer inquiries through email.
First, we examine the content within the email to detect the intent of the customer and if we have an intent we want to support automatically, we use
a second AI operation to extract structured data from that unstructured email content.
Overview AI service definition
To get an overview of the capabilities of the AI-based service definition, please read the AI Service Definition before starting with this step-by-step tutorial on how to build and use an example AI service.
Defining the AI service definition
We first start with building the service definition used to both detect the content and extract structured data from the provided content depending on the intent of the customer detected.
Adding the operation for intent recognition
Within Flowable Design and your example app, create a new service definition and choose Service type to be AI.
Add a new operation named Detect intent and add a new input parameter named customerMessage:
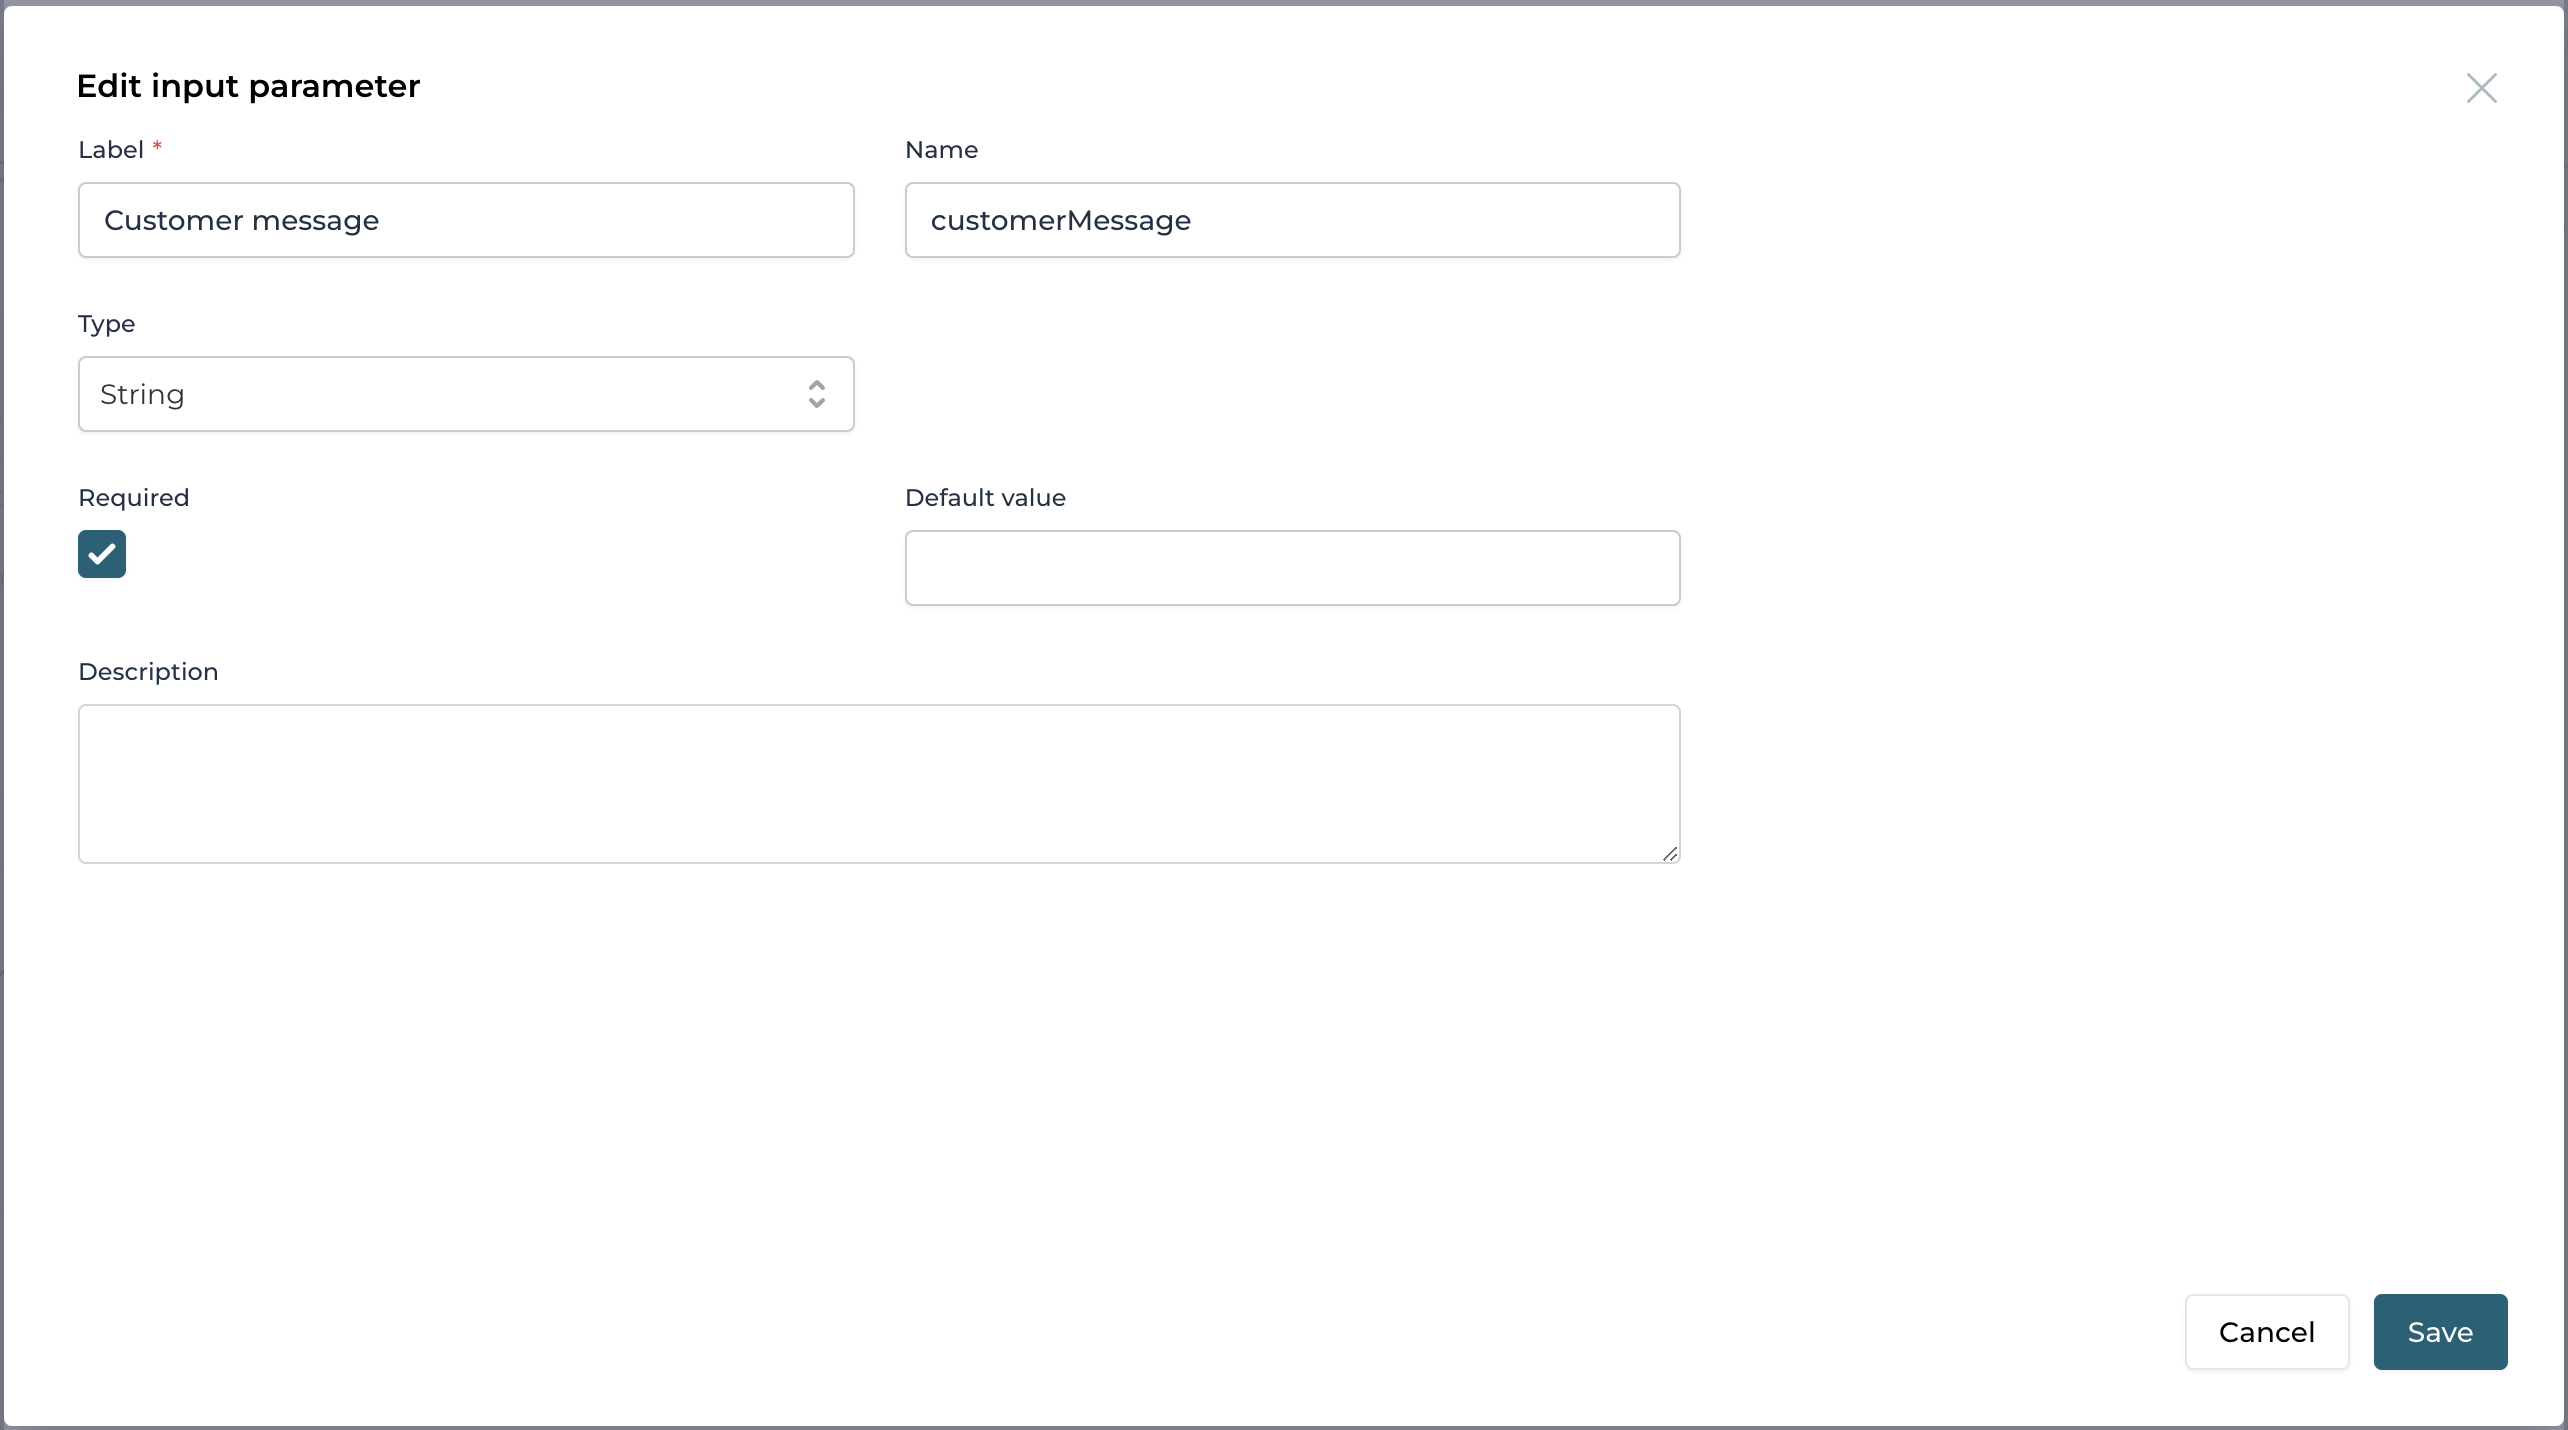
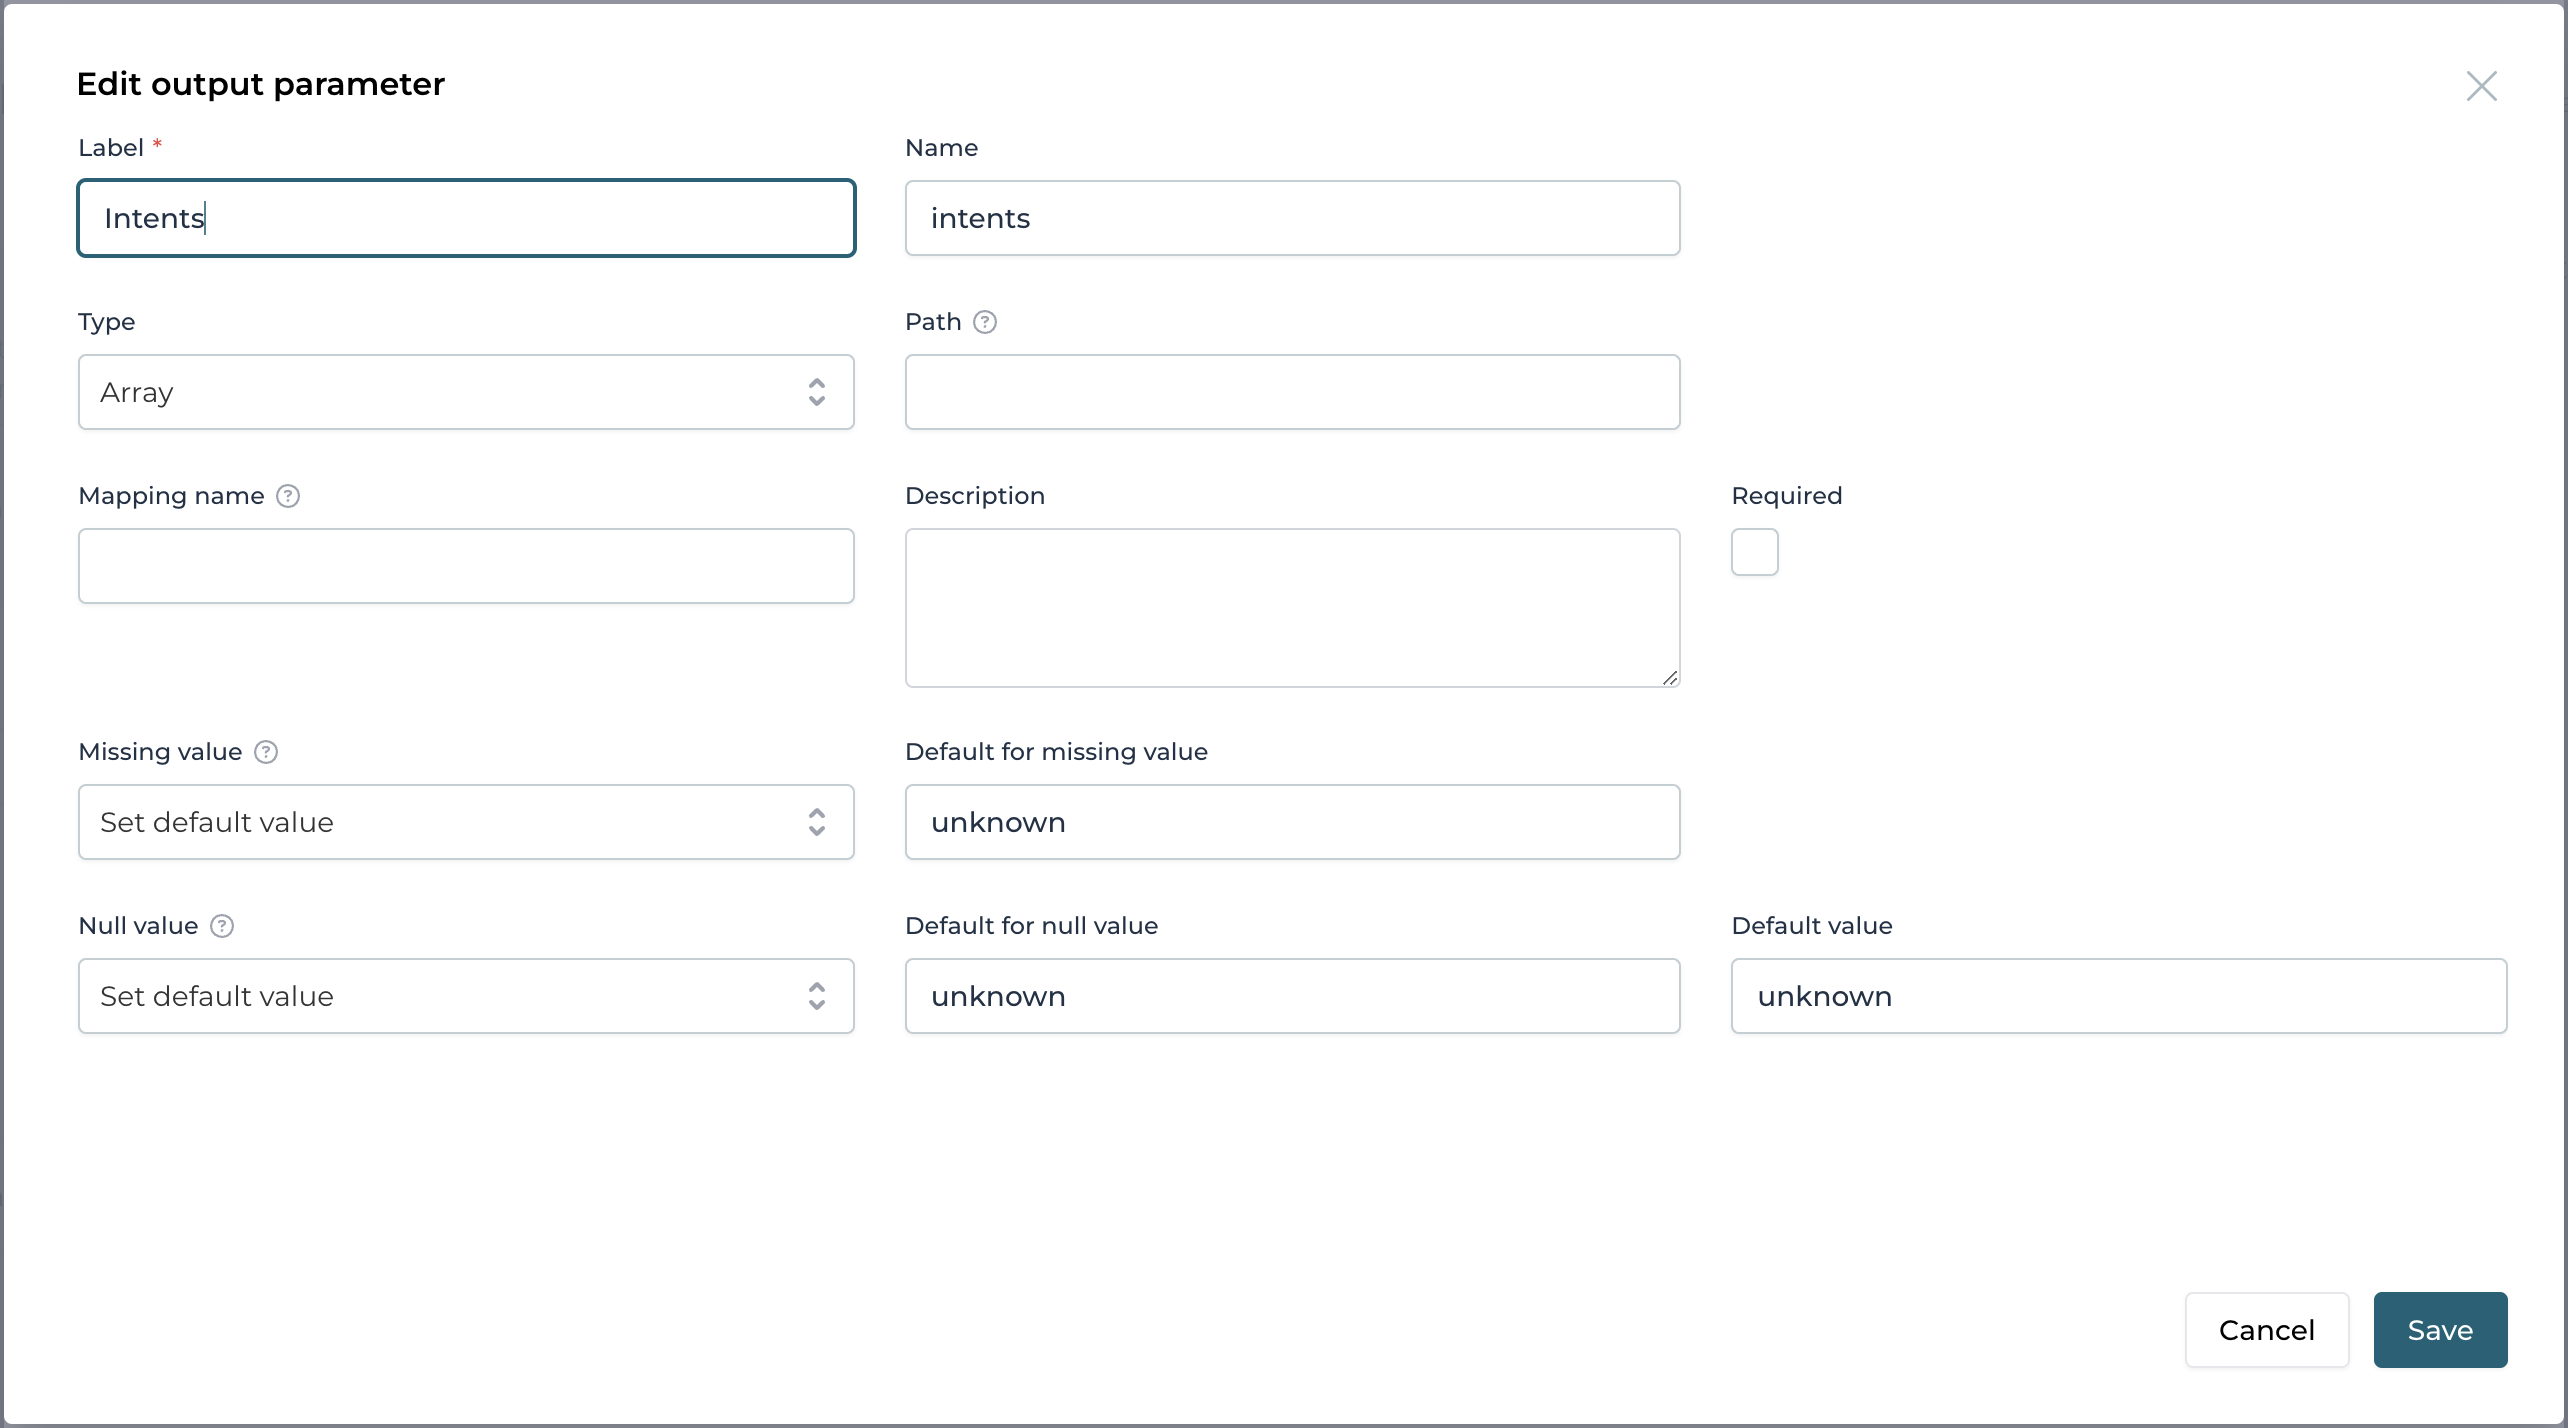
Further we need one output parameter where we get the intent(s).
As the content could have more than one intent (e.g. a customer sending in a payment instruction and in the same email also let the bank know that they
changed address), we choose Array as the type to be able to get more than one intent, if needed.
We also add some default values in the case, the output value is missing or null:
The most important piece is the prompt development, so let's start with something like this:
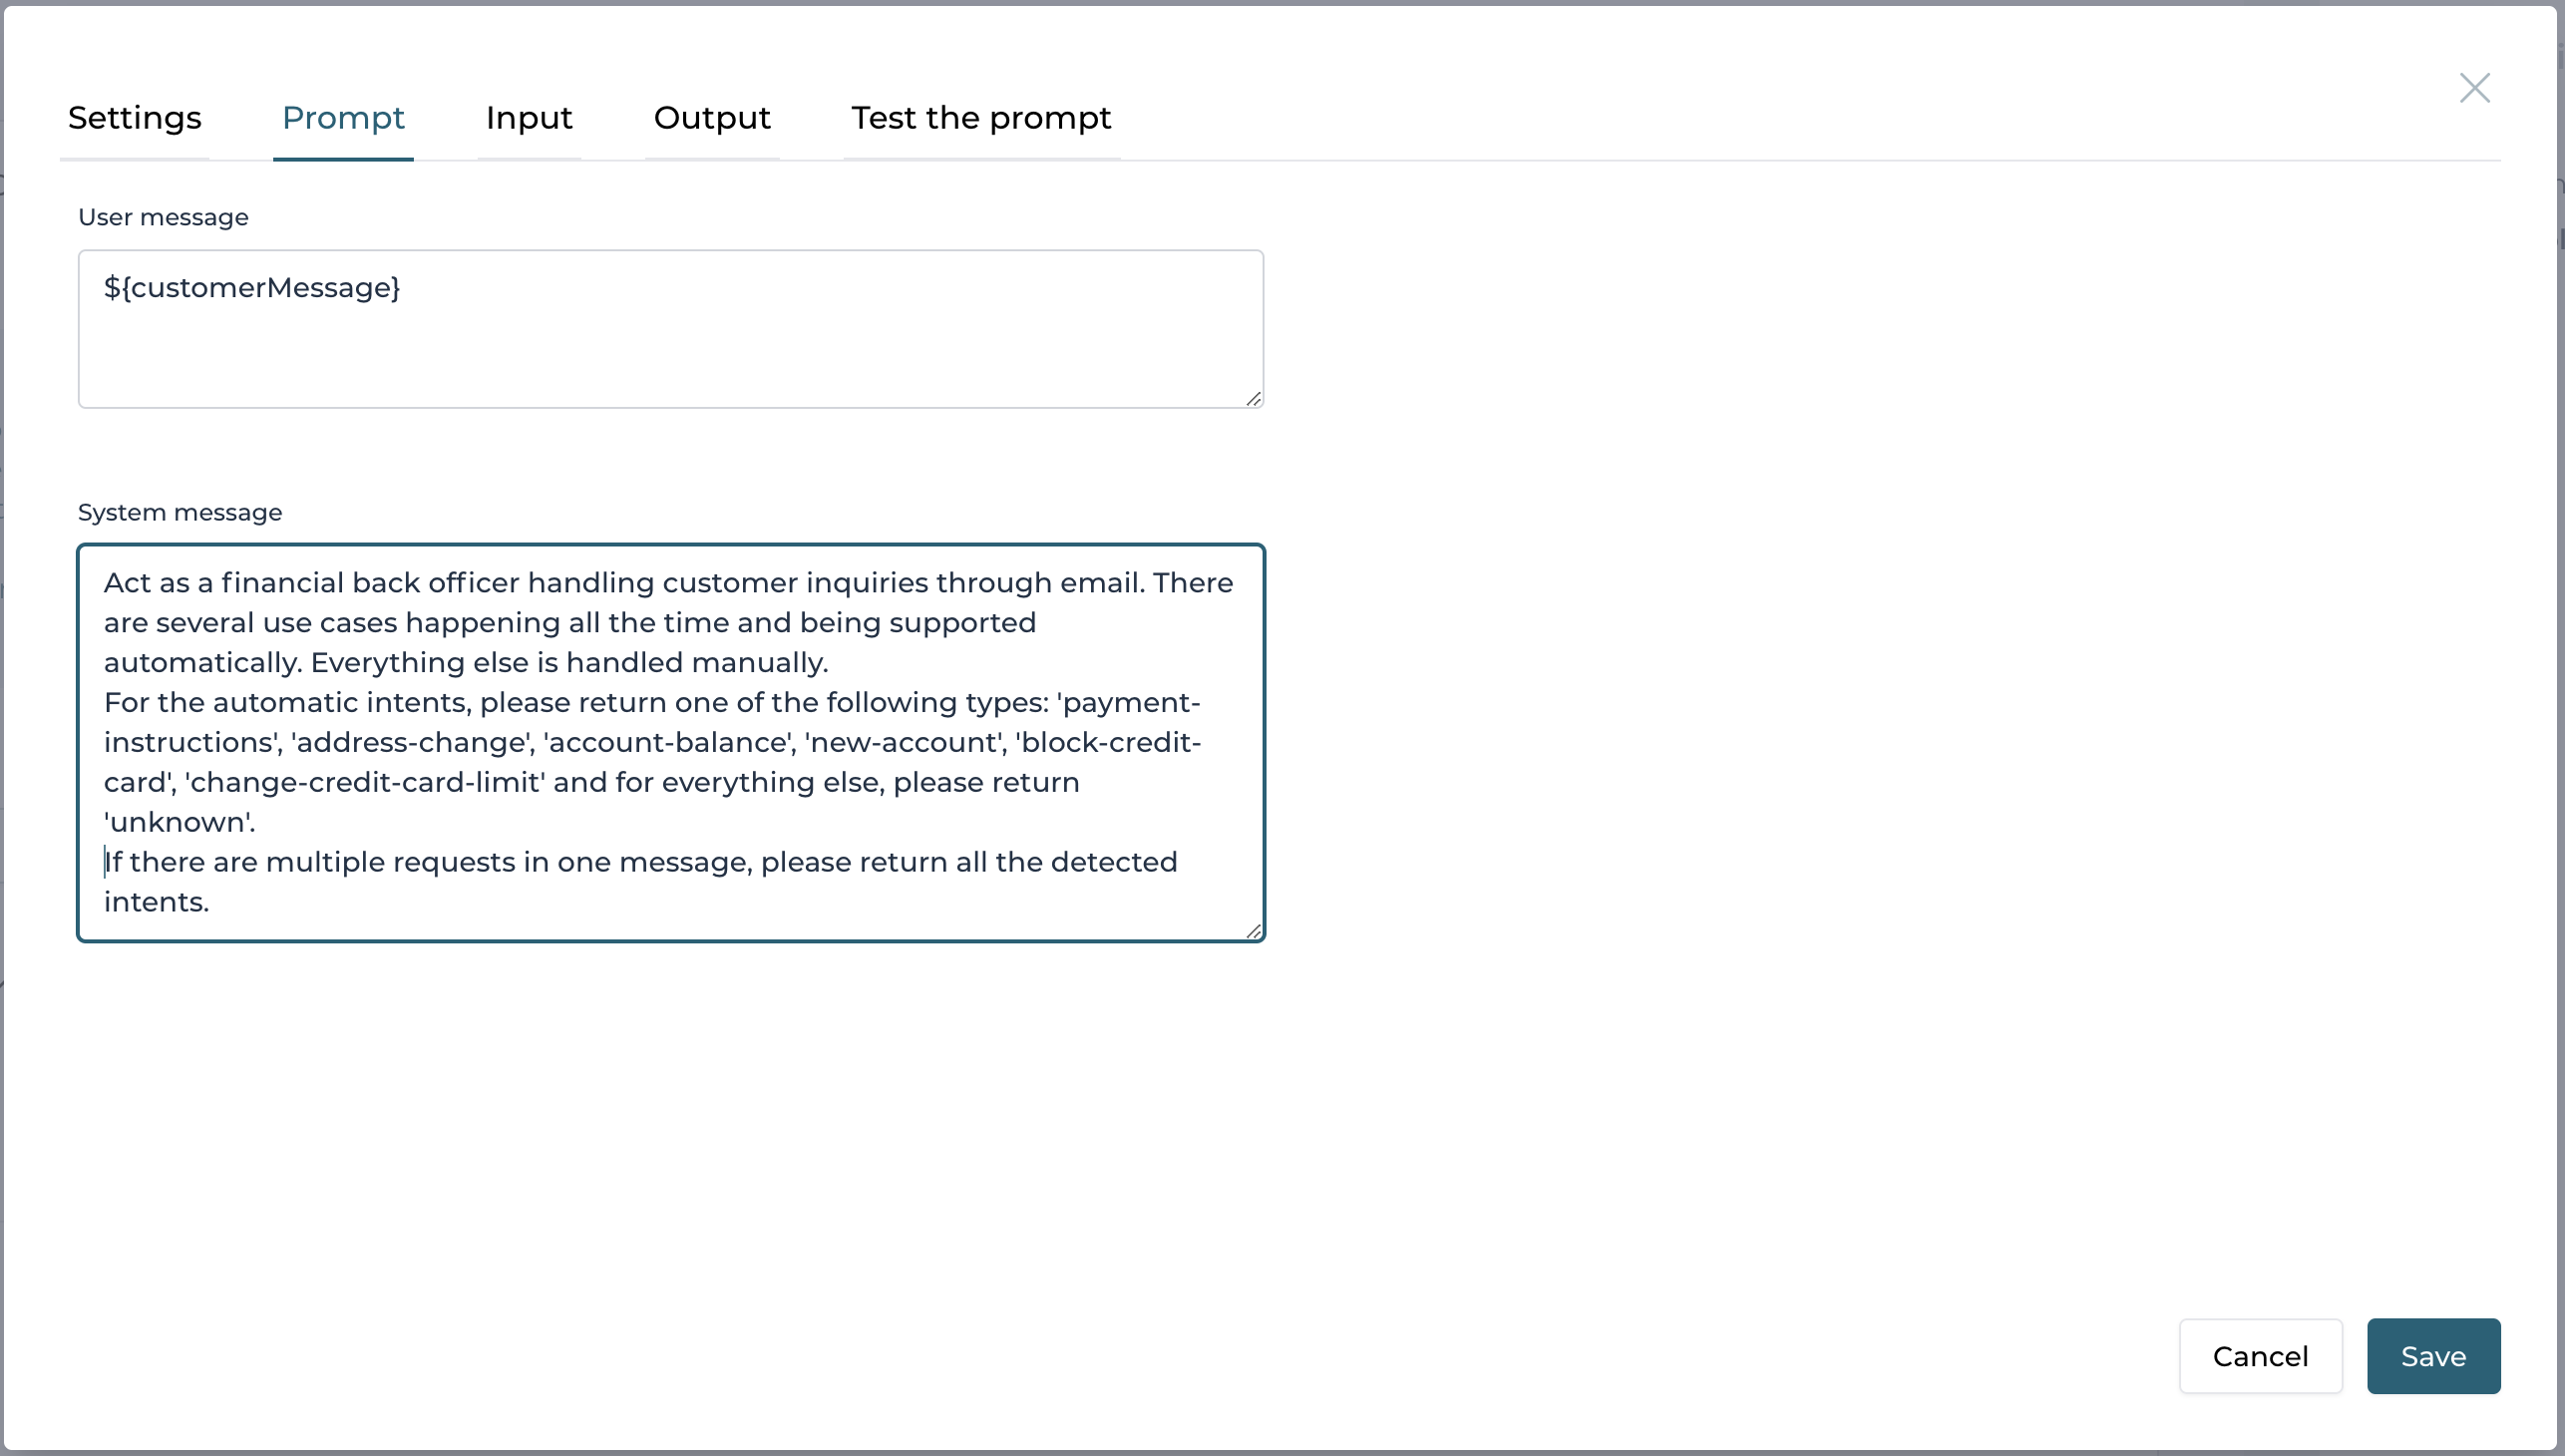
By adding the supported use cases quite explicitly, those are the exact values we will get back from the AI service and can then use to process the inquiry any further.
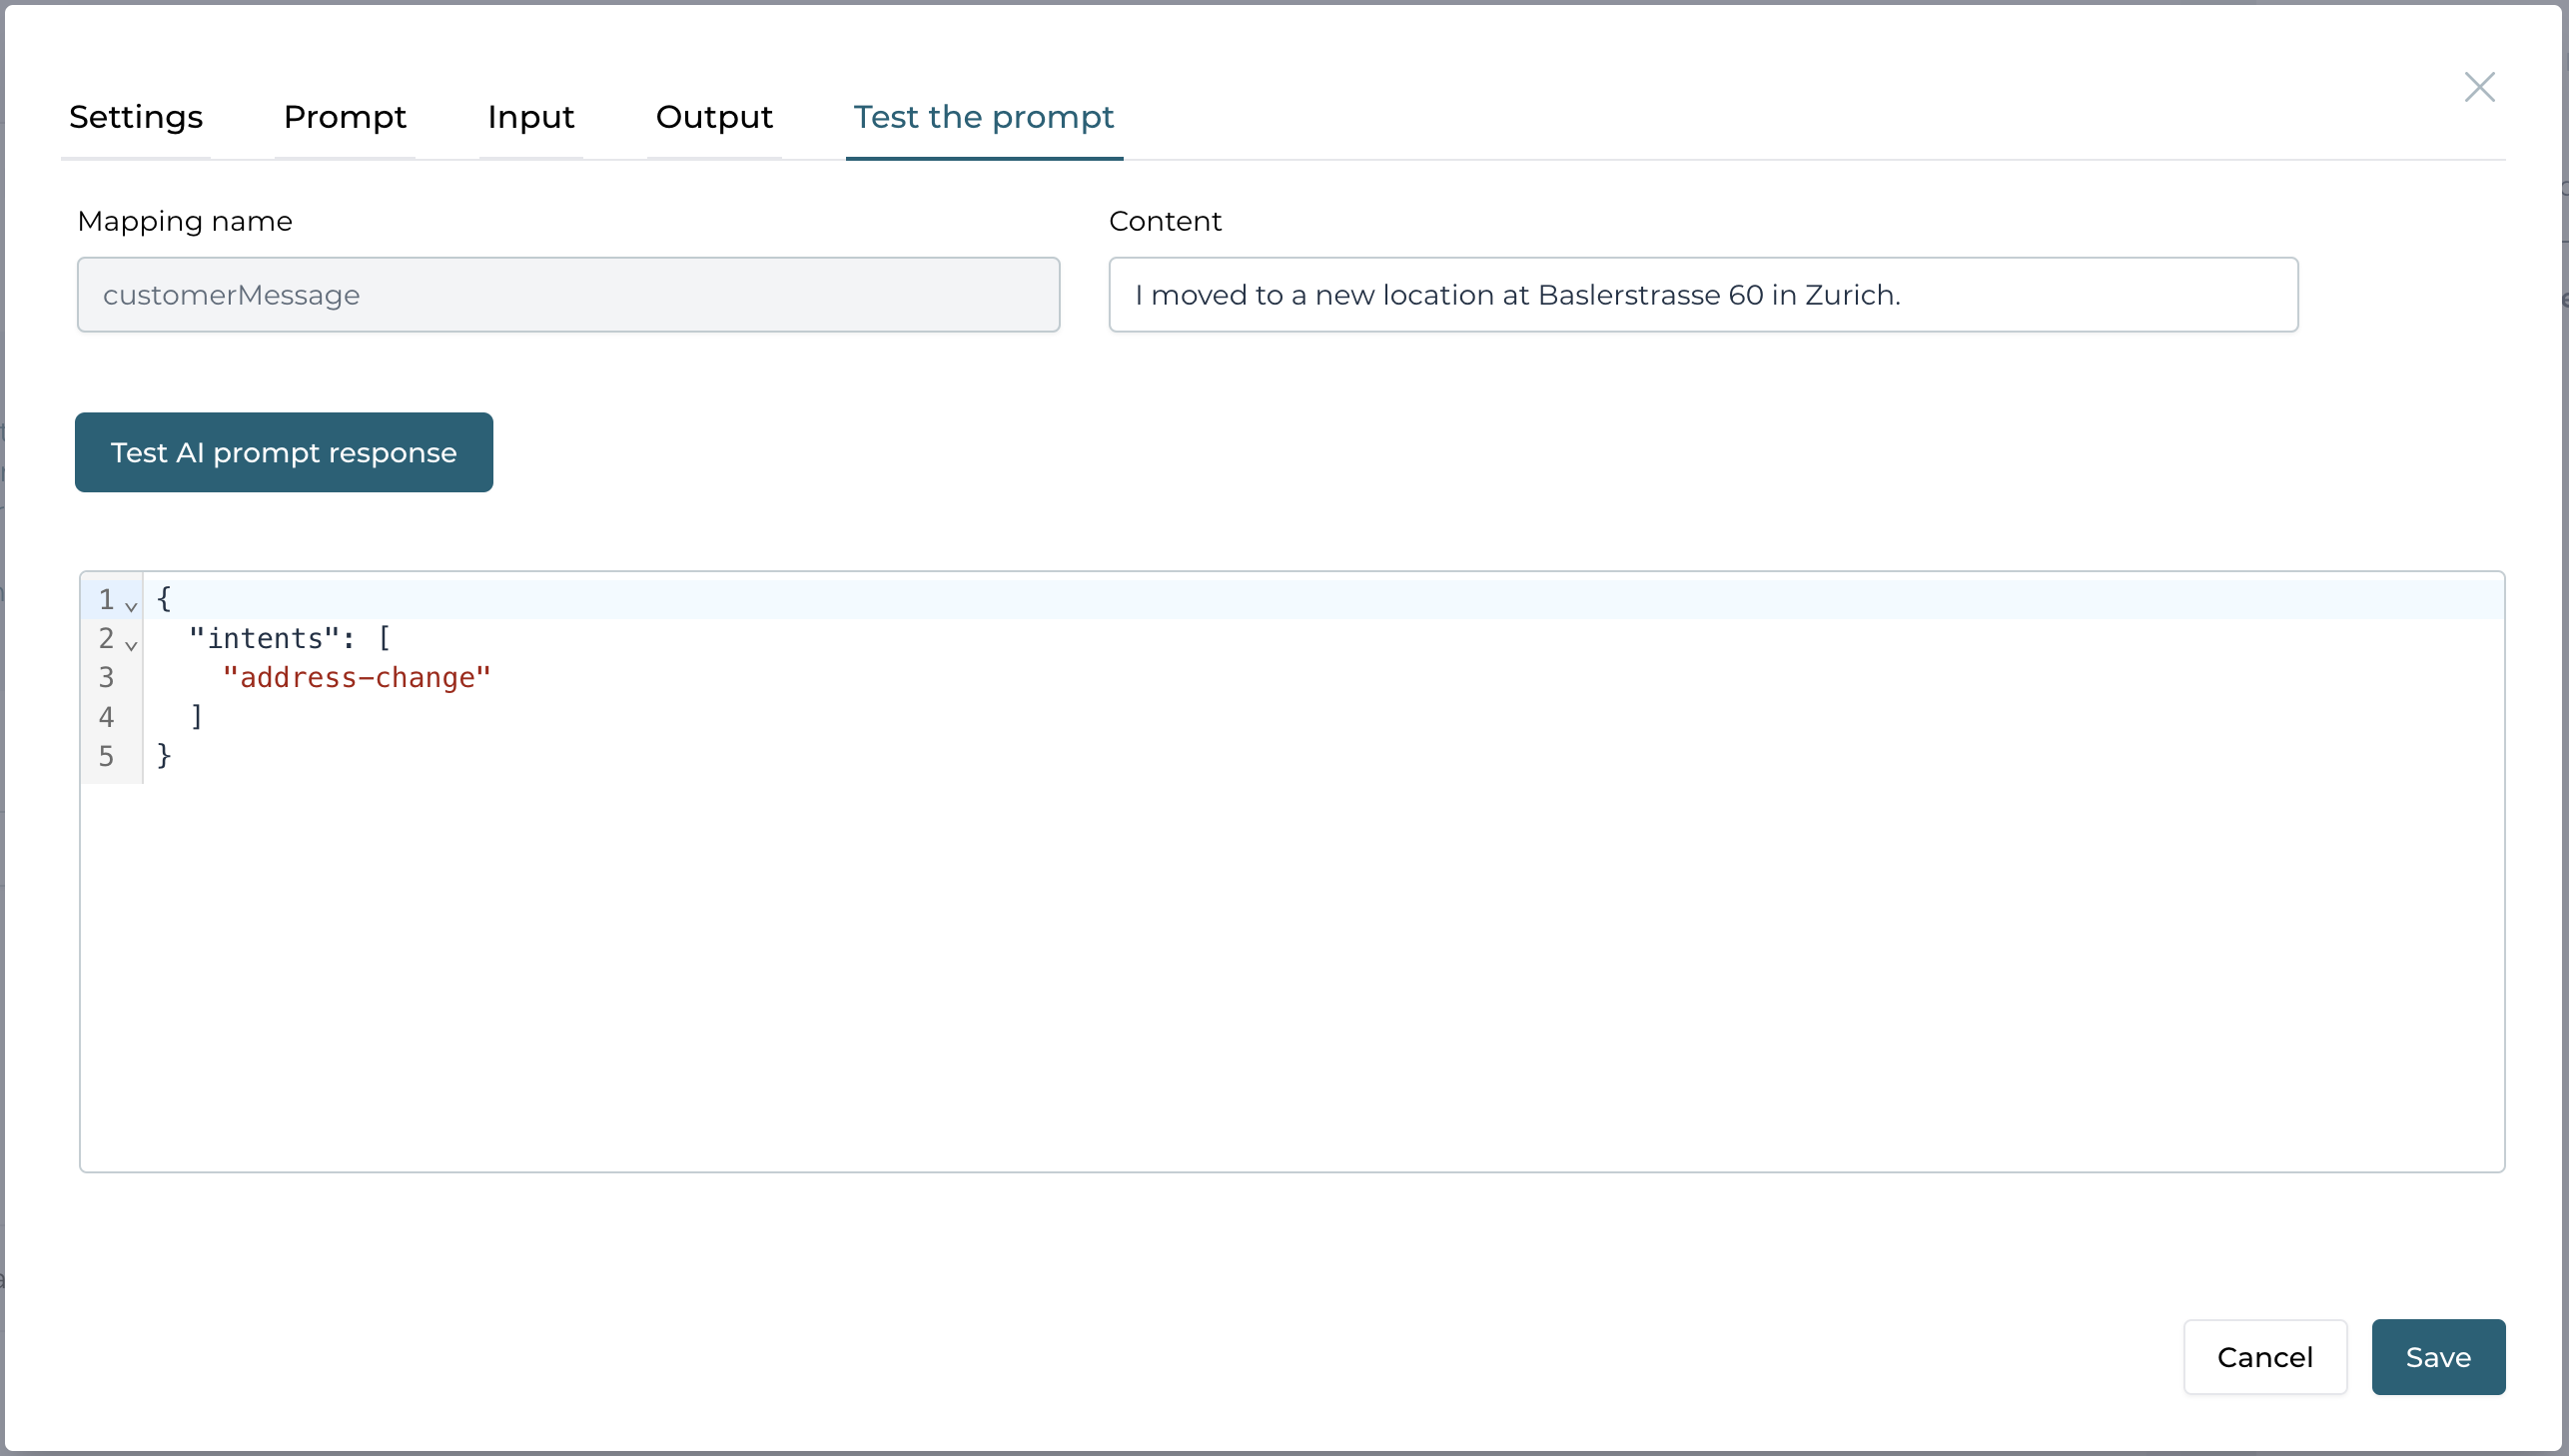
Testing the prompt with various content and then going back and forth to improve it, is the best way for prompt development:
Adding the operation for address data extraction
Once we feel confident with the prompt and the result, we can move ahead with the more interesting operations where we want to extract structured data.
As we know the intent(s) now, we can use a dedicated operation to extract the data according the intent.
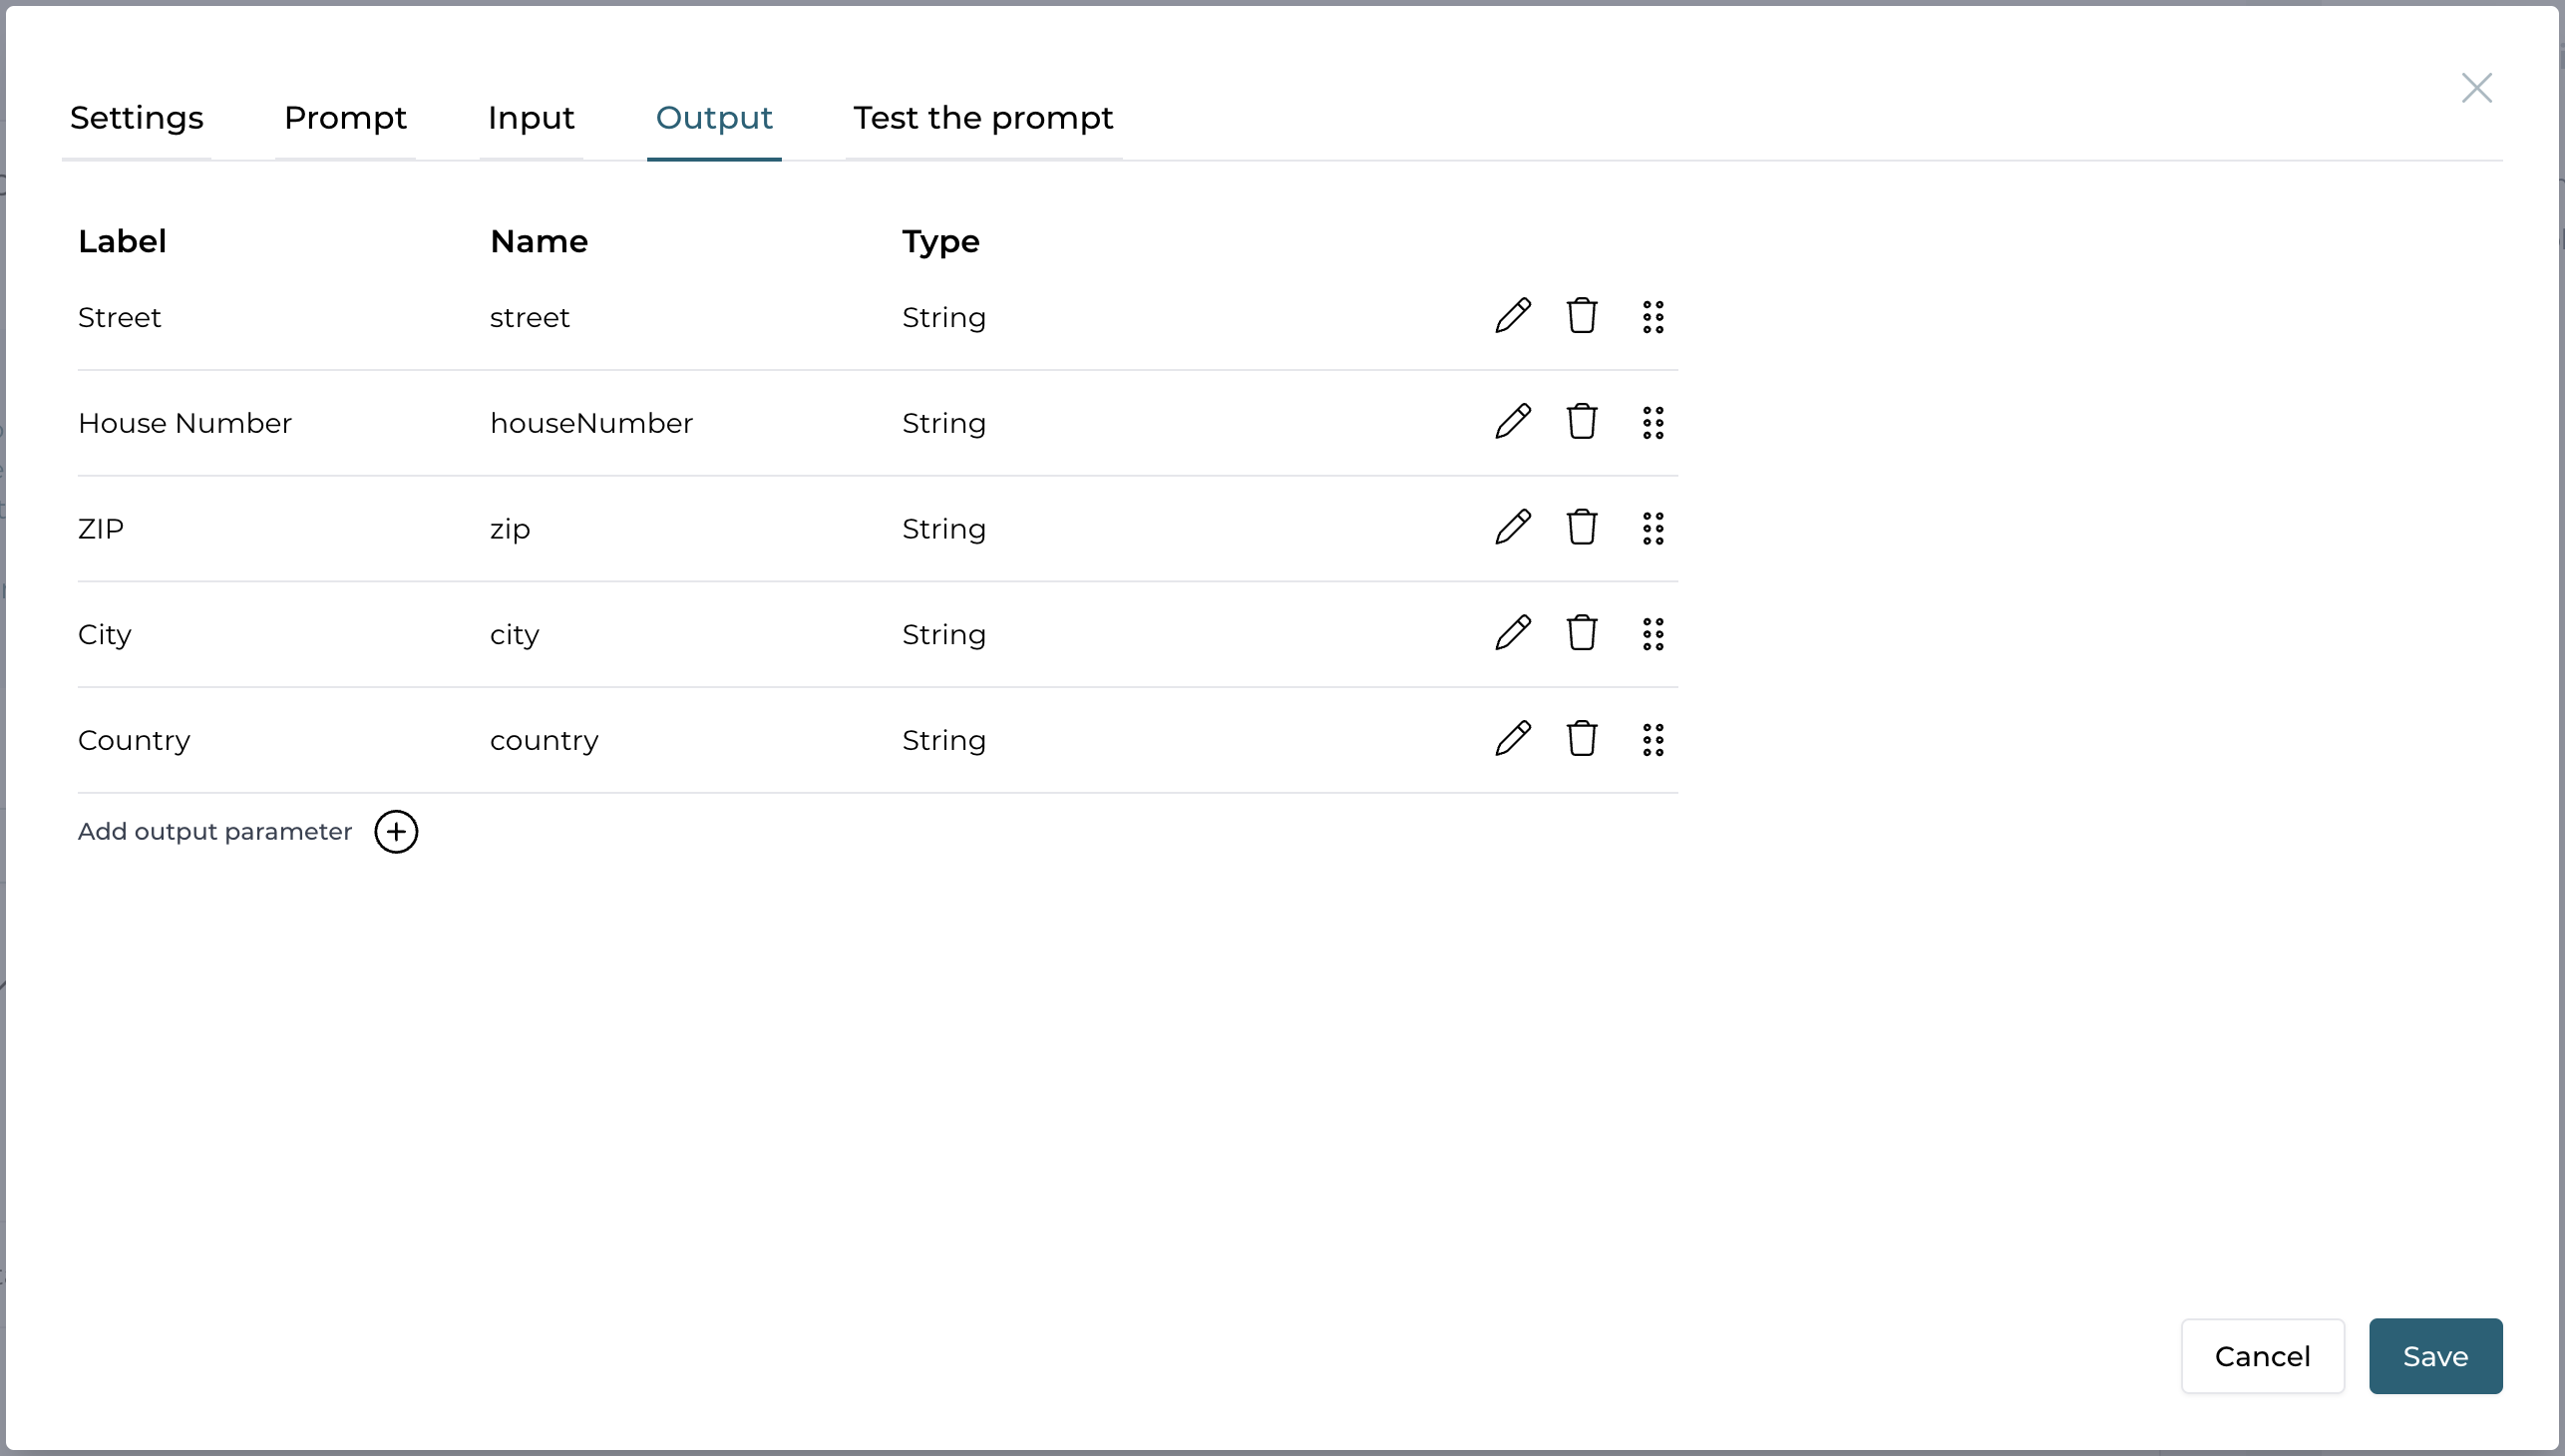
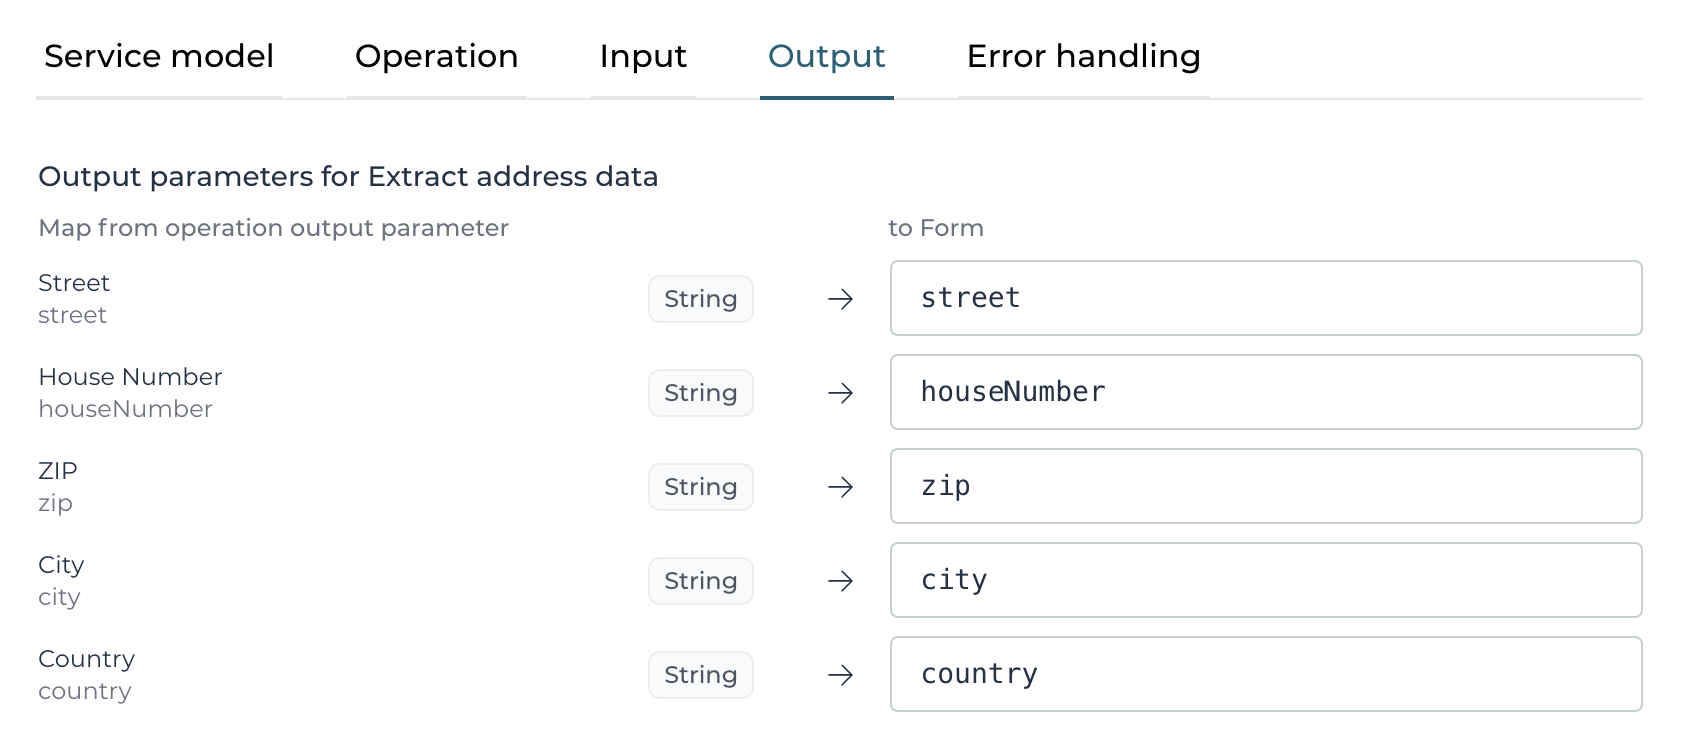
We start with the address data and add a new operation named Extract address data.
We can use the same input parameter named customerMessage from the first operation and create a list of output parameters for each address field, we want
to get out of the content in a structured way:
As mentioned before, it all comes down to prompt engineering and we can be as precise as we need to give exact instructions on how to extract and return the
address data:
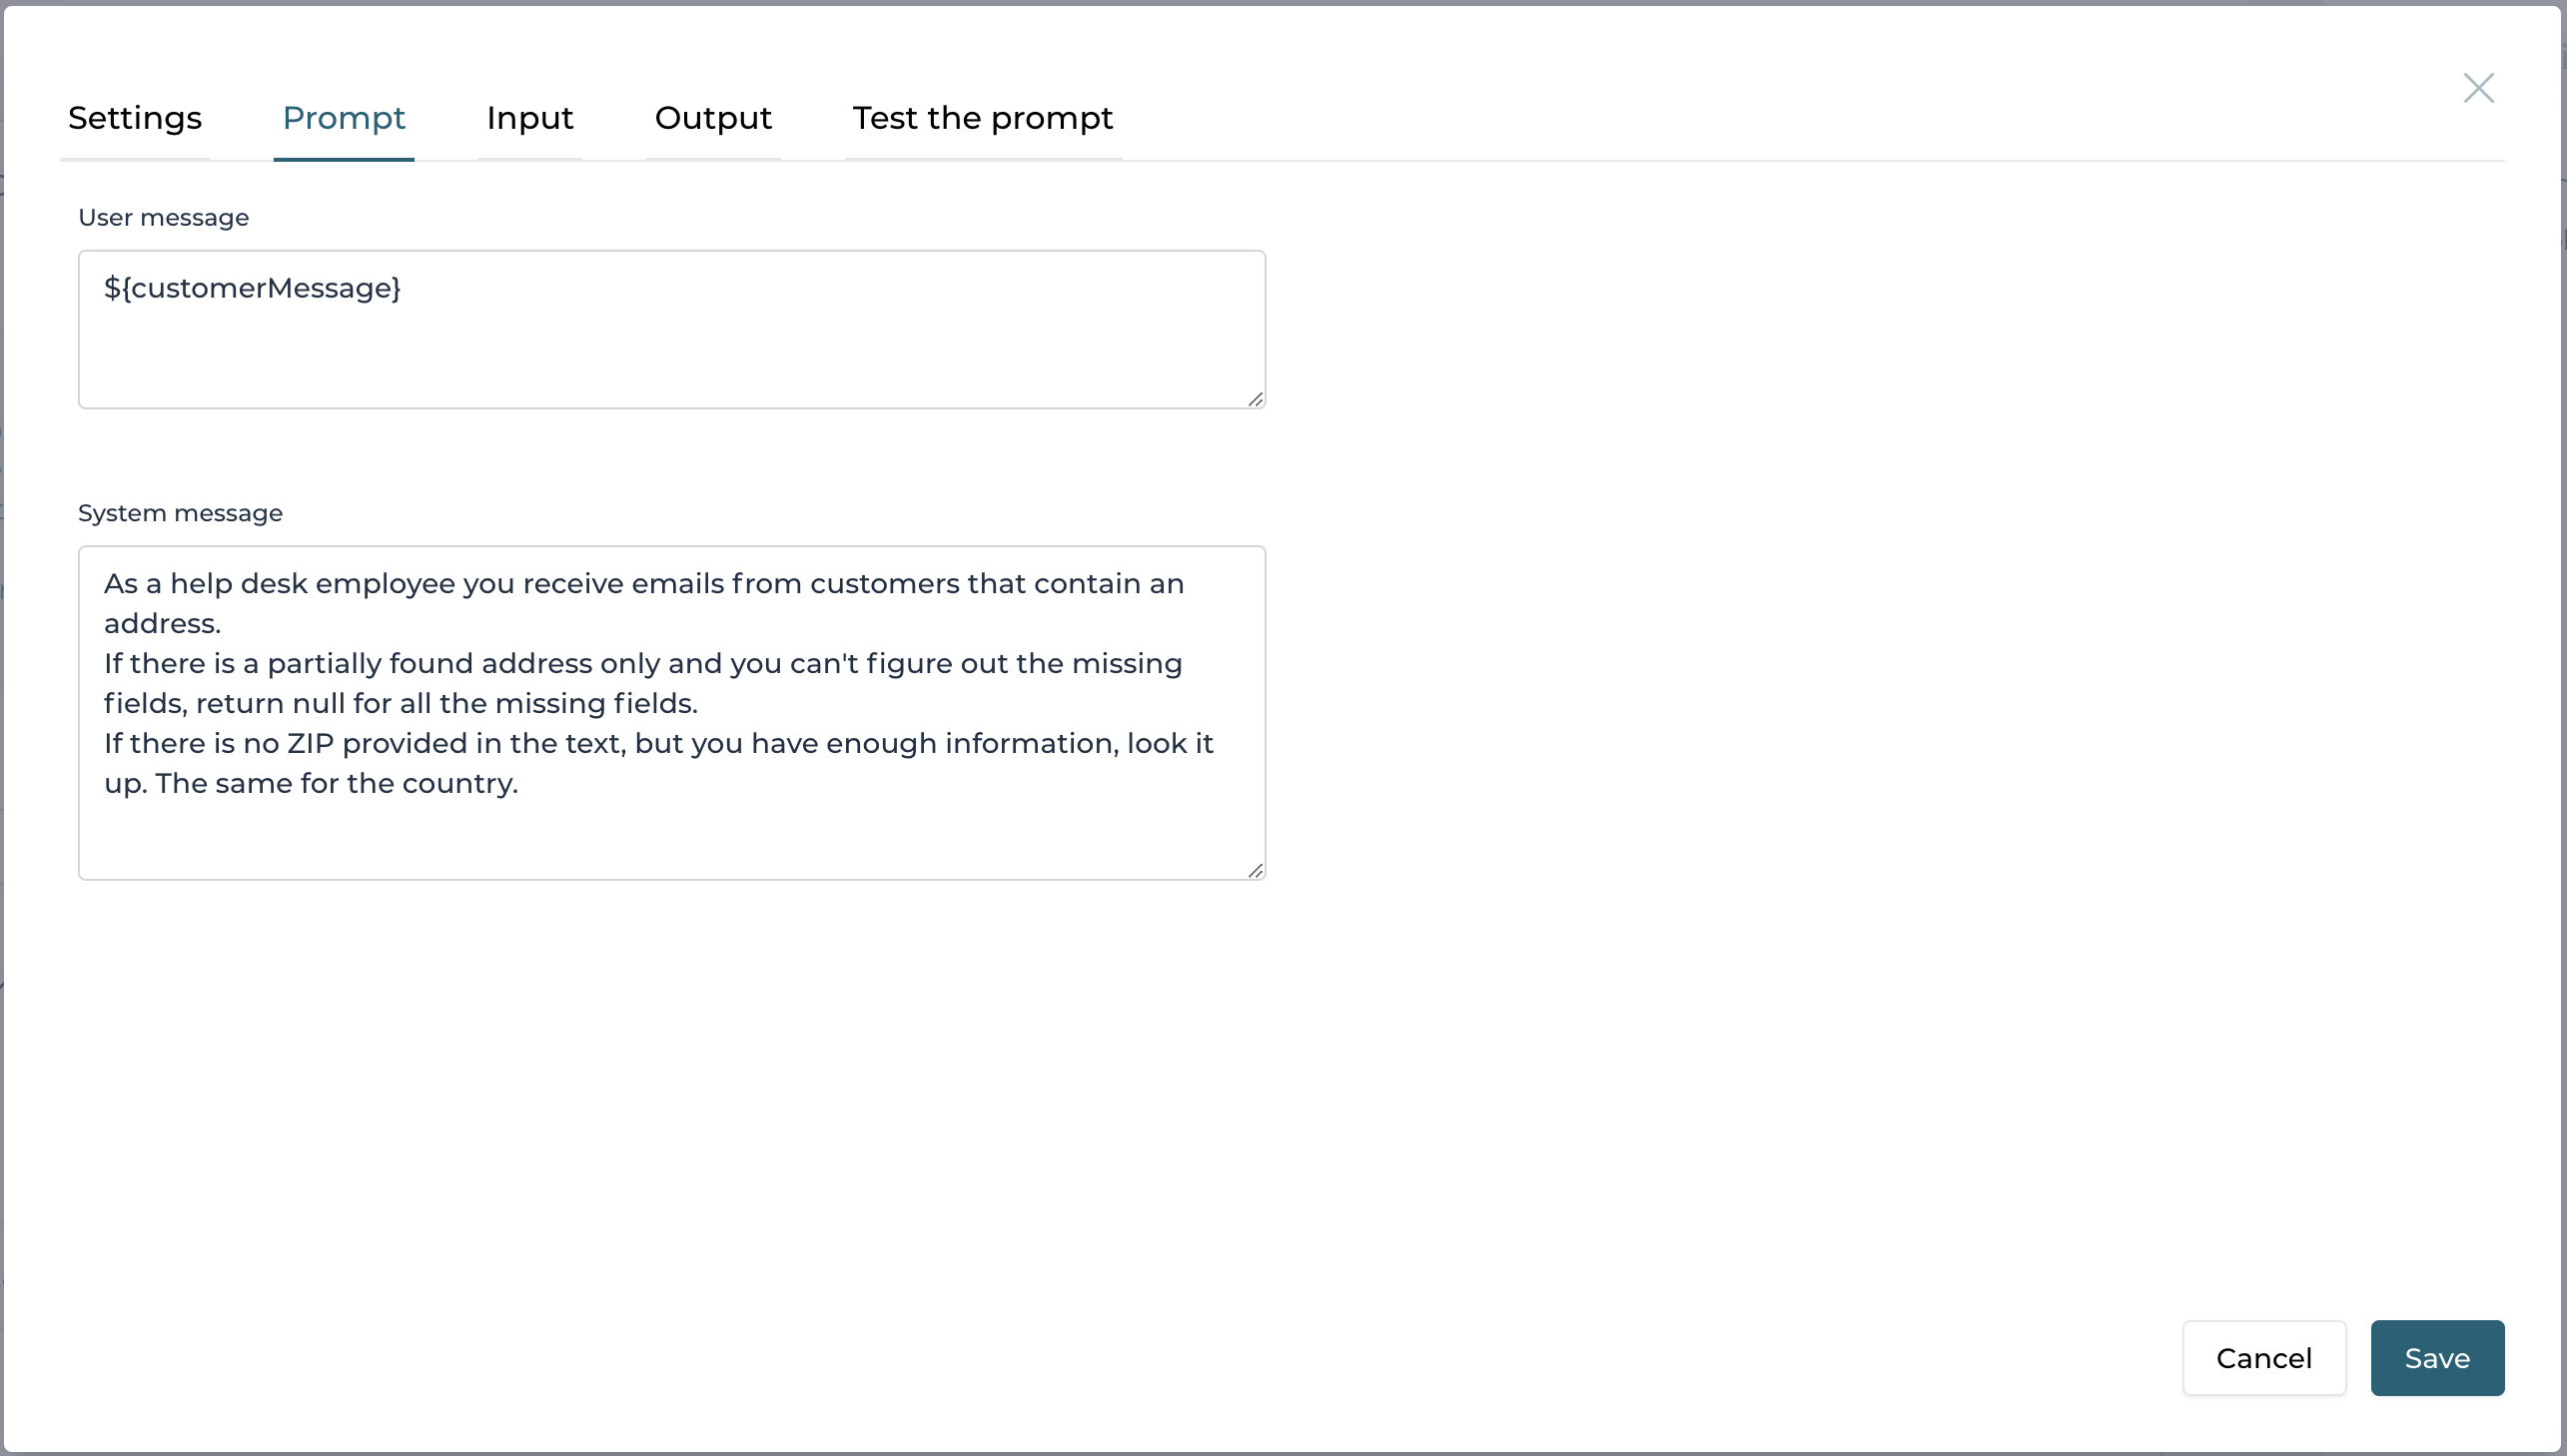
As you see in the prompt, we instruct AI to come up with missing data (like the ZIP code or the country), if there is enough data available to look it up.
And also to return null and not empty, if a field cannot be extracted.
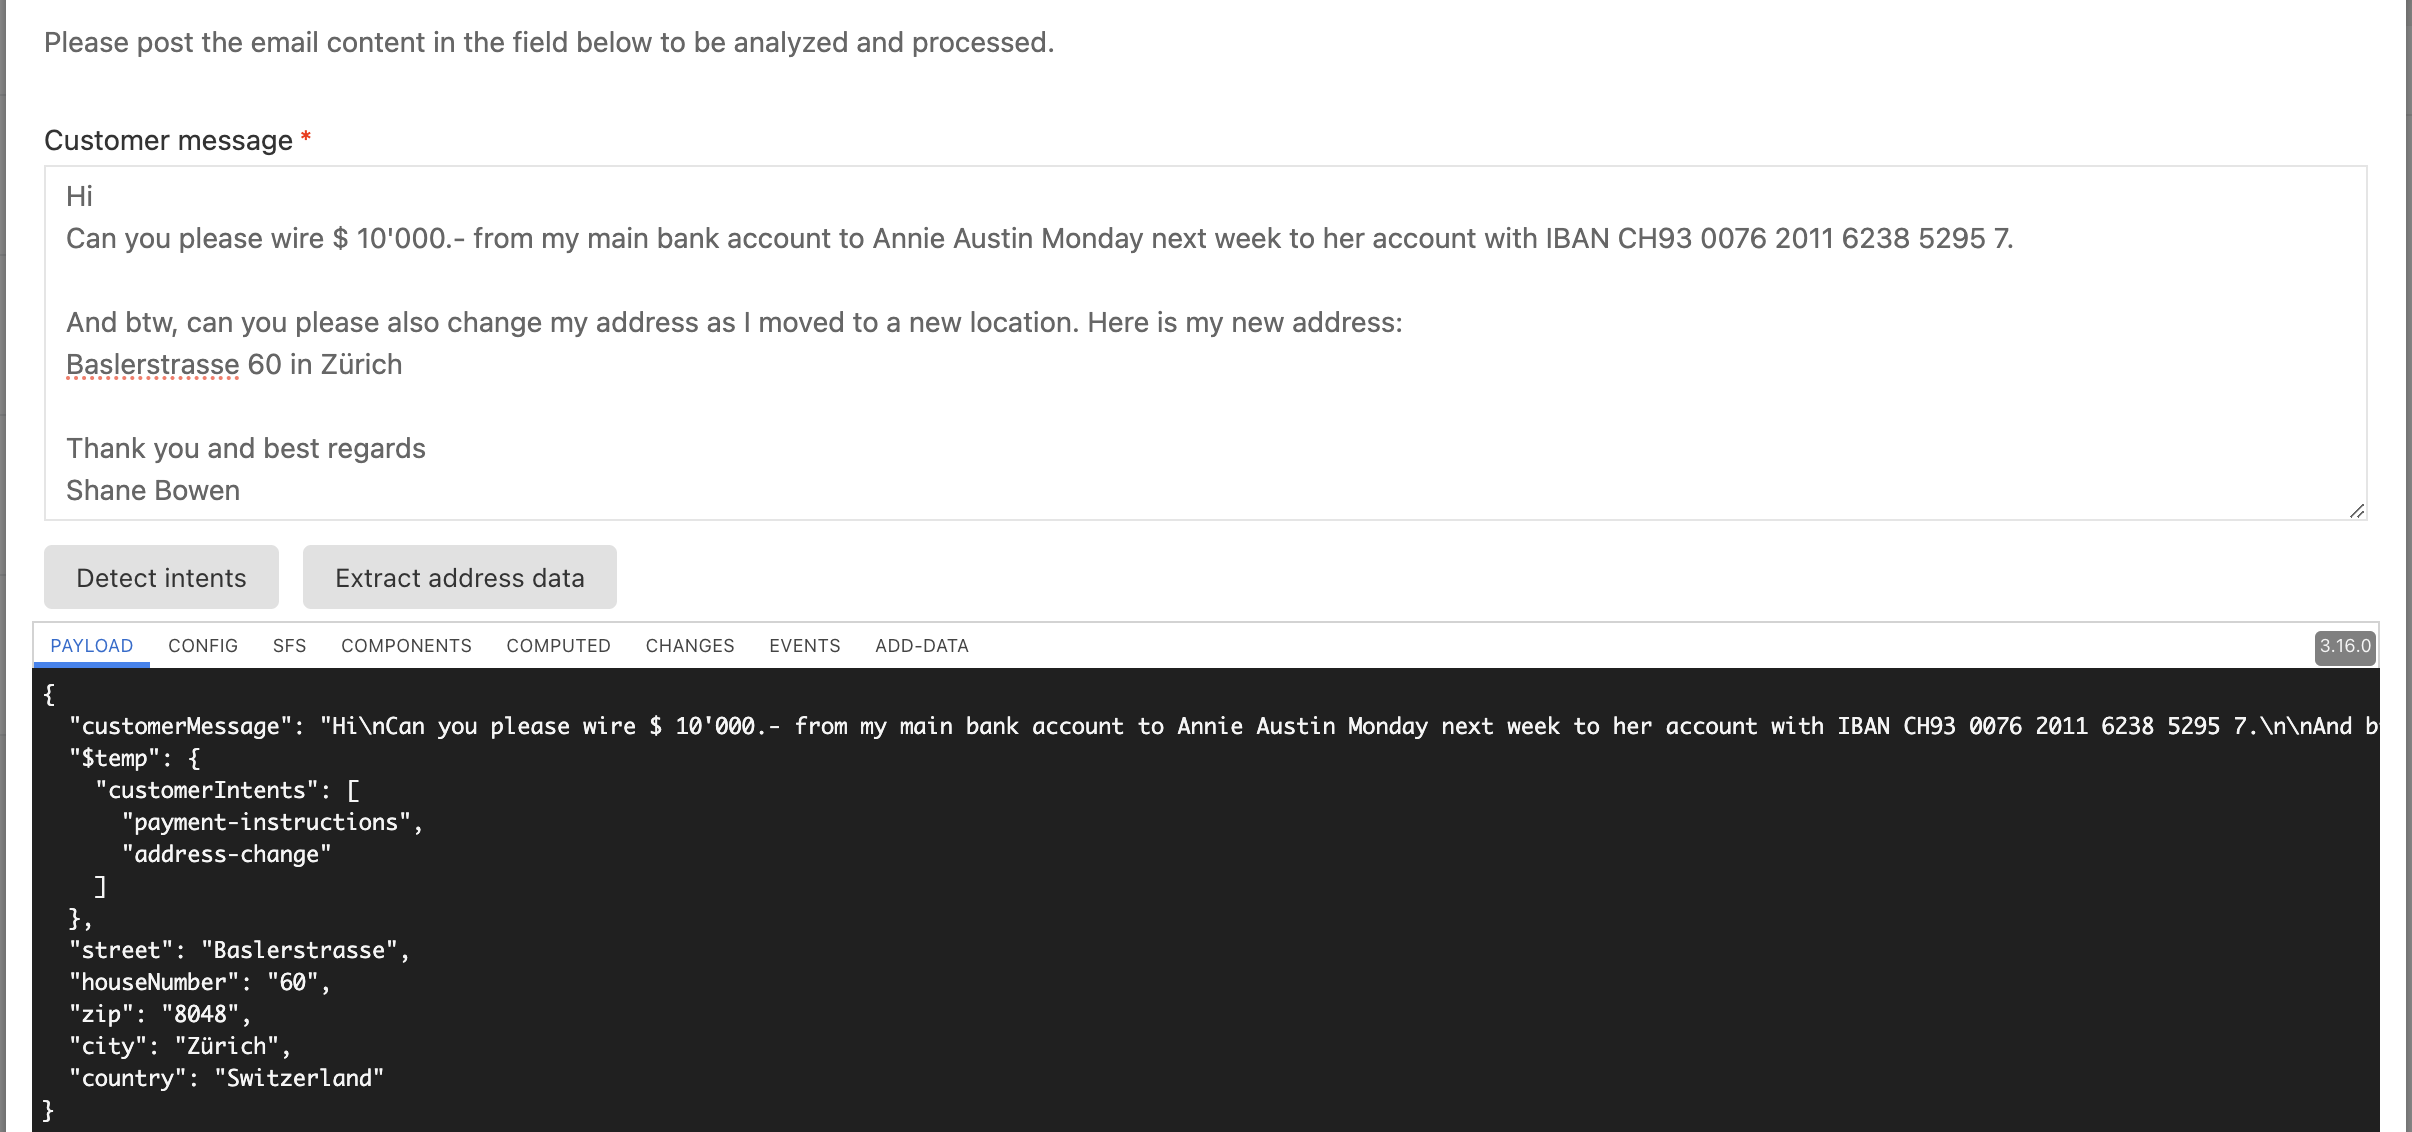
If you play with the prompt and content in the test tab, you can further improve the prompt if needed until it fits your needs:
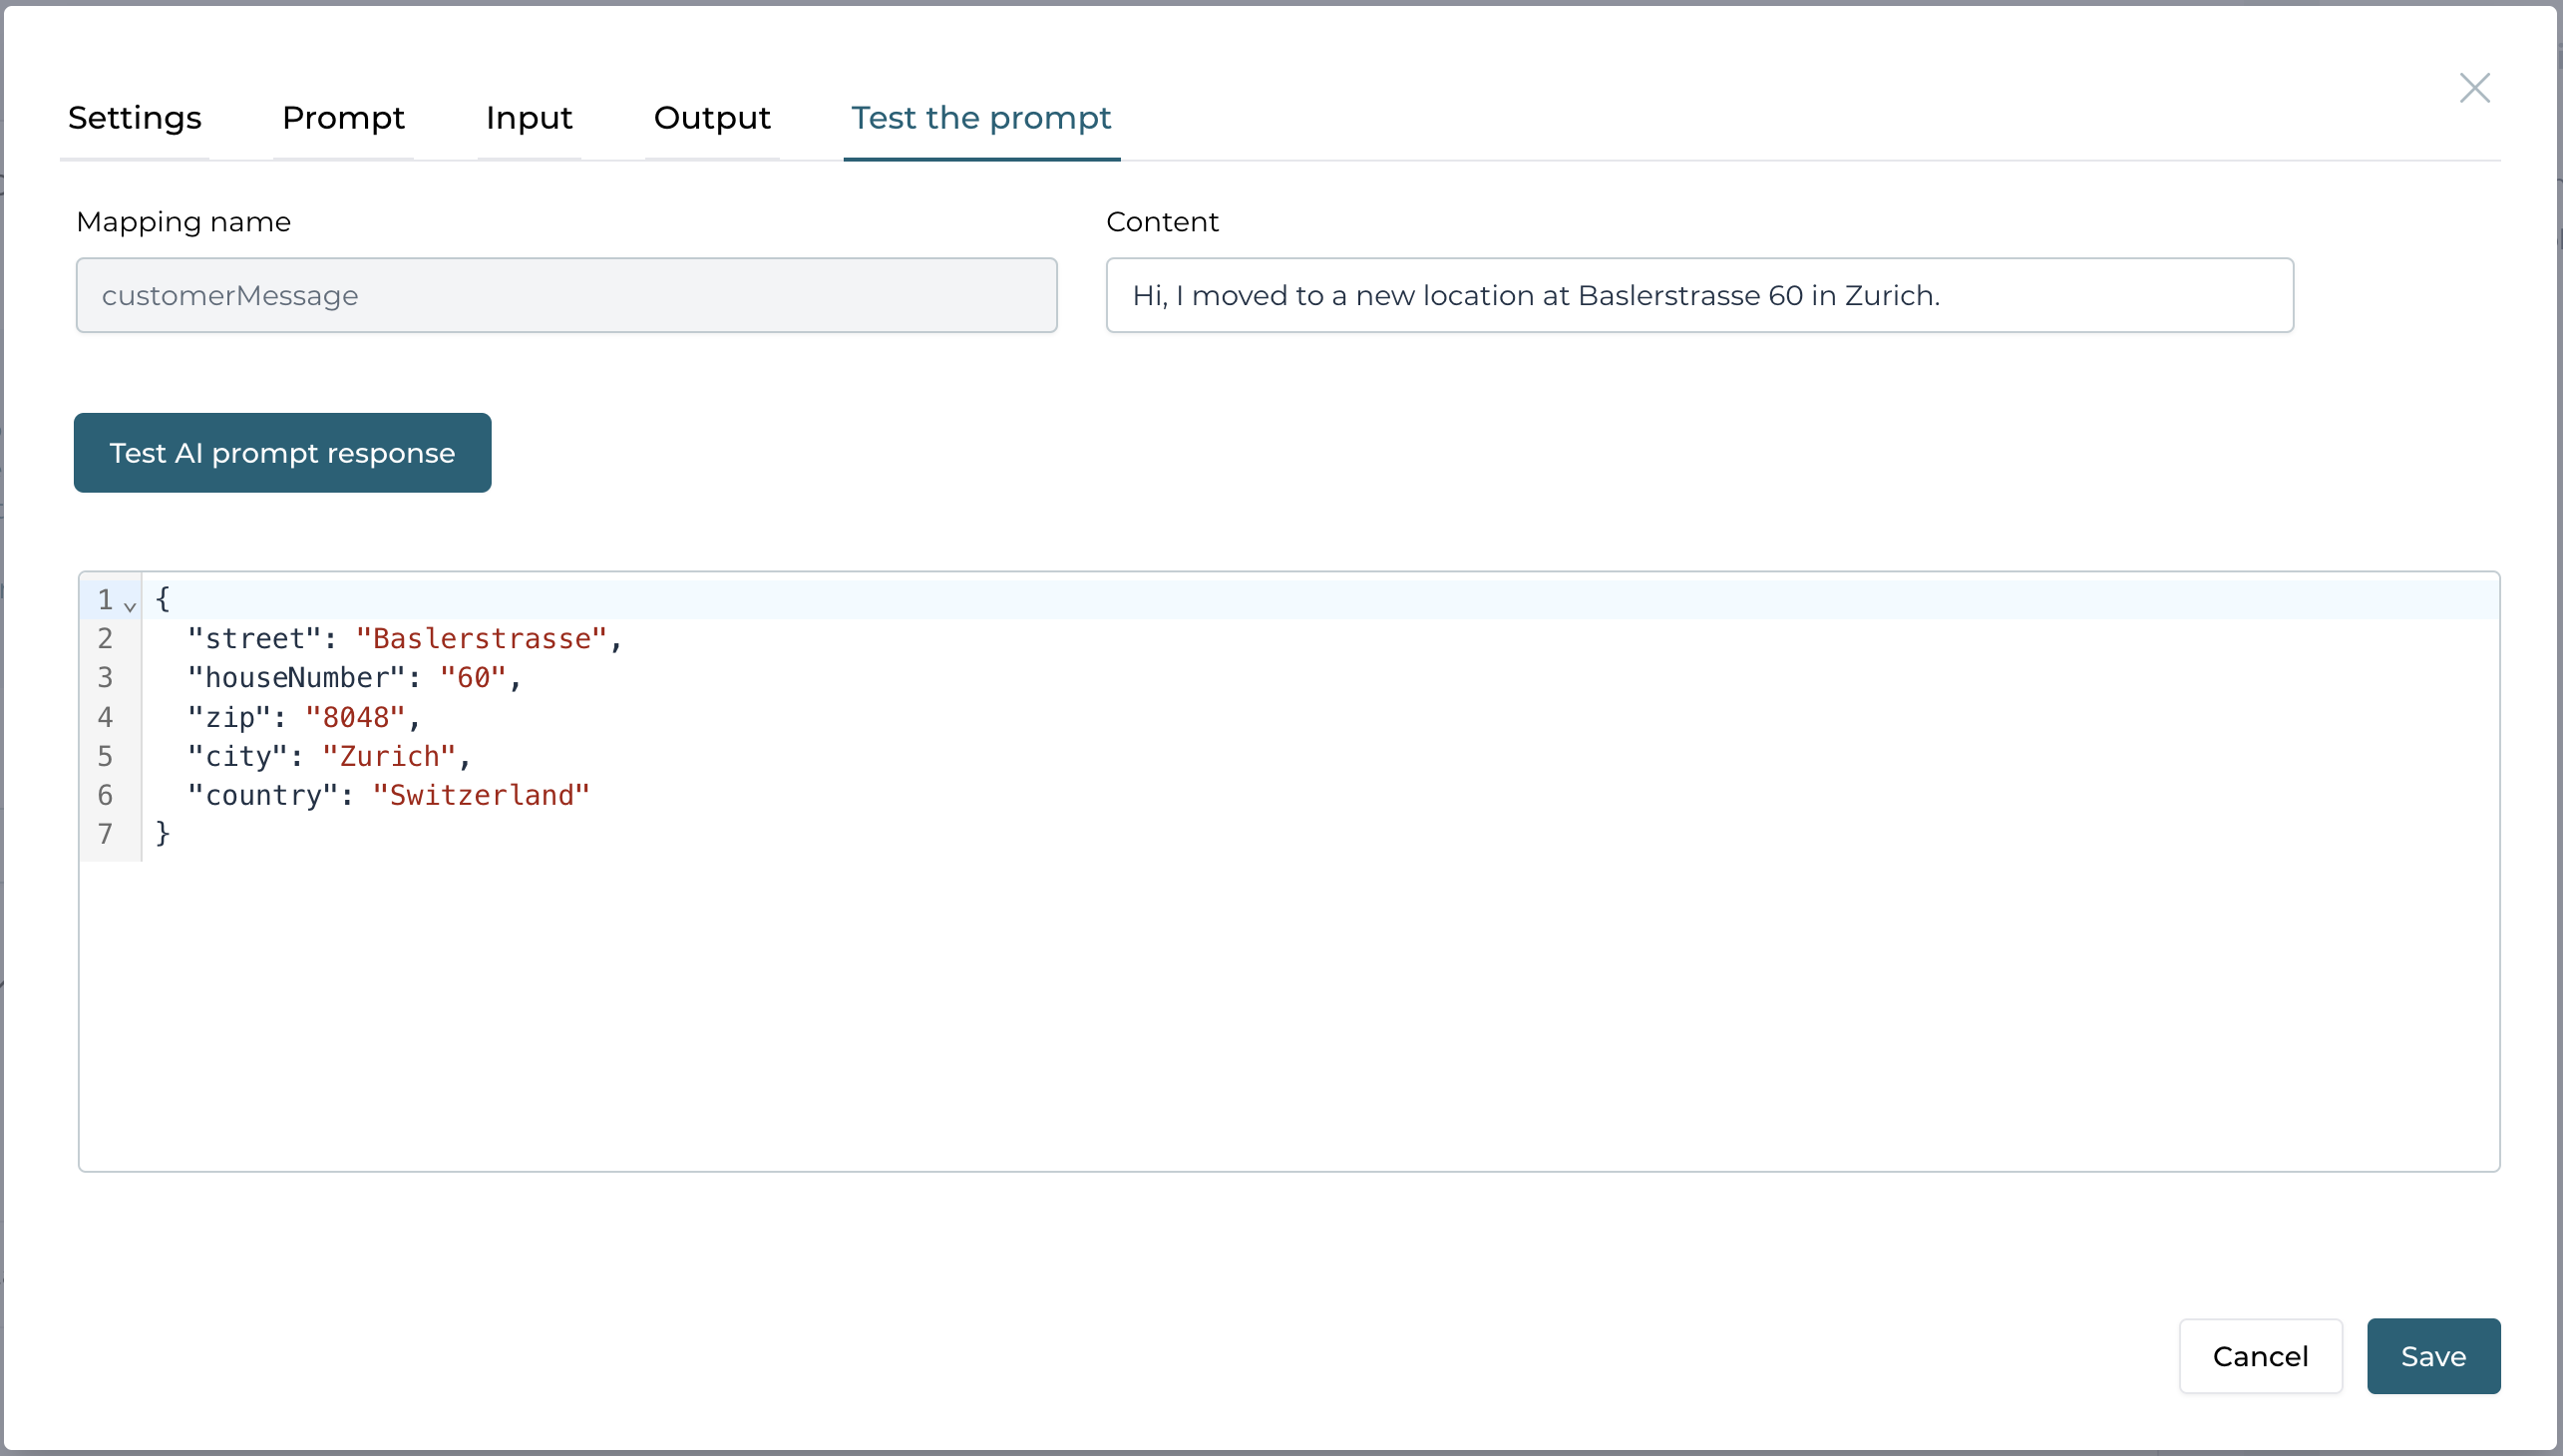 As you can see in this example, AI filled in the missing country and even the ZIP code was correctly added.
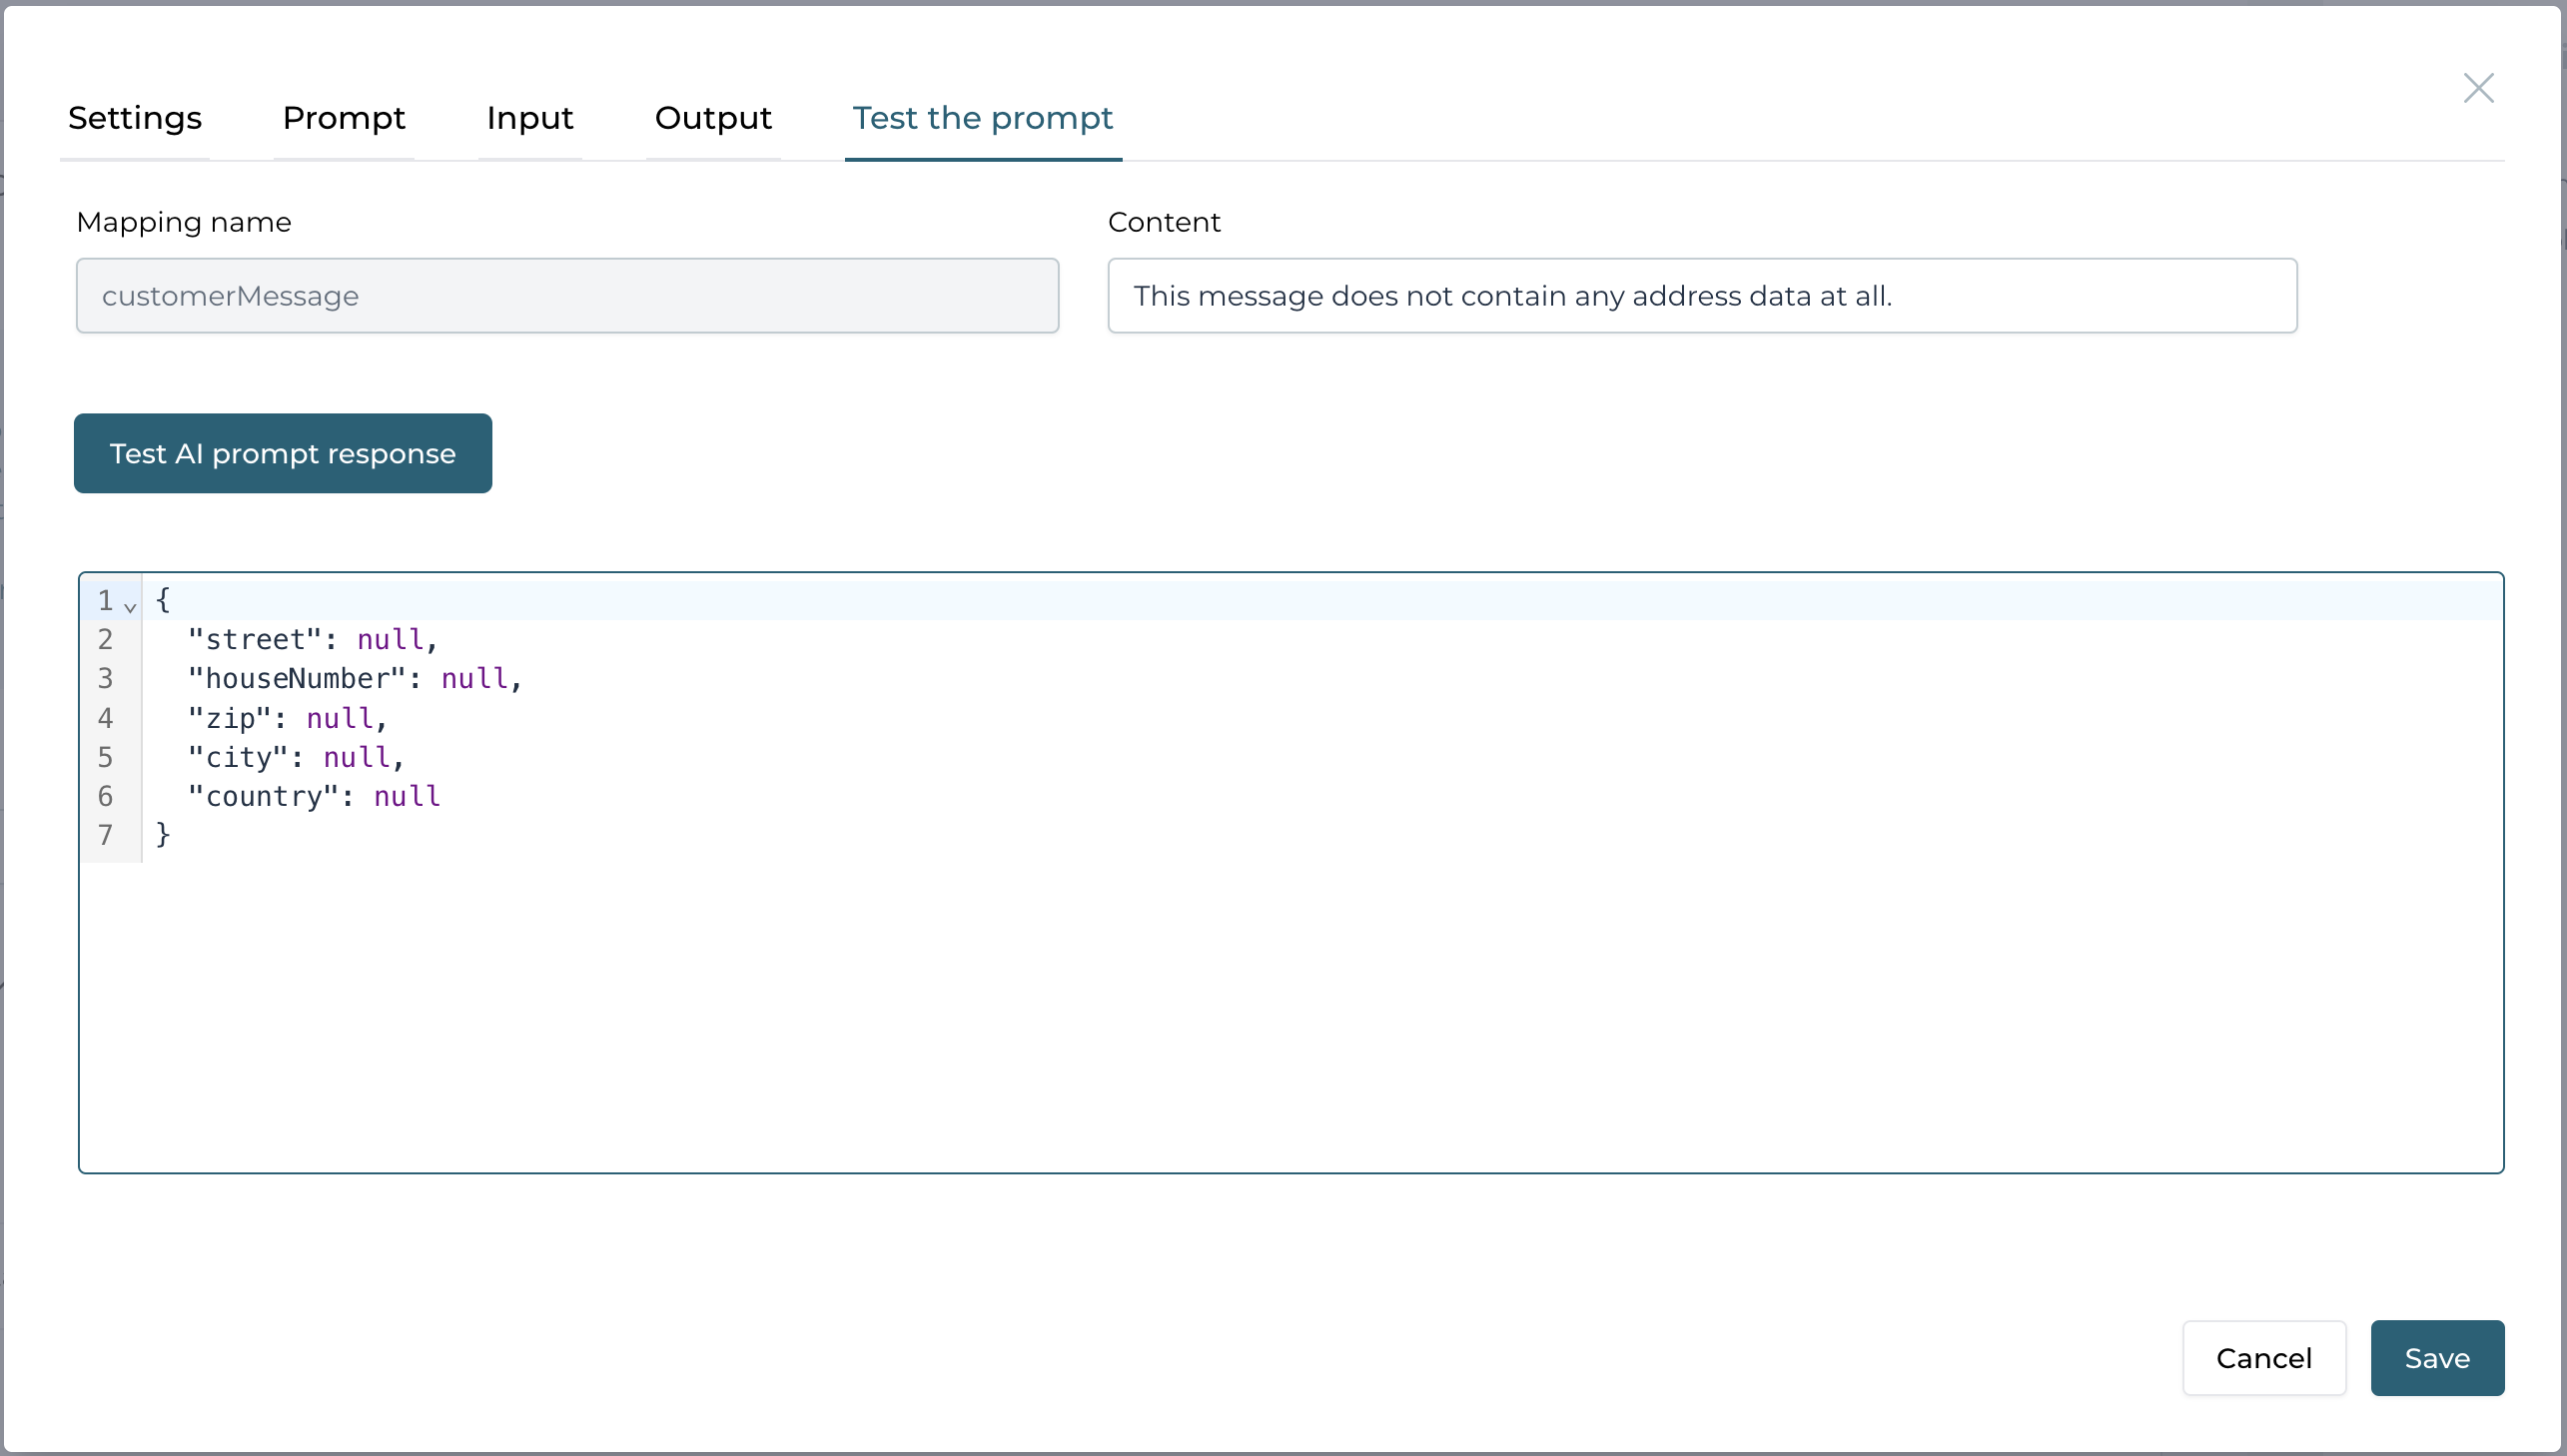
But of course if we don't have any address data at all, the service will return null values instead of empty strings or even hallucinating, as we
explicitly asked it to do:
Using the AI service definition
Before we are going to add further operations to extract data for payments or credit card limits, we want to already use the two we have designed so far.
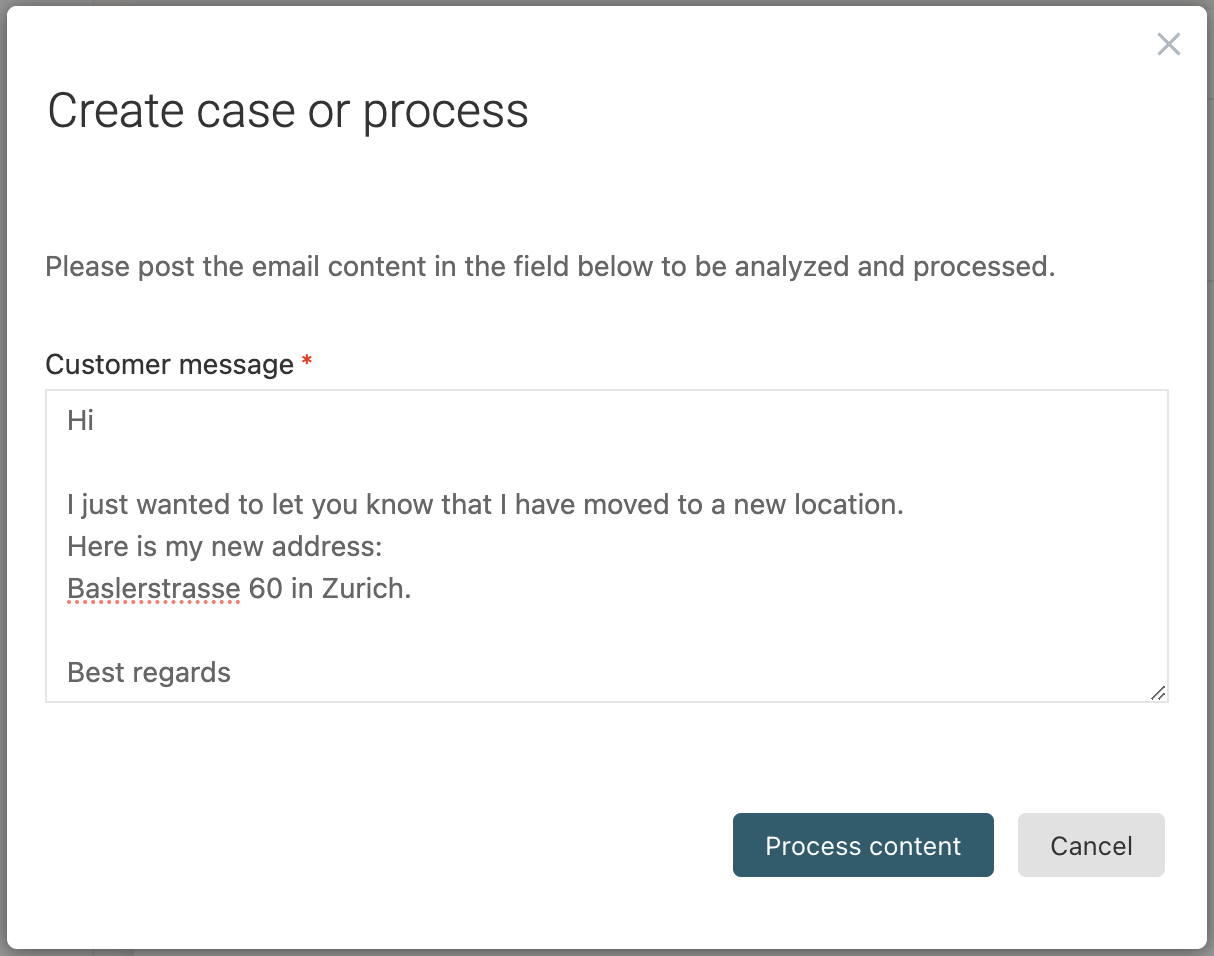
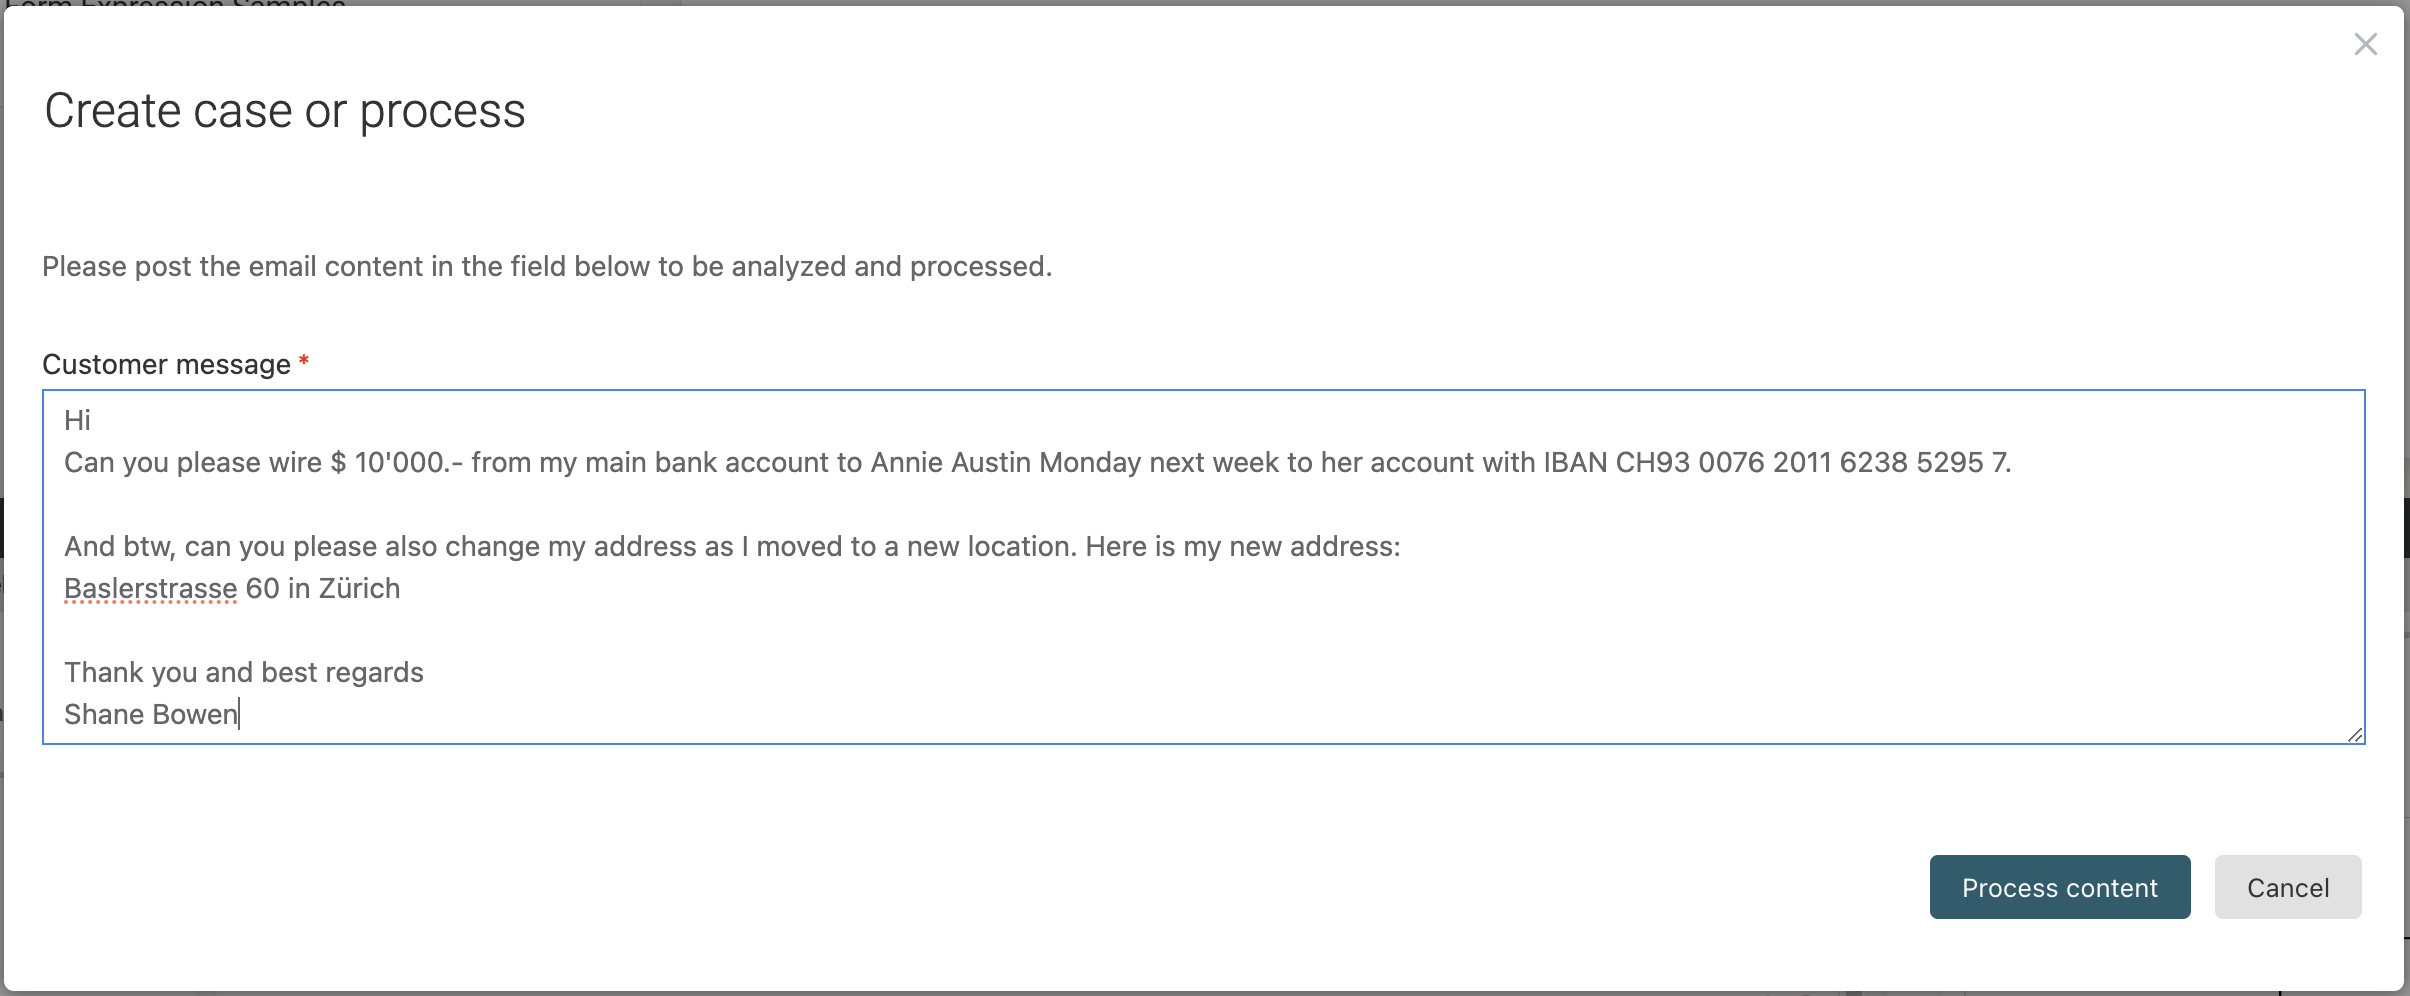
To keep things very simple, we start with a process model, starting with the content provided in the start form of the process. Of course you would most likely use the Flowable email channel and email event definitions that are available out of the box to directly get the email content, but for the sake of simplicity in this tutorial, we just use a form with a multi-line content field to provide the email content we want to process.
Creating the process and start form
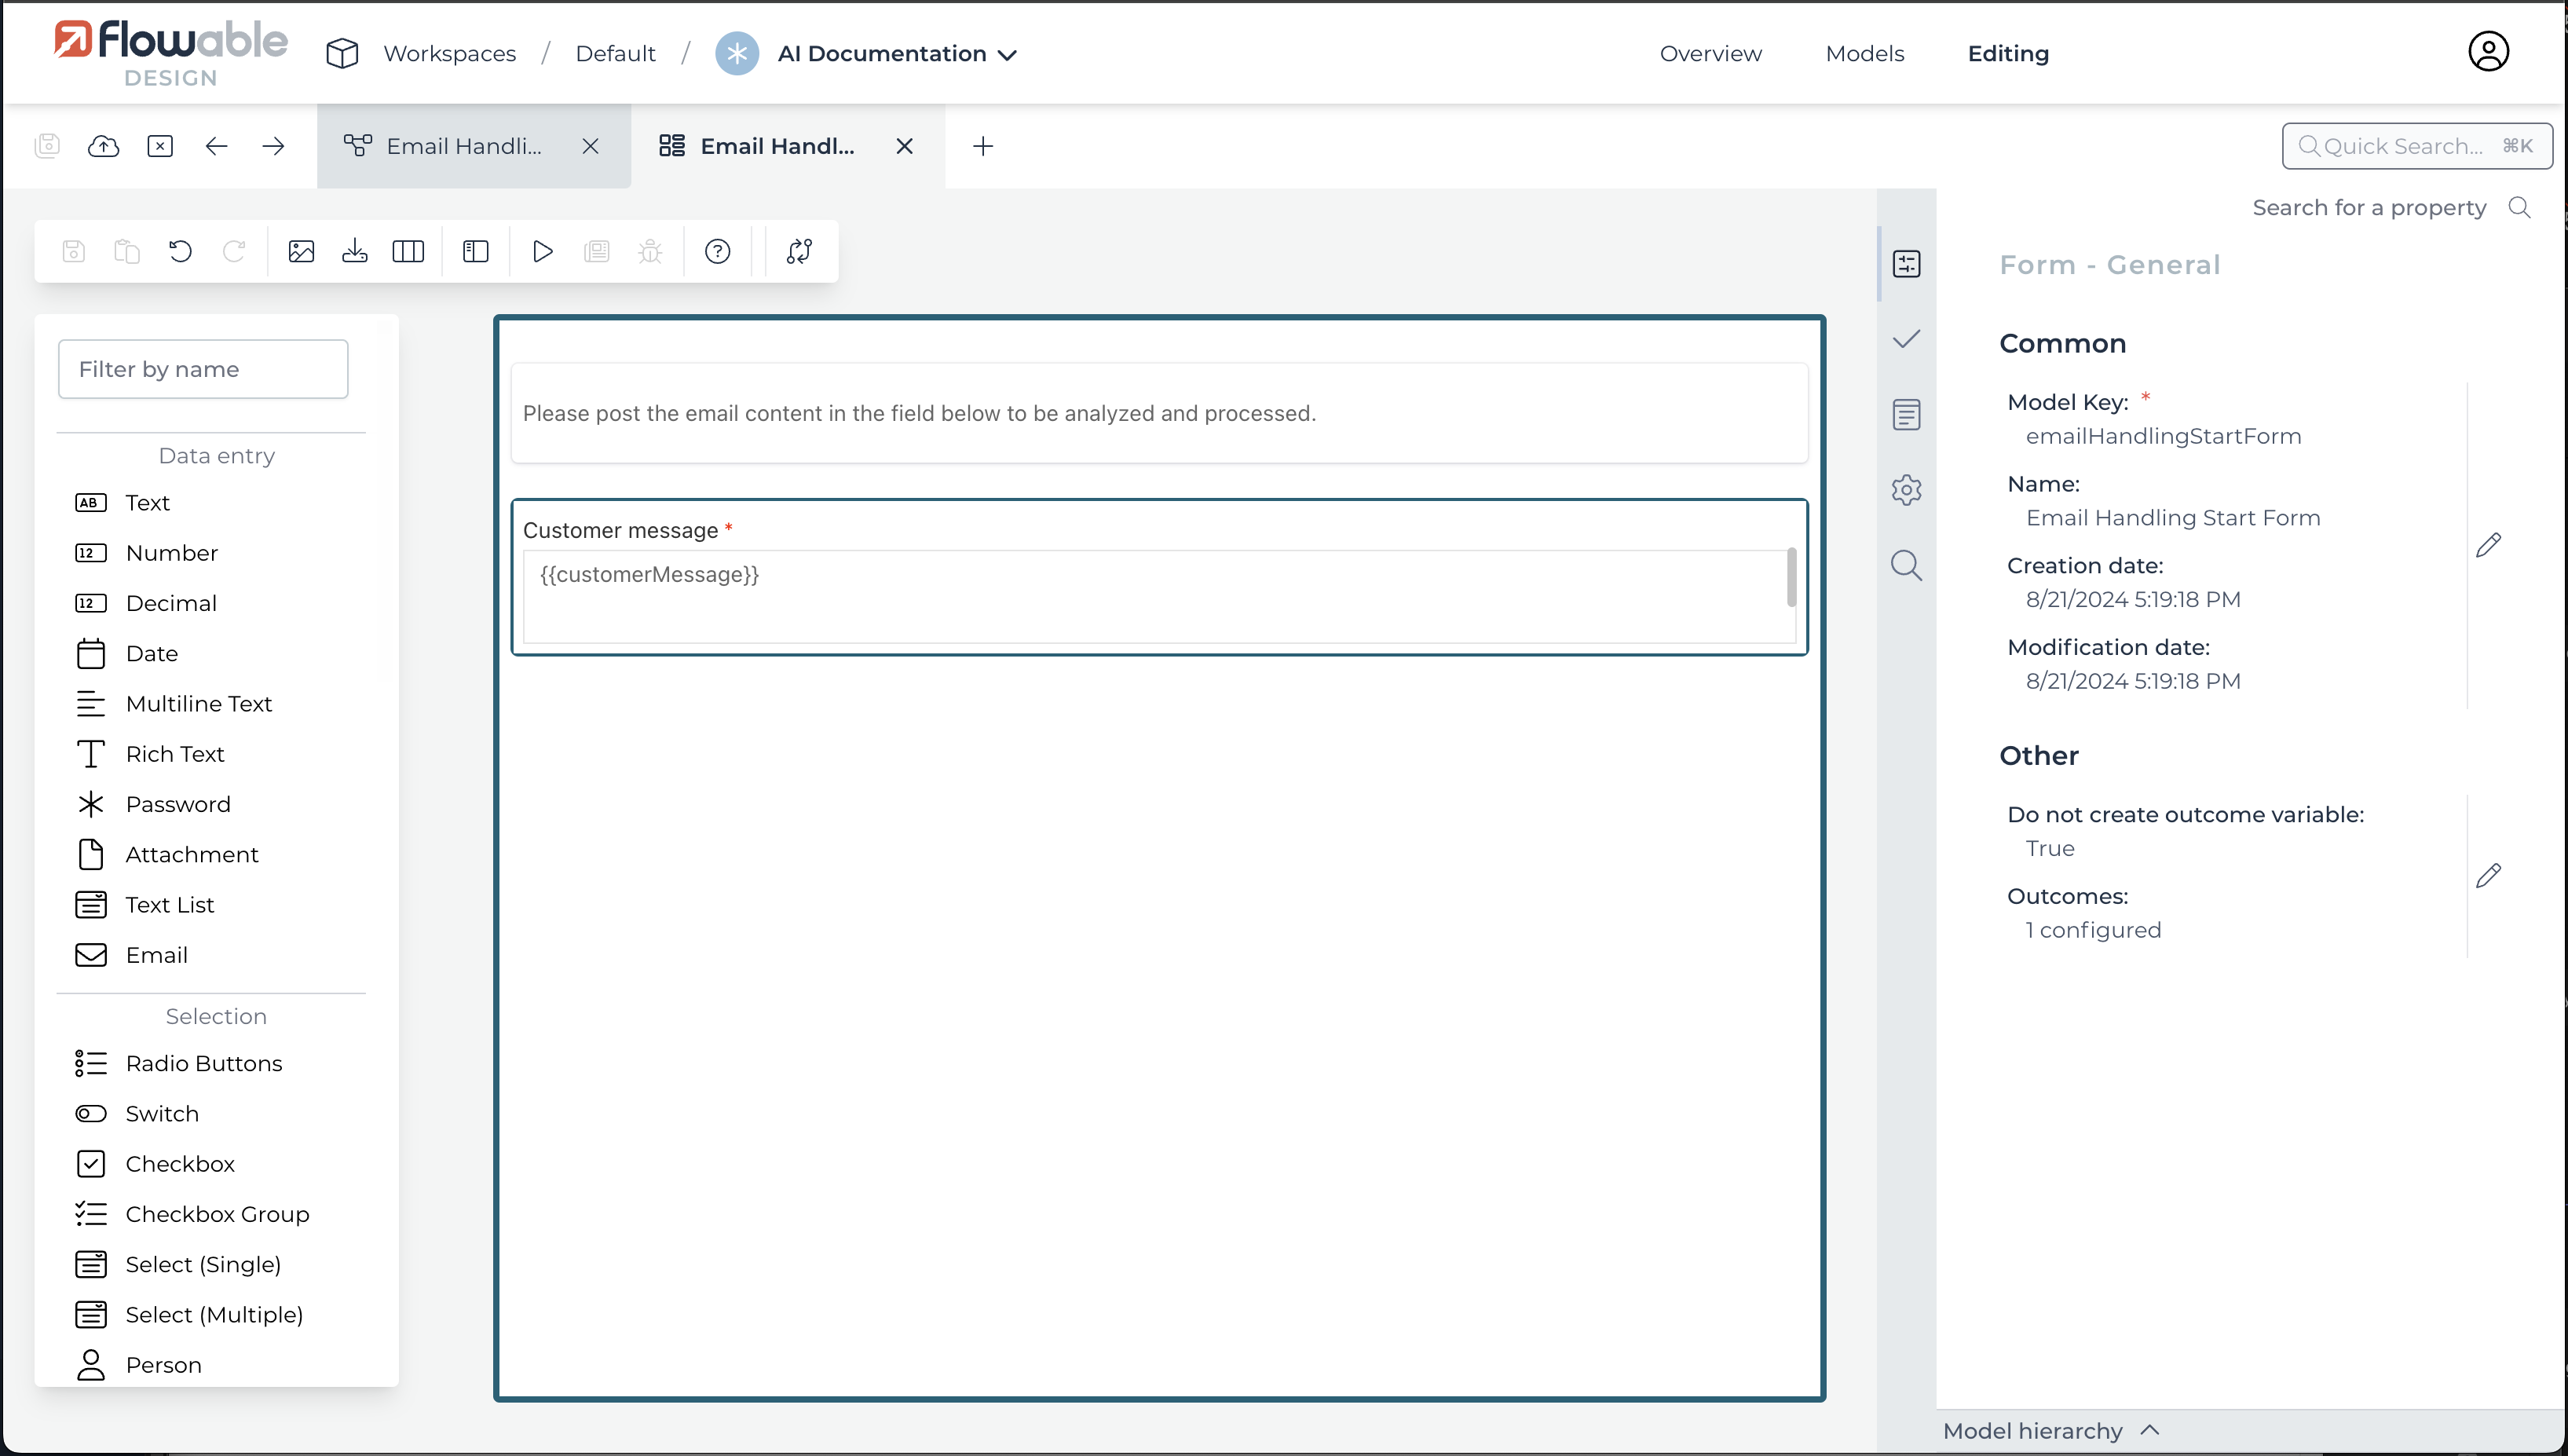
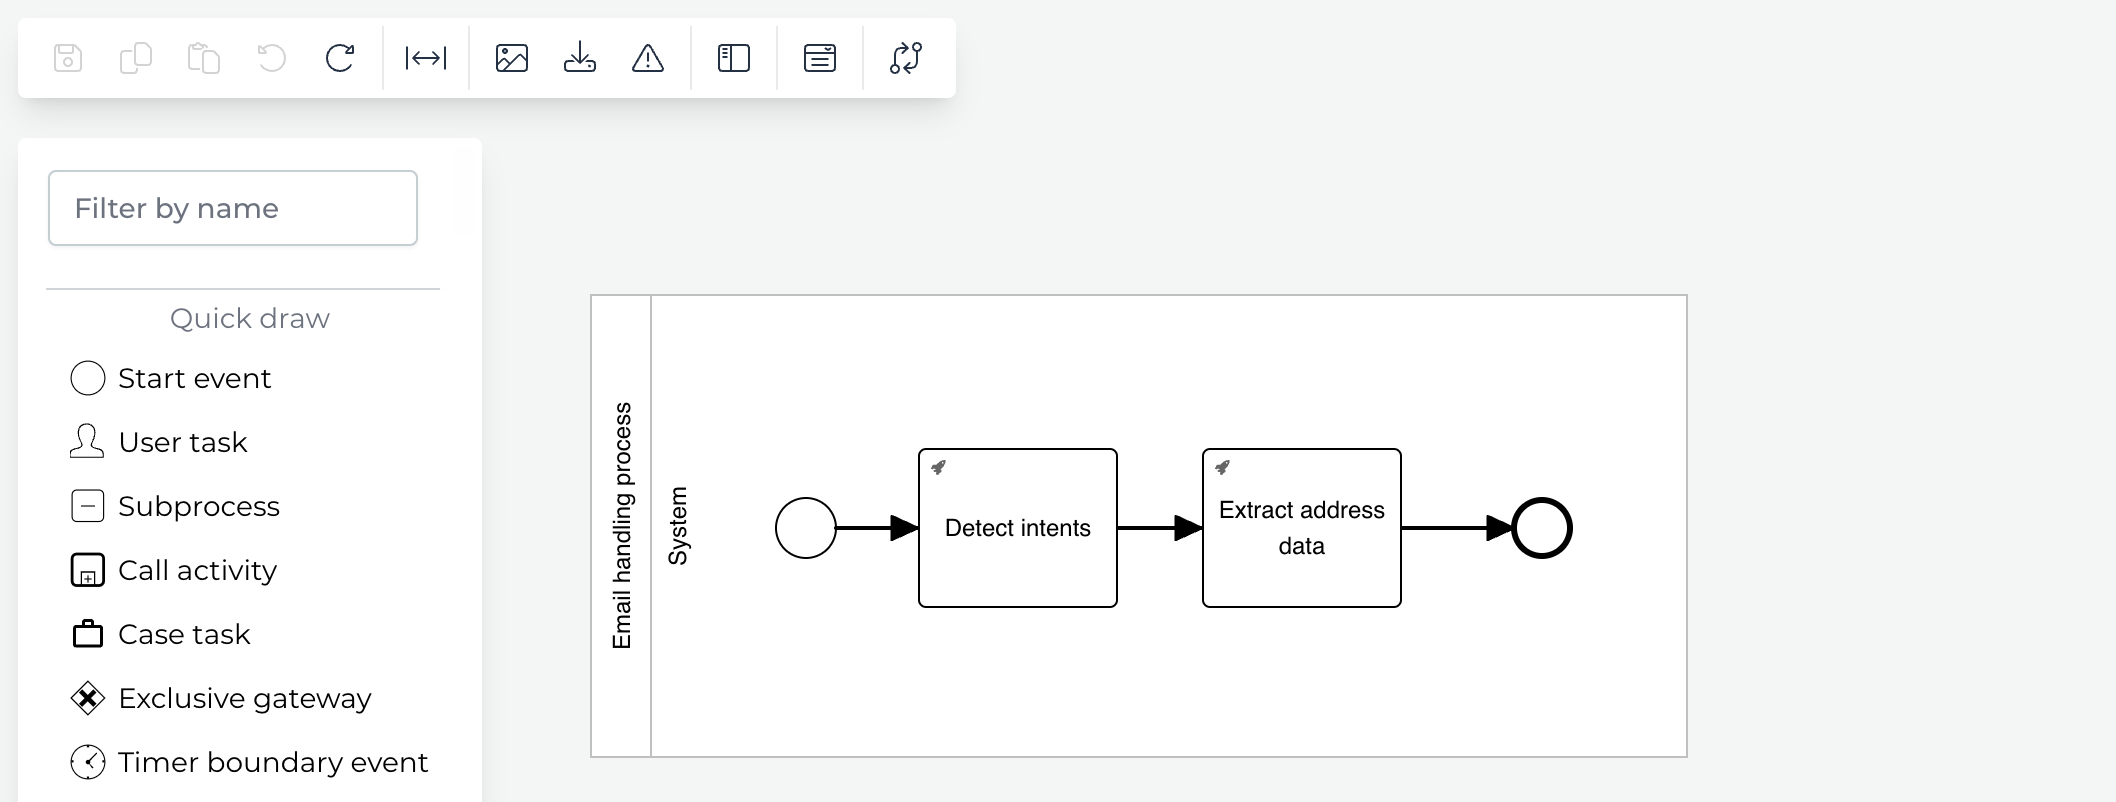
As a next step, we create a new process model named Email Handling Process with a start event having a start form that might look like this:
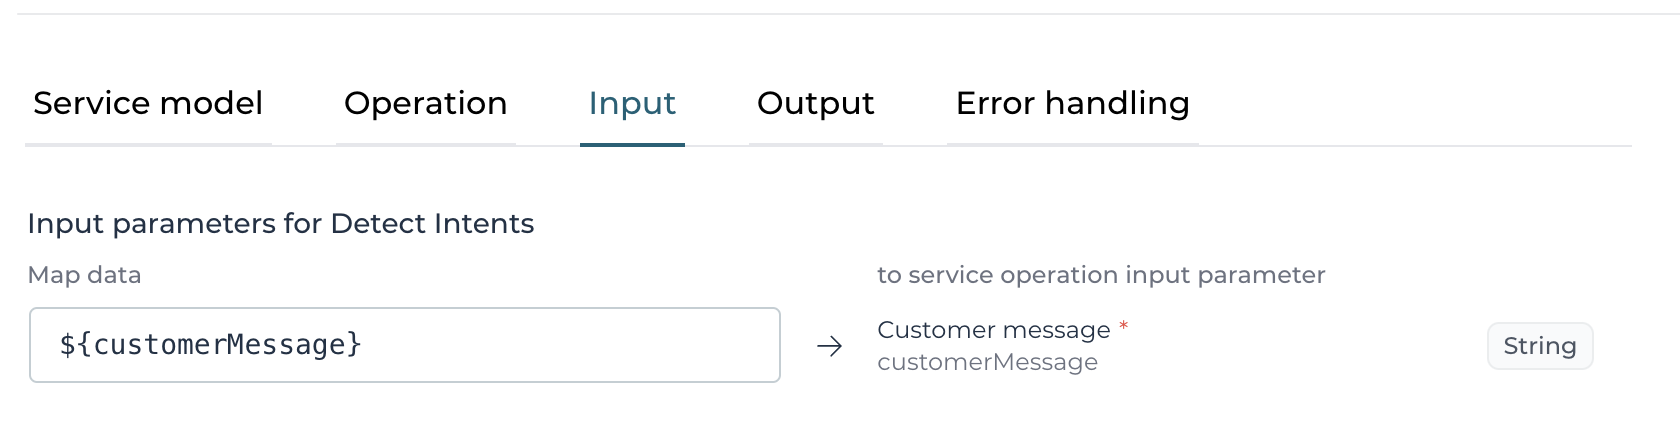
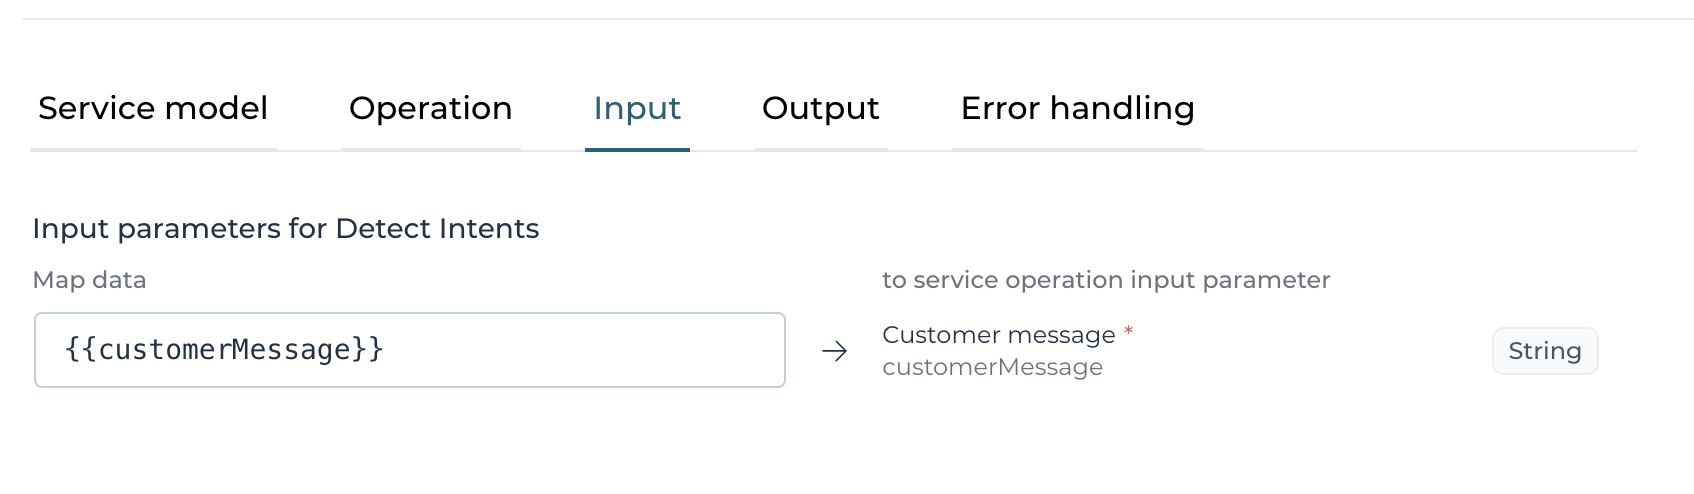
In the process model, add a Service Registry Task and select our service definition and the Detect Intent operation. Once you selected that operation,
the Input and Output tabs will already list the necessary input parameters and available output parameters you then just need to do the mapping for.
For the input parameter, you can do a mapping to the variable we used within the start form or with the autocompletion, you can just select it from the list:
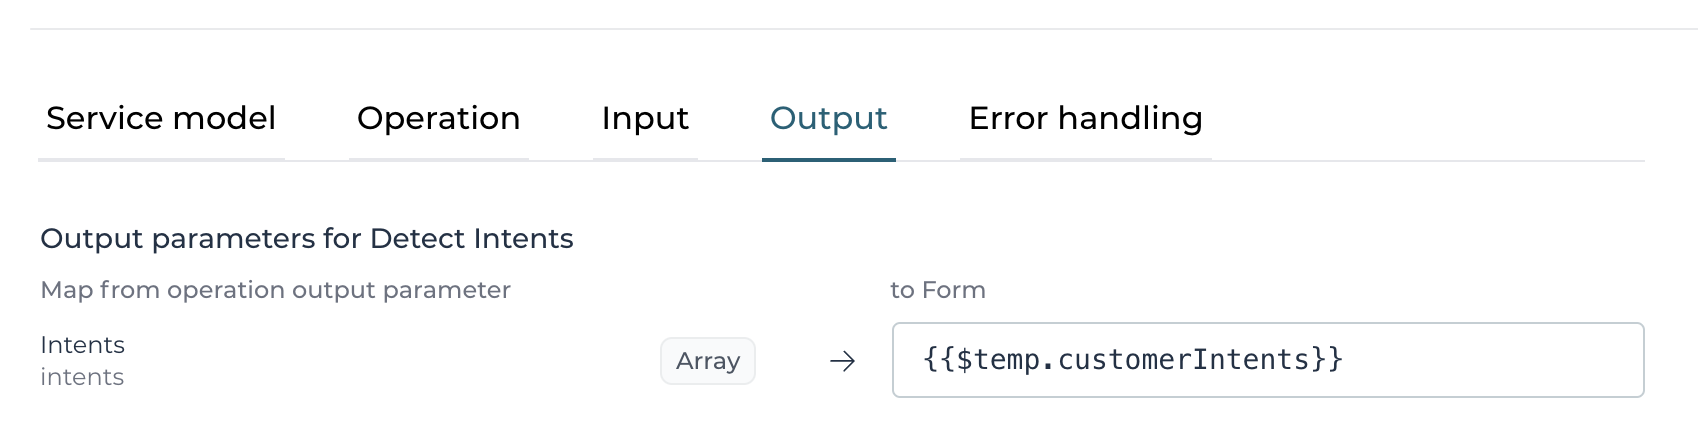
For the output parameter mapping, we can put in any outcome variable name we want, we use customerIntent in our example here:
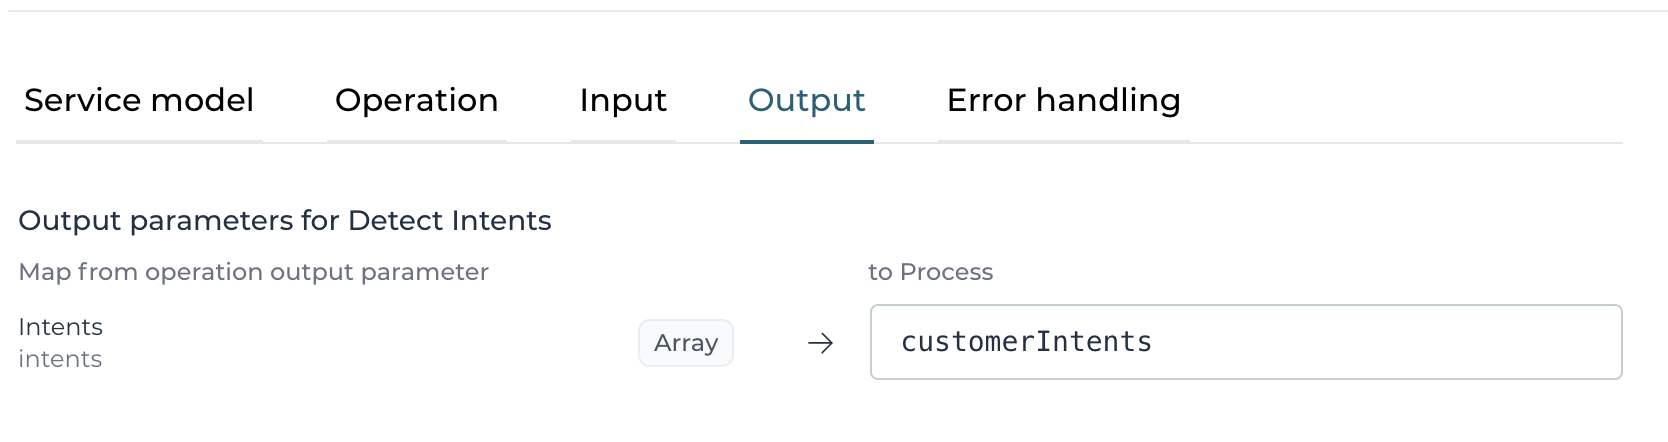
Adding another Service Registry Task after the first one where we get the intent(s) of the customer, we can extract the address data out of the content as
a next step. Of course once we add in all the other use cases as well, we might want to have a gateway and for each use case maybe even a call activity
(sub process) where we continue with each use case individually, but we just want our first use cases tested as fast as possible, so we just have the two
service tasks for now.
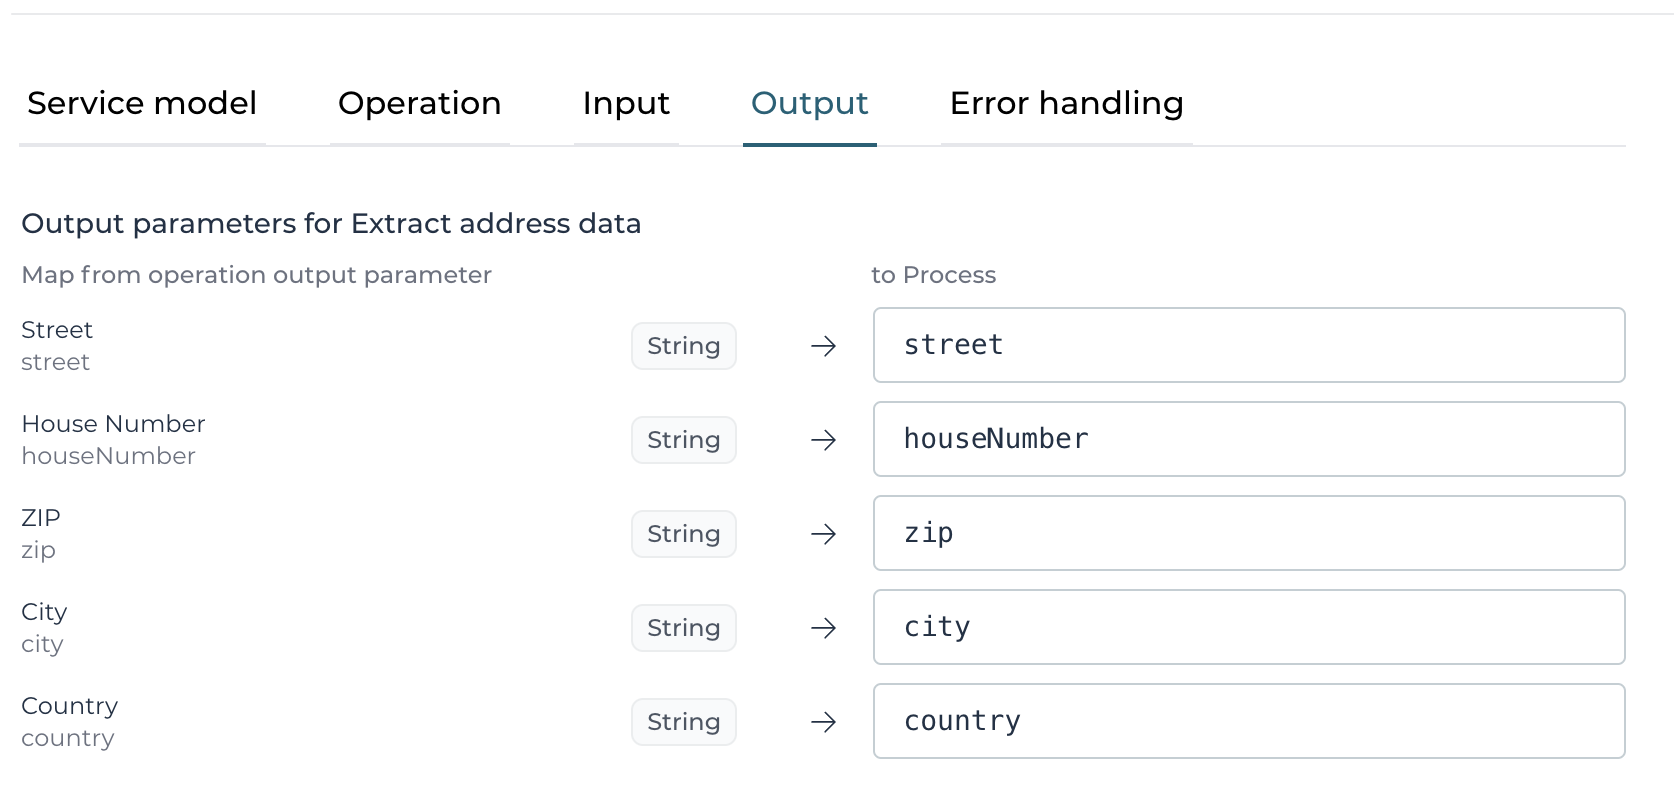
For the second service task, after choosing the same service and the second operation (Extract address data), we can use the very same mapping for the
input parameter as we just pass in the same content and the output mapping might look something like this:
The process model might now look something like this:
Testing the process
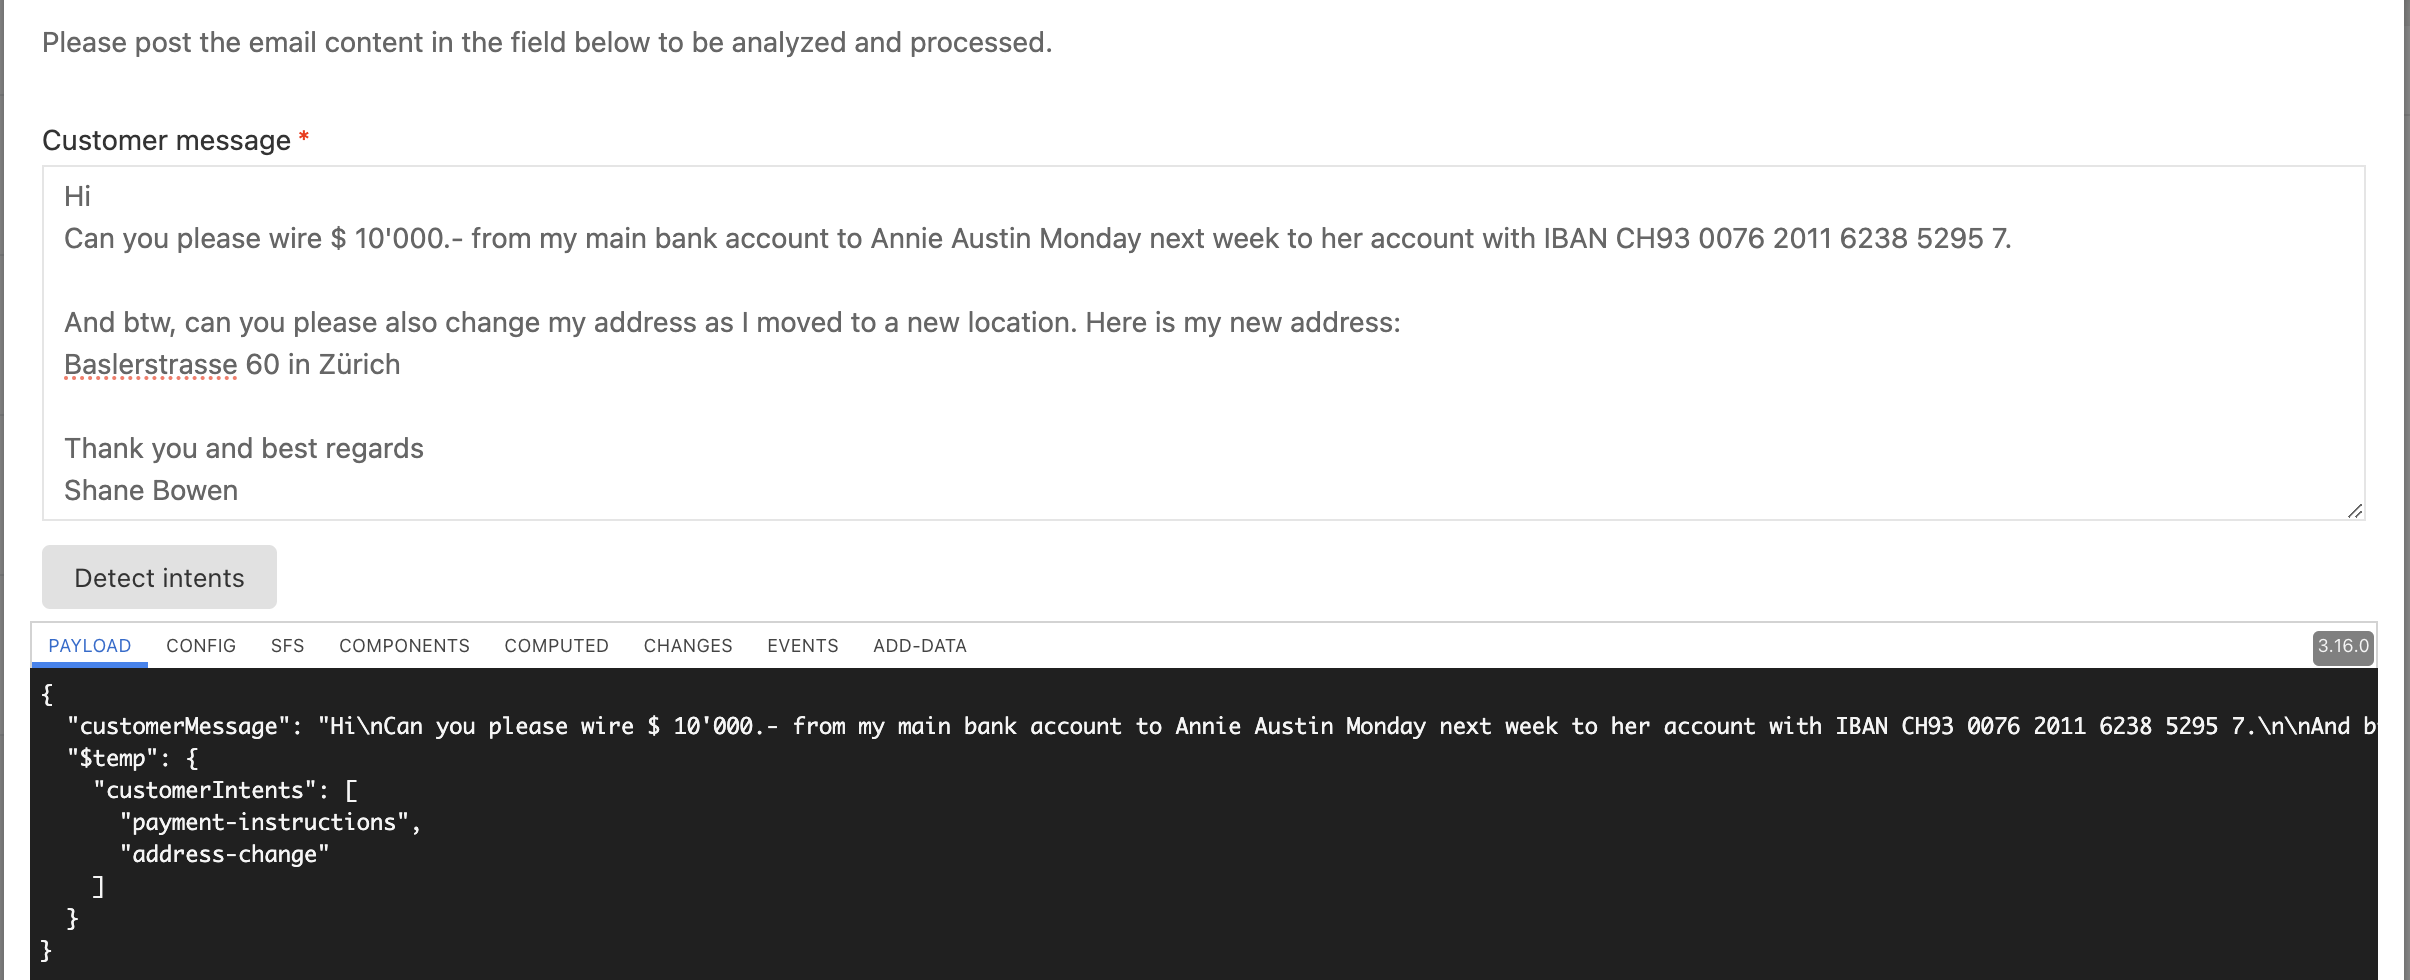
If we already want to test the process, we can deploy and run it now.
Starting a new process instance, you can do something like this:
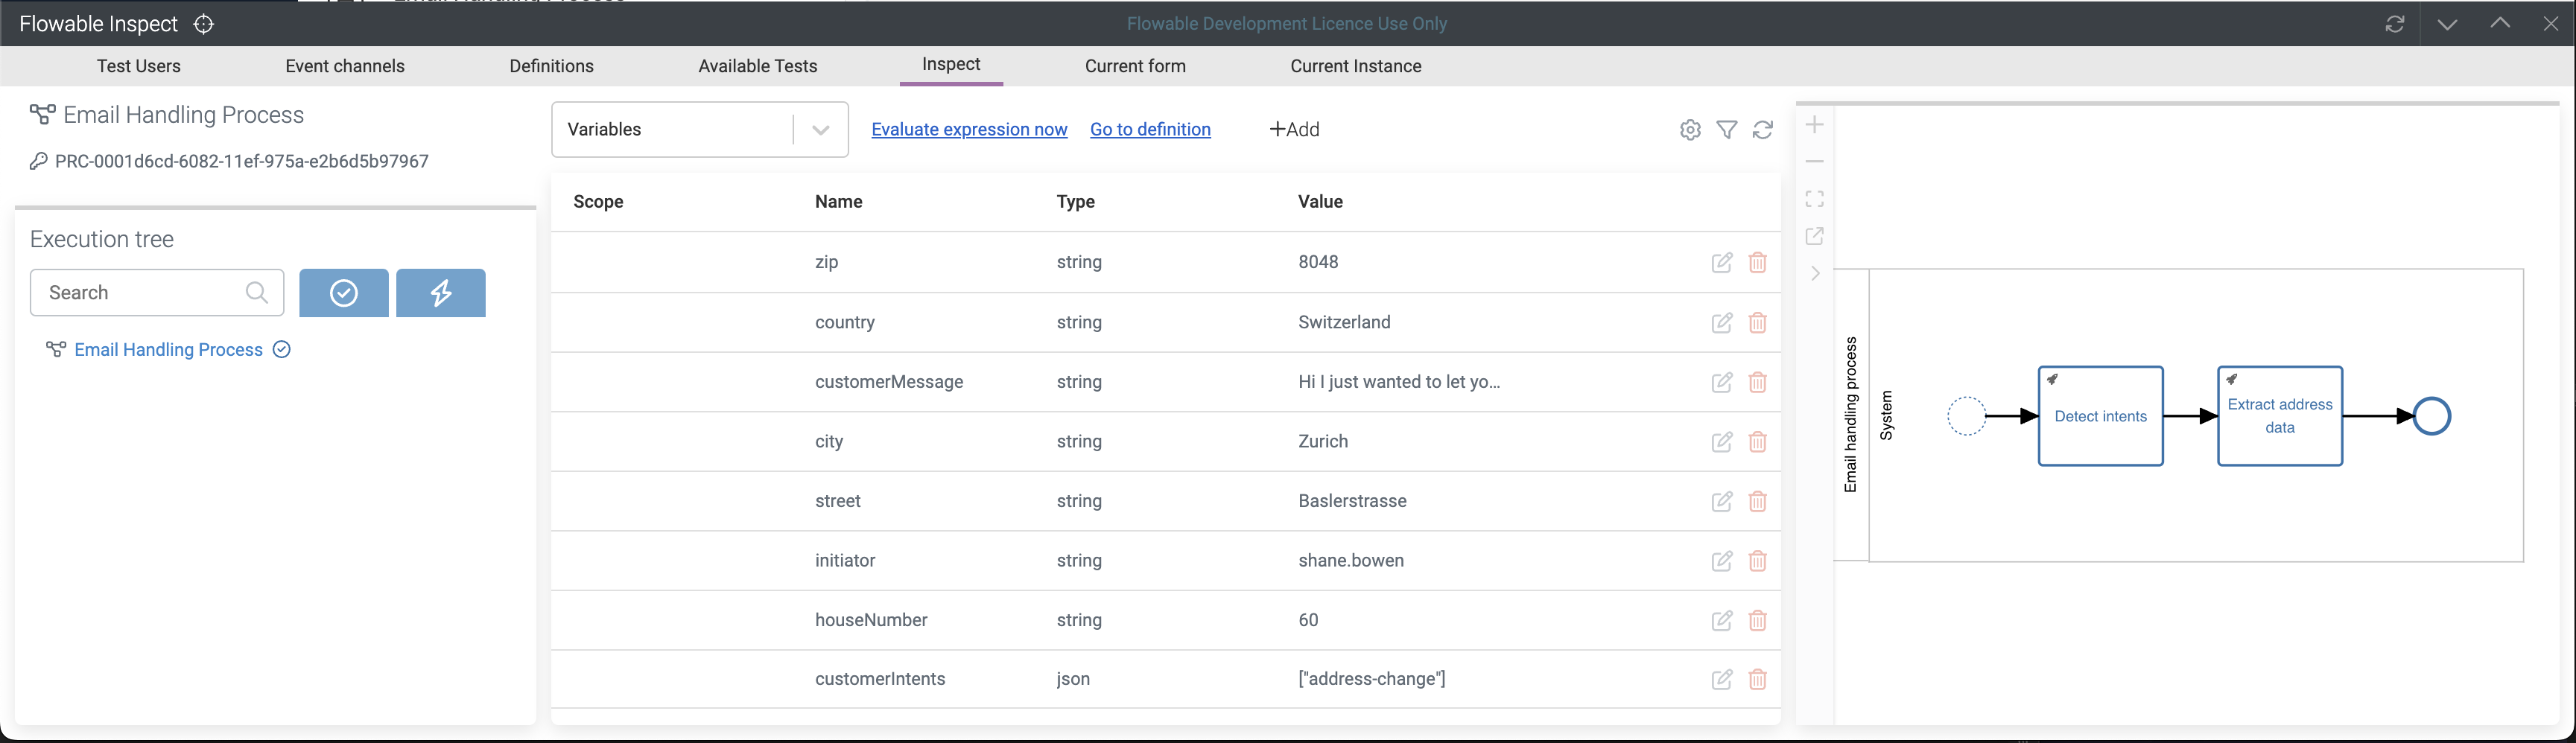
Executing the process and using Flowable Inspect, we can see the extracted values, and as expected, AI even filled in the missing gaps like the ZIP code and
the country:
Adding operations for further use cases
As discussed earlier, we want to add more operations specific to the various use-cases we want to support within the email handling process.
Extracting payment instruction data
Similar to the address data extraction operation, we can add a new one to extract payment instruction data, named Extract payment data as an example.
The input parameter is exactly the same as with the other ones, just customerMessage and here is a list of the output parameters:
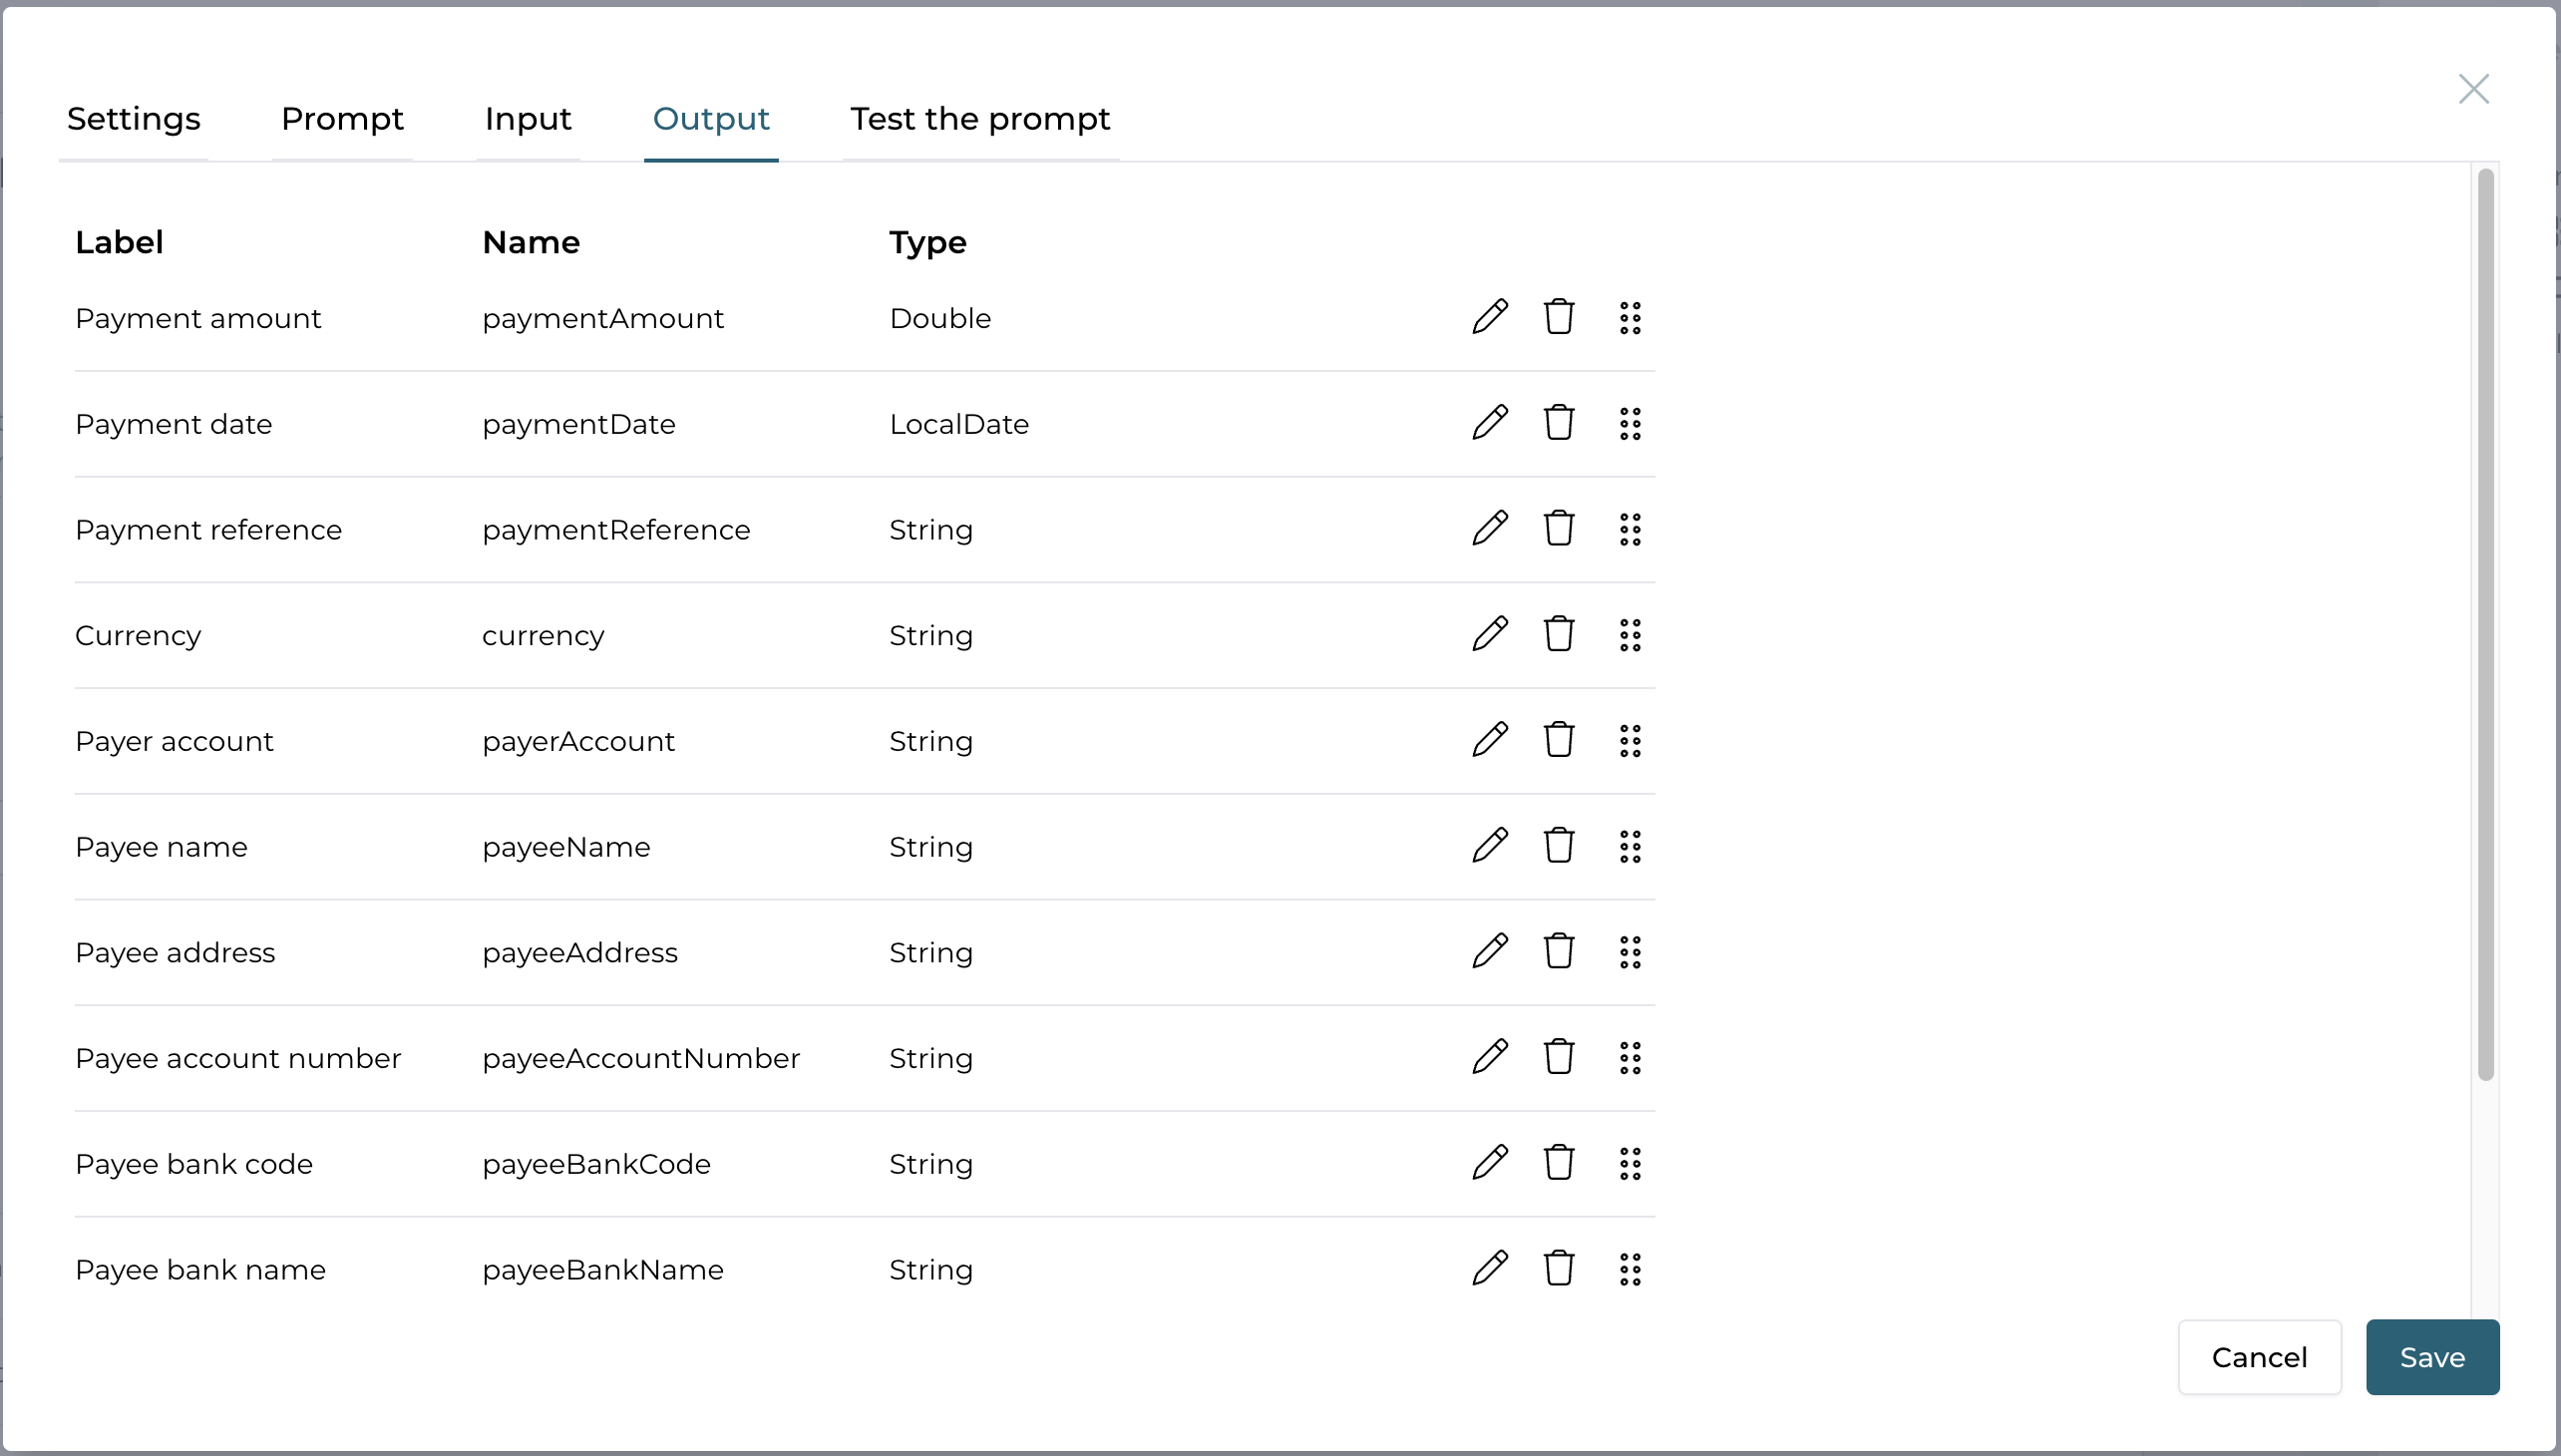
And here is the second part of the list:
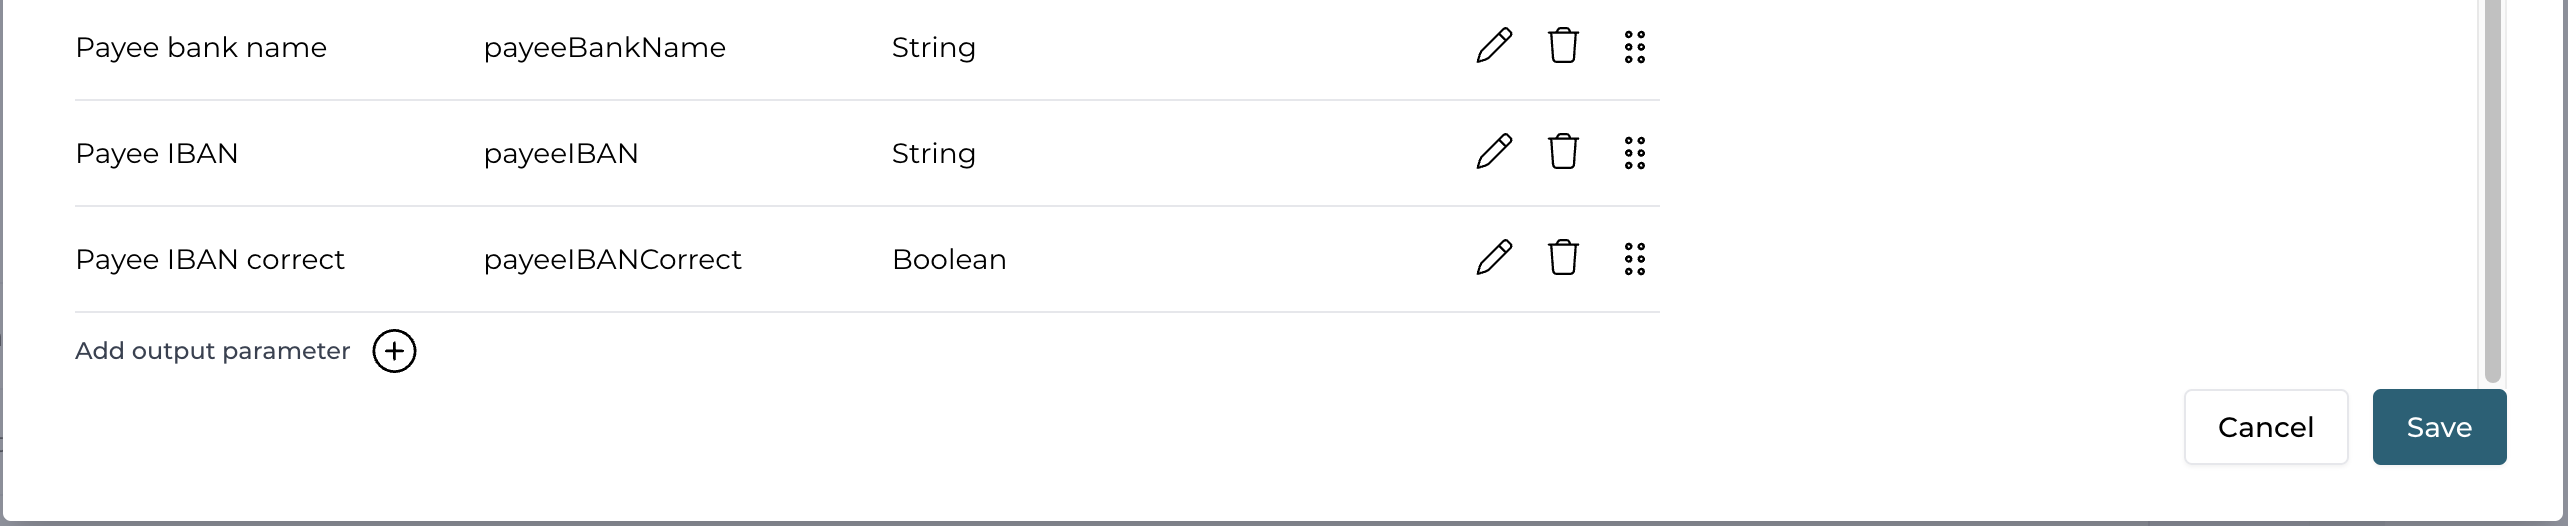
As you can see we added quite a number of output parameter values, knowing that maybe not all of them will be provided, but we want to get the maximum out of a payment instruction message and that's why.
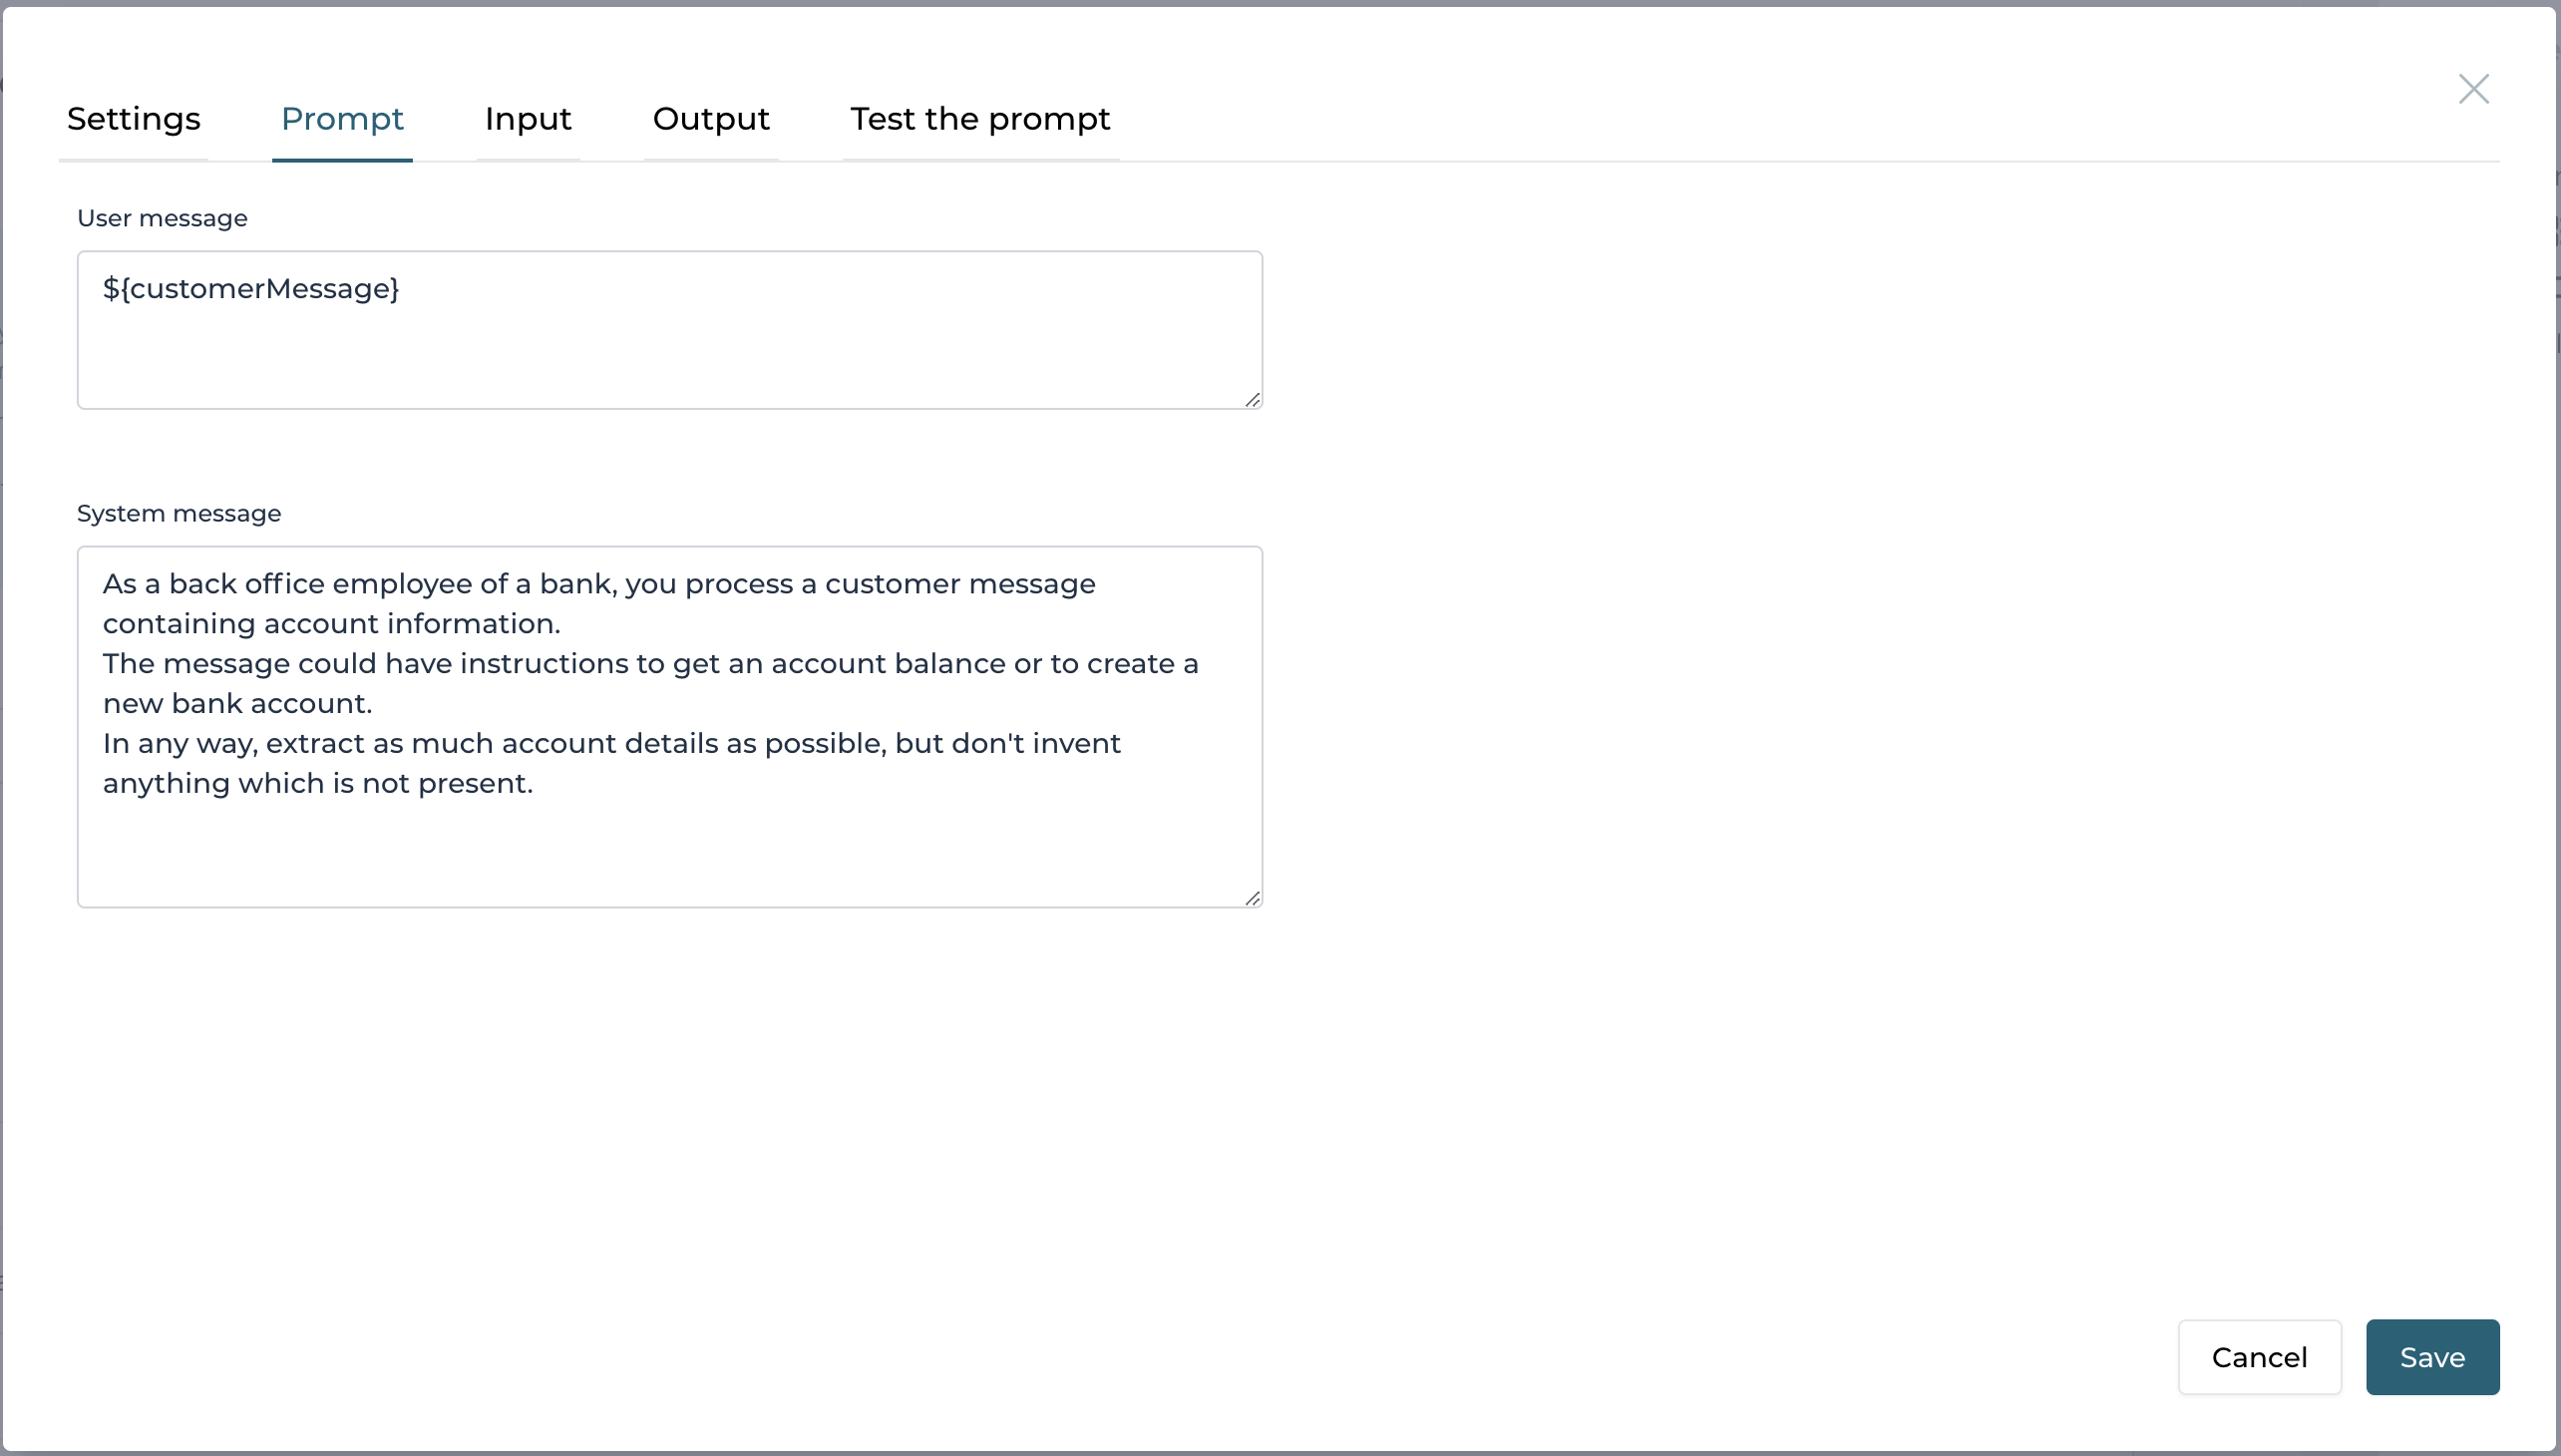
As an example for the prompt, see the following example, which also has instructions to validate the IBAN number, if provided and come up with some banking data that can be extracted out of it as well.
 note
notePay attention to the last sentence, containing an expression evaluating to the current date. If this is missing, most AI services will not be able to determine relative dates like "next Monday" or "tomorrow" as they don't have a reference of today so we include the current date as an instruction to give AI a reference point to calculate any relative date information.

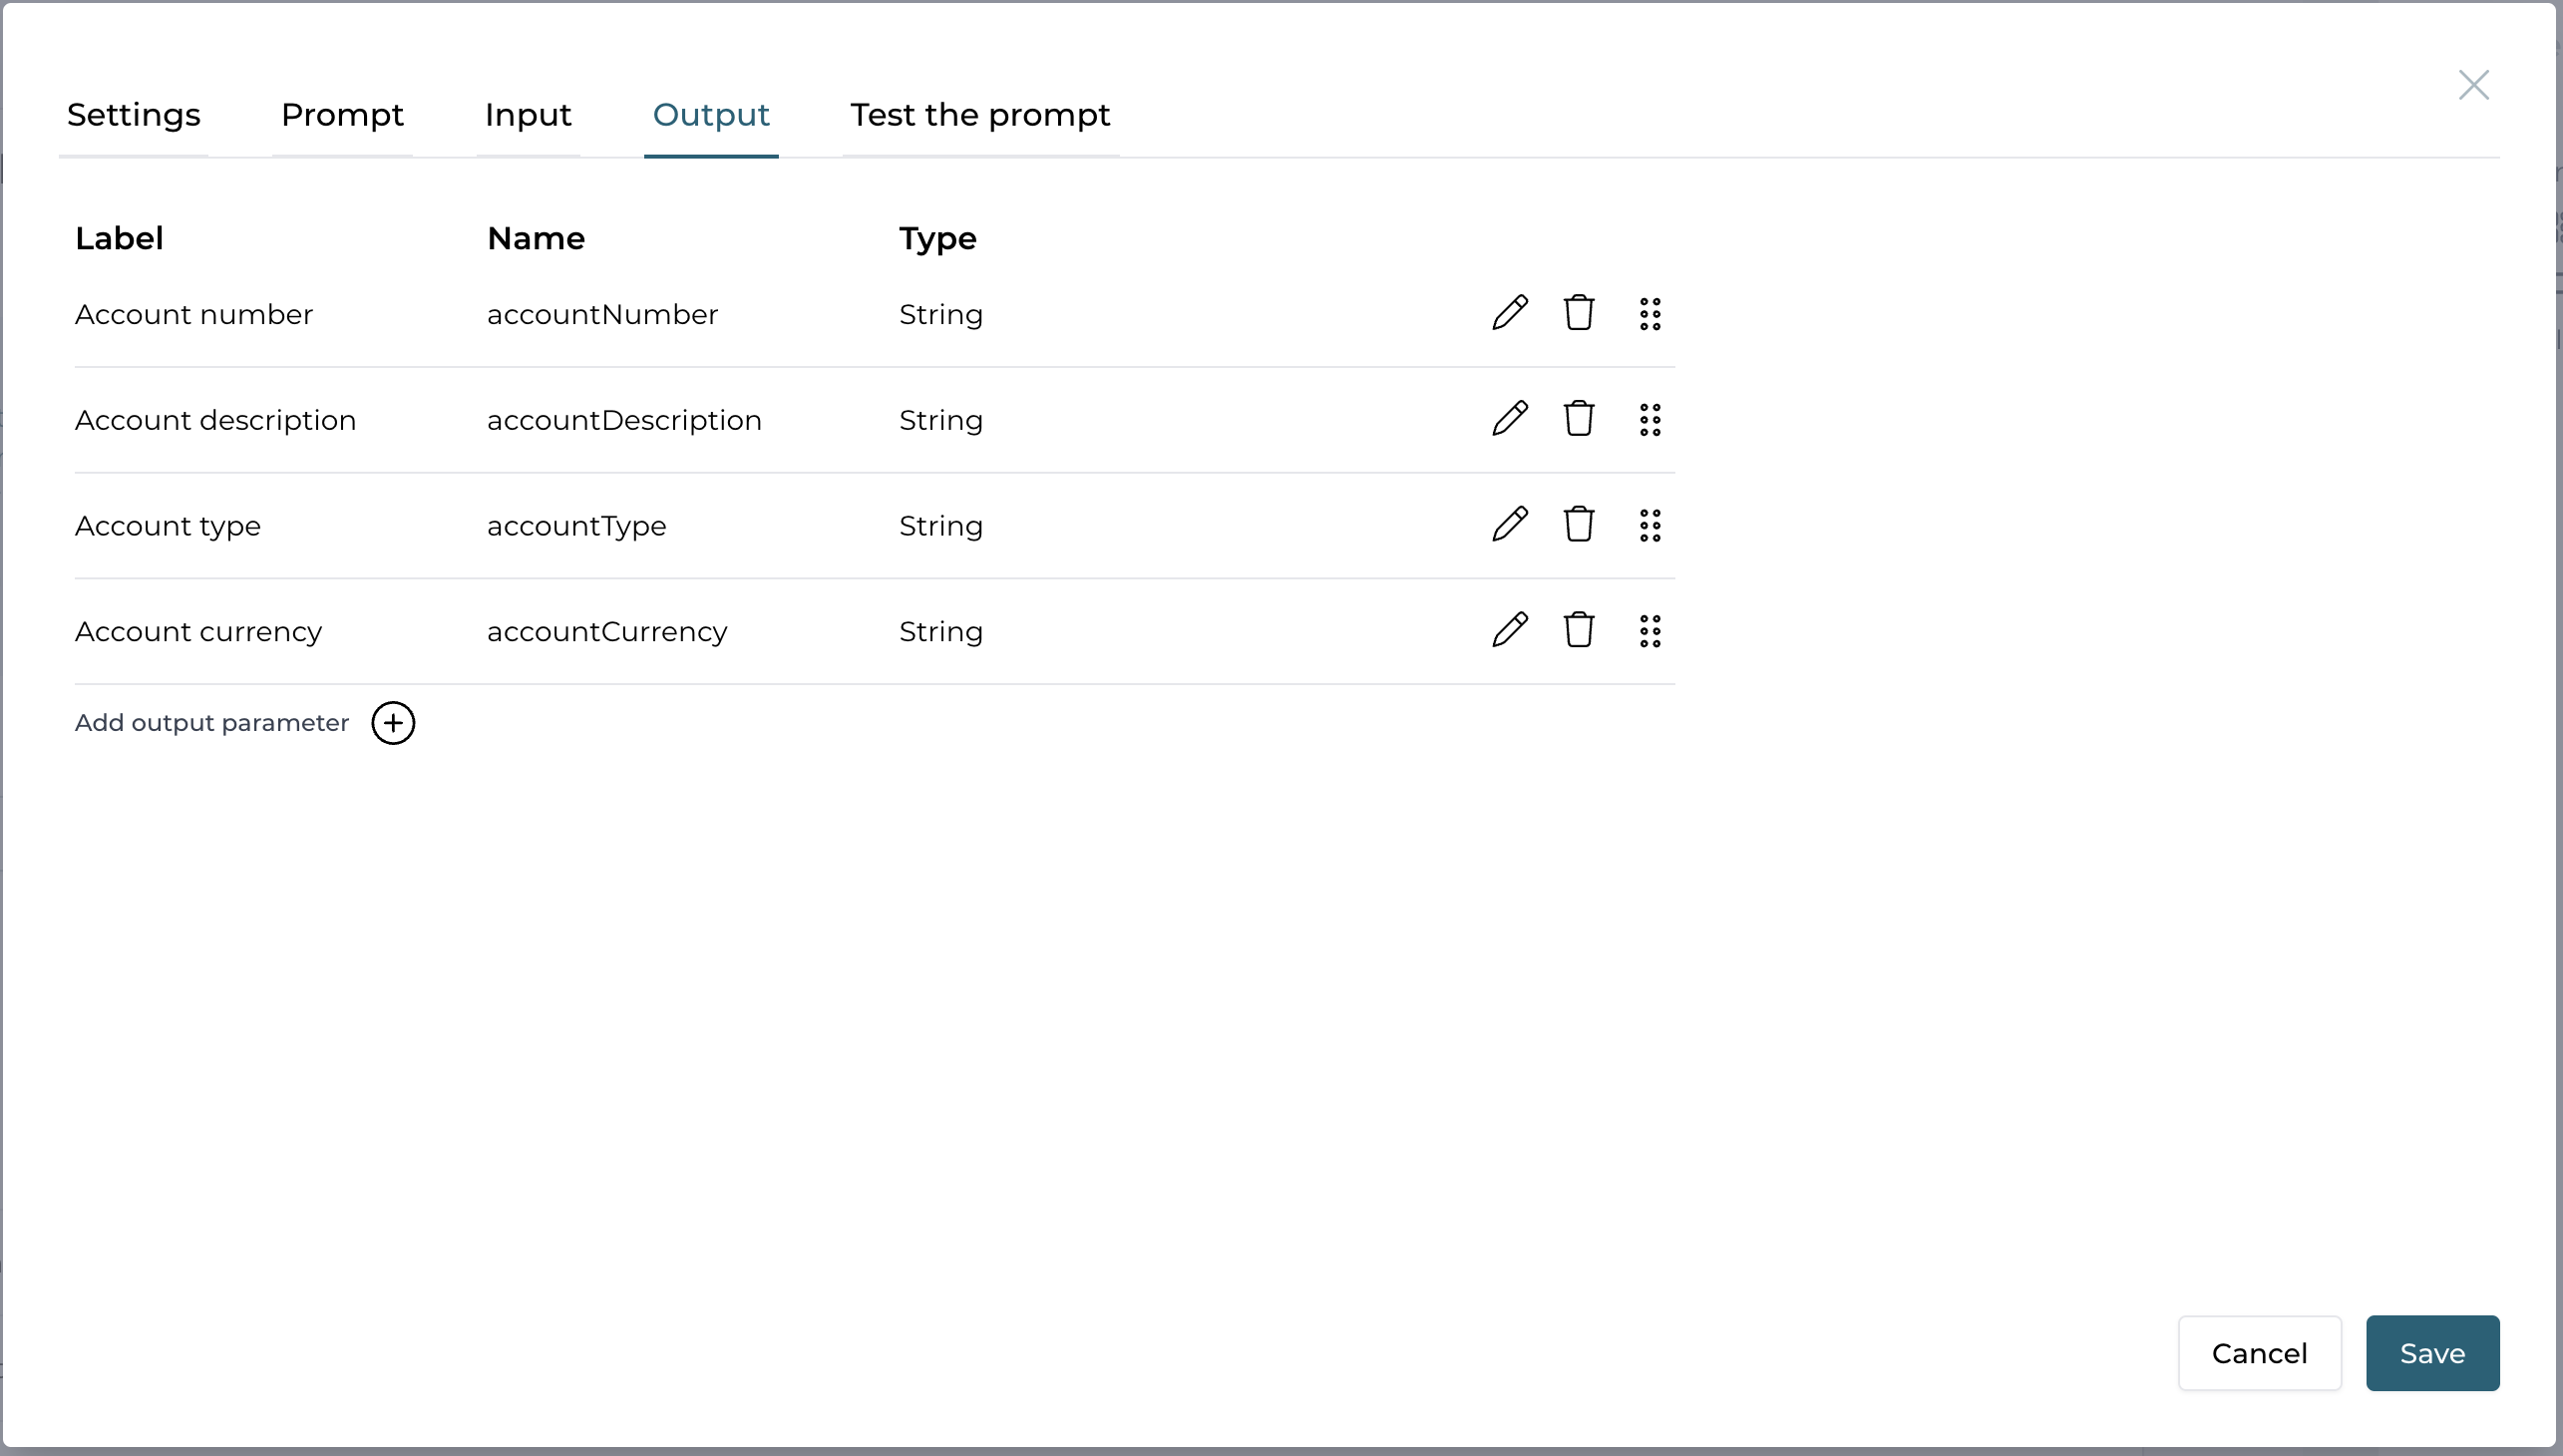
Extracting account data
As a next operation, we combine the two use cases for requesting an account balance or opening a new account into one operation as they are very similar in what data they extract.
As before, the input parameter is the same like with all our operations and here is an example list of output parameters:
And here is an example for the prompt:
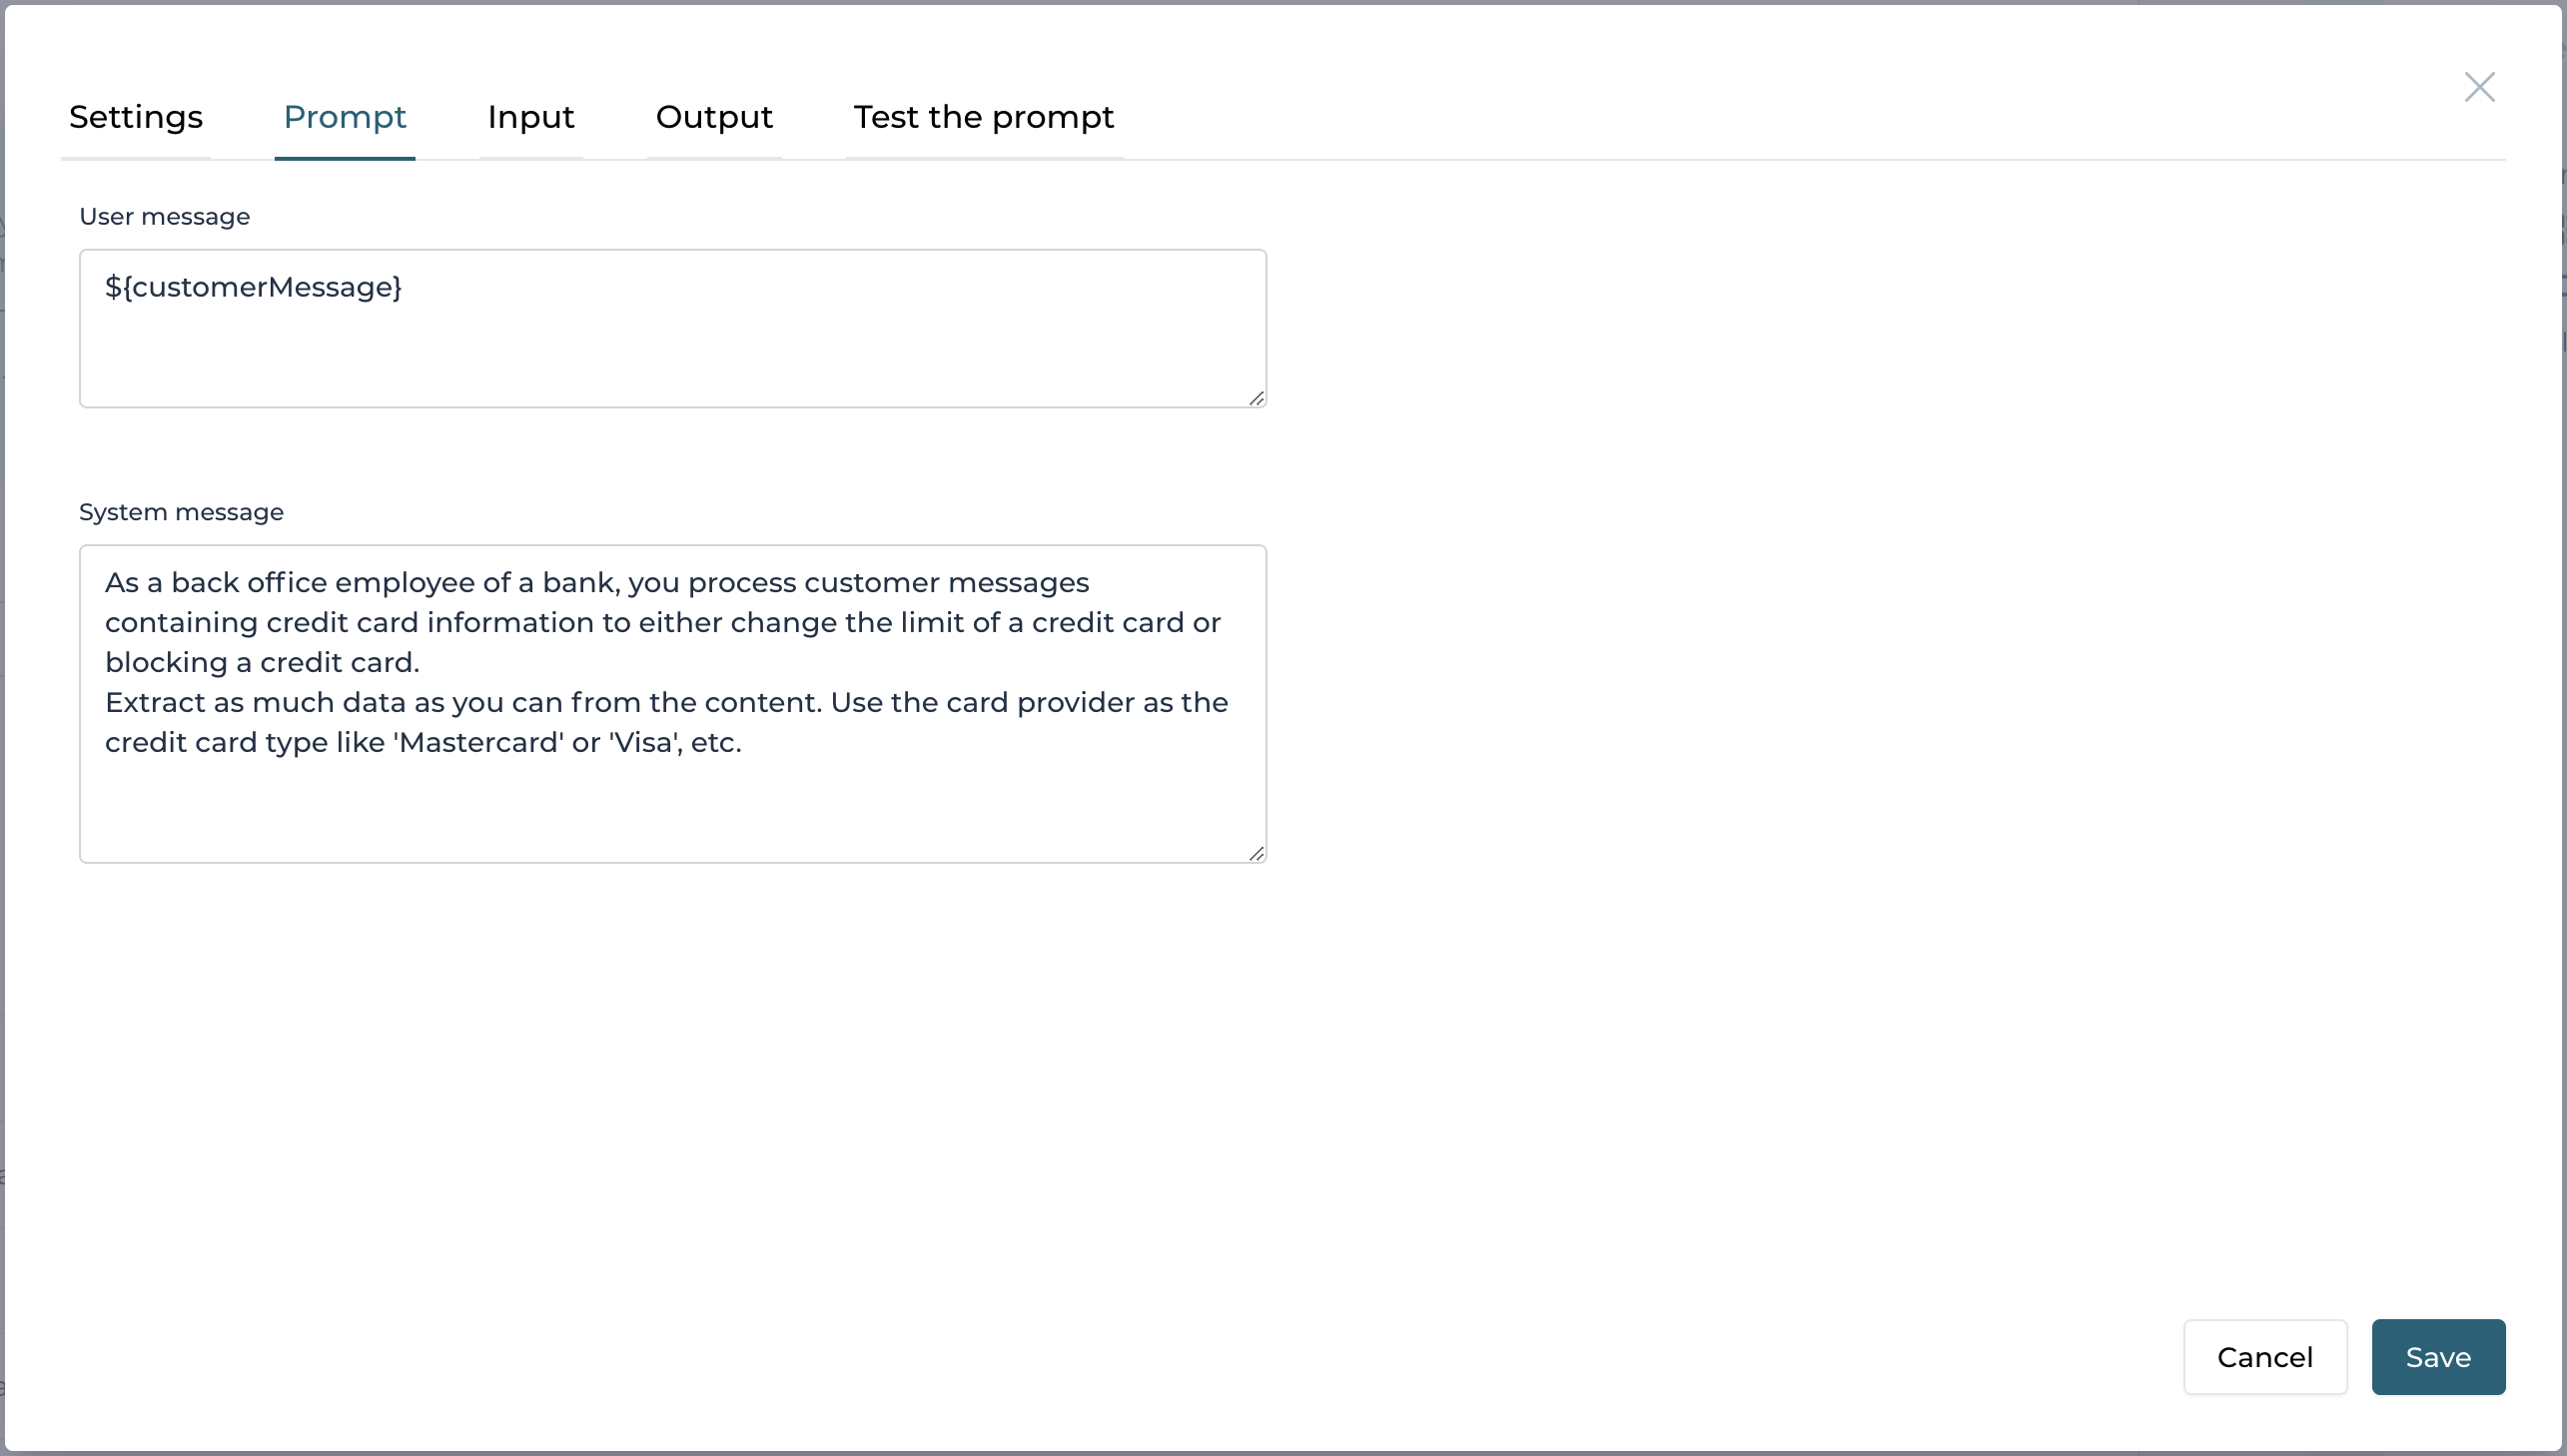
Extract credit card data
We can do the same for extracting data for the two credit card use cases as well. The input will be the same as before and the output could look like this:
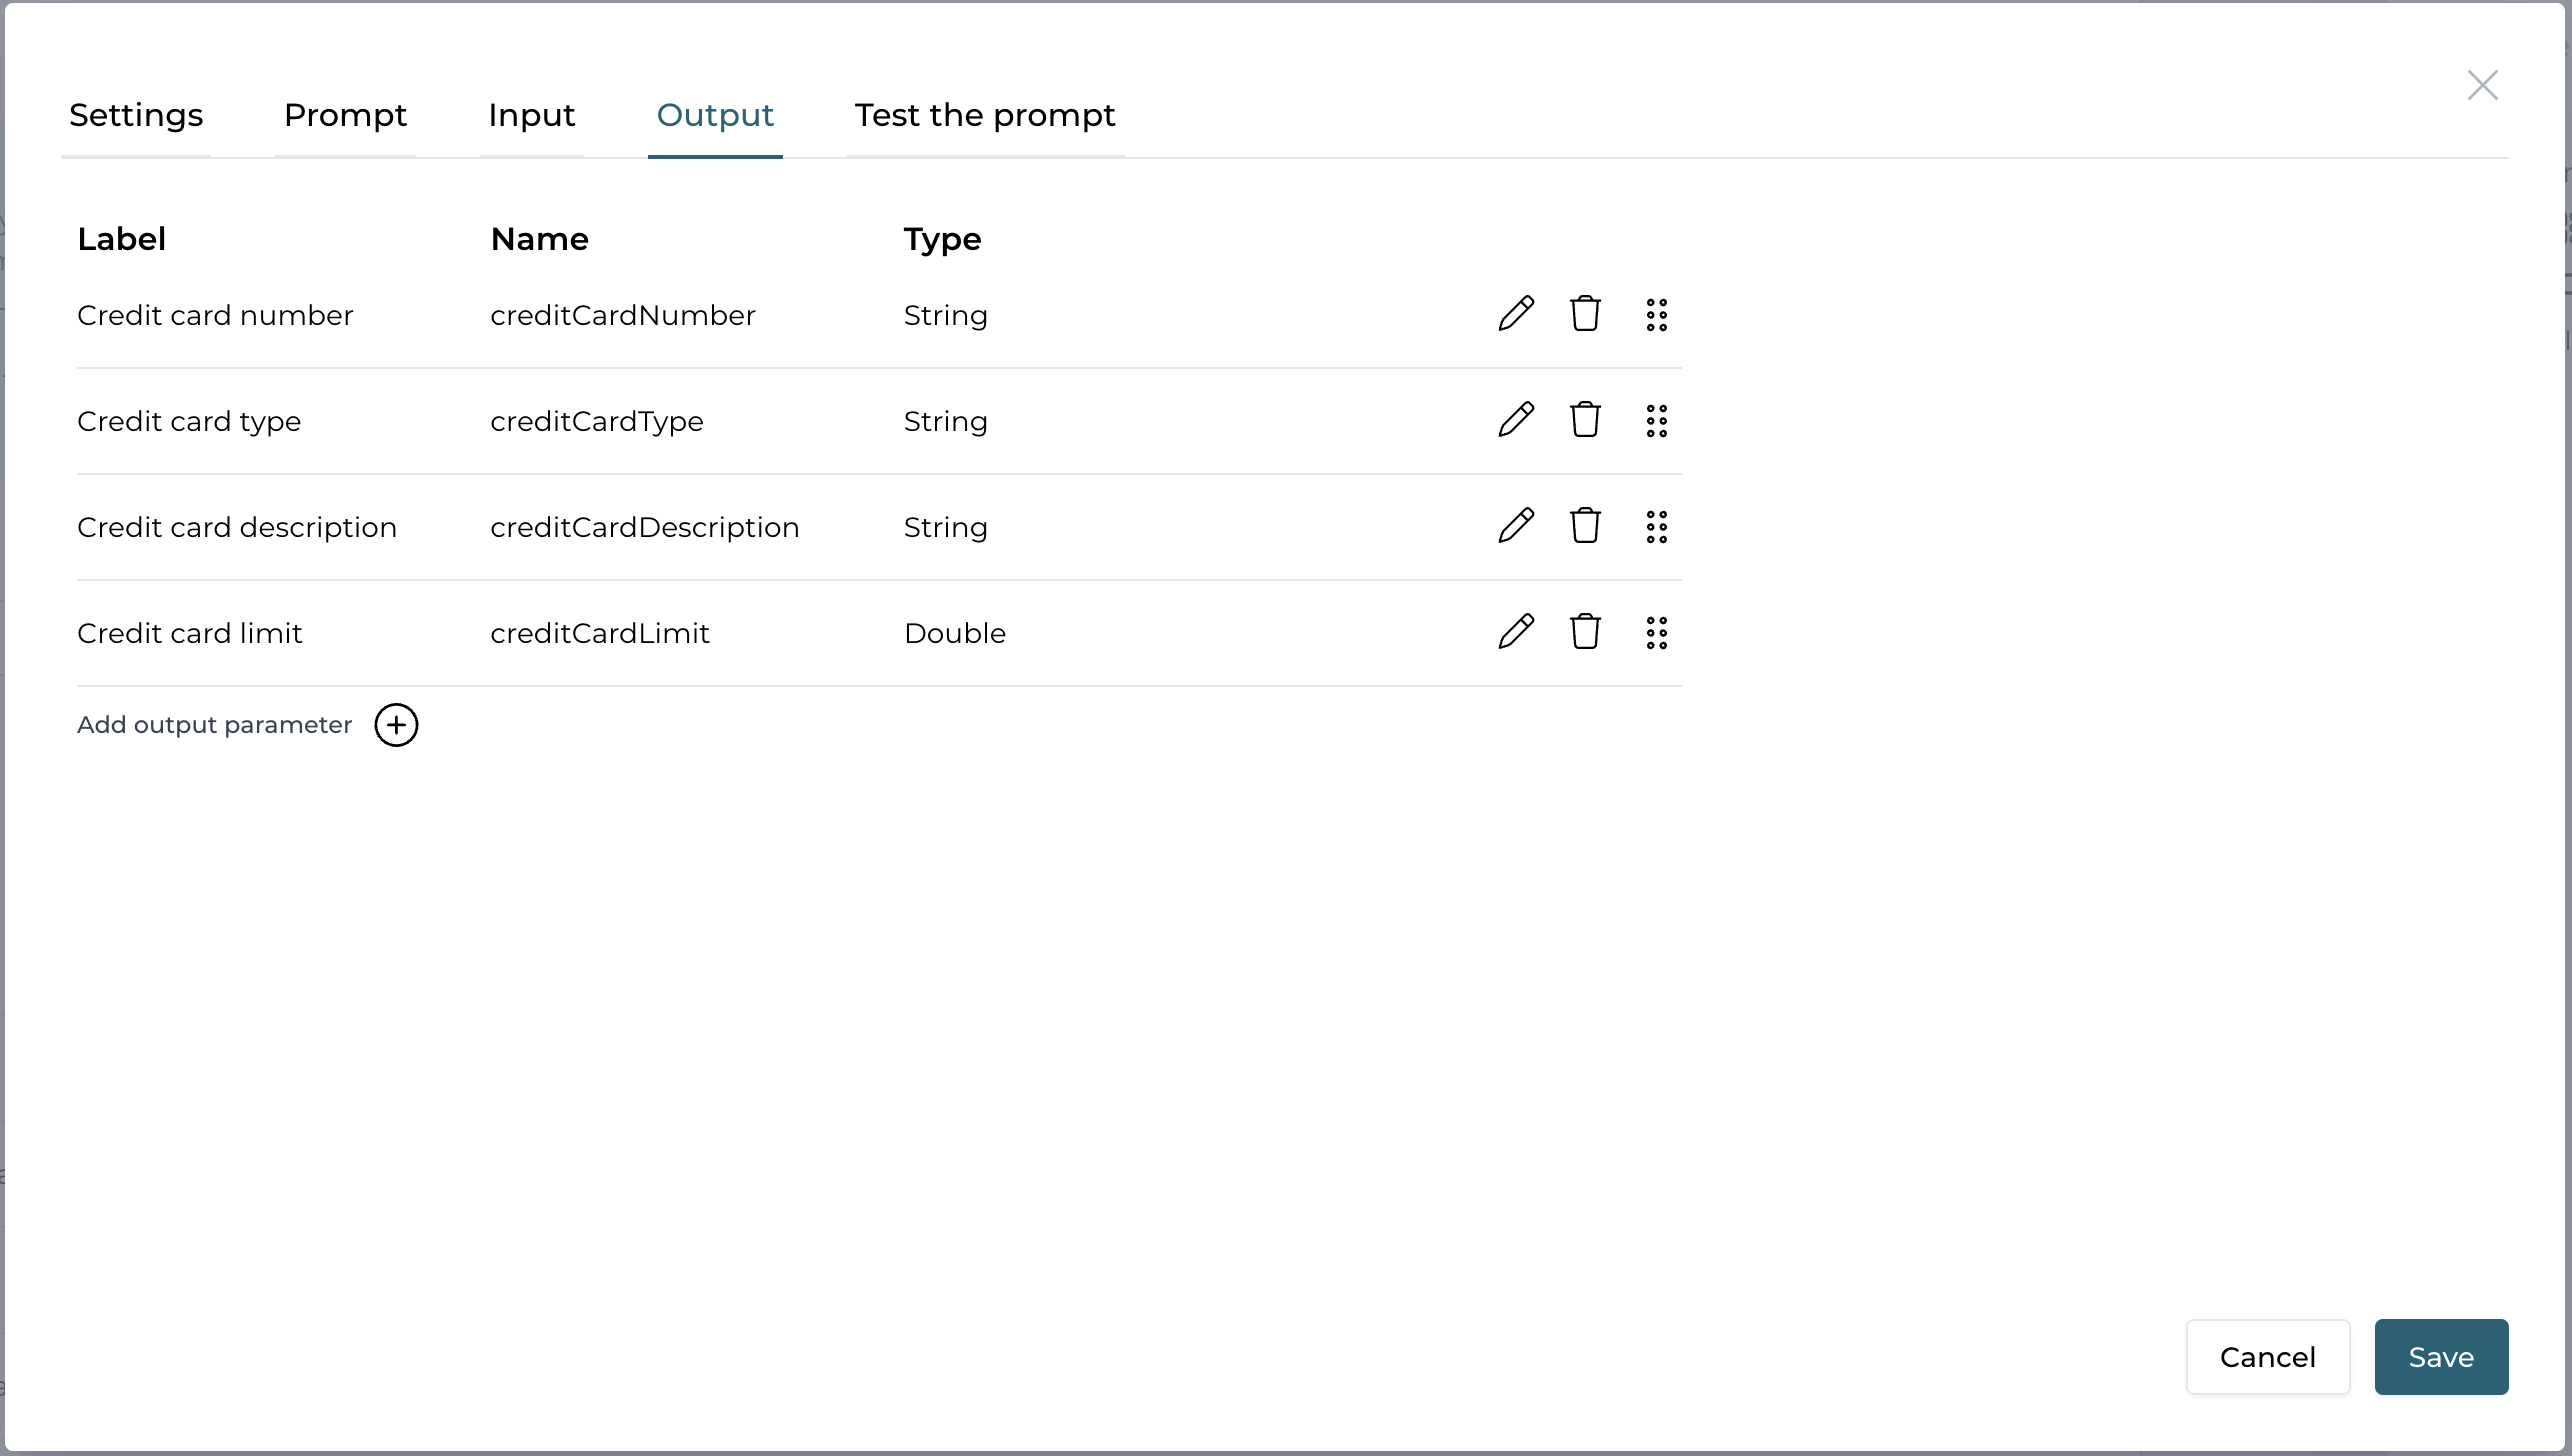
And here is an example for the prompt:
Adapt process to all use-cases
In our first version of the process we only assumed to have content for the address change use-case and so we didn't pay attention to the extracted intent.
When going back to the process model, we can add a gateway after the first service task extracting the intent of the customer and depending on the outcome switch to a different path where we continue by extracting the relevant data and then further process the request.
Add a new inclusive gateway after the detection of the intents, so depending on the array of intents, we activate one or even several path' according the sequence flows conditions. An inclusive gateway is like a parallel gateway with conditions on which path' to execute and merge back together at the end.
The process model could look something like this:
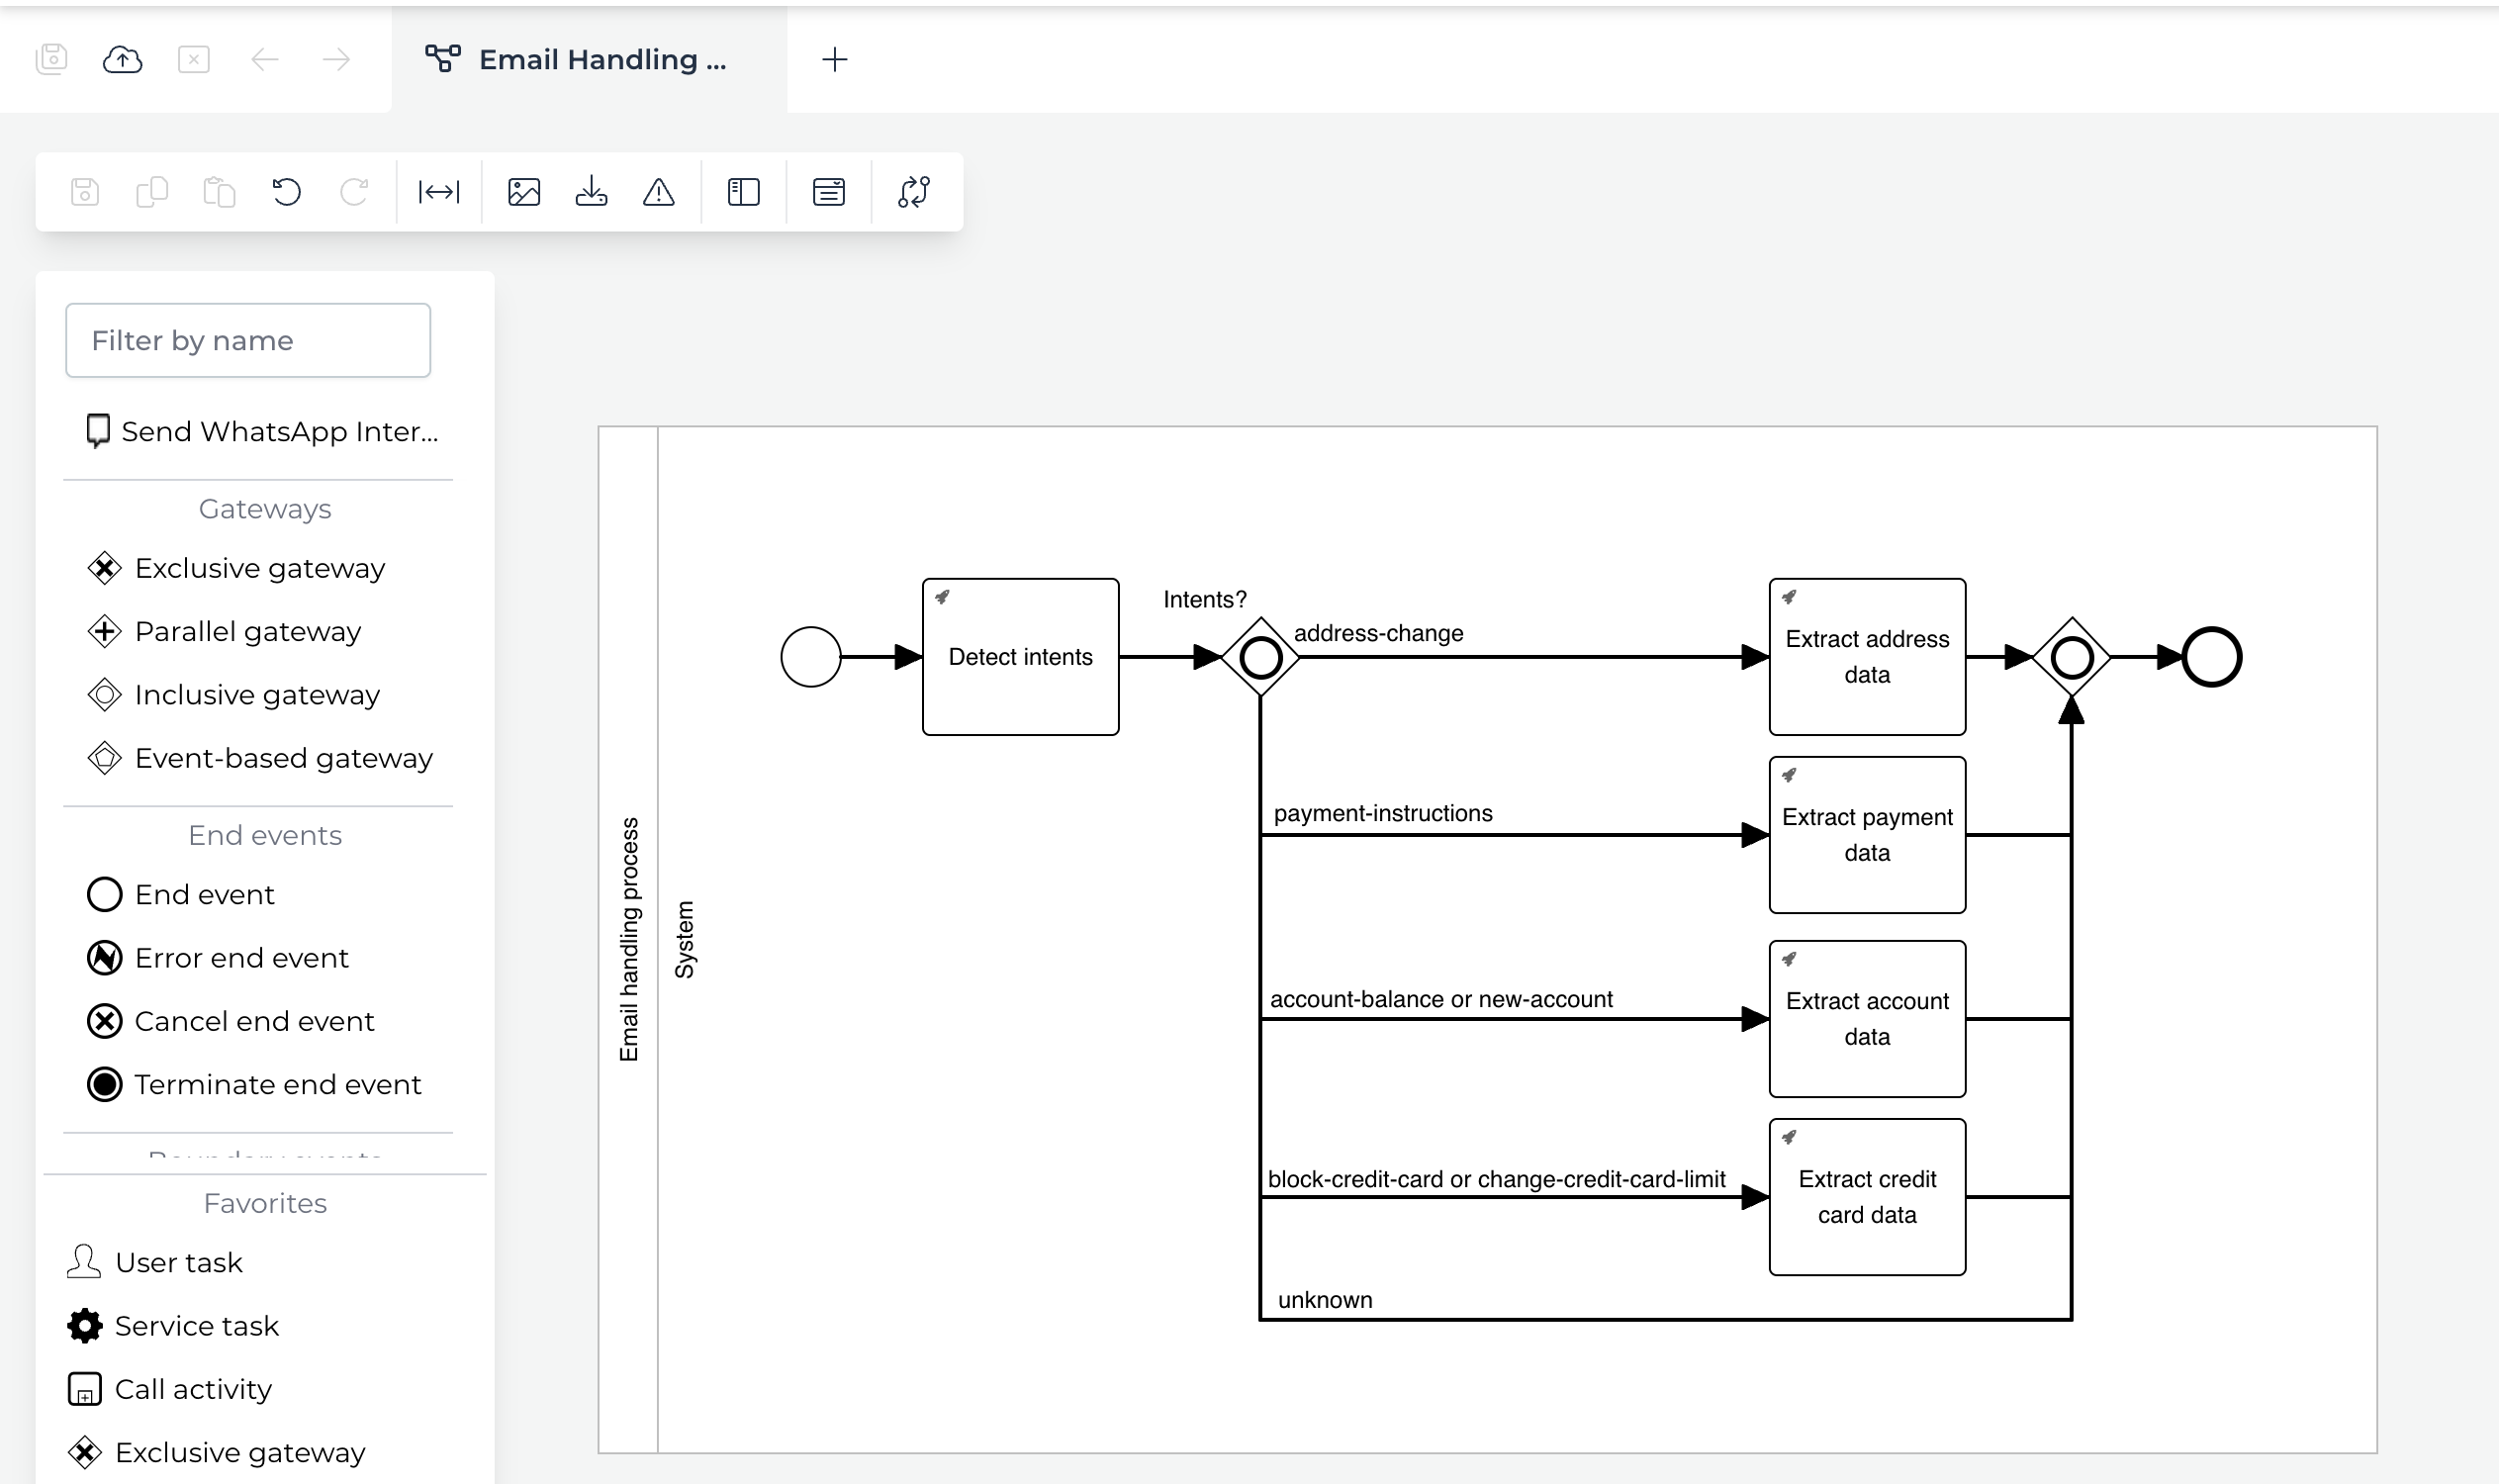
In real-world, you might want to add a call activity (sub-process) for each path to handle the detected intent with more detail, but for the sake of simplicity we just add the extraction service task.
Here are some more details for the process model.
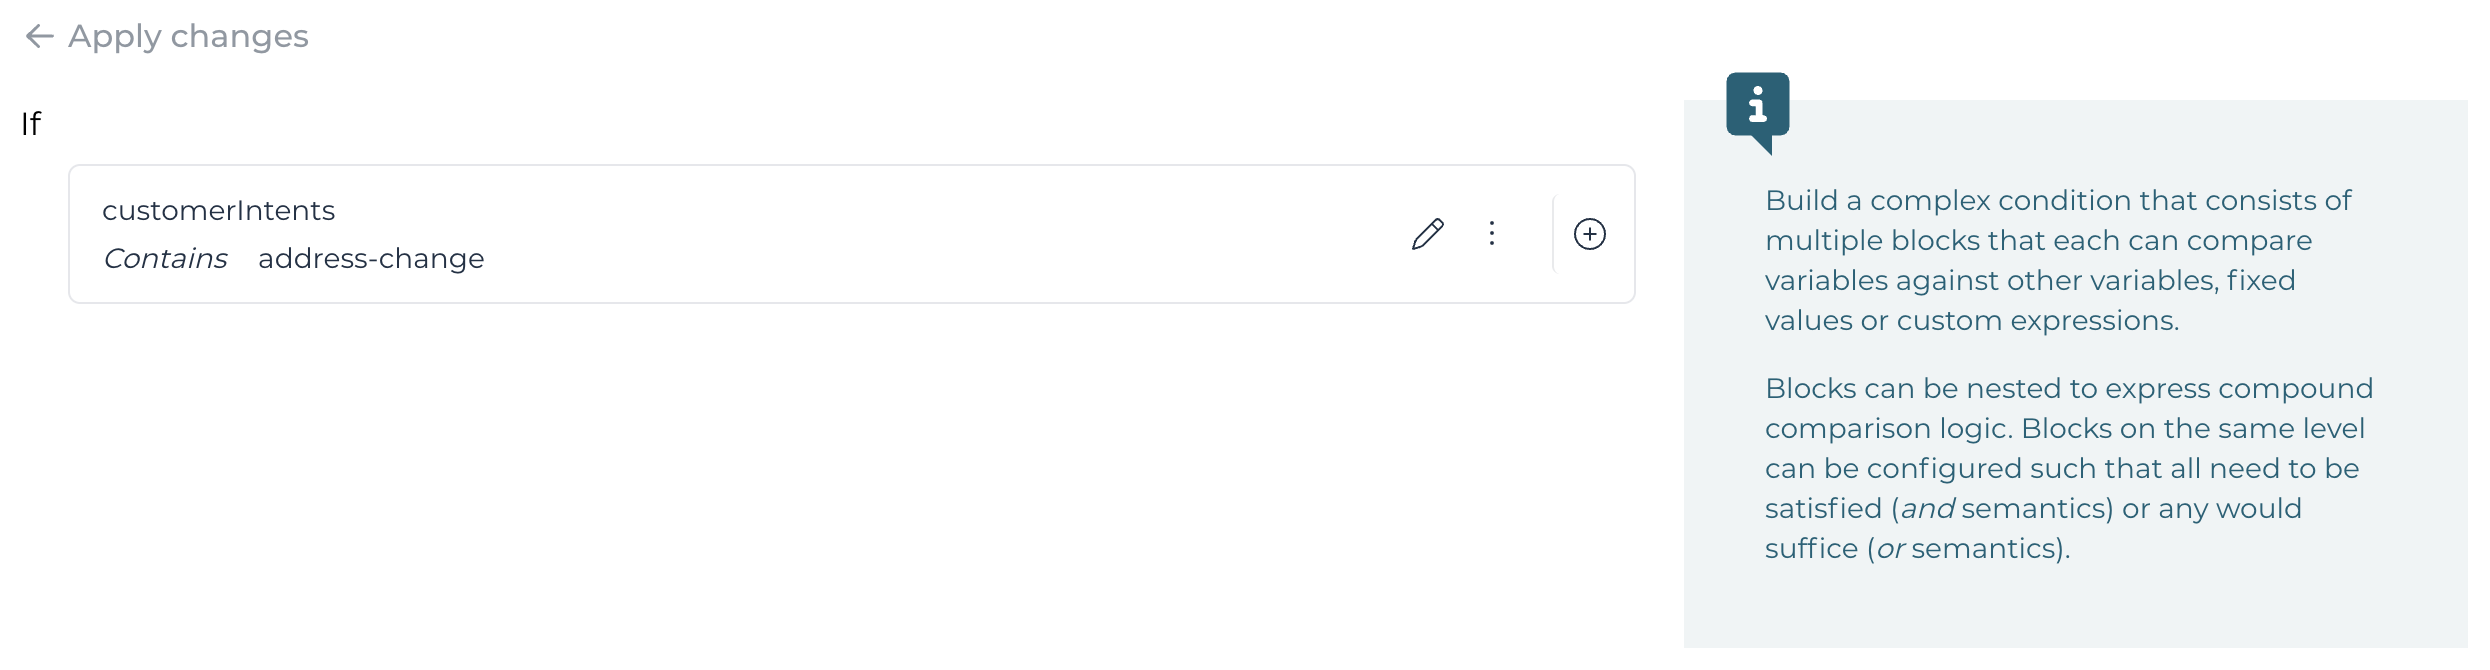
For each sequence flow, you need to add a condition to let the engine know, which ones to execute. We can use the condition builder to do so.
Here is the example for the condition on the first sequence flow for the address-change use case:

When applying the changes, this will result into this condition expression:
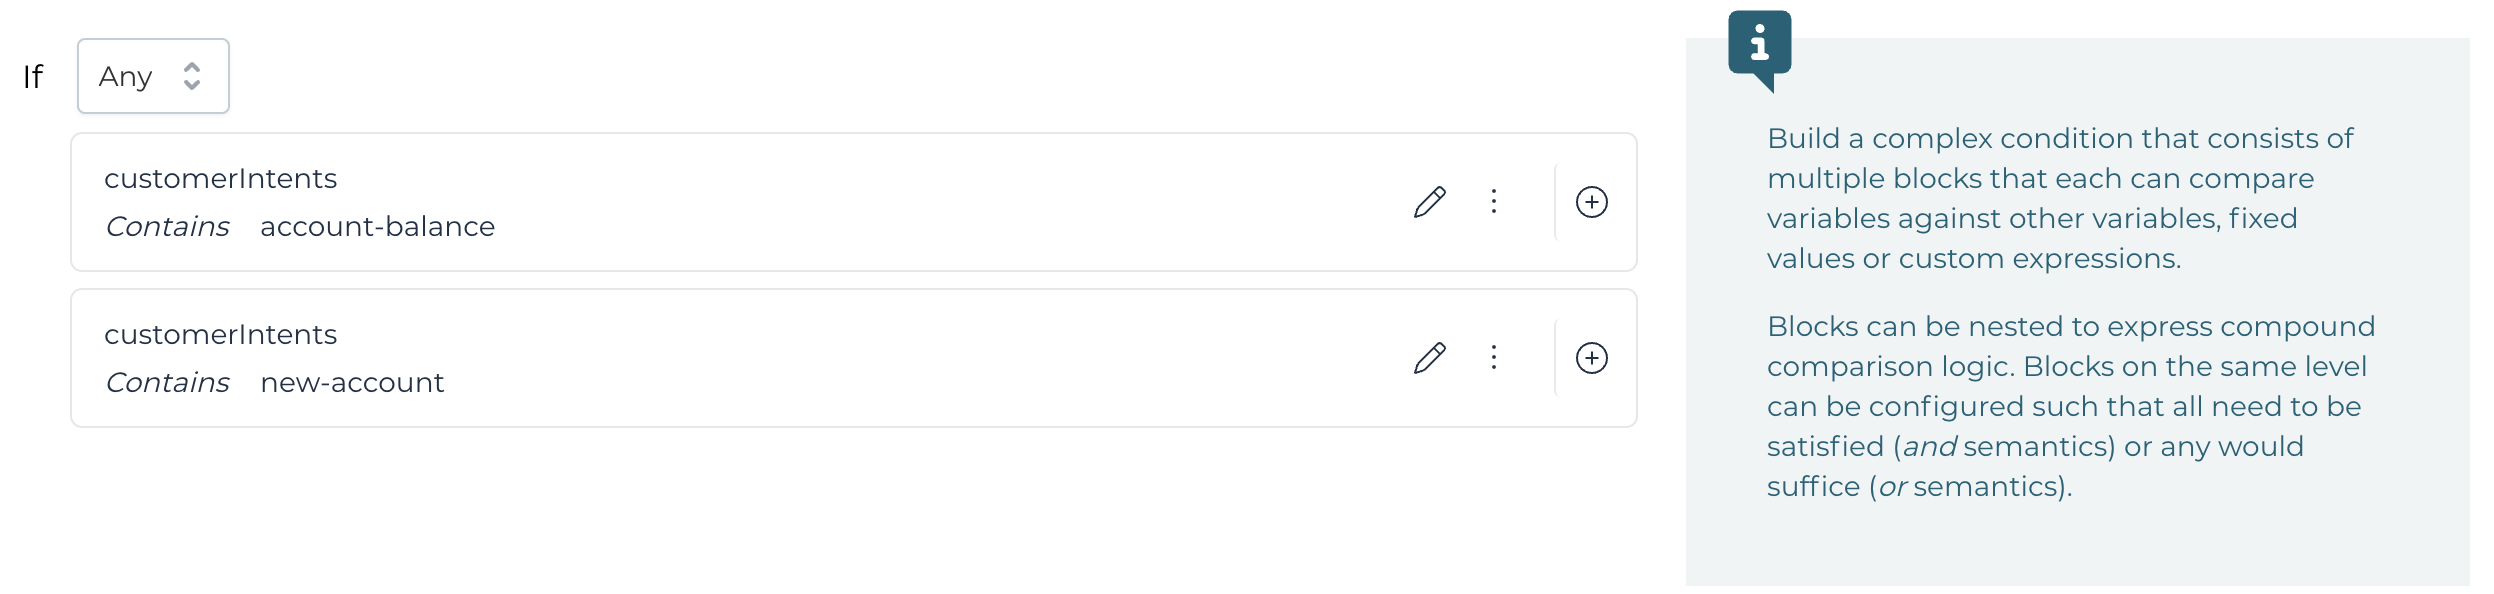
We can even use two different intents for one path (account-balance and new-account as well as block-credit-card and change-credit-card-limit) as
we designed the extraction AI services to handle both use cases the same time as the extracted data is very similar.
The condition for those could look like this to choose the path when one or the other or even both intents have been detected. The important thing to notice
is the Any condition, so the condition becomes true if at least one of the sub-conditions are true (if at least one of the two intents was detected):
If you deploy the process model and run it, you can enter something like this as an example:
When you open Flowable Inspect and look into the variables, you can see the result from both the payment instruction and address change use case service.
We could now extend the process model and create more details like a user task showing the extracted information and detected intents to manually check, if necessary or just go ahead and fully process the extracted data automatically.
Using an AI service within a form
Maybe you even want to invoke an AI-based service from within a form and directly use the extracted information within it.
With the Service Button you can actually do this.
Adding service button to the form
Open the start form for the process we previously created and first add a Button group to it below the content field.
Then drag and drop a new Service button into the button group and name it Detect intents and choose our service model and the operation Detect intents we also used in our service tasks in the process model. As you can see, using the very same service definition within the UI is very similar as in the process model, you also have to provide the necessary inputs and wire the desired outputs as you wish.
Pay attention to the mappings, as we are in the UI now, we need to use UI expressions (double curly braces) instead of the backend expressions we used for the
service task in the process model:
The same applies for the output mapping, we need the UI based expression notation. In this example, we can use the temporary payload scope, prefixed with
$temp, so the extracted intents will not be saved through the payload of the form (but of course that very much depends on your use case, if you want
to store the returned values from the AI service as part of the payload of just use it within the form to drive things:
Publish the form and test it
Publishing this and running it again in the runtime, you can play directly with the intent detection, even without having to start the process:
noteIf you're wondering where this black debug information is coming from, here you go:
The form engine has an embedded debug mode we can activate to see the payload, form components and a lot of interesting stuff going on within the form.
If you open the console of your browser, you can type in flwformsDebug = true; and hit return to activate the debug console of the form engine.
You can turn it off with flwformsDebug = false; of course at any time or simply reload the page to reset it to the default, which is off.
Extracting address data directly into the form
Of course you can also use any of the other operations like extracting address data and push it directly into the form.
So let's just do this as a next step.
Out of simplicity, we also add it to the start form, but of course this doesn't make any sense, if we then redo this again as part of the process we previously designed.
In order to only show the extract address data button, if it is appropriate according the content, we add an ignore condition to the button, only
showing up if we run the intent detection beforehand and it came back with the address change intent.
Add a new Service button into the same button group as the first one and name it Extract address data. Choose the same service model as before, but choose the Extract address data operation.
You can use the very same mapping for the Customer message input mapping as before, but use something like this for the output mappings:
As we want to use those values directly within the form and also submit it along with the payload like the rest of the form, we don't use the $temp prefix
here.
Make sure to add a condition to the Ignored property using an expression like this: {{!flw.in($temp.customerIntents, 'address-change')}} by using the
list function flw.in to check, if we can find the address change intent within the list of detected intents.
Deploying again and using the debug console, this is how it looks like after detecting the intent and then when the second button shows up, extract the
address data as well:
Of course we want to extract that data directly into the form, so we add a sub-form for the address data to our start form and add the address fields to it.
Add a new Subform component right next to the customer message field and create a new form model named Address Data Subform (or similar). We can then
add our address fields into that subform:
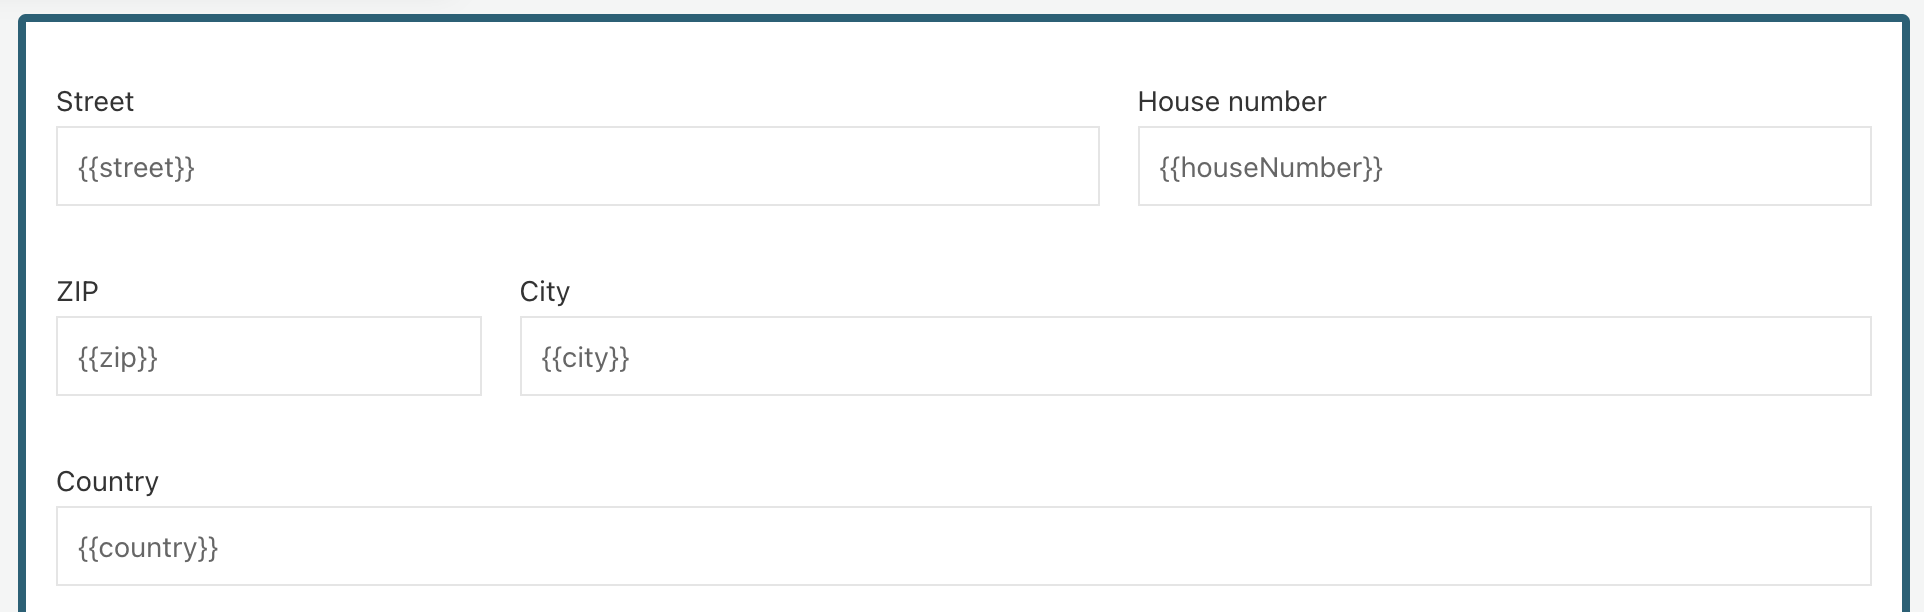 Make sure to use the same names as you did in the output mapping of the service button.
Do have a nicer rendering of the start form, you can put the Customer message input field into a panel and name it Customer message and remove the label
of the input field to look the same as the subform. Name the subform Address data and then your start form should look something like this:
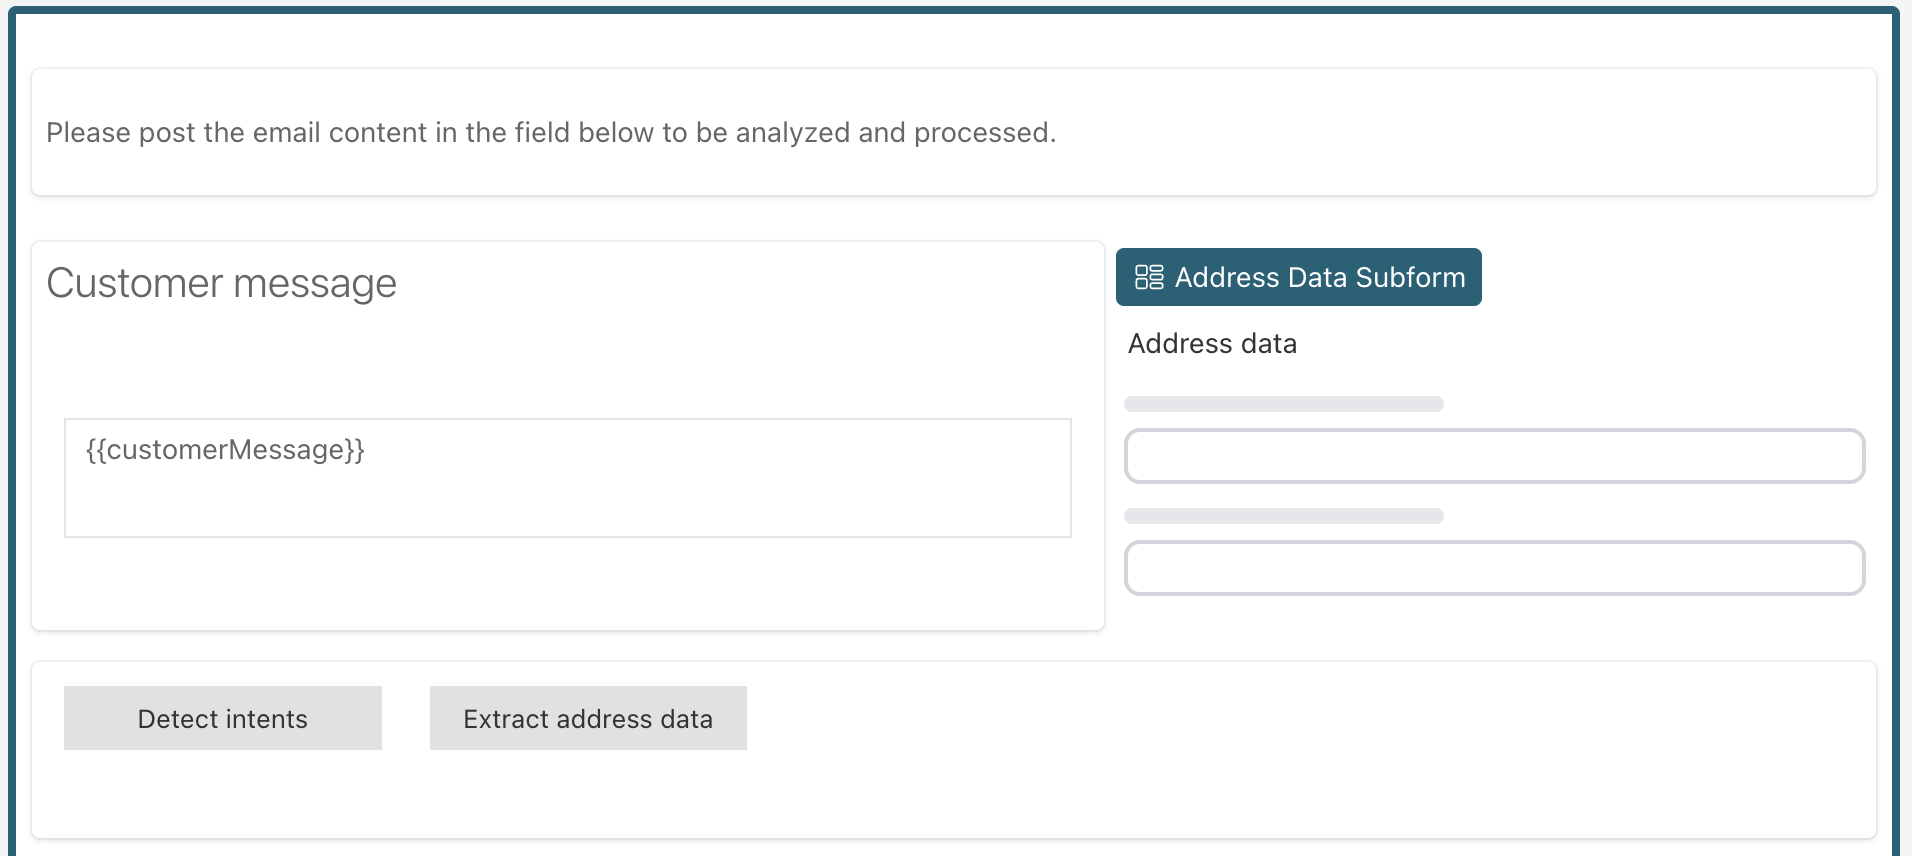
We only want to show the address data subform, if we actually have extracted information, so we can add {{!city}} to the Ignored property of the address
subform to ignore it, if we don't have a city value extracted yet.
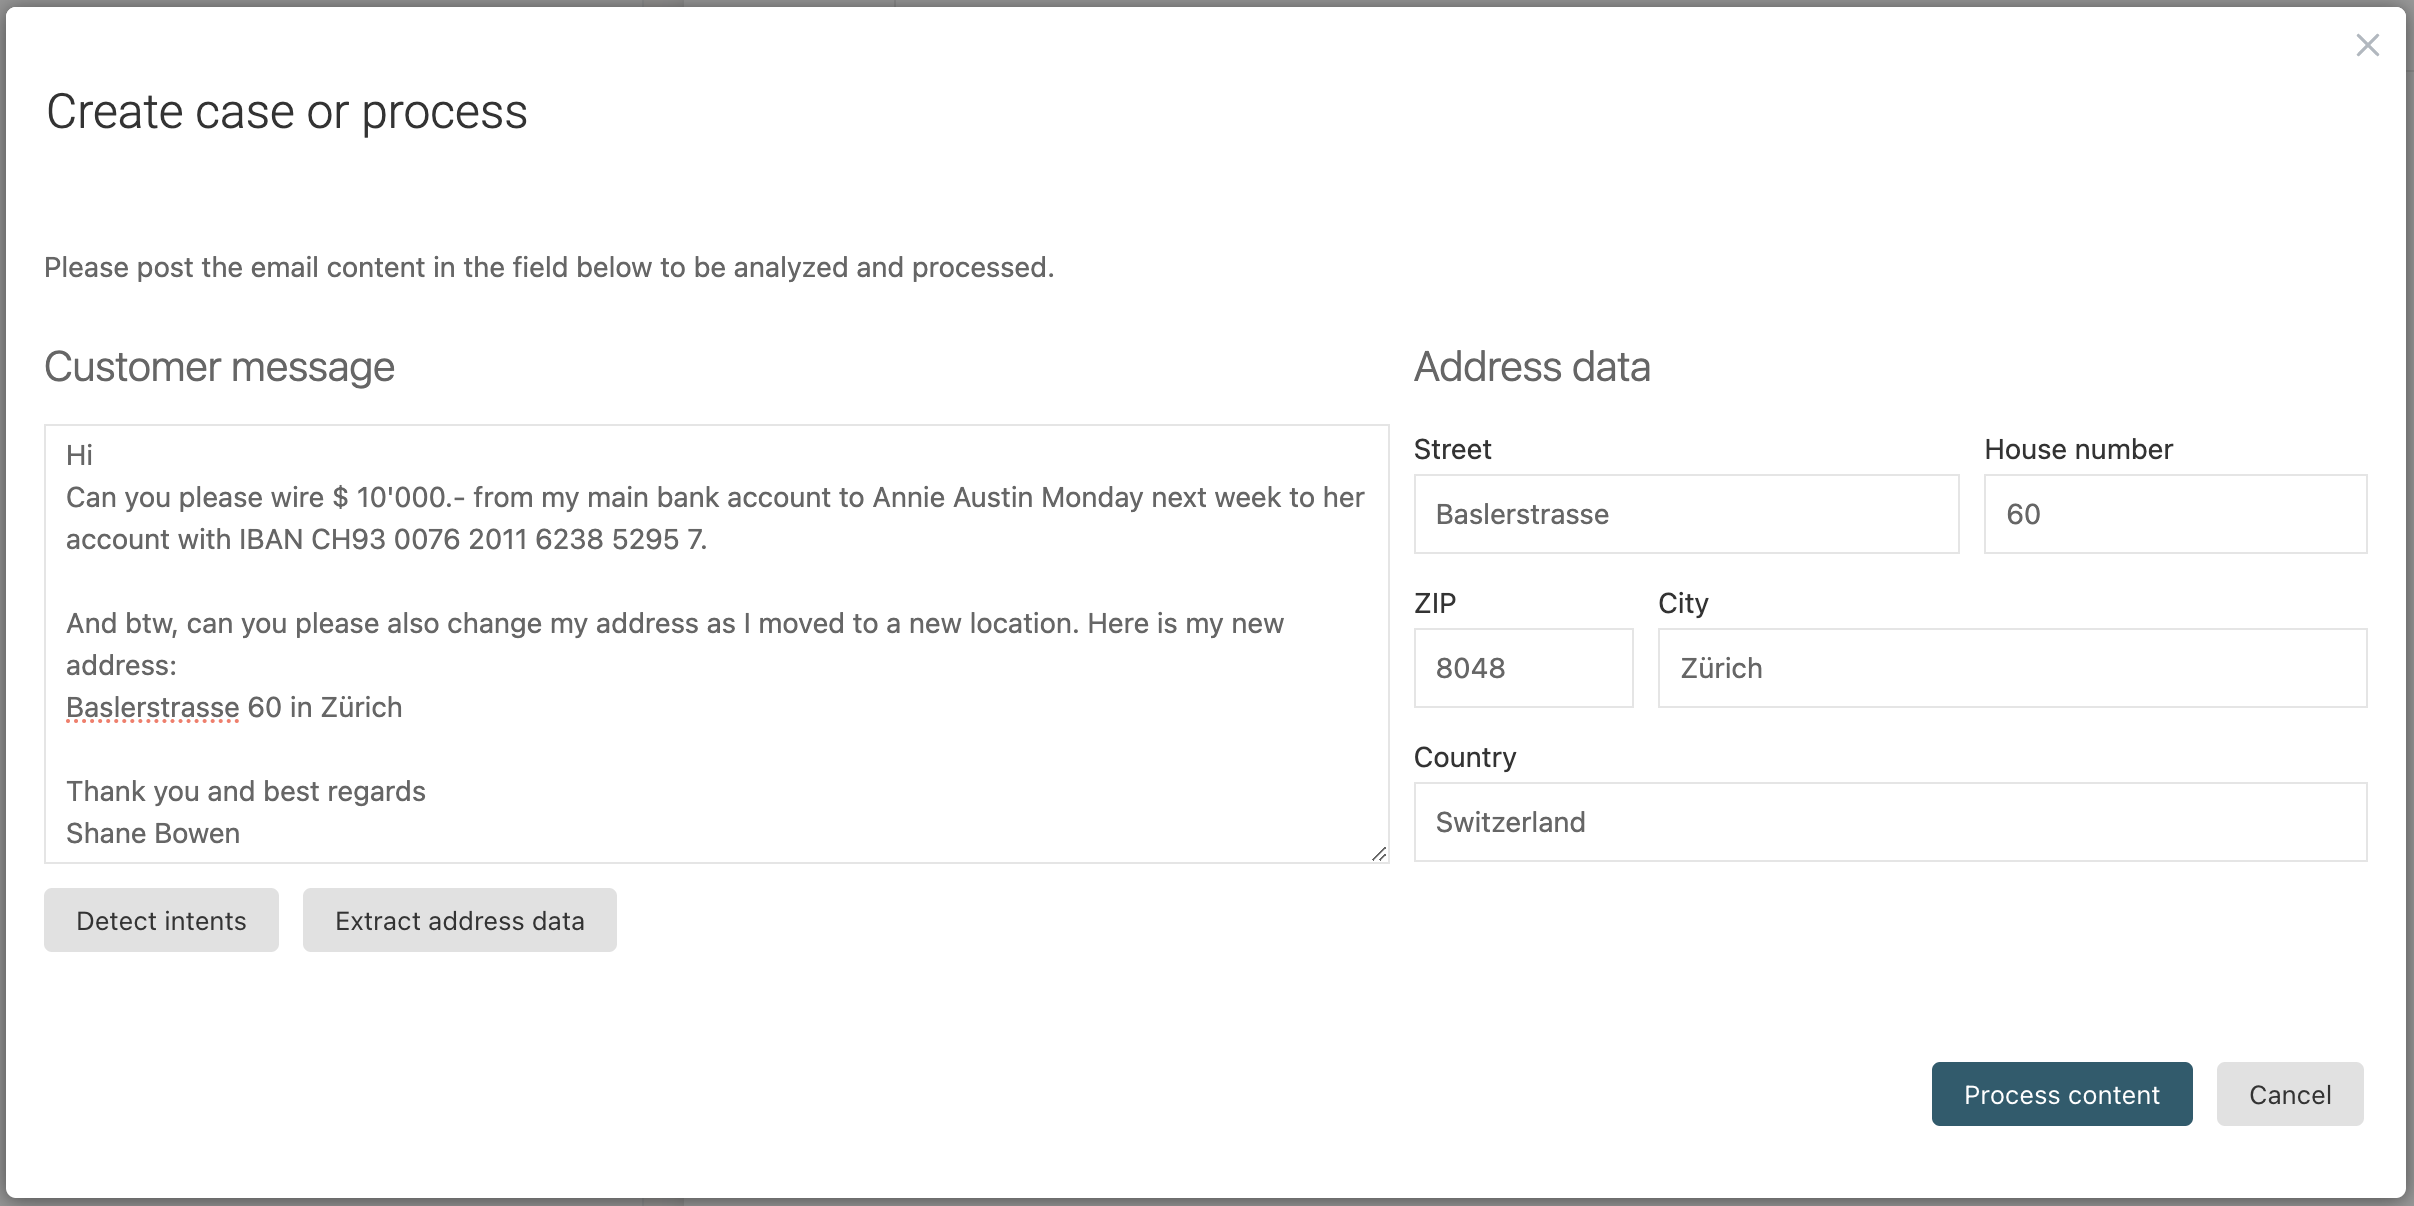
Publishing the app again and testing it, you might get something like this now after clicking the Detect intents button first followed by the
Extract address data button:
Conclusion
As you learned in this tutorial, it is very straight-forward to create your own AI-based services and either use them within a process like any other service task or even use AI power within a form.
Using an AI-service directly within a form might give your users the power to use AI-assisted steps to avoid extracting data from large content and put it into forms or help them creating abstracts of content or basically anything you can imagine AI to help and assist.
With the structured approach of designing an AI-service, it is possible to directly use the outcome within forms, process- or case-models and automatically continue processing the use case.
The Test prompt feature is very helpful when engineering the prompts for the AI services as this is key when designing and using AI based services within your processes and cases.
For prompting, you can use expression in both the user message as well as the system message to build the context where your prompt is running against.